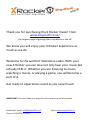
1
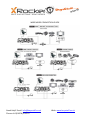
Thank you for purchasing the X Rocker Vision! From
www.boysstuff.co.uk/
the largest range of gaming chairs anywhere in the UK
We know you will enjoy your X Rocker experience as
much as we do.
Welcome to the world of interactive audio. With your
new X Rocker you can now not only hear your music but
actually FEEL it. Whether you are listening to music,
watching a movie, or playing a game, you will become a
part of it.
Get ready to experience sound as you never have!
IMPORTANT: You must keep your original retail receipt as proof of purchase.
Need Help? Email: [email protected]
Phone +44 (01676) 535557
Web: www.boysstuff.co.uk
Need Help? Email: [email protected]
Phone +44 (01676) 535557
Web: www.boysstuff.co.uk
FUNCTIONS:
·
·
·
·
Foldable construction for ease of storage and portability.
Side control panel with volume, bass control, and input/output jacks, and band switch.
Ergonomic design with full back support.
Wireless audio transmission
READ BEFORE USAGE:
·
·
·
·
·
·
·
·
·
·
·
·
·
·
·
Always make sure hinge is locked before moving.
Always make sure hinge is locked before sitting in the chair.
Excessive use of audio equipment could lead to hearing loss.
Excessive sound pressure from earphones and headphones can cause hearing loss.
Children under the age of l 3 should not use this product without adult supervision.
Strictly for indoor use. Do not expose to direct sunlight, moisture or extreme temperatures.
If the cover becomes wet, disconnect the power immediately and don‘t use until it is completely dry.
Do not attempt to remove the cover or any components. Removal of the cover or tampering with components puts you
at risk for injury or death from electrical shock.
When using in wire mode, please keep the band to "OFF" (AS).
The maximum input of the TX box is lV. If the input is over lV, the sound can become distorted or fuzzy. If the Sound
coming out of the chair is fuzzy at low volumes, lower the volume on the audio source (ex. The TV, IVlp3,etc) and the
distortion should go away.
Do not mix alkaline, standard carbon—zinc, or rechargeable Ni—cad, NiMH, etc.
Do not mix old and new batteries.
SET UP:
1.
2.
3.
4.
5.
6.
7.
8.
9.
Lift X Rocker out of box.
Keep the chair in the folded position and place it on the floor so that back side of the chair is touching the floor and the bottom of
the seat is facing up.
Review the set up diagrams to familiarize yourself with the X Rocker's components, accessories, and set—up. Locate all the
included accessories from the accessories pack in the box.
Please complete steps 1 -7 to assemble the chair.
When used in wireless mode, make sure that the control panel is not more than 65.6ft/ 20 meters from the audio source and
5.9ft/ 1.8 meters from a power source.
Unpack the power adapter and connect it to the main power outlet, then to the power jack on the control panel. (A7)
Press the power button (A6) and confirm that the power indicator light (A8) is on. In wireless mode, turn on the power to the TX
box (Al 3), confirm that its indicator light is on, and check that the band selected on the TX box (Al 4) is the same as that selected
on the control panel (A5) of the X Rocker.
Follow the connection diagrams. They show how to connect the X Rocker to the audio source of your choice.
Adjust the bass and volume levels to your preference--—start rocking.
More information please see additional assembly instruction!
Need Help? Email: [email protected]
Phone +44 (01676) 535557
Web: www.boysstuff.co.uk
WIRE MODE CONNECTION GUIDE
Need Help? Email: [email protected]
Phone +44 (01676) 535557
Web: www.boysstuff.co.uk
WIRELESS MODE CONNECTION GUIDE
Need Help? Email: [email protected]
Phone +44 (01676) 535557
Web: www.boysstuff.co.uk
Wired Connection
Direct connection to game console
If you use component or AV cable to connect console to TV:
Fit the B3 connectors to the ends of the B1 cable
Unplug the Red and White plugs of the console‘s AV cable from the TV, leaving the Yellow (video)
plugin place. Plug the Red and White plugs of the console's AV cable into the B3 connectors on the
Rocker's B1 cable.
Component or AV cabIes are supplied with new models of PlayStation 3, X Box Elite and Wii, as well as
earlier generation console
If you use HDMI cable to connect to TV
Connect Rocker to one of TV's Audio Out connections. Most HD-ready TV sets have some combination of RCA, mini—pIug or
optical audio interfaces enabling audio connection to accessories. Many have all three.
RCA connection is direct to the RCA plug terminations of the Rocker's Bl cable, but make sure you are
connecting to an Audio Out pair. If your TV has only two RCA sockets and they are not marked Audio
Out, they are probably input sockets and cannot send audio information to the Rocker.
Mini Plug connection. Mini Plug sockets are often found on the front or side of the TV set, marked
with the headset iconz. Fit the RCA » to » Mini Plug adapter [B4 on instructions] to the RCAi ends of
your three—meter cable [Bl on instructions], converting your three—meter cable to a mini plug—
to—mini plug connector. Plug one end into TV‘s headset socket and the other into Rocker‘s mini Plug
input socket. (This is same configuration as for MP3 and other portable/handheld devices.) NOTE: Audio out volume through
this outlet is usually separately adjustable from speaker volume. Please consult TV‘s user guide for how to regulate output.
Optical Audio Out: A few models ofTV only have optical audio out. If you have one of these sets, you will need an optical to
cable or optical to RCA coaxial adapter, sometimes called a Toslink to RCA adapter, and some connecting cables. There are
several models of adapter available at reasonable prices from general electronic retailers and HD specialist shops and web
sites.
Wireless Connection
If you use the console's Component or AV cable: For direct connection to a game console, fit the mini-plug end of the B4
Mini Plug » RCA adapters the Rocker's transmitter. Fit the RCA socket ends to the red and white audio plugs of the
component or AV cable. If they are plugged into the TV, remove them, leaving the yellow video cable in place.
If you use HDMI connection to the TV: Fit the Rocker's transmitter to an available audio-out on the TV, using the
appropriate connector mini—plug to mini—plug for the headset audio » out, or mini plug » to »RCA for RCA audio—out.
Other sound sources: Connect transmitter to MP3 players or handheld games using mini pIug—to-mini plug connector. For
other devices such as stereo amplifiers, locate the most suitable audio output. Connectors compatible with most sound
sources are included with your Rocker.
Need Help? Email: [email protected]
Phone +44 (01676) 535557
Web: www.boysstuff.co.uk
TROUBLE SHOOTING
- Unable to connect to game console Most gaming consoles are shipped from the manufacturer with an Audio/ Video RCA cable. The A/V RCA cable has three RCA
plugs: a video plug (yellow) and two audio plugs (red and white). If your gaming console came with an A/V RCA cable, please
follow the instructions supplied by the game console manufacturer for setting up your gaming console and connecting it to
the television. Please note that you must leave the red and white audio jacks on the A/V cable UNCONNECTED. Once the
console is properly connected to your TV, please follow the diagram in the illustrated X Rocker Set-up guide to connect the
gaming
console to the X Rocker.
If your gaming console was shipped with a coaxial cable, instead of an A/V RCA cable, you must follow an alternate set—up
procedure (coaxial cable is the same type of cable that is used to connect a VCR to the T\/). You will quickly recognize if your
gaming console uses this type of cable. It connects the gaming console directly to the television and carries both the audio
and video signal over a single cable. If your gaming console uses a coaxial cable, you CAN NOT connect it directly to the X
Rocker. Instead, you must
Use an intermediary A/V device (such as aTV, VCR, DVD, TiVO, etc.) Please follow these steps:
a. Connect your gaming console to the intermediary A/V device via the coaxial cable.
b. Connect the X Rocker to the 'Audio Out jack on the intermediary A/V device.
c. Follow diagram 2 in the X Rocker Set—up guide to connect the X Rocker to the intermediary A/V device and finalize
the setup.
If your gaming console is attached to an HD TV with an HDMI cable. You will need to connect the chair using either the audio
out jacks on the back of the TV or by plugging into the headphone jack on the front of the TV.
- Unable to hear any sound from the X Rocker 1.
2.
3.
4.
Check to ensure that the power adapter is properly connected to the power jack (A7). When properly connected, the
indicator light (A8) on the control panel should light up when the power switch (A6) is turned on. If the indicator light
(A8) does not light up, try to use another power outlet in your home. When the TX box is switched on (Ai 3) for use in
wireless mode, the power indicator light on its front panel should also light up. If the light is not on, please try changing
the batteries in the TX.
Make sure the power unit is turned on and indicator light on the control panel is lit. If it is not, please press the power
switch on the control panel. When you use wireless mode, the power indicator light on the front panel of the TX box
turns green. If the light is not on, please turn on the power switch (Ai 3) on the side. Check the BAND selector (Ai 4) on
the side of the TX box and make sure the number selected is the same as the number selected on the BAND selector
(A5) of the control panel on the chair. For example, if the BAND selector on the TX box is on "l " make sure the BAND
selector on the control panel is also on "1”
Once you have successfully completed 1. and 2. Please review the X Rocker illustrated set-up guide. Double check all
audio connections. Finally, check that the volume on the hand remote is turned to an audible level on both the W and
the chair.
If you have completed l- 3 and still do not hear sound, try connecting another audio source (CD player, television, VCR
or game console) and go through the steps again. Still not working?
1. For technical problems please first contact [email protected]
1. Please contact Boy’s Stuff Support on [email protected]
2. Please call Boys Stuff Support +44 (0) 1676 535557
Need Help? Email: [email protected]
Phone +44 (01676) 535557
Web: www.boysstuff.co.uk
WARRANTY PAGE
Limited Warranty:
Ace Bayou warrants this product (including any accessories) against defects in material and workmanship for a period of 90
days from the date of purchase. This warranty is enforceable only by the original purchaser. ALL DAMAGED OR MISSING
PARTS MUST BE REPORTED WITHIN 14 DAYS OF PURCHASE.
This warranty covers all defects in material and workmanship in this product, but DOES NOT COVER the following:
1. Damage, deterioration or malfunction resulting from:
a)
Acts of God, accident, misuse, abuse, negligence, improper installation, maintenance or operation, or
failure to follow the instructions contained in this owner's manual.
b)
Any damage in the shipment of the product. (Claims must be presented to the carrier.)
c)
Repair, attempted repair, or modifications by anyone other than Boys Stuff.
2. Any unit which has been modified or attempted to be modified or altered in any way whatsoever.
3. Normal wear and periodic maintenance.
4. Any unit used for industrial or commercial purposes (including rental).
5. Products sold ASIS or WITH ALL FAULTS, or consumables (such as fuses, batteries, etc)
6. Customer installation, set up adjustments, or signal reception problems.
Boys Stuff will repair or replace (at its discretion) units covered by this warranty without charge to the consumer for labour or
materials. YOU ARE RESPONSIBLE FOR INITIAL SHIPPING CHARGES. However, we will pay the return shipping charges to any
destination within the European Union if repairs are covered by the warranty.
REPAIR OR REPLACEMENT AS PROVIDED UNDER THIS WARRANTY IS THE EXCLUSIVE REMEDY OF THE CONSUMER. ACE
BAYOU SHALL NOT BE LIABLE FOR ANY INCIDENTAL OR CONSEQUENTIAL DAMAGES FOR BREACH OF ANY EXPRESSED OR
IMPLIED WARRANTY ON THIS PRODUCT. EXCEPT TO THE EXTENT PROHIBITED BY APPLICABLE LAW, ANY IMPLIED
WARRANTIES, INCLUDING WARRANTIES OF MERCHANTABILITY AND FITNESS FOR A PARTICULAR PURPOSE, ARE LIMITED IN
DURATION TO THE LENGTH OF THIS WARRANTY.
Operation is subject to the following two conditions:
1. This device may not cause harmful interference.
2. This device must accept any interference received, including interference that may cause undesired operation.
DO NOT SHIP ANYTHING TO US WITHOUT CONTACTING US FIRST. DO NOT SHIP ANY PARTS OR WHOLE UNITS TO THIS
ADDRESS FOR REPAIR WITHOUT OUR PERMISSION.
Need Help? Email: [email protected]
Phone +44 (01676) 535557
Web: www.boysstuff.co.uk