1
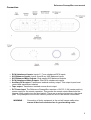
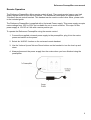
Reference Preamplifier
Owners Manual
Reference Preamplifier user manual
Introduction
Congratulations and thank you for purchasing the Music First Audio Reference Preamplifier.
This original device controls up to six sources and attenuates level. It sits between stereo source
devices such as CD players, turntables etc. and power amplifiers. It also offers additional isolated
outputs for recording and connection of additional amplification. A rotary switch on the front panel
selects inputs and the level is controlled by another rotary switch.
Music First Audio introduced the Classic Preamplifier in 2003 and it went on to receive
widespread critical acclaim. Glowing reviews and many awards followed and it became the
standard by which others are judged.
In the years since we designed our original preamplifier, we experimented with many different
approaches and techniques. We discovered that we could improve on our original design, but
only by ignoring the usual manufacturing constraints of time and expense. The Reference
Preamplifier is a true ‘cost no object’ design. We have used only the finest possible components
and each Reference Preamplifier is built by hand in our Hastings, East Sussex workshop over a
five week period.
The Reference Preamplifier takes the multiple-award winning performance of our original product
to another level and offers unparalleled sonic performance together with an extraordinary range
of features.
•
•
•
•
•
•
46 position level control from -60dB to +6dB in 1.5dB steps
Six inputs (two balanced and four unbalanced)
Six outputs (two main balanced, two main unbalanced, auxiliary output and tape output)
Three position output ground selector switch
Seamless +6dB switching offers gain for lower powered sources
Remote control of level via a stepper motor (there are no active electronics in the signal
path)
• All internal components are mounted on a thick, heavy, dual material laminate block and
the entire preamplifier rests on custom designed feet for maximum stability and vibration
immunity
• Various custom options are available, please enquire
In order to get the most out of your Reference Preamplifier, please take a little time to read
through this user guide.
2
Reference Preamplifier user manual
Unpacking and Installation
The Reference Preamplifier comes supplied in a professional flight case. This ensures that your
preamplifier arrives with you in the same condition as it left us. Please keep this flight case in
case you ever need to return the unit to us (for modification for example).
Under the preamplifier you will find a removable panel in the bottom of the flight case. Under this
panel you will find the preamplifier accessories.
The case contains:
1 x Music First Audio Reference Preamplifier
4 x Reference Preamplifier feet
1 x Universal remote Control handset
1 x Universal Power Supply Unit
1 x Mains Power Lead (connect this to the Power Supply)
1 x User Manual
1 x Certificate of Authenticity
The Reference Preamplifier feet are not attached to the unit itself. Instead they should be placed
underneath the preamplifier with the rubber side up, two feet at the front and two at the rear:
3
Reference Preamplifier user manual
Connection
The rear panel houses all input and output connections. Inputs are situated to the right and
outputs to the left (when viewed from the rear). The inputs should be connected to the outputs of
source devices (CD player, cassette player etc.) at line level. The phono/ RCA inputs are for
connection to unbalanced equipment, while the XLR inputs are for connection to balanced
equipment.
As a general “rule of thumb” if the output of a piece of source equipment is on XLRs then it is
balanced and if it is on phonos/ RCAs, then it is unbalanced. This is not always the case, but
should give a good starting point.
The outputs of the unit are located on the left hand side of the back panel. The main XLR outputs
are balanced and the phono/ RCA outputs are unbalanced. Because the transformers convert
balanced and unbalanced signals, these outputs are always the same, regardless of which input
type is used.
The Reference Preamplifier also offers additional transformer isolated outputs. The Auxiliary
output works in the same way as the main outputs but is isolated from the main outputs via high
quality isolation transformer. This allows, for example, mixed outputs (balanced and unbalanced)
to be accommodated.
The Tape Output is a source direct output which bypasses the attenuation transformers so is
always at the same level as the input, irrespective of the setting of the front panel level control.
Only ever connect one main output type (balanced OR unbalanced) at a time, use of both main
output types at once is not recommended and may cause damage to any equipment connected
to the Reference Preamplifier. This does not apply to the additional Auxiliary and Tape outputs.
If you are in any doubt about connections, please contact us via email [email protected] and
we’ll be very happy to help.
4
Reference Preamplifier user manual
Connection
•
•
•
•
•
RCA Unbalanced inputs: Inputs C- F are unbalanced RCA inputs
XLR Balanced inputs: Inputs A and B are XLR Balanced inputs
XLR Balanced Main Outputs: Dual parallel XLR balanced outputs
RCA Unbalanced Main Outputs: Dual RCA unbalanced outputs
Auxiliary RCA output: Transformer isolated auxiliary output. This output is post level
control and transformer isolated
• Tape output: Transformer isolated source direct output.
• DC Power Input: The Reference Preamplifier requires a 12V DC, 2.3A (centre positive)
power supply for the remote operation. This powers the remote control board and the
stepper motor used to turn the level switch. There are no active electronics in the signal
path. The preamplifier will function without power but will not be remote controllable.
WARNING -
Connection of faulty equipment to the unit will cause malfunction,
ensure all devices connected are in good working order.
5
Reference Preamplifier user manual
Remote Operation
The Reference Preamplifier offers remote control of level. The remote control uses a very high
quality stepper motor to turn the level switch. The Reference Preamplifier is supplied with a
‘Universal’ remote control handset. This handset can be used to control other items, please refer
to the included guide.
The Reference Preamplifier is supplied with a Universal Power supply. This power supply accepts
mains voltage from 100V to 230V so is suitable for use in most countries. The output of this
power supply is 12V DC at 2.4A with a centre positive pin.
To operate the Reference Preamplifier using the remote control:
1. Connect the supplied universal power supply to the preamplifier, plug it into the mains
power and switch on the power.
2. Select the ‘AUDIO’ function on the universal remote handset.
3. Use the Volume Up and Volume Down buttons on the handset to turn the level up and
down.
4. Always disconnect the power supply from the mains when you have finished using the
preamplifier
6
Reference Preamplifier user manual
The Ground Selector Switch
Once equipment has been connected as described, it is necessary to select grounding options
with the rear-mounted switch. This three position switch controls whether the main output
ground is floating (unconnected) or connected to the internal ground reference (and to input
ground). In the centre position the output ground is floated. In the RCA position, the main RCA
outputs are grounded and in the XLR position, the main XLR outputs are grounded.
The setting of this switch is entirely dependent on the rest of your system. A simple procedure will
deduce how it should be set.
1. Ensure your power amplifier is turned off and connect it’s input to the output of the
Reference pre amplifier
2. Connect all your source equipment as described above and switch it on (do not play any
music at this point).
3. Set the Ground Selector Switch to the centre (Lift) position and the Reference pre amplifier
level control to ∞ (minimum)
4. Turn on your power amplifier and turn up the volume control (if there is one) a little.
5. Gradually increase the level control on the Reference Preamplifier. You should here
nothing (a little “hiss” from source devices is normal). If you here a loud “buzzing” or
“humming” sound, turn down all level controls and switch your power amplifier off.
6. Set the grounding switch to RCA or XLR (depending on the type of main output you are
using)
7. Repeat steps 4 and 5. The buzzing should now have stopped.
You might find that the switch requires a different setting for each piece of source equipment. It is
worth trying the above procedure for each separate source.
Please note:
The input grounds are connected to the internal reference via resisters (this is to drain static
voltage on source equipment ground which prevents “clicks” and “pops” when switching sources).
Input F is hard grounded (no resister); this input is best suited to sources that are particularly
noisy (e.g. digital television receivers etc.).
The Auxiliary output and Tape output are not affected by the Ground Selector Switch.
7
Reference Preamplifier user manual
Operation
1. Before use ensure the level control is set to ∞ (minimum level)
2. Switch on the source devices (CD player, tuner, turntable etc.)
3. Switch on the amplifier and set the amplifier volume control (if there is one) to the
maximum necessary listening level.
4. Select the source device.
5. Set the Reference Preamplifier level control to the desired listening level
Please note:
•
If the source is to be changed always return the level control to ∞ (minimum level) before
changing the source to avoid damage to loudspeakers and amplifiers
•
Always turn amplifier levels down and power off before powering down sources, again to
avoid damage.
Burn in
To obtain the very best results from the Music First Audio Reference Preamplifier a period of
“burn in” is necessary. Simply put, this means you will find the sound of the unit improving over
the first 100 hours or so of use. If possible, we recommend the following procedure:
1. Connect source and amplifier as described
2. Set the level of the Music First Audio Reference Preamplifier to 0 (maximum). This
ensures the transformers entire winding will be “burnt in”
3. Play music through the Music First Audio Reference Preamplifier for 100 hours (using the
amplifiers volume control to set level)
If you need further help or advice you can e-mail us at: [email protected]
8
Reference Preamplifier user manual
Maintenance
The unit should be cleaned with a soft dry cloth. NEVER use abrasive cloths or cleaning solution.
For stubborn stains, slightly dampen the cloth with water.
Contacts and connectors can be cleaned with proprietary contact cleaners (Servisol, DeoxIT etc.)
although the use of switch lubricants is not recommended.
Specifications
Inputs
4 x Stereo unbalanced
2 x Stereo balanced
Outputs
2 x Stereo unbalanced main outputs
2 x Stereo balanced main outputs
1 x Stereo Auxiliary output (transformer isolated)
1 x Source Direct Tape Output (transformer isolated)
Controls
Level (46 position rotary switch)
Source (6 position rotary switch)
Grounding (3 position toggle switch)
Z out:
0db volume setting
Source Impedance + 600 R
(1k Source=1600 R)
+6db volume setting
Source Impedance x 4 + 900 R
(1k Source = 4900 R)
-20db volume setting
Source Impedance / 100 + 33 R
(1k Source = 43 R)
9
Reference Preamplifier user manual
Troubleshooting
Symptom
No Sound
Problem
No source playing/ selected
Pre amplifier level too low/ off
Amplifier not on/ level too low
Loud “buzzing or “humming”
sound
Ground selector incorrectly set
Remote Control not working
Power supply not connected
Audio Function not selected
Battery low
Out of range
Solution
Ensure the source is playing
Ensure the correct source is
selected
Turn up the level control on the
Reference Preamplifier
Ensure the amplifier is on and
any volume control is up
Check that the grounding
switch is correctly set (see
“The grounding switch”)
Check to ensure that the
power supply is properly
connected
Ensure that the remote
handset is set to the correct
function by pressing the
‘Audio’ button at the top of the
handset
Replace handset battery
Try moving a little closer to the
main unit
For any further advice, please contact us at [email protected]
WARNING
•
•
•
•
In no event shall the manufacturer be liable for any damage, direct, indirect or
consequential of any type or any expenses or losses resulting from the use of this product.
Contains no user serviceable parts, refer servicing to qualified personnel only.
Do not expose the unit to moisture, excessive heat or cold.
The contents of this manual are correct at the time of going to press. The manufacturer
reserves the right to change the specification and features without prior notice.
10