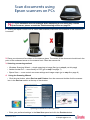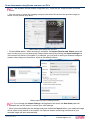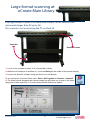
1
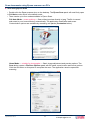
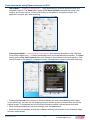
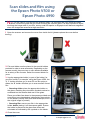
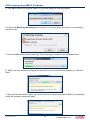
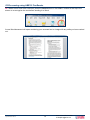
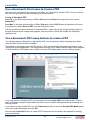
User Guide
Step-by-step tutorials
to help you use uCreate
resources.
www.ed.ac.uk/is/ucreate
Who is this guide for?
Information Services hosts two uCreate resource centres. They provide
multimedia and specialist IT facilities on a self-service basis. The centres are
located on the first floor of the Main Library [ML] and in the KB Study Centre,
King’s Buildings [KB].
This document will provide you with useful information and step-by-step
instructions to get started with your multimedia projects in uCreate.
Guide currency
This document is continually updated. If you are using a printed version,
please be aware that some of its content may have been superseded.
The current version is available in PDF format on the uCreate website:
www.ed.ac.uk/is/ucreate.
If you find any errors, or consider any section of the guide to be unclear or
unhelpful, please inform uCreate using the contact details below.
If you require this document in an alternative format, such as large print, please
call IS Helpline on 0131 651 5151 or email [email protected].
Copyright © University of Edinburgh IS 2013
Permission is granted to any individual or institution to use, copy or redistribute
this document whole or in part, so long as it is not sold for profit and provided
that the above copyright notice and this permission notice appear in all copies.
Where any part of this document is included in another document, due
acknowledgement is required.
September 2014
2
www.ed.ac.uk/is/ucreate
[email protected]
Contents
Scanning
4
Scan documents using Epson scanners on PCs
Scan slides and film using the Epson Photo V500 or Epson Photo 4990
OCR scanning using ABBYY FineReader
Epson A3 scanners on iMac
Large format scanning at uCreate Main Library
Troubleshoot scanning
5
10
13
16
17
19
Printing
20
File Conversion
23
Video
26
Databases
28
Print A0, A1 and A2 posters
Create PDFs
VHS to DVD transfer at uCreate King’s Buildings
Accessing DataStream
21
24
27
29
Scanning
Scan documents using
Epson scanners on PCs
N
ote: If you encounter an error message when attempting a scan using any uCreate
Epson scanner, please consult the Troubleshooting section on page 19.
1 If using the Epson Photo V500 or Photo 4990 scanner, make sure the underside of the scanner lid
is covered.
2 Place your document face down on the scanner glass. The corner of the document should touch the
point of the embossed arrow on the scanner bed. Close the scanner lid.
3 Selecting a scanning method:
• Windows Scanning Wizard — simple scanning to image files (go to step 4, on this page)
• Adobe Acrobat Pro — scan directly to PDF (go to step 5 on page 7)
• Epson Scan — more control over scan settings and image output (go to step 6 on page 8)
4 Using the Scanning Wizard
• Click the start button, select Devices and Printers from the menu and double click the scanner
icon in the Devices section at the top of the window.
Opening the Windows scanning wizard
• Enter your preferred settings in the New Scan panel and click the Preview button.
September 2014
5
www.ed.ac.uk/is/ucreate
[email protected]
Scan documents using Epson scanners on PCs
N
ote: The Windows wizard creates image files only. There are four image formats to choose
from.
• You can move or resize the cropping marquee (the dotted line around the preview image) to
define a more precise scan area.
Wizard New Scan panel with preview
• Click the Scan button. When scanning is complete, the Import Pictures and Videos panel will
open. At this point, you can change the image import settings by clicking the Import settings link
in the bottom left corner of the panel. For example, you may wish to save your scanned images a
location other than your Home drive, which is the default location.
Wizard Import & Import Settings panels
N
ote: If you change the Import Settings, the application will reset, the New Scan panel will
reopen and you will have to re-enter your initial settings.
• When you are satisfied with the settings and have clicked the Import button, your scanned image
will be saved to the default or set location. An Explorer window containing a thumbnail of your
scanned image will open automatically.
September 2014
6
www.ed.ac.uk/is/ucreate
[email protected]
Scan documents using Epson scanners on PCs
5 Scan to PDF using Adobe Acrobat Pro
• Click the Start button, select All Programs > Adobe Acrobat Pro.
• From the menu, select Document > Scan to PDF then select either the type of PDF document
you want to output to (e.g. Colour) or select Custom Scan to enter your preferred settings before
scanning.
N
ote: If an error message appears as you attempt to scan directly to PDF when using one of the
first four menu options, then close the message and open the Custom Scan panel (Document
> Scan to PDF > Custom Scan). Ensure that the scanner make and model details appear in the
first drop down field.
Select Scan to PDF in Acrobat
Acrobat Custom Scan
• When using the Custom Scan panel to enter your own scan settings, tick the Prompt for
scanning more pages option if you want to create a multi-page PDF. Click the Scan button at the
bottom of this panel when you have completed your settings.
• When the initial scan is complete, a small Acrobat Scan panel will appear. This allows you to
continue scanning pages to a single PDF document. Once you have scanned all the pages you
want to include a single PDF, select Scan is complete in this panel.
Acrobat Scan continuation panel
• Save the PDF to your preferred location.
September 2014
7
www.ed.ac.uk/is/ucreate
[email protected]
Scan documents using Epson scanners on PCs
6 Scan using Epson Scan
• Double-click the Epson scanner icon on the desktop. The Epson Scan panel will most likely open
in Full Auto mode, which is the default mode.
• There can be up to four modes available in Epson Scan:
Full Auto Mode — scan anything — Scan without preview directly to jpeg. The file is named
and saved to your home directory automatically. The application closes after each scan.
Customisation options are available by accessing sub panels (Customize button).
Epson Scan Full Auto Mode
Home Mode — suitable for photographs — Basic image adjustment and preview options. The
Scan button opens a File Save Options panel with file name, save location and format options.
Click the OK button on this panel to complete the scan. The application remains open after
scanning.
Epson Scan Home Mode
September 2014
8
www.ed.ac.uk/is/ucreate
[email protected]
Scan documents using Epson scanners on PCs
Office Mode — suitable for documents — Scan speed priority, preview, document size and
orientation options. The Scan button opens a File Save Options panel with file name, save
location and format options. Click the OK button on this panel to complete the scan. The
application remains open after scanning.
Epson Scan Office Mode
Professional Mode — scan anything, including film (film scanning available on the V500 and
Photo 4990 models only) — Preview, advanced colour and image adjustment options. The Scan
button opens a File Save Options panel with file name, save location and format options. Click
the OK button on this panel to complete the scan. The application remains open after scanning.
Epson Scan Professional Mode with Preview
• Clicking the Preview button (except in Full Auto Mode) will open a thumbnail preview image
of your document. You can use the cropping marquee button to place a dotted frame around the
preview image. The marquee can be moved and resized to define a more precise scan area.
• When you are satisfied with the scan settings, click the Scan button.
• When the scan is complete, an Explorer window containing a thumbnail of your scanned image
will open automatically.
September 2014
9
www.ed.ac.uk/is/ucreate
[email protected]
Scan slides and film using
the Epson Photo V500 or
Epson Photo 4990
N
ote: For the care of your film and the scanner glass, it is important that your hands are clean
before commencing and that you avoid touching the scanner glass. It is also important to avoid
touching the image area of your film, as any small dirt specks or fingerprints will become magnified
when the images are scanned at high resolution.
1 Open the scanner and remove the cover from inside the lid (please replace the cover before
leaving).
2 Film and slides must be placed in the special holders
provided in order to scan accurately. Depending on the
scanner model, there are two or more holders available
for a variety of film formats. Select the correct holder for
yours.
3 Use the appropriate holder (or part of the holder) for
your film format. For example, using the Epson V500, the
‘A’ ‘C’ holder will allow you to scan 35 mm film strips or
slides, the ‘B’ holder will allow you to scan medium format
film.
• Scanning slides: place the appropriate holder on
the glass, matching any orientation symbols marked or
embossed on the scanner bed next to the glass.
Place your slides face down in the spaces provided and
ensure they are orientated as indicated by the symbols
on the holder (usually face down and landscape, even if
the original image is portrait).
• Scanning film: secure your film in the appropriate
holder before placing it on the scanner glass. Ensure
the holder is placed on the glass face down and
orientated as indicated by the symbols on the holder.
4 Close the cover.
September 2014
10
www.ed.ac.uk/is/ucreate
[email protected]
Scan slides and film using the Epson Photo V500 or Epson Photo 4990 on PC
5 Launch Epson Scan by double clicking the desktop icon, if available, or from the Start menu (Start
> All Programs > Epson [folder] > Epson Scan > Epson Scan).
6 Select Professional Mode from the drop down menu at the top left of the Epson Scan panel.
7 Adjust the settings:
Document Type: Film (with Film Holder)
Film Type: Select the appropriate film type from the three options: Positive Film, Colour Negative Film or B&W [black and white] Negative Film.
Image Type:
Select colour, greyscale or black and white setting.
Resolution:
Set a high resolution, probably around 1200 as a minimum, to produce an image of printable quality and dimensions.
Adjustment:
The settings in this selection can be used depending on your preferences. They are not always essential, depending on the condition of your film, but it may be worthwhile experimenting with them and comparing the results.
September 2014
11
www.ed.ac.uk/is/ucreate
[email protected]
Scan slides and film using the Epson Photo V500 or Epson Photo 4990 on PC
8 When you are satisfied with the settings, click the Preview button. The scanner may take a few
moments to warm up first. The previewed images will appear as thumbnails (unless the thumbnail
option in the Epson Scan settings window has been un-ticked). This may take a few moments
depending on the settings and resolution you have selected.
9 The image thumbnails will be ticked by default. If you decide not to scan particular previewed
images, un-ticking the associated box will prevent them from being scanned.
N
ote: If you click the Scan button at this point, your scanned image will be automatically saved
to your home drive (M:). However, scanning slides or film at high resolution can result in large
files and if you don’t have enough space in your home drive to receive the scanned image, you will
encounter an error message and the scan will fail.
The File Save Settings button (to the right of the Scan button) will allow you to navigate to and
select a different save location if required (the File Save Settings window may open automatically
if the Scan button is clicked). The File Save Settings window will also allow you to name and select
the file format you require.
See “Troubleshoot scanning” on page 19 for more information about saving scanned images.
10 When you are satisfied with the settings, preview and save location, click the Scan button. As with
the Preview, scanning may take a few minutes depending on selected settings and resolution.
When you have completed scanning, you may like to crop, clean or further manipulate your images in
Photoshop which is available on all uCreate computers.
September 2014
12
www.ed.ac.uk/is/ucreate
[email protected]
OCR scanning using ABBYY
FineReader
ABBYY converts paper and electronic documents into a variety of accessible formats, e.g.
from paper to PDF, or PDF to editable text files such .DOC or .RTF.
The following explains how you can use the program to scan a paper document, correct it
using ABBYY’s inbuilt OCR and proofreading tools, and then save it as a Word file.
1 Check that the scanner is switched on and that it is connected to the computer.
2 Place the document or image you wish to scan in the scanner. Select Start > All Programs >
ABBYY FineReader > ABBYY FineReader.
The HP Scanner with document feeder is useful when scanning multiple loose-leaf documents, especially
when used for OCR scanning. One of these scanners is available at each uCreate location.
3 When ABBYY launches, click Accept to agree to the license. The ABBYY Welcome screen window
will now open.
4 Select your preferred scanning task, e.g. Scan to Microsoft Word.
September 2014
13
www.ed.ac.uk/is/ucreate
[email protected]
OCR scanning using ABBYY FineReader
5 Click OK to confirm the scanner model. You can now adjust the scanning options.
6 Expand the Multi-Page Scanning option and tick or un-tick the boxes as required, or according to
scanner model.
7 Press the Scan button to begin scanning. When scanning is complete, click the Close button.
8 ABBYY will now attempt to recognize the contents of your document before opening it in Microsoft
Word.
9 When the Word document opens, you have the option to resolve errors which ABBYY has picked up
during the character recognition stage.
September 2014
14
www.ed.ac.uk/is/ucreate
[email protected]
OCR scanning using ABBYY FineReader
10 When errors have been resolved, press the Read button on the ABBYY toolbar at the top of the
screen to re-recognize the text before sending it to Word.
A new Word document will open containing your scanned text or image with any edits you have carried
out.
September 2014
15
www.ed.ac.uk/is/ucreate
[email protected]
Epson A3 scanners on iMac
This guide is for scanning with the Epson Expression 1640XL or Epson
GT15000 A3 scanners attached to iMacs in uCreate (KB Library Centre and
Main Library).
N
ote: If you encounter an error message when attempting a scan using any uCreate
Epson scanner, please consult the Troubleshooting section on page 19.
1 Place the document to be scanned face down on the scanner glass (avoid touching the glass).
2 Use the black arrow and scale to the left of the scanner glass to position the document correctly.
3 In the Applications folder, select Image Capture to open the scanning application.
4 Click the Show Details button.
5 In the menu on the right, select Detect Enclosing Box from the Auto selection drop-down menu, if
you wish to capture all areas of the document to be scanned
6 Adjust the marquee edges (the dotted line around the image preview) to the required position.
7 Change the save location to your Home drive or personal external device.
8 Change any other settings as required, including file save location.
9 Click the Scan button to complete the scan.
September 2014
16
www.ed.ac.uk/is/ucreate
[email protected]
Large format scanning at
uCreate Main Library
The large format scanner in uCreate Main Library can be used to scan
documents larger than A3 up to A0.
This scanner is accessed using the PC on Desk 16.
Paper bin
Paper feed zone
1 Log in to the computer at desk 16 in uCreate Main Library.
2 Make sure the scanner is switched on - the word Ready will be visible in the scanner display.
3 Launch the SmartLF software using the shortcut on the desktop.
Or you can launch it from the Start menu: Start > All Programs > Colortrac > SmartLF
4 The three buttons alongside the scanner image (top left) allow you to scan in full colour,
greyscale or black and white. The colour button will be selected by default.
September 2014
17
www.ed.ac.uk/is/ucreate
[email protected]
Large format scanning at uCreate Main Library
5 Select your document’s dimensions from the Paper size drop-down menu.
6 Select orientation - Portrait or Landscape.
7 Select Image detail.
N
ote: Finer detail will create a larger file size. See Troubleshoot Scanning on page 19 for
more information about saving large files.
8 Leave the Number of colors set at the default 16.7 million.
9 Boost the Brightness to around 45 to 50 (this is a suggestion only, you may prefer to set the
brightness level by carrying out a few test scans).
10 In the File section, click the button with three small dots and navigate to the folder you would like
your scanned image to be saved to.
N
ote: File is the only scanning option availalbe to you using the SmartLF software in uCreate.
The direct Copy and Email functions are not available. You can of course print or email any
files after scanning by using the normal print and email functions available to you.
11 Select the file type output you prefer, Tiff, Jpeg or Pdf.
12 When you are satisfied with the settings, carefully push the edge of your document face-down
into the scanner’s paper feeder. The scanner will sense the paper edge and automatically load the
document into position ready for scanning.
N
ote: Never attempt to open the scanner top or feed or force anything through it which is
thicker than paper. Any of these actions will result in expensive damage to the scanner
glass and roller mechanisms. If you need to feed a document backwards or forwards
through the scanner to release it, use the direction labelled feed buttons on the scanner’s
control panel.
13 Click the Scan button directly below the word File in the File section to begin your scan. If the scan
doesn’t begin within a few seconds, feed the document out of the scanner then feed it back in again.
Close and relaunch the SmartLF software (the software will launch immediately and your settings will
be retained) and attempt the scan again.
14 The document will be scanned as it is automatically fed through the scanner. At the end of the
scanning process, the document will drop into the paper bin beneath the scanner.
The scanned image will appear in the Smart LF window and the file saved to your chosen location.
If you have more than one document to scan, you will have to relaunch the software for each
document.
September 2014
18
www.ed.ac.uk/is/ucreate
[email protected]
Troubleshoot scanning
N
ote: The majority of scanning problems are caused by not having enough space in
your home drive (M:/) to store the scanned image. Your home drive is the default save
location if you don’t set another before scanning. See the first Solution on this page to find
out more about file storage.
Problem: ‘Restart scanner’ error message after initiating scan using Epson Scan software. An error
message at this stage almost always means that your Home drive (M drive) is full. Unless you have
designated a different save location for your scanned images, the system will automatically attempt to
save it to your Home drive by default.
Solution: There are a few things you can do to resolve this problem:
• Clear out some space in your Home drive and attempt the scan again
• Save your scanned image to a portable storage device, such as a memory stick
• Save your scanned image temporarily to the uCreate ‘share’ drive
N
ote: The uCreate ‘share’ drive should only be used as a temporary solution for file storage. The
‘share’ drive is a public space and files can be accessed by any uCreate user. Please also be
aware that files stored in the ‘share’ drive will be removed within a month.
Problem: ‘Cannot find a document...’ error message when using Epson Scan Auto or Home mode
when Epson Scan has been launched from the Desktop icon.
Solution: Relaunch the software using the Epson Scan desktop icon and then either select Home or
Professional Mode from the drop down menu on the top right of the panel.
This should allow you to scan without the same error occurring and will also allow you to make
adjustments to the settings before scanning, if you wish.
Problem: ‘Selected folder is not writable’ (or similar) error message when scanning using an Epson
A3 scanner attached to iMac may result if Documents, Pictures or Desktop are initially selected while
setting a save location.
Solution: Select the Other button instead. The save location can now be navigated to or chosen from
the original Document, Pictures and Desktop options (though this time they should be selected from
the Finder sidebar). You should now be able to scan successfully.
September 2014
19
www.ed.ac.uk/is/ucreate
[email protected]
Printing
Print A0, A1 and A2 posters
These instructions assume that you have prepared and are ready to print an A0, A1 or A2
poster using one of the large format printers available in uCreate.
Your file should be converted to PDF format for printing. If you’ve created a file using an
application supported in uCreate (e.g. PowerPoint or an Adobe application), PDF conversion
can be carried out in uCreate. For help converting files to PDF in uCreate, see the Create PDFs
guide on page 24.
If you’ve prepared your file using an application not supported in uCreate, then you will have to
convert your file to PDF before visiting uCreate to print.
1 When ready to print, open the PDF file on a uCreate computer. Select File > Print.
2 From the Printer / Name menu, select either …A0plain… for a plain paper poster or …A0glossy…
for a glossy paper poster.
3 The settings are slightly different for printing Glossy paper posters in uCreate Main Library. Follow
the appropriate settings below for your poster paper type and printing location:
Settings for printing... any poster except a
glossy paper at the Main Library
Settings for printing... a glossy paper poster
at the Main Library
In Page Scaling, select Fit to Printable Area.
In Page handling > Page Scaling, select Fit to
Printable Area.
Still in the Print panel, select Properties (may
take a few seconds to open) and work through
the tabs, ignoring all settings not mentioned
below:
Still in the Print panel, click Properties and
work through the tabs, ignoring all settings not
mentioned below:
Advanced – select A0, A1 or A2 from the
menu.
Main –
– Media Type: Photo Paper > Premium
Glossy Photo Paper
Printing Shortcuts –
– scroll down the options and select Poster
– Color: select Color unless you require a
black and white print (no price difference)
– ensure A0, A1 or A2 is selected
– Print Quality: the Quality setting should be
adequate for most posters. Note: selecting Max Quality will mean file processing
and printing will take a little longer
– Choose paper type: Coated paper for plain
paper printing or HP Everyday Pigment Ink
Gloss Photo Paper for glossy paper printing
– push the slider up to Quality
Page Layout –
Features – If printing an A1 or A2 poster, tick
the Rotate by 90 degrees box under Roll
Options. This will save paper but won’t effect
the final orientation of your poster.
– Page Size: select or input the original
document dimensions (the page set up size of
your print file)
– Output Paper: Set to the poster size
required: A Series > A0 or A1 or A2, even if it’s
the same as the Page Size document.
Click OK to close the Properties panel. Click OK
to close the Print panel.
Click OK to close the Properties panel. Click OK
to close the Print panel.
September 2014
21
www.ed.ac.uk/is/ucreate
[email protected]
Print A0, A1 and A2 posters
4 Wait for the Print Job Confirmation Box to appear. Check that the cost of the poster print is
correct and when ready, click the Print button.
If the amount you are being charged seems wrong, cancel and go back over the steps above (see
www.ed.ac.uk/is/ucreate for poster printing prices).
It can take up to 30 minutes for your poster to print. Don’t attempt to pull the poster from the printer, it
will be cut automatically from the paper roll when dry.
5 Trim uneven edges or unwanted margins from your poster using the large paper trimmer nearby.
Troubleshoot poster printing
Scaling
Too big - The uCreate large format printers are each set up with three queues to produce precisely
A0, A1 or A2 sized prints. A poster of any size may of course be printed within those parameters and
trimmed down to size but the three sizes are set and charged for accordingly.
If an attempt is made to print a poster image which is slightly larger (even by a few millimeters) than
the dimensions of the queue it has been submitted to, it won’t print. Unfortunately, no error message
will appear to indicate the problem. To prevent this, select the Fit to print area option in the printer
settings before submitting the file to the queue.
Too small - If a poster has been created using an A4 (or similar sized) template and not at acutual
size (recommended) and is submitted directly to the printer without scaling, then an A4 image on a
big piece of paper will be the result. Scale or Shrink to fit print area should be selected in the printer
settings to scale the image up to the correct size.
A secondary problem can arise from creating a poster image of smaller dimensions than the required
large format output. When scaled up to large format, images and graphics can appear pixelated. Little
can be done except to source higher quality or larger dimension images (minimum 300dpi for printing).
Flattening
A missing element (usually an image or a graphic) after printing may indicate some invisible layer
interactivity. For example, a transparent layer may have been interpreted as opaque by the printer.
This can usually be solved by opening the PDF in Photoshop and flattening it before reprinting:
1 When the PDF is opened in Photoshop, access the Layers panel on the right (if it’s not visible select
Window > Layers from the main menu at the top of the window).
2 Select all the layers in the panel (select top layer then hold SHIFT and select bottom layer). There
may only be one layer visible, which is fine, it should be selected automatically.
3 Right click on the selected layers and choose ‘Flatten image’ from the drop down menu. If the
‘Flatten image’ option is greyed out because the layer is locked, double click on the layer, click OK in
the pop up window and repeat step 2 above.
4 Resave to PDF with a new name (make sure to select ‘Photoshop PDF’ from the drop down options
in the ‘Save As’ window - be careful NOT to select ‘Photoshop PDS’ or any other option).
5 Reprint the poster from the new PDF.
September 2014
22
www.ed.ac.uk/is/ucreate
[email protected]
File Conversion
Create PDFs
PDFs can be created from any file format capable of being hard copy printed,
such as text documents, images and graphics and publishing files.
N
ote: If creating a PDF from a desktop publishing application such as Adobe InDesign, the
option to Export to PDF will usually be available in the File menu. You should use this option
to create a PDF where available.
Where you are offered an opportunity to set the PDF quality, the settings should be adjusted
according to what the PDF is required for, e.g. ‘High Quality’ for printing or ‘Standard’ for viewing
and emailing. High Quality should always be selected for poster and graphics printing.
Use Adobe Acrobat to create a standard PDF
Suitable for emailing, online reading and every day printing
1 Log in to a uCreate PC workstation and launch Adobe Acrobat from
the Start menu (PC) or from the Applications folder (Mac).
2 From the Adobe Acrobat launch panel, select Create PDF. A
navigation window will open.
3 Navigate to the location of the file you wish to convert to PDF. Select
the file and click Open.
4 A new PDF version of your file will be created and open automatically.
The PDF can now be saved using the Save button in the menu at the top
of the PDF (or you can also use File > Save on PC).
Use Adobe Acrobat to create a High Quality Print PDF
Suitable for high quality image and graphics printing
1 Follow steps 1 and 2 for creating a standard PDF, as above.
2 Navigate to the location of the file you wish to convert to PDF. Click once on the file to select it.
3 In the format drop-down menu at the bottom of the navigation window (the default selection should
be All Supported Formats), select the file format of your original file (e.g. Microsoft Office Word).
4 After making your format selection, you’ll notice
that the Settings button has changed to an active
state, rather than being greyed-out.
5 Click the Settings button to open the Adobe
PDF Settings for supported documents panel.
Using the drop-down menus in the panel, select
the quality settings preferred (e.g. High Quality
Print for a poster).
6 Click OK. When created, the PDF will open
automatically. Save it to your preferred location.
September 2014
24
www.ed.ac.uk/is/ucreate
[email protected]
Create PDFs
Use a document’s Print menu to Create a PDF
You may have a document open already from which you would like to create a PDF. You can create a
PDF from an open document without having to launch Acrobat.
Create a Standard PDF
On a PC: In the open document go to File > Print and from Printer the drop-down menu, select
Adobe PDF.
On a Mac: In the open document go to File > Print and click the PDF button at the bottom left on the
Print panel then select Save as PDF from the drop-down menu.
The two procedures above will result in Standard PDFs, which may not be of high enough quality for
printing documents with images and graphics, such as posters, but will be suitable for emailing or
reading online.
Use a document’s PDF menu buttons to create a PDF
You can also create a Standard or High Quality PDF from a document which is already open when
there are PDF shortcut buttons available.
Depending on operating system and file format, a PDF can be created using tabs and buttons in the
menu bar of some applications. The image below shows the PDF Maker buttons within the Acrobat tab
of the PowerPoint 2010 ribbon menu (with the Acrobat PDF Maker panel used for refining quality).
If you only require a standard PDF, you can simply use the Create PDF button (above left). This will
open a Windows navigation panel which will allow you some basic settings and the usual saving and
naming options.
If you require a High Quality PDF, use the Preferences button to open the Acrobat PDF Maker panel,
enter your preferred settings and click OK.
Now use the Create PDF button to create a PDF document with the quality and application settings
you have entered.
September 2014
25
www.ed.ac.uk/is/ucreate
[email protected]
Video
VHS to DVD transfer at
uCreate King’s Buildings
1 Switch on the DVD recorder, VHS player and screen. The screen switch is located on its right edge.
2 Using the AV Input button on the screen edge (below the power button) select AV1 as indicated on
the screen display.
3 Push the video cassette into the slot at the front of the VHS player (label side up) and queue up the
tape to the beginning of the section you wish to record.
4 Press the DVD button on the DVD recorder. The button will be lit orange when selected.
5 Press the DVD recorder eject button to open the disk tray and place a blank DVD disk in the tray.
Press the eject button again to close it. If the DVD is not blank, the recorder will format it automatically
before recording during which the screen will display Loading... Disk formatting. This procedure may
take a few minutes.
6 When ready, press the record button [lREC] and immediately press the Play button on the VHS
player. Your VHS will now be digitised and stored to the recorder’s hard drive.
7 You can leave the player and recorder to run until either the tape has ended or the DVD is full or
you can stop the recording at a chosen point by pressing the stop recording button [nREC STOP]. If
you are recording selected clips rather than a whole tape, you should be able to continue doing so until
the DVD is full or you are ready to finalise the disk.
8 When recording has stopped, the screen will display Recording information to disk. When this
process has completed you must now use the DVD recorder’s remote control to finalise the disk.
N
ote: the disk must be finalised after recording or it will not be playable.
9 On the remote control, press the System Menu button to bring up the screen menu. Navigate to
Disk setup using the arrow keys and press the Enter button.
10 Navigate to Finalise in the left menu, select Finalise again from the middle menu then Next
screen from the right menu.
11 Select a Menu screen background and press Enter. Choose Yes then press Enter to continue
or select No to go back and select a different menu background.
12 After you have chosen your background and selected to continue, the finalisation process will
begin. This may take a few minutes.
13 When finalisation is complete, you will be returned to the Disk setup menu. Press the Exit button
on the remote control as many times as required to exit the System Menu completely.
14 You can now test that the DVD has recorded and finalised successfully by pressing the play button
on the DVD recorder.
Don’t forget to remove your VHS tape and recorded DVD. Please switch the equipment off after
use.
September 2014
27
www.ed.ac.uk/is/ucreate
[email protected]
Databases
Accessing DataStream
12
f
10
e
8
d
6
c
4
b
a
2
0
DataStream statistical software won’t work with the Microsoft Office 2013
verion of Excel, the current default version available in uCreate.
However, by following the steps below, you can access both Excel 2010 and
DataStream on uCreate PCs.
1 Launch Excel 2010:
Start > All Programmes > Microsoft Office > Excel 2010
2 A pop-up window will appear as soon as you launch Excel:
3 Click the Install button. The Datastream add-ins should now be visible in the Excel tabs.
September 2014
29
www.ed.ac.uk/is/ucreate
[email protected]
User Guide
www.ed.ac.uk/is/ucreate
[email protected]