1
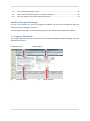
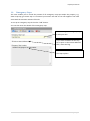
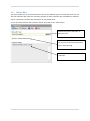
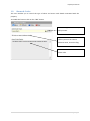
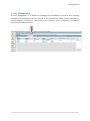
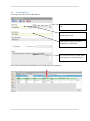
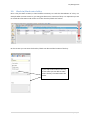
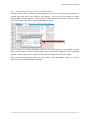
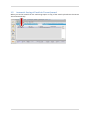
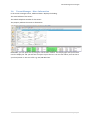
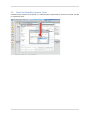
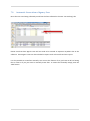
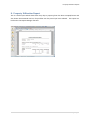
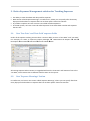
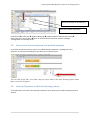
Landlord Property Manager V9 – New Features User Guide Award Winning Software – Designed by Landlords for Landlords. www.propertyportfoliosoftware.co.uk Copyright 2005-2012 Tax Portal Ltd Copyright notice Copyright © 2012 Property Portfolio Software. All rights reserved. Except where expressly stated to the contrary, copyright in the text, graphics and information contained in this publication is owned by Property Portfolio Software. Permanent copying of the information contained herein or reproduction or incorporation of any part of it in any other work or publication whether paper or electronic media or any other form is expressly prohibited. Notice specific to the document Permission to use this document is granted, provided that, the copyright notice (shown above) appears in all copies, use of documents is for non-commercial use only, and, no modification of documentation is made. This permission may be revoked at any time by Property Portfolio Software. Limited warranty Property Portfolio Software makes no warranty about the suitability of the information contained in this document for a particular purpose. Limit of liability The entire risk as to the contents of the documents is with you. In no event shall Property Portfolio Software be liable for any special, indirect or consequential damages whatsoever including, without limitation, damages for loss of business profits, business interruption, or any other pecuniary loss, arising out of the use of information contained on this document. Any rights not expressly granted herein are reserved. Property Essentials Contents Contents................................................................................................................................................... 1 Landlord Property Manager..................................................................................................................... 2 1. 2. 3. 4. 5. Property Essentials........................................................................................................................... 2 1.1. Emergency Stops...................................................................................................................... 3 1.2. Refuse Bins............................................................................................................................... 4 1.3. Alarms & Codes........................................................................................................................ 5 1.4. Other Features ......................................................................................................................... 6 Key Management ............................................................................................................................. 7 2.1. Creating Keys............................................................................................................................ 8 2.2. Check-in/Check-out of a Key.................................................................................................... 9 2.3. Key History .............................................................................................................................12 Tenant Management Changes .......................................................................................................13 3.1. Ending Tenancy Early – Calculating Daily Rental ...................................................................14 3.2. Change Individual Rents Entries.............................................................................................15 3.3. Changing Payment Term During A Tenancy ..........................................................................16 3.4. Capturing a Tenant Forwarding Address ...............................................................................17 3.5. Automatic Saving of Emails in Tenant Journal.......................................................................18 3.6. Tenant Manager – More Information....................................................................................19 3.7. New Four Monthly Payment Term ........................................................................................20 Improvement for HMO / Multi-Let Properties...............................................................................21 4.1. Ability to see ‘Room Occupancy’ in Portfolio Snapshot.........................................................22 4.2. New HMO Room Occupancy Report......................................................................................23 4.3. Assigning HMO Rooms on Start-up........................................................................................25 Early Warning System Changes ......................................................................................................26 5.1. Transaction Drilldown............................................................................................................27 5.2. Room Added to Expiring Tenancies Tab ................................................................................28 6. Property Manager – Tenant Details ...............................................................................................29 7. Letting Agent Fees..........................................................................................................................30 7.1. Creating Letting Agency Fees.................................................................................................30 7.2. Automatic Generation of Agency Fees ..................................................................................32 8. Property Utilisation Report ............................................................................................................33 9. Better Expenses Management solution for Tracking Expenses .....................................................34 9.1. New ‘Due Date’ and ‘Date Paid’ expense fields.....................................................................34 1|P a g e 9.2. New ‘Expense Warnings’ Section...........................................................................................34 9.3. New section ‘Overdue Expenses’ in portfolio snapshot ........................................................35 9.4. New tab ‘Expenses’ in the Early Warning system..................................................................35 Landlord Property Manager The aim of this guide is to take you through the updates that have been released through the Landlord Property Manager v9 solution. This tutorial goes through a case study showing you the new functionalities within this software. 1. Property Essentials The Property Essentials tab can be found at the second blue tab within Property Manager and once opened has four areas: Emergency Stops 3) Alarms & Codes 2) Refuse Bins 4) Other Features Property Essentials 1.1. Emergency Stops This area enables you to record the position of all emergency stop taps within the property, e.g. water stop taps, gas meter taps. It is essential your tenants are able to turn off supplies if the need arises with the minimum amount of hassle. To set-up an emergency stop click on the “Add” button. You can then enter the details of the emergency stop. Choose the type of emergency stop, or add your own. If you want the details of the stop tap to print on the Tenant Welcome Pack, chose this flag. Enter the details i.e. the location of the stop tap here. 3|P a g e 1.2. Refuse Bins This area enables you to record information such as the different types of refuse bins there are and also the collection days. With the increasing number of refuse collection bins and different collection days it is important you keep this information in one central place. To set-up refuse collection bins and their deliver days click on the “Add” button. Choose the type of refuse bin, or add your own. If you want the details of the refuse bin to print on the Tenant Welcome Pack, chose this flag. Enter the details i.e. when the bin is collected. Property Essentials 1.3. Alarms & Codes This area enables you to record the type of alarm and access code details associated with the property. To enable this function click on the “Add” button. Choose the type of alarm code, or add your own. If you want the details of the alarm code to print on the Tenant Welcome Pack, chose this flag. Enter the details i.e. hot to set the alarm code. 5|P a g e 1.4. Other Features In the ‘Other Features’ section it is possible to set flags to indicate to prospective tenants what features the property has. For example, if the property has double glazing, you would set the ‘’Double Glazing’ flag. Key Management 2. Key Management The ‘Key Management’ is a solution for managing the whereabouts of property keys including booking-in and booking-out and can be found at the third blue tab within Property Manager (as illustrated above). If you have a number of keys for a property, then it is important to be able to record the whereabouts of them. 7|P a g e 2.1. Creating Keys To set-up a Key you press the ‘Add’ Button: Choose the type of key, or add your own. If the key is for a specific room, specify which room. Give the key a unique reference, followed by a description. Any notes you want to record about the property can be entered here. Press ‘Save’ and the key will be added to list of other keys for the property. Key Management 2.2. Check-in/Check-out of a Key Once a key has been created, it then becomes necessary to track the whereabouts of a key. For example when a tenant moves in, you may give them one or two sets of keys. It is important you are to record this information and can do so via the ‘Check-in/Check-out’ button. On this screen you can enter the check-in/check-out date and the location of the key. If you select the location of the key as the office you are able to select where the key is located within the office. 9|P a g e If you select the location of the key as with Tenant then you are able to enter tenant information and also the Check-in Due Date. If you check the “Use the tenancy end date” box this date will be inserted automatically into the “Check-in Due Date”. You can also allocate a key to a contact in your contact list and then set the check-in due date accordingly. Key Management Once the keys have been checked-in/out, you are able to clearly see where each key is: 11 | P a g e 2.3. Key History The Key History button when pressed opens up to show you a history of the recorded events of the key. Tenant Management Changes 3. Tenant Management Changes A number of enhancements have been made to the ‘Tenant Management’ module and these include: Ending Tenancy Early - Calculating Daily Rental Change Rent Functionality Enhancement to change individual rents Changing the payment Term Midway through Tenancy Capturing a Tenant Forwarding Address Storing all emails that are sent from the mail merge solution in the Tenant Journal Property / Room address (Tenant’s contact information i.e. Telephone and email address) New payment term added to allow for four monthly payments 13 | P a g e 3.1. Ending Tenancy Early – Calculating Daily Rental Prior to this update when a tenancy was ended early a calculation had to be made, manually, as to how much rent was owed over a partial rent period, say 3 weeks of a monthly rental period or 3 days of a weekly rental period. The Landlords Property Manager now automatically works this out for you. To end a tenancy early you would as usual go to: Tenant Manager Tenancy Details Select Tenant Edit Tenancy End Date Save Yes OK. This window opens which shows you the partial tenant rental amount and you will click on “yes” and then “save” and “exit”. You can see in the rent schedule that the partial payment has been inserted. Tenant Management Changes 3.2. Change Individual Rents Entries You can now easily change the rent amount with this enhancement for a single rent schedule entry. Click on Tenant Manager Edit Tenancy Change Rent, and the following window is displayed: Enter the new rent and you have two options to decide how you want the change to be applied. You can either “Apply to all rents after the target date”. If you select this the rent schedule will show the new rent from the date you selected for all subsequent rents: Should you select “Apply only to the rent at the target date” then once you have changed the date and clicked “ok” the rent schedule will show the rent change for that one rent schedule only: 15 | P a g e 3.3. Changing Payment Term During A Tenancy Historically the software was unable to let the user change the tenant’s payment term once the tenancy had been created. Now with this enhancement you have the ability to change the tenant’s payment term during the existing tenancy as many times as is required. To use this function click on Tenant Manager Tenancy Details Edit Tenancy Change Rent and you will see the following window open: There is an option to change the payment term for example from monthly to weekly. You must enter the rent figure and the date from when the new payment term is to apply. Click on “ok”. A message appears to let you know that the rent was changed successfully, click on “exit” then click on “rent schedule” and view the changes: Tenant Management Changes 3.4. Capturing a Tenant Forwarding Address A useful record to have is a tenant’s forwarding address, so that you can communicate with them or forward them mail that is still coming to the property. You can do this by clicking on Tenant Manager Identity and Address. You will see the screen is split and you need to click on the “Add” button at the right hand side of “Forwarding Addresses” block. Place a tick into the “Default forwarding address for this tenant and any correspondence for this former tenant which is created in mail merge will be automatically addressed to this forwarding address. You have the option to leave the box unticked or remove the tick at a later date. The tenant forwarding address fields now also appear in the ‘Mail Merge’ section, so you still communicate with them through the software. 17 | P a g e 3.5. Automatic Saving of Emails in Tenant Journal When you send an email from the mail merge option a copy of the email is placed into the Tenant Journal automatically: Tenant Management Changes 3.6. Tenant Manager – More Information In the Tenant manager Screen, additional data is displayed including: The email address of the tenant The mobile telephone number for the tenant The property address the tenant is allocated to Remember, you can print this list, using our ‘Smart Print’ feature. Just simply right click your mouse over the display list and you will have an optin to print the list. You can then either print the list to your local printer or save it as a file e.g. Exel, MS Word etc. 19 | P a g e 3.7. New Four Monthly Payment Term Included in the payment term option is a 4 Month option specifically for those rents which are due on a quarterly basis. Improvement for HMO / Multi-Let Properties 4. Improvement for HMO / Multi-Let Properties One of the key benefits of Landlords Property Manager is that it makes managing Multi-let properties easy. We have now added the following new features: Ability to see 'Room Occupancy' in Portfolio Snapshot Detailed new HMO Room Occupancy Report When starting software, tenants who are assigned to properties with HMO rooms are asked to assign to HMO room 21 | P a g e 4.1. Ability to see ‘Room Occupancy’ in Portfolio Snapshot Previously on the Portfolio Snapshot it was not possible to display room occupancy when portfolios had HMSOs. As you can see from the following image you are now able to do so. Improvement for HMO / Multi-Let Properties 4.2. New HMO Room Occupancy Report Within the Portfolio Snapshot you can now create a “Room Occupancy Report” by clicking on the “View Detailed Report” link which opens a window allowing you to choose one of three options: Choose “Show all rooms” and the following report is produced: Choose “Show occupied rooms only” and the following report is produced: 23 | P a g e Choose “Show vacant rooms only” and the following report is produced: Improvement for HMO / Multi-Let Properties 4.3. Assigning HMO Rooms on Start-up When the software is opened for the first time after the version 9 update then any tenants that have been assigned to a property with HMO rooms, but the room has not been specified against the tenancy will need to assign the rooms. This is required so that the occupancy reports can give a true picture of the property/room occupancy. This screen displayed below will continue to be displayed at each occurrence of the software being opened until all the rooms have a tenant assigned to it. 25 | P a g e 5. Early Warning System Changes The following changes have been made to the Early Warning system: Transaction Drilldown Room added to the expiring tenancies tab Early Warning System Changes 5.1. Transaction Drilldown In the ‘Early Warning’ system, you now have the ability to double click on: Expiring Tenancies Expiring Insurances Expiring Safety certificates and jump straight to the relevant transaction. Click onto the tab “Early Warning System” View EW Events Expiring Tenancies and you can see a list of those tenancies due to expire within the range that you have previously set. Double click in one of the record lines and it takes you to the “Tenancy Agreement” screen as so: Similarly if you click on the “Expiring Insurances” tab and double click on one of the record lines then you will be taken to the actual insurance details. And if you click on the ‘Expiring Safety Certificates’ tab you can drilldown to the safety certificate detail. 27 | P a g e 5.2. Room Added to Expiring Tenancies Tab Not only can you view expiring tenancies but this screen also displays any expiring room tenancies too: Property Manager – Tenant Details 6. Property Manager – Tenant Details There is a new feature in Property Manager which displays a summary of who is in the current property: 29 | P a g e 7. Letting Agent Fees It is quite common for users to not only self-manage their properties but in many cases to have part or their entire portfolio managed to be managed by a letting agent. Where properties are managed by a letting agent, we have developed a new solution for tracking commissions that are paid to letting agents. 7.1. Creating Letting Agency Fees The commissions must be set- during the creation of the tenancy agreement. If you have already inputted the property information then create the tenancy in the usual fashion. Then click on Letting Agent and add the following information: Letting Agent, Default Fee Payment Type, Default Fee Payment Reference, etc and click on Save. Then click on the “Add” button and the Agent Fee window opens allowing you to enter your information. Once you have clicked “Save” the following screen will display showing that the Agent’s Fees have been added successfully: Letting Agent Fees then click on “Save” and “Exit”. 31 | P a g e 7.2. Automatic Generation of Agency Fees Once the rent starts being collected you will see the fees collected in the new “Fee Tracking’ tab: Please note that these Agent’s Fees will not need to be entered as expenses anywhere else in the software. These Agent’s Fees are also included in reports such as the Profit and Loss report. It is also possible to create fees manually. You can use this function if say you have an ad-hoc letting fee to create or if you just want to manually create fees. To create fees manually simply press the ‘Add’ button. Property Utilisation Report 8. Property Utilisation Report This is a useful report which shows how many days a property/room has been occupied/vacant and also shows the estimated rent loss for portfolio over the period you have selected. The report can be found in the Report Manager function. 33 | P a g e 9. Better Expenses Management solution for Tracking Expenses The ability to enter due date and date paid for expenses New section called ‘Expense Warnings’ in ‘Preferences’, where you can specify after how many days past the due date an expense that has not been paid is classed as overdue In portfolio snapshot we have a section now called ‘Overdue Expenses’ In the EW system, we have a new tab called ‘Expenses’ that shows both overdue and expenses that are due 9.1. New ‘Due Date’ and ‘Date Paid’ expense fields Under all the expense tracking screens there is now an ability to enter a “Due Date” and “Tax Date”. For example to create an expense Property Manager Maintenance & Repairs Add Description Tax Date Due Date Amount Owed Save. All existing expenses when version 9 is upgraded will have the ‘Due Date’ and ‘Date Paid’ set to the ‘Tax Date’, which means that no difference will be seen on the reports. 9.2. New ‘Expense Warnings’ Section In Preferences, we have a new section called ‘Expense Warnings’, where you can specify after how many days past the due date an expense that has not been paid is classed as overdue: Better Expenses Management solution for Tracking Expenses Select the number of overdue days Select the number of due days Preferences Preferences Expense Warnings Display expenses overdue after (days) Display expenses due in (days) Save. An information box will show with the message “Configuration successfully saved”. 9.3. New section ‘Overdue Expenses’ in portfolio snapshot In portfolio snapshot we have a section now called ‘Overdue Expenses’, showing how many expenses are overdue and clicking on this takes you to the EW system. You can click on the link ‘view detail’ and you will be taken to the Early Warning System where there is a new tab ‘Expenses’. 9.4. New tab ‘Expenses’ in the Early Warning system In the EW system, we have a new tab called ‘Expenses’ that shows both overdue and expenses that are due. 35 | P a g e Double click on here and it takes you to the entry screen