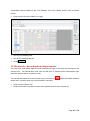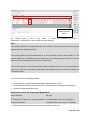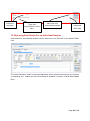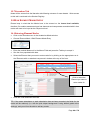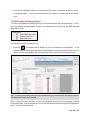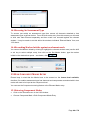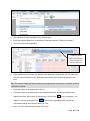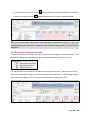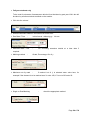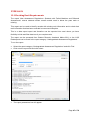
1
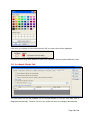
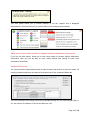
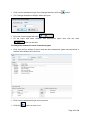
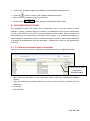
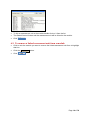
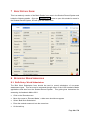
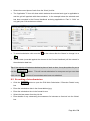
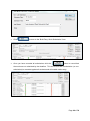
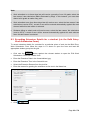
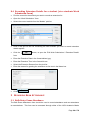
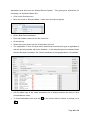
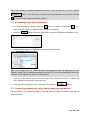
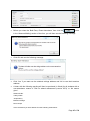
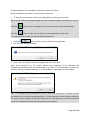
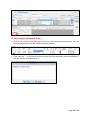
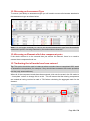
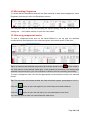
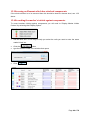
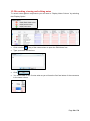
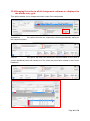
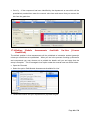
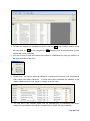
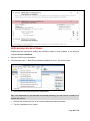
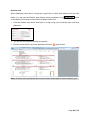
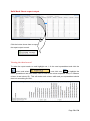
LUSI Academic Marks 2011 v2.2 User Guide For the LUSI Academic Marks 2011 Valerie Bramhall Student Registry | Student Based Services | Lancaster University Version 2.2 | May 2013 Page 1 of 76 CONTENTS 1 Introduction .................................................................................................................... 3 2 Glossary ........................................................................................................................ 4 3 Options Overview........................................................................................................... 5 4 Assessment Profile Form ............................................................................................. 12 5 Bulk Entry: Assessment Profile CMod .......................................................................... 16 6 Assessment Units Form ............................................................................................... 18 7 Basic Details Form ....................................................................................................... 20 8 Recording Work Submission ........................................................................................ 20 9 Recording Exam Attendance........................................................................................ 24 10 Academic Marks: Legend ............................................................................................. 30 11 Cell Help ...................................................................................................................... 30 12 Element Marks Profile Form – Entering and viewing marks for an individual student ... 31 13 Marks Profile Form....................................................................................................... 38 14 Bulk Element Marks Entry ............................................................................................ 44 15 Bulk Component Marks Entry....................................................................................... 46 16 Bulk Resit Marks Entry Form........................................................................................ 52 17 Mark Related Forms In Other LUSI Applications .......................................................... 55 18 Publishing Element Marks ............................................................................................ 65 19 Reports ........................................................................................................................ 67 20 Bulk Mark Sheets Report ............................................................................................. 70 21 Learning more, service, and support ............................................................................ 76 Page 2 of 76 1 INTRODUCTION From October 2011 the university implemented new undergraduate assessment regulations. These changes were introduced to simplify the previous regulations, ensure markers use the full range of available marks across all disciplines and deal with mitigating circumstances in a more transparent way. The main changes are shown below. • The majority of assessed work will be marked using letter grades and these are what you will see on returned work. These grades will be converted to an aggregation score on a 24 point scale for the purposes of calculating your overall module results and your final degree class. • Assessed work which is quantitative (marked to a defined marking scheme and often largely numerical or multiple choice tests) may still be marked in percentages. Again, these marks will be converted to an aggregation score on a 24 point scale. • Departments will make clear the marking method to be used for each assessment, together with the relevant grade descriptors (marking criteria). • Degree classifications will be based on your overall aggregation score and there will be clear definitions for borderline scores and departmental criteria for considering borderline students. • To progress between years, any failed units must be resat. • Failed module marks may only be condoned above a minimum aggregation score indicating a reasonable attempt has been made. All failed marks must be condoned to qualify for a degree. • To qualify for an honours degree, students must attain an overall pass grade and no more than 30 credits condoned. • The penalty for work submitted late is a reduction of one full grade for up to three days late and zero thereafter. If you have any questions about this application please contact [email protected] in the first instance. Page 3 of 76 2 GLOSSARY 2.1 Assessment Type Modules are assessed by ‘Assessment Types’ i.e. Coursework, Exam, Dissertation etc. The Course Handbook Assessment Proportions form shows which Assessment Types are associated with each module and what the % split is if the module is assessed by more than one assessment type. 2.2 Assessment Units An assessment unit is used to link together multiple modules to form an overall mark for the combination of modules. One mark will be reported to the exam board for each assessment unit. 2.3 Element Each assessment type associated with a module can be broken down into Element parts. Elements have submission details recorded against them and work submission is recorded at Element Level. 2.4 Component Elements can contain multiple components; all components attached to an Element will be submitted / or attended at the same time. Components should be created for each element part that will receive a mark, for example; exam questions should be set up as components linked to the exam paper element. 2.5 Elective Elements or Components which are marked as being elective are optional and not all students will be required to take all Elements / Components. In cases where there are ‘Elective’ elements and / or components there will be more than % worth of these created. Students will need to take, and have marks entered or excused for 100% worth of Elements for each assessment type. 2.6 Compulsory Elements and components which are not recorded as being ‘Elective’ are compulsory for all students. 2.7 Include in Calculation If the tick is removed from the ‘include in calculation’ check box for an element or component then any marks recorded against that element / component will not contribute to the next higher assessment mark i.e. a marks recorded against a component marked as ‘do not include in calculation’ will not contribute the associated element mark. Page 4 of 76 2.8 Grade This term is used specifically to mean a letter grade as opposed to a numeric mark or degree classification. 2.9 Mark Mark is used to cover all types of marks. 2.10 Dual Marking In instances where dual marking is used marks can be entered into LUSI and LUSI will calculate the final mark, you will not be able to enter a final agreed mark. It is crucial that single or dual marking is correctly attributed at the point of set up of elements and / or components as changing from single marking to dual marking after marks have been entered will result in deletion of the first attempt marks already entered. TIP: If you need to enter a final agreed mark, use the single marking option in the Course Handbook. 3 OPTIONS OVERVIEW You can set up the screen layout and many of the default options of LUSI through TOOLS OPTIONS from the menu bar (or click the OPTIONS button from the top toolbar). The OPTIONS window is split into tabbed sections. You can make the changes you require and then click SAVE. You will see a save changes confirmation screen - Click YES to confirm your changes. Click CLOSE or the ‘X’ to close the Options window and return to the Academic Marks 2011 screen. All these options are here to save time when dealing with records – so you can change the defaults to your most common settings. The REFRESH button will refresh your view to what the last saved defaults were. Useful if you have clicked accidentally on an option. The DEFAULTS button will reset all options back to standard setup. Page 5 of 76 3.1 General Tab The General Tab provides options to set the default academic year. It is automatically set to the current academic year; however, you can have it set to a particular year or the last academic session you used. 3.2 Find Defaults Tab This tab enables you to set which FIND tab will be used by default when you search for records using the FIND form. Page 6 of 76 3.3 Child Forms Tab When you open a student record, the default form is Basic Details. You can change this default view to a form you use most regularly if you wish. This default can be set here. Remember to click Save if you make any changes. 3.4 Usability Tab This tab is designed to suit your usability needs. You can tick the options you would like activating. The current default text is Microsoft Sans Serif, at 8.25 font size. This can be changed to a larger style if required. However, the larger the font, the more awkward it is to display text on some features. For example, if you choose size 14, the buttons will be not large enough to display all text. Page 7 of 76 3.5 Find Columns Tab The ‘Find Columns’ tab enables you to choose the information that is displayed in the FIND results and subsequently transferred into the SELECTION LIST. You can use the green arrow buttons on screen to choose the order the columns are displayed in and whether you wish any more information to be displayed. This is useful when you want to select only certain students from your results. For example, if you are only interested in students with a particular nationality then add Nationality to the Displayed columns in the following way: 1. Click on Nationality in the left hand column, 2. Then click the right arrow button to transfer it to the Displayed Columns section. 3. To move the order click the column you’d like to reorder in the Displayed Column list and click up/down arrow as needed. 4. Click Save. When you come to search for students you could sort on the Nationality column and then only select those you are interested in. This feature is also useful for analysis purposes. For example, if you want to analyse a particular group of students by gender and nationality, ensure both of these columns are selected for display, carry out the search and select all. You can then use copy and paste to transfer the data from the LUSI selection list into excel where you can then use then pivot table function to analyse the data. Page 8 of 76 3.6 Find Filters Tabs This tab enables you to set the default filters in the Find form to specific criteria. This is really useful if you search using certain criteria often – as it can appear as default and save you a bit of time. Remember to click SAVE if you make any changes. 3.7 Colour Tab The top section of this tab enables you to select different colours to help identify different types of students in the find form. The bottom section allows you to set colour preferences for marks cells to help identify the marks to be entered into particular cells. To set a colour click onto the appropriate cell to open the colour selector: Page 9 of 76 Click onto your choice of colour and then click OK, the new colour will be displayed: Please note that using dark shades for mark cells may make the text (marks) difficult to read. 3.8 Academic Marks Tab The first option on this tab enables you to choose whether or not the ‘Cell Help’ box is displayed automatically. Remove the tick if you prefer this box not to display automatically. Page 10 of 76 This next option allows you to choose whether or not the ‘Legend’ box is displayed automatically. Remove the tick if you prefer this box not to display automatically. Allow me to enter works marks for students without submission information If you tick the third option; ‘Allow me to enter work marks for student without submission information’ then you will be able to enter marks without first having to enter work submission information. Keyboard Shortcuts You can set various keyboard shortcuts to make it easier and quicker to enter the marks. All existing keyboard shortcuts are listed at the bottom part of the Academic Marks tab: You can customise the existing shortcuts (by double-clicking into the Letter/Grade field), or you can scroll to the bottom of the list and add your own. Page 11 of 76 Changing which tab opens in the Marks Profile form By default the Marks Prodile form opens showing the Results tab. You can change this by selecting a different tab as shown below. 4 ASSESSMENT PROFILE FORM The Assessment Profile form has been made available in Academic Marks 2011 to make it more convenient should updates to individual student module assessment profiles be required. This form is also available for updating in the Student Record System. 4.1 Altering a default assessment profile to an elective assessment profile To alter a students assessment profile first select the correct module from the module pick list at the top of the form. Select the course module from the pick list. The students current assessment profile will be displayed in the left hand box and any elective assessment types will be displayed in the right hand box. Page 12 of 76 In the example above the the student has the option of changing the 60% exam assessment type to 60% dissertation. To make this change, click onto ‘Exam’, at this point the arrow and weight buttons in between the two boxes will activate. Click the button to move the assessment type across to the right. Now click onto ‘Dissertation’ and then click the button to move this assessment type to the left. Click the button to save the change. Page 13 of 76 4.2 To change a default assessment profile to a non-standard assessment profile If it has been agreed that a student’s assessment profile for a module should be something other than the standard assessment, use this form to make the changes to assessment type weightings. Note: You will only be able to make changes to weightings of assessment types already associated with the module, you will not be able to use assessment types not associated with the module. In the example below, the student is a visiting michaelmas term only student and will be assessed 100% by coursework. To make this change, click onto ‘Exam’ and then click the assessment type out of the student’s assessment profile. Next, click onto ‘Coursework’ and then click the button to move this button. Page 14 of 76 Click here change assessment weight. This will open the ‘Change Assessment Weight’ box. Change the ‘40’ to ‘100’, click OK and then click . Tip: Make sure that you have created appropriately weighted Part year JYA elements and components for non-standard assessments. Page 15 of 76 5 BULK ENTRY: ASSESSMENT PROFILE CMOD If the assessment proportions for a module have changed then there is a possibility that some students may have the wrong proportions attached to their personal record for this module. This may become apparent when trying to enter / upload marks into LUSI. The form can be accessed from Student Records or Academic Marks 2011. Follow the steps below to check and correct this data: • From the Records menu select Bulk Assessment Profile CMod • When the form loads the current Academic year will already be selected, you can change it if necessary. • Enter the course module mnemonic in the next box • Hit the Tab key; the form will then populate as shown below • Click onto the first name in the list and see the assessment proportions for that student in the bottom section of the form. Click here change assessment weight. To change the weightings of already associated assessment types Page 16 of 76 • Click onto the assessment type to be changed and then click the • The ‘Change Assessment Weight’ button will open • Enter the correct weight then click • Do the same with other students and assessment types then click the main button button for the form. To change the student’s current assessment types • Click onto the first student in the list and see their assessment types and proportions in the box at the bottom left of the form. • Click onto the assessment type to be removed • Click the button to move it out Page 17 of 76 • Click on the assessment type to be added in the available assessments box • Click the • Move to the next student in the list of students • Click the form button to add it to the students assessment profile button when all changes have been made. 6 ASSESSMENT UNITS FORM The Assessment Units form shows which assessment units (if any) are linked to which modules. Usually, modules which are linked to an assessment unit have the assessment unit set as the ‘default’ in the LUSI Course Handbook and the student will be enrolled onto that assessment unit when they are enrolled on the module. It is sometimes necessary to make changes to assessment units for individual students, usually in cases where variations of modules and assessment units are permitted. Changes are made via the Assessment Units form. 6.1 To link an assessment unit to a module Click onto the module you want to change the assessment unit for to highlight that line. Click button to open Assessment Modules Search • Next click onto the button on the right hand side to open the Assessment Modules Search. • Type the assessment module mnemonic (or part of the mnemonic as shown) into the search box. • Click Find • See matches: Page 18 of 76 • To link an assessment unit to the module double click on it from the list • The Search form will close and the assessment unit will be linked to the module. • Click . 6.2 To remove a linked assessment unit from a module • Click to onto the module you want to remove the linked assessment unit from to highlight that line. • Click the • Click button. . Page 19 of 76 7 BASIC DETAILS FORM This is a read only version of the Basic Details form seen in the Student Record System and holds the following details. Click the button to open this student’s record in the Student Record System; SR will open the default form. 8 RECORDING WORK SUBMISSION 8.1 Bulk Entry: Work Submission The Bulk Work Submission form should be used to record submission of non-exam assessment types. This form can be accessed through either of the LUSI Academic Marks applications and also from the Student Record System. This guide gives instructions for accessing via Academic Marks 2011. • Click on the Records menu • Move the cursor to ‘Element Marks’, a side menu should now appear • Select ‘Bulk Work Submission’ • Enter the module mnemonic into the mnem box • Hit the tab key Page 20 of 76 • Select the correct piece of work from the ‘Work’ pick list • The ‘Applicable To’ box will show which students the selected work type is applicable to and the grid will populate with those students. In the example below the selected work has been recorded in the Course Handbook as being applicable to ‘Part Yr JYA’s’ so only part year JYA students are shown: • To record submission click onto the in the column after the ‘Name’ to change it to a . • The due date (recorded against the element in the Course Handbook) will be entered in the submission date box. Tip: If the majority of students submitted a piece of work on time, it may be quicker for you to use the click onto the button. This will record submission for everyone and you can then to remove it from students who have not submitted. 8.2 Recording a late submission • Click the button to open the ‘Edit Work Submission / Extension Details’ entry box • Enter the submission date in the format dd/mm/yyyy • Enter the submission time in the format hh:mm • Select the late reason from the pick list • Enter details of any extenuating circumstances for lateness as free text into the ‘Notes’ box. Page 21 of 76 • Click • Once you have recorded all submissions click the to return to the ‘Bulk Entry: Work Submission’ form button to record that the work was not submitted by the deadline. This will ensure that a submission (or nonsubmission) is recorded against all students and will enable marks entry. Page 22 of 76 Note: • Work submitted un to three days late will receive a penalty of one full grade; select the late reason ‘Late submission (Marks Deducted by Dept)’ in this instance, you must then deduct a full grade at marks entry point. • Work submitted more than three days late will receive zero; select the late reason ‘Late submission (receive 0/F4)’, a mark of zero will be entered automatically against this work element when this late reason is selected. • Students failing to submit work will receive zero; select the late reason ‘No submission (receive 0/F4)’; a mark of zero will be entered automatically against this work element when this late reason is selected. 8.3 Recording Extension Details for a student (via the Bulk Entry: Work Submission Form) To record extension details for a student for a particular piece of work via the Bulk Entry: Work Submission Form follow the steps in 6.1 above to open the form and load the appropriate student group into the grid. • Click onto the button against the relevant student to open the ‘Edit Work Submission / Extension Details’ form • Enter the Extension Date in the format dd/mm/yyyy • Enter the Extension Time in the format hh:mm • Select the Extension Reason from the pick list • Enter the reason for granting the extension as free text in the Notes box. • Click Page 23 of 76 8.4 Recording Extension Details for a student (via a students Work Submission Form) • Find the record for the student you want to record an extension for. • Open the ‘Work Submission’ form. • Select the correct module from the ‘Module’ pick list. • Click in the grid on the row containing the work element you want to record extension details against. • Click the button, to open the ‘Edit Work Submission / Extension Details’ form • Enter the Extension Date in the format dd/mm/yyyy • Enter the Extension Time in the format hh:mm • Select the Extension Reason from the pick list • Enter the reason for granting the extension as free text in the Notes box. • Click 9 RECORDING EXAM ATTENDANCE 9.1 Bulk Entry: Exam Attendance The Bulk Exam Attendance form should be used to record attendance and non-attendance at examinations. This form can be accessed through either of the LUSI Academic Marks Page 24 of 76 applications and also from the Student Record System. This guide gives instructions for accessing it in Academic Marks 2011. • Click on the Records menu • Move the cursor to ‘Element Marks’, a side menu should now appear • Select ‘Bulk Exam Attendance’ • Enter the module mnemonic into the mnem box • Hit the tab key • Select the correct exam from the ‘Examination’ pick list • The ‘Applicable To’ box will show which students the selected work type is applicable to and the grid will populate with those students. In the example below the selected exam element has been recorded in the Course Handbook as being applicable to ‘All students’. • Use the paper copy of the ‘exam attendance list’ to identify students who have or have not attended the exam • To record Attendance click onto the in the column after the ‘Name’ to change it to a . Page 25 of 76 Tip: If the majority of students attended the exam, it may be quicker for you to use the button. This will record everyone as having attended, you can then click the to remove it from students who didn’t attend. 9.2 Recording Exam Non-Attendance • For those who did not attend, leave the as it is (or click to remove the have used the ‘submit all’ option detailed in the tip box above). • Click the • Select the appropriate non-attendance reason from the pick list. if you button at the right of the row to open the ‘Edit Exam Attendance’ box. Tip: If the student has not made alternative arrangements with the department or the Registry, select ‘Did not attend assessment (receive 0/F4)’ this will automatically record the mark of 0 or F4 against the student for that element. • Type any notes directly into the free text notes box; comments such as “medical note seen, assessment deferred” should go here. • Changes will be saved when you close the form using the button. 9.3 Contacting students by letter about exam non-attendance Use this option if you prefer to produce, print and send out letters to students who did not attend an exam. Page 26 of 76 • Before you close the ‘Bulk Entry: Exam Attendance’ form click the button in the ‘Absence Mailing’ section of the form, you will then see the following message: • Click OK and see the following message. • Click ‘Yes’ if you want use the students college address and ‘No’ to use their termtime address. • A letter with the following wording will then be produced (in Word) for all students with a non-attendance reason of ‘Did not attend assessment (receive 0/F4)’ or ‘No reason given’. Student ID No. Today’s Date Juniper Berry Bowland College Dear Juniper I have noted that you were absent from the following examination: Page 27 of 76 Module ENGL201: The Theory and Practice of Criticism Examination ENGL201 Exam Date 20/05/2013 The examination regulations state that if a student is absent from an examination without a satisfactory explanation then a mark of F4 / zero is recorded. If you do not want me to act in this regard, you must provide within the next few days, documentary evidence to account for your absence or let me know of any other arrangements that have been made by your department, which I am currently not aware of. If you were absent due to illness then you must submit a doctor’s certificate stating that you were unable to sit the examination. A Self-Certification form will not be accepted, unless signed by a medical doctor. Yours sincerely Richard English Undergraduate Administrator 01524 59 2136 (direct line) [email protected] c.c. Module Administering Department Print and send the letters, a record will be created in each Student’s ‘correspondence’ form in Student Records confirming that the student has been contacted. 9.4 Contacting students by Email about exam non-attendance Use this option if you prefer to contact students who did not attend an exam by email. • Before you close the ‘Bulk Entry: Exam Attendance’ form click the button in the ‘Absence Mailing’ section of the form, you will then see the following message: • Click OK and see the following message. Page 28 of 76 • Click ‘Yes’ here to send the standard registry email, as soon as you click yes an email will be sent to all students with a non-attendance reason of ‘Did not attend assessment (receive 0/F4)’ or ‘No reason given’. • A record will be created in each Student’s ‘correspondence’ form in Student Records confirming that the student has been contacted. The wording of the email will be the same as the standard letter detailed in section 9.3 above. Note: Although this procedure gives you the option to send your own email, the Deputy Head of the Student Registry requests that you use the standard Registry email. Tip: To send both a letter and an email, run both processes. Page 29 of 76 10 ACADEMIC MARKS: LEGEND Click the button on any of the Marks forms (Marks Profile, Element Marks, Bulk Component Marks Entry, Bulk Element Marks Entry) to see the Legend. The Legend shows you all of the indicators you may see in the first four columns of the marks entry form and the colours and shadings you may see the marks entry cells filled in together with a description of what it means. Click and drag the Legend to move it around or even onto a second screen if you have one. To close the Legend, click the right hand corner. in the top 11 CELL HELP Click the button on any of the Marks forms (Marks Profile, Element Marks, Bulk Component Marks Entry, Bulk Element Marks Entry) to see the Cell Help box. Page 30 of 76 12 ELEMENT MARKS PROFILE FORM – ENTERING AND VIEWING MARKS FOR AN INDIVIDUAL STUDENT Use this form to view and record component and element marks for a student. Apply filters at module and assessment type level Change session Element Marks section Component Marks section 12.1 Viewing Element Marks When you open the form you will see the student’s module assessments for the current academic session. You can change the session to view marks for a previous session. 12.2 Export Button Click this button to get quick access to simple marks reports for the student whose record you are viewing. Grid Export This report will produce a grid version of the Element Marks Profile form which can be easily exported to excel by clicking the button or copied to your clipboard using the option. Page 31 of 76 Data Export This report will produce a more detailed version of the Element Marks Profile form which can be easily exported to excel by clicking the using the button or copy to your clipboard option. Copy to Clipboard This option will copy the columns and marks shown on the Element Marks Profile Form plus the students name and ID number into your clipbard. You can then easily paste this information into any other application e.g. email, excel, word. 12.3 Entering Element Marks You can apply filters at module level (this can make it easier when entering marks for one particular module) and at assessment type level. Use the button to select multiple options: Marks must be entered at the lowest possible level so, if the assessment has Elements and Components you must enter the marks at component level. Page 32 of 76 Component Marks are recorded in the bottom section of the form. Element Marks are recorded in the top section of the form. • To enter an element mark, click into the appropriate cell and type the mark. Tip: The cell colour will indicate whether the mark should be a grade, percentage or out of x. Click the button of open the legend if you need help with colours and indicators Click the button to open the cell help if you need assistance at cell level. You can only enter a mark into a box filled with solid colour. • Click the • You will then see this message: • Click ‘Yes’ if you want to save the changes and ‘No’ if you don’t. button when you have finished entering marks. Once you’ve clicked ‘Yes’, the system checks that weightings of the Elements and Components associated with the student add up to 100%, if any anomalies are found you will get a warning message advising you of the problems. An example is shown below: Tip: This message usually indicates that there is more than one option or elective, but that the options have not been marked as elective. In this example an exam element had been set up for full year students and another had been set up for part year JYA’s; both elements need to be marked as elective and doing this fixes the problem. Page 33 of 76 12.4 Excusing an Element Mark • Click on the ‘cross’ in the ‘Excused’ column to mark an element as excused. This will remove that element from the module mark calculations. • Click onto the … in the Notes column to open the Edit Notes box and record details of why the element is being excused. Page 34 of 76 12.5 Excusing an Assessment Type To excuse (set aside) an assessment type you will need to excuse all elements attached to that assessment type as shown below. Note: It is no longer necessary to remove an excused assessment type from the student’s assessment profile, excusing elements by the method above does this. 12.6 Excusing an Element which has component parts If the whole element is to be excused then just excuse the element, there is no need to excuse the at component level too. 12.7 Indicating that all marks have been entered Tip: This option should be used in instances where a student has not completed 100% worth of assessment components (for example; if they should have answered four exam questions but they only answered three). When all of the component marks have been entered, click onto the cross in the ‘All marks in – incomplete’ column to change this to a tick. This will ensure that the missing components are treated as having received a mark of F4/0 when calculating the aggregate mark for the element: Page 35 of 76 12.8 Recording Plagiarism To record that an assessment element has been deemed to have been plagiarised, select Plagiarism from the pick list in the Disciplinary column. You may also wish to record notes detailing the agreed penalty and this can be done by clicking the … in the Notes column to open the notes editor. 12.9 Entering component marks To enter a component mark click on the linked Element in the top grid, the attached components will be displayed in the component grid in the bottom section of the form: Tip: If an element has attached components an indicator similar to this will be visible in the ‘Grp’ column in the element marks grid. If the module has more than one element with attached components then you’ll see indicators in different colours increasing numerically. To enter a component mark, click into the appropriate cell and enter the mark in the required format. Tip: The cell colour will indicate whether the mark should be a grade, percentage or out of x. Click the button of open the legend if you need help colours and indicators Click the button to open the cell help if you need assistance at cell level. You can only enter a mark into a box filled with solid colour. Page 36 of 76 12.10 Excusing a Component To excuse (set aside) a component, click the cross in the ‘Excused’ column on the row containing the component to be excused. This component will now be ‘set aside’ when calculating the Element aggregation mark. Page 37 of 76 13 MARKS PROFILE FORM This form can be filtered to view Part I or Part II marks, it has four tabs holding different information plus button functionality detailed below. Tip: You can set which tab this form opens to by changing the default in ‘Options’, see section 3.8. Click to view Part I or Part II Click to open the Student Records System View students interactive transcript 13.1 Export Button Click this button to get quick access to simple marks reports for the student whose record you are viewing. Page 38 of 76 Grid Export This report will produce a grid version of the Marks Profile form which can be easily exported to excel by clicking the button or copied to your clipboard using the option. Data Export This report will produce a more detailed version of the Marks Profile form which can be easily exported to excel by clicking the the button or copy to your clipboard using option. Page 39 of 76 Copy to Clipboard This option will copy the columns and marks shown on the Marks Profile Form plus the students name and ID number into your clipbard. You can then easily paste this information into any other application e.g. email, excel, word. Student ID 9252060 Name Berry, Juniper CMod Year ECON211 11/12 15 ECON212 11/12 15 ECON220 11/12 15 ECON221 11/12 15 ECON222 11/12 15 ECON223 11/12 15 ITAL200i 11/12 15 ITAL201i 11/12 15 ECON103 12/13 40 ECON207 12/13 15 ECON227 12/13 15 ECON324 12/13 15 ECON325 12/13 15 ECON326 12/13 15 ECON329 12/13 15 ECON330 12/13 15 ECON331 12/13 15 ECON334 12/13 15 ENGL201 12/13 30 ITAL201/301 Credit Overall Mark Overall Uncapped Agg Overall Capped Agg Coursework Mark Coursework Agg Exam Mark Exam Agg Result 59.5 8.5 11 16.4 16.4 16.4 11 15 13.2 Results tab This tab is read only and displays the current marks at overall assessment type and module level. 13.3 First Attempt tab On this tab you can enter overall assessment marks (if this is the lowest level of mark, you will not be able to enter a mark at assessment type level if elements and / or components exist). 13.4 Deferred Assessments If a student is to take an assessment as a first sit in the resit period (or examination period different to the default examination period for that module) then you should to amend the Page 40 of 76 examination period details on the ‘First Attempt’ tab of the ‘Marks Profile’ form as shown below. • Click onto the correct module in the grid • Set the First Attempt year • Set the First Attempt period • Click 13.5 Resits tab – Recording Resit Requirements You can enter resit marks against overall assessment types in this form by clicking into the relevant cell. You should also enter ticks on this form to indicate which assessment type resits the student will be required to resit. The results tab shows the current marks so you will see an against any failed modules which don’t currently have any resit information recorded. • Click onto the ‘Resits Tab’ • Select the module you want to enter resit requirements for from the pick list Page 41 of 76 Select module here. You should enter a tick in the ‘Resit 1’ column assessment (coursework, exam or both) the resit will take. to indicate the type of Note: If the student failed the coursework but the resit will be by exam then you should put the tick against the exam assessment type. If the mark gained in the re-assessment is to be the overall mark for the module (i.e. the student failed the coursework and the exam but is just being required to take a re-sit by exam) then you must also put a tick in the ‘Overall’ box. If the re-sit is just for one assessment type and the original marks for any other assessment types is to stand then just place a tick against the assessment to be re-sat and leave the overall box empty. You must also set the following details: • Select the year in which the re-assessment will take place (12/13) • Select the examination period in which the re-assessment will take place (Aug/Sept) • Select the Appropriate Resit Cap Resit Caps for 2011 UG Assessment Regulations Part I Students No Cap 2nd years and 3rd years on 4 year programmes Lancaster Non Final Year: Cap at 9.0 Final year students • Lancaster Final Year: Cap at 1st Attempt Enter resit examination details in the bottom section of the form. Page 42 of 76 Select the resit year Type resit requirements / notes here. Select the resit examinations period Select the Resit Cap 13.6 Entering Resit Marks For an Individual Student Resit marks for an individual student can be entered on the Resit tab of the Marks Profile form. The ‘Resit Calculator’ button on the right hand side will be activated as soon as you click into a chequered cell. Marks can then be entered as detailed in section 16 Bulk Resit Marks Entry. Page 43 of 76 13.7 Narration Tab Notes will be entered into the Narration tab following outcome of exam boards. Write access to this tab is restricted to the Student Registry. 14 BULK ELEMENT MARKS ENTRY Please keep in mind that the Marks have to be entered on the lowest level available, therefore if a module assessment type has elements and components associated with it then marks will need to be input at the component level. 14.1 Entering Element Marks • Click on the Records menu in the Academics Marks window • Choose Element Mark > Bulk Element Marks Entry • Enter the module Mnemonic in the Mnem Field and press the Tab key to accept it. • See the form populated with data. • Select the Element that you want to enter marks for by clicking on the appropriate row in the ‘Elements with no attached components’ window at the top of the form: Click to select the Element you want to enter marks for • Click into a cell and enter the mark. TIP: If the exam attendance or work submission has not been recorded, the fields for the marks will be read-only (i.e. with the pink stripes background if using default grade colour settings), and you will not be able to add any marks. Page 44 of 76 • Click on the Individual student id in the Student ID column to open that student’s record in Academic Marks. The record will open to the form which is currently set as the default form. 14.2 Excusing an Element Mark To excuse (set aside) an Element mark you will need to display the excused column. This is done by clicking the appropriate cross in the Display Options section of the Bulk Element Marks Entry form. You will now see an excused column. • Click the to indicate that a student is to be excused from and element. In the example below, the student has had the 40% essay excused and therefore the mark for the Group Oral Presentation will count as 100% of the course work assessment type. Tip: To excuse a student totally from an assessment type, then mark all ‘Elements’ linked to that assessment type as ‘Excused’. When you are excusing the mark you should indicate the reason for the mark being excused in the Notes field: click on three dots to open the Edit Notes window and type the explanation there. Click OK when finished. Page 45 of 76 14.3 Excusing An Assessment Type To excuse (set aside) an assessment type then excuse all elements attached to that assessment type as shown below. From the bulk marks entry form this means you will need to click onto each Element separately and then mark it as excused against the relevant student. It may be easier to do this within the students individual ‘Element Marks’ form, see 12.3 above. 14.4 Recording Marker Initials against an element mark You can set the Marker initials by clicking to highlight the relevant student rows (use the shift or ctrl key to select multiple rows), then click on the Set Marker button, type the marker initials in the window that opens – see below, click . 15 BULK COMPONENT MARKS ENTRY Please keep in mind that the Marks have to be entered on the lowest level available, therefore if a module assessment type has elements and components associated with it then marks will need to be input at the component level. You can use the Component entering feature or the Element Marks entry. 15.1 Entering Component Marks • Click on the Records menu in the LUSI window • Choose Component Mark > Bulk Component Marks Entry Page 46 of 76 • See the Bulk Component Marks Entry window open. • Enter the module Mnemonic in the Mnem Field and press the Tab key to accept it. • The form will then be populated: If there is more than one element, click to select the correct one here. • If the module has more than one Element with attached Components, you will need click onto the correct Element in the ‘Elements with components’ window at the top of the form. Tip: The column header will state whether the component is compulsory or elective and how it should be marked. • Enter the marks in the appropriate column. • If a student has not answered all of the required questions and therefore has marks against less than 100% worth of components, click on the marks in’ column to change it to a in the ‘Incomplete – All . The element aggregate mark will then be calculated treating the missing mark(s) as F4/0. • Once you have entered all the marks click save. Page 47 of 76 • You should now see a blue arrow entered and a green arrow against students who have a partial set of marks against students with a full set of marks recorded. Tip: You can only enter marks into a cells filled with a solid block of colour. If you don’t understand why you can’t enter a mark into a cell open the Legend and / or the cell help for assistance. 15.2 Excusing a component mark To excuse (set aside) a component mark you will need to display the excused column. This is done by clicking the appropriate cross in the Display Options section of the form. You will now see an excused column after each component column. Click the cross to the right of the component column to excuse (set aside) that component. In the example below, the student has marks for 75% of the exam and has been excused from 25%. Page 48 of 76 15.3 Excusing an Element which has attached components If the whole element is to be excused then this should be done at element level, see 12.2 above. 15.4 Recording the marker’s initials against components To record markers initials against components you will need to ‘Display Marker Initials Column’ by selecting that ‘Display Option’. • Use the shift and / or ctrl keys to help you select the cells you want to enter the same marks initials into • Click the • type the marker initials in the window that opens • Click button Page 49 of 76 15.5 Recording, viewing and editing notes To record notes against components you will need to ‘Display Notes Column’ by selecting that ‘Display Option’. • Click onto the • Type your notes into the box • Click • You will be able to see if notes exist as you will see the first few letters of the comments in the notes column in any of the notes column to open the ‘Edit Notes’ box Page 50 of 76 15.6 Changing the order in which Component columns are displayed in the marks entry grid This option enables you to change the column order of the components. Alphabetical – this option will order the component columns alphabetically based on the component name. Work ID this option will order the component columns based on the work id (course handbook) which will usually be in the order they have been created in the Course Handbook. Page 51 of 76 16 BULK RESIT MARKS ENTRY FORM If you have more than one student re-sitting a particular module you may choose to use the Bulk Resit Marks Entry method for entering resit marks. This form is accessed via the records menu as shown below: The form will open with the current academic session pre-selected next, • Click into the ‘Mnem’ box and enter the course module mnemonic then hit the tab key. • If the module has more than one cohort select the cohort you want to enter resit marks for from the pick list. You will now see a grid with a line for each assessment type the student is recorded as resitting, (see Section 13.4: Recording Resit Requirements). Example 1 (Almond, Overton in screen shot) The student is required to resit the exam and the original coursework mark will stand. A resit tick has been entered against the coursework assessment type on the Resit tab of the Marks Profile form. There will be one line in the grid for entering the overall exam resit mark. The system will then calculate this mark with the original overall coursework mark to get the actual and given overall aggregate score after resit. Page 52 of 76 Example 2 (Cream Vale, Abercrombie in screen shot) The student is required to resubmit the coursework and the original exam mark will stand. A resit tick has been entered against the exam assessment type only on the Resit tab of the Marks Profile form. There will be one line in the grid for entering the overall coursework resit mark. The system will then calculate this mark with the original overall exam mark to get the actual and given overall aggregate score after resit. Example 3 (DarkGoldenRod, West in screen shot) The student is required to resit by exam and the mark achieved will be taken as the final module mark. Resit ticks have been entered against Exam and Overall on the Resit tab of the Marks Profile form. There will be two lines in the grid for this student and the same mark will be entered into both cells. The Resit marks can be entered in the following ways: • Directly into the chequered cell as a letter grade • Directly into the chequered cell as a percentage • Via the ‘resit calculator’ 16.1 Using the Resit Calculator You will need to use the resit calculator if you have more than one mark, such as separate letter grades for each exam question. To activate the resit calculator click the button. Page 53 of 76 The example below shows what you would put into the calculator to calculate the aggregate score for a resit exam where the student had to answer four equally weighted exam questions, each receiving a letter grade mark: When you click the ‘Total’ will be entered directly into the appropriate cell or cells of the line you were on when you opened the calculator. Where any part of the calculation has been a letter grade then there will just be an aggregate mark calculated as seen here: Where the marks used in the calculation are all numerical i.e. a combination of percentages and ‘out of’s’, then there will be an ‘Actual Mark’ and an ‘Aggregate Mark’ calculated as seen in the following example. Page 54 of 76 Tip: Set the default form to ‘Marks Profile’ whilst you are entering marks and then if you click on a student id number in the bulk entry grid this will open up that student’s record on their marks profile form. This a quick way to check that the marks you’ve entered have calculated as you expected. 17 MARK RELATED FORMS IN OTHER LUSI APPLICATIONS 17.1 CMods Enrolled / Abandoned (Student Record System) This form shows details of the student’s course module enrolments. Enrolments are grouped by academic session with the total weight and / or credit value being shown at the end of each year grouping. Also shown are details of the examination period, the assessment method for the module and the assessment regulations each module will be assessed under. Once you have attended the write access training course will be able to add and amend course module enrolments for your major students. As you can see in the screen shot below, this student started in 10/11 and therefore their first year assessment was under the old regulations and their part II assessment will be under the new regulations. The assessment regulations data will be attached at the point of enrolment and can be edited if required. 17.2 Assessment Proportions (Course Handbook) From 11/12 the ‘Assessment Proportions’ form will show 2 extra columns to indicate how the module will be assessed; if the module will be assessed by grade then there will be a in the ‘Grade’ , if it’s to be assessed by percentage or out of another value then the appropriate number will be in the ‘Out Of’ column. The default values for UG modules will be set as shown below: Page 55 of 76 Default values for PG modules will be set as percentage i.e. out of 100 17.3 Component / Element Work Cmod (Course Handbook) Use this form to create elements for each piece of assessment and then components for each marked section within each element. You should indicate how each will be Element / Component will be assessed; grade, percentage or out of y, the default assessment method will be grade. Elements are shown in the grid at the top of the form. When a particular Element is highlighted the ‘Element Details’ for that element are shown in the bottom left of the form. If an Element had components linked to it then a coloured group number will show in the ‘Group’ column of the Elements grid and, when you click onto that Element the linked Components will be displayed in the ‘Components’ grid in the bottom right of the form. See the screen shot below. Note: The element % worth relates to the % of the assessment type and NOT the % of the module. Page 56 of 76 17.4 Creating Elements Before creating elements it’s always a good idea to check the ‘Assessment Proportions’ form first to ensure that the information recorded there is correct. If you check the ‘Keep Open’ tick box at the top right of the form you can keep referring back to this form easily. • Open the form ‘Component / Element Work Cmod’. • Click the button and a new line will appear in the ‘Elements’ grid: Page 57 of 76 • Populate the ‘Assessment’ column in the grid line by using the to open the pick list and select the appropriate option. • Populate ‘Work Type’ column in the grid line by using the to open the pick list and select the appropriate option • Click into the ‘Name’ cell and type the name of the Element. • Click into the % worth box and enter the % value of that element i.e. if the coursework is made up of two equally weighted essays for each essay element would you would enter 50. • Populate ‘Student Group Applicable to’ column in the grid line by using the to open the pick list and select the appropriate option: • All Students This is the default value and should be used for elements of assessment which will be taken by every student enrolled on the module, if there is just one student who will not be taking this element of assessment then this value should not be used. • Part Yr JYA’s To be used for elements of assessment which will only be taken by JYA students who will be leaving before the summer term and who have therefore been set an alternative assessment. Page 58 of 76 • Full year students only To be used for elements of assessment which will not be taken by part year JYA’s but will be taken by all other students enrolled on the module. • Click into the column ‘ • Enter the Element Details in the bottom left of the form: • Due Date / Time - • Extension Date / Time in this format: dd/mm/yyyy - hh:mm For recording extension details at a later date if required. • Marking method - • Maximum out of y mark Grade, Percentage, Out of y - If marked ‘out of y’ is selected enter value here, for example if the element is to be marked as a % enter 100, if it’s out of 20 enter 20 • Single or Dual Marking - check the appropriate method Page 59 of 76 • If Dual Marking is to be used you will need to indicate whether the agreed mark will be the Mean, Maximum o Minimum. • Check this box if the Element is Elective (refer to the glossary for definition of ‘Elective’). Note: You only need to mark elements as elective if there is more than 100% worth of assessment for one particular student group. In the example shown at the start of this chapter, none of the coursework elements need to be marked as electives. • The ‘Include in calculation’ check box will be ticked as default, remove the tick if this element is not to be included in the calculations. • Staff – If you want to associate a member of staff with the element click to open the staff picker. • Enter the surname of the staff member into the Name box and click button, any matches will appear in a grid below: Page 60 of 76 • Click onto the correct name (there may be more than one match) • Click the button • That member of staff will now be associated with the element. • If the element work is to be submitted electronically via the VLE then the VLE activity of “Advanced File Upload” should be chosen. If not then the VLE activity should be set to “Offline activity” • If a plagiarism tool is to be used then the correct tool should be chosen (as above). 17.5 Creating Components You will need to create a ‘Component’ for every element part that will be given a mark. For example, if you create an Element for an exam paper and students need to answer 5 questions with each question being given a mark you would create a component for each question. If the student has a choice of which questions to answer (i.e. they choose 5 out of 10), then you would create 10 components, 1 for each questions and make them all ‘elective’. Page 61 of 76 • Click onto the ‘Element’ you want to create a component for. • Click the button which you’ll find at the bottom of the form: • A new line will be created in the Components grid and it will be given a group number linking it to its associated Element: • Click into the ‘Name’ cell and type the component name. • Click into the % cell and enter the % value of the component (this is the % value of the Element and not the percentage value of the module). • Inc In Calc – leave ticked if the mark for this component should be included in the calculations. • Elective – Tick if the component is NOT compulsory. • Grade – Leave ticked if the component will be given a grade mark, untick if another marking method will be used. Page 62 of 76 • Out of y – If the component has been identified by the department as one which will be quantitatively marked then enter the numeric value here and ensure that you remove the tick from the grade box. 17.6 Making Module Handbook) Assessments Available On-Line (Course The default position is that assessments will be published to interactive student transcript unless you mark them as unpublished. When you are in the process of setting up Elements and components you may choose not to publish the details until you are happy that the setup is complete. This is managed via an option under the records menu as shown below: • Open the ‘Records’ • Select the option ‘Bulk Module Assessments Available On-Line’ • Select the Session and your Department to populate the grid: Page 63 of 76 • To mark one module as ‘unpublished’ click on the tick left hand side, the will be changed to a in the ‘Publish’ column at the indicating that the assessments for that module will not be published. • You can choose to mark all modules as publish or unpublished by using the buttons on the right hand side of the form: • Please note, you cannot withhold publication of assessment element and components after marks have been published. If marks have been published the indicator in the marks published column will appear in orange as shown here. • You can see in the example below that the assessments for ENGL308 have been marked as unpublished whereas the assessments for ENGL365 are published: Page 64 of 76 18 PUBLISHING ELEMENT MARKS Departments are expected to publish the academic marks for their students. It can be done using the Course Handbook. • Open the LUSI Course Handbook • Click Records menu > Bulk Element Marks Available On-Line – as shown below: • In the window that opens select the Department. Tip: If the Department is pre-selected and already showing, you still need to re-select it to activate the feature. • Choose the module and see all non-exam assessment elements listed. • Tick the ‘Available on-line’ option. Page 65 of 76 Student view When publishing marks online it might be a good idea to check how students will see their marks. You can use the Student View feature which is available via a on the Marks Profile form and the Element Marks Profile form. button • Click the Student View button and login to co-sign using your University login name and password • You will see the students interactive transcript • Element marks which have been published will have against them Note: All marks will be published after module marks release date for each academic year. Page 66 of 76 19 REPORTS 19.1 Checking Resit Requirements The report ‘New Assessment Regulations: Students with Failed Modules and Deferred Assessments’ returns students whose overall module mark is below the pass mark or missing. This report can be used to identify records with missing resit information and to check that resit information that has been recorded is correct and complete. This is a data export report and therefore can be exported into excel where you have flexibility to hide and filter data to suit your requirements. The report can be accessed from Student Records, Academic Marks 2011 or the LUSI Desktop and can be found in the report category ‘Undergraduate Assessment Regulations’. To run the report: • Select the report category ‘Undergraduate Assessment Regulations’ and click Find • Click onto the report title and click select • The report parameters box will appear Page 67 of 76 • Select the Academic Year and Department from the pick lists • Select ‘Scheme’ to see all of your major students with resit requirements • Select ‘Modules’ to see all students needing to resit any of your modules • Select Part I or Part II • The report will run to a grid which you can then export to excel by clicking the button • The columns returned are: o Student ID o Student Name o Student Programme o Year of Programme o Assessment Regulations o Classification Scheme o Domicile – useful for identifying country for possible overseas resits o Residential Category – useful for identifying possible overseas resits o Module o Title o Credit o Overall Mark - will only show prior to resit ticks being entered o First Sit Session - useful for identifying students with deferred assessments o Registered for 1st Resit - shows Y if a resit tick has been entered and will be blank otherwise. • o 1st Resit Session o Registered for 2nd Resit o 2nd Resit Session o Resit Cap Comments – will state if a student is intercalating or enrolled on a module for Audit purposes Page 68 of 76 • To re-size the data columns click into the top left hand square to select the whole document then move your cursor over the column divider (circled below) an double-click • At this point you may wish to ‘hide’ columns you don’t need to see. You can do this by highlighting the columns, right-clicking your mouse and selecting ‘hide’ • Once you have exported the report to excel click onto the Data tab and click ‘Filter’ You may now want to filter data to identify records to be updated; some examples of this are given below: To identify records with missing resit session details. Filter the ‘registered for 1st resit’ column to show records with a ‘y’ and filter the 1st resit session to show ‘blanks’. To identify records needing 1st resit ticks Filter 1st sit session column to exclude deferred assessments (11/12 Aug/Sept, 12/13 Main Summer, 12/13 End of Module) Filter overall mark column to exclude blanks. Page 69 of 76 Once you’ve identified records requiring attention you can create a load list by copying the student id numbers, pasting into notepad and saving as a .lst file. You can then use the ‘open’ facility within Academic Marks 2011 to load the student records into the selection list. Refer to section 13.4 for entering resit information. 20 BULK MARK SHEETS REPORT To run the Bulk Mark Sheets report, open the Report Finder by clicking onto the Reports menu and select Find Report. Type bulk mark into the Search For box then click the Find button: • Click onto Bulk Mark Sheets and click the Select button. You will now be presented with the report parameters screen. In order to make this report as versatile as possible there are a lot of available parameters and selecting the correct parameters is crucial in determining you get the output you want. The following pages describe each parameter to help you with your selection. Page 70 of 76 Bulk Mark Sheets Report Parameter Form (with suggested parameter highlighted) 20.1 Report Parameter Definitions CMod Session (Mandatory) The report will only include CMods enrolled in the year you select. CMod Department If you select a department here then the report will only include CMods administered by the selected department. Page 71 of 76 OR CMod Mnemonic If you enter a mnemonic here then the report will only include the CMod with the entered mnemonic. You do not need to enter a complete cmod mnemonic here, you can choose to use the wild card character %. You may want to use this option if your department uses more than one alpha mnemonic for example GEOG% or alternatively you could enter GEOG2% Major Dept. If you select a department here then the report will be limited to students whose major department is the selected department. OR Programme of Study If you select a programme here then the report will only include students on the selected programme. Student Selection (Mandatory) By default the report includes all students for each module subject to any programme restrictions, but you can optionally also limit the report to a specific student or to a selection list of students. Student ID The single student to whom you want to limit the report. You must have selected 'Single Student by ID' above. Student Selection Your current selection list, or a selection list file. You must have selected 'From Current Selection' above. Student Year SoS If you enter a year of programme here then the report will be restricted to CMod enrolments in that year of programme (e.g. 2 = 2nd years). OR Final Year Students If you tick this box then the report will only include students on the final year of their programme. Page 72 of 76 Assessment Type If you select an assessment type here then the report will only include marks that count towards that assessment type. Data to Include (Mandatory) A blank report can be exported to Excel to create a spreadsheet that can be used with the 'Upload Marks' wizard. Otherwise, you can choose whether the report will show students' first attempt marks or students' current marks. Current marks will include any resit marks. Sheet Per (Mandatory) Determines whether the report produces a sheet per module or a sheet per student. Sheet per module is recommended. If you use sheet per student then you will end up with a very wide report with a column for each assessment of each module being reported. If any assessments in different modules have the same name (e.g. 'Worksheet 1' or '<CMod Mnemonic> Worksheet 1') then some of the columns will be re-used. This works well for Physics! Include Intermediate Assessments Intermediate assessments are assessments where you don’t directly input the mark, instead the mark is calculated. For example, an element is an intermediate mark if it has components as the element mark is calculated from the component marks. If you tick this box, the marks which have been calculated will appear as separate columns next to the input marks which count towards it. Collapse Dual Marker Columns By default, when an assessment is dual marked, two sets of marks / aggregation score columns appear for the assessment to show both marks. If you tick this option then only the combined (first attempt) mark will be shown for dual marked assessments. Exclude Work If you tick this option, it will remove the columns containing element and component marks from the report. Exclude Non-Work This will remove the columns containing assessment type totals and module overall totals from the report. Page 73 of 76 Separate Mark and Aggregation Score Columns If you tick this option you will see separate ‘Mark’ and ‘Aggregation Score’ columns for each assessment instead of just seeing one column containing the ‘Mark’ (if it exists) or the ‘Aggregation Score’ if there’s no input mark. Display Programme This will add a column to the report to show each students' programme of study. Display Year of Programme This will add a column to the report to show the year of programme in which each student is enrolled on each module for which they are included. Display Assessment Regulations Version This will add a column to the report to show the assessment regulations which apply to the student for the module. Display Submission Status (Mandatory) This will add columns to the report to show late and non-submission for each element. Display Overalls at Right (Instead of Left) This will move overall columns to the right of the lower level marks, rather than the left. Include Statistics? (only available in sheet per module mode) (Mandatory) You can add statistics (e.g. median, mean, standard deviation, number of I’s, Iii’s, IIii’s, III’s, Passes and Fails, etc) to each column. This is only possible when you are running the report in sheet-per-module mode. Produce combined statistics for all assessment regulations This will produce a single set of statistics covering all assessment regulations versions. Beware - Statistics upon different types of marks may not be meaningful! Running the report Once you’ve selected the parameters click to run the report. Page 74 of 76 Bulk Mark Sheets report output Click the button shown here to export the report output to excel. Viewing the data in excel To make the report easier to read highlight row 1 of the excel spreadsheet and click the button and select , next click onto to highlight the whole spreadsheet and then double click on one of the column separator lines(i.e. between column A and column B). This will resize each column width and your spreadsheet should then look something like this: Page 75 of 76 21 LEARNING MORE, SERVICE, AND SUPPORT If you have any questions or need further help please email LUSI Support: [email protected] Page 76 of 76