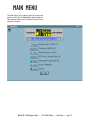
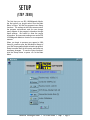
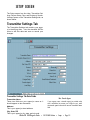
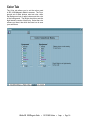
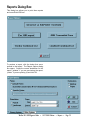
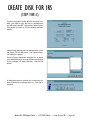
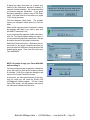
1
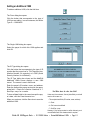
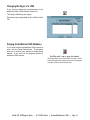
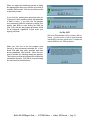
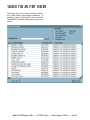
132 Venture Court, Suite 1
Lexington, KY 40511
http://www.tenmast.com
Support:
(877) 359-5492
[email protected]
Marketing:
(877) 836-6278
[email protected]
Fax:
(859) 367-7480
WINTEN IRS 1099/MAGNETIC MEDIA
USER MANUAL VERSION 12/17/2002
FOR PROGRAM VERSION 12/17/2002
©2002 TENMAST SOFTWARE
AND LATER
This page intentionally left blank.
INTRODUCTION
The WinTen IRS 1099/Magnetic Media program is
a data management program designed for use on
computers running the Windows 95, 98, ME, NT, or
2000 operating system. The interface is designed
for use in a Windows environment and includes
point-and-click mouse actions, pull-down menus,
and Windows-based help functions. This manual
contains all of the information you need to use the
WinTen IRS 1099/Magnetic Mediaprogram (hereafter referred to as IRS 1099).
Version Information
This manual is written for the 12/17/2002 release of
IRS 1099/Magnetic Media. It does not apply to previous versions of the program (including MS-DOSbased ones) and some sections may be inaccurate
with regards to later versions.
Whenever Tenmast issues an update to this program, we will notify your agency through email. If
you have a current Update & Support Agreement
for this program, you may download and install
the update through the Tenmast Update Manager
program. During the download and installation
process, Update Manager will notify you of the
changes to the program.
We periodically update this manual to reflect significant changes to the program. You may download
this updated documentation from our Web site at
no charge.
Hint: Downloading Manuals
You can find the current version of this manual
in the Client Service Area of our Web site at
http://www.tenmast.com. All manuals are available in PDF file format. You must have version
4.0 or newer of Adobe Acrobat Reader to open
and print manuals. You can also order printed
copies of the manual through our Marketing/
Communication Services Department.
Getting Help
Though we have made every effort to make this
manual as comprehensive as possible, no document can cover all contingencies. If you encounter problems with IRS 1099/Magnetic Media,
call the Tenmast Training & Support Department
toll-free at (877) 359-5492 or send email to
[email protected].
Revisions
To better serve our clients, we constantly update our
manuals, just as we constantly make improvements
in our programs. If you find an error or omission in
this documentation or have a suggestion for improving it, call the Tenmast Marketing/Communication
Services Department toll-free at (877) 836-6278 or
send email to [email protected].
WinTen IRS 1099/Magnetic Media • 12/17/2002 Edition • Introduction • Page 1.1
WinTen IRS 1099/Magnetic Media • 12/17/2002 Edition • Introduction • Page 1.2
PROGRAM OVERVIEW
The WinTen IRS 1099/Magnetic Media program is
designed to assist you in collecting and processing
the data for your agency’s Form 1099s. The program supports Form 1099-MISC, Form 1098, and
Form 1099-INT.
Unlike most WinTen manuals, this manual is
arranged as a step-by-step set of instructions on
the 1099 submission process. Tenmast realizes
that you submit 1099s only once a year, and this
manual is intended to be the primary resource you
should need for performing this task.
This edition of the manual is for the 2002 tax year.
If you are not processing 1099s for the 2002 tax
year (i.e. it is January 2003) discard this manual
and obtain a copy of the current version from
Tenmast.
1099 Processing Overview
The sequence of tasks in processing your agency’s
1099 forms has four phases:
Phase One
Obtain your agency’s Transmitter Control Code
from the IRS. If you have a Transmitter Control
Code from the 2001 tax year, use that one. If you
do not file 1099s electronically, you do not need
this.
Phase Two
Obtain blank 1099 forms of the correct type and
for the correct printer (laser or dot-matrix). If
you need to order blank 1099 forms, contact Tenmast’s Accounting Department at (877) 359-5492
or [email protected].
Phase Three
Perform your year-end closing procedures in your
Tenmast Accounts Payable and Section 8 Tenant
and Landlord programs. See these programs’ manuals for detailed instructions on these procedures.
Phase Four
Follow the steps presented in this manual to create
your 1099 data file, print your 1099s, and produce
your magnetic media submission disk.
WinTen IRS 1099/Magnetic Media • 12/17/2002 Edition • Program Basics • Page 2.1
Changes to Form 1099-MISC
For the 2001 tax year, the IRS made Form 1099MISC larger. In previous years, three Form 1099s
would fit on an 8.5”x11” sheet of paper. Now, an
8.5”x11” sheet contains two Form 1099-MISCs.
These changes carry over into the 2002 tax year.
Overview of Submission Requirements
The IRS requires you to issue a 1099 form to each
non-corporate payee to whom you have paid $600
or more in the 2002 tax year. IRS regulations allow
exceptions in the cases of corporate entities, but
you should issue a 1099 for any individual to whom
your agency has paid $600 or more.
You are also required to file a 1099 report with
the IRS. As you are probably aware, there are
two methods by which you can submit this data:
paper and magnetic media (diskette). If you are
issuing 250 or more 1099 forms, you must use
the magnetic media submission method for the
IRS. Tenmast recommends that you use magnetic
media to complete your filing with the IRS, regardless of how many payees you have.
Hint: Who doesn’t need a 1099?
• government agencies
• corporations
• charitable religious groups
Regardless of which method of data submission
you use to get your report to the IRS, you must prepare printed 1099 forms for your vendors and your
landlords. You should also keep paper copies of
these forms for your agency’s own records.
Magnetic Media Submission Requirements
Before you can submit magnetic media to the IRS,
you must apply for a Transmitter Control Code
(TCC). You can obtain this by submitting a Form
4419 to the IRS. The Form 4419 is found in IRS
Publication 1220. This document is available in
PDF format on our Web site at:
http://www.tenmast.com/clients/reading/year-end/
If you have already submitted Form 4419 in a previous year, you do not have to apply for a new TCC.
Your previously-issued TCC carries over for the
2002 tax year.
You must enter your agency’s control code in the
IRS 1099/Magnetic Media program’s Setup screen
before you can create your submission diskette.
For more information on how to do this, see the
Setup chapter of this manual.
WinTen IRS 1099/Magnetic Media • 12/17/2002 Edition • Program Basics • Page 2.2
MAIN MENU
The Main Menu is the starting point for using each
function of the IRS 1099/Magnetic Media program.
This manual details each of these functions in its
respective chapter.
WinTen IRS 1099/Magnetic Media • 12/17/2002 Edition • Main Menu • Page 2.3
WinTen IRS 1099/Magnetic Media • 12/17/2002 Edition • Main Menu • Page 2.4
SETUP
(STEP ZERO)
The first time you run IRS 1099/Magnetic Media,
the first option you should select from the Main
Menu is Setup. All WinTen programs have Setup
functions. The settings in the Setup screen control
the program environment, and you can change
many aspects of the program’s operation through
these settings. Be careful to enter the proper
information, as inaccurate settings can cause IRS
1099/Magnetic Media to function in an unexpected
manner.
When you begin to process your agency’s 1099
forms for a new tax year, the individual in charge of
your WinTen programs should review the program’s
Setup to ensure that it is still correct, and make any
necessary changes. To use the Setup functions,
click the Setup button or press <S> at the Main
Menu.
WinTen IRS 1099/Magnetic Media • 12/17/2002 Edition • Setup • Page 3.1
SETUP SCREEN
The Setup screen has four tabs: Transmitter Settings, Payers Setup, Color, and Dir(ectory) Search.
It always opens on the Transmitter Settings tab, as
shown below.
Transmitter Settings Tab
The Transmitter Settings tab contains your agency’s identifying data. Use the standard WinTen
icons to edit this data and save or cancel your
changes.
Transmitter Settings Tab Data Fields
Transmitter Name
These two fields are your agency’s name as it
should appear on tax documents.
Address
This is your agency’s street address.
City, State, ZIP
This is your agency’s city, state, and zip code.
Hint: Transfer Agents
If your agency uses a transfer agent (an outside entity
who is authorized to process your 1099s for you), enter
the transfer agent’s name in the second Transmitter Name
field.
WinTen IRS 1099/Magnetic Media • 12/17/2002 Edition • Setup • Page 3.2
Contact
This is the name of your agency’s primary point of
contact for tax-related issues.
EIN #
This is your agency’s EIN (Employer Identification
Number), as assigned by the IRS.
TCC #
This is your agency’s TCC (Transmitter Control
Code) number, as assigned by the IRS.
Tax Year
This is the tax year for which you are currently processing 1099s.
Foreign Entity
If your agency is a foreign entity that pays income
to one or more US residents, check this box.
Transfer Agent
If your agency uses a transfer agent (an outside
entity who is authorized to process your 1099s for
you), check this box.
Last Filing
If this is your agency’s last year for filing 1099s,
check this box.
Phone #
This is your agency’s phone number.
Hint: Last Filing
You should only check this box if your agency is shutting
down, merging with another agency, or otherwise undergoing a change of status that would result in a new EIN or
TCC # being issued by the IRS.
Phone Ext
This is the extension for the individual whose name
appears in the Contact field.
Name Control
This is your agency’s Payer Name Control, as
assigned by the IRS.
State ID #
This is the state ID number issued to your agency
for inclusion on 1099s, if one has been issued.
State/Federal Combined
If your agency is filing combined state and federal
submissions, check this box.
Hint: Name Control
This is a four-character code on the mail label of the Package 1099 that the IRS mails to your agency each December. The Package 1099 is the package that only contains
instructions for filing paper 1099s. It is not the MMR (Magnetic Media Reporting) packet, which contains instructions
for both paper and electronic submission.
Office Code
If the IRS has assigned your agency an office code
(a code indicating which IRS office must process
your submissions), enter that code here. Otherwise, leave this field blank.
WinTen IRS 1099/Magnetic Media • 12/17/2002 Edition • Setup • Page 3.3
Payers Setup Tab
When you submit 1099s, you must do so for each
“payer” — in IRS terms, each entity that pays
income to US citizens. In the case of most agencies, your agency is the only payer whose 1099s
you need to process, and you can disregard this
tab’s existence. However, some agencies handle
1099 processing for multiple housing authorities. If
this is the case, you need a separate payer record
for each agency whose 1099s you are processing.
The top area of this tab contains a table of each
payer record in the program’s database, along with
that payer’s TIN. The bottom area of the tab
contains the detailed information on the currently
selected payer.
Use the standard WinTen icons to add or delete
payer records, edit existing payer records, and save
or cancel your changes.
NOTE: You cannot edit the payer record that is
for your own agency. You must edit this data on
the Transmitter Settings tab.
WinTen IRS 1099/Magnetic Media • 12/17/2002 Edition • Setup • Page 3.4
Payers Setup Tab Data Fields
Transmitter Name
These two fields are the payer’s name as it should
appear on tax documents.
Address
This is the payer’s street address.
Hint: Transfer Agents
If the payer uses a transfer agent (an outside entity who
is authorized to process the payer’s 1099s for it), enter
the transfer agent’s name in the second Transmitter Name
field.
City, State, ZIP
This is the payer’s city, state, and zip code.
EIN #
This is the payer’s EIN (Employer Identification
Number), as assigned by the IRS.
State ID #
This is the state ID number issued to the payer for
inclusion on 1099s, if one has been issued.
Name Control
This is the payer’s Payer Name Control, as assigned
by the IRS.
Phone #
This is the payer’s phone number.
Phone Ext
This is the extension for the individual who is
the payer’s primary point of contact for tax-related
issues.
State/Federal Combined
If the payer is filing combined state and federal submissions, check this box.
Office Code
If the IRS has assigned the payer an office code (a
code indicating which IRS office must process the
payer’s submissions), enter that code here. Otherwise, leave this field blank.
Last Filing
If this is the payer’s last year for filing 1099s, check
this box.
Transfer Agent
If the payer uses a transfer agent (an outside entity
who is authorized to process the payer’s 1099s for
it), check this box.
Hint: Last Filing
You should only check this box if the payer is shutting
down, merging with another agency, or otherwise undergoing a change of status that would result in a new EIN or
TCC # being issued by the IRS.
WinTen IRS 1099/Magnetic Media • 12/17/2002 Edition • Setup • Page 3.5
Color Tab
The Color tab allows you to set the colors used
in IRS 1099/Magnetic Media’s screens. The Foreground set of radio buttons sets text color, while
the Background set of radio buttons sets the color
of the background. The Bright check box sets the
high-intensity version of that color. Select the color
scheme you want, then click the Save icon to save
your selections.
WinTen IRS 1099/Magnetic Media • 12/17/2002 Edition • Setup • Page 3.6
Dir(ectory) Search Tab
The Dir(ectory) Search tab controls the data areas
from which the IRS 1099/Magnetic Media program
draws payee data. This tab is laid out like a spreadsheet, with each row corresponding to a separate
Tenmast data area.
Each Tenmast data area needs to be entered
on a separate line on this tab. In the Directory
Name field, enter the full path to the data area.
Check the PBL and/or Landlord boxes for that data
area, depending on whether the data area contains
Accounts Payable (vendor) data or Section 8 landlord data. If you have more than one payer set up
on the Payers Setup tab, use the Payer drop-down
selection box to select the payer whose data each
data area contains.
Use the standard WinTen icons to edit the data on
this tab and to save or cancel your changes.
WinTen IRS 1099/Magnetic Media • 12/17/2002 Edition • Setup • Page 3.7
WinTen IRS 1099/Magnetic Media • 12/17/2002 Edition • Setup • Page 3.8
REVIEW/ADD ADDITIONAL 1099S
(STEP ONE)
Once you have ensured that the program is set up
correctly, you need to add records for any payees
to which your agency sent income that (A) require
a 1099 and (B) were never entered in the Accounts
Payable or Section 8 Tenant and Landlord programs. To do this, click the Review button or press
<V> on the Main Menu.
Hint: Why would I need to add an additional 1099?
The most common such situation is one where your agency
sent a vendor a handwritten check and no one ever got
around to entering that vendor’s information in the appropriate program. It’s still taxable income for the recipient, but
it’s not in your database yet.
NOTE: If you have no additional 1099s to enter,
you may skip this step.
WinTen IRS 1099/Magnetic Media • 12/17/2002 Edition • Review/Add Additional 1099s • Page 4.1
ADD/EDIT ADDITIONAL 1099S SCREEN
The Add/Edit Additional 1099s screen contains the
detailed information for one additional 1099. This
screen contains the data fields that appear on the
1099 form that applies to the specified payee.
WinTen IRS 1099/Magnetic Media • 12/17/2002 Edition • Review/Add Additional 1099s • Page 4.2
Adding an Additional 1099
To add an additional 1099, click the Add icon.
The Form dialog box opens.
Click the button that corresponds to the type of
1099 you are adding. In most instances, this will be
Type A — 1099-MISC.
The Single 1099 dialog box opens.
Select the payer for which this 1099 applies and
click OK.
The ID Type dialog box opens.
Click the button that corresponds to the type of ID
number that the payee has: a TIN (Taxpayer Identification Number, for agencies) or a SSN (Social
Security Number, for individuals).
The ID Type dialog box closes and the Add/Edit
Additional 1099s screen displays a new 1099
record. The screen is now in edit mode.
Enter the payee’s ID number, name, and address.
Enter the amount the payee received in the appropriate field: 1. Rents for a Section 8 landlord, or 7.
Non-Emp. comp. for a vendor.
Hint: What about the other data fields?
To clear all data fields in the record except the payer’s data, click the Clear Amounts icon.
Under most circumstances, the only data fields you should
need on this screen are:
When you are done, click the Save icon to save the
additional 1099.
• The recipient data fields (ID number, name, address)
• 1. Rents
• 4. Fed income tax withheld
• 7. Non-Emp. comp.
However, if your fee accountant or auditor instructs you to
use a different field, fill in whatever data is required.
WinTen IRS 1099/Magnetic Media • 12/17/2002 Edition • Review/Add Additional 1099s • Page 4.3
Editing an Existing Additional 1099
To search for an additional 1099 that’s already in
the program, click the Search icon.
The Search for an Item sub-screen opens.
Select the additional 1099 whose record you want
to review or edit and click OK.
The Add/Edit Additional 1099s screen opens on
that record. Use the standard WinTen icons to edit
the data and save or cancel your changes.
WinTen IRS 1099/Magnetic Media • 12/17/2002 Edition • Review/Add Additional 1099s • Page 4.4
Changing the Payer of a 1099
If you need to change the recorded payer of an
additional 1099, click the Reset Payer icon.
The Single 1099 dialog box opens.
Select the payer responsible for this 1099 and click
OK.
Purging the Additional 1099 Database
If you need to delete all additional 1099 records at
once, click the Purge Records icon. The program
asks you to confirm your intention to delete these
records. If you click Yes, the program deletes all
additional 1099 records.
Hint: Why would I want to purge the database?
The most common use of this function is to wipe out additional 1099 records from a previous tax year as you prepare
to process 1099s for the current tax year.
WinTen IRS 1099/Magnetic Media • 12/17/2002 Edition • Review/Add Additional 1099s • Page 4.5
WinTen IRS 1099/Magnetic Media • 12/17/2002 Edition • Review/Add Additional 1099s • Page 4.6
COMBINE 1099 RECORDS
(STEP TWO)
After you have entered all additional 1099s (see
the previous chapter), the next step in preparing
your 1099 data submission is to combine all of your
1099s into one data file. This process pulls 1099
data from each directory listed on the Directory
Search tab of the Setup screen, as well as additional 1099 data, and combines it into one master
list of 1099s. To begin the combining process,
click the Combine button or press <C> at the Main
Menu.
WinTen IRS 1099/Magnetic Media • 12/17/2002 Edition • Combine 1099 Records • Page 5.1
When you begin the combining process, a dialog
box appears that asks you to confirm your intent to
combine 1099 records. Click Yes to continue or No
to abort the process.
If you click Yes, a dialog box opens that asks you
if you want to limit records to those with payments
of $600 or more. If you click Yes, the program
only processes 1099s for recipients to whom your
agency paid $600 or more during the 2002 tax
year. If you click No, the program processes 1099s
for all recipients, regardless of how much your
agency paid them.
Hint: Why $600?
$600 is the IRS-established cutoff for voluntary 1099 processing. You must produce a 1099 for every payee that
received $600 or more in a given tax year. For payees who
received $599.99 or less, 1099s are optional.
When you click Yes or No, the program goes
through a long processing sequence as it combines 1099 data from every specified data area
and the additional 1099 records. When this process is finished, the following dialog box appears.
This informs you that the program has finished the
combination process. Click OK to close this dialog
box and return to the Main Menu.
WinTen IRS 1099/Magnetic Media • 12/17/2002 Edition • Combine 1099 Records • Page 5.2
REVIEW COMBINED 1099 LIST
(STEP THREE)
Once all of your 1099 data has been combined into
one file, you need to review it to ensure that all of
the data is valid. To do this, click the Edit button or
press <E> at the Main Menu to open the Search for
an Item screen.
WinTen IRS 1099/Magnetic Media • 12/17/2002 Edition • Review Combined 1099 List • Page 6.1
SEARCH FOR AN ITEM SCREEN
The Search for an Item screen contains a table of
every 1099 record in the program’s database. To
examine a specific 1099 record, select it and OK.
The Add/Edit Combined 1099s screen opens on its
record.
WinTen IRS 1099/Magnetic Media • 12/17/2002 Edition • Review Combined 1099 List • Page 6.2
ADD/EDIT COMBINED 1099S SCREEN
This screen shows the complete data for one 1099
form. The data fields are those which will appear
on the printed 1099 form.
Review your 1099 data. Use the Previous and Next
icons to scroll between records, or click the Search
icon to return to the Search for an Item screen. If
you find any corrections you need to make to a specific record, use the standard WinTen icons to edit
the data and save or cancel your changes.
WinTen IRS 1099/Magnetic Media • 12/17/2002 Edition • Review Combined 1099 List • Page 6.3
Changing “Printed” Status
At the top left corner of the Add/Edit Combined
1099s screen is a check box labeled “Printed.”
If this box is checked, the program has already
printed the current 1099. When you print a batch
of 1099s, the program prints only those 1099s that
are not marked as printed.
If you print a batch of 1099s and need to re-print
some of them, you must first mark the records in
question as not printed. There are three ways to
unmark the ““printed” status of one or more 1099s.
Printed Status Icon
Click this icon to reset the current 1099’s printed
status.
Printed Status for Type Icon
Click this icon to reset the printed status for all
1099s for a specific type. The Form dialog box
opens. Click the button that corresponds to the
type of 1099 that you want to reset.
Printed Status for Payer Icon
Click this icon to reset the printed status of all
1099s for a specific payer. The Single 1099 dialog
box opens. Select the payer whose 1099s you
want to reset and click OK.
Changing “Submitted” Status
At the top left corner of the Add/Edit Combined
1099s screen is a check box labeled “Submitted.”
If this box is checked, the program has already
placed the current 1099 in a file for submission to
the IRS. When you generate a magnetic media
file for submission, the program includes only those
1099s that are not marked as submitted.
If you need to re-submit some 1099s, you must
first mark the records in question as not submitted. There are four ways to unmark the “submitted”
status of one or more 1099s.
Submitted Status Icon
Click this icon to reset the current 1099’s submitted
status.
Submitted Status for Type Icon
Click this icon to reset the submitted status for all
1099s for a specific type. The Form dialog box
opens. Click the button that corresponds to the
type of 1099 that you want to reset.
WinTen IRS 1099/Magnetic Media • 12/17/2002 Edition • Review Combined 1099 List • Page 6.4
Submitted Status for Payer Icon
Click this icon to reset the submitted status of all
1099s for a specific payer. The Single 1099 dialog
box opens. Select the payer whose 1099s you
want to reset and click OK.
Submitted Status for All Icon
Click this icon to reset the submitted status of all
1099s.
When You’re Done Reviewing
When you’re finished reviewing your 1099s, click
the Exit icon. The program goes through an errorchecking routine, examining each 1099 to ensure
that the IRS’ software will be able to process it. If
the program detects an error, it moves to that 1099
record and informs you of the error. You will not be
able to proceed past this step until you correct each
error that the program finds.
CAUTION
If you modify any data during this step, do not repeat
Step Two: Combine. Combining data after performing Step
Three will overwrite any changes you make during Step
Three.
WinTen IRS 1099/Magnetic Media • 12/17/2002 Edition • Review Combined 1099 List • Page 6.5
WinTen IRS 1099/Magnetic Media • 12/17/2002 Edition • Review Combined 1099 List • Page 6.6
REPORTS
(STEP FOUR)
Now that the program has validated all your data,
you need to print your Pre-1099 report so you can
make a final audit of your 1099 data. Click the
Reports button or press <R> at the Main Menu.
This opens the Reports dialog box.
WinTen IRS 1099/Magnetic Media • 12/17/2002 Edition • Reports • Page 7.1
Reports Dialog Box
This dialog box allows you to print three reports
and one official IRS form.
To produce a report, click the button that corresponds to that report. The Report Options dialog
box opens. Select the correct destination for the
report (“window” if you are previewing the report,
“printer” if you are printing it) and click OK.
WinTen IRS 1099/Magnetic Media • 12/17/2002 Edition • Reports • Page 7.2
Pre-1099 Report
The Pre-1099 report contains details of every
1099 in the combined database (manually entered
1099s, Accounts Payable vendors, and Section 8
landlords). You should print this report and review
it with the utmost attention to detail. Make sure that
every item is correct. If you find any inconsistencies, go back to Step Three and correct the 1099s
in question. Repeat this until the Pre-1099 report
is perfect.
4804/4802 Trans(mittal) Form
The 4804/4802 form is the IRS form with which you
must accompany all magnetic media submissions.
We recommend that you do not print it until you are
ready to send your diskette.
Vendor Combined List
This list details the vendor source information —
the Accounts Payable databases for each data area
— used to create the combined 1099 list. Use
this report if you need to determine how a specific
vendor’s 1099 total breaks down over multiple data
areas.
Landlord Combined List
This list details the landlord source information —
the Section 8 databases for each data area — used
to create the combined 1099 list. Use this report
if you need to determine how a specific landlord’s
1099 total breaks down over multiple data areas.
WinTen IRS 1099/Magnetic Media • 12/17/2002 Edition • Reports • Page 7.3
WinTen IRS 1099/Magnetic Media • 12/17/2002 Edition • Reports • Page 7.4
PRINT 1099S
(STEP FIVE-A)
When the Pre-1099 report is perfect, you are ready
to print your 1099s. Load the blank 1099 forms into
your printer. Then click the Mag button or press
<M> at the Main Menu. This opens the Create
Forms/Files screen.
WinTen IRS 1099/Magnetic Media • 12/17/2002 Edition • Print 1099s • Page 8.1
CREATE FORMS/FILES SCREEN
The Create Forms/Files screen allows you to prepare your actual 1099 forms and data files for distribution to their recipients.
WinTen IRS 1099/Magnetic Media • 12/17/2002 Edition • Print 1099s • Page 8.2
To print 1099s, select the proper radio buttons for
form type (dot-matrix printer forms or laser forms)
and how many 1099s you want to print (those for
a single payer, the one for a single payee, or all
of them). Click the Print 1099s button. The Form
dialog box opens.
Click the button that corresponds to the type of
1099 forms that are currently loaded in your printer.
The Print Order dialog box opens.
If you want to print your 1099s in order of recipient
name, click Yes. If you want to print them in order
of recipient TIN (Taxpayer Identification Number),
click No.
The Report Options dialog box opens. If your blank
1099 forms are not in the printer that is shown
as the default printer, select the Specific Printer
radio button and use the drop-down selection box
to specify the printer that does contain your blank
1099s.
Click OK to print.
Once you have printed all of the 1099s, the program marks their records as printed. If you need
to reprint a specific 1099 or batch of 1099s, go
back to Step Three and change that 1099’s printed
status to “not printed.”
WinTen IRS 1099/Magnetic Media • 12/17/2002 Edition • Print 1099s • Page 8.3
WinTen IRS 1099/Magnetic Media • 12/17/2002 Edition • Print 1099s • Page 8.4
GENERATE MAGNETIC MEDIA FILE
(STEP FIVE-B)
After printing 1099s, your next task is to generate
the magnetic media data file that you will submit to
the IRS. Stay on the Create Forms/Files screen (or
return to it if you exited to the Main Menu).
To generate your magnetic media file, click the All
radio button to specify all 1099s. Then click the
Generate Magnetic Media button.
The screen changes to display your transmitter settings. Review this information to make sure it is
correct. If anything needs to be changed, click
Cancel and return to the Setup screen to make the
necessary changes (see Step One).
WinTen IRS 1099/Magnetic Media • 12/17/2002 Edition • Generate Magnetic Media File • Page 9.1
If all your transmitter information is correct, select
the correct submission file type at the bottom of the
screen and click OK. The program compiles all of
your 1099 data into the magnetic media data file.
When the process is complete, a dialog box opens
that tells you how many 1099s were compiled and
asks if you want to see the total amounts for all of
these records. Click Yes for the totals or No to skip
the totals.
If you click Yes, a dialog box opens that displays
the totals for each income box on the printed 1099
form. Click OK to close it.
NOTE: If the file contains more than one type of
1099, you will see these two dialog boxes once
for each type of 1099 in the file.
A dialog box opens that tells you that your magnetic
media data file has been created. Click OK to close
this dialog box.
WinTen IRS 1099/Magnetic Media • 12/17/2002 Edition • Generate Magnetic Media File • Page 9.2
CREATE DISK FOR IRS
(STEP FIVE-C)
Once the magnetic media data file has been created, you need to copy the file to a diskette that
you will send to the IRS. Stay on the Create Forms/
Files screen (or return to it if you exited to the Main
Menu).
Insert a blank diskette into your diskette drive. Click
the Create File for IRS button. The Choose Directory dialog box opens.
Use the Drives drop-down selection box to select
your diskette drive (A: on most Windows computers
if you’re using a 3.5” floppy diskette). Click the OK
button.
A dialog box opens to remind you to load your diskette if you have not already done so. Click OK to
continue.
WinTen IRS 1099/Magnetic Media • 12/17/2002 Edition • Create Disk for IRS • Page 10.1
A dialog box opens that asks you to select your
method of file submission: electronic (modem) or
magnetic (mailed diskette). We recommend that
you perform magnetic submission. If you prefer
electronic submission, obtain a copy of IRS Publication 1220 and follow the instructions on pages
77-83 of that document.
Click the Magnetic (Mail) button. The program
copies your magnetic media data file to the diskette.
When the file copying process is complete, a dialog
box appears that asks if you want to print your
4804/4802 Transmitter Form.
If you are performing magnetic media submission,
click Yes. The Report Options dialog box opens. If
you are performing electronic submission, click No
and ignore the rest of this page’s instructions.
Select the Printer radio button. Make sure the correct printer for the report is selected and that you
have removed the 1099 forms from that printer and
loaded regular paper. Then click OK to print your
Form 4804/4802.
NOTE: Be certain to sign your Form 4804/4802
before mailing it.
Once the printing process is complete, a dialog box
opens that tells you that the file creation process
is complete. Click OK to close this dialog box and
return to the Create Forms/Files screen.
At this point, you have performed all of the functions for which you will need the WinTen IRS
1099/Magnetic Media program. Exit the Create
Forms/Files screen, exit the program, and remove
the submission diskette from the drive.
WinTen IRS 1099/Magnetic Media • 12/17/2002 Edition • Create Disk for IRS • Page 10.2
MAIL THE DISKETTE
(STEP SIX)
Label the diskette with your agency’s name and
Transmitter Control Code (TCC). For details on the
proper layout of this label, see the documentation
that you received with your TCC assignment.
Mail the diskette and your signed Form 4804/4802
to:
IRS — Martinsburg Computing Center
Information Reporting Program
230 Murall Drive
Kearneysville, WV 25430
Hint: TCC Diskette Label Format
If you don’t have your TCC documentation any longer, you
can get the diskette label format specifications from our
Web site at:
http://www.tenmast.com/clients/reading/year-end/
We recommend that you use a cardboard diskette
mailing envelope, available at most office supply
stores, to minimize the danger of damage to your
diskette.
WinTen IRS 1099/Magnetic Media • 12/17/2002 Edition • Mail Diskette • Page 11.1