1
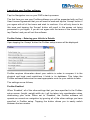
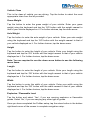
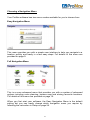
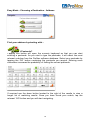
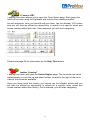
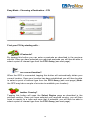
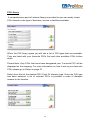
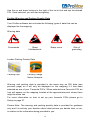
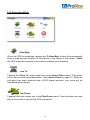
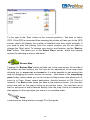
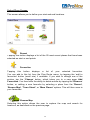
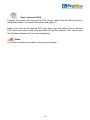
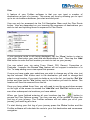
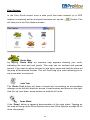
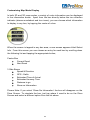
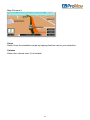
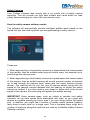
Navigation Software
User Manual
PRONAV SETUP………………………… ............................................... 4
NAVIGATION SETUP ............................................................................. 7
CHOOSE A NAVIGATION MENU .............................................................. 8
EASY NAVIGATION MENU ..................................................................... 9
Choose an Address ................................................................... 10
Choose a Point of Interest .......................................................... 12
POI Library................................................................................. 10
Warnings & PCN data ................................................................ 12
FULL NAVIGATION MENU .................................................................... 15
Follow Map ................................................................................ 15
Drive To ..................................................................................... 15
Plan Route ................................................................................. 15
Browse Map ............................................................................... 16
SELECT PLACE .................................................................................. 17
Favourites .................................................................................. 17
Town, Street, House .................................................................. 18
Point of Interest (POI) ................................................................ 19
VIA'S ................................................................................................ 20
PLAN OPTIONS .................................................................................. 22
Route Map ................................................................................. 22
Route Text ................................................................................. 22
Demo ......................................................................................... 22
DRIVE SCREEN AND MAP OPTIONS ..................................................... 23
Night Colors ............................................................................... 25
Guide Mode / Map Mode ............................................................ 25
2D/3D Display ............................................................................ 25
Alternate .................................................................................... 26
SETUP .............................................................................................. 27
ProNav....................................................................................... 27
POI's .......................................................................................... 27
Language ................................................................................... 27
Route Options ............................................................................ 28
Avoid Tolls ................................................................................. 28
Map/Drive Options ..................................................................... 28
Map Colour Schemes................................................................. 28
Voices ........................................................................................ 28
SAFETY CAMERA ALERTS ................................................................... 32
Registering for free trial .............................................................. 34
2
IMPORTANT SAFETY NOTICE
PLEASE READ CAREFULLY BEFORE COMMENCING
USE OF YOUR PRONAV NAVIGATION SOFTWARE
Do not place your Personal Navigation Device (“PND”) where it
may strike the driver or passengers if the vehicle turns sharply or
stops abruptly. Your PND should be installed securely so it will
not move and cause a distraction. Cables and hardware should
not interfere with driving and use of normal vehicle controls. Try
to locate the PND as close to your normal line of sight as possible
without obscuring your normal view of the road.
Safe control of your vehicle is of paramount importance. Program
your destination and configure your chosen drive screen and
options before starting your journey. For safety reasons DO NOT
interact with your device until you have reached your destination
or you have pulled over and it is safe to do so.
All routing suggestions are advisory and may not take account of
all temporary or permanent traffic control measures or
restrictions. Disregard any suggestion that is hazardous, or does
not comply with posted road signs or is otherwise illegal. Keep
your eyes on the road and comply with all traffic laws at all times.
Your personal judgment and common sense should always
prevail over any instruction received through the use of this
software. Navevo cannot be held responsible for any loss,
damage or harm (direct or otherwise) caused as result of using
the software or placing any reliance on the information provided
to you while using the software.
3
Launching your ProNav software
Tap the Navigation icon on your PND’s start-up screen.
The first time you use your ProNav software you will be presented with an End
User License Agreement that you will need to read and tap the ‘Accept’ button if
you agree with all of the terms and wish to continue. You will only have to do
this once and tapping the ‘Accept’ button will result in this screen not being
presented to you again. If you do not agree with the terms of the license then
tap ‘Decline’ and you will exit the software.
ProNav Setup – Entering your Vehicle‟s Details
Upon tapping the ‘Accept’ button the ProNav setup screen will be displayed.
ProNav requires information about your vehicle in order to compare it to the
physical and legal road restrictions it holds in its database. This helps the
ProNav software determine the most appropriate route for your vehicle to take.
The settings are as follows;
ProNav Enabled
When ‘Enabled’, all of the other settings that you have specified in the ProNav
setup screen (height, weight width etc.) will be taken into consideration when
determining your route. When set to ‘Disabled’, the ProNav software will
operate as normal car navigation by ignoring all of the other settings you have
specified in ProNav setup. Tapping the button allows you to easily switch
between the two modes.
4
Shows Icons on Map
When set to ‘Yes’, any restriction that relates to your vehicle information will be
displayed as an icon on the mapping. When set to ‘No’, no icons will be shown.
The icons used are as follows;
Height
Width
Weight
Length
No Trucks Allowed
Weight Per Axle
Explosive/Corrosive
Goods
Favour Preferred HGV Routes
The ProNav database also includes roads that are preferable for use by Heavy
Good Vehicles. When set to ‘Yes’, these routes will be used in preference when
determining your route. These routes are identified by the following icon;
Preferred HGV
Routes
When set to ‘No’, these roads might still be used when determining your route
but not necessarily in preference to other roads.
5
Vehicle Class
This is the class of vehicle you are driving. Tap the button to select the most
appropriate class from the list provided.
Gross Weight
Tap the button to enter the gross weight of your vehicle. Enter your gross
weight using the keyboard and tap the ‘GO’ button with the weight nearest to
that of your vehicle displayed on it. For further choices, tap the down arrow.
Axle Weight
Tap the button to enter the axle weight of your vehicle. Enter your axle weight
using the keyboard and tap the ‘GO’ button with the weight nearest to that of
your vehicle displayed on it. For further choices, tap the down arrow.
Height
Tap the button to enter the height of your vehicle. Enter your height using the
keyboard and tap the ‘GO’ button with the height nearest to that of your vehicle
displayed on it. For further choices, tap the down arrow.
Note: You are required to use the down arrow button to see the following
menu items.
Length
Tap the button to enter the length of your vehicle. Enter your length using the
keyboard and tap the ‘GO’ button with the length nearest to that of your vehicle
displayed on it. For further choices, tap the down arrow.
Width
Tap the button to enter the width of your vehicle. Enter your width using the
keyboard and tap the ‘GO’ button with the width nearest to that of your vehicle
displayed on it. For further choices, tap the down arrow.
Explosive / Flammable Load
Tap the button and select ‘Yes’, if you are carrying explosive or flammable
goods. Select ‘No’, if you are carrying any other type of goods.
Once you have completed the ProNav setup, tap the return button in the bottom
right hand corner of the screen to complete navigation setup.
6
IMPORTANT: You will be shown the ProNav setup screen each and every
time you start the software. Please check carefully that the details
displayed in the ProNav setup screen match that of the vehicle you are
driving. Any failure to do so could mean that an incorrect route is
determined for your vehicle.
Navigation Setup
Choose your language
Your ProNav software comes with a choice of languages, please select the
language you require by tapping the appropriate button. You will only be
required to do this once but you can change your selection later if you wish,
please see Setup on page 27 for more details.
Read the Safety Notice
Please read the safety instructions and if you accept the terms and conditions,
tap the ‘Accept’ button to go to the Country Selection screen. Selecting
‘Decline’ will result in the software exiting.
Choose your Country
Finally select the country you require by tapping the appropriate button. You will
only be required to do this once but you can change your selection later if you
wish.
You have now completed setup of your ProNav software and the Easy
Navigation Menu will now be displayed.
7
Choosing a Navigation Menu
Your ProNav software has two menu modes available for you to choose from.
Easy Navigation Menu
This menu provides you with a simple user interface to help you navigate to a
location quickly and easily in a few easy steps. Full details of this menu are
provided on page 9.
Full Navigation Menu
This is a more advanced menu that provides you with a number of advanced
options including route planning, browse map and storing favourite locations.
Full details of this menu are provided on page 15.
When you first start your software, the Easy Navigation Menu is the default
setting but you can easily change which navigation menu you require by
following the instruction in Setup on page 28.
8
Easy Navigation Menu
Where would you like to go…
An Address?
Select this if you wish to drive to a particular country, city or town, street, house
number or postcode. See ‘Address‟ in Choosing a Destination in the next
section.
A Point of Interest?
Select this if you wish to drive to a point of interest such as a petrol station or
restaurant. See „POI‟ in Choosing a Destination in the next section.
Or Just Drive?
When the GPS is connected, tapping this button will automatically show a map
with the location of the vehicle in the center of the screen. (Note: the GPS may
take a couple of minutes to establish your location).
Setup
Tap this button to enter Setup. Please see page 27 for more details.
Exit
Tap this button to exit the software.
9
Easy Mode - Choosing a Destination - Address
Find your address by starting with…
A Postcode?
Tapping this button will open the numeric keyboard so that you can start
entering a postcode. As you start to type the postcode, it will select the most
relevant matches from the ProNav software database. Select your postcode by
tapping the ‘GO’ button containing the postcode you require. Entering more
characters increases the probability of finding the correct postcode.
If required use the down button located to the right of the results to view a
longer list of matching results. Once you have found your match, tap the
relevant ‘GO’ button and you will start navigating.
10
A Town in GB?
Tapping this button allows you to open the Town Select page. Start typing the
name of the town using the keyboard and choose from results provided.
As with postcode, once you have found your town, tap the relevant ‘GO’ button
and you will then be offered an opportunity to search for a specific street and
house number within that town. Once selected, you will start navigating.
Please see page 29 for information on the Help Tips feature
Another Country?
Tapping this button will open the Select Region page. The countries are listed
alphabetically, so use the up and down buttons located to the right of the list to
view all the countries available.
Once you have found the country you require tap the relevant button and you
will then be offered an opportunity to search for a specific town, street and
house number within that country. Once selected, you will start navigating.
11
Easy Mode - Choosing a Destination – POI
Find your POI by starting with…
A Postcode?
By tapping this button you can enter a postcode as described in the previous
section. Once you have selected your required postcode you will then be able to
select a point of interest type from the POI Library (see next page).
Your current location?
When the GPS is connected, tapping this button will automatically obtain your
current location. Once your location has been established you will then be able
to select a point of interest type from the POI Library (see next page) (Note:
the GPS may take a couple of minutes to establish your location).
Another Country?
Tapping this button will open the Select Region page as described in the
previous section. Once you have selected your required country, you will then
need to search for a town and once that is selected, you will then be able to
select a point of interest type from the POI Library (see next page).
12
POI Library
A comprehensive point of interest library is provided so you can esaily locate
POI’s based on the type of business, service or facilities available.
When the POI library opens you will see a list of POI types that are available.
They are listed with your favourite POI’s first and other available POI’s further
down.
Please Note: Only POI’s that have been designated your ‘Favourite POI’ will be
displayed on the mapping. For more information on how to set up your favourite
POI’s please go to Setup on page 27.
Select from the list the desired POI (Point Of Interest) type. Once the POI type
has been selected, a list of relevant POI’s is provided in order of distance
nearest to the location.
13
Use the up and down buttons to the right of the list to find and tap the desired
POI. Once selected, you will start navigating.
ProNav Warning and Parking Penalty Data
Your ProNav software also includes the following types of data that can be
displayed on the mapping;
Warning data
Crosswinds
Steep
hills/descents
Sharp curve
Risk of
grounding
London Parking Penalty Data
Parking Pips
Penalty Charge
Notice Hotspots
Warning and parking data is provided in the same way as POI data (see
previous page) so it will only be displayed on the mapping if it has been
selected as one of your ‘Favourite POI’s’. When selected as a Favourite POI, an
icon will appear on the mapping located at the approximate point where there
might be some risk.
For more information on how to set up your favourite POI’s please go to
Setup on page 27.
Please Note: The warning and parking penalty data is provided for guidance
only and it is entirely your decision about what actions you decide take, or not,
in relation to the information being provided to you.
14
Full Navigation Mode
Follow Map
When the GPS is connected, tapping the ‘Follow Map‟ button will automatically
show a map with the location of the vehicle in the center of the screen. (Note:
the GPS may take a couple of minutes to establish your location).
Drive To
Tapping the 'Drive To' button takes you to the Select Place menu. This allows
you to set your end point/destination. (See Select Place on page 17) When an
end point has been selected and a GPS signal received, your route will be
calculated automatically.
Plan Route
Tapping this button takes you to the Plan Route menu. From this menu you can
plan a route with or without the GPS connected.
15
To the right of the ‘Start’ button is the <current position>. Tap here to check
GPS. If the GPS is connected then pressing this button will take you to the GPS
screen, which will display the number of satellites and their signal strength. If
you wish to plan the journey from the current position you do not need to
change the ‘Start’ point. To change your start or end location, tap the 'Start or
End' button. This takes you to the Select Place screen, which has several
options for selecting a start or end point.
Browse Map
Tapping the 'Browse Map' button will take you to the map screen. At the side of
the screen are four buttons, the first two are for adjustment of the map scale
allowing you to, zoom out, and zoom in. It is also possible to pan around the
map by dragging the stylus across the screen. Next there is the magnifying
glass button (which takes you to the Locate on Map screen and allows you to
zoom to a Town, Street, recent destination, favorite location or POI (Point of
Interest). The Back button takes you back to the previous screen. You can also
press and hold on the map to bring up an options menu. You can then set a
start or end point or add a favorite directly from the map. Points of Interest will
also appear on the map when you zoom in to a suitable scale.
Setup
Please see the Setup section on page 27 of this guide.
16
Select Place Screen
This screen allows you to define your start and end locations.
Recent
Tapping this button displays a list of the 20 most recent places that have been
selected as start or end points.
Favourites
Tapping this button displays a list of your selected favourites.
You can add to this list from the Plan Route menu, by tapping the ‘add to
favourites’ button (small star) if available. If you wish to change one of the
entries, tap the „Change‟ button, which takes you to a new page Add
Favourites. You then have the ability to delete entries by tapping the „Remove‟
button, or adding a new favourite by selecting a place from the 'Recent’,
„Browse Map', 'Town Street', or 'More Places' options. This will then save to
your favourites.
Browse Map
Selecting this option allows the user to explore the map and search for
locations, as described on the previous page.
17
Town, Street
Tapping this button will take you to the Town selection page. You can then
enter a town or place. As you type the name, the software will start selecting the
most relevant matches from the ProNav software database. Entering more
characters increases the probability of selecting the correct place. If required,
the suggested options can be ignored and the full place name typed in. If there
are a number of places with the same name you can use the buttons on the
right to scroll up and down the list until you find your required location.
When the Town is listed, tap the ‘GO’ button containing the town name. You are
then taken on to a second screen titled Street which allows you to select
whether you would like to either enter a street name, route to a town center, or
a POI (Point of Interest).
Street – If you know the name of the street use the keyboard to start typing the
name of the street in much the same way as described above for the town
selection screen. When the street is listed, tap the ‘GO’ button containing the
street name required.
Note: If you are searching for a street which has a direction as part of the name
e.g. North 49th Street, start you search only with the street name ‘49th Street and
when the results appear you will be giving the option to choose either the North
or South version of the street. Long streets may be broken up into several
sections and so appear more than once in the list.
House Number – Once you have selected your street name you will be given
the option to choose a house number. Just enter the house number using the
numeric keyboard and when it appears press the relevant ‘GO’ button.
18
Point of Interest (POI)
Tapping this button will bring up the POI Library, which lists all of the Points of
Interest available. For more information see page 13.
Select from the list the desired POI type, then type the name of your desired
POI. Once you have found your desired POI tap the relevant ‘GO’ button and
the ProNav software will then start navigating.
Back
This button will take you back to the previous screen.
19
Vias
A feature of your ProNav software is that you can input a number of
destinations as part of a journey. This saves you time by allowing you to input
up to six via locations between your start and end point.
Vias can only be accessed via the Full Navigation Menu and the Plan Route
button. Vias are dependant on you knowing the sequence of destinations you
wish to visit and inputting those in sequence in Plan Route.
If your previous route is still being displayed, tap the „Clear‟ button to start a
new route. Next enter your start and end destinations first. Then tap the „Add
Via‟ button to enter the first location you wish to visit on your journey.
You can select your via using Town, Street, POI, Recent, Favourites or
Postcode , however the Browse Map feature will not support a selection of a
Via. To keep adding more vias repeat this process.
If once you have made your selections you wish to change any of the vias, just
tap the relevant „Via‟ button next to the destination you wish to change and
select a new location. If you wish to delete a via in the list, just tap the „Del Via‟
button and then tap the „Via‟ button next to the location you wish to delete. The
location will then be removed from the list.
Once you have added three Vias, you will need to use the up and down arrows
on the right of the screen to access the „Add Via‟ and „Del Via‟ buttons and to
see other subsequent via locations you have added.
When you have finished entering all your locations tap the
button to
access the Plan Options screen. You can use any of the options to show the
first leg of your journey. The ProNav software will not show you all of your
journey, just each leg at a time.
To start driving your first leg of your journey press the „Drive‟ button and the
ProNav software will calculate the route to your first destination and commence
navigation.
20
When you have reached your first destination, tap the Drive Screen to open the
Drive Options Screen (see page 25 for more information) and tap ‘Stop Drive‟.
You will then be presented with a confirmation if you wish to go to the next leg
of your journey.
If you select ‘No’ you will return to the Plan Route screen
If you select ‘Yes’, you will then go to the Plan Options screen. At this point your
ProNav software has been designed that if you turn off your PND off using the
main power button, the next leg of your route will be stored.
When you are ready to continue to your next location, turn the PND’s back on
and when the Plan Options screen is displayed, tap the „Drive‟ button. The
ProNav software will now calculate the route to your next destination and
commence navigation.
Repeat this process throughout your journey.
Please Note: It is not necessary to switch off the device between each leg of the
journey if it is not required.
21
Plan Options
In the Plan Route screen once a start point has been entered (or a GPS
location is acquired) and an end point has been set, tap the
will take you to the Plan Options screen.
button. This
Route Map
By tapping „Route Map‟ an overview map appears showing your route,
indicating the start and end points. This map can be zoomed and panned
around. If you wish to adjust the start or end point, press and hold the stylus on
the map at the desired location. This will then bring up a menu allowing you to
set a new start or end point.
Route Text
The „Route Text‟ button will show a simple text list showing an accumulative
mileage on the left with direction arrows, a road number and name on the right.
Use the ‘up’ and ‘down’ arrow buttons to read the full route.
Demo Mode
If the „Demo‟ button is tapped a demonstration of the route starts. Tapping on
the map will bring up the Drive Options menu (see Drive Options on page 25 for
more information).
22
Clear Route
This allows the user to clear an existing route.
Drive Screen
3D map display is the default view.
2D map display is optional
Guide mode (no mapping) is optional
23
Customizing Map Mode Display
In both 2D and 3D map modes, a variety of route information can be displayed
in the information boxes. Apart from the box directly below the turn direction
indicator (shows roundabout and turn icons), you can choose which information
to display in any box, by tapping the centre of a box.
When the screen is tapped in any box area, a new screen appears titled Select
Info. From this screen you can choose an entry for each box by scrolling down
the following list and tapping the appropriate button;
Centre Box
Current Road
Next Road
3 Side Boxes
Speed & Direction
GPS - Satfix
Estimated Time of Arrival
Estimated Journey Time
Distance to go
Show no Information
Please Note: If you select ‘Show No Information’ the box will disappear on the
Drive Screen. To reinstate the box, just tap where it used to be on the Drive
Screen and select a different option from the list above.
24
Drive Options
The options can be accessed by tapping on the top two thirds of the map on the
Drive Screen, which takes you to the Drive Options screen.
You can configure several options as follows;
Night Colors
This changes the background colour of the map and guide screen for better
visibility at night. It also reduces glare.
Guide Mode / Map Mode
This button allows you to change the navigation screen between Map Mode and
the Guide Mode.
2D/3D Display
You can select the map view to display in either 2D or 3D map mode, tap on the
display button to change.
25
Alternate
Tapping this button takes you to a further screen called Avoid/Alternate which
displays the following options:
1 Mile
This button can only be used when a route has been calculated, and
when tapped allows the user to avoid the current road within a mile of
present GPS position (if possible to do so), for example to avoid
congestion or road works.
5 miles
This button is as above but the radius for an alternative route is
increased to 5 miles of the current point (if possible to do so).
Named roads
This button when tapped displays all the road numbers on your route.
The user then has the option to select a particular road that they wish
to avoid and the software will then recalculate the route avoiding the
selected road.
Original
This button allows the user to return to the original route that was
calculated if the user has selected any of the alternate options above.
Mute / Unmute
Tap ‘Mute’ button to turn voice instructions off. If you then wish to turn voice
back on, return to this screen and tap the ‘Unmute’ button which will be in the
same place.
Stop
This stops the Drive Mode and returns the user to the main menu.
26
Setup
Tapping the 'Setup' button takes you to the Setup main menu, which has
several options:
GPS
Selecting this option displays GPS signal status.
POI
Selecting this option allows you to enable which POI types are shown as ‘Your
Favourites’. Only POI’s you have selected as Favourites will be displayed on
the mapping.
You can select any POI as a favorite by simply by tapping it to tick the box and
deselect it by tapping it again. When you exit the POI section your changes will
be saved.
ProNav
This will take you to the ProNav setup screen describe at the beginning of this
manual.
Safety Cameras
See page 32 for more details
Language
This will allow you to change the language of the ProNav software. Upon
selecting the language the menu, text and voice instructions will change
accordingly.
About
Gives software version information
Tap the
down arrow to see more options
27
Route Options
Route Type
Select required type of routing:
Fastest
Tapping this box provides the fastest route
Prefer Main
Tapping this box provides a route which prefers use of motorways
and main roads including primary and A roads
Avoid Motorway
Tapping this box provides a route which avoids Motorways
Shortest
Tapping this box provides the shortest route measured by driving
distance
Interface Mode
Select either the Easy or Full menu modes
Avoid Tolls
Tap this box to avoid tolls on your route. Should a start or end point be selected
that is on a toll road this will be ignored.
Show key roads
Tapping this box lists all the classified roads the route will take after your route
is calculated.
Map/Drive Options
2D/3D
Select the preferred view
Miles and KM
Tap the appropriate box to select whether you would like your distances shown
in miles or km.
28
Help
Your ProNav software is equipped with an on-screen help guide to give tips
when you in-put an address. When you first use your ProNav software, the help
feature is enabled.
To hide the help tips tick the box in the bottom left hand corner. To enable help
tips, go to Setup and scroll down to the ‘Hide Help Tips’ button and un-tick the
button.
Favourites
Please see page 17 for more information.
Color Scheme
There are several colour schemes to choose from. Just tap the button to enable
the colour scheme you require.
Map Scheme 1
29
Map Scheme 2
Map Scheme 3
Map Scheme 4
30
Map Scheme 5
Voice
Select from the available voices by tapping the box next to your selection.
Volume
Select the volume level (3 is loudest)
31
Safety Cameras
Your ProNav software also comes with a six month trial of safety camera
warnings. This will provide you with both audible and visual alerts for fixed
safety cameras along your route (UK road network only).
How the safety camera software works
The software will automatically provide intelligent audible alerts based on the
speed that you are traveling when you are approaching a safety camera.
These are;
1. When approaching a fixed safety camera at a speed below the known speed
of the camera, then an audible sonar ping will sound every five seconds up to
and through the camera zone.
2. When approaching a fixed safety camera at a speed above the known speed
of the camera, then an audible warning will sound a preset number of seconds
up to and through the camera zone, along with the visual warning (shown
above). The warning will tell you the type of camera ahead, along with the
speed of the camera, camera distance and the bearing on where the safety
camera is located. If you then reduce your speed to below that of the known
speed of the camera, the sonar ping will replace the audible warning.
IMPORTANT Some camera types, such as mobile or variable limit safety
cameras, do not have speed limits associated with them so you might well
receive an audible warning for those even if you are driving below the speed
limit. In addition, you might find a number of mobile safety camera locations
fairly close to each other on a single road. This is because there might be a
number of locations along that road that are used by the Mobile Safety Camera
Detection vehicles.
32
Setting the options for safety cameras
There are a number of options available when using the safety camera software
and these are located under „Setup‟, ‘Safety Cameras’ in the Full Navigation
mode.
The options available are:
Enabled / Disabled
This will turn the safety camera software on or off. Please note that if this is set
to ‘Disabled’ you will not receive any visual or audible alerts for any safety
cameras on your route. Tap the button to change.
Warn At 5 Secs
This will allow you to change the time that you receive the first warning before
you reach a safety camera. The options are ‘No Warning’, ‘Warn at 5 Seconds’,
‘Warn at 10 Seconds’, ‘Warn at 15 Seconds’ and ‘Warn at 20 Seconds’.
Smart Warnings
When this is set to ‘ON,’ this will warn you about safety cameras on your side of
the road only. When set to ‘OFF’ the safety camera software will warn you
about cameras on both sides of the road.
Show on Map
When this is enabled, the safety camera icon
depicting the location of a
safety camera will be shown on your map while you drive. To disable please tap
the button to select ‘Don’t Show on Map’
Show on Camera Bearing/Distance/Speed Limit
By tapping this button you can cycle through three choices of how you want the
safety camera visual warning to look like (image shown on previous page).
Whichever of the three choices you decide, it will be the feature that will be
displayed on the largest information box on the visual warning page, with the
other two features displayed on the two smaller boxes.
Warning Sounds
This will turn the audible alerts on or off. Tapping the button will change it
accordingly.
33
View Info
This will tell you when your subscription is due to expire and the date that your
safety camera database was created. Click OK to return.
Registering for your six month free trial
From when you first use your ProNav software you will have an initial 14 days
free trial to use the safety camera alerts. To receive your full six months trial you
will need to go to www.pronav.co.uk to register and download a license to
give you your six month free trial.
Please Note: After your six month trial has expired, the safety camera software
and database will be disabled until such time you purchase a full license (please
see details below).
Upgrade to a full license to get monthly camera location updates as well
Don’t get caught out! From as little as £29.95 per year you can get a monthly
update of the latest safety camera locations. You can also map upgrades and
European packages for safety cameras and mapping. Please go to
www.pronav.co.uk for more information and to purchase an upgrade.
34