1
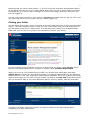
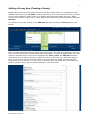
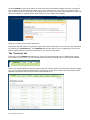
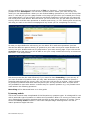
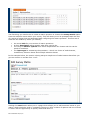
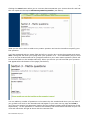
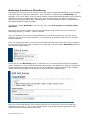
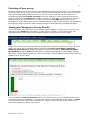
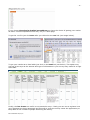
-1-
PloneSurvey User Guide (draft 3)
This short document will hopefully contain enough information to allow people to begin
creating simple surveys using the new Plone online survey tool.
Caveat
PloneSurvey has the potential to be an extremely powerful alternative to the existing email
form system but it is a developing tool and as such may not be appropriate for all users or all
kinds of survey in its current incarnation. As time goes on more features will become available
and the robustness of the survey will increase. This process of improvement is a two-way one
and the Web team would appreciate input and suggestions from users with specific research
requirements or from users who have issues with the interface.
Scope
At the moment PloneSurvey is capable of offering users the ability to create online surveys
with some distinct advantages, including:
•
•
•
•
You can create these surveys from any computer with an internet connection and a web
browser.
You don’t need to be familiar with HTML or web page design.
PloneSurvey can cope with more complex question formats like branching.
PloneSurvey can output your survey data in a variety of useful file formats that are
compatible with programs like Excel.
Things you’ll need to have or know before you can get started
1) In order to be able to create your PloneSurvey you’ll need to be able to log into Plone
and in order to be able to do that you’ll need to have an individual Web account. It is
enough to simply own a web account you will not be asked for the password for that
account as you will log on to Plone using your normal CFS password – however do not
lose your web account or its password as you may need them for non-Plone related web
activities. You can find information on getting a web account at:
http://www.le.ac.uk/webcentre/maintainit/accounts.html
2) You will need an area on the Plone system in which you can create your survey. This
will need to be negotiated with either your Departmental Web maintainer or the central
Web team. Typically, what will happen is that an area will be created for your
department on the Plone system and you will be given ‘Manager’ permissions on a
folder within that space. Once you have this area and the permissions you are free to
create your survey.
3) You need to have a plan – an idea and some detail about the survey you intend to
create. This could be anything from a pad of paper with some questions scribbled on it
to a detailed document where you’ve outlined every question; thought about the
structure and any branching you may have, and have already worked out introductions
and thank you messages for people completing the survey. It’s doubly difficult trying to
develop a survey if you are struggling at the same time with learning a new interface or
technology. Make life easier for yourself and do the ground-work before you even go
anywhere near PloneSurvey.
Ben Coulthard 25/01/07
-2-
Getting started
The first thing you need to do is open a browser and visit the University of Leicester
Plone CMS homepage which is at:
http://www2.le.ac.uk/
You should see a page that looks like the one below:
Next you need to log in to Plone.
To do that all you need to do is click on the words ‘log in’ that should be present in the top
right hand corner of the Plone web page (in fact this log in area is present at the top of every
Plone page – meaning you could in theory log in from anywhere within the Plone pages). When
you click ‘log in’ you should get a screen that looks like this:
Ben Coulthard 25/01/07
-3-
Assuming that you have a web account – if you fill in the CFS username and password boxes
as requested and click the ‘log in’ button below them then you will be taken back to the Plone
homepage but you will now see a message, at the top of the page, that says ‘Welcome! You
are now logged in’.
You are now logged into Plone. If you want to log out then simply click the ‘log out’ link in the
top right hand corner of your screen and you will be logged out.
Finding your folder
You should be able to see a menu of choices on the left hand side of the screen (see the image
below). Use this navigation menu to find your way to the folder that your web maintainer or
the web team set up for you within Plone. In most cases this is likely to be a departmental
folder that you can get to by going to the Departments section (see below).
For the purposes of this guide the survey we create will be in a folder called ‘Survey’ which
will be in the Departments section of Plone in a folder called ‘Example Department’.
When you arrive at your prepared survey folder you should see a blank page with some
editing tabs at the top (see the following image). The editing tabs should have the following
labels: contents, view, edit, properties, sharing and syndication. Don’t worry about what these
mean at this stage you won’t be using all of them. By default the view tab should be selected
and you should be able to see some additional options: actions, display, add item and state.
Just before we begin making the survey it is vital to mention a few basic things about
navigating your way around Plone.
Ben Coulthard 25/01/07
-4-
Finding your way around in Plone
There are three main ways of getting about inside Plone and in many ways these are skills that
most of us have from using web sites and the internet.
a) Using the side navigation
At the risk of stating the obvious you can use the navigation menus that appear at the side
of Plone to move to different pages with Plone. However, a fundamental difference between
Plone and standard web sites is that when you do move to a different area then the navigation
is likely to change as well to reflect the items at that level. For example if you start at the top
home level of Plone for the University of Leicester you will see something similar to the image
on the left:
But if you click on ‘Departments’ you will move into the Department area and the menu will
change to reflect that – see the image above right.
So a Plone user has to be aware that as they dig down into the navigation their surroundings
will change. The only way to keep a firm idea of where you are is consult the Breadcrumb
navigation or trail (see below).
b) Using the Breadcrumb navigation/trail
Every Plone page has a horizontal bar at the top with the word ‘Home’ on the left hand side.
This is the Breadcrumb navigation menu and as you move down into areas it expands and
shows you where you are. The words in this menu are links and can be used to jump back to
any previous point you’ve gone through (see below):
c) Using links on individual pages
The final way to move around Plone is to use hyperlinks that appear on pages. It’s easy to
get lost when doing this so always keep an eye on Breadcrumb trail to see where you’ve
moved to and how to get back.
Now we are ready to create a Survey.
Ben Coulthard 25/01/07
-5-
Adding a Survey item (Creating a Survey)
Without going into too much detail about how the Plone CMS works, it’s essentially a huge
database into which you add items to store and access. It is from these items that you build
up your Plone CMS site. Items come in all shapes and sizes and include (thus far): Blogs,
events, files, folders, images, links, news, pages, Wikis and of particular interest to this guide
Surveys.
You create a survey by clicking on the add item tab and choosing the Survey option (see
below).
After you have clicked the Survey option you will be shown the first setup page for your new
survey, which should look something like following image – a series of empty fields. You may
notice as well that tab you are on has changed from view to edit. The edit tab should be
used whenever you want to amend or add to the info you have put on a particular page or
item. In the case of surveys the edit feature will show either the fields for setting up the
introduction to your survey or, if you are in a question when you press edit, the details of a
specific question. When you’ve finished editing you can click save.
Ben Coulthard 25/01/07
-6-
The fields on the Edit Survey page are fairly self explanatory, and you have the option to save
what you’ve done and come back later to edit it, but in the interests of completeness here’s
what they mean:
• Short Name – You can leave this field alone as it is automatically created from
whatever you use as the ‘title’ for your survey in the title field.
• Title – This is the main title for your survey. It can be whatever you want – but it
probably makes sense to keep it as short as possible.
• Survey description – This field should only really be used for a short description of
what your survey is about – a summary sentence. You will be prompted for a longer
introduction paragraph further along in the process.
• ‘Thank you message’ – If you put something in here then Plone will automatically
display a short thank you bar on the page you are returned to when you’ve filled the
questionnaire in. An alternative to using this function is to leave it blank and specify
another page elsewhere in the ‘Exit URL’ field – and have your thank you message on
that.
• ‘Saved’ message text – As the field description says, ‘This is the message that will be
displayed to the user when they save the survey, but don't submit it’.
• Exit URL – You can use this field to specify a page to be sent to on completion of the
survey. This page can be inside or outside of Plone. If it’s another University of
Leicester Plone page then it will automatically display anything that you’ve written in
the ‘Thank you message’ section. If you leave this box blank then you will automatically
jump to the University’s Plone homepage i.e. http://www2.le.ac.uk/
• Allow anonymous – This option, if checked, allows un-authenticated users (anyone in
the world) to view and complete your survey. Plone does keep a record of the IP
address of anonymous submitters. By default this feature is not checked meaning that
only people who are logged in on the system can make submissions.
• Allow save functionality – As the field description says, ‘Allow logged in users to save
survey for finishing later’. By default this option is unchecked. WE RECOMMEND NOT
USING THIS OPTION AT THIS TIME.
• Survey Notification Email Address – Enter an email address here and the address in
question will be sent notifications whenever a user submits a completed survey (if that
option for Survey notification method has been chosen – see below).
• Survey Notification Method – Two choices – either no email notifications OR being
sent an email every time a user submits a completed survey. Only possible if a
notification email address has been specified.
Pressing NEXT at the bottom of this page will take you to a second page which contains the
final field associated with the beginning setup phase – a prompt to fill in an Introduction for
your survey.
•
Introduction – Here you put a complete introduction for your survey. This can be of
any length and you have the option to edit the text and add hyperlinks and/or images
should you so wish (see image below).
Ben Coulthard 25/01/07
-7-
Pressing SAVE at the end of either of these two setup information pages will save everything
you’ve done up to that point and take you to your new survey. Your new survey won’t have
any questions yet so it will look a bit strange as you’ll have your title, any introductory info and
then immediately a submit button with nothing in the middle (see image).
What you need next are some questions.
But before we talk about the question types and how to add them to your survey it’s important
to mention the Contents tab. The contents tab will be vital to you in organising your survey
and for getting back to previous questions if you need to edit them.
The ‘Contents’ tab
Clicking on the contents tab shows you a list of all the items that you’ve added at a certain
level within your survey. You can change back to another editing tab by clicking that instead.
Items can include different question types and sub surveys and in the following example image
you can see five questions followed by a sub survey, which may contain more questions itself.
Question types and sub surveys will be explained later on.
Ben Coulthard 25/01/07
-8-
By clicking on any item in a contents list you will go to that item – this can be useful if
you want to go back and edit a question after you’ve made it. The Contents tab is also useful
because it allows you to order the items you have created. In the image above you can see
that Surname is the first question but maybe you want it to be the second one – by clicking on
the corresponding down arrow on the right of question 1 we can move it down to the second
position.
This information about the Contents tab is presented to you now – because as you start adding
questions to your survey you may find you lose track a little of where your questions are in
relation to each other and/or what page you are on. By using a combination of the Contents
tab and the Breadcrumb trail you’ll find it much harder to get lost.
So now we know about the Contents tab, let’s look at adding some questions to our survey.
Adding questions to your Survey
You add questions in the same way that you added your survey. Questions are simply items
that can be added via the add item menu. If you click on the add items menu you will see you
have a number of choices (see below).
Currently you can choose from sub survey, survey matrix, survey select question and
survey text question. Here’s an explanation of what these different options mean and do:
a) sub survey
This first option is more of a structuring tool than an actual question type. Sub surveys are at
their most useful to people who have thought about their survey design and structure well in
advance of coming to PloneSurvey.
Basically, you can use sub surveys to split your survey into sections or pages. You may have
groupings of questions, for example a section on personal details. When you’ve finished one
group of questions you move on to the next. It can be off–putting to be faced with a vast array
of questions but shorter sections should help keep the user’s interest peaked.
If you opt to add a sub survey you will be shown a screen that looks like this:
Ben Coulthard 25/01/07
-9-
All you need to do is give your sub survey a Title e.g. Section 1 – Personal Details, and
perhaps a short description. This will then create a section within your main survey into
which you can add questions. When you are finished adding questions to your sub survey then
save it – this will put you on a page similar to the page you got when you created your survey
(see image below). All you will see until you add some questions is just the title you gave the
sub survey and a next button. Next will move you on to what ever you put after your first sub
survey, which could be more questions or another sub survey, or if it’s nothing then the survey
will drop you back on the Plone homepage and say ‘thank you for completing the survey’.
So now you have defined a sub survey you can either fill it with some questions (and we
discuss the different options shortly) or go back to your main survey and create another sub
survey. Use your breadcrumb trail to jump back to your main survey page. If you click on the
contents tab at that point you will be able to see your newly created sub survey as content at
that level – see image below:
Sub surveys can also be used effectively if you intend to have branching in your survey. If
you have a section of questions that you only want answered by users who have chosen a
particular path through the survey, then you can use a sub survey to do that. Define chunks
or groups of questions and store them as part of your survey and then later on make them
only available to users who answer a certain way to a specific question e.g. only female users
need answer the following questions.
Branching will be discussed later on in this guide.
b) survey matrix
This is the first and most complicated of the PloneSurvey question types. It is designed for use
with a particular type of question or rather set of questions. Often in a survey you want to ask
your respondents numerous questions and get them to give rating answers on a scale. This is
where the survey matrix comes in. Here’s an example image showing what a full set of
matrix questions might look like:
Ben Coulthard 25/01/07
- 10 -
The first thing you need to do to create a matrix question is choose the survey matrix option
from the add item menu within your survey. This will cause you to be prompted with the first
of a series of pages that are associated with configuring the matrix question. This first set of
fields are the means by which you identify:
•
•
•
•
An overall title for your section of matrix questions.
A short description telling people what they need to do.
The range of answer options from which respondents can choose and this can be
words or numbers.
The input type for answering the questions – which is a choice of radio buttons,
checkboxes, selection boxes and multiple selection boxes.
In the example below, the matrix is being setup as simple set of radio buttons that allow you
give an answer on a scale from 1 to 5.
Clicking the next button takes you to a page which allows you to add comment boxes to your
matrix, which might be used in a situation where you offer a choice of options and one of them
is ‘other’ with an opportunity to specify what that other is.
Ben Coulthard 25/01/07
- 11 -
Clicking the save button takes you to a screen that summarises your choices thus far and has
the new option at the top to add survey matrix question (see below).
What you do now is click on add survey matrix question and use the interface to specify your
first question.
You’ll be presented with an empty field and all you need to do is write the question and press
save. Doing this will show you a page with your question on it – but immediately all you need
to do is use the breadcrumb trail to jump/move back to your main matrix question (which will
be one level back on the breadcrumb trail). When you do this you will see that your question
has appeared at the bottom of the page (see below):
You can add any number of questions to the matrix by this method and when you are done if
you go back one level on the breadcrumb trail again to your main survey page and view it
you’ll see your matrix has appeared (looking like the example image used at beginning of this
explanation). All the questions in a matrix are basically sub items within that item so you can
view and edit them and get at them with the contents tab.
Ben Coulthard 25/01/07
- 12 -
c) survey select question
Survey select questions are simply ones where you give the recipient a multiple choice set of
answers that produces quantitative data. There are the usual options to have them respond
using radio buttons (pick one), checkboxes (pick one or many), section boxes (where you see
the list and pick one) and multiple selection boxes (where you see the list and can pick one or
more answers).
The answer options in the example image above produce a question that looks like the one
in the image below. Choices are currently only available as a vertical listing. You can also
stipulate whether you want the question to be required.
d) survey text question
This type of question is used in two ways (both of which are designed for the collection of
qualitative data). You have the option to produce Text Field questions or Text Area
questions. The image on the left below is a typical text field and the image on the right is a
typical text area type question.
Ben Coulthard 25/01/07
- 13 -
You add these questions in the same way you add other question types - pick the survey text
question option from the add item menu. When you do this you’ll be presented with a screen
like this:
•
•
•
•
•
•
•
•
The title is simple the question that you want to ask.
The description is any additional information you want to add that might clarify the
question.
The required box lets you decided whether or not this question must be answered in
order for the survey to be submitted.
The input type lets you choose between text area and text field for the question type.
The maximum length of characters places a limit on the amount of text a user can
put into the answer box.
The cols field lets you dictate how wide your answer box will be measured in
characters.
The rows field lets you dictate how many rows or lines deep your answer box will be.
The validation drop box allows you to check the content being typed into an answer
box and not accept it if it isn’t in the correct format. For example if you choose the
isEmail option then your field will not accept anything put in it unless it’s a valid email
address.
With these three question types it should be possible to create most simple surveys.
PloneSurvey may have additional question types added to it in the future.
Ben Coulthard 25/01/07
- 14 -
Branching Questions in PloneSurvey
Sometimes in a survey you may want to only ask certain questions depending on the answers
users have given to previous questions – this is known in PloneSurvey as Branching. For
example, if you were doing a survey about student viewing and listening habits and you asked
whether or not the recipient has a television, then if they answer ‘no’ there is no point in
asking them questions about their viewing habits, and they should be able to skip forward to
the questions about listening habits.
The way you create branches in your survey is by using sub surveys and survey select
questions.
First of all you need to create a survey select question which will be the point where the
branching starts e.g. Gender – Male or Female.
Then you create a sub survey and put questions in it that are relevant to only one of the
choices from the survey select question. e.g. A selection of questions that you will only ask
female recipients.
Then you need to go back one level on the breadcrumb trail from those sub survey questions
to the actual sub survey itself and click on the edit tab. You will notice a branching option at
the top (see image below).
If you click on the Branching option it will take you to a screen which lists all the multiple
choice questions in your survey and shows their options. The idea here is that you choose the
relevant branching question and use the box at the bottom to specify which of the multiple
choice answers will trigger the branching to take place (see image below).
Once you’ve finished filling in your choices then all you need to do is click save and your
branching will be done – e.g. in the example above only people answering female to the
question will see the branched sub survey.
Ben Coulthard 25/01/07
- 15 -
Finishing off your survey
Having a sensible end to your survey is as important as having a good start. If you don’t make
an end for your survey Plone will count the end as the last question you ask. Once a recipient
has answered the last question then the survey will quickly end and you’ll be taken to an
automatically generated thank you page. This may suffice for some people but others will
want to give a kind of debrief at the end of a survey. A good way of doing this is to create a
separate thank you page elsewhere in Plone and use the exit URL feature that you are
prompted for at the start of the survey creation process to specify that location. Recipients will
be pushed through to the new page without seeing the automatically generated message.
Viewing and Saving your Survey Results
You can view the results of your survey at any time by logging in, going to your survey and
clicking on the results tab (see below). If your survey is large i.e. more than a few 100
respondents then there will be a short pause before it shows you the results page.
When you do this you’ll be presented with a page with a number of features. At the top of the
page you’ll see a list of clickable options which include view respondents, download
summary spreadsheet as a csv file (ignore this option currently), download a detailed
spreadsheet as csv or html (the best option). Below these options are bar charts showing
the results of your various questions. Where questions involved additional comments these are
shown as a list on one side.
If you choose the view respondents option you will be shown a list of the usernames of all
the people who have submitted – you have the option as the manager of the survey to reset
(remove) any person’s data from the data set – which is useful if people have filled in your
survey with spam or rubbish (see below).
Ben Coulthard 25/01/07
- 16 -
If you choose download a detailed spreadsheet you have the choice of getting your results
as either a comma separated excel file (.csv) or a html page.
To get the .csv file just click save after you clicked on the csv link (see image below).
To get your results as an html table just click on the html link (see below). This option may
not suit all surveys as the amount and type of information in your survey may make for a huge
html table.
Finally, the bar charts are useful in two particular ways – firstly you can see at a glance how
your questions are being answered and secondly it gives the survey owner the opportunity to
keep tabs on the number of people answering the survey.
Ben Coulthard 25/01/07