1
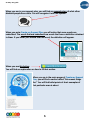
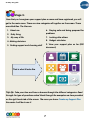
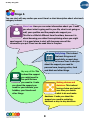
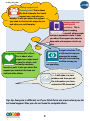
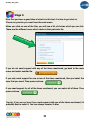
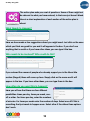
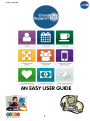
An easy user guide
AN EASY USER GUIDE
1
An easy user guide
Hello!
Welcome to our easy user guide to Create my Support Plan.
We have created this guide to help you start using Create my Support
Plan. And we hope that you will find it useful.
To keep it simple and easy-to-use we have divided it into 10 stages.
When you see this symbol,
you’ll know that we are onto the
next stage.
We will be with you at every stage of Create my Support Plan, so if you
are ever in doubt, just look at this easy guide to Create my Support Plan
and you should find the answer!
At the end of each stage, you will find some top-tips to help you get the
most out of Create my Support Plan.
We do make changes from time to time so some of the things in this
guide might look a little bit different to the website, but we will do our
best to keep it updated.
Thank you for using Create my Support Plan.
The Create my Support Plan team.
Top-tip: Save this guide onto your desktop or print it out so it is always
easy to access if you need it.
2
An easy user guide
Contents
Before you get started…………………………………………………………………4
Stage 1…………………………………………………………………………………….6
Stage 2……………………………………………………………………………………6
Stage 3……………………………………………………………………………………7
Stage 4……………………………………………………………………………………8
Stage 5……………………………………………………………………………………10
Stage 6……………………………………………………………………………………11
Stage 7……………………………………………………………………………………12
Stage 8……………………………………………………………………………………13
Stage 9……………………………………………………………………………………15
Stage 10……………………………………………………………..…………………..15
3
An easy user guide
Before you get started….
You might have noticed this already, but if you look at the top left corner, you will
see these icons:
Click here to go back to the
home page.
Click here to
access the
resources menu.
Click here to contact WECIL
Click here to access
the directory, your
support plans, your
profile page and the
site map.
Click here to login and log-out.
Click here to
register.
Click here
for Help.
There are a number of different ways you can choose to view Create my Support
Plan. In the right hand corner, you will see these buttons. They are called web
accessibility functions:
If you click here, the
screen will only show text.
No images, no logos.
If you click here, you can make
the text on the page go bigger
or smaller.
If you click here, the screen
will go yellow. Some
people find it easier to read
it like that..
4
If you click here,
you can choose the
language you
want.
An easy user guide
When you are in your support plan, you will find an example story of what other
disabled people have done. You will recognise it with this symbol:
When you enter Create my Support Plan you will notice that some words are
underlined. The words that are underlined are words that have a definition attached
to them. If you hover your mouse over the word, the definition will appear.
When you see this button:
You will find an explanation on how to fill that section.
When you are in the main pages of Create my Support
Plan, you will find a section called “this means things
like”. You will find bullet points of short examples of
that particular area is about.
5
An easy user guide
Stage 1:
The first thing to do when you enter
Create my Support Plan is to register
using your name and email address.
You will have your own personal
account, which only you can access.
The full terms and conditions for using
Create my Support Plan are available
here.
Top-tip: Choose a password you will remember easily but do keep it safe!
Stage 2:
Once you have registered you will be asked to “start a
new support plan”.
When you start a new support
plan, you will need to complete
the short form. It asks you, your
name; who the plan is for; who is
doing the support plan and who
you like to share this with.
Top-tip: You do not have to give
your real name if you do not want.
You might need to put your real
name if this is for your social
worker or local council.
6
An easy user guide
Stage 3:
Now that you have given your support plan a name and have registered, you will
get to the main menu. There are nine categories all together on the screen. These
are called tiles. The tiles are:
1. About me
2. Daily living
6. Staying safe and being prepared for
problems
3. My way of life
7. Looking after others
4. Making decisions
8. Budget calculator
5. Finding support and choosing staff
9. View your support plan so far (PDF
document)
That is what it looks like
Top-tip: Take your time and have a browse through the different categories. Read
through the type of questions asked. Read through the examples we have provided
on the right hand side of the screen. The more you know Create my Support Plan
the easier it will be to use it.
7
An easy user guide
Stage 4:
You can start with any section you want. Here’s a short description about what each
category is about:
About me: Here you can enter information about you. It asks
you about what is going well in your life, what is not going so
well, your qualities and the people who support you.
This tile is a little bit different from the others, because it is
about knowing you rather than explaining where you might
need support. It is a good place to start with because some of the
information you put it here can be used later in the plan.
My way of life: This
is about the support
you might need to
live your life how
you want to. It asks
you about the support you
need for your interests, your
hobbies, your friends and
other things.
Daily living: This is about
the basic things we all
need daily, or most days,
to live our lives. It asks you
about the support you need for
personal care, keeping active, food
and drink and other things.
Making choices and
decisions: This is about
having choice and control
over how you decide
what to do and make
decisions. It asks you about the
support you need to make big
decisions or day-to-day decisions.
8
An easy user guide
Finding support and
choosing staff: This is about
the kind of people that could
support you, and who you
employ. It asks you about the support
you need to choose who supports you
and who you could employ.
Staying safe and
dealing with
problems: This is
about keeping
yourself, other people
and your possessions safe. It asks
you about the support you need to
keep safe and prepare a back-up
plan.
Budget calculator: It is
a little tool to help you
manage the money
that you are receiving
and the money you
Looking after others:
This is about what
support you might need
to care for others, such
as family members,
friends or pets. It asks you about the
support you need to take time out
and look after others.
are spending.
View my support plan so
far: It will open in a new
window and show you all
the information you have
entered in PDF document.
Top-tip: Everyone is different, so if you think there are areas where you do
not need support then you do not need to complete them.
9
An easy user guide
Stage 5:
Now that you have a good idea of what is in this tool, it is time to get stuck in.
Choose any section you want from the main menu.
When you click on one of the tiles, you will see a list of choices which you can tick.
These are the different areas which relate to that particular tile.
Tha
t is
wh
at i
t lo
oks
like
!
If you do not need support with any of the items mentioned, go back to the main
menu and select another tile.
If you only need support for one or two of the items mentioned, then just select the
ones that you need. Then press continue.
If you need support for all of the items mentioned, you can select all of them. Then
press continue.
Top-tip: If you are not sure if you need support with one of the items mentioned, it’s
probably best to select it. You can always unselect it later.
10
An easy user guide
Stage 6:
The next page will look like this.
It will ask you what you are doing
now and what you think needs to
happen.
Example:
Let’s say that you have chosen Daily Living and only select Eating, drinking and
preparing meals.
You will now see two sections with “How I manage now”
and “What I need to support
with, or what needs to
change”.
Remove box
Add another
You will notice that in the “What I need support with, or what needs to change”
section, you can add or remove boxes. If you enter one item at a time, it will be
useful when planning for your support in the next stages.
Top-tip: If you select text from anywhere on the page and drag it in the empty box,
it will copy and paste the text for you.
11
An easy user guide
Stage 7:
Now that you have entered the information you want, you have three choices.
You may:
Discard Changes which will delete everything you have entered
for that area.
Plan for this now which will direct you to the action plan. (Go to
Stage 8)
Save and Continue which will direct you to the next item if you
selected one. If you have only selected on items in Stage 5,
then it will direct you to a summary page.
Top-tip: You can come back to all the pages at any time, so don’t worry if you
forget to put something in. You can always come back to it later!
Stage 8:
Once you have completed at least one section of Create my Support Plan, you will
see a new tile appear.
The action plan is where you can plan for the support you might need for a specific
item. For example, if you selected personal care in Daily Living and you mentioned
you needed more PA support to wash your hair, then you can think about how you
are going to plan for this here.
Stage 8 continues on the next page.
12
An easy user guide
The action plan asks you a set of questions. Some of them might not
be relevant to what you have entered, in that case just leave it blank.
Here is a short explanation of each section of the action plan is
about:
What Needs to Happen?
Here we have made a few suggestions about you might need. Just click on the ones
which you think are good for you and it will appear in the box. If you don’t see
anything that is useful or if you have other ideas, you can type it the box.
Who needs to be involved? Who could do this?
If you entered the names of people who already support you in the About Me
section (Stage 4) these will come up here. Simply click on the name and it will
appear in the box. If you have other ideas, you can type them in the box.
How often do you want this to happen?
Here you will see that there are four different
possibilities: times per day, times per week, oneoff or other. For times per day, enter the numbers
of minutes. For times per week enter the number of days. Select one-off if this is
something that just needs to happen once. Select other if the others three options
don’t work.
13
An easy user guide
How long does it take each time?
Here you can enter the number of minutes a particular activity takes.
How much would it cost?
Select the option which is suitable for the support you are planning.
When must this start happening?
If you have a specific time or date when this needs to happen by, enter it here.
Otherwise leave it blank.
What difference will this make to my life?
Having the right kind of support can make a big difference to your life. Select the
boxes that you think are relevant to you. You can also enter your own ideas.
14
An easy user guide
Stage 9:
Now that you have finished this section, you can press continue which will take you
to the next page.
If you are planning for more than one item, it will take you to the next
one.
If not it will give you a short summary and you can click complete or go back and
make changes!
Stage 10:
And that is all you need to know! Now that you have become more familiar with the
process, you can navigate your way round Create my Support Plan without any
problems.
Top-tip: I think we’ve deserved a nice cup of tea (milk no sugar please!) and a few
scrummy biscuits.
15