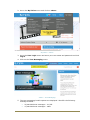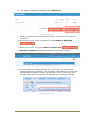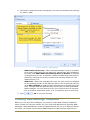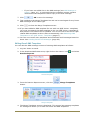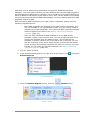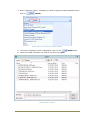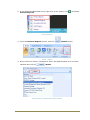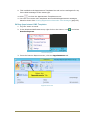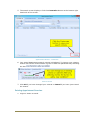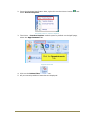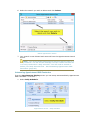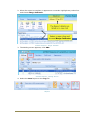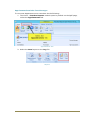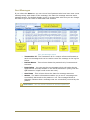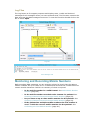
1
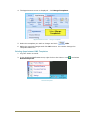
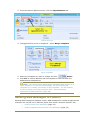
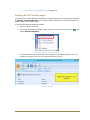
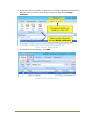
Vision 3 Vision+ SMS Text Messaging User Guide Copyright © INPS Ltd 2015 The Bread Factory, 1A Broughton Street, Battersea, London, SW8 3QJ T: +44 (0) 207 501700 F:+44 (0) 207 5017100 W: www.inps.co.uk Copyright Notice © 2015 INPS All Rights Reserved. No part of this document may be photocopied, reproduced, stored in a retrieval system or transmitted in any form or by any means, whether electronic, mechanical, or otherwise, without the prior written permission of INPS. No warranty of accuracy is given concerning the contents of the information contained in this publication. To the extent permitted by law, no liability (including liability to any person by reason of negligence) will be accepted by INPS, its subsidiaries or employees for any direct or indirect loss or damage caused by omissions from or inaccuracies in this document. INPS reserves the right to change without notice the contents of this publication and the software to which it relates. Product and company names herein may be the trademarks of their respective owners. INPS Ltd. The Bread Factory 1a Broughton Street London SW8 3QJ Website: www.inps.co.uk Contents VISION+ SMS TEXT MESSAGING 5 Introduction 5 What this Guide Covers 5 Overview 6 What do I need to do before using Vision+ SMS Text Messaging? 6 Patient Consent 7 Purchasing SMS Text Messages 7 SMS Settings in Vision+ 11 Creating SMS Message Templates Adding a Recall SMS Message Template Editing Recall SMS Templates Deleting Recall SMS Templates Attaching SMS Templates to non-QOF Vision+ Templates Making Attached Templates Obsolete 12 13 15 16 17 20 Adding an Appointment Reminder SMS Message Template Editing Appointment SMS Templates Deleting Appointment SMS Templates 22 25 26 Sending SMS Messages to Patients Sending Recall Text Messages Sending a Recall Text Message to a Single Patient Sending Appointment Reminder Text Messages Selecting the Appointment Search to Send Instant SMS Reminders Creating Appointment Searches for SMS Viewing Saved Appointment Searches Deleting Appointment Searches Automating Appointment SMS Reminders Deleting a Daily Schedule 27 28 35 35 37 40 42 44 46 48 Sent SMS Text Message Reports Accessing the SMS Text Message Reports Sent Messages Log Files 48 49 52 53 Monitoring and Recording Mobile Numbers Valid Mobile Number Formats Checking a Patient's Personal Contact Mobile Number Examples of Valid/Correctly Recorded Mobile Numbers Examples of Invalid/Incorrectly Recorded Mobile Numbers Confirming the First Mobile Number 53 54 54 58 59 61 Managing Invalid Mobile Numbers (SMS Validation Audit) 61 INDEX 65 iii Vision+ SMS Text Messaging Introduction As part of SIS 10390, we are introducing SMS Text Messaging, a new secure messaging service that enables you to send health care invitations and appointment reminders to patients by SMS text messages. If you intend to make use of this exciting new software, we recommend that you identify and process patients with invalid mobile numbers or patients who do not want to be sent a text message by your practice. See What do I need to do before using Vision+ SMS Text Messaging? (page 6) What this Guide Covers This user guide explains how to implement and manage the Vision+ SMS Recall system for QOF and Enhanced services and Appointment reminders. It covers the following: An overview of Vision+ SMS Text Messaging - See Overview (page 6). What you need to do before implementing Vision+ SMS text messaging - See Patient Mobile Numbers - What do I need to do before using Vision+ SMS Text Messaging? (page 6). Patient Consent - See Patient Consent (page 7). Managing Mobile Numbers - See Managing Mobile Numbers (page 53). Purchasing SMS Text Messages - See Purchasing SMS Text Messages (page 7). Vision+ Settings for SMS - Setting a default Priority for SMS Communication Read codes and practice name - See SMS Settings in Vision+ (page 11). Creating SMS Message Templates - See Creating SMS Message Templates (page 12). Sending SMS Messages from Practice Reports - See Sending SMS Messages to Patients (page 27). Sending an SMS text message to a single patient - See Sending an SMS message to a Single Patient (page 35). 5 Overview The new Vision+ SMS Text Messaging system provides the following functionality and benefits to your practice and patients: Appointment Reminders You can send secure automated appointment reminders to patients who have appointments within the next seven days. This will help reduce DNA's and phone calls to the practice about appointment times. You can create a saved search and schedule your appointment reminders so that they automatically run between 7 pm and 10 pm daily. You can customise the list of patients' whose appointments are due and filter by day, time, type of slot, book owner and session. You can target specific patients eg those patients who consistently do not attend their appointment. Health Care Invitations You can target a group of patients on your QOF/Enhanced recall list to send invitations by SMS text messaging. This will help save time and money on postage and enables direct contact with patients who need to be seen. Co-morbidity invites can be managed through SMS text messaging. You can send personalised SMS message to individual patients. You can customise and configure your message templates to suit your patient and practice requirements. A patient's invitation status is automatically updated when a text message is sent enabling you to monitor recalls. Details of recall SMS communications are automatically recorded in the patient's journal for audit purposes and form part of the patient's medical record. This does not apply to appointment reminders. Patients who have opted out from receiving text messages on their registered mobile phone are excluded from receiving text messages and are easily identified in reports. Audit What do I need to do before using Vision+ SMS Text Messaging? Before adopting the SMS text messaging service you must consider the following: 6 Patient consent - Implied consent is assumed for all patients with a mobile number recorded, however, you can opt a patient out by entering the Read code 9NdQ.00 - Declined consent for short message service text messaging in the patient's journal. See Patient Consent (page 7). Recording Mobile Numbers - It is imperative that you have up-to-date patient mobile numbers. This should be part of your practice's day to day activities when a patient contacts or attends the surgery. Mobile numbers can be easily updated in Appointments, Consultation Manager, Daybook and Registration screens. You must make sure that mobile numbers are: - Up to date - Recorded in a valid format - Have the correct contact type - In the correct order - If the patient has multiple mobile numbers, the first number is used for SMS - Are ideally under Contacts for patients rather than recorded under family address. If recorded under address, the mobile number is still used for SMS messaging but this may be a family rather than a patient number See Recording Mobile Numbers (page 53). Searching for Invalid Mobile Numbers - Patients with mobile numbers recorded incorrectly will not be sent SMS messages. We have therefore created a Clinical Audit for SMS Validation as part of the In Practice Systems (v2) audits to help you identify patients who do not have a valid mobile number recorded. This also looks for patients with no mobile number recorded so they can be targeted. See Managing Invalid Mobile Numbers (page 61). Note - If you still have invalid mobile numbers when you start using the SMS software, they are listed when sending SMS messages and can be easily processed. Patient Consent Patient consent for receiving SMS text messages on their registered mobile is implied, however, if a patient does not want to receive practice text messages you must record the Read code 9NdQ.00 - Declined consent for short message service text messaging in the patient's journal and they will not receive SMS messages from your practice. Note - If a patient opts out then decides to opt back in you can record the Read code 9NdP.00 - Consent given for communication by SMS text messaging. The last recorded Read code is used when checking if the patient has declined or not. Purchasing SMS Text Messages Vision+ SMS text messages are sold in bundles. For practices purchasing their own bundles, you can do this by calling the sales team on 020 7501 7440 or though the vStore as follows: Note - Your Health Board or CCG may look after the provision of message bundles on your behalf, so you may not need to order these yourself. 1. Go to www.inps.co.uk 7 2. Go to the My Vision menu and click on vStore. My Vision - vStore 3. Go to the User Login menu and enter your user name and password and click Log in. 4. Click on the Text Messaging menu. vStore - Text Messaging 5. The text messaging bundle options are displayed. We offer the following message bundles: 8 25,000 SMS text messages - £1,250 15,000 SMS text messages - £900 1,250 SMS text messages - £100 6. Click on the bundle you wish to purchase to see further details. Select Bundle 7. The details are displayed. Enter the required quantity and click Add to Cart. Then you can click the link to checkout: Add to Cart 9 8. Your basket contents are displayed. Click Check Out. Basket - Check Out 9. Enter your billing information and tick the box to agree to the terms and conditions. 10. A summary of your order is displayed, click Continue to Next Step . 11. Review your order, the select Continue to Next Step . 12. Checkout Complete is displayed along with your order number. Checkout Complete 13. You will receive an email confirming your order and your order will be processed as soon as possible. Text messages ordered from the vStore will automatically be added to Vision. You can see a count of how many text messages your practice has from the SMS tab when sending messages: No of Available Texts 10 SMS Settings in Vision+ Before starting to use Vision+ SMS, you can customise the following system-wide SMS Text Messaging settings to suit your practice: SMS Read Code Priority for Recalls - When an SMS message is sent to a patient for a recall (Read codes are not added for appointment text messages), Read code 9N3G. SMS Text Message Sent to Patient is recorded in the patient's journal with the comments denoting the clinical category. You can allocate a different priority to the SMS Read code enabling you to filter the codes or suppress them from appearing in reports etc. SMS From - Determines the message sender name when you send a text message. To change the SMS Options in Vision+ Configuration and Settings: 1. Login to Vision as usual. 2. From the Windows Notification Area, right click on the Vision+ button select Settings. and Accessing the Vision+ Settings Screen Note - To access the Vision+ Setting screen, you must not have a patient selected in Consultation Manager else the patient-specific menu displays. 3. The Settings screen is displayed. Click Advanced from the list of options. Settings screen 11 4. The Vision+ Advanced screen is displayed. You have the following two settings for Vision+ SMS: Vision+ Settings - SMS Options SMS Read Code Priority - When an SMS message is sent to a patient for a recall (Read codes are not added for appointment text messages), the Read code 9N3G SMS Text Message Sent To Patient is recorded in the patient's journal. If required, change the SMS Read code priority default by selecting the priority number from the drop down list. The default priority is 3. SMS From - When text messages are sent, the text in this box displays as the message sender on the patient's phone. We recommend that you enter NHS_NoReply so that the patient knows where the SMS has come from. This also tells the patients they cannot reply to these automated SMS messages. You can however enter your practice name if required. Due to network constraints, there is an 11 character limit on this entry. 5. Click OK to save the changes. Creating SMS Message Templates Before you can send text messages, you need to create SMS message templates which contain the required content for your recall and appointment reminder SMS messages. SMS templates for recall and appointments are set up in different places. For recall, you cannot use the same SMS template for QOF and Non-QOF Vision+ 12 templates. You must therefore set up separate templates for each required Vision+ template even if the subject matter is the same. This is because QOF uses specific Read codes for the invite status which is added and updated on the patient record when an SMS is sent. To set up templates, please refer to the following topics: SMS Templates for QOF Templates - see Adding a Recall SMS Message Template (page 13) SMS Templates for Non-QOF Vision+ Templates - see Adding a Recall SMS Message Template (page 13) and Attaching SMS Templates to non-QOF Vision+ Templates (page 17) SMS Templates for Appointment Reminders - see Adding an Appointment Reminder SMS Message Template (page 22) Adding a Recall SMS Message Template To set up an SMS template for use with QOF and Non-QOF related Vision+ Templates: Note - You cannot use the same SMS template for QOF and Non-QOF Vision+ templates. You must therefore set up separate templates for each required Vision+ template even if the subject matter is the same. This is because QOF uses specific Read codes for the invite status which is added and updated on the patient record when an SMS is sent. 1. Log into Vision as usual. 2. In the Windows Notification area, right click on the Vision+ icon Practice Reports. and select Practice Reports 3. From the Practice Reports screen, click the button. Merge Templates Merge Template 13 4. The Merge Templates screen is displayed. This screen lists existing templates for editing and allows you to add new letter and SMS templates. Merge Templates Screen 5. Click the SMS button to create a new SMS template. 6. The New SMS Template screen is displayed. New SMS Template You need to complete as follows: Name - Type a name so that you can distinguish your template type in the Merge Templates screen. As you cannot use the same SMS templates for sending QOF and non-QOF + texts, you are advised to add (QOF) or (NON-QOF) in the Name Box along with the name of your SMS template. The patient does not see this text when they receive the SMS message. Description - Add the text context. This will be what is included in the SMS message to your patient(s). You have 126 characters available. Advice for text message content: 14 Keep the message brief. You can enter 126 characters in your message. Text messages should not contain patient identifiable data. 7. Click If you have not added this in the SMS settings (see SMS Settings in Vision+ (page 11)), it is advised that the message content contains instructions that the patient cannot reply to the text message. OK to save the message. 8. This is added to the Merge Templates list and can be used again for any future SMS messages of the same type. 9. Click to close the Merge Templates screen. 10. If you have added a SMS template for use with non-QOF Vision+ templates, you must now attach the SMS template to the non-QOF Vision+ template so that patient invite status can be updated. You do not need to do this for QOF related SMS templates as this is done automatically. See Attaching SMS Templates to non-QOF Vision+ Templates (page 17). 11. You can now create more templates and send SMS recall messages based on these. See Sending Recall Text Messages (page 28). Editing Recall SMS Templates You can edit the SMS message content of existing SMS templates as follows: 1. Log into Vision as usual. 2. In the Windows Notification area, right click on the Vision+ icon Practice Reports. and select Practice Reports 3. From the Practice Reports screen, click the button. Merge Templates Merge Template 4. The Merge Templates screen is displayed. This screen lists existing templates for editing and allows you to add new letter and SMS templates. 15 5. Select the SMS Template you would like to edit and click the button. Edit Template 6. The template is displayed and you can change the message content as required. You cannot change the name of the template. Edit SMS Message Template 7. Click OK to save. Deleting Recall SMS Templates You can delete SMS templates as follows: 1. Log into Vision as usual. 16 Edit 2. In the Windows Notification area, right click on the Vision+ icon Practice Reports. and select Practice Reports 3. From the Practice Reports screen, click the button. Merge Templates Merge Template 4. The Merge Templates screen is displayed. This screen lists existing templates for editing and allows you to add new or delete existing letter and SMS templates. 5. Select the SMS Template you would like to delete and select Delete. 6. Click Yes when prompted if you want to delete the template. Delete Template 7. The template is now removed from the list. Attaching SMS Templates to non-QOF Vision+ Templates Before you can select an SMS template when sending a batch of SMS messages for non-QOF Vision+ Templates (eg those which you have downloaded from Download 17 Web Files such as Seasonal Flu Vaccination Programme, DMARDS Outcomes Manager), you must make sure that you have attached the required SMS template to the associated non-QOF Vision+ Template. This is so that the invite status Read code, which is added to the patient record when a text is sent, can be added to the patient record in sequence and with the SMS details added. You do not need to do this for SMS templates related to QOF. Before attaching SMS templates to non-QOF Vision+ templates, please note the following important points: Once SMS templates are attached to non-QOF Vision+ templates, they are not available to use for QOF SMS recalls. You will need to create a separate set of QOF templates. This is because QOF uses different Read codes to update invite status. See Adding a Recall SMS Message Template (page 13). Once you have attached an SMS template to a non-QOF Vision+ template, unless it has not been used, you are strongly advised not to remove the template from the attach screen. This is because the template is directly linked to the invite status and if removed, you will lose the continuity of the invite status already recorded on the patient record and any newly added templates will reset the invite to 1st invite. Instead you can make the template obsolete. See Making Attached Templates Obsolete (page 20). 1. Log into Vision as usual. 2. In the Windows Notification area, right click on the Vision+ icon Practice Reports. and select Practice Reports 3. From the Practice Reports screen, click the Home - Attach 18 Attach button. 4. Next, select the Vision+ Template you wish to apply the SMS template to and click on Attach. Select Vision+ Template and Choose Attach 5. The Letter Templates screen is displayed. Click on the SMS button. 6. Choose the SMS Template you wish to use and click Open. Choose SMS Template 19 7. The SMS Template is now added to the Templates Screen for the selected Vision+ Template. Letter Template with SMS Template Added 8. Click OK to close. You can now select the SMS template when sending an SMS Message. See Sending Recall Text Messages (page 28). Note - You must do this for each new non-QOF SMS template you create. Making Attached Templates Obsolete If you no longer want to associate an SMS template with a Non-QOF Vision+ template you can make it obsolete from the Attach screen. You are strongly advised to make the template obsolete rather than remove it from the attach screen because you will lose the continuity of the patient invite status which is added to the record when a recall SMS is sent. To make an SMS template attached to a non-QOF Vision+ template obsolete: Note - If you delete the SMS template from the Merge Templates screen (see Deleting Appointment SMS Templates (page 26)) the SMS template is not removed from the non-QOF Vision+ template. 1. Log into Vision as usual. 20 2. In the Windows Notification area, right click on the Vision+ icon Practice Reports. and select Practice Reports 3. From the Practice Reports screen, click the Attach button. Home - Attach 4. Next, select the Vision+ Template for which the SMS template is to be made obsolete and click on Attach. Select Vision+ Template and Choose Attach 21 5. The Letter Templates screen is displayed. Find the template you wish to make obsolete and tick the Obsolete box. Obsolete 6. Click OK to save. Please note the following: The selected SMS template is now not available for use with the selected Vision+ Template. This template is still listed in the Merge Template screen for you to use elsewhere. You can now attach another SMS template(s) if required. You can remove the tick from the Obsolete box to reattach the SMS template to the non-QOF Vision+ Template. Adding an Appointment Reminder SMS Message Template 1. Log into Vision as usual. 22 2. In the Windows Notification area, right click on the Vision+ icon Practice Reports. and select Practice Reports 3. From the Practice Reports screen, click the Appointments tab. Appointments Tab 4. The Appointments screen is displayed - Select Merge Templates. Appointments screen - Merge Templates 23 5. This screen lists existing templates for editing and allows you to add new appointment SMS templates. Appointment Templates Screen 6. Click the SMS button to create a new SMS template. 7. The New SMS Template screen is displayed. New SMS Appointment Template You need to complete as follows: Name - Type a name so that you can distinguish your template type in the Merge Templates screen. The patient does not see this when they receive the text message. Description - Add the text context. This will be what is included in the SMS message to your patient(s). You have 122 characters available. You can use the date and time merge buttons to enter the time of date of the appointment in the text message. Advice for text message content: Keep the message brief. You can enter 122 characters in your message. Text messages should not contain patient identifiable data. If you have not added this in the SMS settings (see SMS Settings in Vision+ (page 11)), it is advised that the message content contains instructions that the patient cannot reply to the text message. 8. Click 24 OK to save the message. 9. This is added to the Appointment Templates list and can be used again for any future SMS messages of the same type. 10. Click to close the Appointment Templates screen. 11. You can now create more templates and send SMS appointment messages based on these. See Sending Appointment Reminder Text Messages (page 35). Editing Appointment SMS Templates 1. Log into Vision as usual. 2. In the Windows Notification area, right click on the Vision+ icon Practice Reports. and select Practice Reports 3. From the Practice Reports screen, click the Appointments tab. Appointment Tab 25 4. The Appointment screen is displayed - click Merge Templates. Appointments Screen - Merge Template 5. Select the template you wish to change and click Edit. 6. Make the required changes and click OK to save. You cannot change the Template Name box. Deleting Appointment SMS Templates 1. Log into Vision as usual. 2. In the Windows Notification area, right click on the Vision+ icon Practice Reports. Practice Reports 26 and select 3. From the Practice Reports screen, click the Appointments tab. Appointment Tab 4. The Appointment screen is displayed - select Merge Templates. Merge Templates 5. Select the template you wish to change and click Delete. 6. Click Yes to confirm deletion and the template is removed from the Appointments template list. Note - You cannot delete Appointment templates that are part of a Daily Schedule. You will see the message 'You can't delete this template as it is being used within a daily schedule'. You will need to amend or delete your Daily Schedule first - See Automating Appointment SMS Reminders (page 46). Sending SMS Messages to Patients Sending SMS messages to patients is easy. SMS messages for recall and appointment reminders are carried out in different places from Vision+ Practice Reports. See: Sending Recall Text Messages (page 35) Sending Appointment Reminder Text Messages (page 35) 27 Sent SMS Text Message Reports (page 48) Sending Recall Text Messages You can send a recall SMS text message to a group of patients using specific reports in Vision+ Practice Reports. This is particularly useful when recalling patients for specific QOF or Enhanced areas. To access the Practice Reports module: 1. Login to Vision as usual. 2. From the Windows Notification Area, right click on the Vision+ button select Practice Reports. and Accessing Vision+ Practice Reports 3. The Practice Reports module opens by default on the QOF page but you can choose any report. Click on the required report to run it. Practice Reports 28 4. When the report is complete, it appears on a new tab. Highlight a cohort line of patients that you want to send a text message to and choose Merge Indicator. Practice Reports - Merge Indicator 5. The Mailings screen displays, click SMS. Practice Reports - Mailing Screen 29 6. The SMS menu is displayed, from here you can choose the SMS message template which you must do before a message can be sent (see Adding a Recall SMS Message Template (page 13)) and change the SMS filter options as detailed below. SMS Merge Screen Open Patient - Allows you to open the highlighted patient in Consultation Manager. Select All - Selects all patients in the displayed list with valid mobile numbers. You can deselect as required. Please select an SMS messages template - Allows you to select your predefined template (ie the content of the text message). See Adding a Recall SMS Message Template (page 13). Remember - You have different SMS templates available for QOF and non-QOF Vision+ templates. If you cannot see a template you have created when sending an SMS, it may be that you have attached it to a non-QOF template which means it is not available for SMS messages using QOF reports (see Attaching SMS Templates to non-QOF Vision+ Templates (page 17)) or it is for use with QOF Vision+ templates only. Send SMS Messages (nn Texts Remaining) - Tells you how many text messages are available to your practice. If you have selected more patients than the balance in your SMS account, you must either de-select patients down to the account balance, or purchase more SMS messages. SMS Message - Attempts to send the SMS message to the patients selected in the list. SMS Filters: - 30 No Filter - This option is selected by default and displays all patients within the cohort group. Patients with no mobile number, an invalid mobile number or who has opted out of the SMS text messaging service are displayed in the no filter list but they cannot be selected. - Invalid Mobile Numbers - Selecting the Invalid Mobile Numbers icon re-displays the patient list and shows those patients who have an invalid first mobile number. From here you can open Consultation Manager via the Open Patient button and update their number, print the list or export it to Excel. See the Vision+ on-screen help for more information on how to work with patient target lists. - Declined SMS - If you select the Declined SMS icon you see a list of patients who have opted out of SMS text messaging. From here you can print the list or export it to Excel. For more information refer to the Vision+ on-screen help. SMS Reports - Sent - If you select the Sent icon you can view a list of patients who have been sent a text message along with details of the message description, date sent and message status. See Sent Messages (page 52). - Log - The Log file shows information about a Sent message, it is designed to be used in conjunction with the Sent file. See Log Files (page 53). Training Tip - You can use the column headings to filter and sort the report list ie if you want to display patients with mobile numbers at the top of the list, click on the mobile number column heading. 31 7. Tick the box against the patients you want to recall or choose Select All. Patients with an invalid mobile number (page 54) or dissent recorded (page 7) are not selected and cannot be manually selected for sending SMS. For such patients, the Mobile No column displays either "invalid" or "declined" before the patient mobile number and you can choose open patient to update their mobile number if required. Practice Reports - Selecting Patients to send the SMS messages to 8. Click the patients. SMS Message icon to send the messages to the selected Note - You cannot send text messages unless your SMS account is in credit. The status bar above the patient list shows how many SMS messages remain. If you have selected more patients than the balance in your account, this option will be unavailable. You must either de-select patients down to the account balance, or purchase more SMS messages. When sending an SMS, if the patient has already received an appointment or recall invite in the last 28 days, the following message is displayed. Last Invite Less Than 28 Days Click Yes to continue. 32 9. The invite status is automatically updated in patient reports (shown in the Invite Status column). Invite Status in Reports Updated 10. A Read code of 9N3G. SMS Text Message Sent to Patient is automatically recorded in the patient's journal, along with the details of the text message, once Vision+ has had confirmation from the SMS handling service that the message has been sent. If sending an SMS text message to a patient on a QOF register using a QOF Template an appropriate invite code is also recorded in the patient's journal. If the message has failed to be delivered, nothing is recorded in the patient record and the invite status is reverted back to the previous status. SMS Sent Read Code 33 Here is an example of an SMS text message for recall received by a patient: Example SMS Text Message Received by a Patient Please note the following 34 Where patients share the same mobile number and are within the same group for SMS invitations, only one SMS message is sent and charged for, but both patient records are updated with the 9N3G. SMS Text Message Sent to Patient Read code. Patients who receive SMS text messages whilst abroad are not charged. To send SMS Text messages to an individual patient, see Sending an SMS Text Message to a Single Patient (page 35). Sending a Recall Text Message to a Single Patient You may want to send an SMS message to an individual patient. You can do this from the patient's Vision+ alert screen within Consultation Manager. 1. In Consultation Manager, select the patient and open a consultation. 2. After analysing the patient's data the Alert Indicator screen displays. Alert Indicator Screen 3. Highlight a line on the alert popup window and either right click on the line and choose Merge or select the Mail Merge icon on the toolbar. Patient Alert - Mail Merge 4. The Mail Merge screen displays with the patient details ticked. 5. Now see step 5 in Sending Recall Text Messages (page 28). Sending Appointment Reminder Text Messages You can send an appointment reminder SMS text message to a group of patients using specific Appointment reports in Vision+ Practice Reports. This process can either be automated so that a text message is sent between the hours of 7 and 10 pm Automating Appointment SMS Reminders (page 46). Or you can send instant 35 reminders to patients using the Appointment Search option - See Selecting the Appointment Search to Send Instant SMS Reminders (page 37). To view the Appointment Reports screen and send Appointment SMS reminders: 1. Login to Vision as usual. 2. From the Windows Notification Area, right click on the Vision+ button select Practice Reports. and Accessing Vision+ Practice Reports 3. The Vision + Practice Reports module opens by default on the QOF page, select the Appointments tab. Appointments Reports 4. The Appointments Reports screen is displayed. Appointment Screen 36 The following options are available: Appointment Searches - The Appointment search screen displays patients with appointments in the next 7 days, however, you can customise this list to view different criteria or save searches for future use. See Selecting the Appointment Search to Send Instant SMS Reminders (page 37) or Automating Appointment SMS Reminders (page 46) Delete Filter - Saved searches can be easily deleted using the Delete Filter option - See Deleting Appointment Searches (page 44) Merge Templates - Merge Templates is where you create your SMS Message Templates - See Adding an Appointment Reminder SMS Message Template (page 22) Daily Schedule - To setup an automated appointment reminders use Daily Schedule - Deleting a Daily Schedule (page 48) Sent SMS Messages and Report Logs - To view reports detailing sent messages - See Sent SMS Text Message Reports (page 48) Selecting the Appointment Search to Send Instant SMS Reminders The following explains how to run an Appointment search: 1. From the Appointments display screen, select the Appointment Search icon. Appointment Search 2. The Appointments Search screen is displayed. Patients with appointments for the next 7 days are displayed by default and we will use this as a basis to send our SMS. If you want to send SMS messages to patients with specific appointment criteria, you can set up and save custom appointment searches. See Creating Appointment Searches for SMS (page 40). 37 3. Next, you must select an SMS template which contains the detail of the SMS message the patient will receive. These should have already been set up. See Adding an Appointment Reminder SMS Message Template (page 22). Other options are listed below: Appointment Search - Select Template Column Headings - The headings for the generic next day appointment search display the following columns by default: - The appointment day, date, time, any notes or comments for the appointment, session name, slot type, date booked and how may days in the future it is booked. - Staff name who the appointment is booked with. - Patient name, mobile number and number of DNAs in the last year. You can sort and filter column headings as required ie filter morning surgery only or look at appointments two days in the future. These settings can then be saved as default appointment searches. See Creating Appointment Searches for SMS (page 40). Training Tip - It is very important you consider the type of appointments you want to send reminders to. For example, you may use appointments for messages and this information should be excluded from the search. Open Patient - Allows you to open the highlighted patient in Consultation Manager. Select All - Selects all patients in the displayed list. You can deselect as required. Please select an SMS messages template - Allows you to select your predefined template (ie the content of the text message). See Adding an Appointment Reminder SMS Message Template (page 22). Send SMS Messages (nn Texts Remaining) - Tells you how many text messages are available to your practice. If you have selected more patients than the balance in your SMS account, you must either de-select patients down to the account balance, or purchase more SMS messages. SMS Message - Attempts to send the SMS message to the patients selected in the list. Other Tabs: - Invalid Mobile Numbers - Selecting the Invalid Mobile Numbers icon re-displays the patient list and shows those patients who have an 38 invalid first mobile number. From here you can open Consultation Manager via the Open Patient button and update their number, print the list or export it to Excel. See the Vision+ on-screen help for more information on how to work with patient target lists. - Declined SMS - If you select the Declined SMS icon you see a list of patients who have opted out of SMS text messaging. From here you can print the list or export it to Excel. For more information refer to the Vision+ on-screen help. 4. Tick the box against the patients you want to send an appointment reminder or choose Select All. Patients with an invalid mobile number (page 54) or dissent recorded (page 7) can be viewed and mobile numbers updated in the respective tabs. 5. Click the patients. SMS Message icon to send the messages to the selected Sending and SMS Appointment Reminder Please note the following: You cannot send text messages unless your SMS account is in credit. The status bar above the patient list shows how many SMS messages remain. If you have selected more patients than the balance in your account, this option will be unavailable. You must either de-select patients down to the account balance, or purchase more SMS messages. No Read code is added to the patient record when Appointment reminder text messages are sent. Patients who receive SMS text messages whilst abroad are not charged. Patients with the same mobile number will only receive one message. 39 Here is an example of an SMS text message for recall received by a patient: Sample Appointment Reminder Text Message Received by a Patient To send SMS Text messages to an individual patient, see Sending an SMS Text Message to a Single Patient (page 35). Creating Appointment Searches for SMS The Appointment Search report displays appointments booked for any slot type and any session for the next 7 days by default. You can however set different filters and save these as separate searches which are accessible from the Appointment Reports screen as follows: 1. Login to Vision as usual. 40 2. From the Windows Notification Area, right click on the Vision+ button select Practice Reports. and Accessing Vision+ Practice Reports 3. The Vision + Practice Reports module opens by default on the QOF page, select the Appointments tab. Appointments Tab 4. The Appointments screen is displayed. Select Appointment Search. Appointment Search 5. The Appointments Search screen is displayed. Patients with appointments for the next 7 days are displayed by default. You now need to change the filters as required by selecting the Filter button at the top-right of each column heading. Either select from the existing options or select Custom to create your own. The following example shows how to exclude telephone consultation session types: 41 6. 7. Click on the filter button on the Slot Type column From the slot type list choose “does not equal" and type in the text of your Telephone Consultation appointment slot eg Telephone Consultation and click OK. You can amend the following columns as you prefer: - Day, date and time of the appointment - Session type - Slot type - Date the appointment was booked - Number of days ahead - Staff Name who the appointment is booked with. - Number of DNAs in the last year 8. You then need click on the Press Save again. Save button and give your search a name. 9. The search now displays on your Appointment Reports screen. Viewing Saved Appointment Searches To view your saved Appointment search: 1. Login to Vision as usual. 2. From the Windows Notification Area, right click on the Vision+ button select Practice Reports. Accessing Vision+ Practice Reports 42 and 3. The Vision + Practice Reports module opens by default on the QOF page, select the Appointments tab. Appointment Tab 4. From the Appointments display screen, select your saved appointment search. Saved Appointment Search 43 5. The search screen displays. Click the Customise button at the bottom right hand side of the screen. Appointment Search - Customise 6. Your saved Appointment search criteria is displayed. To change your existing search click on the criteria shown in green or add new parameters by selecting the box . Search criteria 7. Click OK if you have changed your criteria or Cancel if you have just viewed the search. Deleting Appointment Searches 1. Login to Vision as usual. 44 2. From the Windows Notification Area, right click on the Vision+ button select Practice Reports. and Accessing Vision+ Practice Reports 3. The Vision + Practice Reports module opens by default on the QOF page, select the Appointments tab. Appointment Tab 4. Click on the Delete Filter icon. 5. All your saved predefined searches are displayed. 45 6. Select the search you wish to delete and click Delete. Delete Appointment Search 7. Your search is now deleted and removed from the Appointments Search screen. Note - You cannot delete Appointment searches that are part of a Daily Schedule. You will see the message 'You can't delete this filter as it is being used within a daily schedule'. You will need to amend or delete your Daily Schedule first - See Automating Appointment SMS Reminders (page 46). Automating Appointment SMS Reminders From the Appointment display screen you can setup automated daily Appointment SMS reminders. To do this: 1. Select Daily Schedule. Appointment Screen - Daily Schedule 46 2. The Appointment SMS Daily Schedule screen is displayed and lists any existing scheduled events. To add a new schedule - click Daily Schedule. Appointment SMS Daily Schedule 3. Select your saved Appointment Search and Template from the drop down list. See Creating Appointment Searches for SMS (page 40) and Adding an Appointment Reminder SMS Message Template (page 22). Choose the Appointment Search and Template The Appointment reminders are automatically sent daily anywhere between 7 pm and 10 pm so there is no requirement to setup times. Please note the following: Please ensure your searches are setup correctly and you have taken into account appointments that may not be suitable for SMS reminders eg Appointment slots that are used for messages. There is no limit to the number of daily schedules you can create. Examples include setting up a daily schedule for patients at a branch site as well as patients at the main site. This is easily achieved by setting up different Appointment Searches and Templates. However, consideration is required when creating your searches so that patients are not sent multiple appointment reminders for the same appointment time. The Appointment SMS schedule sends reminders every day so patients with appointments on a Monday will be sent a reminder on Sunday if you have a search setup to send reminders for the next day. You can setup different Appointment Search Filters that use the same Template. 47 You cannot setup the same Appointment Search Filter and Template twice. You will see a message stating 'Duplicate Daily Schedule Exists'. 4. Click OK and the scheduled search is saved within Daily Schedules. Deleting a Daily Schedule 1. From Vision+ Practice Reports - click the Appointments Tab. Appointments Tab 2. Select Daily Schedule. Appointment Screen - Daily Schedule 3. Highlight the Scheduled event and select the Delete icon. 4. Click Yes to confirm the deletion and the Daily Schedule is removed. Sent SMS Text Message Reports In Vision+ Practice Reports you can easily view a list of patients to whom you have sent an Appointment or Recall Text message. The reporting options available include a Sent report and a Log File. SMS Recall Message Reports 48 To Access the Reports - See Accessing the SMS Text Message Report To View Sent Messages - See Sent Messages (page 52) To View the Log Report - See Log Files (page 53) Accessing the SMS Text Message Reports To view SMS Text Message reports: 1. Login to Vision as usual. 2. From the Windows Notification Area, right click on the Vision+ button select Practice Reports. and Accessing Vision+ Practice Reports Recall Text Messages To view sent Recall text messages do the following: 1. The Practice Reports module opens by default on the QOF page. Choose any QOF report (it does not have to be the QOF area you sent patients an SMS text message). Practice Reports 49 2. When the report is complete, it appears on a new tab. Highlight any cohort line and choose Merge Indicator. Practice Reports - Merge Indicator 3. The Mailing screen appears, click SMS. Practice Reports - Mailing Screen 4. Select the Sent Report or the Log File. Reports 50 Appointment Reminder Text Messages To view sent Appointment text reminders do the following: 1. The Vision + Practice Reports module opens by default on the QOF page, select the Appointments tab. Appointments Tab 2. Select the Sent Report or the Log File. Reports 51 Sent Messages If you select the Sent icon you can view a list of patients who have been sent a text message along with details of the message, the date the message was sent and a message status. The default display is 100 in reverse date order but you can change this filter to go as far back as when SMS was enabled. Sent Text Message Report Transaction id - The Transaction id is a unique reference allocated to each text message and can be used to trace the message in the log file below. Patient Name - This column shows the patient's title, forename and surname. Description - You can see the text message which will either be the Appointment reminder details or the Recall information (along with the QOF disease if a QOF recall invite was sent). Send Date - This column shows the date the message was sent. Status - The status information enables you to see if a message was successfully delivered to the patient or not. The message Failed at Operator indicates that a message was not successfully received by the patient. Remember - You can resize columns or sort the report list. 52 Log Files The Log button is for support purposes and displays sent, invalid and declined messages for all messages where you have selected Send. The file name contains the date and time the SMS messages were sent. To view the file either double click on the file or select Open. Log File Text Message File Monitoring and Recording Mobile Numbers Before sending SMS messages you are strongly advised to check that the patient mobile numbers are up-to-date, are in a valid format and that the number does not contain invalid characters. Below is a summary of what is required: Is the mobile number in a valid format? See Valid Mobile Number Formats (page 54). Is the mobile number recorded under Contact for patient? See Checking a Patient's Personal Contact Mobile Number (page 54). Do you have an up-to-date mobile number for the patient? See Checking a Patient's Personal Contact Mobile Number (page 54). If the patient has multiple mobile numbers the first number is used - is this the correct mobile number for the patient? See Confirming the First Mobile Number (page 61). 53 Shared Mobile Numbers - Where patients share the same mobile number and are within the same group for SMS invitations, only one SMS message is sent and charged for, but both patient records are updated. Patients should be made aware of this as well as the confidentiality implications. Reminder - In addition to updating, amending or deleting a patient's telephone numbers in Registration and Consultation Manager you can also do this in Appointments and Daybook - look for the Patient Contact Details icon. See Checking a Patient's Personal Contact Mobile Number (page 54). We have created a Clinical Audit for SMS Validation to help you identify mobile number that may need your attention. See Managing Invalid Mobile Numbers (page 61). Valid Mobile Number Formats The following formats are considered as valid mobile numbers for SMS text messaging. All mobile numbers should start with 07 and may contain spaces and be prefixed with the country code. If a mobile number contains letters, these are classified as invalid characters and the patient will not be sent an SMS text message. To find invalid codes see Managing Invalid Mobile Numbers (SMS Validation Audit) (page 61). Example: 07771111111 Acceptable Formats: 07771111111 07771 111111 07773 111 111 4407771111111 44 07773 111 111 +4407771111111 +44 07771111111 Checking a Patient's Personal Contact Mobile Number Personal mobile numbers should be added to Contacts for Patients in Registration – Address. By doing this the number will remain attached to the patient during the Amend Household/Family Transfer process when doing a change of address and the number stays as that patient's personal contact details. The number should also be entered with the type of contact set to Mobile. Note - Whilst it is not advised to record mobile numbers against the patient address, if you have done this and the patient does not have a mobile number recorded in Contacts for Patient, Vision+ uses this to send SMS messages. To check that the patient has their mobile number recorded correctly in Vision: 1. Select the patient in Registration and choose the Address tab. 54 2. Look at the Contacts for Patient section of the screen. Contact for Patient 3. From the Contacts for Patient screen you can add a new mobile number, edit an existing mobile number or delete a mobile number and click OK to save. If the patient has their mobile number recorded under the Address tab you can copy and paste it to the Contacts for Patient section (you are advised to check with the patient first as the mobile may belong to a family member). To do this click on the mobile number on the Address tab and choose Edit. Editing the mobile number 55 The Communication Update screen is displayed, highlight the mobile number and press Control C (to copy). Copying the mobile number Add the number under the Contacts for patient by using Add or Edit and paste the mobile number (by pressing Control V). Pasting the mobile numbers 56 Consultation Manager Alternatively, you can view, add or update mobile numbers for a patient in the patient details tab or the Patient details icon in Consultation Manager. Patient Details Consultation Manager Appointments You can also add or update mobile numbers in Appointments when adding an appointment for a patient. Edit Contact Details in Appointments 57 Add, Amend or Delete the Mobile number Daybook With a task attached to a patient highlighted or from a selected task, select Edit contact details. Daybook - Add, Amend or Delete the Mobile Number Examples of Valid/Correctly Recorded Mobile Numbers Below are some examples of how mobile numbers should be recorded: Correctly recorded mobile numbers 58 Valid mobile number format Multiple mobile numbers Examples of Invalid/Incorrectly Recorded Mobile Numbers Below are examples of invalid or incorrectly recorded mobile numbers: Mobile number recorded incorrectly under the Address tab 59 Note - Whilst it is not generally advised to record mobile numbers against the patient address, if you have done this and the patient does not have a mobile number recorded in Contacts for Patient, Vision+ uses this to send SMS messages. The contact type is set to Telephone Home and not Mobile Phone Invalid mobile number format See also Valid Mobile Number Formats (page 54), Examples of Valid/Correctly Recorded Mobile Numbers (page 58) and Confirming the First Mobile Number (page 61) 60 Confirming the First Mobile Number Vision+ will send the SMS text message to the first mobile number listed in Contacts for Patient. Where a patient has multiple mobile numbers, the first one is selected for sending text messages eg the one at the top. First Mobile Number Managing Invalid Mobile Numbers (SMS Validation Audit) Patients with invalid mobile numbers (page 59) will not receive text messages. We therefore recommend that you identify patients with such numbers and check/update their contact details. Note - If you still have invalid mobile numbers when you start using the SMS software, they are listed when sending SMS messages and can be easily processed. To help with tracking patient mobile number status, we have created a Clinical Audit which is published as part of the In Practice Systems (v2) audits. Using this audit, you can identify and address patients with invalid mobile numbers and other useful information about mobile numbers. The In Practice Systems (v2) audits can be downloaded from the INPS website here http://www.inps.co.uk/my-vision/user-guides-downloads/clinical-audit (instructions on how to download and import are here http://www.inps.co.uk/sites/inps4.co.uk/files/download_and_import_audit.pdf). Please note this will replace any existing versions on the In Practice Systems audit. SMS Validation Audit 61 Note - Reminders are not automatically enabled for these audit lines. To activate a reminder, right click on the audit line and select Activate Reminder. You can then generate the reminders so they display when a patient is selected. Go to the Generate tab and choose Generate Reminders. Audit Line Explanation and what to do... Patients with a mobile number (begins 07) attached to their address Shows all patients with a mobile number added to the address entry. Mobile numbers added to the patient address are unique to the patient unless another patient has been registered as a family member against the same address details, in which case the mobile number will also be copied to the family member. If a patient has an address mobile number but no patient mobile number (see specific audit line below), please check that it is suitable to use for text messaging. Training Tip - You may want to add a reminder to this line and deal with each patient when they visit the surgery. Remember you can also switch on reminders in Appointments if you want to check mobile numbers with patients as you book the patient into Appointments. To do this in Appointments select Maintenance - System Constants Reminders - tick the box Display all reminders . This is a practice wide setting so will display all reminders for anyone accessing Appointments and includes Outstanding Daybook tasks, Clinical Audit and Patient Group reminders. Patients with a mobile number (begins 07) showing as Contact for Patient Shows all patients who have a mobile number recorded under Contacts for Patient. Patients with a mobile number (begins 07) attached to their address, but has no Contact for Patient Shows all patients who have a mobile number recorded under address but has no number recorded in Contact for Patient. Mobile numbers added to the patient address are unique to the patient unless another patient has been registered as a family member against the same address details, in which case the mobile number may be copied to the family member. If a patient has an address mobile number but no patient mobile number, please check that it is suitable to use for text messaging. You may want to add a reminder to this line and deal with each patient when they visit the surgery. Patients with a mobile number(s) (begin 07) attached to their address and also Contact for Patient Shows all patients with a mobile number recorded under both Address and Contacts for Patient. Depending on your practice protocol, these patient numbers may or may not need updating ie if you have a family mobile in address and personal number in Contact for Patient you might want to leave this as it is, however, if you have an out of date number in patient but a correct one in address, you are advised to update the Contact for Patient number since that is used in preference. 62 Patients with a mobile number(s) (begin 07) under Contact for Patient, but not of type MOBILE Shows patients who have a mobile number recorded in Contact for Patient but the type is not mobile. These numbers may have been recorded incorrectly or are other mobile numbers correctly recorded as a non-mobile contact type ie carer. See Examples of Invalid/Incorrectly Recorded Mobile Numbers (page 59). Patients with a mobile number (begin 07) under Contact for Patient, but containing letters (invalid) Shows all patients with a mobile number under in Contact for Patient which are invalid. Patients in this line will not be sent SMS messages. You are advised to create a reminder for this line and/or update each patient by opening this group in Consultation Manager and changing the number in Patient Details. See Consultation Manager on-screen help http://inpshelp.co.uk/DLM470/Consultation_Manager/index.htm#19259 and Examples of Invalid/Incorrectly Recorded Mobile Numbers (page 59). Patients aged =>16 with NO mobile number attached to Contact for Patient Shows patients over 16 years of age with no mobile number recorded in Vision (Contact for Patient only). You may want to add a reminder to these patients so this is flagged when they visit your surgery. Patients aged =>16 with mobile number attached to Contact for Patient Shows patients over 16 with mobile numbers recorded in Contact for Patient only. Remember - If there are multiple mobile numbers recorded, Vision uses the 1st recorded mobile number for SMS purposes. See Confirming the First Mobile Number (page 61). 63 M Index Making Attached Templates Obsolete • 20, 23 Managing Invalid Mobile Numbers (SMS Validation Audit) • 7, 57, 64 Monitoring and Recording Mobile Numbers • 5, 7, 56 O Overview • 5, 6 A Accessing the SMS Text Message Reports • 52 Adding a Recall SMS Message Template • 15, 20, 33 Adding an Appointment Reminder SMS Message Template • 15, 25, 40, 41, 50 Attaching SMS Templates to non-QOF Vision+ Templates • 15, 17, 20, 33 Automating Appointment SMS Reminders • 30, 38, 40, 49 P Patient Consent • 5, 6, 7, 35, 42 Purchasing SMS Text Messages • 5, 7 S Checking a Patient's Personal Contact Mobile Number • 56, 57 Confirming the First Mobile Number • 56, 63, 64, 67 Copyright Notice • ii Creating Appointment Searches for SMS • 40, 41, 44, 50 Creating SMS Message Templates • 5, 15 Selecting the Appointment Search to Send Instant SMS Reminders • 39, 40 Sending a Recall Text Message to a Single Patient • 5, 38, 43 Sending Appointment Reminder Text Messages • 28, 30, 31, 38 Sending Recall Text Messages • 17, 23, 31, 38 Sending SMS Messages to Patients • 5, 30 Sent Messages • 34, 52, 55 Sent SMS Text Message Reports • 31, 40, 51 SMS Settings in Vision+ • 5, 12, 17, 27 D V Deleting a Daily Schedule • 40, 51 Deleting Appointment Searches • 40, 47 Deleting Appointment SMS Templates • 23, 29 Deleting Recall SMS Templates • 19 Valid Mobile Number Formats • 35, 42, 56, 57, 63 Viewing Saved Appointment Searches • 45 Vision+ SMS Text Messaging • 5 C E Editing Appointment SMS Templates • 28 Editing Recall SMS Templates • 17 Examples of Invalid/Incorrectly Recorded Mobile Numbers • 62, 64, 66 Examples of Valid/Correctly Recorded Mobile Numbers • 61, 63 W What do I need to do before using Vision+ SMS Text Messaging? • 5, 6 What this Guide Covers • 5 I Introduction • 5 L Log Files • 34, 52, 55 65