1
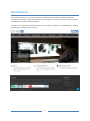
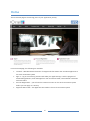
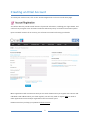
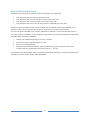
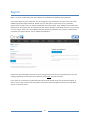
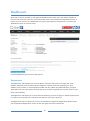
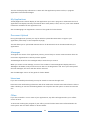
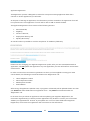
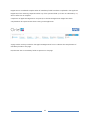
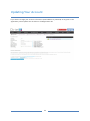
2014-15 Applicant User Guide Hicom Technology Version 3 January 2015 1 Contents Introduction .................................................................................................................................................................................... 3 Main Menu ...................................................................................................................................................................................... 4 Sign in .................................................................................................................................................. 4 Vacancies ............................................................................................................................................ 4 Recruitment Leads .............................................................................................................................. 4 News ................................................................................................................................................... 4 Resource Bank..................................................................................................................................... 4 Help Desk ............................................................................................................................................ 4 FAQ...................................................................................................................................................... 5 Home ................................................................................................................................................................................................. 6 Creating an Oriel Account ......................................................................................................................................................... 7 Account & Password Policy ................................................................................................................. 8 Sign In ............................................................................................................................................................................................... 9 Dashboard .....................................................................................................................................................................................10 Registration ....................................................................................................................................... 10 My Applications ................................................................................................................................ 11 Document Upload ............................................................................................................................. 11 Messages........................................................................................................................................... 11 Interviews.......................................................................................................................................... 11 Offers ................................................................................................................................................ 11 Updating Your Account ...........................................................................................................................................................14 How to Apply ...............................................................................................................................................................................15 Document Upload ......................................................................................................................................................................16 Managing Your Applications .................................................................................................................................................19 Messages .......................................................................................................................................................................................20 Interviews .......................................................................................................................................................................................21 Programme Preferences ..........................................................................................................................................................22 Offers ...............................................................................................................................................................................................24 Troubleshooting..........................................................................................................................................................................26 Who to Contact for Assistance .............................................................................................................................................29 2 Introduction The objective of Oriel is to improve the journey of applicants who apply for medical and dental training by introducing a single portal where they can register, view vacancies, apply, book interviews and assessment centres and receive Offers. The name 'Oriel' represents a window of opportunity and the progression of trainee doctors, dentists and scientists throughout their training. 3 Main Menu The main menu bar will remain visible in the applicant portal, both before and after signing in The following options are available. Sign in Log in to an existing account and make your application(s), track the progress of submitted applications, view messages from the recruitment leads, view and book interviews and track offers. Vacancies Search and apply for vacancies that have been advertised through Oriel. See the ‘How to Apply’ section of this guide for further details. Recruitment Leads View the profiles of the recruitment organisations within Oriel. You will be able to find out more about each organisation, such as contact details, organisation description, social media links/feeds, news, Fitness to Practise policy/contact details and current active vacancies. News Administered by HEE and Recruitment Leads, this section of the Oriel system allows applicants to view and search the latest news items. Each news item can be opened to view further detail and any links/files that may have been attached. Resource Bank Like News items, the Resource Bank is administered by HEE and is a repository for information that will support you in the process of making an application. Applicants can access a wide range of content such as person specifications, guides and FAQs. You can search the resource bank by keywords, to find the required information. Help Desk Contact details in the event that you require technical and/or non-technical support 4 FAQ Administered by HEE, this section of the Oriel system allows applicants to view and search frequently asked questions. 5 Home The Oriel home page is the starting point of your application journey. From the homepage, the following are available: Carousel – HEE administered rotation of images and information that introduce applicants to the Oriel recruitment system Sign in – log in to an existing account and make your application(s), track the progress of submitted applications, view messages from the recruitment leads, view and book interviews and track offers Account Registration – you will need to create an account on the Oriel recruitment system before you can apply to a vacancy Applicant User Guide – The Applicant User Guide to the Oriel recruitment system 6 Creating an Oriel Account To create your Oriel account, click on the ‘Account Registration’ link on the Oriel home page. You will be asked to provide a small amount of personal information, including your login details, and confirm that you agree to the Terms & Conditions and Privacy Policy of the Oriel recruitment system. Upon successful creation of an account, you will receive an email confirming your details. Most organisations will communicate with you via email. Please ensure you register with a secure and individual email address which you check regularly. You will only need to register once on Oriel to make applications across multiple organisations and recruitment years. Please ensure that you keep your password safe and secure. 7 Account & Password Policy All passwords on the Oriel recruitment system must adhere to the following: Your password must be at least 8 characters long Your password must contain at least one upper case letter (A-Z) Your password must contain at least one numeric value (0-9) Your password must not be one of the previous 5 passwords you have used Please note that your password will expire 365 days after its creation and must be updated. If you attempt to log in after this period, the system will require you to update your password. You are strongly encouraged to use a secure password to reduce the risk of unauthorised access to your Oriel account. In addition to the mandatory criteria above, we would recommend following these guidelines when choosing a password: Change your password regularly (e.g. every 3 months) Do not share your password or leave on view Do not re-use old passwords Include as many different character types as possible (e.g. upper and lower case letters, numbers and non-alphanumeric characters such as !, “, £, $ etc.) If you believe your password has been compromised, then please change it at the earliest opportunity and report it via the contact details under ‘Help Desk’. 8 Sign In Sign-in to Oriel is made using the email address and password entered during registration. If you have forgotten your password, use the ‘Forgotten your password?’ function. Enter your email address and press ‘Reset Password’. Please note you will also be required to enter a passcode generated on-screen. This is to prevent fraudulent use of the system. If the address entered has been registered on the system then an email will be sent with a temporary password that you can use to log in to the system. Enter your email address and the temporary password into the sign-in fields and, if successful, the system will ask you to update the password. Please note that passwords stored in Oriel are encrypted and cannot be retrieved directly. If you are requesting password information the password will be reset and then emailed. If you have not received your password within 60 minutes, please check your spam/junk folders. If there is still no sign of the email then please contact the technical support team via the ‘Help desk’ option on the main menu. 9 Dashboard After sign-in you will be taken to the applicant Dashboard. The main menu will remain available so that you can access the vacancies, recruitment leads, news, resource bank and help desk sections, or log out. You can return to the Dashboard at any point (provided you are signed in), by clicking the ‘Dashboard’ option in the main menu. From the Dashboard, you will find 6 tab options: Registration The Registration tab displays your account details, along with the option to change your email address, password, home, mobile and work telephone number (note that updating your email address, home, mobile, or work telephone number will also update any submitted and in progress applications that you have made, ensuring that the recruitment organisations will have access to your latest contact details). The Registration tab allows you to select which Staff Group you wish to apply to. Staff Groups purpose is to ensure your experience is tailored to the vacancies you wish to apply to. The Registration tab also allows you to enter and update your Applicant Registration details. Please see the ‘Applicant Registration’ section of this user guide for further information. 10 The alert list displays key information to assist with the application process such as, in progress applications and unread messages. My Applications The My Applications tab will display all the applications you have in progress or submitted. The list of applications will display summary information about each (status, scores, rank etc.), with more detailed information available via each application link. See the ‘Managing Your Applications’ section of this guide for further details. Document Upload During the application process you may be asked to upload documentation to support your application (most likely on the Competences page). This tab allows you to upload and maintain the list of documents that can be associated with your applications. Messages Throughout the course of the application process, you are likely to receive communications from the recruitment organisations to which you have applied. The Messages tab will list the messages and/or emails that you receive. When you receive a new message, a count of the number of new messages will display within the ‘Messages’ tab header, and you will receive an alert on the ‘Registration’ tab. Once you have opened the new messages, the count and alert will be removed. See the ‘Messages’ section of this guide for further details. Interviews If you are successfully shortlisted, you may be invited to interview through Oriel. Interview invites and booking information will all be listed within the Interviews tab. Follow the links to make a booking or view the full booking details. You may also have the option to cancel an interview slot. Offers If you are successful in one or more of your applications, any offers will appear within your “Offers” section of Oriel. To assist with tracking the progress of your offers, you will find the latest status reflected within the Oriel system. See the ‘Offers Guide’ for further details. 11 Applicant Registration The Registration process is designed to reduce the time spent entering application data that is common to all the applications you will make. At the point of starting an application, the information you have entered on the registration form will be copied across to that application. You will still be able to add or amend the data. The Applicant Registration form consists of the following sections: Personal Details; Eligibility; Fitness to Practise; Employment History; and Equality & Diversity An overall tracker is provided to track the completion of mandatory fields only. Please note that changing your Applicant Registration profile, after you have started/submitted an application, will not update that application. Any new application you start will however use the latest saved version. In order to ensure that recruitment organisations to which you have applied are using your latest contact details, the following are maintained within the ‘Registration’ tab: Home telephone number Work telephone number Mobile phone number Email address After saving, all applications (whether new, in progress or submitted) will be updated. Please note that you cannot edit these fields within an application form – they must be maintained within the ‘Registration’ tab. In the event that you submit an application without updating your Applicant Registration, the recruitment organisation(s) to which you have applied will only be able to contact you via the email address you registered with. As soon as you update one or more of these fields within Applicant Registration, the recruitment organisation will have access to that information. 12 Registration is considered complete when all mandatory fields have been completed in the Applicant Registration form. Entering responses within any of the optional fields (i.e. those not indicated by a *) will not affect the % complete. Completion of Applicant Registration is optional, so whichever Registration Pages have been completed will be copied across when starting a new application. A page tracker is also provided on the Applicant Registration form to indicate the completeness of mandatory fields on that page. N/A denotes that no mandatory fields are present on this page. 13 Updating Your Account If you wish to change your account information (email address or password) at any point in the application process please use the links on the Registration tab: 14 How to Apply Sign in and then from the main menu, select ‘Vacancies’. Search for a specific vacancy using any combination of the Specialty/Sub-specialty, Post type and Training grade filters. Please note, by default, the system will not show vacancies that have already closed. These can be displayed if the appropriate filter is applied. The Vacancy list will show key information about the Vacancy such as Specialty/Sub-specialty, Grade and opening/closing times. Click on a chosen vacancy to view the full advert and apply, following the on screen instructions displayed. 15 Document Upload During the application process you may be asked to upload documentation to support your application (most likely on the Competences page), for example: The Oriel system provides you with a central repository to upload and store your supporting documentation that can be used across all the applications you make. By default, this page will list all documents with the status of ‘current’. The use of the ‘archive’ status is explained below. To upload a new document, click the ‘Add’ button and you will be presented with the following screen. 16 Select the appropriate file Category and use the Choose file option to browse your local machine and locate the file you wish to upload. Leave the status on the default of ‘current’. IMPORTANT NOTE Please note that you must select the correct file Category otherwise your documentation may not be available to the recruitment organisations you have applied to. A successful upload will be indicated by the addition of your document within the file list. The system will allow you to add more recent versions of a document type that has been previously uploaded. At the point you submit your application, the system will capture the latest version of any documents you have uploaded and make these available to the recruitment organisation(s). In the event that you are asked to upload an additional document, or more recent version of an existing file, then simply follow the same steps as above and the recruitment organisation(s) will be able to refresh the files which are available to them. Please note this process must be initiated by a recruitment organisation, as uploading a more recent version of an existing document type will not be available to them by default. If you find you upload a document in error, or you find yourself attaching several versions of a particular document type over time, you can change the status of the old/incorrect documents to ‘archive’ to prevent them being visible to administrators in subsequent applications. Select the file to be archived using the blue arrow. 17 Change the status to ‘archive’ and save. This document is now removed from your default view. 18 Managing Your Applications The “My Applications” area of the applicant dashboard displays all application activity associated with your account. Options are provided to filter your list of applications. The results list provides summary information about each of your applications, including: Links to the full application summary Links to the full vacancy information Closing date of the vacancy Your unique application ID The recruitment lead for the vacancy you have applied to The latest application status Whether the application has been submitted or is in progress The preference order (please note that if the vacancy does not require you to preference then this will always display ‘1’) Your shortlist score for the application – only available if the lead recruitment organisation has chosen to publish this information Your interview score for the application – only available if the lead recruitment organisation has chosen to publish this information Your overall rank for the application – only available if the lead recruitment organisation has chosen to publish this information Click on the vacancy description, ‘View application summary’ link or blue arrow to view the complete detail of that application status. 19 Messages Throughout the course of the application process, you are likely to receive communications from the recruitment organisations to which you have applied. The Messages tab will list the messages and emails that you receive. Please note SMS messages will not be logged here. When you receive a new message, a count of the number of new messages will display within the ‘Messages’ tab header, and you will receive an alert on the ‘Registration’ tab. Once you have opened the new messages, the count and alert will be removed. You can filter your messages by recruitment lead, specialty and whether the message has been read or not. New messages are indicated by the icon. 20 Interviews If you are successfully shortlisted, you may be invited to interview through the Oriel system. Any interview invites or pre-allocated bookings will be notified via the ‘Alert list’ under the ‘Registration’ tab. You may also receive an email from the respective recruitment organisation. To view your invites and bookings, click on the ‘Interviews’ tab. Follow the “Book” / “Booked” link to make a booking or view the full booking details, respectively. You will also have the option to cancel an interview up until 24 hours before the interview date. To cancel an interview, click on the ‘Booked’ link, then view ‘Your slot’. You will see a link to ‘Cancel interview’ and will be required to enter a reason for the cancellation. 21 Programme Preferences Programme preferencing involves marking each option as being in one of up to three different states: Preference - If an option is marked as a “Preference” it means you wish to be considered for posts within this programme. You must rank these options to specify an order of preference. If you come to be made an offer you will be offered your highest ranked preference where posts remain available. No-Preference - If an option is marked as “No-Preference” it means you wish to be considered for posts within this programme if there are no posts available in your preferenced programme(s). If you come to be made an offer and there are no posts available in your “Preference” options you will be offered any one of the “No Preference” options as they are considered to have equal preference ranking. Not Wanted – If an option is marked as “Not Wanted” it means you are not willing to accept an offer for this programme under any circumstances and therefore do not wish to be considered for these posts. NOTE: The recruitment office responsible for your offers will determine which columns are available to you. To order your preferences you can click on an option you want to move then drag and drop it into another column. If you want to save the changes you have made click the “Save” button. If you wish to cancel the changes click “Cancel” and your preferences will revert back to the last time you saved. You can continue to amend and re-save your programme preferences until the end of the preference window, which may be listed in the programme preference opening email you receive and on the preferencing screen as per the screenshot below. If you do not click the Save button then any changes you have made will not be recorded. Whatever order you have saved your programme preferences in when the window is closed is the order that will be used when matching applicants to available posts. It is advisable to review your saved programme preferences prior to the deadline as they cannot be amended once the window is closed. IMPORTANT NOTE The use of mobile browsers is not supported for this page. Applicants should use a PC browser for this function. 22 23 Offers If you are successful in one or more of your applications, any offers will appear within your “Offers” section of Oriel. To assist with tracking the progress of your offers, you will find the latest status reflected within the Oriel system. To respond/update/view your offer, click on the vacancy name to find out more about your offer. Click into the offer to review the offer detail you are presented with options regarding your offer: 24 Note: Depending on the rules stipulated by the recruitment office the options available may vary. 25 Troubleshooting If you encounter any problems, check for guidance below before seeking assistance. Summary Application form tooltips disappear before they can be read. Description Some questions in the application form have tooltips which appear when the user hovers the mouse icon over the questions text. If the application form is being viewed using IE7, this tooltip disappears after approximately 6 seconds. Guidance This problem is only observed when using IE7. If possible, use another browser to view the application form. Unable to delete documents uploaded in error. Once a document has been uploaded a document to the document upload page in the applicant portal, it is not possible to delete it. Provided you have not yet submitted your application, upload a new document and associate it with the correct document type. All document uploads are date and time stamped, so even though the administrator will be able to see both the original and the subsequent document(s), they will be able to view the latest document. If you have already submitted your application, you should contact the relevant recruitment office. If you have not yet submitted your application, change the status of the document uploaded in error to ‘archive’. This will prevent it being submitted with your application (and any other subsequent applications you may make). Unable to navigate away from the application form employment section. In employment section of the application form, you cannot navigate away from the page without first completing all mandatory questions. If you do encounter this problem, close the browser completely, re-open it and log in again. You are advised to first complete registration pages (including the employment 26 Summary Description Guidance page), before completing an application form. The system will not require to complete all mandatory questions, so allowing you to complete the section over a number of sessions. System has detected the use of multiple browsers/tabs, yet I only have one browser and browser tab open Exiting the application using browser back button causes an error message. This message can also be displayed if you have used the browser’s back button to navigate away from the application form. When completing their application, applicants should use the ‘home’ button to exit the application form. Unable to see complete text of options for an option list question in the application form. When viewing ‘Option List’ style questions using an IE8 browser, the response statement text does not wrap, hence the end of any statements of more than approximately 95 characters are cut-off. This issue is confined to IE8. If possible, use another browser to complete the form. I have not received an email sent to me The system queues emails from the system and sends them in batches. As a result there can be a slight delay between the administrator sending a communication from the system and the applicant receiving it. Wait for a few minutes and check your messages again. If you encounter this problem, you must log off, close the browser completely, then reopen it and log back in. NOTE: The system is designed to be able to send up to 200 emails every 5 minutes. Therefore at times of peak activity it can take some time for all emails for very large batch communications to be sent. I am unable to rank preferences from my mobile device Although the rank preference page is displayed correctly, it is not possible to select an individual preference to drag 27 The use of mobile browsers is not supported for this page. Applicants should use a PC browser for this function. Summary Description and drop into the correct place for ranking. 28 Guidance Who to Contact for Assistance If you require assistance during the application process please use the appropriate technical/nontechnical contact details shown on the Help Desk page (accessed from the main menu). If your query is specifically in relation to an application you have made then please contact the recruitment lead for that vacancy. Contact details can be found on the appropriate profile within the ‘Recruitment lead’ section of the system (accessed from the main menu). 29