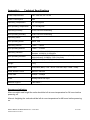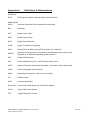
1
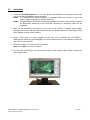
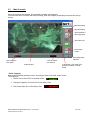
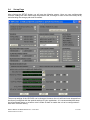
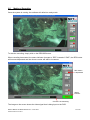
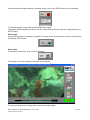
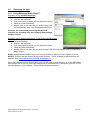
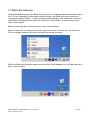
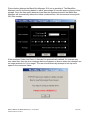
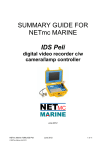
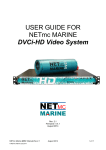
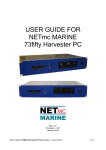
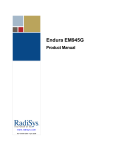
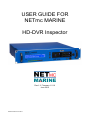
USER GUIDE FOR NETmc MARINE HD-DVR Inspector Rev 1.3 Firmware 1.2.16 June 2015 © NETmc Marine Ltd 2013 Table of Contents 1. 2. Introduction.....................................................................................................................3 System Description.........................................................................................................3 2.1 HD-DVR Inspector Hardware Description and Connections ..................................3 2.2 HD-DVR Inspector License dongles for Optional Features ....................................5 2.3 Installation ...............................................................................................................6 2.3 To Power-down the HD-DVR Inspector...................................................................7 3 Operating Instructions ...................................................................................................8 3.1 Start-up ...................................................................................................................8 3.2 Setting the Time ......................................................................................................9 3.3 Main Controls ........................................................................................................10 3.4 Set-up Page ..........................................................................................................11 3.5 Making a Recording ..............................................................................................14 3.5 Replaying the data ................................................................................................16 3.5.1 Using Windows Media Player™………………………………………………….16 3.6 Black Box Recording………………………………………………………..…………..17 3.7 Black Box Manager……………………………………………………..………………18 4 How to contact NETmc Marine Support………………………………………………..…..20 Appendix i : Technical Specifications .............................................................................21 Appendix ii: Definitions & Abbreviations.........................................................................22 Appendix iii: Keyboard short cuts....................................................................................23 NETmc Marine Ltd New Deer, Turriff, Aberdeenshire AB53 6TL, U.K. TEL. +44 1771 644001 FAX. +44 1771 644005 Email: [email protected] NETmc Marine HD-DVRi Manual rev.1.3 Jun 2015 © NETmc Marine Ltd 2013 2 of 23 1. Introduction NETmc Marine has been designing and manufacturing digital video recorders (DVR) since the late 1990s. The DVR Inspector range, which includes the portable DVRi Peli, is its top of the range single channel recorder specifically designed for the offshore survey, ROV and commercial diving markets. The HD-DVR Inspector or HD-DVRi is a single channel rack mountable recorder running on a Windows platform for recording high definition SDI input video @ 720 and 1080 format, as well as standard definition PAL or NTSC composite inputs. It is possible from the high-definition input to record that image in both native hi-definition and downscaled standard definition: for example to record fantastic quality anomaly clips in HD and an archive of regular footage in standard definition. Digital video recording is fast becoming the industry standard for video acquisition and the DVR Inspector range of products is now the DVR of choice for many oil companies and inspection companies for the production of integrated video and data in the structural integrity monitoring market. 2. System Description 2.1 HD-DVR Inspector Hardware Description and Connections NOTE: The HD-DVR Inspector is designed to function with the connections / settings described in this manual. Please contact NETmc Marine Support team (see Section 5) before attempting to connect any external equipment not described below. 2 x general purpose USB sockets Power button LCD Display VU Meter Up to 4 x 500GB hard drives, set up as RAID5 NETmc Marine HD-DVRi Manual rev.1.3 Jun 2015 © NETmc Marine Ltd 2013 Headphone socket Microphone socket 3 of 23 Rear of the unit Network connection socket 4x USB sockets Mains input socket Cooling fan (Do not cover) VGA out Standard definition downscaled video output Analogue composite lowdefinition video in / passthrough Serial input USB 3 socket MIC IN Audio out (stereo) Overlay serial port RCA audio inputs Not currently used HD SDI input / pass-through Video input: Analogue composite low-definition video is input to / passed through the HD-DVR Inspector via the BNC sockets on the top row. Hi-definition SDI video is input to / passed through the HD-DVR Inspector via the BNC sockets at the right of the bottom row. A downscaled version of the HD video can be obtained through the BNC socket at the left of the bottom row. This may be useful for display on an older style monitor (e.g for QC checking) or for passing on to a standard definition video recorder (like the NETmc Marine 73fiftyBlackbox for example). Audio input: Audio input to the HD-DVR Inspector is via the line in RCA sockets – or via a microphone. There are microphone sockets on the front and back of the unit. USB sockets: The USB keyboard and mouse can be plugged into any of the 5 USB sockets. The USB 3 socket enables faster transfer of data so it would be advantageous to use this socket e.g. for backup onto USB storage devices. NETmc Marine HD-DVRi Manual rev.1.3 Jun 2015 © NETmc Marine Ltd 2013 4 of 23 2.2 HD-DVR Inspector License dongles for Optional Features Latest versions of the HD-DVRi use a USB license dongle to enable / disable features. This allows customers to have a stock of basic units – which can be upgraded by inserting the dongle prior to opening the DVR application. The software checks for the dongle every few seconds – so it must remain inserted for the options to continue working. Example options are: Blackbox Dual format encode Integrity management software remote control Composite video recording Attached screen grabs illustrate the difference when Integrity Management option is enabled and not IM Option not enabled IM Option enabled NETmc Marine HD-DVRi Manual rev.1.3 Jun 2015 © NETmc Marine Ltd 2013 5 of 23 2.3 Installation 1. Install the HD-DVR Inspector in a 19” rack giving consideration to the height at which the unit is mounted to facilitate ease of operation. Note1: It is essential that sufficient space be allowed behind the recorder to allow the power supply-cooling fan to function correctly. Note2: If networking the HD-DVRi, all network connections must be made and the network be live before switching on the HD-DVRi, otherwise no streaming video will be available. 2. Make all the necessary connections at the rear of the recorder, including power cable, keyboard and mouse; the required connections will vary depending on the video signal being input, display devices being used etc. 3. Insert a hard drive in to the receptacle at the front of the machine. Do this GENTLY. Although the drives are ‘Hot Swappable’ we advise that drives are only inserted or removed when unit is powered OFF. 4. Press the “power on” button on the front panel. Note: this is NOT a “power off” switch. 5. For use with an HD input, we recommend using a wide screen VGA monitor to keep the same aspect ratio. NETmc Marine HD-DVRi Manual rev.1.3 Jun 2015 © NETmc Marine Ltd 2013 6 of 23 2.3 To Power-down the HD-DVR Inspector Close all desktop applications Click START from the Windows Tool Bar Select SHUTDOWN With Shutdown selected, click OK This will close Windows and switch off the PSU DO NOT REMOVE MAINS CONNECTION BEFORE SHUTDOWN NETmc Marine HD-DVRi Manual rev.1.3 Jun 2015 © NETmc Marine Ltd 2013 7 of 23 3 Operating Instructions 3.1 Start-up The HD-DVR Inspector software runs on a Windows 2000 or XP professional installation. To launch the application, double click the NETmc HD-DVR Inspector icon on the desktop: Once launched, the following screen will appear (with a picture if video signal input is connected). Live/Enc/OSD This symbol will be red when the unit first powers up and will turn green (as in the image above) when the HD-DVR Inspector is ready to record. If it remains red there is an error – check all connections. OSD signifies that overlay is onboard and is ready for action. NETmc Marine HD-DVRi Manual rev.1.3 Jun 2015 © NETmc Marine Ltd 2013 8 of 23 Status Bar The blue status bar at the top of the screen contains useful information which may be required by our support engineers – not only the software version, but also what video signals/formats have been detected. In the above example, no analogue SD has been input to the recorder, HD is 1080i30. 3.2 Setting the Time The HD-DVRi units use UTC (GMT+0 or GPS time) in auto file naming and overlay manager. In windows time settings, the time zone should always be set to "GMT Greenwich Mean Time: (Dublin, Edinburgh, Lisbon, London)" - with daylight saving disabled. Then simply adjust the date / clock to reflect the local time. NETmc Marine HD-DVRi Manual rev.1.3 Jun 2015 © NETmc Marine Ltd 2013 9 of 23 3.3 Main Controls Once the program has started, the operation controls are displayed. From here the user can start and stop recording, take still images (snapshots) and enter the set-up screen. Start Recording Stop Recording Take Snapshot / Still image grab Take video clip Enter Setup screen Drive capacity – free space* Recording status indicator Time encoded this session Video Window If displayed, a VU meter here gives an indication of audio levels. * Drive Capacity Note that this display changes colour according to how much disk space is free: The display is: Green if more than 25% of the disk is free. Orange if between 10% and 25% of the disk is free Red if less than 10% of the disk is free. NETmc Marine HD-DVRi Manual rev.1.3 Jun 2015 © NETmc Marine Ltd 2013 10 of 23 3.4 Set-up Page After clicking the SETUP button you will see the following screen. Here you can configure the recorder; setting the video format and compression rate, the length or size of the video files (PKTS) and allocating the storage path and file names. The set-up settings of the HD-DVRi can be changed, however the unit will have been shipped from the factory configured with the optimal settings for your application– it is recommended that these be left as shown above or at least a note is made of them to enable the unit to be configured as it was when it left the factory. NETmc Marine HD-DVRi Manual rev.1.3 Jun 2015 © NETmc Marine Ltd 2013 11 of 23 A description of each parameter in the set-up screen is given below: Application: Enable keyboard Shortcuts Always on top This enables or disables the use of keyboard shortcuts. See appendix (iii) for a list of short cuts. Keeps the video recorder display on top of any other windows that may be open. Source: A-PAL A-NTSC HD-SDI 720P HD-SDI 1080i HD-SDI 1080p For use if input video is in the European format PAL For use if input video is in the American / Asian format For use with HD-SDI 720P input For use with HD-SDI 1080i input For use with HD-SDI 1080P input Encoder Format: MPEG4 AVC in MP2-TS* MPEG4 AVC in MP4 MPEG4 content inside MPEG2 transport wrapper MPEG4 Recommended format – more compliant with older tools and players. NOTE: The selection of the format does not just depend on the desired quality of the video; consideration should also be given to how you will view the data at a later date. For instance should you wish to view the data over the Internet then you may wish to use the lowest compression rate available. Profile: This section allows the selection of bit rate – as specified in procedure or by experiment. The higher the number, the more data is used to describe dynamic and colour content of the video, but the files created will become corresponding larger. Therefore if you are using a fixed camera in a clear fairly static environment a low bitrate can be selected which gives easy to store and copy small files. If you are using a moving camera in a highly complex and fluctuating environment a high bit rate will give better results. Maximum Segment Size: Single File Recording This mode enables recording of one continuous file from the moment “Record” is pressed to the moment “Stop” is pressed. The advantage of this type of recording is its simplicity – only one file is created for each recording session. The disadvantage is that if the job is a lengthy one, the file will become very large. This may create problems later (for example files will take a long time to upload, they might be too big to save on a CD or forward by email.) It would also mean that the whole file has to be searched to find a particular incident. Multi-File Record (duration) This mode means that for each recording session (starting when “Record” is pressed and ending when “Stop” is pressed) several individual files of a certain length are created. The standard file length is 5 minutes (300 secs). Each segment is named according to the date/time at the start of this segment. This is intended to make searching for a particular incident easier, and makes storage and transfer of files more simple. These files can later be stored or transferred separately – or if required, can be joined together as the customer requires. Note that the HD-DVR Inspector does not stop and restart recording at the end of each 5-minute period. Instead it records continuously over a longer time period, then cuts the file into the relevant NETmc Marine HD-DVRi Manual rev.1.3 Jun 2015 © NETmc Marine Ltd 2013 12 of 23 length segment. The aim of this is to prevent any gap in recording, and to reduce any “jump” during playback, or if the files are later joined together. We strongly recommend recording in multi-file mode wherever possible. Video File Location, Share and Templates: Record Path This is the location that your video files will be stored. The default location is “D” Videofile Prefix Adds a chosen name or auto variable to the video file. Select “?” for a list of auto name options. Add FILENO Adds an incrementing file number to each file created. Date Adds the current date to the file name Time Adds the current time to the file name Similarly: Clip Path Clip File Prefix Still Path Still File Prefix Select the location where video clips will be stored. The default location is “D” Add a chosen name/name to video clips. Select the location where still image grabs will be stored. The default location is “D” Add a chosen name/name to still image grabs. Options at bottom of Set-up Page Apply – applies the changes Reset – Undoes any changes you have made during the current visit to the set-up screen Close – Closes the SETUP window Once the system has been configured click on the “CLOSE” button to return to the main control screen where you can begin recording. NETmc Marine HD-DVRi Manual rev.1.3 Jun 2015 © NETmc Marine Ltd 2013 13 of 23 3.5 Making a Recording Once the system is running, the software will default to ready mode. To start the recording, simply click on the RECORD button. When recording has started, the status indicator changes to “REC” instead of “IDLE”, the REC button will become depressed and the minute counter will start to increment: REC button is depressed Status indicator Counter is incrementing The image on the screen shows the video signal that is being input to the DVR. NETmc Marine HD-DVRi Manual rev.1.3 Jun 2015 © NETmc Marine Ltd 2013 14 of 23 Once the desired footage has been recorded, simply click on the STOP button to end recording. To resume logging, simply click the RECORD button again. The system will automatically create a new file, automatically named as per the configuration in the SETUP page. Still Images At any point during the recording or preview, the image on the screen can be saved as a bmp file by clicking the STILL button. Video Clips To take short video clips, click on the CLIP button The length of the video clip being recorded is now shown. To stop recording the clip, simply click on the same button again. NETmc Marine HD-DVRi Manual rev.1.3 Jun 2015 © NETmc Marine Ltd 2013 15 of 23 3.5 Replaying the data 3.5.1 Using Windows Media Player™ Replaying on the HD-DVR Inspector Go to the Desktop Click on “My computer” Click on the drive to which you are storing the video Open the video folder there Double click on the video file you wish to check; this will automatically open up in Windows Media Player However, we recommend preserving the HD-DVR Inspector for recording only and replaying data through another channel. Replaying via a network, NAS device, or SATA drive (USB to Sata adapter Go to the Desktop Click on “My computer” Click on the drive to which you are storing the video Open the video folder there Double click on the video file you wish to check; this will automatically open up in Windows Media Player NOTE: Using Windows Media Player it will only be possible to play one video segment at a time. NOTE2: A codec may be required to play video correctly. This is available to download from our website. See www.netmcmarine.co.uk/file_downloads.htm If the video was recorded to a removable drive you will need to insert the drive in to the USB caddie and connect this to your PC. Once the storage unit is connected to the USB port of your PC, a new drive will appear on your desktop. Follow the same options as above. NETmc Marine HD-DVRi Manual rev.1.3 Jun 2015 © NETmc Marine Ltd 2013 16 of 23 3.6 Black Box Recording Black box recording is an optional extra. This option allows a separate, continuous recording of the The whole operation, for example; for health and safety purposes, independent of whether the video is currently recording. This button will only be enabled if you have purchased the Black Box option. The following images indicate whether the Black Box is enabled or not: ENABLED DISABLED If the Black Box option is enabled, clicking on this button will start recording. The button will now look like this: Black Box files are automatically saved under the time and date recorded and can be accessed through Windows: NETmc Marine HD-DVRi Manual rev.1.3 Jun 2015 © NETmc Marine Ltd 2013 17 of 23 3.7 Black Box Manager Unless otherwise arranged, the Black Box will record to a separate hard drive partition called the D: Drive. Depending on the quality settings chosen, the Black Box allows continuous recording for approximately 7 ½ days (medium quality settings). After which time, a process called Black Box Manager will delete the oldest file in that location, to make room for new video to be created. Status and configuration of this process is done via the task bar. Right click black box icon located at the bottom right of the taskbar which will open the options list. Click on configure and this will open the black box storage manager. When the Black Box Manager stops running the Black Box Manager icon will flash red with a white cross as below: NETmc Marine HD-DVRi Manual rev.1.3 Jun 2015 © NETmc Marine Ltd 2013 18 of 23 Picture below displays the Black Box Manager GUI set up as default. The Black Box Manager has file monitoring based on either percentage of free disk space or bytes of free storage. Once the free space becomes less than the monitored amount the Black Box Manager will automatically delete the oldest monitored files. We recommend running with 30% free storage. If the monitored folder has files in it that can’t be automatically deleted, for example any non-video files, then the error message below will appear on screen when the manager can no longer achieve its % free target. The user should manually attempt to free up more space in the monitored folder. NETmc Marine HD-DVRi Manual rev.1.3 Jun 2015 © NETmc Marine Ltd 2013 19 of 23 4. How to contact NETmc Marine Support Should any problems occur with your HD-DVR Inspector that are not addressed by this manual please contact our Support Team: Email: [email protected]. Tel: +44 1771 644001 Should your call be outside office hours, please leave a message on the answering machine, which will be forwarded to one of the support engineers. Although we cannot guarantee 24/7 availability, we endeavour to respond as quickly as possible to any query – regardless of when the support call is made. In order to help our engineers solve the problem as quickly as possible, please have ready the following information: - Type of equipment (please state HD-DVR Inspector) - Serial number (from the bar code sticker attached to the unit or IP Address - A description of the fault, including any information on events that happened prior to the fault that might have affected the equipment (e.g power surge on vessel, change to wiring on vessel, change to software configuration including change to username/password). Note: Whilst every effort has been made to ensure that the information contained in this manual is accurate, no liability can be accepted for errors and omissions. NETmc Marine HD-DVRi Manual rev.1.3 Jun 2015 © NETmc Marine Ltd 2013 20 of 23 Appendix i : Technical Specifications Power Requirements 100 - 240 Vac, 50 - 60 Hz Power Consumption 90w Operating Temperature 10 - 35 Degrees Non-operating Temperature -10 - 60 Degrees Operating Humidity 5-95% RH non-condensing Non-operating Humidity 5-95% RH non-condensing Operating Shock 65G, 2ms Non-operating Shock 250G, 2ms Operating Altitude -305m – 3,050m Non-operating Altitude -305m – 12.200m Operating Vibration Non-operating Vibration Linear 20-300Hz, 0.75G (0 to peak) Random 10-300 Hz, 0.004g2/Hz Low frequency 5-20 Hz, 0.195 inches (double amplitude) High frequency 10-300Hz, 5.0G (0 to peak) Dimensions 482(W) x 88.5(H) x 455(D) (2U case) Weight 11kg Video Input Composite (BNC) / PAL / NTSC / HD-SDI 720p / 1080i / 1080p Video Stream Format MPEG2 / MPEG4 Video Rate 4 Mbps – 20Mbps Audio Analog stereo line input Network Support 1000 Base T Storage and shipping After overnight road freight the units should be left at room temperature for 24 hours before powering on. After air freighting the units should be left at room temperature for 48 hours before powering on. NETmc Marine HD-DVRi Manual rev.1.3 Jun 2015 © NETmc Marine Ltd 2013 21 of 23 Appendix ii: Definitions & Abbreviations Definitions DVRi DVR Inspector Single Channel Digital Video Recorder Abbreviations ASCII American Standard Code International Interchange DB Database DLT Digital Linear Tape DRS Digital Review Suite DVR Digital Video Recorder HTML Hyper Text Mark-up Language MPG Moving Pictures Expert Group File extension for a video file MPEG1 Industrial recording format, controlled by the Moving pictures expert group Playable on all Windows operating systems win95 -> PKT Packet File Extension PAL Phase Alternation by Line – the European video format NTSC National Television Standards Committee – American / Asian video format JPEG Joint Photographic Experts Group Mbps Mega bits per seconds – rate of video encoding QC Quality Control USB Universal Serial Bus Store path Local on hard-disk where the video will be placed SVHS Super Video Home System TIFF Tagged Image File Format NETmc Marine HD-DVRi Manual rev.1.3 Jun 2015 © NETmc Marine Ltd 2013 22 of 23 Appendix iii: Keyboard short cuts ShortCut Key R S Spacebar / Function Record Stop Still image Set-up page End of Document Note: Whilst every effort has been made to ensure that the information contained in this manual is accurate, no liability can be accepted for errors and omissions. NETmc Marine HD-DVRi Manual rev.1.3 Jun 2015 © NETmc Marine Ltd 2013 23 of 23