1
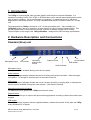
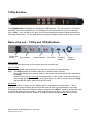
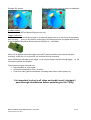
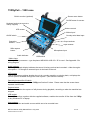
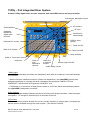
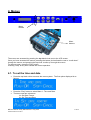
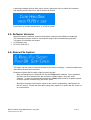
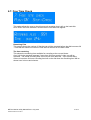
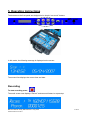
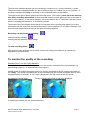
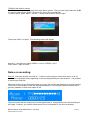
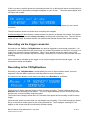
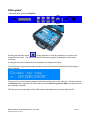
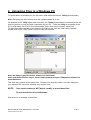
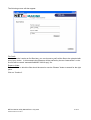
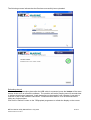
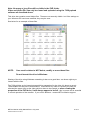
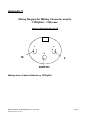
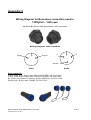
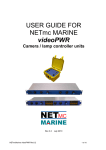
USER GUIDE FOR NETmc MARINE 73fifty range of digital video recorders Rev 6 Firmware 1.54 July 2014 NETmc Marine 73fifty Manual Rev 6 July 2014 © NETmc Marine Ltd 2014 1 of 41 Contents 1. Introduction ..................................................................................................................................... 3 2. Hardware Description and Connections ......................................................................................... 3 Standard (blue) unit......................................................................................................................... 3 73fifty Blackbox ............................................................................................................................... 4 Back of the unit – 73fifty and 73fiftyBlackbox.................................................................................. 4 73fiftyPeli – 1300 case .................................................................................................................... 6 73fifty – Peli Integrated Diver System ............................................................................................. 8 4. Menus ........................................................................................................................................... 11 4.1. To set the time and date......................................................................................................... 11 4.2 To set the recording mode ...................................................................................................... 12 4.3. To set the recording bitrate .................................................................................................... 13 4.4. To set the recording time........................................................................................................ 14 4.5. Software Versions .................................................................................................................. 15 4.6. Renew File System ................................................................................................................ 15 4.7. Free Time Check.................................................................................................................... 16 5. Operating Instructions................................................................................................................... 17 Recording ...................................................................................................................................... 17 To monitor the quality of the recording:......................................................................................... 18 Notes on recording: ....................................................................................................................... 19 Recording via the trigger connector .............................................................................................. 20 Recording to the 73fiftyBlackbox................................................................................................... 20 Playback........................................................................................................................................ 21 Fast-forward and Rewind .............................................................................................................. 22 Skip function.................................................................................................................................. 22 Stills grabs* ................................................................................................................................... 23 6. Uploading Files to a Windows PC................................................................................................ 24 Important information on PC Uploading. ....................................................................................... 29 7. Deleting files from the 73fifty........................................................................................................ 32 8. Playback of files on your Windows PC ......................................................................................... 32 9. FAQ............................................................................................................................................... 33 10. Troubleshooting .......................................................................................................................... 34 11. Antivirus ...................................................................................................................................... 36 12. How to contact NETmc Marine Support...................................................................................... 36 Appendix 1 ........................................................................................................................................ 37 Technical Specifications................................................................................................................ 37 Appendix 2 ........................................................................................................................................ 38 Wiring Diagram for Military Connector used in 73fiftyPeli – 1300 case........................................ 38 Appendix 3 ........................................................................................................................................ 39 Wiring Diagram for Buccaneer connectors used in 73fiftyPeli – 1520 case................................. 39 Appendix 4 ........................................................................................................................................ 40 Wiring Pin-Out of Umbilical Connector for 73fifty-Peli Integrated Diver System .......................... 40 Spare parts:................................................................................................................................... 40 NETmc Marine Ltd Turfhill, New Deer, Turriff Aberdeenshire AB53 6TL TEL. +44 1771 644001 FAX. +44 1771 644005 EMAIL: [email protected] NETmc Marine 73fifty Manual Rev 6 July 2014 © NETmc Marine Ltd 2014 2 of 41 1. Introduction The 73fifty is a robust digital video recorder which is both simple-to-use and affordable. It is capable of recording from a PAL, NTSC or SECAM video source and will automatically detect which type of signal is present. (No re-configuration is necessary.) It can record for up to 120 hours dependent on the bitrate selected. It is fully compatible with the NETmc Marine VideoTXT overlay unit. The standard (blue) 73fifty is housed in a 19” 1U rack-mountable case. Also available is a 73fiftyPeli version, which is supplied in its own robust Peli case for ease of transportation. This can be supplied with or without its own monitor, and with or without internal built-in overlay. The third option in the range is the 73fifty–Blackbox – designed for HSE recording requirements. 2. Hardware Description and Connections Standard (blue) unit Microphone input LCD screen Operating buttons (see below) Capture button On/Off switch USB socket Audio indicator Microphone input Microphone input is available directly from the front panel. Audio indicator A moving bar-graph display indicates that sound is being received and recorded – either through a microphone – or through an external input via the back of the unit. LCD screen Text on this screen indicates whether the unit is currently recording, or playing back, or displays the various options available through the menu system. (See Section 3 below). Operating buttons/On-off switch For details on how to operate the 73fifty see Section 4 below. Capture button This button enables you to capture still pictures during playback, recording or when the machine has stopped. USB socket This USB interface, together with the supplied software, enables the transfer of files from the 73fifty to any Windows PC or laptop. NETmc Marine 73fifty Manual Rev 6 July 2014 © NETmc Marine Ltd 2014 3 of 41 73fifty Blackbox The 73fiftyBlackbox is designed for recording for HSE purposes. The unit records to an internal hard disk. Files can be uploaded on to a Windows PC in the same manner as for the standard (blue) 73fifty. Once the disk is full (after 44 to 83 hours dependent upon the bitrate selected) the unit loops automatically – i.e. the earliest files recorded are deleted to make way for the new ones. Back of the unit – 73fifty and 73fiftyBlackbox Power-cable Input sockets socket Output sockets QC socket Auxilliary socket Trigger connector Input sockets Connect the video and audio sources which are to be recorded here. Output sockets These sockets enable video and audio connections to a monitor for video playback. Note: The 73fifty operates in a similar manner to a domestic video recorder. During video playback the picture visible on the monitor is that which has been recorded by the 73fifty. When the unit is idle or recording, the image shown on your monitor via these sockets is a pass-through signal (i.e. is identical to the input signal.) In order to monitor how the 73fifty has recorded this signal, please use the QC socket. QC socket This socket outputs a “quality control” display which is a decode of the video stream. This is indicative of the mpeg encoding and will lay behind the live video by approximately 2 seconds. Monitoring the QC output will enable the user to check that the 73fifty is recording successfully, and to monitor the quality of that recording. Note: that the screen will show a “QC” logo in the top corner to indicate that the picture shown is for quality control purposes and NOT the live video. NETmc Marine 73fifty Manual Rev 6 July 2014 © NETmc Marine Ltd 2014 4 of 41 Example QC screen: During recording the screen a red dot is displayed: Auxilliary socket The socket is for NETmc Marine Engineer use only. Trigger Connector This socket is used to link the recorder to an external trigger source, so that it may automatically start and stop. A plug to be used for connecting to the external source is supplied with the unit: 2-way COMBICON terminal block connector (RS part no.: 189-6486) When 12v is applied across the trigger input (NOT polarity sensitive) the recorder will start recording. When the 12v is removed, the recorder will stop recording. Once recording is activated by the trigger, it can only be stopped via the external trigger – i.e. the front panel controls are disabled. Typical remote trigger examples are: Record switch on control desk Off-deck microswitch for ROV / dive bell Feed from main system switchboard (recording starts when vehicle power on.) It is important to plug in all video and audio input / playback / pass-through connections before switching on the 73fifty. NETmc Marine 73fifty Manual Rev 6 July 2014 © NETmc Marine Ltd 2014 5 of 41 73fiftyPeli – 1300 case Built-in monitor (optional) Screen menu button On/Off button for screen Keyboard socket (where built-in overlay supplied) Volume control LCD screen Mains input* On/Off switch Overlay serial data input Output sockets Operating buttons Input sockets Stills capture button Audio indicator Microphone input USB socket * Mains input A 3-way military connector – type Amphenol MS3102A-10SL-3S / 3P is used. See Appendix 2 for wiring diagram. Audio indicator A moving bar-graph display indicates that sound is being received and recorded – either through a microphone – or through an external input via the back of the unit. LCD screen Text on this screen advises whether the unit is currently recording, or playing back, or displays the various options available through the menu system. (See Section 3 below). Operating buttons/On-off switch For details on how to operate the 73fifty see Section 5 below. Please note that the screen has a separate on/off button. Capture button This button enables the capture of still pictures during playback, recording or when the machine has stopped. USB socket This USB interface, together with the supplied software, enables the transfer of files from the 73fifty to any Windows PC or laptop. Input sockets Connect the video and audio sources which are to be recorded here. NETmc Marine 73fifty Manual Rev 6 July 2014 © NETmc Marine Ltd 2014 6 of 41 Output sockets These sockets enable video and audio connections to a monitor for video playback. Note: The 73fifty operates in a similar manner to a domestic video recorder. During video playback the picture visible on the monitor is that which has been recorded by the 73fifty. When the unit is idle or recording, the image shown on your monitor via these sockets is a pass-through signal (i.e. is identical to the input signal.) Built-in Monitor The built-in monitor has a separate on/off button at the bottom right of the screen. The screen menu allows the user to adjust brightness and contrast. The “Source Input” option allows the user to switch between watching the input (live) video (SVBC1) and the QC screen (SVBC2) which is a decoded version of the mpeg encoded files for quality control purposes. Built-in Overlay Overlay can be built in, as an optional extra, in the 73fiftyPeli unit. See the separate guide for further details on the Overlay function. It is important to plug in all video and audio input / playback / passthrough connections before switching on the 73fifty. NETmc Marine 73fifty Manual Rev 6 July 2014 © NETmc Marine Ltd 2014 7 of 41 73fifty – Peli Integrated Diver System Portable 73fifty digital video recorder complete with videoPWR camera and lamp controller Commentary Microphone Input AC power in On/Off switch AC fuse Operating buttons for digital video recorder Umbilical for camera/lamp USB for video upload Keyboard for overlay Lamp On /Off Data In for Overlay Camera On/Off Lamp intensity Audio In. From diver comms Audio Out. Video In from alternative camera Video Out to external monitor Monitor input Live/QC Audio replay volume * Mains input VideoPWR camera/lamp controllers are designed to work with our customer’s own camera/lamps as requested: - Where a Souriau umibilical connector is fitted (see Appendix 4), the videoPWR unit has been designed specifically for use with Novasub underwater cameras parts CAMSS2.3TP and CAMSS2.4C, and Novasub LED lights part LUX6LSS1.4-12. - If a different or no connector is fitted please contact us to find out which camera/lamps systems the videoPWR is designed to work with. Audio indicator A moving bar-graph display indicates that sound is being received and recorded – either through a microphone – or through an external input via the back of the unit. LCD screen Text on this screen advises whether the unit is currently recording, or playing back, or displays the various options available through the menu system. (See Section 3 below). NETmc Marine 73fifty Manual Rev 6 July 2014 © NETmc Marine Ltd 2014 8 of 41 Operating buttons/On-off switch For details on how to operate the 73fifty see Section 5 below. Please note that the screen has a separate on/off button. Capture button This button enables the capture of still pictures during playback, recording or when the machine has stopped. USB socket This USB interface, together with the supplied software, enables the transfer of files from the 73fifty to any Windows PC or laptop. Input sockets Connect the video and audio sources which are to be recorded here. Output sockets These sockets enable video and audio connections to a monitor for video playback. Note: The 73fifty operates in a similar manner to a domestic video recorder. During video playback the picture visible on the monitor is that which has been recorded by the 73fifty. When the unit is idle or recording, the image shown on your monitor via these sockets is a pass-through signal (i.e. is identical to the input signal.) Built-in Overlay Overlay can be built in, as an optional extra, in the 73fiftyPeli unit. See the separate guide for further details on the Overlay function. Electrical The units operate from 90 to 260 VAC input. Lamp output 0-24v DC variable. Camera output typically 24v DC Camera signal should be via co-ax unless unit has been ordered specifically with twisted pair line drivers – this is indicated on the product bar code. The internal battery should be charged prior to each use. Connect to the mains, (ensure AC power LED is lit) for a minimum of 15 minutes before powering up the unit. It is good practice to ensure that the battery is always well-charged to ensure maximum performance. It is important to plug in all video and audio input / playback / passthrough connections before switching on the 73fifty. NETmc Marine 73fifty Manual Rev 6 July 2014 © NETmc Marine Ltd 2014 9 of 41 3. Set-up THIS PRODUCT MUST BE EARTHED. 1. Mount the 73fifty in a suitable rack mount system or position the Peli case as required. 2. Connect the power supply. Note: we highly recommend connection to a UPS (uninterruptible power supply) to prevent data loss. 3. Connect audio and video input. We recommend that the best quality input is connected – i.e. that the 73fifty is connected as close to the camera / microphone as possible. 4. Connect audio and video output. Note that the output sockets function as pass-through sockets until “Play” is pressed. 5. Connect a QC monitor via the QC socket. (Not 73fiftyPeli where the QC screen is available through the screen menu options) 6. IMPORTANT: Please plug in and switch on all video and audio input connections before switching on the 73fifty. This is because the 73fifty will automatically detect which type of video signal (PAL, NTSC or SECAM) is present. Also, interference to the video signal after the 73fifty is connected can cause the encoder card to crash – visible by a black stripe on the QC screen. See the Troubleshooting section for more details. 7. Switch on the 73fifty. Note that the unit takes a few seconds to configure the system before becoming fully operational. On 73fiftyPeli units with a built-in monitor, the monitor needs to be switched on separately. 8. Use the menu buttons to set the recording bitrate, and for standard (blue) and Pelicase units the recording mode (continuous or time-restricted.) 9. Start recording by pressing “Record”, or by connecting the external trigger. You will see the message “Record” on the LCD screen, and the decoded image will be shown on the QC monitor with a 2-second delay. 10. Once the job has finished, press “Stop”. Please wait for a few seconds while the 73fifty checks and stores the files (you will see the message “Creating Files” on the LCD screen) before switching off the unit. See below for further operating instructions. NETmc Marine 73fifty Manual Rev 6 July 2014 © NETmc Marine Ltd 2014 10 of 41 4. Menus Menu buttons Menu buttons The menus are accessed by pressing the top black circle next to the LCD screen. Once you have accessed the menus, pressing the bottom circle allows the user to “scroll-down” through the menus, and pressing the top circle “scrolls-up” through the menus. To select a menu, press the “Play” button. Pressing “Stop” at any time cancels the current operation. 4.1. To set the time and date Press the top black circle to access the menu system. The first option displayed is as follows: Press the “Play” button to select Menu 1: Time and Date. There are now two submenus: 1a: Set Date Format. 1b: Set Time and Date. NETmc Marine 73fifty Manual Rev 6 July 2014 © NETmc Marine Ltd 2014 11 of 41 Scroll through these sub-menus by pressing the top and bottom circles. Select one by pressing “Play.” Date Format The default setting is GB format (e.g. DD/MM/YYYY.) This can be changed to US format (MM/DD/YYYY) if required. For example the GB format is as follows: Scroll down through these options by pressing the bottom circle. Once you have reached the format you require, press “Play” to store. Time and Date Press the “Fast Forward” or “Rewind” buttons to move to the next section of the time or date (i.e. from hours to minutes to seconds and from day to month to year). Press the black circles to change the digits up or down. Press “Play” to store the date selected. 4.2 To set the recording mode Note: The 73fiftyBlackbox is configured to record in time-restricted mode only. Standard (blue) unit and Pelicase unit. Press the top black circle to access the menu system. Press the bottom black circle twice to scroll down to Menu 2: Recording Mode Press the “Play” button to select this menu. You now have the following options: 2a: Continuous 2b: Time-restricted Continuous recording This mode enables recording of one continuous file from the moment “Record” is pressed to NETmc Marine 73fifty Manual Rev 6 July 2014 © NETmc Marine Ltd 2014 12 of 41 the moment “Stop” is pressed. The file name given is the date and time recording was started. The advantage of this type of recording is its simplicity – only one file is created for each recording session. The disadvantage is that if the job is a lengthy one, the file will become very large. This may create problems later (for example files will take a long time to upload, they might be too big to save on a CD or forward by email.) It would also mean that the whole file has to be searched to find a particular incident. We strongly recommend recording in time-restricted mode wherever possible. Time-restricted recording This mode means that for each recording session (starting when “Record” is pressed and ending when “Stop” is pressed) several individual files of a certain length are created. The standard file length is 5 minutes, but in standard (blue) 73fifty recorders this can be altered under menu option 4 (see below). Each segment is named according to the date/time at the start of this segment. This is intended to make searching for a particular incident easier, and makes storage and transfer of files more simple. These files can later be stored or transferred separately – or if required, can be joined together as the customer requires. Note that unlike many other video recorders which have a time-restricted mode, the 73fifty does not stop and restart recording at the end of each 5-minutes or other set period. Instead it records continuously over a longer time period, then cuts the file into the relevant length segment. The aim of this is to prevent any gap in recording, and to reduce any “jump” during playback, or if the files are later joined together. During recording in time-restricted mode, you may notice a message on the LCD screen saying “creating file” at the end of each 5-minute segment, telling you that this process is happening. The “Record” button will flash at the same time. Please be reassured that there will be no break in recording while this is happening. Similarly when “Stop” is pressed when recording in time-restricted mode, there will be a few seconds while all the data is collected and stored correctly before any other operation is allowed. The message “creating file” will be displayed on the screen. 4.3. To set the recording bitrate Press the top black circle to access the menu system. Press the bottom black circle to scroll down to Menu 3: Recording bitrate NETmc Marine 73fifty Manual Rev 6 July 2014 © NETmc Marine Ltd 2014 13 of 41 Press the “Play” button to select this menu. By scrolling up and down (through pressing the black circles) you can now select: 3a: Low bitrate 3b: Medium bitrate 3c: High bitrate Note: The chosen bitrate impacts directly upon the ability of the MPEG encoder to produce a detailed image when part or all of the scene as viewed by the camera is in motion. It has very little effect upon the quality of the image when the camera is directed at a stationary scene. Therefore, the low bitrate setting can produce good results when the aim is to inspect/record a series of static scenes. If the scene to be recorded contains some moving elements such as sediment, an outflow, etc. the medium setting would in this case give better results. The high bitrate setting will give the optimum results when television-style high quality recording of continuously moving scenes is required. 4.4. To set the recording time Note: The 73fiftyBlackbox is configured to record in 5 minute segments only. Standard (blue) unit and Pelicase unit. Press the top black circle to access the menu system. Press the bottom black circle to scroll down to Menu option 4: Recording time This option sets the length of file segments to be recorded in time-restricted mode. (See section 4.2 above for more details on recording in this mode.) The standard factory setting is 5 minute files, but there may be operational reasons for choosing another length file – for example if tasks are typically 7 minutes long, the user may prefer to record 10 minute files. Please note that the longer the length of file segment, the larger the size of the recorded file becomes. This may have implications later for the ease of storage and/or transfer of data. Note: Changing the recording time will clear the hard drive of all previously recorded files. Please make sure that all data has been uploaded prior to selecting this menu option. Ideally this selection should be made at the start of a job. To change the set recording time, press the “Play” button to select this menu. By scrolling up and down (through pressing the black circles) you can now select: 4a: 5 minute files 4b: 10 minute files 4c: 15 minute files 4d: 30 minute files 4e: 60 minute files. NETmc Marine 73fifty Manual Rev 6 July 2014 © NETmc Marine Ltd 2014 14 of 41 A warning message will then flash up on screen, asking the user to confirm the selection, and warning that the hard drive will be cleared of all files. Press PLAY to confirm the selection, or STOP to cancel. 4.5. Software Versions When this option is selected, technical information relating to the software is displayed. This information may be useful for our technical support for troubleshooting purposes. Two types of information are shown: 5a: Firmware revs. 5b: PVR OS & API rv. 4.6. Renew File System This option can be used to reset the recorder if it becomes necessary. It does not delete any video files that have been recorded. Examples of when this file option might be useful include: - After uploading files to a Windows PC via the 73fiftyupload software. Once uploaded, the files need to be deleted from the recorder to release space, using the same software. In order to complete the process the 73fifty either needs to be power-cycled, or the file system renewed using this menu option. - Should the encoder have become upset for any reason (indicated by a black stripe on the QC screen). Renew the file system using menu option 5 to restore the QC screen to its normal status. NETmc Marine 73fifty Manual Rev 6 July 2014 © NETmc Marine Ltd 2014 15 of 41 4.7. Free Time Check This option allows the user to check how much recording time is left on the hard disk. Once PLAY has been selected a screen like the one below will appear: Remaining Files This screen shows the number of files that can still be recorded before the disk becomes full – note that the maximum number of files that can be held on the disk is 999. The time remaining This shows the remaining time available for recording at the current bitrate. Over 24H is the standard message if more than 24 hours worth of video can still be recorded. The actual recording time can be much more than this – up to several days. If there is less than 24 hours recording time left on the disk then the remaining time will be shown here in hours and minutes. NETmc Marine 73fifty Manual Rev 6 July 2014 © NETmc Marine Ltd 2014 16 of 41 5. Operating Instructions The buttons on the front panel are designed to be simple “one-touch” buttons. In idle mode, the following message is displayed on the screen: The second line displays the current time and date. Recording To start recording press: The small screen now displays “Record” and two small letters in superscript. NETmc Marine 73fifty Manual Rev 6 July 2014 © NETmc Marine Ltd 2014 17 of 41 The first letter indicates whether you are recording in continuous (c ) or time-restricted (t ) mode. The second letter indicates whether you are recording at high (h), medium (m) or low (l) bitrate. In the above example the 73fifty is recording in time-restricted mode, at high bitrate. The digits to the right of these symbols show the file name. This name is made up of the date and time when recording was started (in time-restricted mode the name will be the time at the start of each 5-minute block.) In the above example, the current date is the 16th April 2007 and this current block of recording was started at 11:55 and 28 seconds. The second line of the display shows the time in seconds since recording was started (or in timerestricted mode the time since the start of the latest 5 minute segment.) In the above example 12.5 seconds have lapsed since the start of the latest recording segment. Recording can be paused by pressing: and resumed by pressing ensuring that the same file name is kept. To stop recording press: After stop has been pressed, the file name of the most recently recorded file (or segment) is displayed for a few seconds. To monitor the quality of the recording: Standard (blue)” unit and 73fifty Blackbox When the unit is recording, the image shown on the monitor connected to the input sockets is a pass-through signal (i.e. is identical to the input signal.) Quality control is enabled through the use of a monitor connected to the QC socket at the back of the 73fifty. This shows a decoded view of the encoded mpeg file and will lay behind the live video by approximately 2 seconds. A “QC” logo is displayed in the top corner of the QC screen. An example is shown here: During recording the screen a red dot is displayed: If recording is paused, the red dot becomes blue. NETmc Marine 73fifty Manual Rev 6 July 2014 © NETmc Marine Ltd 2014 18 of 41 73fiftyPeli with built-in monitor The QC screen is available through the Screen Menu system. There are two input channels: SVBC 1 is the live video signal, SVBC 2 shows a QC view of the encoded files. To switch inputs, press “Menu”, use the ^ v arrow keys to select “Source Input”: Then press “Menu” to select. The following screen will appear: Use the ^ v arrow keys to select CVBS1 (= live) or CVBS2 (= QC). Press “Menu” again to select. Notes on recording: Disk full: Note that the disk can hold 40 – 110 hours of recording in continuous mode, up to 83 hours in time-restricted mode, depending on the recording bitrate you have selected. It is possible to record up to 999 files. When the amount of free disk space starts to get low, the unit will start bleeping at regular intervals. The top line of the display screen will alternate between the record display and a bar chart which gives an indication of how much space is left. The more boxes that are chequered, the less space there is. Note that the unit is still recording at this stage. However, you should upload some files to a Windows PC as soon as possible. NETmc Marine 73fifty Manual Rev 6 July 2014 © NETmc Marine Ltd 2014 19 of 41 If this is not done, the disk space will eventually become full, at which point further recording will not be possible, and an alternating message will appear on your screen. “Recorder was stopped” and “No Room left on disk” It will then be necessary to upload and delete some files from the 73fifty before you can record more files. The date and time shown are those when recording was stopped. Accidental switch-off: Note that as a safety measure to prevent accidental loss of data, if the power switch of the 73fifty is pressed during recording, recording will not actually stop. The unit will not switch off until “Stop” is pressed and the unit has ensured that the file has been saved correctly. Recording via the trigger connector Recording to the 73fifty or 73fiftyBlackbox can also be triggered by an external connection – for example to a record switch on the control desk, an off-deck microswitch for the ROV / dive bell, or a trigger from the main system switchboard. When 12v is applied across the trigger input (NOT polarity sensitive) the recorder will start recording. When the 12v is removed, the recorder will stop recording. Once recording is activated by the trigger, it can only be stopped via the external trigger – i.e. the front panel controls are disabled. Recording to the 73fiftyBlackbox Recording to the 73fiftyBlackbox is automatically set to be in time-restricted mode, 5 minute segments. (See the Menu section on recording mode for more information.) An example of the display screen during recording to the Blackbox is as follows: The first line of display indicates that the unit is currently recording. The BL indicates that it is a Blackbox and is recording at low bitrate. The line of digits shows the current file name (the date and time the current recording segment began.) The second line of display shows that 12.5 seconds have lapsed since recording to this file name began. Once the disk space has been filled, the unit begins loop-recording. Every 300 seconds the oldest file(s) is removed to make space for the newly-recorded file. The messages “creating file” will appear on the screen and the record button will flash rapidly. NETmc Marine 73fifty Manual Rev 6 July 2014 © NETmc Marine Ltd 2014 20 of 41 Once the percentage has reached 100%, the message “releasing space” is displayed on the screen. The record button flashes slowly. Please note that recording continues whilst these messages are displayed. It will not be possible to stop the 73fiftyBlackbox while the message “Releasing Space” is displayed. If you wish to stop recording at this time, please wait until this message has cleared before pressing Stop. Playback To start playback of the video press: If a recording has just been made, pressing the play button will automatically play the file that has just been recorded. The file-name of the file currently being played back will be shown on the LCD screen. The small letter indicates whether the recording was made at high (h), medium (m) or low (l) bitrate. In the above example recording was made at low bitrate. The file name of the file currently being played back is shown next to this symbol. The file name in the above example shows that file currently being played, was recorded on the 16th April 2007, starting at 11:55:28. The second line displays how many seconds of the current file have been played. To pause playback, with the picture still on the screen, press: Press “Play” again to start from where the file was paused. NETmc Marine 73fifty Manual Rev 6 July 2014 © NETmc Marine Ltd 2014 21 of 41 The following screen shows that play has stopped because there are no more files on the disk: Fast-forward and Rewind The fast-forward and rewind buttons are illustrated here: Note: These buttons work during video playback only. 2x normal speed Press and hold the fast-forward or rewind button to advance or go back through the video at double speed. 8x normal speed After holding the button down for several seconds, the function “locks” (you will hear a beep) and you can let go of the key. You will now advance / rewind through the video at 8x normal speed until either “Stop” or “Play” is pressed. Please note that the picture will appear slightly jumpy when rewinding at 8x speed. Unfortunately this is due to the nature of mpeg files and cannot be avoided. Skip function Pressing the following buttons allows you to “skip” to the start of the next file or back to the start of the previous file. It is possible to keep track of which file is currently being shown, by watching the file-name shown on the small screen. Note: these buttons work during playback, or during fast-forwarding / rewinding, or when “stop” has been pressed – to enable you to search for a particular date/time of a recording before playing back any file. NETmc Marine 73fifty Manual Rev 6 July 2014 © NETmc Marine Ltd 2014 22 of 41 Stills grabs* * Standard (blue) unit and 73fiftyPeli. Pressing the following button during playback or recording enables you to grab a still image from the video. The still picture will be saved as a jpeg file, separately from the video recording. A stills grab can also be taken when the machine has stopped recording. The following message will be briefly displayed on the LCD screen indicating that a still image is being captured: The second line of the display indicates the filename being given to the stills grab. Please note that the filename of the stills grab will be the date and time when the grab was taken (not when the file was originally recorded). This file can later be uploaded via the USB socket and transferred to another Windows PC. NETmc Marine 73fifty Manual Rev 6 July 2014 © NETmc Marine Ltd 2014 23 of 41 6. Uploading Files to a Windows PC To upload files to a Windows PC you will need a USB cable and the free 73fiftyupload software. Note: Recording can still continue when the upload software is in use. On standard newer 73fifty digital video recorders, the 73fiftyupload software is installed on the unit itself, so there is no need to install it separately on your PC. Once the 73fifty is connected to the PC by USB cable, the PC will “find new hardware” and a new drive is created, called PVR. To open the software double click to open the PVR drive, and open the folder called “Upload”. Double-click on the 73fifty upload .exe file to start the software. Note: No mpeg or jpeg files will be visible in the PVR folder. Video and photo files can only be viewed and uploaded using the 73fiftyupload software as described above. This drive also contains some hidden files. These are not normally visible - but if the settings on your Windows PC have been modified, they may be seen. NOTE: Care must be taken to NOT delete, modify or move these files. Do not format this drive in Windows. See below for an example of these files. NETmc Marine 73fifty Manual Rev 6 July 2014 © NETmc Marine Ltd 2014 24 of 41 The 73fiftyupload software is also supplied on a CD with the 73fifty. Alternatively it can be downloaded from our website www.netmcmarine.co.uk. If you do wish to install the software on your Windows PC, simply insert the CD and follow the instructions on screen. (On Windows Vista and Windows 7 you may need to right-click on the file name and Run as Administrator to install the file correctly.) Then connect the USB cable between the socket on the front of the 73fifty and your Windows PC. Start the software on your Windows PC by double-clicking on the or selecting it under “Start, Programs”. NETmc Marine 73fifty Manual Rev 6 July 2014 © NETmc Marine Ltd 2014 icon on your desktop, 25 of 41 Once the software is open, you will now see a screen like this: Note: When the USB connection is made, the upload software only shows those files which had been created up to the point of plugging in the USB. To see files which have been recorded subsequently, you must refresh the software. This feature avoids confusion which may occur if the list were continually growing while uploading / deleting were taking place. To do this either disconnect and then reconnect the USB cable, or press the bottom of the menu access circles once to refresh the software. The machine will emit a beeping sound 2 seconds later to indicate that this has happened. Depending on the speed of your computer it may take a moment or two for the refresh to take effect. Please therefore wait for 10 to 20 seconds before taking any further actions. Follow these steps to upload your files: 1. Select “Video” or “Image” according to the type of file you wish to upload. 2. Select the files that you wish to upload, by ticking the relevant box(es). Several files can be uploaded at once, and there is also an option to select “All” files. Clicking “None” de-selects any files that had previously been selected. 3. Click on “Export” to start the process. NETmc Marine 73fifty Manual Rev 6 July 2014 © NETmc Marine Ltd 2014 26 of 41 The following screen will then appear: File Prefix In order to make it easier to find files later, you can choose to prefix all the files to be uploaded with text of your choice. In this example the filenames will be prefixed by the text “testmachine” so the first file will be named “testmachine090807181916.mpg” etc. Export to folder Enter the folder in which the files should be saved or use the “Browse” button to search for the right place. Click on “Continue”. NETmc Marine 73fifty Manual Rev 6 July 2014 © NETmc Marine Ltd 2014 27 of 41 The following screens indicate that the files have successfully been uploaded. Refreshing the unit If further recording has taken place after the USB cable is connected, press the bottom of the menu access circles once to refresh the software. The machine will emit a beeping sound 2 seconds later to indicate that this has happened. Again depending on the speed of your computer it may take a moment or two for the refresh to take effect. Please therefore wait for 10 to 20 seconds before taking any further actions. Click on the “Refresh” button on the 73fiftyupload programme to refresh the display on the screen. NETmc Marine 73fifty Manual Rev 6 July 2014 © NETmc Marine Ltd 2014 28 of 41 Important information on PC Uploading. When the 73fifty is connected to a Windows PC, the PC is given an additional drive called 'PVR': If this drive is explored, a folder containing a copy of the upload utility can be found. This is provided as an alternative to using the supplied CD-Rom or downloading the utility from www.netmcmarine.co.uk - you will always have a copy with the unit. NETmc Marine 73fifty Manual Rev 6 July 2014 © NETmc Marine Ltd 2014 29 of 41 Note: No mpeg or jpeg files will be visible in the PVR folder. Video and photo files can only be viewed and uploaded using the 73fiftyupload software as described above. This drive also contains some hidden files. These are not normally visible - but if the settings on your Windows PC have been modified, they may be seen. See below for an example of these files. NOTE: Care must be taken to NOT delete, modify or move these files. Do not format this drive in Windows. Sharing of the drive using Windows networking is also not a good idea - as others might try to interact with the files. The 73fifty divides up its internal storage disk in preparation for the video it is about to record. These hidden files are part of that structure. Even before any video is recorded, the files are allocated the same sizes as the video which is about to be created, so when viewing the properties of the PVR drive, it will always appear to be full - this is correct and is essential to correct operation of the recorder. If your unit is different - contact NETmc Marine support. NETmc Marine 73fifty Manual Rev 6 July 2014 © NETmc Marine Ltd 2014 30 of 41 PVR Drive Must be FAT32* * If Windows is allowed to format the drive it might choose NTFS file system, which will not work. Please contact the NETmc Marine Support team if you require more information. NETmc Marine 73fifty Manual Rev 6 July 2014 © NETmc Marine Ltd 2014 31 of 41 7. Deleting files from the 73fifty To delete files from the 73fifty, use the same 73fiftyupload software – never try to delete files directly from Windows Explorer. Select the files to be deleted and click on the “Delete” button. In order to complete the delete process and free-up disk space, either of the following actions MUST be carried out: - switch the 73fifty off and back on again, - or select Menu Option 5: Renew File System. Press “Play” to confirm. It is good practice to upload files regularly and to delete all files, once they have transferred to your Windows PC. This will ensure that your 73fifty is always ready for recording. 8. Playback of files on your Windows PC All the files should be easy to play back on your Windows PC. Simply double-click to start playback. Video files are .mpg format and so will play using Windows Media Player. Still Grabs are .jpg files and will be shown using, for example, Microsoft Office Picture Manager. These grabs can be easily pasted into a word document. (In Word, click on “Insert” “Picture” “From file”). NETmc Marine 73fifty Manual Rev 6 July 2014 © NETmc Marine Ltd 2014 32 of 41 9. FAQ Q: I have pressed the off-switch but the 73fifty appears to be still recording A: This is a safety feature to prevent accidental loss of data. Please press “Stop” before switching off the unit. If you are using a 73fiftyBlackbox then note that the front panel keys are disabled when recording is triggered externally. Recording will only stop when the trigger is removed. Q: During recording, the record button suddenly flashes and the message “creating file” is displayed on the small LCD screen A: This is a feature of recording in time-restricted mode. The message means that more than 5 minutes of data has been recorded and a 5-minute segment is being created. Please be reassured that recording is still in progress. After a few seconds this message will disappear and the screen will say “Record” again. Q: The LCD screen shows the message “Releasing space” A: This is a feature of the loop-recording of the 73fiftyBlackbox. Once the disk space has been used up, the unit will start progressively removing the oldest files to make room for the new one. You will see this message every 300 seconds. Recording is not interrupted whilst this message is displayed, and it is not possible to stop recording until this task has been completed. Q: The LCD screen shows a series of blocks, some of which are filled, some chequered A: This message is a warning that disk space is becoming full. The more chequered boxes that are displayed, the less space there is less on the disk. When you see this message it will be necessary to upload some files (for example to a Windows PC). If this is not done, eventually the disk will become full and recording will no longer be possible until some files are uploaded. NETmc Marine 73fifty Manual Rev 6 July 2014 © NETmc Marine Ltd 2014 33 of 41 10. Troubleshooting Q: No data is being recorded A: Please make sure that the camera/audio input is running BEFORE the 73fifty is switched on. Q: No sound is being recorded A: Please ensure that there is a moving display on the audio indicator. If not, there may be a problem with the microphone or the connection to the 73fifty. Q: The LCD screen shows the message “No room left on disk” A: Press “Stop” to clear this message. It will be necessary to upload and delete some files from your 73fifty before further recording is possible. Note that the deletion process is not complete until the 73fifty has been power-cycled. Q: The LCD screen shows the message “Can’t start recorder” A: This message is displayed when “Record” is pressed but the disk space is already full. The “Can’t start recorder” message alternates with “No room left on disk”. Pressing “Stop” clears the message. It will be necessary to upload and delete some files from your 73fifty before further recording is possible. Note that the deletion process is not complete until the 73fifty has been switched off and back on again. Q: The QC screen shows a black stripe Example shown when the 73fifty is connected to a very poor TV signal. A: This is an indication that something has happened to the video signal after the 73fifty is up and running to make it out-of-spec. The 73fifty circuits continually monitor the video input in case the format changes (PAL/NTSC/SECAM etc). The black band suggests that the signal was either corrupt or very poor, causing the circuits to error. This event is very rare – and more likely related to a more serious problem like the umbilical being damaged or the camera being faulty. Switching NETmc Marine 73fifty Manual Rev 6 July 2014 © NETmc Marine Ltd 2014 34 of 41 the 73fifty off and on again will restore the QC screen to the normal status (assuming that any faulty equipment / cables have been repaired.) Q: The LCD screen shows the message “Internal Error” A: In the unlikely event that this message is displayed, it is indicative that something inside the recorder has become damaged / corrupted. Please switch the 73fifty off and on again. If the message remains the same, please contact our Support Team for further advice (see Section 11.). NETmc Marine 73fifty Manual Rev 6 July 2014 © NETmc Marine Ltd 2014 35 of 41 11. Antivirus It’s a good idea to make sure that the upload PC has virus protection, as a virus can jump to the PVR drive of your 73fifty digital recorder and cause problems. 12. How to contact NETmc Marine Support Should any problems occur with your 73fifty digital recorder that are not addressed by this manual please contact our Support Team: Email: [email protected]. Tel: +44 1771 644001 Should your call be outside office hours, please leave a message on the answering machine, which will be forwarded to one of the support engineers. Although we cannot guarantee 24/7 availability we endeavour to respond as quickly as possible to any query – regardless of when the support call is made. Notes: 1. Whilst every effort has been made to ensure that the information contained in this manual is accurate, no liability can be accepted for errors and omissions. 2. Should this product be modified in any way by anyone other than a qualified NETmc Marine employee, then NETmc Marine cannot be held liable for any consequences. NETmc Marine 73fifty Manual Rev 6 July 2014 © NETmc Marine Ltd 2014 36 of 41 Appendix 1 Technical Specifications Power Requirements 90-264 Vac, 47-70 Hz Power Consumption 20 w Operating Temperature 10 - 35 Degrees Non-operating Temperature -10 - 60 Degrees Operating Humidity 5-95% RH non-condensing Non-operating Humidity 5-95% RH non-condensing Operating Shock 65G, 2ms Non-operating Shock 250G, 2ms Operating Altitude -305m – 3,050m Non-operating Altitude -305m – 12.200m Operating Vibration Non-operating Vibration Dimensions Linear 20-300Hz, 0.75G (0 to peak) Random 10-300 Hz, 0.004g2/Hz Low frequency 5-20 Hz, 0.195 inches (double amplitude) High frequency 10-300Hz, 5.0G (0 to peak) 482(W) x44(H) x 155(D) (1U rackmount case) Pelicase dependent on size of unit chosen Weight 2kg Video Input Composite (BNC) / PAL / NTSC Video Stream Format MPEG2 Video Rate L/M/H Audio Analog stereo line input / microphone Microphone Suitable for use with low impedance, dynamic microphone suitable for vocal applications. Approx 600 ohms. Approx 80Hz to 12kHz response. Approx sensitivity of -79db@ 1kHx terminated in ¼ inch plug. Storage and shipping After overnight road freight the units should be left at room temperature for 24 hours before powering on. After air freighting the units should be left at room temperature for 48 hours before powering on. NETmc Marine 73fifty Manual Rev 6 July 2014 © NETmc Marine Ltd 2014 37 of 41 Appendix 2 Wiring Diagram for Military Connector used in 73fiftyPeli – 1300 case Amphenol MS3102A-10SL-3S / 3P C A B N L EARTH Mating view of male bulkhead on 73fiftyPeli NETmc Marine 73fifty Manual Rev 6 July 2014 © NETmc Marine Ltd 2014 38 of 41 Appendix 3 Wiring Diagram for Buccaneer connectors used in 73fiftyPeli – 1520 case 400 Series Buccaneer IP68 sealed electric cable connectors Wiring Diagram: Face of sockets Signal Ground L R Ground Video Audio Audio Part numbers: 3-way cable plug: Bulgin part PX0410/03P/5560. RS 426-0903 2-way cable plug: Bulgin part PX0410/02P/5560. RS 426-0896 8A solder pin contact 20-24awg: Bulgin SA3350/1. RS 426-1338 Sealing cap: Bulgin part PX0480. RS 426-1243 NETmc Marine 73fifty Manual Rev 6 July 2014 © NETmc Marine Ltd 2014 39 of 41 Appendix 4 Wiring Pin-Out of Umbilical Connector for 73fifty-Peli Integrated Diver System Spare parts: Umbilical: Novasub. Type DLR-3P25-2C100 Umbilical Plug: Brand Souriau, type UTS6JC1210P, RS part 191-428 Crimp pin : Souriau SM20WL3S25UK RS 233-2703 NETmc Marine 73fifty Manual Rev 6 July 2014 © NETmc Marine Ltd 2014 40 of 41 Note: This equipment has been tested and found to comply with the limits for a Class A digital device, pursuant to part 15 of the FCC Rules. These limits are designed to provide reasonable protection against harmful interference when the equipment is operated in a commercial environment. This equipment generates, uses, and can radiate radio frequency energy and, if not installed and used in accordance with the instruction manual, may cause harmful interference to radio communications. Operation of this equipment in a residential area is likely to cause harmful interference in which case the user will be required to correct the interference at his own expense. NETmc Marine 73fifty Manual Rev 6 July 2014 © NETmc Marine Ltd 2014 41 of 41