1
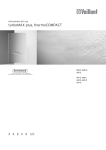
pets Steam Mop
User Guide
Model No: ADSM5001
For Customer Services & Spare Parts please call 0345 209 7461
Opening times: Monday - Friday 8am – 6pm & Saturday 9am – 1pm
Or visit us at www.productcareuk.com
IMPORTANT:
RETAIN FOR FUTURE REFERENCE
Contents
Page
Safety instructions
…………………………….………..
3
Steam mop feature diagram
………………………………....…..
6
Steam mop assembly
……………………………….……..
7
Using your steam mop
………………………………………
8
Storing your steam mop
………………………………………
12
Cleaning and care
………………………………………
14
Problem solving
………………………………………
15
Guarantee
………………………………………
18
Customer support
………………………………………
19
Spare parts
………………………………………
20
Connection to the mains supply
………………………………………
21
Thank you for purchasing your Abode Pets Steam Mop.
With a three corner mop head for flexible cleaning and an ergonomic handle for
comfort, cleaning your floors has never been so easy.
What’s more, the pet friendly deodoriser leaves your home smelling fresh,
killing 99.9% of household germs when used with steam.
To get the best from your new cleaner, take a few moments to read these
instructions, and keep them in a safe place for future reference.
Should you require any further assistance, our friendly Product Care team will
be happy to help.
For Customer Services & Spare Parts please call 0345 209 7461
Opening times: Monday - Friday 8am – 6pm & Saturday 9am – 1pm
Or visit us at www.productcareuk.com
2
IMPORTANT SAFETY
INSTRUCTIONS
READ CAREFULLY AND KEEP
FOR FUTURE REFERENCE
Safety instructions
WARNING:
It is hazardous for anyone other than a competent person to
carry out any service or repair operation that involves the
removal of a cover which gives protection against exposure to
electrical parts.
If the supply cord is damaged, it must be replaced by the
manufacturer, its service agent or similarly qualified persons
in order to avoid a hazard.
This product is intended for household use only. Do not use
outdoors. DO NOT use to clean pets, this is a floor cleaner
only. We recommend that you do not use near pets when
steam cleaning.
This appliance can be used by children aged from 8 years and
above and persons with reduced physical, sensory or mental
capabilities or lack of experience and knowledge IF they have
been given supervision or instruction concerning use of the
appliance in a safe way and understand the hazards involved.
Children shall not play with the appliance. Cleaning and user
maintenance shall not be made by children unless they are
older than 8 and supervised. Keep the appliance and its’ cord
out of reach of children less than 8 years.
• Do not operate this appliance for anything other than its
intended use. This product is intended for household use
only. Do not use outdoors.
• Do not immerse in water or other liquids for cleaning.
3
Safety instructions
• Do not direct steam at people, animals, electrical outlets,
or equipment containing electrical components.
• Unplug from power outlet when not in use. Do not leave
steam mop unattended while plugged in.
• Do not use with damaged cord or plug.
• Do not use steam mop if it has been dropped, damaged,
left outdoors or dropped into water.
• Keep the steam mop away from water; do not allow it to
get wet. If unit is wet, do not plug unit into wall socket or
turn unit on.
• Do not handle steam mop with wet hands.
• Do not pull or carry by cord, use cord as a handle, close
door on cord, pull cord around sharp corners or edges, or
expose cord to heated surfaces.
• Do not unplug by pulling on cord.
• To protect against electrical shock do not immerse cord,
plug, or appliance in water or other liquid.
• Unplug from the mains outlet when not in use, before
putting on and taking off parts, and before cleaning.
• The use of accessory attachments not recommended by
the appliance manufacturer may cause fire, electric shock
or injury. Only use the accessories supplied by the
manufacturer.
• Do not let the cord hang over the edge of the worktop, or
touch hot surfaces.
• Never remove parts from the appliance such as the screws
and so on.
4
Safety instructions
• The filling aperture must not be opened during use.
• Do not use appliance in an enclosed space filled with vapor
given off by oil-based paint, paint thinner, some moth
proofing substances, flammable dust, or other explosive or
toxic vapors.
• Do not use on leather, wax polished furniture or floors,
synthetic fabrics, velvet or other delicate, steam-sensitive
materials.
• Do not immerse unit in water or other liquids.
• Never put descaling, aromatic or alcoholic products into
the steam mop, as this may damage the unit.
• Close attention is necessary when used near children.
• Do not store with a wet mop pad still attached.
• Using distilled or demineralized water will maximize the
performance of your steam mop.
• Use extra care when cleaning on stairs.
• WARNING: Refreshers MUST NOT be used on carpets.
• Do not use steam for space heating purposes; household
use only.
• Use on waxed or some unwaxed floors may diminish
glossiness. Do not use on unsealed wood floors. Test in an
inconspicuous area or check the care instructions from your
flooring manufacturer.
Symbol IEC 60417-5597 (2002-10) is used on the unit to indicate
that this unit operates with hot water vapour (steam). To avoid
scalding and burns take extra care when in use.
5
Steam mop feature diagram
1
Handle
10
Solution tank dial
2
Steam/Solution release trigger
11
Mop head
3
Upper power cord grip
12
Microfibre cleaning pad
4
Lower power cord grip
13
Carpet glider
5
Solution tank
14
Filler cup
6
Water tank
15
Power cord
7
On/Off button
16
Odour refreshers
8
Hard water filter
17
Cooling tray
9
Indicator lights
6
Steam mop assembly
Before using your steam mop:
Remove all packaging and lay out the separate components.
Check the steam mop after unpacking for any visual damage such as:
•
•
•
Misaligned or damaged parts
Damage to the main body and separate components
Damage to the plug or cable.
If you can see any damage do not use the steam mop and refer to page 19.
Slot the handle into the top of the body of
the steam mop.
You may need to push the stud on the
handle inwards to fully insert the handle.
IMPORTANT: Ensure the stud on the handle
protrudes through the hole in the housing
on top of the steam mop.
Slot the insert on the bottom of the steam
mops body into the housing on the back of
the mop head.
Check that the mop head is the correct way
round – refer to diagram.
IMPORTANT: Ensure the stud on the insert
protrudes through the slot on the mop
heads housing.
7
Using: Filling the water tank
Grip the sides of the water tank and pull
upwards to remove.
Remove the cap on the top of water tank by
turning it anti-clockwise and lifting.
Fill the tank with 500ml of water using the filler
cup. Screw the cap back onto the tank by placing
in in the bottle and turning it clockwise.
Note: When you turn the tank upside down, some
water may drip out of the cap. Ensure the tank is
turned upside down over a sink before
transporting it to the steam mop.
Slot the tank back onto the steam mop.
Push down on the tank until it locks in place.
8
Using: Filling the solution tank
Grip the sides of the solution tank on the
front of the steam mop and pull upwards to
remove.
Remove the cap on the top of the solution
tank by turning it anti-clockwise and lifting.
Fill the tank, using the filler cup with 30ml of refresher
solution & 150ml of water. Screw the cap back onto the
tank by turning it clockwise.
Again, turn the tank upside down over a sink.
IMPORTANT: Only use recommended refresher solution. Solution must be diluted with
water as per the above instructions. Always cover food preparation areas and remove food
from all surfaces. Do not clean surfaces that come into direct contact with food.
Slot the solution tank back onto the steam
mop. Push down on the tank until it locks in
place.
9
Using your steam mop
Fasten the microfibre cleaning pad on the base.
IMPORTANT: Never use the steam mop without
the microfibre cleaning pad fitted correctly.
Plug the steam mop into a mains socket and
turn the power on.
Press the ON/OFF button on the front of the
steam mop body in to switch the mop ON.
Press the button again to switch it OFF.
When the steam mop is turned on the power
light will illuminate.
A few seconds later the steam light will
illuminate, this shows that the steam mop is
ready to use.
IMPORTANT: Always ensure the solution dial is
set to close when not in use.
If you wish to use the refresher, turn the
solution tank dial to open to add refresher
solution to the steam.
10
To recline the handle, place your foot over the shoe
symbol on the side of the mop head and gently pull
the handle downwards.
Cleaning hard floors
Pull trigger on the handle (1) to release the steam.
Move the steam mop backwards and forwards
across the floor (2). For stubborn dirt or stains, focus
the steam mop over the area for a few seconds.
Note: Do not leave the steam mop over one area for
more than a few seconds. This can damage the floor.
Refreshing carpets
Pads can be used for both functions but if you have
used the solution on one floor and do not intend to
use it on another, you will need to clean/change the
pad.
Place the mop head into the carpet glider (1).
Note: The mop head does not attach to the carpet
glider but just sits in it. Pull the trigger on the handle
(2) to release the steam.
WARNING: Test the solution in an inconspicuous
area before using on floors.
Move the steam mop backwards and forwards
across the carpet, again paying particular attention
to well trodden and frequently used areas.
When not using the mop, place it on the cooling
tray provided.
11
Storing your steam mop
Place the mop head on the cooling tray that has
been provided after every use.
When you have finished cleaning your floor,
switch the steam mop off by pressing the
ON/OFF button.
Switch the power off at the plug socket and
remove the plug.
Remove the water and solution tanks as per
pages 8 and 9.
Unscrew the caps and pour any unused liquid
down the sink.
IMPORTANT:
Always wipe up any spilled solution.
Never store the steam mop with liquid still in
the tanks.
12
Pull the microfibre cleaning pad from the base
of the mop head.
IMPORTANT: Never store the steam mop with
the pad fitted.
Wind the power cord around the top and
bottom cord grips on the handle. Slot the end
of the power cord into the grip on the top
power cord grip.
Note: The top power cord grip can be rotated
so the power cord cable can be easily removed
when needed.
13
Cleaning and Care
If you live in a hard water area, over time the filter will become
blocked and affect the performance of the steam mop.
Check and change the filter regularly to ensure your steam mop
works to its optimum level.
As the filter becomes more blocked the colour will darken and
discolour.
The filter should be changed every 6 months.
To change the filter, remove the water tank (1) on page 8.
Grip the water filter and pull upwards (2).
Slot the new water filter into the back of the steam mops body.
Ensure the guides on the sides of the filter are correctly fitted.
New filters are available to purchase from Product Care,
call 0845 209 7461 or visit us at www.productcareuk.com
Before you clean the appliance, disconnect the mains plug from the wall socket.
To clean the exterior of the device, use a damp, soft cloth and mild detergent.
NEVER IMMERSE THE STEAM MOP IN WATER
When wiping off the main body, do not allow moisture in the area around the
on/off button or indicator lights.
Wash non-electrical accessories in warm soapy water and allow to dry thoroughly
before reuse.
If the steam mop is damaged, contact the customer service helpline.
Care of your microfibre cleaning pads
Wash pads in warm water, no more than 40 degrees.
Wash separately. Do not use fabric softener and do not tumble dry. Dry on a
line.
Should there be any loose threads on the microfibre pad, carefully cut the
threads with scissors.
Do not try to pull any threads or cut any threads at the base.
14
Problem Solving
PROBLEM
POSSIBLE PROBLEM
POSSIBLE SOLUTION
1. Difficult to attach mop 1. The main body of the product can be pushed down into
head.
the nozzle of the mop head. Ensure the groove is aligned
correctly with the body. Refer to page 7 of the instruction
manual provided. Do not disassemble the heap after use.
2. Difficult to assemble
handle.
2. Slot the handle into the top of the body of the steam
mop. You may need to push the stud on the handle
inwards to fully insert the handle. The stud should
protrude through the hole at the top of the body for it to
be secure. To remove the handle, push in the stud whilst
lifting the handle upwards.
Trouble assembling/
disassembling steam
mop
3. Difficult to attach mop 3. Lay the mop pad on the floor and lift the steam mop
pad.
head, placing onto the pad. Make sure the blue microfibre
side of the pad is on the floor and attach the mop to the
other side. After use let the steam mop rest in the cooling
tray provided. To remove the mop pad hold you foot on
the edge of the pad and lift away the steam mop.
4. Difficult to attach
carpet glider.
4. Lift the mop and place the head into the side of the
carpet glider that has space for the mop head. The mop
head rests in the glider and does not click into place.
1. Difficult to fill/empty
water tank. Note: Do not
Filling/Emptying
water tank
1. From above the steam mop, grip the sides of the water
tank, located on the back of the main body, and pull
put any solution in the water upwards to remove. Unscrew the cap on the water tank in
tank.
an anticlockwise direction and remove. You could use the
tap to fill, being careful not to overfill. Replace the cap on
the water tank and turn clockwise to secure. Turn the tank
upside down over the sink to let any water from the cap
drain out. Slide the tank back into the body, ensuring the
cap goes in the correct space. To refill, unplug and follow
the same procedure as above. To empty, use the same
procedure as filling but empty rather than fill the tank.
2. Difficult to fill/empty
solution tank.
2. Follow the same procedure as the water tank, but
measure approximately 30ml of refresher solution and
150ml water and add to the smaller solution tank, located
on the front of the steam mop. Note: Ensure the solution
tank dial is set to “close” when cleaning on carpets and
use a clean mop pad.
15
Problem Solving
PROBLEM
The mop is not
working/steaming
POSSIBLE PROBLEM
1. The power button has 1. Press the power button on the centre of the steam
not been pressed.
mop. This should illuminate the power indicator light.
Ensure you have waited 40 seconds for the water to heat
up – this should allow the second indicator light to
illuminate green
2. Water tank may not be 2. Make sure the water tank is filled. Refer to page 8 of
filled.
the instruction manual provided.
3. The unit may not be
3. Verify the unit is plugged into an approved electrical
plugged in properly/the outlet, is switched on and that the fuse or breaker is
fuse or breaker may not functioning properly.
be working.
4. The steam trigger has
not been pulled.
5. The filter had become
blocked.
1. What do the indicator
lights mean?
Indicator lights
1. The solution has not
The mop is leaving the
been diluted.
floor streaky
1. The water/solution
tanks have not been
tipped over a sink/have
been overfilled.
The steam mop is
leaking
Using refreshers
POSSIBLE SOLUTION
4. You will need to pull the steam trigger under the handle
for steam to begin emitting.
5. If the filter has become blocked you will need a
replacement filter.
1. The light on the left illuminates blue when the mop is
plugged in and power button is pressed. When the blue
light has been on and the water has heated sufficiently,
after around 40 seconds, the light on the right should
illuminate green, indicating it is steam ready.
1. The solution tank needs to have 5 parts water to 1 part
refresher in. The recommended amount is 30ml Abode
refresher with 150ml water.
1. When filling the tanks, screw the lids on securely and tip
the tanks upside over the sink to enable water from the lid
to drain. Avoid overfilling the tanks.
2. The steam mop has
2. Do not leave the steam mop concentrated over one
been held over one area area for more than a couple of seconds. This could
for too long.
damage your floor and may cause small puddles of water
to leak.
3. The water has not
3. You need to let the water heat up in the tanks for at
heated sufficiently.
least 60 seconds before pulling the steam trigger. Make
sure the power is switched on.
1. What can I use
1. You can only use refresher solution on sealed hard
refreshers on?
floors. Do not use on carpets, this can cause damage. If
you are unsure, contact the manufacturer.
2. How do I use the
refresher solution?
2. Fill the tank and set the dial on the front of the mop to
“open” to start using the refresher on sealed hard floors.
16
Problem Solving
PROBLEM
The filter needs
replacing
The indicator lights
are not working
There is a peculiar
smell coming from
the unit
The mop pad is not
picking up dirt
Parts have
broken/need
replacing
I have lost the
instruction manual
provided
POSSIBLE PROBLEM
POSSIBLE SOLUTION
1. Contact customer services using the details on the
bottom of this page.
1. The unit may not be 1. Verify the unit is plugged securely into an approved
plugged in properly/the electrical outlet and that the fuse or breaker is functioning
fuse or breaker may not properly.
be working.
1. First time using
1. If this is the first time you are using the mop, continue
product.
using the product. The smell may be due to new parts
being heated up for the first time.
2. This is not the first
time the product has
been used.
2. Discontinue use if problem persists and contact
Customer Services using the details on the bottom of this
page.
1. The mop pad is
saturated and needs
washing.
1. Wash the mop pad, following cleaning and care
instructions on page 14 of the instruction manual
provided.
1. Either the
1. Call customer services or visit the website detailed at
water/solution tank/cap, the bottom of this page.
mop pad, carpet glider,
filler cup, filter, cooling
tray or handle have
broken or been lost.
2. None of the above
2. Discontinue use and contact customer services using the
have broken but another details on the bottom of this page.
part has.
1. The instruction manual 1. It is important to have a copy of the instruction manual.
has been lost or
Visit www.productcareuk.com or contact customer
misplaced.
services using the details provided on the bottom of this
page.
Note: When cleaning carpets, turn off the steam mop, set the dial on the front of the body to
“close” and use a clean mop pad and the carpet glider.
We’re here should you need us.
For Customer Services & Spare Parts please call 0345 209 7461
Opening times: Monday - Friday 8am – 6pm & Saturday 9am – 1pm
Or visit us at www.productcareuk.com
17
Guarantee
This product is guaranteed for 12 months from the date of the original
purchase. If any defect arises due to faulty materials or workmanship
the faulty product must be returned to the place of purchase.
Refund or replacement is at the discretion of the retailer.
The following conditions apply:
• The product must be returned to the retailer with the original proof
of purchase.
• The product must be installed and used in accordance with the
instructions contained in this instruction guide and any other
instructions for use which has been supplied.
• It must be used for domestic purposes only and for its intended use.
• This guarantee does not cover wear and tear, damage, misuse or
consumable parts.
This does not affect your statutory rights.
18
Customer support
Attach your receipt to this page for proof of purchase.
We’re here should you need us
For Customer Services & Spare Parts please call
0345 209 7461
Opening times: Monday - Friday 8am – 6pm &
Saturday 9am – 1pm
Or visit us at www.productcareuk.com
Produced for:
G2S Limited,
Wigan,
WN2 4EZ
Disposal information
This symbol is known as the 'Crossed-out wheelie bin Symbol'.
When this symbol is marked on a product/batteries, it means
that the product/batteries should not be disposed of with your
general household waste.
Only discard electrical/electronic/battery items in separate
collection schemes, which cater for the recovery and recycling
of materials contained within. Your co-operation is vital to
make sure the success of these schemes and for the protection
of the environment. For your nearest disposal facility, visit
www.recycle-more.co.uk or ask in store for details.
We reserve the right due to possible changes to design to alter
the instruction manual without prior notice.
19
Spare parts
Part:
1. Body
2. Handle
3. Hard water filter
4. Microfibre cleaning pad
5. Mop head
6. Filler cup
7. Solution tank
8. Water tank
9. Carpet glider
10. Odour refresher solution
11. Cooling Tray
We’re here should you need us
For Customer Services & Spare Parts please call
0345 209 7461
Opening times: Monday - Friday 8am – 6pm &
Saturday 9am – 1pm
Or visit us at www.productcareuk.com
20
Connection to the mains supply
WARNING- THIS APPLIANCE MUST BE EARTHED
This appliance is designed to operate from a mains supply of AC230V 240V ~ 50/60HZ.
Check that the voltage marked on the product corresponds with your
supply voltage.
This product is fitted with a 13A plug complying with BS1363.
If this plug is unsuitable or needs to be replaced, please note the following:
Important: The wires in the mains lead are coloured in accordance with
the following code:
GREEN/YELLOW-EARTH
BLUE-NEUTRAL
BROWN-LIVE
21
Connection to the mains supply
For UK use only – Plug fitting details (where applicable):
As the colours of the wires in the mains lead of this appliance may not
correspond with the coloured markings identifying the terminals in your
plug, proceed as follows:
The GREEN/YELLOW wire is the EARTH and must be connected to the
terminal which is marked with the letter E or by the earth symbol or
coloured GREEN or
GREEN/YELLOW.
The BLUE wire is the NEUTRAL and must be connected to
the terminal marked with the letter N or coloured BLACK.
The BROWN wire is the LIVE wire and must be connected to
the terminal marked with the letter L or coloured RED.
Always ensure that the plug cord grip is fastened correctly.
If a 13A (BS1363) fused plug is used it must be fitted with a
13amp fuse conforming to BS1362 and be BSI or ASTA approved.
22
Model number: ADSM5001
R2