1
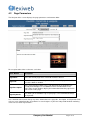
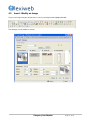
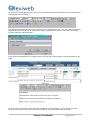
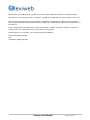
FlexiWeb
Content Management System
Site Editor User Guide
Company Confidential
Page 1 of 18
Contents
1.
Introduction
3
2.
Getting Started
4
2.1
4
3.
4.
Access to the Content Management System
Site Basics
5
3.1
6
Site Editor
Pages Component
4.1
4.2
4.3
4.4
4.5
4.6
4.7
4.8
Site Editor Options
Page Parameters
Content Editor
Common Editing Options
Insert / Modify an Image
Insert / Modify a Hyperlink
Inserting a .pdf Document
Insert Text Anchors
7
7
8
9
10
11
13
14
15
5.
Users Component
18
6.
Building & Publishing
18
The contents of this document are privileged, proprietary information and may not be divulged,
transmitted, forwarded, copied or duplicated, in whole or in parts, in any manner or form possible,
mechanical, electronic or otherwise, without prior permission from the rights holder, namely, RWS
Web Solutions Ltd.
Company Confidential
Page 2 of 18
1.
Introduction
Flexiweb is a highly versatile web development platform that allows a wide range of websites to be
designed, built and updated both quickly and easily.
In addition to general website design and development, Flexiweb allows the integration of a range of
modules or page types including:
•
•
•
•
•
•
•
•
•
•
•
•
•
•
•
•
•
•
•
•
•
•
Content Management System
Online Store
Online Albums
F.A.Q.
Publications
SMS Support
Banner Advertising
FlexiPages / Bulletin Board
Appointment Request / Booking Form
Forum
RSS Feeds
Tell A Friend
Custom Forms
Image Galleries
Secure Pages / Password Protection
UK Weather
Guestbook
Site Search
Date & Time
Google Maps
Subscriptions
Contact Us
This document provides a guide to the site administration area which gives access to the content
management system. It is intended to be used by content owners needing to update the content of
individual pages.
Instructions for additional modules will be added, where necessary, in the future.
Company Confidential
Page 3 of 18
2.
Getting Started
FlexiWeb does not need to be installed on your computer. FlexiWeb is a web-enabled application.
This means that all you need to access your website Content Management System is an internet
connection.
FlexiWeb is built using the innovative and unique FlexiWeb system. By combining the latest
techniques in website development, FlexiWeb provides an unrivalled web delivered application that
allows you to maintain and enhance your website with ease.
This User Guide will lead you through the process of accessing, maintaining and enhancing your
FlexiWeb site.
2.1
Access to the Content Management System
To access your site, enter the following URL:
http://www.rws-flexiweb.co.uk/flexiweb/siteadmin.php
(Save this URL to your browser favourites so that you can recall it when you need to return to your site).
A screen similar to the following login screen is displayed in your browser.
Content Management Access to your site is for a Site Editor. A Site Editor is able to edit existing pages.
Your username is: demo
Your password is: demo
Site Name: cmsdemo
Company Confidential
Page 4 of 18
3.
Site Basics
In this chapter, we’ll explore the basics of your FlexiWeb site.
A website is simply a collection of documents that are accessed across the internet. Built on a standard
known as HTML, your website delivers these documents to your site visitors via their web browser.
Documents that comprise your website include:
Document
Description
HTML Files
The building blocks of a website. HTML files or pages contain a mix of content
that you want your visitors to see along with code that tells the browser how and
where to display the content.
Image Files
When a browser displays images, they are not embedded within the document as
they might be in say a Word document. Images are included via code within the
HTML page. The code tells the browser what image to display, where to find it
and how to display it.
Script Files
Script files enable active content on a site. For example, when a visitor moves
over a menu item the script code tells the browser to change the way the menu
item looks so that your visitor knows what s/he’s selecting.
Style Sheets
Styles sheets tell the browser how to display your content. For example, what
font, colour and size to display text.
PDF Files
PDF is the standard for distributing documents on the web. Examples of PDFs
that you might include are questionnaires, brochures or fact sheets.
When a visitor types your web address into their browser, the index page is delivered by default. Like all
pages in your site, the index page includes links to other pages within the site. The links are presented in a
user-friendly way via a menu. Depending on the style of site we have created for you, the menu may be
along the top in the header area or it may be to the left. In either case, clicking on a menu item loads another
page into the browser.
The standard style for FlexiWeb sites is to have a top level, horizontal menu that defines the major site
areas, i.e., Home, Services, About Us, Contact Us, etc.
Certain site areas then have sub-menus displayed to the left of the main content. These display more links to
information that a visitor can view. This layout makes it easy for a visitor to navigate around the information
you have on your site.
Company Confidential
Page 5 of 18
3.1
Site Editor
The following screen is displayed for the Site Editor account:
The blue header section is the same for all accounts. The other fields are as follows:
Field Name
Description
Friendly Name
If you have a standard Contact page on the site, this appears in the
title of the email received.
Contact Name
The contact name for the site. This is optional.
Contact Email
The contact email address for the site contact. This is needed to send
the Contact Us form to.
Site Mobile Number
The mobile number for the site contact. This is optional, but needs to
be completed if SMS support is being used.
Site Post Code
This can be left as is.
Upload to documents
This allows you to upload documents to your site. You can provide a
link to these documents on your content pages. For example, you
may have a PDF brochure that you want site visitors to be able to
view.
Google Map Key
Google Map Text
Google Map Geocode
These are used if you have a link to a Google Map. These must not
be changed.
Site Services
This can be left blank. If your site is using the Appointment form for
hair/beauty salons, then your services are input here.
Sync Images
This can be blank.
Company Confidential
Page 6 of 18
4.
Pages Component
The Pages component is the most important site component. It allows you to edit the content of pages.
Each page of your website is named <page>.php. The PHP extension is a special web extension that allows
dynamic page content. It is beyond the scope of this User Guide to explain how PHP works. Just remember
that if you need to add links to pages within your site, you must specify the page with a .php extension.
When you first select the Pages component, the default page that will be loaded is the first page of your site
as listed alphabetically.
The HOME page of your site is entitled “index.php”.
4.1
Site Editor Options
If you are logged in as a Site Editor, you will see the following options just below the header. Note that a Site
Editor cannot delete or add pages:
Field / Button
Description
Select Page
Use this drop-down to select the page you wish to work on.
Update Page
Click this button to apply any updates you have made.
Use Editor
Ensure this has Xinha enabled, so you are able to use the WYSIWYG Editor. Unless
you are familiar with HTML, the coding language used to create web pages, we
suggest that you leave this box checked at all times.
Company Confidential
Page 7 of 18
4.2
Page Parameters
The final part of the screen displays the page parameters and content editor.
For an explanation of these elements see below.
Field / Button
Description
Page Name
This is the current page name. This field cannot be altered.
Page Title
This is the title you want to assign to the page. This is displayed in the Title
area of the browser window.
Page Description
This is your page description. This is not displayed on the website but is
used by Search Engines as an additional source of information on the
page. Some Search Engines display this information below the page link in
their search results page.
Page Keywords
This allows you to add Meta-Tags to your pages. This would include things
like keywords.
Care should be taken not to change any of the information in the page title, description, and keywords fields,
as these areas control how the site performs in search engines. If you have not paid for website marketing
services these fields may be blank.
Company Confidential
Page 8 of 18
4.3
Content Editor
The page content editor allows you to alter the content of the page without knowing anything about how the
page has been coded. It has two modes of operation:
WYSIWYG:
What You See Is What You Get. This allows you to work on a page in much the
same way as you would work on a document in Microsoft Word™.
HTML:
If you are familiar with the HTML coding language, you can switch to an HTML view
of the page content and alter the HTML code directly. If you are unfamiliar with
HTML, we suggest you use the WYSIWYG mode.
FlexiWeb uses the latest Cascading Style Sheet (CSS) technology to display your web pages. This allows
you to amend the way the content of your page displays using Styles, much like you would use Styles in
Word. Styles in FlexiWeb are created through the Elements component only available to Site Builder users.
However, CSS is not yet fully supported in the Content Editor. Therefore fonts, colours and layout options do
not yet display in the Content Editor as they would on the website. We are currently integrating full CSS
support into the Content Editor. This will be made available to all FlexiWeb users as soon as possible.
In the meantime, you should add content to your pages without adding formatting options such as fonts,
sizes and colours. Only add these if you specifically wish to alter some text within the page; for example,
making a section of text bold. The formatting specified in your CSS files will be applied to the site when it is
displayed to visitors. You can see how the page will display by saving your page using the Update button
and then clicking the Build Site button in the header. This will open your site in your default browser where
you can navigate to the page to see how it displays.
For help in using the Content Editor, hover your mouse pointer over each of the buttons. A tooltip will display
what the button does. The majority of buttons are relatively straightforward. The buttons perform the same
functions as similar buttons in Microsoft Word.
Company Confidential
Page 9 of 18
4.4
Common Editing Options
In general, you will not need to apply any formatting to the text you enter into the Content Editor. As
mentioned earlier, appropriate formatting for your site has already been specified via the site Elements.
Formatting you may want to add includes making part of the text Headers using the Format dropdown.
If you want to make text bold, italic or use different colours to highlight text, use the appropriate buttons
We would suggest that you refrain from using the text justification options (see image below). Appropriate
justification has been defined for your site using the Element styles.
You can insert and manage tables through the interface. The buttons to use are highlighted below. Note that
some buttons will be greyed out until you select a table to work on:
The selection of buttons highlighted below allows you to carry out standard activities such as Undoing /
redoing changes, selecting, cutting and pasting and printing.
If you cut and paste text from a Microsoft Word™ document, the text will be added to your web page with
Word formatting included. This means the copied text will most likely display in a different format to the rest
of your site. The same goes for text copied from another website. It is therefore good practice, when copying
from Word or another website, to paste the text via Notepad. This should enable the text to be placed on the
Flexiweb page without carrying over any earlier formatting.
Company Confidential
Page 10 of 18
4.5
Insert / Modify an Image
To insert an image into your content you use the insert image button highlighted below:
This will open a new window as shown:
Company Confidential
Page 11 of 18
The basic process for inserting an image is:
1. Upload the image to the website. Use the Browse button to locate the image on your computer and
then click the Upload button to upload it.
2. The image is added to the images available for your site. Use the scroll bar to the left to locate the
image you just uploaded and then select it by clicking it once. The selected image is highlighted and
displayed in the window in the bottom right.
3. The default description is the image file name. To allow visually impaired people to understand what
the image conveys, add a description of the image. This displays when a visitor hovers over the
image and can be read out by screen reader applications.
4. The default Width and Height are taken from the image. You may alter these here, but better
practice is to create the image at the correct size rather than alter the size displayed on the website.
5. Select your alignment. This determines where the image displays on the page. You may have to play
with the alignment to get the image to display where you want it. You can come back and alter the
alignment at any time.
6. Select Margin, Padding and Border options. You specify these as pixels e.g. 2px. Margin is the
space created around the entire image and border (if selected). This allows you to keep text away
from images. Padding is the space between the image and any border you add. Border size and
colour can be set.
7. When done, click OK and the image will be inserted into your content.
(If you add a hyperlink to the image i.e. you make it so that clicking on the image opens a new page, set the
border to 0px. This prevents a border being added by default).
If you need to alter the image parameters, select the image before clicking the Insert Image button. The
image dialog will then display with the settings for that image.
To delete an image from your web page, simply select and delete it. The image is still available in your
website image folder, but won’t display on the page. To delete the image from your website folder, click the
Insert Image button, locate and select the image and then click the trash can icon as highlighted below:
You can also edit the image on the website by clicking the edit icon next to the trash can. Note that
you can only edit JPEG format images.
Company Confidential
Page 12 of 18
4.6
Insert / Modify a Hyperlink
A hyperlink is simply a link to another website/page. This can be within your website or elsewhere on the
web. When you add a hyperlink, the text or image that you add the hyperlink to becomes ‘clickable’ – the site
visitor clicks on the text / image to open a new page.
To insert or modify a hyperlink, select the text or image that you want to add a hyperlink to and then click the
hyperlink button highlighted below:
This will open a new window as shown:
1. Type or paste the URL into the URL field. This needs to be in full, so for internal pages you will need to
input the Flexiweb page name – anotherpage.php. For external websites you will need to input
http://www.anotherwebsite.co.uk
2. Add a tooltip if required. This displays when a site visitor hovers over the hyperlink.
3. Specify the target for the document to be opened. You will use either:
a. None – replace the current page with the new page – use for internal linking and text anchors
b. New Window – the page opens in a new browser window – use for external linking
4. Click OK when done.
If you need to alter the hyperlink parameters, select the image or text with the hyperlink before
clicking the Insert Hyperlink button. The hyperlink dialog will then display with the settings for that
hyperlink.
(When you have completed a set of changes to a page, save them by clicking the Update button. Your login
to FlexiWeb has a timeout. If there has been no activity for 1hour, your account will be logged out. Any
changes you have made and not saved will be lost!)
Company Confidential
Page 13 of 18
4.7
Inserting a .pdf Document
You can upload .pdf documents to your website, for viewing and downloading by the visitor.
The process is similar to inserting a hyperlink, but you will need to upload the .pdf document before using the
Insert/Modify Hyperlink icon.
First of all, create the text / image, on the relevant page, that you want to use as the linking object. Click on
Update Page to hold this information, then go to the Site Info component:
This is where you will upload the .pdf document.
Once here, on the left-hand side, you will see the text “Upload to documents” with a blank field next to it, then
a Browse button. Click on the Browse button, and navigate to the .pdf on your hard drive. Once you’ve found
it, highlight it, click on Open and the pop-up box will disappear and the filename will appear in the text field
between Upload to documents and Browse.
Click on UPDATE SITE, and the blue header bar will change, with text in :
You can either highlight and copy the bit “documents/test.pdf” (or whatever your document name is) or make
a note of it, but it must be exactly the same as in the header bar.
Go to the page where you have created the item to link to your .pdf document, click on the text/image you
want to be the link, click on the Insert Web Link icon in the Editor and in the URL field, paste (or type) in the
filepath and name from the Site Info page (i.e., in this case - documents/test.pdf -) . The target will be New
Window, click on OK – click on Update Page, and then Build.
Company Confidential
Page 14 of 18
4.8
Insert Text Anchors
A Text Anchor is a link to a certain area of a page within your website. For example, if you had a page of
Case Studies / News Items, etc., and wanted to direct your visitor to a particular part of the page, you can
insert a Text Anchor on the relevant page and when the visitor clicks on the hyperlink, they will be directed
straight to that point on the page.
To insert a Text Anchor, create your page and insert the heading, etc:
Place your cursor where you would like the page text to start, and type in your news item (for example).
Company Confidential
Page 15 of 18
Once you have completed your item, place your cursor to the left of the first letter of the text and click on the
icon that looks like an anchor.
This will open a dialogue box, where you need to input the Text Anchor name. This name will be used in the
hyperlink that directs visitors to this place on the page, so good practice is for the name to be something
relevant, and quite short (if possible).
Once you have decided on the Text Anchor name, click OK and a text box with an anchor will appear in the
editor:
To create more Text Anchors on the same page, follow the same procedure. Type in the text you want,
place the cursor to the far left of the first letter, and click on the icon that looks like an Anchor.
Company Confidential
Page 16 of 18
NOTE: When you Build the page, you will not see the anchor symbol or the blue line around the image.
Now you have set up the page with Text Anchors, you will need to link to these, from elsewhere on the site.
Go to the page you want to place the actual link, and follow the instructions on how to Insert a Hyperlink.
The naming convention for the hyperlink will be the page name, followed by # and the text anchor name you
have given it.
In the example given in this document, the first Text Anchor is entitled “testanchor” and the second Text
Anchor on the same page (page name: textanchors) is “testanchor2”.
So to link to these text anchors, your separate hyperlinks would be:
textanchors.php#testanchor
and
textanchors.php#testanchor2
Company Confidential
Page 17 of 18
5.
Users Component
This component has various uses, depending on your website setup. The Users component allows you to
add, remove or amend user accounts. In general, there should be no need to add additional user accounts.
6.
Building & Publishing
When you have completed the changes to your site you need to build and then publish it. There are no
complicated steps required to upload your revisions to the public internet. All of the steps required to achieve
this are completed in the background by FlexiWeb.
Building your site turns the changes you have made into web documents. You can build the site as many
times as you need to. Building does not make the changes you have made public. That is, people visiting
your site will not see the changes until you have published the site. The Build option not only creates your
site, it allows you to see the changes you make as your site visitors would see them. In effect, you see a
copy of your site. Building the site opens the index page in a new browser window. You can then navigate to
the pages you have changed and confirm that you are happy with the content and the way it displays.
IMPORTANT NOTE: If you are using IE7 or IE8 you may often have to hold down ctrl and press F5 on the
keyboard to fully refresh the page. Internet Explorer stores a local version of the website which sometimes
doesn’t update. Ctrl + F5 forces Internet Explorer to load the latest version of this page.
Once you have completed all of the changes and are happy with them, you publish the site. This makes all of
the changes visible on the public internet. Nothing you have done is made public until you have published
the site. You can publish as many times as you need to.
That’s it!
IMPORTANT NOTE: If you are using browsers IE7 or IE8 you may have problems when clicking on the
Publish Site button. If this is the case – don’t worry – all you need to do is keep the Control key down while
simultaneously clicking on Publish Site. As soon as the "FlexiWeb Site Transfer Utility Page" appears, you
can let go of the Control key.
Company Confidential
Page 18 of 18