1
BT Community Web Kit
User Guide
Version 5
February 2012
Page | 1
Contents
About BT Community Web Kit .................................................................................... 5
The User Guide .......................................................................................................... 5
Getting Started ........................................................................................................... 5
Home Page ......................................................................................................................................... 6
BT Community Web Kit Site Navigation ............................................................................................. 6
Community Directory........................................................................................................................... 7
Help & FAQ ......................................................................................................................................... 7
Inline Help ....................................................................................................................................... 8
Helpdesk ............................................................................................................................................. 8
Helpdesk Home Page ..................................................................................................................... 8
Submit a Support Ticket .................................................................................................................. 9
Register .................................................................................................................... 10
Register your Community Group - Step 1 of 4: Your Details ............................................................ 10
Step 2 of 4: Your Community Group ................................................................................................. 11
Step 3 of 4: Your Community Website .............................................................................................. 13
Step 4 of 4: Terms and Conditions ................................................................................................... 14
Creating and Editing the Properties of your Site ...................................................... 16
Layout................................................................................................................................................ 17
Settings ............................................................................................................................................. 18
Website Title ................................................................................................................................. 18
Logo .............................................................................................................................................. 18
Header Text .................................................................................................................................. 19
Footer ............................................................................................................................................ 19
Header Background Image and Left Navigation Background ....................................................... 20
Contact Details .............................................................................................................................. 20
Bookmark Icon .............................................................................................................................. 20
External URL ................................................................................................................................. 20
Description and Keywords ............................................................................................................ 20
Category ........................................................................................................................................ 20
Pages ................................................................................................................................................ 21
Visit Counter ...................................................................................................................................... 21
Menu Order ....................................................................................................................................... 22
Rename ......................................................................................................................................... 22
Page Level .................................................................................................................................... 23
Display........................................................................................................................................... 23
Page | 2
Delete ............................................................................................................................................ 24
Add a Page ................................................................................................................................... 24
Restore Deleted Pages ................................................................................................................. 25
Guestbook ......................................................................................................................................... 27
Calendar ............................................................................................................................................ 28
Setting up your Calendar Page ..................................................................................................... 28
Adding Calendar Entries ............................................................................................................... 29
Your Account ..................................................................................................................................... 30
Your Websites ............................................................................................................................... 30
Your Account ................................................................................................................................. 31
Creating and Editing your Website Content ............................................................. 32
Edit Website Home Page .................................................................................................................. 32
Edit Page ....................................................................................................................................... 32
Edit Site Properties ....................................................................................................................... 34
Save Page ..................................................................................................................................... 34
My Account.................................................................................................................................... 34
Logout ........................................................................................................................................... 34
Edit ................................................................................................................................................ 34
Save Page ..................................................................................................................................... 34
The Content Editor ............................................................................................................................ 34
Editor Interface .............................................................................................................................. 34
1 Toolbar ....................................................................................................................................... 35
2 Content Area .............................................................................................................................. 35
3 View Options .............................................................................................................................. 35
Tag Inspector ................................................................................................................................ 35
Statistics ........................................................................................................................................ 36
Toolbar Buttons ............................................................................................................................. 36
Formatting Text Appearance......................................................................................................... 36
Formatting Paragraphs & Lists...................................................................................................... 38
Working with Portions of Text ....................................................................................................... 39
Inserting Elements ........................................................................................................................ 41
View............................................................................................................................................... 43
Miscellaneous ............................................................................................................................... 43
Other Shortcuts ............................................................................................................................. 44
Formatting Text ................................................................................................................................. 44
Changing the Text Font................................................................................................................. 44
Changing the Text Size ................................................................................................................. 44
Applying Text Colours ................................................................................................................... 45
Setting Text Alignment .................................................................................................................. 46
Indentation..................................................................................................................................... 46
Applying Paragraph Styles ............................................................................................................ 46
Copying Formatted Text................................................................................................................ 46
Paste button or Ctrl+V ................................................................................................................... 47
Paste from Word ........................................................................................................................... 47
Paste from Word, Strip Font.......................................................................................................... 47
Paste Plain Text ............................................................................................................................ 47
Pasting content in non IE browsers .............................................................................................. 47
Strip Word-Formatting after Paste ................................................................................................ 48
Page | 3
Working with Hyperlinks .................................................................................................................... 49
Inserting a Hyperlink ..................................................................................................................... 49
Internal Hyperlink .......................................................................................................................... 49
Modifying a Hyperlink .................................................................................................................... 51
Removing a Hyperlink ................................................................................................................... 51
Inserting Anchors .......................................................................................................................... 51
Inserting E-mail Links .................................................................................................................... 53
Find and Replace .............................................................................................................................. 53
Working with Tables .......................................................................................................................... 55
Creating a Table Using the Table Builder ..................................................................................... 55
Creating a Table Using the Table Wizard ..................................................................................... 56
Inserting a Table from Microsoft Excel® or other Applications ..................................................... 56
Show/Hide Table Borders ............................................................................................................. 56
Formatting Tables ......................................................................................................................... 57
Table Properties Explained ........................................................................................................... 57
Cell Properties Explained .............................................................................................................. 58
Inserting/Deleting Rows and Columns .......................................................................................... 59
Merging/Splitting Cells .................................................................................................................. 59
Resizing Tables ............................................................................................................................. 60
Formatting Tables with CSS Classes ........................................................................................... 60
Creating Bulleted/Numbered Lists .................................................................................................... 61
Inserting Special Characters (€, ®, ©, ±, Ë, etc.) .............................................................................. 61
Image Manager ................................................................................................................................. 62
Inserting an Image from the Web-Server ...................................................................................... 62
Uploading Images on the Image Manager .................................................................................... 63
Editing Image Properties ............................................................................................................... 64
Editing Image Properties via the Insert Image dialog ................................................................... 65
Using the Image Map Editor.......................................................................................................... 65
Uploading Images Stored Externally ............................................................................................. 66
Working with Documents .............................................................................................................. 67
Inserting Documents ..................................................................................................................... 67
Uploading Documents on the Web-Server ................................................................................... 67
Embedding a Youtube Video ............................................................................................................ 69
Spell-Checking .................................................................................................................................. 70
Creating Accessible Content ("Section 508"Compliant) ................................................................... 70
Creating Accessible Tables........................................................................................................... 70
Creating Accessible Hyperlinks .................................................................................................... 71
Creating Accessible Images.......................................................................................................... 72
Using the HTML Mode ...................................................................................................................... 72
The Preview Mode ............................................................................................................................ 73
Printing Content ................................................................................................................................ 73
Page | 4
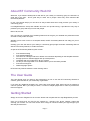
About BT Community Web Kit
Welcome, if you haven't already built a web site for your charity or community group, the internet is a
great way to be seen - and a great way to reach out to people. That's why we've launched BT
Community Web Kit.
In just a few simple steps you can have an easy-to-build web site to help promote your charity or
community group.
It's straightforward to set-up and maintain and once it's up-and-running, it provides an easy way to
publicise your group and stay in touch with people.
Best of all, it's free.
Our new service is packed full of amazing features that will give your website the professional look
and feel to really make an impact.
Whether you're a tech novice or a computer whizz, the BT Community Web Kit can really put you on
the map.
Creating your own web site for your charity or community group might sound like a daunting task but
with BT Community Web Kit, it couldn't be easier.
As part of BT Community Web Kit you'll receive:
Free website hosting
Free website addresses
The choice of 9 designs and five or fifteen colour themes depending on the template selected
Enough space for unlimited pages and up to 250 pictures
Templates and colour options for all your content
An easy-to-use Page Editor or an HTML Editor if you’re technically minded
Free technical support
Welsh language options
BT Community Web Kit. Make the most of being online.
The User Guide
This User Guide gives you step by step instructions on how to use the BT Community Web Kit to
create a great web site for your community organisation.
If you have any additional questions our ‘Inline Help’ and ‘Help & FAQ’ page has lots of answers to
common queries. But if you really are stuck, our team of helpful people are on hand to provide free
technical support.
Getting Started
Simply click on the "Register for an Account" button and complete the four-step Registration process.
Once you’ve done that, it's time for the creative bit - choosing your layout, settings, pages and
entering your content. You can even choose from a range of colours to reflect your logo and give your
site that personal touch.
Page | 5
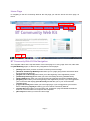
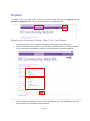
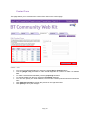
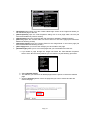
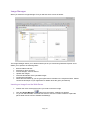
Home Page
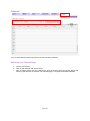
In navigating to the BT Community Web Kit the first page you will see will be the home page, as
below:
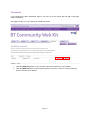
BT Community Web Kit Site Navigation
The navigation ribbon at the top and bottom of the Home page is on every page of the site, other than
the [Edit Website] pages, to allow for easy navigation across all pages.
[Home] button takes you back to the BT Community Kit Home Page
[About BT Community Web Kit] button takes you to a page giving further information about
the BT Community Web Kit
[Register for an Account] button takes you to the beginning of the registration process
[Community Directory] button takes you to the Community Directory (detailed below)
[Help & FAQ] button takes you to the BT Community Web Kit help section (detailed below)
[Register] button takes you to the beginning of the registration process, if you are logged into
your account this will display [Your Account] and will take you to your account details
(detailed below)
[Login to Account] button takes you to the login page, if you are logged into your site this
button will display [Logout] and will log you out of the BT Community Web Kit
[Contact BT] button takes you to the BTPlc site ‘Contact BT’ page and details the different
methods of communication for enquiries and complaints
[BT.com] button takes you to the BT Home Page
Page | 6
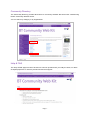
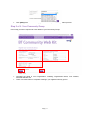
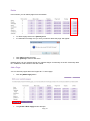
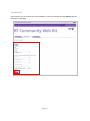
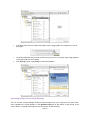
Community Directory
The Community Directory provides direct links to community websites that have been created using
the BT Community Web Kit service.
You can search by Category or by Organisation:
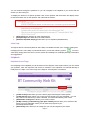
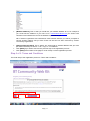
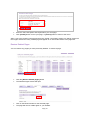
Help & FAQ
The ‘Help & FAQ’ page has lots of answers to common queries and if you really are stuck, our team
of helpful people are on hand to provide free technical support.
.
Page | 7
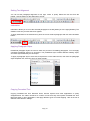
You can browse through the questions or you can navigate to the Helpdesk if you cannot find the
answer you are looking for.
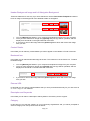
To display the answer to a specific question click on the question and the answer will display below,
to hide the answer click on the question and it will hide the answer:
[Show All] button displays all of the FAQ answers
[Collapse All] button hides all of the FAQ answers
[Submit a Helpdesk Enquiry] button takes you to Helpdesk (detailed below)
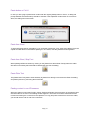
Inline Help
Throughout the BT Community Web Kit ‘Inline Help’ is available to assist you in creating, editing and
managing the site. ‘Inline Help’ is indicated wherever you see the following symbol:
To use the
‘Inline Help’ simply place the cursor over the symbol and a dialog box will display with tips, information
and suggestions.
Helpdesk
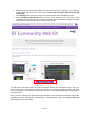
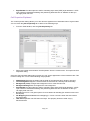
Helpdesk Home Page
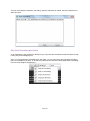
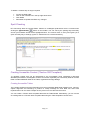
On navigating to the Helpdesk you will be taken into the Support Ticket system where you can submit
your question, track the response and receive a resolution. The Helpdesk is monitored Monday to
Friday 9am to 5.30pm. The Home Page of the Support Ticket System is as follows:
[Ticket Center] button takes you to the Home page of the Support Ticket System
[Ticket Search] button allows you to search for tickets that you have submitted – you can
only search on tickets that you have submitted, not tickets submitted by other users
[Submit New Ticket] button allows you to submit a ticket
[All My Tickets] / [Ticket History] / [All Open Tickets] buttons allow you to view all of the
tickets you have submitted, where you can track the progress of your
question/problem/request
[Advanced] button allows you to modify how you view and organise your tickets
Page | 8
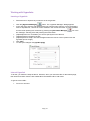
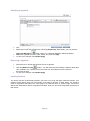
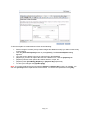
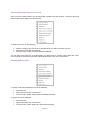
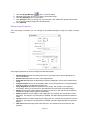
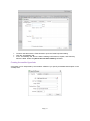
Submit a Support Ticket
If you have a question/problem/request that cannot be answered within the User Guide or the FAQ
section you can submit a ticket through the helpdesk.
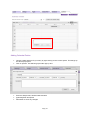
To submit a new ticket, select the [Submit new ticket] button where you will be navigated to the
[Create a New Ticket] page:
Complete the form including:
Title – the title of your question/problem/request
Type
Category
Attach any additional information and select [Create Ticket]
You can track the progress of your ticket within the Helpdesk. To track progress, navigate to the [Help
& FAQ] section and [Submit a Helpdesk Enquiry] to enter the Support Ticket System.
Page | 9
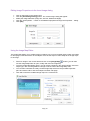
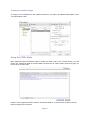
Register
To register to use and build a site on the BT Community Web Kit select the [Register for an
Account] or [Register] button and you will be directed to the following screen:
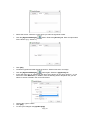
Register your Community Group - Step 1 of 4: Your Details
Complete the fields; Title; First Name; Last Name; Email address (see note above)
Select a User Name and Password – you will need to remember this as you will be prompted
for your User Name and Password each time you log into the BT Community Web Kit
Choose a Security Question for your Account, something that you will remember in the event
that you forget your User Name and/or Password
Page | 10
Click [Next] at the bottom of the page to move to Step 2 of the registration process
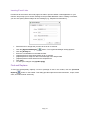
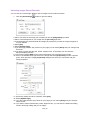
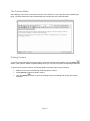
Step 2 of 4: Your Community Group
In this step you will be required to enter details of your Community Group:
Complete the fields in ‘Your Organisation’ including; Organisation Name; Your Position;
Intended Website Use
There is a check button to complete advising if you registered Charity yes/no:
Page | 11
o
o
If you are a Registered Charity Number check [yes] and a box will appear where you
are required to add your Charity number
If you are not a Registered Charity check [no] and continue with the form
NB: If you are a registered charity it is a legal requirement that your charity number appear on
your site.
Complete the fields in ‘Survey Questions’:
Complete the fields in ‘Organisation Address Details’, using the drop down selection for
County:
Page | 12
Click [Back] if you wish to move to the previous step of the registration process
Click [Next] at the bottom of the page to move to Step 3 of the registration process
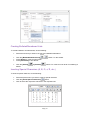
Step 3 of 4: Your Community Website
In this step you will be required to enter the details of your Community Website:
Complete the fields including:
[Website Name] This is the name of your Website i.e. ‘Jane Bloggs Charity’ –this section is
not the website address
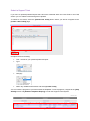
[Category] This is the category of your Community Organisation and you will be prompted to
select a category from a drop down menu as below:
Page | 13
[Website Address] This is what you would like your website address to be, for example if
you would like the address of your site to be: www.animals.btck.co.uk you would enter
‘animals’ into this field as the rest of the address is provided for you
NB. If another organisation has selected the same website address you will be prompted to
choose another address until you have found one that has not been reserved by another
Community Organisation.
[External Domain Name] This is where you would enter a website address that you have
purchased externally such as a .co.uk / .org / or .com address
Click [Back] if you wish to move to the previous step of the registration process
Click [Next] at the bottom of the page to move to Step 4 of the registration process
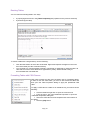
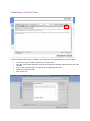
Step 4 of 4: Terms and Conditions
The fourth step of the registration process is ‘Terms and Conditions’:
Page | 14
Read through the Terms and Conditions on the screen and if you accept them, check the box
at the bottom right hand side of the screen: [I have read and agree with the terms and
conditions]
Click [Back] button if you wish to move to the previous step of the registration process
Click [Complete Registration] button and you will be directed to the next step in the
registration process ‘Choose Your Layout and Colours’ with the following message at the top
of the screen confirming that your account has been set-up.
You will then be directed to select a Layout and Colour Scheme from the options given, once you
have selected your layout select the [Select this layout and continue button] at the bottom left hand
corner of the page – full instructions on layouts are given in ‘Creating and Editing the Properties of
your Site’ below.
Once you have selected your Layout and Colour Scheme you will be directed to the final step of the
registration process, selecting your ‘Site Settings’ - full instructions are given in ‘Creating and Editing
the Properties of your Site’ below.
Page | 15
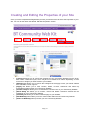
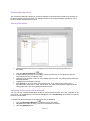
Creating and Editing the Properties of your Site
Once you have completed the Registration process you will then have to select the Properties of your
site. You can do this within the tabbed ‘Edit Site Properties’ section:
[Layout] tab allows you to choose the template for your Community Website from the given,
each offers a different layout, some maybe more suitable than others depending on how
much text or images you want to add to your website.
[Settings] tab allows you to choose the settings that will apply across your whole website
such as header, footer, logo etc.
[Pages] tab allows you to add, rename, delete, re-order, hide/show and make top
level/sublevel pages within your Community Website
[Contact Form] tab allows you to customise the Contact Form on your Community Website
[Guest Book] tab allows you to monitor, review and delete comments entered into the
Guestbook on your Community Website
[Calendar] tab allows you to add a calendar page to your website.
[Edit Website] button takes you to the content editor within the BT Community Web Kit
[View Live Website] button previews your live Community Website
Page | 16
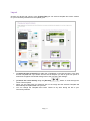
Layout
Choose your layout and colours: In the [Layout Tab] you can select a template and colour scheme
for your Community Website from the options given:
[1. Select the type of layout] from either the 8 Templates on the left hand side, or the Free
Format Template NB. if you select the free format template you will be given the option to
amend the navigation and header background in the next step ‘Site Settings’
[2. Select the colour theme] using the [Scroller]
buttons to scroll through the
Colour Theme options
When you are happy with your selection click on the image and the selected Template will
automatically be implemented onto your site
You can change the Template and Colour Theme at any time during the life of your
Community Website
Page | 17
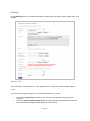
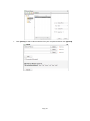
Settings
In the [Settings] tab you can add and amend the settings that will apply to all the pages within your
website.
Website Title
This is the name of your Website i.e. ‘Jane Bloggs Charity’ – this field is not the website address.
Logo
You can upload a Logo to appear on your Community Website. To do this:
You can either [Browse] the folders in your computer and upload an image from your
computer
Or you can [Show Available Images] from the Image Manager (full instructions on the BT
Community Web Kit Image Manager detailed in later section)
Page | 18
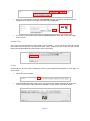
Once you have selected an image click [Upload] and your logo will be uploaded, and will
display as a thumbnail on the right hand side of the [Logo] field
If you wish to remove the image select the [Remove] button which will remove the image
from your site
Header Text
This is the text that will appear in the Header of your website – you do not have to have text in this
field. Within this function you can amend the size, colour, position and font of the text (full Content
Editor Instructions detailed in a later section of the User Guide)
Footer
In this field you have the option of adding a Footer to your website that will appear on each page. To
add a Footer:
Check the box as follows:
This will display the footer editor where you can add text; images; background colour and
much more (Content Editor instructions detailed in a later section of the User Guide).
Page | 19
Header Background Image and Left Navigation Background
These two fields are for use only if you have selected to use the Free Format Template and wish to
have an image in the background of the Website Header or Navigation.
You can [Browse] the folders in your computer and upload an image from your computer
Once you have selected an image click [Upload] and your logo will be uploaded, and will
display as a thumbnail on the right hand side of the field
If you wish to remove the image select the [Remove] button which will remove the image
from your site
Contact Details
In this field you can add any contact details you wish to appear in the Header or Footer of the site.
Bookmark Icon
In this field you can add a bookmark image to the site. This needs to be in the format .ico. To add a
bookmark image:
You can [Browse] the folders in your computer and upload an image from your computer
Once you have selected an image click [Upload] and your logo will be uploaded, and will
display as a thumbnail on the left hand side of the field
If you wish to remove the image select the [Remove] button which will remove the image
from your site
External URL
In this field you can enter a website address that you have purchased externally for your site such as
a: .co.uk / .org / or .com address.
Description and Keywords
In this field you can add in a description and keywords to be used by search engines.
Category
In this field you can add the category of your Community Organisation and you will be prompted to
select a category from a drop down menu as below:
Page | 20
Pages
You can add, rename, delete, hide and re-order pages to create a menu and structure suitable for
your website content in the ‘Pages’ tab of the BT Community Web Kit.
Visit Counter
The visit counter allows you to see how many visits you have had to each page of the website. This
cannot be reset.
Page | 21
Menu Order
You can change the order of the pages in your Community Website. The ‘Menu Order’ field allows
you to change the order by clicking the [Up] or [Down] buttons next to selected item.
You can move each page up or down in the navigation until you have the order that you require for
the navigation of your site.
Rename
The [Rename] button for an item within the list of pages allows you to modify the navigation text and
name of that page. To edit a page:
Click the [Rename] button
A dialogue window will open containing a text box where you can change the title of the page:
Click the [OK] button to save the changes, or the [Cancel] button to return to the menu
Please note that if you modify the name of a page this will not change any custom page links that you
have placed within the text content of your website. These custom links will still re-direct the user to
the previous page title location and you will need to modify them through the BT Community Web Kit’s
content editor.
Page | 22
Page Level
You can move items to sub-menus and back in ‘Page Level’. You do this by clicking the [Make Top
Level] or [Make Sub Level] buttons.
Please note that if you modify the page level this will alter your websites navigation links.
Display
If you have created pages that you do not want to be visible within the main navigation list you can
choose to ‘Hide’ or ‘Show’ the page.
To hide/show pages:
To hide a page from the navigation click on the [Click to hide] button
To restore a hidden page click on the [Click to show] button
If an item within the list of pages has been set to hidden it will still appear in the list, however its title
text will be set to a grey/italic font. This change in font is so that you can see that this page has been
hidden from the websites navigation menu. Please note, that although the webpage is not in the
navigation menu, it may still be found using search engines.
Page | 23
Delete
In this section you can delete pages from the website.
To delete a page click on the [Delete] button
A confirmation message “Are you sure you want to delete this page” will appear:
Click [OK] to delete the page
Click [Cancel] to return to the menu
Deleted pages can be restored through the ‘Deleted Pages’ functionality of the BT Community Web
Kit – detailed in a later section of the User Guide.
Add a Page
You can add new pages within the ‘Pages’ tab. To add a page:
Click the [Add a Page] button
The [Create a New Page] window will open
Page | 24
Enter the Title, Description and Keywords for your new page
Click [Create] button to save your page, or [Cancel] button to return to the menu
After a you have created a new page through the ‘Create a new Page’ window you will be returned to
the ‘Pages’ tab and the newly created page will appear as an item at the bottom of the pages list.
Restore Deleted Pages
You can restore any pages you have previously deleted. To restore a page:
Click the [Restore deleted pages] button
The Deleted Pages window will open
Click on the Restore button for the selected page.
The page will now be visible again on your website.
Page | 25
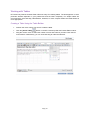
Contact Form
This page allows you to customise the contact form used on the contact page.
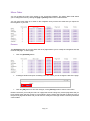
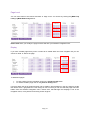
You can move selected fields up or down by clicking [Up] or [Down] buttons.
Tick the [Single Line] checkbox to make a field single line or untick it to make it a multiline
field.
To make a selected field mandatory tick the [required] checkbox.
To exclude a field from the form untick the [Included] checkbox.
You can also specify the email address, to which the entered queries/comments should be
sent.
Click [Refresh Preview] to refresh the preview on the right hand side
Click [Save] to save your changes
Page | 26
Guestbook
If you would like to add a Guestbook page to your site, go to the 'Pages' tab and add a new page
called 'Guestbook'.
This page is where you can review your Guestbook entries.
Click the [Approve] button if you would like comments to appear on your website.
Click the [Remove] button to permanently delete a comment – there is no way of restoring
these comments once deleted
Page | 27
Calendar
You can add Calendar entries using the BT Community Web Calendar.
Setting up your Calendar Page
Go into your account
Click on the Calendar tab, shown above
Now, choose a page to put your calendar on. Click on the drop down box (shown above) and
select a page OR click on create a new Calendar page. This page will be titled Calendar.
Page | 28
Adding Calendar Entries
Choose a date and time for your entry by right clicking on the correct square. This brings up
the above pop up box.
Click on options. This will bring up another pop up box.
Enter the Subject title, start/end date and time
[optional] Enter description
Remember to save any changes
Page | 29
Your Account
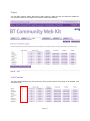
Your Websites
In this section you can view the websites that you have registered under your account:
URL – this is the URLs of any sites you have registered under your user account
Status – this indicates if your site is active or disabled
[Submit to Directory] click this button to submit your completed site to the Community
Directory, this will display as pending until it is authorised. This does not affect your sites live
status.
Edit: [Layout] / [Settings] / [Pages] / [Content] buttons take you back to the ‘Edit Site
Properties Section’
[Your Community] button takes you to a page where you can enter your Organisation
details.
Manage: [Disable] button disables your site so that it cannot be viewed by the public
Manage: [Delete] button deletes your site – this cannot be restored if deleted
[Add New Website] button allows you to add details of an additional website you want to
include in your user account
Page | 30
Your Account
In this section you can amend your account details, to save any changes click the [Save] button at
the bottom of the page:
Page | 31
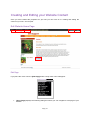
Creating and Editing your Website Content
Once you have created the properties for your site you can move on to creating and editing the
content of your site – the fun part!
Edit Website Home Page
Edit Page
If you place the cursor over the [Edit Page] button a drop down menu will appear:
[Go to Page] displays the following dialog box where you can navigate to each page of your
website:
Page | 32
[New Page] button takes you to the ‘Create a New Page’ section in the ‘Pages’ tab where you
can add a new page to the site
[Edit Properties] open the ‘Edit Properties’ dialog box for that page within the site (full
instructions detailed in previous section)
[Edit Content] opens the Content Editor (full instructions detailed in following section)
[Edit List] opens the Content Editor for the list items on the Home page (full instructions
detailed in following section)
[Edit Image Panel] opens the Content Editor for the Image Panel on the Home page (full
instructions detailed in following section)
[Save Page] allows you to save the changes you have made to the page
[Deleted Pages] takes you to a list of the pages that you have deleted from the site:
If you delete a page through the ‘Pages’ tab within the ‘Edit Website Properties’
section of the BT Community Web Kit you can restore it by the following procedure:
Select [Deleted Pages]
This will take you to a list of all deleted pages with the option to restore the deleted
page
Click the [Restore] button next to the page that you want to restore and this will
restore the page
Page | 33
Edit Site Properties
This takes you to the tabbed ‘Edit Site Properties’ section of the BT Community Web Kit.
Save Page
This saves the changes you have made to the current page.
My Account
This takes you into the ‘My Account’ section of the BT Community Web Kit.
Logout
This logs you out of the BT Community Web Kit.
Edit
opens the Content Editor (full instructions detailed in following section)
Save Page
saves the changes you have made to the current page.
The Content Editor
The
button next to each of the content areas within the BT Community Web Kit opens the
content editor for that section.
The BT Community Web Kit contains a powerful WYSIWYG (What You See Is What You Get) content
editor allowing even non-technical users to author and manage HTML content as easily as writing a
document. In its familiar Word®-like interface users can seamlessly format text, set hyperlinks, build
tables and insert images, documents, etc.
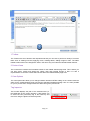
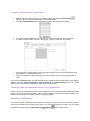
Editor Interface
Within the BT Community Web Kit administration pages there are a number of text content editors
however each of these editors has a similar interface containing one or more toolbars at the top (1)
the main text content area in the middle (2) and some view option tabs at the bottom (3).
Page | 34
1
2
3
1 Toolbar
The Toolbars are set of buttons and dropdown lists that you can click to perform a variety of common
tasks such as making text bold, applying colour, building tables, adding images or files. The editor
toolbar buttons have been designed to work in the same way as in Microsoft Word® toolbar buttons.
2 Content Area
The content area contains the formatted content for the related website page area. This is where you
can add, select, modify and delete text, tables, links and inserted images or files. It is also a
representation of what the content will look like within the related website page area.
3 View Options
The view options tabs allow you to change between advanced HTML editing on the content within the
editor for the related website page area and the standard Word®-like design view. It is also possible
for you to preview their changes within the editor through the preview tab.
Tag Inspector
This module displays the path of the selected item (i.e.
the DOM path of the current element). It also allows you
to select the last (innermost) tag in the hierarchy and
remove it using the [Remove Element] button.
Page | 35
Statistics
This module provides word/character count or other
analysis of the content. It is especially useful when you
have a word/character limit for an article.
Toolbar Buttons
The BT Community Web Builder Toolkit content editor allows you to make modifications to the related
website page area text content layout and formatting through the use of Microsoft Word® style
buttons.
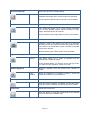
Formatting Text Appearance
The buttons in this section work on a selected portion of text. For some tools, it is enough to position
the mouse cursor in a word to apply the necessary formatting.
Bold
Applies bold formatting to the selected text.
Ctrl+B
Italic
Applies italic formatting to the selected text.
Ctrl+I
Underline
Select the text and click to apply Italic. If the cursor is in a
single word, clicking this button applies italic to the whole
word.
Applies underline formatting to the selected text.
Ctrl+U
Strikethrough
Select the text and click to apply bold. If the cursor is in a
single word, clicking this button applies bold to the whole
word.
Select the text and click to apply underline. If the cursor is in
a single word, clicking this button applies underline to the
whole word.
Applies strikethrough formatting to the selected text.
Select the text and click to apply strikethrough. If the cursor
is in a single word, clicking this button applies strikethrough
to the whole word.
Font Name
Sets the font typeface.
This dropdown allows you to change the font of the selected
text.
Page | 36
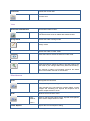
Font Size
Sets the font size.
These dropdowns allow you to change the font size of the
selected text.
Text Colour (Foreground)
Changes the colour of the selected text.
This dropdown allows you to change the font colour of the
selected text.
Text Colour
(Background)
Changes the background colour of the selected text.
This dropdown allows you to change the background colour
of the selected text.
Superscript
Makes text or numbers appear as
superscript
.
When typing text, you can click this button to make the text
superscript
that follows
. The button also works on selected text.
You need to click the button again to switch back to normal
text typing.
Subscript
Makes text or numbers appear as subscript.
When typing text, you can click this button to make the text
that follows subscript. The button also works on selected text.
You need to click the button again to switch back to normal
text typing.
Convert to Lower Case
Converts selected text to lower case
When typing text and select it, you can click this button to
change the text to lower case.
Convert to Upper Case
Converts selected text to upper case
When typing text and select it, you can click this button to
change the text to upper case.
Page | 37
Formatting Paragraphs & Lists
Inserts а new paragraph.
New Paragraph
Ctrl+Enter
Numbered List
This button allows you to insert a new paragraph. There is
a difference between clicking this button and clicking
[Enter]. Click [Enter] to create a new line and keep the
paragraph formatting. Click this button to create a
paragraph with different paragraph settings that can be
changed later on. This feature is important when applying
indentation and justification to text.
Creates a numbered list from the selection.
Select some text or place the cursor inside a paragraph
and click this button to make the text a numbered list. Click
the button again to turn the numbered list into a regular
paragraph of text.
Bulleted List
Creates a bulleted list from the selection.
Select some text or place the cursor inside a paragraph
and click this button to make the text a bulleted list. Click
the button again to turn the bulleted list into a regular
paragraph of text.
Increase Indent
Indents a paragraph to the right.
This button indents a paragraph to the right. Each time this
button is clicked, the paragraph is indented further to the
right within the main content area.
Decrease Indent
Decreases the paragraph indent to the left.
This button works only if indent has been applied to a
paragraph beforehand. To use this button, click anywhere
in the paragraph you want to indent to the left and click it.
Horizontal Ruler
Inserts a horizontal line (ruler).
Click this button to insert a horizontal line below the cursor
position within the main content area.
Align Left
Aligns the selected paragraph to the left.
Click this button to align the selected paragraph to the left.
Centre
Aligns the selected paragraph to the centre.
Click this button to centre the lines in the selected
paragraph.
Page | 38
Align Right
Aligns the selected paragraph to the right.
Click this button to align the selected paragraph to the right.
Justify
Justifies the selected paragraph to the left and to the right.
Click this button to justify the selected paragraph.
Remove Alignment
Removes the alignment of the selected paragraph.
Click this button to remove the alignment settings of the
selected paragraph.
Working with Portions of Text
Spell Checker
Launches the inline Spell Checker
The spellchecker is a tool for checking spelling of the
written text contained within the content area.
Spelling is checked asynchronously and all your mistaken
words will be highlighted inline. The context menu on every
word gives you a quick and easy way to Change, Ignore or
Add the word to a custom dictionary.
See the Spell Checking section for more details.
Print
Prints the contents of the editor or the whole web page.
Ctrl+P
Click this button to launch your default printer’s dialog box.
Click [OK] or [Print] to print the current page in your web
browser. It is possible to setup your printers’ properties
before printing.
Page | 39
Cut
Cuts the selected content and copies it to the Clipboard.
Ctrl+X
This button works on the selected text, image and/or table.
Select some content and click [Cut]. The selected text or
image is removed from the page and is stored in the
clipboard for later use.
Please note that only the last cut (or copied) item is stored
in the Clipboard for later use.
Copy
Copies the selected content to the Clipboard.
Ctrl+C
This button works on the selected text, image and/or table.
Select some content and click [Copy]. This tool can be very
helpful when you need to type the same text many times.
The content is stored in the clipboard for later use but
please note that only the last copied (or cut) item will be
stored within the Clipboard.
Paste
Pastes copied content from the clipboard into the editor.
Ctrl+V
After you have either [Cut] or [Copied] an item (text, image,
etc.), you can [Paste] it using this button.
Place the cursor where you want the item to appear and
click on the [Paste] button to retrieve the text from the
clipboard.
Paste from Word
Pastes copied content from the Clipboard into the editor.
After you have either [Cut] or [Copied] an item (text, image,
etc.), you can [Paste] it using this button and the editor will
clean all unnecessary Microsoft Office related tags from the
retrieved text taken from the Clipboard.
In case you try to paste Word content with the regular
[Paste] button or Ctrl+V, a dialog will appear asking
whether to clean the Word markup. If the Clipboard content
does not come from Word, the dialog does not show.
Paste from Word (Cleaning Fonts &
Sizes)
Pastes copied content from the clipboard into the editor.
After you have either [Cut] or [Copied] an item (text, image,
etc.) in Microsoft Word ®, you can [Paste] it using this
button. The editor will clean all of the unnecessary
Microsoft Office related tags plus font formatting.
Paste Plain Text
Pastes copied content from the clipboard into the editor.
Ctrl+V
After you have either [Cut] or [Copied] an item (text, image,
etc.), you can [Paste] it using this button.
The [Paste Plain Text] button works similarly to [Paste from
Word], but it removes all HTML formatting and pastes plain
text, preserving the line breaks.
Page | 40
Paste as HTML
Pastes copied content from the clipboard into the editor.
Ctrl+V
After you have either [Cut] or [Copied] an item (text, image,
etc.), you can [Paste] it using this button.
This tool allows you to paste the HTML content of the
Clipboard as code, which may be quite convenient for
developer-oriented applications.
Paste HTML
Pastes copied content from the clipboard into the editor.
Format Stripper
Removes Word®, custom or all formatting.
Strips (removes) the formatting from the selected text or all
of the content within the editor.
Inserting Elements
Image Manager
Opens the image dialog
Ctrl+G
The image dialog allows you to insert, upload, create
thumbnails and set image properties.
See the Working with Images section for more details.
Insert Image
Insert and edit images
This dialog is a light version of Set Image Properties and its
content is immediately loaded without delay.
The user could insert images with HREF paths that come
from internal or external domains.
Page | 41
Document Manager
Opens the document manager dialog
The document manager dialog allows you to insert a
predefined document at the cursor position into the editor.
See the Working with Documents section for more details.
Image Map Editor
Opens the Image Map editor.
The Image Map allows you to create images containing
one or more invisible regions which are linked to other
pages, otherwise known as hotspots.
See the Working with Image Maps section for more details.
Insert Table
Inserts a table in the content area of the editor.
Inserting a table in the editor is as easy as in Microsoft
Word®: just click the button and select the number of rows
and columns you would like to create. The table is inserted
at the cursor position.
See the Working with Tables section for more details.
Hyperlink Manager
Makes the text selection a hyperlink.
Ctrl+K
This button allows you to create a hyperlink from the
selected text, number or image.
In the hyperlink dialog, you need to choose the type of link
you want to insert: Hyperlink, Anchor or E-mail.
Remove Hyperlink
Removes hyperlink from the selected text, number or
image.
Ctrl+
Shift+K
Insert Symbol
Select an image/text in a hyperlink, anchor or e-mail link
and click this button to remove the link.
Inserts symbol
Click this button to display a dropdown list with the built-in
symbols. Select a character to insert at the cursor position.
Insert Time
Inserts the current time
Click this button to insert the current time at the selected
cursor location on the editable area.
Page | 42
Insert Date
Inserts the current date
Click this button to insert the current date in the editable
content area.
View
Show/Hide Table Borders
Shows/hides table borders.
Toggles borders of all tables within the editor ON and OFF.
The ON function works on tables with hidden borders.
Design Mode
Places the editor in design mode
Click this button to switch the content editor WYSIWYG to
design mode.
HTML Mode
Places the editor in HTML mode
Click this button to switch the editor to HTML mode.
Preview Mode
Places the editor in Preview mode
Click this button to switch the editor to preview mode to see
the result of your changes without any editor set formatting.
An example of editor set formatting would be the dotted
lines around table cells with no set borders.
Miscellaneous
Undo
Disregards the last action
Ctrl+Z
Click to undo your last changes.
This includes but is not limited to inserting tables, moving
images and formatting text. Expand the dropdown list to
select multiple actions to undo.
Redo
Redoes the last undone action.
Ctrl+
Shift+Z,
Click to redo the last undone action. Expand the dropdown
list to select multiple actions to redo.
Ctrl+Y
Find & Replace
Opens the Find and Replace dialog.
Page | 43
Ctrl+F
Select All
Finds user defined text within the content editor and
replaces it with other user defined text.
Select all the editor content
Ctrl+A
Selects the whole content of the editor including any text,
images, tables and other content items.
Other Shortcuts
Ctrl + A
Selects the whole content of the editor.
Ctrl + W
Closes the active window.
Alt + F4
Closes the active application.
Formatting Text
The following section contains information on how to use the text formatting functionality contained
within the BT Community Web Kit Content Editor.
Changing the Text Font
To change the font of some text, select the text first and then select a font from the dropdown list on
the content editor’s toolbar.
Changing the Text Size
To change the font size of some text, select the text first and then select a font size from the
dropdown list on the content editor’s toolbar.
Page | 44
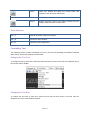
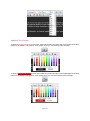
Applying Text Colours
To apply a foreground colour to some text, select the text first and then click the [Foreground Colour]
button on the toolbar. This opens a colour picker where you can select a colour to apply.
To apply a background colour to some text, select the text first and then click the [Background Colour]
button on the toolbar. This opens a colour picker where you can select a background to apply.
Page | 45
Setting Text Alignment
You can set the paragraph alignment to left, right, centre or justify. Select the text and from the
toolbar, click the button for the alignment to be set.
Indentation
Indentation allows you to move the selected paragraph to the left [Indent] or to the right [Outdent]. The
Outdent works only if Indent has been applied.
To apply indentation to the selected text, place the cursor inside a paragraph and click the indentation
button:
Applying Paragraph Styles
Predefined paragraph styles are used to ease the process of formatting paragraphs. You can apply
consistent paragraph styles to a document. The predefined styles include different heading styles,
and other styles defined by the developer.
To apply a paragraph style to some text, first place the cursor within the text, then from the paragraph
styles dropdown list, select the style you want to apply.
Copying Formatted Text
Copying formatted text from Microsoft Word, Internet explorer and other applications is pretty
straightforward. The editor introduces a number of tools that help users paste formatted text from
Microsoft Word or other applications, and apply different types of format stripping. Here is the list of
different Paste buttons / dialogs:
Page | 46
Paste button or Ctrl+V
In case you are trying to paste Word content with the regular [Paste] button or Ctrl+V, a dialog will
prompt whether the Word markup should be cleaned. If the Clipboard content does not come from
Word, the dialog will not be shown.
Paste from Word
To strip MS Word-specific formatting (<o:p> and other Word tags, mso styles and classes) from the
copied from MS Word content before pasting it in The editor, click the [Paste from Word] button.
Paste from Word, Strip Font
When pasting MS Word content by clicking on the [Paste from Word Clean Fonts] button the editor
will clean unnecessary Microsoft Office related tags plus font formatting.
Paste Plain Text
The [Paste Plain Text] button works similarly to [Paste from Word], but removes all HTML formatting
and pastes plain text, preserving the line breaks.
Pasting content in non IE browsers
When the editor is used under Firefox, Opera, Safari and Google Chrome and any of the paste events
discussed above are used a new dialog window appears. This is due to browser restrictions that do
not allow accessing the content from the clipboard. To copy and paste content from and in the editor,
you should use the Ctrl+C and Ctrl+V shortcuts.
Page | 47
The text to be pasted is entered in this dialog. After the OK button is clicked, this text is added to the
editor text area.
Strip Word-Formatting after Paste
As an alternative to the [Paste from Word] tool you can paste the formatted content first and then strip
it using the [Format Stripper] tool.
Once you have pasted the formatted text in the editor, you can remove the Word-specific formatting
that is not suitable for the web. To do that, first select the text and then select [Strip Word Formatting]
from the Code Stripper dropdown list.
Page | 48
Working with Hyperlinks
Inserting a Hyperlink
Select the text or object that you want to set as a hyperlink.
Click the [Hyperlink Manager]
button. The "Hyperlink Manager" dialog appears.
In the URL field, enter the web address that you want the link to point to or from the Existing
Anchor dropdown list, choose an anchor inserted in the current document. It is also possible
to insert a link pointing to a document by pressing the [Document Manager]
icon in the
link manager, selecting a file and pressing the Insert button.
(Optional)Fill the Link Text field if you want to specify the text of the link,
(Optional) Select a target for the link.
(Optional) Enter a tooltip. This text will appear when the mouse cursor is placed over the
hyperlink (text or image).
Click [OK]
To save your changes click [Update page]
Internal Hyperlink
To do this, you follow the steps as above. However, when you insert the URL for the internal page,
this needs to be taken from the live website NOT the website URL in edit mode.
To get the correct URL:
Go to Your Account
Page | 49
Click on ‘View live website’
A new tab will open with the live site. Navigate to the page you would like to link to. This page
will have the correct URL address.
You can then follow the steps detailed above, using the Hyperlink Manager.
Page | 50
Modifying a Hyperlink
Click inside the hyperlink (or in the image if you have an image link)
Right-click to open the context menu and click [Properties]. Alternatively, you may click the
[Hyperlink Manager]
button again. The "Hyperlink Manager" dialog will appear.
Modify the hyperlink attributes (URL, tooltip, etc.) and click [OK]
To save your changes click [Update page]
Removing a Hyperlink
Select the text or image that has been set as a hyperlink.
Click the [Remove Link]
button . You will notice that all formatting, related to links (blue
color, underline, etc.) will be removed from the text. This holds true for the inserted
documents as well.
To save your changes click [Update page]
Inserting Anchors
The anchor function is particularly helpful if you have a very long web page. With this function, your
readers will be able to jump from one section of the page to another. In other words, the anchor is
used for hyperlinks that lead to the same page or a particular place in another page. The anchor
defines the destination to which a hyperlink must lead. Then you can create a hyperlink and point it to
that anchor.
Page | 51
Define the Anchor. Place the cursor where you want the hyperlink to lead.
Click the [Hyperlink Manager]
for the anchor (e.g. “Anchor1”).
Click [OK].
Create the hyperlink that will lead to the Anchor. Select some text or an image.
Click the [Hyperlink Manager]
button again. Select the [Hyperlink] tab.
In the URL filed, type “#” followed by the name of the anchor (in our case “Anchor1”, so you
will have to enter #Anchor1). In addition, from the Existing Anchor dropdown list, you can
select an anchor inserted in the current document.
Change the Type to “Other”.
Click [OK].
To save your changes click [Update page]
button. Select the [Anchor] tab. Enter a unique name
Page | 52
Inserting E-mail Links
E-mail links do not lead to other web pages, but rather open the default e-mail application on your
machine and prompt you to send a message to the provided addressee. When creating e-mail links,
you can also specify default subject for the message (e.g. "Request for information").
Select the text or image that you want to set as an e-mail link.
Click the [Hyperlink Manager]
button. The "Hyperlink Manager" dialog appears.
Click the [E-mail] tab.
Enter the e-mail address in the Address field.
(Optional) Enter a text that will appear as an e-mail link
(Optional) Enter a subject for the e-mail message in the Subject field
(Optional) Select a CSS Class from the dropdown list.
Click [OK]
To save your changes click [Update page]
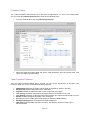
Find and Replace
To find (and subsequently replace) a word or passage of text in the content, click the [Find and
Replace]
button on the toolbar. This dialog provides options like search direction, scope, match
case, and match whole words only.
Page | 53
To find and replace a certain abstract of text do the following:
Select a range of content (it may contain images and tables as well) if you want to search only
in that content.
Click the [Find and Replace] button or press [Ctrl+F]. The Find and Replace dialog
appears.
Type the word or abstract of text you want to find in the Find field.
(Replace) If you want to replace this text with a different one, click the [Replace] tab.
(Replace) Choose other options like search direction, scope, etc.
(Replace) Click [Find Next], [Replace], or [Replace All] respectively
To save your changes click [Update page]
Note: If you have replaced a given text with the Replace or Replace All functions by mistake, you
can click [Cancel] and the replacement will be undone. To confirm the replacement click [OK]
Page | 54
Working with Tables
BT Community Web Kit Content Editor offers two ways for creating tables. The best approach in each
particular situation depends on your preferences and the table complexity. For simpler tables we
recommend the click-and-drag Table Builder, whereas, for more complex tables the Table Wizard is
more appropriate.
Creating a Table Using the Table Builder
Position the cursor where you want to create the table.
Click the [Insert Table]
button on the BT Community Web Kit Content Editor toolbar.
Drag the mouse cursor to select the number of rows and columns you want. Click the left
mouse button. Alternatively, you can click-and-drag to make the selection.
Page | 55
Creating a Table Using the Table Wizard
Position the cursor where you want to create the table and click the [Insert Table]
button on the BT Community Web Kit Content Editor toolbar.
Click the [Table Wizard] button at the bottom to open the “Table Wizard” dialog.
The Table wizard appears and you can use it to create your table and set its properties.
To add or remove columns or rows, click [+] or [ - ] next to “Columns” and “Rows”:
Click [+] next to “Column span” to merge the right cell with the cell you have selected. Click
the [-] button to unmerge the left cell.
The [ - ] or [+] buttons next to “Row span” work in a similar way as “Column span” but for
rows.
If you click the [Insert] button, the defined table will be created. Further customization of this table is
allowed using the [Table Properties], [Cell Properties], and [Accessibility] tabs of the Table
Wizard. The next few sections describe in detail how to modify tables.
Inserting a Table from Microsoft Excel® or other Applications
Inserting a table from Microsoft Excel® or other applications into the BT Community Web Kit Content
Editor is an easy copy-paste operation. Most of the formatting is preserved, including borders, text,
numbers and cell colour. Formulae, however, will not be pasted.
Show/Hide Table Borders
If you have created a table that has no borders by default, you can switch on the auxiliary borders.
They are not saved in the content but only help you locate and work with your table. You can toggle
the auxiliary borders using the [Show/Hide Table Borders]
Page | 56
button on the toolbar.
Formatting Tables
The “Table Properties” dialog allows you to fine-tune the appearance of a new or an existing table.
You can reach the [Table Properties] tab in either of the following ways:
From the Table Wizard, click the [Table Properties] tab.
Right-click inside an existing table and select "Table Properties" from the context menu. This
opens the Table Properties dialog.
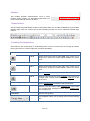
Table Properties Explained
Once the Table Properties dialog tab is opened, you can set the appearance of the table. This
involves setting one or more of the following table properties:
Width/Height Specifies the height and the width of the table (in pixels or percent).
Background Sets the background color of the table.
Alignment Aligns the table to the left, center or right side of the page.
Cell spacing Increases or decreases the space between the borders of the cells.
Cell padding Increases or decreases the space between the content and the border of a cell.
Border Includes setting border width, color, and layout.
ID Setting an ID for a table gives some options for advanced table handling.
Background Image Sets an image as the table background.
CSS Class Specifies table CSS class and style. This property should be used only by
advanced users.
Page | 57
Style Builder Provides options to define cascading style sheet (CSS) style attributes. A CSS
style combines individual formatting and positioning attributes into an attribute set that you
can apply all at one time.
Cell Properties Explained
The “Cell Properties“ dialog allows you to fine-tune the appearance of individual cells of a given table.
You can reach the [Cell Properties] tab in either of the following ways:
From the Table Wizard, click the [Cell Properties] tab
Right-click a table cell and select "Cell Properties" from the context menu. This opens the Cell
Properties dialog.
Once the Cell Properties dialog tab is opened you can set the appearance of the individual cells. This
involves setting one or more of the following cell properties:
Width/Height Specifies the height and the width of the selected cell (in pixels or percent).
Content alignment Aligns the content within the selected cell, vertically and horizontally.
Background (color) Changes the background colour of the selected cell.
Background Image Sets an image as the cell background.
Style Builder Provides options to define cascading style sheet (CSS) style attributes. A CSS
style combines individual formatting and positioning attributes into an attribute set that you
can apply all at one time.
ID Setting an ID for a cell gives options for some better cell handling (for advanced users and
developers)
No Wrapping Enables/disables text wrapping (i.e. forces a new line when the text reaches
the Cell border).
CSS Class Specifies cell CSS class and style. This property should be used only by
advanced users.
Page | 58
Inserting/Deleting Rows and Columns
Once you have created a table, you can easily add or delete rows and columns. To do this, right-click
inside a table cell to display the context menu.
To insert a new row, do the following:
Place the cursor in the row on top or beneath which you want to insert a new row.
Right-click to open the context menu.
From the menu, select the "Insert Row Above/Below".
You can insert new columns in a similar fashion. To delete rows or columns, simply place the cursor
in the respective row/column and select "Delete Row/Column" from the context menu.
Merging/Splitting Cells
To merge a cell with the adjacent cell, do the following:
Select the cell.
Right-click to open the context menu.
From the menu, select "Merge Cells Horizontally/Vertically".
To split a cell, do the following:
Select the cell.
Right-click to open the context menu.
From the menu, select "Split Cell / Split Cell Horizontally".
Page | 59
Resizing Tables
You can resize an existing table in two ways:
by specifying dimensions in the [Table Properties] tab (explained in the previous sections)
by direct drag-and-drop
To resize a table with a drag-and-drop, do the following:
Click the table border to select the whole table. Eight small squares will appear in the outer
area of the table (see the screenshot above).
You can drag any of these handles vertically, horizontally or diagonally to resize the table. All
cells that do not have exact dimensions (specified in pixels), will be resized evenly to
accommodate the new table size.
Formatting Tables with CSS Classes
CSS class provides an easy and consistent way for formatting tables.
In order to use the CSS Class, you have to first create the table and
then open the Table Properties dialog to apply the predefined CSS
class.
To apply a CSS class to a table or an individual cell, you need to do the
following:
Click the table/cell right-click to open the context menu
From the menu, click "Set Table/Cell Properties" to open the
"Table/Cell Properties" dialog tab.
Select the CSS class from the dropdown list at the bottom of
the dialog.
Click the [OK] button.
Page | 60
Creating Bulleted/Numbered Lists
To create bulleted or numbered lists, do the following:
Select the text that you want to convert to a bulleted/numbered list.
Click the [Bulleted/Numbered list]
Press [Enter] to create a new list item.
Press [Ctrl+Enter] to end the list.
Click the [Indent]
bullets.
or [Outdent]
button / on the toolbar.
buttons / to create an inner level of numbering or
Inserting Special Characters (€, ®, ©, ±, Ë, etc.)
To insert a special character, do the following:
Select the place where you want to insert a special character.
Click the [Insert Special Character]
button.
Click to select the respective character in the dropdown list.
Page | 61
Image Manager
When you select the Image Manager Tool you will first see a screen as follows:
The Image Manager allows you to browse folders just as you would using Windows Explorer and it
allows you to perform the following tasks:
Browse folders and files
Sort files by name and type
Preview images, zoom in and out
Upload new images
Generate thumbnails of the uploaded images
Create new sub-folders
Delete files and folders (if you are given permissions to delete in the respective folder. Please
contact the developer of your application for details about the given permissions)
Inserting an Image from the Web-Server
Position the cursor at the place where you need to insert the image
Click the [Image Manager]
button from the toolbar. A dialog box appears
To go to a new subfolder, double-click its name or use the Treeview control to expand the
parent folder and access the available subfolder(s):
Page | 62
If the file browser lists more than 100 images use the paging slider to navigate to the rest of
the pages:
Locate the image file that you want to insert and click it once. A preview of the image appears
in the right-hand side of the dialog.
Click [Insert] to finish or [Cancel] to cancel the operation.
Uploading Images on the Image Manager
You can use the "Image Manager" dialog to upload images from your computer to the web server.
Once uploaded, the image appears in the [Browse Files] tab at the bottom of the file list in the
current folder. To upload new images on the web server, do the following:
Page | 63
1.
2.
3.
4.
Click the [Image Manager]
button to open the dialog.
Navigate to the folder in which you want to upload the image.
Click the [Upload] button on the toolbar.
Click [Select] to select an image from your computer. The multiple file upload controls allow
you to upload multiple images files simultaneously.
5. Click [Upload]
Editing Image Properties
Once the image is inserted, you can manage its properties through the right-click Options context
menu.
The image properties that can be managed are described below:
Border Width Specifies the width (thickness) of the image border. Select "No Border" to
remove the border.
Border Color Specifies the colour of the image border.
Image Alt Text Specifies the alternative text that is displayed in some cases instead of the
image.
Long description This is an Accessibility option. The text entered in the "Long Description"
field will be read by the Windows Narrator tool.
Image Alignment Specifies the alignment of the image, with respect to the adjacent
text/images. When you choose left or right alignment, the text wraps around the image.
Margin Specifies the margin (distance to the top, to the left, to the right and to the bottom)
between the image and the adjacent text/images.
Width Specifies a custom width for the image (you can constrain the proportions to avoid
distortion). The image is not resampled or modified, but rather displayed with the specified
width.
Height Specifies a custom height for the image (you can constrain the proportions to avoid
distortion). The image is not resampled or modified, but rather displayed with the specified
height.
CSS Class Specifies image CSS class and style. Only advanced users should use this
property.
Page | 64
Editing Image Properties via the Insert Image dialog
Click on the image in the content area.
Click the [Insert Image dialog] button. The "Insert Image" dialog will appear.
Modify the image attributes (Image Src, Alt Text, Width and Height).
Click the "All Properties…" button to set additional properties through the Properties… dialog.
Click [OK]
Using the Image Map Editor
The Image Map allows you to create images containing one or more invisible regions which are linked
to other pages, otherwise known as a hotspots. Here are the steps to create steps to set image maps
to an image:
Select an image in the content area and click on the [Image Map]
button (you can also
use the Image Map Editor to open, modify and insert an image file).
Once the Image Map Dialog opens, you can create a hotspot in the opened image, select the
shape type, click and drag within the image to set the size of the Image Map Area.
You can also customize the newly created Image Map area from the provided Properties
pane and set the URL to link the hotspot to another web page.
Click OK to insert the modified image map in the content area.
Page | 65
Uploading Images Stored Externally
You can use the "Insert Image" dialog to link to images from an external location.
1. Click the [Insert Image]
button to open the dialog:
2. Add in your URL for the image you are linking to into the [Image SRC] input field
3. Add in a text description for your image into the [Alt Text] input field
4. If required add your preferred width and height (in pixels) that you wish the image to appear at
on your website
5. Select [OK]
6. Select [Update Page]
7. If you are happy with the way it looks on your page you can select [Save] and your changes will
be saved
8. If you wish to further edit the size, border, alignment etc. of the image you can enter the
advanced editing function
9. To access this select [Edit] on the content area where you have linked to the image
10. Once in the editable area, right click on the Image and select [Properties] from the 2 options
given, which opens the Image [Properties] dialogue box where you can further edit your
image properties:
11. Amend any setting and when complete, select [OK]
12. Select [Update Page]
13. If you are happy with the way it looks on your page you can select [Save] and your changes
will be saved
14. If you wish to further edit the size, border, alignment etc. you can enter the advanced editing
function and keep editing until you are happy
Page | 66
Working with Documents
The "Document Manager" allows you to insert hyperlinks to document files stored on the web server
by simply selecting them from a list. The dialog is similar to the "Image Manager" and allows you to
browse, upload, and delete documents.
Inserting Documents
(Optional) Select some text or an image that you want to set as the hyperlink to the
document.
Click the [Insert Document]
button.
A dialog opens to display a list of folders and documents that you are allowed to browse.
Select the document you want to insert.
(Optional) Type a tooltip. This is an Accessibility option as well. The tooltip will be read by the
Windows Narrator.
(Optional) Select a target for the link.
Click [Insert]. In case you have selected some text or an image in step it becomes a
hyperlink to the document. In case you have not, the name of the document appears at the
cursor point and is set as a hyperlink to the document.
Uploading Documents on the Web-Server
You can use the "Document Manager" dialog to upload document files from your computer to the
web-server. Once uploaded, the documents will appear in the File Browser at the bottom of the filelist in the current folder.
To upload new Document files on the web server, do the following:
Click the [Document Manager]
button to open the dialog.
Navigate to the folder in which you want to upload the Document.
Click the [Upload] button.
Page | 67
Click [Select] to select a Document file from your computer and then click [Upload].
Page | 68
Embedding a Youtube Video
To add a Youtube video onto your website, you need to be in the Web Editor on the correct page.
You need to get the embed code from your chosen video
Click the ‘share’ button under the video clip, then press the ‘Embed’ button and copy the code
provided
Click on the Youtube button. This brings up the following pop up box
Paste the code into the box.
Click ‘Insert Link’
Page | 69
To delete a Youtube clip no longer required
Go into the Web editor
Click on the Youtube box in the top right hand corner
Click delete
Remember to Update and Save any changes
Spell-Checking
BT Community Web Kit Content Editor features a multilingual spellchecker that is invoked when
clicking the [Spellchecker]
button on the toolbar. You can check your spelling asynchronously
and all your mistaken words will be highlighted inline. The context menu on every word gives you a
quick and easy way to Change, Ignore or Add the word to a custom dictionary.
Creating Accessible Content ("Section 508"Compliant)
To generate content that can be interpreted by the Accessibility Tools integrated in Microsoft
Windows (the Narrator, the Magnifier, and the On-Screen Keyboard), BT Community Web Kit Content
Editor includes additional fields in the Table, Hyperlink and Image dialogs.
Creating Accessible Tables
The narrative software uses the information from the Accessibility table fields (heading rows, columns,
caption alignment and summary) to produce a Tooltip message for each table cell. Users with
impaired vision can see those Tooltips as they hover over the cells with the mouse.
You can create a "Section 508"-compliant table with the Table Wizard. Alternatively, you can convert
an existing table to a "Section 508"-compliant table using the Table Properties context menu.
Page | 70
Create a new table with the Table Wizard or open the Table Properties dialog.
Click the “Accessibility” tab.
In the “Accessibility” tab, fill in the fields: Heading rows/columns, Caption, and Summary
about the table. Select the [Associate cells with headers] checkbox.
Creating Accessible Hyperlinks
A hyperlink can be interpreted by the narrative software if you specify an additional description in the
"Tooltip" field.
Page | 71
Creating Accessible Images
An image can be interpreted by the narrative software if you specify an additional description in the
"Long Description" field.
Using the HTML Mode
More advanced users sometimes need to modify the HTML code of the content directly. For this
reason, BT Community Web Kit Content Editor provides the so called "HTML mode" that gives you
access to the content code.
HTML is not a supported function of the BT Community Web kit, so we would be unable to provide
technical support for this format.
Page | 72
The Preview Mode
After editing the document in the editor preview, users may like to see a preview before updating the
page. The editor switches to the Preview Mode with a single click of the preview button:
Printing Content
To print the whole web-page including the BT Community Web Kit Content Editor click the [Print]
button. It will open the Printer Properties dialog where you can choose a printer and printing options.
To print only the content of the BT Community Web Kit Content Editor, do the following:
Make sure the cursor is positioned inside the editor's content.
Press [Ctrl+A] to select the whole content.
Click the [Print]
operation.
button to open the Printing Preferences dialog and confirm the printing
Page | 73