1
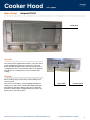
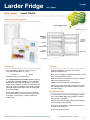
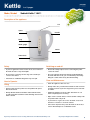
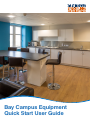
Bay Campus Equipment
Quick Start User Guide
Contents
!
THINK GREHETFNUL
G
BEING THOUUIP
MENT WILL
Q
E
R
U
WITH YO VE ENERGY
SA
R OUR
LOOK OUT FHOINTS.
L
U
HELPF
KITCHEN
Cooker Hood
3
Oven4
Cooker Hob
5
Fridge Freezer CAA55
6
Fridge Freezer CVTAA55NF
7
Larder Fridge
8
Kettle9
Microwave10-13
ELECTRONICS
James Numatic Vacuum Cleaner
14
FIRE SAFETY
Fire Blanket
15
OTHER APARTMENT GUIDES
Central Heating
16
Ventilation17
Door Access System
18
Lighting19
Shower Area
20
Clothes Drying Rack
21
Window Restrictors
22
WashBasin23
IMPORTANT CONTACTS
24
Emergency Services
Health Centre
Student Admin & Residential Offices
Student Welfare
Security
Weblink for Maintenance Requests
Report any maintenance issues via: http://maintenance.stmodwenstudentliving.co.uk
Bay Campus Equipment User Guide
2
Cooker Hood
Make/ Model: KITCHEN
1 of 1 pages
Hotpoint HTU32
Suction Grill
Operation
The control panel is supplied with a switch to select the suction
speed and lighting. The switch is located on the side of the
suction grill. Use the higher suction speed for greater levels of
cooking vapours. It is recommended to switch on the appliance
5 minutes prior to cooking and for at least 15 minutes after
cooking.
Cleaning
Before cleaning, always ensure that you have switched your
cooker hood off.
The cooker hood should be cleaned regularly externally. For
cleaning use a cloth moistened with neutral liquid detergents.
Avoid abrasive detergents. Always make sure you follow the
instructions and never mix cleaning products. If you have any
queries, please ask staff for advice.
Report any maintenance issues via: http://maintenance.stmodwenstudentliving.co.uk
Light switch
Suction Speed
Bay Campus Equipment User Guide
3
Oven
Make/ Model: KITCHEN
1 of 1 pages
Indesit FIM31KAWH
Description of the appliance
Description of the appliance
Overall view
Description of the appliance
CONTROL
ControlPANEL
panel
GRILL
GRILL
GRILL
Overall
view
position
5 5
position
position
4 4
position
GUIDES
for the 3
position
position
sliding racks
Control panel
DRIPPING
PAN
DRIPPING
PAN
G
3
position
2 2
position
position 5
position
1 1
position
GRILL
position 4
position 3
position 2
position 1
DRIPPING PAN
Control panel
GUIDES
the
GUIDES for
for the
sliding
racks
sliding racks
Control panel
TIMER
TIMER
Knob
Knob*
Starting the Oven
TIMER
Knob*
1. Select the desired cooking mode by turning the
SELECTOR knob.
Indicator
Indicator light
THERMOSTAT
THERMOSTAT
Indicator light
THERMOSTAT
2. Select the desired temperature with the
VARIABLE GRILL knob.
SELECTOR
SELECTOR
Knob
Knob
3. When preheating is finished, the THERMOSTAT indicator
light will stay on; place the food in the oven.
TRYDANOL
ELECTRONIC
programmer*
programmer*
Safety
Oven door should remain OPEN when grilling.
VARIABLE
VARIABLEGRILL
GRILL
Knob
Knob
SELECTOR
Knob
Indicator light
Indicator
light
THERMOSTAT
THERMOSTAT
VARIABLE GRILL
Knob
Cleaning
ELECTRONIC
• Always turn the appliance off before cleaning.
• The stainless-steel or enamel coated external parts as well
as the rubber seals may be cleaned using a sponge that has
been soaked in lukewarm water and neutral soap.
SELECTOR
SELECTOR
programmer*
Knob
Knob
Indicator light
VARIABLE
VARIABLE GRILL
GRILL THERMOSTAT
Dolen
Knob
* Only on certain models
• If these stains are difficult to remove, use only specialised
products.
5
• After cleaning, rinse and dry thoroughly.
• Do not use abrasive powders or corrosive substances.
SELECTOR
• Ideally the inside of the oven should be cleaned after each
Knob
use. Use hot water and detergent, rinse and dry with a soft
cloth. Do not use abrasive products.
VARIABLE GRILL
Knob
* Onlyand
on never
certainmix
models
• Always make sure you follow the instructions
cleaning products. If you have any queries, please ask staff
for advice.
Report any maintenance issues via: http://maintenance.stmodwenstudentliving.co.uk
Bay Campus Equipment User Guide
4
Cooker Hob
Make/ Model: KITCHEN
1 of 1 pages
DO NOT US
AS A SHELEFTHE HOB
NOT IN USE WHEN
STILL BE H. IT MAY
OT !
Indesit 4 ring hob PIM604WH
Description of the appliance
ELECTRIC PLATE
Pilot lamp of the
ELECTRIC PLATE
Control knobs for the cook-top
ELECTRIC PLATE
Operation
Setting
Usage
0
Off
1
Cooking vegetables, fish
• The position of the corresponding electric hot plate is
indicated on each control knob.
2
Cooking potatoes (using steam), soups,
chickpeas, beans
• The Electric Plate ON indicator light switches on whenever
the knob is moved from the ‘off’ position.
3
Continuing the cooking of large quantities of food,
minestrone
4
For roasting (average)
5
For roasting (above average)
6
For browning and reaching a boil in a short time
• The Electric Plate vary in diameter and power: “normal” and
“fast”. The latter can be identified by a red boss in the centre
of the hot plate itself.
• The Electric Plate control knob is a device used to regulate
power. The knob may be turned clockwise or anti-clockwise
and set to six different positions:
Setting position
Normal or Fast Place
0
Off
1
Low
2-5
Medium
6
High
Safety
• Make sure the knobs are in the “0” position when the
appliance is not in use
• Always make sure pan handles are turned towards the
centre of the hob in order to avoid accidental burns
• Do not leave the electric plate switched on without a pan
placed on it
• Do not use cookware with uneven or deformed bottoms
Practical Advice on Using the Electric Hot Plates
In order to avoid heat loss and damage to the hot plate, use
cookware with a flat bottom the diameter of which is not less
than that of the hot plate.
Cleaning
• It is usually enough to wash the hob with a damp sponge
and dry it with absorbent kitchen roll.
• The electric hobs should be cleaned using a damp cloth and
then rubbed with oil while still warm.
• Stainless steel may become marked if it comes into contact
with very hard water or harsh detergents (containing
phosphorous). After cleaning, it is rinse and dry thoroughly.
• Do not use abrasive or corrosive detergents, stain removers,
anti-rust products, powder detergents or sponges with
abrasive surfaces; these may scratch the surface.
• Never use steam cleaners or pressure cleaners.
• Always make sure you follow the instructions and never mix
cleaning products. If you have any queries, please ask staff
for advice.
• After cleaning, it is advisable to rinse thoroughly and dry.
Report any maintenance issues via: http://maintenance.stmodwenstudentliving.co.uk
Bay Campus Equipment User Guide
5
Fridge freezer
Make/ Model: KITCHEN
1 of 1 pages
OKING
’RE LTOIME THE
U
O
Y
WHAT E THE
KNOWO MINIMISIS OPEN.
FOR T DOOR OODS HOME
G
OZEN
D USE
GET FQRUICKLY, ANBAG.
L
A COO
Indesit CAA55
Description of the appliance
Removable lidded shelf
with EGG TRAY and
BUTTER DISH*
TEMPERATURE
REGULATING knob
Removable
multipurpose
SHELVES*
SHELVES*
Compartment for a
2 LITRE BOTTLE
FRUIT and
VEGETABLE bin
BOTTLE shelf
FREEZER and
STORAGE
compartment
STORAGE
compartment*
Levelling FOOT
How to Use
Cleaning
• The temperature inside the refrigerator compartment
automatically adjusts itself according to the thermostat
knob.
• The external and internal parts, as well as the rubber seals
may be cleaned using a sponge that has been soaked in
lukewarm water and bicarbonate of soda or neutral soap.
Do not use solvents, abrasive products, bleach or ammonia.
1 = warmest
5 = coldest
• A medium position is recommended
• If the TEMPERATURE ADJUSTMENT knob has been set
on high values with large quantities of food and with a
high ambient temperature, the appliance can operate
continuously, resulting in excessive frost formation and
excessive energy consumption: compensate for this by
shifting the knob towards lower values (defrosting will
occur automatically).
• Do not fill the appliance with too much food. Cold air
must circulate freely for food to be preserved properly.
If circulation is impeded, the compressor will work
continuously.
• The removable accessories may be soaked in warm water
and soap or dishwashing liquid. Rinse and dry them
carefully.
• Always make sure you follow the instructions and never mix
cleaning products. If you have any queries, please ask staff
for advice.
Food Storage Tips
• Keep raw meat and poultry below cooked food and dairy
products.
• Wrap raw meat and poultry loosely in polythene or
aluminium foil to prevent from drying.
• Wrap cheese in greaseproof paper and then in a polythene
bag excluding as much air as possible.
• Place only cold or lukewarm foods in the compartment, not
hot foods.
Report any maintenance issues via: http://maintenance.stmodwenstudentliving.co.uk
Bay Campus Equipment User Guide
6
Fridge freezer
Make/ Model: KITCHEN
1 of 1 pages
Indesit CVTAA55NF
Description of the appliance
E THE R
O
E THE TEIM
IS
IM
E
Z
IN
M AND FRE R DO
E
FRIDG IS OPEN.
DS
ZEN GOO
GET FROQUICKLY, AND
HOME A COOL BAG.
USE
How to Use
Cleaning
• The temperature inside the refrigerator compartment
automatically adjusts itself according to the thermostat
knob.
• The external and internal parts, as well as the rubber
seals may be cleaned using a sponge with lukewarm
water and bicarbonate of soda or neutral soap. Do not
use solvents, abrasive products, bleach or ammonia.
Min = warmest
Max = coldest
• A medium position is recommended
• If the TEMPERATURE ADJUSTMENT knob has been set
on high values with large quantities of food and with a
high ambient temperature, the appliance can operate
continuously, resulting in excessive frost formation and
excessive energy consumption: compensate for this by
shifting the knob towards lower values (defrosting will
occur automatically).
• Do not fill the appliance with too much food. Cold air
must circulate freely for food to be preserved properly.
If circulation is impeded, the compressor will work
continuously.
• The removable accessories may be soaked in warm
water and soap. Rinse and dry carefully.
• Always make sure you follow the instructions and never
mix cleaning products. If you have any queries, please
ask staff for advice.
Food Storage Tips
• Keep raw meat and poultry below cooked food and dairy
products.
• Wrap raw meat and poultry loosely in polythene or
aluminium foil to prevent from drying.
• Wrap cheese in greaseproof paper and then in a
polythene bag excluding as much air as possible.
• Place only cold or lukewarm foods in the compartment,
not hot foods.
Report any maintenance issues via: http://maintenance.stmodwenstudentliving.co.uk
Bay Campus Equipment User Guide
7
Larder Fridge
Make/ Model: KITCHEN
1 of 1 pages
Indesit TFAA10
ATION,
ONTAMIN FROM
C
ID
O
V
Y
A
TO A
EATS AW
AS
STORE MFRESH FOODS, LE
IB
R
POSS
OTHE
WN AS
LOW DO E FRIDGE.
IN TH
Description of the appliance
TEMPERATURE REGULATING
knob
Removable lidded shelf
FREEZER and
STORAGE
compartment
Removable
multipurpose
SHELVES*
SHELVES*
Drain for
DEFROST WATER
FRUIT and
VEGETABLE bin
BOTTLE shelf
Levelling FEET
How to Use
Cleaning
• The compartment temperature can be set by the
temperature knob between “1” and “7”
• Use luke warn water to clean the cabinet of the
appliance and wipe it dry.
• Never clean the appliance with flammable fluids. It could
cause a damage and fire hazard.
1 = warmest
7 = coldest
• A medium position is recommended
• If the TEMPERATURE ADJUSTMENT knob has been set
on high values with large quantities of food and with a
high ambient temperature, the appliance can operate
continuously, resulting in excessive frost formation and
excessive energy consumption: compensate for this by
shifting the knob towards lower values (defrosting will
occur automatically).
• Do not fill the appliance with too much food. Cold air
must circulate freely for food to be preserved properly.
If circulation is impeded, the compressor will work
continuously.
• Clean the exterior of the appliance and door seal with a
damp cloth and dry it through.
• Shelves are all removable for cleaning purpose.
• Always make sure you follow the instructions and never
mix cleaning products. If you have any queries, please
ask staff for advice.
Food Storage Tips
• To obtain the best results from your appliance, neither
hot foods nor liquids which may evaporate, should be
placed in the compartment
• Keep the time between buying chilled food and placing
it in your fridge as short possible
• Do not push food together too much, try to allow air to
circulate around each item
• Do not store food uncovered
Report any maintenance issues via: http://maintenance.stmodwenstudentliving.co.uk
Bay Campus Equipment User Guide
8
Kettle
Make/ Model: KITCHEN
1 of 1 pages
KETTLE
UP YOUR F WATER
L
IL
F
Y
L
O
T
ON
E AMOUN
ES
WITH TH EED. THIS SAV HE
YOU N AND HELPS T
ENERGY, LAST LONGER.
KETTLE
Sabichi Kettle 110411
Description of the appliance
Lid
Spout
Handle
Body
Water gauge
Switch
Power base
Safety
Switching on and off
• To protect against the risk of electric shock, do not immerse
the kettle in water or any other liquids.
• Ensure lid is firmly in place before connecting the power
cord to the outlet.
• Do not let the cord hang over the edge of the worktop or
contact a hot surface.
• Press the switch down and the indicator light will light up,
the kettle will start to boil, you can switch the power off by
lifting the control switch at any time whilst boiling.
• If the kettle is overfilled boiling water may over spill.
How to Operate:
Filling
• Remove kettle from the power base and pull the lid open to
fill to desired level.
• Always fill kettle between minimum and maximum marks,
too little water will result in the kettle switching off before the
water is boiled.
Care and Maintenance
• Clean the appliance after each use.
• Always make sure you follow the instructions and never mix
cleaning products. If you have any queries, please ask staff
for advice.
• Unplug the appliance from the outlet and allow it to cool
down completely before cleaning.
• Wipe over the outside surface of the head with a damp cloth
and polish it with a dry cloth.
• To prevent loss of gloss do not use chemical, steel, wood
abrasives or cleaners to clean the outside.
• Limescale in tap water may cause the kettle to discolour, to
remove this build-up use a standard descaler.
Report any maintenance issues via: http://maintenance.stmodwenstudentliving.co.uk
Bay Campus Equipment User Guide
9
Microwave
Make/ Model: KITCHEN
OFF AT
SWITCHALL. AS
THE W AVES USE
MICRORWICITY EVEN
ELECT NOT IN USE.
WHEN
1 of 4 pages
Daewoo KOC9Q1T
Description of the appliance
1) Glass plate turntable which should be placed on the
‘rolling’ base.
2) Rolling base.
3) ‘Standing’ Metal rack to be placed on the glass plate.
Control panel
1.
Digital display
2.
AUTO COOK pad. To choose one of the automatic
functions listed to the left of the button
3.
MW pad. For microwave cooking function
4.
DEFROST pad. For defrost function only
5.
GRILL pad. For Grill function only
6.
COMBO pad. For combined microwave and grill function
7.
CONVECTOR pad. For convector oven function
8.
CLOCK pad. To set the clock display
9.
STEAM CLEAN pad. To choose steam clean function
10.
WARM pad. For food warming function
11.
TIME SET pads. To choose the time required for cooking
in hours, minutes and seconds.
12.
START/SPEEDY COOK pad. Press to start cooking
13.
STOP pad. For when necessary to stop mid-cooking,
Also press to clear all functions.
Cooking instructions overleaf
Report any maintenance issues via: http://maintenance.stmodwenstudentliving.co.uk
Bay Campus Equipment User Guide
10
Microwave continued
2 of 4 pages
COOKING with this microwave oven
This microwave cooking method allows you to cook food for a desired time. In addition to the maximum power level (100%), you can
select different microwave power from 9 other levels, 10% to 90% for the foods that require slower cooking.
Note: The oven will automatically work on 100% microwave power if a cooking time is entered without the power level previously
being selected.
If you have used the appliance for grilling, convection or combination cooking, let the oven cool down before using again. Never
switch the microwave oven on when it is empty.
MICROWAVE COOKING
GRILL COOKING
1. Touch the MW pad once. P-HI shows in display
The Grill enables you to heat and make food to turn brown
quickly without using microwave.
2. Select the appropriate power level by pressing the MW pad
again until the corresponding percentage is displayed
1. Touch the GRILL pad once.
3. Touch the TIME SET pad to set the cooking time.
Example: For a time of 12 minutes, touch the 10min pad
once & 1min pad twice to set 12:00.
4. Touch the START pad.
The oven light comes on and the turntable starts rotating.
2. Touch the TIME SET pad to set the grilling time.
Example: For a time of 12 minutes, touch the 10min pad
once & 1min pad twice to set 12:00.
3. Touch the START pad.
The oven light comes on and the turntable starts rotating.
Cooking starts and the time in the display will count down.
Cooking starts and the time in the display will count down.
Report any maintenance issues via: http://maintenance.stmodwenstudentliving.co.uk
Bay Campus Equipment User Guide
11
Microwave continued
3 of 4 pages
AUTO COOK
This function allows you to simply and automatically cook a range of popular foods.
Always use oven gloves when touching the utensils in the oven.
1. Touch the AUTO COOK pad once.
2. Select the menu by touching the AUTO COOK pad until the required menu is displayed.
Refer to the auto cook menu chart below for further details.
3. Touch the TIME SET pad to set the cooking weight.
Example: For a cooking weight of 1000 grams, touch the 10min & 1min pad once to set
1000 (up to 2000 grams )
Refer to the auto cook menu chart below for further details.
4. Touch the START pad.
The oven light comes on and the turntable starts rotating. Cooking starts and the time in
the display will count down.
Tabl Dewislen Auto Cook
Touch Auto Cook Key
Auto Cook Menu
Minimum Weight
Maximum Weight
Weight Step
Once
ROAST PORK
500g
2000g
100g
Auto Cook
Menu
Twice
EIDION RHOST
500g
2000g
100g
3 times
CYW IÂR RHOST
800g
2000g
100g
4 times
PYSGOD PÔB
300g
900g
100g
5 times
LLYSIAU FFRES
100g
900g
50g
Start
Temperature
Method
Cookware
1. Tie the joint into a neat shape.
2. Place the meat on the dish.
ROAST PORK
3. Brush with a little oil.
Chilled
4. Place roasts fat-side-down on the dish.
Glass Turntable &
Metal Rack
5. Cook on “AUTO COOK - ROAST PORK OR ROAST BEEF.”
6. Turn over when hearing the beep.
ROAST BEEF
7. Remove from oven. Drain off any excess juices.
8. Stand for 10 minutes in foil before serving.
1. Wash and dry chicken. Tie the legs loosely together with string.
2. Pierce the skin a couple of times just under the legs.
3. Brush butter mixture all over the chicken on the dish.
ROAST
CHICKEN
Chilled
4. Place roasts breast-side-down on the dish.
Glass Turntable &
Metal Rack
5. Cook on “AUTO COOK-ROAST CHICKEN”.
6. Turn over when hearing the beep.
7. Remove from the oven. Drain off any excess juices. Season with salt if required.
Stand for 10 minutes in foil before serving.
1. All types of fresh fish (except battered or breadcrumbed fish) can be cooked
whether whole, fillets or steaks.
2. Place the prepared fish in a buttered dish.
BAKED FISH
Chilled
3. Season with salt and pepper, sprinkle with lemon juice and dot with butter. Do not
cover dish.
4. Place on the dish, on the metal rack, on the turntable.
Microwave and
heatproof shallow
dish. (e.g. Pyrex)
Glass Turntable &
Metal Rack
5. Cook on “AUTO COOK-BAKED FISH”.
1. Wash and trim.
2. Place prepared vegetables into a suitable sized container.
FRESH
VEGETABLES
3. Sprinkle with 2-5 tablespoons. of water.
4. Cover with pierced cling film or a lid
5. Place on a dish on the turntable.
Microwave-proof
dish (e.g. Pyrex)
Glass Turntable
6. Cook on “AUTO COOK-FRESH VEGETABLES”.
• For best results cut vegetables into similar sized pieces.
Report any maintenance issues via: http://maintenance.stmodwenstudentliving.co.uk
Bay Campus Equipment User Guide
12
Microwave continued
4 of 4 pages
DEFROSTING with this microwave oven
Note: During the defrosting process the oven will beep to remind you to check the food. When the oven beeps, open the door, turn
the frozen food over and close the door, and press the START pad again.
WEIGHT defrost
TIME Defrost
Weight Defrost automatically sets the defrosting times and
power levels to give even defrosting results for frozen food.
1. Touch the DEFROST pad twice. This is a time defrost mode.
1. Touch the DEFROST pad once. This is a weight defrost
mode.
2. Touch the TIME SET pad to set the weight. Weight can be
set up from 200g to 3000g. The weight will change in 50g
increments or decrements.
Example: For a defrosting weight of 1000 grams, touch the
10min pad once to set 1000.
2. Touch the TIME SET pad to set the defrosting time.
Example: For a time of 12 minutes, touch the 10min pad
once & 1min pad twice to set 12:00.
3. Touch START pad.
The oven light comes on and the turntable starts rotating.
Cooking starts and the time in the display will count down.
3. Touch the START pad.
The oven light comes on and the turntable starts rotating.
Cooking starts and the time in the display will count down.
Cleaning
• Clean the appliance after each use.
• Unplug the appliance frim the outlet and allow it to cool down completely before cleaning.
• Wipe over the inside with a damp cloth and polish it with a dry cloth.
• Always make sure you follow the instructions and never mix cleaning products.
If you have any queries, please ask staff for advice.
Report any maintenance issues via: http://maintenance.stmodwenstudentliving.co.uk
Bay Campus Equipment User Guide
13
Vacuum Cleaner
Make/ Model: ELECTRONICS
1 of 1 pages
Numatic James Cleaner JVP180A1YELAA1
Description of the appliance
Safety
Power on and off
Storing the cable safely
DO
• Keep your machine clean.
• Keep filters clean.
• Use filter bags, they will enhance performance and help
keep machine clean.
• Use a Numatic Original filter bag under fine dust conditions.
• Keep hoses and tubes clear.
• Report any worn or damaged parts to the Student Living
helpdesk immediately.
• Regularly examine the power cord. If damage is found such
as cracking or ageing the power cord must be replaced by a
competent person using the correct Numatic original part.
• Change dust bag frequently.
• Keep diffuser filter (where fitted) clean.
• Only use the brushes provided with the machine. The use of
other brushes may impair safety
DON’T TR
ON TRAILINIPG
CABLES!
Changing the dust bag
DON’T
• Unreel the cable with one pull or pull on the cable to unplug
the machine from the power supply.
• Use to suck up hot ashes or lighted cigarette ends.
• Use steam cleaners, pressure washers or immerse in water
to clean the machine.
• Attempt machine maintenance or cleaning unless the power
supply plug has been removed from the supply outlet.
• Use in a wet environment or to collect wet materials.
• Store your machine in wet conditions.
Care and Maintenance
•
•
•
•
•
•
Keep the machine clean, including hoses and tubes.
Ensure the bag and filter are fitted.
Regularly examine the power cord.
Check dust bag frequently.
Check filters are clean.
Check for any worn or damaged parts and report
immediately.
• Do not steam clean or pressure wash.
Report any maintenance issues via: http://maintenance.stmodwenstudentliving.co.uk
Bay Campus Equipment User Guide
14
Fire Blanket
FIRE SAFETY
1 of 1 pages
Location: Fire blankets will be wall mounted at eye level, near or very close to the kitchen area
Description of the appliance
How to use a fire blanket
Safety Warning
1. Pull down (generally) the tapes to remove fire blanket from
its container.
1. Never attempt to carry a container of burning liquid.
2. Ensure that you are positioned between the fire and safe
exit/escape route.
3. Hold one tab in each hand near the blanket, and rotate your
hands inwards so they are protected by the blanket, also to
shield your forearm and face.
4. Hold arms out towards the fire
5. Move slowly towards the fire. The blanket will protect you
from the heat and flame. Do not look over the top of the fire
blanket.
2. Never attempt to use water to extinguish any flammable
liquid
3. Never reuse a fire blanket
If you have used the fire blanket you must notify the
St Modwen Student Living Admin Office
Office number : 0300 103 3000
Opening Hours: 08:30 – 17:30
6. Let the bottom of the blanket touch the side of cooker or
worktop. Still moving forward slowly and carefully place the
blanket over the burning liquid /material completely.
7. Place a saucepan lid or metal tray on top of the fire blanket
over the mouth of the container.
8. Use the blanket to extinguish the fire before turning off
electrical or gas supply or removing any heat source if safe.
Leave cool for at least 30 minutes, keeping out of the smoke.
9. Leave the area closing all the doors behind you and call Bay
Campus Security on 01792 606010.
Report any maintenance issues via: http://maintenance.stmodwenstudentliving.co.uk
Bay Campus Equipment User Guide
15
Central Heating
OTHER GUIDES
1 of 1 pages
Location: Bay Campus Residential Buildings
Heating type: Gas Central Heating
AVING
AVOID LWES OPEN
WINDO RADIATOR.
ABOVE AHEAT WILL
YOUR PPEAR!
DISA
FEELIN
WEARINGG CHILLY?
WILL REDUA JUMPER
CARBON F CE YOUR
O
ENORMOUOTPRINT
SLY
The Radiators
The Valve
The Heating is provided by Hot Water Radiators.
The Valve pictured is located on the right hand side of the
radiator, and turns your radiator ON and OFF
Radiator temperature is automatically controlled so that
the level of heating supplied in the building is comfortable
without wasting energy.
There are different styles of radiators, however they all work
on the same principles.
Radiator temperature
Radiators control the heating in each room. Radiators
produce heat by circulating water through the radiator. The
temperature of the water circulating through the radiators
is regulated by an efficient control system which makes
reference to the external temperature.
The radiator system is automatically controlled, so the
temperature of heating supplied in your room cannot be
higher than the highest temperature supplied anywhere in
the halls. You can however turn your heating down or off.
To turn your radiator ON you need to turn the Valve
CLOCKWISE. To turn OFF, turn the valve ANTI-CLOCKWISE.
Please remember that the ON / OFF valve does not alter the
temperature of the hot water to the radiator, however it does
control the amount of hot water into the radiator so, if you
don’t open the valve fully, you will restrict the flow of hot water
into the radiator, thus limiting the amount of hot water that will
effectively heat the radiator.
How to operate:
• Select the amount of heat supplied to your radiator by
turning the dial on the thermostatic valve towards the ON or
OFF as desired.
• 5 is the hottest setting and 1 is the coolest.
Each radiator’s hot water flow can be controlled by the
VALVE. This allows you to set your own comfort level.
Report any maintenance issues via: http://maintenance.stmodwenstudentliving.co.uk
Bay Campus Equipment User Guide
16
Ventilation
Type:
OTHER GUIDES
1 of 1 pages
Methods of ventilation to your room
Ceiling fan
Ventilation to the bathroom and kitchen
HEARIN
YOU MAY GH A HUM?
THE BATHRAVE LEFT
OO
KITCHEN M OR
LIGHT ON!
This is provided by a central system which operates at a
continuous low level. This is boosted whenever a bathroom or
kitchen light is switched on, so it is important not to leave lights
on as this will increase electricity consumption.
A bathroom fan is automatically activated when the light switch
is on.
Kitchen hood
To reduce food smells, steam and smoke, kitchen hoods
provide separate ventilation and should only be used when
cooking.
Window
Windows have a side louvre to allow for individual control of
fresh air. Please note that the windows only open a short way.
Please do not store items on inner and outer window ledges. It
can pose a serious Health and Safety risk if windows are open,
and is therefore prohibited.
Report any maintenance issues via: http://maintenance.stmodwenstudentliving.co.uk
Bay Campus Equipment User Guide
17
Door Access System
Type: OTHER GUIDES
1 of 1 pages
Bedroom lock
Description of the appliance
Card Reader
LOOK AFTER YOUR CARD!
YOU WILL BE CHARGED
FOR REPLACEMENTS.
Bedroom locks
Access Cards
Your Access Card is used to access your bedroom by
presenting the card to a reader on the outside of the door.
• You will be issued with one Access Card.
Once you use the card to enter your bedroom (not study
bedroom), and close the door behind you, the door will be
locked.
When you exit the room and close the door behind you, it will
remain unlocked for 25 minutes, after this time it locks itself.
This allows you to use the communal areas without being
locked out.
• If you have any issues with your swipe card, call into the
Student Living Admin Office and speak to a member of staff.
• In the event of losing your swipe card there will be £10.00
replacement fee which will be added to your residence fees
account.
• Do not tamper or deface your swipe card i.e. punch holes,
as this will render the card inactive resulting in the necessary
purchase of a replacement card.
However, should you wish to lock your bedroom door upon
exiting, you must present your card to the reader to activate the
lock (remember to check the handle before you leave).
Communal locks
• Your Access Card will allow you to enter the main entry door,
internal flat door and your room door.
• Unlike your bedroom door the internal cluster doors will lock
immediately once closed.
Report any maintenance issues via: http://maintenance.stmodwenstudentliving.co.uk
Bay Campus Equipment User Guide
18
Lighting
OTHER GUIDES
1 of 1 pages
Location: Bay Campus Residential Buildings
Bedroom & bathroom
ALL OF OUR LI
GHTS ARE RUN
EFFICIENTLY W
ITH TIMERS AN
D
ENERGY-SAVIN
G BULBS.
IT WILL SAVE EV
EN M
TURN LIGHTS OF ORE IF YOU
F WHEN YOU
DON’T NEED TH
EM ON.
Bedroom and bathroom lighting is operated via standard
light switches. Within each room, desk lights have their own
switches under the shelf.
In the bedroom, switches on the headboard control the main
bedroom lighting and also the over bed light.
In the bathroom, a light over the mirror is operated by the pull
cord.
Kitchen & lounge
In the kitchen and lounge areas, a push switch will turn the
lights on. Lights will remain on for 15 minutes if the room is
empty. These lights will also automatically turn off when rooms
are empty and when there is sufficient natural lighting via an
absence detector.
Flat corridor
Flat corridor lighting is controlled automatically via sensors,
the lights will turn on when movement is detected at the flat
entrance via a presence detector. Lights will turn off after a predetermined time, if no movement is detected.
Lobby
Lobby lighting is controlled via presence sensors which will turn
the lights on when they detect movement and turn the lights off
after a pre-determined time if no movement is detected.
Stair
Stair lighting will remain off if a daylight sensor measures that
the natural light is sufficient.
External
External lighting is centrally controlled by a time programme
and daylight sensors.
Report any maintenance issues via: http://maintenance.stmodwenstudentliving.co.uk
Bay Campus Equipment User Guide
19
Shower area
Type: OTHER GUIDES
1 of 1 pages
Electric shower & extending clothes dryer
Description of the appliances
How to use the shower:
• The shower head is at a fixed height; however the direction
of flow can be altered manually.
• Turn the control on the right side to activate shower.
• To alter the temperature of the shower, use the control on the
left side.
The shower will remain on until turned off manually.
Your cleaning responsibilities:
• You are responsible for cleaning your room, and this
includes your ensuite. This needs to be carried out on a
regular basis. Please use the appropriate cleaning materials
• Always make sure you follow the instructions and never mix
cleaning products. If you have any queries, please ask staff
for advice.
Report any maintenance issues via: http://maintenance.stmodwenstudentliving.co.uk
Bay Campus Equipment User Guide
20
Clothes drying rack
Type: OTHER GUIDES
1 of 1 pages
Extending clothes drying rack - over shower area
Description of the appliances
BE CAREFUL OT
TO OVERLOADNTH
RACK WITH WETE
CLOTHES
How to use the Clothes dryer:
• Open arms from centre.
• Pull out rack.
• To close, push in rack and close arms
• Please make sure you have removed as much excess
water as possible, to avoid damage to the drying rack by
overloading.
• Your clothes line should be periodically wiped clean with a
damp cloth and mild detergent.
• Do not release the locking mechanism when there are
clothes attached to the lines.
• Place heavier items at the back closest to the wall and work
your way outwards for lighter items
Report any maintenance issues via: http://maintenance.stmodwenstudentliving.co.uk
Bay Campus Equipment User Guide
21
Window Restrictors
Type: OTHER GUIDES
1 of 1 pages
Window Restrictor
Description
DON’T DO IT
TAMPERING !
WINDOW R WITH
EST
IS REALLRYICTORS
DANGEROU
S!
How to use the windows:
• For security and safety reasons, windows have restrictors
fitted.
• Do not force windows, interfere with mechanisms, or remove
any parts.
• If you are unsure on how to operate your window, please
speak to a member of staff on site.
Items on window sills
Please do not store items on inner and outer window ledges. It
can pose a serious Health and Safety risk if windows are open
and is therefore prohibited.
Tampering with window restrictors is a breach of regulations
and may result in disciplinary sanctions being applied.
regulations can be viewed at swansea.ac.uk/accommodation
Report damage promptly via
http://maintenance.stmodwenstudentliving.co.uk
Report any maintenance issues via: http://maintenance.stmodwenstudentliving.co.uk
Bay Campus Equipment User Guide
22
Wash Basin
OTHER GUIDES
1 of 1 pages
Location: Ensuite
Description of the appliance
How to use
Your cleaning responsibilities:
• Press the top of the HOT or COLD tap to activate the water.
• You are responsible for cleaning your room, and this
includes your ensuite. This needs to be carried out on a
regular basis. Please use the appropriate cleaning materials
• The tap will run for 15 seconds, after which you will need to
push the tap button again to activate the water.
• Be aware that the hot water tap is not a mixer tap and
therefore the water will become very hot if left running.
• Always make sure you follow the instructions and never mix
cleaning products. If you have any queries, please ask staff
for advice.
• Use appropriate cleaning materials, and clean regularly.
Report any maintenance issues via: http://maintenance.stmodwenstudentliving.co.uk
Bay Campus Equipment User Guide
23
Important Contacts
CONTACTS
1 of 1 pages
333
Emergency Services
Tel:
University Health Centre
Tel: (01792) 295321
Swansea GP out of hours
Tel: 0845 850 1362 *
NHS Direct
Tel: 0845 46 47 *
St. Modwen Student Living
Admin Office
Tel: (0300) 103 3000
Email: [email protected]
Opening Hours: Monday to Friday 08:30 - 17:30
Swansea University
Residential Services
Tel: (01792) 295101
Email: [email protected]
Web: www.swansea.ac.uk/accommodation
Swansea University Student Services
Tel: (01792) 602000
Tel: (07552) 714 656
Bay Campus Welfare Wardens
Welfare Wardens are available daily for a student drop-in service
at the Admin Office Reception between 17:30 -18:30.
Please note that between 18:30 – 22:30 Welfare Wardens may
be out visiting other tenants.
Tel: (01792) 606 010
Bay Campus Security
Swansea University Estates Security Service provide 24/7
security provision including foot patrols throughout the campus
supplemented by the appropriate use of CCTV cameras to deter
unauthorised access and protect property.
They are located within the Bay Library and Tower Information
Centre
Maintenance Request
maintenance.stmodwenstudentliving.co.uk
CAFM online facility for you to log issues
with your apartment and its facilities.
Monday to Friday during normal working hours 08:30 - 17:30.
Regular Mantenance
Emergency Works
Outside of these of hours and on weekends, emergencies such as
loss of all water, power, floods, gas leaks or persons trapped in lifts
should be referred to Swansea University Bay Campus Security
Tel: 01792 606010
* Call charges apply
Report any maintenance issues via: http://maintenance.stmodwenstudentliving.co.uk
Bay Campus Equipment User Guide
24