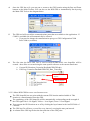
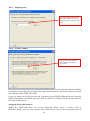
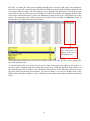
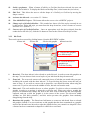
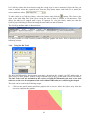
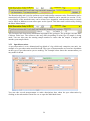
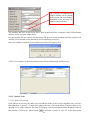
1
Installation and User Guide for
the 2009A Open Source Release
of BGS∙SIGMAmobile
Spatial Geoscience Technologies Programme
Internal Report OR/09/037
BRITISH GEOLOGICAL SURVEY
SPATIAL GEOSCIENCE TECHNOLOGIES PROGRAMME
INTERNAL REPORT OR/09/037
Installation and User Guide for
the 2009A Open Source Release
of BGS∙SIGMAmobile
C J Jordan, E J Bee, N A Smith, K I G Lawrie, A P Marchant, G
Wildman, J Bow, W Shelley & P Turner
The National Grid and other
Ordnance Survey data are used
with the permission of the
Controller of Her Majesty‟s
Stationery Office.
Ordnance Survey licence number
Licence No:100017897/2009.
Keywords
Report; digital, field, data,
capture, SIGMA.
Bibliographical reference
JORDAN C J, BEE E J, SMITH N A,
LAWRIE K I G, MARCHANT A P,
WILDMAN G, BOW J, SHELLEY W
& TURNER P. 2009. Installation
and User Guide for the 2009A
Open Source Release of
BGS∙SIGMAmobile. British
Geological Survey Internal
Report, OR/09/037. 64pp.
Copyright in materials derived
from the British Geological
Survey‟s work is owned by the
Natural Environment Research
Council (NERC) and/or the
authority that commissioned the
work. You may not copy or adapt
this publication without first
obtaining permission.
Contact the BGS Intellectual
Property Rights Section, British
Geological Survey, Keyworth,
e-mail [email protected] You may
quote extracts of a reasonable
length without prior permission,
provided a full acknowledgement
is given of the source of the
extract.
© NERC 2009. All rights reserved
Keyworth, Nottingham British Geological Survey 2009
BRITISH GEOLOGICAL SURVEY
The full range of Survey publications is available from the BGS
Sales Desks at Nottingham, Edinburgh and London; see contact
details below or shop online at www.geologyshop.com
The London Information Office also maintains a reference collection
of BGS publications including maps for consultation.
The Survey publishes an annual catalogue of its maps and other
publications; this catalogue is available from any of the BGS Sales
Desks.
The British Geological Survey carries out the geological survey of
Great Britain and Northern Ireland (the latter as an agency service
for the government of Northern Ireland), and of the surrounding
continental shelf, as well as its basic research projects. It also
undertakes programmes of British technical aid in geology in
developing countries as arranged by the Department for
International Development and other agencies.
The British Geological Survey is a component body of the Natural
Environment Research Council.
British Geological Survey offices
BGS Central Enquiries Desk
Tel 0115 936 3143
email [email protected]
Fax
0115 936 3276
Kingsley Dunham Centre, Keyworth, Nottingham NG12 5GG
Tel 0115 936 3241
Fax 0115 936 3488
email [email protected]
Murchison House, West Mains Road, Edinburgh EH9 3LA
Tel 0131 667 1000
email [email protected]
Fax
0131 668 2683
Natural History Museum, Cromwell Road, London SW7 5BD
Tel 020 7589 4090
Fax 020 7584 8270
Tel 020 7942 5344/45
email [email protected]
Columbus House, Greenmeadow Springs, Tongwynlais, Cardiff
CF15 7NE
Tel 029 2052 1962
Fax 029 2052 1963
Maclean Building, Crowmarsh Gifford, Wallingford
OX10 8BB
Tel 01491 838800
Fax 01491 692345
Geological Survey of Northern Ireland, Colby House, Stranmillis
Court, Belfast BT9 5BF
Tel 028 9038 8462
Fax 028 9038 8461
www.bgs.ac.uk/gsni/
Parent Body
Natural Environment Research Council, Polaris House,
North Star Avenue, Swindon SN2 1EU
Tel 01793 411500
Fax 01793 411501
www.nerc.ac.uk
Website www.bgs.ac.uk
Shop online at www.geologyshop.com
Foreword
The British Geological Survey began developing digital field mapping systems in 1989, however it
was apparent that the commercially available hardware was not suitable at that time. In 2001 we
revisited the topic under the System for Integrated Geoscience Mapping (SIGMA) programme. By
2003 BGS had developed a PDA (personal digital assistant) field system, which was superseded in
2005 when we began deploying a beta system on rugged Tablet PCs. The Tablet PC system, which
we call BGS·SIGMAmobile is now used by BGS in mapping projects across the UK as well as
overseas. It is now available in Open Source form via the BGS website, www.bgs.ac.uk under an
agreement which stipulates that updates and modifications must be supplied to BGS in order to
stimulate further developments.
It is envisaged that future releases will be made available from the BGS website incorporating new
modules, modifications and upgrades.
This document has been written to guide users through the installation and use of
BGS·SIGMAmobile.
We are happy to receive feedback emailed to [email protected].
Acknowledgements
The authors would like to acknowledge the work of all the digital field data capture team since
2001, in particular Andrew Howard, Russell Lawley, John Laxton, Jon Ford and Bill Hatton.
Furthermore, the BGS·SIGMAmobile system could not have been developed without the comments
and feedback of our dedicated teams of field testers including Maxine Akhurst, Helen Burke, Tony
Cooper, Andy Farrant, Andrew Finlayson, Martin Gillespie, Nick Golledge, Kathryn Goodenough,
Mike Hall, Mat Hardenberg, Holger Kessler, Simon Price, Andreas Scheib and Chris Thomas.
i
Contents
Foreword ......................................................................................................................................... i
Acknowledgements......................................................................................................................... i
Contents ......................................................................................................................................... ii
Introduction .................................................................................................................................. iii
1
Installation Instructions ........................................................................................................ 4
1.1 System requirements ...................................................................................................... 4
1.2 Installing tools ................................................................................................................ 4
1.3 Microsoft Access 2003 SETUP ...................................................................................... 5
1.4 Setting up a project ......................................................................................................... 5
2
Global Positioning System (GPS) ......................................................................................... 5
2.1 Projection Setup.............................................................................................................. 5
2.2 ArcGIS GPS Setup Instructions ..................................................................................... 6
3
Using BGS·SIGMAmobile ................................................................................................... 11
3.1 Opening the BGS·SIGMAmobile GIS ......................................................................... 11
3.2 Preparing BGS·SIGMAmobile for field use ................................................................. 12
3.3 The BGS·SIGMAmobile Graphical User Interface (GUI) ........................................... 16
3.4 Using the digital field slip ............................................................................................ 23
3.5 Capturing structured data or detailed observations ...................................................... 32
3.6 Displaying structural information in BGS·SIGMAmobile ........................................... 45
4
Using the BGS Integrated Tools ......................................................................................... 47
4.1 The BGS Compass Bearing Tool ................................................................................. 47
4.2 The BGS Structure Contour Tool ................................................................................. 48
5
Backing-up your data .......................................................................................................... 53
6
Viewing sketches on the Desktop ........................................................................................ 53
7
Troubleshooting, bug reporting and feedback .................................................................. 54
8
Using BGS·SIGMAmobile outside the UK......................................................................... 55
Appendix Using the Basic Précis Tool...................................................................................... 60
ii
Introduction
This report serves as an installation and introductory user guide to BGS·SIGMAmobile, which is an
application for digital geoscience field data collection developed within the British Geological
Survey‟s SIGMA (System for Integrated Geoscience Mapping) programme within the Earth &
Planetary Observation & Mapping Team. This document provides installation instructions,
followed by a brief guide to using the application. In BGS we provide our field staff with a two-day
training course, and while this guide does not replace that, it is hoped that these instructions will
provide a basis for successful use of BGS·SIGMAmobile in your organisation.
BGS·SIGMAmobile is designed to run in the field on rugged Tablet PCs, but can also be used on a
desktop PC. The system is a heavily customised ArcGIS 9.2 and MSAccess application. The user
must have a licensed copy of ArcView ArcGIS and MSAccess 2003, BGS does not supply these.
The BGS uses the application on several models of Tablet PC including Itronix GoBooks, Xplore
iX104s and GETAC V100‟s. This guide does not provide instructions to its use on specific
hardware platforms.
BGS staff have used the system for mapping in locations including the UK, Ghana, Madagascar,
Tajikistan, the Antarctic and the U.S.A. We use it as part of a workflow of other customised BGSdeveloped systems that enables us to:
1. automatically collate spatial information from our databases,
2. interpret new data from satellite imagery and digital photogrammetry,
3. take our baseline and interpreted data to the field,
4. populate corporate databases with our field data,
5. build 3D digital models and visualisations,
6. output our data in formats such as maps.
Further information on these steps is available from the BGS website at
http://www.bgs.ac.uk/research/technologies_epo.html. Only the field system has been supplied in
this Open Source agreement so you will need to build/define your own methods for integrating
BGS·SIGMAmobile into your mapping workflow.
iii
1 Installation Instructions
1.1
SYSTEM REQUIREMENTS
BGS·SIGMAmobile has been developed using ESRI‟s ArcGIS 9.2 software. It is built onto a
relational database built in Access 2003. It is important that all users of BGS·SIGMAmobile use
these versions of the software for this release of BGS·SIGMAmobile otherwise they may experience
problems with some of the functionality.
BGS has developed several integrated tools that require additional installation. These are the BGS
Bearing Tool, the BGS Fonts, the BGS GPS tool, the BGS Précis Tool, the BGS Sketch Tool and
the BGS Structure Contour Tool.
Important Note: The Précis Tool must be installed for BGS·SIGMAmobile to run.
Ensure that your system has been set to UK language and regional settings, and therefore shows the
24hr clock. To check this, open the Control Panel and in Regional and Language Options check all
settings.
1.2
INSTALLING TOOLS
The integrated tools that require installation are stored in the BGS·SIGMAmobile folder structure.
The following instructions explain how to load each of the tools.
1.
Install DotNet_Framework_2050727. From the DotNet_Framework_2050727 folder run
dotnetfx.exe.
2.
Install the BGS Sketch Tool. From the \BGS_SKETCH_TOOL\Install Files folder run the
SketchTool.msi. If you are running the system on Windows XP also install WindowsXPKB900722-v1-x86-ENU.exe.
3.
Install the Bearing Tool. From the \BEARING_TOOL folder run the BearingToolInstall.msi.
On the installation window select to allow everyone to access the tool.
4.
Install the BGS Structure Contour Tool. From the \STRUCTURE_CONTOUR_TOOL\StructureContourTool_May2007\Install Files folder run the StructureContourToolDotNet2005Install.msi. On the installation form select to allow everyone to access the tool.
5.
From the \PRECIS_TOOL folder run the setup.msi to install the BGS Précis Tool. On the
installation form select to allow everyone to access the tool.
4
6.
Install the BGS GPS Tool. From the \BGS_GPS_TOOL folder run the BGS_GPS_1.5.msi.
7.
Load the BGS fonts. From the Control Panel select Fonts. From the File menu select Install
New Font and browse to the \MOBILE_HELP_DOCUMENTATION\FontsV4 folder. Select
All and click OK.
1.3
MICROSOFT ACCESS 2003 SETUP
This step will need to be repeated on the system if a different profile name is used.
For some of the BGS·SIGMAmobile macros to work, the Microsoft Access security level needs to
be set to Low. Open Access 2003 from the programs menu and go to Tools > Macro > Security and
toggle the Low button on.
1.4
SETTING UP A PROJECT
Data can either be added to a blank BGS·SIGMAmobile.mxd or, if a project GIS is already set up,
layers can be dragged and dropped between the project GIS and the empty BGS·SIGMAmobile
GIS. It is important that the BGS·SIGMAmobile layers GeoPoly, GeoLine, Map Face Note,
National Grid QS and TestPointProjection remain in the project for the system to work.
Ensure that you start/run a BGS·SIGMAmobile instance by double-clicking on the MXD rather than
opening a blank project and then opening BGS·SIGMAmobile.
2 Global Positioning System (GPS)
2.1
PROJECTION SETUP
For onshore field data collection in the UK, the British National Grid (BNG) projection, which has
an OSGB 1936 datum, is used. The DFDC data frame in ArcMap should automatically have this as
its projection. If it does not, then it needs to be set using the data frame properties dialogue box,
Coordinate System tab.
GPS systems use the world geographic coordinate system (WGS 1984). Since the DFDC data frame
in ArcMap and the GPS use different coordinate systems, it is essential that ArcMap knows how to
read in the GPS signal and transform the latitude and longitude coordinates into OSGB coordinates
that are accurately viewed within ArcMap. To do this, a file called TestPointProjection has been
added to the project. This file has a WGS84 projection and forces ArcMap to store the
transformation properties required to transform data from a WGS84 projection into BNG. This can
be checked using the data frame properties dialogue box, Coordinate System tab. Click the
5
Transformations button to see the values ArcMap uses to convert between the coordinate systems.
(N.B. - all the other layers in the data frame should have a BNG projection).
2.2
ARCGIS GPS SETUP INSTRUCTIONS
To use the GPS tools a system with a GPS receiver and software must be used.
2.2.1
Using the ArcGIS GPS tools
Note that there is an incompatibility issue with the ArcGIS GPS tools and some hardware systems
that may cause an increase in computer crashes. If this is the case, the BGS GPS tool can be used
instead (see 2.2.2 below).
2.2.1.1 CONNECTING TO THE GPS
1.
Open BGS·SIGMAmobile from within Windows Explorer (or your Desktop shortcut) and use
the GPS toolbar (or the GPS drop down on the menu bar) to set up the GPS connection as
follows.
2.
Click the GPS Connection Setup Option button
to open the GPS Connection Setup
dialogue box. The datum on the receiver should be set to GCS_WGS_1984. Everything else
should stay as default.
3.
Click OK. Then click the Connect to GPS icon on the toolbar
. If you get the warning
message below, click OK. The error message is because the GPS uses a WGS84 coordinate
system whereas the BGS·SIGMAmobile data frame is using BNG.
6
4.
You can also see the GPS readings from the toolbar using the GPS position window button.
5.
You can now use the Display Options within GPS Tools to change how the GPS locator is
displayed and whether you want a track log etc.
2.2.1.2 ARCGIS GPS TOOLBAR
3
4
5
6
8
1
2
7
9
10
1.
GPS Connection Setup – enables the user to connect to the GPS through the correct COM
port and using the correct baud rate.
2.
GPS Position Window – displays useful information about the GPS connection and its current
position. In advanced mode it is possible to see the satellite availability as well as time/date
and magnetic variances, along with suggested accuracy measurements.
The GPS position is
here
When there is no connection, the GPS window shows an estimated position in red as shown below.
7
3.
Open Connection – Establishes a connection to the GPS.
4.
Close connection – Closes the connection to the GPS.
5.
Pan to GPS position
6.
Zoom to GPS position
7.
Auto pan to GPS position – turn on or off depending on whether you want the system to
move the map view to the GPS position whilst you are walking.
8.
Add destination– Sets the clicked point on the screen as the destination.
9.
Destination properties – Sets the symbol and label for the destination flag and allows the user
to show the bearing to the destination from their current location.
10.
Display options – Sets how the GPS symbol is displayed.
2.2.2
Using the BGS GPS tools
2.2.2.1 BGS GPS TOOLBAR
1.
If the BGS GPS Toolbar is not visible go to View > Toolbars and select it.
Main GPS Tool
Zoom to GPS
Pan to GPS
2.
Click on the Main GPS Tool to open BGS GPS dialog box. Select Start GPS. The GPS tool
will attempt to get a GPS fix.
3.
To stop the GPS press the Start GPS button again.
Slider to control map
panning frequency,
GPS log frequency
and GPS symbolising
frequency in seconds.
Common GPS
Status:
- GPS OFF
- No Fix
- GPS Fix
Number of satellites. The progress bar fills
up with more satellites.
8
4.
Once the GPS has a fix you can pan or zoom to the GPS location using the Pan and Zoom
buttons on the Main Toolbar. You can also set the BGS GPS to Automatically Pan by using
the Main GPS Tool see the diagram below.
5.
The GPS tool will scan all the communications ports that are available to the application. If
COM2 is available this will automatically be selected
a. If you need to change the communication port go to GPS Configuration/COM
Port/COM n (see below)
6.
The first time the BGS GPS Tool is used in BGS·SIGMAmobile two shapefiles will be
created – these files are created using the same spatial reference as the current data frame.
a. Current GPS location (Created at DocPath\GPS\GPS.shp)
b. GPS Log (Created at DocPath\GPS\GPS_Date_Time.shp)
GPS Current Location
Shapefile
GPS Log Shapefile
2.2.2.2 MORE BGS GPS SETTINGS AND INFORMATION:
The GPS shapefile has one point with the current GPS location marked within it. This
location is a transformation from the GPS.
The symbology of the GPS shapefile will be automatically set depending on the strength of
the GPS signal. Red = No Signal, Yellow = Low Signal, Green = Good Signal.
You can turn the GPS location on or off by clicking the layer button in the ArcGIS Table of
Contents.
The GPS log file will have a record for every interval, set using the auto pan interval.
A column in the GPS log file has the date and time of the GPS point.
9
You can turn the GPS log file on or off by clicking the layer button in the ArcGIS Layer
Table of Contents.
You can alter the critical battery level at which the GPS will turn off (see figure below). This
is recommended to be at least 1% above the system‟s critical battery level. This setting will
persist until the application is removed.
2.2.3
GPS in ArcMap - trouble shooting
If you think that the GPS position is being shown incorrectly in ArcMap, check the transformation
settings in the data frame properties/coordinate system/transformations dialogue. It should appear as
displayed in the image below. If this is not correct, then make sure that the TestPointProjection
feature class and a feature class with BNG projection have been added to the data frame.
10
3 Using BGS·SIGMAmobile
The digital field data collection system has been developed using ArcGIS 9.2 and a personal
geodatabase in Access 2003 which is viewable in Access 2000. Access 2003 offers greater
capabilities than Access 2000, especially in terms of handwriting recognition support.
The system should be treated in much the same way as a paper map and its accompanying
notebook; the only difference is that data are captured digitally. On a paper map, geologists make
notes and observations by drawing lines, polygons, map face comments and points with labels to
reference their geological notebook observations. The same is true in the digital system.
3.1
OPENING THE BGS·SIGMAMOBILE GIS
BGS·SIGMAmobile accesses code in the background whilst the system is being loaded. For this to
work, the application needs to be opened either through a shortcut from the Desktop to the .mxd
itself or by double-clicking the .mxd in the project folder in Windows Explorer. If the application is
opened via ArcMap, you will come across an error in the code and will not be able to use the
system. This is because ArcMap temporarily looks for the geodatabase in a bin folder rather than in
its real location. For ease, and to reduce the risk of this error, you should create a shortcut on your
system to the BGS·SIGMAmobile.mxd.
Once the BGS·SIGMAmobile GIS is opened a dialogue box will be displayed showing the project
and user details which are currently in use. These are default settings, which are added to any data
captured during fieldwork so that, in the future, it can always be determined who captured the data,
when and for which project. The user can change the user name shown here to their own by
selecting their name from a list of user names displayed in the dropdown list.
If a valid username does not exist in the dropdown list, or any of the project details are incorrect,
the user will have to access and populate the user dictionary form through the project details button
and make the appropriate changes here. You will also note that there is the option to change the
starting locality number.
BGS·SIGMAmobile relies on particular layers to store field observations. These will appear in the
Table of Contents (TOC) when you open the GIS. They should not be renamed or removed as their
names are coded into the project. If they are renamed and you use one of the BGS·SIGMAmobile
tools you will be alerted by a message box saying that the layer cannot be found. The layers which
are specific to BGS·SIGMAmobile are:
11
These are all stored in the DFDC.mdb database.
3.2
PREPARING BGS·SIGMAMOBILE FOR FIELD USE
To begin a new project, copy the BGS·SIGMAmobile folder and subfolders from the zip file to the
project workspace.
If a project GIS project file has already been created, then so long as it has been created in ArcGIS
9 or above, you can open both the project GIS and the BGS·SIGMAmobile GIS on your office PC
and drag and drop the data layers from the Table of Contents (TOC) in the project GIS into the
TOC of the BGS·SIGMAmobile GIS.
The BGS·SIGMAmobile.mxd can be renamed to reflect the project or the user. The DFDC database
MUST NOT be renamed. Alternatively data layers can be added directly into BGS·SIGMAmobile
using the add data button. If you do this, make sure you have created layer files (.lyr) first in order
to save the legend symbology information.
Setting up project details
When you first open the BGS·SIGMAmobile GIS, the Project and User Details form will prompt
you to check the default details. When creating the BGS·SIGMAmobile GIS for project use, these
default details will be incorrect so you must amend these by opening the DFDC Project Details
Menu and selecting Populate User Dictionary. The Populate Project Details Dictionary form will
appear with four tabs. In BGS a table has been loaded with the names of all our staff, this will need
to be compiled for your organisation. The user names are used to generate a UUID (unique user ID)
for each map face note, line, polygon and observation so it is important that the details are added for
your field staff / students.
12
Tab 1 – User Names
This list refers to a list of names
and usernames that are stored in
the table called DIC_META_
ORACLE_USER in the
geodatabase. You can type in a
name and it will appear in the
list. You can then select it and
add it to the list below. If the
name you require does not
appear, you can add it to the
table in the Access database.
This is the list which appears in
the project/user details form.
The user can add or remove
names from that list using this
form. To delete a name, select it
and click the delete button.
Tab 2 – Project Name and Code
This form shows the project name and project code currently set in the database. You can replace
these entries to ensure that the correct project code and name appear. Ensure both text boxes are
entered before clicking the Add button.
13
Tab 3 – Mapping Scale
The data manager should enter
the scale at which the project is
mapping at here, and then click
add.
Tab 4 – Locality Number
Change the locality number to
that required for the start of
your project.
Once these four sections have been populated with information, the user can check that the database
is using the correct values by viewing Project and User Details form. All of these details are stored
in the database table USER_DETAILS.
If any user names are missing from the list, you must close the BGS·SIGMAmobile.mxd, open the
DFDC.mdb database and edit the table DIC_META_ORACLE_USER to include the name and user
ID of the missing person.
Setting-up Project Dictionaries
Within the DFDC.mdb there are several dictionary tables. Some of these, such as
BGS_DIC_ROCK_ALL are very extensive and would take up a lot of room in dropdown lists in
14
the field. To reduce the time spent searching through lists to find the right value, the dictionaries
have been set up with a project control field because different projects map in different domains and
will require different values. The data manager can go through each dictionary to check the project
control box beside any dictionary value that they feel will be used within the mapping domain. This
forces these checked dictionary values into alphabetical order at the top of a dropdown list on the
system. The remaining values with no project control tick will be included, in alphabetical order, in
the dropdown list, but below the checked values.
Check values here if
you want them to
appear at the top of
a dropdown list.
This means that all dictionary values will be available in the field, but only some will be listed at the
top of the dropdown list
To edit the dictionaries you will need at least one field observation point added to the project; if
necessary place a dummy field observation point on the map. When the database form opens go to
the Housekeeping Tab and select View Manipulate Dictionaries. In the Dictionary Browser select
the down arrow and choose the Dictionary you wish to change. You can also double-click on the
DFDC.mdb in Windows Explorer, select a field observation point, and continue with the steps listed
above.
15
3.3
THE BGS·SIGMAMOBILE GRAPHICAL USER INTERFACE (GUI)
MAIN MENU
BEARING TOOL
STRUCTURE
CONTOUR TOOL
BGS_DFDC TOOLS
BGS_GPS TOOL
BGS_DFDC
The layout of the BGS·SIGMAmobile application is shown above.
3.3.1
BGS DFDC Tools Toolbar
This toolbar uses a subset of useful tools that appear on the default ArcGIS tools toolbar as well as
customised DFDC tools developed in BGS. Each tool is outlined below but their best practice use is
described in more detail later in this document.
1
2
3
4
5
6
7
8 9
10 11 12 13 14
15
16
17
18
1.
Zoom in
2.
Zoom out
3.
Fixed zoom in - Zooms in to the centre of the map in steps.
4.
Fixed zoom out - Zooms out of the centre of the map in steps.
5.
Measure - Allows the user to measure a distance on the map.
6.
Pan - Lets the user move the map centre.
7.
Full Extent - Zooms to the full extent of all the data.
8.
Go back to previous extent
9.
Go to next extent
10.
Identify – displays the attributes of a feature.
11.
Zoom to selected features
12.
Select features - Selects map features that are set as selectable.
13.
Clear selected features - (unselect the selected features).
14.
Delete selected geofeatures and graphics - deletes those selected GeoPoly, GeoLine, Map
Face Note, Field Observation Point or Graphic features.
16
15.
Select graphic elements - this tool will select graphic elements in the map layout, but not
features saved in the DFDC.
16.
Finish Sketch - If you are creating a GeoLine or GeoPoly feature and find it difficult to
double tap on the tablet to finish drawing, click this button instead and it will finish drawing
for you.
17.
Toggle table of contents - Toggle this on or off to view the TOC window or not.
18.
Map scale - This combo box shows the current map scale. A new scale can be entered here
and the map will zoom to the selected scale.
3.3.2
BGS DFDC Toolbar
1 2 3 4
5 6 7
8
9
10
11 12 13 14 15
16
17
1.
Add Map Face Note - This tool enables the user to enter a map face note to the digital field
slip.
2.
Edit Map Face Note - This tool enables the user to edit the content of an existing map face
note.
3.
Move Map Face Note Tool - This tool allows the user to move the position of a map face
note.
4.
Copy map face note - This tool allows the user to copy a selected map face note to save time
re-writing it.
5.
Add Notebook observation point - This button allows the user to add a point to the map face.
Once the point is added the notebook application opens.
6.
Edit Notebook observation point - This button allows the user to edit an existing notebook
point on the map face. Once the point is selected the notebook application opens.
7.
Précis tool - Use this tool to identify a field observation point and view all the data entered at
that point in a précis list within ArcMap. This tool is also available within the DFDC
database.
8.
Draw GeoPoly - This tool is used to draw a polygon on the field slip. Users select the colour
and the shading of the polygon by changing the selections available in the form activated by
button 11. The style in use is written on the button. The project leader must decide what
combination of fill style and colour correspond to each type of feature being mapped. This
will vary depending upon mapping domain and as such project specific.
9.
Draw GeoLine - The user can use this tool to draw a line on the field slip. They can select the
linestyle by changing the selections available in the form activated by button 11. The style in
use is written on the button.
10.
Streaming - Turn on/off streaming - Streaming adds vertices as your pointer moves around
the screen whilst in editing mode. If you prefer to tap to add vertices, turn this off, else turn it
on for streaming. You can set streaming preferences using the editing options button
described in 6r below and detailed in section 3.4.7.
11.
Change GeoLine/ GeoPoly symbology - This button allows the user to amend the symbology
of a selected feature. The symbology is updated to reflect what is visible in the combo boxes
(buttons 8 and 9).
17
12.
Label a geofeature - When a feature (GeoPoly or GeoLine) has been selected, the user can
use this tool to label it. To display the labels on the Map Face, select button 6n (see below).
13.
Edit Tool - This allows the user to edit the shape of a GeoPoly or GeoLine by moving the
shapes vertices.
14.
Activates the ink tools - see section 3.3.3 below.
15.
View Old DFDC Projects - This button allows the user to view old DFDC projects.
16.
Change style of GeoPoly/GeoLine - This combo box shows all of the styles currently in use
by the project. Select the style you want from the drop down box, select a feature to convert
and click „Go‟ (button 17).
17.
Convert style of GeoPoly/GeoLine - Once an appropriate style has been selected from the
combo box to the left (16), click the Go button to convert the selected GeoPoly/GeoLine.
3.3.3
Ink Tools
These tools can be accessed by clicking button 14 on the BGS DFDC toolbar.
1 Draw ink
2 Erase ink
3 Select ink graphic
4 Reactivate ink
5 Converts the graphics
to a different style
6 Converts the ink or
graphics to a
GeoLine/GeoPoly
1.
Draw ink - The draw ink tool, also referred to as the Ink tool, is used to create ink graphics on
the map. You can choose from several styles of pen ink from the drop down menus.
2.
Erase ink - The erase tool removes all connected pieces of ink that you touch with your pen,
including ink created with the draw ink tool. To erase ink drag the eraser across the ink you
want to erase. If you wish to convert ink to shapefile, care should be taken when using the
eraser tool. Try not to rub out in the middle of lines, but rub out from the ends.
3.
Select tool - This tool enables the user to select graphics. Use this to select a committed ink
graphic in order to re-activate it using the re-activate tool. When you select a graphic the
project will automatically change the view to the same scale at which the ink was originally
captured, and pan so that the graphic is in the centre of the screen. The ink tools within
ArcMap are still fairly primitive, and this action prevents the graphics from randomly
disappearing from the map.
4.
Reactivate ink graphic - The Reactivate Ink button re-creates an ink sketch from a selected
ink graphic element. You can reactivate an ink graphic that has been committed as a graphic
and use the ink and erase ink tools to alter the graphic before you commit it to shapefile. Once
a feature has been committed to shapefile it cannot be re-activated.
18
5.
Changes the style of the selected graphic element - If you want to change the style of a
committed graphic, select the line type from the combo boxes and click „Go‟.
6.
Convert ink to GeoLine or GeoPoly tool - Converts ink of selected graphics into a line or
polygon geometry (i.e GeoLine or GeoPoly) as defined in the adjacent combo box.
3.3.4
Main Menu
The main menu toolbar includes all menus found in any new ArcMap document, and some addition
menus to use within BGS·SIGMAmobile.
1
2
3
4
5
6
7
1.
Save - Saves the project
2.
Add layer - lets the user browse to add a new layer into the GIS.
3.
Launch editor toolbar - launches the editor toolbar to allow users more freedom with editing.
4.
GPS tools – ArcGIS GPS Tools.
5.
DFDC project details - menu of project/person specific buttons which change default
settings.
5a
5b
5c
5d
5e
5.a. Set map face note style - Use this to change the colour of the text and arrow of future map
face note. Each time the project opens, the default is reset to a black arrow and black text.
There is a choice of three styles.
5.b. Populate User dictionary - This button opens a form in which the user can change the
default project details. This should be done by the data manager before going into the field,
but in case it isn‟t, a user can populate the project details here.
5.c. Project/User details - This button displays the default project name and user details that
have been entered into the database. Click this to change the user name, or check to see the
details are correct. It is the same form as the one which pops up when the
BGS·SIGMAmobile application is opened.
19
5.d. Use default GeoPoly styles - By clicking this button, the default fill types and label text for
the GeoPoly layer are applied. This removes any project specific customisation of value
labels which may have been applied (see 5e).
5.e. Change Geopoly symbology labels - This button opens the symbology window of the
GeoPoly layer. A user can enter an alternative label for each polygon fill type into the label
section. The value field must not be altered as the application colours the polygons based
on the value field rather than the label field. The value fields are also used to construct the
drop-down menu boxes for polygon fill-type, so it is important to note that even though
you may change the label field, the dropdown menus will not change.
User changes symbology label here
Both the Value text and the Label text are stored within the attribute table of the GeoPoly
layer. This is to ensure that project specific fill types can be retrieved with their true
meaning at a later date.
20
6. DFDC tools, drop down list of tools (see list of buttons 6a – 6r below)
6a
6b
6c
6d
6e
6f
6g
6h
6i
6j
6k
6l
6m
6n
6o
6p
6q
6r
6.a. Finish Sketch - If you are creating a GeoLine or GeoPoly feature and find it difficult to
double tap on the tablet to finish drawing, click this button instead and it will finish
drawing for you.
6.b. Turn on/off streaming - Streaming adds vertices as your pointer moves around the screen
whilst in editing mode. If you prefer to tap to add each vertex, turn this off, or else turn it
on for streaming. You can set streaming preferences using the editing options button
described in 6.r and detailed in section 3.4.7.
6.c. Delete Features - This button allows the user to delete selected features.
6.d. Undo - This button undoes the last action.
6.e. Redo - This button redoes the previously undone last action.
6.f.
Modify Geofeature - When a GeoLine of GeoPoly is selected, the user can select this tool
to automatically start modifying the look of the feature.
6.g. Delete Vertex - ArcGIS editing tool that is also accessible by a right click, this option lets
the user delete a vertex on a polygon.
6.h. Insert Vertex - ArcGIS editing tool that is also accessible by a right click, this option lets
the user insert a vertex to a polygon.
6.i.
Split - ArcGIS editing tool. This allows the user to split a geoline into two given a
specified length.
6.j.
Save Edits - This button allows the user to save any edits without having to stop editing. It
should be used regularly during an editing session.
6.k. Stop Editing - This button forces the user to stop the edit session. If you have created or
edited features, it will ask you whether you wish to save your edits.
21
6.l.
Snapping - Opens the snapping window where the user can choose the part of the feature
(vertex, edge, or endpoint) to which they want their new feature to snap. Snapping can be
set for each layer loaded in the TOC.
6.m. Change vertex size - Allows the user to change the size of the vertex editing square to aid
drawing.
6.n. Back Up Graphics - Backs up any graphics to the graphics feature class in the DFDC.mdb.
The graphics are stored in the database as well as in the map
6.o. Turn labels on/off – If you have entered any labels for the GeoLine or GeoPoly layers, or
want to view the notebook point labels, this turns labelling on or off.
Select the layers that you wish to
view with labels. To add a label to a
GeoLine or GeoPoly feature, use
button 12 on the BGS DFDC toolbar
and turn on the layers labelling option
here.
If a layer‟s labels do not
appear to correspond to
the correct attribute field,
right click on the layer to
open its properties. Go to
the labels tab and check
that the label field is set to
LABEL as shown here.
22
6.p. Toggles status bar - This button toggles on and off the status bar to create more room on
the tablet to view the field slip. The status bar holds information about location and tool
messages.
6.q. Reset DFDC Toolbars - If there are several toolbars displayed in the GIS, click this button
to hide all those except the main BGS·SIGMAmobile toolbars.
6.r. Editing Options - This button opens the editing options form. Settings such as streaming
tolerance can be adjusted for user preference here.
7.
3.3.5
Reset DFDC Toolbars - If there are several toolbars displayed in the GIS, click this button to
hide all of those except for the main BGS·SIGMAmobile toolbars.
Maximising the map display (data view)
In order to maximise the available screen space for viewing the digital field slip, a number of
buttons have been created within the BGS·SIGMAmobile GIS.
To turn off viewing the TOC click this button
(BGS DFDC Tools button 17).
To turn off the status bar click this button
(main menu button 6.p).
To reset all the toolbars click this button
(main menu button 6.q or 7).
The Windows task bar can be set to auto hide. Right click on the task bar, select properties
and check auto-hide.
Unwanted
toolbars
Task bar
display
TOC on
display
Status bar
on display
Wasteful use of screen space
3.4
Optimal use of screen space
USING THE DIGITAL FIELD SLIP
Field mapping can consist of the following types of data recording:
Pro-forma based recording - structured data which are commonly dictionary constrained.
Notebook based recording - freeform recording of detailed comments and sketches (e.g. The
Red Notebook).
Map based recording – brief text notes on the map face, geological lines and landforms (e.g.
the field slip).
BGS·SIGMAmobile has incorporated all of these types of recording into a digital environment. The
GIS map acts as the field slip for map based recording of geological line work, landforms and brief
text notes. Points that require further detailed comments or structure based recording can be marked
on this digital map and expanded upon through the digital notebook.
23
3.4.1
The Map Face Note
The map face note is designed to replicate the traditional brief comments geologists make on their
field slips. These are notes that are viewed on the map whilst conducting fieldwork.
To add a map face note to the GIS, click the Add Map Face Note tool
. There are two clicks
required to position the Map Face Note; the first positions the arrowhead and the second positions
the end of the arrow at the start of the note. Once positioned, the Enter Map Face Note menu will
appear in which you can add your note and tag your note with a topic to which it refers. More than
one topic can be entered.
Hold the stylus over the box where the notes are to be added and the icon for the text input tool will
appear. This allows users to select an onscreen keyboard or handwriting input.
Enter note here – make sure
you click enter if you want
your comment to appear on a
new line.
Select appropriate topic tags
for your note here
Click this button when you
have finished entering your
map face note.
The map face note will appear in ArcMap. It can be moved around or resized using the edit
annotation tool.
24
Resize handle resizes the text.
Location marker –
The place the note
refers to.
Selection anchor – enables
you to move the text box to a
new position.
To edit a note you have created you must first select the annotation feature you wish to edit, then
click the edit Map Face Note icon
. This will open the Edit Map Face Note form as before, but
this time the tags and comments previously entered will be displayed. Change the tags or note and
click save edits. The edit annotation button is automatically turned on so that you can now move
the annotation.
When annotation is created or edited, BGS·SIGMAmobile automatically stores the username and
the date in the annotation attribute fields. The note itself is also stored here. The size of the
annotation is set so that it can be viewed and read at the quarter sheet level for 1:10,000 mapping –
the size of a BGS field slip. The text therefore may appear quite large when zoomed in, or too small
if zoomed out.
When creating map face notes, it is important to bear in mind that the enter key must be clicked to
create a new line within the note. This is true on the tablets even if using the hand writing
recognition where text wraps to a new line.
The following QA attributes are stored within the Map face note attribute field:
There are three different Map Face Note Styles available: Black Arrow with Black Text, Orange
Arrow with Orange Text, and Purple Arrow with Black Text.
There are two ways to modify the style. To change the Map Face Note Style for the next map face
note go to the DFDC Project Details Menu and choose Set Map Face Note Style. Note that this does
not change the style of any previously placed map face notes.
To change any other map face note styles – right click on Map Face Note in the Table of Contents
to open the Attribute Table. Under SymbolID* change the number to reflect the style: Black = 20,
Orange = 23, and Purple = 24. To change many records: Select the records, right-click on
SymbolID*, Field Calculator, in the SymbolID= box, type 20 (or 23 or 24 depending on the style
you require).
Map Face Note X and Y values are automatically updated when the document closes.
3.4.2
The Notebook Point Observation
Notebook points can be added to the digital field slip when more detailed or structured information
is required about a certain point. There are two buttons which access the digital notebook.
The green flag allows the user to add a notebook point; the red flag allows a user to edit an existing
notebook point. Notebook points are labelled on the map face with the username and a consecutive
number so that the geologist can reference it. It is also possible to add a summary label in to the
digital notebook to summarise the notebook entry if required. For example, if the lithology is
25
Mercia Mudstone then the geologist may wish to write the summary label MM. The method in
which you would create this summary label will be outlined in section 3.5. These summary labels
are shown in red as indicated below. To view these in the GIS, the map must be refreshed and the
layer label option turned on.
It is important to be patient with the system when adding or editing a field observation. It takes a
small amount of time for the code to be generated to open Access from within ArcMap and transfer
and build the relevant forms for data entry.
To delete a notebook feature ensure the layer is open for editing. Select the feature and click delete.
Note that the database has been set to cascading so any associated notes in the database will also be
deleted. Use the Undo button (6.d) to restore (undelete) the data.
ArcMap has been customised so that when it shuts down, all X and Y attribute values are updated in
case any feature has been moved within the session.
To move a Notebook point observation: Go to Editor > Start Editing > OK. Using the „Select
Elements‟ tool hold the cursor over your new location and write down the coordinate location from
the bottom right of your screen. Set the Task on the Editor Toolbar to Modify Feature, Select the
Field Observation Point to be moved, right-click and select Move To. Enter the X and Y
coordinates of your new location. The new coordinates will also have to be updated in the Attribute
Table. In the Table of Contents, right-click on the Field Observation Point, Open Attribute Table,
and enter the new coordinates in the X and Y fields of the selected Field Observation Point.
Observation Point Trouble Shooting: You have made a selection with the „Edit Notebook
observation point‟ tool and received the following message: “You have not made a selection.” This
may be caused by broken links (red exclamation marks) in the Table of Contents (in ArcMap) or the
Field Observation Point layer (from either the current DFDC or the old DFDC) is not switched on.
Repair the links by clicking on the red exclamation mark and re-setting the source and make sure all
Field Observation Point layers are on and visible.
3.4.3
Reviewing Notebook Data within ArcMap – Précis Tool
The green information button
(Précis Tool) shown as button 7 on the
BGS_DFDC toolbar enables the user to view the contents of the notebook for
each field observation point. The Précis Tool can also be accessed through the DFDC database.
General Information is displayed at the top of the form with more detailed information contained in
tabs below. Photos and Sketches are viewable and selected using the Film Strip view at the bottom
of the form and can be individually rotated.
26
3.4.4
The GeoLine Tool
The GeoLine tool
is designed to add geological linework onto the digital field
slip. The user selects the tool and draws the line style displayed on the tool. The line style is chosen
using the set line style tool.
The following menu will appear. Select the Line tab.
The tool will remember the last selected line style during the working session. The line style
selected will appear in the tool name field.
Streaming can be turned on or off (see section 3.4.7) and vertices can be removed using the edit
vertices tool. The size of the editing vertices can be altered by using the change vertices size button.
If a GeoLine feature has been drawn using the wrong style it can be amended. Select the line you
want to amend, select the required style from the drop down menu, and click Go to attach the
correct attribute values.
To add a label to a GeoLine feature, select the feature and click the
button. A comments form
with tags will be shown. This form is the same as the Add Map Face Note form except the size of
label is limited to 50 characters. This allows the label to be tagged with a topic if required. To view
the labels, make sure that the GeoLine layer labelling is turned on using the turn labels on and off
button.
The attribute table for the GeoLine is shown below.
It is also possible to create GeoLine features using the graphic ink tools. This is described in section
3.4.6.
27
3.4.5
The GeoPoly Tool
The GeoPoly tool
is designed to delineate and draw polygon features onto the
digital field slip. The user selects the tool and draws the polygon style displayed on the tool. The
polygon style can be set using the set polygon style tool.
Select the Polygon tab on the
following menu.
Alternatively, if the project has preset project fill styles, the menu may look as follows:
28
If a GeoPoly feature has been drawn using the wrong style it can be amended. Select the line you
want to amend, select the required style from the drop down menu, and click Go to attach the
correct attribute values.
To add a label to a GeoPoly feature, select the feature and click the
button. This form is the
same as the Add Map Face Note form except the size of label is limited to 50 characters. This
allows the label to be tagged with a topic if required. To view the labels, make sure that the
GeoPoly layer labelling is turned on using the turn labels on and off button.
The GeoPoly attribute table is shown below:
It is also possible to create GeoPoly features using the graphic ink tools. This is described in the
following section.
3.4.6
Using the Ink Tools
The BGS·SIGMAmobile development team have developed the existing ArcGIS tablet tools to
allow users to draw graphic features using freehand tools as they would with a pencil and rubber.
The Ink Tools tools are included in this release of BGS·SIGMAmobile but need to be used
with care as the core development of ink tools within ESRI software is still being developed.
The tools can be used in the following stages:
1.
Click on the pencil button and draw graphic ink on screen. Move the stylus away from the
screen to complete the graphic.
29
Use the line thickness and colour options from the two drop down lists to change the pencil
line style.
2.
Once the ink sketch is completed decide whether you want to commit it to the database as a
GeoLine or GeoPoly feature or whether you want to temporarily store it as a graphic within
the BGS·SIGMAmobile .mxd project. If you are satisfied with the ink sketch and want to
store it as a GeoLine or GeoPoly feature then select a GeoLine or GeoPoly style from the
lower drop down box and click Go.
3.
If you have selected a line feature style the element will be converted into a GeolLine feature
and stored in the database. The feature will be symbolised with the symbology of the selected
line style.
4.
If a polygon style is selected from the drop down box, even if the ink sketch is not a closed
feature, the tool will convert the sketch to a polygon closing the polygon across any gap. The
created GeoPoly feature will be symbolised with the symbology of the selected polygon style
as in the image below.
5.
If you are not ready to convert this feature, you can temporarily commit the sketch to the
graphic layer in the ArcGIS .mxd project to re-activate it later. To commit the element to the
graphics layer either start using another tool or close the Ink Tools and save the project. Note
that the element will not be stored in the database; it will not have any attributes and will not
be transferable into another GIS. In the event of the .mxd becoming corrupt, data captured in
this way, without conversion to a database feature is likely to be lost. Users should therefore
only temporarily store data as a graphic, with the requirement to convert them to
database features as soon as possible (preferably before the end of the editing session). If
you do not do this, it is imperative to keep a regular back up of your .mxd on an external
device such as a data stick, external drive or another PC.
6.
The eraser tool
allows part or the entire graphic to be erased.
30
7.
To re-select a stored ink sketch, open the Ink Tools window, click the arrow button and select
the graphic. Once the graphic is selected, click on the refresh
ink button. As a function of
the software the map will refresh and redraw a number of times. Be patient while this happens
as repeatedly clicking the map may cause BGS·SIGMAmobile to crash. Once the graphic is
re-activated the eraser tool or the pen tool can be used to refine the sketch. Be careful to just
rub out the edges of the line rather than the middle because this may affect the conversion to
shapefile. If in doubt, create a new ink line to draw over your edits and use this to convert to
shapefile. Note: The view will automatically change to the same scale at which the ink
was originally captured, and pan so that the graphic is in the centre of the screen. The
ink tools within ArcMap are still being developed, and this action prevents the graphics
from randomly disappearing from the map.
Ink Tools trouble shooting: On some hardware systems, if the system has been on Stand-by mode
you may start to experience the „invisible ink phenomenon‟ where no element appears when it is
being drawn. This is a known issue and the solution is to close all programmes and re-boot the
machine for the tool to work correctly again.
3.4.7
Editing Options (Stream or Point Mode)
GeoLine or GeoPoly features can be created in two ways; point mode or stream mode (streaming).
You can switch back and forth between the two modes as you digitise by clicking the streaming
button
(main menu button 6b).
When you start creating a feature on the screen, the default mode is point mode. This enables the
user to create a feature on the map using a series of points. The user taps on the screen to create
each new point.
Stream mode capture lets the user capture features by automatically adding vertices at an interval
specified in the stream tolerance section of the ArcMap editing options. The default ArcGIS stream
tolerance is normally zero, although in BGS·SIGMAmobile it has been set to five. Each user must
enter a tolerance value that suits their requirements. If the tolerance is set to zero, the vertices will
join together or overlap each other. The stream tolerance can be changed at any time, even when in
the process of creating a feature. The user should adjust these options to their own preferences using
the Editing Options dialogue, available via the Editing Options Tool (6.r).
Set Stream tolerance here
Set grouping here
The user can also define the number of streaming vertices that they would like to group together.
This number tells ArcMap how many vertices to delete when the Undo button is clicked. For
example, if this number is set to 50 and the Undo button is clicked whilst the feature is being
31
created, ArcMap deletes the last 50 digitized vertices from the feature. This value is set to 10 as
default in the BGS·SIGMAmobile GIS.
Sticky move tolerance can also be set here. This setting determines the minimum number of pixels
the pointer must move on the screen before a selected feature is moved. This reduces the risk of
moving a feature by accident.
Other ArcGIS specific editing tools, such as inserting vertices, have been incorporated into the
DFDC Tools drop down list many of which can be accessed by right-clicking. Additionally, for
those users who dislike right-clicking, these tools have been included in the drop down list as well.
3.4.8
Viewing Old DFDC Projects
This button allows the user to view old DFDC projects. These projects are not actually loaded into
your current database (DFDC) but become viewable in one .mxd from their separate locations.
Older databases can be both queried and viewed using the BGS·SIGMAmobile tools available in
your current project but should not be edited. It should also be noted that the précis tool, new to
2009A, will not be usable with these files.
Before uploading any old DFDC projects you must rename that database in Windows Explorer or
ArcCatalog (this tool will not upload a file called DFDC as one already exists within the project). A
suggested naming convention might be ProjectName_Field Date_UserID_DFDC.mdb. When the
button is clicked, a „Select Database‟ dialog box will appear, browse to the database to be used, and
click OK. The Project will then take a few seconds to load.
3.5
CAPTURING STRUCTURED DATA OR DETAILED OBSERVATIONS
BGS·SIGMAmobile data is structured and data is recorded in a set of related tables in Microsoft
Access. A Microsoft Access 2003 database can hold 20GB of information. Once this limit is
reached, it will not store any more. There may be a loss in speed the more data is in the database.
3.5.1
Layout of the Notebook form
1
4
3
2
5
6
32
The notebook application is designed to fit a 12.5cm by 17cm screen in landscape format. It is
accessible via the add notebook point button or the edit notebook point button in ArcMap.
1
Creation of unique user ID (UUID) and site label to be displayed on the GIS. This is done
automatically when the observation point is created.
2
Top level information. Much of this is populated automatically. This is detailed below.
3
Switch form offering the modules available in BGS·SIGMAmobile for data capture.
4
Buttons to add comments, sketches, photos or samples at any point in application.
5
The user can tell where in the system they are from this message. FOP means you are at the
top Field Observation Point level, FOP_SPOT_LITH_2 would tell you that you were in Spot,
lithology number 2. The sketch, sample, photo and comment areas record where in the
notebook they were activated. So if a sketch were now drawn in FOP_SPOT_LITH_2, it
would record that it was a sketch relating to Spot, lithology number 2.
6
General Tools including Photo Transfer, Photo Collection Spreadsheet and Précis of the
Current Location.
3.5.2
Top level information
There are six tabs where data can be entered about the observation point.
In the Locality Desc and Summary Label enter a location description and a summary label to
summarise the notebook entry. This can be viewed on the field slip in red ink as described earlier in
section 3.4.1.
The X, Y and Z values tab displays the easting and northing of the notebook point you added or are
editing. This is automatically generated by ArcMap when the point is added. A note of caution – if
you move a point by editing it in ArcMap, the X and Y values in the attribute table will not
automatically update to the new location. They will need to be edited in the attribute table to show
the new X and Y location of the geometry.
Enter the Z value if known and how you obtained this Z value in the Z source field.
The Project Scale Field Slip values were all automatically entered within the GIS. You cannot edit
them here, just view them. Enter more information about the X, Y or Z data source in the field.
The Management Fields tab is used to confirm the date and geologist code are correct. These cannot
be edited. PFO stands for Primary Field Observation. All data collected in the field will have this
value.
33
The Housekeeping tab is used to perform several tasks quality assurance tasks. Dictionaries can be
customised (see section 3.5.16 for more detail), sample numbers can be entered (see section 3.5.14),
a text display of the notebook entry can be created (see Appendix), and the main menu in Access
can be shown or hidden to create more space on the system. This latter task is achieved by clicking
the Show Menu button.
The Geologist Info form stores information important to the geologist. The geologist can enter their
Collector codes here. The collector code may differ depending on what type of sample is being
made. You can also enter the starting sample number to ensure that the sample is unique and
matches your sample labels.
3.5.3
Spot Observations
A spot observation is a two dimensional log (think of a log which only comprises one unit). An
example of a spot observation would be brash. The types of measurements to record are dependent
on the type of spot observation you are making. The example below shows the measurements you
may make for brash.
You can take several measurements or make descriptions here about the spot observation by
clicking on the tabs entitled Grain Size etc. to open the individual forms.
34
In the above example, the orange area highlights the two lithologies entered for a spot observation,
one for mudstone and the other for clay. The pencil symbol on the grey column is highlighting the
second lithology and any sketch, photo, sample or comment taken now would relate to lithology 2 clay. To navigate through different lithologies, either use the scroll down list or use the default
Access record mover in the lithology section.
The area shown in orange in the diagram above lets the user enter information relating to the
lithological distributions within the unit as a whole. The unit thumbnails also store information
about the whole unit, whereas the lithology thumbnails just store information about the lithology
within the unit.
The system gives the user flexibility to write information (such as grain size, and CaCo3 content)
pertaining to the whole unit or just a particular lithology in the unit. The user must decide in the
field, which is more appropriate.
The example above shows how grain size information may be entered about the whole unit.
35
Whereas this example shows how a user may enter grain size information about the second
lithology in the unit.
3.5.4
Structures
Enter information about structures in this section of the notebook. Again, relevant boxes and
dropdown lists for entering data will appear in the form depending on the type of structural
measurement being made in the field. Also the GeoLine, GeoPoly or Map Face note tools can be
used in the digital field slip to augment the information. Note that the Dip-Azimuth can be recorded
directly or it can be calculated from the Strike/Dip information by clicking in the compass tick
boxes. Multiple structures can be recorded using the >* button at the bottom of the window, and the
measurements can be symbolised automatically with the correct azimuth by following the
instructions in Section 3.6.
36
3.5.5
Landforms (glacial)
Enter information about glacial landforms in this section of the notebook. The measurements made
in the field are dependent on the landform type being recorded. Depending on the value entered in
the Landform Type field different boxes will appear to enter subsequent values.
When developing the data model, all landforms were considered, but only those landforms that
would actually be measured in the field were included in the system. Other landforms, or the extent
of a landform should be recorded using the GeoLine, GeoPoly or Map Face Note tools.
More than one landform can be entered at any one point by clicking the record arrow at the
bottom of the Landforms form to navigate to a second record. A record can be deleted using
the delete button.
3.5.6
Sections
Logs (augers, sections, quarries etc) can be entered in this section.
By clicking the Sort Log Units button, the order of units can be sorted in the correct order so that
the user can sequence through the log from top to bottom correctly using the unit record arrows
37
For each unit any number of lithologies can be entered, and information, such as grain size, about
the unit as a whole, or a lithology within the unit, can be entered in a similar manner as described in
the spot observations section.
3.5.7
Viewing the log tools
At any point whilst creating units within a log, the user can click the View/Edit Log button. When
this button is clicked, the form shown above will appear. In the example above, the user has edited
the order fields so that they are numeric 1 – n. Where there are two orders of the same number, it
signifies that there are two lithologies recorded for one unit. For example, unit 2 above has both
Aggregate and Alkali Metabasalt. The form shows the log from top to bottom and lets the user edit
some of the main details about the log.
The log viewer, shown in the image above, lists the thickness of each unit and adds these
thicknesses together to give a cumulative thickness. If there are two lithologies within a unit it
displays the thickness of the whole unit for both these lithologies. For example, for the unit ordered
number 3, there are two lithologies; Clay and Cobbles. Unit 3 has a thickness of 0.3 metres. This
0.3 metres is written beside both lithologies. However, only one 0.3 metres is included in the
cumulative thickness of the log as 0.3 refers to the whole unit not the lithology.
3.5.8
Full Log and Sections Tool
Documentation for this tool is still in preparation along with instructions on full log data capture.
3.5.9
Landslide Observations
Documentation for this tool is still in preparation along with instructions on landslide data capture.
38
3.5.10 Setting the correct location, before entering comments, sketches etc
The user can ensure that they are entering a comment, sketch, photo or samples about the correct
feature by ensuring that the black bold text displayed in the top right hand corner of the notebook
reads what the user wants to relate the comment, photo, sample or sketch to. The following images
show different scenarios depending on which part of the form the user has last used. The black
filled columns are a useful guide to this, and if the user clicks within these areas, the text in the top
right hand corner of the notebook should change.
Indicates that the comment
etc will refer to the field
observation point (FOP) as
a whole
Indicates that the comment
will refer to the fourth
Spot observation recorded
in the database.
Indicates that the user is
viewing the first of two
spot observations at this
site.
39
Indicates that the
comment etc will refer
to this lithology – the 3rd
recorded in the database.
Indicates that the user is
viewing the first of only
one lithology recorded
for this, the first of 2
spot observations, at this
site.
3.5.11 Comments
Comments can be made at any point in the system. The position where they were called from is
documented automatically. This will be the location the comment button was clicked in and will
relate to the value displayed in black bold text in the top right hand location of the notebook as
discussed in section 3.5.1. Each comment made should be tagged with an appropriate topic tag.
More than one tag can be used for any one comment.
40
3.5.12 Sketches
Sketches can be added or reviewed from the notebook at any point by clicking the sketch button.
The form shown above will open in which you can add or edit a comment about your sketch. The
position where the sketch was called from is documented automatically. This will be the location
the comment button was clicked in and will relate to the value in black bold text in the top right
hand location of the notebook as discussed in section 3.5.1.
Sketches are created using a customised version of Agilix infinotes called the BGS Sketch Tool.
This programme needs to be installed separately from BGS·SIGMAmobile. The drawing tools are
very simple to use.
41
3.5.13 Photos
Metadata about photos taken in the field can be added through the photo forms. The photos will
remain on your camera until you upload them to your PC. Use the Photo Transfer facility on the
database start up screen. This is detailed below.
3.5.13.1 PHOTO FORM
The database requires that you first enter a description of the photo. Once you have entered this you
can link to a photo if it is already on your tablet, by clicking the photo button on the form
. There
is no need to rename the photos as the database will do this automatically. It will also copy the
renamed photo to the Photographs folder in your BGS·SIGMAmobile directory and make the
necessary linkages automatically.
If you have linked to a photo you can view it by clicking on the „view photo‟ button. If your photos
are not yet on your PC you can go back and transfer them to the BGS·SIGMAmobile database at a
later date.
The new file name assigned to a photograph consists of the LOCALITY NUMBER plus the current
date and a number which starts at 1 for each locality. The original file name is also preserved in the
Film Frame database table field. It is recommended that photos are transferred as often as possible.
3.5.14 Samples
Before taking samples using the BGS·SIGMAmobile system, each geologist must set up a Collector
code number in the database on the system. This is done through the housekeeping section of the
notebook. If a user is returning to the field the start number can be set to any value.
The user should click the “Edit Collector/sample no” button before taking the system out in the field
and make the appropriate changes to the form which is displayed below.
42
The Collector ID and the last
sample number can be edited
at any point and may change
depending upon the type of
sample being collected.
The numbers and ID‟s written in the above form should reflect the Geologist‟s user ID and sample
number in their relevant sample book.
For information, the user can see the user name, ID, project details and map scale they registered in
ArcMap. These should not be edited here unless absolutely necessary.
Once the “sample” button has been clicked you will see this pop up box:
Click Yes to continue to the form and enter any relevant information and No to exit.
3.5.15 General Tools
3.5.15.1 PHOTO TRANSFER
If the photos are not on your tablet you can link the photos to the correct metadata once you have
uploaded them to your PC. To link to the photos like this, click on the Photo Transfer button on the
opening screen of the database. The form will display a list of descriptions about the photos taken at
that location. Click on the photo button
to associate a photo on your PC to the appropriate
43
description. There is no need to rename the photos as the database will do this automatically, as
well as copy the renamed photo to the Photographs folder in your BGS·SIGMAmobile directory.
3.5.15.2 PHOTO COLLECTION SPREADSHEET
This button creates an excel spreadsheet in the photographs folder of your current working project.
It exports the data in a format suitable for the BGS Photographic database. For this to work
efficiently you must transfer and describe all of the photos in the database that are to be exported. It
is recommended that you do this on a daily basis.
3.5.15.3 SAMPLE COLLECTION SPREADSHEET
This button creates an excel spreadsheet in the root of your current working project area. It exports
the data in a format suitable for the BGS Collections Department to enter in to their systems. For
this to work efficiently you must transfer and describe all of the samples in the database that are to
be exported. It is recommended that you do this on a daily basis.
3.5.15.4 PRÉCIS OF CURRENT LOCATION
A specialized Précis Tool can be accessed using the information button in BGS·SIGMAmobile and
within the Database itself. This tool is described in more detail in the Appendix.
3.5.16 Customising project dictionaries in the notebook
The user can select the dictionary values a project uses most often so that they appear at the top of a
dictionary listing by clicking the View Manipulate Dictionaries button in the housekeeping section
of the notebook, as shown below.
This action will open the following form. The user can select the appropriate dictionary to
customise from the drop down list (combo box) and tick or untick values in the Project Control field
depending on whether a value should be listed at the top of a dictionary list in the system. The
44
example below shows the values for the DIC_WEATH_WEAK dictionary that describes
weathering.
The results of the above customisation can only be seen when the notebook application is reopened. They can then be seen within the Weathering sections of the notebook (within the Spot or
Log forms). The image below shows that the three values that were ticked in the dictionary browser
above appear at the top of the drop down list. They are in alphabetical order. The other values are
still included in the drop down list but now appear below those values where the user had indicated
a preference in the Project Control field.
3.6
DISPLAYING STRUCTURAL INFORMATION IN BGS·SIGMAMOBILE
It is possible to display structural measurements taken within BGS·SIGMAmobile as a separate
layer within the GIS and orientated in their appropriate direction. When you open
BGS·SIGMAmobile you will see that there is a layer called Structure Events. This layer is an Event
theme. It is created by adding the tabled called FOP_STRUCTURE from the DFDC.mdb into the
GIS. The table is visible in the Table of Contents when the Source tab is selected.
3.6.1
Creating a Structure Event Layer
Follow the instructions below to set-up the Structure Events Layer:
45
1.
Add in the FOP_STRUCTURE table from the DFDC.mdb
2.
Right click on the FOP_STRUCTURE table in the Source tab of the TOC and select
Properties to open the properties dialog box. Select the Joins/Relates Tab.
3.
Right click on the FOP_STRUCTURE table in the Source tab of the TOC and select Joins and
Relates followed by Join.
4.
It is necessary to make a join to the FIELD_OBSERVATION_POINT based on the UUID in
order to join the X and Y data to the FOP_STRUCTURE table. In the Join Dialog box that
opens the following should be set:
Select the UUID field as the field the join will be based on.
Select the Field Observation Point table as the table to join to.
Select UUID as the field from the Field Observation table to
use in the join.
5.
Once the joins are made an event theme can be generated. To do this, right click on the
FOP_STRUCTURE table and click Display XY data. The following menu will appear.
46
The X Field and Y Field attributes need to be assigned in order to display the points in the
GIS.
X value should be the FIELD_OBSERVATION_POINT.X attribute and the
Y value should be the FIELD_OBSERVATION_POINT.Y attribute
Make sure to set the coordinate system to be British National Grid.
Click OK and a FOP_STRUCTURE_FIELD_OBSERVATION_POINT Events layer will be
added to the TOC.
6. To symbolize the structure layer:
Open the Layer Properties for FOP_STRUCTURE_FIELD_OBSERVATION_POINT
Events, select the Symbology tab and select Import.
Browse to your Project Folder SIGMA_MOBILE_2009A and select Structural_Symbols.lyr.
On the Symbology tab click the Advanced button and check that rotation is based upon the
FOP_STRUCTURAL_AZIMUTH field. Set the rotation to be the Geographic Rotation
Style.
To Label the Structures go to the Labels tab within Layer Properties – check on Label features
in this layer and within Label Field select FOP_STRUCTURE AZIMUTH.
Once you have set this up once, it will be saved in your project and structural measurements will
automatically appear in the event layers when you create them using the notebook point tool.
4 Using the BGS Integrated Tools
4.1
THE BGS COMPASS BEARING TOOL
The purpose of the tool is to show compass bearings i.e. lines of sight and backsight in ArcMap.
The tool is a simple way for the geologist to use a compass to record a bearing to/from features on
the landscape, and to draw lines of the same bearings onto the map.
To use the Bearing Tool select Bearing Tool from the list of toolbars available.
The Bearing Toolbar will then become visible:
Bearing tool
Delete Bearing Graphics
47
Bearing Tool
After clicking the Bearing tool button, the mouse icon changes to a set of cross-hairs and
the tool is ready to use. Single-tap on the screen where you wish to take the bearing from
and hover the stylus elsewhere to see a dashed red line appear. The bearing of the line is
displayed in the bottom left of the screen.
When you double-tap to finish the line, it becomes a solid line and is annotated with the compass
bearing. The compass bearing is always displayed at the terminus of the line (i.e. where you doubletapped).
Delete Bearing Graphics
Clicking the Delete Bearing graphics button will remove the graphics created by the
Bearing tool from ArcMap‟s map display. Note that any other graphics on the map display
(that were not created by the Bearing tool) will not be removed.
4.2
THE BGS STRUCTURE CONTOUR TOOL
The purpose of the tool is to calculate Structure Contours to estimate where a geological bed will
outcrop. Given the location of an Observation Point where the angle and direction of dip of the bed
are known, and assuming the dip is uniform, the tool can calculate an equation for the plane of the
bed. From this equation it is then possible to calculate the elevation of the bed at any point. By
using a DTM this elevation can be compared with the ground elevation and where the two are equal
it can be predicted that the bed will outcrop.
4.2.1
1.
Using the Tool
Open the Structure Contour Toolbar (from the View Menu on ArcMap, select Toolbars and
then click on Structure Contour Tool from the list of toolbars available).
The Structure Contour Toolbar contains the following three buttons:
Calculate Structure Contours
Delete Structure Contours
Save Structure Contours as Shapefile
The functionality of each of these buttons is described in detail below.
4.2.1.1 CALCULATE STRUCTURE CONTOURS
After clicking the Calculate Structure Contours button, the user is presented with the following
window:
48
The user is required to enter four types of input: DTM, Observation Point, Tool Parameters and
Search Area:
DTM
The DTM input consists of a dropdown menu that lists the raster layers available in the current
project. Note that this list includes non-DTM rasters such as topographic maps or images. The user
must select only the DTM layers to be used to calculate all elevation values by the Structure
Contour Tool.
If the Search Area that you are interested in is likely to be covered by more than one DTM, click on
the Multiple Layers as DTM button and you will be presented with the following window:
Make sure that all of the DTM layers that cover the Search Area are ticked and then click on the
„Back to Main Form‟ button. The value in the DTM Combo box will now be set to: Multiple
DTMs.
49
Calculation method
There is an option to use one input point for structure contour calculation or up to three input points
where there are known measurements. The user can input measurements for each known
observation point as described in the Observation Point section below.
Observation Point
The Observation Point inputs consist of the observed properties of the bed at a known location.
They include:
1. Easting: The National Grid Coordinate (Easting) of the point.
2. Northing: The National Grid Coordinate (Northing) of the point.
a.
Easting and Northing values can be typed in manually or can be entered automatically
by clicking on the required location on the map display. As the Inputs window is
relatively large and obscures the majority of the map display, the button „Switch to
Small Inputs Form‟ has been provided. Clicking this button closes the main inputs form
and opens the following window.
b.
Once this window appears the user simply clicks on the map display to input the
coordinates of the structure measurement. When the correct values are entered, click on
the „Back to Main Form‟ button to return to the original Inputs window. Note that on
returning to the main Inputs window the Easting and Northing values have been
populated using those values selected using the smaller window.
3. Elevation: The elevation of the point in meters. This value can be typed in manually or
populated automatically (after the Easting and Northing have been entered) by clicking on the
Get Elevation from DTM button. This button uses the entered Easting and Northing values to
query the selected DTM and returns the appropriate elevation Z value.
50
4. Dip: The observed angle of dip of the bed. This will be a value between 0 and 90 degrees and
can be typed in manually or populated using the slider to the right of the Dip text box. To
move the slider by a factor of one degree, click just to the left or to the right of the slider‟s
pointer and it will move 1 degree in that direction.
5. Azimuth: The observed direction of dip of the bed (measured from North in a clockwise
direction). This will be a value between 0 and 360 degrees and can be typed in manually or
populated using the slider to the right of the Azimuth text box. To move the slider small
amounts click just to the left or just to the right of the slider‟s pointer and it will move 1
degree in that direction.
Tool Parameters
These three input values are parameters that affect how the tool calculates and displays structure
contours. Each input is initially given a default value.
The three inputs are:
1.
Tolerance: At various points in the search area the tool calculates the predicted elevation of
the bed and compares it with the ground elevation value from the DTM to see if they are the
same. The tolerance value defines how close (in meters) these two values need to be to be
declared „the same‟. This value can be typed in manually or populated using the slider to the
right of the Tolerance text box. To move the slider small amounts click just to the left or just
to the right of the slider‟s pointer and it will move 1 meter in that direction. A non-integer
value (e.g. 0.5) can be entered as the tolerance, but this must be entered manually.
2.
Sample Resolution: For large search areas the time taken to produce structure contours can
be high as calculations are made every 5 meters. To speed up the tool the distance between
calculations can be increased. A sample resolution of 2 means calculations will be made every
10 meters, whilst a sample resolution of 3 means calculations will be made every 15 meters
and so on. Increasing the sample resolution may decrease the number of points found that
form structure contours. This value can be typed in manually or populated using the slider to
the right of the Sample Resolution text box. To move the slider small amounts click just to the
left or just to the right of the slider‟s pointer and it will move 1 in that direction.
3.
Point Colour: The colour used to display structure contours on the map display. Select from
the pull down list of colours. Through the use of different colours it is possible to display the
results of several structure contour calculations on the map display at the same time.
Search Area
These three input values are used to define a circular search area. Only structure contours that fall
within this search area will be identified. The three inputs are:
1.
Easting: The National Grid Coordinate (Easting) of the centre of the search area. This value
can be typed in manually or populated automatically as the Easting of the Observation Point
by clicking on the Use Easting and Northing of Observation Point button.
2.
Northing: The National Grid Coordinate (Northing) of the centre of the search area. This
value can be typed in manually or populated automatically as the Northing of the Observation
Point by clicking on the Use Easting and Northing of Observation Point button.
3.
Radius: The radius in meters of the search area. This value can be typed in manually or a
value can be selected from the dropdown list.
When all of the inputs have been entered, click on the Calculate button to run the tool. The progress
of the tool is displayed, and once completed the results are displayed on the map display as
graphics. An example result is shown below:
51
The blue cross is the location of the Observation Point.
The blue circle is the search area.
Each red cross is a location where the estimated bed elevation is within the tolerance value of
the ground elevation (forming a structure contour).
Important Notes on the use of the tool
The Structure Contours are drawn as graphics onto the map display of ArcMap. To make a
permanent copy of the results they must be converted into a Shapefile. An additional tool is
provided for this purpose and is described in section 4.2.1.3 below.
Slider controls have been included on the inputs form to simplify the process of manually entering
values on a System. The easiest way to enter a precise value using the sliders is to drag the pointer
of the slider to roughly the right value (within 1 or 2) and then click just to the left or just to the
right of the slider‟s pointer (causing the value to increment or decrement by 1) until the precise
value is displayed.
4.2.1.2
DELETE STRUCTURE CONTOURS
Clicking the Delete Structure Contours button will remove the graphics created by the Structure
Contour tool from ArcMap‟s map display. Note that any other graphics on the map display (that
were not created by the Structure Contour tool) will not be removed.
4.2.1.3
SAVE STRUCTURE CONTOURS AS SHAPEFILE
Clicking the save Structure Contours as Shapefile button allows the user to save all the points
created by the Structure Contour tool to a Shapefile, which can then be retrieved at a later time. The
user is presented with the following dialog:
52
Navigate to the required directory, enter a filename and then click on the Save button to complete
the operation.
Note that it is possible to overwrite an existing Shapefile, but not if that Shapefile is currently being
used in the active ArcMap project.
4.2.2
Limitations of the Structure Contour Tool
When choosing a DTM or multiple DTMs for the Structure Contour Tool, the user is able to select
from all raster layers held in the GIS, as it is not possible to distinguish DTMs from other raster
layers such as topography layers or photographs. Make sure that only DTMs are selected otherwise
the Structure Contour Tool will attempt to get elevation values from a non-DTM raster layer.
5 Backing-up your data
We recommend that field data are backed-up each evening in the field in case your data becomes
corrupted or the system fails. This also ensures that you will never lose more than one day of
fieldwork.
Go to your Project area using Windows Explorer and Copy and Paste your DFDC.mdb file from
your main Project Area to the ArchivedCopies Folder. Within the ArchivedCopies Folder rename
DFDC.mdb to DFDC_UserID_Date, for example: DFDC_TEST_08092009.mdb
6 Viewing sketches on the Desktop
You can use the Précis Tool
in BGS·SIGMAmobile to view your sketches or you can use the
edit
tool to edit a geological observation and also edit any associated sketch. The sketch tool on
the System works with .ANT files in their native format, but it also saves a JPG file for use in any
other programme.
53
7 Troubleshooting, bug reporting and feedback
Most bugs have been error trapped within the system either through the provision of a message box
telling you what the problem is and how to alter it, or through internal code. However, it is possible
that you may encounter errors. If you come across any, the developers would find it very valuable if
you can document the error so that it can be fixed in a later release. Be patient with the system.
There is a lot of code working in the background to reduce the amount of data entry and button
clicking you have to do. This takes time to run, so occasionally you might find things don‟t work as
quickly as you may like.
Some common errors include:
Not having the GeoPoly, GeoLine, National grid QS or Field observation point loaded
into the GIS or having them spelt incorrectly. These must be loaded, with the correct layer
name spelling as in the blank BGS·SIGMAmobile GIS.
If whilst using the BGS·SIGMAmobile system you are asked to enable macros in
Access2003 rather than viewing a data entry form, it is likely that you haven‟t set the security
level to be low in Access. You will need to open the DFDC.mdb in Access 2003 and select
Tools > Macro > Security and set the security level to low. This ensures that macros built in
the system will work when fired up from ArcGIS.
The DFDC.mdb has been renamed. This should never been renamed as the code between
ArcMap and Access relies on knowing the access database filename.
If there is more than one version of the same .mxd open, or there are two open MXD‟s
pointing to the same geodatabase, this can cause problems with the code. Only use one .mxd
project at a time.
If the user has changed a button image using the customize button, this can upset the
default path for editing and the editing tools will no longer work. If this happens, refresh the
code in the VBA editor and go to File > Save As and overwrite the project. This resets the
correct path.
If the database opens with an error, check to ensure your virtual keyboard doesn‟t have
SHIFT + CTRL highlighted. If this doesn‟t solve the problem, check to ensure that in
Microsoft Access 2003 under Tools > Macro > Security, the security level is set to low.
54
8 Using BGS·SIGMAmobile outside the UK
When working outside the UK a different coordinate system to the British National Grid will be
required. You will need to update BGS·SIGMAmobile (this includes the DFDC database and the
ArcMap MXD project) to reflect the coordinate system you will be using. The following guidance
notes describe how to do this. Please also remember to follow the generic BGS·SIGMAmobile
installation instructions.
1.
Copy a new empty BGS·SIGMAmobile project to your PC.
2.
You need to replace the NationalGridQS layer, which is set up for the UK and references
Ordnance Survey map sheets, with a layer that holds the map sheets for your country of
working. BGS·SIGMAmobile uses a point in polygon operation to grab the NationalGridQS
attribute value where you insert an observation point. The NationalGridQS polygon layer can
therefore either be a real map sheet grid or could simply be a polygon covering the country in
which you are working. It is essential that when creating the dataset using ArcCatalog you set
the coordinate system to be that of your project.
3.
With ArcMap closed, open ArcCatalog and within the DFDC rename the existing
NationalGridQS to NationalGridQSBNG.
4.
Create the new National Grid layer for the country you are mapping either by creating a new
layer or importing a feature class or shapefile you already have. To import into the DFDC
right-click on the DFDC.mdb and select import, feature_class (single). Browse to the feature
class for the layer you are importing. Name the new layer as NationalGridQS.
5.
It is essential that the new NationalGridQS layer you have created has a field name in its
attribute table called QS. This should be a text field of maximum 50 characters and should be
populated with the names of the map sheets.
6.
Close ArcCatalog, open your BGS·SIGMAmobile.mxd ArcMap project and add the
NationalGridQS layer. Open the attribute table and create a new field called QS. Add the
sheet information into the QS field.
7.
See the example below for a project created for mapping in Tanzania which shows the old
NationalGridQSBNG layer with OS maps sheets and the new NationalGridQS showing
Tanzanian map sheets.
55
8.
You need to set the coordinate system of the data frame to the coordinate system for your
country of working. Open the Data Frame properties and select the Coordinate System tab.
Select the appropriate coordinate system for your project or import one from a feature class
that already has the coordinate system stored within it. Save the project and close ArcMap.
9.
Update the spatial references of some the feature classes in the DFDC database. In
ArcCatalog browse to the project DFDC database. Add a new feature class called “TEST2”
by selecting the DFDC.mdb and selecting File, New, Feature Class.
10.
In the New Feature Class dialogue, enter the name “TEST2”, and select point features as the
type. Click Next.
56
11.
Select the required coordinate system from the following window.
12.
Select Next and continue clicking through the forms until clicking Finish.
13.
The coordinate system for your country of mapping must also be added to the Field
Observation Points, GeoLine, GeoPoly and Map Face Note data classes. Right click on each
layer and click Properties. Select the XY Coordinate System tab and amend the Coordinate
System as in 11 above. Close ArcCatalog.
14.
In Windows Explorer, open the DFDC.mdb in Access 2003. If the database opens with only
the Field Observation Entry Form viewable select Window, Unhide and click OK to view the
database tables.
15.
In the table view select the GDB_spatialRefs table and click Open or double click the table
name.
16.
One row in the table represents the spatial reference system for the “TEST2” data class you
created. The SRTEXT field in this row should match the coordinate system you will be using.
Select this row.
57
17.
The rows after the selected row represent the Field Observation Points, Geotools (GeoLine
and GeoPoly) and Map Face Note data classes and should all have the same coordinate
system as the area you will be mapping, but the FalseX, FalseY, precision and XY Tolerance
values will differ to your TEST2 dataset.
18.
Replace the FalseX, FalseY, precision and XY Tolerance values in these four rows with the
values found in your “TEST2” row.
19.
Save changes, close the table and close the database.
20.
Open your BGS·SIGMAmobile.mxd project. Try adding a field Observation point and add a
sketch, Mapface note, GeoLine and GeoPoly within the QS map area of where you will be
working. If you can do this, you have successfully modified BGS·SIGMAmobile to be used
outside the UK. If not, check that you have completed the steps.
21.
The final thing to do in order to have a working BGS·SIGMAmobile for your country of
working is to change the hard coded reference system from BNG to the reference system you
will be using. In the open BGS·SIGMAmobile.mxd go to Tools > Macros > Visual Basic
Editor. Locate the module GW_FOP and double click on it to open the code. In the right hand
window, scroll down to the “Public Sub AddFOP(obj As esriGeoDatabase.IObject)” code.
22.
Within this sub there is some code that looks like the text shown below:
If pfield7 > -1 Then
obj.value(pfield7) = "BNG"
End If
58
23.
Change “BNG” to be the correct text to describe the coordinate system you are using. Note,
you can only insert a word up to 6 characters long. Click Save and close down the visual basic
editor.
24.
You are now ready to populate the rest of the GIS with the data layers you require to take
overseas. You will also have to ensure that the tablet is set up with the Structure Contour Tool
and the BGS Sketch Tool. Please follow the generic installation instructions.
59
Appendix Using the Basic Précis Tool
Viewing the Précis of the observation point
If the user wishes to see basic text report of the notebook data (without thumbnails of photographs
or sketches) for the given observation point they can create a précis by clicking the “View précis of
FOP” button in the housekeeping section of the notebook.
The report will appear in a format similar to that shown below. To close the report, simply click on
Close in the Précis Report Toolbar; clicking on the red X will close Access. The plan for future
versions of BGS·SIGMAmobile is that the user will be able to hyperlink to these reports from with
ArcMap. Until then, the user can manually export the précis using the file export button in Access
and then set up their own hyperlink to the file in ArcMap.
60