1
MICRO1470DABI
CD Micro System with Digital Radio and iPhone Dock
User Guide
IMPORTANT: Please read all instructions carefully before use and keep for future reference
Introduction
Thank you for choosing this Micro System with Docking Station. Not only can you
listen to your favourite radio stations and CDs, but you can also listen to all the
songs stored on your iPod.
It's really simple to use; you can fully operate your Micro System with Docking Station using
the supplied Remote Control.
Throughout this User Guide the Micro System with Docking Station will be referred to as the
Micro System.
Safety is important
Use of any electrical equipment should be undertaken with care. Please read the Safety
instructions on pages 20 and 21 before you operate this Micro System.
2
What’s in the box
CD Micro System with Digital Radio
and iPhone Dock
Remote Control
(1 x battery for remote control)
This User Guide
Contents
01 Your Micro system.............................4
07 Using the CD...………………...14
02 Get going..........................................6
08 Using the Aux Input …………...17
03 Daily Use..........................................7
09 Other functions.........................17
04 Using the Clock or Timer and Sleep......8
10 Trouble shooting……............... 18
05 Using the radio……..........................9
11 Specifications…………...........19
06 Using the iPhone dock…………….....13
12 Safety………………...............20
3
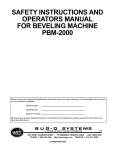
01
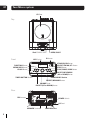
Your Micro system
CD Door
Top
iPod CONNECTOR
Front
LCD Display
OPEN/CLOSE
IR Sensor
STANDBY/ON Button
SELECT/FM MO./ST. Button
STOP Button
PLAY/PAUSE/SCAN Button
SKIP/TUNE SEARCH
(UP or DOWN)Button
FUNCTION Button
MENU/INFO Button
CLOCK Button
TIMER BUTTON Button
HEADPHONES Socket
PRESET/MEMORY Button
VOLUME Knob
PRESET (UP or DOWN)Button
Rear
FM Antenna
POWER Switch
AC Cord
SPEAKER Terminals
4
LINE IN Socket
Your Micro system
01
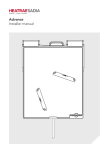
Remote control
PLAY/PAUSE/SCAN Button
FUNCTION Button
STANDBY Button
MENU/INFO Button
PRESET/MEMORY Button
REPEAT Button
SKIP/TUNE SEARCH UP Button
SELECT/MONO/ST. Button
SKIP/TUNE SEARCH DOWN Butto n
RANDOM Button
STOP Button
PRESET DOWN Button
PRESET UP Button
CLOCK Button
TIMER Button
EQ Button
SLEEP Button
MUTE Button
VOLUME “+” Button
VOLUME “-” Button
INTRO Button
5
Get going
02
02
1
2
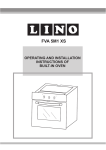
Using remote control
Press down on the compartment cover, and
slide the cover off to open the compartment.
Place the CR2032 battery in the remote control
according to the polarity markings("+" and "-”).
Place the cover into the compartment,
press down lightly, and push it inside until it
snaps on.
Please remove the plastic tab
before using the unit
iPod/iPhone dock
Any iPod/iPhone can be connected to the Micro System
to allow all your songs to be played through the Micro
System speakers.
Place your iPod/iPhone Adaptor into the recess on the top
of the Micro System and carefully insert your iPod/iPhone
into the Adaptor.
Remark: The dock adaptor is not included.
3
Installing the speaker wire to the speaker terminals
1. Speaker Connection;
Extend the SPEAKER WIRES and
connect them to the SPEAKER
TERMINALS.
2. Power Cord Connection;
Before using the unit, connect the AC Power
Cord to the AC outlet. Turn on the main switch on
the rear of the unit.
6
BATTERY
COMPARTMNT
OPEN/CLOSE
Get going
4
02
Using Earphones
Connect earphones to the earphone socket on the right hand side of the front
panel. When earphones are used the speaker sound will be muted.
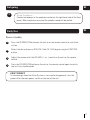
Daily Use
03
Power/standby
1
Press the STANDBY/ON button on the unit or on the remote control to switch the
unit on.
2
Select the desired source (DAB, FM, iPod, CD, AUX) by pressing the FUNCTION
button.
3
Adjust the volume with the VOLUME (+ or -) control on the unit or the remote
control.
4
Press the STANDBY/ON button on the unit or the remote control again to switch
the unit into standby mode.
DON'T FORGET!
To save energy when the Micro System is not used for long periods, turn the
power off at the main power switch on the rear of the unit.
7
Using the Clock and Timer
04
Clock Setting
The clock will be automatically synchronized to the DAB clock if you can receive DAB
signals in your location. If you can only receive FM, then you can set the clock manually.
The manual clock setting must be done in standby mode.
Manual clock setting
Ensure the unit is in Standby mode.
1
Press the CLOCK button, the hour digits flash in the display, press the SKIP/TUNE
SEARCH (UP or DOWN) button on the unit or the remote control to set the correct hour,
then press the CLOCK button again to confirm.
2
After the hour is set, the minute digits will then flash, press the SKIP/TUNE SEARCH
(UP or DOWN) button to set the correct minute.
3
When the display shows the correct time, press the CLOCK button again to confirm,
the manual clock setting is now complete.
DON'T FORGET!
Press the CLOCK button in any mode to briefly display the current time. The clock will
display for 5 seconds then the unit will return to the previous operation.
Synchronise the clock to DAB local time
1
Press the STANDBY/ON button on the unit(or remote control) once to switch the unit
on.
2
Press the FUNCTION button on the unit(or remote control) to select DAB mode.
3
Tune to a DAB station and the clock will be automatically synchronized to the DAB
local time.
Timer Setting
This function allows you to switch on and off the system at a desired time and mode:
1
8
Press the TIMER button to toggle the timer function between on and off, the display will
show “Timer on” or “Timer Off ”. The display will show “ ” to indicate timer function is
on.
2
To set the On timer, press and hold the TIMER button until the display shows “On Timer”
and the “hour” digit of the timer will flash.
3
Press the SKIP/TUNE SEARCH (UP or DOWN) button to set to the desired hour, then
press the TIMER button to confirm, first set the hour and finally the minute.
Using the Clock and Timer
04
4
The unit will now enter the timer off setting, the display will show “Off Timer” and the
“hour” digit will flash. Press the SKIP/TUNE SEARCH (UP or DOWN) button to set to the
desired hour, then press the TIMER button on the remote control to confirm, first set
the hour and finally the minute.
5
Finally press the SKIP/TUNE SEARCH (UP or DOWN) button to select the timer on
mode - DAB, FM, CD or iPod then press the TIMER button to confirm. The timer setting
is now completed.
6
Press the TIMER button again, the timer Volume indicator will flash on the display,
adjust the timer volume higher or lower by pressing the SKIP/TUNE SEARCH
(UP or DOWN) button.
7
To check the timer setting, repeatedly press the TIMER button, until the display
shows the on timer and the off timer setting.
To Set Sleep Function (on the remote control)
This function allows you to program the system to switch off itself after a set period of
time. You can set the sleep time in power on mode:
1
To activate the sleep function, press the SLEEP button on the remote control, the
display will show “Sleep Timer-OFF,90, 80,70,60, 50, 40,30,20,10” and flash.
2
When the display shows your desired sleep time, release the button, the sleep timer
is now activated. When the desired sleep time is reached, the unit will switch off to
standby mode.
3
To cancel the sleep timer, press the SLEEP button once again, the sleep function will
turn off.
Using the radio
05
Listening to radio
This unit carries a single lead wire DAB/FM antenna. To obtain the best performance, you
should fully extend the wire antenna and adjust the position as well as the direction until you
find the best reception for ideal DAB reception. Always maintain the wire antenna in a vertical
position (Fixing it upward or downward behind the unit) is highly recommended.
DAB mode
When the unit is powered up for the first time, it will be in standby mode, and the display will
show “Welcome to digital radio”.
9
Using the radio
05
Press the STANDBY/ON button on the unit (or remote control) to turn the radio on, it will
automatically enter into the DAB mode and perform the Autotune Quick scan function.
During the scan, the display will show “Searching …” together with a slide bar that indicates
the progress of the scan and the amount of stations that have been found so far. Once the
scan has finished, the radio will select the first alphanumerically found station. To explore the
found stations, Press the SKIP/TUNE SEARCH (UP or DOWN) buttons to scroll through the
station list.
DAB Autotune Full scan mode
Full scan will search for all DAB Band III channels. After the scan has finished, the first
alphanumerically found station will be automatically selected.
1
2
To activate autotune full scan, press and hold the PLAY/PAUSE/SCAN button on the
unit (or remote control) to enter into the “Autotune Full scan” mode, the display will
show “Searching...” and a slower progressing slide bar.
All the stations that have been found will be stored automatically, to explore the
stations that have been found, press the SKIP/TUNE SEARCH ( UP or DOWN) to scroll
through the station list.
DAB Manual tune
To select manual tune, press and hold the SELECT button on the unit
1
(or remote control) to enter the “Manual tune” mode.
2
Press the SKIP/TUNE SEARCH (UP or DOWN) button to scroll through the DAB
channels, the display will show “5A to 13F” and their associated frequencies.
3
W hen your desired frequency appears in the display, press the SELECT button to
confirm. The name of the station group (ensemble/multiplex) will be displayed.
4
Press the MENU/INFO button to see what stations are present on the found
ensemble/multiplex.
DON'T FORGET!
Secondary Services
On some occasions you will see a “>” symbol after the name of the station, this
indicates that there are secondary services available to that station. These secondary
services contain extra services that relate to the primary station. E.g. a sports station
may want to add extra commentaries. The secondary services are inserted directly after
the primary station. To select the secondary station, press the SELECT button on the
remote control when the “>” appears in the display.
10
Using the radio
05
FM mode
Press the FUNCTION button on the unit (or remote control) to select FM mode, the
1
display will show FM and the frequency.
2
To activate frequency auto search, press the PLAY/PAUSE/SCAN button on the unit
(or remote control) it will stop automatically once a station has been found. To scan
backwards through the waveband, press and hold the PLAY/PAUSE/SCAN button.
3
You can also press the SKIP/TUNE SEARCH(UP or DOWN) button on the unit
(or remote control) to manually select your desired frequency.
4
Press the SELECT button on the unit (or remote control) to toggle select between
FM “STEREO” and “MONO” reception.
Storing and recalling stored preset stations
In either DAB or FM mode, you can store up to 20 stations to the favourite presets;
this will enable you to get direct access to your favourite stations.
1
To store a preset, first tune to your desired station, then press and hold the
PRESET/MEMORY button on the remote control, the display will show frequency
and “#” will flash.
2
Press the PRESET ( UP or DOWN) button to select your desired station preset number,
then press the PRESET/MEMORY button on the remote control to confirm your
selection; the display will show “Preset # stored” in DAB/FM mode.
3
To recall a preset station, press the PRESET/MEMORY button once and then press the
PRESET(UP or DOWN) button to select the desired station that you have stored, then
press the PRESET/MEMORY button to confirm your selection.
DON'T FORGET!
The stored stations will be saved into the preset memory. Storing a new station into
a preset location will erase the previously stored station in that location.
11
05
Using the radio
Display modes
Every time you press the MENU/INFO button, the display will cycle through the following
display modes:
In FM mode:
Frequency
Signal strength
Auto(Mono/Stereo)
In DAB mode:
Ensemble/Multiplex (Group name)
Frequency
Audio bit rate
Signal strength
Programme Type
Time/Date
DLS (Scrolling text)
Auto(Mono)
FM Stereo and FM Mono.
Signal strength
The display will show a slide bar to indicate the signal strength, the stronger the signal,
the longer the bar will be.
Time and date
The time and date will be automatically updated by the broadcasted information; there
is no need to set the clock manually. In the unlikely event that no clock information is
received, the display will show “<Time/Date>”.
Audio bit rate
The display will show the digital audio bit rate being received.
Frequency
The frequency of the present station will be displayed.
Ensemble/Multiplex (Group name)
The Ensemble/Multiplex is a collection of radio stations that are bundled and
transmitted together in a single frequency. There are national and local multiplexes,
local ones contain stations that are specific to that area.
Programme type
This describes the style of the programme that is being broadcast. If the information is
not available, the display will show “<Programme Type>”.
DLS
DLS stands for Dynamic Label Segment which is a scrolling message that the
broadcaster may include in their transmissions.
The message usually includes information such as programme details.
12
Using the iPhone Dock
06
iPod/iPhone Operation
1
Carefully insert your iPod or iPhone in the iPod dock on the top of the unit.
2
Press the STANDBY/ON button on the unit or on the remote control to switch the
unit on.
3
Press the FUNCTION button on the unit (or remote control) to select the iPod mode.
4
Press the PLAY/PAUSE/SCAN button on the unit (or remote control) to begin playback
of the tracks on your iPod/iPhone.
5
Adjust the volume with the VOLUME (+ or -) control knob on the unit .
6
Press the PLAY/PAUSE/SCAN button on the unit (or remote control) once to pause
the current track.
7
To skip forwards or backwards, press the SKIP/TUNE SEARCH (UP or DOWN) button
on the unit (or remote control) to select the desired track.
8
Press the REPEAT or RANDOM buttons on the remote control to make the iPod or
iPhone play tracks repeatedly or randomly.
DON'T FORGET!
When the iPod touch iPhone screen has been locked, the above operations are still
available.
DON'T FORGET!
Your ipod or iPhone battery will charge whenever it is docked on the unit. It will
charge in any mode and also when the unit is in standby mode.
DON'T FORGET!
When an iPhone is playing through the unit and an incoming call is received, the
music level will reduce so that you can hear the iPhone ringing tone.
DON'T FORGET!
To navigate through the menu system on your iPod or iPhone:
Press the MENU button to enter the various menus and use the PRESET/ARROW
buttons on the remote control to navigate through the options or tracks. To select
a track press the SELECT button.
13
Using the CD
07
CD Operation
Listening To a compact Disc
1
Press the FUNCTION button to select CD mode.
2
Press the CD DOOR OPEN/CLOSE button on the main
unit to open the CD door.
3
Insert the CD disc into the CD compartment, press the CD DOOR to close the CD door,
the unit will read the CD disc automatically.
DON'T FORGET!
This unit can play CD, CD-R, CD-RW discs.
Playing a CD
1
Insert the CD disc into the CD compartment, the main unit will automatically read the
total number of tracks and time will be displayed.
2
Press the PLAY/PAUSE/SCAN button once, the unit
will play the first track of the CD disc.
3
Press the PLAY/PAUSE/SCAN button once again to
pause the current track . Press the PLAY/PAUSE/SCAN
button again to resume playback of the current track.
4
Press the SKIP/TUNE SEARCH(UP or DOWN) button once to skip the current track.
press and hold the SKIP/TUNE SEARCH (UP or DOWN) button to fast forward
or backward through the currently playing track.
5
Press the STOP button to stop playback of the current track.
Repeat
14
1
Press the REPEAT button once, REP1 will show in the display. The current track will play
repeatedly.
2
Press the REPEAT button twice, REP ALL will show in the display. All tracks on the CD
will play repeatedly.
Using the CD
3
07
Press the REPEAT button once more to cancel the repeat function and resume normal
playback.
Program
You can program up to 20 of your favourite tracks to play in any order.
DON'T FORGET!
To program tracks the CD must be in STOP mode.
1
In STOP mode
a. Press the PRESET/MEMORY button to enter program memory mode.
b. Press the SKIP/TUNE SEARCH(UP or DOWN) button, the track number will be
changed.
c. Press the PRESET/MEMORY button to confirm the track number.
d. Repeat the above steps to continue programming up to 20 tracks.
2
PROGRAM PLAY
Press the PLAY/PAUSE/SCAN button. The unit will play the first track of the program.
When all tracks have been played, the display will show the number of tracks and the
playing time.
3
CANCEL PROGRAM
Press the STOP button twice.
DON'T FORGET!
When you play your programmed tracks, the REPEAT function can be used in the same
way as when playing tracks normally.
Random play
You can play CD tracks in a random order.
DON'T FORGET
You can select random playback either in STOP mode or while the CD is playing.
1
Press the RANDOM button once to select random playback. "RAND" will show in the
display and the CD will begin to play any track.
15
Using the CD
07
2
During Random playback, press the SKIP/TUNE (UP/DOWN) buttons to skip to another
random track.
3
To resume normal playback, press the RANDOM button again.
1
Intro play
Press the INTRO button once, "INTRO" will show in the display. The Micro System will
play the first 10 seconds of each track on the CD in sequence.
2
Press the INTRO button again to resume normal playback.
Compact disc
1
Always use a compact discs bearing the mark as
shown.
2
Notes on handling discs
Removing the disc from its storage case and loading it.
* Do not touch the reflective recorded surface.
* Do not stick paper or write anything on the surface.
* Do not bend the disc.
3
Storage
* Store the disc in its case.
* Do not expose discs to direct sunlight or
high temperatures, high humidity or dusty
places.
4
16
FROM THE CENTRE
TO THE EDGE
Cleaning a disc
* Should the disc become soiled, wipe off
CORRECT
INCORRECT
dust, dirt and fingerprints with a soft cloth.
* The disc should be cleaned from the centre to the edge.
* Never use benzene, thinners, record cleaner fluid or anti static spray.
* Be sure to close the CD door so the lens is not contaminated by dust.
* Do not touch the lens.
Using the Aux Input
08
Aux in
The AUX input is located at the rear of the unit. Use a 3.5mm stereo jack cable to
connect audio equipment through the LINE IN socket.
1
To select the AUX input function, repeatedly press the FUNCTION button on
the Micro System (or remote control) until AUX IN is indicated on the display.
2
Press the play button on the auxiliary device and then adjust the VOLUME control
on the Micro System to a comfortable level.
DON'T FORGET!
A line-in or aux cable is not supplied with the Micro System.
Other functions
09
EQ control(on the remote control)
When you press the EQ button, the sound tone changes as below:
Mute setting (on the remote control)
Press the MUTE button on the remote control to stop the sound from the speakers
temporarily, the sound stops and the display will show “MUTE”. To cancel mute, press
the MUTE button again or use the volume control, “MUTE” disappears in the display and
the sound is restored.
17
10
18
Troubleshooting
PROBLEM
POSSIBLE CAUSE
SOLUTION
No sound
Connections incorrect or loose.
Volume knob at zero.
Check all connections and
correct as required. Turn up
the volume knob.
Poor radio reception
The wire antenna is not extended and Extend the wire antenna to
arranged correctly.
ensure the best reception.
No CD
playback
The disc is dirty. The disc is upside
down. The CD player is on Pause.
Clean or replace the disc. Turn
it over, placing the label
upwards. Remove the Pause
mode.
The remote control
does not work.
An obstacle blocks the signal
between the remote control and the
unit's sensor. The remote control's
batteries are low.
Remove any obstacles.
Replace the batteries.
All functions are
inoperative.
The microprocessor is disturbed by
exterior electronic disturbances.
Unplug the Micro System the
unit for a few minutes, then
turn it back on.
Specifications
POWER SUPPLY :
OUTPUT POWER :
UNIT DIMENSIONS :
SPEAKER BOX DIMENSIONS :
WEIGHT (including Speakers):
RADIO SECTION
FREQUENCY RANGE :
COMPACT DISC SECTION
OPTICAL PICKUP :
FREQUENCY RESPONSE :
11
AC 230V~50Hz
5 Watts x 2
180 (W) x 210 (D) x 100 (H) mm
100 (W) x 180 (D) x 180 (H) mm
4.1kg
FM 87.5 - 108 MHz
DAB/DAB+ 174 - 240 MHz
3 - BEAM LASER
100Hz - 16kHz
SPECIFICATION SUBJECT TO CHANGE WITHOUT PRIOR NOTICE.
19
12
Safety
Sound Levels
Your hearing is important to you and to us
so please take care when operating this
equipment. It is strongly recommended that
you follow the guidelines in order to prevent
possible damage to, or loss of hearing. Over
time your hearing will adapt to continuous
loud sounds and will give the impression
that the volume has in fact been reduced.
What seems normal to you may in fact be
harmful. To guard against this, set the initial
volume of the equipment to a low level.
Follow the steps below to ensure that the
product can be enjoyed at a comfortable
listening level:
Slowly increase the level until you can
hear comfortably and clearly and
without distortion.
Damage to your hearing is accumulative
and irreversible. Any "ringing" or
discomfort in the ears indicates that
the volume is tooloud.
Once you have established a
comfortable listening level, do not
increase the volumelevel.
General Safety
This equipment has been designed and
manufactured to meet European safety
standards, but like any electrical equipment,
care must be taken if you are to obtain the
best results and safety is to be assured.
Do read these operating instructions before
you attempt to use the equipment.
Do ensure that all electrical connections
(including the mains plug, extension leads
20
and interconnections between pieces of
equipment)are properly made in
accordance with the manufacturer's
instructions.
Switch off and remove the mains plug
when making or changing any
connections.
Do consult your dealer if you are ever in
doubt about the installation, operation or
safety of your equipment.
Don't continue to operate the equipment
if you are ever in doubt about it working
normally, or if it is damaged in any way.
Switch it off withdraw the mains plug
and consult your dealer.
Don't remove any fixed covers as this
may expose you to dangerous voltages.
Don't leave the equipment switched On
when it is unattended, unless it is
specifically stated that it is designed for
unattended operation or has a standby
mode.
Switch off using the switch on the
equipment and make sure that other
people in your household are conversant
with the equipment.
Special arrangements may need to be
made for infirm or handicapped people.
Don't obstruct the ventilation vents on
the equipment, for example with curtains
or soft furnishings. Overheating will
cause damage and shorten the life of
the product.
Don't allow electrical equipment to be
exposed to rain or moisture.
Safety
12
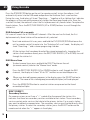
Electrical Information
This Micro system is fitted with a BS1363/A 13 amp plug. If it is not suitable for your supply
sockets it must be removedand replaced with an appropriate plug. If the plug becomes
damaged and/or needs to be replaced please follow the wiring instructions below. The
plug removed must be disposed of immediately. It must not be plugged into a supply socket
as this will be an electrical hazard. If the fuse needs to be replaced it must be of the same
rating and ASTA approved to BS1362. If the plug is changed, a fuse of the appropriate rating
must be fitted in the plug, adapter or at the distribution board. If the fuse in a moulded plug
is replaced, the fuse cover must be refitted before the appliance can be used.Wiring
InstructionsThe supply cable will be either 2-core or 3-core. Follow the appropriate wiring
instructions given below. In both cases ensurethat the outer sheath of the cable is firmly
held by the cable clamp.
Wiring Instructions
The supply cable will be either 2-core or 3-core. Follow the appropriate wiring instructions
given below. In both cases ensurethat the outer sheath of the cable is firmly held by the
cable clamp.
3- Core plug
2- Core plug
WARNING : Do not connect either wire to the
earth terminal.
This symbol indicates that this 2-core appliance is
Class II and does not require an earth connection.
WARNING : This appliance must be earthed.
The wire coloured green and yellow must be connected
to the terminal marked with the letter E, or by the earth
symbol
,or coloured green or green and yellow.
The wire coloured blue must be connected to the
terminal marked with the letter N or coloured black.
The wire coloured blue must be connected to the
terminal marked with the letter N or coloured black.
The wire coloured brown must be connected to the
terminal marked with the letter L or coloured red
The wire coloured brown must be connected to the
terminal marked with the letter L or coloured red.
Fuse
Blue
(Neutral)
Brown (Live)
Green & yellow
(Earth)
Blue
(Neutral)
Fuse
Brown (Live)
Blue
WEEE
This appliance is labelled in accordance with European Directive 2002/96/EG
concerning used electrical and electronic appliances(Waste Electrical and Electronic
Equipment - WEEE). The guideline determines the framework for the return and
recycling of used appliances.
21
Helpline 0871 230 1777
www.goodmans.co.uk