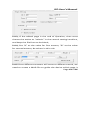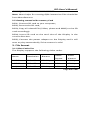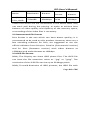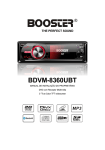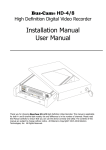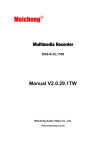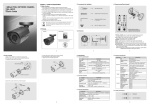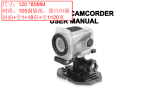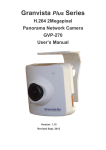
1
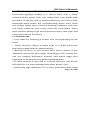
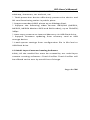
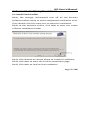
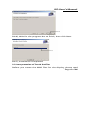
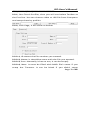
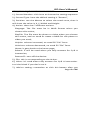
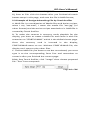
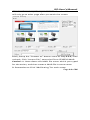
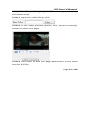
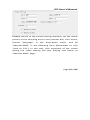
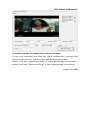
Interactive Signage Display
User’s Manual
________________________________ISD User’s Manual
Table of Contents
1.
Product specification........................................................3
1.1 Function list………………………………………………………………3
1.2 Multi-Layer Content Creating Software.......................4
2.
Create Media File by Touch Profiler..................................5
2.1 Install Touch Profiler…………………………………………………5
2.2 Interpretation of Touch Profiler…………………………………6
2.3 Design Advertising File by Touch Profiler...................10
2.4 Main points for Q&A interaction File Edit……………….18
2.5 Getting started with memory Card............................19
3.
File format......................................................................19
3.1 Video Codec list.........................................................19
3.2 Recommend file format.............................................20
3.3 JPEG file format.........................................................20
4.
Other functions..............................................................21
4.1 Firmware update.......................................................21
4.2 AutoCopy*.................................................................22
4.3 AutoConfig.................................................................22
5.
FAQ and trouble shooting...............................................24
5.1 Frequently Asked Questions......................................24
5.2 Trouble shooting......................................................25
Page 2 of 26
________________________________ISD User’s Manual
1. Product specification
Interactive Signage Display is a device built with 4 wires
resistive touch panel. User can create their own media files
and store in the SD card or Internal Memory, the files will be
displayed when touch the corresponding touch area. With
our unique Multi-Layer Content Creating Software, the user
can easily create his own touch menu for each layers, every
layer has the ability to go to the previous layer, next layer and
main menu of the first layer.
1.1 Function list
* Play video by touching a screen icon corresponding to the
video.
* Timer function: When a video ends or a JPEG times-out,
play next predefined file automatically.
* Record function: it will record each user’s action if you
opened Timeout for each page; According to this record file,
you can analyze operator’s amount and which page they
operated, to bring you very good marketing data.
* If valid content in SD card or internal memory, the device
will play file in a loop automatically after power it on.
* Build with high definition TFT screen, and come with metal
Page 3 of 26
________________________________ISD User’s Manual
case or open frame; easy-to-install on supermarket shelves,
tabletop, showcase, car and taxi, etc.
* Theft-protection device effectively prevent the device and
SD card from being stolen in public place.
* Support standard JPEG photo up to 30Mega Pixel.
* Support the following video format: MPG/AVI (MPEG1,
MPEG2, MPEG4 Motion-JPEG and DIVX codec), up to 720x576,
30fps.
* Auto copy contents to Internal Memory via USB flash drive.
* Support firmware updating from memory card or USB
storage device.
* Load system settings from configuration file in SD Card or
USB flash drive.
1.2 Multi-Layer Content Creating Software
1.2.1, All the media files must be created by our multi-layer
content creating software—Touch Profiler. Touch Profiler will
be offered to the user by email free of charge.
Page 4 of 26
________________________________ISD User’s Manual
2. Create Media File by Touch Profiler
2.1 Install Touch Profiler
2.1.1, We strongly recommend turn off all the Security
Software before setup to avoid unexpected installation error.
Then double click the setup icon to start the installation.
2.1.2, At the welcome screen, click Next to enter the screen
of Select Installation Folder.
2.1.3, Click Browse to choose where to install this software.
2.1.4, Click Next to enter the Confirm Installation page
2.1.5, Click Next to confirm the Installation.
Page 5 of 26
________________________________ISD User’s Manual
2.1.6, Wait for the progress bar to finish, then click Next
2.1.7, Installation completed.
2.2 Interpretation of Touch Profiler
Before you create the MAD files for the display, please read
Page 6 of 26
________________________________ISD User’s Manual
this part completely.
2.2.1, Run Touch Profiler, then you will see below Toolbar at
the first line. You can choose video or JPG file from Computer
and setup them by profiler.
2.2.2, Click Page, it will show as below:
2.2.2-1, ID means the file number you created.
2.2.2-2, Name: it should be same with the file you opened.
2.2.2-3, Prev: Normally it has no use, it can be empty.
2.2.2-4, Next: It must be filled with MAD file’s name if you
setup the Timeout. It can be blank if you didn’t setup
Page 7 of 26
________________________________ISD User’s Manual
“Timeout”.
2.2.2-5, Home: it will be STARTUP.MAD for each page.
2.2.2-6, Control Number: it means how many touch points
you want to create for the page. It can be 1 to N.
2.2.2-7, Timeout: it means the non-operation time. If nobody
operates the display in the setting time, it will go to the
predefined Next file.
NOTE: If you want to record user’s Action (the record
function), must setup “Timeout” for each file.
2.2.3, Click “control”, it will show as below:
Page 8 of 26
________________________________ISD User’s Manual
2.2.4, Meaning for each item:
1), Control Number: click here to choose the setting sequence
2), Control Type: here the default setting is “Button”,
3), Position: use the Mouse to select the touch area, then it
will show the value in X, Y, Width and Height.
4), Action: there has 7 different actions:
Playpage: The file must be in MAD format when you
choose this action;
Playfile: The file must be photo or video when you choose
this action, and no need to create a MAD for the photo or
video you used;
Volplus: volume increased, no need fill “file” form.
Volminus: volume decreased, no need fill “file” form.
Home: it goes back to the home page;
Submit: it will be used when you tally answers for Q & A
interaction;
Poweroff—turn off the device.
5), File: this is corresponding to the Action.
6), Value: it’s used when tally answers for Q & A interaction.
Let it be blank if you don’t use it.
7), Add to setting: remember to click this button after you
Page 9 of 26
________________________________ISD User’s Manual
finished the setup of one touching area.
8), Save to File: click this button after you finished all touch
button setup in this page, and save the file in MAD format;
2.3 Example of Design Advertising File by Touch Profiler
A. MAD file is a combination of Media files and Action scripts,
when I say “xxx.mad”, I mean the media file “xxx.jpg” (or
other format) and the action scripts attached to it. MAD file is
created by Touch Profiler.
B. To make the content in memory cards playable for the
display, you have to create a MAD file and name it with file
extension as “STARTUP.MAD” which is the default home page.
Once the memory card is inserted in the display,
STARTUP.MAD starts to run. Without STARTUP.MAD file, the
display can’t start to play other files.
C. If some MAD file you want to use but not existed, you must
type it to the corresponding form first and remember to
create it after you finished the current page.
2.3.1, Run Touch Profiler, click “image” then choose prepared
file “Test” from computer:
Page 10 of 26
________________________________ISD User’s Manual
2.3.2, Put “0” to the ID form, and “Test” as the Name, Prev. is
blank, and type “Products.MAD” to Next form, put “ 4” as the
Control Number, “60” as the Timeout:
2.3.3, Click “save to setting”. The page parameters will be
saved and displayed in the box on the right side. You can also
edit those parameters directly in the box.
2.3.4, Click “control” bar to switch to control setting interface,
create a touch button by framing “Home” on the preview box.
Then choose the control name as “Control_00” in the
drop-down menu, the default value of control type is
Page 11 of 26
________________________________ISD User’s Manual
“button” , choose “Play page” in the drop-down menu, then
type “Chinese.MAD” to file form ( Note this file name down,
and remember to create one MAD file to be the same name).
Remember to click “add to setting”
2.3.5, Frame “About us” button, and choose Control Name as
“Control_01” in the drop-down menu, setup the action as
“playfile” and type “Aboutus.AVI” into the file form. In this
way, device will play the video “Aboutus” after you click the
Page 12 of 26
________________________________ISD User’s Manual
“Aboutus” button and it will go back to the page after video
playing finished.
2.3.6, Frame “Products” button, and choose Control Name as
“Control_02” in the drop-down menu, setup the action as
“playpage” and type “Products.MAD” in the file form.
(remember to create “Products.MAD” by editing the video
file “Products”) In this way, device will play the video file
Page 13 of 26
________________________________ISD User’s Manual
“Products” in a loop after you click the “Products” button. It
will only go to other page after you touch the screen.
2.3.7, Setup the “Contact us” button same as Step 2.3.4, after
recheck, Click “save to file”, name the file as STARTUP.MAD
Caution: A. Note down the MAD file name which you typed
for the action, and then create a MAD file in same name.
B. Remember to Click “Add Setting” for each setup.
Page 14 of 26
________________________________ISD User’s Manual
2.3.8, If the file you are going to edit is Video, please follow
the below steps:
2.3.8-1, Open the video file by click:
2.3.8-2, in the video preview section, click “pause to setting”
button to catch one page,
2.3.8-3, then start to edit the page parameters in the same
way for JPG file,
Page 15 of 26
________________________________ISD User’s Manual
2.3.8-4, Switch to the control setting interface, set the whole
picture as the touching area in the preview box, click action,
choose ”playpage” in the drop-down menu, and fill
“Aboutus.MAD” in the following form (Remember to click
“Save to File”). In this way, click anywhere of the screen
during the video playing will quit playing and switch to
“Aboutus.MAD” page:
Page 16 of 26
________________________________ISD User’s Manual
2.4 Main points for Q&A interaction File Edit
If you are creating the files for Q&A interaction, except the
above instructions, please note the following points:
2.4.1, Tick the “Question Start” if the edited page is the start ;
2.4.2, Tick the “Question End” if the edited page is the end;
Page 17 of 26
________________________________ISD User’s Manual
2.4.3, If the edited page is the end of Question, then must
choose the action as “submit” in the control setting interface,
and keep the file form to be blank;
2.4.4, Put “A” as the value for first answer, “B” as the value
for second answer, do others in this rule.
2.4.5 Since different answers will come to different result, we
need to create a MAD file to guide the device which page it
Page 18 of 26
________________________________ISD User’s Manual
should go.
Note: More helps for creating Q&A interaction files should be
from Manufacturer.
2.5 Getting started with memory Card
2.5.1, Connect SD card to your computer;
2.5.2, Format the SD card;
2.5.3, Copy all related file (Video, photo and MAD) to the SD
card accordingly.
2.5.4, Insert SD card to the card slot of the Display in the
correct direction.
2.5.5, Connect the power adaptor to the Display and it will
start to play automatically if the content is valid.
3. File format
3.1 Video Codec list
The Display supports the following video codec.
Audio
Audio
format
bitrates
3000kbps
PCM
320kbps
720x480
8000kbps
PCM
320kbps
640x480
2000kbps
PCM
320kbps
Name
Resolution
Bitrates
MPEG1
720x480
MPEG2
AVI/MJPEG
Page 19 of 26
________________________________ISD User’s Manual
Name
AVI/DIVX
5.0+, XVID
Resolution
Bitrates
720x480
6000kbps
Audio
Audio
format
bitrates
PCM
320kbps
Video files which are not mentioned in the above table may
not work well during the playing. In order to achieve best
balance of video quality and capacity of the memory space,
re-encoding of the video files is necessary.
3.2 Recommend file format
Divx format is the one which can have better quality; it is
recommend to be used on this product. However, there are a
few encoding software for Divx, we suggested to use the
official software from Divx,Inc: DivxPro (Commercial version)
and Dr. Divx (freeware version) with video bitrates at
1500kbps and audio bitrates at 160kbps.
3.3 JPEG file format
3.3.1, The Display can show JPEG photo files. The JPEG file
can have the file extension name as “.jpg” or “.jpeg”. The
resolution of the JPEG file can be up to 30 Mega pixels.
3.3.2, To avoid distortion of JPEG pictures, the JPEG file with
Page 20 of 26
________________________________ISD User’s Manual
the same screen ratio of LCD panel is recommended. For
example, if the resolution of LCD panel is 1280X1024, please
make sure the resolution of JPEG files is 1280X1024 too.
4. Other functions
4.1 Firmware update
The Display supports the firmware update from memory card
or USB storage device. Here are the instructions of updating
firmware via SD card.
Please follow the instructions here to
update the firmware if necessary.
4.1.1, Prepare one SD Card and format it from computer;
4.1.2, Obtain the updated firmware from reliable source,
unpack it and copy to the root directory of SD Card.
Note: Don’t change the filename of the firmware!
4.1.3, Insert the SD Card to the card slot.
4.1.4, Connect the power supply and make sure it is well
connected, updating will start automatically.
4.1.5, Once the updates completed, the Player will start to
reboot it automatically. When the screen turns to black,
disconnect the power cable and remove the SD Card from the
slot at once. Otherwise, it will do upgrade looply.
4.1.6, Then delete the update file from the SD Card before
Page 21 of 26
________________________________ISD User’s Manual
reusing it.
Caution: Do not disconnect the power during the updating
process. Power disconnection during the update will destroy
the firmware.
4.2 AutoCopy*
The Display supports to update the contents in SD card from
USB flash drive automatically. Here are the instructions of
updating contents using USB flash drive:
4.2.1, Format the USB flash drive via computer;
4.2.2, Place all your contents you want copy to SD card into
the root directory of USB flash drive;
4.2.3, Create a blank text file named “AUTOCPSD.TXT” in the
root directory of the flash drive.
Note: If you want to update the internal memory, the blank
text file must be named to be “AUTOCOPY.TXT”.
4.2.4, Plug the flash drive into the USB Host port of Display,
all files in SD card will be deleted first, and then copying will
start automatically and show the process on the screen.
Caution: Don’t disconnect the power during the copying.
4.3 AutoConfig
The Display can load settings from the file of SD Card and USB
Page 22 of 26
________________________________ISD User’s Manual
flash drive. Here are the instructions of updating settings
using USB flash drive.
4.3.1, Edit a text file named “SYS_CONF.MAD” on your PC
with following content:
[System]
Extract = 1
; Extract the user's action record to USB flash
drive *
[Screen]
Recalibrate = 1
; 1 -- do calibrate at next reboot
0 -- not
[Audio]
VolumeLevel = 4
; 0-7-- default sound level, 0 -- Mute
Note: Text after “;” is comment, and will be filtered out by
the Display.
4.3.2, Put this file into the root directory of the flash drive;
4.3.3, Plug the flash drive into the USB Host port of Display,
then the display will load the setting from the configuration
file automatically and then show a message.
4.3.4, When the Display is restarting, you need take the flash
drive out immediately; otherwise, the settings will be
reloaded looply.
Caution: Do not disconnect the power during the loading.
Page 23 of 26
________________________________ISD User’s Manual
5. FAQ and trouble shooting
5.1 Frequently Asked Questions
5.1.1, Q: Why some video files will cause the LCD display
hangs up?
A: Some video files are not supported due to the codec or
high data rate. Those files need to be re-encoded to official
DIVX format to achieve smooth video.
5.1.2, Q: Is XVID codec supported by the LCD player?
A: XVID is only partially supported. Because XVID is an open
source project and there are too many encoding software for
XVID and some of them will have different compressing
algorithms. It is difficult to support such non-standard
formats. Please use DIVX codec to have similar quality and
compression ratio.
5.1.3, Q: Why there is no sound?
A: Firstly, please check the volume setting, the sound level
should not be “0” or at the MUTE status. If the volume setting
is correct, please check the video clip on computers to make
sure if there is any audio track inside the file. If the audio
track is coded by PCM (Pulse coded modulation) with high
data rate, it may also cause the sound problem. To solve this,
Page 24 of 26
________________________________ISD User’s Manual
please re-encode the file with MP3 or AC3 sound track.
5.1.4, Q: Can I mount the unit in a vertical (portrait)
orientation?
The mounting system on the back is setup for
a horizontal mounting only.
A: Sure. We have some model of Display that with VESA
mount at the back of the Frame. We can also support rotate
the pictures according the Frame's orientation automatically
by add a sensor.
5.2 Trouble shooting
Please use the following flowchart to do trouble shooting for
the product if necessary.
5.2.1, No display/dark screen
1. Check power adaptor if it is working ok;
2. Check the connection of power adaptor;
5.2.2, No Sound
1. Check if the setting is mute or sound level 0;
2. Check if the video clip has sound track;
5.2.3, Dark screen but has sound
1. Check the video format if it is supported. Some video files
will cause such problem if the Audio codec is MP3 but the
video codec is unknown type.
Page 25 of 26
________________________________ISD User’s Manual
5.2.4, No Playable file
1. Check if there is file named “STARTUP.MAD” in the root
directory of SD Card.
2. Check if the video files with the correct file extension name,
it should be MPG (for MPEG1 and MPEG2) or AVI (for
DIVX/XVID codec’s).
Page 26 of 26