1
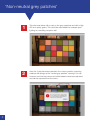
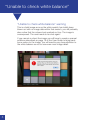
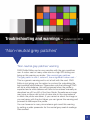
Troubleshooting and warnings - updated Apr 2014
‘Non-neutral grey patches’
‘Non-neutral grey patches’ warning
DNG Profile Editor can be very sensitive with the grey swatches
row. A colour cast or heavy noise due to a high ISO setting can
bring up this warning or similar: ‘Non-neutral grey patches.
The grey patch in row 4, column3, has a significant colour cast...’
This is a generic warning and is not a fault with the card. DNG
Editor is just giving you the option to re-shoot for calculating the
best possible white balance. Please also note that although DNG
will set a white balance, this will be ignored when the profile is
exported and a white balance will have to be entered manually as
described on p20 or p30 of the User Guide. Sometimes an image
may have a colour cast or lots of noise due to the circumstance
in which the photo was taken, if you cannot re-shoot the image or
you are happy with the shot taken you can ignore this warning and
proceed to edit/export the profile.
You can however in many circumstance get round this warning
by setting a wider parameter for the neutral grey swatch readings.
See overleaf.
2
‘Non-neutral grey patches’
3
1
This shot was taken with a cast on the grey swatches and with a high
ISO so is pretty grainy. This could be unavoidable for example poor
lighting at a wedding reception hall.
2
Here the 4 dots have been placed in the correct position, selecting
create profile brings up the ‘neutral grey patches’ warning! You can
however see that the colours and white balance have been adjusted
and can be exported from the menu.
3
In this screen shot you can see that the white and black dots are
placed off-centre. The white is further to the left, and the black, the
right. By moving these positions a wider parameter has been set for
the grey swatch row and a profile created with no warning.
TIP: Just move the white and black dots a small fraction off-centre at
a time, then hit create profile, if it doesn’t clear, move a bit more
till it does. You are trying to find the minimal off-centre position to
clear this warning. In some circumstance this may not clear if the
cast level or noise is too great. In this situation you will have to
ignore this warning and export as is.
You can see that the image with the warning and the one without
visually look the same, the white balance set is an average reading so
although slightly different in both images the pixel samples falls within
a percentage tolerance giving an overall similar result. In this example
the white balance reading with the warning is 3700/0 and the reading
without the warning is 3650/-2 this is a 1.4% difference! This is totally
acceptable as DNG Profile Editor is sampling a different average area
with less or more pixel noise or cast.
4
‘‘Unable to check white balance’’
‘‘Unable to check white balance’’ warning
This is a fatal image error as the white swatch has totally been
blown out with no image data within that swatch, you will probably
also notice that the colours look washed out too. The image is
overexposed. The card needs to be shot again!
If you cannot re-shoot the image you will have to create a manual
profile as described on page 18 of the User Guide to bring back
some colour to the image. You will need to pay close attention to
the white balance so not to lose even more image detail.
5