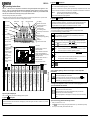
1
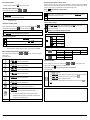
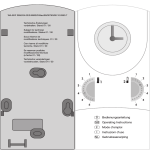
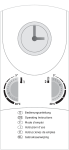
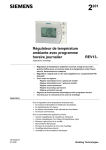
REV13..
Is symbol
displayed?
This symbol tells you that you must replace the batteries within the next 3 months.
Operating instructions
Insert 2 new alkaline batteries type AAA, 1.5 V as follows:
REV13.. – the 24-hour room temperature controller for the right temperature at the right time. The
REV13... offers you 2 individually selectable and adjustable switching patterns. All factory settings
already provide optimal living comfort. You can easily adjust the controller to your individual needs
with the user-assisted clear-text display and program selection slider.
Remove the controller from its mounting base; open the battery compartment at the rear; remo
batteries; insert the new batteries; close the battery compartment and reinsert the controller in
Note the following when placing the controller:
Dispose of the old batteries as per regulations.
• Make sure no other influencing factors adversely affect the controller’s temperature sensor (no direct solar
Radio clock
Date
Remote control active
Time display
Automatic mode with 2
heating phases
Temperature setpoint
symbols
Automatic mode
with 1 heating phase
Alarm
Continuously Comfort mode
The controller contains a factory-set switching pattern and temperature values.
For initial commissioning, proceed as follows:
Remove the controller from its mounting base and pull off the black transit tab
from the 2 batteries: The controller turns on automatically. Reinsert the
controller in its mounting base.
Replace batteries
Text display
Continuously Energy Saving
mode
Switching pattern
with time cursor
Heating on
After startup, a welcome message appears for about 2 minutes. Press any of
the buttons to interrupt the running display. Language selection starts with
Frost Protection mode
Temperature display
Operating mode
selector:
- Automatic mode
with 2 heating
phases
- Automatic mode
with 1 heating
phase
- Comfort mode
- Energy saving
mode
- Frost protection
mode
"ENGLISH“ (factory setting). Press
or
until your language appears.
or move the slider to confirm your language.
Press
Info button
Slider in position 1 (time setting): Press
or
to set the time of day.
Increase values, set time or
make a selection
Note:
Change between comfort and
energy saving temperature
(active until next switching time)
and party function
Slider in position 2 (date: day - month - year): Press
date.
You do not need to enter the time of day when the DCF77 receiver
for the time signal from Frankfurt (Germany) is fitted.
Note:
Decrease values, set time or
make a selection
or
to set the
You do not need to enter the date when the DCF77 receiver for the
time signal from Frankfurt (Germany) is fitted.
RUN Move the slider to the very right to position RUN (only way to close the cover).
Program selection slider
Select the operating mode with the operating mode selector. Factory setting is
RUN
.
10
11
Temperature remote control
9
Comforttemperature
Automatic mode A and B
8
End in Automatic mode
with 1 heating phase
7
Start time in Automatic mode
with 1 heating phase
6
End 2 in Automatic mode
with 2 heating phases
5
Start time 2 in Automatic
mode with 2 heating phases
4
End 1 in Automatic mode
with 2 heating phases
3
Start time 1 in Automatic
mode with 2 heating phases
2
Date
Day / month / year
1
Slider positions
Fold the operating instructions again and reinsert them in the mounting base.
Time setting
Operating elements and settings
Commissioning the controller and quick start
°C or °F
Heating mode
Saving temperature
Automatic mode A and B
Display
active
displayed?
The radio clock symbol only appears if the receiver is set up and activated to receive the
time signal from Frankfurt (Germany). A permanent symbol indicates that both time of
day and date of the controller are synchronized to Frankfurt radio clock (DCF77).
The symbol blinks if the time signal is not received for more than 1 week.
Info display
Party mode active
Time of day and date are retained for 1 minute.
(All other settings are fixed and remain unchanged!)
Is symbol
radiation and no influence from other heat or refrigeration sources)
Day of week
Caution:
Turn on display lighting, check error messages or other important
information
Press the Info button once to activate display backlighting. Backlighting
goes off automatically after a short time.
Continuing to press the Info button activates the info display:
is lit.
The controller first shows pending error messages and then important
information (e.g. switching programs, etc.).
Change the temperature level in the time switch program, or are
you not at home for a while?
In the time switch program, press this button to change from the current
temperature level to the next and back.
If the selected operating mode does not support the setting, the time display shows PASS.
Quickly activate the energy saving temperature when you leave the
apartment for a short time to save energy.
Special symbols displayed
The change appears on the display. It is valid only until the next switching
time.
The controller display can show the following special symbols:
Is symbol
displayed?
The alarm indicates an error!
Tips to save energy without sacrificing comfort
Press the Info button and check the error message (e.g. radio clock signal, radio link to receiver, etc.). Contact
a specialist if required.
B2201en
17.01.2008
•
Heat your rooms to max. 21 °C
•
Press
•
Air out your rooms briefly, but windows wide open
to switch to energy saving temperature even if you are absent only briefly
Siemens Building Technologies
Select operating mode
Enter temperature for active remote control
Press the operating mode button
With active remote control, you are free to select the temperature. Activating remote control immediately
enables control to the remote operating temperature regardless of the current operating mode. After you
switch off remote control, the controller returns to the selected operating mode
to select one of 5 modes.
Operating modes with time program
The controller offers 2 time programs:
and
Proceed as follows:
Do you feel too warm / too cold?
Press
or
to set the required temperature. The setting is temporary and active only
until the next time the controller activates a change.
Note:
To set your own time programs, refer to section “Enter customized temperatures
and switching times“.
Continuous operating modes
The controller offers the continuous operating modes “Continuously Comfort mode”
“Continuously Energy Saving mode“
,
.
and “Frost Protection mode“
or
Slider in position 11 (temperature for active remote control: Press
temperature for active remote control.
or
to set the
RUN Move slider back to the RUN position.
Reset to factory settings
Press
and
together with the operating mode button
temperature and time settings are reset to their default values.
The clock starts at 12:00.
for 3 seconds. All
Caution: All customized settings will be lost!
Do you feel too warm / too cold?
Press
blinks with active remote control.
Symbol
.
to set the required continuous temperature.
Factory settings: Heating
Enter time of day and date
20 °C
Slider in position 1 (time setting): Press
or
to set the correct time of day.
Slider in position 2 (date: day - month - year): Press
or
16 °C
to set the date.
8 °C
12 °C
RUN Reset the slider to the RUN position.
Note:
You do not need to enter the time of day and the date when the DCF77 receiver for
the time signal from Frankfurt (Germany) is fitted. The time display shows PASS.
Factory settings: Switching times
Enter customized temperatures and switching times
The controller offers 2 Automatic modes
selector slider.
and
that you can set with the program
Proceed as follows:
A1
A2
A3
A4
06:00
08:00
17:00
22:00
B1
B2
07:00
23:00
Slider in position 3 (start time 1 for Automatic mode with 2 heating phases):
Press
or
to set the required start time.
Slider in position 4 (end time 1 for Automatic mode with 2 heating phases):
Press
or
to set the required end time.
Activate Party mode
You can activate Party mode only in operating modes
and
controls to any selectable temperature for any selectable time.
Slider in position 5 (start time 2 for Automatic mode with 2 heating phases):
In Party mode, symbol
Press
Proceed as follows:
or
to set the required start time.
Slider in position 6 (end time 2 for Automatic mode with 2 heating phases):
Press
or
to set the required end time.
1. Press
2.
Slider in position 7 (start time for Automatic mode with 1 heating phase):
Press
or
to set the required end time.
Slider in position 8 (end time for Automatic mode with 1 heating phase):
Press
or
Press
. In Party mode, the unit
is displayed along with the end of Party mode.
for 3 seconds.
or
to set the duration of Party mode. Party mode can last a maximum of 9
hours. The entry is confirmed after 20 seconds or when you press
3. Press
4.
to set the required end time.
or
.
to set the required temperature.
Party mode ends automatically after the party duration ends or when you press
or
.
Slider in position 9 (comfort temperature for Automatic mode A and B):
Press
or
to set the required comfort temperature.
Slider in position 10 (energy saving temperature for Automatic mode A and B):
Press
Note:
RUN
B2201en
or
Notes (e.g. customized settings):
to set the required energy saving temperature.
The energy saving temperature in time programs A and B is
independent of the energy saving temperature in operating mode
“Continuously Energy Saving mode“.
Move slider back to the RUN position and close the cover.
17.01.2008
Siemens Building Technologies