1
TR 55
TR 70
TR 80
TR 60
TR 50.4
TR 700
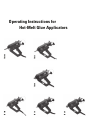
Operating Instructions for
Reka Hot-Melt Glue Applicators
Table of Contents
1.
Product Description
3
2.
General Safety Instructions
4
3.
Safety Measures to be taken during Operation
5
4.
Start-up and Control
6
5.
Cleaning and Maintenance
10
6.
Trouble-Shooting
12
8.
Environmental Protection
13
9.
CE Declaration of Conformity
14
Glue Applicators
Spare Parts | Technical Data | Accessories
10.
TR 50.4
16
11.
TR 55
18
12.
TR 60
20
13.
TR 700
22
14.
TR 70
24
15.
TR 80
26
Product Description
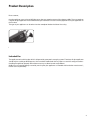
Dear customer,
the glue applicator you purchased will help you to glue parts together more easily and more rapidly. To ensure optimum
usage of the glue applicator we recommend that you read these instructions thoroughly before using the applicator for
the first time.
The type of your applicator can be taken from the nameplate fitted to the side of the casing.
Eggenstein-Leopoldshafen, December 1, 2009
Indended Use
The applicator works with hot glue which is dispensed by a pneumatic conveying system. Therefore, this glue applicator
should only be used by qualified persons who have been familiarized with its proper use and the safety precautions.
Handling the applicator properly will avoid unnecessary accident hazards and problems.
Bodily injury or material damage caused by not using the glue applicator as intended shall not be the manufacturer’s,
but the user’s responsibility.
3
Instructions
Care and Diligence of the User
The glue applicator has been designed and fabricated
in conformity with the applicable harmonized standards
and additional technical specifications. So, it is state of
the art and ensures maximum safety.
This safety, however, can only be achieved in the operational practice, if all the necessary measures are taken.
The user of the equipment shall be obliged to plan these
measures and to make sure that they are taken.
Safety Symbols
This operating manual gives concrete safety instructions
to alert the user to remaining unavoidable hazards. These
hazards imply dangers to
UÊ «Ê iÀÃÃ
UÊ «Ê À`ÕVÌÊ>`ÊiµÕ«iÌÊ
Meaning of the Symbols used in the Manual
In particular, the user shall ensure that
UÊÊÌ
iÊ>««V>ÌÀÊÌÊLiÊÕÃi`ÊÃÊÊ}`ÊÜÀ}ÊÀ`iÀ
UÊÊÌ
iÊ«iÀÃ>Ê«ÀÌiVÌÛiÊiµÕ«iÌÊ«ÀÌiVÌÛiÊ}ÛiÃ]ÊÊ
safety goggles) required for the operating personnel
is available and used
This symbol indicates that there is, above all, danger
to persons, but also to equipment and material.
UÊÊÌ
iÊ«iÀ>Ì}ÊÃÌÀÕVÌÃÊ>ÀiÊÊi}LiÊV`ÌÊ>`ÊÊ
available to the operator
UÊÊÞÊÃÕvwViÌÞʵÕ>wi`Ê>`Ê>ÕÌ
Àâi`Ê«iÀÃiÊÊ
operates and maintains the applicator
UÊÊÌ
ÃÊ«iÀÃiÊÃÊÀi}Õ>ÀÞÊÃÌÀÕVÌi`ÊÊÌ
iÊ>««V>LiÊÊ
regulations of operational safety and environmental
protection and knows the operating instructions and,
in particular, the safety instructions.
Caution: hot surface!
Accident Prevention Regulation VBG 125 – W26
Hot surfaces such as machine parts, tanks or
materials, but also hot liquids cannot always be
perceived. The utmost caution is advised when this
symbol is attached to a component. Wear protective
gloves whenever you have to touch hot surfaces.
Making the Information Available
This operating manual shall always be kept at the place
of operation of the applicator. Be sure that all persons
handling the applicator can consult the instructions
at any time. In addition to this operating manual, there
must be available instructions regarding legal and other
mandatory regulations relating to accident prevention
and to relevant requirements of the employers‘ liability
insurance association.
Wear protective gloves and safety goggles whenever you work with the applicator.
To avoid accidents lay the cables so that they will
not cause any risk of stumbling.
4
Safety Measures to be taken during Operation
The applicator must only be used by trained, instructed and authorized persons. These persons must have read the
operating instructions and be able to work accordingly. Before using the applicator, check it for visible damage and
make sure that it is only used when in proper and safe condition.
Notify detected defects to your superior immediately.
Safety Instructions for the Operation of the TR 50.4 / 55 / 60 / 700 / 70 / 80 Hot-Melt Glue Applicators
UÊ Never direct the glue jet towards people.
Wear protective gloves and safety goggles whenever you work with the applicator.
Avoid accidents by stumbling – Lay all cables, hoses
and conducts so that they will not cause any risk of
stumbling. For this, install cable ducts and bridges.
UÊ 7
iÊÞÕÀÊÃÊ}ÌÊÌÊVÌ>VÌÊÜÌ
Ê
ÌÊ}Õi]ÊVÊÊ
it with cold water immediately. Do not try to remove
the hot-melt from the skin first. If necessary, consult
a doctor. When hot adhesive got into your eyes,
immediately cool them under running water for about
15 minutes and consult your doctor at once.
UÊ /Ê
iÊ>««V>ÌÀÊÕÃÌÊÛiÌÊ>Õ`LÞ°Ê"Ì
iÀÜÃiÊ
ÌÊ}ÕiÊÊ
might flow out of the sound absorber when the trigger
is operated.
UÊ "
Ê ÞÊ«iÊÌ
iÊ`ÊvÊÌ
iÊ}ÕiÊÌ>ÊÜ
iÊÌ
iÊÌ>Ê
>ÃÊÊ
been vented.
UÊ Ê/
iÊ«ÀiÃÃÕÀiÊvÊÌ
iÊV«ÀiÃÃi`Ê>ÀÊÃÕ««i`ÊÌÊÌ
iÊÊ
instrument must not exceed 6 bars.
UÊ Ê ÊÌÊ>ÞÊÌ
iÊ>««V>ÌÀÊÊÌÃÊÃ`i°
UÊ ÊNever hold nozzle top upward.
UÊ Ê"ÞÊwÊÌ
iÊÌ>ÊÕ«ÊÌÊ£°xÊVÊÕ`iÀÊÌ
iÊÕ««iÀÊÀ°
UÊ Ê ÊÌÊV>ÀÀÞÊÕÌÊÛiÀ
i>`ÊÜÀ°
UÊ ÊNever exceed the operating temperature of the hot
melt. This temperature is indicated in the technical
specification of the glue. Overheating may lead to
decomposition which may affect the health of the
user as well as the operability of the applicator.
UÊ -Ì«ÊÕÃ}ÊÌ
iÊiµÕ«iÌ]ÊvÊÌ
iÊV>Ã}ÊÃÊ`>>}i`ÊÊ
due to shock, breakage or heavy wear.
UÊ Ê"ViÊÌ
iÊ}ÕiÊ>««V>ÌÀÊ
>ÃÊÜ>Ài`ÊÕ«]ÊââiÊ>`ÊÊ
lid are very hot.
UÊ ÊÌÊvii`ÊÃÛiÌÃÊÀÊ«>À>vw°Ê,ÃÊvÊiÝ«Ãt
UÊ Ê ÛiÊÜ
iÊÌ
iÊ>««V>ÌÀÊÃÊÃÜÌV
i`Êvv]ÊÌÊ>ÞÊLiÊÊ
under pressure and glue may flow out.
UÊ ÊÊÌÊÃÌ>ÀÌÊÜÀ}ÊLivÀiÊwÌÌ}Ê>ÊââiÊwÀÃÌ°
UÊ Ê1«Õ}ÊÌ
iÊViVÌ}ÊV>LiÊLivÀiÊÀi«>V}Ê>Ê
nozzle. Warning: risk of burns! When a nozzle is replaced, liquid glue might leak out.
UÊ ÊNever bring the hot nozzle into contact with the cable.
5
Start-up and Control
Before you connect the applicator perform functional
tests according to the following list:
Avoid accidents by stumbling – Lay all cables,
hoses and conducts so that they will not cause
any risk of stumbling. For this, install cable ducts
and bridges.
UÊ Ê ÃÊV«ÀiÃÃi`Ê>ÀÊÃÕ««i`ÊÌÊÌ
iÊ}ÕiÊ>««V>ÌÀ
UÊ Ê ÃÊÌ
iÊ«ÀiÃÃÕÀiÊ>Ý°ÊÈÊL>ÀÃÊ>`Ê°ÊÓÊL>Àö
UÊ Ê ÃÊÌ
iÊ>««V>ÌÀÊViVÌi`ÊÌÊÓÎäÊÛÌÃÊÀÊ£ÓäÊÛÌÃ]Ê
Ê vÊÀiµÕÀi`ÊLÞÊÌ
iÊëiVwVÊ>««V>ÌÀ®Ê
UÊ Ê ÃÊÌ
iÊ>««V>ÌÀÊÃÜÌV
i`ʶ
Wear protective gloves and safety goggles
whenever you work with the applicator.
UÊ Ê ÃÊÌ
iÊââiÊVi>Ê>`ÊvÀiiÊvÊvÀi}Ê>ÌÌiÀö
UÊ Ê ÃÊ
ÌiÌÊ}ÕiÊÊÌ
iÊiÌ}ÊÌ>¶Ê
UÊ Ê >ÃÊÌ
iÊ
i>ÌÕ«ÊÌiÊvÊ>««ÀÝ°Ê£äÊÕÌiÃÊ`i«i`Ê
Ê }ÊÊ}ÕiÊÌÞ«i®ÊLiiÊi«Ì¶Ê
Never direct the glue jet towards people!
Only open the lid when the tank has been vented.
The applicator must vent audibly.
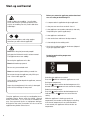
Set the hot-melt working temperature
(all LCD types)
Do not lay the applicator on its side.
Never hold nozzle top upward.
Do not carry out overhead work.
Never start working before fitting a nozzle first.
Do not overcharge the applicator; only fill it up to
max. 1.5 cm under upper rim.
If the stand is used to deposit the applicator, remove
the wire stand!
Stop using the equipment, if the casing is damaged
due to shock, breakage or heavy wear.
The glue applicator must only be used/applied for its
intended purpose. Please read the chapter „General
Safety Instructions“. If it is not used as intended, this
may cause personal injuries or equipment damages.
Disregard of the safety instructions for the use of the
applicator may lead to serious burns.
6
Switching the applicator on and off:
Press the
button to switch the applicator on or off.
Raising the temperature:
Press the
button until the desired temperature is indicated. Press the button once to confirm the setting.
Reducing the temperature:
Press the
button until the desired temperature is
indicated. Press the button once to confirm the
setting.
While the applicator is heating up to the set
temperature, the numbers on the display are flashing.
If the chosen temperature is not confirmed within
a few seconds, the applicator will use the last set
temperature.
Setting the Working Temperature of the Hot-Melt
(TR 50.4)
After having started the applicator, wait for approx.
10 minutes and check the working temperature at the
Ì
iÀiÌiÀÊV«iÌÊ`À>Ü}Ê«>}iʣȮʰÊvÊiViÃÃ>ÀÞ]Ê
VÀÀiVÌÊ Ì
iÊ Ìi«iÀ>ÌÕÀiÊ >ÌÊ Ì
iÊ Ì
iÀÃÌ>ÌÊ V«iÌÊ
drawing page 16).
Clockwise = higher temperature
Anti-clockwise = lower temperature
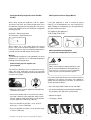
Working with a Balancer (Spring Motion)
vÊ Ì
iÊ }ÕiÊ >««V>ÌÀÊ ÃÊ wÝi`Ê ÌÊ >Ê L>>ViÀÊ Ã«À}Ê
motion), it is recommended to use the suspension art.
10436. Thereby it is avoided that, by a wrong positioning,
glue gets into the vent valve.
This applies to glue applicators
TR 55, TR 700, TR 70, TR 80.
Measuring Point
Minor leaking out of the nozzle during the heat-up
phase is due to the hot-melt expanding in the nozzle/
heating chamber. As soon as the working temperature is
reached, the hot-melt will not leak out any more.
Working with Stationary Equipment
(in connection with pneumatic foot switch)
Warning:
The temperature regulation is not calibrated! If an exact
temperature is required, use a calibrated temperature
probe to check the temperature.
Stand including pressure regulator and
pressure gauge
The precision adjustment for the compressed air regulates your glue application exactly to the quantity
needed. The set pressure may be read from the indication
of the pressure gauge.
Warning:
Risk of burns!
When, in the stationary mode of operation, workpieces are passed below the glue applicator by
hand, there is a risk of burns; so, it is absolutely
necessary that you wear protective gloves.
First, mount the pneumatic foot switch and the stationary
equipment. The relevant instructions are supplied together with the respective accessories. To connect the
system, proceed as follows:
UÊ *
Ê ÀiÃÃÊÌ
iÊÌÀ}}iÀÊÌiÊÇ®Ê`ÜÊÌÊÃÌ«Ê>`Ê
`ÊÌ°
UÊÊ7
iÊÞÕÊÕÃiÊÌ
iÊÃÌ>`ÊvÀÊ`i«ÃÌ}ÊÌ
iÊ>««V>ÌÀ]ÊÊ
remove the wire stand.
UÊ *
Ê ÕÌÊÌ
iÊiVÃi`Ê«Õ}ÊÌÊÌ
iÊLÀi
iÊ«ÀÛ`i`ÊvÀÊÊ
this purpose at one side of the casing handle.
UÊ Ê
iVÌÊÌ
iÊV«ÀiÃÃi`>ÀÊ
ÃiÊÌÊÌ
iÊÀi>ÀÊÃ`iÊvÊÊ
the stand. Connect the glue applicator and the stand
with the compressed-air hose which is firmly fitted to
Ê Ì
iÊ}ÕiÊ>««V>ÌÀ°Ê/,Êxä°{ÊÉÊxxÊÉÊÇääÊÉÊÇä®Ê
UÊ ,
Ê ii>ÃiÊÌ
iÊÌÀ}}iÀ°
UÊ /Ê
iÊÌÀ}}iÀÊÃÊVi`°
UÊ *ÀiÃÃÕÀiÊVÌÀiÀÊÊÌ
iÊÀ}
ÌÊrÊ>ÀÊvÀÊëÀ>ÞÊ>ÀÊÊ
Ê `ÃV
>À}iÊ£ÊÊÓÊL>ÀÃIÊ/,ÊÈäÊÉÊnä®
UÊ Ê*ÀiÃÃÕÀiÊVÌÀiÀÊÊÌ
iÊivÌÊrÊ>ÀÊvÀÊ}ÕiÊ`ÃV
>À}iÊÊ
Ê ÓÊ{ÊL>ÀÃIÊ/,ÊÈäÊÉÊnä®Ê
*Depending on the glue type and the desired quantity to be applied
7
Start-up and Control
Loading Hot-Melt Glue (TR 50.4 / 55 / 60)
UÊ ÊÃÊÃÊ>ÃÊÌ
iÊ>««V>ÌÀÊ
>ÃÊÜ>Ài`ÊÕ«]ÊÌÕÀÊÌ
iÊÊ
Ê ÃÌ>ÀÊÊ}À«Ê°ÊÈ®Ê>ÌVVÜÃiÊ>`Ê«iÊÌ
iÊ`Ê/,ÊÊ
50.4 / 60: item 3; TR 55: item 4) upward.
Now, you can load the desired non-reactive glue.
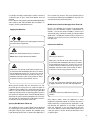
Preparation of the Cartridge
To open the cartridge pierce the
outlet, using a pointed tool.
UÊ Ê"ÞÊwÊÌ
iÊÌ>ÊÕ«ÊÌÊ>««ÀÝ°Ê£°xÊVÊLiÜÊÌÃÊÕ««iÀÊÊ
rim. Turn the star grip clockwise to close the lid.
UÊ ÊÜÊ>««ÀÝ°ÊÎÊqÊ£äÊÕÌiÃ]Ê`i«i`}ÊÊÌ
iÊÊ Ê
quantity and type of glue, for the applicator to melt
the hot-melt.
UÊ Ê/
iʵÕ>ÌÌÞÊÌÊLiÊ>««i`ÊÃÊ`iÌiÀi`ÊLÞÊ
ÜÊ}ÊÊ
the trigger is pulled. The longer it is pressed, the more
glue comes out.
Using PUR Hot-Melt Cartridges
(TR 700 / 70 / 80)
New cartridges may be inserted or exchanged, when
the applicator is warm or cold. Do only use cartridges in
perfect condition, that is, without dents, etc., so that the
piston may move freely in the cartridge.
Screw the nozzle/nozzle adapter
on the cartridge
Preheating the Cartridge
To ensure optimum operation it is recommended to
preheat the closed cartridge in the switched-on glue
applicator. After about 10 minutes, depending on the type
of glue, take off the preheated cartridge and open it at
Ì
iÊÕÌiÌÆÊÃVÀiÜÊÌ
iÊiVÃi`Ê>`>«ÌiÀÊV°ÊââiÊÃiiÊ
chapter „Preparation of the Cartridge“) on. Alternatively,
the cartridge may also be preheated in our cartridge
«Ài
i>ÌiÀÊ>ÀÌViÊxÎnÊÓÎäÊ6®ÆÊ>ÀÌViÊxÎÊ£ÓäÊ6®°Ê
Loading the Hot-Melt Cartridge
UÊ Ê ÃÊÃÊ>ÃÊÌ
iÊ>««V>ÌÀÊ
>ÃÊÜ>Ài`ÊÕ«]ÊÌÕÀÊÌ
iÊÊ
Ê ÃÌ>ÀÊ}À«ÊÌiÊÈ®Ê>ÌVVÜÃiÊ>`Ê«iÊÌ
iÊ`Ê
Ê ÌiÊx®ÊÕ«Ü>À`°Ê
UÊ Ê iÊÃÕÀiÊÌ
>ÌÊÌ
iÊV>ÀÌÀ`}iÊÕÌiÌÊ
>ÃÊLiiÊ«ii`ÊÊ
Ê Ãiiʹ*Ài«>À>ÌÊvÊÌ
iÊ
>ÀÌÀ`}iº®°Ê
Wear protective gloves and safety goggles whenever you work with the applicator.
Insert the cartridge into the
cartridge applicator.
When the applicator has warmed up, there is a risk
of burns!
If, when changing the cartridge, another type of glue
Ê ÃÊÊÕÃi`]ÊÌ
iÊââiÊÕÃÌÊLiÊÀÃi`ÊÌ
ÀÕ}
ÞÊÃiiÊÊ
chapter „Cleaning of the Nozzle/Nozzle Adapter“).
8
Allow approx. 20 minutes for the
>««V>ÌÀÊÌÊÜ>ÀÊÕ«Ê`i«i`}Ê
on the type of glue). Warming-up
will not take as long, if the cartridge
has been preheated.
Apply the hot-melt glue.
If an empty cartridge is replaced by a full one containing
a different type of glue, nozzle and adapter must be
cleaned.
For this, please read „Cleaning the Nozzle/Nozzle Adapter
>vÌiÀÊ ÜÀ}Ê ÜÌ
Ê *1,Ê ÌiÌÊ ÕiÊ >ÀÌÀ`}iÃºÊ Ê
chapter „Cleaning and Maintenance“.
Applying Hot-Melt Glue
Wear protective gloves and safety goggles whenever
you work with the applicator.
Ì
ÃÊÃÊÌÊÌ
iÊV>Ãi]Ê>ÌÌ>V
ÊÌ°Ê/
iÊëÀ>ÞÊV>«ÊÌiÊÎÓ®ÊÕÃÌÊ
be screwed on slightly by hand; never use any tools. You
are advised to wear protective gloves.
Modification for Bead and Dot Application (TR 60 / 80)
For this, the complete spray head must be exchanged.
Please see the following chapter „Replacement of
Nozzles“. The correct nozzle assembly is shown in the
attached drawing „Nozzle Assembly for Bead and Dot
Application“. To apply dots, beads and lines, the pressure
regulator for the spray air on the stand must be set to
zero pressure.
Replacement of Nozzles
Never start working before fitting a nozzle first.
Never direct the glue jet towards people!
When your skin got into contact with hot glue, cool
it with cold water immediately. Do not try to remove
the hot-melt from the skin first. If necessary, consult
a doctor. When hot adhesive got into your eyes, immediately cool them under running water for about
15 minutes and consult your doctor at once.
Warning: risk of burns!
When your skin got into contact with hot glue, cool
it with cold water immediately. Do not try to remove
the hot-melt from the skin first. If necessary, consult
a doctor. When hot adhesive got into your eyes, immediately cool them under running water for about
15 minutes and consult your doctor at once.
For your own safety wear protective gloves and safety goggles whenever you work with the applicator.
Make yourself familiar with the instrument first. Apply a little glue in varying forms on a piece of paper or
cardboard. For example, lines, small or big spray or glue
points. Try to find out the correct quantity and the ideal
pattern by adjusting the air and glue quantities by means
vÊÌ
iÊ«ÀiÃÃÕÀiÊÀi}Õ>ÌÀÊ>ÌÊÌ
iÊÃÌ>`Ê/,ÊÈäÊÉÊnä®]Ê>Ü>ÞÃÊ
observing the correct working temperatures of the specific hot-melt. This temperature is indicated in the technical datasheet of the respective hot-melt.
Spraying Hot-Melt Glues (TR 60 / 80)
The supplied hot-spray systems TR 60 / 80 are designed
vÀÊëÀ>Þ}Ê«ÀiÃÃÕÀiÃiÃÌÛiÊ>`
iÃÛiÃÊ>`Ê*1,Ê
Ì
melt glues. Please check, whether the complete spray
i>`Ê`À>Ü}ÊiÌ>ÊÀÌ®ÊÃÊwÌÌi`ÊÌÊÌ
iÊ>««V>ÌÀÆÊvÊ
1«Õ}ÊÌ
iÊViVÌ}ÊV>LiÊLivÀiÊÀi«>V}Ê
nozzles!
Only replace nozzles when the applicator is warm
>««V>ÌÀÊ Ìi«iÀ>ÌÕÀiÊ ÈänäÊ c
®Ê >`Ê Ì
iÊ }ÕiÊ Ì>Ê ÃÊ
empty. Replacing a nozzle when the applicator is cold,
may damage the applicator. If the nozzle is replaced
when the applicator is too hot, liquid glue may leak
out. For the melting range and the melting point of the
used glue, please see the technical datasheet of the
respective glue.
9
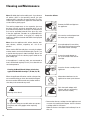
Cleaning and Maintenance
Never fill soiled glue into the melting tank. If you observe
all advices given in the operating manual, the glue
applicator does, normally, not need cleaning. The nonreactive glue contained in the applicator will remelt and
can be used for glueing again.
The working temperature of the respective glue may
be taken from the technical datasheet which can be
procured from the producer of the glue. This temperature
must not be exceeded, otherwise the glue may coke
in the glue applicator. Hot-melts on a polyamide basis
are particularly sensitive. If the glue has coked, the
applicator should be cleaned with REKA cleaning liquid
>ÀÌViÊÎx£®°
Never clean the applicator with solvent, benzine, benzene, toluene, acetone, turpentine, etc. risk of explosion!
7
iÊÀi>VÌÛiÊ*1,Ê
ÌiÌÊ}ÕiÃÊ>ÀiÊÕÃi`]ÊÌ
iÊ>`>«ÌiÀÊ
and the nozzles must be flushed thoroughly. For this, use
a special cleaning agent in 310ml cartridges. Please ask
the glue producer for the cleaning agent suited for the
glue used by you.
Proceed as follows:
,iÛiÊÌ
iÊ*1,ÊV>ÀÌÀ`}iÊvÀÊ
the applicator.
1ÃVÀiÜÊÌ
iÊââiÊ>`>«ÌiÀÊvÀÊ
the warm glue cartridge.
1ÃiÊ>Ê«Ìi`ÊÌÊÃVÀiÜÊ`ÀÛiÀ]Ê
knife or the like) to open the outlet
vÊÌ
iÊ*1,Vi>iÀÊV>ÀÌÀ`}i°Ê
Screw the nozzle adapter on
the screw thread of the cleaner
cartridge.
If the applicator is used very often, we recommend to
have it maintained regularly. For this, fix a date with our
service department.
Cleaning the Nozzle/Nozzle Adapter after having
applied PUR Hot-Melt Cartridges (TR 700 / 70 / 80)
When the applicator will not be used for a longer time,
we recommend that you clean the nozzle/the adapter
LiV>ÕÃiÊÀi>VÌÛiÊ*1,Ê
ÌiÌÃÊ>ÞÊ
>À`iÊÜÌ
Ê>Ê
short time, and cannot melt any more.
Insert the cleaner cartridge in the
applicator.
Allow about 20 minutes for the
applicator to warm up the cleaner.
Flush the nozzle adapter with
cleaner until you see cleaning
agent come out steadily.
Warning: risk of burns!
For your own safety you are advised to wear protective gloves and safety goggles when replacing
nozzles.
10
UÊÊ,iÛiÊÌ
iÊVi>iÀÊV>ÀÌÀ`}iÊvÀÊÌ
iÊ>««V>ÌÀÊ>`ÊÊ
unscrew the nozzle/nozzle adapter from the cleaner
cartridge while it is still warm.
Allow the cleaner cartridge to cool and keep it for further use.
Cleaning the Vent Valve
>V
Ê ÌiÊ Ì
iÊ ÌÀ}}iÀÊ ÌiÊ Ç®Ê
>ÃÊ LiiÊ «Õi`]Ê Ì
iÊ
applicator must audibly vent through the vent valve. If
Ì
iÊÃÕ`Ê>LÃÀLiÀÊÌiÊn®Ê}ÌÊÃÌÕV]ÊÌ
iÊ}ÕiÊÌ>Ê>ÞÊ
be under pressure.
Warning:
With this, hot glue might come out of the sound
absorber!
Prevent liquid glue from getting into the sound absorber,
when the applicator is ready for operation by …
UÊ Ê`i«ÃÌ}ÊÌ
iÊ}ÕiÊ>««V>ÌÀÊÊ>ÊiÛiÊ«>i]ÊÕÃ}ÊÊ
its wire bracket
UÊ Ê`i«ÃÌ}ÊÌ
iÊ}ÕiÊ>««V>ÌÀÊÊÌ
iÊÃÌ>`ÊÜÌ
ÕÌÊÊ
the fitted wire bracket
UÊ ÊÃÕëi`}ÊÌ
iÊ}ÕiÊ>««V>ÌÀÊ>ÌÊ>ÊëÀ}ÊL>>ViÀÊÊ
Ê >ÀÌViÊÎx{{®
UÊ Êw}ÊÌ
iÊ}ÕiÊ>««V>ÌÀÊÞÊÕ«ÊÌÊ>««ÀÝ°Ê£°xÊVÊÊ
under the upper rim
If, nevertheless, glue should have got into the vent valve,
Vi>Ê ÌÊ ÀÊ Ài«>ViÊ Ì
iÊ ÃÕ`Ê >LÃÀLiÀÊ ÌiÊ n®]Ê Ì
i
/Ê-6ÊÌiÊ®Ê>`ÊÌ
iÊÃVÀiÜ}ÊÌiʣ䮰Ê
Even if the applicator has been switched off, it may be
under pressure and glue might flow out.
11
Trouble-Shooting
List of possible fault indications and assistance in trouble-shooting
In case of damage, send the glue applicator to Reka, indicating type and serial no. of your applicator. We shall not be
responsible for any repair made by yourselves.
Fault
Possible cause/operating error
Measures to be taken
No or too little glue comes off though
UÊ
}}i`Êââi
UÊ
1ÃVÀiÜÊââi]ÊVi>ÊÀÊÀi«>ViÊÌ
the heat-up time has been observed
UÊ
/
iÊ«ÃÌÊ}ÌÊÃÌÕVÊÊÌ
iÊV>ÀÌÀ`}i
UÊ
,i«>ViÊV>ÀÌÀ`}i
exactly
UÊ
*ÀiÃÃÕÀiÊÌÊÜ
UÊ
iVÊ«ÀiÃÃÕÀiÊÀi}Õ>ÌÀ
UÊ
/i«iÀ>ÌÕÀiÊÌÊÜÊÊ
UÊ
iVÊÌi«iÀ>ÌÕÀi
UÊ
iviVÌÛiÊÛ>Ûi
UÊ
,i«>ViÊÛ>Ûi
UÊ
/i«iÀ>ÌÕÀiÊiÌ
iÀÊÌÊ
}
ÊÀÊÌÊÜ
UÊ
iVÊÌ
iÊÌi«iÀ>ÌÕÀi
UÊ
/
iÊÃÕ`Ê>LÃÀLiÀÊ}ÌÊÃÌÕV
UÊ
i>ÊÀÊÀi«>ViÊÌ
iÊÃÕ`Ê>LÃÀLiÀ
UÊ
}}i`Êââi
UÊ
1ÃVÀiÜÊÌ
iÊââiÊ>`ÊVi>ÊÌÊV>ÀivÕÞÊÀÊÀi«>ViÊ
Ê
ÊÌ°Ê1ÃVÀiÜÊÌ
iÊââiÊ>ÌÊ«iÀ>Ì}ÊÌi«iÀ>ÌÕÀiÆÊÊ
The glue is too fluid or too thick.
Glue leaks out of the nozzle
Ê
Üi>ÀÊ}ÛiÃÊÀÃÊvÊLÕÀî
/
iÊ«ÃÌÊ}ÌÊÃÌÕVÊÊÌ
iÊV>ÀÌÀ`}i
UÊ
,i«>ViÊÌ
iÊV>ÀÌÀ`}i
UÊ
/
iÊëÀ}Ê«ÀiÃÃÕÀiÊvÊÌ
iÊL>ÊÛ>ÛiÊ
UÊ
,i>`ÕÃÌÊÌ
iÊëÀ}Ê«ÀiÃÃÕÀiÊvÊL>ÊÛ>ÛiÊââi®
Ê
ââi®ÊÃÊÌÊÜ
UÊ
/
iÊ>««V>ÌÀÊÃÊÃÜÌV
i`ÊvvÊÊ
ÊÌÞ«iî UÊ
UÊ
The applicator does not heat up
ÃÊÌ
iÊ>««V>ÌÀÊ«À«iÀÞÊViVÌi`ÊÌÊ«ÜiÀ
UÊ
ÃÊÌ
iÊ>««V>ÌÀÊÃÜÌV
i`ʶ
UÊ
/
iÊÌ
iÀÃÌ>ÌÊÃÊÃÜÌV
i`ÊvvÊÊ/,Êxä°{®
UÊ
iVÊÌ
iÊÌ
iÀÃÌ>ÌÊ>`]ÊvÊii`ÊLi]ÊÃÜÌV
ÊÌÊ
UÊ
iviVÌÛiÊÌ
iÀÃÌ>ÌÊ/,Êxä°{®
UÊ
,i«>ViÊÌ
iÊÌ
iÀÃÌ>ÌI
UÊ
iviVÌÛiÊiiVÌÀVÃ
UÊ
-i`ÊÌ
iÊ>««V>ÌÀÊ
The spray pattern is not optimum
UÊ
iVÊÌ
iÊëÀ>ÞÊ>ÀÊ`ÃV
>À}i
(applicable to TR 60 / 80 types)
UÊÊÊ -iÌÊÌ
iÊ}ÕiÊ«ÀiÃÃÕÀiÊÀi}Õ>ÌÀÊÊÌ
iÊÃÌ>`Ê
to zero pressure
UÊÊ "«iÊëÀ>ÞÊ>ÀÊ«ÀiÃÃÕÀiÊÀi}Õ>ÌÀÊÊÌ
iÊÃÌ>`ÊÊ
Ê
>ÝÕÊÈÊL>Àî°
UÊÊÊ -iÌÊÌi«iÀ>ÌÕÀiÊÌÊÓääÊc
Ê°
UÊÊÊ vÌiÀÊ>««ÀÝ°ÊÎäÊÃiV°]Ê
ÌÊëÀ>ÞÊ>ÀÊÕÃÌÊLiÊ`ÃÊ
pensed. If, after this time, the spray air coming out of
the applicator is not hot, send the applicator in.
The display indicates: 999 (applicable
UÊ
to all LCD types)
vÊÌ
ÃÊiÃÃ>}iÊÃÊ}Ûi]ÊÕ«Õ}ÊÌ
iÊ>ÃÊ«Õ}Ê>`ÊÊ
put it in again. Switch the glue applicator on again.
UÊ
vÊÌ
ÃÊ«ÀLiÊÃÊÃÌÊ«ÀiÃiÌ]ÊÃi`ÊÌ
iÊ>««V>ÌÀÊÊÊ
for checking please.
12
*For this, send applicator in or replace thermostat.
Environmental Protection
Never throw electric tools in the domestic waste. According to the European directive 2002/96/EC for used electric
and electronic devices and according to national regulations, used electric tools must be collected separately and
treated in an environmentally compatible way for re-use.
Reka packing material can be recycled completely.
Please take instructions for the disposal of hot-melt glues and hot-melt cartridges from the respective safety
specifications.
Additional Information
ÊÞÕÊ
>ÛiÊ>ÞÊÀiʵÕiÃÌÃÊÀÊÀiµÕiÃÌöÊ7iÊÃ
Õ`ÊLiÊ}>`ÊÌÊ
i«ÊÞÕ°
Please contact us by
*
iʳ{Êä®ÇÓ£ÉÇäÇnä
!"#$%$&'()%*%'+',#./',*01*2,*+)!&)!#,2*3.2'/#22*4)!5
E-mail:+$$!*+#)-*!$)[email protected]
,6'(5#/")+
Our mailing address is:
+'--%#2#7
Reka Klebetechnik
GmbH & Co. KG
Siemensstr.
6
,68*89/
D-76344
Eggenstein
./',#-*5'/&-$+
/iiv>Ýʳ{Êä®ÇÓ£ÉÇäxäÈ
Internet: http://www.reka-klebetechnik.de
,#%:*;;<<=>;?=@A?=8>@B
C)7:*;;<<=>;@=?<<=>>>>
#+)'%:*DEFGDHIJGKFKLMNEFONKOPQ
6#3:*RRROIJGKFKLMNEFONKOPQ
13
CE Declaration of Conformity
Product:
Hot-Melt Glue Applicators
Types:
TR 50.4
TR 55
TR 60
TR 700
TR 70
TR 80
This is to certify that the above applicators in the design marketed by us are in conformity with the following EC
directives:
until 15-01-2007:73/23/EEC, from 16-01-2007: 2006/95 EC
until 19-07-2009: 91/368 EEC, from 20-09-2009: 2004/108 EC
until 28-12-2009: 89/336 EEC, from 29-12-2009: 2006/42 EC
2002/95/EC
The following standards have been applied:
IEC CISPR14
IEC 60335
IEC 60204
IEC 61000
This declaration of conformity shall get invalid, if the product
UÊÃÊ`wi`]ÊiÝÌi`i`]ÊÀÊÌ
iÀÜÃiÊV
>}i`ÊÜÌ
ÕÌÊiÝ«ÀiÃÃÊ>««ÀÛ>ÊvÊ,i>ÊiLiÌiV
Ê
UÊ>`ÉÀÊÌ
iÀÊV«iÌÃÊÌ
>Ê>VViÃÃÀiÃÊvÊ,i>ÊiLiÌiV
Ê>ÀiÊwÌÌi`]Ê
UÊ>`ÊvÊÌ
iÊ«À`ÕVÌÊÃÊÌÊViVÌi`ÊÀÊÕÃi`Ê>ÃÊÌi`i`°Ê
Eggenstein, September 1, 2009
Christa Armbruster
Management Purchasing and Production
14
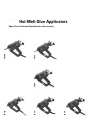
Reka Hot-Melt Glue Applicators
TR 55
TR 70
TR 80
TR 60
TR 50.4
TR 700
Spare Parts | Technical Specifications | Accessories
16
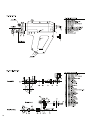
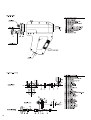
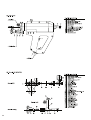
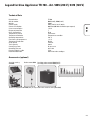
Legend for Glue Applicator TR 50.4 – Art. 5327 (230 V), 5333 (120 V)
Denomination
Article number
Weight
Power supply
Power consumption
Current consumption
Degree of protection
Class of protection
Temperature control
Temperature limitation
"«iÀ>Ì}ÊÌi«iÀ>ÌÕÀiÊ
ÃÃÌiVÞÊvÊÌi«iÀ>ÌÕÀiÊ
Temperature indication
Heat-up time
Tank capacity
Conveying system
Operating pressure
Length of electric cable
Recommended melts
TR 50.40
5327ÊÓÎäÊ6®]Ê5333Ê£ÓäÊ6®
1200g
230 V / 50 Hz, 120 V / 60 Hz
400 Watt
1,75 A
l
IP 30
Thermostat
Temperature controller
ÓäÓääÊc
³ÊxÊc
Analogue
3-10 min.
250 ml
Air pressure
0,5 - 6 bar
8,5 m
Hot-melt granulate, pillows and sticks
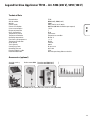
TR 50.4
Technical Data
Accessories (optional)
Stand for storing
art. 3587
Balancer art. 3544
Premelter art. 5563 ÓÎäÊ6®
Premelter art. 5567 £ÓäÊ6®
Download our full nozzle range at
www.nozzles.reka-klebetechnik.de
More accessoiries like cleaning liquid
or a funnel can be found at www.rekaklebtechnik.de
Stationary equipment art. 3618ÊÞÊÊVÕVÌÊÜÌ
ÊÃÌ>`ÊvÀÊÃÌÀ}Êart. 3587)
17
18
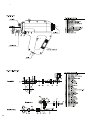
Legend for Glue Applicator TR 55 – Art. 5356 (230 V), 5359 (120 V)
Denomination
Article number
Weight
Power supply
*ÜiÀÊVÃÕ«ÌÊÊ
Current consumption
Degree of protection
Class of protection
Temperature control
Temperature limitation
"«iÀ>Ì}ÊÌi«iÀ>ÌÕÀiÊ
ÃÃÌiVÞÊvÊÌi«iÀ>ÌÕÀiÊ
Temperature indication
Heat-up time
Tank capacity
Conveying system
Operating pressure
Length of electric cable
Recommended melts
TR 55
5356ÊÓÎäÊ6®]Ê5359Ê£ÓäÊ6®
1400g
230 V / 50 Hz, 120 V / 60 Hz
{ääÊ7>ÌÌÊÈääÊ7>ÌÌÊ>Û>>LiÊÕ«ÊÀiµÕiÃÌ®
1,75 A
l
IP 30
Thermostat
Temperature controller
xäÓ£äÊc
³ÊÓÊc
Digital
3-10 min.
330 ml
Air pressure
0,5 - 6 bar
8,5 m
Hot-melt granulate, pillows and sticks
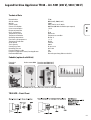
TR 55
Technical Data
Accessories (optional)
Stand for storing
art. 3587
Balancer art. 3544
Premelter art. 5563 ÓÎäÊ6®
Premelter art. 5567 £ÓäÊ6®
Download our full nozzle range at
www.nozzles.reka-klebetechnik.de
More accessoiries like cleaning liquid
or a funnel can be found at www.rekaklebtechnik.de
Stationary equipment art. 3618ÊÞÊÊVÕVÌÊÜÌ
ÊÃÌ>`ÊvÀÊÃÌÀ}Êart. 3587)
19
20
Legend for Glue Applicator TR 60 – Art. 5351 (230 V), 5361 (120 V)
Denomination
Article number
Weight
Power supply
*ÜiÀÊVÃÕ«ÌÊÊ
Current consumption
Degree of protection
Class of protection
Temperature control
Temperature limitation
"«iÀ>Ì}ÊÌi«iÀ>ÌÕÀiÊ
ÃÃÌiVÞÊvÊÌi«iÀ>ÌÕÀiÊ
Temperature indication
Heat-up time
Tank capacity
Conveying system
Operating pressure
Length of electric cable
Length of supply line of stand / hand applicator
Recommended melts
TR 60
5351ÊÓÎäÊ6®]Ê5361 £ÓäÊ6®
1200g
230 V / 50 Hz, 120 V / 60 Hz
{ääÊ7>ÌÌÊÈääÊ7>ÌÌÊ>Û>>LiÊÕ«ÊÀiµÕiÃÌ®
1,75 A
l
IP 30
Electronics
Temperature controller
xäÓ£äÊc
³ÊÓÊc
Digital
3-10 min.
250 ml
Air pressure
0,5 - 6 bar
4m
4,5 m
Hot-melt granulate, pillows and sticks
TR 60
Technical Data
Zubehör (optional erhältlich)
Footswitch
art. 3518
Balancer art. 3544
Premelter art. 5563 ÓÎäÊ6®
Premelter art. 5567 £ÓäÊ6®
Download our full nozzle range at
www.nozzles.reka-klebetechnik.de
More accessoiries like cleaning liquid
or a funnel can be found at www.rekaklebtechnik.de
Stationary equipment art. 3618ÊÞÊÊVÕVÌÊÜÌ
ÊÃÌ>`ÊvÀÊÃÌÀ}Êart. 3587)
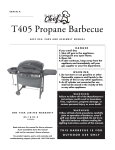
TR 60 LCD – Detail Front
21
22
Legend for Glue Applicator TR 700 – Art. 5385 (230 V), 5370 (120 V)
Denomination
Article number
Weight
Power supply
*ÜiÀÊVÃÕ«ÌÊÊ
Current consumption
Degree of protection
Class of protection
Temperature control
Temperature limitation
"«iÀ>Ì}ÊÌi«iÀ>ÌÕÀiÊ
ÃÃÌiVÞÊvÊÌi«iÀ>ÌÕÀiÊ
Temperature indication
Heat-up time
Tank capacity
Conveying system
Operating pressure
Length of electric cable
Recommended melts
TR 700
5385ÊÓÎäÊ6®]Ê5370Ê£ÓäÊ6®
1400g
230 V / 50 Hz, 120 V / 60 Hz
{ääÊ7>ÌÌÊÈääÊ7>ÌÌÊ>Û>>LiÊÕ«ÊÀiµÕiÃÌ®
1,75 A
l
IP 30
Thermostat
Temperature controller
£ÓäÊc
³ÊxÊc
Digital
3-10 min.
310 ml
Air pressure
0,5 - 6 bar
8,5 m
310 ml hot-melt cartridges
TR 700
Technical Data
Accessories (optional)
Stand for storing
art. 3587
Balancer art. 3544
Cartridge preheater art. 5398 ÓÎäÊ6® Download our full nozzle range at
Cartridge preheater art. 5399 £ÓäÊ6® www.nozzles.reka-klebetechnik.de
More accessoiries like cleaning liquid
or a funnel can be found at www.rekaklebtechnik.de
Stationary equipment art. 3618ÊÞÊÊVÕVÌÊÜÌ
ÊÃÌ>`ÊvÀÊÃÌÀ}Êart. 3587)
23
24
Legend for Glue Applicator TR 70 – Art. 5347 (230 V), 5365 (120 V)
Denomination
Article number
Weight
Power supply
*ÜiÀÊVÃÕ«ÌÊÊ
Current consumption
Degree of protection
Class of protection
Temperature control
Temperature limitation
"«iÀ>Ì}ÊÌi«iÀ>ÌÕÀiÊ
ÃÃÌiVÞÊvÊÌi«iÀ>ÌÕÀiÊ
Temperature indication
Heat-up time
Tank capacity
Conveying system
Operating pressure
Length of electric cable
Recommended melts
TR 70
5347ÊÓÎäÊ6®]Ê5365Ê£ÓäÊ6®
1400g
230 V / 50 Hz, 120 V / 60 Hz
{ääÊ7>ÌÌÊÈääÊ7>ÌÌÊ>Û>>LiÊÕ«ÊÀiµÕiÃÌ®
1,75 A
l
IP 30
Electronics
Temperature controller
xäÓ£äÊc
³ÊÓÊc
Digital
3-10 min.
310 ml
Air pressure
0,5 - 6 bar
8,5 m
310 ml hot-melt cartridges
TR 70
Technical Data
Accessories (optional)
Stand for storing
art. 3587
Balancer art. 3544
Cartridge preheater art. 5398 ÓÎäÊ6® Download our full nozzle range at
Cartridge preheater art. 5399 £ÓäÊ6® www.nozzles.reka-klebetechnik.de
More accessoiries like cleaning liquid
or a funnel can be found at www.rekaklebtechnik.de
Stationary equipment art. 3618ÊÞÊÊVÕVÌÊÜÌ
ÊÃÌ>`ÊvÀÊÃÌÀ}Êart. 3587)
25
26
Legend for Glue Applicator TR 80 – Art. 5354 (230 V), 5362 (120 V)
Denomination
Article number
Weight
Power supply
*ÜiÀÊVÃÕ«ÌÊÊ
Current consumption
Degree of protection
Class of protection
Temperature control
Temperature limitation
"«iÀ>Ì}ÊÌi«iÀ>ÌÕÀiÊ
ÃÃÌiVÞÊvÊÌi«iÀ>ÌÕÀiÊ
Temperature indication
Heat-up time
Tank capacity
Conveying system
Operating pressure
Length of electric cable
Length of supply line of stand / hand applicator
Recommended melts
TR 80
5354ÊÓÎäÊ6®]Ê5362Ê£ÓäÊ6®
1400g
230 V / 50 Hz, 120 V / 60 Hz
{ääÊ7>ÌÌÊÈääÊ7>ÌÌÊ>Û>>LiÊÕ«ÊÀiµÕiÃÌ®
1,75 A
l
IP 30
Electronics
Temperature controller
xäÓ£äÊc
³ÊÓÊc
Digital
3-10 min.
310 ml
Air pressure
0,5 - 6 bar
8,5 m
4,5 m
310 ml hot-melt cartridges
TR 80
Technical Data
Accessories (optional)
Footswitch
art. 3518
Balancer art. 3544
Cartridge preheater art. 5398 ÓÎäÊ6® Download our full nozzle range at
Cartridge preheater art. 5399 £ÓäÊ6® www.nozzles.reka-klebetechnik.de
More accessoiries like cleaning liquid
or a funnel can be found at www.rekaklebtechnik.de
Stationary equipment art. 3618ÊÞÊÊVÕVÌÊÜÌ
ÊÃÌ>`ÊvÀÊÃÌÀ}Êart. 3587)
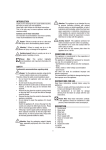
TR 80 LCD – Detail Front
27