1
INTRODUCTION
Attention: The appliance is not intended for use
by persons (including children) with reduced
physical, sensory or mental capabilities, or lack of
experience and knowledge, unless they have been
given supervision or instruction concerning use
of the appliance by a person responsible for their
safety. Children should be supervised to ensure
that they do not play with the appliance.
Thank you for choosing this De’Longhi Coffee machine.
We hope you enjoy your new appliance.
Please take a few minutes to read these instructions.
This is the only way to ensure optimum results and
maximum safety.
Symbols used in these instructions
The important recommendations have these symbols.
These recommendations must be followed.
Scalding hazard! This appliance produces hot
water and steam may form when it is operating.
Pay attention not to come into contact with hot
water sprays or steam.
Do not touch the cup warmer plate when the
appliance is on; it is hot.
Danger! Failure to comply can be or is the cause
of injury due to life-threatening electric shocks.
Attention! Failure to comply can be or is the
cause of injury or damage to the appliance.
Scalding hazard! Failure to comply can be or is
the cause of scalding or burns.
CONDITIONS OF USE
This appliance is manufactured for the preparation of
coffee and to heat beverages.
The appliance is designed and produced for domestic
ÕÃiÊÞ°ÊÌÊÃÊÌÊÃÕÌ>LiÊvÀÊÕÃiÊ\
- staff kitchens in shops, offices and other workplaces.
- farms
- hotels, motels or other holiday accommodation
- guest houses
Any other use must be considered improper and
therefore dangerous.
The manufacturer is not liable for damage deriving from
the improper use of the appliance.
Please Note: This symbol highlights
recommendations and important information for
the user.
SAFETY
Fundamental recommendations regarding safety
Danger! As the appliance operates using electric
current, electric shocks can not be excluded.
Therefore, follow the safety recommendations given:
UÊÊ Ê ÌÊ ÌÕV
Ê Ì
iÊ >««>ViÊ Ü
iÊ ÞÕÊ
>ÛiÊ ÜiÌÊ
hands or feet.
UÊÊ ÊÌÊÌÕV
ÊÌ
iÊ«Õ}ÊÜÌ
ÊÜiÌÊ
>`ð
UÊÊ >iÊÃÕÀiÊÌ
>ÌÊÌ
iÊÃViÌÊÕÃi`ÊV>Ê>Ü>ÞÃÊLiÊi>ÃÞÊ
reached, so that the plug can be removed when
required.
UÊÊ ,iÛiÊÌ
iÊ«Õ}ÊvÀÊÌ
iÊÃViÌÊLÞÊ>VÌ}Ê`ÀiVÌÞÊ
on the plug itself. Do not pull the cable as damage
could be caused.
UÊÊ ,iÛiÊÌ
iÊ«Õ}ÊvÀÊÌ
iÊÃViÌÊÌÊ`ÃViVÌÊÌ
iÊ
appliance completely.
UÊÊ ÊÌÊ>ÌÌi«ÌÊÌÊÀi«>ÀÊÌ
iÊ>««>ViÊvÊÌÊÃ
Õ`Ê
breakdown.
Switch the appliance off, remove the plug from the
socket and contact the After-Sales Service. Please
refer to enclosed guarantee leaflet for details.
UÊÊ vÊÌ
iÊ«Õ}ÊÀÊ«ÜiÀÊÃÕ««ÞÊV>LiÊ>ÀiÊ`>>}i`]Ê
>ÛiÊ
them replaced exclusively by the De’Longhi AfterSales Service, in order to prevent risks. Please refer
to enclosed guarantee leaflet for details.
INSTRUCTIONS FOR USE
,i>`Ê Ì
iÃiÊ ÃÌÀÕVÌÃÊ V>ÀivÕÞÊ LivÀiÊ ÕÃ}Ê Ì
iÊ
appliances.
- Failure to comply with these instructions can lead
to injury and damage to the machine.
The manufacturer is not liable for damage
deriving from the failure to comply with the user
instructions.
Please Note: Keep these instructions carefully.
vÊ Ì
iÊ >««>ViÊ Ã
Õ`Ê LiÊ ÌÀ>ÃviÀÀi`Ê ÌÊ Ì
iÀÊ
persons, these instructions must accompany it.
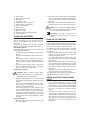
DESCRIPTION
1.
2.
3.
4.
5.
6.
7.
8.
9.
10.
11.
Attention: Keep the packaging material (plastic
bags, expanded polystyrene) out of the reach of
children.
6
Control panel
Steam knob
Water tank
Water tank lid
Power supply cable
Steam or hot water tube
Cup tray
Drip tray
Cappuccino maker
Nozzle
Boiler outlet
12. Coffee tamper
£Î°Êi>ÃÕÀiÊvÀÊ}ÀÕ`ÊVvvii
14. Filter-holder
15. Large filter, 2 cups
16. Small filter, 1 cup or for ESE pod
17. Steam function selection button
18. Coffee or hot water tube
19. On/off button
20. On indicator light
21. OK indicator light
22. Steam function selected indicator light
23. Cup warmer plate
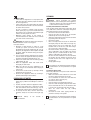
Ó°ÊÊ ÊÌ
iÊÌ>ÊÜÌ
ÊvÀiÃ
ÊÜ>ÌiÀÊLÕÌÊ`ÊÌÊ«>ÃÃÊ8°Ê
w}°Êή°Ê,i«ÃÌÊÌ
iÊÌ>ÊLÞÊ«ÀiÃÃ}ÊÌÊ}
ÌÞÊÊ
a way to open the valve situated on the base of the
tank itself.
3. Alternatively, do not remove the tank, just fill it by
pouring in water from a jug, be careful of splashes
Attention: do not operate the appliance without
water in the tank and always fill it when the water
is a few centimetres from the bottom.
Please Note: it is normal to find water in the
compartment under the tank; dry using a clean
sponge.
PRELIMINARY OPERATIONS
Check after transport
After the packaging has been removed, check the
integrity of the appliance and the presence of all
accessories.
Do not use the appliance in the presence of obvious
damage. Contact the De’Longhi After-Sales Service.
Installing the appliance
The following safety measures must be complied with
when installing the appliance:
UÊ /
iÊ>««>ViÊVÕ`ÊLiÊ`>>}i`ÊLÞÊÌ
iÊ«iiÌÀ>ÌÊ
of water.
Do not position the appliance near to water taps or
sinks.
UÊÊ /
iÊ >««>ViÊ VÕ`Ê LiÊ `>>}i`Ê vÊ Ì
iÊ Ü>ÌiÀÊ ÌÊ
contains freezes. Do not install the appliance in a
room where the temperature can fall below freezing
point.
UÊÊ *ÃÌÊ Ì
iÊ «ÜiÀÊ ÃÕ««ÞÊ V>LiÊ Ê >Ê Ü>ÞÊ Ì
>ÌÊ ÌÊ
cannot be damaged by sharp edges or by contact
with hot surfaces (e.g. electric plates).
USING FOR THE FIRST TIME
Pre-heating the coffee machine
Before using the machine for the first time all accessories
and internal circuits must be washed by making at least
five cups of coffee without using ground coffee.
ÌÊÃÊ>`ÛÃi`ÊÌÊ«Ài
i>ÌÊÌ
iÊVvviiÊ>V
iÊ>ÃÊvÜÃÊ
in order to obtain an espresso coffee at the right
temperature:
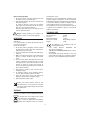
1. Press the ON/OFF button (the relative indicator light
switches on) (fig. 4) and attach the empty filterholder to the machine (fig. 5).
2. Place a cup under the filter-holder. Use the same
cup in which the coffee is to be served so that it can
be pre-heated.
3. Wait until the OK light comes on (fig. 6) and then
press the coffee button straight away (fig. 7). Allow
the water to run until the OK light switches off and
then stop the water by pressing the coffee button
again (fig. 7).
4. Empty the cup, wait for the “OK” light to switch on
again and repeat the same operation again.
ÌÊÃÊÀ>ÊvÀÊ>ÊÃ>]Ê
>ÀiÃÃÊ«ÕvvÊvÊÃÌi>ÊÌÊLiÊ
released when the filter-holder is removed).
Connecting the appliance
Attention! >iÊ ÃÕÀiÊ Ì
>ÌÊ Ì
iÊ iiVÌÀVÊ >ÃÊ
voltage corresponds with that indicated on the
data plate on the base of the appliance.
MAKING AN ESPRESSO USING GROUND
COFFEE
UÊÊ "ÞÊViVÌÊÌ
iÊ>««>ViÊÌÊ>ÊVÀÀiVÌÞÊÃÌ>i`Ê
socket with a minimum rating of 10A and correctly
earthed.
UÊÊ Ê Ì
iÊ V>ÃiÊ vÊ V«>ÌLÌÞÊ LiÌÜiiÊ Ì
iÊ ÃViÌÊ
and the plug on the appliance, have the plug
replaced by a qualified technician.
UÊÊ /
iÊ «ÜiÀÊ ÃÕ««ÞÊ V>LiÊ Ê Ì
ÃÊ >««>ViÊ ÕÃÌÊ
never be replaced by the user as special tools are
needed for this operation. Contact an After-Sales
Centre authorised by the manufacture if the cable
is damaged or must be replaced, in order to avoid
all risks. Please refer to enclosed guarantee leaflet
for details
1. After having pre-heated the machine as described
in the previous paragraph, in¬sert the ground
coffee filter into the filter-holder, making sure that
the projection is correctly inserted into the relative
seat as indicated in fig. 8. Use the smallest filter for
one coffee or the larger one to make two cups of
coffee.
2. To prepare one coffee, fill the filter with a level
measuring spoon of ground coffee, about 7gr. (fig.
®°ÊvÊÞÕÊÜÃ
ÊÌÊ«Ài«>ÀiÊÌÜÊVÕ«ÃÊvÊVvvii]ÊwÊÌ
iÊ
filter with two less-than-level measuring spoons
of ground coffee (about 6+6 gr). Fill the filter with
small amounts at a time to prevent the coffee
spilling out.
Filling the water tank
1. Open the water tank lid (fig. 1) and then lift the tank
to remove it (fig. 2).
7
3.
{°Ê
5.
È°Ê
7.
Attention: for correct use, before filling the filter
with ground coffee always make sure there is
no residual coffee in the filter from the previous
infusion.
Distribute the ground coffee evenly and press it
lightly using the coffee tamper (fig. 10).
Pressing the ground coffee is very important to
LÌ>Ê>Ê}`ÊiëÀiÃðÊvÊÞÕÊ«ÀiÃÃÊÌÊ
>À`]ÊÌ
iÊ
VvviiÊÜÊÀÕÊÕÌÊÃÜÞ°ÊvÊÞÕÊ«ÀiÃÃÊÌÊ}
ÌÞ]Ê
the coffee will run out too fast.
,iÛiÊ>ÞÊiÝViÃÃÊVvviiÊvÀÊÌ
iÊÀÊvÊÌ
iÊwÌiÀ
holder and attach it to the machine: turning it fully
home to the right (fig. 5) to prevent water from
escaping.
Position the cup or cups under the filter-holder
ëÕÌÃÊ w}°Ê ££®°Ê ÌÊ ÃÊ ÀiVi`i`Ê ÌÊ Ü>ÀÊ Ì
iÊ
cups before making the coffee by running them
under hot water or leaving them to pre-heat on
the cup warmer for at least 15-20 minutes or by
following the rinse method in ‘using for the first
time’ (fig. 12).
>iÊÃÕÀiÊÌ
>ÌÊÌ
iÊ"Ê}
ÌÊw}°ÊÈ®ÊÃÊÊvÊÌÊÃÊvv]Ê
wait for it to switch on) and press the coffee button
(fig. 7). Once the desired amount of coffee has been
LÌ>i`]Ê«ÀiÃÃÊÌ
iÊÃ>iÊLÕÌÌÊ>}>Êw}°ÊÇ®°ÊÌÊÃÊ
recommended not to run the coffee for more than
45 seconds).
Turn the filter holder from right to left to release the
filter-holder.
the relative seat as indicated in fig. 8.
Î°Ê ÃiÀÌÊÌ
iÊ«`]ÊViÌÀ}ÊÌÊ>ÃÊv>ÀÊ>ÃÊ«ÃÃLiÊÊÌ
iÊ
filter (fig. 14). Always follow the instructions of the
pod pack for correct positioning of the pod on the
filter.
4. Attach the filter-holder to the machine, turning it
fully home to the right (fig. 5).
5. Then proceed as in points 5, 6 and 7 in the previous
paragraph.
MAKING A CAPPUCCINO
1. Prepare the espresso coffee as described in the
previous paragraphs, using cups that are large
enough (160ml).
2. Press the steam button (fig. 15).
Î°Ê Ê Ì
iÊ i>Ìi]Ê wÊ >Ê VÌ>iÀÊ ÜÌ
Ê >LÕÌÊ £ääÊ
grams of milk for every cappuccino to be prepared.
The milk must be at refrigerator temperature (5°C).
When choosing the container consider that the
volume of the milk will increase by 2 or 3 times.
Please Note: it is recommended to use semiskimmed milk at refrigerator temperature (+/5°C).
4. Open the steam tap for a few seconds to remove
any water present in the circuit. Close the tap.
5. Position the container with the milk under the
cappuccino maker nozzle.
6. Wait for the indicator light relative to the steam
button to switch on (fig. 16). This indicates that
the boiler has reached the ideal temperature for the
production of steam.
7. Dip the cappuccino maker into the milk a few
millimeters (fig. 17) making sure not to immerse the
raised line on the cappuccino maker (indicated by
the arrow in fig. 17). Turn the knob anti-clockwise,
(fig. 18) for at least half a turn. Steam escapes from
the cappuccino maker, giving the milk a creamy
appearance and increasing its volume. To obtain a
creamier froth, dip the cappuccino maker into the
milk and turn the container with slow movements
from the bottom upwards.
8. When the volume of the milk has doubled, dip the
cappuccino maker deep down and continue to
heat the milk. When the desired temperature (ideal
value is 60°C) and the desired milk froth have been
reached, interrupt the steam by turning the steam
knob clockwise and release the steam button.
Use the on/off button to switch the machine off (fig.
4) (The relative on light switches off).
9. Pour the frothed milk into the cups containing
the previously-prepared espresso coffee. The
cappuccino is ready: add sugar at will and if
desired, sprinkle a little powdered chocolate on top
of the froth.
Scalding hazard! To prevent sprays, do not
release the filter-holder while the machine is
dispensing coffee.
8. To remove the used coffee, lock the filter using
the lever in the grip and let the coffee fall out by
knocking the over-turned filter-holder (fig. 13).
9. Turn the machine off by pressing the on/off button
(fig. 4).
MAKING AN ESPRESSO USING PODS
1. Pre-heat the machine as described in the “1- Ê
",Ê /Ê ,-/Ê /” chapter, making sure that
Ì
iÊwÌiÀ
`iÀÊÃÊ>ÌÌ>V
i`ÊÌÊÌ
iÊ>V
i°ÊÌÌiÀÊ
coffee is obtained in this way.
Please Note: use pods that comply with the ESE
Standard: this will be indicated on the packaging
by the following mark.
The ESE Standard is a system
accepted by the leading coffee
pod manufacturers and allows
espresso coffee to be made
simply and without making a mess.
2. Place the small filter in the filter-holder, making
sure that the projection is correctly inserted into
8
CLEANING
Please Note:
UÊ vÊÀiÊÌ
>ÊiÊV>««ÕVVÊÃÊÌÊLiÊ«Ài«>Ài`]ÊwÀÃÌÊ
make all of the coffees and then prepare the milk for
all of the cappuccinos;
UÊ vÊÀiÊVvviiÊÕÃÌÊLiÊ«Ài«>Ài`Ê>vÌiÀÊÌ
iÊÊ
>ÃÊ
been frothed, allow the boiler to cool first otherwise
the coffee will be burned.
To cool it, position a container under the filterholder spouts (fig. 11), press the steam button and
allow water to run out until the steam function light
switches off: then prepare the coffee.
UÊ >ÝÕÊ ÃÌi>Ê `iÛiÀÞÊ vÊ ÈäÊ ÃiV`ÃÊ ÃÊ
recommended and the milk must not be frothed
more than 3 times consecutively.
Danger!
Before performing any cleaning
operations of the external parts of the appliance,
switch the machine off, remove the plug from the
socket and let the machine cool down.
Cleaning and maintenance of the filter
Clean the filter-holder and ground coffee filters about
every 200 coffees and if the coffee drips through the
filter-holder and does not flow completely:
UÊ ,iÛiÊÌ
iÊwÌiÀÊvÀÊÌ
iÊwÌiÀ
`iÀ°
UÊ 1ÃVÀiÜÊ Ì
iÊ wÌiÀÊ V>«Ê w}°Ê ÓÓ®Ê Ê Ì
iÊ `ÀiVÌÊ
indicated by the arrow on the cap itself.
UÊ -`iÊÌ
iÊVÀi>Êi
>ViÀÊ`iÛViÊvÀÊÌ
iÊVÌ>iÀÊ
by pushing it from the cap end.
UÊ ,iÛiÊÌ
iÊ}>ÃiÌ°
UÊ ,ÃiÊ >Ê V«iÌÃÊ >`Ê Vi>Ê Ì
iÊ iÌ>Ê wÌiÀÊ
thoroughly using hot water and a brush (fig. 23).
Check that the holes in the metal filter are not
LVi`°ÊvÊÌ
ÃÊÃÊÌÊÌ
iÊV>Ãi]ÊVi>ÊÌ
iÊÕÃ}Ê>Ê
pin (see fig. 24) or when descaling.
UÊ ,iÕÌÊ Ì
iÊ wÌiÀÊ >`Ê Ì
iÊ }>ÃiÌÊ Ê Ì
iÊ «>ÃÌVÊ
`ÃVÊ >ÃÊ `V>Ìi`Ê Ê w}°Ê Óx®°Ê >iÊ ÃÕÀiÊ Ì
>ÌÊ Ì
iÊ
plastic disc pin is inserted inside the hole in the
gasket as indicated by the arrow in (fig. 25).
UÊ ,iÃiÀÌÊÌ
iÊÕÌÊLÌ>i`ÊÌÊÌ
iÊÃÌiiÊVÌ>iÀÊ
for the filter (fig. 26), making sure that the pin is
inserted into the hole of the support itself (see
arrow fig. 26).
UÊ >Þ]ÊÌ}
ÌiÊÌ
iÊÌ>«°
Attention: the cappuccino maker must always be
washed after use to ensure hygiene.
Proceed as follows:
1. Discharge a small amount of steam for a few
seconds (see points 2,5 and 6 of the previous
paragraph) by turning the steam knob (fig. 18). By
doing this, the cappuccino maker empties any milk
left inside. Switch the machine off by pressing the
ON/OFF button.
2. Use one hand to hold the cappuccino tube and the
other to release the cappuccino maker by turning it
clockwise and pulling it downwards (fig. 19).
Î°Ê ,iÛiÊÌ
iÊÃÌi>ÊââiÊvÀÊÌ
iÊÌÕLiÊLÞÊ«Õ}Ê
it downwards (fig. 20).
4. Wash the cappuccino maker and steam nozzle
thoroughly in warm water.
x°Ê >iÊ ÃÕÀiÊ Ì
>ÌÊ Ì
iÊ ÌÜÊ
iÃÊ `V>Ìi`Ê LÞÊ Ì
iÊ
arrows in fig. 21 are not blocked. Clean using a pin
if necessary.
È°Ê ,iÕÌÊ Ì
iÊ ÃÌi>Ê ââiÊ LÞÊ ÃiÀÌ}Ê ÌÊ wÀÞÊ
upwards into the steam tube.
Ç°Ê ,iÕÌÊ Ì
iÊ V>««ÕVVÊ >iÀÊ LÞÊ ÃiÀÌ}Ê ÌÊ
upwards and turning it anti-clockwise.
The warranty is not valid if the cleaning operations
described above are not performed on a regular
basis.
Cleaning the boiler outlet
About every 200 coffees the espresso boiler outlet must
be cleaned as follows:
UÊ >iÊÃÕÀiÊÌ
>ÌÊÌ
iÊVvviiÊ>V
iÊÃÊÌÊ
ÌÊ>`Ê
the plug is disconnected from the socket;
UÊÊ 1ÃiÊ >Ê ÃVÀiÜ`ÀÛiÀÊ ÌÊ ÀiÛiÊ Ì
iÊ ÃVÀiÜÊ Ì
>ÌÊ wÝiÃÊ
the espresso boiler outlet (fig. 27);
UÊÊ ,iÛiÊÌ
iÊLiÀÊÕÌiÌÆ
UÊÊ i>ÊÌ
iÊLiÀÊÕÃ}Ê>Ê`>«ÊVÌ
Êw}°ÊÓÇ®ÆÊ
UÊÊ i>ÊÌ
iÊÕÌiÌÊÌ
ÀÕ}
ÞÊÕÃ}Ê
ÌÊÜ>ÌiÀÊ>`Ê>Ê
LÀÕÃ
°Ê
iVÊÌ
>ÌÊÌ
iÊ
iÃÊ>ÀiÊÌÊLVi`°ÊvÊÌ
ÃÊ
is not the case, clean them using a pin (fig. 24).
UÊÊ ,ÃiÊ Ì
iÊ ÕÌiÌÊ Õ`iÀÊ Ì
iÊ Ì>«]Ê ÀÕLL}Ê
continuously.
UÊÊ ,iÕÌÊ Ì
iÊ LiÀÊ ÕÌiÌ]Ê «>Þ}Ê >ÌÌiÌÊ ÌÊ
position it correctly on the gasket.
PRODUCING HOT WATER
1. Switch the machine on by pressing the on/off
button (fig. 4). Wait for the OK light to switch on
(fig. 6).
2. Position a container under the cappuccino maker.
3. Press the coffee button (fig. 7) and turn the steam
knob anti-clockwise at the same time (fig. 18): the
hot water will escape from the cappuccino maker.
4. To interrupt the hot water, turn the steam knob
clockwise and press the coffee button again (fig.
7).
>ÝÕÊ `iÛiÀÞÊ
recommended.
vÊ
ÈäÊ
ÃiV`ÃÊ
The warranty is not valid if the cleaning operations
described above are not performed on a regular
basis.
ÃÊ
9
Other cleaning operations
1. Do not use solvents or abrasive detergents to clean
the machine. Use a soft, damp cloth.
2. Clean the filter-holder cup, the filters, drip tray and
water tank regularly.
To empty the drip tray, remove the cup warmer
grid, remove the water and clean the tray using a
cloth: then re-assemble the drip tray.
Clean the water tank using a soft bottle-brush in
order to reach the bottom.
providing this service.
Disposing of a household appliance separately avoids
possible negative consequences for the environment
and health deriving from unsuitable disposal and allows
to recover the materials of which it is made in order to
make significant savings in energy and resources.
The product has the crossed-out wheeled bin mark as
a reminder of the obligation to dispose of household
appliances separately.
TECHNICAL DATA
Danger! During cleaning, never immerse the
machine in water: it is an electric appliance.
>ÃÊÛÌ>}i\ÊÊ
Ê
Absorbed power:
Pressure:
Water tank capacity:
iÃÃÊÝÝÊÊÊ
Weight
DESCALING
ÌÊÃÊÀiVi`i`ÊÌÊ`iÃV>iÊÌ
iÊ>V
iÊ>LÕÌÊiÛiÀÞÊ
200 coffees.
ÌÊÃÊÀiVi`i`ÊÌÊÕÃiÊi½}
Ê`iÃV>iÀÊÌ
>ÌÊV>Ê
be found on the market.
Follow this procedure:
1. Fill the tank with the descaling solution obtained
by diluting the descaler with water following the
indications given on the pack.
2. Press the on/off button and wait for the OK light to
switch on.
ΰÊÊ >iÊÃÕÀiÊÌ
>ÌÊÌ
iÊwÌiÀÊ
`iÀÊÃÊÌÊ>ÌÌ>V
i`Ê>`Ê
position a suitable container under the machine
outlet.
4. Press the coffee button and allow about 1/4 of the
solution contained in the tank flow out: every now
and again turn the steam knob and allow a small
amount of solution to escape; then interrupt by
pressing the button again and leave the solution to
act for about 5 minutes.
x°ÊÊ ,i«i>ÌÊ «ÌÊ {Ê >Ì
iÀÊ ÎÊ ÌiÃ]Ê ÕÌÊ Ì
iÊ Ì>Ê ÃÊ
completely empty.
6. To eliminate residues of the descaling solution,
rinse the tank well and fill it with clean water.
7. Press the coffee button (fig. 6) and operate the
appliance until the tank is completely empty.
n°ÊÊ ,i«i>ÌÊ«iÀ>ÌÃÊÈÊ>`ÊÇÊ>}>°
ÓÓäÓ{ä6HxäÉÈäâ
1100W
15 bar
1,4 litres
ÓxxÝΣxÝÓnäÊÎx®Ê
3,9 kg
The appliance is in compliance with the
following CE Directives:
UÊ ºÜÊ ÛÌ>}iÊ ÀiVÌÛi»Ê ÓääÈÉxÉ
Ê >`Ê
suc¬cessive amendments.
UÊ º
ÊÀiVÌÛi»ÊÊ
ÊÓää{É£änÉ
Êand suc¬cessive
amendments.
UÊ /
iÊ >ÌiÀ>ÃÊ >`Ê LiVÌÃÊ `iÃÌi`Ê ÌÊ ViÊ ÌÊ
contact with food stuffs are in compliance with the
provisions of the 1935/2004 European Standard.
,i«>ÀÃÊ ÌÊ Ì
iÊ VvviiÊ >V
iÊ Ài>ÌÛiÊ ÌÊ iÊ
scale problems are not covered by the warranty
if the above-described descaling is not performed
on a regular basis.
DISPOSAL
,iVi`>ÌÃÊ vÀÊ Ì
iÊ VÀÀiVÌÊ `ëÃ>Ê vÊ Ì
iÊ
product in compliance with the 2002/96/CE European
Directive.
The product must not be disposed of as urban
waste at the end of its working life.
ÌÊ ÕÃÌÊ LiÊ Ì>iÊ ÌÊ >««À«À>ÌiÊ V>Ê >ÕÌ
ÀÌÞÊ
separate waste collection centres or to dealers
10
PROBLEM
POSSIBLE CAUSES
SOLUTION
Espresso coffee does not flow out
UÊ
UÊ
ÊÌ
iÊÜ>ÌiÀÊÌ>
Espresso coffee drips from the edges of the filter-holder instead of
through the holes
The espresso coffee is cold
Loud pump noise
The coffee flows quickly from the
spout
UÊ
/
iÊ
iÃÊÊÌ
iÊwÌiÀ
`iÀÊ>ÀiÊLVi`
UÊ
i>ÊÌ
iÊ
iÃÊÊÌ
iÊwÌiÀ
`iÀÊëÕÌÃ
UÊ
/
iÊiëÀiÃÃÊLiÀÊÕÌiÌÊÃÊLVi`
UÊ
i>Ê>ÃÊ`V>Ìi`ÊÊÌ
iʺ
i>}ÊÌ
iÊ
boiler outlet” paragraph
UÊ
/
iÊwÌiÀ
`iÀÊÃÊÃiÀÌi`ÊVÀÀiVÌÞ
UÊ
ÌÌ>V
ÊÌ
iÊwÌiÀ
`iÀÊVÀÀiVÌÞÊ>`ÊÌÕÀÊ
it fully home firmly to the right
UÊ
/
iÊiëÀiÃÃÊLiÀÊ}>ÃiÌÊ
>ÃÊÃÌÊ
elasticity
UÊ
,i«>ViÊÌ
iÊiëÀiÃÃÊLiÀÊ}>ÃiÌÊ>ÌÊ>Ê
After-Sales Centre
UÊ
/
iÊ
iÃÊÊÌ
iÊwÌiÀ
`iÀÊëÕÌÊ>ÀiÊ
blocked
UÊ
i>ÊÌ
iÊ
iÃÊÊÌ
iÊëÕÌð
UÊ
/
iÊiëÀiÃÃÊ"Ê}
ÌÊÃÊÌÊÊÜ
iÊÌ
iÊ
coffee button is pressed
UÊ
7>ÌÊvÀÊÌ
iÊ"Ê}
ÌÊÌÊÃÜÌV
Ê
UÊ
*Ài
i>Ì}Ê
>ÃÊÌÊLiiÊV>ÀÀi`ÊÕÌ
UÊ
*Ài
i>ÌÊ>ÃÊ`V>Ìi`ÊÊÌ
iÊ«>À>}À>«
UÊ
/
iÊVÕ«ÃÊ
>ÛiÊÌÊLiiÊ«Ài
i>Ìi`
UÊ
*Ài
i>ÌÊÌ
iÊVÕ«ÃÊÕÃ}Ê
ÌÊÜ>ÌiÀÊÀÊ
leaving them for at least 20 minutes on
the cup warmer plate on the lid
UÊ
/
iÊÜ>ÌiÀÊÌ>ÊÃÊi«ÌÞ
UÊ
ÊÌ
iÊÜ>ÌiÀÊÌ>
UÊ
/
iÊÌ>ÊÃÊÃiÀÌi`ÊVÀÀiVÌÞÊ>`ÊÌ
iÊ
valve on the bottom is not open
UÊ
*ÀiÃÃÊÌ
iÊÌ>Ê}
ÌÞÊÌÊ«iÊÌ
iÊÛ>ÛiÊ
on the bottom
UÊ
/
iÊ}ÀÕ`ÊVvviiÊ
>ÃÊÌÊLiiÊ
sufficiently pressed
UÊ
/>«iÀÊÌ
iÊ}ÀÕ`ÊVvviiÊÀiÊw}°Ê£ä®®
UÊ
VÀi>ÃiÊÌ
iÊ>ÕÌÊvÊ}ÀÕ`ÊVvvii
UÊ
/
iÊVvviiÊÃÊÌÊ}ÀÕ`ÊwiÞÊiÕ}
UÊ
"ÞÊÕÃiÊVvviiÊ}ÀÕ`ÊëiVwV>ÞÊvÀÊ
espresso coffee machines
UÊ
VÀÀiVÌÊÌÞ«iÊvÊ}ÀÕ`ÊVvvii
UÊ
>}iÊÌ
iʵÕ>ÌÞÊvÊÌ
iÊ}ÀÕ`ÊVvvii
UÊ
1Ãiʼ-½Ê*`
ʼ-½Ê*`
UÊ
/
iÊ}ÀÕ`ÊVvviiÊÃÊÌÊÌ}
ÌÞÊ«ÀiÃÃi`
UÊ
/>«iÀÊÌ
iÊVvviiÊiÃÃÊw}°ÊÈ®
UÊ
/ÊÕV
Ê}ÀÕ`ÊVvvii
UÊ
iVÀi>ÃiÊÌ
iÊ>ÕÌÊvÊ}ÀÕ`ÊVvvii
UÊ
/
iÊiëÀiÃÃÊLiÀÊÕÌiÌÊÃÊLVi`
UÊ
i>Ê>ÃÊ`V>Ìi`ÊÊÌ
iʺ
i>}ÊÌ
iÊ
espresso boiler outlet” chapter.
UÊ
/
iÊwÌiÀÊÃÊLVi`
UÊ
i>Ê>ÃÊ`V>Ìi`ÊÊÌ
iʺ
i>}ÊÌ
iÊ
filter” par.
UÊ
/
iÊVvviiÊÃÊÌÊwiÞÊ}ÀÕ`Ê
UÊ
"ÞÊÕÃiÊVvviiÊ}ÀÕ`ÊëiVwV>ÞÊvÀÊ
espresso coffee machines
UÊ
/
iÊ}ÀÕ`ÊVvviiÊÃÊÌÊwiÊÀÊÃÊ`>«
UÊ
"ÞÊÕÃiÊVvviiÊ}ÀÕ`ÊëiVwV>ÞÊvÀÊ
espresso coffee machines and it must
not be damp
UÊ
VÀÀiVÌÊÌÞ«iÊvÊ}ÀÕ`ÊVvvii
UÊ
>}iÊÌ
iʵÕ>ÌÞÊvÊÌ
iÊ}ÀÕ`ÊVvviiÊ
powder
UÊ
1Ãiʼ-½Ê*`
UÊ
The milk does not froth when making a cappuccino
ÌÊiÕ}
Ê}ÀÕ`ÊVvvii
UÊ
UÊ
The coffee flows slowly from the
spout
ÊÜ>ÌiÀÊÊÌ
iÊÌ>
ʼ-½Ê*`
UÊ
/
iÊÊÃÊÌÊV`ÊiÕ}
UÊ
Ü>ÞÃÊÕÃiÊÊ>ÌÊÀivÀ}iÀ>ÌÀÊ
temperature
UÊ
/
iÊV>««ÕVVÊ>iÀÊÃÊ`ÀÌÞ
UÊ
>ÀivÕÞÊVi>ÊÌ
iÊ
iÃÊÊÌ
iÊ
cappuccino maker, in particular, those
indicated in figure 21
11