1
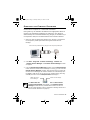
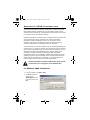
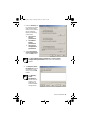
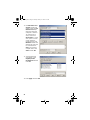
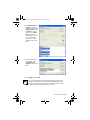
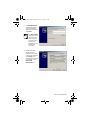
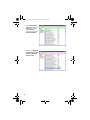
INSTEI_02.fm Page -1 Monday, January 26, 2004 2:11 PM
CENTAUR V3.1
INSTALLATION GUIDE
INSTEI_02.fm Page 0 Monday, January 26, 2004 2:11 PM
INSTEI_02.fm Page 1 Monday, January 26, 2004 2:11 PM
TABLE
OF
CONTENTS
What’s New in V3.1.................................................................. 2
New Features in Centaur V3.1 ..................................................... 2
New Features in Pro-Report V3.1 ................................................. 2
Introduction ............................................................................ 3
Centaur Server......................................................................... 3
Computer Requirements (Centaur Server) .....................................
Operating System Requirements (Centaur Server) .........................
CT-V900-A Controller Requirements .............................................
Before installing the Centaur software...........................................
Installing/Updating the Centaur Server .........................................
3
4
4
5
5
Centaur Administration Console (User Interface) .................... 8
Computer Requirements (Workstation) ......................................... 8
Operating System Requirements (Workstation) .............................. 8
Installing/Updating the Administration Console (User Interface) ....... 9
Starting the Centaur Software ............................................... 13
Registering the Centaur Software .......................................... 15
Problems? ................................................................................ 15
Appendix A: DCOM Configuration ........................................... 16
For Windows 2000 Professional ................................................... 16
For Windows XP Professional ...................................................... 21
Appendix B: Programming Windows Users on the Centaur Server
Computer ............................................................................... 26
For Windows 2000 Professional ................................................... 26
For Windows XP Professional ...................................................... 28
Appendix C: Setting Centaur as a Service Under Windows ..... 31
Appendix D: Enabling Network Access On Windows XP.......... 33
INSTALLATION GUIDE 1
INSTEI_02.fm Page 2 Monday, January 26, 2004 2:11 PM
WHAT’S NEW
IN
V 3.1
New Features in Centaur V3.1
• All of the software modules can now be automatically installed with
the Centaur Server CD or Workstation CD and no longer require a
separate licence (hardware key) to run on a networked workstation
with the exception of FrontView. The software modules include
FrontCard, Card Import/Export (server only), Database
Management (server only), Database Backup Scheduler (server
only), FrontGuard, Card Locator, WavePlayer, and Pro-Report 3.1
(which now includes Tracker).
• The Site Configuration Wizard guides you through the necessary
steps to get the site communicating with its controllers when
starting Centaur for the first time or when adding a new site (i.e.,
select the site’s Communication type, the number of controllers,
the controller’s Input Configuration, and the doors’ Settings).
• The Controller Configuration Wizard allows you to automatically
create and link doors, inputs, and outputs when adding controllers.
• The Database Backup Scheduler enables you to schedule regular
backups of the Centaur databases. You can back up the Main
database and the Event database separately, specify the location of
the backup files, and select how often the backup will occur.
• You can now select the desired Centaur or Pro-Report language
from the Logon window instead of installing separate Centaur
Administration Consoles or Pro-Report software for each language.
• You can limit the use of certain software modules to specific
Operators.
• Events in the Tree window will now appear in bold if they have
been modified from their default values.
• You can now reset an event’s definition by right-clicking on the
desired event in the Tree window and selecting Reset Settings.
• You can enable or disable a Door Group from the Tree window or
using System Events.
New Features in Pro-Report V3.1
• The Tracker Time and Attendance software is now an integral part
of Pro-Report and is no longer offered as a separate software. A
separate hardware key is no longer required.
• Addition of Absence, Operator Action, and Card Usage Reports.
• Import settings from previous Pro-Report and Tracker databases.
• Back up and restore Pro-Report and Tracker databases.
• And more.
2
INSTEI_02.fm Page 3 Monday, January 26, 2004 2:11 PM
INTRODUCTION
This manual details how to install the Centaur software including the
Centaur Server and Administration Consoles available on the Centaur
Server CD and the Centaur Workstation CD.
Each edition of the Centaur software (Lite, Standard, Professional and
Enterprise) has two different applications - the Server and the
Administration Console (User Interface). Please note that the terms
Administration Console (User Interface) and Workstation both refer to
the same software User Interface, and are used interchangeably.
In a brand new installation, the Centaur Server must be installed first.
CENTAUR SERVER
Using the Centaur Server CD, install the Centaur Server on the
computer where all the CT-V900-A controllers are or will be connected.
The Centaur Server manages the controllers and maintains the access
control system’s databases. The Centaur Server CD includes the
Centaur Server, the Server’s Administration Console, several software
modules (refer to “What’s New in V3.1” on page 2), and the reference
manuals for these software components. The Administration Console is
automatically installed with the Server and supports three languages
simultaneously. Each Centaur Server CD comes with a hardware key
(dongle) that will set the Centaur edition to either Lite, Standard,
Professional or Enterprise. If a hardware key (dongle) is not connected
to the Centaur Server computer, Centaur will run as a Demo Edition (no
communication). In installations where remote workstations will access
the Server through a network, DCOM must be configured on the
Centaur Server computer (refer to "Appendix A:DCOM Configuration"
on page 16), and the Server must be installed on a Windows 2000/XP
operating system (refer to “Operating System Requirements (Centaur
Server)” on page 4).
Computer Requirements (Centaur Server)
The Centaur Server is designed to operate with IBM or IBM compatible
computers running a suitable Windows operating system as detailed in
the "Operating System Requirements (Centaur Server)" on page 4.
•
•
•
•
Pentium 600MHz or higher
128MB RAM (256MB for superior performance)
300MB free disk space (1GB recommended, 4GB for larger
installations)
RS-232 serial port (depending on the installation, more than
INSTALLATION GUIDE 3
INSTEI_02.fm Page 4 Monday, January 26, 2004 2:11 PM
•
•
one may be required)
For dial-up sites, the Centaur Server and each dial-up site
requires a US Robotics Sportster 56k baud modem (external/
internal). Other modems can be used, but we recommend the
above-mentioned modem. WinModems are not supported.
Super VGA Monitor
Operating System Requirements (Centaur Server)
The Centaur Server has been tested on the following operating
systems:
•
•
•
•
Windows
Windows
Spanish)
Windows
Windows
98 Second Edition (English and French)
2000 Professional Edition (English, French and
2000 Server Edition (English, French and Dutch)
XP Professional Edition (English and French)
If you connect workstations to the Server over a network,
the Centaur Server must be installed on a computer with a
Windows 2000/XP operating system.
If the operating system you are using to run Centaur is not listed
above, please contact Position Technology for an updated list.
Other software requirements (available on the CD):
•
•
•
•
•
DCOM
MDAC 2.5
Microsoft® Database Engine (MSDE)
Microsoft Internet Explorer (version 4.0 and service pack 1 or
higher)
Acrobat Reader 5.0 or higher
CT-V900-A Controller Requirements
CT-V900-A Rev. 200/210/220/230/260 require firmware R2-C3-31 or
higher.
CT-V900-A Rev. 100/110 require firmware R1-C1-71 or higher.
The required firmware files are available on the Centaur Server CD. To
access these files, insert the Centaur Server CD, click Firmware/
Manuals and then Firmware. For more information on how to update
the controllers online, refer to “Update Firmware” in the Centaur
Reference Manual or Online Help.
4
INSTEI_02.fm Page 5 Monday, January 26, 2004 2:11 PM
Before installing the Centaur software
It is important that you read the latest installation instructions before
installing the Centaur software. To access the latest version of the
installation instructions, insert the Centaur Server CD, click Firmware/
Manuals, View Manuals and then select the required manual.
Please note that for CT-V900-A controllers Rev. 100 or 110,
the firmware cannot be updated using a modem connection.
Installing/Updating the Centaur Server
This section describes how to install or update the Centaur Server.
To install software and applications on Windows 2000/XP
operating systems, you must be logged on as the
Administrator.
1. Insert the Centaur Server CD into the computer’s CD-ROM drive.
2. If the auto run feature is enabled, go to step 4. Otherwise, click Run
from the Start menu.
3. Type the appropriate drive indicator (x:\) followed by the path
containing the C3setup.exe file or click Browse to search for the
C3setup.exe file. Click OK.
4. The Full Installation window will appear. From the menu, click
Automatic Install.
When you select Automatic Install, Centaur installs all
operating prerequisites, the Centaur Server, and the Server’s
Administration Console by default.
We strongly recommend that Manual Install be used only by
experienced Centaur Installers. In a Manual Install, all software
components must be installed separately.
INSTALLATION GUIDE 5
INSTEI_02.fm Page 6 Monday, January 26, 2004 2:11 PM
View the release.txt file
containing the latest
product release
information.
Automatically install all
operating system
requirements and the
Centaur software.
For advanced installations,
you can individually install
each prerequisite and the
Centaur software.
Install Pro-Report,
FrontView, Acrobat Reader,
or the Database Updater.
Access the latest controller
firmware files and install
the Centaur manuals.
View the CD content.
View Position Technology’s
contact information.
5. The Automatic Install window will appear. Click Centaur Server.
6. The Prerequisites Installation window will appear. Click Next.
7. Setup will automatically detect and list which prerequisites have not
been installed on your computer. To install the required software
components, click Next and follow the on-screen instructions. If you
already have all prerequisites, Setup will skip this step (go to step 8).
8. When Setup has completed the installation of the required software
components, the Prerequisites Installation window will appear. Click
Finish.
9. If this is a new installation of the Centaur Server, go to step 10. To
update previously installed software, select Update, then click Next,
then click Finish.
10. The Choose Setup Language window will appear. From the drop-down
list, select the language that Setup will use during the installation. Click
OK.
11. The Welcome window will appear. Click Next to begin the installation of
the Centaur Server.
12. The License Agreement window will appear. To install the Centaur
Server, select I accept the terms of the license agreement and then
click Next.
6
INSTEI_02.fm Page 7 Monday, January 26, 2004 2:11 PM
13. The Setup Type window will appear. The installation procedures
detailed in this section apply to the Complete Setup Type. Select
Complete and then click Next.
When you select Complete, Centaur installs all operating
prerequisites, the Centaur Server, the Server’s Administration
Console, Pro-Report, FrontView, FrontGuard, FrontCard, Card
Locator, Card Import/Export, Database Management Module,
Database Backup Scheduler, WavePlayer, and the software
reference manuals by default.
We strongly recommend that Custom Setup be used only by
experienced Centaur Installers. In a Custom Setup, only the
operating prerequisites, Centaur Server, and the Server’s
Administration Console install by default.
14. The Choose Destination Location window will appear. We recommend
that you do not change the destination location. Click Next.
15. The Select Program Folder window will appear. Select the desired
folder and then click Next.
16. The Selecting Languages window will appear. The Centaur Server
supports three languages. English is automatically supported by default.
Select two other languages and then click Next.
If you select either Greek or Bulgarian, the Windows
operating system must be compatible with the selected
language. Please note that Greek and Bulgarian are not
supported on the same installation.
17. The Ready to Install the Program window will appear. Type your
name and company name in the appropriate text boxes. Then type the
Centaur and FrontView serial numbers in the appropriate text boxes.
The serial numbers can be found on the Centaur CD-ROM package. Click
Next.
18. The Start Copying Files window will appear. Review the information
and then click Next.
19. The InstallShield Wizard Complete window will appear. Select if you
wish to restart your computer now or later. Click Finish.
Before you can use the Centaur program, you must restart your
computer.
INSTALLATION GUIDE 7
INSTEI_02.fm Page 8 Monday, January 26, 2004 2:11 PM
CENTAUR ADMINISTRATION CONSOLE (USER
INTERFACE)
This section describes how to install a Centaur Administration Console
(User Interface) on a networked workstation.
The Centaur Administration Console (User Interface) is installed on a
networked workstation computer using the Centaur Workstation CD.
The Centaur Administration Console (User Interface) allows operators
to monitor and manage the access control system remotely by
accessing the Centaur Server’s databases and its network of CT-V900-A
controllers through a network.
Each workstation computer connected to the Centaur Server through a
network must have a Centaur Workstation Software License and the
corresponding hardware key (dongle) connected to the workstation’s
parallel port.
In order for a remote workstation to access the Server,
DCOM must be configured on the Centaur Server computer
(refer to "Appendix A:DCOM Configuration" on page 16).
Computer Requirements (Workstation)
The Centaur software is designed to operate with IBM or IBM
compatible computers running a suitable Microsoft Windows operating
system as detailed in the Operating System Requirements below.
•
•
•
•
Pentium 600MHz or higher
128MB RAM (256MB for superior performance)
300MB free disk space
Super VGA Monitor
Operating System Requirements (Workstation)
The Centaur Administration Console (User Interface) has been tested
on the following operating systems:
•
•
•
•
8
Windows
Windows
Spanish)
Windows
Windows
98 Second Edition (English and French)
2000 Professional Edition (English, French and
2000 Server Edition (English, French and Dutch)
XP Professional Edition (English and French)
INSTEI_02.fm Page 9 Monday, January 26, 2004 2:11 PM
If you connect workstations to the Server over a network,
the Centaur Server must be installed on a computer with a
Windows 2000/XP operating system.
If the operating system you are using to run Centaur is not listed,
please contact Position Technology for an updated list.
Other software requirements include (available on the CD):
•
•
•
•
DCOM
MDAC 2.5
Microsoft Internet Explorer (version 4.0 and service pack 1 or
higher)
Acrobat Reader 5.0 or higher
Installing/Updating the Administration Console
(User Interface)
This section describes how to install or update the Centaur
Administration Console (User Interface).
1. Insert the Centaur Workstation CD into the computer’s CD-ROM drive.
2. If the auto run feature is enabled, go to step 4. Otherwise, click Run
from the Start menu.
3. Type the appropriate drive indicator (x:\) followed by the path
containing the C3setup.exe file or click Browse to search for the
C3setup.exe file. Click OK.
4. The Workstation window will appear. From the menu, click Centaur
Installation.
When you select Centaur Installation, Centaur installs all
operating prerequisites, the Administration Console (User
Interface), Pro-Report, FrontView, and Card Management by
default and also gives the option to install the software
reference manuals.
We strongly recommend that Manual Installation be used only
by experienced Centaur Installers. In a Manual Installation, all
software components must be installed separately.
INSTALLATION GUIDE 9
INSTEI_02.fm Page 10 Monday, January 26, 2004 2:11 PM
View the release.txt file
containing the latest
product release
information.
Automatically install all
operating system
requirements and the
Centaur software.
Install and update the ProReport software.
For advanced installations,
you can individually install
each prerequisite and the
Centaur software.
Access the latest controller
firmware files and install
the Centaur manuals.
View the CD content.
View Position Technology’s
contact information.
5. The Prerequisites Installation window will appear. Click Next.
6. Setup will automatically detect and list which prerequisites have not
been installed on your computer. To install the required software
components, click Next and follow the on-screen instructions. If you
already have all prerequisites, Setup will skip this step (go to step 7).
7. When Setup has completed the installation of the required software
components, the Prerequisites Installation window will appear. Click
Finish.
8. If this is a new installation of the Centaur Administration Console (User
Interface), go to step 9. To update previously installed software, select
Update, then click Next, then click Finish.
9. The Choose Setup Language window will appear. From the drop-down
list, click the language that Setup will use during the installation. Click
OK.
10. The Welcome window will appear. Click Next to begin the installation
process.
11. The License Agreement window will appear. To install the
Administration Console (User Interface), select I accept the terms of
the license agreement and then click Next.
10
INSTEI_02.fm Page 11 Monday, January 26, 2004 2:11 PM
12. If the Centaur Server is not installed on your computer, go to step 13. If
Setup detects an installation of the Centaur Server on your computer,
the Options Selection window will appear. Select if you would like to
use the same information for this installation and then click Next. If you
selected Yes, go to step 16.
13. The Customer Information window will appear. Type your name,
company name and the Centaur serial number in the appropriate text
boxes. The serial number can be found on the Centaur CD-ROM
package. Click Next.
14. The Choose Destination Location window will appear. We recommend
that you do not change the destination folder. Click Next.
15. The Select Program Folder window will appear. Select the desired
folder and then click Next.
16. The Start Copying Files window will appear. Review the information
and then click Next.
17. The Choose Setup Language window will appear. From the drop-down
list, click the language that Setup will use during the installation. Click
OK.
18. The Welcome window will appear. Click Next.
19. The License Agreement window will appear. To install Pro-Report 3.1,
select I accept the terms of the license agreement and then click
Next.
20. The Customer Information window will appear. Type your name and
company name in the appropriate text boxes. Click Next.
21. The Choose Destination Location window will appear. We recommend
that you do not change the destination folder. Click Next.
22. The Select Program Folder window will appear. Select the desired
folder and then click Next.
23. The Start Copying Files window will appear. Review the information
and then click Next.
24. The Options Selection window will appear. Select if you would like to
add an icon for Pro-Report 3.1 to your desktop. Click Next.
INSTALLATION GUIDE 11
INSTEI_02.fm Page 12 Monday, January 26, 2004 2:11 PM
25. The Options Selection window will appear again. Select if you would
like to add icons for the Administration Console (User Interface) and
Card Management to your desktop. Click Next.
26. Select if you would like to install the reference manuals and then click
Next. If you selected No, go to step 34.
27. The Choose Setup Language window will appear. From the drop-down
list, click the language that Setup will use during the installation. Click
OK.
28. The InstallShield Wizard for Centaur Manuals window will appear.
Click Next.
29. The Choose Destination Location window will appear. We recommend
that you do not change the destination folder. Click Next.
30. The Select Components window will appear. Select which manuals you
want to install, then click Next.
31. The Select Program Folder window will appear. Select the desired
folder and then click Next.
32. The Start Copying Files window will appear. Review the information
and then click Next.
33. The InstallShield Wizard Complete window will appear. Click Finish.
34. The InstallShield Wizard Complete window will appear. Select if you
wish to restart your computer now or later. Click Finish.
Before you can use the Centaur program, you must restart your
computer.
12
INSTEI_02.fm Page 13 Monday, January 26, 2004 2:11 PM
STARTING
THE
CENTAUR SOFTWARE
This section describes how to start the Centaur software from the
Centaur Server computer or a networked workstation.
During start-up, the software will default to the appropriate edition of
Centaur (Lite, Standard, Professional or Enterprise). The edition is
determined by the connected hardware key (dongle). A hardware key is
not required to start/run the Demo Edition of the Centaur software.
1. Make sure that the appropriate hardware key (dongle) is connected to
the computer’s parallel port before starting the Centaur Service
Manager.
Connect the 25-pin hardware key (dongle) to the computer’s parallel port.
Male Pins
Printer
2. Click Start JPrograms JPosition Technology JCentaur 3.1
JCentaur Service Manager. The Centaur Service Manager window
will appear.
3. From the Centaur Service Manager window, click the Start/Continue
button. Once the Centaur Service Manager is running, you can close the
Centaur Service Manager window. Also note that when you start the
Centaur Service Manager, the Centaur software will automatically start
the MSDE or SQL Server. If you get an error message during this step,
click OK, and then click the Start/Continue button again.
MSDE (SQL Server)
Service Manager
Centaur Service Manager
The Auto-start service when OS starts and Auto-restart
service when stopped check boxes in the Centaur Service
Manager window are only available when Centaur is set as a
service under Windows (refer to "Appendix C:Setting Centaur as a
Service Under Windows" on page 31).
INSTALLATION GUIDE 13
INSTEI_02.fm Page 14 Monday, January 26, 2004 2:11 PM
4. Click Start JPrograms JPosition Technology JCentaur 3.1
JAdministration Console JAdministration Console. The Logon
window will appear.
If you are starting an additional software, click Start
JPrograms JPosition Technology JCentaur 3.1 Jthe
appropriate software Jthe appropriate software.
5. From the Logon window, type the appropriate Logon ID and
Password. The default Logon ID is Admin and the default Password is
Admin. If you are trying to logon to a Centaur Server that is on a
network, type the Server computer’s network name or IP address in the
Computer text box. Click OK.
To allow access from remote workstations, DCOM must be
configured on the Centaur Server computer (refer to
"Appendix A:DCOM Configuration" on page 16).
To stop the Centaur Service Manager, click Stop. If the Operator
Logon window appears, enter your Centaur Logon ID and
Password and then click Ok. The Operator Logon window will not
appear if Centaur is a service under Windows (refer to "Appendix
C:Setting Centaur as a Service Under Windows" on page 31).
14
INSTEI_02.fm Page 15 Monday, January 26, 2004 2:11 PM
REGISTERING
THE
CENTAUR SOFTWARE
If your software is not registered you will not have access to technical
support or any upgrade information. To register your software:
1. Go to www.postech.ca. From the Support menu, click Software
Registration to access the registration options.
2. Complete the registration form as indicated. You will be required to type a
serial number (i.e. PTC3-000000-0000-0000-DEMO) which can be found on
the Centaur CD-ROM package.
3. When you have entered the required information, click Submit
Registration to register by direct internet connection. If you wish, you
can print the registration form and fax it to Position Technology Inc. at
(450) 491-2313.
Problems?
If you experience any problems during the installation or use of
Centaur and its software components, contact our technical support
team at 1-800-996-9244 or from outside the US or Canada call (450)
491-7444, or logon to our web site at www.postech.ca. You can also
review the release.txt file that is included with the Centaur CD-ROM.
Updated manuals and release files are available on the Position
Technology Web site at www.postech.ca.
INSTALLATION GUIDE 15
INSTEI_02.fm Page 16 Monday, January 26, 2004 2:11 PM
A P P E N D I X A : D C OM C O N F I G U R A T I O N
Centaur uses Distributed Component Object Model (DCOM) to
communicate between its software components. DCOM is a protocol
that enables software components to communicate directly across
multiple network transports, including Internet protocols such as HTTP,
in a reliable, secure, and efficient manner.
DCOM configuration is performed only in situations where operators will
access the Centaur Server computer from remote workstation
computers. DCOM configuration is done on the Centaur Server
computer only and sets its Windows system to allow access from
remote workstations by creating Windows user accounts.
The Centaur Server must be installed (refer to “Installing/Updating the
Centaur Server” on page 5) and the users that will access the Centaur
Server must be programmed in the Centaur Server computer (refer to
"Appendix B:Programming Windows Users on the Centaur Server
Computer" on page 26) before configuring DCOM. The DCOM
Configuration Utility is automatically installed with Windows 2000/XP
operating systems. Since knowledge of the network system that the
Centaur Server is installed on is required, we recommend that the
network administrator perform the DCOM configuration.
Configuring DCOM on Windows 2000/XP operating systems
requires that you are logged on as the Administrator.
For Windows 2000 Professional
1. From the taskbar, click Start JRun.
2. The Run window will
appear. Enter
dcomcnfg.exe in the
text box and then click
OK.
16
INSTEI_02.fm Page 17 Monday, January 26, 2004 2:11 PM
3. The Distributed COM
Configuration
Properties window
will appear. Click
SpxSvr from the list
and then Properties.
4. The SpxSvr
Properties window
will appear. From the
Authentication
Level drop-down list,
click (None).
INSTALLATION GUIDE 17
INSTEI_02.fm Page 18 Monday, January 26, 2004 2:11 PM
5. Click the Location tab
and then select the
Run application on
this computer check
box.
The Run
application on
this computer
check box is
selected by
default.
6. Click the Identity tab
and then select the
The interactive user
check box.
18
INSTEI_02.fm Page 19 Monday, January 26, 2004 2:11 PM
7. Click the Security tab
to configure the users
that will be allowed
access to the Centaur
Server computer.
Select the following
check boxes:
•
Use custom
access
permissions
•
Use default
launch
permissions
•
Use custom
configuration
permissions
8. Under Use custom
access permissions,
click the Edit button.
The Use default launch permissions and Use custom
configuration permissions check boxes are selected by
default.
9. The Registry Value
Permissions window
will appear. To add
users, click the Add
button.
The Registry
Value
Permissions
window may be
empty or not
depending on
previous DCOM
configurations.
INSTALLATION GUIDE 19
INSTEI_02.fm Page 20 Monday, January 26, 2004 2:11 PM
10. The Add Users and
Groups window will
appear. From the List
Names From dropdown list, select the
computer or domain.
To view the list of
users, either click
Show Users or if the
user is part of a user
group, select the
group and then click
Members. Select the
desired user from the
list. Hold down the
SHIFT key to select
multiple users. Click
Add and then OK.
11. The selected users
now appear in the
Registry Value
Permissions window.
Click OK.
12. Click Apply and then OK.
20
INSTEI_02.fm Page 21 Monday, January 26, 2004 2:11 PM
For Windows XP Professional
Ensure that network access is enabled (refer to "Appendix
D:Enabling Network Access On Windows XP" on page 33) before
configuring DCOM on Windows XP.
1. From the taskbar, click Start JRun.
2. The Run window will
appear. Enter
dcomcnfg.exe in the
text box and then click
OK.
3. The Component
Services window will
appear. Expand the
Component
Services,
Computers and
MyComputer
branches, and then
click DCOM Config.
INSTALLATION GUIDE 21
INSTEI_02.fm Page 22 Monday, January 26, 2004 2:11 PM
4. Right-click the SpxSvr
file and then click
Properties.
5. The SpxSvr
Properties window
will appear. From the
Authentication
Level drop-down list,
click (None).
22
INSTEI_02.fm Page 23 Monday, January 26, 2004 2:11 PM
6. Click the Location tab
and then select the
Run application on
this computer check
box.
The Run
application on
this computer
check box is
selected by
default.
7. Click the Identity tab
and then select the
The interactive user
check box.
INSTALLATION GUIDE 23
INSTEI_02.fm Page 24 Monday, January 26, 2004 2:11 PM
8. Click the Security tab
to configure the users
that will be allowed
access to the Centaur
Server computer:
•
Under Launch
Permissions,
click Use
Default.
•
Under Access
Permissions,
click Customize.
•
Under
Configuration
Permissions,
click Customize.
9. Under Access
Permissions, click
the Edit button.
10. The Access
Permission window
will appear. Click the
Add button to add
users.
The Access
Permission
window may or
may not be
empty
depending on
previous DCOM
configurations.
24
INSTEI_02.fm Page 25 Monday, January 26, 2004 2:11 PM
11. The Select Users or
Groups window will
appear. Verify that the
Object Type and the
Location is correct
and then click Find
Now. Select the
desired user from the
list. Hold down the
CTRL key to select
multiple users. Click
OK.
12. The selected users
now appear in the
Select Users or
Groups window. Click
OK.
13. Click Apply and then OK.
For more information on advanced DCOM configuration or the
installation of client/Server functions under Windows 2000/XP,
contact out technical support team at 1-800-996-9244 or from
outside the US or Canada call (450) 491-7444.
INSTALLATION GUIDE 25
INSTEI_02.fm Page 26 Monday, January 26, 2004 2:11 PM
APPENDIX B: PROGRAMMING WINDOWS
USERS ON THE CENTAUR SERVER
COMPUTER
A Windows user is one that can access the Windows application on a
specific computer. During DCOM configuration (refer to "Appendix
A:DCOM Configuration" on page 16), you will be asked to select the
users who will be able to access the Centaur Server computer from a
remote workstation computer. However, in order for users to gain
access to the Centaur Server, they must be programmed as Windows
users within the Centaur Server computer. If the user you wish to select
as a remote user does not have a user account programmed in the
Centaur Server computer, you will not be able to select that user when
configuring DCOM. Programming Windows users in the Centaur Server
computer must be done prior to DCOM configuration.
Programming users on Windows 2000/XP operating
systems requires that you are logged on as the
Administrator.
For Windows 2000 Professional
1. From the taskbar, click Start JSettings JControl Panel.
2. Double-click Users and Passwords.
3. The Users and
Passwords window
will appear. The users
that appear in the list
are already
programmed in the
Centaur Server
computer. Click the
Add button.
26
INSTEI_02.fm Page 27 Monday, January 26, 2004 2:11 PM
4. The Add New User
window will appear.
Type the required
information and then
click Next.
The User name
typed here must
match the user
name typed by
the user when
logging into
Windows on the
workstation
computer.
5. Choose the user’s
access level by
selecting one of the
check boxes and then
click Finish. The
programmed user will
now appear in the
Users and
Passwords list.
INSTALLATION GUIDE 27
INSTEI_02.fm Page 28 Monday, January 26, 2004 2:11 PM
For Windows XP Professional
1. From the taskbar, click Start JSettings JControl Panel.
2. Double-click User Accounts.
3. The User Accounts
window will appear.
Click Create a new
account.
4. Type the user name
and then click Next.
The user name
typed here must
match the user
name typed by
the user when
logging into
Windows on the
workstation
computer.
28
INSTEI_02.fm Page 29 Monday, January 26, 2004 2:11 PM
5. Click an account type
(access level), and
then click Create
Account. The
programmed user will
now appear in the
Users and
Passwords list.
6. The created user will
appear in the User
Accounts window.
Click the created user.
7. Click Create a
password.
INSTALLATION GUIDE 29
INSTEI_02.fm Page 30 Monday, January 26, 2004 2:11 PM
8. Type and confirm a
password for the user,
if necessary type a
password hint, and
then click Create
Password.
The password
typed here must
match the
password typed
by the user when
logging into
Windows on the
workstation
computer.
30
INSTEI_02.fm Page 31 Monday, January 26, 2004 2:11 PM
APPENDIX C: SETTING CENTAUR AS A
SERVICE UNDER WINDOWS
These instructions pertain to Windows 2000/XP operating systems, and
will enable the Auto-start service when OS starts feature in the
Centaur Service Manager. This feature will automatically start the
Centaur Server when you start the computer. You will only need to start
the Centaur Server Administration Console.
1. If the Centaur Service Manager is already stopped and has been exited,
proceed to step 5. Otherwise, from the taskbar, click Start JPrograms
JPosition Technology JCentaur 3.1 JCentaur Service Manager.
The Centaur Service Manager window will appear.
2. Click Stop. The Operator Logon window will appear.
The Operator Logon window will not appear if Centaur is set as a
service under Windows.
3. Enter your Centaur Logon ID and Password and then click Ok. The
default Logon ID is Admin and the default Password is Admin.
4. In the taskbar’s status area, right-click the Centaur Service Manager
icon (see below) and then click Exit.
Centaur Service Manager
5. To manually set Centaur as a service under Command Prompt, go
directly to step 6. Otherwise, open Windows Explorer and locate drive
(C:). Double-click Program Files, double-click Position Technology,
double-click Centaur 3.1, then double-click Service.bat. Proceed to
step 9.
6. To manually set Centaur as a service under Command Prompt, click
Start JPrograms JAccessories JCommand Prompt.
7. The Command Prompt window will appear. Type cd\program
files\position technology\centaur 3.1 and then press [ENTER] on your
keyboard.
INSTALLATION GUIDE 31
INSTEI_02.fm Page 32 Monday, January 26, 2004 2:11 PM
8. Type spxsvr.exe /service and press [ENTER] on your keyboard. Close
the Command Prompt window.
Ensure that there is a space between spxsvr.exe and the front
slash (/).
9. Click Start JPrograms JPosition Technology JCentaur 3.1
JCentaur Service Manager.
10. The Centaur Service Manager window
will appear. Select the Auto-start
service when OS starts check box.
11. If you want the Service Manager to
verify every 5 minutes if the service is
running or not, and then start it if it is
not running, select the Auto-restart
service when stopped check box.
Close the window.
12. Restart your computer. The Centaur Service Manager will now start
automatically. To run Centaur you will only need to click Start
JPrograms JPosition Technology JCentaur 3.1 JAdministration
Console.
The Centaur Service Manager will run in the background and will
not be visible in the status area.
32
INSTEI_02.fm Page 33 Monday, January 26, 2004 2:11 PM
A P P E N D I X D: E N A B L I N G N E T W O R K A C C E S S O N
WINDOWS XP
On computers running Windows XP Professional, network access must
be enabled on the Centaur Server computer prior to configuring DCOM
(refer to "Appendix A:DCOM Configuration" on page 16).
1. From the taskbar, click Start JSettings JControl Panel.
2. Double-click
Administrative
Tools.
3. Double-click Local
Security Policy.
INSTALLATION GUIDE 33
INSTEI_02.fm Page 34 Monday, January 26, 2004 2:11 PM
4. The Local Security
Settings window will
appear. Expand the
Local Policies
branch, and then click
Security Options.
5. Double-click Network
Access: Sharing and
security model for
local account.
34
INSTEI_02.fm Page 35 Monday, January 26, 2004 2:11 PM
6. The Network
Access: Sharing and
security model for
local account window
will appear. From the
drop-down list, click
Classic - local users
authenticate as
themselves and then
click Ok.
INSTALLATION GUIDE 35
INSTEI_02.fm Page 36 Monday, January 26, 2004 2:11 PM
© 2002-2004 Position Technology INC. All rights reserved.
Specifications may change without prior notice. Centaur is a
trademark or registered trademark of Position Technology INC. or
its affiliates in Canada, the United States and/or other countries.
Microsoft and Windows are registered trademarks of Microsoft
Corporation. IBM is a registered trademark of IBM Corporation.
Sportster is a registered trademark of U.S. Robotics.
INSTEI_02.fm Page 37 Monday, January 26, 2004 2:11 PM
INSTEI_02.fm Page 38 Monday, January 26, 2004 2:11 PM
is an affiliated company of
780 boul. Industriel, St-Eustache, Québec, J7R 5V3 CANADA
Tel: (450) 491-7444 Fax: (450) 491-2313
www.postech.ca
INST-EI02
Printed in Canada 01/2004


![[ ] playback mode](http://vs1.manualzilla.com/store/data/005894332_1-eb04455062e124c285a30d79ed1ad6c3-150x150.png)