1
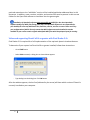
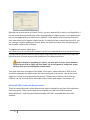
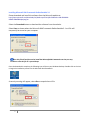
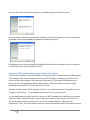
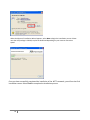
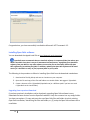
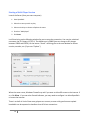
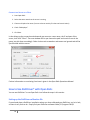
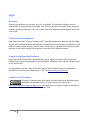
Open Rails
Installation Manual
Version 0.9
1
Table of Contents
Version .................................................................................................................................................... 3
Overview ................................................................................................................................................. 3
System Requirements ......................................................................................................................... 3
For the future...................................................................................................................................... 3
Supported Operating Systems ............................................................................................................ 4
Technical Requirements – Software ................................................................................................... 4
Installation Procedure ............................................................................................................................ 4
Working installation of Microsoft Train Simulator ............................................................................. 4
Video card supporting DirectX v9.0c or greater with Pixel Shader 2.0+ ............................................ 5
Microsoft XNA Framework Requirements .......................................................................................... 6
Installing Microsoft XNA Framework Redistributable 3.1 .............................................................. 7
Upgrade of .NET Framework Requirements for Open Rails software............................................ 8
Installing Microsoft .NET Framework 3.5 Service Pack 1 (SP1) Redistributable ............................ 9
Installing Open Rails software .......................................................................................................... 11
Upgrading from a previous Download ......................................................................................... 11
Uninstalling Open Rails software ................................................................................................. 12
Video Card Settings ...................................................................................................................... 12
Using Open Rails without MSTS Installed ......................................................................................... 12
Checking your Installation .................................................................................................................... 12
Using Multi-Player Server or Client Features ....................................................................................... 14
Getting Started ................................................................................................................................. 14
Requirements ............................................................................................................................... 14
Technical Issues ............................................................................................................................ 14
Technical Support ......................................................................................................................... 14
Starting a Multi-Player Session ......................................................................................................... 15
Connect to a Server as a Client ..................................................................................................... 16
How to Use RailDriver® with Open Rails .............................................................................................. 16
Setting up the RailDriver calibration file........................................................................................... 16
Driving with your RailDriver in Open Rails ....................................................................................... 18
Legal ...................................................................................................................................................... 20
Warranty ........................................................................................................................................... 20
Trademark Acknowledgment ........................................................................................................... 20
License for the Open Rails Software ................................................................................................. 20
License for this Document ................................................................................................................ 20
2
Version
This document is based on version 0.9.
Overview
System Requirements
Currently, Open Rails software requires a similar hardware specification as Microsoft Train Simulator
(MSTS) with one major exception: Open Rails software requires a video card compatible with
DirectX 9.0c and Pixel Shader 2.0.
One of the major breakthroughs achieved by the Open Rails software is that it places less demand
on the CPU for processing information and rendering the graphics. These requirements are now
placed on the GPU, instead of the CPU. For this reason, Open Rails recommends a video card with
256MB GPU RAM for decent performance. In addition, Open Rails will spread the game execution
threads across four CPUs so users with multi-core CPUs will experience significantly better
performance than users with single core CPUs. Certainly, a single core 2.8+ GHz CPU will experience
acceptable game performance.
As Open Rails software offers the ability to have richer, more detailed route environments,
professional grade physics simulation, and other more compute-costly features, the performance of
Open Rails will be in a direct ratio with the quality of the system it’s running on.
For the future
Open Rails software is aimed at the serious hobbyist. Open Rails software is being developed
specifically for a train sim community member who cares about loco physics, train handling, signals
and intelligent AI behavior. We believe those users are willing to invest in a more powerful
computer to ensure they get the results they want. Therefore, development of the Open Rails
software will be focused on optimizing its performance on multi-core CPU systems with mid-to-high
end graphics cards. It would be nice to support the less powerful computers, and it’s technically
possible to do so, but with limited resources, the Open Rails development team assigns a lower
priority to this.
3
Supported Operating Systems
Open Rails software strives to support Windows XP (SP2 and later), Windows Vista, Windows 7 and
Windows 8.
Open Rails is not compatible with Microsoft's XBox and Windows RT products.
Open Rails software does not certify any operating system as “supported”.
The operating systems listed above are based on reports from community users that have the Open
Rails software running. Note, your system and configuration may be different from another person’s
setup. Therefore, Open Rails software may require configuration changes to your individual system
to run the Open Rails software or to get the same performance as another user.
Technical Requirements – Software
You must have the following installed and properly configured:
1. A working installation of MSTS (This is the currently general requirement although Open Rails can be
used without MSTS. This is discussed further later in this document).
2. DirectX v9.0c or greater with Pixel Shader 2.0 (free download).
3. Microsoft XNA Framework Redistributable 3.1 (free download).
4. Microsoft .NET Framework 3.5 SP1 Redistributable (free download).
5. Open Rails software (free download).
6. [optional] Raildriver® control console.
Installation Procedure
Working installation of Microsoft Train Simulator
Currently a working installation of Microsoft Train Simulator (MSTS) is required for Open Rails
software, including all the main folders such as Global, Routes, Sound and Trains. Open Rails
software uses the Microsoft Train Simulator entries in the Windows registry to find where your
Microsoft Train Simulator files are located on your computer. If you have MSTS installed on a nondefault drive, or if you have multiple MSTS installation folders for route grouping, please pay
4
particular attention to the “add folder” section of the installed application addressed later in this
document. In addition, route, consists, activities, and services files must be present in their correct
folders for the Open Rails software to read them into the game engine.
Installation of Open Rails software does not modify any MSTS files. Nor does Open Rails
software modify any MSTS files during game play. The Open Rails software is not responsible for
your inability to access any MSTS train sets, activities, consists, services or routes. Those are set by
your configuration of MSTS. The only reason that MSTS software must be installed is to make
available to your routes certain original and default MSTS files which they depend upon for running.
Video card supporting DirectX v9.0c or greater with Pixel Shader 2.0+
Pixel Shader 3.0 is required for a full implementation of the optional dynamic shadows features.
To determine if your system has DirectX v9.0c or greater installed, follow these instructions:
-
Go to START menu
-
Select RUN command; a dialog box as shown below appears
-
Type dxdiag into the dialog box. Click OK button
After the window appears, the last line (indicated by the arrow) will show which version of DirectX is
currently installed on your computer.
5
Although the current version of DirectX is ver11, you only need ver9.0c in order to run Open Rails. If
this test shows that you already have v9.0c, then upgrading to a higher version is not needed, and it
may not be supported by your video card. In addition, if your version of DirectX is less than v9.0c,
your video card may not support a higher version. If indeed you have a version less than v9.0c, you
are *strongly* urged to update your system with a new video card rather than risk updating your
old card with a new version of DirectX.
To upgrade your system, please go to
http://www.microsoft.com/downloads/en/details.aspx?FamilyID=2da43d38-db71-4c1b-bc6a-9b6652cd92a3
to download the correct version of DirectX. Many major video card manufacturers will install the
optimal version of DirectX as part of the installation of the video card drivers.
Before changing or upgrading your system, you must make sure your system hardware
supports DirectX v9.0c or higher and Pixel Shader 2.0. Do not upgrade or change your system
software unless you are knowledgeable on how to do it.
Your video card must also support Pixel Shader 2.0 or better. Video cards built in 2005 or later
should be compatible, but please check with the manufacturer to be certain. We do not have a
suggestion on how you can determine this yourself. The best way to find this out is torun the
software and see if it works. Most reasonably modern video cards support Pixel Shader 2.0.
Microsoft XNA Framework Requirements
There are certain Microsoft runtime libraries that must be installed for the Open Rails software to
function properly. These runtime libraries are included in the Microsoft XNA Framework
Redistributable 3.1. XNA Framework Redistributable 4.0 is NOT compatible with Open Rails
software.
6
Installing Microsoft XNA Framework Redistributable 3.1
Please download and install this software from the Microsoft website at
http://www.microsoft.com/downloads/en/details.aspx?FamilyID=53867a2a-e249-4560-801198eb3e799ef2&displaylang=en
Select the Download button to download the software from the website.
Select Save to choose where the Microsoft XNA Framework Redistributable 3.1 .msi file will
temporarily be stored on your computer.
Since this file will only be used to install the Microsoft XNA Framework one time, an easy
location to save this file to is your desktop.
Once the download is complete, the following icon will be on your Windows desktop. Double click on the icon
to begin the installation process for the Microsoft XNA Framework.
A security warning will appear, select Run to unpack the msi file.
7
When the Microsoft installation Wizard appears, select Next to begin the installation process.
Once you have successfully completed the installation of the XNA Framework, you will see the final
installation screen. Select Finish to complete the installation process.
Congratulations, you have successfully installed the Microsoft XNA Framework. Next, it's important
to install the correct version of Microsoft .NET.
Upgrade of .NET Framework Requirements for Open Rails software
This must be installed for Open Rails software to function properly. Previous versions of OR required
.NET Framework 3.0. Be sure that you are running v3.5 SP1 before attempting to run the current
version of Open Rails software. Also, whilst you may have .NET Framework v4 installed on your
system, this is not compatible with Open Rails software. There is no need to remove it. Simply
download the install file for v3.5 SP1 and install it as well.
Windows 7 and 8 include .NET Framework 3.5 but it is not enabled by default. To enable this, open
“Programs and Features”, “Turn Windows features on or off”, and activate this.
You can easily determine which version or versions of .NET Framework are installed on your system.
Open the "Add or Remove Programs" system application, which is found on your Control Panel. If
you do not find the following exact entry in the list of installed programs, "Microsoft .NET
Framework 3.5 SP1", then you'll need to install it. Please download and install this software from the
8
Microsoft website http://www.microsoft.com/downloads/en/details.aspx?FamilyID=AB99342F-5D1A413D-8319-81DA479AB0D7
Installing Microsoft .NET Framework 3.5 Service Pack 1 (SP1) Redistributable
Select the Download button to download the software.
Select Save to choose where the Microsoft .NET Framework 3.5 Service Pack 1 Redistributable
.msi file will temporarily be stored on your computer.
Since this file will only be used to install the Microsoft .NET Framework once, an easy location to
save this file to is your desktop.
Once the download is complete, the following icon will be on your Windows desktop. Double click
on the icon to begin the installation process for the Microsoft .NET Framework.
A security warning will appear, select Run to unpack the msi file and start the download from the
Microsoft website.
9
When the Microsoft installation Wizard appears, select Next to begin the installation process. Please
note the .NET package is 2.8 MB, so plan the download depending on your Internet connection
speed.
Once you have successfully completed the installation of the .NET Framework, you will see the final
installation screen. Select Finish to complete the installation process.
10
Congratulations, you have successfully installed the Microsoft .NET Framework 3.5.
Installing Open Rails software
You can download the zipped install file at http://openrails.org/release.html
Open Rails team recommends that you install the software in a separate folder from where your
MSTS is installed. Since there is not yet an automated uninstall process, segregating your Open Rails
software from your MSTS or any other software ensures that you can accurately remove the Open
Rails software by just deleting the folder. In addition, updating the Open Rails software will be much
easier if it is located in an easy- to-find, separate folder on your system.
The following is the procedure to follow in installing Open Rails from the download noted above.
1. Download the file OR_v09.zip and save to a location on your computer.
2. Open this file and copy all the files and folders to a suitable folder. We suggest C:\OpenRails.
3. Create a shortcut to file C:\OpenRails\OpenRails.exe (or a different path if you have not used
C:\OpenRails as the install folder).
Upgrading from a previous Download
If you have previously installed an earlier download, upgrading Open Rails software is easy.
Download the latest version from the Open Rails website. Unzip the contents into any empty folder.
You have two options: (1) copy and paste the new Open Rails files and folders into their existing
Open Rails installation, overwriting the files and folders; or, (2) unzip the Open Rails software into a
new folder.
11
Multiple instances of Open Rails software can exist on your computer without any conflicts. Please
check the path of any desktop shortcuts you may have created to ensure they reference the desired
version of Open Rails software.
Uninstalling Open Rails software
Simply delete the folder where Open Rails was installed.
Video Card Settings
A setting for Vertical Sync is available in Open Rails Menu > Options. Other video settings should be
set in the control panel of your video card. However, the default settings will work well and give a
good appearance and performance.
Using Open Rails without MSTS Installed
Open Rails does not require any MSTS executable files to be installed for it to run.
Currently Open Rails uses routes and rolling stock together with their activity, path, services,
cabviews, sound, environment and many other associated files in MSTS formats, in order to be
functional. Traditionally, content from third parties are frequently dependent on default MSTS files.
Routes, stock and activities can be written which do not depend on these files and this has been
done. With such routes, Open Rails can be fully operational without MSTS. Work is underway on
further enhancing this and a list of routes which are completely free of any MSTS dependency is
published at http://openrails.org.
Four New South Wales routes have been packaged to run without MSTS installed. They do not
completely eliminate references to MSTS files but, if the MSTS files are missing, the routes are
perfectly usable. They are available at http://www.coalstonewcastle.com.au/
The four routes made to run without MSTS are Burrinjack Railway, Craven Timber Railway, Tweed
Railway and Manning River Breakwater Railway. Full details of the installation required is given on
the relevant “OR installation instructions” page for each route. It is quite lengthy.
With the current version of Open Rails, routes and activities can only be created using MSTS.
Checking your Installation
Start Open Rails by clicking on the “Open Rails” shortcut you should have created on your desktop
during installation. This will open the Open Rails start menu. It will default to you MSTS installation
12
path and will show a drop-down menu of the routes you have installed and the activities installed
for the route chosen.
Assuming that you have a default MSTS installation installed, with no additional add-ons, clicking on
“Route” will list the MSTS default routes. Choosing on of these will list the list the activities for that
route. Choose the activity you would like to rum (or choose “Explore Mode”) and this will appear in
the information pane to the right.
Click on the “New game” button below this and the Activity (or Explore Mode) will open.
Now that you have Open Rails running, try a few simple procedures to become familiar with this:
1. Press Alt+Enter to toggle between window and full-screen.
2. Press Space to confirm that sound is working (you should hear the loco whistle).
3. Press 1, 2, 3, 4 and 5 to show cameras working (this will show the different views available).
4. Press PrtScr to show that a screenshot is saved.
5. Press F2 to show that the game is saved.
6. Press Escape, then Alt+F4 to quit which will return you to the Open Rails Menu. Click on the
“Resume” button in the Open Rails menu the return to the activity you saved.
7. Quit and Return to the Desktop and open the log file OpenRailsLog.txt to show the
information logged during the session.
13
Using Multi-Player Server or Client Features
Getting Started
One player starts as the server, and then others connect in as clients. Each player will choose
and operate their own consist (and locomotive), but also can jump to watch others’ consists, or
couple with others to work as lead and DPU through a tough route, or even act as a dispatcher to
control signals and switches manually.
Requirements
The server can start an activity or choose to explore. Clients MUST choose to explore (or a simple
activity with timetable but no AI trains).
The client must choose the same route played by the server.
It is not required for everyone to have the same set of paths, rolling stocks and consists.
Technical Issues
If you start the server at home, it will be necessary for you to learn your public IP address. You may
also need to configure your router for port forwarding. Details to accomplish these are given in
sections that follow.
It is recommended that you do not run a server for a prolonged period as the code has not been
tightened for security. Only tell people you trust that you have a server started.
Technical Support
The OR team officially does not currently provide support with the Multi-Player feature, but the
team may make efforts to help you sort out problems.
You can ask questions in the forums at trainsim.com, elvastower.com and uktrainsim.com. A new
web forum has been set for you to post questions and announce servers. You can also request a
private club so that only your friends know of your server. The forum is free to join and post:
http://www.tsimserver.com/forums
14
Starting a Multi-Player Session
Launch the Server (from your own computer)
1. Start OpenRails.
2. Select the route you wish to play.
3. Select an Activity or choose to Explore the route.
4. Check on “Multiplayer”
5. Click Start.
It will then bring up the following window for you to setup the connection. You can give a desired
username, the IP is always 127.0.0.1. The default port is 30000 (you can change to any integer
between 10000 and 65536). Hit the button “Server” will bring you to the next window to choose
consists, weather, etc. (if you use “Explore”).
When the server starts, Windows Firewall may ask if you want to allow OR access to the Internet. If
so, click Allow. If you use other firewall software, you may need to configure it to allow OpenRails
to access the Internet.
There is no built-in limit of how many players can connect; a server with good Internet upload
bandwidth can be expected to handle at least 10 client connections.
15
Connect to a Server as a Client
1. Start Open Rails.
2. Select the same route that the server is running.
3. Choose to Explore the route. (You can select an activity if it does not have AI trains)
4. Check “Multiplayer”.
5. Click Start.
It then brings up the connection window and you can enter a user name, the IP and port of the
server, then click “Client”. The next window will let you choose the path and consist to use in the
game, just pick them accordingly. Other choices such as weather and season are ignored and will be
synchronized with the server.
Further Information on continuing from here is given in the Open Rails Operations Manual
How to Use RailDriver® with Open Rails
You can use RailDriver® to run Open Rails. Just follow the steps in this section.
Setting up the RailDriver calibration file
If you already have a RailDriver installation where you have calibrated your RailDriver, you’re in luck,
as there is very little to do. Simply find your RailDriver software folder (C:\Program Files\PI
16
Engineering\RailDriver, or something similar). With luck, Open Rails will find it there. (A Registry
entry LOCAL MACHINE/SOFTWARE/PI Engineering/PIBUS/RailDriver should identify the location. If
you’re not familiar with Registry navigation, don’t try.)
If you can find it, but Open Rails software cannot, look in a folder named controller and copy the
ModernCalibration.rdm file to your main Microsoft Train Simulator folder. You’re done! Hook up
your RailDriver and launch Open Rails software
If you don’t have a ModernCalibration.rdm file or you want to re-calibrate your RailDriver, here is
the suggested procedure:
1. If you have an existing RailDriver software installation, find the installation folder
(C:\Program Files\PI Engineering\RailDriver, or something similar). If you don’t, you’ll have to install
the RailDriver software from your RailDriver CD or from the RailDriver website, at
http://www.raildriver.com/support/downloads.php . Use the MSTS version, halfway down the page.
(If you like, you can uninstall it at the end of this calibration procedure.) Using the RailDriver
Calibration application, this procedure will have you create an independent copy of just the
calibration file.
2. Now that you have located or installed your RailDriver software folder, create a new folder
in any place of convenience to hold just the files needed for calibration. Name the folder
something like RDcalibration.
3. Now you’re going to fill the new RDcalibration folder from the RailDriver software folder. Copy
the following eight files from the RailDriver software folder to the new RDcalibration folder:
RDcalibration.cnt
RDcalibration.hlp
RDcalibration_ger.hlp
RDLanguage.ini
RDcalibration.exe
RDcalibration_ger.cnt
RDCalReadme.txt
PIEHid.dll
Also, copy the controller folder (along with the two files in it) to your RDcalibration folder.
4. If you haven’t hooked up your RailDriver already, do so now – power and USB cable, at least.
5. You’re ready to calibrate the RailDriver. Launch RDcalibration.exe by double-clicking it. (If
you get a window from User Account Control asking your permission to proceed with the launch,
click Allow.) Then, follow the RailDriver calibration instructions to their completion.
After you click Finish at the end of the procedure, and if you’re running Windows Vista or Windows
7, you may get a Program Compatibility Assistant notification that the setup may not have
17
succeeded. If the calibration seemed to go smoothly, you can click “This program installed
correctly.” If it didn’t, let us know.
6. After the RailDriver calibration program exits, check the controller folder in your
RDcalibration folder. The calibration program should have modified the two files in the
controller folder (with a “Date modified” of approximately the time you clicked Finished).
7. Copy the ModernCalibration.rdm file to your main Microsoft Train Simulator folder.
8. You’re done! (If you had to install the RailDriver software from your RailDriver CD, you
can uninstall it now, if you want.)
Driving with your RailDriver in Open Rails
Now that you have a calibration file in a place where Open Rails knows to look, you’re ready to fire
up an operating session.
1. Power up your RailDriver, but without the USB cable plugged in. The LED display is blank.
2. Plug in the USB cable. Windows will detect new hardware and respond by installing a generic
human interface driver. Assuming the installation is successful, the LED display is "rd".
3. Launch Open Rails (V471 or greater) with your selected route and activity to load. The
LED's now contain "---".
4. Press the RailDriver Run/Stop button. The LED's contain "0.0" (speed).
5. If you hit Run/Stop again while operating, the LED's will turn to “---“, and if you hit it again,
the LED's will return to report your speed.
6. With RailDriver still active, if you hit RailDriver's ESC button, Open Rails will exit
normally, and the LED's will turn blank
In general, you should experience the following start-up sequence.
1. When you click Start on the Open Rails main menu, Open Rails looks for a RailDriver. If it finds
one, the interface is initialized and the RailDriver LED's are set to three dashes.
2. Next, the calibration file (ModernCalibration.rdm) is read. The code first looks for a calibration
file in the train simulator folder that contains the route. If no file is found there, the code checks in
the folder pointed to by Registry entry LOCAL MACHINE/SOFTWARE/PI
Engineering/PIBUS/RailDriver. If a calibration file is not found there, Open Rails blanks the LED's and
18
uses default values instead of the calibration file. (Your RailDriver probably won't work properly if
there is no calibration data that matches your particular RailDriver. It will be to your advantage to
perform the calibration procedure.)
3. Whether a calibration file is used or default values are used, the RailDriver starts in the
inactive state and you need to press the Run/Stop button to activate the RailDriver.
4. Most of the RailDriver buttons work the same as with Microsoft Train Simulator.
Buttons that do not have an Open Rails equivalent do nothing at all.
19
Legal
Warranty
openrails.org disclaims any warranty, at all, for its software. The Open Rails software and any
related tools, or documentation is provided “as is” without warranty of any kind, either express or
implied, including suitability for use. You, as the user of this software, acknowledge the entire risk
from its use.
Trademark Acknowledgment
Open Rails, Open Rails Transport Simulator, ORTS, Open Rails trademark, openrails.org, Open Rails
symbol and associated graphical representations of Open Rails are the property of openrails.org. All
other third party brands, products, service names, trademarks, or registered service marks are the
property of and used to identify the products or services of their respective owners.
License for the Open Rails Software
Open Rails is free software: you can redistribute it and/or modify it under the terms of the GNU
General Public License as published by the Free Software Foundation, either version 3 of the License,
or any later version.
You should have received a copy of the GNU General Public License as part of the Open Rails
distribution in Documentation\Copying.txt. If not, see http://www.gnu.org/licenses/.
License for this Document
This work is licensed under the Creative Commons Attribution-NonCommercialShareAlike 3.0 Unported License. To view a copy of this license, visit
http://creativecommons.org/licenses/by-nc-sa/3.0 or send a letter to Creative Commons, 444 Castro
Street, Suite 900, Mountain View, California, 94041, USA.
20