1
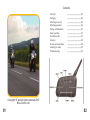
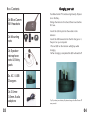
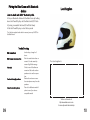
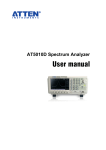
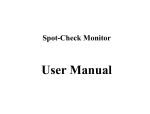
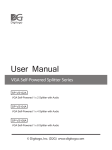
Bike-Comm M1
Bluetooth Motorcycle Intercom
For your nearest dealer; Please visit us at
http://www.bike-comm.com
User Manual
Contents
Parts List
Charging
Attaching main unit
Attaching speakers
Pairing with Bluetooth
Basic operation
Hands-free calls
Intercom
Group communications
Listening to audio
Troubleshooting
....................................................03
...................................................04
...................................................05
...................................................06
...................................................07
...................................................07
...................................................07
...................................................08
...................................................08
...................................................09
...................................................09
Copyright ‘©’ and all rights reserved 2010
Bike-Comm.com
01
02
Box Contents
2x Bike-Comm
M1 Headsets
2x Mounting
sets
2x Speaker
microphone
sets & Sticky
pads
Charging your unit
Your Bike-Comm M1 contains a high density Polymer
Li-Ion Battery.
Charge the intercom for at least three hours before
first use.
•Insert the 2.5mm jack into the socket on the
intercom
•Insert the USB connecter into the AC charger or a
free port on your computer
•The red LED on the intercom will light up while
charging.
•When charging is completed the LED will switch off
2x AC / USB
Chargers
2x 2.5mm3.5mm Audio
adaptors
03
Tip: To protect your battery life please charge the Bike-Comm M1
every month
04
Attaching to a Helmet
Positioning the Speakers & Microphone
•Find your prefered position to mount the intercom
on the left side of the helmet
•Insert the clip between the shell and foam liner[1] and
secure to the mounting plate[2] with the supplied
screws
•Slide the intercom onto the mounting plate
To achieve the best sound quality; the speakers must
be placed directly in line with your ears
[1] Clip and Spacer
[2] Mounting plate
Clip and mounting plate in
position
Intercom mounted on helmet
•Put your helmet on but do not close it
•Slide your thumb inside the helmet until you feel
your earhole.
•Close your hand and mark the thumbs position
•Mount a velcro pad to the centre of this position.
•Repeat for the other ear
•Position the microphone in front of the lips and
secure with a velcro pad.
•Plug the speakers into the intercom
Correct positioning of Microphone
Tip: If the shell does not fit the clips, try using the spacer or
supplied sticker pad to secure the mounting plate
05
Tip: The speaker for the left ear has a shorter wire than the right
hand wire
06
Pairing the Bike-Comm with Bluetooth
devices
Pairing to a phone:
•Press the reset button on the intercom for 1 second
•Place the intercom into pairing mode by holding the
power button until the red and blue LED’s begin to
flash alternately
•Search for a bluetooth device and select
“MOTORPHONE”
•When a password is requested input “0000” [Four
Zeros]
•If pairing is successful the blue LED will flash every
five seconds
Operation
•Press the power key for six seconds to connect to
your phone and accept the connection
•The blue LED will begin to flash slowly when the
connection is made
•When a phonecall is received the headset will automatically answer after three to five seconds
•To end a call; press the Phone/Play key
•To reject a call; press the Phone/Play key for two
seconds
•To dial the last number called; press the Phone/play
key for two seconds
Remember to test your connections before
taking the Bike-comm out on the road.
07
Pairing the Bike-Comm with Bluetooth
devices
Intercom function
Each Bike-Comm Unit can pair with up to five other Bike
Comm headsets. By assigning each one to a rider key.
Make sure that you only have two units switched on at a
time to ensure correct pairing.
•Push the reset button on both units for one second
•Choose which Letter [A-E] you will assign the other headset to
•Push and hold the letter key until the red and blue LED’s
flash.
•If pairing is successful, the blue LED will flash slowly
•To talk with another user press the corresponding key for
one second.
•Push the same button to end the call.
Examples:
•Push and hold the A key on both headsets to assign each
user to Rider A
•Push and hold the B key on two headsets to assign a user
to the B key
Headset
1
2
3
4
5
1:
2:
3:
4:
5:
Tip: Use a table to keep track of who is assigned to each intercom key.
08
Pairing the Bike-Comm with Bluetooth
devices
Local Suppliers
Listen to Audio with A2DP Bluetooth profile
•Pair your Bluetooth Audio with the Bike-Comm by holding
down the Phone/Play Key until the Blue & red LED’s flash
•If pairing is successful the blue LED will flash Slowly
•Push the Phone/Play key so start & stop audio
Tip: Use the supplied audio cable to connect your mp3 & GPS to
the Bike-Comm
Trouble Shooting
Bike-Comm dead
Bike-Comm loses connection
No audio
Feedback through speakers
Cannot connect to phone
Low battery, charge for 3
hours.
Push the reset button then reconnect. Can be caused by
areas of high Radio energy
Check to see if all cables are
connected. Test with another
speaker set to confirm operation.
Reduce the volume or move
the microphone away from the
speakers
Test with a different model of
phone to see if you have a
compatible model
Your Local supplier is:
Visit us on the web at:
http://www.bike-comm.com
for more tips and technical help
09
10