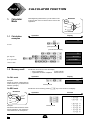
1
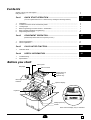
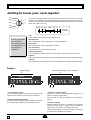
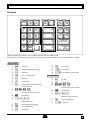
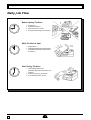
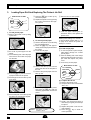
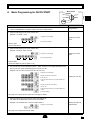
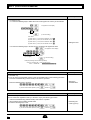
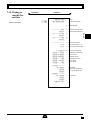
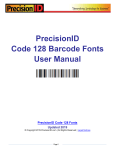
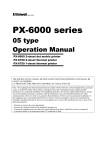
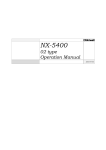
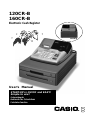
120CR-B
160CR-B
Electronic Cash Register
160CR-B
User's Manual
START-UP is QUICK and EASY!
Simple to use!
4 departments
Automatic Tax Calculations
Calculator function
EU
DI
UK
Introduction
Thank you very much for purchasing this CASIO electronic cash register.
START-UP is QUICK and EASY!
Part-1 of this User's Manual can help you make a quick start.
Once you have mastered the QUICK START operations, you will undoubtedly want to
expand your use of this machine by studying other sections of Part-2.
Original Carton/Package
Power Supply
If for any reason, this product is to be returned to the store
where purchased, it must be packed in the original carton/
package.
Your cash register is designed to operate on standard household current (120V, 220V, 230V or 240V; 50/60Hz). Do not
overload the outlet by plugging in too many appliances.
Location
Cleaning
Locate the Cash register on a flat, stable surface, away from
heaters or areas exposed to direct sunlight, humidity or dust.
Clean the cash register exterior with a soft cloth which has
been moistened with a solution of a mild neutral detergent
and water, and wrung out.
Be sure that the cloth is thoroughly wrung out to avoid
damage to the printer.
Never use paint thinner, benzene, or other volatile solvents.
Contents
Getting to know your cash register ...........................................................................................................
Daily Job Flow ...........................................................................................................................................
Part-1
2
4
QUICK START OPERATION .........................................................
5
(You can operate this ECR on a basic level by reading the following sections)
1.
2.
3.
4.
5.
6.
Initialization ......................................................................................................................................
To Select the Date Format and Monetary Mode ..............................................................................
Loading Paper ..................................................................................................................................
Basic Programming for QUICK START – TIME/DATE ....................................................................
Basic Operation after Basic Programming .......................................................................................
Daily Management Report ...............................................................................................................
Part-2
CONVENIENT OPERATION ..........................................................
5
5
6
7
9
13
15
(Please keep these sections to expand your use.)
1.
2.
Various Programming ......................................................................................................................
Various Operations ..........................................................................................................................
Part-3
1.
Calculator Mode ...............................................................................................................................
Part-4
1.
2.
CALCULATOR FUNCTION ............................................................
USEFUL INFORMATION ...............................................................
Troubleshooting ...............................................................................................................................
Specifications ...................................................................................................................................
Before you start
Roll paper
15
24
28
28
30
30
31
Take-up reel
User’s manual
Drawer keys (2)
Program key
Operator key
Memory protection
batteries
Operator display
Keyboard
Multipurpose tray
Drawer
Rear customer display only for 160CR-B
1
E
Getting to know your cash register
Getting to know your cash register
CAL
REG
X
OFF
Z
The position of the Mode Switch controls the type of operations you can perform on the cash
register. The PROGRAM Key (marked PGM) that comes with the cash register can be used
to select any Mode Switch setting, while the OPERATOR Key (marked OP) can be used to
select OFF, REG or CAL only.
RF
PGM RF OFF
●
●
PGM
Note:
An error is generated
(E01 displayed)
whenever the position
of the Mode Switch is
changed during
registration.
REG
CAL X
●
Z
●
OP Key
PGM Key
OFF
In this position, the power of the cash register is off.
REG (Register)
This is the position used for registration of normal transactions.
RF (Refund)
This is the position used for registration of refunds.
CAL (Calculator)
This is the position used for calculator mode.
PGM (Programming)
This is the position used to program the cash register to suit the needs of your store.
X (Read)
This is the position used to produce reports of daily sales totals without clearing the totals.
Z (Reset)
This is the position used to produce reports of daily sales totals. This setting clears the totals.
Displays
Rear Customer Display (only for 160CR-B)
Operator Display
$
$
AMOUNT
> TOTAL
> CHANGE
>
!
>
@ #
@ #
# Number of Repeat Display
Anytime you perform “repeat registration” (page 9), the
number of repeats appears here.
Note that only one digit is displayed for the number of
repeats.
! Total/Change Display
The total (upper segment) or change (lower segment) sign
appears when a subtotal, total or change is obtained.
@ Department Number Display
Anytime you press a department key to register a unit price,
the corresponding department number appears here.
E
!
$ Numeric Display
Entered values (unit prices or quantities) and calculated
values (subtotals, totals or change amount due) are displayed here. The capacity of the display is 8 digits.
This part of the display can be used to show the current time
or date between registrations (page 26).
2
Getting to know your cash register
Keyboard
!
FEED
*
@×
#
DATE
TIME
AC
$
ERR.
CORR
C
7
8
9
)
÷
4
5
6
×
1
2
3
(
0 00 .
−
+
%
–—
^
%
&
#
NS
Q
4
3
WEURO
RA
MR
PO
E R
CH
CHK
T
2
SUB TOTAL
Y
1
=
CA AMT
TEND
Certain keys have two functions; one for register mode and one for calculator mode.
In this manual, we will refer to specific keys as noted below to make the operations as easy to understand as possible:
Register Mode
! l
Feed Key
R m
@ h
Multiplication/Date Time Key
T o Subtotal Key
# y
Clear Key
Y p Cash Amount Tendered Key
$ ,
Error Correction Key
% z
Minus key
^ x
# t
AC Key
Percent Key
& n
^ x
Percent Key
Reference Number/No Sale Key
* ?Z~>, '
Calculator Mode
Drawer Open key
Numeric Keys and 2-zero key
* ?Z~>, '
" Decimal key
) qwer
(
Numeric Keys and 2-zero key
( "
)
Decimal key
Arithmetic Operation Keys
asdf
Q /
Department Keys
Q .
Received On Account Key
W ;
Euro/Paid Out Key
E u
Charge Key
Check Key
Memory Recall key
Y p Equal Key
3
E
Daily Job Flow
Daily Job Flow
Before Opening The Store
1.
2.
3.
4.
Plugged in?
Enough Roll Paper?
Date and Time is correct?
Enough small change in the drawer?
While The Store Is Open
1. Registrations.
2. Issuing latest daily sales total if needed.
(Generating report by Mode Switch to
X position.)
After Closing The Store
1. Issuing Daily Sales Total.
(Resetting report by Mode Switch to Z
position.)
2. Picking up money in the drawer.
3. Turn the Mode Switch to OFF.
E
4
Part-1
Part-1
1.
QUICK START OPERATION
Initialization and Loading Memory Protection Battery
Important
You must initialize
the Cash register
and install the
memory protection
batteries before you
can program the
cash register.
◗ To initialize the cash register
1.
2.
3.
4.
Set the Mode Switch to OFF.
Plug the power cord of the cash register into an AC outlet.
Load the memory protection batteries.
Set the Mode Switch to REG.
◗ To load the memory protection batteries
1. Remove the printer cover.
2. Press down on the oval just behind the printer paper inlet, and slide the battery
compartment cover toward the back of the cash register.
3. Load 3 new UM-3, R6P (SUM-3) or LR6 (AM-3) type batteries into the compartment.
Be sure that the plus (+) and minus (–) ends of each battery are facing in the
directions indicated by the illustrations inside the battery compartment (Figure 1).
4. Slide the memory protection battery compartment cover back into place.
5. Replace the printer paper and printer cover.
REPLACE MEMORY PROTECTION BATTERIES AT LEAST ONCE
EVERY YEAR.
(Figure 1)
2.
To Select the Date Format and Monetary Mode
You can select the date format and Monetary mode after initialization depending on the requirements in your area.
Default date format is Day/Month/Year.
Default Monetary Mode is Add 2.
ZC p
o
1. Set the Mode Switch to PGM.
2. Press the following keys.
P3 appears in mode
display
Program set code number
Select numbers from
lists A and B
▲
Example:
Change the date format to Month/
Co
Day/Year, and change Monetary mode
to Add 3.
?ZXX o
(To end the setting)
Date Format Selections
?
Z A
X
Year/Month/Day
Month/Day/Year
Day/Month/Year
Monetary Mode Selections
Add 0 (0.
)
Add 1 (0.0
)
?
Z B
X
Add 2 (0.00 )
5
E
Part-1 QUICK START OPERATION
3.
Loading Paper Roll And Replacing The Printer’s Ink Roll
& Press the l key to take up any
Mode Switch to REG
& Remove the core of the paper.
slack in the paper.
CAL
REG
REG
X
OFF
Z
* Replace the printer cover by placing
the cover’s front tab into the register’s groove.
RF
PGM
* Load new paper following the in-
1. To load journal paper
structions above, and replace the
printer cover.
! Remove the printer cover by lifting
up the back.
2. To remove journal paper
! Remove the printer cover following
@
@ Put a roll of journal paper into the
#
#
the instructions above.
Press the l key until approximately 20cm of the paper is fed from
the printer.
Cut off the roll paper.
holder.
Cut the leading end of the roll paper
with scissors and insert the paper
into the inlet.
Default printer setting is for Journal.
To print receipts, please refer to 1-7-3
on page 20 to switch the printer for
Receipt or Journal.
◗ To load receipt paper
! To use the printer to print receipts,
@
#
Mode Switch to OFF
$ Remove the take-up reel from the
%
$ Press the l key until 20 or 30 cm
follow steps 1 through 4 of “To load
journal paper”.
Pass the leading end of the receipt
paper through the printer cover’s paper outlet and replace the printer
cover.
Tear off any excess paper.
CAL
printer and take off the left plate of
the reel.
Remove the journal paper from the
take-up reel.
of paper is fed from the printer.
REG
X
OFF
OFF
Z
RF
% Roll the paper onto the take-up reel
PGM
a few turns.
◗ To replace the ink roll
! Remove the printer cover.
@ Lift up the tab on the ink roll marked
“PULL UP”.
^ Cut off the paper left in the printer
and press the l key until the
remaining paper is fed out from the
printer.
^ Set the left plate of the take-up reel
and place the reel into the register.
# Install a new Ink Roll and press it
$
Options:
E
Roll paper – P-5860
Ink Roll – IR-40
6
%
down firmly but gently until it snaps
into place.
Replace the printer cover onto the
cash register.
Press the n key to check for
correct operation.
Part-1 QUICK START OPERATION
4. Basic Programming for QUICK START
CAL
Mode Switch
X
OFF
Z
Part-1
REG
RF
PGM
PGM
Procedure
Purpose
1. Insert the PROGRAM key (marked “PGM”) and rotate to PGM position.
Programming
2. Press the following keys to set the current time.
Example: 13:18 PM = 1318
• Enter 4 digits
• 24-hour time format
Zo
ZCZ<h
y
Minutes
Time
P appears in mode display
Setting the current
time
(to end the time setting)
3. Press the following keys to set the current date.
Example: January 8, 2002 = 020108
Zo
?X?Z?< h
y
Year
Day
Month
P appears in mode display
Setting the current
date
(to end the date setting)
• Enter 6 digits
• Enter last 2 digits for year set. (2002 → 02)
4. You can set only one tax calculation system – either an add-on or an add-in depending on the
laws in your area. Press the following keys to set the tax rate.
Example: Set tax rate 1 as 5.25% and tax rate 2 as 10%.
Co
?ZXB o
B"XB p
B??C p
o
?XXB o
Z? p
B??C p
o
P3 appears in mode display
Program set code No. for tax rate 1
Setting the Tax rate
5.25% tax rate
50 for Round off and 03 for VAT (Value Added Tax)
– Add In
Program set code No. for tax rate 2
10% tax rate
50 for Round off and 03 for VAT (Value Added Tax)
– Add In
(to end the setting)
• See page 21 to specify the tax system and rounding for details.
5. Press the following keys to preset tax status of departments.
Tax status for the Departments are fixed as Non-taxable.
Example: Set Departments 1 and 2 as taxable status 1.
Zo
.as o
P appears in mode display
Setting the status of
Departments
• See page 15 to change the fixed tax status.
7
E
Part-1 QUICK START OPERATION
Procedure
Purpose
6. For the Euro only
6-1. Press the following keys to define the main currency/print out currency of the subtotal.
Co
XVXX o
Zp
P3 appears in mode display
Euro Status
o
(to end the setting)
Euro status
(1) Main currency = Local, Print out subtotal = Local: ?
(2) Main currency = Euro, Print out subtotal = Euro : Z
(3) Main currency = Local, Print out subtotal = Both: X
(4) Main currency = Euro, Print out subtotal = Both : C
Setting the Euro
6-2. Press the following keys to set the currency exchange rate against the Euro.
Co
Z>>> o
Z>MMC p
Exchange rate
(up to 6 digits)
P3 appears in mode display
Decimal position
o (to end the setting)
Example: (Exchange rate and decimal position)
Currency exchange rate = 1 Euro in local currency
1 Euro = 1.95583 DM :
Z>BB<CB
Procedure
Purpose
For Australia only.
You can set some programmable options to suit the Australian GST by the following procedure.
1. Insert the PROGRAM key (marked “PGM”) and rotate to Z position.
Setting the
Australian GST
2. Press the following keys to program.
?Z?ZX??Zop
If you want to cancel this operation, press o instead of p.
Procedure
Purpose
For the Euro only.
You can restrict the registable currency to the Euro only by the following procedure.
1. Insert the PROGRAM key (marked “PGM”) and rotate to Z position.
2. Issue all reset report including periodic data.
3. Press the following keys to set.
?Z?MX??Xop
If you want to cancel this operation, press o instead of p.
E
8
Restricting the
currency (Euro)
Part-1 QUICK START OPERATION
5.
Mode Switch REG
Basic Operation after Basic Programming
CAL
X
OFF
Z
Part-1
Note:
REG
REG
Whenever an error is generated (E01 displayed), the input figures reset to 0.
RF
PGM
Printout
Operation
n
••••••••••
Z??a
•1•00
5-1 Open the drawer
without a sale
5-2 Basic operation
Example
Unit Price
Unit Price
Quantity
1
Dept.
1
¡ — Unit Price/Department No.
Department 1
o
B??p
$1.00
N — No Sale Symbol
•1•00 S
•5•00 C
— Subtotal
•4•00 G
— Change Amount Due
— Cash Amount Tendered
Cash amount tendered
Cash Amount
tendered
$5.00
5-3 Multiple registration
of the same items
Z?? a
Unit Price
Department 1
a
Ch
Example
Unit Price
$1.00
$1.35
Quantity
2
3
Dept.
1
2
Quantity
•1•00
¡
•1•00
3
¡ — Repeat
X — Multiplication Symbol
•1•35
•4•05
@ — Unit Price Symbol
™ — Department No.
Multiple key
ZCB s
o
p
•6•05 C
Note that repeat registration can be used with unit prices up to 6 digits long.
5-4 Charge sales
Example
Unit Price
$1.00
$2.00
$3.00
Quantity
1
1
1
Dept.
1
2
1
Z?? a
X?? s
C?? a
o
u
•1•00
•2•00
¡
™
•3•00
£
•6•00 H
— Charge Sales
Charge key
You cannot perform the amount tendered operation using the u key.
9
E
Part-1 QUICK START OPERATION
Printout
Operation
5-5 Split cash/
charge sales
Example
Unit Price
$2.00 $3.00
$4.00
Quantity
1
1
1
Dept.
1
2
1
Cash
Amount
tendered
X?? a
C?? s
V?? a
o
B?? p
u
$5.00
5-6 Corrections
5-6-1 Before you press
a department key
•2•00
¡
•3•00
•4•00
™
1
•9•00 S
•5•00 C — Cash Amount Tendered
•4•00 H — Charge Sales
Corrections can be made while you are registering the item (before you press a department
key), or after it has already been registered into the memory (by pressing a department
key).
y key clears the last item entered.
Printout
Operation
Example
1. Entered 400 for unit price
by mistake instead of
100.
V?? y
Wrong entry
•1•00
¡
5
•2•00
X
@
•10•00
™
10
•1•05
X
@
•10•50
£
Clears the last item entered.
Z?? a
Correct entry
2. Entered unit price first
instead of quantity and
then pressed h.
Registered Department 1
X?? h
Unit price
Multiplication
y
Clears the last item entered.
Bh
Quantity Multiplication
X?? s
Unit price
3. Entered 150 for unit
price by mistake instead
of 105.
Registered Department 2
Z? h
Quantity
Multiplication
ZB? y
Wrong entry
Clears the last item entered.
Z? h
Quantity
Z?B d
Correct entry
E
Registered Department 3
10
Part-1 QUICK START OPERATION
Mode Switch REG
CAL
X
OFF
Z
Part-1
REG
REG
RF
PGM
Printout
Operation
5-6-2 After you pressed
a department key
Example
1. Entered unit price 550 by
mistake instead of 505
and pressed a department
key.
, key cancels the last registered item.
BB? a
Wrong entry
,
•5•50
¡
-5•50 V
•5•05
¡
Cancels the last item registered.
B?B a
Correct entry
2. Entered unit price 220 by
mistake instead of 230
and pressed a department
key.
Registered Department 1
Ch
Quantity
Multiplication
XX? s
Wrong entry
,
Cancels the last item registered.
3
•2•20
X
@
•6•60
™
-6•60 V
3
•2•30
X
@
•6•90
™
Ch
XC? s
Correct entry
Registered Department 2
11
E
Part-1 QUICK START OPERATION
Mode Switch REG
CAL
REG
REG
X
OFF
Z
5-7-1 Registering with
currency exchange
RF
PGM
Display
Operation
Example
Unit Price
2.00
Quantity
3
Dept.
1
Cash Amount
Tendered
Rate
Euro 15.00
1Euro = 0.5 Fr
Main currency
Local (Fr)
Printout of ST
Both currencies
Ch
X?? G
;
o
1200E
.
Pressing ; before subtotal converts
the subtotal amount into the Euro.
ZB'
;
1500E
.
Pressing ; after amount tendered
converts the amount into the Euro. *1
p
150
.
Press p to finalize the transaction.
The change amount in the main
currency is shown on the display. *2
p
3.00E
You can switch the currency of change
amount repeatedly by pressing the
p key.
*1 If the payment is the same as the subtotal amount, you can omit this operation.
Press p key directly after the subtotal.
*2 If the payment is less than the subtotal amount, the cash register specifies it as a
partial payment and shows the balance in the main currency on the display.
Printout
3
X
•2•00
•6•00
@
¡
•6•00 S
e
e
— Subtotal in the main currency
12•00 @ — Subtotal after conversion
15•00 C — Payment in the Euro
@
•7•50 C
— Payment after conversion
•1•50 G — Change in the main currency
e 3•00 @ — Change in the sub currency
E
12
Part-1 QUICK START OPERATION
6.
Daily Management Report
Important
Remember that when you issue a reset (Z) report, the data that is reported is cleared from the
applicable totalizers. To view data without clearing totalizers, issue a read (X) report.
6-1 Financial Report
Printout
Operation
Mode Switch
h
CAL
REG
XX
OFF
Z
08-01-02
12-35#0085
— Date
— Time/Consecutive No.
X — Read Symbol
RF
PGM
158 *
•16676•48 *
46 n
— Gross Sales No. of items
— Gross Sales Amount
— Net Sales No. of Customers
•16675•99 n — Net Sales Amount
•16518•99 C# — Cash Total in Drawer
•92•00 H# — Charge Total in Drawer
•70•00 *K — Check Total in Drawer
6-2 General Control
Read/Reset
Report
6-2-1 Daily Read/Reset
Report
Mode Switch to
Printout
Operation
Z (Reset) report
08-01-02
p
— Time/Consecutive No.
— Non-resettable No. of *1
Resets/RESET Symbol
0001 Z
X
48
•166•94
(Read)
Mode Switch to
— Date
19-35#0086
Z
p
¡ — No. of Items/Dept. No.
— Amount
61
•1259•15
™
44
•15175•39
£
5
•75•00
¢
158 *
•16676•48 *
— Gross Sales No. of Items
— Gross Sales Amount
(Reset )
13
E
Part-1
This section tells you the procedures to use to produce reports of the transaction data stored in the
cash register's memory.
Part-1 QUICK START OPERATION
•1•40
- — Reduction Amount
•0•91 %+ — Premium/Discount Amount
•1182•64
T — Taxable Amount for Tax Rate 1
•62•07 t — Tax Amount for Tax Rate 1
•167•45 *T — Taxable Amount for Tax Rate 2
•16•75 t™ — Tax Amount for Tax Rate 2
46 n
•16675•99 n
— Net Sales No. of Customers
— Net Sales Amount
47 C
— Cash Sales Count
•16513•99 C
4 H
— Cash Sales Amount
— Charge Sales Count
•92•00 H — Charge Sales Amount
1
K — Check Sales Count
•70•00
K — Check Sales Amount
•15•00 R
•10•00 P
— Received On Account Amount
— Paid Out Amount
4 V
1 r
— Error Correction Count
— Refnd Mode Count
•3•00 r — Refund Mode Amount
16 CX — No. of p key operation
1 N — No sale Count
•16518•99 C# — Cash in Drawer
•92•00 H# — Charge in Drawer
•70•00 *K — Check in Drawer
000001
—
6675•99
X (Read) report is the same except
6-2-2 Periodic Read/Reset
Report
Mode Switch to
Z or
X
*1
and *2.
Printout
Operation
Z?p
— Date
08-01-02
19-50#0087
#10#••••
— Time/Conseccutive No.
X
77 *
•1116•90 *
11 n
•1116•90 n
E
Non-resettable Grand Sales total
(Printed only on RESET report) *2
14
— Read Symbol
— Gross Sales No. of Items
— Gross Sales Amount
— Net Sales No. of Customers
— Net Sales Amount
Part 2
CONVENIENT OPERATION
Mode Switch
1.
Various Programming
CAL
1-1 Unit price for
Departments
REG
X
OFF
Z
RF
Example
Unit Price $1.00
Dept.
1
2
PGM
PGM
Zo
$2.20 $11.00
3
Part-2
P appears in mode display
Z?? a
XX? s
ZZ?? d
o
(For Dept. 1)
(For Dept. 2)
(For Dept .3)
• Unit prices within the range of 0.01~9999.99.
1-2 Rate for percent key
Zo
Example
Discount Rate
2.5%
P appears in mode display
X"B x
o
(To end the setting)
• The rate within the range of 00.01 to 99.99%.
1-3 To change tax
status for
Departments
Tax status for the Departments 1~4 are initialized as Non-Taxable.
Zo
P appears in mode display
Example
Taxable 1
Taxable 2
Depts.
1
2
Taxable status 1 For Dept. 1
▲
.a
Status
;s
Taxable status 2 For Dept. 2
o
(To end the setting)
Selections
.
;
.;
n
Taxable status 1
Taxable status 2
Taxable status 1 and 2
Non-taxable status
15
A
E
Part-2 CONVENIENT OPERATION
Mode Switch
1-4 Status for
Department
CAL
OFF
Z
1
A
0
2
0
Selections
B
4
5
PGM
PGM
C
1
Co
1
▲
P3 appears in mode display
?VZ a For Dept. 1
Normal
department
Single item sale
department
Maximum No. of
digits to be 4
Normal
department
▲
?BZ s For Dept. 2
Single item sale
department
Maximum No. of
digits to be 5
o
(To end the setting)
Selections
Minus department
?
Z A
No limitation for manually entered price.
?
Normal department
Maximum number of digits for manually entered price
Z~M
< or >
(1 ~ 7 digits).
To prohibit manual price entries.
Normal sale (not a single-item sale) department.
Set as a single-item sale department.
B
?
Z C
1-5 Status for percent key
1-5-1 To change taxable
status for the percent
key
The percent key is initialized as Non-taxable.
Zo
Example
P appears in mode display
.x
▲
Change Percent key registration as a Taxable status 1.
Taxable status 1 (For percent key)
o
(To end the setting)
Selections
.
;
.;
n
Taxable status 1
Taxable status 2
Taxable status 1 and 2
Non-taxable status
E
X
RF
Example
Depts.
REG
16
A
Part-2 CONVENIENT OPERATION
Co
1-5-2 Status for
percent key
Example
P3 appears in
mode display
Up
Percent
%+
▲
ZZ x
Round
Round up Premiums (%+)
o
(To end the setting)
Selections
Rounding of results produced by Percent Key operation.
Round up (1.544=1.55; 1.545=1.55)
Cut off (1.544=1.54; 1.545=1.54)
Program Percent Key to register discounts (%–).
Program Percent Key to register premiums (%+).
1-6 Taxable Status for
minus key
?
Z
X
A
?
Z
B
Part-2
Round off (1.544=1.54; 1.545=1.55)
The minus key is initialized as Non-taxable.
Zo
Example :
.z
Taxable status 1
▲
P appears in
mode display
Change minus key registrations
Taxable status 1.
Minus key
o
(To end the setting)
Selections
.
;
.;
n
Taxable status 1
Taxable status 2
Taxable status 1 and status 2
Non-taxable status
17
A
E
Part-2 CONVENIENT OPERATION
ModeSwitch
1-7 General features
CAL
1-7-1 To set general
controls
Co
▲
(To end the setting)
Select a
number
from
list C
Selections
Maintain key buffer during receipt issue in REG mode.
Reset the transaction number to zero whenever a
General Control Reset Report is issued.
Allow credit balance registration.
Yes
Yes
No
No
Yes
No
No
Yes
Yes
No
Yes
Yes
No
No
?
Z
X
C
V
B
N
M
A
Selections
Limit the last 2 digits of cash amount tendered to 00, 25,
50 and 75 when Denmark rounding is specified for
subtotal and total amount.
Allow partial cash amount tendered.
Allow partial check amount tendered.
No
Yes
Yes
Yes
No
No
Yes
Yes
No
Yes
No
No
No
Yes
?
Z
X
C
V
B
N
M
B
?
Z
C
Selections
Use the ' key on a numeric keyboard.
Use the ' key as a 000 key.
E
18
Z
PGM
Program code No.
Select a
number
from
list B
OFF
PGM
?NXX o
Select a
number
from
list A
X
RF
P3 appears in mode display
??? p
o
REG
Part-2 CONVENIENT OPERATION
Co
1-7-2 To set printing
controls
P3 appears in mode display
?BXX o
???? p
▲
Program code No.
Select a number
from list A
Select a
number
Select a number from list C
from list B
o
(To end the setting)
Part-2
Select a number
from list D
Selections
?
Z
Use the printer to print a journal.
Use the printer to print receipts.
A
Selections
Print zero-total item on the General Control Read/Reset
Reports.
Print total line at finalization
Yes
No
No
Yes
Yes
No
?
Z
V
B
B
Selections
Print RF switch mode refund count/amount on the
General Control Read/Reset Reports.
Print the grand sales total on the General Control
Reset Reports.
Print the time on the receipt and journal.
Yes
No
No
Yes
Yes
Yes
No
No
Yes
No
No
Yes
Yes
No
?
Z
X
C
V
B
N
M
C
Selections
Print the consecutive number on the receipt/journal.
Print the subtotal on the receipt/journal when the
Subtotal Key is pressed.
Skip item print on journal.
No
Yes
No
No
Yes
Yes
No
Yes
No
No
Yes
Yes
Yes
No
19
?
Z
X
C
V
B
N
M
D
E
Part-2 CONVENIENT OPERATION
1-7-3 Printer switch for
Receipt or Journal
The printer is initialized as journal.
Mode Switch
CAL
Example
To print a receipt
REG
X
OFF
Z
RF
PGM
PGM
Zo
Zu
▲
P appears in mode display
Print receipt
o
(To end the setting)
Selections
Use the printer to print a journal.
Use the printer to print receipts.
?
Z
A
• Printer selection to print a journal or receipts can also be set on
procedures 1-7-2 “To set printing controls”.
E
20
Part-2 CONVENIENT OPERATION
1-8 Setting the Tax Rate
and rounding
Co
P3 appears in mode display
?ZXB o
Program set code No. for tax rate 1*1
▲
??"???? p
▲
Enter tax rate A
???? p
*1 Program set code No. for Tax
rate 2 is ?XXB.
Select number
from list D
Part-2
Select numbers Select
from list B
number
from
list C
o
(To end the setting)
Tax rate specifications
The tax rate within the range of 0.0001 ~ 99.9999%.
Use
A
" key for decimal point.
Normal rounding specifications
??
Cut off to 2 decimal places.
• You can use either an add-on
rate tax or an add-in rate tax
(VAT), depending on the requirements in your area. You can
specify only one tax rate.
(1.544=1.54; 1.545=1.54)
(1.544=1.54;
>?
1.545=1.55)
Special rounding specifications for subtotal and total amounts
?
Z
No specifications
Special rounding 1
0 ~ 2 ➝ 0;
• The special rounding specification and Denmark rounding tell
the cash register how to round
off subtotals and totals so that
their rightmost 2 digits are 00,
25, 50 and 75.
B
1.545=1.55)
Round up to 2 decimal places.
(1.544=1.55;
• The normal rounding specification tells the cash register how to
round tax amounts to the proper
number of decimal places.
B?
Round off to 2 decimal places.
Examples:
3 ~ 7 ➝ 5;
8 ~ 9 ➝ 10
1.21=1.20; 1.26=1.25; 1.28=1.30
X
Special rounding 2
0 ~ 4 ➝ 0;
Examples:
5 ~ 9 ➝ 10
1.123=1.120; 1.525=1.530
C
Denmark rounding
(set the amount tender restriction on page 18 also)
• Note that the rounding specification you program for your cash
register depends on the tax laws
of your country.
00~ 12 ➝ 0;
13 ~ 37 ➝ 25;
63 ~ 87 ➝ 75;
88 ~ 100 ➝ 100
Examples:
C
38 ~ 62 ➝ 50;
1.11=1.00; 1.28=1.25; 1.39=1.50;
1.80=1.75; 1.99=2.00
N
Scandinavian rounding
00~ 24 ➝ 0;
Examples:
25 ~ 74 ➝ 50;
75 ~ 99 ➝ 100
1.21=1.0; 1.30=1.50; 1.87=2.00
Australian rounding (only for tax rate 1)
0 ~ 2 ➝ 0;
Examples:
3 ~ 7 ➝ 5;
M
8 ~ 9 ➝ 10
1.21=1.20; 1.26=1.25; 1.28=1.30
Tax system specifications for subtotal and total amounts
?
X
C
No specifications.
Specifies add-on rate tax.
Specifies add-in rate tax (VAT).
21
D
E
Part-2 CONVENIENT OPERATION
1-9 To control Tax Status printing
Mode Switch
CAL
Co
▲
Select number
from list A
Select number
from list B
Always “0”
o
(To end the setting)
Selections
Print tax total line (only for Australia).
Print tax symbol (only for Australia).
No
Yes
Yes
No
No
Yes
?
Z
X
C
A
Selections
Print taxable amount.
Print taxable amount and tax amount for Add-in.
Yes
No
Yes
No
E
22
Z
PGM
Program set code No.
No
OFF
PGM
?CXN o
Yes
X
RF
P3 appears in mode display
??? p
REG
?
Z
X
C
B
Part-2 CONVENIENT OPERATION
1-10 Printing to
read All Preset Data
Printout
Operation
p
• Printing preset data.
08-01-02
08-06#0038
— Date
— Time/Consecutive No.
X — Read Symbol
¡ — Dept No./Unit Price/Tax Status
#041
2•••••2•20
— Normal Dept/Digit Limit/Single Item
™
#051
3••••11•00
#
Part-2
1•••••1•00
#000
-•••••••••
¡ — Minus/Tax Status
2•5 % — Percent Rate/%+ or %#11
e 1•23242
0122•••#22
¡ — Percent Key Control/Tax Status
# — Euro Exchange Rate
— Date/Monetary Mode Control
0522•#1062
0622•#0000
— Print Control
1022••••#3
0326••#002
— Calculation Control
2422••••#0
— Euro Status
0125••••••
5•2500 %
5003
0000
0255••••••
10•0000 %
— General Control
— Tax Control
— Tax Rate1
Rounding specification/
— Tax System specification
— Tax Rate 2
5003
0000
08-01-01
23
E
Part-2 CONVENIENT OPERATION
2.
Various Operations
Mode Switch
CAL
2-1 Registration using
preset price for Departments.
REG
REG
X
OFF
Z
(Programming: See page 15)
PGM
RF
Printout
Operation
Example
Unit Price
$1.00
$2.20
$11.00
Quantity
1
2
4
Depts.
1
2
3
Amount
tendered
$50.00
a
s
s
V hd
o
B???p
Price Programmed
¡ — Unit
to Department 1
•1•00
•2•20
•2•20
™ — Unit Price Programmed
to Department 2
™ — Repeat
4
•11•00
X — Multiplication Symbol
@ — Unit Price Programmed
•44•00
£
•49•40 S
•50•00 C
to Department 3
— Cash Amount Tendered
•0•60 G
— Change
2-2 Single-Item Sales
(Programming: See page 16)
B? a
•0•50
¡
Example 1:
Status
•0•50 C
Single item sale
Unit Price
— Cash Sales
$0.50
Quantity
1
Dept.
1
For this example, Dept. 1 is programmed for a single-item-sale.
(Programming: See page 16.)
Example 2:
Status
Unit Price
Normal Single item sale
$1.00
$0.50
Quantity
1
1
Dept.
2
1
Z?? s
B? a
o
p
•1•00
2
•0•50
¡
•1•50 C
— Cash Sales
Single-item sale cannot be finalized if an item is registered previously.
E
24
Part-2 CONVENIENT OPERATION
2-3 Check sales
Example:
Unit Price
CB?? f
f
o
m
$35.00
Quantity
2
Dept.
4
Printout
Operation
•35•00
•35•00
¢
¢
•70•00
K — Check Sales
•30•00
™
•25•00
£
Example:
Unit Price
$30.00
$25.00
Quantity
1
1
Depts.
2
3
Cash amount
tendered
$20.00
Check
$35.00
C???s
XB??d
o
X???p
m
Part-2
2-4 Split cash/
check sales
•55•00 S
•20•00 C
•35•00
K
Mode Switch
CAL
REG
X
OFF
Z
RF
RF
PGM
2-5 Refund
Example
Unit Price
Printout
Operation
$1.00
$2.00
Quantity
1
1
Dept.
2
3
Z?? s
X?? d
o
p
13-55#0074 r
•1•00
•2•00
— Refund Mode Indicator
™
£
•3•00 C
After you finish RF mode operation, be sure to return the Mode Switch
to the REG (register) setting.
25
E
Part-2 CONVENIENT OPERATION
Mode Switch
CAL
REG
REG
X
OFF
Z
RF
2-6 Other registrations
PGM
Display
Operation
2-6-1 Reading the Time
and Date
h
13 - 5 3.
h
0 8 - 0 1 - 02
y
000
.
Hour/Minute
Day/Month/Year
• Flashes per second
Printout
Operation
2-6-2 Paid out from cash
in drawer
12345678 n
Enter reference No.
Z??? ;
#12345678
08-01-02
— Reference Number
13-57#0060
•10•00 P
Printout
Operation
2-6-3 Cash received
on account
N?? .
•6•00 R
A reference number or ID number of up to 8 digits can be registered prior to any
transaction.
ZXCV
BNM< n
B? a
p
#12345678
26
— Reference Number or
ID No.
08-01-02
13-59#0062
•0•50
•0•50 C
E
— Received On Account
Amount
Printout
Operation
2-6-4 Registering
identification
numbers
— Paid Out Amount
¡
Part-2 CONVENIENT OPERATION
2-6-5 Reduction on
subtotal
Printout
Operation
Example:
Amount due reduced by $0.50.
Z?? a
X?? f
o
B? z
p
• 2.5% premium/discount
(programmed to x key)
applied to first item.
• 7% premium/discount applied
to transaction total.
• For programming the x key
as percent minus or percent
plus, see page 17.
• For programming percent rate,
see page 15.
-0•50
•2•50 C
Premium
Z?? a
x
X?? s
C?? a
o
Mx
p
¡
¢
Part-2
2-6-6 Premium/
Discount
•1•00
•2•00
Discount
•1•00
¡ •1•00
¡ — Premium/Discount Rate
2•5 %
2•5 % — Premium/Discount Amount
•0•03
-0•03
•2•00
•3•00
™ •2•00
™
¡ •3•00
¡
•6•23 S
•5•97 S — Subtotal
7 %
7 % — Premium/Discount Rate
•0•43
— Premium/Discount Amount
-0•42
•6•46 C
•5•55 C
2-7 About the daylight saving time
Mode Switch
It is possible to set the internal clock forward/backward by 1~9 hour(s)
for the daylight saving time.
CAL
REG
REG
X
OFF
Z
RF
PGM
Operation
• Forward by 1 hour
Display
h
12 - 34.
*Z
12 - 34.
h
13 - 34.
y
• Backward by 1 hour
(blinking)
Set forward by 1 hour.
000
.
h
12 - 34.
J
12 - 34.
(blinking)
*Z
12 - 34.
(blinking)
h
11 - 34.
y
Set backward by 1 hour.
000
.
*Put X~>, in case of set the clock by 2~9 hours.
27
E
Part 3
1.
CALCULATOR FUNCTION
Calculator
Mode
While registering at REG mode, you can switch to CAL
mode and then return to REG mode to resume the
registration.
ModeSwitch
CAL
CAL
REG
X
OFF
Z
RF
PGM
Display
Operation
1-1 Calculation
examples
t
BqZ t
5+3–2=
C
0
(Miss operation)
(Cancels item entered.)
(23–56)×78=
(4×3–6)÷3.5+8=
BqCwX p
6.
XCwBNeM< p
–2 5 74.
VeCwNrC"Bq< p
ZB??eZX x
12% on 1500
1-2 Memory recall
Display
/rCp
Example:
Divide the current subtotal $30.00
at REG mode by 3 (to divide the bill
between 3 people).
On REG mode
18 0.
Recalls the current amount onto the display.
– during registration:
current subtotal
– registration has been completed: the last amount
Operation
On CAL mode
10 .
Memory recall
Recalls the current result by pressing p key at CAL mode on the display.
ModeSwitch
Printout
Operation
CAL
REG
REG
X
OFF
Z
/p
/p
/p
RF
PGM
Memory recall
Example:
Recall the current result at CAL mode
during registration, and register the
cash amount due for each person.
E
97142857
.
•10•00
•20•00
¡
™
•30•00 S
•10•00 C
•10•00 C
•10•00 C
•0•00 G
28
Part-3 CALCULATOR FUNCTION
Mode Switch
CAL
1-3 Setting for calculator operation
REG
X
OFF
Z
RF
PGM
PGM
Co
P3 appears in mode display
Z?XX o
?p
▲
Program Code No.
Select a number from list A.
Part-3
o
(To end the setting)
Selections
Open drawer whenever p is pressed.*
Open drawer whenever n is pressed.
Print No. of Equal key operations on
General Control X and Z reports.
No
No
Yes
Yes
No
Yes
Yes
No
No
Yes
No
Yes
No
Yes
?
Z
X
C
V
B
N
M
A
* Drawer does not open during registration procedures even
if you press p by turning the mode switch to CAL
position.
29
E
Part 4
1.
USEFUL INFORMATION
Troubleshooting
Most common causes
Symptom/Problem
Solutions
1
E01 appears on the display.
Changing modes without completing transaction.
Return key to where it stops buzzing and
press p.
2
E94 appears on the display.
Printer paper is jammed.
Remove jammed paper. Turn Mode
switch to OFF then turn to ON, or Turn
power OFF and then turn power ON.
3
No date or time on receipt.
Paper is not advancing enough.
Printer is programmed as a journal.
Program printer to print receipts.
4
Key won’t turn to Z, X, PGM and RF modes.
Using OP key.
Use the PGM key.
5
Drawer opens up after ringing up only one
time.
Department is programmed as a single item dept.
Program the dept. as a normal dept.
6
Not clearing totals at end of day after taking
report.
Using X mode to take out reports.
Use Z mode to take out reports.
7
Programming is lost whenever register is
unplugged or there is a power outage.
Bad or no batteries.
Put in new batteries.
8
Register is inoperative.
Can’t get money out of drawer.
No power.
Pull lever underneath register at rear.
When the cash drawer does not open!
In case of power failure or the machine is in malfunction, the cash drawer does not open automatically. Even in these cases, you can open the cash drawer by pulling drawer release lever (see below).
Important!
The drawer will not open, if it is locked with a drawer lock key.
E
30
2.
Specifications
INPUT METHOD
Entry:
10-key system; Buffer memory 6 keys (2-key roll over)
Display (Digitron): Amount 8 digits (zero suppression); Department No.; No. of repeats; TOTAL; CHANGE
PRINTER
Receipt:
(or journal)
Paper roll:
12 digits (Amount 10 digits, Symbol 2 digits)
Automatic paper roll winding (journal)
58 mm × 80 mm ∅ (Max.)
CALCULATIONS
Entry 8 digits; Registration 7 digits; Total 8 digits
CALCULATOR FUNCTION
8 digits; Arithmetic calculations; Percent calculations
Part-4
Memory protection batteries:
The effective service life of the memory protection batteries (3 UM-3, R6P (SUM-3) or LR6 (AM-3) type batteries) is
approximately one year from installation into the machine.
Power source/Power consumption: See the rating plate.
Operating temperature:
0°C to 40°C (32°F to 104°F)
Humidity:
10 to 90%
Dimensions/Weight:
254 mm(H)× 330 mm(W)× 450 mm(D) with S drawer
5.5 kg with S drawer
270 mm(H)× 410 mm(W)× 450 mm(D) with M drawer
8.5 kg with M drawer
Specifications and design are subject to change without notice.
The main plug on this equipment must be used to disconnect mains power.
Please ensure that the socket outlet is installed near the equipment and shall be easily
accessible.
Casio Electronics Co., Ltd.
Unit 6, 1000 North Circular Road
London NW2 7JD, U.K.
Please keep all information for future reference.
31
E
To open the multipurpose tray
To lock/unlock the multipurpose tray
A. Turn the lever (1) clockwise to lock the tray (the indicator becomes red).
B. Turn the lever (1) counterclockwise to unlock the tray (the indicator becomes green).
A
B
(1)
E
32
CASIO COMPUTER CO., LTD.
6-2, Hon-machi 1-chome
Shibuya-ku, Tokyo 151-8543, Japan
120CR-B/160CR-B*E
IR0111-A
Printed in Malaysia