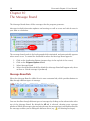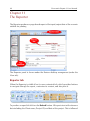
1
Geocentrix
Repute 2
User Manual
Onshore pile design and analysis
2
Geocentrix Repute 2 User Manual
Notices
Information in this document is subject to change without notice and does not represent
a commitment on the part of Geocentrix Ltd. The software described in this document is
furnished under a licence agreement or non-disclosure agreement and may be used or
copied only in accordance with the terms of that agreement. It is against the law to copy
the software except as specifically allowed in the licence or non-disclosure agreement. No
part of this manual may be reproduced or transmitted in any form or by any means,
electronic or mechanical, including photocopying and recording, for any purpose, without
the express written permission of Geocentrix Ltd.
©2002-9 Geocentrix Ltd. All rights reserved.
"Geocentrix" and "Repute" are registered trademarks of Geocentrix Ltd. Other brand or
product names are trademarks or registered trademarks of their respective holders
PGroupN is used under exclusive licence from Geomarc Ltd. PGROUP code used under
licence from TRL Ltd.
Set in Optimum using Corel® WordPerfect® 12. Printed in the UK.
Acknowledgments
Repute 2 was developed with the generous support of Corus, Atkins, and Stent
Foundations.
Repute 2 was designed and written by Dr Andrew Bond of Geocentrix, with assistance from
Ian Spencer of Honor Oak Systems.
PGroupN was designed and written by Dr Francesco Basile of Geomarc. Special recognition
goes to the late Dr Ken Fleming of Cementation Foundations Skanska for his invaluable
advice and support during the development of PGroupN.
The Repute 2 User Manual was written by Joe Bond and Andrew Bond.
The following people and organizations assisted with the production of the program and
its documentation: Francesco Basile, Jenny Bond, Joe Bond, Tom Bond, and Jack Offord.
Revision history
Last revised 23 September 2009 (for version 2.0.0).
Table of contents
3
Table of contents
Notices
Acknowledgments
Table of contents
2
2
3
Chapter 1
Documentation . . . . . . . . . . . . . . . . . . . . . . . . . . . . . . . . . . . . . . . . . . . . . . . . . . . . . 6
Chapter 2
Overview . . . . . . . . . . . . . . . . . . . . . . . . . . . . . . . . . . . . . . . . . . . . . . . . . . . . . . . . . .
User interface
Ribbon
Desktop
Status Bar
7
7
7
8
8
Chapter 3
The Ribbon . . . . . . . . . . . . . . . . . . . . . . . . . . . . . . . . . . . . . . . . . . . . . . . . . . . . . . .
Application button
Application menu
Tabs
Home tab
Insert tab
Build tab
Wizards tab
Tools tab
View tab
Contextual tabs
Title Bar
Help button
10
10
10
12
13
14
15
16
16
17
19
20
20
Chapter 4
The Drawing Board . . . . . . . . . . . . . . . . . . . . . . . . . . . . . . . . . . . . . . . . . . . . . . . . .
Drawing Board tab
Context menu
Drawing Board status bar
21
21
23
24
Chapter 5
The Project Manager . . . . . . . . . . . . . . . . . . . . . . . . . . . . . . . . . . . . . . . . . . . . . . . 25
Context menu
25
Home tab
26
4
Geocentrix Repute 2 User Manual
Chapter 6
The Stockyard . . . . . . . . . . . . . . . . . . . . . . . . . . . . . . . . . . . . . . . . . . . . . . . . . . . . . .
Context menu
Drop-down menu
Insert tab
27
27
28
29
Chapter 7
The Property Inspector . . . . . . . . . . . . . . . . . . . . . . . . . . . . . . . . . . . . . . . . . . . . . . . 30
Context menu
31
Chapter 8
The Workbook . . . . . . . . . . . . . . . . . . . . . . . . . . . . . . . . . . . . . . . . . . . . . . . . . . . . .
Column context menu
Custom filter box
Workbook context menu
Workbook tab
32
32
34
35
35
Chapter 9
The Graph Paper . . . . . . . . . . . . . . . . . . . . . . . . . . . . . . . . . . . . . . . . . . . . . . . . . . . 36
Graph Paper tab
36
Graph Options
37
Chapter 10
The Message Board . . . . . . . . . . . . . . . . . . . . . . . . . . . . . . . . . . . . . . . . . . . . . . . . . 38
Message Board tab
38
Context menu
39
Chapter 11
The Reporter . . . . . . . . . . . . . . . . . . . . . . . . . . . . . . . . . . . . . . . . . . . . . . . . . . . . . . . 40
Reporter tab
40
Reporter toolbar
41
Chapter 12
The Browser . . . . . . . . . . . . . . . . . . . . . . . . . . . . . . . . . . . . . . . . . . . . . . . . . . . . . . . 43
Browser tab
43
Online help
44
Chapter 13
Wizards . . . . . . . . . . . . . . . . . . . . . . . . . . . . . . . . . . . . . . . . . . . . . . . . . . . . . . . . . . .
Wizards tab
Project Wizard
Borehole Wizard
Pile Group Wizard
Action Wizard
Calculation Wizard
46
46
46
48
50
53
54
Table of contents
5
Chapter 14
Program options . . . . . . . . . . . . . . . . . . . . . . . . . . . . . . . . . . . . . . . . . . . . . . . . . . . 56
The Program Options box
56
6
Geocentrix Repute 2 User Manual
Chapter 1
Documentation
Repute 2 is supplied with a detailed Quick-start Guide, comprehensive User Manual, and
authoritative Reference Manual. The latest versions of these manuals (including any
corrections and/or additions since the program’s first release) are available in electronic
(Adobe® Acrobat®) format from the Geocentrix website. Please visit
www.geocentrix.co.uk/repute and follow the links to Repute’s documentation.
Quick-start guide
The Repute Quick-start Guide includes six tutorials that show you how to use the main
features of Repute. Each tutorial provides step-by-step instructions on how to drive the
program. There are three tutorials dealing with single pile design and three with pile group
design. The tutorials increase in difficulty and are designed to be followed in order.
User manual (this book)
The Repute User Manual explains how to use Repute. It provides a detailed description of
the program’s user interface, which is being rolled out across all of Geocentrix’s software
applications. The manual assumes you have a working knowledge of Microsoft Windows,
but otherwise provides detailed instructions for getting the most out of Repute.
Reference manual
The Repute Reference Manual gives detailed information about the engineering theory that
underpins Repute’s calculations. The manual assumes you have a working knowledge of the
geotechnical design of single piles and pile groups, but provides appropriate references for
further study if you do not.
Overview
7
Chapter 2
Overview
This chapter gives an overview of the components of Repute’s user interface.
User interface
Repute’s user interface comprises the Ribbon (see Chapter 3), the Desktop (displaying any
number of panels), and a Status bar.
Ribbon
The Ribbon is based on Microsoft’s ‘Fluent user interface’, first introduced in Microsoft
Office 2007. The features of the Ribbon as it appears in Repute are described in Chapter
3.
8
Geocentrix Repute 2 User Manual
Desktop
At any one time the Desktop can display any number of the following panels:
!
The Drawing Board (Chapter 4)
!
The Project Manager (Chapter 5)
!
The Stockyard (Chapter 6)
!
The Property Inspector (Chapter 7)
!
The Workbook (Chapter 8)
!
The Graph Paper (Chapter 9)
!
The Message Board (Chapter 10)
!
The Reporter (Chapter 11)
!
The Browser (Chapter 12)
Buttons on the Ribbon's View tab allow you to select one of the pre-defined Desktop
arrangements to change the panels being displayed.
Each panel contains a caption bar which is located at the top of the panel’s window. This
displays the name of the panel and, on the right-hand side, it provides a button to minimize
or pin the panel in place and a button
to close it.
Status Bar
The status bar is located at the bottom of the program’s user interface.
It displays the name of the project you currently have opened, the name of the item
currently selected in the Project Manager, as well as a number of useful indicators and a
sizing grip.
Modified project indicator
The indicator on the far-left of the status bar turns from grey to yellow if you make unsaved
changes to the project. When the project is saved this indicator will be reset to grey.
Overview
9
Progress bar
The progress bar gives an indication of how long a task takes to complete (e.g. calculation).
Message indicators
The four boxes in the middle of the status bar indicate whether there are unread messages
in the Message Board. When a new message appears, the indicators turn from grey to a
colour depicting the type of message that has appeared. From left to right the indicators turn
green, yellow, red, and black representing Information, Warnings, Errors, and Critical errors
respectively.
Left-click on the tick boxes in the ‘Read?’ column of the Message Board panel to
mark messages as read and reset the indicators to grey.
Keyboard indicators
The various letters on the right-hand side of the status bar indicate whether certain keys are
in an on or off state, by turning black or grey respectively. From left to right, the indicators
refer to the following keys: Caps lock, Number lock, Scroll Lock, and Insert.
Sizing grip
The sizing grip allows you to resize the program’s main window, which, for example, might
be needed to see all the information given in one of its detailed reports. To resize the
window, left-click on the sizing grip and drag the window to the desired size. The sizing grip
is only displayed if the program has been restored down (i.e. not maximized).
10
Geocentrix Repute 2 User Manual
Chapter 3
The Ribbon
The Ribbon is located at the top of the program’s user interface.
The key components of the Ribbon are: the Application button; the Quick-access toolbar;
and a row of Tabs.
Application button
The Application button is located in the top-left corner of the Ribbon. It
provides access to the Application menu and a quick way of exiting the
program.
!
To display the Application menu, click on the Application button
!
To exit the program, double-click on the Application button
Application menu
The Application menu displays a list of mainly file-related commands.
!
To create a new project, click on New
!
To open an existing project, click on
Open or select from the list of recent
projects you have worked on from the
Recent projects panel
!
To save the current project, click on
Save
!
To save the current project under a
different name or in a different format,
click on Save As
Chapter 3: The Ribbon
11
!
To close the current project, click on Close
!
Click on Licence Registration to open the License Registration Box (see below)
!
To display product and licence information about the program, click on About
Repute...
!
To edit the program’s default settings, click on the Program Options button at the
bottom of the menu which will open the Program Options box (see Chapter 14:
Program Options)
!
To exit the program, click on the Exit button at the bottom right of the menu
Importing data files from Piglet
To convert a Piglet 5.x data file:
1.
2.
3.
4.
Click the Open button from the Application menu, Home tab, or Quick-access
toolbar
Navigate to the folder where the file is located
Click the drop-down arrow next to Files of type and select Piglet 5.x spreadsheet
(*.xls)
Select the file and click Open
Repute will read the data file and automatically convert it from .xls to .rpx format. This will
open the Piglet data file as a new project in Repute.
The Licence Registration box
The Licence Registration Box assists you in registering your copy of Repute, allowing you
to unlock the particular edition you have purchased.
Until Repute has been registered, only those features included in the Trial Edition of the
program are available.
To register Repute:
1.
2.
3.
4.
Select the Product you
have purchased from
those listed
Enter your company’s
name in the Company
Name box
Enter the PIN provided by
Geocentrix in the PIN box
Enter the licence number
provided by Geocentrix in
the Licence Number box
12
Geocentrix Repute 2 User Manual
If you have entered the information correctly, a green tick mark will appear beside the
Licence Number box and the OK button will be enabled. If this does not occur, please
contact Geocentrix for assistance.
5.
Click OK to register the program
Quick-access toolbar
The Quick-access toolbar is a small, customizable toolbar, that displays
frequently used commands. The quick-access toolbar is located
immediately to the right of the Application button.
1.
To create a new project, click the New button
2.
To open an existing project, click the Open button
3.
To save the existing project, click the Save button
4.
To customize the toolbar, click on the down-arrow at its right-hand end
Tabs
The row of tabs at the top of the Ribbon organizes commands into logical groups.
The following tabs always appear on the Ribbon:
!
Home
!
Insert
!
Scenario
!
Build
!
Wizards
!
Tools
!
View
Further ‘contextual’ tabs appear after the View tab,
depending on which panels are currently displayed
(e.g. the Reporter and Message Board tabs).
To display a particular tab, click on the
corresponding heading beneath the program’s title
bar.
Chapter 3: The Ribbon
13
Home tab
The Home tab provides easy access to the program’s most frequently used commands.
The commands on the Home tab are arranged into the following groups: File, Clipboard,
and Edit.
File
!
Click the New button to create a new project. This button is disabled if a project
is already open
!
Click the Open button to open a previously saved project. If a project is already
open then it automatically closes. If the project has been modified then it asks you
if you want to save it before closing
!
Click the Save button to save changes made to the project. The button is disabled
if the project is unmodified
Clipboard
The Clipboard buttons allow you to copy, cut, and paste items in the Project Manager. If no
item is selected in the Project Manager then the Copy and Cut buttons are disabled. If no
item is currently being copied then the Paste button is disabled.
These buttons can be used to copy items to Windows’ Clipboard for later inserting into
other external applications (e.g. Microsoft Excel and Word). If you are running two copies
of Repute on the same computer, then these buttons can be used to copy and paste items
from one project to another.
Edit
The Edit buttons allow you to rename, duplicate, and delete items in the Project Manager.
If no item is selected in the Project Manager then these buttons are disabled. When you
click the Delete button a box appears asking if you want to delete the selected item. Click
Yes to continue.
14
Geocentrix Repute 2 User Manual
Insert tab
The Insert tab provides buttons for inserting new items into the project.
The Stockyard is closely associated with the Insert tab. Clicking buttons on the Insert tab
automatically opens the Stockyard to the corresponding group (e.g. the Section button
opens the Stockyard to the Sections group of items).
Scenario tab
The Scenario tab provides buttons for viewing and transforming scenarios in the Drawing
Board.
The commands on the Scenario tab are arranged into the following groups: Scenario and
Transform.
Scenario
These buttons allow you to navigate through scenarios in the Project Manager (e.g. Stage
1). As you select a scenario in the Project Manager, the scenario that is displayed in the
Drawing Board changes.
Transform
These buttons allow you to transform aspects of
the scenario.
!
Click the rotation buttons to rotate the
pile group within the Drawing Board
!
Click the Reset Datum button to open
the Reset Datum box which will allow
Chapter 3: The Ribbon
15
you to change the origin’s datum in the Drawing Board
!
Click the Flip Cross-Section button to change the sign of the x co-ordinate of all the
piles in the Drawing Board (e.g. a pile at x = +3 m becomes x = !3 m)
!
Click the Flip Elevation button to change the y co-ordinate of all the piles in the
Drawing Board (e.g. a pile at y = +3 m becomes y = !3 m)
Build tab
The Build tab provides buttons for validating and running calculations for the current or all
scenarios.
Buttons on the Build tab
If a scenario hasn’t been created yet then the buttons on the Build tab are disabled.
The Status category in the Property Inspector shows the current status of a scenario’s
calculations. This can be:
!
Suspended
!
Scheduled
!
Running
!
Cancelled
!
Finished
The Build tab’s buttons affect the status of the calculations in either one or all the project’s
scenarios:
!
Click the Validate button to check that all the data in the calculations is valid. If the
data fails a validation then the calculation is suspended
!
Click the Run button to run scheduled calculations. This automatically validates the
data before the calculations are run. This either results in the calculations being
finished (if successful) or cancelled (if unsuccessful)
!
Click the Schedule button to mark calculations as scheduled to be run the next
time the run button is pressed. When calculations are created they are
16
Geocentrix Repute 2 User Manual
automatically scheduled. Calculations that have already been run (whether
successful or not) will need to be scheduled in order to be run again
!
Click the Re-run button to schedule calculations that have been run before
(whether successful or not) and then instantly run scheduled calculations
The buttons on the Build tab are arranged into the following groups: Build Current Scenario
and Build All Scenarios.
Current Scenario
These buttons allow you to validate and run calculations linked to the scenario that is
currently selected in the Project Manager. The buttons’ names indicate which scenario is
selected: e.g. Schedule ‘Stage 1'.
All Scenarios
These buttons apply to all the calculations in the project regardless of which scenario is
selected in the Project Manager.
Wizards tab
The Wizards tab provides buttons to run either Project or Creation wizards.
Greyed-out buttons indicate that a particular wizard cannot be run. For more information
on the buttons that this tab provides, see Chapter 13: Wizards.
Tools tab
The Tools tab provides buttons for accessing various utilities provided by the program.
Chapter 3: The Ribbon
17
The commands on the Tools tab are arranged into the following groups: Security Key,
Manuals/Guides, and Advanced.
Tools
The Check Security Key button reads information from the security key attached to the
computer. This can be useful for solving licensing problems.
The Connect/Disconnect buttons control connections between the program and the
Network Licence Manager (if installed).
You may need to use the buttons when receiving technical support from Geocentrix.
Manuals/Guides
Click these buttons to open the program’s various manuals and guides in Adobe PDF
format.
!
Quick-Start Guide: guides you through 6 different tutorials to help you become
familiar with the program
!
User Manual: gives a detailed description of Repute’s user interface
!
Reference Manual: gives information regarding the program’s geotechnical
capabilities.
Advanced
Click the XML Project File button to display the project (.rpx) file in XML format. This feature
may be useful if you require technical support.
View tab
The View tab contains controls that allow you to change the display of the program’s user
interface.
The commands on the View tab are arranged into the following groups: Desktops, Panels,
View, and Visual Appearance.
Desktops
The Desktops group contains buttons that allow you to change which of the program’s predefined Desktop arrangements appears on your screen.
18
Geocentrix Repute 2 User Manual
The table below summarizes which panels appear in each Desktop arrangement.
Panel
Desktop arrangement
Welcome
Normal
Construct
Specify
Drawing Board
T
T
T
Project Manager
T
T
T
Check
Review
News
T
T
Stockyard
T
Property
Inspector
Workbook
T
Graph Paper
T
Message Board
T
Reporter
Browser
T
T
By default, the Welcome Desktop arrangement is automatically displayed when Repute
starts up. The program start-up Desktop arrangement can be changed in Program Options
(accessed from the Application Menu).
The Normal Desktop arrangement is automatically displayed when a previously saved
project is opened.
The Construct Desktop arrangement is automatically displayed when a new project is
created.
The Check Desktop arrangement is automatically displayed when a calculation has run.
The Message Board panel is not included in any pre-defined Desktop arrangements but
once it is opened it remains open until the user closes it manually.
Panels
The Panels group
contains buttons that
allow you to select
which panels appear on
your screen.
Chapter 3: The Ribbon
19
To open or close a particular panel, click its corresponding button.
Buttons on the View tab are highlighted to indicate which panels are currently open:
e.g. in the picture above the Project Manager and Workbook are currently open.
To open all the panels, click on the Open All button.
To close all the panels, click on the Close All button.
To toggle the appearance of a particular panel, press Ctrl+Alt+letter on your
keyboard, where “letter” corresponds to the letter that is underlined on the corresponding
button, e.g. D for Drawing Board, P for Project Manager, S for Stockyard, etc.
View
!
Click the Collapse/Expand All button to collapse or
expand all controls in every panel (whether displayed or
not)
!
Click the Refresh All button to refresh all the panels
(whether displayed or not)
Visual Appearance
The Visual Appearance group contains buttons that allow you to change
the program’s colour-scheme.
!
Click the Blue button to apply a blue skin to the program
!
Click the Black button to apply a black skin to the program
!
Click the Silver button to apply a silver skin to the program
A blue skin is selected as the default visual appearance but this can be changed in Program
Options (see Chapter 14).
Contextual tabs
The following panels have their own contextual tabs which are displayed only when those
panels are open:
!
Drawing Board
!
Graph Paper
!
Message Board
!
Reporter
20
Geocentrix Repute 2 User Manual
!
Browser
For information on the buttons that these tabs provide, see later chapters.
Title Bar
The title bar runs across the top of the Ribbon.
The title bar displays the program’s name, version number, and edition (e.g. Repute 2
Enterprise Edition) plus – when a project has been opened or saved – the full path name
of the current project (e.g. C:\Program Files\Repute\Projects\Tutorial 1.rpx).
Double-click anywhere on the title bar to restore or maximize the program’s main window.
The three buttons at the right-hand end of the title bar provide quick ways of minimizing,
restoring, or closing Repute.
Help button
The Help button
is located at the right-hand side of the row of tabs on Repute’s Ribbon.
Click on this button to open Repute’s help file, which has extensive information about how
to use the program.
Chapter 4: The Drawing Board
21
Chapter 4
The Drawing Board
The Drawing Board provides a scaled
representation of the selected scenario.
The Drawing Board consists of:
1.
The drawing
2.
Vertical and horizontal rulers
3.
A soil column
4.
A scale indicator
5.
A status bar
Drawing Board tab
When the Drawing Board is visible it has its own contextual tab, which provides commands
that control its appearance. The commands on the Drawing Board tab are arranged into the
following groups: Select/Zoom, Orientation, Scale, and Show/Hide.
The following paragraphs explain the functions available via the buttons on the Drawing
Board tab.
The mouse cursor can be used to select an item on the drawing or alternatively you can
select an area to enlarge using the zoom key.
By choosing the appropriate mode, you can switch between one of three orientations:
!
Cross-section
!
Plan
!
Elevation
22
Geocentrix Repute 2 User Manual
All these orientations follow the left-hand notation. By switching orientation, the direction
of the x, y, and z axes change as shown in the table below.
Orientation
Cross-Section
(Default)
Plan
x
6
6
Elevation
Out of screen
y
z
Into screen
9
8
Into screen
6
9
The scale can be adjusted on the tab from a ratio of 1:10 to 1:1000.
By selecting the appropriate option you can show or hide a variety of drawing features:
!
Origin – by selecting the Origin button you can display horizontal and vertical grey
lines whose intersection indicates the point of origin. To turn off this feature leftclick on the button again
!
Grid – by selecting the Grid button the program displays points on the drawing
which form a grid
!
Mirror Image – the Mirror Image button reverses the direction of axes whose
positive direction points to the right (see table above). For example, under CrossSection orientation, the x-axis would point positively to the left
Selecting an item
1.
2.
3.
To select an item on the Drawing Board, first make sure the Select mode is chosen
under the Drawing Board tab
Then move the mouse cursor over the item and left click (when the mouse is over
the item, the cursor will change from a cross-hair to a hand)
This will automatically select the item in the Project Manager and display its
properties in the Property Inspector (if open)
Repute 2 synchronizes panels so that when an item is modified in the Property Inspector,
it is automatically updated on the Drawing Board.
Chapter 6: The Project Manager
23
Zooming in (increasing scale)
To zoom in on the Drawing Board you can either choose the Zoom button or the Increase
Scale button on the Drawing Board tab.
!
If you chose the Zoom button then left click and drag inside the drawing to form
the area which you would like to enlarge to the full screen
!
If you chose the Increase Scale button then continue to left click until the desired
scale is reached (alternatively you can select the scale size from the Drawing Board
tab e.g. 1:100)
!
Right-clicking on the horizontal or vertical rulers will also give options of scale size
to choose from
Moving the drawing
To move the drawing within the Drawing Board:
1.
2.
3.
Left-click anywhere in the Drawing Board
Drag the mouse cursor to reposition the drawing
The vertical and horizontal rulers will automatically adjust to match the origin on
the drawing
Context menu
For more options to select, edit, and arrange items, right-click inside
the Drawing Board or directly on an item to display the panel’s
context menu. This will also give you shortcuts to change the
drawing’s orientation and display settings, as well as options to print
and save.
Selecting items in the Soil Column
The Soil Column displays the Borehole that is currently present in the scenario shown in the
drawing.
!
Left-click in the Soil Column to select the borehole in the Project Manager and
display its properties in the Property Inspector (if open)
!
Ctrl + left-click to select individual layers of the borehole
!
Shift + left-click to select the soil within the layer
24
Geocentrix Repute 2 User Manual
Drawing Board status bar
The Drawing Board status bar is located at the bottom of the panel and displays the current
orientation, scale, position of the mouse cursor from the origin, and scenario selected in the
Project Manager.
Chapter 5: The Project Manager
25
Chapter 5
The Project Manager
The Project Manager organizes the items already created in a
project. It displays items in a hierarchical structure under
separate Groups (e.g. Materials).
Context menu
For options to edit and sort items, right-click inside the panel. It
also allows you to print the Project Manager.
Clicking the Sort > Into Groups button shows or hides the
group names.
Viewing an Item’s properties
An item's properties are displayed in the Property Inspector.
If the Property Inspector is open:
!
Left-click on an item in the Project Manager to display its properties
If the Property Inspector is not open:
!
Right-click on an item and select Properties to open the Property Inspector to that
item's page
!
Or... Double-click on that item
!
Or... Select the item and press F12
26
Geocentrix Repute 2 User Manual
Creating Items
Items are created in the Stockyard panel. To access this from the Project Manager:
1.
2.
3.
Right-click on the group name of the item type you want to create
Click Create
This opens the Stockyard displaying the panel corresponding to the item’s group,
from here items can be created (see Chapter 6: The Stockyard)
Editing Items
!
Either:
1.
2.
3.
Right-click on the name of the item you want to edit
Click Edit to Cut, Copy, Paste, Delete or Duplicate an item
When you click the Cut or Delete button, a box appears to check that you
want to delete the selected item, click Yes to continue deleting
!
Or... Type Ctrl+X to cut, Ctrl+C to copy, Ctrl+V to paste, Ctrl+Del to delete, or
Ctrl+D to duplicate the selected item
!
Or... Select the Paste, Cut, Copy, Duplicate, or Delete button from the Home tab
on Repute’s Ribbon
Duplicating an item creates a carbon copy with identical properties but a different name.
Renaming an Item
!
Right-click on an item and select Rename
!
Or... Select the item and press F2
!
Or... Select the Rename button from the Home tab on Repute’s Ribbon
Home tab
The Project Manager is closely associated with the Home tab. The Home tab provides a
number of buttons for modifying items in the Project Manager (see Home tab in Chapter
3: The Ribbon).
Chapter 6: The Stockyard
Chapter 6
The Stockyard
The Stockyard stores a wide range of pre-built items for
inclusion in the project.
Items available to be added are organized into groups,
e.g. Structural Elements, Project Information, Geotechnical
Constituents etc. Above the divider is a list of all the items
included in the currently expanded group.
The group caption bar displays the name of the currently
expanded group. This is also highlighted in the list of
groups below the divider. The Common group includes
the most frequently created items (all of which are
repeated in other groups).
Surplus groups go into the overflow bar at the bottom of
the panel. These can be selected by clicking on the image
representing them. Further commands are available via the
drop down arrow on the right hand side of the bar (see
below).
Greyed-out items
If an item is greyed-out then it is not available in the
edition of Repute that is running.
To hide unavailable items:
1.
2.
3.
4.
Click on the Application Button (program logo in the top left of the screen)
Click on the Program Options button
Select Stockyard
Tick the box that says “Hide disabled items”
Context menu
Right-clicking anywhere inside the panel reveals its context menu which
gives options to expand Stockyard groups, create items, and print the
panel.
27
28
Geocentrix Repute 2 User Manual
Expanding Groups
To expand a group:
!
Left-click on the group name from the list below the divider or on the group icon
in the overflow bar at the bottom of the panel
!
Or... Right-click and select the desired group name
!
Or... Click on the relevant button on the Insert tab
Creating Items
To create an item:
!
Left-click on the item name and drag it into the Project Manager (the mouse cursor
picture will change when in the Project Manager to illustrate the item being
created)
!
Or... Right-click on the item name and select Create <Name of item>
Creating an item opens the Project Manager (if not already displayed), which automatically
selects the new item. The item is also selected in the Property Inspector (if open) so that its
properties can be altered.
Drop-down menu
The drop-down menu is shown by clicking on the drop-down
arrow in the bottom right-hand corner of the panel.
This menu allows you to see all available groups and adjust
which are displayed in the panel's list of groups.
Adding/Removing groups from the panel’s list
To add or remove specific groups from the list displayed in the panel:
1.
2.
Select Add or Remove Buttons from the drop-down menu to view a list of all
available groups
Left-click on specific group names to add or remove them
Adjusting the number of groups in the panel’s list
!
Select Show More Buttons or Show Fewer Buttons from the drop-down menu
!
Or... Left-click and drag the divider up or down
Surplus groups not displayed in the panel’s list go into the overflow bar at the bottom of the
panel and any remainder are shown at the bottom of the drop-down menu.
Chapter 6: The Stockyard
29
Insert tab
The insert tab provides buttons for inserting new items into the project.
The Stockyard is closely associated with the Insert tab. Clicking buttons on the Insert tab
automatically opens the Stockyard and displays its corresponding group.
30
Geocentrix Repute 2 User Manual
Chapter 7
The Property Inspector
The Property Inspector allows you to inspect and
change the properties of items already created.
Properties are split into groups, e.g. Dimensions,
Material Properties etc. When there is a lot of
information being displayed some groups are
collapsed by default. To expand or collapse a group,
press the + and ! buttons respectively.
The General group is common to all items. Other
groups are item-specific.
There are a variety of types of property value boxes:
!
Numerical boxes
!
Tick boxes
!
Multiple choice lists
!
Paths (links to the internet)
!
Names (single line of text)
!
Notes (multiple lines of text)
Changing an item’s properties
To change the numerical properties of an item:
1.
2.
3.
Left-click on the row of the desired property to change
Type in the new value
Press enter or tab
Left-clicking in the numerical box displays a drop down arrow
on the right-hand side, which can then be clicked on to
reveal a built-in calculator.
For tick box properties, simply click on the tick box to select
or deselect that option. Properties with a multiple choice box
can be chosen via the drop down arrow.
Chapter 7: The Property Inspector
31
To change the units of a numerical property:
1.
2.
3.
Click the + button on a property so that it expands to reveal its units
Click on the drop down arrow in the units row to display available units
Select the desired Imperial/SI units
Repute synchronizes panels so that when an item is modified in the Property Inspector, it
is automatically updated on the Drawing Board.
Context menu
Right-clicking anywhere inside the panel reveals the context menu
which gives options to expand or collapse groups, and to print the
panel.
32
Geocentrix Repute 2 User Manual
Chapter 8
The Workbook
The Workbook shows results
calculations in tabular format.
from
The data is presented on separate
worksheets (e.g. Longitudanal ULS,
Randolph’s Analysis etc.) which can be
selected by clicking on the worksheet tabs
at the bottom of the Workbook. Some
worksheets have no data to display, in
which case the worksheet displays a
message to that effect.
In a worksheet, results are presented in a
table where columns indicate properties and
each row depicts a different result.
The default display only shows a small
proportion of the available results.
Left-click on a column heading and drag it
across the worksheet to change the column
order.
Column context menu
Right-click on a column heading for more options to sort and group
the data, as well as to remove that column.
!
Left-click on Alignment and select Align Left, Right, or
Center to adjust the positioning of the results values within
their data cells.
!
Left-click on Best Fit to re-size the column
!
Choose Best Fit (all columns) to re-size all the columns
Chapter 8: The Workbook
33
Displaying a different selection results
1.
Left-click on the asterisk * in the top left corner of the table to
see a drop-down list of all available columns
2.
Left-click in the relevant tick boxes to show or hide the results
you want displayed
Or...
1.
2.
On the column context menu, choose Field Chooser to open
a Customization dialog box
Left-click and drag columns onto the worksheet to add them
to the results table
Grouping results
To group identical values in a particular column:
!
Drag the desired column into the Grouping bar found above the column headings
or choose Group By This Field in the column context menu
This sorts all the results in ascending order by value for that column’s property. It also
groups results with the same numerical value for that property
!
Left-clicking on the + button on each row expands the group to show all results
with that value
!
Left-clicking on the drop down arrow in the column that has been dragged onto
the Grouping bar allows you to filter the grouped results (see Filtering results)
Sorting results
To sort the numerical values by a particular property:
!
Left-click on the column heading that you want the data to be sorted by (data
ascends from lowest value) or select Sort Ascending on the column context menu
!
Left-click on the column heading again to reverse the order (data descends from
highest value)
By default, data is sorted in ascending order by value in the furthest left column.
34
Geocentrix Repute 2 User Manual
Filtering results
To filter results by their numerical values in a particular column:
1.
2.
Left-click on the drop down arrow in the column heading of the
property you want to filter by
Left-click to tick the boxes of the values that you want to keep or leftclick on (Custom...) for more advanced filtering options (see Custom
filter box below)
This hides all results apart from those which have one of the ticked numerical
values for that property.
!
Left-click on the drop down arrow and select (All) to restore filtered
data
Deselecting current filters
Current filters are displayed at the bottom of the workbook (above worksheet tabs).
!
Left-click on the checked tick box
!
Left-click on the
to temporarily deselect the current filter
button to cancel the current filter
To the right-hand side of the line describing the current filter, there is a drop down arrow
which gives a list of previous filters so that they can be returned to easily.
The Customize... button in the bottom right corner of the Workbook links to the Custom
filter box.
Custom filter box
The custom filter box allows you to
select from a list of parameters to filter
the data by. The list is accessible from
drop down arrows in the left hand
boxes.
Parameter values are entered in the
right-hand boxes which have built-in
calculators accessible from the drop
down arrows.
Changing results
To change the values shown in the results:
!
Left-click on the data cell you wish to change
Chapter 8: The Workbook
35
!
Type a new value and press Enter
!
You can left-click on a data cell and drag the mouse down to select multiple data
cells to change to the same value
Note: if data values are greyed out then they can’t be modified.
Workbook context menu
Right click elsewhere on the Workbook to reveal a second context menu allowing you
to print or export the worksheet.
Workbook tab
When the Workbook is visible it has its own contextual tab, which indicates which
worksheets have data to display and lets you switch between them. It also enables you to
Export Workbook so that the results can be saved on an external program (e.g. Microsoft
Excel) for future reference or printing.
36
Geocentrix Repute 2 User Manual
Chapter 9
The Graph Paper
The Graph Paper shows the calculation’s key results in graphical format.
Graph Paper tab
When the Graph Paper is visible it has its own contextual tab, which allows you to select the
type of graph you would like to see and change the graph settings. When certain graph
types aren’t available the relevant buttons are greyed out on the Graph Paper tab.
Chapter 9: The Graph Paper
37
The legend at the bottom of the panel labels the lines on the graph.
!
Left-click on the appropriate tick box to hide or show the lines on the graph
!
Left-click on the Show All or Show None buttons on the Graph Paper tab to show
or hide all the lines
By default all the available lines are displayed.
Graph Options
Left-click the Options button on the Graph
Paper tab to open a dialog box which
enables you to customize every aspect of
the graph. It also allows you to export the
graph to another program or to print it.
38
Geocentrix Repute 2 User Manual
Chapter 10
The Message Board
The Message Board shows all the messages that the program generates.
Messages include information updates and warnings as well as errors and critical errors in
your data or calculation.
The message board works in the background whilst minimized, and automatically appears
when errors occur. To control the threshold for when the Message Board appears:
1.
2.
3.
4.
Click on the Application Button (program logo in the top left of the screen)
Click on the Program Options button
Select Message Board
Select the desired threshold (by default the Message Board will appear only when
an Error or Critical message is produced)
Message Board tab
When the Message Board is visible it has its own contextual tab, which provides buttons to
filter through different types of message.
You can also filter through different types of messages by clicking on the relevant tabs at the
top of the Message Board. By default the All tab is selected, showing every message
produced. While all message types are being shown, the message type icon displayed before
the message enables you to distinguish between them (e.g.
for Warning messages).
Chapter 10: The Message Board
39
Related messages are automatically grouped together. Left-click on the + button (to the left
of the message type icon) to expand the group and view individual messages in more detail.
Sorting messages
Repute automatically records the date and time that messages are produced as well as
judging the severity of the message and displaying this in the relevant columns. To sort
messages by time, date, or severity:
!
Left-click on the column heading that you want the data to be sorted by (messages
are ordered chronologically and from least to most severe)
!
Left-click on the column heading again to reverse the order
Context menu
For more options to clear, copy and arrange messages, right-click
inside the panel to reveal the context menu. This menu also
allows you to print and save the Message Board.
To reset the Message Board indicators in the status bar to
grey, select Mark All As Read on the right-click menu.
Clearing Messages
To clear individual messages:
1. Left-click in the tick boxes under the column
‘Read?’ to select the messages you have read and
no longer need
2. Right-click anywhere in the panel
3. Left-click on Clear Read or press Ctrl+Del
To clear all messages:
1. Right-click anywhere in the panel
2. Left-click on Clear All or press Shift+Del
40
Geocentrix Repute 2 User Manual
Chapter 11
The Reporter
The Reporter produces a page-based report of the input/output data of the scenario
suitable for printing.
The Reporter panel is shown under the Review desktop arrangement (under the
View tab).
Reporter tab
When the Reporter is visible it has its own contextual tab, which provides buttons
to navigate through the report, customize its content, and also print it.
To produce a report left-click on the Refresh button. All reports start with reference
data including the Client name, Project ID, and date of the project. This is followed
Chapter 11: The Reporter
41
by specific elements of the project.
Customizing the report’s content
The Reporter tab shows a list of report elements. To change the content of the
report:
1. Left-click to select desired elements of the report and deselect undesired
ones
2. You can select All or None of the elements by clicking the appropriate
button
3. Left-click on the Refresh button
Reporter toolbar
The Reporter toolbar appears at the top of the panel window and repeats many of
the
commands available on the panel's contextual tab. This allows you to access these
buttons when the Reporter tab isn't showing.
It also includes the Show Thumbnails button (see below) and a drop-down box on
the
right hand side which allows you to customize the buttons on the toolbar.
Customizing buttons on the toolbar
1. Left-click on the drop-down arrow on the right-hand side of
the Reporter toolbar
2. Select Add or Remove Buttons
3. Left-click to select/deselect desired buttons to add or remove
them from the toolbar
! Select Reset Toolbar to restore the display to its default (all
buttons are displayed)
! Select Customize... for options to further modify the toolbar
Navigating through the report
The Reporter tab gives options to fit the height and width and zoom in and out of
42
Geocentrix Repute 2 User Manual
the report. It also has Next Page and Last Page buttons to skip through the pages
in the report. Many of these buttons are also available when the Reporter tab isn’t
in view via the toolbar in the Reporter.
Left-click and drag the mouse cursor to move through the report slowly.
In the left-hand margin of the Reporter there are thumbnails showing the reports
pages so they can be quickly skipped between. Left-click on the Show Thumbnails
button (on the Reporter toolbar) to show or hide this margin.
Modifying the report (Enterprise edition only)
To modify the report left-click on the Modify button on the Reporter tab. This will
open another window allowing you to customize the report. Further information on
how to use this feature is given on the Repute 2 training course.
Chapter 12: The Browser
43
Chapter 12
The Browser
The Browser allows you to view web pages within Repute instead of having to open
up an external program. It uses the same browsing engine as Microsoft Internet
Explorer.
The Browser panel is shown under the News desktop arrangement (under the View
tab).
Browser tab
When the Browser is visible it has its own contextual tab, which provides buttons
to navigate through the Internet similar to those provided by Internet Explorer (e.g.
Back, Forward, Refresh). There are also buttons providing direct links to the
Geocentrix web site and the Repute home page.
44
Geocentrix Repute 2 User Manual
Surfing the Internet
To surf the internet whilst in Repute:
! Left-click in the address bar in the Browser tab
! Type in the desired internet address and press Enter
Online help
Repute has a comprehensive online help system that includes all the information
given in the program’s Quick Start Guide, User Manual, and Reference Manual.
Opening Repute’s online help
! Click the Help button
on Repute’s Ribbon
Chapter 12: The Browser
45
! Or... Click the Help button in a dialog box
! Or... Press F1
Navigating Repute’s online help
! If the navigation panel is not showing, click on the Show button on the help
window’s toolbar
! Click on the Contents tab to see the help file’s table-of-contents, doubleclick a book to see more of the contents, and then click on the topic you
want to display
! Click on the Index tab and then double-click on a keyword to display a
matching topic
! Click on the Search tab, enter the keyword to find, click the List Topics
button, and then select the topic you want to display
! Throughout the help system there are a number of words or phrases that
are underlined and shown in red. These are hyperlinks which navigate you
to related topics
46
Geocentrix Repute 2 User Manual
Chapter 13
Wizards
Repute’s Wizards take you through a series of steps to help you perform various
tasks.
Wizards tab
The Wizards tab can be accessed from Repute’s ribbon and provides buttons to run
each of the wizards. Greyed-out buttons indicate when a particular wizard can’t be
run.
The Project wizard is used to start a new project. This is only available if there is no
existing project open. If an existing project is open, the Project Wizard button is
disabled on the Wizards tab.
The other wizards are used to create items within a project. This is only available if
there is an existing project open, otherwise their buttons are disabled on the
Wizards tab. Once created, all of the items can be edited, but the wizard is a
convenient way of performing several steps at once.
To run a wizard simply click on the relevant button in the Wizards tab. A box opens
giving instructions on how to perform the desired task.
Project Wizard
The Project Wizard helps you create a new project.
To create a new project, the Project Wizard takes you through the following steps:
1. Enter the administrative details for your project
2. Select the design standards you want to use in this project
Chapter 13: Wizards
3. Define the scenarios to create in this project
Administrative details
Project name: this must be a valid
Windows file name (excluding the
characters + and ,). The Wizard
creates a .rpx file with whatever
project name you enter, e.g.
Example1Y Example1.rpx
Path: by default the Wizard
places the file in the folder where
Repute was installed, under
Projects.
Description: this text appears on the project report.
Project ID: any alphanumeric text. This also appears on the project report.
Design standards
The number of design standards
available depend on which
edition of the program is running.
For access to all the design
standards you need Repute 2
Enterprise edition.
Tick the relevant boxes to select
the desired design standards.
Click on the All or None buttons
to select or deselect all the tick
boxes respectively.
47
48
Geocentrix Repute 2 User Manual
Defining scenarios
No. of construction stages: enter
the desired number of
construction stages. The number
of stages must be between 1 and
10.
Longevity: left-click in the cells in
the right-hand column to access a
drop down list allowing you to
change the longevity of the
stages. The longevity can either
be Persistent, Transient, Accidental, or Seismic.
You can navigate between the different stages you have created using the first,
previous, next, and last buttons located at the bottom left of the table’s window.
Borehole Wizard
The Borehole Wizard helps you create a borehole. This allows you to define all of
the ground conditions for your site in one simple procedure.
To create a new borehole, the Borehole Wizard will take you through the following
steps:
1. How many layers do you want to create?
2. Please specify the thickness and soil type of each layer
3. Please enter the drained properties of each soil
4. Please enter the undrained properties of each cohesive soil
5. Select the scenarios in which you want to use the borehole
Chapter 13: Wizards
Borehole layers
Enter the desired number of
layers. The number of layers must
be between 1 and 50.
Soil type and thickness
Thickness: Left-click on cells in
the thickness column to access
the built-in calculator via the drop
down arrow and enter the correct
value.
Soil type: Select the soil type
from the drop down list.
Drained Properties
Left-click on relevant cells and
enter the correct properties. You
can use the built-in calculators via
the drop down arrows.
49
50
Geocentrix Repute 2 User Manual
Undrained Properties
If the borehole includes a
cohesive soil then enter
properties as before. If there is no
cohesive soil present then click
Next.
Selecting scenarios
Tick the relevant boxes to select
the scenarios in which you want
to use the borehole.
Click on the All or None buttons
to select or deselect all the tick
boxes respectively.
Pile Group Wizard
The Pile Group Wizard generates piles on a grid layout that you specify.
To create a new pile group, the Pile Group Wizard takes you through the following
steps:
1. Specify the plan arrangement and number of piles
2. Select the pile type and enter its properties
3. Enter the pile length and rake
4. Enter the location and rotation of the group centroid
5. Select the scenarios in which to place this pile group
Chapter 13: Wizards
51
Plan arrangement
Choose either a Predefined or
Custom plan arrangement.
Total number of piles: Select the
desired number of piles. For a
predefined arrangement, this can
be between 1 and 11. The image
on the left of the box illustrates
the pile arrangement.
For a custom arrangement, the
Wizard creates a quadrilateral
group with sides of length m x n piles. Values m and n can be between 1 and 100.
The total no. of piles is a product of these values and is displayed in the Wizard.
Specify the dimensions: Enter the dimensions for Spacing and Cover. You can use
the built-in calculators via the drop down arrows. Click the + buttons to expand to
reveal the units and select the desired Imperial/SI units from the drop down list.
Pile properties
Choose the pile type: The pile
type can be either Bored,
Augered, or H pile.
Select the key section
properties: select the
Section/Diameter and Concretes
from various options displayed in
drop down lists.
52
Pile length and rake
Enter the dimensions for
Embedded length and Upstand.
You can use the built-in
calculators via the drop down
arrows. Click the + buttons to
expand to reveal the units and
select the desired Imperial/SI
units from the drop down list.
Group centroid
Enter the X and Y co-ordinates for
the group centroid’s location and
its angle of rotation. As before
you can use built-in calculators
and change the units.
The diagram within the Wizard
illustrates what these values
relate to.
Selecting scenarios
Tick the relevant boxes to select
the scenarios in which you want
to place the pile group.
Click on the All or None buttons
to select or deselect all the tick
boxes respectively.
Geocentrix Repute 2 User Manual
Chapter 13: Wizards
53
Action Wizard
The Action Wizard creates forces and moments for your project and brings them
together in combinations.
To create a new force or moment, the Action Wizard takes you through the
following steps:
1. Define the forces to create in this project
2. Define the moments to create in this project
3. Define the combinations of actions to create in this project
Forces
No. of forces: Enter the desired
number of forces. The number of
forces can be between 0 and 10.
You can only have 0 forces if there
is at least one moment created.
Left-click on relevant cells and enter
the correct properties. You can use
the built-in calculators via the drop
down arrows.
Variability: left-click in the cells in
the right-hand column to access a drop down list allowing you to change the
variability of the forces. The variability can either be Permanent, Variable,
Accidental, or Seismic.
Moments
No. of moments: Enter the desired
number of moments. This number
can be between 0 and 10. You can
only have 0 moments if there is at
least one force created.
Enter the properties of the
moments and change their
variability as before.
54
Geocentrix Repute 2 User Manual
Combinations
No. of combinations: Enter the
desired number of combinations.
This number can be between 0
and 10.
Forces and Moments to include:
Left-click in the cells to access
drop down arrows allowing you
to select the forces and moments
to include in a combination.
Combinations can have any
number of forces and/or moments (restricted by the number of forces and
moments created).
Calculation Wizard
To set up calculations in Repute, make use of the Calculation wizard, which allows
you to easily choose a specific calculation and link it to design standards and
scenarios in your project.
To create a new calculation, the Calculation Wizard takes you through the
following steps:
1. Select the calculations you want to create
2. Select the design standard to apply
3. Select the scenarios to use in the calculations
Calculations
Tick the relevant boxes to select
the calculations you want to
create.
Click on the All or None buttons
to select or deselect all the tick
boxes respectively.
Chapter 13: Wizards
55
You must have at least one calculation selected to continue.
Design standards
Select the design standard to
apply. The design standards
displayed are those that have
been previously created in this
project.
You can apply a maximum of
one design standard. To continue
with no design standard applied,
select None.
Selecting scenarios
Tick the relevant boxes to select
the scenarios you want to use in
the calculation.
Click on the All or None buttons
to select or deselect all the tick
boxes respectively.
The best way to learn how to use the wizards is to follow Tutorials 1–6, which
make extensive use of them to create projects and items in Repute.
56
Geocentrix Repute 2 User Manual
Chapter 14
Program options
You can change the default settings for Repute’s user interface, projects, and
reports using the Program Options box. This allows you to customize everything
from the visual appearance of the program to the file extension of the backup files
that it produces.
The Program Options box
To open the Program Options box:
1. Left-click on the Application button to open the Application menu
2. Left-click on the Program Options button at the bottom of the menu
The tree control on the left-hand side allows you to select pages to be displayed on the right.
!
Click the OK button to apply the changes made to Repute’s default settings
!
Click the Cancel button to close the box and cancel any changes made
!
Click the Help button in the bottom right of the box to access the help file and
view more details on how to use this box
The following paragraphs explain the pages available in the Program Options box and each
of the settings they allow you to modify.
User interface
Show splash screen when program starts
This selects whether or not the splash screen is displayed during the program
start-up. This window shows the program name and version number as well as containing
a progress bar at the bottom indicating when the program has finished loading.
Chapter 14: Program options
57
Automatically show panel when the mouse is over docking label
When a panel is minimized it is displayed on the edge of the main window as a docking
label. This selects whether the panel is automatically maximized when the mouse
cursor moves over this label.
Write a log of program activity
This tells Repute to keep a record of the program activity which can be accessed
from the folder C:\DocumentsandSettings\All Users\ApplicationData\Geocentrix\Repute.
This may be useful if you have to contact Geocentrix technical support.
Show this view at program startup
This lets you select from a drop down list which desktop arrangement is displayed
at the program start-up. By default this is the Welcome desktop.
Visual appearance
This lets you select from a drop down list which colour scheme to apply to the program.
By default this is the Blue skin style.
Drawing Board
This lets you select the maximum
dimensions of the drawing within the
Drawing Board panel.
Stockyard
This lets you hide the greyed-out items
which appear in the groups of the
Stockyard. If an item is greyed-out then
it is not available in the edition of Re/x
that is running. All items are available in
the Enterprise edition.
Message Board
This lets you control the threshold for
when the Message Board panel opens.
Select the box applying to the desired
level of severity for when you want the
Message Board to open.
58
Geocentrix Repute 2 User Manual
Project
Create a new project when the program
starts
This programs Re/x to automatically
create a new blank project when the
program starts-up.
Automatically create a backup when
the project is saved
This creates a backup copy of the
previously saved file which is kept in the same
folder as the normal file. You can change the backup extension in the box underneath.
By default, the extension is .bak.
Reset
If you are unhappy with any changes
you have made you can restore the
settings to their factory-set values by
clicking the Reset button found on the
Reset page in the tree control.