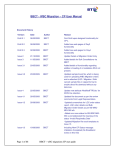
1
CP Administrator User Guide
Openreach Portal
(Release R2250)
ORPG CP-UM-18-05-2013, Issue v21.00
14 May 2013
British Telecommunications plc
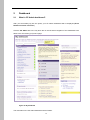
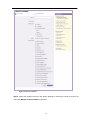
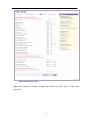
Table of Contents
Table of Contents .......................................................................................................................... iii
Document Revisions ......................................................................................................................... v
Document Approval ......................................................................................................................... vi
Table of Figures ............................................................................................................................ vii
1
2
Introduction ................................................................................................................................ 1
1.1
Overview ........................................................................................................................... 1
1.2
Purpose ............................................................................................................................. 1
1.3
Audience ........................................................................................................................... 1
1.4
Ownership ......................................................................................................................... 1
1.5
Distribution ........................................................................................................................ 1
1.6
What's new in this version? .............................................................................................. 2
1.7
Who is a CP Admin? ......................................................................................................... 4
1.8
How do I register my company? ....................................................................................... 4
1.9
How do users register under my company? ..................................................................... 9
1.10
How do I log in to Openreach Portal? .............................................................................14
1.10.1
Can't remember your password? ............................................................................18
1.10.2
What happens when my login session expires? ....................................................23
Dashboard ...............................................................................................................................24
2.1
2.1.1
3
What is the 'CP Admin home' page? ..........................................................................27
User Management ...................................................................................................................29
3.1
CP User Types and Functions ........................................................................................29
3.2
How do I create a new user in the portal? ......................................................................31
3.3
A user I created cannot login… Why? ............................................................................38
3.3.1
How do I stop a user from accessing the portal? .......................................................41
3.3.2
What are these links on my Admin home page? ........................................................41
3.4
4
What is CP Admin dashboard? .......................................................................................24
A user cannot access the portal, but I did not deactivate the user. Why? ......................43
3.4.1
How do I re-activate an inactive user? .......................................................................46
3.4.2
How can a user reset the secret question and answer? ............................................49
3.5
How do I delete a user? ..................................................................................................54
3.6
How do I edit a user profile? ...........................................................................................55
3.7
How do I make a user another CP Admin? Why? ..........................................................57
Group Management ................................................................................................................61
4.1
Overview .........................................................................................................................61
4.2
How do I create a User Group? ......................................................................................61
4.3
How do I edit a User Group? ..........................................................................................71
iii
4.4
How do I search for a group?..........................................................................................76
4.4.1
4.5
5
How do I find a list of users assigned to a group? ......................................................78
How do I add users to a group? ......................................................................................78
My Tools – Giving User Access ..............................................................................................84
5.1
How do I allow users to access the Portal applications? ................................................84
5.2
What is Openreach Seibel and how do my users get access to it?................................85
5.3
What is X-hour repair tool and how do my users get access to it?.................................86
5.4
What is Openreach Reporting and how do my users get access to it? ..........................86
5.5
What is eBilling and how do my users get access to it? .................................................90
5.6
Access to Assurance dashboard (fault tracker) application ............................................94
5.7
What is Shared Calendar? ..............................................................................................96
5.7.1
Request access page .................................................................................................96
5.1.1.1
5.7.2
Shared calendar Normal user functionality.................................................................97
5.7.3
Shared calendar Events manager functionality ........................................................102
5.7.4
Shared calendar view through Industry forum page .................................................107
5.8
6
7
Request access page .............................................................................................96
What Service based solutions application and how do my users get access to it? ......111
User Permission Management ..............................................................................................112
6.1
How do I manage the access rights for each user?......................................................112
6.2
How do I change users' permissions? ..........................................................................112
6.3
How do I provision a user request? ..............................................................................115
6.4
How do I search for a user? ..........................................................................................116
Other Portal Capabilities .......................................................................................................119
7.1
What is the 'Profile' link on my Dashboard? .................................................................119
7.2
What is the Sitemap? ....................................................................................................124
7.3
What are secure content folders and how do I allow users to access them? ...............126
7.4
What are notifications and how do I subscribe? ...........................................................128
7.5
What is the collaboration area? ....................................................................................132
7.6
What are bookmarks and how do I bookmark pages? .................................................136
7.7
How can I track user history - Create audit reports ......................................................138
7.8
What happens when my company acquires another company or my company gets
acquired by another company?.....................................................................................143
7.9
8
How do I contact Openreach? ......................................................................................146
Cross Reference ...................................................................................................................152
iv
Document Revisions
Date
Version
Description
Author
16-05-2007
Issue 1.0
Created
Virtusa team
07-09-2007
Issue 1.1
Updated with R600 functionality
Virtusa team
12-12-2007
Issue 1.2
Updated with R613 functionality – new home
Virtusa team
page
14-01-2008
Issue 1.3
Updated R700 – note on email format
Virtusa team
changes
10-06-2008
Issue 8.1
Updated for T2R functionality
Virtusa team
09-08-2008
Issue 9.0
Updated with R900 functionality
Virtusa team
05-09-2008
Issue 9.4
Updated with R904 functionality
Virtusa team
12-11-2008
Issue
Updated with R1000 functionality
Virtusa team
Updated with R1004 Functionality
Virtusa Team
Updated with R1011 Functionality
Virtusa Team
Updated with R1020 Functionality
Virtusa Team
Updated with R1023 functionality
Virtusa Team
Updated with R1100 functionality
Virtusa Team
Updated with R1110 functionality
Virtusa Team
Updated with R1200 functionality
Virtusa Team
Updated with R1208 functionality
Virtusa Team
Updated with R1300 Functionality
Virtusa Team
Updated with R1400 functionality
Virtusa Team
Updated with R1412 functionality
Virtusa Team
Updated with R1500 & KnowHow functionality
Virtusa Team
10.0
01-12-2008
Issue
10.4
20-01-2009
Issue
10.11
26-03-2009
Issue
10.20
15-04-2009
Issue
10.23
10-07-2009
Issue
11.00
16-09-2009
Issue
11.10
16-11-2009
Issue
12.00
11-01-2010
Issue
12.08
13-03-2010
Issue
13.00
14-Mar-2010
Issue
14.00
07-Oct-2010
Issue
14.1
05-Nov- 2010
Issue
v
15.00
18-August-
Issue
2011
17.00
29-
Issue
November-
18.00
Updated with R1710 functionality
Virtusa Team
Updated with R1808 functionality
Virtusa Team
Virtusa Team
2011
03-March-
Issue
Updated with R1900 functionality (includes
2012
19.00
changes in access to Openreach Reporting –
formerly Openreach Analytics)
08-Mar-2013
Issue
Updated with R2200 functionality (includes
20.00
the changes of the new Dialogue Service
Virtusa Team
Request Connection Price Band
18-Mar-2013
Issue
Updated with R2250 changes
Virtusa Team
21.00
Document Approval
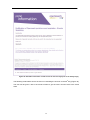
OR CIO and Openreach have reviewed this document and hereby agree that the contents herein
are accurate. Any changes to this document must be communicated in writing and signed off by
both parties.
Signature
Signature
Date:
Date:
Name:
Name:
Client: Openreach
OR CIO
Distribution List
Communication Provider
CP
Admin
of
OR
portal
registered
communication provider
Openreach
OR Help Desk, OR Customer Reception
OR CIO
vi
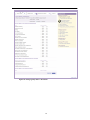
Table of Figures
Figure 1: Openreach home page...................................................................................................... 5
Figure 2: Become a customer registration form .............................................................................. 6
Figure 3: Become a customer registration form – error page ......................................................... 7
Figure 4: Customer registration form – Confirm page ...................................................................... 8
Figure 5: Account creation page ...................................................................................................... 8
Figure 6: Extract of the Prospect user dashboard ........................................................................... 9
Figure 7: Openreach home page..................................................................................................... 9
Figure 8: CP user registration .......................................................................................................10
Figure 9: Openreach registration form...........................................................................................11
Figure 10: CP New user registration form - DUNS ID validation ...................................................11
Figure 11: CP New registration form - DUNS ID validation confirmation .....................................12
Figure 12: DUNS ID validation page ..............................................................................................12
Figure 13: Openreach access registration confirmation page ......................................................13
Figure 14: Account creation page.................................................................................................13
Figure 15: Email confirmation sent to the Non-Portal user ...........................................................14
Figure 16: Openreach home page.................................................................................................15
Figure 17: Portal Login – log-in page ............................................................................................15
Figure 18 a: Openreach Terms and Conditions – New user .........................................................16
Figure 198 b: Openreach Terms and Conditions - T&C page content modified ...........................16
Figure 20: Openreach home page.................................................................................................18
Figure 21: Password reminder ......................................................................................................19
Figure 22: Password question .......................................................................................................19
Figure 23: Password acknowledgement .......................................................................................20
Figure 24: Text of the email sent with the system generated password .......................................20
Figure 25: Password reminder – change Password page ............................................................21
Figure 26: Password reminder – password error ..........................................................................22
Figure 27: Acknowledgement – password changed page ............................................................22
Figure 28: Portal Login – log-in page when a session expires ......................................................23
Figure 29: Application timeout error page .....................................................................................23
Figure 30: My dashboard ................................................................................................................24
Figure 31: CP Admin home page – with pending requests ...........................................................27
Figure 32: CP Admin home page – without pending requests ......................................................27
Figure 332: Your home page (CP Admin home page) ..................................................................32
Figure 343: The non portal user registration form .........................................................................33
Figure 35: Non portal user registration confirmation page ............................................................34
Figure 36: CP New user registration process – Manage customer status ....................................35
vii
Figure 37: CP new user registration process – Manage customer permission .............................37
Figure 38: Account confirmation page ............................................................................................37
Figure 39: Email confirmation sent to the Non-Portal user ............................................................38
Figure 40: CP Admin home page – Manage customer status .......................................................38
Figure 41: Manage customer status – Search customer................................................................39
Figure 42: Manage customer status – Select customer .................................................................39
Figure 43: Manage customer status – User activation ...................................................................40
Figure 44: Manage customer permission .......................................................................................41
Figure 45: Acknowledgement – Customer account activated ........................................................41
Figure 46: CP Admin home page – Select pending user request ..................................................41
Figure 47: Manage customer permissions .....................................................................................42
Figure 48: Automatic inactivation - Email sent to the user five days prior to the 28-day expiry .....45
Figure 49: Automatic inactivation - Email sent to the user on expiration of the 28 days................46
Figure 50: CP Admin home page – Manage customer status .......................................................47
Figure 51: Manage customer status – Find user ............................................................................47
Figure 52: Manage customer status – Select user name ...............................................................47
Figure 53: Manage customer status – activate user status ............................................................48
Figure 54: Manage customer status – Confirm user activation ......................................................48
Figure 55: Acknowledgement – Customer account activated page ...............................................49
Figure 56: Search customer ...........................................................................................................50
Figure 57: Search customer – Select customer .............................................................................51
Figure 58: Manage customer status – Reset security question and answer .................................52
Figure 59: Acknowledgement of password and security information reset ....................................53
Figure 60: Email sent to user after password reset ........................................................................54
Figure 61: Edit customer account – search user name ..................................................................55
Figure 62: Edit customer account details – Select desired user ....................................................55
Figure 63: Edit customer account ...................................................................................................56
Figure 64: Edit customer account details – Confirm page .............................................................57
Figure 65: Acknowledgement - User details updated.....................................................................57
Figure 66: CP Admin home page ...................................................................................................58
Figure 67: Convert to CP Admin – Find user .................................................................................58
Figure 68: Convert to CP – Select the user ....................................................................................59
Figure 69: Convert to CP Admin.....................................................................................................59
Figure 70: Convert to CP Admin – Confirmation ............................................................................60
Figure 71: Convert to CP Admin – Successful confirmation ..........................................................60
Figure 72: CP Admin home page ...................................................................................................62
Figure 73: Add a group – Find group name ...................................................................................62
Figure 74: Add a group ...................................................................................................................63
viii
Figure 75: Add a group – Confirm access rights ............................................................................65
Figure 76: Acknowledgement - Group added page........................................................................66
Figure 77: CP Admin home page ...................................................................................................67
Figure 78: Change group status - Search group ............................................................................67
Figure 79: Change group status – Select group.............................................................................68
Figure 80: Change group status - Deactivate .................................................................................69
Figure 81: Change group status – Confirm page ...........................................................................70
Figure 82: Acknowledgement – Group deleted page .....................................................................71
Figure 83: CP Admin home page ...................................................................................................72
Figure 84: Edit a group – Search group name ...............................................................................72
Figure 85: Edit a group – Select group ...........................................................................................73
Figure 86: Edit a group – step 3 .....................................................................................................73
Figure 87: Edit a group – Edit .........................................................................................................74
Figure 88: Edit a group – confirm page ..........................................................................................75
Figure 89: Acknowledgement - Group updated page ..................................................................75
Figure 90: CP Admin home page ...................................................................................................76
Figure 91: Search group page ........................................................................................................77
Figure 92: Search group – Edit a group .......................................................................................77
Figure 93: Search users belonging to a group ...............................................................................78
Figure 94: CP Admin home page ...................................................................................................79
Figure 95: Add users to a group – Search group ...........................................................................80
Figure 96: Add users to a group – Required groups ......................................................................80
Figure 97: Add users to a group – Search users ............................................................................81
Figure 98: Add users to a group – Select users .............................................................................82
Figure 99: Add Users to Group – Confirmation ..............................................................................82
Figure 100: Add users to a group – Success .................................................................................83
Figure 101: User dashboard ...........................................................................................................85
Figure 102: Other tools page and link to ‘Openreach reporting’ ....................................................87
Figure 103: Request for access......................................................................................................87
Figure 104: CP Admin dashboard ..................................................................................................92
Figure 105: Order tracker ...............................................................................................................93
Figure 106: Track order status .......................................................................................................93
Figure 107: Track fault query status ...............................................................................................94
Figure 108: Fault tracker - notes ....................................................................................................95
Figure 109: Fault tracker – download CSV ....................................................................................96
Figure 110 - Request access page.................................................................................................97
Figure 111 – Dashboard .................................................................................................................98
Figure 112 - Shared calendar landing page ...................................................................................99
ix
Figure 113 - Calendar view ............................................................................................................99
Figure 114 - New event - Event pop-up .......................................................................................100
Figure 115: Approved event - Event pop-up ................................................................................100
Figure 116: Add new event - Event pop-up ..................................................................................101
Figure 117: Copy event - Event pop-up .......................................................................................102
Figure 118: Event manager calendar view ...................................................................................103
Figure 119: Approve option available to Events managers ..........................................................104
Figure 120: Update option for events managers in approved events ..........................................105
Figure 121: Events report - Link in Related links tile ....................................................................106
Figure 122: Events report - Search page .....................................................................................106
Figure 123: Events report - HTML view ........................................................................................106
Figure 124: Events report - File Download pop-up.......................................................................107
Figure 125: Events report - Save As popup .................................................................................107
Figure 126: Openreach Homepage ..............................................................................................108
Figure 127: Industry forum landing page ......................................................................................109
Figure 128: Shared calendar - read-only view .............................................................................109
Figure 129: Read-only events pop-up - Openreach users ...........................................................110
Figure 130: Read-only events pop-up - External users ................................................................110
Figure 131: Manage customer permission – Find user ................................................................112
Figure 132: Manage customer permission – select user..............................................................113
Figure 133: Manage customer permission – select permission type ...........................................114
Figure 134: Acknowledgement – permission updated page ........................................................115
Figure 135: CP Admin home page ...............................................................................................116
Figure 136: Search customer .......................................................................................................117
Figure 137: Search customer – customer results.........................................................................118
Figure 138: Manage profile ...........................................................................................................120
Figure 139: Manage profile – Edit ................................................................................................121
Figure 140: Password change ......................................................................................................122
Figure 141: Password change successful ....................................................................................122
Figure 142: Manage profile – Confirm profile details....................................................................123
Figure 143: Manage profile updated successfully ........................................................................124
Figure 144: Openreach home page..............................................................................................124
Figure 145: Site index ...................................................................................................................125
Figure 146: Login page .................................................................................................................126
Figure 147: CP Admin home - Request received .........................................................................126
Figure 148: Manage customer permissions - Secure Content Access ........................................127
Figure 149: Secure content access granted - Acknowledgement page .......................................128
Figure 150: CP Admin dashboard - My notifications ....................................................................129
x
Figure 151: Notification settings – select notifications..................................................................130
Figure 152: Notification settings – Confirm ..................................................................................131
Figure 153: Subscribe to notifications – acknowledgement .........................................................131
Figure 154: CP Admin dashboard – Collaboration .......................................................................132
Figure 155: Available projects ......................................................................................................133
Figure 156: Manage documents ...................................................................................................134
Figure 157: Manage documents – complete ................................................................................135
Figure 158: My projects – view all project documents..................................................................135
Figure 159: Products page without book marking ........................................................................136
Figure 160: Products page – with bookmark ................................................................................137
Figure 161: CP Admin dashboard – showing 'My bookmarks' .....................................................137
Figure 162: CP Admin home – Generate audit reports ................................................................138
Figure 163: Generate audit reports – Search user .......................................................................139
Figure 164: Generate audit reports – Select user ........................................................................139
Figure 165: Generate audit reports – Define date and type .........................................................140
Figure 166: Generate audit report – Confirmation........................................................................141
Figure 167: Generate audit reports ..............................................................................................141
Figure 168: Generate audit report – PDF format..........................................................................142
Figure 169: Generate audit report HTML view .............................................................................142
Figure 170: Generate audit report – print view .............................................................................143
Figure 171: CP Admin home – Manage losing company permissions.........................................144
Figure 172: Manage losing company permissions – Select Company ........................................144
Figure 173: Manage losing company permissions – Select permission ......................................145
Figure 174: Manage losing company permissions – Select permission ......................................146
Figure 175: Acknowledgement page ............................................................................................146
Figure 176: Openreach Portal Home page ..................................................................................147
Figure 177: Contact us page ........................................................................................................149
Figure 178: Contact us - I have a complaint form ........................................................................149
Figure 179: Contact us – Confirm page .......................................................................................151
Figure 180: Acknowledgement – Contact received page .............................................................151
xi
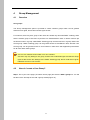
1
Introduction
1.1
Overview
The Openreach Portal is a key information and collaboration tool that can facilitate open and
dynamic engagement with you (our customer). Through the Openreach Portal, you will have
access to the following facilities:
News and Briefings on Openreach and our products
Access to Dialogue Services such as Appointing Services, Number Portability etc.
Access to other applications such as eBilling and Openreach Reporting
Access to the Openreach Collaboration Area
Notifications and RSS feeds
Access to Customer IT Zone
As an administrator, your task is to facilitate access and data rights to the users in your company
who access the portal.
1.2
Purpose
This training document has been designed to guide you through all the functionality available for
you on the portal, with tips on troubleshooting for any other functionality that may be useful during
operations.
1.3
Audience
The intended audience for this training document is;
1.4
The CP administrators
Ownership
The ownership of this document lies with the Openreach CIO. It should be updated in line with
each release of the Portal using the appropriate Release Note as input.
1.5
Distribution
Not to be distributed beyond Openreach Communication Providers and internal Openreach teams
1
1.6
What's new in this version?
Version History:
Release 1.0 is the first version of the CP administrator user guide and covers the
Openreach portal functionality up to release 510.
Issue 10.11 contains all the updates regarding the release 1011 functionality (Released
th
on the 24 January 2009)
Issue 10.20 contains all the updates regarding the release 1020 functionality (Released
th
on the 26 March 2009)
Issue 10.23 contains all the updates regarding the release 1023 functionality (Released
th
on the 18 April 2009)
Issue 11.00 contains all the updates regarding the release 1100 functionality (Released
th
on the 18 July 2009)
Issue 11.10 contains all the updates regarding the release 1110 functionality (Released
th
on the 26 September 2009)
Issue 12.00 contains all the updates regarding release 1200 functionality (Released on
st
the 21 November 2009)
Issue 12.08 contains all the updates regarding release 1208 functionality (Released on
th
the 16 January 2010)
Issue 13.00 contains all the updates regarding release 1300 functionality (Released on
th
the 13 March 2010)
Issue 14.00 contains all the updates regarding release 1400 functionality (Released on
th
the 17 July 2010)
Issue 15.00 contains all the updates regarding release 1500 functionality including the
enhancements released as a part of KnowHow programme (Released on the 22
nd
November 2010)
Issue 16 contains all updates regarding release R1600 functionality (Released on the 12
2
th
March 2011)
Issue 17 contains all updates regarding release R1710 functionality (Released on 24
th
September 2011)
Issue 18 contains all updates regarding release R1808 functionality (Released on 14
th
January 2012)
Issue 21.00 contains all the changes that were implemented on R2250. (Released on 18
May 2013)
3
th
Getting Started
The Openreach portal home page was changed to the following format on 20
th
December 2007, and all scenarios referring to the home page should be referred to the
same figure.
All portal email formatting were changed in R700 to include HTML text and images.
Please note that some screens displaying portal email messages can be out of date.
1.7
Who is a CP Admin?
A CP Admin administers access and data rights relating to users within the company. There can
be more than one CP Admin for a given company. CP Admin bridges the gap between CP portal
users (customers) and the Openreach help desk. The following defines the CP Admin role and
functionality:
1.8
Manage customers within the organisation.
Manage groups of users within the organisation.
Manage access to applications such as dialogue services and workflows.
Generate and view required reports.
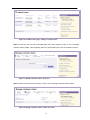
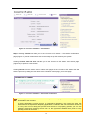
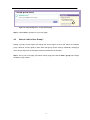
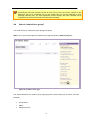
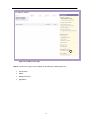
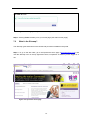
How do I register my company?
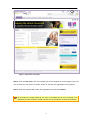
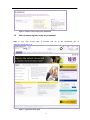
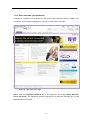
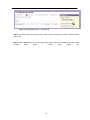
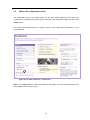
Step 1: Open a browser and go to http://www.openreach.co.uk.
4
2
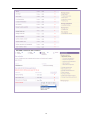
Figure 1: Openreach home page
Step 2: Click the New user? link. This will take you to the Register for Access page. From here,
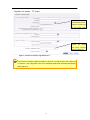
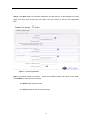
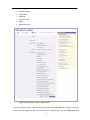
click ‘Access form’ link under ‘CP Users’ section to view the user registration form (Figure 2).
Step 3: Enter the required data on the user registration form and click Submit.
On providing an invalid DUNS ID, the user is prompted with an error message “The
DUNS ID you have entered is invalid” and the user is prompted to re-enter the DUNS ID.
5
Email address and the
password entered will
be
the
portal
user
name and password.
Provide
CP
details
such as the company
name and DUNS ID.
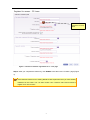
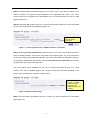
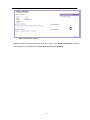
Figure 2: Become a customer registration form
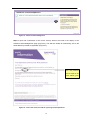
If you have not supplied valid information on this form, you will be taken to the 'Become
a customer - error' page with in-line error messages against the improperly filled/empty
fields (Figure 3).
6
'Inline errors'
against the incorrect
fields
Figure 3: Become a customer registration form – error page
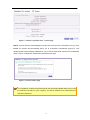
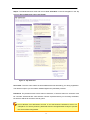
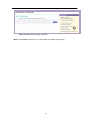
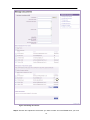
Step 4: After you complete the data entry, click Submit to be taken to the 'Confirm' page (Figure
4).
If the DUNS ID entered is an existing DUNS ID with Openreach then you have already
registered in the portal. You can then confirm your company name and proceed to
register for a user account.
7
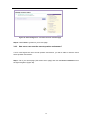
Figure 4: Customer registration form – Confirm page
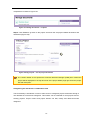
Step 5: You will see the acknowledgement at the end of this process. Thereafter, once you click
Finish, the system will automatically direct you to a temporary 'Dashboard' (Figure 6). This
dashboard will have marketing collaterals for you to view and download until the CP is established
and the user is changed into a permanent operational user type.
Figure 5: Account creation page
Your registration request will be assessed by the OR portal helpdesk team and you will
be made the CP Admin of your company. You will be notified via an email when this
has been carried out.
8
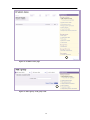
Figure 6: Extract of the Prospect user dashboard
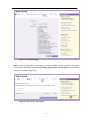
1.9
Step
How do users register under my company?
1:
The
user
should
open
a
browser
and
go
to
the
http://www.openreach.co.uk .
2
Figure 7: Openreach home page
9
Openreach
site
at
Step 2: Click New user? on the global masthead. This will take you to the Register for Access
page. From here, click ‘Access form’ link under ‘CP Users’ section to view the user registration
form.
3
Figure 8: CP user registration
Step 3: Enter/Select data as required. * Fields are mandatory fields and cannot be left blank.
Click Submit to continue to the next step.
- The Reset button clears the form.
- The Cancel button reverts to the home page
10
Click Cancel, Reset or
Submit'
3
Figure 9: Openreach registration form
On providing an invalid DUNS ID, the user will be prompted with an error message “The DUNS
ID he/she has entered is invalid.” and prompted to re-enter the DUNS ID.
Important: If incorrect information is supplied on the form by the user, an 'error' page with in-line
error messages against the incorrectly filled/empty fields will be displayed.
Step 4: Enter your company's DUNS ID and click Submit. You will be asked to confirm the name
of the user's company with the existing name on the Openreach database (Figure 10).
If a new DUNS ID is entered by the user, the registration flow will proceed to Step 7. (In this
case, the request will get forwarded to Customer Establishment Team Admin).
Select Yes or No
Figure 10: CP New user registration form - DUNS ID validation
11
Step 4.1: Selecting Yes will send the request to CP Admin (you) if your status is active. If your
status is inactive, the request will get forwarded to the Openreach Site Admin. Your user's
account needs to be activated by the administrator once it is confirmed that your user is a valid
applicant (Figure 11).
Step 4.2: Selecting No will direct the user to a new screen giving the option to re-enter the DUNS
ID or to proceed with the entered DUNS ID (Figure 12).
Re-enter DUNS ID or
Proceed with the
registration
Figure 11: CP New registration form - DUNS ID validation confirmation
Step 5: Selecting Re-enter DUNS ID will guide the user to a new screen that enables the user to
enter the DUNS ID again. This process will continue three times (Figure 13). If the user fails to
confirm the company name after three attempts, the system will forward the registration request to
the customer establishment administrator. Selecting Proceed with the registration will continue
the registration process by executing step 6.
The screen below will be displayed for the user to re-enter the DUNS ID which is a 9-digit
numeric. This will be validated against your company DUNS ID information available in the
system, again to retrieve the matching company name.
DUNS ID - 9 digit
numeric - 8 numeric,
and the last alpha
character to be
validated against your
company
Figure 12: DUNS ID validation page
Step 6: If the information provided by the user is correct, you will be directed to the confirmation
page (Figure 13).
12
Figure 13: Openreach access registration confirmation page
Upon submitting the information, the system will process the request accordingly and forward the
request to the relevant administrator, either the Openreach Site Admin or your company's active
CP Admin (you).
Step 7: An email will be sent to your user with the pending request (Figure 15).
Then you or the Openreach administrator will have to attend to the pending request and grant or
deny access by making the user active and assigning the user with the relevant permissions.
Figure 14: Account creation page
13
Figure 15: Email confirmation sent to the Non-Portal user
1.10
How do I log in to Openreach Portal?
Step 1: Open a browser and go to http://www.openreach.co.uk (Error! Reference source not
found.).
14
1
Figure 16: Openreach home page
Step 2: In the login area, on the top navigation, enter the login information and click Enter.
Alternatively, you can click Login on the top right hand corner. This will take you to the generic
login page.
Figure 17: Portal Login – log-in page
15
Figure 18 a: Openreach Terms and Conditions – New user
Figure 198 b: Openreach Terms and Conditions - T&C page content modified
Step 3: The user is directed to Openreach Terms and conditions page only if the user is a new
user or if the Terms and conditions page has been modified. Openreach Terms and conditions
page will not be displayed to a regular user. Upon acceptance of these Terms and conditions the
user will be directed to the dashboard.
16
Step 4: The Dashboard then loads with a link called CP Admin on the left navigation in the 'My
tools' tile (Error! Reference source not found.).
Figure 19: My dashboard
User name: The user name will be the email address that was entered by you during registration.
This will be unique to you and will be validated against the password provided.
Password: The password must have at least 8 characters, of which at least one character must
be a number. Passwords are case sensitive. Choose a password that you can easily remember,
but which is difficult for someone else to guess.
Do not disclose your password to anyone. If you write down the password, store it in a
safe place. For security reasons, passwords must be changed within 90 days to prevent
the account from being locked.
17
1.10.1 Can't remember your password?
A request for a password can be made from the system if the password has been forgotten. You
can use the secret question and answer to receive a new password via email.
1
Figure 20: Openreach home page
Step 1: Click the Forgotten password? link on the Openreach home page (Error! Reference
source not found.). The 'Password reminder' page (Figure 21) will load, activating step 1 of the
'Password reminder' wizard.
18
2
Figure 21: Password reminder
Step 2: Enter the user name in the text box provided and click Send (Figure 21). You will be
taken to step 2 of the 'Password reminder' wizard.
3
Figure 22: Password question
Step 3: Enter the answer to the question posed by the system (Figure 22) in the text box provided
and click Send. If the answer is correct, step 3 of the 'Password reminder' wizard will be initiated.
If your answer is incorrect, the system will prompt again for the correct answer.
The answer to the question is the answer provided by you to the secret question during
the registration process.
After five attempts, your user name will get locked because the system will treat it as a
security breach.
19
4
Figure 23: Password acknowledgement
Step 4: Input and confirmation of the correct security answer will result in the display of the
'Password acknowledgement' page (Figure 23). This will also initiate an email being sent to the
email address provided at registration (Figure 24).
Your new password
sent via email to the
email address given
while registering with
Openreach.
Figure 24: Text of the email sent with the system generated password
20
The password sent via email by the system should be changed on the first login.
How do I log in to the Openreach Portal with the new password?
Step 1: Open a browser and go to http://www.openreach.co.uk
Step 2: In the login area, enter the user name and the new password provided in the email and
click login. The 'Password reminder – change password' page will load (Figure 25).
3
Enter the new
password, confirm by
retyping and click
Send
Figure 25: Password reminder – change Password page
Choose a new password that has at least 8 characters, and contains mix of upper and
lower case characters, a number and a non alphanumeric character. Must not be the same
as the User name.
Step 3: Enter the new password, confirm by retyping it, and click Send.
Step 4: If the passwords were entered correctly, the 'Acknowledgement – password changed'
page (Figure 27) will load. If incorrect, the 'Password reminder – password error' page (Figure 26)
with error messages displayed against the corresponding fields will load.
21
'Password entered
incorrectly' error
4
Figure 26: Password reminder – password error
5
Figure 27: Acknowledgement – password changed page
Step 5: Click Finish to proceed to the Dashboard.
The list of applications displayed will contain only those applications accessible to the user
logged in.
22
1.10.2 What happens when my login session expires?
Portal login sessions are handled by SiteMinder. When your session has expired and you try to
access a controlled page, the system will redirect you to the login page. You will need to re-login
to access controlled pages.
You may receive an application timeout while you are accessing an application. In this
event, you will be directed to an error page that has the link to the login page for you to relogin (Figure 29).
Figure 28: Portal Login – log-in page when a session expires
Application time out
– Login page
Figure 29: Application timeout error page
23
2
Dashboard
2.1
What is CP Admin dashboard?
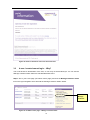
After you successfully log into the portal, your CP Admin dashboard will be displayed (Error!
Reference source not found.).
Click the CP Admin link in the 'My tools' tile on the left hand navigation of the dashboard to be
taken to the 'CP Admin (your) home' page.
Figure 30: My dashboard
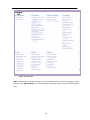
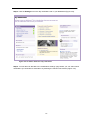
The main tiles on the CP Admin dashboard are as follows.
24
My Views: This provides the user with the opportunity to browse the product information on the
Openreach portal from a customised view. This is achieved through setting a default view (out of
the four views available – Business, Process, Technical or View All) and specifying your default
product type (e.g. Business Ethernet, Local Loop Unbundling (LLU), etc). The ‘Take me to my
view’ link allows you to access that default view of the default product type. However, you can at
anytime change these settings (by clicking ‘Change my default settings’) and also switch views
while browsing information.
My Tools: This will provide links to all dialogue services and other applications/tools as well as a
link to the 'CP Admin home (your home)' page.
My Projects: A list of all the projects that the user has access to will also be displayed in the
same tile under the heading 'My projects'. This should be linked to individual project home pages.
Contents of this tile will be system generated and can be different for each user. When there are
no projects for a user, the system displays the "No projects to view" message.
My Flows: The flows allow the user to execute a business transaction comprising several
dialogue services in a single transaction thus saving time and effort. This will list down all the
flows that are applicable to you or created by you. This will also provide two links, Manage flows
that enables you to create and edit workflows, and Other flows that lists all flows.
News and Briefings Updates: The three most recent news and briefings will be displayed in this
tile. As soon as a new item of news and briefings is added in the main news and briefings pages,
this tile will be updated automatically. The content in this tile remains the same for all users. Once
users navigate in to the details, user has the facility to download the news & briefings content in
PDF format.
Other Notifications Updates: This will show the update notifications headings. You can click the
heading to view the full update.
Key Contacts: This tile will have a list of contacts that a given CP user could contact if and when
required.
Customer IT Zone: This tile contain links to several IT related applications. The functionality of
these applications are either allow users to raise an issue to the Openreach service desk or
providing updated views of RAD components, EMP error codes, Problem record status and
25
Known errors.
My Bookmarks: This tile will have a list of all the bookmarks that you have. You will be able to
add pages to the bookmarks list by clicking the relevant link on top of the page. Bookmarks will
appear as links and the text will be the page title as defined in the CMS (Content Management
System). Each of the bookmarks will have a link next to it to remove the bookmark from the tile.
Bookmarks could be removed from the relevant page, where there is a link Remove bookmark.
My Notifications: This will display the subscribed notification categories. You can select settings
to edit your preferences, or go to 'more notifications' to see all subscribed categories.
Frequently Asked Questions (FAQ): Answers to most frequently asked queries will be displayed
here. Content for this tile is entered by the CMS user and is the same for all dashboard views.
Locations of these tiles can vary from time to time. They depend on how the CMS content authors
place the tiles on pages before a content deployment.
Last log-in details:
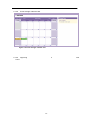
Figure 31 - Last login details displayed on dashboard
The last login details should be reflected in the dashboard, as per formats below;
If the last login is successful;
Your last login on DD/MM/YYYY hh:mm:ss was successful (Time will be shown in 24 hour format)
If the last login is unsuccessful;
Your last login on DD/MM/YYYY hh:mm:ss was unsuccessful (Time will be shown in 24 hour
format)
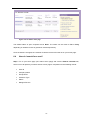
26
2.1.1
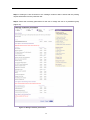
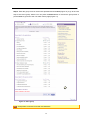
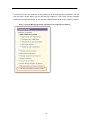
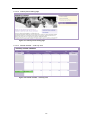
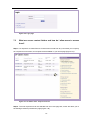
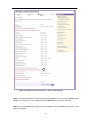
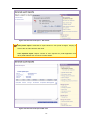
What is the 'CP Admin home' page?
The CP Admin home page has the open request accesses to the dialogue services, portal
application, secure content, etc. in a table as a link (Figure 31). CP Admin users can click these
links and grant the required access rights to the users. When this page does not have any
pending requests, it shows the message "There are no open requests available" as in Figure 32.
'Related
links'
containing links
Figure 31: CP Admin home page – with pending requests
Figure 32: CP Admin home page – without pending requests
This page contains the 'Related links' tile which contains many links for the following CP Admin
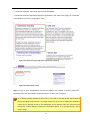
features (Figure 31 and Figure 32).
27
tile
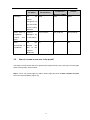
Table 1: 'Related Links' – features
Section
Related Link Name
Feature
Manage
Add
This takes you to the non-portal user
customer
account
->
customer
registration form to add new users to the
Non-portal
user
company. (Refer section 2.3 for details.)
registration
Manage
customer
You can manage users by changing their
status
states, user types etc.
Edit customer account
Change your users' profile
Manage
You can manage permissions granting for
customer
permissions
users and denying permissions for portal
applications.
Search customer
Search for users
Convert to CP Admin
You can make an existing user a peer CP
Admin
Manage
losing
This link will be activated if your company
company permissions
acquires another CP company. You can
manage the users of the newly acquired
company using this link.
Manage groups
Add a group
You can create user groups and assign
group permissions
Change group status
Manage
group
status
from
'active'
to
'inactive'
Edit a group
Edit group permissions
Add users to a group
Add users to an existing group
Search group
Search for groups by permission type or by
name and other criteria
Manage flows
Manage flows
View reports
Generate
reports
Add, edit and manage workflows
audit
View audit reports of user profile changes
and permission changes
The sections below provide detailed information about each sub feature.
28
3
User Management
3.1
CP User Types and Functions
Table 2 - User types and role
CP Admin
Administered
Site Admin
by
CP Operations
CP Business
Reseller
Manager (CPBM)
CP Admin or Site
CP Admin or Site
CP
Admin
Admin
Admin
Site Admin
Administers
CP Operations
None
None
None
Requests Sent
Site Admin
CP Admin
Site Admin
CP Admin
CP Operations
None
None
None
to
Receives
Requests from
29
or
CP Business
Reseller
CP Admin
CP Operations
Registration
CP Admins can
CP Ops Users can
CBM
Process
register
register through the
register
Web
the
Web
through
Registration
form
Web
through
the
Manager (CPBM)
Registration
be
can
through
Reseller
users
can
register
the
Web
form
Registration
registered on the
or be registered on
Registration
their
the portal by the
form
or
be
form
or
Users
or
be
portal
registered
on
respective
CP
Site Admin. If the
registered
on
the
by
Admin. If the user
user is registering
the
by
the Site Admin.
is
registering
through the Web,
their respective
Each
CP
through the Web,
the user has to
CP
Admin.
If
must
the user has to
enter
the
user
is
have a unique
enter
user's
Openreach DUNS
registering
DUNS ID.
DUNS
to
ID to complete the
through
registration
Web, the user
portal
Admin
by
the
ID
complete
the
registration
process.
DUNS
the
user's
process.
If
the
ID
is
portal
the
The
has to enter the
request is sent to
user's DUNS ID
the
to complete the
Site
Admin
recognised by the
who will proceed
registration
system, the request
with
process. If the
is
user to the system.
sent
to
respective
the
adding
the
CP
DUNS
ID
is
recognised
by
Admin. If the DUNS
Note: The CBMs
the system, the
ID
not
user type cannot
request is sent
the
be changed.
to
the
request is sent to
respective
CP
the Site Admin who
Admin.
the
should get in touch
DUNS ID is not
with the user using
recognised, the
an offline process
request is sent
before proceeding
to
with
the
Admin
user to the system.
should
is
recognised,
adding
If
the
Site
who
get
in
touch with the
user using an
offline
process
before
proceeding with
adding the user
30
to the system.
CP Admin
Manages
The
CP Operations
CP
CP Business
Reseller
Manager (CPBM)
None
None
None
Non-portal CP
Non-portal CP
Non-portal CP
No
No
No
Admins
manage the CP
Ops Users who
have the same
DUNS ID.
Initial state at
Prospect
registration
(Managed
request
(use
by
the CE Admin)
type)
Auto
provisioned
registration
at
Yes,
and
directed
the
user
the
to
Prospect
dashboard
3.2
How do I create a new user in the portal?
The steps to create a new user in the portal and to assign the user with a user type, access rights
and the user groups, are as follows:
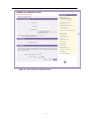
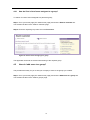
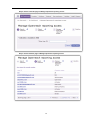
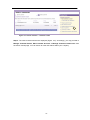
Step 1: Go to your home page ('CP Admin home' page) and click the Add customer account
link on the right navigation (Figure 33)
31
Link to Nonportal
user
registration
Figure 332: Your home page (CP Admin home page)
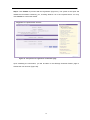
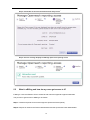
Step 2: The non portal user registration form will then load. Enter/Select details as required in the
form. Mandatory fields are marked with * and cannot be left blank. If required, the form can be
cleared by clicking Reset (Figure 34).
32
2
Figure 343: The non portal user registration form
33
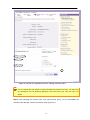
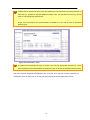
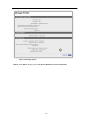
Step 3: Click Submit to proceed with the registration (Figure 34). The system at this point will
validate all information entered by you, checking whether it is in the required format. You may
click Confirm to confirm the details.
Figure 35: Non portal user registration confirmation page
Upon submitting the information, you will be taken to the 'Manage Customer Status' page to
activate the user account (Figure 36).
34
4
Figure 36: CP New user registration process – Manage customer status
You can change the user status to 'active' and select the relevant user type. You may have
CP Operations and CP Business Manager users other than your own user type, CP
Admin.
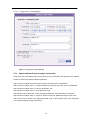
Step 4: After selecting the customer type, user type and user group, you can click Next to be
directed to the 'Manage customer permission' page (Figure 37).
35
36
Figure 37: CP new user registration process – Manage customer permission
Step 5: You can now select Grant or None type of access to the user created and click Save.
This will direct you to the 'Account confirmation' page (Figure 38).
5
Figure 38: Account confirmation page
Step 5: Clicking Finish will take you to your home page ('CP Admin home' page). The system will
send an email (Figure 39) to the user informing of the account creation and an email to admin.
37
Figure 39: Email confirmation sent to the Non-Portal user
3.3
A user I created cannot login… Why?
This could be due to deactivation of the user, or user may not be activated yet. You can use the
'Manage customer status' feature to activate/deactivate users.
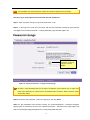
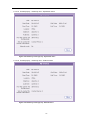
Step 1: Go to your home page ('CP Admin home' page) and click the Manage customer status
link on the right navigation which will load the 'Manage customer status' wizard.
Manage
customer
status link
Figure 40: CP Admin home page – Manage customer status
38
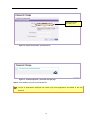
Step 2: Enter the user ID and click Find user which will take you to step 2 of the 'Manage
customer status' wizard (Figure 41).
Figure 41: Manage customer status – Search customer
The user search results page will be displayed. Select the relevant user.
Step 3: Select the user name to be activated (Figure 42).
3
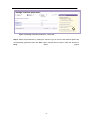
Figure 42: Manage customer status – Select customer
Step 4: Select the Active status on 'User status' and click Next. The 'Manage customer status –
confirm' page will then be displayed (Figure 43).
39
4
Figure 43: Manage customer status – User activation
Assigning a user group will assign the user permissions as per the group. The system will
then take you to the confirmation page; click the Edit option to go back to step 3 of the
'Manage customer status' wizard. If the information is correct, click Confirm to load the
'Acknowledgement – customer account activated' page (Figure 45).
Step 5: If you do not assign the user to a group, the system will take you to the 'Manage
Customer Permissions' page. You can select the individual permissions for the user and click
Save (Figure 44) from where you will be directed to the 'account created acknowledgement' page.
40
Figure 44: Manage customer permission
Step 6: Click Finish to be taken back to the CP Admin home page.
6
Figure 45: Acknowledgement – Customer account activated
3.3.1
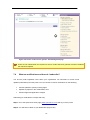
How do I stop a user from accessing the portal?
Steps to follow to deactivate a user:
To deactivate a user, you need to follow the same process described in activating a user (3.3)
In Step 4, instead of selecting the Active user status, select the radio button marked Inactive and
click Next.
Click Finish to be taken back to your home page.
3.3.2
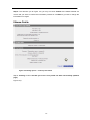
What are these links on my Admin home page?
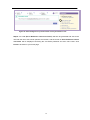
Step 1: Select the user request from the home page ('CP Admin home' page) by clicking the User
ID (Figure 46) link.
5
1
Figure 46: CP Admin home page – Select pending user request
41
Step 2: Clicking the User ID directs to the 'Manage customer status' wizard with the pending
request information from the particular user.
Step 3: Select the necessary permissions for the user or assign the user to a predefined group
(Figure 47).
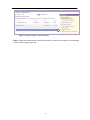
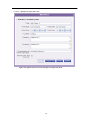
Figure 47: Manage customer permissions
42
3.4
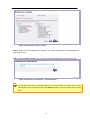
A user cannot access the portal, but I did not deactivate the user.
Why?
Auto inactivation of the user accounts of your company can take place for the following scenarios;
If a user has not changed the user's password for a period of 90 days, the user is made
inactive.
If the user has entered the incorrect password thrice while logging in to the portal, the
account status can automatically be set to 'inactive'.
If the user enters the security answer incorrectly five times during the forgotten password
flow, the user's account status can automatically be set to 'inactive'.
If the user has created the account but not logged in for 28 days after creation, the user is
made 'inactive'.
If the above scenarios take place, you must navigate to the 'Manage customer status' screen to
ensure that the account is inactive and re-activate the user if necessary.
TIP: The portal will send an email to those users who have not changed their password for the
past 90 days, two weeks before the expiry. When logged into the portal, the system will redirect to
the password reset page for the password to be re-entered.
The reason for the specified User Inactivation will be displayed on the 'Manage customer status'
page.
The
table
below
tabulates
the
display
messages
for
you.
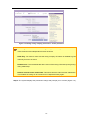
Table 3 - Reasons for auto-inactivation
1
2
Page Widget
Reason for Inactivation
Display Message
The user has not logged into
User hasn't logged in
'Inactive'
the portal during the 28 days
within
button - selected
since the user first registered.
account creation.
The user has not logged in
User has not logged
'Inactive'
during the 60 days since the
into the account for a
button - selected
user's last login.
period of 60 days.
28
43
days
Status
of
radio
radio
Comment
Reason for Inactivation
3
Page Widget
Display Message
The user has not changed the
Comment
Status
N/A
'Active'
user's password for 90 days.
radio
button - selected
Known Limitation –
If a user contacts
the help desk with
a complaint that the
user cannot access
the system and the
Site
Admin
visits
the relevant user's
'Manage customer
status'
page
and
notices
that
the
user is still set as
'Active',
then
the
reason behind this
is that the user has
not
changed
the
user's password for
90
days.
solution
The
for
this
scenario is for the
user to change the
password
through
Manage
Profile
(Refer Section 8)
4
The user has entered five
User has entered the
'Inactive'
incorrect
incorrect secret answer
button - selected
answers
to
the
security question.
5
6
7
The
user
has
radio
five times.
incorrectly
User has made more
'Inactive'
entered the user's password
than three failed login
button - selected
three times.
attempts.
Explicit inactivation from the
Disabled
Service Desk
Administrator
button - selected
Decline Registration
Registration declined
'Inactive'
by
'Inactive'
radio
radio
radio
button - selected
The following email will be sent to the user five days prior to 28 days of account expiry (Figure
48).
44
Figure 48: Automatic inactivation - Email sent to the user five days prior to the 28-day expiry
th
The following email will be sent to the user on inactivating the account on the 28 day (Figure 49).
The user will be given a link in the email to follow to get the user's account back to the active
state.
45
Figure 49: Automatic inactivation - Email sent to the user on expiration of the 28 days
3.4.1
How do I re-activate an inactive user?
Follow the steps below to activate a user:
Step 1: To activate a user, go to your home page ('CP Admin home' page) and click the Manage
customer status link which will load step 1 of the 'Manage customer status' wizard (Figure 50).
46
Figure 50: CP Admin home page – Manage customer status
'
Step 2: Enter the user ID and click Find user which will navigate to step 2 of the 'Manage
customer status' wizard. This will display the list of users based on the user ID entered to search.
Figure 51: Manage customer status – Find user
Step 3: Select the user name to be taken to step 3 of the 'Manage customer status' wizard.
Figure 52: Manage customer status – Select user name
47
Step 4: Select the Active status on 'User status' and click Next (Figure 53).
4
Figure 53: Manage customer status – activate user status
Step 5: The 'Manage customer status – confirm' page will then be displayed (Figure 54).
Figure 54: Manage customer status – Confirm user activation
Step 6: Clicking Confirm will take you to the 'Acknowledgement - Customer account activated'
page (Figure 55).
48
6
Figure 55: Acknowledgement – Customer account activated page
Step 6: Click Finish to go back to your home page.
3.4.2
How can a user reset the secret question and answer?
If a CP user forgets the user's secret question and answer, you will be able to reset the user's
secret question and answer.
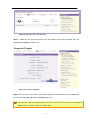
Step 1: Go to your home page ('CP Admin home' page) and click the Search customer link on
the right navigation (Figure 56).
49
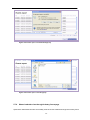
Figure 56: Search customer
Step 2: Select the required user from the Search Results by selecting the User ID (Figure 57).
Then click Manage Customer Status to proceed.
50
2
Figure 57: Search customer – Select customer
Step 3: Select the 'Reset Security question and answer' check box at the bottom of the 'Manage
customer status' page (Figure 58).
51
3
Figure 58: Manage customer status – Reset security question and answer
Step 4: Click Next to continue; Cancel will end the process and Reset will reset the fields.
52
5
Figure 59: Acknowledgement of password and security information reset
Step 5: An email (Error! Reference source not found.) will then be generated and sent to the
user with the user's new secret question and answer, and the screen in Error! Reference source
not found. will be displayed confirming the successful password and user name reset. Click
Finish to be taken to your home page.
53
Figure 60: Email sent to user after password reset
3.5
How do I delete a user?
To delete a user, you have to follow the same flow as inactivating a user (4.3).
Once the user is marked as inactive, the system will automatically delete the account from
the portal database after 90 days if there is no change in status within this period.
54
3.6
How do I edit a user profile?
Edit capabilities allow you to select the user and edit the user profile information (information
entered during the registration).
Step 1: Go to your home page ('CP Admin home' page) and click the Edit customer account link
to load the 'Edit customer account details' (Figure 61) wizard.
1
2
Figure 61: Edit customer account – search user name
Step 2: Enter the user name and click Find user to move on to step 2 of the 'Edit customer
account details' wizard.
Step 3: Click the desired user name to navigate to step 3 of the 'Edit customer account details'
wizard (Figure 62).
Figure 62: Edit customer account details – Select desired user
55
The portal will take you to the user profile information page where the user details will be
displayed for editing (Figure 63).
Click Cancel, Reset
4
or Submit
Figure 63: Edit customer account
Step 4: Edit the required details. Mandatory fields are marked with * and cannot be left empty. On
clicking Reset, the form will be cleared. Once the form has been filled, click Submit to continue to
the 'Edit customer account details - confirm' page (Figure 64).
Please use less than 250 characters for the 'Comments' field.
56
5
Figure 64: Edit customer account details – Confirm page
Step 5: Check for accuracy of the displayed information and click Confirm (Figure 64) to navigate
to the 'Acknowledgement - user details updated' page (Figure 65).
6
Figure 65: Acknowledgement - User details updated
Step 6: Click Finish to go back to your home page
3.7
How do I make a user another CP Admin? Why?
57
Conversion of an ordinary user to a CP Admin could be useful when a CP decide to roll out some
of the responsibilities of one CP Admin to another so that users are managed by multiple CP
Admins.
An existing user can be converted to a CP Admin user through the 'Convert to CP Admin' wizard.
This is the only way to make an existing user another CP Admin user.
This functionality is available only for CP Admins who has the required permission to convert a
user to a CP admin. The Site Admin can grant this privilege to CP Admins via their ‘Manage
Customer Status’ screen.
Step 1: Go to your home page ('CP Admin home' page) and click Convert to CP admin (Figure
66).
1
Figure 66: CP Admin home page
2
Figure 67: Convert to CP Admin – Find user
Step 2: Enter the user ID and click Find user (Figure 67).
58
3
Figure 68: Convert to CP – Select the user
Step 3: Select the user (Figure 68) and the 'CP user details' page will be displayed. Click the
Convert to CP admin link (Figure 69).
3
Figure 69: Convert to CP Admin
Step 4: The 'Convert to CP Admin – Confirmation' page will then load with options to Cancel the
process, Convert other CP user and Confirm (Figure 70).
The user also could be granted permission to convert other users as CP Admins by selecting the
allow button for creating of other CP admin users
59
4
Figure 70: Convert to CP Admin – Confirmation
Step 5 Clicking Confirm will take you to the 'Convert to CP Admin – Successful confirmation'
page (Figure 71) and an email will be sent to the newly set up CP Admin by the system.
Clicking Convert other CP user will take you to the 'Convert to CP Admin' user search page
(Figure 67) to perform a new search.
Clicking Cancel from the search user or select user pages of the 'Convert to CP Admin' flow will
end the process by taking the user back to the CP Admin home page, your home page.
5
Figure 71: Convert to CP Admin – Successful confirmation
Converting a user to Admin means that they automatically gain access to all applications
accessible to the company.
If these applications include access to Openreach Reporting, the portal will send this
information to the Openreach Reporting application so that this user can have admin access to
it. If any error occurs during this process and access is not properly granted, you can use
‘Manage Openreach reporting access’ link on the right-hand 'Related links' panel to retry
granting access for that user.
60
4
Group Management
4.1
Overview
User groups
The 'Group management' option is provided to create customer groups which can be granted
similar access rights, and revoked access rights in bulk.
For instance, there may be a group of ten users who would only deal with SMPF ordering, while
there is another group of five users to perform Line Characteristics check. It will be useful to put
the first ten users in a group called 'SMPF Ordering group' and the next five in a group called 'Line
Check group'. 'SMPF Ordering group' can be granted access to OneSiebel in bulk, whereas 'Line
Check group' can be granted access to Line Checker in bulk which will supplement permissions
for all users within these groups.
You can only manage groups within your own company.
One user may only belong to one group, and the user's individual rights override the Group
rights so that a user who belongs to the 'SMPF Ordering group' above could also be given
individual access to Line Checker.
4.2
How do I create a User Group?
Step 1: Go to your home page ('CP Admin home' page) and click the Add a group link. You will
be taken to the first step of the 'Add a group' wizard (Figure 72).
61
1
Figure 72: CP Admin home page
2
Figure 73: Add a group – Find group name
62
Step 2: Enter the group name in the text box provided and click Next (Figure 73) to go to the next
step of the 'Add a group' wizard. You can press the Reset button to re-enter the group name or
press Cancel to go back to the 'CP Admin home' page (Figure 74).
2
&
4
Figure 74: Add a group
Group Name cannot be more than 25 characters.
63
Adding user group rights
Step 3: The dialogue services to be applicable to the group can be selected through this page by
selecting one or more applications (Figure 74). The default type of access will be None. If access
is given, Full can be selected against the appropriate dialogue service.
Step 4: Click the Next option to confirm the input (Figure 74).
Important: Changes made in this group will affect all users within the group.
Add dialogue services to User Group confirmation
Step 5: You can view the access granted to the group and confirm your input via this page. Click
Confirm to confirm your input. The system will save the dialogue services assigned to the group.
When this group is assigned to an end user, the user will be given access to the selected
dialogue services (Figure 75).
64
Figure 75: Add a group – Confirm access rights
Editing the access rights before confirmation
If any incorrect data persists, click Edit to revert to the 'Add a group – step 2 of 3' page and
continue from step 4. If however information displayed is accurate, click Confirm. The
'Acknowledgement - group added' page will be loaded (Figure 76).
65
6
Figure 76: Acknowledgement - Group added page
Step 6: Click Finish to complete the Group creation process (Figure 76), and to be taken back to
your home page ('CP Admin home' page).
How do I change a Group?
The 'change group status' functionality can be used to deactivate, i.e., delete a group from the
portal database. However, this functionality will not delete individual users within the group or
affect their individual permissions.
Deactivate/delete a group
Step 1: Go to your home page ('CP Admin home' page) and click the Change group status link
to begin the 'Change group status' wizard.
66
1
Figure 77: CP Admin home page
2
Figure 78: Change group status - Search group
Step 2: Enter the group name and click Next to be taken to step 2 of the 'Change group status'
wizard (Figure 78)
The system would require you to enter the correct group name to be selected. You can
however enter a partial name and perform a search. The system will search and provide a
list of group names for you to select.
67
3
Figure 79: Change group status – Select group
Step 3: On clicking the desired group name, step 3 of the 'Change group status' wizard will load
(Figure 79).
Step 5: Select Inactive for the 'Group status' field (Figure 80) and click Next to proceed to the
'Change
group
status
-
confirm'
68
page
(Figure
81).
5
Figure 80: Change group status - Deactivate
69
6
Figure 81: Change group status – Confirm page
Step 6: If any changes need to be made before confirmation, click Edit (Figure 81) and revert to
step 2 of the 'Change group status' wizard. If however, the information is correct, clicking
'Confirm' will take you to the 'Acknowledgement – group deleted' page (Figure 82).
70
7
Figure 82: Acknowledgement – Group deleted page
Step 7: Click Finish to go back to your home page.
4.3
How do I edit a User Group?
Editing a group's access rights will change the access rights of each user within the selected
group. However, access rights of users within that group can be reset by individually changing a
user's access rights via the 'Manage customer permissions' functionality.
Step 1: Go to your home page ('CP Admin home' page) and click the Edit a group link to begin
the 'Edit a group' wizard.
71
1
Figure 83: CP Admin home page
Step 2: Enter the group name in the text box provided, and click Submit to move on to step 2 of
the 'Edit a group' wizard (Figure 84).
2
Figure 84: Edit a group – Search group name
Step 3: Select the desired group and proceed to step 3 of the 'Edit a group' wizard (Figure 85).
The system will display the application rights given to the selected group.
72
3
Figure 85: Edit a group – Select group
4
Figure 86: Edit a group – step 3
Step 4: To make changes, click Edit for the 'Edit a group' page to load (Figure 86).
73
Figure 87: Edit a group – Edit
Step 5: After making the changes, click Next and proceed to the 'Edit a group – confirm' page
(Figure 88).
74
6
Figure 88: Edit a group – confirm page
Step 6: Click Confirm and proceed to the 'Acknowledgement' page (Figure 89).
7
Figure 89: Acknowledgement - Group updated page
Step 7: Click Finish to go back to your home page.
75
Granting/revoking access to Openreach Reporting application requires the portal to
communicate with other systems. Should an error occur in this, the access changes to this
application will not be completed and can be retried later (you will be displayed an error
message informing this). Any other application access changes that were specified will be
completed even if issues are faced with Openreach Reporting.
4.4
How do I search for a group?
You could search for a particular group through the portal.
Step 1: Go to your home page ('CP Admin home' page) and click the Search group link.
1
Figure 90: CP Admin home page
You will be directed to the 'Search group' page (Figure 91) which allows you to search for users
based on;
Group Name
Status
Dialogue Service
76
Figure 91: Search group page
Step 2: From the group search results page, you will be allowed to select a group by clicking the
corresponding radio button and selecting Change group status and Edit group to proceed with
the required operation (Figure 92).
2
Figure 92: Search group – Edit a group
77
4.4.1
How do I find a list of users assigned to a group?
To search for a list of users assigned to a particular group;
Step 1: Go to your home page ('CP Admin home' page) and click the Search customer link.
You will then be taken to the 'Search customer' page.
Step 2: Enter the required group name and click Find users.
Figure 93: Search users belonging to a group
The application then lists out all users who belong to the required group.
4.5
How do I add users to a group?
This provides the facility for you to add your company's users to the groups you created.
Step 1: Go to your home page ('CP Admin home' page) and click the Add users to a group link.
You will then be taken to the 'Search groups' page.
78
1
Figure 94: CP Admin home page
Step 2: A search for a group can be based on the following criteria (Figure 94);
Group Name
Status
Dialogue Service
Application
79
Figure 95: Add users to a group – Search group
Step 4: Depending on the search results displayed, select the required group and click Add
users to a group (Figure 95). You will then be directed to the Add users to a group – Search
users' page (Figure 96).
Figure 96: Add users to a group – Required groups
Step 5: The 'Search customer' page can be used to search for the users you would like to add to
the group. The search criteria for the users can be as follows (Figure 97):
User ID
80
Company Name
Group Name
DUNS ID
Customer Type
Status
Dialogue Service
Figure 97: Add users to a group – Search users
Once the required search criterion has been entered, click Find users to proceed. The search
results are then displayed, and you may select the required users and click Add users to a
81
group.
5
Figure 98: Add users to a group – Select users
Step 6: Select the users to be included to the search combination results.
Completion of step 6 will then take you to the confirmation page that lists out all the users that
have been added to the group, displaying the selected users to be included to the Group Name
(Figure 99).
7
Figure 99: Add Users to Group – Confirmation
Step 7: You can select the Confirm option to confirm the selected users to be added to the
group. You can also go back by clicking the Previous option to edit the users to be selected
(Figure 99).
Step 8: Once you have confirmed the list of users to the group, the users are successfully added
to the required group, and the confirmation message is displayed (Figure 100).
82
9
Figure 100: Add users to a group – Success
Step 9: Click Finish to go back to your home page ('CP Admin home' page).
83
5
My Tools – Giving User Access
5.1
How do I allow users to access the Portal applications?
Customers can request access to the following dialogue services and applications on the
Openreach portal directly.
Line characteristics
Enhance line characteristics (For GEA)
Appointing services for LLU and WLR
Address matching
Network availability
Line test and diagnostics for LLU and WLR
Service test (For GEA)
Number portability checker
eBilling
Openreach Reporting (formerly Openreach Analytics)
Simultaneous order checker
MAC checker
Tie pair report
Manage line plant availability
Manage Friendly URL Resolver
Obtain installation details
Number reservation and management
Number portability (WLR)
Manage linked order
Request Connection Price Band
Statement of requirement
Shared Calendar
Calling and network features
Test access products
Tie pair checker
RAD View
CP Admins who have access to Openreach Reporting application will automatically be
granted access to the ‘Openreach Reporting admin tool’ which will allow you to control the
information that your users with access to Openreach Reporting can view.
84
Figure 101: User dashboard
Service Provider Gateway (SPG), eCo X and Quick Quote access is not managed through
the Openreach portal.
As of R2200, the new dialogue service Request Connection Price Band will be available for
the users.
5.2
What is Openreach Seibel and how do my users get access to it?
Openreach Siebel is a strategic Customer Relationship Management (CRM) platform for
facilitating online ordering and tracking of products and services. The following steps define
access to Siebel.
Step 1: Your company contacts Openreach Account Manager for Siebel access (offline).
Step 2: Openreach Account Manager completes the offline process to allow your registered
company to order MPF or SMPF online.
Step 3: Openreach Account Manager contacts Siebel administrator to set up your company as a
Siebel user (offline).
Step 4: The Siebel administrator sets up the contact details of your company on Siebel.
85
Step 5: The Openreach customer record is updated automatically on the Openreach portal using
Web services.
Step 6: An email is sent to your company by the Openreach portal confirming access (or denial of
access) to Siebel.
Step 7: If access is granted, CP Admin will see the Launch Application link on the Siebel home
page and will have the access rights 'Line Checker' at the end of this process.
5.3
What is X-hour repair tool and how do my users get access to it?
X-hour repair tool is a tactical solution that allows CP’s to expedite faults in a given faulty line. In
order to request an X-hour repair request the CP must have first submitted the fault report on your
usual Openreach gateway and have received an Openreach fault reference
The process to gain access to X-hour repair tool is as follows,
Step 1 Customer clicks the ‘Other tools’ link from My dashboard
Step 2 Customer navigates and clicks on X-Hour repair tool
Step 3 Customer clicks the ‘Request for access’ link
Step 4 Help desk and requester will be notified about the request
Step 5 Once service desk approves the request, email sent to customer and the application will
be listed in the CP’s dashboard.
Step 6: User should then click on the X-hour repair tool and click on launch application
5.4
What is Openreach Reporting and how do my users get access to it?
Openreach Reporting (formerly Openreach Analytics) is a service offered to CPs that will enable
them to view and monitor Openreach performance in delivering orders and restoring faults for
Private Circuits and Broadband lines, within a secure environment.
The process to gain access to Openreach Reporting is as follows:
Step 1: Customer requests for access through the Openreach Portal (online)
86
1.1 Customer clicks the ’Other tools’ link from ‘My dashboard’.
1.2 Customer clicks the Openreach Reporting application in the ‘Other tools’ page, CP is directed
to the ‘Request for access’ page (Figure 105).
Figure 102: Other tools page and link to ‘Openreach reporting’
Figure 103: Request for access
Step 2: Login to your administrative account and approve the request to access Openreach
Reporting (if the user requesting it is authorised to do so within your company).
As of R1900 (release updated in March 2012), the need to manually fill the request access
form and mailing to Openreach is no longer required to get access to Openreach Reporting.
Users can be granted access to this application by CP Admins using the normal access
permission module (Manage Customer Permissions option) or for groups through ‘Edit a
group’ option.
87
In some rare cases, the automatic access granting to Openreach Reporting application may fail
and the user’s access status may not be properly updated. In such cases use the ‘Manage
Openreach reporting access’ link on the right-hand 'Related links' panel to retry correcting access:
Step 1: Link to the Manage Openreach reporting access application for Admins
88
Step 2: Search customer page in Manage Openreach reporting access
Step 3: Select customer page in Manage Openreach reporting access
89
Step 4: View details of the user selected and click ‘Retry access’
Step 5: Success message displayed in Manage Openreach reporting access
5.5
What is eBilling and how do my users get access to it?
E-billing is a service offered to CPs to view their bills online as opposed to paper-based bills.
The process to gain access to eBilling is as follows:
Step 1: Customer requests for access through the Openreach Portal (online).
Step 2: Request is routed to the Geneva administrator and the Openreach Portal administrator.
90
Step 3: Geneva administrator grants access to the user to the eBilling application (offline).
Step 4: Geneva administrator informs the Openreach Portal administrator that access has been
granted to the specified user.
Step 5: Openreach Portal administrator updates the user record on the Openreach portal.
Step 6: An email is sent to the customer by the Openreach portal confirming access (or denial of
access) to eBilling.
What is a CP dashboard (Order tracker) application?
The CP dashboard is a portal built application that provides the ability for CP Ops users to look at
the orders' KCIs. This will help to search and locate these orders and fault entries.
Application access should be granted to your users the same way you grant/deny access to other
portal dialogue services, using manage customer permissions. This will allow your CP Ops user
to log in and access the 'CP dashboard' order tracker.
Step 1: To access CP dashboard (order tracker), click the CP dashboard link on the 'My tools'
tile with other applications.
91
1
Figure 104: CP Admin dashboard
Step 2: This will take the user to the CP dashboard. The user can use the given search criteria to
search for tail orders and/or fault entries.
92
Figure 105: Order tracker
Users enter the customer reference number for a single order and search for order details. If the
order exists, the order details will come as a one-row item.
In the results row, there is a link called notes. When the user clicks notes, the notes details for
that order will popup. If orders are not found, an inline error message will be displayed.
Figure 106: Track order status
93
5.6
Access to Assurance dashboard (fault tracker) application
Assurance dashboard is a portal application identical to the order dashboard. The Assurance
version is the fault tracker version of the CP order dashboard. This application will help the CP
Operations users and Openreach SMC users to search and locate the related fault queries of
CP’s company or selected CP company for SMC user.
Application access should be granted to users the same way you grant/deny access to other
portal dialogue services, using manage customer permissions.
Step 1: To access the Assurance dashboard (fault tracker), click the Fault Tracker link on the
'My tools' tile with other applications.
Step 2: This will take the user to the Assurance dashboard home page where the user can launch
the application by clicking the launch application link.
Step 3: The user can use the given search criteria to search for tail orders.
Figure 107: Track fault query status
Step 4: In the results row, there is a link called notes. When the user clicks notes, the notes
details for that fault query will popup. If queries are not found, an inline error message will be
displayed.
94
Presets that are relevant for Web notes are hidden from CPs who does not have permission to
add notes (i.e. updates for CP and updates for SMC). Also, CP and SMC icons are only shown
if the CP has appropriate permissions.
These user permissions are granted based on DUNS ID of the CP as well as permitted
product types.
Figure 108: Fault tracker - notes
The add note functionality will only be shown if the CP has appropriate permissions. These
user permissions are granted based on DUNS ID of the CP as well as permitted product types.
The user can also download the appearing list of records as a CSV file for later reference, by
clicking the “Save as CSV” link on the top right hand side of the tracker application screen
95
Figure 109: Fault tracker – download CSV
5.7
What is Shared Calendar?
“Openreach shared calendar” will be an application provided within “My tools” pane to Openreach
users and permission to this application will be handled through the existing permission module in
Openreach Portal.
Step 1: Openreach user launches Openreach portal and logs in to the dashboard.
Step 2: Openreach user clicks on “Other tools” link on “My tools” pane to launch the “Service
support” page.
Step 3: Openreach user navigates through the page to locate “Shared calendar” application link
and clicks the link.
Step 4: Landing page of the “Shared calendar” application displayed to the user.
Step 5: Openreach user clicks on “Request access” link on “Shared calendar” application landing
page.
Step 6: Upon being granted permission, Openreach user receives a Portal notification via email,
confirming access (including permission level granted) to the “Shared calendar” functionality.
5.7.1
Request access page
5.1.1.1 Request access page
96
Figure 110: Request access page
Admin can grant two levels of permissions: Event Manager and Normal User. Openreach (internal) user
being able to request access for shared calendar application.
Site administrator (Service desk) being able to grant/deny Normal user/Events manager access requests
from Openreach users.
5.7.2
Shared calendar Normal user functionality
Openreach user successfully adds, modifies, copies and removes events on Openreach shared
calendar application.
Step 1 Normal user launches the Openreach portal and logs in to dashboard.
Step 2 Normal user clicks on “Shared calendar” link from the “My tools” pane on dashboard.
Step 3 Normal user clicks on “Launch application” link.
Step 4 Normal user clicks on a date to add an event.
Step 5 Normal user specifies the event information on the relevant fields on the event pop-up and
clicks on “Save” button.
Step 6 Event will be saved in the appropriate date cage on the calendar view in the respective
color coding assigned to new/to be-approved events.
5.7.2.1
Openreach portal – dashboard
97
Figure 111: Dashboard
98
Shared calendar – Landing page
5.7.2.2
Figure 112: Shared calendar landing page
5.7.2.3
Shared
–
calendar
Calendar
view
Figure 113 - Calendar view
5.7.2.4
Un-approved
–
event
99
Event
pop-
up
Figure 114: New event - Event pop-up
5.7.2.5
Approved
–
event
up
Figure 115: Approved event - Event pop-up
100
Event
pop-
5.7.2.6
Add new event – Event pop-up
Figure 116: Add new event - Event pop-up
101
5.7.2.7
Copy event – Event pop-up
Figure 117: Copy event - Event pop-up
5.7.3
Shared calendar Events manager functionality
Openreach user successfully performs all “Normal user functionality” and approves and updates
events on Openreach shared calendar application.
Step 1 Events manager launches the Openreach portal and logs in to dashboard.
Step 2 Events manager clicks on “Shared calendar” link from the “My tools” pane on dashboard.
Step 3 Events manager clicks on “Launch application” link.
Step 4 Events manager clicks on to be-approved event.
Step 5 Event pop-up displayed. Events manager updates the event information as required.
Step 6 Events manager clicks on “Approve” button to save the updates and approve the event.
Step 7 Event will be saved in the appropriate date cage on the calendar view in the respective
color coding assigned to Approved events.
102
5.7.3.8
Event manager calendar view
Figure 118: Event manager calendar view
5.7.3.9
Approving
a
event
103
new
Figure 119: Approve option available to Events managers
104
5.7.3.10 Updating an approved event
Figure 120: Update option for events managers in approved events
105
5.7.3.11 Events report generation
Figure 121: Events report - Link in Related links tile
Figure 122: Events report - Search page
Figure 123: Events report - HTML view
106
Figure 124: Events report - File Download pop-up
Figure 125: Events report - Save As popup
5.7.4
Shared calendar view through Industry forum page
Openreach users/external users successfully view the events calendar through the Industry forum
107
home page.
Step 1 Openreach user/external user launched Openreach Portal.
Step 2 Openreach user/external user clicks “Industry forum” link from “Quick links” section on
Homepage.
Step 3 Industry forum homepage displayed. Openreach user/External user clicks on “View
calendar” link from “Industry forum calendar” tile.
Step 4 Read-only view of the shared calendar displayed to users as per business rules defined in
section 3.5.2.
5.7.4.12 Openreach home page
Figure 126: Openreach Homepage
108
5.7.4.13 Industry forum landing page
Figure 127: Industry forum landing page
5.7.4.14 Shared calendar – read-only view
Figure 128: Shared calendar - read-only view
109
5.7.4.15 Events pop-up – read-only view – Openreach users
Figure 129: Read-only events pop-up - Openreach users
5.7.4.16 Events pop-up – read-only view – External users
Figure 130: Read-only events pop-up - External users
110
5.8
What Service based solutions application and how do my users get
access to it?
Broadband Boost (BBB) Portal provides functionality which allows the CP users to reserve the
service of an engineer for BBB orders. The CP user will be able to place an order with an
appointment as desired depending on the availability of the engineers. Currently, there is no
provision to create a BBB orders through the OR Portal. Therefore Service Based Solution is the
gateway in accommodating this functionality
The process to gain access to Service based solutions application is as follows,
Step 1 Customer clicks the „Other tools‟ link from My dashboard
Step 2 Customer navigates and clicks on Service based solutions
Step 3 Customer clicks the „Request for access‟ link
Step 4 Help desk and requester will be notified about the request
Step 5 once service desk approves the request, email sent to customer and the application will be
listed in the CP‟s dashboard.
Step 6: User should then click on the Service base solution and click on launch application
111
6
User Permission Management
6.1
How do I manage the access rights for each user?
A change in user permissions can either be triggered by a user within your company or by you.
The user can navigate to the relevant application or dialogue service page and request for
access, which will be shown as an open request in your admin home page. Alternatively, site
administrators can modify the user's access rights to different applications and dialogue services
available via the Openreach portal on their own or upon receiving offline requests from CP
companies like yours or their customer business managers.
Requests from your CP users within your company will be shown as open requests to you.
6.2
How do I change users' permissions?
Step 1: Go to your home page ('CP Admin home' page) and click Manage customer
permissions.
Step 2: Enter the user name and click Find user (Figure 131).
2
Figure 131: Manage customer permission – Find user
Step 3: Select the desired user name and follow on to step 4 of the 'Manage customer
permission' wizard (Figure 132).
112
3
Figure 132: Manage customer permission – select user
Step 4: Select the permissions by clicking the relevant 'Type of access' radio buttons against the
corresponding applications and click Save. Open requests will be shown in Red and will have a
Deny
option
113
(Figure
4
133).
Figure 133: Manage customer permission – select permission type
Step 5: The 'Acknowledgement – permission updated' page will then load (Figure 134).
114
6
Figure 134: Acknowledgement – permission updated page
Step 6: Clicking the Finish button will take you back to the home page.
The Ops Users within the company can only be given permission to services that you have
access to.
When giving permission to 'Amend',,'Cancel' and 'Place a fault', please note that users need
Seibel access. Please make sure that users have Seibel access before you grant permission.
Every request made by you will be passed to the Openreach Site Admin while the request for
access from Ops Users will be passed on to you.
Granting/revoking access to Openreach Reporting application requires the portal to
communicate with other systems. Should an error occur in this process, the access changes to
this application will not be completed and can be retried later (you will be displayed an error
message informing this). Any other application access changes that were specified will be
completed even if issues are faced with Openreach Reporting.
A new Dialogues Service ‘Request Connection Price Band’ will be introduced from R2200. The
CP Admin can manage the access requests sent from other CP users if the CP Admin has
access to the new Dialogues Service.
6.3
How do I provision a user request?
Open requests from customers will be shown on your home page. You can then navigate to step
4 of the 'Manage customer permission' wizard by clicking the user name (Figure 135).
115
Figure 135: CP Admin home page
The default status of open requests will be None. The status can be reset to Full or Deny
depending on whether access is granted or denied respectively.
Once the status is changed, the customer ID will be removed from the list on your home page.
6.4
How do I search for a user?
Step 1: Go to your home page ('CP Admin home' page) and click the Search customer link,
which in turn will present you with a search screen (Figure 136) based on the following criteria:
User ID
Company Name
Group Name
Customer Type
Status
Dialogue Service
116
1
Figure 136: Search customer
Step 2: The search criteria can then be entered. Click Find users to proceed.
117
3
Figure 137: Search customer – customer results
Step 3: The search results will then be displayed (Figure 137). Accordingly, you may proceed to
Manage Customer Status, Edit Customer Account or Manage Customer Permissions from
the search results page. You can search for other CP Admins within your company.
118
7
Other Portal Capabilities
7.1
What is the 'Profile' link on my Dashboard?
The Profile link on your dashboard gives an overview of your name and login details, contact
details, your company details and also an edit option to change your profile details. The following
profile information can be edited by you:
First name
Surname
Security question and answer
Change your password
Telephone number
Changing the interested product options
Default product type
Default view
Default release
Step 1: Clicking the Profile link takes you to the 'Manage profile' page (Figure 138).
119
2
Figure 138: Manage profile
Step 2: Click Edit to change your profile (Error! Reference source not found.).
120
3
Figure 139: Manage profile – Edit
Step 3: To change your password, click the Change Your Password link. You will be taken to
Figure 139.
121
3.1
Figure 140: Password change
Step 3.1: Enter your existing password and the new password (twice for confirmation)
and click Send (Figure 140)..
Step 3.2: If the password entered is in the correct format (It must be a minimum of 8 characters.
Passwords must consist of a mix of upper and lower case characters, a number and a nonalphanumeric character. Must not be the same as the username.
), you will be taken to the 'Password change successful' page. Clicking Finish (Figure
141) will take you back to the 'Manage profile' page.
If password entered is incorrect or format is incorrect, you will be directed to the error
page.
Figure 141: Password change successful
Step 4: If you do not want to change your password but your other profile information, enter the
new information on the textboxes and click Submit (Figure 139). If the password was changed,
you will still be directed to this page and you can continue with step 5.
122
Step 5: This will take you to Figure 142; you may now click Confirm if the details entered are
correct and you want to confirm the information provided or click Edit to go back to change the
information once again.
7
Figure 142: Manage profile – Confirm profile details
Step 6: Clicking Confirm will take you to the 'Your profile has been successfully updated'
page (
Figure 143).
123
Figure 143: Manage profile updated successfully
Step 7: Clicking Finish will take you to your home page ('CP Admin home' page).
7.2
What is the Sitemap?
The 'Sitemap’ gives direct links to all content and processes available in the portal.
Step 1: To go to the site index, go to the Openreach home page (www.openreach.co.uk) and
click the ‘Sitemap’ icon on the top right hand corner, irrespective of whether you are logged in or
not.
1
Figure 144: Openreach home page
124
2
Figure 145: Site index
Step 2: Clicking any of the links will take you to the relevant area. If you are not logged in to the
portal but click My dashboard, you will be directed to the login page to access services (Figure
146).
125
Figure 146: Login page
7.3
What are secure content folders and how do I allow users to access
them?
Step 1: If a request for a certain Secure Content Area is made from any user within your company
as a request access session, this request will be available on your home page (Figure 147).
1
Figure 147: CP Admin home - Request received
Step 2: The user request link can be selected from the home page link, which will direct you to
the 'Manage customer permissions' page (Figure 148).
126
3
Figure 148: Manage customer permissions - Secure Content Access
Step 3: The requested Secure Content folder will be highlighted in Red, The status None, Full or
Deny for the chosen user can be selected. Clicking Save will take you to the next step. .
Step 4: The 'Acknowledgment' page will then be displayed. Clicking Finish will take you to your
admin home page.
127
4
Figure 149: Secure content access granted - Acknowledgement page
Users are not notified when the request for secure content has been granted, but will be notified if
the request is rejected.
7.4
What are notifications and how do I subscribe?
You and all portal registered users within your organisation can subscribe to receive email
updates (notifications) from the portal. You can choose to receive notifications on the following;
Content updates to portal (content) pages
Updates to projects in the collaboration area
Portal outages and application outages
Subscribing for notifications is simple and easy.
Step 1: Go to the Openreach home page (www.openreach.co.uk) and log in to the portal.
Step 2: You will then be taken to your Dashboard (Figure 150)
128
Step 3: Click the Settings link on the 'My notifications' tile on your Dashboard (Figure 150).
3
Figure 150: CP Admin dashboard - My notifications
Step 4: You will then be directed to the 'Notifications settings' page where you can select which
notifications you would like to subscribe to by selecting the relevant check boxes (Figure 151).
129
4
5
Figure 151: Notification settings – select notifications
Step 5: Upon clicking Submit, you will be taken to confirm the notifications you subscribed for
(Figure 152).
130
6
Figure 152: Notification settings – Confirm
Step 6: When you have confirmed your selection, you will be directed to the 'Acknowledgement'
page (Figure 153).
Step 7: Clicking Finish will take you to your home page ('CP Admin home' page) (Figure 153).
7
Figure 153: Subscribe to notifications – acknowledgement
You can also subscribe to notifications directly from a content page. To do this, simply visit the
content page on the portal and click the link Notify me which is on the top right corner of each
page.
131
7.5
What is the collaboration area?
The collaboration area on the portal allows you and other portal registered users within your
organisation to collaborate and share project information with Openreach CBMs and other CPs
(CPBM users).
If you have been granted access to a project, the link to the project will be available to you on
your dashboard.
1
Figure 154: CP Admin dashboard – Collaboration
Step 1: Click My projects to view more details on the project and share documents with other
users registered to the same project.
132
2
Figure 155: Available projects
Step 2: To share documents with other users of the project, click Manage documents within the
selected project. You will be taken to Error! Reference source not found..
133
3
Figure 156: Manage documents
Step 3: Browse and upload the documents you wish to share and click Finish when you have
134
completed to be taken to Figure 157.
Figure 157: Manage documents – complete
Step 4: Click Finish to go back to the project view and view all project related documents and
milestones (Figure 158).
4
Figure 158: My projects – view all project documents
The contact details of the Openreach Customer Business Manager (CBM) who created the
project will be displayed on the top left corner of the project details page right under the project
title and description.
Categorizing the document in collaboration area
This functionality is introduced in order to allow users to categorize project documents through a
user defined set of document categories. This feature can be extended for new projects and for
existing projects. Project owners and project admins can add, modify and delete document
categories.
135
7.6
What are bookmarks and how do I bookmark pages?
Bookmarks are an easy way to remember content pages that are important to you. By
bookmarking pages that are important to you, you can ensure they are displayed directly on your
dashboard.
Follow the steps below to bookmark pages that are important to you:
Step 1: Login to the Openreach portal using http://www.openreach.co.uk
Step 2: Visit the content page that you would like to bookmark.
3
Figure 159: Products page without book marking
Step 3: Select Bookmark this page located at the top right corner of the content page under the
main navigation (Figure 159)
Step 4: If the bookmark has been successful, the page refreshes and the link changes to
Remove bookmark (Figure 160).
136
4
Figure 160: Products page – with bookmark
Step 5: All your bookmarks will be available to you on your dashboard in the 'My bookmarks' tile
(Figure 161).
5
Figure 161: CP Admin dashboard – showing 'My bookmarks'
137
7.7
How can I track user history - Create audit reports
The system allows you to create audit reports to keep track of individual users within your
company for up to two months.
Step 1: Go to your home page ('CP Admin home' page) and click Generate audit reports under
the 'View reports' tile (Figure 162).
Figure 162: CP Admin home – Generate audit reports
Step 2: The system will prompt you to enter the User ID of the user the audit report is required
for. The search is a standard search based on wildcard characters.
138
1
2
Figure 163: Generate audit reports – Search user
Step 3: The system will display a matching list of records where you can click the User ID to
select the user.
3
Figure 164: Generate audit reports – Select user
Step 4: The 'Generate audit report' screen will be prompted by the system where the date range
for the report and the report type can be selected. The user can select to view and print the report
in HTML format or download the report in PDF format.
139
4
4
Figure 165: Generate audit reports – Define date and type
140
Figure 166: Generate audit report – Confirmation
Step 5: You will be directed to the 'Confirmation' page (Figure 166).
5
Figure 167: Generate audit reports
141
Figure 168: Generate audit report – PDF format
User profile report: Generates a report based on user profile changes, keeping a
track of the old value and the new value.
User requests report: Report consists of user requests for portal application and
other portal features such as secure content folders.
Figure 169: Generate audit report HTML view
142
Figure 170: Generate audit report – print view
7.8
What happens when my company acquires another company or my
company gets acquired by another company?
When a company (Gaining Co.) takes over another company (Losing Co.) in either a hostile or
friendly takeover, the assets of Losing Co. will be transferred to Gaining Co. In the portal,
management of the company data and permissions needs to be transferred from Losing Co. to
Gaining Co. Gaining Co. CP Admin (you) plays a major role in executing this task.
To initiate a Novation change, the Openreach site admin will create the link between the two
companies. The system will inform the CP Admins of both companies via an email.
Then Gaining Co. CP Admin (if this is you) will see the link Manage losing company
permissions in the right navigation in the CP Admin home page.
Step 1: Click Manage losing company permissions in your right navigation on the home page
(Figure 171).
143
1
Figure 171: CP Admin home – Manage losing company permissions
Step 2: You will see the losing companies assigned to you. The system prompts you to select the
relevant losing company (Figure 172).
2
Figure 172: Manage losing company permissions – Select Company
Step 3: The system prompts you to select the relevant permissions for the losing company
(Figure 173).
144
Figure 173: Manage losing company permissions – Select permission
No Changes: You can select No changes to give the losing CP Admin and other
users full access and independent function as before.
Read Only: You have to make sure the losing company CP Admin is disabled to grant
read-only access to its users.
Disable users: This will deactivate all the users of the losing CP and drop the gaininglosing relationship.
Remove gaining-losing relationship: This will reverse the gaining-losing relationship.
This enables the losing CP to function as an independent entity again.
Step 4: The system displays the permission change and prompts you to confirm (Figure 174).
145
4
Figure 174: Manage losing company permissions – Select permission
Step 5: System displays the acknowledgement (Figure 175). Click Finish to complete.
5
Figure 175: Acknowledgement page
7.9
How do I contact Openreach?
The 'Contact us' form enables you to contact Openreach to submit a general inquiry, give
feedback, or make a complaint. It is not intended to be used for user registration.
Step 1: Login to the Openreach Portal and click the Contact us link to navigate to the 'Contact
us' page.
146
Figure 176: Openreach Portal Home page
147
148
Figure 177: Contact us page
Step 2: Select the 'Reason for contact' from the list and click Next (Figure 177). Depending on the
reason for contact, the applicable 'Contact us' form will be displayed.
3
Figure 178: Contact us - I have a complaint form
149
Step 3: Fill in the required details and click Next (Figure 178). NB: Your user details and
company details will be auto populated and cannot be edited
Please note that all mandatory fields are marked with * and cannot be left blank.
The example used in this case is the 'I have a complaint’ form. However, as mentioned above,
this form may vary depending on the reason for contact.
Step 4: The system will display the 'Contact us confirmation' page to confirm the inputs entered
before sending the information to the help desk (Figure 179).
If the information entered is incorrect, click Cancel to go back to the 'Contact us' page; if correct,
click Confirm to proceed to the Acknowledgement page (Figure 180).
150
4
Figure 179: Contact us – Confirm page
5
Figure 180: Acknowledgement – Contact received page
Step 5: Click Finish to be navigated to back to your Dashboard.
151
8
Cross Reference
Keyword
Page Number(s)
Application timeout
24
Applications
1, 2, 23,25,28,60,83,84, 88,89
Appointing Services
1, 83
Bookmarks
26, 112, 114
CBM
26, 29, 108, 112
Collaboration Area
1, 105, 108
CP Ops
29, 84
CP portal users
2
CPBM
29, 108
Customer Establishment administrator
14
Customer Establishment Team (CET)
8, 13
26, 29, 83, 84, 85, 95, 99, 100, 104, 105, 108,112,
Dashboard
114
Dialogue Services
1, 2, 25, 26, 60, 83, 84, 104
DUNS ID
3, 7, 12,13, 14
eBilling
1, 83, 84
Openreach Reporting
91
FAQs
26
Manage access
2
Manage Customer Permissions
28, 37, 40, 47, 48, 67, 84, 88, 94, 102, 103, 104
Manage Customer Status
28, 32, 33, 35, 36, 37, 39, 41, 42, 43, 44, 45, 46, 94
Manage groups
2, 16, 28, 35
Multiple CP Admins
54
My tools
17, 25, 83, 84
Non-Portal user
28, 35, 16
Notifications
1, 26, 105, 106, 107
Novation
121
OneSiebel
57, 84
Openreach Communication Providers
1
Openreach portal
83, 84, 88, 112
Openreach Site Admin
13, 15
Password
18, 19, 20, 21, 22, 23, 41, 49, 96, 97
Projects
25, 105, 108, 109, 112
Prospect user
8, 29
152
Site Minder
24
SMPF Ordering group
57, 84
User name
18, 20, 21, 36, 43, 44, 49, 50, 51, 88, 91
153