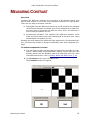
1
User Manual June, 2011 TABLE OF CONTENTS Chapter 1: Introduction: The Basics ............................................................3 What to Expect from Calibration .....................................................................................4 What Do I Need? ...........................................................................................................5 Calibration Procedures ...................................................................................................6 Essential Equipment ..................................................................................................6 Basic Principles .........................................................................................................6 Essential Terminology................................................................................................9 Calibration Order.....................................................................................................10 Calibration Steps .....................................................................................................10 Calibrating a Front Projector ....................................................................................15 Chapter 2: ChromaPure Pre-Calibration Procedures ................................ 17 Installing and Configuring ChromaPure for Initial Use .....................................................18 Install .Net 4.0 ........................................................................................................18 Install ChromaPure Software....................................................................................18 Import your License File ..........................................................................................18 Install a Driver for your Color Analyzer......................................................................19 Selecting and Initializing the Meter ...........................................................................25 Setting Calibration Options.......................................................................................27 Recording Display Settings ...........................................................................................28 Selecting Calibration Options ........................................................................................29 Color Luminance .....................................................................................................29 Reference Gamut ....................................................................................................29 Grayscale ...............................................................................................................29 Luminance..............................................................................................................30 dE Method ..............................................................................................................30 Measurement Smoothing .........................................................................................31 Signal Generator .....................................................................................................31 Auto Recovery ........................................................................................................34 Report Settings .......................................................................................................34 Creating a Meter Correction ..........................................................................................35 Taking Pre-Calibration Grayscale Measurements ............................................................37 Taking Grayscale Measurements in 5% Increments ...................................................38 Taking Pre-Calibration Color Gamut Measurements ........................................................39 Chapter 3: Video Calibration using ChromaPure ...................................... 41 Setting White and Black Level .......................................................................................42 Black and White Pluge .............................................................................................43 Setting White Balance ..................................................................................................44 Setting the Main Color Control ......................................................................................47 Setting the Main Tint/Hue Control .................................................................................49 Using Color Management .............................................................................................51 Table of Contents i Using Advanced Color Management ..............................................................................53 Adjusting Color Decoding .............................................................................................57 What's the difference between the Color Decoding and Color Management modules?...58 Setting Gamma ...........................................................................................................59 Measuring Contrast ......................................................................................................62 Using Auto-Calibrate ....................................................................................................64 Chapter 4: ChromaPure Post-Calibration Procedures............................... 67 Taking Post-Calibration Grayscale Measurements ...........................................................68 Taking Post-Calibration Color Gamut Measurements .......................................................69 Running a Calibration Report ........................................................................................70 Interpreting the Calibration Report ...........................................................................71 QuickReports ...............................................................................................................73 Calibration Tools ..........................................................................................................74 Sharing Data...........................................................................................................74 Importing and Exporting Calibration Data..................................................................74 Calculating Lumens for a Front Projector...................................................................78 Raw Data Module ....................................................................................................80 Data Conversion Tool ..............................................................................................80 Chapter 5: Video Calibration Concepts ..................................................... 82 Color Wheel ................................................................................................................83 Dark Reading Requirements .........................................................................................84 Reference Gamuts .......................................................................................................85 Understanding Delta-E .................................................................................................86 Lightness and Luminance .............................................................................................87 Table of Contents ii CHAPTER 1 INTRODUCTION: THE BASICS What’s Inside? What to Expect from Calibration, p. 4 What Do I Need?, p. 5 Calibration Procedures, p. 6 Use this software to calibrate your television, flat panel, or projector to industry standards. For technical support for issues not covered in this document, contact [email protected]. Introduction: The Basics 3 Introduction: The Basics WHAT TO EXPECT FROM CALIBRATION Calibration can make either a very large or very small difference to the quality of the image on your display. Which result you get depends on several variables. How far from industry standards is your display out of the box? If it is properly setup at the factory (it almost never is), then calibration will make little difference. Otherwise, it can make a profound difference. How much control does the display offer to the calibrator to obtain a good image? This varies wildly among displays. Some are better candidates for calibration than others simply because they offer a wealth of calibration controls. At a minimum a display should offer custom white balance controls in addition to the standard Contrast, Brightness, Color, Tint, and Sharpness adjustments found on all displays. The best candidates also offer adjustments for gamma, color decoding, and/or color management. What is the quality of the calibration equipment (hardware and software). Even those displays that are the best candidates for calibration will see little improvement if the calibrator uses sub-standard equipment. Finally, there is a purely subjective element to this. How sensitive are you to changes in color and luminance? The best candidates for calibration are those who have a good eye for accurate reproduction. If you are not sensitive to this, then may not notice much of a difference. What to Expect from Calibration 4 Introduction: The Basics WHAT DO I NEED? In addition to ChromaPure software and a PC or laptop, you will need What Do I Need? A color analyzer to read the light and color that your display produces. Some way to get test patterns into your display. The most common method is with a calibration DVD. There are many commercial and freeware versions to choose from. You can also use internal test patterns generated from your PC that ChromaPure controls. Finally, you can use external test signal generators. If you have a front projector, I would recommend an illuminance meter and a camera tripod to mount your meter on. The AEMC CA813 is a good illuminance meter. 5 Introduction: The Basics CALIBRATION PROCEDURES Essential Equipment Color analyzer. This is a USB device that you point at the display so it can read the color and light output of the display and then connect to a laptop computer. The most accurate device under $1000 is the X-Rite i1Pro, though it can be tedious to use. A close second is the X-Rite Chroma 5. A much less expensive option that is somewhat less accurate is the X-Rite Display 2, also sold as the Pantone Eye-One Display LT for less than $150. These meters are the same, distinguished only by the packaging and the included X-Rite software aimed towards photography applications. ChromaPure also offers optional software enhancements to the Chroma 5 and Display 2/LT that substantially increases their accuracy beyond that even of the i1Pro. Calibration Software. You need ChromaPure to interpret the data that the meter provides, analyze the data, and plot the results on easyto-read charts/graphs. Video Test Patterns. Finally, you'll need some way to get a test pattern on the screen on your display. The easiest way to do this is with a DVD. The GetGray video calibration disc, which can be downloaded and burned to DVD, works well and sells for $25. AVS members have created a very nice set of HD patterns for Blu-ray called AVSHD. Finally, I have created a very simple calibration disc that provides all the patterns necessary for the steps in this guide. If you prefer something more automated you can also use the built-in test patterns generated by the PC’s video card. For more information about this option, refer to Using automation with a video test pattern generator, p. 32. You can also use an external test pattern generator, such as the DVDO Duo or Accupel. For more information about this option, refer to Using automation with a video test pattern generator, p. 32. This is an appealing option, because ChromaPure generates the needed test patterns automatically. The user doesn’t have to worry about selecting the correct pattern before taking a reading because the software does that for you. ChromaPure supports several of these devices. Once you have the items in this list, you are ready to calibrate your display. Basic Principles Display performance is measured in several ways: White and black levels. The most basic aspect of video calibration is getting the correct white and black levels. White level—the intensity of light the display produces when the video signal is at 100% strength— is adjusted by the contrast control. Black level—the intensity of light the display produces when the video signal is a 0% strength—is Calibration Procedures 6 Introduction: The Basics adjusted by the brightness control. For more information on setting white and black levels, refer to Setting White and Black Level, p. 42. Sharpness. This adjustment is a holdover from the days of analog video and generally should be turned down considerably or simply left at its default setting. On many modern digital displays, the sharpness control has very little effect on the image. White Balance. This is the aspect of color performance that gets the most attention. It concerns the display's ability to provide a neutral shade of white. The shade of white all the way from darkest gray to the brightest white is called the grayscale. If the display can't reproduce a neutral white, then it will add an unnatural color cast to all images. For this reason, it is absolutely essential to correctly calibrate the display’s grayscale.For more information on calibrating white balance, refer to Setting White Balance, p. 44. Color Decoding. This term refers to a process that is used to lower bandwidth requirements by encoding the native RGB signal into YPbBr (analog) or YCbCr (digital), which must then be decoded back to RGB prior to display. There are different encoding/decoding standards, so sometimes a poor design in the television may lead to color decoding errors. These errors are primarily seen as primary colors (red, green, or blue) with incorrect luminance and/or secondary colors (yellow, cyan, or magenta) with incorrect hues. All commercial displays include a Color and Tint control. These are basically controls designed to resolve color decoding errors, though their effectiveness is extremely limited because Color adjusts the luminance of ALL of the colors and Tint effects hue of ALL of the secondaries. The problem is that typically displays have color decoding errors that effect the colors differently. For example, you could adjust Color/Tint to get the correct luminance of blue and the correct hue of cyan, but the luminance of green and red may still be inaccurate. You could adjust the color control to get red right, but then blue and green would be inaccurate. See the problem? A full set of color decoding controls addresses this problem by offering color/tint controls that operate on red/magenta and green/yellow independently. Then you can use the main Color/Tint controls to adjust blue/cyan. For more information on resolving color decoding errors, refer to Adjusting Color Decoding, p. 57. Color Gamut. This is the range of colors that the display is capable of rendering. The gamut is most often represented as a triangular pattern plotted on a standard tongue-shaped chart as shown below. Calibration Procedures 7 Introduction: The Basics CIE Chromaticity Chart The gamut is defined by the xy coordinates of the primary colors (red, green, and blue) and the white point. The secondary colors (cyan, magenta, and yellow) are derived from them. These color points have specific definitions for both standard and high definition signals. All commercially available video material is mastered according to these standards. If the display cannot reproduce the gamut accurately, then the image will visibly suffer. Digital displays used to offer especially poor performance in this regard, but recently they seem to have gotten better. The only way to fix errors in the gamut is with a Color Management System (CMS). A CMS can make a profound difference to the performance of the display, but few offer one and of those that do not all work properly. For more information on using a CMS with ChromaPure, refer to Using Color Management, p. 51. Gamma. This performance parameter describes how the display responds to increasingly more intense signals. As a signal gets more intense, if the display rises out of black very fast, then it has a low gamma. If it rises out of black slowly, then it has a low gamma. The optimal gamma is expressed numerically. Aim for a gamma in the 2.22.35 range. For more information on adjusting gamma in ChromaPure, refer to Setting Gamma, p. 59. It is important to understand two things about these aspects of display performance Calibration Procedures 8 Introduction: The Basics These are independent aspects of image quality. You can have good gray scale tracking and poor color decoding. You can have good color decoding and a very inaccurate color gamut. The bottom line is that each needs to be adjusted separately. Adjusting them is a reiterative process. Although these aspects of image performance are independent, adjusting them often has interactive effects. This means that after you finish adjusting one area of performance, it is a good idea to go back and look at areas you have already worked on to see how adjustments in one area may have affected other areas or performance. generating a calibration report is a useful tool for checking this. For more information on generating a calibration report, refer to Running a Calibration Report, p. 70. Essential Terminology xyY - This is a common method for precisely measuring color performance. x and y are coordinates on the triangular CIE chromaticity chart mentioned above that plot out how colors measure relative to their reference points. Y is used to represent the luminance of a color. Luminance is not plotted by on the CIE chart because it cannot be represented by xy coordinates. It must be represented separately. Saturation - This is the colorfulness of the color relative to its own brightness. A color's saturation is represented on the CIE chart as the distance from the white point. As a color moves closer to the white point it loses saturation. As it moves away from the white point towards the gamut boundary (this defines the limits of visible light) it becomes more deeply saturated. Add saturation to a color and it will begin to appear more deep and rich. Reduce saturation of a color and it will begin to appear more pale and less colorful at their same level of brightness. There has been an unfortunate tendency in the popular press to refer to saturation as though it were an unqualified positive aspect of a display’s color reproduction and that the more of it the better. In reality, there is only one correct amount of saturation for any color, and that is the amount defined by the gamut being used. For all practical purposes, this gamut you should always calibrate to is the high-definition standard known as Rec. 709. For more information about calibrating to different gamuts, refer to Reference Gamut, p. 29. Hue - This is the primary characteristic of color that allows us to distinguish one color from another. A color's hue is measured by its angle to the white point. If saturation is changed by moving a color towards or away from the white point, hue is changed by revolving a color around the white point. When a color's hue is off, its appearance will seem contaminated by other colors. For example, red that is too yellowish will begin to seem orange. Blue that is too reddish will begin to appear purplish. Human vision is very sensitive to changes in hue. Color Luminance - This is the brightness or intensity of color. Often confused with saturation, the luminance of any color (or even white) can be measured by a simple light meter. Color luminance comes in two types: absolute luminance and relative luminance. Calibration Procedures 9 Introduction: The Basics • Absolute luminance is the value typically expressed in cd/m2 or foot-lamberts (metric or imperial units of luminance) that is reported directly by the color analyzer. Absolute luminance is useful for determining peak output, black level, and gamma. • Relative luminance is the luminance of a color expressed as a percentage of the luminance of white at the same level of stimulus. The relative luminance of reference white is always represented as 1.0 and colors are shown as some percentage of that. For example, the high-definition standard for the luminance of red is 0.2126. That means that red should measure 21.26% as bright as white at the same level of stimulus. Relative luminance is useful for gamut specifications and calculating the dE of color. For more information about dE, refer to dE Method, p. 30. To sum up, as we have seen each color can be expressed by xy coordinates on a chromaticity chart that establishes its saturation and hue. The Y value defines its luminance. The correct xy coordinates for all primary and secondary colors are defined by reference points on the triangular CIE chromaticity chart shown as described above on p. 8. If the color deviates from the reference point by appearing shifted towards other colors on the chart, then its hue is wrong and needs correcting. If a color is shifted closer to or father from the white point in the center of the chart relative to the reference, then its saturation is wrong and needs correcting. Finally, if the color is too bright or too dim relative to the established standard (not shown on the chart, but determined mathematically), then its luminance is wrong and needs correcting. Calibration Order Adjustments should be made in the following order: 1 Black and White levels 2 Sharpness 3 White Balance 4 Color/Tint (Color decoding) 5 Color gamut (If your display has a CMS, then Color and Tint adjustments are not necessary. The display’s CMS will take care of this.) 6 Gamma When finished, go back and remeasure each parameter, because changes in one may have affected the readings for another. Remember, video calibration is a reiterative process. Calibration Steps List below are the main steps you should take when calibrating your display. For specific instructions on how to make these adjustments using ChromaPure software, refer to Chapter 3: Video Calibration using ChromaPure, p.41. However, if you do not have a good background on how the process works, read this section first. Calibration Procedures 10 Introduction: The Basics Setting White Level (Contrast) The Contrast control determines the peak output your display will provide. Set it too low and you lose image punch and lower the contrast ratio. Set this too high and you lose color accuracy and detail in bright scenes. peak output set too high can also cause eye strain, image noise, and premature aging of the display. The standard method for setting Contrast requires that you look at a test pattern that has a just-below-white stripe against a white background. You are supposed to set Contrast as high as you can without losing the ability to distinguish the just-below-white stripe from full white. I included such a pattern on the calibration DVD. However, there are a couple of problems with this method. Many modern digital displays will never suffer from loss of high level detail even with Contrast set to 100%. This method will recommend a setting that is much too high. This method does not take into consideration color performance. Many displays will lose their ability to track a neutral grayscale at very high output levels when Contrast set as high as this method recommends. Thus, a better method for setting Contrast is to set it at a level consistent with good color performance and reasonable light output for a given display device. What's a reasonable level? CRT tubes, plasmas, digital rear projection, and LCD flat panels: 120 cd/m2 (35 fL) Digital front projection: 48 cd/m2 (14 fL) These values comes from the SMPTE standard, which is always useful in such matters. Setting Black Level (Brightness) You should set black level by eye using test patterns. The purpose of these test patterns are the same. You want to set the black level of the display as low as you can without losing the ability to see video information that is just above black intensity. If you set black level too low, then you will lose shadow detail (this is sometimes referred to as “crushed blacks”). If you set black level too high, then you lower the display’s contrast and realism in dark scenes. The typical method for setting black level is to use a test pattern that displays a 2% below-black stripe and a 2% above-black stripe against a black background. You set brightness so that the 2% above-black is barely visible and the 2% below-black is invisible. However, more recent test patterns, such as the ones found on the Spears and Munsul calibration disc and the AVSHD disc, are much more accurate than a standard 2% pluge pattern and should be used to set brightness. There is one problem with the method just described. How do we set black level for broadcast sources where no test pattern is available? Fortunately, there is one approach that will get a correct black level even without a test pattern, but you must have a recorded source of broadcast material, either from a DVR or DVD. Calibration Procedures 11 Introduction: The Basics 1 Record a television source that includes a “fade to black” sequence that typically occurs in between commercials or between commercials and network programming. 2 Play back the sequence and pause at the “fade to black” section. 3 Using a colorimeter or a light meter, measure the light output of the black screen. 4 Adjust the black level up and down. You will find a place where additional downwards adjustments of the Brightness setting will not affect the light output of the panel. That point just where the panel's light output becomes unresponsive to decreases in the Brightness setting is the correct setting for black. Setting Sharpness This should also be adjusted by eye. Use a sharpness test pattern, which is generally a series of horizontal and vertical lines, to look for ringing or faint outlines along the edges of the lines in the test pattern. Set the Sharpness control to the highest point you can that minimizes ringing (you may not be able to eliminate it entirely). On some sets, the sharpness should be set to zero. But for most it is usually at about the 1/3 point. Adjusting the White Balance Briefly, white balance adjustment simply involves adjusting specialized controls that allow a display to track a neutral white throughout its entire range from the blackest black to the whitest white. Unlike a good color management system (CMS), which is relatively rare, virtually all displays have white balance controls. Sometimes they are in the user menu, or they may be buried in a service menu that can only be accessed by a specific key sequence on the remote. The goal is to get an xy measurement as close as possible to x0.3127, y0.329 or when red, green, and blue are each at 100% relative intensity. Since white is the combination of all three primary colors, neutral white is achieved when those colors are in relative balance. The calibration software will provide these raw numbers and a graphical representation of RGB relative to the target white point. To calibrate the white balance: 1 Aim the meter at the display. 2 Select a 80% gray test pattern. 3 Adjust the RGB Contrast controls until RGB is balanced or until you read x0.3127, y0.329. 4 Select a 20% gray test pattern and use the RGB Brightness controls until RGB is balanced or until you read x0.3127, y0.329. 5 Repeat the last two steps as many times as necessary until both the 80% gray and the 20% gray test patterns measure a neutral shade of white. This may take several sets of measurements. 6 Finally, take an entire series of grayscale measurements at 10% intervals from 10% to 100% to ensure that the display tracks white accurately throughout the entire range. Calibration Procedures 12 Introduction: The Basics Consider the example below. This is not a neutral shade of white, because there is too much red and insufficient blue and green. You would adjust your display’s white balance controls until these three bars all measured as close to 100% as possible. Sometimes you may find that even though 80 and 20% stimulus are neutral white, the mid range 40-60% stimulus is not. This means that your display won't track a good grayscale and you have to make some compromises. The general rule of thumb is to focus on getting the mid range to track neutral white. Then get the low end right. Sacrifice accuracy at the top end if you have to. NOTE: There is no industry-wide accepted terminology for white balance controls. You may see RGB Contrast/Brightness, RGB Gain/Bias, RGB Gain/Offset, RGB Drives/Cuts. They all mean the same thing. Contrast, Gain, or Drive is for adjusting the bright end of the grayscale and Brightness, Bias, Offset, or Cut is for adjusting the dark end of the grayscale. Setting Color/Tint The standard method for adjusting color and tint involves looking at a SMPTE color bar test pattern through a blue filter. This method has 2 drawbacks. First, at best it is an approximation of the correct setting. Second, and more importantly, for some displays it simply does NOT work. On some plasmas in particular I have noticed that this method will recommend a grossly inaccurate setting. Here's a foolproof method for setting Color/Tint that does not use filters. Color 1 Point the colorimeter or light meter towards the screen and display a 75% or 100% white test pattern. 2 Measure the Y value (luminance) of white. 3 Display a 75% or 100% Red test pattern, and measure the Y value here as well. You will notice that as you move the Color control up and down, the Y value of Red increases and decreases, but white stays the same. Calibration Procedures 13 Introduction: The Basics 4 Set the color control at the point where Red Y measures closest to 21% of the white reading. TIP: It is not really important whether you use 75% or 100% patterns in this test, so long as you use the SAME level of intensity for both red and white. Tint 1 If you have not already done so, adjust the gray scale and get it as close to D65 (x=0.3127, y=0.329) across the entire range as possible. 2 Point the colorimeter towards the screen and display a cyan test pattern. 3 Put the Tint control at its neutral mid setting. 4 Use the software controls to plot the hue of cyan. 5 Adjust Tint up or down until the reading places the hue of cyan as close to the target (0% error) as possible 6 If you had to substantially adjust Tint from the neutral point to get an accurate hue of cyan, then check the other secondaries—yellow and magenta—as well. You may have to select another setting that gets the average error in hue of the three secondaries as low as possible. TIP: If your display has a full-featured CMS, then adjusting the main Color and Tint controls is not necessary. Adjusting Color using a Color Management System (CMS) 1 Point your colorimeter towards the screen, display a white window, and then take a xyY measurement. 2 Repeat the step above for all of the primary and secondary colors (red, green, blue, yellow, cyan, magenta). 3 Use the controls on your calibration software to plot the amount of error in hue, saturation, and brightness each color shows relative to the chosen standard. I would select the Rec. 709 (High-Definition) standard. Your software should allow you to set that as the target gamut. 4 Use the CMS on the display to adjust the colors so that they show the lowest error in each of the 3 dimensions as possible. dE is a good single numerical metric for judging the amount of color error. The lower the dE value, the better. For more information about dE, refer to dE Method, p. 30. 5 You probably won't be able to get all of the colors lined up perfectly, but get them as close as you can. 6 It is important to understand that some poorly designed CMSs are such that as you change the xy values to get correct hue/saturation of a color and a good looking CIE chart, the Y value (luminance) will change Calibration Procedures 14 Introduction: The Basics as well. Since the CIE chart doesn’t show luminance, it is very important that you check this after making these changes. Otherwise, you could have made the color worse without knowing it. If your software doesn’t support direct read-outs of color luminance, then you'll have to do it manually. The luminance of each color should be a close as possible to the Y value specified by the target gamut. Remember, these Y values are relative luminance, so they are just percentages of reference white. You’ll have to measure the luminance of white first, and then check the luminance of the colors to see how close they are to the specified value in the gamut. For more information about various reference gamuts, refer to Reference Gamuts, p. 85. NOTE: The human eye is not equally sensitive to all colors and all color differences. For example, it is more important to get red and green right than blue. It is also more important to get correct hues than correct saturation. Adjusting Gamma You want to ensure that your display has a gamma response that is both within the accepted range and that it is reasonably linear. I suggest 2.22 as a good gamma value to aim for, but you can experiment with somewhat higher gammas if you like. Above 2.35 you will likely find that the image loses shadow detail and begins to appear somewhat contrasty. 1 Display a 100% white test pattern and record the Y (brightness) value. 2 Display a 90% white test pattern and record the Y (brightness) value. 3 Repeat until you have recorded the intensity of white all the way down to 10%. 4 Your calibration software should plot the gamma values at each of these levels. Use your display's controls to make necessary adjustments to achieve a gamma value as close to 2.22 as possible at every point throughout the grayscale. That's it. Now you should go back and remeasure black/white levels, grayscale, color decoding, saturation/tint, and gamma because there may have been interaction between these adjustments. You may have to go through two or three rounds of measurements until all are correct. Calibrating a Front Projector Calibrating front projectors poses some special issues primarily concerned with the fact that, unlike flat panels, you can measure projectors in two ways: off the screen or directly from the lamp. SMPTE recommends that all critical measurements should be taken from the center of the screen. This is good advice, but there are a couple of circumstances in which measurements directly from the lamp are useful. Contrast: Since the light reflected off the screen is minimal when projecting black, you will probably get a more accurate reading by taking measurements directly from the lamp. Compare this to a measurement Calibration Procedures 15 Introduction: The Basics of full white to get contrast ratio. To ensure accuracy, do not move the sensor between the two readings. A standard camera tripod is useful for this. Peak output: Since you don't have to worry about angle of acceptance or screen gain, reading the light output directly from the lamp is generally easier than reading reflected light off the screen. Some additional points to consider. Use a diffuser: Whenever you take readings directly from the projector lamp you must install a diffuser on the meter. All of ChromaPure's supported meters are luminance devices and do not support reading directly from a projector lens without the use of a diffuser. Consider an illuminance meter: Alternatively, you can use an illuminance meter (such as the AEMC CA813) for contrast and gamma readings, but not for readings that require color information. Illuminance meters read in lux rather than in fL or nits. ChromaPure includes a lumens calculator for calculating fL, nits, and lumens from lux measurements from such a device. For more information on the lumens calculator, refer to , p. 77. Use Color Correction: Finally, if you do take color readings directly from the lamp using a meter and diffuser, you should also take readings with the same meter off the screen and use those to create a reference to color correct the direct-from-lamp readings. For more information on creating an offset using ChromaPure refer to Creating a Meter Correction, p. 35. Calibration Procedures 16 CHAPTER 2 CHROMAPURE PRECALIBRATION PROCEDURES What’s Inside? Installing and Configuring ChromaPure for Initial Use, p. 18 Recording Display Settings, p. 28 Creating a Meter Correction, p. 35 Taking Pre-Calibration Grayscale Measurements, p. 37 Taking Pre-Calibration Color Gamut Measurements, p. 39 ChromaPure Pre-Calibration Procedures 17 ChromaPure Pre-Calibration Procedures INSTALLING AND CONFIGURING CHROMAPURE FOR INITIAL USE Overview To get ChromaPure fully up and running you need to accomplish four tasks. Install .Net 4.0 Install ChromaPure Software Import you license file Install a driver for your color analyzer Select and Initialize your color analyzer Select the desired options Each of these steps is covered below. Install .Net 4.0 To install Chroma video calibration software: 1 Install the Microsoft .Net 4.0 framework if your PC does not already have this. The .Net 4.0 installation file may be downloaded from the ChromaPure web site. 2 Once .Net 4.0 is installed, just double-click the .exe file. Install ChromaPure Software To install ChromaPure, just double-click the setup.exe file you were provided and follow the on-screen instructions. A ChromaPure icon will appear on your desktop. Import your License File You will now need to install the license file that you were provided when you purchased the software. This file includes the serial number of the color analyzer you were licensed to use with ChromaPure. 1 To begin, start ChromaPure by double-clicking the desktop icon. The first time ChromaPure runs, you will be prompted for a license file. Installing and Configuring ChromaPure for Initial Use 18 ChromaPure Pre-Calibration Procedures 2 Click Import License, and then browse to the location where your license file has been saved. 3 Select it and then click Open. Your license file will be installed. TIP: If you ever need to install a new license, you can access the Licensing Utility from the Tools menu. Install a Driver for your Color Analyzer Overview Before you can use your color analyzer, whether it is a tristimulus colorimeter or a spectroradiometer, you will have to install a driver so that Microsoft Windows can communicate with it. The procedures vary somewhat depending upon whether you use Windows XP or Windows 7. The instructions below cover both. Installing a Driver in Windows XP 1 Plug the meter into an available USB port. A Found New Hardware Wizard window will appear. Installing and Configuring ChromaPure for Initial Use 19 ChromaPure Pre-Calibration Procedures 2 Select No, not at this time, and then click Next. A second Found New Hardware Wizard window will appear. Installing and Configuring ChromaPure for Initial Use 20 ChromaPure Pre-Calibration Procedures 3 Select Install from a list or specific location (Advanced), and then click Next. Another Found New Hardware Wizard window will appear. 4 Select Include this location in the search, and then click the Browse button. 5 Browse to the following location on your hard drive: C:\Program Files\Display Calibrations LLC\ChromaPure\Drivers\<select the correct folder>. TIP: There are several subfolders under Drivers. Select the one that contains the driver for your device (For example, if you are installing the X-Rite i1Pro or Display 2, then select the i1Pro-D2 subfolder. If you are installing the X-Rite Chroma 5, then select the Chroma5 subfolder.) 6 Click Next. A final Found New Hardware Wizard window will appear. Installing and Configuring ChromaPure for Initial Use 21 ChromaPure Pre-Calibration Procedures 7 Click Finish. Your meter is now ready to use in Windows XP. Installing a Driver in Windows 7 1 Plug in the meter to an available USB port. A bubble message will appear in the task tray informing you that Windows did not install this device. 2 Close this message. 3 Open the Windows Control Panel. 4 In the Control Panel, navigate to System and Security, System, Device Manager. The Windows Device Manager will appear. Installing and Configuring ChromaPure for Initial Use 22 ChromaPure Pre-Calibration Procedures You should see an item with a yellow exclamation point—probably under “Other Devices”—indicating that the driver is not installed (the example above shows the Chroma 5). 5 Right-click that item, and then select Update Driver Software. An Update Driver Software window will appear. Installing and Configuring ChromaPure for Initial Use 23 ChromaPure Pre-Calibration Procedures 6 Click the Browse button, and then browse to the following location on your hard drive. C:\Program Files\Display Calibrations LLC\ChromaPure \Drivers\<select the correct folder>. TIP: There are several subfolders under Drivers. Select the one that contains the driver for your device (For example, if you are installing the X-Rite i1Pro or Display 2, then select the i1Pro-D2 subfolder. If you are installing the X-Rite Chroma 5, then select the Chroma5 subfolder.) 7 Click Next. A final Update Driver Software window will appear. Installing and Configuring ChromaPure for Initial Use 24 ChromaPure Pre-Calibration Procedures 8 Click Close. You are now ready to begin using the meter in Windows 7. Selecting and Initializing the Meter Overview Prior to any calibration session, you must have a color analyzer connected. ChromaPure Standard currently supports the following devices: X-Rite Display 2/Lt colorimeter X-Rite Chroma 5 colorimeter X-Rite DTP-94 colorimeter X-Rite i1Pro spectrophotometer DataColor Spyder3 colorimeter NOTE: Any of the colorimeters can be upgraded to a PRO version. This indicates that the colorimeter’s response has been corrected by a reference instrument using offsets built in to the ChromaPure license file. No change is made to the hardware device itself. The following color analyzers are supported by ChromaPure Professional only: X-Rite Hubble/Sencore OTC-1000 non-contact colorimeter Installing and Configuring ChromaPure for Initial Use 25 ChromaPure Pre-Calibration Procedures Klein K-10 non-contact colorimeter Minolta CS-200 colorimeter Photo Research PR-655/670 spectroradiometer Orb Optronics SP100/JETI Specbos 1201 spectroradiometer JETI Specbos 1211 spectroradiometer We continually review the hardware options available and add new meter support when appropriate. These meters measure both the chromaticity and luminance of light. The measurements are reported in xyY format. xy coordinates describe the chromaticity of the light and Y describes its luminance in either in candelas per square meter (cd/m2)or foot-lamberts (fL). Luminance is the diffuse light we receive from flat panels or projector screens. If you wish to read light directly from a front projector's lens, you must attach a diffuser to the meter. For more information about calibrating a front projector, refer to Calibrating a Front Projector, p. 15. To prepare a meter for a calibration session: 1 Attach the meter to your PC’s USB port. 2 From the main ChromaPure window, click Select/Initialize Meter. The Select/Initialize Meter module will appear with the licensed meter(s) displayed. Select serial port settings here. 3 Click the radio button next to the desired meter to select it. 4 Click Initialize. The Initialize button will turn into Apply Mode. Installing and Configuring ChromaPure for Initial Use 26 ChromaPure Pre-Calibration Procedures 5 Set the desired mode. (Note: Some meters only have one operating mode.) 6 If the meter requires a dark reading, place against a flat surface to block out all light. For more information about the dark reading requirements of various color analyzers, refer to Dark Reading Requirements, p. 84. 7 Click Apply Mode. TIP: If the selected meter relies on a serial connection—such as the Klein K-10—you will have to set the serial port settings. This usually involves only setting the correct port, which you can determine by looking in the Windows Device Manager. Click the button to the right of the operating mode drop-down to access the serial port settings. 8 Close the Select/Initialize Meter window. Setting Calibration Options before beginning your calibration session, you will probably want to set the options that you desire. To do this, click the Options button on the toolbar. For detailed information about the various options, refer to Selecting Calibration Options, p. 29 below. Installing and Configuring ChromaPure for Initial Use 27 ChromaPure Pre-Calibration Procedures RECORDING DISPLAY SETTINGS Overview You may wish create a detailed recording of the display’s settings as part of the calibration process. What you record here will be available in the Settings Report. For more information about running reports, refer to Running a Calibration Report, p. 70. To record the display’s settings: 1 From the main navigation tool bar, select Settings. A Session Parameters page will appear. 2 Type the various settings on this page. Recording Display Settings 28 ChromaPure Pre-Calibration Procedures SELECTING CALIBRATION OPTIONS Overview Before beginning the calibration you should first set the desired options. Just click the Options button on the toolbar and then select the desired values. The selected value will be in effect during the calibration session and will become the default for future calibration sessions unless subsequently changed. ChromaPure offers the following settings in the Options module: Color Luminance Use this option to select whether you wish the color luminance targets in the Pre/Post Color Gamut modules to be determined by reference to the selected gamut or to be calculated from the measured primaries. You should use “Fixed Target from Gamut” if the display has a CMS that allows you to adjust the primary colors or if the primary colors naturally match your desired gamut. Use “Calculated target” if the primary colors significantly deviate from your desired gamut and you cannot adjust them with a CMS. Reference Gamut Each of these options has an effect on the results that your calibration will produce. When calibrating a display, you need to have a reference gamut. Each gamut specifies the hue and saturation for the primary colors (red, green, and blue) and a white point. From this is calculated the saturation and hue of the secondary colors and the luminance of all of the colors. ChromaPure offers four reference gamuts. SMPTE-C Rec. 709 EBU DCI Use SMPTE-C for NTSC standard definition, Rec. 709 for NTSC high-definition, and EBU for PAL-based material in Europe. DCI (Digital Cinema Initiative) is an expanded gamut for which consumer material is not widely available. For more information about the standard gamuts, refer to Reference Gamuts, p. 85. Grayscale Standard grayscale readings are taken in 10% increments. However, in the Options, Calibration panel, you can select 5% increments if you like. If you Selecting Calibration Options 29 ChromaPure Pre-Calibration Procedures do so, the charts in the Pre/Post-Calibration Grayscale modules will appear on separate tabs in order to accommodate 20 measurement points. You can also select between a gamma curve graph (levels of stimulus and percentage output) or a gamma line graph (levels of stimulus and gamma response). Luminance The two options provided are cd/m2 (candelas per meter squared) or fL (footlamberts). Either provides a standard of measurement for the absolute luminance of the signal. Cd/m2 (sometimes called nits) is a metric unit and fL is an Imperial unit. 1 cd/m2 equals 0.2919 fL and 1 fL equals 3.426 cd/m2. The choice here is a merely a matter of preference. It does not affect the substantive results, but only how they are reported. dE Method Delta-E (dE or ) is a measurement of color error relative to a standard. Thus, the goal in calibration is to get the dE of the measured color as low as possible. There are different dE formulas that provide somewhat different results. ChromaPure offers four options: CIELUV CIELAB CIE94 CIE2000 Both CIELUV and CIELAB were endorsed by CIE in 1976. The underlying formula in each is the same, but they rely on different color spaces. Because Luv offers a linear chromaticity diagram, it is more commonly used for video applications, but Lab is a perfectly acceptable alternative. In fact, SMPTE has recently endorsed CIELAB as the color difference metric for its Digital Cinema Initiative. CIE94 was developed by CIE in 1994 and is based on Lab only. It is a more complicated formula than the 1976 alternatives and arguably provides more accurate results, especially with color. CIE2000, endorsed in 2000 by CIE, is an even more complicated formula that has never gained widespread acceptance outside of the textile industry. It is also Lab-based. It is important to understand that these different measurements of color error scale somewhat differently, so when comparing results obtained by different dE formulas, use the following equivalence scales: For white CIELUV 4.0 CIELAB/CIE94/CIE2000 3.0 For color CIELUV 4.0 CIELAB 3.0 Selecting Calibration Options 30 ChromaPure Pre-Calibration Procedures CIE94 1.5 CIE2000 1.5 Which dE formula you use is to a certain extent a matter of personal preference. However, we recommend using CIE94 for primary/secondary color grading. For simplicity's sake, you could use CIE94 for grayscale also. It will return the same results as CIELAB. However, many prefer CIELUV for grayscale as it is somewhat more sensitive to small color errors. The targets for color measurements when using the newer formulas are different because of the manner in which the newer formulas treat luminance in the calculation, which is ignored for grayscale. Luminance performance with resect to grayscale tracking is part of the gamma response of the display and plays no role in dE calculations. Measurement Smoothing With some meters you will notice that in Continuous mode the results will bounce around considerably making it difficult to determine with any precision the value of the reading. The Measurement Smoothing option addresses this problem. Simply select a method (either Average or Median) and a number of measurements (as few as 3 will significantly improve readings). There are couple of issues to consider when using Measurement Smoothing. It will slow the application's ability to return data. The higher the number of readings you select, the longer the application will require to return xyY values. This feature is also accessible directly from the White Balance module. If you enable Measurement Smoothing from the Options module, the effects are global so you will not need to enable it from the White Balance module as well. But if you do leave it engaged in the White Balance module, the effects will be global as well. Signal Generator You may want to automate your calibration sessions. You can do this by using a signal generator. ChromaPure Standard currently supports the following devices as signal generators: PC’s video card DVDO iScan Duo Lumagen Radiance The following signal generators are available in ChromaPure Professional only. AccuPel HDG-3000 AccuPel HDG-4000 AccuPel DVG-5000 Selecting Calibration Options 31 ChromaPure Pre-Calibration Procedures Sencore VP-40x Quantum Data 780 Sencore MP-500 Using any of these options, ChromaPure will automatically display the correct test pattern required by the feature you access within the application. No user intervention is required. TIP: Only the PC video card and the AccuPel HDG-4000/DVG-5000 support custom colors that are required for the Advanced Color Management module. If you want to use this module and you don’t have these external generators, then you must use either the PC-generated signals or a DVD/Blu-ray disc. Using automation with a video test pattern generator 1 Plug-in the signal generator, connect it to the PC via serial or USB (depending on the unit), and then connect the signal generator’s output to the display you wish to calibrate. If you wish to use the Built-in test pattern generator, then no initial steps are necessary. 2 Click the Options button on the navigation toolbar, and then click Signal Generators. The Signal Generator window will appear. 3 Check Enable Signal Generator Support. Selecting Calibration Options 32 ChromaPure Pre-Calibration Procedures 4 From the drop-down list, select the desired generator, and then click Add. The selected generator will appear in a list of enabled devices. Port setup button 5 Click the radio button next to the desired generator, and then click the port setup button. A Serial Port Configuration window will appear. Selecting Calibration Options 33 ChromaPure Pre-Calibration Procedures 6 Select the correct serial port parameters. You can check the Windows Device Manager to ensure that you have the correct settings for the device. 7 Click Apply. The Serial Port Configuration window will close and you will return to the Signal Generator window. 8 9 Select all of the desired display options, such as • Color Format • Resolution • Signal Intensity • Pattern Type Check Enable Auto Advance if you want the readings to advance automatically through the Pre/Post Grayscale and the Pre/Post Color Gamut modules (you can select the desired interval). 10 Click OK. You are now ready to begin calibrating your display. TIP: In addition to automatically providing the desired patterns during a calibration session, external signal generators all provide a large number of test patterns that can be called up by activating the Test Pattern Toolbar. Just click View, Toolbars, Signal Generators. Auto Recovery To ensure data integrity, ChromaPure includes an auto recovery feature. This feature automatically saves a copy of your calibration session information on a regular basis (every 2 minutes is the default). Also, if the program ever shuts down unexpectedly, then upon restart you will be prompted to load the most recent session file. Finally, upon normal exit you will be prompted to save a session file. Report Settings You can customize your report by inserting a logo image and information about the name of the calibration technician and the company at the top of the report. To add a custom logo: 1 Create your logo. It should be a relatively small size. It must fit in the report's header. 2 Save the file as a Logo.jpg (it must be this name) in the following folder c:\Program Files\Display Calibrations LLC\ChromaPure\Reports\Images To add custom text type the desired information about the name of the technician and the company. Selecting Calibration Options 34 ChromaPure Pre-Calibration Procedures CREATING A METER CORRECTION Overview Meter correction is an optional feature that allows a calibrator to use a reference meter to correct the response of a faster, but less accurate, field device. Many low-cost colorimeters are easy to use and offer very good low-light sensitivity, but lack precise color accuracy, especially for certain types of displays. At the same time, many spectroradiometers offer reference color accuracy, but can be slow and often have poor low-light sensitivity. The Meter Correction feature allows you to adjust the response of the colorimeter to match the performance of the reference spectroradiometer. The result is the best of both worlds. You can now calibrate displays with a device that is fast, easy to use, color accurate, and good at low light levels. You can also use the Meter Correction feature with front projectors when you wish to measure directly from the projector lens. Use measurements taken off the screen to correct the readings taken directly from the lens. To create and use a meter correction: 1 Select and Initialize the reference meter. TIP: You may use the Meter Correction feature even if ChromaPure does not support the reference device. In this case, simply measure RGBW with the reference meter, record the results, and then manually type the xy values into the appropriate reference fields in the Meter Correction module. Then proceed with Step 4 below. 2 Click the Meter Correction button. The Meter Correction module will appear. 3 Select the Reference Meter radio button, and then take a series of WRGB measurements. Creating a Meter Correction 35 ChromaPure Pre-Calibration Procedures 4 Open the Select/Initialize Meter module, and then disconnect the reference meter. TIP: If you are using an i1Pro/Display 2 combination, be sure to physically unplug the i1Pro before initializing the Display 2. 5 Plug-in your field meter and initialize it. For information about how to setup a meter, see Installing and Configuring ChromaPure for Initial Use, p. 18. 6 Return to the Meter Correction module. The reference fields will be populated with the values you already measured. 7 Select the Field Meter radio button, and then take a series of WRGB measurements. ChromaPure will automatically calculate the correction between the Reference and Field meters. 8 Once all of the corrections have been calculated, click the Apply button. The correction will now be applied to all measurements for this session, and the field meter will emulate the performance of the reference meter. Creating a Meter Correction 36 ChromaPure Pre-Calibration Procedures TAKING PRE-CALIBRATION GRAYSCALE MEASUREMENTS Overview The Pre-Calibration Grayscale module allows you to measure the ability of the display to track a neutral color of white from black all the way to peak white. The initial grayscale reading provides a snapshot of the display's precalibration performance for both white balance and gamma. You should take pre-calibration grayscale readings for every calibration session. This data is crucial if you wish to generate a before/after report. To take an Pre-Calibration Grayscale measurement: 1 Click the Pre-calibration Grayscale button. The Pre-calibration Grayscale module will appear. 2 Display a 10% test pattern. 3 Click Measure. Taking Pre-Calibration Grayscale Measurements 37 ChromaPure Pre-Calibration Procedures ChromaPure will take a measurement of the xyY values at that level of stimulus and automatically advance to the next level. 4 Display the next gray pattern in the series. 5 Click Measure. 6 Repeat these steps until you complete the 100% reading. When you have finished the grayscale readings, several data elements are available. You can review the dE values. You can review the gamma values. You can review the Correlated Color Temperature (CCT) values. You can review both the gamma response and the RGB values at each level of stimulus from the provided graphs. You can also save those graphs as image files by clicking the associated Save Image button. TIP: If at any point you make a mistake, you can always go back and re-measure one of the levels. Also, you can display gamma data either as a curve chart as shown above or as a line chart. You select this in the Options, Grayscale window. Taking Grayscale Measurements in 5% Increments Overview You may wish to take grayscale measurements with more granularity than what is provided by 10% increments. To meet this need we offer the option to take grayscale measurements in 5% increments. For more information about setting this option, refer to Grayscale, p. 29. The process works exactly as described above, except that the charts appear on separate tabs. Taking Pre-Calibration Grayscale Measurements 38 ChromaPure Pre-Calibration Procedures TAKING PRE-CALIBRATION COLOR GAMUT MEASUREMENTS Overview The Pre-Calibration Color Gamut module allows you to measure the ability of the display to track accurate primary and secondary colors relative to the target gamut. The initial gamut reading provides a snapshot of the display’s pre-calibration performance for the hue, saturation, and luminance of the primary and secondary colors. You should take a pre-calibration gamut reading for every calibration session. This data is crucial if you wish to generate a before/after report. To take a pre-calibration color gamut measurement: 1 Click the Pre-Calibration Color Gamut button on the navigation bar. The Pre-Calibration Color Gamut module will appear. 2 Display a white test pattern. 3 Click Measure. ChromaPure will take a measurement of the xyY values of white and automatically advance to the next color (red). Taking Pre-Calibration Color Gamut Measurements 39 ChromaPure Pre-Calibration Procedures 4 Display a red test pattern. 5 Click Measure. 6 Repeat these steps until you complete all of the remaining readings. When you have finished the gamut readings, several data elements are available. You can review the E value for each color. You can review the raw xyY data for each color. You can review the provided CIE graph and color luminance bar chart of the measured gamut. You can also save those graphs as image files by clicking the associated Save Image button. TIP: If at any point you make a mistake, you can always go back and re-measure one of the colors. Taking Pre-Calibration Color Gamut Measurements 40 CHAPTER 3 VIDEO CALIBRATION USING CHROMAPURE What’s Inside? Setting White and Black Level, p. 42 Setting White Balance, p. 44 Setting the Main Color Control, p. 47 Setting the Main Tint/Hue Control, p. 49 Using Color Management, p. 51 Using Advanced Color Management, p. 53 Adjusting Color Decoding, p. 57 Setting Gamma, p. 59 Measuring Contrast, p. 62 Using Auto-Calibrate, p. 64 Video Calibration using ChromaPure 41 Video Calibration using ChromaPure SETTING WHITE AND BLACK LEVEL Overview Properly setting black level (generally labeled as Brightness) and white level (generally labeled as Contrast or Picture) of the display is a prerequisite for all other calibration adjustments. You should do this first. To properly set black level (brightness): 1 Display a pluge pattern that contains video information just above and below video black against a fully black background. 2 Lower the brightness control until the just-above-black bar fades into the background and becomes invisible. 3 Raise the brightness control until the just-above-black bar just becomes clearly visible. NOTE: Video black is digital 16 on a 0-255 scale. Video white is 235 on the same scale. Everyone agrees that information below 16 should be invisible and that everything between 16-235 should be visible. There is some controversy as to whether we should be concerned about above white material (236-255) and if so to what extent. To properly set white level (contrast): Display a test pattern that contains video information that is just below white and just above white against a fully white background. TIP: We recommend that you use the test pattern contained on the AVSHD disc or the Spears and Munsil High-Definition Benchmark disc to set white and black level. The correct white level setting is that setting at which 3 conditions are met: The peak white output is consistent with the display type. The just-below-white bar is clearly visible. The color of full white is neutral. Use the White Balance tool to check the color of white. For more information about the White Balance tool, refer to Setting White Balance, p. 44. Raise the contrast as high as you can within the recommended limit without the just-below-white bar disappearing and without the color of white becoming distorted. Use the Raw Data Module to check the peak white output. Light Output Targets for Various Display Types CRT/Plasma/LCD Flat Panel/Rear Projector: 30-40 fL (103-137 cd/m2) Digital front projector: 12-16 fL (41-55 cd/m2) Setting White and Black Level 42 Video Calibration using ChromaPure Just set the contrast as high as you can within the recommended limit so long as the other two criteria are also both met. Your display may not be able to achieve the minimum recommended light output. This is fine. Just get as close as you can. However, going much over the recommended value is not recommended. Higher peak output will only cause eye strain, excessive image noise, and lessened operating life of the display. Black and White Pluge ChromaPure's built-in test patterns includes a Black Pluge and a White Pluge test pattern for setting black level (brightness) and white level (contrast). You can access the patterns from the Signal Generator drop-down (View, Toolbars, Signal Generators). The Black Pluge test pattern contains two vertical stripes, a just-above-videoblack (21) on the right and a just-below-video-black (11) on the left against a PC black (0) background. 1 Adjust the Brightness control on the display to its minimum. 2 Display the Black Pluge test pattern. 3 Slowly raise the brightness setting until you just clearly see the stripe on the right. If you also see the stripe on the left, then you have raised it too far. The White Pluge test pattern contains two vertical stripes, a just-above-videowhite (240) on the right and a just-below-video-white (230) on the left against a PC white (255) background. 1 Adjust the display's contrast control until you achieve the recommended output for the display. 2 Display the White Pluge test pattern. 3 Ensure that you can see the stripe on the left. Seeing the stripe on the right is desirable, but not essential. 4 If you cannot see the stripe on the left, then lower the contrast control until you can, even if this means less light output than the recommended level. TIP: The brightness and contrast settings are usually interactive, so you should go back and forth between them to ensure that both parameters are correctly set. Setting White and Black Level 43 Video Calibration using ChromaPure SETTING WHITE BALANCE Overview Setting the white balance is arguably the most important step in calibration. Getting the color of white correct affects all viewing material, even black-andwhite content. The correct white balance is achieved when white contains equal amounts of red, green, and blue of the target gamut. As it turns out, all of the gamuts commonly used (SMPTE-C, Rec. 709, and EBU) use the same white point, x0.3127, y0.329. To set the white point: 1 Click the White Balance module button on the main tool bar. The White Balance tool will appear. 2 If necessary, enable Measurement Smoothing. For more information about Measurement Smoothing, refer to Measurement Smoothing, p. 31. If you enable Measurement Smoothing in this module, it will be Setting White Balance 44 Video Calibration using ChromaPure active in all modules, so remember to return it to 1 when you are finished calibrating the white point. 3 Display a 80% gray test pattern. 4 Click Measure. The application will return information for: dE Raw xyY data CCT RGB balance This initial measurement provides a snapshot of the white balance at that level of stimulus. 5 Click Continuous. The application will show the data listed above as it changes in real time. 6 Adjust your display's white balance controls to get the RGB balance as close to 100% for red, green, and blue as possible. Between 98% and 102% or no more than 4 dE is a good goal. 7 When finished, click Stop. 8 Display a 20% gray test pattern. 9 Repeat steps 4-7 as necessary. TIP: Setting white balance is a reiterative process. Whenever you adjust the white balance at the low end of the grayscale you must then recheck the white balance at the high end again, and vice-versa. This is necessary because changes in one are likely to effect the response in the other. The goal is to get a good white balance at both ends of the grayscale at the same time. There is no standard industry-wide terminology for white balance controls. You may see RGB Contrast/Brightness, RGB Gain/Bias, RGB Gain/Offset, RGB Drives/Cuts. They all mean the same thing. Bright end of the grayscale Contrast Gains Drives Dark end of the grayscale Brightness Biases Offsets Cuts Setting White Balance 45 Video Calibration using ChromaPure The display’s white balance controls may be easily accessible in the user menu, or they may be hidden in a special service menu accessible only through a unique key combination on the remote. Setting White Balance 46 Video Calibration using ChromaPure SETTING THE MAIN COLOR CONTROL Overview The main Color control affects the luminance of all of the colors, and to a lesser degree their saturation. Use the Color control to adjust the primary colors' luminance to their correct position. TIP: Use the main Color and Tint control only if your display has no color management system. If it does, then usually adjusting the Color control is unnecessary. However, even if your display does have a CMS you may find it useful to adjust the main Color control to provide extra adjustment room for the color luminance parameter. To adjust Color: 1 Click the Color Decoding button on the main toolbar. The Color Decoding module will appear. 2 Take a series of WRGBCYM readings to create a baseline. 3 Display a red test pattern. 4 Select the Red radio button. 5 Click the Continuous button. 6 Click Measure. ChromaPure will take readings and update the error chart in real time. Setting the Main Color Control 47 Video Calibration using ChromaPure 7 Adjust the Color control until the Red Color bar shows as close to 0% error as possible. 8 When finished, click Stop. NOTE: The goal here is to minimize the brightness error for all of the primaries, not just red. After adjusting red with the Red Color control, you may want to continue and repeat the process for the Blue Color and Green Color controls to get the lowest possible average percentage error for all three primaries. Setting the Main Color Control 48 Video Calibration using ChromaPure SETTING THE MAIN TINT/HUE CONTROL Overview The main Tint of Hue control affects the position of the secondary colors on the color wheel. Use the Tint/Hue control to align the secondary colors to their correct position. Use the main Tint/Hue control only if your display has no color management system. If it does, then usually adjusting Tint/Hue is unnecessary. TIP: Always adjust the white balance of the display before attempting to make adjustments to Tint/Hue. For more information about setting the white balance, refer to Setting White Balance, p. 44. To adjust Tint/Hue: 1 Click the Color Decoding button on the main tool bar. The Color Decoding module will appear. 2 Take a series of WRGBCYM readings to create a baseline. 3 Select the Cyan radio button. 4 Click the Continuous button. 5 Display a cyan test pattern. 6 Click Measure. ChromaPure will take readings and update the error chart in real time. Setting the Main Tint/Hue Control 49 Video Calibration using ChromaPure 7 Adjust the Tint/Hue control until the Blue Hue bar shows as close to 0% error as possible. 8 When finished, click Stop. NOTE: The goal here is to minimize the hue error for all of the secondaries, not just cyan. After adjusting cyan with the Blue Hue control, you may want to continue and repeat the process for the Red Hue (magenta) and Green Hue (yellow) controls to get the lowest possible average percentage error for all three secondaries. Setting the Main Tint/Hue Control 50 Video Calibration using ChromaPure USING COLOR MANAGEMENT Overview Use the Color Management module if the display includes a color management system (CMS) that provides control over the hue, saturation, and lightness of the primary and secondary colors. You can also select the desired color space in which to work. Select the color space that best corresponds to the human interface in the CMS controls. For example, Select HSL for CMS’s that rely on these adjustment parameters, such as the JVC LCoS projectors. Select RGB for CMS’s that rely on these adjustment parameters, such as the Samsung flat panels and the Lumagen Radiance external video processors. Select xyY for CMS’s that rely on these adjustment parameters, such as the iScan DVDO Duo external video processor. To use Color Management: 1 Click Color Management on the main tool bar. The Color Management module will appear. Using Color Management 51 Video Calibration using ChromaPure 2 Select the desired color space. 3 Select the desired Reference Gamut. 4 Take an initial measurement of white, red, green, blue, yellow, cyan, and magenta to obtain a baseline reading. The following data will appear: • Percentage error in each of the three poles of the selected color space for each color on the graph. • The dE error for each color on the graph. • The raw xyY data for each color below the measurement panel. Luminance data is presented both in absolute luminance (cd/m2) and relative luminance (Y). For more information about absolute and relative luminance, refer to Lightness and Luminance, p. 87. 5 Display a test pattern for the target color. 6 Select the radio button for that same color. 7 Click the Continuous checkbox, and then click Measure. ChromaPure will measure changes in percentage errors in the selected color space in real time. 8 Adjust your display’s CMS controls to bring the percentage error of the selected color to as close to zero as possible. It is useful to pay close attention to the dE value shown below the error bars to determine what mix of errors in the selected color space offers the most accurate color. 9 Click Stop. 10 Repeat steps 4-7 for whatever color or colors require correcting. NOTE: You may want to use the Advanced Color Management module to determine if more accurate color through the color space can be obtained by calibrating to the 75% Rec. 709 reference gamut. Using Color Management 52 Video Calibration using ChromaPure USING ADVANCED COLOR MANAGEMENT Overview The standard color management module allows the user to adjust the primary and secondary colors of the display to match as closely as possible the selected gamut. Unfortunately, the color performance of consumer displays is not entirely linear. To see what this means, think of the gamut not just in terms of six colors and a white point, but also think of the same six colors falling not just on the edge of the color space, but distributed throughout at different levels of saturation and amplitude. Saturation is just the distance from the white point. The selected gamut defines where a fully saturated color should fall relative to the white point on the outside edge of the selected gamut. However, we can also think of the same color closer to the white point, and thus less saturated. A perfectly linear display (assuming the HD gamut) would produce a fully saturated red at x0.640, y0.330. It would also produce a 50% saturated red half way towards the white point at x0.476, y0.330. Unfortunately, displays are generally not perfectly linear. A fully-calibrated red at 100% saturation may measure perfectly while a 50% saturation red shows substantial errors. These errors, if large enough, are easily visible. Nonetheless, they remain completely unmeasured by the standard CIE chart. The Advanced Color Management module measures these errors. At present the tool is for diagnostic purposes only. There is no commercially available CMS solution for consumer gear that can correct non-linear performance throughout the entire color space. Nonetheless, this tool is useful for determining how well a CMS functions and whether it is advisable to calibrate your display at, say, the 75% saturation point of the gamut. Doing so may result in lower average color errors when measured in the Advanced Color Management module. Using Advanced Color Management 53 Video Calibration using ChromaPure The saturation scale at 25% increments In addition to different levels of saturation, we can also think of the six primary and secondary colors at different levels of amplitude or stimulus. Just like we measure white at different levels of stimulus when calibrating the grayscale, we can also measure any color at different levels of stimulus as well. So too, just like white should remain x0.3127, y0.329 throughout the grayscale, a HD red should remain x0.640, y0.330 at different levels of stimulus. NOTE: You can use this module only if you have access to the proper test patterns. ChromaPure's built-in patterns offer a saturation and amplitude scale in 25% increments as do the HDG-4000 and DVG-5000 AccuPel external signal generators. The Advanced Color Management module is designed to measure these parameters. No commercially available color management system will correct these errors. However, if calibrating at full saturation results in significant errors in the rest of the color space, then you can try to calibrate at 75% saturation using the Color Management module. This may provide better overall results. For more information, refer to Using Color Management, p. 51. To measure the amplitude and saturation scale: 1 Click the Advanced CM button. The Advanced Color Management module will appear. Using Advanced Color Management 54 Video Calibration using ChromaPure 2 Select White, and ensure that Baseline Measurements is the selected Measurement Mode. 3 Click Measure. Continue to measure RGBYCM just as in the standard color management module. Each measurement returns values in xyY, absolute luminance in cd/m2, and dE. 4 Select Primary Saturations from the Measurement Mode dropdown box. 5 Measure red, green, and blue each at 25%, 50%, and 75% saturation. 6 Select Secondary Saturations from the Measurement Mode dropdown box. 7 Measure yellow, cyan, and magenta each at 25%, 50%, and 75% saturation. Using Advanced Color Management 55 Video Calibration using ChromaPure 8 You may also take similar measurements of amplitude in 25% increments. 9 When finished, you can share the results in several ways: • View and save a CIE Chromaticity chart • View and save a Saturations dE chart • View and save a Saturations Luminance chart • Export raw xyY and dE data in csv format • Generate an Advanced Color Management Report that can be saved in pdf format What do I look for? The goal of these measurements is mostly diagnostic. What you want to see is that the measured saturation level for each color is a close to the targets on the CIE chart and luminance chart as possible and the dEs for the colors are as low as possible across the entire range. Ideally, the colors will be as accurate inside the color space as they are at its outside boundary. Also, ideally the amplitude measurements will show very little deviation on the CIE chart and relatively constant dEs. The Advanced Color Management module will also help you to determine if perhaps you should calibrate your color using 75% saturation targets. You may use the standard Color Management module for this. For more information, refer to Using Color Management, p. 51. Using Advanced Color Management 56 Video Calibration using ChromaPure ADJUSTING COLOR DECODING Overview Use the Color Decoding module when your display lacks a full-featured CMS. Some displays have color decoding controls that allow you to independently adjust the brightness of each primary color and the hue of each secondary color. Most displays, however, only have a universal Color and Tint (or Hue) control. To adjust a display’s color decoding performance: 1 Click Color Decoding on the main navigation tool bar. The Color Decoding module will appear. 2 Take an initial measurement of White, Red, Green, Blue, Yellow, Cyan, and Magenta to get a baseline. The percentage error in RGB Color and RGB Hue will appear on the graph. RGB Color measures the percentage error of the luminance of each primary color. RGB Hue measures the percentage hue error of each secondary color (magenta-red hue, yellow-green hue, and cyanblue hue). 3 Display a red test pattern. 4 Select the Red radio button. 5 Click the Continuous checkbox, and then click Measure. ChromaPure will measure changes to the to the brightness of red in real time. Adjusting Color Decoding 57 Video Calibration using ChromaPure 6 Adjust the color decoding control or the main color control to achieve the smallest percentage error as possible. 7 Click Stop. 8 Repeat 4-7 for the other two primary colors. 9 Display a magenta test pattern. 10 Click the Magenta radio button. 11 Click the Continuous checkbox. 12 Click Measure. ChromaPure will measure changes to the red hue in real time. 13 Adjust the color decoding control or the main hue control to achieve the smallest percentage error as possible. Repeat 9-13 for the remaining secondary colors. What's the difference between the Color Decoding and Color Management modules? All modules measure the luminance of the primary colors and the hue of the secondary colors. However, there are three important differences between them. By default, the Color Management and Advanced Color Management modules use a fixed set of references. However, the references for the Color Decoding module are calculated from the measured values of the primary colors (a standard white point is assumed). The Color Management module uses lightness to display the percentage color luminance error, whereas the Color Decoding module uses relative luminance to display the percentage color luminance error. For more information on the difference between luminance and lightness, refer to Lightness and Luminance, p. 87. Depending on the selected color space, the Color Management module gives the calibrator three axes of adjustment • Hue, Saturation, and Lightness (HSL) • Red, Green, and Blue (RGB) • x, y, and Y (xyY) for each of the six primary and secondary colors. Color decoding offers only one axis of adjustment for the primary colors (luminance) and one axis of adjustment for the secondary colors (hue). These adjustments are the only ones offered because these are where the overwhelming majority of color decoding errors occur. Adjusting Color Decoding 58 Video Calibration using ChromaPure SETTING GAMMA Overview All displays have gamma, which is a number that reflects the relationship between the intensity of signal input relative to the intensity of measurable output. This relationship between input and output is not linear. There are two reasons for this. CRTs, the devices traditionally used for image reproduction and video production, have a voltage input to signal output relationship that is itself non-linear. Second, and quite coincidentally, human perception is nonlinear as well in approximately the inverse of CRTs. Thus, all display devices must exhibit gamma to accommodate both of these phenomenon. Gamma can be displayed as a non-linear curve on a graph plotting input and output or as a more or less horizontal line on a graph indicating the gamma function at each level of stimulus. By default, ChromaPure documents gamma in the latter way. Ideally, you would want a perfectly flat line somewhere in the 2.2-2.35 range. This indicates both that the gamma response is consistent at all levels of stimulus and that the gamma function is neither too high or too low. A gamma function that is too high will offer great image depth and deep blacks, but you will lose shadow detail and the image may appear “contrasty.” A gamma function that is too low will provide great shadow detail, but contrast will suffer and the image may lack depth. To measure and adjust gamma: 1 Click the Gamma button on the main navigation tool bar. The Gamma module will appear. Setting Gamma 59 Video Calibration using ChromaPure 2 Display a 100% white stimulus pattern. 3 Click Measure. ChromaPure will take a measurement and then automatically advance to the next level. 4 Display a 90% gray test pattern. 5 Click Measure. The application will take a measurement, return a gamma value for that level, and then automatically advance to the next level. 6 Setting Gamma Repeat steps 4-5 until you have finished measuring 10%. You may also take an additional readings at 5% increments by checking the desired 60 Video Calibration using ChromaPure boxes next to each level. Checking the gamma response at 5% in particular can help with precisely tuning shadow detail. NOTE: Only the values above 0% and below 100% stimulus have gamma. 100% is only used as a reference from which gamma at the other levels of stimulus are calculated. 0% is not measured at all. Displays offer three ways of adjusting gamma to achieve the flattest gamma response possible within the prescribed range. Adjust Brightness and Contrast Select from various gamma presets. Adjust the luminance output at each level of stimulus. You can use any of the these methods to adjust your gamma response. It all depends on what controls your display offers. If you put the Gamma module into continuous mode, you can see changes in real time to the gamma response at any level of stimulus. When the measurements are complete, you will have gamma values at each level of stimulus and an average gamma value. Setting Gamma 61 Video Calibration using ChromaPure MEASURING CONTRAST Overview Contrast—the difference between the luminance of the display’s black level and its peak output—is one of the most important indicators of image quality. There are two ways to measure contrast. Sequential Contrast: Otherwise known as on/off contrast, this indicates the difference between the black level of the display and its peak output when each is measured one after the other. Use a 0% and then a 100% white test pattern for this. Simultaneous Contrast: This indicates the difference between 100% black and 100% white when both are displayed at the same time. Use a checkerboard test pattern for this. Because the white squares will affect the black squares on a checkerboard pattern, simultaneous contrast is always considerably lower than sequential contrast. To measure sequential contrast: 1 You may want to take contrast readings both before and after the calibration. When taking a post-calibration reading, ensure that you have already properly set the display’s black level and white level. For more information about this, refer to Setting White and Black Level, p. 42. 2 Click Contrast on the main navigation bar. The Contrast module will appear. Measuring Contrast 62 Video Calibration using ChromaPure 3 Display a full black test pattern from a external disc. If you are using an external test pattern generator or ChromaPure’s own internal test patterns, click the Please select a pattern drop-down box in the upper right hand corner from which to select a full black test pattern. 4 Click inside the large black square on the left. A luminance value will appear in either fL or cd/m2. This is your display’s black level. 5 Display a full white test pattern from a external disc. If you are using an external test pattern generator or ChromaPure’s own internal test patterns, click the Please select a pattern drop-down box in the upper right hand corner from which to select a full white test pattern. A luminance value will appear in either fL or cd/m2. This is your display’s white level or peak output, and a number will appear below. This is your display’s sequential contrast. To measure simultaneous contrast: 1 Display a checkerboard test pattern using the drop-down list for test pattern generators or from an external disc. 2 Place your sensor on one of the black squares. 3 Click a black square. A luminance value will appear in either fL or cd/m2. 4 Place your sensor on one of the white squares. 5 Click a white square. A luminance value will appear, and a number will appear below. This is the display’s simultaneous contrast. NOTE: You can repeat this for as many or as few of the squares as you wish to measure, so long as you have measured at least one black and one white square. Any additional measurements will be averaged. Measuring Contrast 63 Video Calibration using ChromaPure USING AUTO-CALIBRATE Overview ChromaPure offers an auto calibration tool as an optional add-on to the main program. ChromaPure Standard users may purchase this add-on. For ChromaPure Professional users Auto-Calibrate is provided free of charge. This tool only works in conjunction with either the DVDO Duo or Lumagen Radiance family of external video processors. It allows the user to set some basic options and then just click a button and the system will fully calibrate the display and even generate a comprehensive calibration report without any additional user input. Calibrations take from 5-10 minutes to complete depending on the speed of the color analyzer you use. To use Auto-Calibrate: 1 Ensure that Auto-Calibrate is enabled. This requires a specific setting in the license file. If your license does not support Auto-Calibrate, then the Auto-Calibrate button will be grayed out. 2 Click the Auto-Calibrate button. A Welcome to ChromaPure Auto-Calibration window will appear. Using Auto-Calibrate 64 Video Calibration using ChromaPure 3 Select and initialize the meter you wish to use. TIP: If you wish to use meter correction, ensure that you do this now before the auto-calibrate session begins. For more information about meter correction, refer to Creating a Meter Correction, p. 35. 4 If you have not already done so, setup the desired Calibration Device. Auto-Calibrate currently supports either the DVDO Duo or the Lumagen family of processors. TIP: ChromaPure saves information about selected signal generators between calibration sessions. Thus, if in your previous session you setup the desired device, this should not have to be done again. 5 Select the calibration device. This should be the same device you setup in the previous step. 6 Click the Test Device button. If your calibration device has been successfully setup and selected, then a red test pattern will appear. 7 Manually adjust the brightness, contrast, and sharpness of your display. Clicking the relevant buttons will bring up the appropriate test patterns. Since these image parameters must be set by eye, they cannot be included in the automated session. 8 Click Next. The second ChromaPure Auto-Calibration window will appear. Using Auto-Calibrate 65 Video Calibration using ChromaPure 9 Select the desired calibration functions. If you select Color Gamut, then you must also choose the correct gamut from the Select Reference Gamut drop-down. 10 Select whether you wish the application to generate a calibration report when auto-calibrate has completed. 11 Click Start Auto-Calibration. The process will begin and display activity in the window below. You can cancel the session at any time. When it has completed, it will generate a calibration report (if you selected that option) and turn off the test patterns so normal viewing can continue. Using Auto-Calibrate 66 CHAPTER 4 CHROMAPURE POSTCALIBRATION PROCEDURES What’s Inside? Taking Post-Calibration Grayscale Measurements, p. 68 Taking Post-Calibration Color Gamut Measurements, p. 69 Running a Calibration Report, p. 70 QuickReports, p. 73 Calibration Tools, p. 74 ChromaPure Post-Calibration Procedures 67 ChromaPure Post-Calibration Procedures TAKING POST-CALIBRATION GRAYSCALE MEASUREMENTS Overview Taking measurements in the Post-Calibration Grayscale module works just like the Pre-Calibration Grayscale module. Its only function is to measure the results obtained from your calibration session. You can then compare the pre and post measurements in the calibration report. For more information about taking a grayscale measurement, refer to Taking Pre-Calibration Grayscale Measurements, p. 37. If you see any problems in the readings, then return to the White Balance and/or Gamma modules and make further adjustments. Taking Post-Calibration Grayscale Measurements 68 ChromaPure Post-Calibration Procedures TAKING POST-CALIBRATION COLOR GAMUT MEASUREMENTS Overview Taking measurements in the Post-Calibration Color Gamut module works just like the Pre-Calibration Color Gamut module. Its only function is to measure the results obtained from your calibration session. You can then compare the pre and post measurements in the calibration report. For more information about taking a color gamut measurement, refer to Taking PreCalibration Color Gamut Measurements, p. 39. If you see any problems in the readings, then return to the Color Management and/or Color Decoding modules and make further adjustments. Taking Post-Calibration Color Gamut Measurements 69 ChromaPure Post-Calibration Procedures RUNNING A CALIBRATION REPORT Overview Once you have completed your calibration session, it is useful to have a permanent record of the results. ChromaPure provides four calibration reports A simple one-page results report A multi-page comprehensive results report A settings report A customizable multi-page comprehensive results report in Microsoft Excel format. The results reports contain both raw xyY data and charts and graphs displaying the pre and post calibration performance of your display. To run a calibration report: 1 Click Calibration Report on the main navigation toolbar. A page will appear that allows you to select the desired report. 2 3 Click the desired report type. You can select: • Simple Calibration Report: This is internally generated and shows basic grayscale and gamut data only. • Detailed Calibration Report: This is internally generated and shows a wide variety of calibration data. • Calibration Settings Report: This is internally generated and shows the information you entered in the Settings module. • Excel Report: This is an externally generated report and requires you to have Microsoft Excel install on your PC. For those with ChromaPure Professional licences these reports can be customized to your specifications. Click Run Report. A printable calibration report will appear. You can then export the report pdf to make it sharable with others. Running a Calibration Report 70 ChromaPure Post-Calibration Procedures Interpreting the Calibration Report The calibration report summarizes data gathered from the calibration session. It includes several different sections, each showing before and after performance. Grayscale Performance: This section shows raw xy data, dE, and CCT for the grayscale. It also graphs the before/after dE performance. You should aim for grayscale results in which dE is no larger than 4.0 (CIELAB, CIE94, or CIE2000) or 5.0 (CIELUV). You can select your preference for which dE color difference model you wish to use. RGB Bar Chart: This section shows the same grayscale data as above, but breaks the results out by the contributions of red, green, and blue. A perfectly neutral white for the selected gamut will have 100% values for all three primary colors. Aim for no more than ± 4% RGB error. Color Temperature: This section again shows grayscale performance, but this time using Correlated Color Temperature (CCT) as the standard. A neutral shade of white is 6505k. Lower than that is too red and higher than that is too blue. CCT is a deprecated metric because the measurement is imprecise. This is because CIE never endorsed a specific method for calculating CCT (there are several) and, more importantly, it ignores the contribution of green. You can have two very different shades of white that share the same color temperature. For this reason, dE, RGB balance, or even the raw xy coordinates are all better measures of the color of white. Chromaticity Performance: This section shows the dE performance of the primary/secondary colors relative to the target gamut. You should aim for a post-calibration result in which the primary/secondary colors have a dE of no more than 1.5 (CIE94 and CIE2000), 4.0 (CIELAB), or 5.0 (CIELUV). Unless your display includes an effective color management system, you will unlikely be able to achieve results this good. Lightness, Saturation, and Hue Error: This section shows the same information as above, but breaks out the contributions to the before/ after color errors in terms of percentage errors in lightness, saturation, and hue. You should aim for no more than ± 2% error in any component. Unless your display includes an effective color management system, you will unlikely be able to achieve results this good. CIE Chart: This section shows a subset of the same information as above plotted on a familiar CIE chart. These charts plot saturation and hue errors only. The report includes the 1931 xy version, which is less perceptually uniform than the 1976 u'v' chart but more familiar to most users. Gamma: This section plots luminance performance of the display. This includes gamma, which is the display's ability to properly increase signal output as signal input increases. The relationship between them is summarized mathematically and referred to a gamma. You should aim for a gamma value that is a flat as possible in the range of 2.2-2.35. This section also shows the contrast and white level/black level performance of the display. For comfortable viewing you should aim for a Running a Calibration Report 71 ChromaPure Post-Calibration Procedures white level of 30–40 fL for flat panels, and 12–16 fL for front projection. The black level should be as low as possible without losing shadow detail. SMPTE recommends an on/off contrast ratio of no lower than 2000:1. Running a Calibration Report 72 ChromaPure Post-Calibration Procedures QUICKREPORTS Overview In addition to the standard reports you can run on your calibration session, ChromaPure also includes QuickReports within the application. These are available in the Pre/Post-Calibration Grayscale and Pre/Post-Calibration Color Gamut modules. They offer a simple and fast method for obtaining a quick snapshot of the pre and post-calibration data. To run a QuickReport: 1 From within the Pre/Post-Calibration Grayscale or Color Gamut modules, click the Quick Report button. A QuickReport will be generated from the data in the module. Export as Image 2 QuickReports Export as PDF or Word You can export the report as an image, PDF, or Word file. 73 ChromaPure Post-Calibration Procedures CALIBRATION TOOLS Sharing Data When you have completed your calibration, you may wish to share the data with others. Click one of the Save Image buttons found on several of the modules to save a graph to your local PC as an image file. Export the entire calibration to a session file. These files have a .calx extension and can be opened by any other ChromaPure user. Export xyY data from the Before/After Grayscale and Color Gamut modules in CSV format. This raw data can be opened by Excel. Generate a comprehensive calibration report. This can be printed and shared as hard copy or converted to PDF and then e-mailed or posted online. Importing and Exporting Calibration Data Overview It is important that you are able to export the results of a calibration session so you can open the data in ChromaPure later or share with other ChromaPure users. It is also useful to export raw calibration data to use with other data analysis tools or to share with those who are not ChromaPure users. To export a calibration session: 1 Click Export on the main navigation tool bar. An Export Results window will appear. Calibration Tools 74 ChromaPure Post-Calibration Procedures 2 Select XML Session File from the Save as type box. 3 Type a desired name for the file in the File name box. 4 Select a desired location in the Save in box. 5 Click Save. A file with the specified name will save in the specified location. It will have a .calx extension. You or any other ChromaPure user can subsequently open this file, view the data and associated charts, and run a report on the data. This file includes all of the basic calibration data, including customer information and calibration settings. NOTE: ChromaPure includes a fail-safe feature in case you forget to save the calibration data. Whenever you attempt to exit the program, you will be prompted to save a calibration file first. Also, if for whatever reason, the program shuts down abnormally, when you re-start, you will be prompted to restore the calibration data from the previous session. To export raw calibration data: 1 Click Export on the main navigation tool bar. An Export Results window will appear. Calibration Tools 75 ChromaPure Post-Calibration Procedures 2 Select CSV File from the Save as type box. 3 Type a desired name for the file in the File name box. 4 Select a desired location in the Save in box. 5 Click Save. A file with the specified name will save in the specified location. It will have a .csv extension. You can open this file format in Excel for data analysis. The file includes raw xyY data from the Pre/Post Grayscale and Color Gamut modules. All calibration information can be derived from these values. To import a session file: 1 Click Import from the main navigation tool bar. An Import window will appear. Calibration Tools 76 ChromaPure Post-Calibration Procedures 2 Navigate to the location where the desired ChromaPure .calx session file was saved. 3 Select the file, and then click Open. 4 ChromaPure will import all of the pre and post-calibration data from that saved session. TIP: You can also import a calibration session by simply doubleclicking a .calx file. ChromaPure will open and automatically load the information contained in that session. Also, get in the habit of saving all of your calibration data in a single place. Use some naming convention—such as date of calibration, name of client, or both—that will allow you to easily call up specific data from past calibration sessions. Calibration Tools 77 ChromaPure Post-Calibration Procedures Calculating Lumens for a Front Projector Overview The Lumens Calculator module should be used for front projectors to calculate the peak output of the projector by an illuminance or a luminance reading. You can input several data formats into the calculator, including lux lumens foot-lamberts cd/m2 In addition to providing the necessary data input, you must also provide information about your screen. Once all of the information has been supplied, you may calculate the output of your projector in the same four data formats listed above. To use the Lumens Calculator: Calibration Tools 1 Display a 100% white test pattern. 2 Either turn on an illuminance meter (such as the AEMC CA813) and place up against the screen facing the projector lens, or position a standard color analyzer facing the center of the screen with a minimal degree of offset. 3 Take a reading. The illuminance meter will read in lux, and the color analyzer will read in fL or cd/m2. 4 Make a note of the value returned from the reading. 5 Start the Lumens Calculator module. 78 ChromaPure Post-Calibration Procedures 6 Type the value you recorded in the Measurement Value field. 7 Select the correct Measurement Type (lumens, lux, fL, or cd/m2). 8 Type the screen size in inches. 9 Select the dimension in which the screen size is measured (diagonal or width). 10 Select the correct aspect ratio of the screen. 11 Select the gain* of the screen. 12 Click Calculate. 13 ChromaPure will return the equivalent value in: Calibration Tools • fL • cd/m2 • lumens • lux 79 ChromaPure Post-Calibration Procedures * Manufacturers routinely report gain figures that are inflated from the actual value. Raw Data Module Overview Use the Raw Data module for a wide variety of calibration tasks. You can take either single measurements or continuous measurements that appear in large xyY format. If you are using the Offset feature or a signal generator, be sure to click the radio button to indicate the type of measurement (WRGBCYM) that you plan to take prior to clicking Measure. The data you measure will appear in the grid on the right. You can export that data to a CVS file for analysis simply by clicking the Export button. Data Conversion Tool Overview You may have a need to do some data modeling of potential measurements of one or more displays. This involves providing sample xyY data to determine what performance images based on that data would provide. To support this, ChromaPure includes a Data Conversion tool. Simply provide your own xyY test data and this utility will convert it into several other color spaces, including: Calibration Tools XYZ Lab 80 ChromaPure Post-Calibration Procedures Luv RGB R’G’B’ You can also supply a sample test and reference color to obtain a dE value from the major dE formulas, as well as information about the percent of deviation from the test color shows from the reference color in lightness, saturation, and hue. To use the Data Conversion tool: 1 On the main navigation bar, click Data Conversion. The Data Conversion Utility will appear. 2 Type the xyY values of the color you wish to model. 3 Click Calculate. The corresponding equivalent values in the provided color spaces will appear. You can obtain different R’G’B’ values by selecting a different reference gamma. 4 To obtain color difference information, type xyY values in the Reference and Test boxes, and then click Calculate. dE information will appear along with information about percentage difference in lightness, saturation, and hue. Calibration Tools 81 CHAPTER 5 VIDEO CALIBRATION CONCEPTS What’s Inside? Color Wheel, p. 83 Dark Reading Requirements, p. 84 Reference Gamuts, p. 85 Understanding Delta-E, p. 86 Lightness and Luminance, p. 87 Video Calibration Concepts 82 Video Calibration Concepts COLOR WHEEL The primary and secondary colors, shown in degrees on the color wheel. Placement on the color wheel defines the hue of a color. Color Wheel 83 Video Calibration Concepts DARK READING REQUIREMENTS The Chroma 5 does not require a dark reading. The Spyder3 does not require a dark reading. The Display 2 and DTP-94 require a single dark reading at the beginning of the calibration session. The i1Pro requires an initial dark reading at the beginning and subsequent periodic dark readings throughout the calibration session. The Hubble requires an initial dark reading at the beginning and subsequent periodic dark readings throughout the calibration session. The Klein K-10 does not require a dark reading. The Minolta CS-200 does not require a dark reading. Reference spectroradiometers, such as the JETI and Photo Research units, automatically take dark readings as part of the measurement process. Dark Reading Requirements 84 Video Calibration Concepts REFERENCE GAMUTS SMPTE-C Red Green Blue Yellow Cyan Magenta White x 0.6300 0.3100 0.1550 0.4209 0.2306 0.3144 0.3127 y 0.3400 0.5950 0.0700 0.5067 0.3262 0.1606 0.3290 Y 0.2124 0.7011 0.0866 0.9134 0.7876 0.2989 1.0000 Rec. 709 Red Green Blue Yellow Cyan Magenta White x 0.6400 0.3000 0.1500 0.4193 0.2246 0.3209 0.3127 Red Green Blue Yellow Cyan Magenta White x 0.6400 0.2900 0.1500 0.4172 0.2197 0.3271 0.3127 Red Green Blue Yellow Cyan Magenta White x 0.6800 0.2650 0.1500 0.4248 0.2048 0.3424 0.3140 y 0.3300 0.6000 0.0600 0.5053 0.3287 0.1542 0.3290 Y 0.2126 0.7152 0.0722 0.9278 0.7874 0.2848 1.0000 y 0.3300 0.6000 0.0600 0.5018 0.3287 0.1576 0.3290 Y 0.2220 0.7067 0.0713 0.9287 0.7780 0.2933 1.0000 y 0.3200 0.6900 0.0600 0.5476 0.3602 0.1544 0.3510 Y 0.2095 0.7216 0.0689 0.9311 0.7905 0.2784 1.0000 EBU DCI Reference Gamuts 85 Video Calibration Concepts UNDERSTANDING DELTA-E Overview Delta-E (dE) is a measurement of color error relative to a known standard. Thus, the goal in calibration is to get the dE of the measured color as low as possible. There are several different dE formulas. CIELAB CIELUV CIE94 CIEDE2000 Each formula produces somewhat different results and has different tolerances. We recommend using CIE94, though CIELUV is a reasonable choice for grayscale. When using CIE94 or CIEDE2000 strive for a value of 1.5 or less (1.0 and below is visually perfect) for color and 4.0 or less (2.0 or less is visually perfect) for grayscale. If using CIELAB or CIELUV, strive for 4.0 or less for all readings. Understanding Delta-E 86 Video Calibration Concepts LIGHTNESS AND LUMINANCE Both are a measure of the intensity of light. Lightness is a non-linear, perceptually-weighted unit of intensity that is approximately the inverse of display gamma. Human vision is very sensitive to even small changes in the intensity of light under low light conditions, but less sensitive to similar changes under bright conditions. As the graph below shows, at only 18% of the total level of intensity we already perceive approximately half of the difference between black and peak output. Luminance is a linear unit of intensity that can be expressed in absolute or relative terms. Absolute luminance is expressed in raw cd/m2 or fL. Relative luminance is expressed as a number between 0.0-1.0, where 1.0 is equal to the absolute luminance of the white reference. The Color Management module measures lightness. The Color Decoding module uses relative luminance. The Pre/Post-Calibration Grayscale modules and the Pre/Post-Calibration Color Gamut modules use both relative and absolute luminance. One of the obvious consequences of the difference between lightness and luminance is that the difference in lightness between a bright color (green) and a dim color (blue) is much smaller than it would be if expressed in luminance (relative or absolute). Green luminance is approximately 71% of reference white, whereas blue luminance is approximately 8%—a ratio of nine-toone. However, the same difference in expressed lightness is a ratio of less than three-to-one. One way to think of this is that the intensity of green measures 9 times brighter than blue, but green only appears to the eye as 2.7 times brighter than blue. This is what is meant by the claim that our perception of the intensity of light is non-linear. Lightness and Luminance 87