1
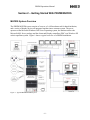
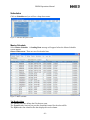
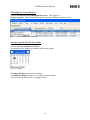
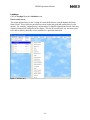
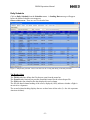
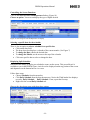
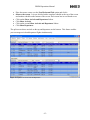
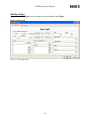
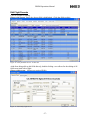
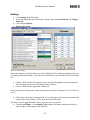
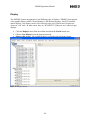
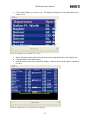
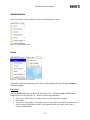
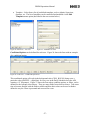
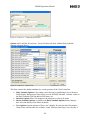
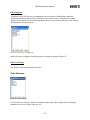
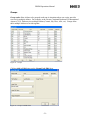
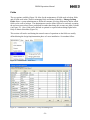
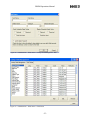
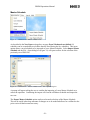
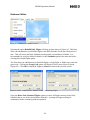
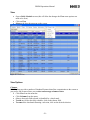
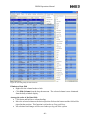
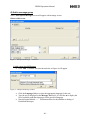
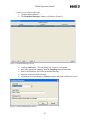
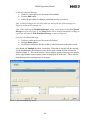
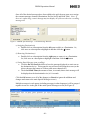
PRIZM Operations Manual PRIZM PRIZM USER MANUAL February 2007 -1- PRIZM Operations Manual Table of Contents Table of Contents ............................................................................................................................ 2 INTRODUCTION .......................................................................................................................... 3 Purpose .................................................................................................................................... 3 Overview ................................................................................................................................. 3 Section 1 - About IED..................................................................................................................... 4 Technology for the Future .......................................................................................................... 5 Our Location ............................................................................................................................... 5 Help Desk Support ...................................................................................................................... 5 Section 2 – Getting Started With PRIZM MUFIDS ....................................................................... 6 MUFIDS System Overview ........................................................................................................ 6 Section 3 - PRIZM Smart Client – System Administration ............................................................ 7 Introduction ................................................................................................................................. 7 Schedules .................................................................................................................................. 10 Master Schedule .................................................................................................................... 10 Lookups................................................................................................................................. 12 Daily Schedule ...................................................................................................................... 13 Add New Flight..................................................................................................................... 16 Edit Flight Records ............................................................................................................... 17 New/Open ............................................................................................................................. 18 Reports ...................................................................................................................................... 19 CAS ........................................................................................................................................... 21 Settings...................................................................................................................................... 22 Display ...................................................................................................................................... 24 Administration .......................................................................................................................... 26 Users ..................................................................................................................................... 26 Color Schemes ...................................................................................................................... 30 Groups ................................................................................................................................... 31 System Options ..................................................................................................................... 33 Fields ..................................................................................................................................... 34 Master Schedule .................................................................................................................... 36 Database Utilities .................................................................................................................. 37 View ...................................................................................................................................... 38 View Options ........................................................................................................................ 38 Logout ....................................................................................................................................... 41 Help ........................................................................................Error! Bookmark not defined.42 Section 4 – Appendix .................................................................................................................... 43 Appendix A ............................................................................................................................... 44 Special Messages - Introduction ........................................................................................... 44 A) Add a message group ....................................................................................................... 45 B) Edit a message group ....................................................................................................... 49 C) Delete a message group ................................................................................................... 49 -2- PRIZM Operations Manual INTRODUCTION The following documentation describes the operation and system administration of Innovative Electronic Designs’ PRIZM-ACS (Airport Communication System). In particular it describes the functionality and control of our Multiple User Flight Information Display (MUFIDS). For nearly three decades, IED has been the leader in developing vertical products designed and customized to meet the visual and audio requirements of the airport industry. Our product line can address the needs of a small regional airport such as Abilene Regional Airport or large megaterminal facilities such as JFK International or Philadelphia International Airport. IED has installed more airport systems than any other vendor in the USA. Our voice technology has far exceeded the concept of “airport paging”. It has evolved into a true Customer Information Provider. Our current systems provide automated multilingual support, emergency evacuation procedures, and passenger security checkpoint announcements which are fully approved and recommended by the new TSA standards. IED’s expertise in this technology is well-known. IED has several patents pending in this technology, which is a reflection of our commitment to supply the best and most advanced technology available to our customers. With the heightened security now prevalent and the ever-increasing passenger counts, more effective and efficient communications are required. Not only does the public demand clear and concise audio communications, but visual communications have also reached a new level of technology expectations. Historically, voice and visual information systems have been two separate entities. However, we are experiencing on a daily basis the requirement for audio and visual information to be combined and synchronized. IED is strategically positioned to provide the industry with a multi-sided product that can provide either or both as one integrated solution. IED has invested heavily in resources and technology to bring this fully integrated product to the public transportation industry. Purpose This document provides the operators and system administrators with clear and comprehensive instructions describing all the functions of the system. Getting Started deals with the primary functions necessary to operate the system on a daily basis. System Administration describes the remaining functionality of the system. Overview Section 1 – About IED This provides a brief description of IED and our capabilities. Section 2 – Getting Started This is a quick reference tutorial for performing basic operation functions of PRIZM. Section 3 – PRIZM Smart Client - System Administration This is a detailed description of all other functions of the system. -3- PRIZM Operations Manual Section 1 - About IED Innovative Electronic Designs, Inc (IED), located in Louisville, Kentucky, is a global leader in manufacturing, integrating and supporting commercial audio systems. For three decades, we have supplied the transportation industry with the hardware and software systems that have grown to become the ‘industry standard’ for airlines, airports and ground transportation facilities. Historically, IED’s systems expertise has been directed towards the design and development of Audio Announcement Systems for these types of large facilities. IED, the premier provider of Audio and Voice Announcement systems in the USA, has invested in providing a new level of communications by integrating graphical text information fully synchronized with our voice announcement technology. IED also worked with the Transportation Security Agency (TSA) to develop information screens for Security Checkpoints that assist the airport in expediting passengers through the process. These screens provide clear and concise information on the requirements for passengers to complete the check-in and boarding process. Along with the information screens, periodic messages are played advising passengers of specific processes that expedite the screening requirements. When these messages are played, the video screens scroll the same message in ADA-compliant text. Now that IED’s systems have graphic visual displays integrated with audio technology, flight information display has become a natural progression. IED has designed and developed its own IED-CIS (Communications Information System) product. This product is not just an expansion of our video display capability, but a ground-up development of a state-of-the-art Multiple User Flight Information Display System product. This product will not only meet the requirements of the most sophisticated FIDS user, it will be fully integrated with our audio and voice technology to create a system unparalleled in the industry. In 2002, IED reached a milestone in developing a Quality Management System by achieving ISO 9001 certification. This certification and the work leading up to it underscore IED’s commitment to constantly strive to provide its customers with quality products and services. Since the original certification, IED has passed several surveillance audits, bolstering our continuous efforts toward improvement. IED takes great pride in providing its customers with the highest quality and performance of any products in the industry. -4- PRIZM Operations Manual Technology for the Future The IED PRIZM-ACS (Airport Communications System) contains a complete suite of modules fully addressing the requirements of a MUFIDS system. This includes capability management; seamless integration to other systems, including legacy systems; e-commerce and advertising solutions; wireless data access; and a truly user-friendly screen design tool. Based on Windows® 2003 Server, PRIZM-ACS was designed from the ground up for both change and flexibility. PRIZM-ACS is a browser-based solution that utilizes the newest display technology developed for the Web – Extensible Markup Language/Extensible Stylesheet Language (XML/XSL)-based portable data transformation and transfer – to display flight information more rapidly and effectively than ever before. With the PRIZM-ACS family of products, IED offers integrated solutions for information display, screen design, integration to other systems, reporting, advertising and e-commerce, Web integration and wireless access. Our Location IED maintains its main office and manufacturing campus in beautiful Louisville, Kentucky. Our complex has approximately 46,000 square feet of offices, service and production areas encompassing multiple buildings. This includes a state-of-the-art training facility rarely found in companies our size. We also have regional sales offices in Tampa, FL; Chicago, IL; Los Angeles, CA and Montreal, Canada. Help Desk Support Our Help Desk facility provides on-call support 24 hours a day, 7 days a week for all hardware and software service issues. The Help Desk is staffed with customer support representatives who have extensive knowledge of our hardware and software products. They provide comprehensive support, from answering simple operational questions to resolving complex problems. -5- PRIZM Operations Manual Section 2 – Getting Started With PRIZM MUFIDS MUFIDS System Overview The PRIZM MUFIDS system consists of a server, a LAN-based network for data distribution, and a variety of display devices all integrated together into a common system. The server operates on the Microsoft Windows 2003 Server operating system, the database utilizes the Microsoft SQL Server package and the clients and Display controllers (DDC) use Windows XP as their operation system. Figure 1 shows a typical overview of a PRIZM installation. Figure 1 - Typical PRIZM MUFIDS System -6- PRIZM Operations Manual Section 3 - PRIZM Smart Client – System Administration Introduction Familiarity with the navigation methods of Microsoft Windows is recommended when working with the PRIZM Smart Client. Familiarity with all typical airline terms and abbreviations is also recommended. For instance, knowing the difference between Scheduled Time and Actual Time, what ADI means, etc. is recommended for being able to fully use the Client. To reference these terms, you will find a glossary of terms and abbreviations on page Error! Bookmark not defined.42. Logging onto the System Double-click on the PRIZM Client icon PRIZM Client.lnk on your computer screen. Observe the screen. This is the screen you will see for log-in. Figure 2 - Login Screen Enter your User Name. Press <TAB>. Enter your Password. Press <Enter> or click OK. (If you get a Log-in error, or do not have a User Name and Password, please contact your system administrator). -7- PRIZM Operations Manual Daily File Operation You are now signed onto the system. Observe the PRIZM backdrop screen. Across the top of the PRIZM backdrop screen you will see two Header Bars: the Title Bar and the Menu Bar. Figure 3 - PRIZM Client Backdrop The Title Bar and its elements: The PRIZM icon in the far left corner of the title bar provides a list of commands used to change the size and position of the application window or close it. 1. Program Title: The words Prizm Smart Client are displayed to the right of the PRIZM icon. 2. Minimize Button: The dash on the right side of the title bar shrinks the application window to a button that reads: Prizm Smart Client on the taskbar. 3. Maximize Button: The box to the right of the Minimize button enlarges the application window to fill all available screen space. 4. Close Button: The X on the far right side of the title bar closes both the open database and the PRIZM application. -8- PRIZM Operations Manual The Menu Bar and its elements: The menu bar is located immediately below the title bar. There are multiple menu options available. As in other Windows-based programs, the menus drop down to display commands. To display a menu, click on the menu option. Overview of Menu Selections/Options Schedules Master Schedules Daily Schedules Reports Plugins CAS (Courtesy Announcement System) (User name and password are required to access.) Settings Displays Administrative (This menu choice is only available to administrative personnel) View Logout Help -9- PRIZM Operations Manual Schedules Click on Schedules and you will see a drop-down menu. Figure 4 - Schedules drop-down menu. Master Schedule Select Master Schedule. A Loading Data message will appear before the Master Schedule screen appears. Observe this screen. There are now five header lines. Figure 5 - Master Schedule The Header Lines The Third header line defines the files that are open. The Fourth header line/tool bar provides functional control for the selected file. The Fifth header line identifies the data displayed in each column. - 10 - PRIZM Operations Manual Controlling the Screen Functions Click on the Show Arrivals and Departures listbox. (See Figure 6.) Choose an option. This will display the group or groups of flights you desire to view. Figure 6 - Master Schedules drop down menu Selecting a specific date for the schedule Click on the Show schedule as of listbox. The drop-down box displays a calendar of the current month: Figure 7 - Calendar To change the Date, choose the desired date. To change the Month, use the arrows at the top of the calendar. Click on a specific date to select or change the date. - 11 - PRIZM Operations Manual Lookups Click on Lookups from the Schedules menu. Observe this screen. This menu option allows for the viewing of certain fields that are used throughout the Prizm Smart Client. These fields are provided on various forms and grids and contain lists of valid options. For example, Language may contain entries for English, Spanish and French; Gate may contain a listing of all valid gates for the airport. This can be a useful tool, esp. for newer users, to be able to quickly check the values available for a particular data field. Figure 8 – Lookups menu - 12 - PRIZM Operations Manual Daily Schedule Click on Daily Schedule from the Schedules menu. A Loading Data message will appear before the Master Schedule screen appears. Observe this screen. There are now five header lines. Figure 9 - Sample Daily schedule. This screen allows for the viewing and editing of the Daily Schedule The Header Lines The Third header line defines the files that are open from the menu bar. The Fourth header line/tool bar provides functional control for the selected open file. The Fifth header line identifies the data displayed in each column. The first left-hand column heading of the screen, displayed (ADI), indicates whether a flight is an arrival or a departure. The second column heading displays the two or three letter airline code. (I.e. the AA represents American Airlines). - 13 - PRIZM Operations Manual Controlling the Screen Functions Click on the Show Arrivals and Departures listbox. (Figure 10) Choose an option. You now can display the type of flights desired. Figure 10 - Selecting Arrivals and Departures for display Selecting a specific date for the schedule There is also an option to select a schedule for a specific date. Click on the date field. The drop-down box displays a calendar of the current month. (See Figure 7) To change the Date, choose the desired date. To change the Month, use the arrows at the top of the calendar. Click on a specific date to select or change the date. Displaying Split Schedules PRIZM has the ability to display two schedules at once on the screen. This powerful tool is available to you in the PRIZM Client. Arrivals can be displayed on the top portion of the screen and departures on the bottom half or vice-versa. Follow these steps: Choose Schedules from the menu bar. Click Daily Schedule from the drop-down menu. Notice the Third header line displays two tabs: Daily Schedule Daily Schedule. If not, repeat the first step Right-click the second Daily Schedule tab. Observe the drop-down menu with these three options. Figure 11 – Splitting screen for multiple Daily Schedule displays - 14 - PRIZM Operations Manual Place the mouse cursor over the New Horizontal Tab option and click it. Observe the screen. It is now divided with a complete schedule at the top of the screen and another schedule at the bottom of the screen. Each screen has its own header rows. Click on the Show Arrivals and Departures listbox. Click Show Arrivals. Click on the second Show Arrivals and Departures listbox. Click Show Departures. The split screen shows arrivals on the top and departures on the bottom. This feature enables you to manage arrival and departure flights simultaneously. Figure 12 - Split screen of Arrivals and Departures - 15 - PRIZM Operations Manual Add New Flight Notice: Edit Daily Flight screen will appear with a heading of New Flight. Observe this screen Figure 13 - New Flight Screen - 16 - PRIZM Operations Manual Edit Flight Records Click on a flight for editing. Observe the screen. Notice the chosen field is highlighted. Click that field to edit it. Figure 14 - Daily Schedule Screen – In-line edit Aside from being able to edit fields directly, double-clicking a row allows for the editing of all fields associated with a flight. Observe this screen. (Shown are required fields) Figure 15 - Edit Daily Flight Screen - 17 - PRIZM Operations Manual When the selected field expects a typed entry, the field is highlighted. Type the new information into the highlighted field. Press <ENTER>. Editing is now terminated. The left and right <Arrow> keys allow the freedom to move back and forth within that field. A field with predefined selections will display a drop-down menu. These are the only selections available and can only be edited in those entries. A field that displays up or down arrows to its right allows you to increment or decrement the value in that particular field. ---Edit several fields at once in a complete flight record. Place the mouse pointer over the flight to be edited and double-click the mouse button on the flight. View the table displaying the fields of that specific flight. Click in any field on the screen and change as many fields as necessary. Click OK to save all changes. ---Adding Partners/Code Shares Observe the Screen in Figure 15 Notice the middle column: Partners/Code Shares Click the ‘…’ button. A screen will appear with a Field Lookup. Enter the airport code. Click OK to select or Cancel to exit this screen and return to the flight edit screen. Delete Flight Highlight the flight (row) you wish to delete. Press <Del> Click on Yes to delete the selected row or No to cancel. New/Open These menu options allow for the creation of an offline schedule. New allows an offline schedule to be created and saved while Open allows for an existing offline schedule (a work in progress, perhaps) to be opened for continued editing. The benefits of using offline schedules allow additions and changes to a schedule to be made without impacting the live Daily Schedule. This feature’s main purpose is to handle situations where automatic feeds from the airlines do not occur. When changes to occur airlines’ schedules, those changes can be input via offline schedules and later imported as a new Master Schedule (see section on the Administration menu for information on importing a new Master Schedule.) - 18 - PRIZM Operations Manual Reports In order to utilize this Menu choice, a printer should be available and identified by the Client Operating System. Click on Reports from the menu bar and you will see a drop-down menu. Notice, there are three choices of a Report you can create and print: Daily Schedule, Gate Utilization, and Master Schedule. Click on Daily Schedule Observe the Daily Schedule Report dialog box. Figure 16 - Report Control Dialog Box Notice the number of control options available for your selection. First option shows the range of dates for the report. Enter your beginning date and ending date. Second option is a set of Boxes. Choose Arrivals and/or Departures. Click on the listbox. Notice, your Selection is indicated by a check mark in the Box. Third option for this report allows you to control the sorting of the report: Click on the listbox. The drop-down menu displays selections in data to be included in the report. Notice the selections. Choose from: Arrival/Departure, Airline, Schedule, Gate, Claim areas, etc. - 19 - PRIZM Operations Manual Observe the Columns: Airlines and Column Gates. You can select some of or all of the Airlines and Gates to be included in the report. Click the checkbox next to the data elements to be included in the report. Notice your choices are indicated by a checkmark. You also have the Option to utilize the listboxes shown directly below each column. Click on each box to alternate between Check All and Uncheck All. Click the View Report button. The report will be generated and displayed on the screen for review. If the report is acceptable, a Printer icon will appear above the report. Click on the icon and the report will be printed out. Click Cancel to close this screen and return to the Client Menu. Use these procedures to print all reports. Each report has its own selection criteria based on the type of report. If a specific report is needed, PRIZM Client has a procedure for creating customized reports and adding it to the list. This process is covered elsewhere. - 20 - PRIZM Operations Manual CAS Courtesy Announcement System (User name and password are required to access this screen.) Figure 17 - CAS Screen - 21 - PRIZM Operations Manual Settings Click Settings on the Menu Bar. Notice the drop-down menu offers three options: User, User Conditional, and Change Password. Click on User Options Observe the screen. Figure 18 - Edit Settings Notice the columns to the left of the screen. Each field in the first column describes the function of a setting within the Schedule. The action for each function is provided in the field to the right of it. Choose a field from the first column. Notice the field is highlighted and a description of the field appears in the lower left-hand portion of the box. Choose a field from the right-hand column side. Notice the first two fields provide a drop-down menu to allow this setting to be True or False (on or off). Click on any one of the remaining fields. A box will appear with options to customize the design format with settings in Color, Font and Column Settings. The frame to the far right, Preview, allows you to preview your choices. Choose Load Theme. An Available Color window will appear with menu choices to make changes to the settings in the Schedule. - 22 - PRIZM Operations Manual Click OK to apply your choices or Cancel to close the window. Choose Default Settings. Click on Load to apply these pre-determined settings. Click OK to apply the changes or Cancel to exit the Settings screen. - 23 - PRIZM Operations Manual Display The MUFIDS System incorporates several different types of displays. PRIZM Client supports video graphic displays with LCDs and plasmas, LED character displays, and LCD character matrix displays. Any display can be viewed directly from your Client Screen. Displays are always in “real” time. In other words, they are “WYSIWYG” (What you see is what you get) displays. Click the Displays menu from the toolbar located on the Fourth header line. Choose View Displays from the drop-down menu. Observe this screen. All available displays are listed in the left-hand column. Figure 19 - Displays Screen - 24 - PRIZM Operations Manual Click on the display you want to view. The Display will appear in the right hand section of the screen. Figure 20 - Display Screen – Default view is 100% Notice the Zoom slider control located at the bottom right-hand side of the display area. Click and hold on the slider button. Slide the button to the left to shrink the display. Slide the button to the right to expand up to 100%. Figure 21 - Display Screen – Zoomed out to view full page - 25 - PRIZM Operations Manual Administration This menu choice is only available to users with administrative access. Figure 22 – Administration menu Users Figure 23 – Administration –Users menu The options under the Users menu allow for the adding/editing/deleting of Users, Templates, and User Groups. Edit Users Selecting Edit Users brings up the Users list (Figure 24). Clicking the Add or Edit buttons brings up the User form (Figure 25). Enter the following information: User Login - This is the User Name used to log into the Client at startup First Name Last Name / Description – If creating a generic user used by more than one person, leave the First Name field blank and enter a description for this user in this field, such as ‘Airport Staff Member’. - 26 - PRIZM Operations Manual Template – Select from a list of predefined templates, such as Admin, Supervisor, Operator, etc. The list of templates can be controlled and modified via the Edit Templates menu option (described in the next section below.) Figure 24 –Edit Users – User List Figure 25 – Add/Edit User form Conditional Options can be defined for each user. Figure 26 shows the form with an example of a conditional option. Figure 26 – Edit Users – Conditional Options list This conditional option will result in the background color (CELL_BGCOL) being set to a particular color (#80FFFF – a light blue) for every row in the Daily Schedule where the ADI contains a “d” (Departure). Figure 27 shows the form where condition options, or filters, can be defined for the currently selected user. There are many fields from which to choose. Take some time to become familiar with the fields available and how their values can be used to further define the way the Client is presented and accessed for a user. - 27 - PRIZM Operations Manual Figure 27 – Edit Users – Conditional Options form Options can be defined for each user. Figure 28 shows the form with the Daily Schedule Options selections shown. Figure 28 – Edit Users – Options form This form controls the display attributes for various portions of the Client’s interface. Daily Schedule Options is for setting values allowing or prohibiting a user to Insert or Delete flights, Background Colors for the rows in the Daily Schedule, Columns visible in the Daily Schedule, Roll On and Roll Off times, etc. Interface Options allows for changes to the menu bar’s colors to be made. Master Schedule Options is similar to the Daily Schedule Options but the changes here affect the display of the Master Schedule. User Options contains options to filter a user’s display for Arrivals and/or Departures, Group Codes (airlines) that are available, Login Timeout (which logs a user out after ‘x’ - 28 - PRIZM Operations Manual minutes of inactivity), and options to force the Daily and Master Schedule screens to be read-only as well as other options. Load Theme allows a pre-defined theme to be loaded that controls the display attributes of the various screens, such as font size, background colors, etc. Themes are defined in the Color Schemes menu option, described below. Default Theme will restore and display changes to the system default for the Client. - 29 - PRIZM Operations Manual Edit Templates Templates are an efficient way of maintaining various groups of settings that control the appearance and functionality of the Client for various types of users. Templates are simply groups of user options (as described immediately above) saved under a descriptive title, such as Administrators, Supervisors, etc. Figure 29 – Edit Users – Templates list Each of the above templates contains a group of settings as shown in Figure 29. Edit User Groups This feature is not implemented at this time. Color Schemes Figure 30 – Color Schemes Color schemes are simply a subset of Templates as they only allow setting values for display attributes such as row colors, font sizes, etc. - 30 - PRIZM Operations Manual Groups Group codes allow airlines to be grouped under one in situations where one carrier provides services for multiple airlines. For example, at the Greater Cincinnati/Northern KY International Airport (CVG), Delta services multiple airlines (Comair, Sky West, ASA, etc.) Groups allow those multiple airlines to be tied together. Figure 31 – Groups Clicking Add or Edit brings up the Group Code Edit form: Figure 32 – Group Code Edit form - 31 - PRIZM Operations Manual Add/Edit Group Code Enter the following data: Group Code (Only editable when adding a new Group Code) Line (name of servicing airline) Line Code (two-character code for the servicing airline) Ops Code (two-character code for the airline - optional) First Number (lowest numeric value for a flight number) Last Number (highest numeric value for a flight number) Image Type (Banner Image, Inline Image, Logo Image) Image File Name (Click the ‘…’ button for a File Open dialog box to select a filename. A thumbnail image will appear in the Image Preview frame.) Image Description Click Ok to save changes or Cancel to return to the Group Code list screen. - 32 - PRIZM Operations Manual System Options This screen allows for the setting of various values used throughout the entire Prizm system. Most of these values are set during initial installation and do not need to be modified. Others are set and used internally by various Prizm system services. Figure 33 – System Options form - 33 - PRIZM Operations Manual Fields The two options available (Figure 34) allow for the maintenance of fields used as lookup fields and of fields used in the Client for managing Daily and Master Schedules. Manage Lookup Fields allows a system administrator to define the contents of lookup fields and to define which fields can be used as lookups. The administrator can also define fields to be read-only, meaning the end users must select from a predefined list rather than being able to enter new data (Column 6 in Figure 35). Also, fields can be defined as optional or required when editing flights in the Daily or Master Schedules (Figure 36). This section will not be used during the normal course of operations as the fields are usually defined during the design/implementation phase of a new installation. Screenshots follow: Figure 34 – Administration – Fields menu Figure 35 – Administration – Fields menu – Lookup Field Management - 34 - PRIZM Operations Manual Figure 36 – Administration – Fields menu – Lookup Field Management - Edit Figure 37 – Administration – Fields menu – Field Values - 35 - PRIZM Operations Manual Master Schedule Figure 38 – Administration – Master Schedule menu As described in the New/Open section above on page Error! Bookmark not defined.18, schedules can be created and saved offline thereby not affecting the live schedules. This menu option allows a saved schedule to be imported as a new Master Schedule. Select Import Master Schedule and the File…Open dialog box (Figure 39) will open to allow for the selection of the previously saved XML file. Figure 39 – Administration – Master Schedule menu – File…Open dialog box A prompt will appear asking the user to confirm the importing of a new Master Schedule or to cancel the operation. Confirming the import will clear the old Master Schedule and import the new one. The Export Master Schedule option can be used to make a backup of the Master Schedule. This can be useful when large amounts of changes are to be made and allows for a rollback to the prior version if that becomes necessary. - 36 - PRIZM Operations Manual The Clear Master Schedule option should be used with care as it will remove all flights from the Master Schedule. - 37 - PRIZM Operations Manual Database Utilities Figure 40 – Administration – Database Utilities Selecting the option Rebuild Daily Flights will bring up form shown in Figure 41. This form allows an administrator to rebuild the flights in the Daily Schedule for the specified period of time. This will restore the Daily Schedule based upon the current Master Schedule. It is recommended to verify the Master Schedule via the Schedules option in the menu bar before selecting this rebuild flights option. The form allows an administrator to rebuild all flights, a single flight, or flights for a particular group code. Clicking the Group Code option will display a field to enter a specific group (Figure 42). Click OK to rebuild the flights or Cancel to return to the previous screen. Figures 41 and 42 – Administration – Database Utilities – Rebuild Daily Flights Select the Delete Non-Scheduled Flights option to remove all flights currently in the Daily Schedule that are not in the current Master Schedule. A prompt will appear asking for confirmation before continuing with the operation. - 38 - PRIZM Operations Manual View Open a Daily Schedule screen (this will allow the changes the View menu options can make to be seen) Click on View Observe the drop-down menu on the screen. Figure 43 – View menu View Options Columns PRIZM client provides a number of Standard Features that allow customization to the screen as you prefer. One feature allows you to select and arrange columns of data. Click View from the menu bar. Click Columns from the menu. Observe that each field selected is identified by a check mark. To add any field to the daily schedule, click on the chosen field. To remove the checkmark denoting a selection, click on the desired selection. - 39 - PRIZM Operations Manual Figure 44 - Selecting Daily file data elements Eliminate a Data field Right-click the column header to hide. Click Hide Column from the drop-down menu. The selected column is now eliminated from the daily schedule display. Arrange the order of the Data fields Click down and hold on a column heading. Move the selected column to the desired position. Release the button and the field will be placed in that position. This function is referred to as Drag and Drop. All selections and changes will be saved when you log out of the system. - 40 - PRIZM Operations Manual Allow Grouping of Columns Notice that you can drag a column heading. Drag - Click down and hold on a column heading and move the mouse cursor to where you want the column to be inserted. Drop - Release the mouse button to drop the column. Notice all rows from that group appear under the heading in the new location. Quick Edit This option is only allowed in Daily Flights. Figure 45 – Quick Edit This allows for the entry of a specific airline code and flight number to go to an edit screen where the information for that particular flight will be displayed for editing. See section above in Daily Schedules for more detail on adding/editing/deleting a flight. Add New Flight See section above in Daily Schedules for more detail on adding/editing/deleting a flight. Edit flight See section above in Daily Schedules for more detail on adding/editing/deleting a flight. Delete flight This will prompt to delete the currently highlighted flight. Click Yes to delete the flight or No to cancel the operation. - 41 - PRIZM Operations Manual Logout Click on this menu choice to log out of the client. A Login menu item will then appear to allow you log back on. -Or Click the X in the Title Bar to log off and close the PRIZM Client program completely. - 42 - PRIZM Operations Manual Glossary of Abbreviations and Terms AODB — Airport operational database ADI – Arrival or Departure Indicator BIDS — Baggage Information Display System CAS — Courtesy Announcement System CIS — Customer Information System Client – The terminal or workstation used by an operator to sign-in and operate the system. CUTE — Common Use Terminal Equipment DDC — Device display controller. Every display has an associated controller FAS — Flight Announcement System FIDS — Flight Information Display System GB — Gigabyte (approximately one billion bytes of data) GIDS — Gate Information Display System GUI — Graphical user interface IVR — Interactive voice response system LAN — Local area network LCD — Liquid crystal display LED — Light emitting diode MB — Megabyte (approximately one million bytes of data) MUFIDS — Multi-User Flight Information Display System MUSE — Multi-user system environment SNMP — Simple Network Management Protocol SQL — Structured Query Language VOIP – Voice over Internet Protocol (IP) WYSIWYG — What-you-see-is-what-you-get XML – Extensible Markup Language. Global standard for information exchange and displaying data. XSL – Extensible Stylesheet Language. XSL provides for the formatting of XML data. - 43 - PRIZM Operations Manual Section 4 – Appendix This page intentionally left blank - 44 - PRIZM Operations Manual Appendix A Special Messages - Introduction Prizm Smart Client has support for plugins. A plugin is typically a feature that has been customized for a particular location or a more generic feature that is not tied directly to the maintenance of Master and Daily Schedules. This section will describe the functionality of the Special Messages plugin. Click on Daily Schedule from the Schedules menu. Observe the screen. Figure 1 – Plugins Menu Clicking on the Special Messages menu option brings up the main screen for this plugin. Figure 2 – Special Messages Screen - 45 - PRIZM Operations Manual A) Add a message group Notice: Edit Special Messages screen will appear with an empty screen. Observe this screen Figure 3 – Edit Special Messages – Add screen 1) Add a new Special Message Click Add. A window like that shown below in Figure 4 will appear. Figure 4 – Add Special Message window Click the Language listbox to select the appropriate language for the text. Type the text to displayed in the Message Text field. Or click the to display the list of available predefined messages for the specified language. Note the button labeled: ‘…’ This button allows for the addition or editing of Predefined Messages: - 46 - PRIZM Operations Manual a) Add a new Predefined Message Click the button labeled ‘…’. The Predefined Messages window will display. (Figure 5). Figure 5 – Predefined Messages Screen Click the Add button. The edit dialog box (Figure 6) will appear. Select the appropriate language from the Language drop-down listbox. Enter a description to use for this predefined message. Enter the actual text of the message. Click Ok to save the changes or Cancel to ignore and return to the prior screen. Figure 6 – Edit Predefined Message Screen - 47 - PRIZM Operations Manual b) Edit a Predefined Message Click once on the grid row of the item to be modified. Click the Edit button. Follow the procedure for adding a predefined message (see above). Note: Double-clicking a row will select that row and set the text of the message (see Figure 4) to that of the selected row. Note: When entering the Predefined Messages screen via the button on the main Special Messages screen (see Figure 2), the Select button will be disabled and double-clicking on a grid row will open the Edit Predefined Message screen (see Figure 6). c) Delete a Predefined Message Click once on the grid row of the item to be deleted. Click the Delete button. Click Yes to confirm the deletion or No to cancel and return to the prior screen. As a default, the Enabled checkbox is turned on. When that is checked off, the message will be disabled and will not display on any device page; editing of fields will also be disabled (Figure 7). This can be used as a way to prepare groups of messages for specific device pages that do not necessarily need to be displayed all of the time. This saves time from deleting and recreating groups of messages. Figure 7 – Edit Predefined Message Screen - 48 - PRIZM Operations Manual Once all of the desired messages have been added to the grid, the next steps are to assign the common message elements (Destination, Do Not Scroll, and Hold Time). Note: If the text is rather long, a static message may not display all of the text whereas a scrolling message will. Figure 8 – Add/Edit Special Messages – Common Message Elements a) Assigning Destination(s) Double-click on a description from the left pane to add it as a Destination. Or, click once on a description to highlight it and then click the button. b) Removing Destination(s) Double-click on a description from the right pane to remove it as a Destination. Or, click once on a description to highlight it and then click the button. c) Setting Static Message (non-scrolling) Click the Do Not Scroll checkbox to have the message displayed as static text on the destination device. This means the text will not scroll along the screen (as the tickers shown at the bottom of 24-hour cable news channels do.) The default Hold Time (the amount of time, in seconds, that a static message will be displayed on the destination device) is 10 seconds. Click the Ok button to save all of the changes (or Cancel to ignore the additions and changes and return to the main Special Messages screen.) Multiple messages in each group (including messages in other languages) will be grouped together in one row in the grid on the main Special Messages screen (see Figure 9). Figure 9 – Multiple-message groups on the main Special Messages screen - 49 - PRIZM Operations Manual 2) Edit a Special Message Double-click the desired row of the grid (see Figure 3) or click once to highlight the row and then click Edit. Follow the procedure for adding a special message (see all of section A1 above). 3) Delete a Special Message Click once to highlight the row to delete. Click Delete. Click Yes to confirm the deletion or No to cancel and return to the prior screen. B) Edit a message group Double-click the desired row of the grid (see Figure 3) or click once to highlight the row and then click Edit. This will follow the same procedures as the A) Add a message group section above except that the grid on the edit window (see Figure 3) will contain all of the messages in the row selected. C) Delete a message group Click once to highlight the row to delete. Click Delete. Click Yes to confirm the deletion or No to cancel and return to the prior screen. - 50 -