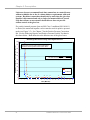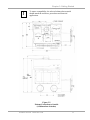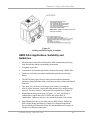
1
User’s Manual
XPert® Weigh Boxes
Models
5220300
5220320
5220321
5220330
5220331
Voltage, Frequency
115V, 60 Hz
230V, 50 Hz
230V, 60 Hz
100V, 50 Hz
100V, 60 Hz
To receive important product updates,
complete your product registration card
online at register.labconco.com
Labconco Corporation
8811 Prospect Avenue
Kansas City, MO 64132-2696
800-821-5525, 816-333-8811
FAX 816-363-0130
E-MAIL [email protected]
HOME PAGE www.labconco.com
Please read the User’s Manual before operating the equipment.
Copyright © 2007 Labconco Corporation. All rights reserved.
The information contained in this manual and the accompanying products are copyrighted and all
rights reserved by Labconco Corporation. Labconco Corporation reserves the right to make periodic
design changes without obligation to notify any person or entity of such change.
Warranty
Labconco provides a warranty on all parts and factory workmanship. The warranty includes areas of
defective material and workmanship, provided such defect results from normal and proper use of the
equipment.
The warranty for all Labconco products will expire one year from date of installation or two years
from date of shipment from Labconco, whichever is sooner, except the following;
•
Purifier® Delta® Series Biological Safety Cabinets and PuriCare® Lab Animal Research
Stations carry a three-year warranty from date of installation or four years from date of
shipment from Labconco, whichever is sooner.
•
SteamScrubber® & FlaskScrubber® Glassware Washers carry a two-year warranty from
date of installation or three years from date of shipment from Labconco, whichever is
sooner.
•
Blood Drawing Chairs carry a ten year warranty.
•
Carts carry a lifetime warranty.
•
Glassware is not warranted from breakage when dropped or mishandled.
This limited warranty covers parts and labor, but not transportation and insurance charges. In the
event of a warranty claim, contact Labconco Corporation or the dealer who sold you the product. If
the cause is determined to be a manufacturing fault, the dealer or Labconco Corporation will repair
or replace all defective parts to restore the unit to operation. Under no circumstances shall Labconco
Corporation be liable for indirect, consequential, or special damages of any kind. This statement
may be altered by a specific published amendment. No individual has authorization to alter the
provisions of this warranty policy or its amendments. Lamps and filters are not covered by this
warranty. Damage due to corrosion or accidental breakage is not covered.
Returned or Damaged Goods
Do not return goods without the prior authorization from Labconco. Unauthorized returns will not be
accepted. If your shipment was damaged in transit, you must file a claim directly with the freight
carrier. Labconco Corporation and its dealers are not responsible for shipping damages.
The United States Interstate Commerce Commission rules require that claims be filed with the
delivery carrier within fifteen (15) days of delivery.
Limitation of Liability
The disposal and/or emission of substances used in connection with this equipment may be governed
by various federal, state, or local regulations. All users of this equipment are required to become
familiar with any regulations that apply in the user’s area concerning the dumping of waste materials
in or upon water, land, or air and to comply with such regulations. Labconco Corporation is held
harmless with respect to user’s compliance with such regulations.
Contacting Labconco Corporation
If you have questions that are not addressed in this manual, or if you need technical assistance, contact
Labconco’s Customer Service Department or Labconco’s Product Service Department at 1-800-8215525 or 1-816-333-8811, between the hours of 7:00 a.m. and 6:00 p.m., Central Standard Time.
Part #5233703, Rev. ECO D470
TABLE OF CONTENTS
CHAPTER 1: INTRODUCTION
1
CHAPTER 2: PREREQUISITES
Support, Vibration & Preventive Requirements
Location Requirements
Exhaust and Blower Requirements
ISO Class 3 Definition
Electrical Requirements
Space Requirements
2
3
3
3
5
7
7
CHAPTER 3: GETTING STARTED
Unpacking the Glove Box
Installing the Glove Box on a Supporting Structure &
Work Surface
Connecting to the Exhaust System (If Applicable)
Installation of Gloves to the Glove Ports
Connecting the Electrical Supply to the Glove Box
Setting Exhaust Volume with Speed Control Adjustment
Validating the Glove Box
Summary of Performance Testing Results
8
9
10
10
12
13
13
14
14
CHAPTER 4: PERFORMANCE FEATURES AND
SAFETY PRECAUTIONS
Performance Features
Safety Precautions
16
16
19
CHAPTER 5: USING YOUR GLOVE BOX
Routine Daily Work Procedures
HEPA Filter Applications, Suitability & Guidelines
Definition of Terms
Appropriate Chemicals for Carbon Filters
Hazardous Misapplications for Carbon Filters with
Volatile Chemicals
Chemical Carcinogen Use with Carbon Filters
Prohibited Acid Use
21
21
23
24
24
25
25
26
CHAPTER 6: MAINTAINING YOUR GLOVE BOX
Routine Maintenance Schedule
Decontamination
Determining When to Replace HEPA Filters
How to Install New HEPA Filters
HEPA Filter Leak Test
Initial Certification
Re-Certification
Fluorescent Light Replacement
Motorized Impeller Replacement
Speed Control Replacement
Ionizer Fan Maintenance
27
28
29
29
29
31
33
33
33
34
34
34
CHAPTER 7: ACCESSORIZING YOUR GLOVE BOX
35
CHAPTER 8: TROUBLESHOOTING
41
APPENDIX A: REPLACEMENT PARTS
42
APPENDIX B: DIMENSIONS
44
APPENDIX C: SPECIFICATIONS
45
APPENDIX D: IONIZER FAN PERFORMANCE CRITERIA 46
APPENDIX E: PRESSURE & FLOW RATE CONVERSIONS 48
APPENDIX F: REFERENCES
49
DECLARATION OF CONFORMITY
50
Chapter 1:
Introduction
Congratulations on your purchase of a Labconco XPert® Weigh Box. Your
glove box provides personnel protection through superior containment rated
at Class 1 conditions for hazardous environments, per ISO 10648-2. The
XPert Weigh Box has two added features that provide an added benefit
during weighing procedures. These two features include the stainless steel
covered marble slab and the anti-static ionizer fan.
These glove boxes will effectively contain toxic or noxious particulates when
properly installed and operated. In positive or negative pressure operation
modes, the glove box can create an ISO standard Class 3 (ISO 14644-1) clean
air environment. This glove box uses two HEPA filters, rated at least 99.99%
efficient for 0.3-micron particles.
The XPert Weigh Boxes offer many unique features to enhance safety and
performance. To take full advantage of them, please acquaint yourself with
this manual and keep it handy for future reference. All glove box operators
must read and understand how HEPA filtered glove boxes operate; please
review Chapter 4: Performance Features and Safety Precautions before
beginning to work with this glove box. Even if you are an experienced user,
please review Chapter 5: Using Your XPert Weigh Box, which describes the
XPert features so that you can use the filtered glove box effectively and
safely.
Product Service 1-800-522-7658
1
Chapter 2:
Prerequisites
Before you install the glove box, you need to prepare your site for
installation. You must be certain that the area is level and of solid
construction. In addition, a dedicated source of electrical power should be
located near the installation site to power the glove box. The glove box
should be strategically placed in the lab to provide efficient workflow and
prevent operator interference from normal traffic patterns.
Carefully read this chapter to learn the requirements for your installation site:
•
The support, vibration and preventive requirements.
•
The location requirements.
•
The exhaust and blower requirements.
•
The electrical power requirements.
•
The space requirements.
Refer to Appendix B: XPert Weigh Box Dimensions for complete glove box
dimensions.
Refer to Appendix C: XPert Weigh Box Specifications for complete electrical
and environmental conditions, specifications and requirements.
2
Product Service 1-800-522-7658
Chapter 2: Prerequisites
Support, Vibration and Preventive Requirements
In the preparation of a glove box site, please consider the following:
•
A bench or stand that is rigidly mounted to the floor or fixed to the wall,
but not both, may be appropriate. 35" to 40" (889mm-1016mm) is
typical for standing height. (Labconco stands offered in Chapter 7 vary
in height from 33" to 40".)
•
The corners of a building typically have less vibration than the center,
which promotes analytical balance stability.
•
The bench typically should not contain any vibration-producing
equipment, such as shakers or pumps.
•
A marble slab with dampening pads placed within the enclosure is an
effective low cost means of controlling vibration and one is included
with the XPert Weigh Box.
Location Requirements
The XPert Weigh Boxes have been designed to rest on a typical 29"-30"
(737mm-762mm) deep work surface. The height should be 35"-40" for
standing position. Avoid placing the glove box in high traffic areas where
walking might disrupt the operator or experimentation.
Exhaust and Blower Requirements
The XPert Weigh Box, as manufactured, uses an integral motorized impeller
to pull room air through the inlet and exhaust HEPA filters and discharge the
clean air back into the laboratory. This negative pressure operation mode
pulls all internally-contaminated air through the exhaust HEPA filter. The
HEPA-filtered exhaust air is then forced out the top of the glove box. An
optional FilterMate™ Portable Exhauster with a carbon filter may be
installed downstream of the exhaust to adsorb low levels of organic fumes,
formaldehyde, or ammonia gases.
The HEPA-filtered exhaust air from the glove box can be exhausted to the
outside with the installation of a thimble exhaust connection kit and remote
blower listed in Chapter 7. As an option, if necessary, the built-in motorized
impeller can be wall mounted.
Labconco does not recommend a hard duct connection using the built-in
motorized impeller as the source of airflow out of the facility. This
creates a positive pressure in the exhaust duct.
Product Service 1-800-522-7658
3
Chapter 2: Prerequisites
Labconco does not recommend hard duct connections to remote blowers
without a thimble due to the air volume balance requirements with such
systems. Hard duct connections should only be used when the glove box
impeller is disconnected and only a single roof-mounted blower is used.
Note that reliance on an external exhaust blower does not provide
airflow control at the glove box.
If a positive internal pressure clean air ISO Class 3 condition (ISO 14644-1)
is desired, the motorized impeller can be rotated to work in positive pressure
mode (see Figure 3-3). See Chapter 7 for the Positive Pressure Conversion
Kit. See the following Negative and Positive Pressure Particle Test data in
the charts below. Both charts show the dilution rates of the glove boxes.
XPert Weigh Box Particle Testing under Negative Pressure
500
NOTE: Ambient Air Baseline Particle Count at 1 Minute
294132 Particles measuring 0.3 Micron detected within 1 Minute.
33296 Particles measuring 0.5 Micron detected within 1 Minute.
Number of Particles
(Per Cubic Meter Per Minute)
450
400
350
300
Airflow Testing Performed at 50 Dial Setting (61 CFM)
with Glove Box Under Negative Pressure.
250
200
150
> 0.3 Micron
100
> 0.5 Micron
60
50
24
14
0
0
1
0
0
1
2
3
13
1
4
5
6
12
11
1
1
7
11
0
8
9
11
0
10
9
0
11
6
0
12
13
14
4
0
15
0
0
16
0
17
18
Time (Minutes)
4
Product Service 1-800-522-7658
19
Chapter 2: Prerequisites
XPert Weigh Box Particle Testing under Positive Pressure
500
NOTE: Ambient Air Baseline Particle Count at 1 Minute
198671 Particles measuring 0.3 Micron detected within 1 Minute.
25473 Particles measuring 0.5 Micron detected within 1 Minute.
Number of Particles
(Per Cubic Meter Per Minute)
450
400
350
306
300
Airflow Testing Performed at 50 Dial Setting (61 CFM)
with Glove Box Under Positive Pressure.
250
200
139
150
> 0.3 Micron
100
> 0.5 Micron
50
18
0
12
0
0
0
1
2
8
2
3
0
1
4
0
5
6
Time (Minutes)
ISO Class 3 Definition
Airborne particulate cleanliness inside any clean air glove box or enclosure is
designated by ISO Class 3, which is equivalent to 35 particles 0.5 µm or larger
per cubic meter of air per minute as defined by ISO Standard 14644-1. ISO
Class 3 cleanliness is illustrated in the table below and is equivalent to Class 1
air conditions as defined by Federal Standard 209E or 1 particle 0.5 µm or
larger per cubic foot of air per minute.
Table 1-1 Selected airborne particulate cleanliness classes for cleanrooms and clean zones.
ISO
Maximum concentration limits (particles/m3 of air/minute) for particles equal to
classification and larger than the considered sizes shown below (concentration limits are
number (N)
calculated in accordance with 3.2 of Standard 14644-1)
0.1 µm
0.2 µm
0.3 µm
0.5 µm
1 µm
5 µm
ISO Class 1
10
2
ISO Class 2
100
24
10
4
ISO Class 3
1 000
237
102
35
8
ISO Class 4
10 000
2 370
1 020
352
83
ISO Class 5
100 000
23 700
10 200
3 520
832
29
ISO Class 6
1 000 000
237 000
102 000
35 200
8 320
293
ISO Class 7
352 000
83 200
2 930
ISO Class 8
3 520 000
832 000
29 300
ISO Class 9
35 200 000
8 320 000
293 000
Table 2-1 ISO Classification Number (N)
Product Service 1-800-522-7658
5
Chapter 2: Prerequisites
Additionally, the motorized impeller can also be used in a full recirculation
mode providing the operator with some control of the atmosphere chemistry
within the glove box. See Chapter 7 for the Recirculation Conversion Kit.
The airflow chart below represents typical operational data including air
changes per minute, exhaust volume, noise levels, main chamber static
pressures, and total system static pressures measured at the blower intake
(suction side). Exhaust volumes are reduced by 17% for products operating
on 100V, 60 Hz and reduced 34% for 100V, 50 Hz products.
Air Changes
per Minute
(acm)
1
1.5
3.3
4.7
6.2
7.2
7.7
0
Dial Setting
Min. Dial
20 Dial
40 Dial
50 Dial
60 Dial
80 Dial
Max. 100 Dial
Dial OFF
Exhaust
Volume
(CFM)
13
20
43
61
80
93
100
0
Noise Pressure
dB (A)
44
48
48
65
68
70
71
37
Static Pressure
Inside Glove Box
(inches of water)
.14
.17
.45
.68
.80
.89
.91
0
XPERT WEIGH BOX
Static Pressure Test Results
2.5
Static Pressure Inside Glove Box
(Inches of Water Column)
2.375
Total Static Pressure at Blower
Intake (Suction Side)
2
Negative Static Pressure
Total System
Static Pressure
(inches of water)
.34
.51
1.32
1.81
2.14
2.38
2.42
0
2.422
2.141
1.81
1.5
1.323
1
0.89
0.8
0.91
0.68
0.5
0.5072
0.45
0.3435
0.14
0
10
0.17
20
30
40
50
60
70
80
90
100
Airflow Volume (Cubic Feet per Minute)
6
Product Service 1-800-522-7658
Chapter 2: Prerequisites
For thimble-ducted glove boxes, the proper remote blower selection can be
determined from these exhaust requirements as the remote blower only needs
to be sized for the static pressure loss of the ductwork system. The thimble
ducted exhaust blower should be sized for 25% additional airflow. When
exhausting a glove box to the outside, it should be connected to a dedicated
remote blower.
Labconco offers accessory remote blowers listed in Chapter 7. Contact
Labconco for blower sizing assistance.
!
When a glove box is connected to a remote blower exhaust system, an
adjustable damper (or valve) should be installed in the duct to control the
airflow volumes properly. See Chapter 7 for Exhaust Dampers.
Electrical Requirements
Electrical services should be nearby for connecting the glove box, and
accessory equipment. The glove box is rated 115V, 8A or 230V, 4A or
100V, 8A. A convenience duplex outlet is located inside the glove box and is
rated for 115V, 5A or 230V, 2A or 100V, 5A. A four outlet power strip is
included with the 115V XPert Weigh Box for connection to the duplex outlet.
International outlet strips are listed in Chapter 7.
Space Requirements
The dimensions are shown in Appendix B: Dimensions. Provide adequate
space to the right of the transfer chamber for loading and unloading.
Product Service 1-800-522-7658
7
Chapter 3:
Getting Started
Once the site for your XPert Weigh Box is properly prepared, you are ready
to unpack, inspect, install, and validate your system. Read this chapter to
learn how to:
•
Unpack and move the glove box.
•
Set up the glove box with the proper supporting structure and work
surface.
•
Connect to an exhaust system if applicable.
•
Install the gloves.
•
Connect the electrical supply.
•
Set the exhaust volume with the speed control adjustment.
•
Arrange validation for the glove box.
!
8
Each XPert Glove Box weighs 275 lbs. (124 kg). The
shipping container allows for lifting with a mechanical lift
truck or floor jack. If you must lift the enclosure
manually, follow safe-lifting guidelines. Do not lift by the
upper sheet metal façade and front panel as damage can
occur to the plastic glove box liner (see Figure 3-1).
Product Service 1-800-522-7658
Chapter 3: Getting Started
Figure 3-1
Lifting Instructions
Unpacking the Glove Box
We recommend that you do not remove the glove box from its shipping
container until it is ready to be placed into its final location. Note: The
vibration isolating marble slab is packaged in a separate cardboard
carton attached to the main cardboard carton. Move the unit by placing a
flat, low dolly under the shipping skid, or by using a floor jack.
Carefully remove the carton shrink-wrap on the glove box and inspect it for
damage that may have occurred in transit. If damaged, notify the delivery
carrier immediately and retain the entire shipment intact for inspection
by the carrier.
!
THE UNITED STATES INTERSTATE COMMERCE
COMMISSION RULES REQUIRE THAT CLAIMS BE
FILED WITH THE DELIVERY CARRIER WITHIN
FIFTEEN (15) DAYS OF DELIVERY.
!
DO NOT RETURN GOODS WITHOUT THE PRIOR
AUTHORIZATION OF LABCONCO. UNAUTHORIZED
RETURNS WILL NOT BE ACCEPTED.
Product Service 1-800-522-7658
9
Chapter 3: Getting Started
!
IF ENCLOSURE WAS DAMAGED IN TRANSIT, YOU
MUST FILE A CLAIM DIRECTLY WITH THE FREIGHT
CARRIER. LABCONCO CORPORATION AND ITS
DEALERS ARE NOT RESPONSIBLE FOR SHIPPING
DAMAGES.
Do not discard the packing material until you have checked all of the
components and tested the glove box.
Installing the Glove Box on a Supporting
Structure and Work Surface
Exercise caution when lifting or moving the glove box.
When installing the glove box onto a work surface or benchtop, ensure that
the structure can safely support the combined weight of the glove box and
any related equipment. The work surface should be as wide as the glove box
to properly support it. The front of the glove box should be aligned with the
front of the work surface for optimal comfort. A height of 35"-40" (889mm1016mm) is appropriate for standing operation. Adjustable Height Base
Stands listed in Chapter 7 may be adjusted from 33"-40" (838mm-1016mm).
Connecting to the Exhaust System (If Applicable)
!
WARNING: The weight of any exhaust ductwork system
must be supported independently of the glove box
superstructure or damage may occur.
The exhaust system should be installed by a qualified
HVAC contractor.
The XPert Weigh Box has been manufactured to exhaust into the laboratory
in its standard configuration. For exhausting to the outside of the building
(see Figure 3-2), a Thimble Exhaust Connection should be ordered (see
Chapter 7). To remove chemical fumes and odors not trapped by the HEPA
filter, the glove box can be exhausted to the outside, or connected to an
accessory FilterMate Portable Exhauster with carbon filters (see Figure 3-2).
See Chapter 7 for accessories including: Thimble Exhaust Connection,
FilterMate Portable Exhauster, Positive Pressure Conversion Kit,
Recirucation Kit, Hard Duct Connection.
Consult Labconco Customer Service if you require help sizing a remote
blower for the exhaust volume and the duct work system (static pressure loss
listed in Chapter 2).
10
Product Service 1-800-522-7658
Chapter 3: Getting Started
!
To ensure compatibility, the selected exhaust duct material
should match the enclosure, procedures and chemical
applications.
Figure 3-2
Exhaust Connection to Outside
(All dimensions in inches)
Product Service 1-800-522-7658
11
Chapter 3: Getting Started
Figure 3-3
Positive Pressure Glove Box Configuration
Installation of Gloves to the Glove Ports
With thumbs up and right/left orientation, secure the gloves in place on the
glove ports by stretching the beaded cuff into the groove nearest the window.
Install the separate 8" diameter O-ring over the gloves and into the outer
groove of the glove port surface. Stainless steel band clamps are provided for
securing the separate O-ring into the glove port groove. Replacement gloves
and parts are listed in Appendix A with a decription in Chapter 7.
Figure 3-4
Glove Installation
12
Product Service 1-800-522-7658
Chapter 3: Getting Started
Connecting the Electrical Supply to the Glove Box
115V, 60 Hz; 100V, 50 Hz; or 100V, 60 Hz Models
Connect the power cord supplied to the IEC electrical supply plug on the
back of the glove box. 115V or 100V models are rated at 8 amps total.
The maximum circuit load for the interior electrical duplex is 5 amps.
230V, 50 Hz or 230V, 60 Hz Models
The same procedure applies for the 230V model except it is shipped without
a plug. Install the appropriate plug per local requirements. The 230V, 50 Hz
or 230V, 60 Hz models are both rated at 4 amps total. The interior
electrical duplex is rated at 2 amps.
Setting the Exhaust Volume with the Speed
Control Adjustment
For XPert Weigh Boxes, adjustment of the speed control provides control of
exhaust air volume and is located on the front panel. The exhaust air volume
should be adjusted at the low setting for weighing operations. (Consult your
Safety Officer for airflow recommendations for your application).
Working at the lowest exhaust volume appropriate for the application will
give the quietest operation. To increase the rate of air volume changes after
working in the glove box and to ensure proper cleaning, the speed control
should be set at a higher (50 to 100) dial setting for 5 to 10 minutes as
recommended by the operator’s predetermined protocol and the chart below.
The exhaust volume is increased by turning the speed control
counterclockwise.
Dial Setting
for Cleaning
Internal Air
Volume
Approximate
Air Volume
Changes per
Minute
Estimated
Total Exhaust
Volume
(CFM)
50
100
4.7
7.7
61
100
Product Service 1-800-522-7658
Minimum
Recommended
Times to
Clean Internal
Air Volume
(minutes)
10
5
13
Chapter 3: Getting Started
Validating the Glove Box
The XPert Weigh Box has been leak tested at the factory for HEPA filter and
main chamber pressure integrity. The HEPA filters should be leak checked
upon start-up and annually thereafter per the procedure in Chapter 6. Upon
start up, the main chamber pressure should be greater than 0.7" w.g. at
full blower speed to validate proper blower operation; if not, contact
Labconco for service.
!
NOTE: Main chamber pressure and smoke removal tests
should be performed frequently, per your established
quality system, to ensure safe performance.
Summary of Performance Testing Results
Labconco’s test results show that the XPert Weigh Box meets all the
performance criteria when operated at the following estimated airflow
volumes: 61 CFM or less for weighing with an analytical balance or handling
powders and 61 CFM or above for safe air clean up. The XPert Weigh Box
has been tested to the point of insufficient performance. In each case, the lack
of performance occurred at airflow volumes below Labconco’s minimum
recommended airflow volume for the specific operation. Contact Labconco
or visit www.labconco.com for complete performance test data. The
following provides a brief summary of the findings:
•
•
•
•
14
Smoke removal was tested at minimum 13-CFM to maximum 100-CFM
airflow volumes. The time required to completely purge the main
chamber of smoke varied from approximately 75 seconds at 100-CFM, to
420 seconds at 13-CFM.
During tracer gas containment tests with the glove box vented to the
outside, no gas was detected within the operator’s breathing zone.
Perimeter scans were also conducted during tracer gas testing of the
XPert Weigh Box. Under normal laboratory conditions the tracer gas
levels detected during perimeter scan testing were below ASHRAE 110
permissible limits (0.10 PPM average or less) and achieved Labconco
permissible limits (0.05 PPM average or less).
Sound levels “Noise Pressure” varied from 44 dB(A) at 13-CFM to 71
dB(A) at 100 CFM. If vented to the outside, the sound level will be
greatly reduced.
Airborne particulate cleanliness (measured under positive and negative
pressures) within the main chamber of the glove box exceeded ISO Class
5 conditions (equivalent to Class 100) and achieved ISO Class 3
conditions (equivalent to Class 1) at both minimum and maximum
operational airflow volumes.
Product Service 1-800-522-7658
Chapter 3: Getting Started
•
•
•
•
•
•
Glove box fluorescent lamp light levels “illumination” (measured across
the work surface) averaged 29.9 foot candles with room lights turned off
and 33.7 foot candles with the test lab’s overhead fluorescent lights
turned on.
Static pressure measured inside the glove box varied from negative 0.14
inch of water column at minimum 13-CFM to negative 0.91 inch of water
at maximum 100-CFM. The total system static pressure measured
between the exhaust filter and the blower varied from negative 0.34 inch
of water column at 13-CFM to negative 2.4 inches of water at 100-CFM.
The vibration level “displacement” measured on the work surface is
negligible at minimum through maximum airflow volume settings. The
measured level of displacement ranged from 0.59 x 10⁻⁵ inches to 1.45 x
10-5 inches.
The static electricity measured on the work surface and interior surfaces
of the glove box achieved a negligible level (below +/- 100V on any
surface) with the glove box blower operating at a min 13-CFM to max
100-CFM at 22% relative humidity. Test conditions included the ionizer
fan speed set to high output and the potentiometer within the ionizer was
adjusted slightly between positive and negative output in order to
maintain balanced ionization. The time required for sufficient
electrostatic decay will vary depending upon user application, moisture
levels within the supply air and the level of cleanliness within the glove
box interior. Anti-Static Ionizer Fan is sold separately (see Chapter 7).
The helium leaks ranged from 2 x 10⁻⁴ to 1 x 10⁻⁶ ml/sec with no
individual leak greater than the specified 1 x 10⁻³ ml/sec.
Balance stability testing results were excellent with no detectable
instability of an analytical balance to five decimal places and a top loader
balance to three decimal places. Test results were confirmed for various
sample weights with the glove box running at various blower airflow
settings.
Product Service 1-800-522-7658
15
Chapter 4:
Performance Features and
Safety Precautions
Performance Features
The XPert Weigh Box is designed to meet the needs of the laboratory
scientist, and provide superior particulate containment. The HEPA-filtered
XPert Weigh Boxes have been tested to effectively contain toxic and noxious
materials when properly installed and operated. Labconco engineered the
HEPA-filtered glove boxes to minimize the effects of turbulence. The
concentrations of particulate materials are predominantly removed from the
main chamber by controlling the frequency of main chamber air volume
changes. See Figure 4-1 to refer to a detailed description of the main
performance features.
1. Molded One-Piece Chemical-Resistant Glove Box Shell made of
medium density polyethylene, which provides superior chemical
resistance. The molded liner is seamless and easy to clean with coved
interior corners.
2. Versatile Vibration Isolated Motorized Impeller Isolation supports
eliminate the transfer of vibration to the work surface which is extremely
important in weighing operations with precision analytical and micro
balances. The impeller wheel is also dynamically balanced capable of a
minimum airflow of 13 CFM to a maximum of 100 CFM. Measured
displacement for vibration is less than 1.5 x 10⁻⁵ inches. Additional
unique features of the impeller include an optional Positive Pressure Kit,
a Recirculation Kit, and a Blower Wall Mount Kit (see Chapter 7).
3. HEPA Filter System consists of the inlet and outlet HEPA filters rated
99.99% efficient on 0.3 micron particulates. Inlet and outlet HEPA filters
are identical and include a test port for challenging the HEPA filter
integrity. An optional filter bag may be ordered for bag-in/bag-out filter
change procedures (see Chapter 7).
16
Product Service 1-800-522-7658
Chapter 4: Performance Features and Safety Precautions
4. Main Chamber Static Pressure Gauge provides an indication of HEPA
filter condition inside the glove box. Typically, HEPA filters should be
replaced when the static pressure gauge reading has increased two-fold.
The gauge can be changed to positive pressure for clean air glove box
operations by reversing the hose on the gauge to the positive pressure
connection. Positive Pressure Conversion Kit is sold separately (see
Chapter 7).
5. Glove Ports are 8" nominal size and molded into the main glove box
shell. The double grooves provide two points of restraint for safe
changing of the gloves.
6. Neoprene Gloves are supplied with the glove box, .015" thick, 30" long,
one pair, size 9 ¾. See Appendix A for replacements parts and Chapter 7
for a description.
7. Removable Framed Glass Window is 1/4" thick laminated safety glass
and is reinforced with a powder-coated steel frame. The removable glass
window frame provides access to the interior for loading large apparatus.
When removed, the window opening is 26.4" wide x 12.5" high (670mm
wide x 317mm high). The framed glass window is sealed with a onepiece molded neoprene gasket. See Chapter 7 for optional Acrylic
Viewing Window with Frame.
8. Fluorescent Lamp provides 30-40 foot candles of interior illumination
on the work surface. The lamp may be replaced from outside the glove
box. See Chapters 6 and 7 for replacement.
9. Control Panel consists of the main chamber static pressure gauge,
switches for the light, blower, duplex outlet, and speed control. The
speed control can vary the impeller speed from 13 to 100 CFM.
10. Work Surface is black chemically-resistant phenolic core and sealed to
the glove box floor. The black surface aids proper cleaning and provides
high visibility of powders. Phenolic core has superior chemical resistance
and stain resistance.
11. Interior Switched Duplex is located on the glove box ceiling. The
innermost outlet of the duplex labeled “AUX” is switch operated on the
front control panel. An additional power strip is included with 115V
models. See Chapter 7 for accessory power strips for international
electrical configurations. The interior duplex is rated at 115V, 5A or
230V, 2A or 100V, 5A.
12. Transfer Chamber Doors have a molded one-piece neoprene gasket
with a quick operating latch for user comfort. The counterweight doors
swing up to save space. IMPORTANT: Transfer chamber must have
an optional High Vacuum Sleeve if the chamber is converted for
vacuum operation. See Chapter 7.
13. Anti-Static Ionizer Fan is located on the ceiling of the glove box and
switch operated on the control panel. It circulates ionized air inside the
glove box to reduce static charge and is useful in weighing applications.
(See Appendix D for Ionizer Fan Performance Criteria.)
14. Balance Vibration Isolator includes a marble slab with isolator pads and
stainless steel cover to protect the porous marble. Provides stable
platform for sensitive weighing applications.
Product Service 1-800-522-7658
17
Chapter 4: Performance Features and Safety Precautions
Note: Items 13 & 14 are not shown
Figure 4-1
18
Product Service 1-800-522-7658
Chapter 4: Performance Features and Safety Precautions
Safety Precautions
1. It is the responsibility of the user to determine the suitability of this
product for the intended applications. Consult your Safety Officer.
2. Prior to using the glove box, check to make sure that the exhaust
blower is operating and that air is entering the glove box by observing
the static pressure gauge.
3. Use good housekeeping in the enclosure at all times. Clean up spills
immediately. Periodically clean glove box interior.
4. This product is not designed or intended to be explosion proof. It is
the responsibility of the user to determine and avoid lower explosive
limits and flammability of any enclosed chemicals or gases. The user
is also responsible for taking proper precautions to prevent equipment
damage or injury due to explosion or combustion.
5. Avoid the use of flammable gases or solvents in the glove box. Care
must be taken to ensure against the concentration of flammable or
explosive gases or vapors. Use of an open flame or exposure to high
heat should be avoided in the glove box as heat can damage the liner.
Heat may harm the HEPA filter and damage the filter’s adhesive.
6. Perchloric acid use in this enclosure is prohibited.
7. Radioisotope usage in the glove box should be cleared with your
Safety Officer.
8. A qualified certification technician should test the integrity of the
HEPA filters before the box is initially used.
9. The glove box should be recertified whenever it is relocated or
serviced and at least annually thereafter.
10. The use of safety goggles, protective clothing, and any other personal
protective equipment recommended by your safety officer should be
employed.
11. The HEPA filter provides personnel and environmental protection
from particulate matter. Should the blower be reversed to positive
pressure inside, this glove box may be used for operations requiring
product protection from environmental particulate contamination.
12. HEPA filters are only effective for entrapment of particulate matter.
Manipulations that generate gases or vapors from toxic chemicals or
radionuclides are not captured by the HEPA filters.
Product Service 1-800-522-7658
19
Chapter 4: Performance Features and Safety Precautions
13. The surface of the HEPA filter is fragile and should not be touched.
Care must be taken to avoid puncturing the HEPA filter during
installation or normal operation. If you suspect that a HEPA filter has
been damaged DO NOT use the glove box; contact a local
certification agency or Safety Officer.
14. The HEPA filters in the glove box will gradually accumulate airborne
particulate matter from the room and from work performed in the
glove box. The rate of accumulation will depend upon the cleanliness
of the room air, the amount of time the glove box is operating and the
nature of work being done in the glove box. With normal usage, the
HEPA filters will last two to five years before requiring replacement
(see Chapter 6).
15. Ensure that the filtered glove box is connected to an electrical service
in accordance with local and national electrical codes. Failure to do
so may create a fire or electrical hazard. Do not remove or service
any electrical components without first disconnecting the glove box
from electrical service.
16. Used HEPA filters may be hazardous waste. The user is responsible
for recording chemicals used and disposal of used filters.
17. Ensure only trained operators use the glove box. New users must
review the User’s Manual with emphasis on Routine Daily Work
Procedures in Chapter 5 and become familiar with the safe operation
of the glove box.
18. Only powders and particulates removed by HEPA filters are
appropriate for use in this glove box. Vapors and other gases should
be exhausted to the outside or adsorbed with the use of an accessory
FilterMate Portable Exhauster equipped with carbon filters. See
Chapter 7.
19. Leave the impeller on for at least 5-10 minutes at 50%-100% speed
after work in the glove box has been completed to purge the interior
of containments.
20. If a chemical, powder or particulates are spilled on the work surface,
DO NOT switch off the blower until all traces have been removed.
21. Tag glove box with appropriate warning if filters have been removed
or the glove box requires servicing.
22. If the blower fails during use, processes should cease and the area
should be vacated. Inform your Safety Officer immediately.
23. Consult your Safety Officer before removing any hoses to the static
pressure gauge or exhaust hoses as they may be contaminated.
20
Product Service 1-800-522-7658
Chapter 5:
Using Your Glove Box
Now that the installation of your glove box is completed, you are ready to use
your XPert Weigh Box.
Read this chapter to learn about:
•
Routine Daily Work Procedures
•
Appropriate HEPA Filter Applications, Suitability and Guidelines
•
Carbon Filter Exhaust Applications
•
Definition of Terms
•
Appropriate Chemicals for Carbon Filters
•
Hazardous Misapplications for Carbon Filters
•
Chemical Carcinogen use with Carbon Filters
•
Acid Use
Routine Daily Work Procedures
Planning
•
Thoroughly understand procedures and equipment required before
beginning work.
Start-up
• Consult your Safety Officer for personal protective equipment
recommendations.
•
Turn on exhaust system and light.
•
Allow the enclosure to operate for 2-5 minutes at 50-100% blower
speed.
Product Service 1-800-522-7658
21
Chapter 5: Using Your Glove Box
Loading Materials and Equipment (see Figure 5-1)
•
Load only the materials required for the procedure. Do not overload
the glove box.
•
Be aware that gloves will inflate when the glove box is operated
under negative pressure. Ensure items in the glove box will not
obstruct the movement of the gloves.
•
After loading, wait 2-5 minutes at 50-100% blower speed to purge
airborne contaminants from the work area before beginning
procedures.
Work Techniques
• Segregate all clean and contaminated materials in the work area.
Final Purging (see Figure 5-1)
• All open trays, weigh vessels or containers must be sealed before
being removed from the glove box.
•
Objects in contact with contaminated material must be surface
decontaminated before removal from the glove box.
•
The interior surfaces should be cleaned per user’s protocol.
•
Upon completion of work, the glove box should be allowed to operate
for 5 minutes undisturbed at 100% speed or 10 minutes at 50% speed
to purge and dilute airborne contaminants from the work area.
•
After purging the main chamber, the transfer chamber should also be
purged for 5 minutes at 100% speed or 10 minutes at 50% speed with
the inner door open, before removing sealed material.
Shutdown
22
•
Turn off the exhaust system and light.
•
Keep outer door closed when not in use.
Product Service 1-800-522-7658
Chapter 5: Using Your Glove Box
Safety Note: Must seal and wipe down all
chemical containers.
Figure 5-1
Loading and Final Purging Technique
HEPA Filter Applications, Suitability and
Guidelines
•
Microbiological materials and hazardous solids containment protecting
only the operator and the surrounding environment.
•
Weighing of powders.
•
Containment of hazardous particulates and powders using a HEPA filter.
•
Powder or particulate procedures traditionally performed on an open
bench.
•
The HEPA filtered glove box provides personal and environmental
protection from particulate matter, hazardous powders and microbiological
materials.
•
This glove box can be used for sample protection by reversing the
blower airflow direction, causing the main chamber to be under positive
pressure. Positive Pressure Conversion Kit is required (see Chapter 7).
•
Manipulations that generate gases or vapors, i.e., toxic chemicals or
radionuclides, require the use of a HEPA and carbon filter in
combination. Otherwise the glove box should be ducted to the outside.
•
Each filtered glove box is provided with two HEPA filters. Follow the
HEPA Filter change procedure in Chapter 6 for disposal instructions.
For microbiological materials, follow the Decontamination Procedure in
Chapter 6 for disposal instructions.
Product Service 1-800-522-7658
23
Chapter 5: Using Your Glove Box
Definition of Terms
NIOSH – National Institute for Occupational Safety and Health/Mine Safety
and Health Administration. (U.S.A.)
TWA – Recommended Exposure Limits expressed as a Time Weighted
Average. The exposure limit for that chemical for up to a 10-hour workday,
40 hours a week. Expressed in units of parts per million or milligrams per
cubic meter.
Odor Threshold – The value in parts per million or milligrams per cubic
meter for which one might expect to smell a chemical’s presence in the air.
This value is very subjective and detection will vary with the sensitivity of
one’s nose. The period of time until the odor threshold is reached in the
exhaust stream can be estimated from Labconco exclusive computerized filter
modeling program. Contact Labconco on carbon filter life for specific
applications. See Chapter 6.
Saturation Level or Time – There is a limit to the amount of chemical that
can be adsorbed by activated carbon, or neutralized by chemically-treated
carbon. Once the capacity of the carbon is reached, it is considered to be
saturated and will adsorb (or neutralize) no further material; the outlet
concentration of the chemical will equal the inlet concentration from that
point until the filter is replaced. (Note that the capacity of activated carbon is
not a constant, but varies with the inlet concentration). Labconco Technical
Specialists can determine with the computerized carbon-modeling program
the estimated time saturation for a particular chemical. When using a HEPA
filter in all filtered glove boxes or in combination with a carbon filter, the
speed control will need to be increased to allow for HEPA filter loading.
IDLH (Immediately Dangerous to Life and Health). An atmosphere that
poses an immediate hazard to life or produces immediate irreversible health
effects. IDLH concentrations should not be approached in the glove box.
Appropriate Chemicals for Carbon Filters
Below is a general set of rules to determine appropriateness of chemical
usage.
!
Selected organic chemicals considered to be occupational
carcinogens by NIOSH can be used in the filtered glove
box with carbon filters under rigid restrictions. See
separate discussion on carcinogens for special instructions.
Organics must have time weighted exposure limits (TWA) of 1 PPM or
greater.
Chemicals must have a detectable odor at concentrations below the TWA for
the chemical.
24
Product Service 1-800-522-7658
Chapter 5: Using Your Glove Box
Chemicals must be designated by NIOSH guidelines as acceptable for use
with chemical cartridge-type respirators (the exception is formaldehyde and
ammonia/amines, which use impregnated carbon). Chemicals not listed by
NIOSH in the Pocket Guide must be approved by Labconco Product
Specialist (or Engineering).
Inlet concentration must never exceed the IDLH (Immediately Dangerous to
Life and Health) concentrations.
Chemicals having a recommendation by NIOSH of at least “Escape
GMFOV” (Gas Mask Full-Face Respirator).
When evaporating a mixture of chemicals, the chemical having the lowest
TWA will be used to determine if the mixture meets the guidelines.
Call a Labconco Product Specialist at 1-800-821-5525 for assistance in
chemical appropriateness.
Hazardous Misapplications for Carbon Filters
with Volatile Chemicals
There is one scenario where the accessory FilterMate carbon filter
misapplication would be a part of a hazardous condition. If the user
continues to operate the glove box with FilterMate Portable Exhauster with
any of the following conditions, a potentially hazardous condition will exist:
1. The inlet concentration of vapors is greater than the TWA.
2. The carbon filter becomes saturated.
3. The ventilation of the room is insufficient to dilute the exhaust of the
enclosure to below the TWA for the chemical.
When the inlet concentration is greater than the TWA, extra measures must
be taken to monitor the filter and number of room air exchanges.
Chemical Carcinogen Use with Carbon Filters
Selected carcinogens may be used safely with accessory FilterMate carbon
filters under the following restrictions.
!
The use of a ventilated glove box with ducting to the
outside is always the preferred method when working with
carcinogens. The carbon filters should only be used, as a
last resort, when venting to the outside is not an option.
The potential carcinogens are listed in the NIOSH Pocket Guide to Chemical
Hazards as “Ca.” Each potential carcinogen must have a TWA of 1 or
greater; have minimum respirator recommendation of Escape GMFOV, and
an odor threshold significantly lower than the TWA for the chemical.
Product Service 1-800-522-7658
25
Chapter 5: Using Your Glove Box
The inlet concentration or the evaporation rate of the chemical must never
exceed the TWA for the chemical.
Consult a Labconco Technical Specialist for estimated saturation life. See
Chapter 6 for an example of estimating saturation life based on Labconco’s
chemical guide.
Prohibited Acid Use
The XPert Weigh Box motorized impeller and internal metal parts must not
be exposed to mineral acid use. No exceptions are permitted, as the glove
box life span will be limited with acid use.
NOTE: If mineral acids are used with the XPert Weigh Box, Labconco
makes no claims about life span and warranties will become
void.
26
Product Service 1-800-522-7658
Chapter 6:
Maintaining Your Glove Box
Review this chapter on maintenance for the following:
1. Routine maintenance.
2. Decontamination.
3. Determining when to replace the HEPA filters.
4. How to install new HEPA filters.
5. HEPA filter leak test.
6. Initial certification.
7. Re-certification.
8. Fluorescent light replacement.
9. Motorized impeller replacement.
10. Speed control replacement.
11. Ionizer fan maintenance.
Product Service 1-800-522-7658
27
Chapter 6: Maintaining Your Glove Box
Routine Maintenance Schedule
Weekly
•
Wipe down the interior surfaces of the glove box with a disinfectant
or cleaner, depending upon the application.
•
Using a damp cloth, clean the exterior surfaces of the glove box,
particularly the front and top, to remove any accumulated dust.
•
Operate the exhaust system, noting the airflow through the glove box
to effectively remove a source of visible smoke.
Monthly (or more often as required)
•
Chart the operating static pressure at a typical speed control setting.
Change HEPA filters when the static pressure increases two-fold or
speed setting increases two-fold. Guardian™ Jr. Airflow Monitors are
available for constant monitoring (see Chapter 7).
•
While the glove box is filled with the contaminant gas, test filter
condition of accessory FilterMate carbon filters using the appropriate
gas detector tube at intervals of 20% of the total estimated time. The
exception to the 20% recommendation is formaldehyde or any
carcinogen or suspected carcinogen. These hazardous chemicals must
be checked at least every 10% of the total estimated time. Gas
detector tubes for the specific chemicals that are being used in the
glove box can be obtained from your laboratory supply dealer (refer
to FilterMate manual).
•
Replace accessory FilterMate carbon filters when chemical
breakthrough is indicated by odor, time, detector tube, or for some
chemicals, analytical instrumentation.
HEPA
Accessory
FilterMate
Carbon
Accessory
FilterMate
Carbon
Annually
28
•
Replace the fluorescent lamps.
•
Have the glove box re-certified by a qualified certification technician.
See Certification and Recertification in Chapter 6.
Product Service 1-800-522-7658
Chapter 6: Maintaining Your Glove Box
Decontamination
When used in conjunction with microbiologicals, the glove box should be
decontaminated with formaldehyde gas before:
•
Performing maintenance work in contaminated areas
•
HEPA filter changes
•
Moving the glove box to a new location
•
Changing research programs
The procedures for performing a gaseous decontamination are thoroughly
outlined in the U.S. Department of Health, Education and Welfare booklet
entitled Formaldehyde Decontamination of Laminar Flow Biological Safety
Cabinets, available from NIH, Division of Safety, Bethesda, MD 20892, call
301-496-2801.
Determining When to Replace HEPA Filters
The HEPA filters in the filtered glove boxes gradually accumulate airborne
particulate matter and powders from the enclosure and room. The rate of
accumulation will depend upon the cleanliness of the room air, the amount of
time the enclosure is operating, and the nature of work being done in the
enclosure. In typical installations and usage, the HEPA filters will last two to
five years before requiring replacement. Replace HEPA filters if the speed
control is adjusted to full speed or if the normal operating speed and/or static
pressure is double the original starting point. Replace HEPA filters if it fails
the HEPA Filter Leak Test in Chapter 6.
How to Install New HEPA Filters
The XPert Weigh Boxes include a true bag-in/bag-out filter disposal system
for safely removing the HEPA filter and protecting the worker from toxic
powders and particulates (see Figure 6-1, Filter Changing Diagram). The
accessory bags can be ordered from Labconco (see Chapter 7). Two bags
will be required for each HEPA filter for a total of 4 each to complete the
change process. For your safety, wear appropriate personal protective
equipment during the change of HEPA filters. If working with microbiologicals, use the decontamination procedure referenced above. (Consult
your Safety Officer before performing filter changes).
1. Turn the glove box OFF. Refer to Appendix A for replacement parts
and Appendix B for dimensions.
2. Loosen the six filter nuts that secure each HEPA filter.
3. Place the accessory bag over the HEPA filter and seal to the filter
housing.
Product Service 1-800-522-7658
29
Chapter 6: Maintaining Your Glove Box
4. Place both arms in the rear gloves of the bag, and carefully draw the
HEPA filter out of the glove box. Rest the HEPA filter on the floor,
table or cart. Remove arms from bag gloves.
5. Create two seals between the glove box housing and the old HEPA
filter. Seals can be heat sealed or sealed with tie wraps. Cut off the
bag between the two seals and leave the bag stub on the access port to
the glove box.
6. Place the new HEPA filter in another new bag. Then place the new
bag with the new HEPA filter over the old bag stub and onto the
glove box filter housing.
7. Carefully remove the old bag from the filter housing using the single
glove near the access port. Draw the old bag and stub into the single
glove and turn the glove inside out. Double seal this glove on the
contaminated bag stub inside. Remove the bag and dispose of
properly.
8. Carefully install the new HEPA filter and uniformly tighten the six
filter nuts until the HEPA filter gasket is compressed 50%.
9. Turn the glove box ON and proceed to the HEPA Filter Leak Test in
Chapter 6.
Figure 6-1
HEPA Filter Changing Diagram
30
Product Service 1-800-522-7658
Chapter 6: Maintaining Your Glove Box
HEPA Filter Leak Test
Purpose
This test is performed to determine the integrity of the HEPA filter(s), the
filter housing, and the filter mounting frames. The leak test is to be done by a
qualified technician with calibrated equipment. Reference Leak Testing and
Photometer scanning from the Institute of Environmental Services (IES-RPCC001.3)
Equipment Required
1. An aerosol photometer ATI model 2D, 2E, 2G or equivalent. Air
Techniques Hamilton Associates inc. 11403 Cron Ridge Dr. Owings
Mills, MD 21117
2. One aerosol generator of the Laskin nozzle(s) type. An aerosol of
mineral oil or suitable liquid shall be created by flowing air through it.
The compressed air supplied to the generator should be adjusted to a
pressure as indicated in the procedure. Air Techniques Inc. Model TDA4A or equal.
3. Mineral oil (Labconco P/N 1491400).
4. Sampling Nozzle, Rectangular 1/2" x 3-1/4", Air Techniques, Inc.
Procedure
When Using the ATI 2G Photometer
NOTE: Because the downstream side of the HEPA filters cannot be
scanned, a downstream average must be taken.
1. Turn on the photometer and allow it to operate for a minimum of 5
minutes. Leave the valve in the “CLEAR” setting.
2. Press the “ENTER” keypad. Press the “REF” keypad.
3. The display will show “P1” or “P2” for approximately 1 second, and
then display a numerical value.
4. Using the “!” or “"” keypads, increase or decrease the numerical
value, respectively, until it equals 68. (Set for 100 CFM, adjust for
other airflows.)
5. Press the “ENTER” Keypad. The photometer will scan for 15
seconds, and then the “0” keypad will flash. Press the “Enter” keypad.
The unit will scan for 5 seconds, the display will read “0000,” and the
unit will sound a confirming tone.
6. Set the valve to “DOWNSTREAM.” Place the palm of your hand
over the sampling port of the pistol. There should be a strong vacuum
at this port. If the vacuum is weak, contact Air Techniques Hamilton
Associates.
Product Service 1-800-522-7658
31
Chapter 6: Maintaining Your Glove Box
7. Ensure that the glove box speed control is adjusted to the maximum
setting and the blower is exhausting 100 CFM through the glove box.
8. Position the aerosol generator discharge near the internal opening of
each HEPA filter. Check both filters.
9. Start the aerosol generator. Ensure that the generator is operating
with 1 nozzle on at 10 PSIG.
10. Allow the generator to operate for a minimum of 15 seconds. Place a
1/4" OD sampling tube in the exhaust downstream of the HEPA
filters. The inlet HEPA filter can be checked from the test port on the
exhaust HEPA filter and the exhaust HEPA filter can be checked from
the blower inlet (suction side) test port. Connect this tube to the
“downstream” sampling port of the photometer.
Acceptance
The downstream average penetration shall not exceed 0.005 percent as
measured by the photometer.
Procedure When Using the ATI 2-D or 2-E Photometer
NOTE: Because the downstream side of the HEPA filters cannot be
scanned, a downstream average must be taken.
1. Turn on the photometer and allow it to operate for a minimum 5
minutes. Leave the range switch at “100%” and the valve in the
“CLEAR” setting.
2. Use the screw on the face of the gauge to adjust the meter to 0 if
necessary.
3. If the “INT REF” switch is a square button, depress it. The switch will
remain depressed and illuminated. If the switch is a toggle type
switch, push and hold the switch to the “ON” position. Keep this
switch in the “ON” position through step 4.
4. Turn the “GAIN” knob until a value of 15 is obtained. (Set for 100
CFM, adjust for other airflows.)
5. Turn the range switch to 0.1. Turn the Stray Light knob until the
meter reads “0.”
6. Turn the valve to the “DOWNSTREAM” setting. Place the palm of
your hand over the sampling port of the pistol. There should be a
strong vacuum at this port. Return the valve to the “CLEAR” setting.
7. Ensure that the glove box speed control is adjusted to the maximum
setting and the blower is exhausting 100 CFM through the glove box.
8. Position the aerosol generator discharge near the opening of each
HEPA filter. Check both filters.
9. Start the aerosol generator. Ensure that the generator is operating
with 1 nozzle on at 10 PSIG.
10. Allow the generator to operate for a minimum of 15 seconds. Place a
1/4" OD sampling tube in the exhaust downstream of the HEPA
filters. The inlet HEPA filter can be checked from the test port on the
exhaust HEPA filter and the exhaust HEPA filter can be checked from
32
Product Service 1-800-522-7658
Chapter 6: Maintaining Your Glove Box
the blower inlet (suction side) test port. Connect this tube to the
“downstream” sampling port of the photometer.
Acceptance
The downstream average penetration shall not exceed 0.005 percent as
measured by the photometer.
Initial Certification
The XPert Weigh Box has been leak tested at the factory with helium gas at
positive 1" w.g. pressure; leaks cannot exceed 1 x 10⁻³ cc/sec. The HEPA
Filter Leak Test has been performed at the factory on both HEPA filters with
no particulate leaks greater than .005 percent. The filtered glove box should
be certified before use for the three tests listed under Re-Certification below.
It is also recommended to perform the HEPA Filter Leak Test again should
there be any damage caused during transport.
Re-Certification
Under normal operating conditions, the glove box should be re-certified at
least annually if serviced. The certifier should perform the following tests.
•
•
•
Record airflow volume and glove box static pressure. Replace HEPA
filters if pressure doubles or airflow is reduced to half the original
volume.
Perform HEPA Filter Leak Test.
Perform a Smoke Test to determine proper dilution rate inside the glove
box. Smoke removal should be completely purged in less than two
minutes at full blower speed.
Fluorescent Light Replacement
1. Disconnect the power. Refer to Appendix A for replacement parts.
2. Locate the light reflector located on the top of the glove box behind
the front panel.
3. Remove the light reflector support by removing two hex nuts located
on both sides of the light reflector.
4. Remove the old fluorescent lamp.
5. Reinstall the new fluorescent lamp and light reflector by reversing the
steps above.
Product Service 1-800-522-7658
33
Chapter 6: Maintaining Your Glove Box
Motorized Impeller Replacement
The motorized impeller must be replaced as a complete unit. See Appendix A
for replacement parts diagram.
1. Unplug the motorized impeller from the electrical outlet. Refer to
Appendix A for replacement parts.
2. Remove the hose connecting the exhaust HEPA filter to the motorized
impeller.
3. Remove the motorized impeller and support braces from the light and the
rear sheet metal façade.
4. Reassemble the new motorized impeller by reversing the steps above.
!
WARNING: High-speed blower. Never operate impeller
with housing off.
Speed Control Replacement
1. Disconnect the power and remove the cover behind the front control
panel where the speed control is located.
2. Remove the two fasteners holding the speed control. Refer to Appendix
A for replacement parts.
3. Disconnect all wires leading to the speed control. Connect wires on new
speed control in the same position as the old speed control.
4. Reassemble to the system in the same position and with the same
fasteners that were removed earlier.
Ionizer Fan Maintenance
1. To maintain optimum neutralization efficiency and operation, the ionizer
fan should be cleaned on a regular basis with the alcohol cleaners
provided or a swab wet with isopropyl alcohol.
2. The input power must be turned OFF before the unit is opened up for
maintenance.
3. The emitter electrodes (ionizer points) should be cleaned with the alcohol.
4. Unscrew the four screws on the back of the unit and remove the screen to
clean the emitter electrodes.
5. After cleaning, reinstall by reversing the steps above.
6. See Appendix D for additional information.
34
Product Service 1-800-522-7658
Chapter 7:
Accessorizing Your Glove Box
There are many ways to accessorize and modify the glove box for your
individual requirements. These include many different accessories listed in
this chapter.
1. Black Epoxy Flat Work Surface (Part #4882807)
A solid epoxy resin 60" x 30" x 1.25" work surface is available to
support the glove box.
2. 30" Standard Base Cabinet (Part #9900200)
Two optional base cabinets can be ordered to support the 60" x 30"
work surface and glove box. Contact Labconco for additional sizes.
3. Adjustable Height Base Stands with Attached Work Surface
(Part #5235500 w/casters, Part #5235501 w/adjustable feet)
These stands, 60" x 31", with attached black laminate work surfaces
have an adjustable height range from 33" to 40" and include a lower
shelf for supporting accessory equipment.
4. Blower Foot Switch (Part #5241600)
Provides a hands-free means to shut off power to the built-in blower.
5. Bag Set for Bag-in/Bag-out HEPA Filter Replacement (Part #5241700)
Set of two convenience bags and two safety straps for changing and
disposing of one HEPA filter safely with a bag-in/bag-out procedure.
6. Anti-Static Ionizer Fan (Part #5234400, 100/115V or
Part #5234401, 230V)
Included with the XPert Weigh Box. Used for weighing operations
and attaches to the ceiling of the glove box. The ionizer circulates
ionized air inside the glove box to reduce static charge. Ionizer
Replacement Points (set of 8 emitter electrodes) are ordered
separately (Part #5235100). See Appendix D for additional
information.
Product Service 1-800-522-7658
35
Chapter 7: Accessorizing Your Glove Box
7. Balance Vibration Isolator (Part #5234600)
Included with the XPert Weigh Box. Isolates building vibration and
aids with balance weighing. Includes a 20" x 13" x 2 1/4" marble slab
with isolator pads and type 304 stainless steel top cover to protect the
porous marble.
8. Pressure Gauge for the Transfer Chamber (Part #5238100)
Kit includes the pressure gauge, hose and fittings to add to the transfer
chamber. Range 0 to 29 inches of mercury vacuum.
9. Add-A-Valve Kit (Part #5225701)
Includes the valve, O-ring, and nut to supply the main chamber or the
transfer chamber to purge vacuum, fill gas, or connect a drying train.
One each Identifier Label Set for valves (Part #5236600) is ordered
separately.
10. Vacuum Aspirator Kit
Includes the valve, hose, canister, and vacuum pump for evacuating
fluids around the work surface.
Part #
5241800
5241801
Descriptions
Vacuum Aspirator Kit, 115V
Vacuum Aspirator Kit, 230V
11. Electrical Power Strips
These convenience electrical power strips are available in US and
international versions and plug into the interior duplex of the glove
box. The 115V, 4 position, 5A US Power Strip is already included
on 115V XPert Weigh Boxes.
Part #
5211500
5210600
5290400
5332600
5211501
Descriptions
US Power Strip 115V, 4 Position, 5A
UK Power Strip 250V, 6 Position, 2A
European Power Strip 250V, 4 Position, 2A
Australian Power Strip 250V, 6 Position, 2A
Installation Tool
12. Electrical 9 Pin Sealed Pass-Through Kit (Part #5075619)
Includes sealed 9 pin (D-subminiature with male pins on one side and
female pins on the other) connector and cord for data transfer to a
typical printer outside the glove box from the balance. Note: Order
the 9 pin installation kit separately which includes all the drill bits and
hole saws for field installation (Part #5241100).
13. Mechanical or Electrical Straight Pass-Through Kit (Part #5240700)
Provides three ID pass-through ports with sizes of .230/.395,
.230/.530, and .450/.705. Order the installation kit with drill bits
separately (Part #5240800). Useful for sealing cords and plumbing.
36
Product Service 1-800-522-7658
Chapter 7: Accessorizing Your Glove Box
14. FilterMate Portable Exhausters and Filters for Secondary
Filtration (see models and filters below)
The FilterMate Portable Exhauster can successfully adsorb low level
organic vapors, formaldehyde, ammonia, and secondary particulates
via another HEPA filter.
Part #
3970000
3970020
3970001
3970021
3970002
3970022
3970003
3970023
3970004
3970024
3707900
3923400
3923401
3923402
3776002
Descriptions
115V FilterMate (HEPA only included)
230V FilterMate (HEPA only included)
115V FilterMate (Carbon Filter sold separately)
230V FilterMate (Carbon Filter sold separately)
115V FilterMate w/thimble (HEPA included)
230V FilterMate w/thimble (HEPA included)
115V FilterMate Combination HEPA/Carbon (order
Carbon Filter separately)
230V FilterMate Combination HEPA/Carbon (order
Carbon Filter separately)
115V FilterMate (Two Carbon Filters sold separately)
230V FilterMate (Two Carbon Filters sold separately)
HEPA Filter for FilterMate
Organic Carbon Filter for FilterMate, 12 lbs.
Formaldehyde Carbon Filter for FilterMate, 14 lbs.
Ammonia Carbon Filter for FilterMate, 16 lbs.
Replacement Bag to Bag-In/Bag-Out HEPA Filter
15. 5" Thimble Exhaust Connector for Connection to the FilterMate
(Part #5241900)
Connects to the top of the blower on the glove box for attaching the
FilterMate Portable Exhauster. The thimble is necessary for
balancing the blower in the glove box with the FilterMate Portable
Exhauster.
16. 6" Thimble Exhaust Connection to Building Exhaust
(Part #5230200)
Provides a 6" exhaust thimble connection to the blower on the glove
box for exhausting to the outside. The thimble is necessary for
balancing the blower on the roof with the glove box blower.
17. 6" Hard Duct Connection to House Exhaust (Part #5230400)
Provides a 6" closed hard duct connection for using a roof-mounted
blower and by-passing the blower on the glove box.
18. Remote Wall-Mount Blower Kit (Part #5229800)
Provides a wall-mount bracket, 4" dia. x 6' long hose, hose clamps,
and 8' power cord for moving the blower from the glove box and
remotely mounting it to a wall within 5'.
19. 6" Exhaust Dampers
Exhaust dampers allow airflow adjustments to be made, maintaining
proper airflow to roof-mounted remote blowers or building exhaust.
Product Service 1-800-522-7658
37
Chapter 7: Accessorizing Your Glove Box
Part #
3924000
4724200
Descriptions
6" Epoxy-Coated Steel In-Line Adjustable Damper
6" PVC In-Line Adjustable Damper
20. Remote Blowers
Has a 1/4 hp direct drive motor and corrosion-resistant epoxy-coated
steel housing and wheel with blower inlet of 6.00" ID. Outlet
dimensions are 4.25" x 7.38" OD.
S.P.
CFM
Part #
4863500
4863501
0.0"
595
CFM @ Static Pressure-Inches of H2O
0.125"
0.25"
0.50"
0.75"
560
515
420
300
0.87"
167
Description
Remote Blower, 115 V, 60 Hz. 4.4 amps
Remote Blower, 115/230 V, 50 Hz, 5.6/2.8 amps
Figure 7-1
All dimensions in inches
21. Positive Pressure Conversion Kit (Part #5236900)
Converts integral glove box blower from negative pressure operation
to positive pressure.
22. Recirculation Kit (Part #5236500)
Allows the blower exhaust to be connected to the HEPA inlet filter
for recirculation of the exhaust air. Useful with drying train
components on the main chamber.
23. Filtration Components for Moisture and Fume Removal
The following components are useful in removing organics, acids,
ammonia, moisture, and other gases as indicated. They are connected
to the glove box using the #5225701 Add-A-Valve Kit.
Part #
5248200
5248201
38
Descriptions
Vacuum Pump for Circulation, 115V, 60 Hz w/switch
Vacuum Pump for Circulation, 230V, 50 Hz
Product Service 1-800-522-7658
Chapter 7: Accessorizing Your Glove Box
Part #
7815301
7815200
7814800
7815000
7995600
5244100
5240100
Descriptions
Canister with Stand for Traps
Moisture & Solvent Trap Insert (molecular sieve)
Acid Vapor Trap Insert
Radioisotope Trap Insert
Ammonia Trap Insert
Flowmeter, Visual
Gas & Vacuum 0.2 Micron Filter
24. Acrylic Viewing Window with Frame (Part #5236100)
Acrylic Window, 1/2" thick, for those users that prefer acrylic over
the standard laminated safety glass (includes metal frame).
25. Guardian Jr.™Airflow Monitor (Part #5242000)
Audio and visual airflow monitor is especially useful for installations
that exhaust to the outside as it provides feedback on the roofmounted blower status. Monitor mounts to the top of the control
panel.
26. Interior Storage Shelf Kits
Provide convenient storage in the rear or the left side of the glove box
to maximize space. Additional hanging shelf kits (sold separately)
can hang from the rear interior shelf kit. Each shelf kit adds 240
square inches of usable space. Will support a large 15.2" x 4.8" x
3.7" tissue box.
Part #
5235000
5235001
Descriptions
Rear Storage Shelf Kit
Side Storage Shelf Kit
27. IV Bar Kit (Part #5242100)
Provides a bar for supporting IV bags. Must be used with one of the
interior storage shelf kits 5235000 or 5235001.
28. External Glove Port Caps (Part #5242200)
Cap and clamp attaches to the glove ports to eliminate glove inflation
during dilution or venting operations. Sold as a set of two.
29. Hanging Shelf Kits
All shelves require the 5235000 rear interior storage shelf kit to
function.
Part #
3925000
3927700
3927800
5247300
5247301
Descriptions
Consists of three utility shelves (coated steel)
Bottle Holder (coated steel)
Tissue Holder (coated steel)
Bin Organizer, 5.4" (plastic)
Bin Organizer, 7.4" (plastic)
Product Service 1-800-522-7658
39
Chapter 7: Accessorizing Your Glove Box
30. DOP Test Kit for HEPA Filters (Part #5242400)
Includes the connections and hoses to carry out the HEPA Filter Leak
Test documented in Chapter 6 of this manual.
31. Drying Train Tubing Kit
Includes the (FEP) tubing and plumbing fittings for connecting typical
moisture, and other gas fume removal components (see item 23
above). Fluorinated ethylene-propylene (FEP) tubing has very low
moisture absorption.
Part #
5242500
Descriptions
Drying Train Tubing Kit; Moisture, Solvents,
and Radioisotopes
32. HEPA and ULPA Filters
HEPA filters come standard with the glove box. ULPA filters may be
substituted as an upgrade.
Part #
5225105
5225106
Descriptions
Replacement Standard HEPA Filter, 99.99%
efficient on 0.3 micron particles
Optional ULPA Filter, 99.999% efficient on 0.3
micron particles
33. Gloves (see Appendix A: Replacement Parts for glove sizes and
material types)
Neoprene gloves are the most resistant to abrasion and tearing. Butyl
gloves provide higher impermeability and improved dexterity.
Hypalon gloves are made with a mixture of neoprene and butyl rubber
to provide an intermediate level of neoprene and butyl features.
34. Transfer Chamber High Vacuum Sleeve (Part #5236200)
An internal steel reinforced transfer chamber sleeve is required if a
vacuum will be pulled in the transfer chamber.
35. Waste Chute (Part #5245800)
The glove box can be configured to add a waste chute from which a
waste bag can hang. Waste bags and bands can be ordered from your
laboratory dealer. The minimum waste bag size is 8.5" wide.
36. Exterior Transfer Chamber Shelf (Part #5245900)
A powder-coated steel shelf, 10.7" wide x 15.1" deep, can be attached
to the top of the transfer chamber. The exterior transfer chamber shelf
maximizes work area, useful for printers, laboratory supplies, and
notebooks.
40
Product Service 1-800-522-7658
Chapter 8:
Troubleshooting
Refer to the following table if the XPert filtered glove box fails to operate
properly. If the suggested corrective actions do not solve your problem,
contact Labconco for additional assistance.
PROBLEM
CAUSE
CORRECTIVE ACTION
Blower won’t operate.
Unit not plugged into
outlet.
Circuit breaker(s) or
Ground Fault Interrupter.
Blower wiring is
disconnected.
Blower switch is
defective.
Motorized impeller or
blower is defective.
Unit not plugged into
outlet.
Circuit breaker(s) tripped.
Lamp not installed
properly.
Lamp wiring
disconnected.
Defective lamp.
Light switch is defective.
Defective electronic
ballast.
Plug the glove box into appropriate electrical
service.
Reset circuit breaker.
Blower and lights won’t
operate.
Lights do not work.
Product Service 1-800-522-7658
Inspect blower wiring per wiring diagram on
unit.
Replace switch if no voltage at blower.
Replace motorized impeller or blower. See
Chapter 6.
Plug unit into appropriate electrical service.
Reset or replace circuit breaker.
Inspect lamp installation.
Inspect lamp wiring.
Replace lamp.
Replace light switch.
Replace ballast.
41
Appendix A:
Replacement Parts
The components that are available for the XPert filtered glove box are listed.
The parts shown are the most commonly requested. If other parts are
required, please contact Product Service.
Item
Qty.
Part Number
1A
1B
2A
2B
2C
2D
2E
3A
3B
3C
3D
3E
3F
3G
3H
4
5
6A
6B
6C
6D
6E
7A
7B
7C
7D
8A
8B
9A
9B
9C
9D
9E
10A
10B
11A
11B
12A
12B
12C
13A
13B
14A
14B
15
16
1ea
1ea
1ea
1ea
1ea
1ea
1ea
1pr
1pr
1pr
1pr
1pr
1pr
2ea
2ea
1ea
1ea
1ea
1ea
1ea
2ea
1ea
2ea
2ea
1ea
12ea
1ea
1ea
1ea
1ea
1ea
1ea
1ea
1ea
1ea
1ea
1ea
1ea
4ea
1ea
REF.
REF.
1ea
1ea
1ea
1ea
5232200
5236100
1230700
1283900
5232900
5232901
5233400
1640600
1640601
1640602
1640500
1640501
1640502
1640000
1965600
1952500
1307000
3704402
1931500
5229400
1890302
3704403
5225105
5225106
5241700
1905617
5227300
5227301
5222700
5222800
5222801
5222802
5242900
1305800
1305900
5226400
5226500
1327204
1327205
1327200
5226900
5226901
5234400
5235100
5234600
5211500
42
Description
Framed Glass Window (standard)
Framed Acrylic Window (optional)
Receptacle, 115V Duplex
Receptacle, 230V Duplex
Sealed Duplex, 115V Complete
Sealed Duplex, 230V Complete
Wallplate Duplex Gray
9 ¾ size Neoprene Gloves (standard)
9 ¾ size Butyl Gloves
9 ¾ size Hypalon Gloves
8 ½ size Neoprene Gloves
8 ½ size Butyl Gloves
8 ½ size Hypalon Gloves
O-Rings
Clamp – O-Ring Gloves
Pressure Differential Gauge
Switch, Rocker (2 Position)
Blower Speed Control, 115V
Knob, Speed Control
Extension, Speed Control
Set Screw, Extension #8-32 x .12"
Blower Speed Control 230V
HEPA Filter 99.99%
ULPA Filter 99.999%
Bag-In/Bag-Out Kit
Nut, Keps #10-24
Motorized Impeller, 115V (also used on 100V units)
Motorized Impeller, 230V
Fluorescent Bulb, 8" Circleline FC8T9/CW, 22 Watt, 4 Pin
Ballast, 115V 60 Hz
Ballast, 230V 50 Hz (also used on 100V, 50 Hz)
Ballast, 230V 60 Hz (also used on 100V, 60 Hz)
Transformer, 230V to 100V (100V models only)
Inlet Power Cord, 115V
Inlet Power Cord, 230V
Inner Transfer Door w/attached gasket
Outer Transfer Door w/attached gasket
Circuit Breaker, 5A, 115V
Circuit Breaker, 2A, 230V
Circuit Breaker, 3A, 115V
Wiring Diagram, 115V
Wiring Diagram, 230V
Anti-Static Ionizer Fan
Ionizer Points (set of 8 emitter electrodes)
Balance Vibration Isolator (1 set)
US Power Strip, 115V, 4 Position, 15A (see Chapter 7 for other
international versions)
Product Service 1-800-522-7658
Appendix A: Replacement Parts
Note: Items 14, 15, & 16 are not shown.
Figure A-1
Replacement Parts for XPert Weigh Box
Product Service 1-800-522-7658
43
Appendix B:
Dimensions
See the following dimensions and exhaust options for the XPert Weigh
Boxes. All dimensions are in inches.
Figure B-1
44
Product Service 1-800-522-7658
Appendix C:
Specifications
This Appendix contains technical information about all the glove boxes
including electrical specifications and environmental operating conditions.
•
8 Amps, 115V, 50/60 Hz or 4 Amps, 230V, 50/60 Hz or 8 Amps, 100V,
50/60 Hz, XPert Weigh Box.
Environmental Conditions
•
Indoor use only.
•
Maximum altitude: 6562 feet (2000 meters).
•
Ambient temperature range: 41° to 104°F (5° to 40°C).
•
Maximum relative humidity: 80% for temperatures up to 88°F (31°C),
decreasing linearly to 50% relative humidity at 104°F (40°C).
•
Main supply voltage fluctuations not to exceed ±10% of the nominal
voltage.
•
Transient over-voltages according to Installation Categories II (Overvoltage Categories per IEC 1010). Temporary voltage spikes on the
AC input line that may be as high as 1500V for 115V models and
2500V for 230V models are allowed.
•
Used in an environment of Pollution degrees 2 (i.e., where normally
only non-conductive atmospheres are present). Occasionally,
however, a temporary conductivity caused by condensation must be
expected, in accordance with IEC 664.
Product Service 1-800-522-7658
45
Appendix D:
Ionizer Fan Performance Criteria
Static Electricity Test
The tests were performed by monitoring the level of static electricity found on the work
surface and interior surfaces within the glove box. Static electricity levels were measured
with an AlphaLab Surface DC Voltmeter http://scientificmeter.com/surface_dc.htm.
A DESCO Emit Mini Zero Volt Ionizer http://www.descoemit.com/ViewProduct.aspx?pid=
50661&h=1323 was installed in the glove box. The DESCO ionizer is a dual steady state DC
auto balancing bench top ionizer. The ionizer helps to neutralize static electricity on
surrounding surfaces. The time required by the ionizer to neutralize static electricity will
be the shortest when objects are within 12" to 36" directly in front of the ionizer. The time
for neutralization increases as the distance from the ionizer increases. The time required
for sufficient electrostatic decay will also vary depending upon user application, moisture
levels within the supply air and the level of cleanliness within the glove box interior.
46
Product Service 1-800-522-7658
Appendix D: Ionizer Fan Performance Criteria
Electrostatic with
Glove Box Blower &
Ionizer Fan OFF
100 CFM Blower &
Ionizer Fan ON
After 1 Hour
100 CFM Blower &
Ionizer Fan ON
After 2 Hours
Test Point Locations and Voltage Levels
Metal
Back
Left
Right
Transfer
Interior
Interior
Interior
Chamber Surface
Surface
Surface
Handle
+ 734
+ 375
+ 106
+ 151
Metal
Housing
Inlet
HEPA
+ 420
Metal
Housing
Exhaust
HEPA
+ 220
+ 96
+ 114
+ 290
+ 93
+ 45
+ 28
+ 58
+ 51
- 52
- 15
Interior
Lamp
Window
Center
Work
Surface
+ 242
+ 153
+ 52
+ 46
+ 35
- 20
- 28
- 22
Static Electricity Test Results (VOLTS) on the Glove Box
(Neutralization is best between +/-100V)
The mini zero volt ionizer’s neutralization time will be shortest when objects are
approximately 12" to 36" directly in front of the ionizer and will increase as the
distance from the ionizer increases. Set the fan speed switch on the side of the
ionizer to the LOW or HIGH position. Higher airflow will result in faster
neutralization rates. Position the ionizer so that the maximum airflow is directed
at the items or area to be neutralized. The LED will turn on during power up and
remain GREEN during normal operation. The ionizer has a grounding jack and
must have a good earth ground to maintain proper balance. Always plug the AC
power adaptor into the ionizer and then into the appropriate AC power source.
The ionizer has no On/Off switch so it should be running as soon as it is plugged
in. The ionizer is designed to run off of 24VDC ±10% 300mA.
The balance adjustment for the ionizer can be accomplished by inserting a small
screwdriver or trimmer adjustment tool into the balance adjustment hole located
on the side of the unit. To increase the output in a positive direction, turn the
potentiometer in a clockwise direction. Conversely, to increase the output in a
negative direction, turn the potentiometer in a counter clockwise direction. It is
recommended that you use a surface DC voltmeter when adjusting the balance of
the ionizer.
Under normal conditions, the ionizer will attract dirt and dust (especially on the
emitter electrodes). To maintain optimum neutralization efficiency and operation,
cleaning with isopropyl alcohol should be performed on a regular basis. If the
performance of the ionizer degrades because of dirty or corroded points, the LED
on the front of the unit will turn YELLOW; the audible alarm will sound
continuously. Under this condition, the unit is not able to maintain balanced
ionization. The input power cord must be disconnected before the unit is opened
for maintenance. The emitter electrodes should be cleaned using the alcohol
cleaners included or a swab wet with isopropyl alcohol. Unscrew the 4 screws on
the back of the unit and then remove the screen. After cleaning the emitter
electrodes, reinstall the screen and 4 screws. The emitter electrodes should not
require replacement during the life of the unit with normal handling. Verify the
balance of the ionizer with a surface DC voltmeter after cleaning.
Product Service 1-800-522-7658
47
Appendix E:
Conversions
Pressure Conversions
To
From
mmHg
in.Hg
in.H2O
ft.H2O
atm
lb/in.2
Kg/cm2
kPa
bar
mmHg
in.Hg
in.H2O
ft.H2O
atm
lb/in.2
Kg/cm2
kPa
bar
1
25.40
1.868
22.42
760
51.71
735.6
7.500
750
.03937
1
.07355
.8826
29.92
2.036
28.96
.2953
29.53
.5353
13.60
1
12
406.8
27.69
393.7
4.016
401.6
.04461
1.133
.08333
1
33.90
2.307
32.81
.3347
33.47
.00132
.03342
.00246
.02950
1
.06805
.9678
.00987
.987
.01934
.4912
.03612
.4334
14.70
1
14.22
.1451
14.51
.00136
.03453
.00254
.03048
1.033
.07031
1
.0102
1.02
.1333
3.387
.2490
2.988
101.3
6.895
98.05
1
100
.0013
.0339
.0025
.0299
1.013
.0689
.981
.01
1
Flow Rate Conversions
To
From
lit/sec
gal/min
ft3/sec
ft3/min
bbl/hr
bbl/day
48
lit/sec
gal/min
ft3/sec
ft3/min
bbl/hr
bbl/day
1
0.06309
28.32
0.4719
0.04415
0.00184
15.85
1
448.8
7.481
0.6997
0.02917
0.03532
0.00223
1
0.01667
0.00156
6.50x10⁵
2.119
0.1337
60
1
0.09359
0.00390
22.66
1.429
641.1
10.69
1
0.04167
543.8
34.30
1.54x10⁴
256.5
24
1
Product Service 1-800-522-7658
Appendix F:
References
Many excellent reference texts and booklets are currently available. The
following is a brief listing:
Pharmaceutical Isolators, A Guide to their application design and control.
Pharmaceutical Press 2004, Editors: Midcalf, Phillips, Neiger, and Coles.
Isolation Technology, A Practical Guide, 2004 CRC Press, 2nd Edition,
www.crcpress.com
International Standard ISO 10648-2 Containment Enclosures
• Classification according to leak tightness and associated checking
methods.
International Standard ISO 14644-7 Clean Rooms and associated controlled
environments
• Separate devise such as glove boxes and isolators.
NIOSH Pocket Guide to Chemical Hazards
U.S. Dept of Health and Human Resources
Centers for Disease Control and Prevention
National Institute for Occupational Safety and Health
Product Service 1-800-522-7658
49
DECLARATION OF CONFORMITY
Application Council Directive(s):
73/23/EEC, 89/336/EEC, 2002/95/EC (ROHS),
2002/96/EC (WEEE)
Standard(s) to which conformity is declared: EN61010-1, EN61326-1
Manufacturer’s Name:
Labconco Corporation
Manufacturer’s Address:
8811 Prospect Avenue
Kansas City, MO 64132 USA
Importer’s Name:
See Shipping/Customs Documents
Importer’s Address:
See Shipping/Customs Documents for your equipment
Type of Equipment: Laboratory Equipment Precise Glove Boxes
5220000 Series
5220100 Series
5220200 Series
5220300 Series
Serial No.:
Precise Basic Glove Box
Precise Controlled Atmosphere Glove Box
Precise HEPA-Filtered Glove Box
XPert Weigh Box
Various – See Individual Declaration
Year of Manufacture: 2006 and subsequent
I, the undersigned, hereby declare that the equipment specified above conforms to the
above Directive(s) and Standard(s).
See individual Declaration of Conformity which
will be signed by the importer for your country.
Place:
_______________________________________
(Signature)
Date:
_______________________________________
(Full Name)
_______________________________________
(Position)
Labconco P/N 36960-60 REV B, ECO E026
50
Product Service 1-800-522-7658