1
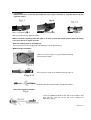
User Manual
Long Reach Sander
LRS600 (230v)
&
LRS600IND (110v)
Page 1 of 8
PRODUCT DESCRIPTION
The machine is designed for sanding drywalls, ceilings and walls of the inner and outer surfaces,
clearing the floor residues, paint coatings, adhesive and loose plaster etc.
Our machine is not suitable for processing the object containing asbestos.
You must abide by certain safety precautions when using the equipment.
In order to prevent injuries and damages from occurring, you must always read through this
operating manual carefully.
This manual must be kept in a safe place so that the information that it contains is always available. This
operating manual must accompany the equipment if it is transferred to somebody else.
We do not accept any liability for accidents or damage arising from ignoring this manual and the safety
instructions.
SPECIFICATIONS
Model No.
Power
LRS600IND
LRS600
600W
600W
Speed
0-1000 /min
0-1000 /min
Grinding pad diameter
215mm
215mm
Sandpaper diameter
225mm
225mm
Tube diameter
32mm
32mm
Short-length
(Without additional tube)
1.23 /1.65m
Long Length
(With additional tube)
2.20m
2.20m
Short-weight
4.5 kg
4.5 kg
Long Weight
5.0 kg
5.0 kg
Voltage
110v
230v
1.23 /1.65m
3. SAFETY INSTRUCTIONS
The following pictograms appear throughout these operating instructions:
Indicates danger of injury, risk to life and possible damage to the appliance if these instructions
are not followed.
Indicates the presence of electric shocks.
•
•
•
•
Read through these operating instructions carefully before using the appliance.
Become familiar with the functions and method of operation.
To ensure proper operation, always maintain the appliance according to the instructions.
The operating instructions and associated documents should always be kept close to the appliance.
When using power tools, you must observe the following basic safety precautions in order to ensure protection
from electric shocks, injury and fire. Read and follow all the instructions before using this power tool.
Page 2 of 8
Always check if your mains voltage corresponds with the value on the type plate
The machine has been double-insulated in accordance with EN60745: therefore, an earth wire
is not necessary
USE CORRECT SUPPLY VOLTAGE: The power supply voltage must match the information quoted on the
tools identification plate. Use of an approved RCD circuit breaker between the machine and the electrical
power point is highly recommended.
USE PROPER EXTENSION CORD: Only use an approved extension cable that is suitable for the machine's
2
power. The cord must have a diameter of at least 1.5mm .When the extension cable is on a reel, unroll the cable
in its entirety.
SWITCH OFF THE MACHINE IMMEDIATELY IN CASE OF:
1. Malfunction in the mains plug, power cable or damaging of cable.
2. Broken switch.
3. Smoke or smell of burning.
GENERAL SAFETY RULES
WARNING! Read all safety warnings and all instructions. Failure to follow the warnings and instructions
may result in electric shock, fire and/or serious injury.
Work area safety
a) Keep work area clean and well lit.
b) Do not operate power tools in explosive atmospheres, such as in the presence of flammable liquids, gases
or dust.
c) Keep children and bystanders away while operating a power tool.
Electrical safety
a)
b)
c)
d)
e)
f)
Power tool plugs must match the outlet. Never modify the plug in any way. Do not use any adapter
plugs with earthed power tools.
Avoid body contact with earthed or grounded surfaces, such as pipes, radiators, ranges and
refrigerators. There is an increased risk of electric shock if your body is earthed or grounded.
Do not expose power tools to rain or wet conditions.
Do not abuse the cord. Never use the cord for carrying, pulling or unplugging the power tool. Keep
cord away from heat, oil, sharp edges or moving parts.
When operating a power tool outdoors, use an extension cord suitable for outdoor use.
If operating a power tool in a damp location is unavoidable, use a residual current device (RCD)
protected supply.
Personal safety
a)
b)
c)
d)
e)
f)
g)
Stay alert, watch what you are doing and use common sense when operating a power tool. Do not
use a power tool while you are tired or under the influence of drugs, alcohol or medication.
Use personal protective equipment. Always wear eye protection and protective mask
Prevent unintentional starting. Ensure the switch is in the off-position before connecting to power
source and/or battery pack, picking up or carrying the tool. Carrying power tools with your finger on the
switch or energizing power tools that have the switch on invites accidents.
Remove any adjusting key or wrench before turning the power tool on. A wrench or a key left attached
to a rotating part of the power tool may result in personal injury.
Do not overreach. Keep proper footing and balance at all times. This enables better control of the
power tool in unexpected situations.
Dress properly. Do not wear loose clothing or jewellery. Keep your hair, clothing and gloves away
from moving parts.
If devices are provided for the connection of dust extraction and collection facilities, ensure these
are connected and properly used.
Page 3 of 8
Power tool use and care
a)
b)
c)
d)
e)
f)
Do not force the power tool. Use the correct power tool for your application.
Do not use the power tool if the switch does not turn it on and off. Any power tool that cannot be
controlled with the switch is dangerous and must be repaired.
Disconnect the plug from the power source and/or the battery pack from the power tool before
making any adjustments, changing accessories, or storing power tools.
Store idle power tools out of the reach of children and do not allow persons unfamiliar with the
power tool or these instructions to operate the power tool.
Maintain power tools -check for misalignment or binding of moving parts, breakage or damage of
parts and any other condition that may affect the power tool’s operation. If damaged, have the power
tool repaired before use.
Use the power tool, accessories and tool bits etc. in accordance with these instructions, taking into
account the working conditions and the work to be performed. Use of the power tool for operations
different from those intended could result in a hazardous situation.
Service
a)
Have your power tool serviced by a qualified repair person using only identical replacement parts.
5. PRECAUTIONS ON USING DRYWALL SANDER
Attention! You must abide by the following basic safety measures against electrical shocks, injuries and the
danger of fire when using electric tools. Read and abide by these instructions before you start to use any tools.
These instructions must be kept in a safe place.
-
Do not use damaged accessories - always check before use whether the accessories are damaged
or cracked. For example, to grinding pad, please check the support plate is not cracked.
Ensure everybody to be out of the machine’s rotation area and run the machine at maximum speed
for one minute, which can fully test the accessories.
Do not put down the machine until it has stopped completely.
Clean the exhaust port on your machine regularly.
When working, control the machine firmly with both hands to ensure safe operation.
When choosing sanding disc, please observe the manufacturer's specifications.
We recommend that you always wear industrial safety gloves, safety goggles & P2 respiratory mask
when working with the drywall sander & wearing close-fitting clothes is mandatory.
Always allow for reaction torque
6. HOW TO USE DRYWALL SANDER
Before setting up, repair or maintenance of the appliance you must always turn off the operating switch and pull
out the mains plug!
Before Initial Operation
- Check if the rated frequency of the mains supply corresponds to the details of the type place.
-
Before using the tool, read the instruction book carefully.
Page 4 of 8
6.1 Installation
- Unfold the machine and fasten the handle.(See Fig.1-1,Fig1-2 and Fig1-3). Strip the machine by the
opposite actions.
Fit the screw to the groove;
Lock on by fastening block;
Finish installation;
Strip the machine by the opposite actions.
NOTE: If find the fastening block too tight or to loose to lock the handle, please adjust the fitting
screw to be looser or tighter by hand!
-Stick the sanding paper to the pad(Fig.2)
Ensure the holes on the sanding paper to fit the holes on the pad accuracy.
-Medium length installation
Loose the screw nut (Fig. 3-1) by anti-clockwise turning
and extend the length.
Then fasten the screw nut by clockwise turning (Fig.3-2).
Go back to the non-extended status by opposite actions.
--The longest length installation
Insert the additional handle to the end of the machine. And
then turn the screw nut on the end of the machine for
tightening. (Fig.4)
Page 5 of 8
6.2. Electronic Control
This machine has the characteristics as below
:
●On/Off Switch with soft start
Ensure machine starts smoothly without wobbling.
●Adjustable Speed
Adjust the speed from 0-1000rpm by turning the speed
wheel (Fig.5) In this way, user can choose different
speed for different sanding surface.
●Constant Speed Control
Keep the machine running at the same speed as
selected no matter loading to the machine changes or
not.
6.3 Replace Grinding Pad
● Insert the hex wrench (size 5) into the hexagonal screw bolt on the grinding block (Fig.6)
● Hold the grinding pad firmly, and then turn the wrench to dismount the pad.
● Installation of new grinding pad by tightening the bolt (Fig.6).
Attention: Only install the specified grinding pad on the machine.
In order to ensure optimal performance, machine should be run at slightly
lower speed for several minutes to make the grinding pad fit the sealing
surface perfectly. During this process, the white foam particles will come out
from the grinding head. However, this won’t damage the machine.
6.4 Two Options For Extracting Dust
There are internal extraction [7-1] and external extraction [7-2] for
dust particles. The 8-hole internal extraction system collects fine
dust particles, enabling to adhere to wall and ceiling, obtaining
perfect effect of extracting dust.
6.5 Grinding Adjacent Edges
Detachable brush segment can reach up to the adjacent
edge with ease. (Fig.8)
6.6 Connect to Vacuum Cleaner
Page 6 of 8
Inhalation of dust is hazardous to health! When carrying out
the work which can produce dust, please always wear a dust
mask.
● Loose the fastening nut.
●Connect the hose to the exit of the handle (Fig.9)
●The other end of the hose is connected to the vacuum
cleaner;
7. Operate the Machine
-Do not control the machine’s head.
-Hold the machine with both hands.
-Before operating the machine, make sure every fastening handle is closed.
-Connect the machine to the main power supply.
- Before switching on the machine, keep the sanding head slightly away from the work surface.
- Start the machine for necessary sanding work.
Operate the machine with short length in narrow and awkward area.
Run the machine with medium length for higher walls.
Use the machine with longest length for ceilings.
- Do not over-press machine so that to avoid overloading! Press with proper pressure for better grinding
effects. Good grinding effects and quality are mainly decided by choosing the right abrasive material.
-Once finishing the sanding task, switch off the machine.
8. CARE AND MAINTENANCE
Remove the plug from the socket before carrying out any adjustment, servicing or maintenance.
Your power tool requires no additional lubrication or maintenance. Always store your power tool in a dry
place.
If the supply cord is damaged, it must be replaced by the manufacturer, its service agent or similarly qualified
persons in order to avoid a hazard.
If a fault can not be rectified, return the mixer to an authorised dealer for repair.
Cleaning
- Keep the safety devices, ventilation slots and Motor housing as free of dirt and dust as possible.
- Clean the unit by rubbing it with a clean cloth or blow it clean using low-pressure compressed air.
- We recommend that you always clean the unit immediately after using it.
- Do not use cleaners or solvents; these will attack the plastic parts in the unit. You must also ensure
that water cannot get into the inside of the unit.
Carbon brushes
- If excessive sparking occurs you must have the carbon brushes checked by a qualified electrician.
Attention! Only a qualified electrician is allowed to change the brushes.
Page 7 of 8
For your own safety, never remove parts or accessories of the electric tool during operation.
In case of fault or damage have the electric tool repaired only by a specialist workshop or
by the manufacturer.
For your personal safety, READ and UNDERSTAND before using.
Save This Instruction For Future Reference
Always Wear Ear Protection With This Tool
Always Wear Eye Protection With This Tool
Always Wear a breathing Mask With This Tool
11. ENVIRONMENTAL PROTECTION
Do not dispose of electrical products in your normal household waste.
Always use recycle facilities where possible.
Additional recycling information can be found through your local Authority
or retailer.
For further information or advice, please call the Vitrex Technical Helpline on +44 (0) 1253 789180
Q.E.P. Co UK Ltd., Everest Road, Lytham St Annes, Lancs, UK FY8 3AZ
Tel +44 (0) 1253 789180
email: [email protected]
Page 8 of 8