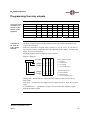
1
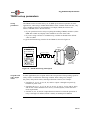
Model TR400
Programmable Process Ratemeter
Installation & Operation Manual
Model TR400
Programmable Process Ratemeter
Installation and Operation Manual
Part Number: 990000500
Revision D
Electro-Sensors®, Inc.
6111 Blue Circle Drive
Minnetonka, MN 55343-9108
Contact us at:
Local:
952-930-0100
National:
1-800-328-6170
Fax:
952-930-0130
Web:
www.electro-sensors.com
Sales
[email protected]
Support:
[email protected]
Release Date: June, 2007
Introduction To This Manual
What is in this
manual?
This installation and operations manual provides detailed technical information about
the TR400 Programmable Process Ratemeter. It should serve as your technical
resource to install, set up, operate, and test the TR400.
Who should use
this manual
(audience)
Keep in mind that the function of the TR400 installed in a mechanical process is to
monitor speed and direction; therefore, it must be installed by qualified personnel
only. This manual is designed for persons who have the primary responsibility to
install, set up, operate, and test the TR400.
The secondary audience would be those persons seeking technical information about
the electrical concepts and operation of the TR400.
Knowledge
level
Persons installing, setting up, and operating the TR400 should have good knowledge
and understanding of electrical and mechanical concepts and principals pertaining to
Programmable Process Ratemeters. Again, the TR400 should be installed by
qualified personnel only.
Notices
x Installing Electro-Sensors, Inc., products is the responsibility of the purchaser, and
is in no way guaranteed by Electro-Sensors, Inc.
x While the information in this manual has been carefully reviewed, Electro-Sensors,
Inc., assumes no liability for any errors or omissions in this manual. Additionally,
Electro-Sensors, Inc., reserves the right to make changes to any part of the
information in this manual or the product described herein without further notices.
x No part of this manual may be photocopied, reproduced, or translated to another
language without the prior written consent of Electro-Sensors, Inc.
Rev D
i
Introduction To This Manual
How this manual is organized
Manual
navigation tools
Manual
sections
This manual contains the following navigation tools:
x Table of contents
x Beginning section table of contents
x Index
Each is designed to help you find the information you need quickly.
This manual is divided into the following sections:
x Section 1:
x Section 2:
x Section 3:
x Section 4:
x Section 5:
Warnings and Cautions, discusses personal injury possibilities and
potential damage to equipment.
TR400 Installation, discusses installing the TR400 into a panel.
TR400 Wiring and DIP Switches, discusses practical wiring
practices, wiring schematics, and configuring DIP switches.
TR400 Setup, discusses the TR400 parts and functions, and set up
information.
TR400 Programming, discusses programming the operational
variables of the TR400.
x Section 6:
TR400 Diagnostics, discusses the tests used to verify the operation
and functionality of the TR400.
x Appendix A: TR400 Specifications, discusses the specifications for the TR400.
ii
Rev D
Table of Contents
How this manual is organized..........................................................................................................ii
TABLE OF CONTENTS ............................................................................................................................... III
SECTION 1 ................................................................................................................................................. 1
WARNINGS & CAUTIONS .......................................................................................................................... 1
Introduction...................................................................................................................................... 1
About warnings and cautions........................................................................................................... 2
Warnings.......................................................................................................................................... 3
Cautions ........................................................................................................................................... 4
SECTION 2 ................................................................................................................................................. 5
TR400 INSTALLATION .............................................................................................................................. 5
Introduction...................................................................................................................................... 5
Installation overview........................................................................................................................ 6
Installing the TR400 ........................................................................................................................ 7
SECTION 3 ................................................................................................................................................. 9
TR400 WIRING & DIP SWITCHES............................................................................................................. 9
Introduction...................................................................................................................................... 9
Recommended wiring practices ..................................................................................................... 10
TR400 wiring schematics .............................................................................................................. 11
4-20 mA/0-10 Vdc analog output .................................................................................................. 13
Switch input wiring........................................................................................................................ 14
Single-channel and quadrature signal wiring................................................................................. 15
A and B channel input signal wiring.............................................................................................. 16
TR400 DIP switches ...................................................................................................................... 17
SECTION 4 ............................................................................................................................................... 19
TR400 SET-UP PARAMETERS ................................................................................................................. 19
Introduction.................................................................................................................................... 19
TR400 parts and functions ............................................................................................................. 20
TR400 set-up parameters ............................................................................................................... 22
SECTION 5 ............................................................................................................................................... 23
TR400 PROGRAMMING ........................................................................................................................... 23
Introduction.................................................................................................................................... 23
Programmable variables................................................................................................................. 24
How to select a variable and view its data ..................................................................................... 27
Keypad keys used to access and program variables ...................................................................... 29
How to select and change a variable’s numerical value ................................................................ 30
Programming rate and signal parameters....................................................................................... 32
Programming the display ............................................................................................................... 33
Programming the relay outputs...................................................................................................... 35
Programming the analog output..................................................................................................... 38
Programming the switch inputs ..................................................................................................... 39
SECTION 6 ............................................................................................................................................... 41
Rev D
iii
Table of Contents
TR400 DIAGNOSTICS .............................................................................................................................. 41
Introduction.................................................................................................................................... 41
Keypad and display test ................................................................................................................. 42
Relay output test ............................................................................................................................ 43
Switch input test............................................................................................................................. 44
Analog output calibration .............................................................................................................. 45
Resetting the variables ................................................................................................................... 47
Setting and changing the security code number............................................................................. 48
System slowdown test.................................................................................................................... 50
Clearing the LRC code................................................................................................................... 51
TR400 SPECIFICATIONS .......................................................................................................................... 53
INDEX...................................................................................................................................................... 55
iv
Rev D
Section 1
Warnings & Cautions
Introduction
This section discusses warnings and cautions to guard against the possibility of
injury to persons and damage to equipment. Since the TR400 monitors the speed and
direction of various mechanical systems, observe all warnings and cautions that
pertain to the mechanical systems as well.
In this section
These are the topics:
Topic
About warnings and cautions
Warnings
Cautions
Rev D
See Page
2
3
4
1
S1Warnings & Cautions
About warnings and cautions
Important
notice
Read through the warnings and cautions in this section before attempting to install,
set up, or operate the TR400. Warnings and cautions appear in this section and
throughout this manual.
Definitions
Warnings are given when there is the possibility of injury to persons.
Cautions are given when there is the possibility of damage to equipment.
The warning label will appear as follows:
Warning
The caution label will appear as follows:
Caution
Continued on next page
2
Rev D
S1Warnings & Cautions
Warnings
Warning
Always turn the power source OFF before wiring the TR400. Failure to observe this warning
could result in an electrical shock or damage to the equipment.
Warning
During a Stop condition, any slight movement of the shaft or magnetic disc could activate the
control relay and start the motor. To prevent starting the motor accidentally, always use proper
LOCKOUT, TAG OUT procedures. Failure to observe this warning could result in an injury to
persons or damage to equipment.
Warning
Do not touch the Pulser Disc or Wrap while it is spinning. Failure to observe this warning could
result in a hand injury.
Warning
Always wear protective eye goggles when using power tools. Failure to observe this warning
could result in an eye injury or blindness.
Warning
Practical wiring practices must be followed when wiring industrial equipment such as the
TR400. Failure to follow practical wiring practices could result in an injury to persons or damage
to equipment.
Warning
The TR400 is a programmable process ratemeter and must be installed by qualified personnel
only. Failure to observe this warning could result in an injury to persons or damage to
equipment.
Warning
Only qualified personnel should attempt to connect any wires to the TR400. Failure to observe
this warning could result in an injury to persons.
Continued on next page
Rev D
3
S1Warnings & Cautions
Cautions
Caution
Power to sensors is provided at TB26 (+12 Vdc) and TB25 (common) on the TR400. Wiring
to those inputs should be shielded cable with the shield tied to TB25 common only. Failure to
observe this caution could result in improper sensor function.
Caution
Always turn the power source OFF before wiring the TR400. Failure to observe this caution
could result in damage to the TR400.
Caution
Never use shielded cable with extra conductors. Extra conductors can act as antennas, picking
up electrical noise. Failure to observe this caution could result in improper sensor operation.
Caution
The TR400 standard uses 115 Vac, 6 VA @ 60/50 Hz, with 230 Vac as an option. Make sure
you know the correct supply voltage before applying power to the TR400. Failure to observe
this caution could result in damage to the TR400.
Caution
Do not touch the Pulser Disc or Wrap while it is spinning. Failure to observe this caution could
cause an interruption in pulse generation, resulting in a disruption in the mechanical process
being monitored.
Caution
When the digital input function is programmed as a Reset input and the switch input remains
closed, the relay will never turn OFF regardless of the operating condition. A momentary
contact closure of the switch is advised. Failure to observe this caution could result in damage
to the equipment.
Caution
Only qualified personnel should attempt to connect any wires to the TR400. Failure to observe
this warning could result in damage to the equipment.
4
Rev D
Section 2
TR400 Installation
Introduction
This section discusses unpacking and then installing the TR400 into a panel.
In this section
These are the topics:
Topic
Installation overview
Installing the TR400
Rev D
See Page
6
7
5
S2TR400 Installation
Installation overview
Warning
The TR400 is a programmable process ratemeter and must be installed by qualified personnel
only. Failure to observe this warning could result in an injury to persons or damage to
equipment.
Unpacking the
TR400
After unpacking the TR400, save the following items:
x Packing list
x All instructions and other documentation
Verify that all parts were shipped via the packing list.
Continued on next page
6
Rev D
S2TR400 Installation
Installing the TR400
Panel cutout
To install the TR400 into an instrument panel, do the following:
Step
1.
2.
3.
4.
Action
Cut a rectangular hole in the panel to the dimensions shown in Figure 1.
Loosen the screws holding the mounting bracket to the TR400 and
remove it, as shown in Figure 1.
Slide the TR400 into the cutout.
Replace the mounting bracket and tighten the screwsdo not over
tighten. See Figure 1.
Note: Allow a minimum of 1.5 inches of clearance on all sides of the TR400 (all
dimensions are in inches).
Ins ert Mounting Bracket
3.10"
R em ove Mounting Bracket
Front
View
4.85"
Side View
4.28"
5.50"
6.25"
2.61"
Panel
C utout
4.31"
Top
View
2.58"
Figure 1: TR400 Dimensions
Rev D
7
S2TR400 Installation
Intentionally Left Blank
8
Rev D
Section 3
TR400 Wiring & DIP Switches
Introduction
This section discusses electrical information concerning the TR400, including wiring
practices, wiring schematics, and DIP-switch settings.
In this section
These are the topics:
Topic
Practical wiring practices
TR400 wiring schematics
4-20 mA/0-10 Vdc analog output
Switch input wiring
Single channel and quadrature signal wiring
A and B channel input signal wiring
TR400 DIP switches
Rev D
See Page
10
11
13
14
15
16
17
9
S3TR400 Wiring & DIP Switches
Recommended wiring practices
Warning
Recommended wiring practices must be followed when wiring industrial equipment such as the
TR400. Failure to follow the practical wiring practices listed below could result in an injury to
persons or damage to equipment.
Wiring
practices
The following is a list of recommended wiring practices for installing industrial
equipment. It is critically important that you observe and follow these wiring
practices when wiring the TR400.
x All control signals must be shielded cable. The shield must be tied to common or
earth ground at the receiving end only. In some environments, earth ground may
contain excessive electrical noise. If you encounter problems using earth ground as
a shield-tie point, switch the shields to signal common. All connections to the
controller are considered signal unless they carry AC voltage.
x Never use a shielded cable with unused conductors. The unused conductors act as
antennas. Attempting to tie the unused conductors to ground or other signalcarrying wires will create different antenna configurations. In many cases, an
unshielded wire could be less susceptible to electrical noise. Always make sure
that a shielded cable with the correct number of conductors is pulled.
x All control signals must be separated from power wires. Power wiring includes
any AC or DC wires carrying voltages with a current potential of greater that one
(1) amp or a voltage greater than 24 volts. This includes, but is not limited to, 115
Vac, 230 Vac, and 460 Vac. Do not bundle shielded cables and power wires
together.
x Do not run signal cables along high magnetic or electrostatic generators. This
includes, but is not limited to motors, fans, contactors, igniters, etc. Aluminum
shielded cable does not stop magnetically induced noise; braided shielded cable
only partially reduces magnetically induced noise.
x An earth ground wire must be installed on microprocessor-based equipment when
required. Do not rely on the enclosure’s contact with the panel for earth ground.
Earth ground is often used in noise-rejection circuitry as well as for safety.
x Contactors, solenoids, and relay coils connected to the same AC power source or
in the same enclosure panel as the controller must be suppressed with a capacitorresistor filter across the coil. These can be made with a 1 kV capacitor and a ¼watt resistor in series, or they can be purchased in a pre-made package. Use a
capacitance value of 0.1 µF or larger and a resistance value of 500 ohms or less.
x When AC voltage is stepped down for use with equipment, a capacitor-resistor
network or a filter should be placed across the secondary.
10
Rev D
S3TR400 Wiring & DIP Switches
TR400 wiring schematics
Warning
Only qualified personnel should attempt to connect any wires to the TR400. Failure to observe
this warning could result in an injury to persons.
Caution
Do not wire the TR400 to 230 Vac or 10-30 Vdc unless it has been specially wired for that
voltage. The standard voltage setting is 115 Vac. Failure to observe this caution could result in
damage to the TR400.
Wiring
schematic
Figure 2 shows the various wiring schemes for the TR400.
Main board
DC power
AC Power
(+)
(-)
Line(L1)
Neutral(L2)
2 Relay option
6 Relay option
TB1
TB3
1
2
3 NC
4
5
6
(-)
(+)
PLC
Offset Pot
Span Pot
Relay
Output 1
Relay
Output 2
4-20 mA
Relay
Output 3
TB2
Line
(same potential
as TB1-1)
1
2
3
4
5
6
7
8
TB3
NC
Common
+12 V Supply
Signal A
Signal B
Relay
Output 1
Relay
Output 2
1
2
3
4
5
6
Relay
Output 4
Relay
Output 5
Relay
Output 6
1
2
3
4
5
6
7
8
9
10
11
12
13
14
15
16
17
18
Quad Only
Figure 2: TR400 Wiring
Continued on next page
Rev D
11
S3TR400 Wiring & DIP Switches
TR400 wiring schematics, continued
Warning
During a Stop condition, any slight movement of the shaft or magnetic disc could activate the
control relay and start the motor if the Motor Auxiliary, Normally Open Contact (MS Aux n.o.) is
not wired in series. To prevent starting the motor accidentally, always use the proper
LOCKOUT TAG OUT procedures. Failure to observe this warning could result in an injury to
persons or damage to equipment.
Motor
shutdown
schematic
Figure 3 shows a Stop Command Wiring schematic, designed to prevent an
accidental motor startup.
M otor Shutdown with Alarm
MS
Line
Stop
M aintained
OL
Neutral
Start
M om entary
MS
Aux
MS
n.o.
TR400
Internal
On TR400
Internal
On TR400
MS M otor Starter (not supplied)
OL Over Load
n.o. Norm ally open (relay is in a deactivated
state)
W arning Light,
Horn, Solenoid, etc.
Figure 3: Wiring Schematic to Disable the Alarm on a Stop Command
Input power
wiring
12
The TR400 standard comes set-up for 115 Vac, 6VA at 50/60 Hz. An external 1/16
amp slow-blow fuse must be provided by the customer. AC power will tie to TB11,
Line, and TB12, Neutral. Optionally it can be ordered in 230 Vac and 10-30 Vdc.
See Figure 2.
Rev D
S3TR400 Wiring & DIP Switches
4-20 mA/0-10 Vdc analog output
4-20 mA/0-10
VDC analog
output
The 4-20mA output supports a maximum load resistance of 500 ohms. The analog
output plus (+) signal is at TB15, and the negative (-) signal is at TB14, as shown
in Figure 4. This applies for both 0-10VDC* and 4-20mA
See the Diagnostics section for additional information about the analog outputs.
DC Power
AC Power
(+)
(-)
Line (L1)
Neutral (L2)
Analog Output
Analog Output Aux
TB1
1
2
NC 3
4 (–)
5 (+)
6
4–20 mA/
0–10Vdc
Offset Pot
Span Pot
4-20 mA/0-10 Vdc
Figure 4: Wiring for Analog Outputs 4-20 mA/*0-10 Vdc
Analog Output
Aux
*
Analog Output Aux is currently only used with the TR400 when the optional 6 relay
board is installed. When the 6 relay option board is installed, 4-20mA is output at
TB1-5 and 0-10Vdc is output at TB1-6. The common for both is at TB1-4. Only one
output can be calibrated at a time. Only one output should be connected and used at a
time.
When analog is ordered, 4-20mA is standard and 0-10VDC is optional.
Rev D
13
S3TR400 Wiring & DIP Switches
Switch input wiring
Switch inputs
and wiring
There are three (3) switch inputs that are programmable using variable 14. They are
used to Reset the outputs, or to freeze the display. Inputs 1, 2, and 3 require a voltage
equal to the supply voltage, which is at the same potential as the input Line (L1)
voltage. The opposite sides (non accessible) of these solid-state inputs are tied to
input Neutral (L2). Wire input 1 to TB21, input 2 to TB22, and input 3, to TB23.
See Figure 5.
DC Power
AC Power
(+)
(-)
Line (L1)
Neutral (L2)
TB1
1
2
3
4
5
6
TB2
Switch Inputs
1
2
3
4
5
6
7
8
Figure 5: Wiring for Switch Inputs
14
Rev D
S3TR400 Wiring & DIP Switches
Single-channel and quadrature signal wiring
Signal types
There are two (2) signal types: Single Channel and Quadrature:
x Single Channel Rate information is provided by a single pulse generator
connected to channel A, input terminal, TB27.
x Quadrature Quadrature signals are configured for speed and direction. Sensor
wiring is across TB2, 7 and 8. Rate information is provided by a two-channel
quadrature pulse generator with a 90º phase shift between the signals, as shown in
Figure 6.
0
180
90
360
270
Output (1)
Output (2)
Figure 6: Two-Channel Quadrature Signals 90º Phase Shift
A and B
channel input
signals
Rev D
These inputs require a frequency input relative to speed. Devices such as Hall-Effect
sensors, encoders, or magnetic pickups can be used. Voltage to these sensors is from
TB26 (+12 Vdc) and TB25 (common). The maximum current draw available is
100 mA @ 12 Vdc, unregulated.
15
S3TR400 Wiring & DIP Switches
A and B channel input signal wiring
Caution
Never use shielded cable with extra conductors. Extra conductors can act as antennas, picking
up electrical noise. Failure to observe this caution could result in improper sensor operation.
A and B
channel input
signal wiring
Wiring to these inputs should be shielded cable, with the shield tied to TB25
common only. TB27 is the single-channel A input signal, and TB28 is the channel
B input signal. TB28 is Quadrature only. See Figure 7.
TB2
1
2
3
4
5
6
7
8
NC
Common
+12 V Supply
Signal A
Signal B
Quad Only
Figure 7: Wiring for Channels A and B Input Signals
16
Rev D
S3TR400 Wiring & DIP Switches
TR400 DIP switches
The sensor DIP switches are located on the bottom of the TR400, as shown in Figure
8. Sensor input and switch information is shown in Table 1.
Sensor DIP
switches
Table 1: Sensor Input Configuration DIP Switches
Input
Input Type
NPN
Switch ON
Switch OFF
5
4, 6
Channel A TB27
PNP
Mag. 2
Wire
6
4
4 ,5
5, 6
Logic
Level
None
4, 5, 6
NPN
2
1, 3
Channel B TB28
PNP
Mag. 2
Wire
3
1
1, 2
2, 3
Logic
Level
None
1, 2, 3
Note: All Electro-Sensors, Inc., sensors are NPN open collector.
TR400
standard DIP
switch settings
Since all sensing devices produced by Electro-Sensors, Inc., are NPN open collector,
the standard switch settings are 2 and 5, set to ON, and all others set to OFF, as
shown in Figure 8.
OFF
ON
1 2 3 4 5 6
123456
Figure 8: TR400 Sensor Switch Settings
Sensor
connections
Sensor connection information is shown in Table 2.
Table 2: Sensor Connections
Connection
TB25, Common
TB26, Supply
TB27, Signal A
TB28, Signal B
Sensor 906/907
Clear/White
Red
Black
*Green
ESI Prox
Blue
Brown
Black
N/A
ESI Other
Black
Red
Clear/White
Green
Note: If the signal is reversed, swap signal A and signal B wires.
Present in bi-directional version only.
Rev D
17
S3TR400 Wiring & DIP Switches
Intentionally Left Blank
18
Rev D
Section 4
TR400 Set-Up Parameters
Introduction
This section discusses information about the TR400 operations panel and set-up
parameters.
In this section
These are the topics:
Topic
TR400 parts and functions
TR400 set-up parameters
Rev D
See Page
20
22
19
S4TR400 Set-Up Parameters
TR400 parts and functions
Overview
The TR400 face contains five (5) status LEDs, a four-digit display, and a keypad
containing nine (9) keys. See Figures 9a and 9b; the letters in Figures 9a and 9b
represent each part on the front panel of the TR400. The Parts and Functions table
that follows describes the function of each the parts.
Sensor DIP switches, located on the bottom of the TR400, are not discussed in this
section; see “TR400 DIP Switches” in Section 3.
B
C
A
REV PROG
OUT
1
OUT
2
KEY
ERR
0000
VAR
REV
ENTER
DIAG
TR400 RATEMETER
Figure 9a: TR400 Front Panel Description
Table 3: TR400 Panel Parts and Functions
Part
A
B
C
Function
The REV LED will light when either variable 15 or 16 is being
programmed for reverse direction. By pressing the REV key when in
variable 15 or 16, the REV LED will light and stay lighted until you exit
Program Mode and will re-light every time you select and enter that
variable. It will also light when the TR400 is programmed for Quadrature
Mode, where signal B leads signal A.
The PROG LED will light when the VAR key is pressed, indicating
Program Mode. It also turns on when the DIAG key is pressed, entering
Diagnostic Mode.
The OUT 1 LED will light when relay “1” is activated. Relay “1” is
enabled by variable 13, and its set-point value is entered in variable 07.
Continued on next page
20
Rev D
S4TR400 Set-Up Parameters
TR400 parts and functions, continued
REV PROG
OUT
1
OUT
2
D
KEY
ERR
E
O
N
0000
F
M
VAR
G
REV
L
H
ENTER
J
K
DIAG
I
TR400 RATEMETER
Figure 9b: TR400 Front Panel Description
Table 3: TR400 Panel Parts and Functions (continued)
Part
D
E
F
G
H
I
J
K
L
M
N
O
Rev D
Function
The OUT 2 LED will light when relay “2” is activated. Relay “2” is enabled
by variable 13, and its set point value is entered in variable 10.
The KEY ERR LED will light when the wrong key is pressed.
The REV key is used to establish reverse direction when programming
variables 15 and 16.
The ENTER key is used in Program Mode to set the value of a variable after
it has been changed.
The RIGHT ARROW key, when pressed, selects the next digit to the right
when in Program Mode.
The DIAG key, when pressed, enters Diagnostic Mode. Press the DIAG key
again to exit Diagnostic Mode.
The DOWN ARROW key, when pressed in Program Mode, decrements the
active digit position on the display down by one (1).
The DECIMAL POINT key, when pressed when in Program Mode, moves
the decimal point to the left one place.
The LEFT ARROW key, when pressed in Program Mode, selects the next
digit to the left.
The VAR key when pressed, enters Program Mode.
The UP ARROW key, when pressed in Program Mode, increments the
active digit position on the display up by one (1).
Four-digit display.
21
S4TR400 Set-Up Parameters
TR400 set-up parameters
Set-up
parameters
The TR400 comes from the factory set for NPN open-collector operation. In most
applications, when using a standard Hall-Effect sensor with the model 255 disc, only
a few variables need to be programmed. For example, RPM (Revolutions Per
Minute) and PPR (Pulses Per Revolution):
x If your operation involves relays requiring the reading of RPM, variable 01, Max
RPM and variable 03, Display Units should be set to the same value.
x If you are using a 255 disc or standard wrap, variable 02 should be the default
value of 8 PPR.
A typical shaft monitoring scenario for the TR400 is shown in Figure 10.
OUT
2
KEY
ERR
S
Sensor
N
N
N
OUT
1
S
REV PROG
S
S
N
1 5 0 0
N
Direction of Signal
N
N
N S
S
S
N S N S N S
VAR
REV
S
N
S
ENTER
DIAG
Rotating
Pulser Disc
T R400 RATEM ETER
Figure 10: TR400 Monitoring Shaft Speed
Set-point and
relay output
values
In some applications, the set point will be 90 to 95 percent of full operating speed for
safety reasons. Consider the following variables when setting relay outputs:
Set points, delay and on-times, and output function selection; for example:
x Variables 07, 10, 36, 39, 43, 46, 50, and 53: outputs 1 through 8 respectively,
hold the set point value.
x Variables 08, 09, 11, 12, 37, 38, 40, 41, 44, 45, 47, 48, 51, 52, 54, and 55: delay
and on-time values should be set to one (1) second (default), which will meet
most requirements.
x Variable 13, 42, 49, and 56: output function selection is where the operation of
relays 1 through 8 is defined, which is usually an underspeed condition.
22
Rev D
Section 5
TR400 Programming
Introduction
This section discusses information about programming the TR400.
In this section
These are the topics:
Topic
Programmable variables
How to select a variable and view its data
Keypad keys used to access and program variables
How to select and change a variable’s numerical value
Programming rate and signal parameters
Programming the display
Programming the relay outputs
Programming the analog output
Programming the switch inputs
Rev D
See Page
24
27
29
30
32
33
35
38
39
23
S6TR400 Diagnostics
Programmable variables
Variables
Table 4 describes the programmable variables for the TR400.
Table 4: TR400 Programmable Variables
Var #
00
Variable Name
Security Match Code
01
02
03
Max RPM
PPR
Display Units
04
05
Rate Function
Keypad Lockout
06
Start-Delay Time
07
Output 1 Value
08
Output 1 Delay Time
09
Output 1 On Time
10
Output 2 Value
11
Output 2 Delay Time
12
Output 2 On Time
13
Relay Output 1 & 2
Function
Description
This value is compared to the security code
number, which is programmed in diagnostics.
Record the value in diagnostics not variable 00.
x Numbers match = Unlocked
x Numbers don’t match = Locked
Keypad lockout options are set in variable 05.
Maximum Revolutions Per Minute.
Pulses Per Revolution.
The value displayed when a monitored shaft is
turning at the speed programmed in variable 01,
Max RPM.
Selects the display and input signal types.
Selects the function keys that are enabled or
disabled when security is set (keypad lockout
function).
Upon power-up or after initiating a Reset, the
relays are turned on, regardless of the set-point
condition, for the amount of time in seconds
entered in this variable, up to 600 seconds. The
start-delay time allows the process to reach
normal operating speed.
Holds the set-point value for output “1” in
display units.
The amount of time that the set-point condition
must exist before the output will deactivate.
The minimum time that the output will stay
inactive when a set-point condition occursup
to 600 seconds. The output latch code value is
999.9.
Holds the set-point value for output 2 in display
units.
The amount of time that the set-point condition
must exist before the output will deactivate
The minimum time the output will stay inactive
when a set-point condition occursup to 600
seconds. The output latch code value is 999.9.
Selects the set-point function of the relay outputs
and the direction required for activation.
See Page
48
Default
Values
0400
31
31
31
1800
0008
1800
32
48
0000
36
001.0
36
1500
37
001.0
37
001.0
36
1000
37
001.0
37
001.0
35
0000
User
Values
Continued on next page
24
Rev D
S6TR400 Diagnostics
Programmable variables, continued
Var #
Variable Name
14
Input Function
Selection
Display Value at 4
mA
Display Value at 20
mA
Range Selection
Display Unit Interval
Analog Output
Response Time
15
16
17
18
19
20
21
22
23-24
25-32
33-35
36
Modbus Node
Address
Modbus Baud Rate
Analog Output cutoff
%
Reserved
Reserved (Modbus
only)
Reserved
Output 3 Value
37
Output 3 Delay Time
38
Output 3 On Time
39
Output 4 Value
40
Output 4 Delay Time
41
Output 4 On Time
42
Relays 3 & 4 Output
Function
Description
The configuration for the switch inputs.
39
Default
Value
0000
The rate-display value to be represented at 4 mA
output.
The rate-display value to be represented at 20
mA output.
The time it takes the display to zero out.
The time in seconds for the display to update.
The response time of the analog output in
percent. The analog output changes with input
frequency changes.
Address the TR400 resides on the network
38
0000
38
1800
34
34
38
0500
000.5
000.0
Addendum
0001
0 = 2400, 1 = 4800, 2 = 9600, 3 = 19200, 4 =
38400
The percent of full scale where the analog cuts
off to zero output. It can be set from 0.0 to 10.0
percent.
Addendum
0003
38
000.5
Read only status
Addendum
-------
36
---0600
37
001.0
37
001.0
36
0500
37
001.0
37
001.0
35
0000
Holds the set-point value for output “3” in
display units.
The amount of time that the set-point condition
must exist before the output will deactivate.
The minimum time that the output will stay
inactive when a set-point condition occursup
to 600 seconds. The output latch code value is
999.9.
Holds the set-point value for output 4 in display
units.
The amount of time that the set-point condition
must exist before the output will deactivate
The minimum time the output will stay inactive
when a set-point condition occursup to 600
seconds. The output latch code value is 999.9.
Selects the set-point function of the relay outputs
and the direction required for activation.
See Page
User
Value
Continued on next page
Rev D
25
S6TR400 Diagnostics
Programmable variables, continued
Var #
Variable Name
43
Output 5 Value
44
Output 5 Delay Time
45
Output 5 On Time
46
Output 6 Value
47
Output 6 Delay Time
48
Output 6 On Time
49
50
Relays 5 & 6 Output
Function
Output 7 Value
51
Output 7 Delay Time
52
Output 7 On Time
53
Output 8 Value
54
Output 8 Delay Time
55
Output 8 On Time
56
Relays 7 & 8 Output
Function
26
Description
See Page
Holds the set-point value for output “5” in
display units.
The amount of time that the set-point condition
must exist before the output will deactivate.
The minimum time that the output will stay
inactive when a set-point condition occursup
to 600 seconds. The output latch code value is
999.9.
Holds the set-point value for output 6 in display
units.
The amount of time that the set-point condition
must exist before the output will deactivate
The minimum time the output will stay inactive
when a set-point condition occursup to 600
seconds. The output latch code value is 999.9.
Selects the set-point function of the relay outputs
and the direction required for activation.
Holds the set-point value for output “7” in
display units.
The amount of time that the set-point condition
must exist before the output will deactivate.
The minimum time that the output will stay
inactive when a set-point condition occursup
to 600 seconds. The output latch code value is
999.9.
Holds the set-point value for output 8 in display
units.
The amount of time that the set-point condition
must exist before the output will deactivate
The minimum time the output will stay inactive
when a set-point condition occursup to 600
seconds. The output latch code value is 999.9.
Selects the set-point function of the relay outputs
and the direction required for activation.
36
Default
Values
0400
37
001.0
37
001.0
36
0300
37
001.0
37
001.0
35
0000
36
0200
37
001.0
37
001.0
36
0100
37
001.0
37
001.0
35
0000
Rev D
User
Values
S6TR400 Diagnostics
How to select a variable and view its data
Overview
Each programmable variable can be selected and its data viewed within a few key
pressesthe results will appear on the display. The following procedure shows how
to enter Program Mode and view the data for variable 01, Max RPM.
Selecting the
variable
To select variable 01, do the following three steps:
Step
1.
Action
Press the VAR key; the PROG LED will light, and the display will show
Pr (Program Mode) and a variable with the 1’s digit position flashing. See
Figure 11 for a pictorial of this step.
LED On
Flashing digit
REV
PROG
OUT
1
OUT
2
KEY
ERR
P r 0 1
Press
VAR
REV
ENTER
DIAG
Figure 11: TR400 Placed in Program Mode Displaying Variable 01
Note: The TR400 will remember the last variable selected and changed until the
TR400 is powered Down and then Up. This will Reset the TR400 to display
Pr01 (the first time you enter Program Mode after a power-up).
Continued on next page
Rev D
27
S6TR400 Diagnostics
How to select a variable and view its data, continued
Viewing
variable data
To view the data for variable 01, do the following:
Step
2.
Action
Press the ENTER key to go to the data-entry level; the display will show
1800, the (default value) for variable 01, Max RPM, with the 1’s digit
position flashing. See Figure 12 for a pictorial of this step.
REV
PROG
OUT
1
OUT
2
KEY
ERR
1800 RPM (default value) for variable 01,
Max RPM, with 1’s digit position flashing
1 8 0 0
ENTER
Press
Figure 12: Data for Variable 01
Exiting
To exit the variable without changing its value, do the following:
3.
Press the VAR or ENTER key to exit Program Mode with no change to
the data. See Figure 13 for a pictorial of this step.
REV
PROG
OUT
1
OUT
2
KEY
ERR
LED Off
0 0 0 0
Meter idle display (Program Mode exited)
VAR
Press either key
ENTER
Figure 13: Exit Program Mode Without Changing the Variable’s Value
Continued on next page
28
Rev D
S6TR400 Diagnostics
Keypad keys used to access and program variables
Overview
You can access and program the variables by using the VAR, LEFT ARROW,
RIGHT ARROW, UP ARROW, DOWN ARROW, DECIMAL, and ENTER keypad
keys. The REV and DIAG keys are inactive when the TR400 is in Program Mode.
Figure 14 shows only the keys used to program the variables. Table 5 describes the
keys and their functions.
A
B
VAR
C
G
D
ENTER
F
E
Figure 14: Keypad Keys Used to Program Variables
Table 5: TR400 Keys and Functions for Programming Variables
Key
A
B
C
D
E
F
G
Rev D
Function
x Press the VAR key to enter Program Mode; the display will show Pr
(Program Mode) and the last selected programmable variable, 01 thru 56.
x Press the VAR key again to exit Program Mode.
Press the UP ARROW key to increment the flashing digit by one (1) on the
display.
x Press the ENTER key to go to the data-entry level for the programmable
variable.
x Press the ENTER key to accept the new numerical value and exit
Program Mode.
Press the Right ARROW key to select a digit position from left to right on
the display.
Press the DOWN ARROW key to decrement the flashing digit by one (1)
on the display.
Press the DECIMAL key to position the decimal point at each digit
position from right to left on the display.
Press the LEFT ARROW key to select a digit position from right to left on
the display.
29
S6TR400 Diagnostics
How to select and change a variable’s numerical value
The following 7-step procedure shows:
Exercise
x How to enter Program Mode
x How to change from variable 01 (Max RPM) to variable 02 (PPR)
x How to change the value of variable 02 from 8 PPR to 16 PPR
x How to save the change, and exit Program Mode
Note: You can use the following 7-step procedure to select any variable, change its
value, and save the results.
Note:
You can select a variable and change its value either when the TR400 is
monitoring or when it is idle.
To select variable 02 and display its data, press the key sequence shown in the three
(3) steps below, while viewing the result on the display.
Selecting and
displaying
variable data
Step 1
REV
PROG
OUT
1
Step 3
Step 2
OUT
2
KEY
ERR
REV
PROG
OUT
1
OUT
2
KEY
ERR
REV
PROG
OUT
1
OUT
2
KEY
ERR
LED ON
P r 0 1
P r 0 2
0 0 0 8
Data Entry Level, 8 PPR
Press
VAR
REV
ENTER
Press
Press
ENTER
DIAG
Continued on next page
30
Rev D
S6TR400 Diagnostics
How to select and change a variable’s numerical value, continued
Changing the
value
To change the PPR from 8 to 16 for variable 02, press each key the number of times
shown in the three (3) steps below, while viewing the results on the display.
Step 4
REV
PROG
OUT
1
OUT
2
Step 6
Step 5
KEY
ERR
REV
0 0 0 6
PROG
OUT
1
OUT
2
KEY
ERR
REV
0 0 0 6
PROG
OUT
1
OUT
2
KEY
ERR
0 0 1 6
Press
Press
2 Presses
Saving the
Value and
exiting
To save the new value and exit Program Mode, press the ENTER key shown in Step
7 below, and view the result on the displaythe PROG LED is OFF.
Step 7
REV
PROG
OUT
1
OUT
2
KEY
ERR
LED OFF
0 0 0 0
Meter idle display (Program Mode exited)
ENTER
Press
Rev D
31
S6TR400 Diagnostics
Programming rate and signal parameters
Overview
Programming Rate  The TR400 has the ability to display rates as “Speed” or as
“Time in Process.” Variables 01, 02, 03, and 04 are used to program the rate and
signal parameters.
Variables 01,
RPM, and 02,
PPR
x Variable 01, Maximum RPM  Enter the maximum desired speed (Revolutions
Per Minute) for the monitored shaft.
x Variable 02, PPR  Enter the actual Pulses Per Revolution for the sensor on the
monitored shaft.
Note: Electro-Sensors Model 906 sensor with a Model 255 disc will provide eight
(8) PPR.
Variable 03,
display value
/user units
Display Value/User Units  Enter the value of the “user units” that will appear on
the display when the monitored shaft is turning at the “speed” programmed in
variable 01.
The position of the decimal point will be fixed in Display Mode by its placement in
variable 03.
32
Rev D
S6TR400 Diagnostics
Programming the display
Overview
Variables 04, 17, and 18 select the data to be displayed and the frequency at which it
will be displayed.
Variable 04,
rate function
The Rate Function sets the display and input signal types as shown below.
Display Characters:
0 0 0 0
Rate Display: 0 = Speed, 1 = Time in Process
Signal Type: 0 = Single Channel, 1 = Q uadrature
Examples of this type of display are RPM (Revolutions Per Minutes) and FPM (Feet
Per Minute).
Rate Displays:
x Speed  Speed is the most commonly selected display option. Speed is
calculated by the formula:
Variable 03 x Shaft Speed
Speed =
Variable 01
x Time In Process  The Time In Process (TIP) display is the inverse of the speed
display and is calculated by the following formula:
Variable 03 x Variable 01
TIP =
Shaft Speed
The accuracy of the above formulas is dependent upon Variable 02 (PPR) since:
RPM (Variable 01) x PPR (Variable 02)
Frequency =
60
Continued on next page
Rev D
33
S6TR400 Diagnostics
Programming the display, continued
Variable 17,
range selection
The Range Selection can be set to values from 1 to 9999. The default setting is 500,
which should be suitable for most applications. If the TR400 display does not zero
out as desired, decrease the range selection value which will decrease the time for the
display to read zero (0), but will increase the minimum speed that will appear on the
display.
For example, when the TR400 is programmed to read 1800 RPM maximum, it will
read any speed under 3.6 RPM as zero (0); RPM formula (1800/500 = 3.6). This is
used to prevent long update times before the display reads zero (0).
Variable 18,
display update
interval
34
The Display Update Interval enables the TR400 to show speed averages for slow and
unstable shafts. The minimum update interval is 0.5 seconds, and the maximum
update interval is eight (8) seconds. The factory default is 0.5 seconds.
Rev D
S6TR400 Diagnostics
Programming the relay outputs
Overview of the
variables in a
matrix as they
pertain to the
Setpoints
Variables 13,
42, 49 & 56
relay output
function
SP1
SP2
SP3
SP4
SP5
SP6
SP7
SP8
Start delay
6
6
6
6
6
6
6
6
Setpoint value
7
10
36
39
43
46
50
53
Delay time
8
11
37
40
44
47
51
54
On time
9
12
38
41
45
48
52
55
Relay function
13
13
42
42
49
49
56
56
The Relay Output Function sets the function of the relay outputs and the direction
required for activation.
Each relay output has a set-point value (variables 07, 10, 36, 39, 43, 46, 50, and 53).
The set-point value is compared to the value appearing on the display, and when they
match, an action is performed.
The Relay outputs can be configured as shown below:
Display Characters
0 0 0 0
Variable
13 42 49 56
Output
Output
1 3 5 7
2 4 6 8
Output
Output
1 3 5 7
2 4 6 8
Relay Output Function
0 = Unused
1 = Underspeed
2 = Overspeed
3 = Forward/Reverse*
Activation Direction
0 = Forward Only
1 = Reverse Only
2 = Forward and Reverse
Underspeed  Deactivates the output when the displayed value is below the set
point value.
Overspeed  Deactivates the output when the displayed value is above the set point
value.
Forward/Reverse  (Quadrature) output is activated when the channel A signal
leads the channel B signal.
Continued on next page
Requires a quadrature sensor.
Rev D
35
S6TR400 Diagnostics
Programming the relay outputs, continued
Variables 13,
42, 49, and 56
activation
direction
Forward Only  When the output activation-direction digit of variables 13, 42, 49,
56 is set to zero (0), the associated output set point is only valid when the TR400
recognizes the input signal as being in the forward direction (REV LED OFF).
Note: Both output activation-direction digits should be zero (0) if quadrature
feedback is not in use.
Reverse Only  When the output activation-direction digit of variables 13, 42, 49,
56 is set to one (1), the associated output set point is only valid when the TR400
recognizes the input signal as being in the reverse direction (REV LED ON).
Forward and Reverse  This function is used in a bi-directional application when
set points of the same value are required in both forward and reverse directions.
Variable 06,
start delay time
Upon power-up or after an active Reset, both outputs are held ON until the Start
Delay expires. The amount of delay time can be set up to 600 seconds. The default is
one (1) second.
Output set
points
The output set-point value is compared to the value that appears on the display, and
the outputs will deactivate if a set-point condition occurs after the Start Delay times
out.
Variables 07,
10, 36, 39, 43,
46, 50 and 53,
relay output set
point values
These variables are used to set the values at which the outputs will activate. There is
a 1 percent hysteresis for the value used to activate the outputs; e.g., with an
underspeed set point of 1000 RPM, the output will activate at 1010 RPM, if the On
Time has expired.
The default value for variable 07 is 1500, 10 is 1000, 36 is 600, 39 is 500, 43 is 400,
46 is 300, 50 is 200, and 53 is 100.
Continued on next page
36
Rev D
S6TR400 Diagnostics
Programming the relay outputs, continued
Variables 08,
11, 37, 40, 44,
47, 51, and 54,
relay outputdelay times
Output Delay Times are used to set the amount of time the set-point condition must
exist before the output will respond. The default value for these variables is one (1)
second.
Variables 09,
12, 38, 41, 45,
48, 52, and 55,
relay outputon times
Output On Times are used to set the minimum time that the output must be deenergized after a set point condition occurs and the relay has been de-energized. This
value can be up to 600 seconds. The default value for these variables is one (1)
second.
Latching
outputs
The relay outputs can be set to latch by entering value 999.9 in the relays applicable
“on time” variable. The outputs will then latch when a fault is detected. This holds
the output inactive until a Reset, or the power is cycled to clear the output.
Rev D
37
S6TR400 Diagnostics
Programming the analog output
Overview
The analog range is specified with variables 15 and 16. The output is linear between
the two specified values. Variable 19 is used to set the analog output response time.
Variable 22 is used to set the bottom end cutoff
The REV key is used to change the direction associated with the value.
Variable 15,
4 mA display
This variable contains the display value at which the analog output is 4 mA or 0
VDC. The default is “0.”
Variable 16,
20 mA display
This variable contains the display value at which the analog output is 20 mA or 10
VDC. The default is “1800.”
Note:
Variables 15 and 16 can be set up for reverse direction or as a window, 200800
RPM.
Variable 19,
analog output
response time
The variable sets the response time of the TR400's analog output from 0 to 100
percent. The TR400 will limit how much the analog output can change as the input
frequency changes, filtering the output. The minimum response time is “0.0,” which
corresponds to approximately 50 msec from 0 to 100 percent. The maximum
response time is ten (10) seconds. The default is “0.0.”
Variable 22,
analog output
cutoff
This is used to set when the analog cuts off to zero. It can be set from 0.0 to 10.0
percent. This is used to speed up the zeroing of the analog output to zero out.”
The 0-10 Vdc analog output is optional.
38
Rev D
S6TR400 Diagnostics
Programming the switch inputs
Overview
The switch inputs are configured using variable 14. The switch inputs can be
configured to Reset the outputs or freeze the display.
For switch input wiring, see the TR400 Wiring & DIP Switches section.
Caution
When the digital input function is programmed as a Reset input and the switch input remains
closed, the relay will never turn OFF regardless of the operating condition. A momentary
contact closing of the switch is advised. Failure to observe this caution could result in damage
to the equipment.
Variable 14,
switch input
function
selection
This variable configures the function of the switch inputs.
The input functions’ bit assignments are as shown below:
Display Characters
0 0 0 0
Input 1
Input 2
Input 3
Digital Input Functions
0 = Unused
1 = Reset Output 1
2 = Reset Output 2
3 = Display Hold
4 = System Reset
Reset Output  Deactivates the latched output.
Display Hold  Freezes the display. The analog output and set points are unaffected
by this switch.
System Reset  Acts as a power-up function; all set points are reset and will not
activate until the start-delay times out. This allows the monitored
shaft to reach proper operating speed and eliminates the need for an
external start-delay relay.
Rev D
39
S6TR400 Diagnostics
Intentionally Left Blank
40
Rev D
Section 6
TR400 Diagnostics
Introduction
Diagnostics are used to test the functionality of the TR400. When the DIAG key is
pressed, the TR400 will display “dIAg,” and all of the LEDs except the KEY ERR
LED will light. The LEDs will remain on until you exit Diagnostic Mode.
In Diagnostics you can do the following:
x
x
x
x
x
x
In this section
Test the keypad and display
Test the switch inputs
Test the relay output
Calibrate the analog output
Resetting the variables
Set up the keypad security
These are the topics:
Topic
Keypad and display test
Relay output test
Switch input test
Analog output calibration
Resetting the variables
Setting and changing the security code number
System slowdown test
Clearing the LRC
Rev D
See Page
42
43
44
45
47
48
50
51
41
S6TR400 Diagnostics
Keypad and display test
Overview
The keypad diagnostic tests the functionality of each key and bit position on the
display.
Keypad and
display test
To perform the keypad test, do the following:
Step
1.
2.
3.
4.
Action
Press the DIAG key.
Press the VAR key; the display will show 8888, the keypad diagnostic.
Press each key from left to right and the display will appear as shown in
Figure 15. Note the position of the decimal point after each key press.
Press the DIAG key to exit the keypad diagnostic.
D isplay
1 1 1 1.
2 2 2. 2
VAR
4. 4 4 4
3 3. 3 3
REV
5 5 5 5.
6 6 6 6.
ENTER
7 7 7. 7
8 8. 8 8
Figure 15: Keypad Test Showing the Display After Each Key Press
42
Rev D
S6TR400 Diagnostics
Relay output test
Overview
The Relay Output diagnostic tests the functionality of the relays.
Relay output
test
To test the relay outputs, do the following:
Step
1.
2.
Action
Press the DIAG key.
Press the RIGHT ARROW key and the display will show the status of
relay outputs 1, 3, 5, 7 and 2, 4, 6, 8. See Figure 16.
Display Characters
0 0 0 0
0 = OFF
1 = ON
Output 1, 3, 5, 7
Output 2, 4, 6, 8
Figure 16: Relay Output Test Display
3.
4.
Rev D
Use the LEFT ARROW key to turn ON output 2, 4, 6, and 8. Use the
RIGHT ARROW key to turn ON output 1, 3, 5, and 7.
To turn OFF both outputs, press the ENTER key.
43
S6TR400 Diagnostics
Switch input test
Overview
The Switch Input diagnostic tests the TR400’s ability to recognize switch inputs tied
to TB1. When a closed switch is tied to TB2, screw tap 1, 2, or 3, the
corresponding bit position will toggle to “1.”
Switch input
test
To test the switch inputs, do the following:
Step
1.
2.
Action
Press the DIAG key.
Press the UP ARROW key and the display will show the status of the
three (3) switch inputs.
When a switch is activated at one of the inputs, the corresponding display
character toggles to “1.” When an input turns OFF, the corresponding
display character toggles to “0.”
Figure 17 shows the bit positions associated with the three (3) switch
inputs.
Display Characters
0 0 0 0
0 = OFF
1 = ON
Input 1
Input 2
Input 3
Figure 17: Display Bit Positions Associated with Switch Inputs
44
Rev D
S6TR400 Diagnostics
Analog output calibration
Overview
The Analog Output diagnostic puts the TR400 into Pot Output Mode, which permits
you to adjust the 4-20 mA 12-bit isolated, or the 0-10 Vdc output. The same
hardware and procedure are used regardless of the option. There is a direct
correlation between current/voltage and speed. See Figure 18.
20
mA
4
Sp eed
Figure 18: 420 mA 12 Bit Isolated Output Display
Note: 4-20 mA or 0-10 Vdc output is set up at the factory.
Adjusting the
output
To adjust the 4-20 mA or 0-10 Vdc output, do the following:
Step
1.
2.
Action
Connect a milliammeter with a maximum load resistor of 500 ohms
across TB14 and 5, or a voltmeter if using the 0-10 Vdc option.
Press the DIAG key.
Continued on next page
The 0-10 Vdc analog output is optional.
Rev D
45
S6TR400 Diagnostics
Analog output calibration, continued
Step
3.
Action
Press the DOWN ARROW key and the display will appear, as shown
in Figure 19.
Display Characters
0
0
Percent Symbol
00 – 99 Range
Figure 19: 420 mA or 010 Vdc Output Display In Percent
4.
5.
6.
7.
46
Turn the Offset Pot until the mA meter reads 4 mA or V meter reads 0
Vdc.
Press the UP ARROW key until the display reads 99%.
Adjust the Span Pot until the meter reads either 20 mA or 10 Vdc.
Press the DIAG key to exit the diagnostic.
Rev D
S6TR400 Diagnostics
Resetting the variables
Overview
When necessary, the TR400’s variables can be reset to factory default, using the
default function. See Figure 20.
Resetting
variables
To Reset the variables, do the following:
Step
1.
2.
Action
Press the DIAG key.
Press the REV key; the display will appear as shown in Figure 20, with
the factory defaults restored.
Display Characters
r
E S E
Figure 20: Reset Variables Display
Rev D
47
S6TR400 Diagnostics
Setting and changing the security code number
Overview
The TR400 can be programmed to prevent unauthorized changes to its operational
variables by setting the keypad lockout function, using a security code number.
There are three elements to enable or disable the keypad lockout function: variable
05 (selectable lockouts), variable 00 (security access number), and the location
where you set up the security code number, which will be in Diagnostics.
Variable 05,
keypad lockout
Variable 05 is used to select the function keys that are enabled or disabled when
security is set.
Display Characters
0 0 1 1
0 = Unlocked
1 = Locked
Variable Key
(Variables can be viewed but not changed.)
Diagnostic Key
The default value for variable 05 is “0011,” as shown above. This level of security
prevents two things:
x Changing the variables (except variable 00) and allowing them to be viewed
only.
x Entering Diagnostics Mode.
Variable 00,
security code
number and
location
The Security Code Number is a number chosen by you. The default number is 0400.
After you enter a new security code number to “enable” the keypad lockout function
in Diagnostics Mode, you must enter that same number into variable 00, to “disable”
the keypad lockout function.
For example, if you enter 0401 into Diagnostics Mode for your security code number
(which will enable the keypad lockout function) you must enter “0401” into variable
00 when you want to disable the keypad lockout function, which allows you access
to all keys.
Continued on next page
48
Rev D
S6TR400 Diagnostics
Setting and changing the security code number, continued
Setting security
To set the security code number, do the following:
Step
1.
2.
3.
Action
Determine which keys you want to lock out, using variable 05. The
default is 0011, which locks out the DIAG key and prevents changes to
operational variables, except variable 00.
Press the DIAG key.
Press the LEFT ARROW key and the display will show the default
Security Code of 0400, as shown in Figure 21.
REV
PROG
O UT
1
OUT
2
KEY
ERR
All LEDs ON
0 4 0 0
Figure 21: Security Code Number in Diagnostics Mode
4.
Enter a new security code number, up to four digits.
Important
Write your security code number down on paper and keep it in a safe place; if you
forget the number or lose it, you will not be able to “disable” the keypad lockout
function.
5.
Rev D
Press the ENTER key to set the new security code number; this will
enable the keypad lockout function and exit Diagnostics Mode.
49
S6TR400 Diagnostics
System slowdown test
Overview
The system slowdown test, tests the functionality of the system as a whole.
System
slowdown test
To run the slowdown test on the system you must have the system up and running.
The system must be running faster then the relay setpoints you wish to test. This test
does not require the user to change the setpoints, and works on underspeed setpoints
only. Activating the test on the TR400 slowly scales down the actual input frequency
to ramp down the display and trigger the relays, (simulating a real slowdown while
running at normal speed). This verifies all aspects of the system. Releasing the (.)
decimal point key at any time restores the system to a normal state. To initiate the
test follow the steps below:
Step
Action
1
Press the (.) decimal key and hold it down.
2
The displayed RPMs will start to decrement after 1.5 sec.
3
The alarm Setpoint will go off and the alarm should sound. This should
occur (2-6 seconds) after starting the test depending on the operating
speed. These times are based on the operating speeds of 50RPM to
200RPM. The test will work at all speeds but time will be greater or less
than those shown.
4
The shutdown Setpoint will go off and the system should shut down. (3-8
seconds) after starting the test depending on the operating speed.
5
Test complete release the decimal key
Note:
50
This test in this form is available on versions 20.22 and later.
Rev D
S6TR400 Diagnostics
Clearing the LRC code
LRC on the display is due to the EEPROM memory corruption. This is typically caused by a large power
disturbance. Normally all that is necessary is the unit will have to be reset, and the values in the variables
re-entered. This can be done by holding the “diAG” key while the power to the unit is off, and continue
holding the “diAg’ key while the power to the unit is restored. The unit will say “RESE”. When the
“RESE” is displayed the “diAg” key should be released. It should now no longer display the LRC and
you should be free to reprogram at this time.
Rev D
51
S6TR400 Diagnostics
Intentionally Left Blank
52
Rev D
Appendix A:
TR400 Specifications
Power
Input Power
Description
x 115 Vac, 6VA @ 50/60 Hz, requires external fuse 1/16 amp slowblow
x 230 Vac, 6VA @ 50/60 Hz, requires external fuse 1/32 amp slowblow
x 10-30 Vdc requires external fuse 2 amp slow- blow
Sensor
Sensor Supply
Sensor Input
NPN Open Collector
PNP Open Collector
Logic Level
Magnetic Pickup
Maximum Frequency
Optional External Control
I/O
Switch Inputs
Set Point Outputs (Relays)
Analog Outputs
Description
12 Vdc unregulated up to 100mA for 115 and 230 Vac units.
12 Vdc regulated up to 100mA for 10-30 Vdc units, max 2 relays.
12 Vdc regulated up to 50mA for 10-30 Vdc units with 6 relays.
Switch selectable
2200 ohm pull-up to 12 Vdc, 2.5 volts trigger level
2200 ohm pull-down, 2.5 volts trigger level
2.5 volts trigger level
150 mV peak-to-peak minimum signal, 50 mV trigger level
Up to 4 kHz (consult factory for higher frequencies)
Description
3 programmable inputs
2 or 6 programmable-form C relays on board, rated 250 Vac 5 amp, 30
Vdc 5 amp resistive load With option for 8 external relays.
1 programmable 4-20 mA or 0-10 VDC output, 12 bit
Continued on next page
Rev D
53
TR400 Specifications
Operational Values
Accuracy
Frequency range
Response Time
Control Range
Modes of Operation
Set Points
Description
Display and relays: 0.01 percent +/- 1digit
Analog: 12bit +/- 1 bit
.01 Hz to 4Khz
Minimum 0.02 seconds
Default 500 1, can be programmed from 9999 1
x Speed
x Time in process
x Single channel
x Quadrature
Display Update Time
x 2 or 6 programmable as “over” or “under”
x Forward and reverse
0.5 seconds update time minimum; 8 seconds update time maximum
Mechanical
Enclosure
Keypad
Display
Operating Temperature
Humidity
Description
ABS Plastic 94V0
Polycarbonate Tactile switch pad, chemical resistant, splash proof
4 digit .3 inch height, seven-segment display, 5 status LEDs
0º C to 50º C (+32º to + 122º F)
0% to 90% non-condensing
Specifications are subject to change without notice.
54
Rev D
Index
0
0-10 Vdc Output
analog, 13
offset and span pots, 11, 45, 46
4
4-20 mA Output
analog, 13
max load resistance, 13
offset and span pots, 11, 45, 46
security, 48
switch input, 44
System slowdown test, 50
DIP Switches
input configurations, 17
standard settings, 17
Display
long update times, 34
update interval, 34
F
Fuses, 53
A
A/B Channel Input Signals, 15
maximum current draw, 15
sensor wiring schematic, 16
wiring, 16
wiring caution, 16
A/B Signal Inputs
sensor voltage, 15
AC Power
115 Vac, 53
115 Vac and neutral, 14
230 Vac, 53
fuse, 12, 53
Analog Output, 11, 13, 45, 46
C
Calibrating TR400
analog output, 46
Caution
definition
label, 2
list of, 4
wiring, 16
Installation
panel cutout dimensions, 7
unpacking TR400, 6
K
Keypad Lockout, 48
L
Latching Outputs, 37
O
Offset and Span Pots, 46
Output Set Points, 36
Over/Underspeed Conditions, 35
P
D
Diagnostics, 41
Analog calibration, 46
Clearing an LRC, 51
keypad and display, 42
relay outputs, 43
reset variables, 47
Rev D
I
Programming TR400
analog output cutoff, 38
analog output offset, 38
analog output response time, 38
analog output span, 38
display update interval, 34
display/user units, 32
keypad lockout, 48
max RPM, 32
PPR, 32
range selection, 34
relay activation direction, 36
relay output, 35
55
Index
relay output delay times, 37
relay output on times, 37
relay outputs, 36
security code number, 48
start delay, 36
switch input function, 39
Q
Quadrature
pulse generation, 35
settings, 35
signal wiring, 15
variable 4, 35
Quadrature Signals, 15
90º phase shift, 15
R
Relay Output
values, 22
Relay Output Function, 35
Resetting Variables, 47
Rev LED
on and off, 36
S
Security
code number, 48
keypad lockout, 48
setting, 49
setting and changing code number, 48
Security Code Number, 48
Sensors
electrical connections, 17
electro-sensors standard type, 17
Set Point
values, 22
Signal Types, 15
Single Channel Signal, 15
Specifications, 53, 54
Switch Inputs, 14
programming, 39
test, 44
T
Test
analog, 45
56
keypad and display, 42
relay outputs, 43
switch inputs, 44
Time In Process
formula, 33
TR400
keys to access and program variables, 29
parts and functions, 20, 21
set-up process, 22
variable programming, 30, 31
variables, 24, 25, 26
selecting and vewing, 28
selecting and viewing, 27
V
Variables, 24, 25, 26
00 security code, 48
01 max RPM, 32
02 PPR, 32
03 display units, 32
04 rate functions, 33
05 keypad loctout, 48
06 start delay time, 36
07 relay output 1setpoint, 36
08 relay output 1 delay time, 37
09 relay output 1 on time, 37
10 relay output 2 setpoint, 36
11 relay output 2 delay time, 37
12 relay output 2 on time, 37
13 relays 1 & 2 activation direction, 36
13 relays 1 & 2 output function, 35
14 input function selection, 39
15, 4 mA output, 38
16, 20 mA output, 38
17 range selection, 34
18 display update interval, 34
19 analog output response time, 38
22 analog output cutoff, 38
36 relay output 3 setpoint, 36
37 relay output 3 delay time, 37
38 relay output 3 on time, 37
39 relay output 4 setpoint, 36
40 relay output 4 delay time, 37
41 relay output 4 on time, 37
42 relays 3 & 4 activation direction, 36
42 relays 3 & 4 output function, 35
43 relay output 5 setpoint, 36
Rev D
Index
44 relay output 5 delay time, 37
45 relay output 5 on time, 37
46 relay output 6 setpoint, 36
47 relay output 6 delay time, 37
48 relay output 6 on time, 37
49 relays 5 & 6 activation direction, 36
49 relays 5 & 6 output function, 35
50 relay output 7 setpoint, 36
51 relay output 7 delay time, 37
52 relay output 7 on time, 37
53 relay output 8 setpoint, 36
54 relay output 8 delay time, 37
55 relay output 8 on time, 37
56 relays 7 & 8 activation direction, 36
56 relays 7 & 8 output function, 35
accessing and programming, 29
selecting and changing values, 30, 31
selecting and viewing, 27, 28
Rev D
W
Warning
definition
label, 2
list of, 3
Wiring
A/B channel input signals, 15, 16
AC switch inputs, 14
analog output, 13
installation warning, 11
motor shutdown schematic, 12
overall schematic, 11
recommended practices, 10
screw taps
TB1, TB2, TB3, 11
signal types
single channel and quadrature, 15
voltage caution, 11
57
Index
58
Rev D