1
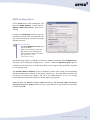
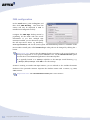
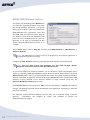
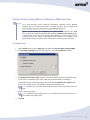
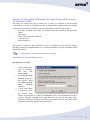
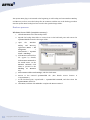
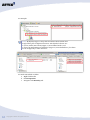
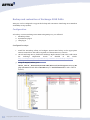
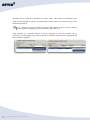
Attix5 Pro Plug-ins V7 Sailfish R2 User Manual for Microsoft Windows Your guide to installing and using Attix5 Pro plug-ins. Copyright notice and proprietary information All rights reserved. © Attix5, 2014 Trademarks ® - Microsoft, Windows, Microsoft Windows, Microsoft Windows Server, MS Windows, MS Exchange, MS SQL, MS SharePoint, Exchange, System State, Windows Backup and Windows Explorer are registered trademarks of their respective owners. Copyright © Attix5. All rights reserved. 2 Instruction symbols The following icons appear in the User Manual: The information icon precedes important information. The example icon indicates a practical illustration of a process or procedure. The hint icon indicates a suggestion or hint to guide or assist you with performing a task. The warning icon provides a warning against potential mistakes and actions that could cause critical error. 3 Copyright © Attix5. All rights reserved. Contents 1. Plug-in Installer ................................................................................. 5 Installation and configuration ............................................................................. 5 2. Plug-ins .............................................................................................. 8 1. 2. 3. 4. 5. 6. Email Notification ....................................................................................... 9 MS SQL Server .......................................................................................... 11 Script ....................................................................................................... 15 SIMS........................................................................................................ 17 System State ............................................................................................. 29 VSS .......................................................................................................... 34 Copyright © Attix5. All rights reserved. 4 1. Plug-in Installer The Plug-in Installer allows you to upgrade existing Server Edition (SE) Backup Clients with added functionality by installing application-specific plug-ins and other monitoring tools. You can update existing plug-ins with this installer. Alternatively, if enabled on the Storage Platform, plug-ins can also be auto-updated during the backup process. Warnings: If a plug-in has been deprecated, the Backup Client will only be auto-updated to the latest version in which the plug-in was still supported. If you manually upgrade a Backup Client that contains deprecated plug-ins, these plug-ins will be removed. The SE Backup Client must be installed on the computer before you can install any plug-ins. SE plug-ins require working space for the cache and disk space for creating a data dump and patches. Notes: Ensure that the drive on which the SE Backup Client is installed has enough free hard drive space to store an extra copy of all the selected files. If not, move the ToBackup, Cache and dump folders to another drive. For certain plug-ins (SIR Plus, VSS etc.), the backup selection size is an estimate only. The true size of the backup is calculated during the backup when the data is dumped and might not match the selection size. Installation and configuration The application that the plug-in will be working on does not have to be installed before installing the SE Backup Client. The installer will detect the current SE Backup Client installation location and confirm it as part of the installation process. Note: The Plug-in Installer and SE Backup Client have to be the same version. If this is not the case, a warning will be shown and you will not be able to continue. 5 Copyright © Attix5. All rights reserved. After ensuring that the Plug-in Installer and SE Backup Client are the same version, simply run the Plug-in Installer executable and supply the necessary information. If the SE Backup Client interface is open, the installer will prompt you to close it. The installer checks various requirements (such as the operating system and MS .NET Framework installation) and adds a note next to the plug-in name should the requirement not be met. A list of available plug-ins will enable you to select the plug-ins you wish to install and/or configure. Plug-ins marked with a ins marked with a green icon are already installed on the system. Any plug- blue icon will be upgraded to the latest plug-in version. Note: Manually upgrading a tree-based plug-in could result in your backup selection being lost. In that case, follow these steps to restore your backup selection: 1. Close the Backup Client 2. Stop the Backup Client service 3. Browse to the install folder e.g.: C:\Program Files\Attix5 Pro\Backup Client SE 4. Rename the following two files: Backupset.xml to Backupset.xml.upgr Backupset.xml.0 to Backupset.xml 5. Restart the Backup Client service and Backup Client 6. Confirm that the selection has been restored See the Plug-ins section below for more information on which plug-ins are tree-based. Select or deselect any of the plug-ins by clicking in the check box next to the plug-in name. After you have made all the necessary changes, click Next. The next step in the wizard will display a summary of all the changes that you have requested. Click Apply requested changes to continue with the upgrade or Back if you want to modify your selection. The Plug-in Installer stops the SE Backup Client service, installs/upgrades/uninstalls the selected plug-ins and starts the service again. Click Finish to close the application. After installing the plug-ins, open the SE Backup Client and configure the installed plug-ins. Copyright © Attix5. All rights reserved. 6 Note: As a precaution, the Plug-in Installer does not remove the dump folder used by the plug-ins or any plug-in-specific settings when you remove plug-ins. You have to remove them manually if needed. 7 Copyright © Attix5. All rights reserved. 2. Plug-ins Adding to its features and functionality, the SE Backup Client plug-ins provide a solution for numerous databases and applications. Once installed, plug-ins display in one of two areas of the SE Backup Client application: in the Backup Selection tree or in a dedicated dialog box. Plug-ins available in the selection tree can be selected/excluded for backup in the same manner as all other items in the tree. Plug-ins available in dialog boxes can be enabled/disabled/configured via the Tools menu. The table below lists the plug-ins supported by the SE Backup Client (in the same order as displayed in the Plug-in Installer’s GUI) with the latest version available and the associated ID. Server Edition plug-ins currently available Plug-in name Description Plug-in ID (as listed in Plug-in Installer) Backup Client location Email Notification V2.15 19 Dialogue MS SQL Server V3.12 7 Dialogue (2000/2005/2008/2012) Script V1.6 20 Dialogue SIMS V3.10 28 Dialogue System State V3.5 36 WSB Dialogue V3.1 25 NTBackup V2.14 29 VSS Tree Note: Only plug-ins in the selection tree can be used in secondary backup sets. Copyright © Attix5. All rights reserved. 8 1. Email Notification The Email Notification plug-in enables you to receive email notification on backup activity. You can configure the plug-in to notify you on a specified email address when a backup has been successful, when it failed or both. The level of information can also be specified. Note: Please refer to the Server Edition Backup Client User Manual; this plug-in comes standard with every SE Backup Client installation. Installation This plug-in has been included in SE installers since v4.2. If it is not installed, run the Plug-in Installer and select the Email Notification plug-in. Note: The Plug-in Installer will run automatically during the SE Backup Client installation if located in the same folder as the Client MSI. Configuration and use To configure the email notification plug-in: 1. On the Tools menu, point to Plugins, and then click Email Notification. 2. Select the Use email notification check box to enable the plug-in. 3. Select the types of notifications to be emailed. The following options are available: Notify me when a backup fails Notify me after a successful backup Append the subject line with the following options and message: 9 Warnings Errors Copyright © Attix5. All rights reserved. Notes: You can modify the Email subject and content for each of the options by clicking in the relevant message box, and then editing the text. The Backup Account name is automatically included in the subject, e.g. “Backup Completed [Backup Account name]”. 4. In the Mail settings area, type To and From email addresses in the fields provided and supply the SMTP server address and authentication information if necessary. Tips: In the SMTP Server box, you can specify the SMTP Server name in isolation (e.g. mail.company.com) or you can include the port number (e.g. mail. company.com:80). When no port is specified, 25 will be used by default. 5. Click the Test button to verify that the settings are correct. A test email will be sent to the address specified in the To field and a message will appear confirming if the email was sent successfully. Click OK to close the message and return to the Email Notification settings dialog box. 6. Select the Attach files check box to include a log file and/or report as attachments. 7. In the Attachment settings area, select from the following options: Summary, warnings and errors Entire log file (as per Advanced Options log level setting) Backup selection report – Provides a summary of the backup selection 8. Click OK to save the settings and close the Email Notification settings dialog box. The Email Notification plug-in is now activated and will start emailing reports during the next backup. Copyright © Attix5. All rights reserved. 10 2. MS SQL Server The Attix5 MS SQL plug-in provides SQL Server 2012/2008 (including R2)/2005/2000 protection down to the individual table or file group. Execute binary patching backups as well as Transaction Log backups with automatic truncation. Restore options include redirection to another SQL Server using the native SQL restore procedures and the ability to perform “rollback restores”, enabling a database to be recovered to a specific backup job. Installation and configuration Note: It is recommended that Attix5 Pro SE and the MS SQL Server plug-in be installed on the actual SQL Server, but ensure that the SQL services are running. However, if Attix5 Pro SE and the MS SQL Server plug-in are installed on a remote server, ensure that permissions are correctly set. Run the Plug-in Installer and select the MS SQL Server plug-in to upgrade the SE Backup Client with the MS SQL Server plug-in. After the upgrade, open the Attix5 Pro Client. You will notice a new entry on the Backup Selection tab, in the left-hand pane, called MS SQL Server. To add and configure a SQL instance click on the MS SQL Server entry: In the right-hand pane, specify the global database dump folder for the SQL instances in the MS SQL Server Plugin section. You can use the Browse button to browse to a specific folder. Warnings: Ensure that SQL has sufficient rights to dump the data into the specified folder. The database dump folder itself is deleted and created again before being used, so if a UNC path is used, the actual dump folder must not be a shared folder (this will cause an access violation). Example: the UNC path should be as follows: \\server\share\dump where dump can be deleted by the user mentioned above. Specifying \\server\share as the dump folder might cause access violations, because the service will then try to delete the share itself. Notes: Ensure that the server has enough free hard drive space to store a data dump of all the selected databases. 11 Copyright © Attix5. All rights reserved. If you chose to to dump the database to any other folder than the default SQL server backup location that is usually ...\MSSQL\Backup, you have to ensure that the user account your SQL server instance is running has full read and write rights in the file system to the plugin dump location. Log Maintenance enables you to specify whether the SQL plug-in must truncate the MS SQL logs once the backup has been completed to ensure that the log files will not use unnecessary disk space. Click the Apply button to add the first SQL Server instance. A sub-node will be created in the MSSQL Server section in the left-hand pane, as displayed in the image below. Use the MS SQL Server Instance section pane to configure this SQL instance. MS SQL Server Instance: Last status provides information about the last connection to the SQL Server. Enter the Server address, port, SQL username and password that the SE Backup Client must use to connect to the SQL Server. Note: You need to manually enable TCP/IP ports in the SQL 2005 Management tools. Click Apply. The list of the available SQL databases is populated in the left-hand pane as sub-notes of the selected instance, from where you can select the database that you want to backup. If you select the entire section, all databases will be included, as well as any new databases created. Select the database(s) that you wish to backup. Backup & Restore operations are not allowed on the tempdb database (SQL-DMO ODBC SQLState: 42000). To add another instance, click the MSSQL Server entry in the left-hand pane, and then click the Add new server button in the right-hand MSSQL Server plug-in section. A new node will be added. Configure the SQL Server settings and select the necessary databases. Note: Ensure that you have sufficient rights if protecting a remote server. Copyright © Attix5. All rights reserved. 12 Verify that you have included all the required SQL databases in the left-hand pane before you initiate the first backup. To create your first backup, select Backup Now on the File menu. Attix5 Pro will create an exact copy of the selected databases in the dump folder. These files will be compressed and transferred to the Storage Platform. The next backup will compare the selected storage groups with the selection from the previous backup, which is stored in the cache. Attix5 Pro will create a patch file for each database. This file consists of all the changes made to the database since the last backup. Only the patch files and any new selections will be backed up. 13 Copyright © Attix5. All rights reserved. How to restore a SQL Database from a backup device The first step is to restore the database from the Storage Platform. Click the Restore tab and select the dump folder from the specific backup date. On the File menu, click Restore. Select a restore location and restore the database. Open the SQL Enterprise Manager. From the Console root, expand Microsoft SQL Servers and browse to the Server where you would like to restore the databases database. section and Expand the select the database that you would like to restore. If the database does not exist anymore, you have to create and configure the database first. Right-click on the database, select All Tasks and click Restore Database. In the Restore as database window, select the database you wish to restore. Select From device and then click Select Devices. From the Restore from option, select disk and then click Add. Browse to the folder where you have restored the database and select the file. Click OK to accept the file name selected and OK again to accept the device. Using SQL functionality, you can select how you would like to restore the backup set. You can choose between a complete or differential database, the transaction log or file group. If you are restoring to a new database, you need to enable SQL to overwrite the database. Click OK to start restoring the database. SQL Server Enterprise Manager will confirm that you have successfully restored the selected database. Copyright © Attix5. All rights reserved. 14 3. Script The Script plug-in enables you to execute scripts and batch files during the backup process. This allows you to prepare an application for backup and to create a data dump of a database. You can also stop and start applications or services before, during or after any backup. Installation To install the Script plug-in, run the Plug-in Installer and select the Script plug-in. After the installation, open the SE Backup Client interface. Configuration and use To add scripts, open the Tools menu, select Plug-ins and click on Scripting. The Scripting settings window allows you to Add new and Edit or Delete existing scripts. Click on Add to create a new script. Start by supplying a Script name and specify when this script should run. You can choose between: 15 Backup/Restore start/end Backup data created Connection open/closed Backup/Restore Transfer start/end Copyright © Attix5. All rights reserved. Browse to the application or batch file that should be executed. Supply a location where it should be executed as well as any other Parameters needed. Specify whether you want the SE Backup Client to wait for the process to be completed before continuing with backup process by enabling the check box next to Wait for process to complete. Click Ok to save the new script. You can enable/disable scripts by clicking in the check box next to the Script Name. After you have configured all your scripts, click Ok to close the Scripting settings window. Copyright © Attix5. All rights reserved. 16 4. SIMS Installation The plug-in is currently shipped in a zip file, with a separate plug-in installer planned for a future release. Until then, you are advised to use the Attix5 Pro Deployment Wizard to package and include the plug-in in a standard Server Edition installation file (MSI). More information is available in the Attix5 Pro Storage Platform Console User Manual. To install the plug-in manually: 1. Close the Backup Client and then stop the Attix5 Pro SE service in the Control Panel. 2. Only applicable if an older version of the plug-in is already installed: Browse to the Backup Client plugins subfolder (the default location is C:\Program Files\Attix5 Pro\Backup Client SE\plugins) and rename the existing sims_plugin.jar file to sims_plugin.old. 3. Copy the sims_plugin.jar file to the plugins folder and then start the Attix5 Pro SE service again. 4. Open the Backup Client and configure the plug-in sections. Auto Updates As with all Attix5 Pro plug-ins, the SIMS/FMS/Discover plug-in will automatically be upgraded during the backup process when an update is available on the Storage Platform, if the Storage Platform is already running a later version of Attix5 Pro (and configured to do the update automatically). This negates the need to manually update all plug-ins in your environment. 17 Copyright © Attix5. All rights reserved. SIMS configuration On the Tools menu, point to Plug-ins, and then click SIMS Backup. Ensure that the Backup SIMS SQL Server check box is selected. Configure the SIMS SQL backup section by verifying that all the boxes are populated with the correct information, and then specifying the SQL password. Important notes: The SIMS Database Name field is case sensitive. Please ensure that you enter the SQL Server name and instance when specifying the server name. E.g. WIN2003-SIMS\ SQLEXPRESSSIMS. The default dump folder is a subfolder in the Server Edition install path called SIMSBackups. This path can be changed by clicking on the … button. Whilst the DBAttach path option is available, you will rarely have to modify this setting. Only change it when specifically requested by your support team. The Include Master database option is enabled by default. This setting will automatically add the MS SQL Master database to the backup selection list. Note that SIMS usernames and passwords are stored in the Master, and not in the SIMS database, so you are strongly recommended to include this database for Disaster Recovery purposes. Enable/Disable the Backup Shared SIMS Directory and Backup SIMS Document Management Server (DMS) check boxes next, verify that the correct locations are specified, and then click OK. Copyright © Attix5. All rights reserved. 18 FMS configuration On the Tools menu, point to Plug-ins, and then click FMS Backup. Note that this section will only be displayed if FMS is installed and configured correctly. Configure the FMS SQL backup section by populating all the fields with the correct information. If you have multiple SQL instances installed, you are advised to specify the full SQL Server Name, e.g. WIN2003SIMS\SQLEXPRESS, and not the (local) option. The default dump folder is a subfolder in the Server Edition install path, called FMSBackups. This path can be changed by clicking the … button. Important note: Ensure that the DBAttach path is pointing to the correct location, as it may be configured to use a separate DBAttach tool. Use the DBAttach Path option to select the correct DBAttach application in the FMS subfolder. It is typically located in a FMSSQL subfolder in the MS SQL install directory, e.g. …\MSSQL\BINN\FMSSQL. Click OK to save the settings. If FMS is running on another MS SQL instance, you are advised to also include the Master database of the particular instance. Separate the database names with a comma, e.g. FMS, FMS1, Master. Important note: The FMS Database Name field is case sensitive. 19 Copyright © Attix5. All rights reserved. Discover configuration On the Tools menu, point to Plugins, and then click Discover Backup. Note that this section will only be displayed if Discover is installed and configured correctly. Configure the Discover SQL backup section by populating all the fields with the correct information. If you have multiple SQL instances installed, you are advised to specify the full SQL Server Name, e.g. WIN2003-SIMS\SQLEXPRESS, and not the (local) option. The default dump folder is a subfolder in the Server Edition install path, called DiscoverBackups. This path can be changed by clicking the … button. Important note: Ensure that the Discover.Backup.Console path is pointing to the correct location. It is typically located in the following directory: C:\Program Files\Microsoft SQL Server\MSSQL\Binn. Click OK to save the settings. If Discover is running on another MS SQL instance, you are advised to also include the Master database of the particular instance. Separate the database names with a comma, e.g. Discover, Discover1, Master. Important note: The Discover Database Name field is case sensitive. Backup process Once you have finalised the SIMS/FMS/Discover database settings, and you have selected any additional files and folders to be included in the backup selection, you can click the Backup toolbar button to initiate the first backup. Note: If there are any problems with the SIMS or FMS database backups, please refer to the dbattach.log file(s), found in the Binn directory of the installed SQL instance. Copyright © Attix5. All rights reserved. 20 SIMS/FMS/Discover restore You need to use the Backup Client Restore tab to retrieve the applicable database dump from the Storage Platform. Thereafter, you can use these plug-in sections to restore the database to SIMS/FMS/Discover applications. Note that the SIMS, FMS and Discover restore plug-ins are identical (aside from the DBAttach path being the Discover.Backup.Console path for Discover) so all three are described in this section using the SIMS Restore section as an example. On the Tools menu, point to Plug-ins, and then click SIMS Restore or FMS Restore or Discover Restore. Note: The FMS/Discover sections will only be displayed if the relevant application is installed and configured correctly. Configure the SQL Restore section by populating the fields with the correct information. Note: You can only restore one database at a time and the SQL Master database cannot be restored with the DBAttach tool. If you have multiple SQL instances installed, you are advised to specify the full SQL Server Name, e.g. WIN2003-SIMS\SQLEXPRESS, and not the (local) option. Ensure that you point the Restore from path to where you restored the database dump and specify whether the database must be overwritten, if applicable. Verify that the correct DBAttach path is specified if the FMS database is being restored. If the Discover database is being restored, verify that the Discover.Backup.Console path is correct. Click Restore Now to start the process, Ok to just save the settings or Cancel to discard any changes. The Backup Client will restore the database to the application, and notify you when the process is completed. The following section describes different scenarios that can be followed during a Disaster Recovery. Information was SIMS/FMS/Discover plug-in. 21 Copyright © Attix5. All rights reserved. supplied by Capita, and modified to include the SIMS restore DR scenario tests Scenario 1 A: Backup of only SIMS Database [assuming DBDetach has not been run in the past] 1. Installed SIMS Server/SQLExpress and SIMS Workstation. 2. SIMS was working properly. 3. Created a new user called user1/abcd in it. 4. Ran SIMS plug-in to back up only the SIMS database [assuming the school would have done Detach sometime]. 5. Started with completely new Virtual machine having no SIMS or SQL2005 installation. 6. Installed SIMS and SQLExpress. Restored the backup taken in Step 4 using the SIMS plug-in. 7. Sysman username/password should remain intact. Result: Sysman password was reset to password and hence can login into SIMS even without backing up master database. Disadvantage: All the passwords for all users will be reset. B: Backup of only SIMS database [assuming DBDetach was run sometime in past] 1. Installed SIMS Server/SQLExpress and SIMS Workstation. 2. SIMS was working properly. 3. Created a new user called user1/abcd in it. 4. Ran DBAttach to first detach the DB and then re-attach it. This is to repeat the scenario which schools would have done during migration from SQL 2000 to SQL2005 [This activity could have been taken from August to date]. 5. This would transfer all SQL Logins from Master to SIMS database [No new logins created after last detach will be stored in SIMS]. 6. Ran SIMS plug-in to back up only SIMS database [assuming the school would have done Detach sometime]. 7. Started with completely new Virtual machine having no SIMS or SQL2005 installation. 8. Installed SIMS and SQLExpress. Restored the backup taken in Step 6 using SIMS plug-in 9. All the usernames/passwords [which were stored due to last detach] are working. Disadvantage: This method depends on the school having done detach of SIMS database sometime after August release of SIMS. Copyright © Attix5. All rights reserved. 22 Notes: This will be fine for all schools that have done migration from SQL 2000 to SQL 2005 [anytime in between August and February]. This will not work for any new school that has directly used SQL 2005 and has not done detaching of SIMS DB. Only logins from the last detach will work. This will always include sysman login. Scenario 2 Restoring Master and SIMS database 1. Started with an empty virtual machine. 2. Installed SIMS [Workstation, Server], SQLExpress on this virtual machine. 3. Created 2 new users in SIMS DB. 4. Used SIMS plug-in to backup SIMS, Master. 5. Used a clean VM [again with nothing on it]. 6. Installed SIMS [Workstation, Server, and SQLExpress on this VM]. 7. Restored the backup of Master Database using below command: RESTORE DATABASE master FROM DISK = 'C:\Backup\Master.BAK' DBAttach cannot be used to restore Master Database. Master DB will have to restore when the service is running in single user mode. You will get below error while trying to use DBAttach for restoring of Master DB: 01/04/2008 14:50:38 Could not connect to Server: Login failed for user 'sa'. Reason: Server is in single user mode. Only one administrator can connect at this time Restoring of master database will get all the names of databases/logins in the state Master was being backed up. This would in affect means that you will be able to even see database for which the data files no longer exist as shown below. But this process will restore all the logins required. 8. Ran the service back into multi user mode 9. Restored the backup of SIMS in Step 4 using the SIMS plug-in Result: All the users and their passwords were left intact. 23 Copyright © Attix5. All rights reserved. Disadvantage: Any databases between last backup of master will also be restored if they were deleted [though their corresponding data files may be missing.] Scenario 3 Detaching SIMS database This method requires detaching of SIMS database using below command: DBATTACH /SERVER="SR2003SRV\SIMS2005" /DATABASE="SIMS" /USER="sa" /PASSWORD=P@ssw0rd1 /AUTO /AUTODETACHMODE The database will be detached and the data files will be left in ‘data’ folder of SIMS instance [i.e. C:\Program Files\Microsoft SQL Server\MSSQL.1\MSSQL\Data]. Re-attaching the data files will restore all login and their passwords. Disadvantage: This method cannot be used while SIMS Database is in use. Copyright © Attix5. All rights reserved. 24 Discover restore from total server failure In the event of a total server failure affecting both the SIMS and Discover installations and resulting in the replacement of the designated SIMS server, the following recommendations should be considered: 1. If the affected Discover server hosted the SIMS installation, begin by installing and restoring SIMS to normal operation. 2. Re-install the Discover application. 3. Initiate the Discover Transfer Process. 4. Log into Discover to ensure that the server is operational. 5. Locate the Discover backup file and restore the data. Note: The new server should be given the same name as the defunct server and the SQL Server should be given the same instance name. If this is not possible, all Discover clients must be revisited to ensure that they are pointing to the correct server location and SQL Server instance. 6. In the event that a recovered Discover database needs to be installed on a server with a new name (instance or machine name), the Discover clients will need to point to the new server. The location of the Discover server is contained within the Discover.Designer.Desktop.exe.config file located alongside the Discover executable. 7. Replace the values of the discoverInstance and discoverDatabase line items with the new Discover database server location. Discover restore from partial server failure In the event of a partial server failure that renders the Discover database inaccessible but does not affect the Discover services or related scheduled tasks, the following procedures can be undertaken: 1. Uninstall the Discover server components via Control Panel > Programs and Features. 2. Re-install the Discover application. 3. Initiate the Discover Transfer Process. 4. Log into Discover to ensure that the server is operational. 5. Locate the Discover backup file and restore the data. The account management and access rights configurations remain unaffected by this restore procedure. 25 Copyright © Attix5. All rights reserved. SIMS & FMS plug-in migration guide from SQL Express 2005 to 2008 Important note: Please note that this document is to be used as an Attix5 SIMS & FMS Plug-in reconfiguration guide (for v2.6 and above). It is not intended to replace the Capita Sims Migration Document. Before you begin migration, it is important to check that you have an up-todate backup of your SIMS & FMS databases. For more information about configuring the Attix5 SIMS/FMS/Discover Plugin, see: http://v6.attix5.com/kb/?View=entry&EntryID=48. The Attix5 SIMS & FMS Plug-in has a number of configuration fields that require information about your database & SQL Express configuration: SQL Username [SQL database user] (Default = “sa”) SQL Password Database Name (Default = “SIMS”) Server Name [Specify server name and instance] Backup to [Attix5 backup dump location] DBAttach path (Default SQL2005 Path = C:\Program Files\ Microsoft SQL Server\ MSSQL.1\MSSQL\binn) Copyright © Attix5. All rights reserved. 26 During the Capita Sims migration process, you will be prompted to provide new configuration information that will affect the Attix5 SIMS & FMS plug-in configuration. It is very important that you note the following information during your SQL Express 2008 Migration: Entry New named instance (SIMS2008 Default) New “sa” password (Could be the same as SQL Express 2005) New SQL Express installation paths 27 Copyright © Attix5. All rights reserved. Screenshot Once the migration has completed, you will need to change the following Attix5 SIMS & FMS configuration fields: SQL Username (sa default) SQL Password (If changed) SIMS Database Name (Case sensitive) Server Name & Instance DBAttach path: C:\Program Files\Microsoft SQL Server\MSSQL10.SIMSDATA\ MSSQL\Binn\DBattach.exe (Default) Once the SIMS & FMS plug-in has been reconfigured, perform a backup and inspect the Attix5 backup logs for any warnings or errors. For more information on troubleshooting any error, please inspect the DBAttach.log located in the new SQL2008 instance path for more information (i.e. C:\Program Files\Microsoft SQL Server\MSSQL10.SIMSDATA\MSSQL\Binn). Copyright © Attix5. All rights reserved. 28 5. System State When the System State plug-in is selected for installation, two plug-ins are actually installed. The plug-in used to perform a System State backup or restore depends on the operating system that it’s installed on: System State (using WSB) for Windows 2008 and later System State (using NTBackup) for operating systems prior to Windows 2008 Notes: The VSS plug-in sometimes picks up a System State writer. This writer is not supported and should not be used. For System State backup and restore, use the System State plug-in. System State for Windows Server 2008 requires .NET 3.5. System State for Windows Server 2012 requires .NET 4. Installation To install the plug-ins, run the Plug-in Installer and follow the steps outlined below to completion. Notes: The Attix5 Pro Server Edition Client must be installed on the computer before you can install any plug-ins. SE plug-ins require working space for the cache and disk space for creating a data dump and patches. Step 1: Specify Backup Client folder location 1. Ensure that the correct Backup Client folder location is selected. If not, click the Browse button, select the correct folder, and then click OK. 2. Click Next. Step 2: Modify plug-in selection 1. Select the System State check box. 2. Click Next. Step 3: Apply changes On the Summary page, click the Apply requested changes button, and then click Next. Step 4: Close the Plug-in Installer Click Finish to close the Plug-in Installer. 29 Copyright © Attix5. All rights reserved. System State (using WSB) for Windows 2008 and later Notes: On a new Windows Server 2008 R2 installation, Windows Server Backup Features are not installed by default. To install Windows Server backup and recovery tools, follow the instructions as specified by Microsoft: http://technet.microsoft.com/en-us/library/cc732081.aspx. Space requirement for Optimise for speed option: Because the WSB plug-in splits the VHD into separate files when the Optimise for speed option is selected, the drive where the System State backup is stored needs to have enough space for two copies of the System State backup. For example, if the System State backup is 8 GB, a drive with at least 16 GB of space is required. Configuration 1. On the Tools menu, point to Plug-ins, and then click System State (using WSB). 2. In the Backup Settings dialog box that appears, select the Enabled check box. 3. The Optimise for disk usage option is selected by default. This ensures that the plugin only uses as much disk space as the VHD, plus a small amount for workspace (potentially as large as the largest file in the VHD). Select Optimise for speed if disk space is not an issue and you would like to improve the backup speed. Note: Optimise for disk space reduces the disk space usage by between 30% and 50%. 4. Select a dump target drive. Note: A System State backup can be over 10 GB large. Ensure that you choose a drive with enough disk space. 5. Click Ok. Copyright © Attix5. All rights reserved. 30 Backup Once the plug-in is enabled, you can select other data to back up, and then schedule backups or initiate one manually by clicking the Backup button on the toolbar. Warning: If installed on a Windows 2008 server, the plug-in will also back up Remote Installation server images. These are included in the backup selection and can inflate the backup significantly. Tip: While the backup is in progress, it is useful to monitor its status in detail. To do this, open a Command Prompt window and run the following command: Wbadmin get status. Note: The plug-in will abort the backup if it runs out of disk space. Restore process To restore the System State via WSB, you need to restore the System State data to its original location and then launch the Windows Server Backup restore process via the command prompt. To restore System State data: 1. In the Backup Client, click the Restore tab. 2. Under the System State Backup target drive node, navigate to the WindowsImageBackup folder. 3. Right click the folder name, and then click Include. 4. Click the Restore button on the toolbar. 5. In the Save files in area of the Restore Options dialog box, select Original location. 6. Click Ok. 7. Once the contents of the WindowsImageBackup files are restored to their original locations, you can invoke the Windows Server Backup tool to complete the restore process. To launch the Windows Server Backup restore process: 1. In Windows Explorer, navigate to: <System State Backup target drive>\WindowsImageBackup\<Machine Name>\SystemStateBackup. 2. Open the restore.txt file and follow the instructions contained therein. 31 Copyright © Attix5. All rights reserved. System State (using NTBackup) for operating systems prior to Windows 2008 The Attix5 Pro System State plug-in enables you to back up a collection of system-specific components as a unit to a target directory that is automatically included in the daily backup routine. These components include the following (depending on the operating system): Boot files, including system files, and all files protected by Windows File Protection (WFP) The registry. COM+ Class Registration database Active Directory SYSVOL directory This plug-in is included in the SE installer. If it is not installed, run the Attix5 Pro Plug-in Installer and select the System State plug-in. After the installation, open the SE Backup Client application window. Note: This plug-in is used for Windows Server 2003 only. Installation and configuration Windows Server 2003 1. On the Tools menu, point to Plug-ins, and then click System State. 2. In the System State Backup dialog box that appears, select the Enable System State backups check box. 3. A local target folder is required to create the System State backup. Type the path to a folder in the Backup to box or use the Browse button to specify it, and then click OK. If the target folder does not exist, the SE Backup Client will display a message asking if it should create the folder. Click Yes. This folder will be included in the backup selection list automatically. Copyright © Attix5. All rights reserved. 32 The System State plug-in is initiated at the beginning of each backup and uses Windows Backup and Recovery tools to create the backup file. SE continues with the rest of the backup procedure after the System State backup has been saved in the specified target folder. Restore process Windows Server 2003 (complete recovery): 1. Click the Restore tab in the Backup Client. 2. Expand the backup date folder to restore from in the left-hand pane and restore the sysstate.bkf file located in the target folder. 3. Open Backup the and Windows Recovery application (Start > All Programs > Accessories > System Tools > Backup). 4. If the Restore Wizard does not appear by default, click Restore Wizard on the Tools menu. In the Restore Wizard, click Next to proceed to the Backup or Restore step. 5. Select Restore files and settings, and then click Next. 6. Browse to the restored sysstate.bkf file. (The default restore location is C:\SystemState.) 7. In the left-hand pane, expand File > sysstate.bkf created, and then select the System State check box. 8. Click Next, and then click Finish to complete the Restore Wizard. 33 Copyright © Attix5. All rights reserved. 6. VSS Attix5 Pro makes use of the MS Volume Shadow Copy Service (VSS) to back up open files like your Outlook PST file, which is just a fraction of what VSS can do. The VSS plug-in utilises VSS on a much more advanced level by allowing you to protect any VSS-enabled database and application available on your server with a single plug-in; without the need for a database dump. Attix5 Pro VSS support Attix5 Pro supports the following applications/databases through the VSS plug-in: Exchange 2003 Exchange 2007 Exchange 2010 Exchange 2013 MS SQL 2005 MS SQL 2008 MS SQL 2012 Hyper-V VSS explained Please note that this explanation will only focus on functionality related to databases, even though VSS is not limited to databases. VSS (Volume Shadow Copy Service) consists of three basic components: 1. Writers (e.g. MSSQL) It is the responsibility of each database vendor (MS SQL, Oracle, Exchange, etc.) to develop a VSS writer which will allow a requestor (see below) to back up the data without having to understand the exact inner workings of the database engine. The writer ensures data consistency and provides a safe way to back up the data, even while the application or database is still running. It provides a common backup interface that is similar across all databases, regardless of the vendor. Using writers is a way to ensure that the database vendor controls the data access, not an outside party. 2. Requestors (e.g. Attix5 Pro) A requestor initiates the VSS process. The requestor uses a generic set of instructions to initiate the VSS process and read data from the database. The instructions are the same regardless of the database being backed up. 3. Providers (e.g. Microsoft Windows) The provider is the interface to the point-in-time imaging capabilities. An in-depth discussion of providers is not needed for the purpose of this document. It is more important to understand the Writer and Requestor. Copyright © Attix5. All rights reserved. 34 Attix5 Pro VSS plug-in explained The VSS plug-in is a “Requestor” that (in theory) can back up any database or service that has a VSS writer. These would include MS Exchange and MS SQL to name a few. In short, it works like this: 1. During the first backup, the VSS plug-in connects to the VSS writer of the database, reads all the data and compresses it to the ToBackup folder from where it is transmitted to the Storage Platform - no database dump is done. 2. After the backup, the data that has been sent to the Storage Platform is moved from the 3. For subsequent backups, the data in the cache is compared to the database data as it is ToBackup folder to the cache. being read by the VSS plug-in, to work out patches which are again stored in the ToBackup folder. 4. The patches are transmitted to the Storage Platform. 5. After transmission to the Storage Platform the cache is updated by applying the patches to the files in the cache. 6. Repeat from step 3. Notes: The VSS plug-in sometimes picks up a System State writer. This writer is not supported and should not be used. For System State backup and restore, use the System State plug-in. It can be seen that with the VSS plug-in, databases are treated as large files with no need to dump them separately. If Delta Blocking is used, the disk space requirements are further reduced (sometimes at the expense of larger backups). Advantages Makes use of a generic set of instructions. So as new Writers are developed for databases, Attix5 Pro should be able to back them up via the VSS plug-in. NO DUMP SPACE needed. The VSS plug-in reads the data directly from the database, without the need to make a database dump. The backup should be much quicker since data is not first dumped and then patched and compressed. Disadvantages Not all the features that are provided in the existing Attix5 Pro plug-ins are available in the VSS plug-in (for example to use an Exchange recovery group). 35 Copyright © Attix5. All rights reserved. Installation and configuration Note: The VSS plug-in can only support VSS-enabled databases, applications and files on the local machine where it is installed. Run the Attix5 Pro Plug-in Installer and select the VSS plug-in to upgrade the SE Backup Client with the plug-in. After the upgrade, open the Attix5 Pro Client. You will note a new entry in the left-hand pane, called VSS Plug-in. The VSS plug-in will automatically display all the writers available on the server. If you do not see the expand option (+) next to the VSS Plug-in node, right-click the node, and then select Refresh on the shortcut menu that appears. When you select the VSS Plug-in node, the VSS Backup options display in the right-hand pane. Select the type of backup you wish to perform: Full Backup or Copy Backup. Full Backup Following a Full Backup, the backup history of each file will be updated and, in the case of Exchange writers, the backup transaction logs will be truncated. Warning: If employing other backup/archiving processes in addition to Attix5 Pro that require full backup transaction logs (e.g. Exchange tape backup), it is recommended that you use Copy Backup instead, as Copy Backups retain full transaction logs. Copy Backup Copy Backups leave the backup history of each file and the application logs as they were before the backup. This is recommended if using additional backup/archiving processes that require full backup transaction logs. Warning: If both the SQL database and Exchange server are on the same machine, the Full/Copy setting will apply to both. Copyright © Attix5. All rights reserved. 36 Browse through the available writers and select the items as you would select folders in the lefthand pane. Once you have made your selection, you can click the Backup toolbar button to initiate the first VSS plug-in backup, as described earlier in this document. Note: If the MS SQL Server item does not appear in the Backup Selection tree under the VSS plug-in, ensure that the SQL Service VSS Writer service is running. Tip: If selecting the Microsoft Exchange Writer, you have the option to bypass the database integrity check. Please note that integrity checking is recommended by Microsoft but may slow the backup preparation process down significantly. It should only be skipped if it is certain that the files are in a good state and can be used for recovery. Restoration of databases using the VSS plug-in Open the Restore tab, select the required databases and files in the VSS Writers section and then click on the Restore button in the toolbar. The Restore Options dialog box will appear. On the General tab, you will note that you cannot restore to the original location when selecting any items from the VSS Database section as VSS will do that once the data is restored. Select a temporary restore location using the Browse button or enter a path to on in the Folder box. Warning: VSS restores can overwrite current live data. During a restore, data is downloaded from the Storage Platform and written to a temporary location on the hard drive. This location is a folder that will temporarily hold the restored data, before it is streamed back into the database from where it was initially backed up. Therefore, take care when doing test restores as they will overwrite any current data in the database with the data from the restore. Naturally, if you restore only a certain section of data (i.e. one information store), the rest of the database will not be affected. The only way to avoid this scenario is to restore to a different machine, although some other components like Active Directory may need to be set up first. 37 Copyright © Attix5. All rights reserved. Once you have configured all the relevant restore options, click Restore. Warning: Restoring the SQL Server master database using the SQL/MSDE Writer sometimes fails and causes errors. When performing a restore, it is recommended that you exclude the master database and restore it individually as described in the following links: http://msdn.microsoft.com/en-us/library/aa173557%28v=SQL.80%29.aspx http://msdn.microsoft.com/en-us/library/aa173515%28v=SQL.80%29.aspx The SE Backup Client will restore the files to the specified location and VSS will thereafter pick up the files and restore them to the applicable database. Note: For MS SQL Server restorations, if you make your restore selection on the file level, the VSS plug-in will not be used to restore the entire database. Instead, the files that you have selected will only be restored to the location that you specified. You will have to attach the files to the database yourself. Copyright © Attix5. All rights reserved. 38 Example: Restoration of Microsoft Exchange Writer using the VSS plug-in 1. Open the Restore tab, expand the VSS Writers node, and then select the Microsoft Exchange Writer node. 2. Include the writer by right-clicking the node, and then selecting Include on the shortcut menu that appears. 3. Click the Restore button in the toolbar. The Restore Options dialog box will appear. 4. On the General tab, you will note that you cannot restore to the original location when selecting any items from the VSS Database section as VSS will do that once the data is restored. Select a temporary restore location using the Browse button or enter a path to on in the Folder box. 5. Click the VSS Plug-in: Exchange tab and configure the restore options. Tips: It is recommended that Replay outstanding transaction logs be enabled when restoring from the most recent database backup. Please note that you need to disable this option if restoring from a backup prior to the most recent one. Automatically dismount databases and allow overwrites is disabled by default (as a safety precaution) but enabling it is recommended to prevent restore failures due to Exchange settings. Only databases selected for restore will be overwritten. 6. Click Restore. 39 Copyright © Attix5. All rights reserved. Backup and restoration of Hyper-V virtual machines Note: Attix5 Pro only supports the backup and restoration of Hyper-V virtual machines on Windows Server 2008 R2. It is possible to back up and restore Hyper-V virtual machines (VMs) using the Attix5 Pro SE Backup Client. To back up, follow these steps: 1. Install the Attix5 Pro SE Backup Client and the VSS plug-in. 2. In the Backup Client's Backup Selection tab, navigate to the VSS plug-in node and expand the Hyper-V Writer. Note: It might be necessary to register the Hyper-V VSS Writer before it becomes visible in the Backup Selection tab. 3. Include the VMs that you want to back up and begin the backup process. You have now successfully backed up Hyper-V virtual machines, including their hardware configuration settings. To restore, follow these steps: 1. In the Backup Client's Restore tab, select the VMs that you would like to restore and begin the restore process. After the restore has taken place, the restored files will be moved back to their original location. 2. The VMs now appear in the Hyper-V management console. However, you will be unable to start the restored VMs until you change their associated permissions: In Windows Explorer, navigate to the location of the restored VMs. The restored files will have the associated Virtual Machine’s hexadecimal ID (and VHD file names), which can be viewed under the VSS writer in the Restore tab. Copyright © Attix5. All rights reserved. 40 For example: Note: By default, Hyper-V keeps the Virtual Hard Disk (VHD) and configuration files in different locations. The defaults locations are C:\Users\Public\Documents\Hyper-V\Virtual Hard Disks\ and C:\Program Data\Microsoft\Windows\Hyper-V\Virtual Machines\, but these can be configured for other locations. For each restored file or folder: a. Right-click the file. b. Click Properties. c. 41 Navigate to the Security tab. Copyright © Attix5. All rights reserved. d. Ensure that all users have access to the file and that Allow is ticked for all permissions. You can add the Everyone group with all permissions allowed to accomplish this. e. Click OK. f. Click OK. Note: You may notice a small lock icon on the restored files, but this is not always displayed. The VMs’ hardware configuration settings are restored with the VM. You can now start the restored VMs using the Hyper-V management console. Copyright © Attix5. All rights reserved. 42 Backup and restoration of Exchange 2010 DAGs Attix5 Pro can be configured to support the backup and restoration of Exchange 2010 Database Availability Groups (DAGs). Configuration To back up or restore Exchange 2010 DAGs using Attix5 Pro, you will need: 1. SE Backup Client 2. System State plug-in 3. VSS plug-in Configuration steps 1. Install the SE Backup Client and configure System State backup on the appropriate Domain Controller as this will be required in a Disaster Recovery scenario. 2. On each Exchange Server, disable the Exchange Replica Writer (VSS writer) and restart the Exchange Replication service as detailed in this article: http://exchangeserverpro.com/event-id-2137-windows-server-backup-completedwarnings-exchange-2010-mailbox-server. 3. Using the Registry Editor, go to: HKEY_LOCAL_MACHINE\SOFTWARE\Microsoft\ExchangeServer\V14\Re play\Parameters and add a DWORD entry of “EnableVSSWriter” with a value of 0 (zero). 43 Copyright © Attix5. All rights reserved. 4. Using PowerShell, restart the Exchange Replication service as follows: [PS] C:\>Restart-Service MSExchangeRepl 5. Install an SE Backup Client and VSS plug-in on each Exchange DAG member. Note: After the reboot of an Exchange machine, it could happen that the Exchange Information Store or related storage does not start up in a timely enough fashion. As a result, the VSS plug-in is unable to back up the Exchange databases. To ensure that this does not occur, set the SE Backup Client service to be dependent on the Exchange Information Store service. This will ensure that the SE service only starts up after Exchange has successfully started up. Backup On each Exchange DAG member, open the SE Backup Client and include the Exchange Writer node for backup. When backups run, only mounted databases (i.e. the active ones) will be backed up, and the logs transacted. Any healthy (i.e. standby) databases will be ignored. After the logs are transacted, native DAG replication will replicate the transaction to the other members. If a server has no active databases, only the Exchange writer details will be backed up. Typically, this backup would be less than 2 KB in size. If a database is promoted to "mounted" status, it will be included in the selection and added. If a database is demoted to "healthy" status, it will be deselected and removed. Note: As databases are promoted or demoted, they will be added or removed from the backup selection on each Backup Client. This means that they will be added as full files when promoted, which will impact data transmission. If the database status does not change, the active databases will patch as normal. The display status within the Backup Client’s GUI may not refresh within a timely fashion, although the databases do back up successfully (the status may refresh after the backup runs, with demoted databases disappearing from the writer). Restore In a DR scenario the Active Directory environment should first be restored and the Exchange databases reinstalled. Thereafter, they should be reconnected to the DAG via Active Directory exactly as with a conventional Exchange restore. Copyright © Attix5. All rights reserved. 44 Databases can be restored to mounted (i.e. active) copies, rather than to the healthy copies which remain invisible to VSS. It is recommended to restore these to the last active peer from which they backed up. Note: Restores operate through the normal VSS method, with the normal settings recommendations applying for older database copies and so on. After restoring, in a non-DR scenario, it may be necessary to force the standby copy to synchronise. If the standby copy database shows as healthy it should first be suspended, and then resumed or updated. 45 Copyright © Attix5. All rights reserved. If updating, the database will be replicated in full from the active database, whilst the resume might only be successful if the copy has been deliberately suspended and the database remains in sync. Note: Updating is effectively reseeding, which Microsoft warns can take several hours, but may be the only successful method. If the standby "healthy" copy is not fully synchronised the restored mounted database (i.e. the active one) will not truncate logs on subsequent backups, and may fill up the disk. You are advised to monitor these for a short period after the restore and ensure that synchronisation is operating correctly. Copyright © Attix5. All rights reserved. 46