1
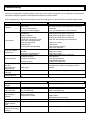
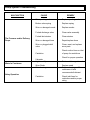
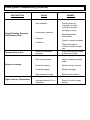
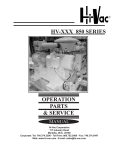
Operators Manual
for
2513-JE Cart Jetter
Phone: (740) 374-2306
Toll Free: (800) 638-1901
e-mail: [email protected]
www.obrienmfg.com
Congratulations
We at Hi-Vac Corporation wish to express our appreciation on your purchase of a water-jetting sewer
cleaner (jetter).
With you in mind, our skilled craftsmen have designed and assembled the finest water-jetting sewer cleaner
available.
This manual includes operating instructions, maintenance instructions, and instructions for troubleshooting.
Your jetter is built for dependability, and will bring you years of service, as long as maintenance is performed
regularly and a qualified person operates the jetter.
Sincerely,
Hi-Vac Corporation
History
Your new O’Brien water jet unit is the latest model developed in over 40 years of producing sewer-cleaning
equipment.
Depending on your pump, over 2,000 psi water pressure can be generated. This pressure is directed through
the hose to a nozzle, which is propelled into the sewer line by a rearward directed force of water. Just the right
amount of water plus pressure is needed to effectively clean the pipe and neither high pressure nor large
amounts of water alone will do the job.
With just the right combination at your disposal you will find the jet nozzle will carry the weight of the hose into
the pipe. With the penetrator installed (we recommend that your cleaning begin with the penetrator nozzle) it
should penetrate most blockages of grease, sand, mud etc. that clog the line.
Normally, the penetrator nozzle is used to scour the inside of the pipe. The actual cleaning of the pipe is done
as the hose is being retracted from the pipe onto the reel. You will note that this brings out the source of the
blockage. Little or no cleaning is done while entering the sewer either with the penetrator or other nozzles.
Therefore it is very important that when retracting the hose a slow steady speed is used. Many times it is
necessary to repeat this slow retracting process to thoroughly clean the pipe.
Hi-Vac’s years of experience in developing and using various pressures and flows have not succeeded in
being able to cut roots by pressure alone. Although some manufacturers state that extremely high pressure
will remove roots, Hi-Vac has not been able to confirm or verify these statements. Instead, Hi-Vac offers the
patented original water powered root cutter unit.
When any root systems are encountered, we highly recommend the O’Brien Root Cutter machine, which not
only cuts any roots in the system but other blockages such as starch and grease build-ups. The Root Cutter
also is an aid in indicating broken or caved-in tile pipe or sewers.
Before operating the unit, read the enclosed engine and pump manuals carefully and review the safety
information in great detail.
Warranty Registration Instructions
Immediately upon receiving:
•
Examine the unit for damage. Notify the carrier at once with any claims.
•
The Warranty/Registration Card is located in the front of your owner’s manual. The consumer must fill
out the Warranty/Registration Card and mail back to Hi-Vac Corporation within ten (10) working days.
The warranty is provided below.
•
The Hi-Vac Corporation identification tag contains product identification information which is also
provided on the cover sheet inside your Operator’s Manual. Record the required information in the
space provide below. This information must be provided when filing a warranty claim or ordering parts.
Serial No. ___________________
Model No. ____________________
• RETAIN THIS INFORMATION FOR
FURTHER USE
• HAVE THIS INFORMATION WHEN FILING A
WARRANTY CLAIM OR ORDERING PARTS
Warranty
Each and every product manufactured by Hi-Vac Corporation is tested carefully prior to shipment to assure a
high standard of quality and maximum operating efficiency. The following warranty is operative upon the
receipt, by Hi-Vac Corporation, of a properly completed and executed warranty registration card.
A. Hi-Vac Corporation warrants that sewer units, equipment, accessories and parts manufactured by HiVac Corporation shall for a period of one (1) year from date of purchase be free from:
1. Defects in material and workmanship.
2. Defects arising from process of manufacturing.
3. Defects in design thereof.
B. The foregoing warranty shall not apply to components supplied to Hi-Vac Corporation by other
manufacturers and the purchaser is directed to contact said individual manufacturers nearest factory
service center for repair or replacement of said components. Hi-Vac Corporation, when necessary, will
act as agent to secure adjustment. Purchaser is responsible for labor and freight of any return
part/components.
C. In case of defects in material or workmanship or defects arising from processes of manufacture or
design, such defects must become apparent in the machine, accessory, equipment, or part within (1)
year from date of purchase. The extent of Hi-Vac Corporation’s liability under the warranty is limited to
the repair of such defects or to the repair or replacement of any part, equipment, or accessory, which is
defective in any such respects.
D. Hi-Vac Corporation shall, as to each defect, be relieved of all obligations and liability under this
warranty if:
1. The product is operated with any accessory, equipment, or part not specifically approved by HiVac Corporation and not manufactured by Hi-Vac Corporation unless purchaser furnishes
reasonable evidence that such installation was not the case of the defect.
2. The product is not operated or maintained in accordance with Hi-Vac Corporation’s operation
manual furnished with said equipment.
3. The product was modified, altered, or repaired without the approval of Hi-Vac Corporation.
4. The purchaser does not, within the applicable time period set forth in paragraphs A and C
above; notify Hi-Vac Corporation of said defect. Disassembly of the product to correct the
defect, removal of the defective accessory, new part(s) and reassembly of the product shall be
at the purchaser’s expense.
5. Purchaser does not submit reasonable proof that the defect is due to a material embraced
within Hi-Vac Corporation’s warranty hereunder.
Liability under this warranty is limited to parts and is furthermore limited to the replacement or repair
of said parts returned, freight prepaid, to Hi-Vac Corporation. Only parts deemed defective due to
workmanship or a related defect will be warranted. A Return Goods Authorization (RGA) number
and completed warranty evaluation form are required prior to the return of any part(s) to Hi-Vac
Corporation.
Under no circumstances is loss of time, revenue, or consequential damages covered under this
warranty.
Any part(s) returned without proper pre-authorization will be returned/refused. Technical
Service will supply the RGA. Please phone Technical Service @ 800.752.2400 to obtain the
proper authorization or with any other service related question.
Maintenance
This section covers maintenance procedures not covered by the manufacturers’ instruction manuals.
Please follow the manufacturers’ instructions for engine, pump and power take-off maintenance.
Fluid Levels
1. Water Pump – Oil
Check tank fill daily
Fill with 30 W SEA oil
2. Engine Oil
Check tank fill daily
Fill with 10W-30 oil
Jetter Operation Safety Precautions
ÌWARNING Read manual and supplemental(s) before operating water jetter. Read and become familiar with all safety
precautions, pre-operation notes and details, operating instructions and manual operating instructions before operating
your jetter.
ÌWARNING Inspect jetter before operation. Do not operate jetter if you suspect damage, wear or any abnormal
condition.
ÌWARNING Keep operator and bystanders clear of area in which high pressure hose operates.
ÌWARNING Do not overload or abuse water jetter unit.
ÌWARNING Do not operate jetter while on medications, narcotics, or while intoxicated. Always wear protective clothing
and eye protection when operating equipment.
ÌWARNING Do not allow children to operate equipment.
ÌWARNING This equipment can be hazardous to the operator’s safety, and only authorized personnel who have read
and understand the installation and operating manual should be permitted to operate this unit.
ÌWARNING Do not allow equipment to run unattended.
ÌWARNING This unit may conduct static electricity through the discharge nozzle, and is not designed for cleaning
applications using combustible liquids, materials, or flammable gases. To do so could result in severe or fatal injury.
ÌWARNING Do not use any type of insecticide, toxic chemicals, or heat-activated chemicals that produce toxic fumes or
explosive materials in the soap solution system of this equipment. Use only those detergents proven safe for human
contact. Failure to do so could result in severe or fatal injury.
ÌWARNING Do not keep gun trigger open by mechanical means when using washdown gun.
ÌWARNING Do Not stand or allow other personnel to stand in front of the cleaning gun nozzle and avoid contact with hot
water discharge if connected to hot water source. To do so could result in severe bodily injury.
ÌWARNING Bleed off all pressure prior to removal of nozzles, hoses, or drain plugs.
ÌWARNING Position and secure hose and reel before transporting jetter.
ÌWARNING Accidental activation of control switch (es) may cause unintended operation(s).
ÌWARNING Maintenance and lubrication procedures must be performed as specified in this manual by qualified
(authorized) service personnel.
ÌWARNING Replace missing, worn, or illegible decals.
ÌWARNING Keep owner’s/service manual with jetter at all times.
ÌWARNING Never modify (alter) a Hi-Vac Corporation water Jetter.
ÌWARNING Do not use accessory devices not authorized by Hi-Vac Corporation.
ÌWARNING Do not remove any guards or covers.
ÌWARNING Failure to follow these safety precautions may result in serious bodily and/or property damage.
Operation
1. Check the engine oil and hydraulic oil levels.
2. Engine and pump maintenance schedules must be followed.
3. Connect the water line to the cart jetter.
4. Follow engine manufacturer’s instructions for starting engine.
5. Engine should be started and warmed up for 3 to 5 minutes before applying any load.
6. The unit should be positioned as close to the cleaning location as possible.
7. Normal cleaning is started by using the penetrator nozzle, which should be attached at this time.
8. Unwind hose from the reel by pulling the hose off of the reel. Care should be taken not to damage the hose by
keeping it clear of the manhole sides.
9. The point of the hose nozzle should be pointed upstream into the pipe rather than downstream.
10. Make sure water control valve lever is in correct position for cleaning. NOTE: The valve has two marked
positions. One is marked High Pressure to Hose Reel, and the other is marked Re-Circulate, Wash down Gun
(this position is for operating the washdown gun).
11. With the hose unreeled and pointed into the sewer or pipe, engage the engine by putting the clutch handle to the
ON position. The nozzle will now start to carry itself into the sewer line and penetration will begin. The correct
method of cleaning is to extend the hose into the line and gradually and slowly retract it. During the retraction you
will note that cleaning or flushing takes place.
12. Adjust engine throttle by using the vernier throttle control unit (desired pressure is shown on the pressure gauge).
More throttles produces more pressure which gives greater effort to drive the hose and nozzle into the line.
Pressure is normally set at 2,500psi.
13. Unreel the hose, as needed allowing the nozzle to go further into the line. Short distances into the line are
recommended on the first pass with slow retraction to flush the blockage of the line.
14. In large lines, or in lines with several clogs, repeated passages may be necessary to insure that the line is
cleaned to your satisfaction.
15. When the pipe or line is cleaned, retract the hose and nozzle back just short of the end of the line. Reduce the
throttle to near idle and turn water control valve to recirculate, washdown gun position.
16. Disengage the reel in the cleaning hose with the electric reel control.
17. Stop engine.
All machines have a low water warning, which flashes brightly when water is low in the supply tank.
Do not rely on these gauges to maintain your water jet unit.
Normal maintenance schedules must be followed.
Troubleshooting
As an aid in locating and correcting problems, which may occur in transit or while the unit is in operation, this section was
developed to assist the operator in the diagnosis and repair of equipment failure.
Prior to disassembly or removal of components, check the following list for a quick reference to possible problem areas.
Problem
Pulsation
Low Pressure
Pump runs rough or
pressure low
Short packing life
Strong surging at
inlet and
Low pressure on
discharge side
Oil leakage from
drain plug
Loud pump knock
Problem
Excessive crankshaft
endplay
Water in crankcase
Oil leaking from
crankcase shaft
Will not siphon
chemical
Pump overheating
Pump and motor
RPM & pressure
spike
Low pressure or no
pressure when using
hand gun
Probable Cause
Obstructed or worn valve
Worn nozzle
Air leak in inlet plumbing
Inlet suction strainer clogged
Worn plunger assembly Abrasives in
pumped fluid
Severe cavitations
Inadequate water supply
Fouled inlet or discharge valves
Worn inlet or discharge valves
Leaky discharge hose
Restricted inlet
Air entering the inlet plumbing
Solution
Check valves and seats for worn surfaces Replace
with nozzle of proper size Disassemble, reseal, and
reassemble
Clean, use adequate size, check frequently
Rebuild plunger assembly
Install proper screen filter in suction line
Install proper screen filter in suction line
Install proper screen filter in suction line
Clean inlet and discharge valve assemblies
Worn valves
Replace worn valves
Replace hose
Proper size inlet plumbing
Check for air tight seal
Clean out obstructions
Replace worn valves
Replace worn valves
Install proper screen filter in suction line
Check pressure
Check fluid temperature
Install thermal relief valve
DO NOT RUN PUMP DRY
Check for smooth lap surfaces on valves seats
Damaged valves cannot be lapped but must be
replaced
Loose or worn drain plug
Tighten or replace drain plug
Worn or broken bearing or connecting
rod
Replace bearings or connecting rods
Probable Cause
Worn main ball bearing
Solution
Replace ball bearing
Water condensing into crankcase
Bad bearing
Bad crankshaft seal
Dirty or clogged chemical hose strainer
Worn injector orifice
Wrong nozzle in wand
Change oil at 3 month or 200 hour intervals
Replace bearing
Replace crankshaft seal
Clean or replace strainer
Inlet restrictions
Air leaks
Stuck inlet or discharge valve
Abrasives in pumped fluid
Excessive pressure
Excessive temperature
Running pump dry
Foreign particles in valves
Water left re-circulating in pump
Clogged nozzle jets
Replace orifice
Use brass soap injector nozzle
Allow fresh water supply into pump
Clean jets and check water supply for debris
Wrong nozzle in hand gun
Use steel high pressure spray nozzle
Notes:
Engine System Troubleshooting
MALFUNCTION
Engine Will Not Start
Check battery and fuse
CAUSE
REMEDY
Battery discharged
Recharge battery
Fuse burnt out
Fuel valve OFF
Replace fuse
Move lever to ON
Choke OPEN
Move lever to CLOSED
unless engine is warm
Check fuel
Engine switch OFF
Out of fuel
Turn engine switch to ON
Refuel
Drain fuel tank and
carburetor; refuel with fresh
gasoline.
Remove and inspect
spark plugs
Bad fuel; engine stored
without treating or
draining gasoline, or
refueling with bad
gasoline
Spark plugs faulty, fouled,
or improperly gapped
Spark plugs wet with fuel
Dry and reinstall spark
plugs; start engine with
throttle lever in FAST
position
Replace or repair faulty
components as necessary
Check control positions
Take engine to an
authorized engine
servicing dealer, or refer
to shop manual
Engine Lacks Power
Check air filter
Check fuel
Engine overheating
Take engine to an
authorized servicing
dealer or refer to shop
manual
Fuel filter clogged,
carburetor malfunction,
valves stuck, etc.
Filter element(s) clogged
Bad fuel; engine stored
without treating or
draining gasoline, or
refueling with bad
gasoline
Insufficient air flow
Clean, gap, or replace
spark plugs
Clean or replace filter
element(s)
Drain fuel tank and
carburetor; refuel with fresh
gasoline
Allow engine to cool
Pump System Troubleshooting
MALFUNCTION
The Pressure and/or Delivery
Drops
CAUSE
REMEDY
Worn packing seals
Replace packing seals
Broken valve spring
Replace spring
Worn or damaged nozzle
Replace nozzle
Fouled discharge valve
Clean valve assembly
Fouled inlet strainer
Clean strainer
Worn or damaged hose
Repair/replace hose
Worn or plugged relief
valve
Clean, reset, and replace
worn parts
Cavitation
Check suction lines on inlet
of pump for restrictions
Check for proper operation
Unloader
High humidity
Reduce oil change interval
Water In Crankcase
Worn Seals
Worn bearings
Replace seals
Replace bearings, refill
crankcase oil with
recommended lubricant
Cavitation
Check inlet lines for
restrictions and/or proper
sizing
Noisy Operation
Pump System Troubleshooting (Continued)
MALFUNCTION
Rough/Pulsating Operation
with Pressure Drop
CAUSE
REMEDY
Worn packing
Replace packing
Inlet restriction
Check system for
stoppage, air leaks,
correctly sized inlet
plumbing to pump
Accumulator pressure
Recharge/replace
accumulator
Unloader
Check for proper operation
Cavitation
Pressure Drop at Gun
Excessive Leakage
High Crankcase Temperature
Restricted discharge
plumbing
Worn plungers
Check inlet lines for
restrictions and/or proper
size
Resize discharge plumbing
to flow rate of pump
Replace plungers
Worn packing seals
Adjust or replace packing
seals
Excessive vacuum
Reduce suction vacuum
Cracked plungers
Replace plungers
Inlet pressure too high
Wrong grade of oil
Reduce inlet pressure
Giant oil is recommended
Improper amount of oil in
crankcase
Adjust oil level to proper
amount