1
AWS CloudFormation
User Guide
API Version 2010-05-15
AWS CloudFormation User Guide
AWS CloudFormation: User Guide
Copyright © 2015 Amazon Web Services, Inc. and/or its affiliates. All rights reserved.
AWS CloudFormation User Guide
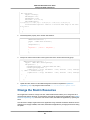
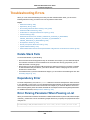
Table of Contents
What is AWS CloudFormation? ........................................................................................................ 1
Simplify Infrastructure Management .......................................................................................... 1
Quickly Replicate Your Infrastructure ......................................................................................... 1
Easily Control and Track Changes to Your Infrastructure ............................................................... 2
Related Information ............................................................................................................... 2
AWS CloudFormation Concepts ............................................................................................... 2
Templates .................................................................................................................... 2
Stacks ......................................................................................................................... 4
How Does AWS CloudFormation Work? .................................................................................... 4
Update Stack Workflow .................................................................................................. 5
Delete Stack Workflow .................................................................................................... 6
Additional Resources ..................................................................................................... 6
Getting Started ............................................................................................................................. 7
Signing Up for an AWS Account ............................................................................................... 7
Get Started .......................................................................................................................... 8
Step 1: Sign up for the Service ......................................................................................... 8
Step 2: Pick a template ................................................................................................... 8
Step 3: Make sure you have prepared any required items for the stack .................................. 11
Step 4: Create the stack ................................................................................................ 12
Step 5: Monitor the progress of stack creation ................................................................... 12
Step 6: Use your stack resources ................................................................................... 13
Step 7: Clean Up ......................................................................................................... 14
Learn Template Basics ......................................................................................................... 14
What is an AWS CloudFormation Template? ..................................................................... 14
Resources: Hello Bucket! .............................................................................................. 15
Resource Properties and Using Resources Together .......................................................... 15
Receiving User Input Using Input Parameters ................................................................... 19
Specifying Conditional Values Using Mappings ................................................................. 20
Constructed Values and Output Values ............................................................................ 22
Next Steps ................................................................................................................. 24
Walkthrough: Updating a Stack .............................................................................................. 24
A Simple Application .................................................................................................... 25
Create the Initial Stack .................................................................................................. 31
Update the Application .................................................................................................. 32
Changing Resource Properties ...................................................................................... 34
Adding Resource Properties .......................................................................................... 37
Change the Stack's Resources ...................................................................................... 38
Availability and Impact Considerations ............................................................................. 46
Related Resources ...................................................................................................... 46
Using CloudFormer to Create Templates .................................................................................. 47
Step 1: Create a CloudFormer Stack ............................................................................... 47
Step 2: Launch the CloudFormer Stack ............................................................................ 48
Step 3: Use CloudFormer to Create a Template ................................................................. 49
AWS CloudFormation Endpoints ............................................................................................ 53
AWS CloudFormation and VPC Endpoints ............................................................................... 54
Best Practices ............................................................................................................................. 56
Organize Your Stacks By Lifecycle and Ownership ..................................................................... 56
Use IAM to Control Access .................................................................................................... 57
Verify Quotas for All Resource Types ....................................................................................... 57
Reuse Templates to Replicate Stacks in Multiple Environments .................................................... 57
Use Nested Stacks to Reuse Common Template Patterns ........................................................... 58
Do Not Embed Credentials in Your Templates ........................................................................... 58
Use AWS-Specific Parameter Types ........................................................................................ 58
Use Parameter Constraints .................................................................................................... 58
Use AWS::CloudFormation::Init to Deploy Software Applications on Amazon EC2 Instances ............. 59
API Version 2010-05-15
iii
AWS CloudFormation User Guide
Validate Templates Before Using Them .................................................................................... 59
Manage All Stack Resources Through AWS CloudFormation ....................................................... 59
Use Stack Policies ............................................................................................................... 59
Use AWS CloudTrail to Log AWS CloudFormation Calls ............................................................. 60
Use Code Reviews and Revision Controls to Manage Your Templates ........................................... 60
Controlling Access with IAM .......................................................................................................... 61
AWS CloudFormation Actions and Resources ........................................................................... 61
AWS CloudFormation Console-Specific Permissions .......................................................... 63
AWS CloudFormation Conditions ............................................................................................ 64
Acknowledging IAM Resources in AWS CloudFormation Templates .............................................. 64
Manage Credentials for Applications Running on Amazon EC2 Instances ...................................... 64
Grant Temporary Access (Federated Access) ........................................................................... 65
Working with Stacks ..................................................................................................................... 67
Using the Console ............................................................................................................... 67
In This Section ............................................................................................................ 67
Logging In to the Console ............................................................................................. 68
Creating a Stack .......................................................................................................... 69
Creating an EC2 Key Pair .............................................................................................. 73
Estimating the Cost of Your Stack ................................................................................... 74
Viewing Stack Data and Resources ................................................................................ 74
Deleting a Stack .......................................................................................................... 75
Viewing Deleted Stacks ................................................................................................ 76
Related Topics ............................................................................................................ 77
Using the AWS CLI .............................................................................................................. 77
Creating a Stack .......................................................................................................... 77
Describing and Listing Your Stacks .................................................................................. 78
Viewing Stack Event History .......................................................................................... 80
Listing Resources ........................................................................................................ 83
Retrieving a Template ................................................................................................... 83
Validating a Template ................................................................................................... 84
Deleting a Stack .......................................................................................................... 85
Stack Updates ..................................................................................................................... 85
Modifying a Stack Template ........................................................................................... 87
Updating a Stack ......................................................................................................... 90
Monitoring Progress ..................................................................................................... 92
Canceling a Stack Update ............................................................................................. 93
Prevent Updates to Stack Resources .............................................................................. 94
Working with Windows Stacks .............................................................................................. 104
In This Section ........................................................................................................... 104
Windows AMIs and Templates ...................................................................................... 104
Bootstrapping Windows Stacks ..................................................................................... 105
Accessing Windows Instances ...................................................................................... 109
Working With Templates .............................................................................................................. 112
Template Anatomy ............................................................................................................. 113
See Also .................................................................................................................. 114
Format Version .......................................................................................................... 114
Description ............................................................................................................... 114
Metadata .................................................................................................................. 115
Parameters ............................................................................................................... 115
Mappings ................................................................................................................. 122
Conditions ................................................................................................................ 125
Resources ................................................................................................................ 127
Outputs .................................................................................................................... 129
Example Templates ............................................................................................................ 130
Auto Scaling Group with LoadBalancer, Auto Scaling Policies, and CloudWatch Alarms ......... 130
Amazon EC2 Running an Amazon Linux AMI .................................................................. 139
Create a Load-Balanced Apache Website ...................................................................... 142
Auto-Scaled Worker that uses Spot Instances to Monitor Work in an SQS Queue .................. 145
API Version 2010-05-15
iv
AWS CloudFormation User Guide
Template Snippets .............................................................................................................
General ....................................................................................................................
Auto Scaling ..............................................................................................................
AWS CloudFormation .................................................................................................
CloudFront ................................................................................................................
CloudWatch ..............................................................................................................
CloudWatch Logs .......................................................................................................
Amazon EC2 .............................................................................................................
Amazon ECS ............................................................................................................
Elastic Beanstalk .......................................................................................................
Elastic Load Balancing ................................................................................................
IAM .........................................................................................................................
AWS OpsWorks .........................................................................................................
Amazon Redshift .......................................................................................................
Amazon RDS ............................................................................................................
Amazon Route 53 ......................................................................................................
Amazon S3 ...............................................................................................................
Amazon SNS ............................................................................................................
Amazon SQS ............................................................................................................
Creating Templates ............................................................................................................
Specifying Intrinsic Functions .......................................................................................
Adding Input Parameters .............................................................................................
Use Parameters and Mappings to Specify Values in Your Template .....................................
Conditionally Creating Resources .................................................................................
Tagging Your Resources ..............................................................................................
Specifying Output Values .............................................................................................
Creating Wait Conditions .............................................................................................
Deploying Applications ................................................................................................
Custom Resources .............................................................................................................
How Custom Resources Work ......................................................................................
Amazon Simple Notification Service-backed Custom Resources ........................................
AWS Lambda-backed Custom Resources ......................................................................
Custom Resource Reference .......................................................................................
Using Regular Expressions ..................................................................................................
Template Reference ...................................................................................................................
AWS Resource Types .........................................................................................................
AWS::AutoScaling::AutoScalingGroup ...........................................................................
AWS::AutoScaling::LaunchConfiguration ........................................................................
AWS::AutoScaling::LifecycleHook .................................................................................
AWS::AutoScaling::ScalingPolicy ..................................................................................
AWS::AutoScaling::ScheduledAction .............................................................................
AWS::CloudFormation::Authentication ...........................................................................
AWS::CloudFormation::CustomResource .......................................................................
AWS::CloudFormation::Init ...........................................................................................
AWS::CloudFormation::Stack .......................................................................................
AWS::CloudFormation::WaitCondition ............................................................................
AWS::CloudFormation::WaitConditionHandle ..................................................................
AWS::CloudFront::Distribution ......................................................................................
AWS::CloudTrail::Trail .................................................................................................
AWS::CloudWatch::Alarm ............................................................................................
AWS::DataPipeline::Pipeline ........................................................................................
AWS::DynamoDB::Table ..............................................................................................
AWS::EC2::CustomerGateway .....................................................................................
AWS::EC2::DHCPOptions ...........................................................................................
AWS::EC2::EIP ..........................................................................................................
AWS::EC2::EIPAssociation ..........................................................................................
AWS::EC2::Instance ...................................................................................................
AWS::EC2::InternetGateway ........................................................................................
API Version 2010-05-15
v
152
152
157
160
163
167
169
177
186
193
194
195
207
210
214
218
221
224
224
224
224
225
226
228
229
229
230
234
252
252
254
260
274
285
286
286
288
294
301
304
305
308
311
314
324
326
329
330
331
334
338
343
347
349
351
353
354
361
AWS CloudFormation User Guide
AWS::EC2::NetworkAcl ...............................................................................................
AWS::EC2::NetworkAclEntry ........................................................................................
AWS::EC2::NetworkInterface .......................................................................................
AWS::EC2::NetworkInterfaceAttachment ........................................................................
AWS::EC2::Route ......................................................................................................
AWS::EC2::RouteTable ...............................................................................................
AWS::EC2::SecurityGroup ...........................................................................................
AWS::EC2::SecurityGroupEgress .................................................................................
AWS::EC2::SecurityGroupIngress .................................................................................
AWS::EC2::Subnet .....................................................................................................
AWS::EC2::SubnetNetworkAclAssociation ......................................................................
AWS::EC2::SubnetRouteTableAssociation ......................................................................
AWS::EC2::Volume ....................................................................................................
AWS::EC2::VolumeAttachment .....................................................................................
AWS::EC2::VPC ........................................................................................................
AWS::EC2::VPCDHCPOptionsAssociation .....................................................................
AWS::EC2::VPCGatewayAttachment .............................................................................
AWS::EC2::VPCPeeringConnection ..............................................................................
AWS::EC2::VPNConnection .........................................................................................
AWS::EC2::VPNConnectionRoute ................................................................................
AWS::EC2::VPNGateway ............................................................................................
AWS::EC2::VPNGatewayRoutePropagation ....................................................................
AWS::ECS::Cluster ....................................................................................................
AWS::ECS::Service ....................................................................................................
AWS::ECS::TaskDefinition ...........................................................................................
AWS::ElastiCache::CacheCluster ..................................................................................
AWS::ElastiCache::ParameterGroup .............................................................................
AWS::ElastiCache::ReplicationGroup ............................................................................
AWS::ElastiCache::SecurityGroup ................................................................................
AWS::ElastiCache::SecurityGroupIngress ......................................................................
AWS::ElastiCache::SubnetGroup .................................................................................
AWS::ElasticBeanstalk::Application ...............................................................................
AWS::ElasticBeanstalk::ApplicationVersion .....................................................................
AWS::ElasticBeanstalk::ConfigurationTemplate ...............................................................
AWS::ElasticBeanstalk::Environment .............................................................................
AWS::ElasticLoadBalancing::LoadBalancer ....................................................................
AWS::IAM::AccessKey ................................................................................................
AWS::IAM::Group ......................................................................................................
AWS::IAM::InstanceProfile ...........................................................................................
AWS::IAM::ManagedPolicy ..........................................................................................
AWS::IAM::Policy .......................................................................................................
AWS::IAM::Role .........................................................................................................
AWS::IAM::User .........................................................................................................
AWS::IAM::UserToGroupAddition ..................................................................................
AWS::Kinesis::Stream .................................................................................................
AWS::Lambda::Function ..............................................................................................
AWS::Logs::LogGroup ................................................................................................
AWS::Logs::MetricFilter ...............................................................................................
AWS::OpsWorks::App .................................................................................................
AWS::OpsWorks::ElasticLoadBalancerAttachment ...........................................................
AWS::OpsWorks::Instance ...........................................................................................
AWS::OpsWorks::Layer ...............................................................................................
AWS::OpsWorks::Stack ...............................................................................................
AWS::Redshift::Cluster ...............................................................................................
AWS::Redshift::ClusterParameterGroup .........................................................................
AWS::Redshift::ClusterSecurityGroup ............................................................................
AWS::Redshift::ClusterSecurityGroupIngress ..................................................................
AWS::Redshift::ClusterSubnetGroup .............................................................................
API Version 2010-05-15
vi
363
364
366
370
371
374
375
378
381
385
387
389
390
393
395
397
398
400
408
410
411
412
414
414
416
418
424
426
431
431
432
433
434
436
438
441
448
450
451
453
456
458
463
464
465
466
468
469
470
473
474
478
482
486
491
493
494
495
AWS CloudFormation User Guide
AWS::RDS::DBInstance ..............................................................................................
AWS::RDS::DBParameterGroup ...................................................................................
AWS::RDS::DBSubnetGroup .......................................................................................
AWS::RDS::DBSecurityGroup ......................................................................................
AWS::RDS::DBSecurityGroupIngress ............................................................................
AWS::RDS::EventSubscription .....................................................................................
AWS::RDS::OptionGroup ............................................................................................
AWS::Route53::HealthCheck .......................................................................................
AWS::Route53::HostedZone ........................................................................................
AWS::Route53::RecordSet ..........................................................................................
AWS::Route53::RecordSetGroup ..................................................................................
AWS::S3::Bucket .......................................................................................................
AWS::S3::BucketPolicy ...............................................................................................
AWS::SDB::Domain ....................................................................................................
AWS::SNS::Topic .......................................................................................................
AWS::SNS::TopicPolicy ...............................................................................................
AWS::SQS::Queue .....................................................................................................
AWS::SQS::QueuePolicy .............................................................................................
Resource Property Types ....................................................................................................
AutoScaling Block Device Mapping ...............................................................................
AutoScaling EBS Block Device .....................................................................................
Auto Scaling MetricsCollection .....................................................................................
Auto Scaling NotificationConfigurations ..........................................................................
Auto Scaling Tags ......................................................................................................
CloudFormation Stack Parameters ................................................................................
CloudFront DistributionConfig .......................................................................................
CloudFront DistributionConfig CacheBehavior .................................................................
CloudFront DistributionConfig CustomErrorResponse .......................................................
CloudFront DefaultCacheBehavior ................................................................................
CloudFront Logging ....................................................................................................
CloudFront DistributionConfig Origin ..............................................................................
CloudFront DistributionConfig Origin CustomOrigin ..........................................................
CloudFront DistributionConfig Origin S3Origin .................................................................
CloudFront DistributionConfiguration Restrictions ............................................................
CloudFront DistributionConfig Restrictions GeoRestriction .................................................
CloudFront DistributionConfiguration ViewerCertificate .....................................................
CloudFront ForwardedValues .......................................................................................
CloudFront ForwardedValues Cookies ...........................................................................
CloudWatch Metric Dimension ......................................................................................
CloudWatch Logs MetricFilter MetricTransformation Property .............................................
AWS Data Pipeline Pipeline ParameterObjects ................................................................
AWS Data Pipeline Parameter Objects Attributes .............................................................
AWS Data Pipeline Pipeline ParameterValues .................................................................
AWS Data Pipeline PipelineObjects ...............................................................................
AWS Data Pipeline Data Pipeline Object Fields ...............................................................
AWS Data Pipeline Pipeline PipelineTags .......................................................................
DynamoDB Attribute Definitions ....................................................................................
DynamoDB Global Secondary Indexes ..........................................................................
DynamoDB Key Schema .............................................................................................
DynamoDB Local Secondary Indexes ............................................................................
DynamoDB Projection Object .......................................................................................
DynamoDB Provisioned Throughput ..............................................................................
Amazon EC2 Block Device Mapping Property .................................................................
Amazon Elastic Block Store Block Device Property ..........................................................
EC2 ICMP ................................................................................................................
EC2 MountPoint .........................................................................................................
EC2 Network Interface ................................................................................................
EC2 Network Interface Association ...............................................................................
API Version 2010-05-15
vii
496
506
508
509
511
513
515
517
518
520
524
526
533
535
535
537
538
542
543
545
546
548
548
549
550
551
553
555
556
557
558
559
560
560
561
561
562
563
564
566
566
567
568
568
569
570
570
571
572
572
573
574
575
576
578
578
580
582
AWS CloudFormation User Guide
EC2 Network Interface Attachment ................................................................................
EC2 Network Interface Group Item ................................................................................
EC2 Network Interface Private IP Specification ................................................................
EC2 PortRange .........................................................................................................
EC2 Security Group Rule ............................................................................................
Amazon ECS Service LoadBalancers ............................................................................
Amazon ECS TaskDefinition ContainerDefinitions ............................................................
Amazon ECS TaskDefinition ContainerDefinitions Environment ..........................................
Amazon ECS TaskDefinition ContainerDefinitions MountPoints ..........................................
Amazon ECS TaskDefinition ContainerDefinitions PortMappings ........................................
Amazon ECS TaskDefinition ContainerDefinitions VolumesFrom .........................................
Amazon ECS TaskDefinition Volumes ............................................................................
Amazon ECS TaskDefinition Volumes Host .....................................................................
Elastic Beanstalk Environment Tier ...............................................................................
Elastic Beanstalk OptionSettings Property Type ...............................................................
Elastic Beanstalk SourceBundle Property Type ................................................................
Elastic Beanstalk SourceConfiguration Property Type .......................................................
Elastic Load Balancing AccessLoggingPolicy ..................................................................
AppCookieStickinessPolicy ..........................................................................................
Elastic Load Balancing ConnectionDrainingPolicy ............................................................
Elastic Load Balancing ConnectionSettings ....................................................................
ElasticLoadBalancing HealthCheck ...............................................................................
LBCookieStickinessPolicy ............................................................................................
ElasticLoadBalancing Listener ......................................................................................
ElasticLoadBalancing Policy ........................................................................................
IAM Policies ..............................................................................................................
IAM User LoginProfile .................................................................................................
AWS Lambda Function Code .......................................................................................
Name Type ...............................................................................................................
AWS OpsWorks AutoScalingThresholds Type .................................................................
AWS OpsWorks ChefConfiguration Type ........................................................................
AWS OpsWorks Layer LifeCycleConfiguration .................................................................
AWS OpsWorks Layer LifeCycleConfiguration ShutdownEventConfiguration ........................
AWS OpsWorks LoadBasedAutoScaling Type .................................................................
AWS OpsWorks Recipes Type ......................................................................................
AWS OpsWorks Source Type .......................................................................................
AWS OpsWorks SslConfiguration Type ..........................................................................
AWS OpsWorks StackConfigurationManager Type ...........................................................
AWS OpsWorks TimeBasedAutoScaling Type .................................................................
AWS OpsWorks VolumeConfiguration Type .....................................................................
Amazon Redshift Parameter Type .................................................................................
AWS CloudFormation Resource Tags ............................................................................
Amazon RDS OptionGroup OptionConfigurations ............................................................
Amazon RDS OptionGroup OptionConfigurations OptionSettings .......................................
RDS Security Group Rule ............................................................................................
Route 53 AliasTarget Property ......................................................................................
Amazon Route 53 Record Set GeoLocation Property .......................................................
Amazon Route 53 HealthCheckConfig ...........................................................................
Amazon Route 53 HealthCheckTags .............................................................................
Amazon Route 53 HostedZoneConfig Property ...............................................................
Amazon Route 53 HostedZoneTags ..............................................................................
Amazon Route 53 HostedZoneVPCs .............................................................................
Amazon S3 Cors Configuration ....................................................................................
Amazon S3 Cors Configuration Rule .............................................................................
Amazon S3 Lifecycle Configuration ...............................................................................
Amazon S3 Lifecycle Rule ...........................................................................................
Amazon S3 Lifecycle Rule NoncurrentVersionTransition ....................................................
Amazon S3 Lifecycle Rule Transition .............................................................................
API Version 2010-05-15
viii
582
583
583
584
584
587
588
590
591
592
592
593
594
594
595
596
597
597
598
599
600
600
601
602
603
606
606
607
608
609
610
610
611
611
612
613
614
615
615
616
617
618
619
620
620
621
622
623
625
625
626
626
627
627
628
628
630
631
AWS CloudFormation User Guide
Amazon S3 Logging Configuration ................................................................................
Amazon S3 Notification Configuration ............................................................................
Amazon S3 Notification Topic Configurations ..................................................................
Amazon S3 Versioning Configuration .............................................................................
Amazon S3 Website Configuration Property ....................................................................
Amazon S3 Website Configuration Redirect All Requests To Property .................................
Amazon S3 Website Configuration Routing Rules Property ...............................................
Amazon S3 Website Configuration Routing Rules Redirect Rule Property ............................
Amazon S3 Website Configuration Routing Rules Routing Rule Condition Property ...............
Amazon SNS Subscription ...........................................................................................
Amazon SQS RedrivePolicy .........................................................................................
Resource Attributes ............................................................................................................
CreationPolicy ...........................................................................................................
DeletionPolicy ...........................................................................................................
DependsOn ..............................................................................................................
Metadata ..................................................................................................................
UpdatePolicy .............................................................................................................
Intrinsic Functions ..............................................................................................................
Fn::Base64 ...............................................................................................................
Condition Functions ....................................................................................................
Fn::FindInMap ...........................................................................................................
Fn::GetAtt .................................................................................................................
Fn::GetAZs ...............................................................................................................
Fn::Join ....................................................................................................................
Fn::Select .................................................................................................................
Ref ..........................................................................................................................
Pseudo Parameters ............................................................................................................
CloudFormation Helper Scripts .............................................................................................
cfn-init ......................................................................................................................
cfn-signal ..................................................................................................................
cfn-get-metadata .......................................................................................................
cfn-hup ....................................................................................................................
Sample Templates ......................................................................................................................
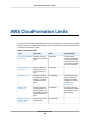
AWS CloudFormation Limits ........................................................................................................
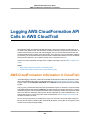
Logging API Calls ......................................................................................................................
AWS CloudFormation Information in CloudTrail .......................................................................
Understanding AWS CloudFormation Log File Entries ..............................................................
Troubleshooting .........................................................................................................................
Troubleshooting Guide ........................................................................................................
Troubleshooting Errors ........................................................................................................
Delete Stack Fails ......................................................................................................
Dependency Error ......................................................................................................
Error Parsing Parameter When Passing a List .................................................................
Insufficient IAM Permissions ........................................................................................
Invalid Value or Unsupported Resource Property .............................................................
Limit Exceeded ..........................................................................................................
Nested Stacks are Stuck in UPDATE_COMPLETE_CLEANUP_IN_PROGRESS,
UPDATE_ROLLBACK_COMPLETE_CLEANUP_IN_PROGRESS, or
UPDATE_ROLLBACK_IN_PROGRESS ..............................................................................
No Updates to Perform ...............................................................................................
Security Group Does Not Exist in VPC ...........................................................................
Update Rollback Failed ...............................................................................................
Wait Condition Didn't Receive the Required Number of Signals from an Amazon EC2
Instance ...................................................................................................................
Contacting Support ............................................................................................................
Release History .........................................................................................................................
AWS Glossary ...........................................................................................................................
API Version 2010-05-15
ix
631
632
632
633
633
635
635
636
637
638
638
639
639
641
642
645
645
648
649
649
660
661
666
667
668
669
674
676
677
679
683
684
688
689
692
692
693
697
697
698
698
698
698
699
699
699
699
700
700
700
700
701
702
719
AWS CloudFormation User Guide
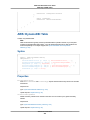
Simplify Infrastructure Management
What is AWS CloudFormation?
AWS CloudFormation is a service that helps you model and set up your Amazon Web Services resources
so that you can spend less time managing those resources and more time focusing on your applications
that run in AWS. You create a template that describes all the AWS resources that you want (like Amazon
EC2 instances or Amazon RDS DB instances), and AWS CloudFormation takes care of provisioning and
configuring those resources for you. You don't need to individually create and configure AWS resources
and figure out what's dependent on what; AWS CloudFormation handles all of that. The following scenarios
demonstrate how AWS CloudFormation can help.
Simplify Infrastructure Management
For a scalable web application that also includes a back-end database, you might use an Auto Scaling
group, an Elastic Load Balancing load balancer, and an Amazon Relational Database Service database
instance. Normally, you might use each individual service to provision these resources. And after you
create the resources, you would have to configure them to work together. All these tasks can add complexity
and time before you even get your application up and running.
Instead, you can create or modify an existing AWS CloudFormation template. A template describes all
of your resources and their properties. When you use that template to create an AWS CloudFormation
stack, AWS CloudFormation provisions the Auto Scaling group, load balancer, and database for you.
After the stack has been successfully created, your AWS resources are up and running. You can delete
the stack just as easily, which deletes all the resources in the stack. By using AWS CloudFormation, you
easily manage a collection of resources as a single unit.
Quickly Replicate Your Infrastructure
If your application requires additional availability, you might replicate it in multiple regions so that if one
region becomes unavailable, your users can still use your application in other regions. The challenge in
replicating your application is that it also requires you to replicate your resources. Not only do you need
to record all the resources that your application requires, but you must also provision and configure those
resources in each region.
When you use AWS CloudFormation, you can reuse your template to set up your resources consistently
and repeatedly. Just describe your resources once and then provision the same resources over and over
in multiple regions.
API Version 2010-05-15
1
AWS CloudFormation User Guide
Easily Control and Track Changes to Your Infrastructure
Easily Control and Track Changes to Your
Infrastructure
In some cases, you might have underlying resources that you want to upgrade incrementally. For example,
you might change to a higher performing instance type in your Auto Scaling launch configuration so that
you can reduce the maximum number of instances in your Auto Scaling group. If problems occur after
you complete the update, you might need to roll back your infrastructure to the original settings. To do
this manually, you not only have to remember which resources were changed, you also have to know
what the original settings were.
When you provision your infrastructure with AWS CloudFormation, the AWS CloudFormation template
describes exactly what resources are provisioned and their settings. Because these templates are text
files, you simply track differences in your templates to track changes to your infrastructure, similar to the
way developers control revisions to source code. For example, you can use a version control system with
your templates so that you know exactly what changes were made, who made them, and when. If at any
point you need to reverse changes to your infrastructure, you can use a previous version of your template.
Related Information
• For more information about AWS CloudFormation stacks and templates, see AWS CloudFormation
Concepts (p. 2).
• For an overview about how to use AWS CloudFormation, see How Does AWS CloudFormation
Work? (p. 4).
• For pricing information, see AWS CloudFormation Pricing.
AWS CloudFormation Concepts
When you use AWS CloudFormation, you work with templates and stacks. You create templates to
describe your AWS resources and their properties. Whenever you create a stack, AWS CloudFormation
provisions the resources that are described in your template.
Topics
• Templates (p. 2)
• Stacks (p. 4)
Templates
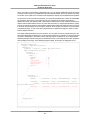
An AWS CloudFormation template is a text file whose format complies with the JSON standard. You can
save these files with any extension, such as .json, .template, or .txt. AWS CloudFormation uses
these templates as blueprints for building your AWS resources. For example, in a template, you can
describe an Amazon EC2 instance, such as the instance type, the AMI ID, block device mappings, and
its Amazon EC2 key pair name. Whenever you create a stack, you also specify a template that AWS
CloudFormation uses to create whatever you described in the template.
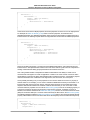
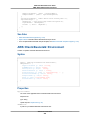
For example, if you created a stack with the following template, AWS CloudFormation provisions an
instance with an ami-2f726546 AMI ID, t1.micro instance type, testkey key pair name, and an
Amazon EBS volume.
API Version 2010-05-15
2
AWS CloudFormation User Guide
Templates
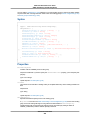
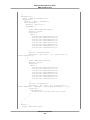
{
"AWSTemplateFormatVersion" : "2010-09-09",
"Description" : "A sample template",
"Resources" : {
"MyEC2Instance" : {
"Type" : "AWS::EC2::Instance",
"Properties" : {
"ImageId" : "ami-2f726546",
"InstanceType" : "t1.micro",
"KeyName" : "testkey",
"BlockDeviceMappings" : [
{
"DeviceName" : "/dev/sdm",
"Ebs" : {
"VolumeType" : "io1",
"Iops" : "200",
"DeleteOnTermination" : "false",
"VolumeSize" : "20"
}
}
]
}
}
}
}
You can also specify multiple resources in a single template and configure these resources to work
together. For example, you can modify the previous template to include an Elastic IP (EIP) and associate
it with the Amazon EC2 instance, as shown in the following example:
{
"AWSTemplateFormatVersion" : "2010-09-09",
"Description" : "A sample template",
"Resources" : {
"MyEC2Instance" : {
"Type" : "AWS::EC2::Instance",
"Properties" : {
"ImageId" : "ami-2f726546",
"InstanceType" : "t1.micro",
"KeyName" : "testkey",
"BlockDeviceMappings" : [
{
"DeviceName" : "/dev/sdm",
"Ebs" : {
"VolumeType" : "io1",
"Iops" : "200",
"DeleteOnTermination" : "false",
"VolumeSize" : "20"
}
}
]
}
},
"MyEIP" : {
"Type" : "AWS::EC2::EIP",
"Properties" : {
"InstanceId" : {"Ref": "MyEC2Instance"}
API Version 2010-05-15
3
AWS CloudFormation User Guide
Stacks
}
}
}
}
The previous templates are centered around a single Amazon EC2 instance; however, AWS
CloudFormation templates have additional capabilities that you can use to build complex sets of resources
and reuse those templates in multiple contexts. For example, you can add input parameters whose values
are specified when you create an AWS CloudFormation stack. In other words, you can specify a value
like the instance type when you create a stack instead of when you create the template, making the
template easier to reuse in different situations.
For more information about template creation and capabilities, see Template Anatomy (p. 113).
Stacks
When you use AWS CloudFormation, you manage related resources as a single unit called a stack. In
other words, you create, update, and delete a collection of resources by creating, updating, and deleting
stacks. All the resources in a stack are defined by the stack's AWS CloudFormation template. Suppose
you created a template that includes an Auto Scaling group, Elastic Load Balancing load balancer, and
an Amazon RDS database instance. To create those resources, you create a stack by submitting the
template that you created, and AWS CloudFormation provisions all those resources for you. To update
resources, you first modify the original stack template and then update your stack by submitting the
modified template. You can work with stacks by using the AWS CloudFormation console, API, or AWS
CLI.
For more information about creating, updating, or deleting stacks, see Working with Stacks (p. 67).
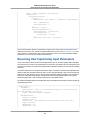
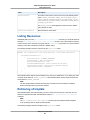
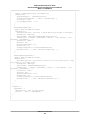
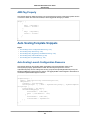
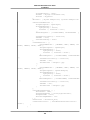
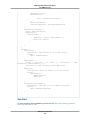
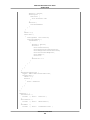
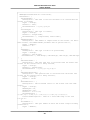
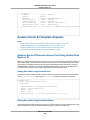
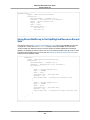
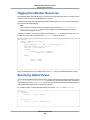
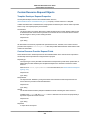
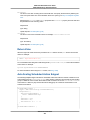
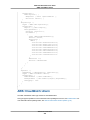
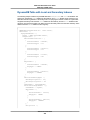
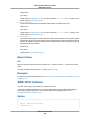
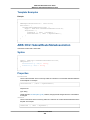
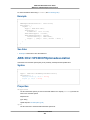
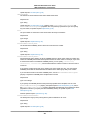
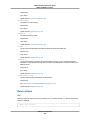
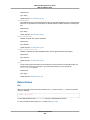
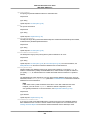
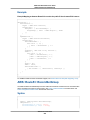
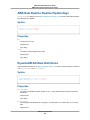
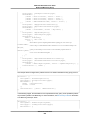
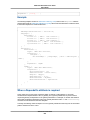
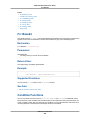
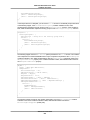
How Does AWS CloudFormation Work?
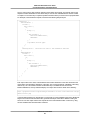
Whenever you create a stack, AWS CloudFormation makes underlying service calls to AWS to provision
and configure your resources. Note that AWS CloudFormation can only perform actions that you have
permission to do. For example, to create Amazon EC2 instances by using AWS CloudFormation, you
need permissions to create instances. You'll need similar permissions to terminate instances when you
delete stacks with instances. You use AWS Identity and Access Management to manage permissions.
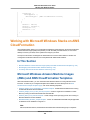
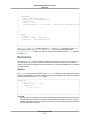
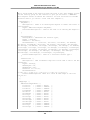
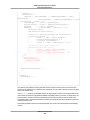
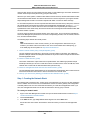
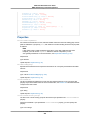
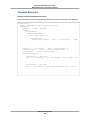
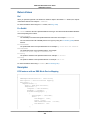
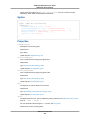
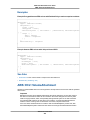
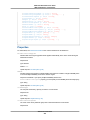
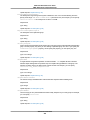
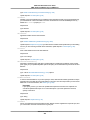
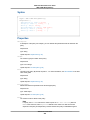
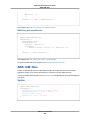
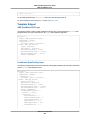
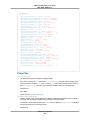
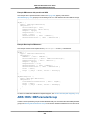
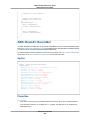
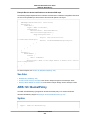
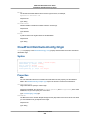
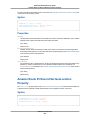
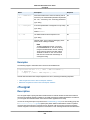
The calls that AWS CloudFormation makes are all declared by your template. For example, suppose you
have a template that describes an Amazon EC2 instance with a t1.micro instance type. When you use
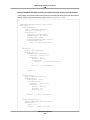
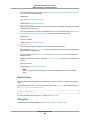
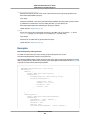
that template to create a stack, AWS CloudFormation calls the Amazon EC2 create instance API and
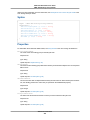
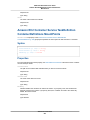
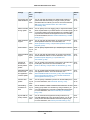
specifies the instance type as t1.micro. The following diagram summarizes the AWS CloudFormation
create stack workflow:
API Version 2010-05-15
4
AWS CloudFormation User Guide
Update Stack Workflow
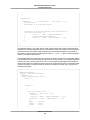
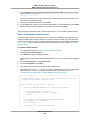
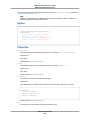
1. You can write an AWS CloudFormation template (a JSON-formatted document) in a text editor or pick
an existing template. The template describes the resources you want and their settings. For example,
suppose you want to create an Amazon EC2 instance. Your template can declare an Amazon EC2
instance and describe its properties, as shown in the following example:
{
"AWSTemplateFormatVersion" : "2010-09-09",
"Description" : "A simple Amazon EC2 instance",
"Resources" : {
"MyEC2Instance" : {
"Type" : "AWS::EC2::Instance",
"Properties" : {
"ImageId" : "ami-2f726546",
"InstanceType" : "t1.micro"
}
}
}
}
2. If you created a template, save the AWS CloudFormation template with any file extension like .json
or .txt. You can save the file locally or in an Amazon S3 bucket.
3. You create an AWS CloudFormation stack and specify the location of your template file. The location
can be a file on your local computer or an Amazon S3 URL. You can create stacks by using the AWS
CloudFormation console (p. 69), API, or AWS CLI.
Note
If you specify a local template file, AWS CloudFormation uploads it to an Amazon S3 bucket
in your AWS account. AWS CloudFormation creates a unique bucket for each region in which
you upload a template file. The buckets are accessible to anyone with Amazon S3 permissions
in your AWS account. If an AWS CloudFormation-created bucket already exists, the template
is added to that bucket.
You can use your own bucket and manage its permissions by manually uploading templates
to Amazon S3. Then whenever you create or update a stack, specify the Amazon S3 URL of
a template file.
AWS CloudFormation provisions and configures resources by making calls to those AWS services that
are described in your template.
After all the resources have been created, AWS CloudFormation signals that your stack has been
successfully created. Then you can start to use all the resources in your stack. If the stack creation fails,
AWS CloudFormation rolls back any changes by deleting any resources that were created.
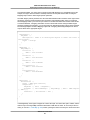
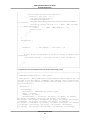
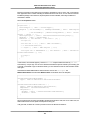
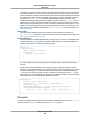
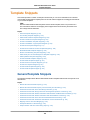
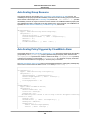
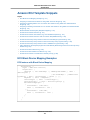
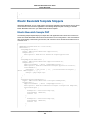
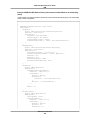
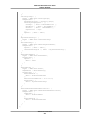
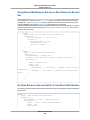
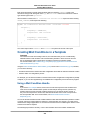
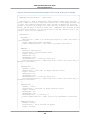
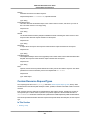
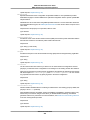
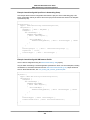
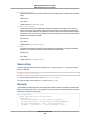
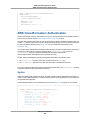
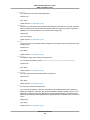
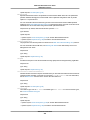
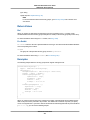
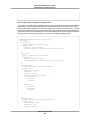
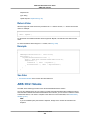
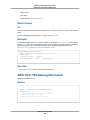
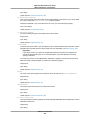
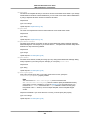
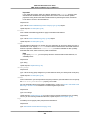
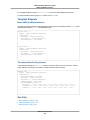
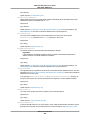
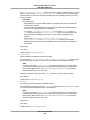
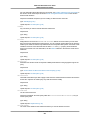
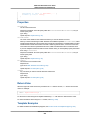
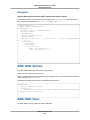
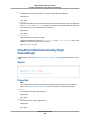
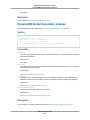
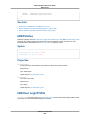
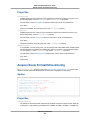
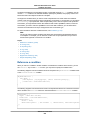
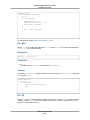
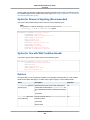
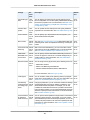
Update Stack Workflow
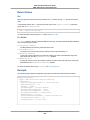
When you update a stack, you modify the original stack template. AWS CloudFormation compares the
modified template with the original stack template and updates only the resources that you modified. The
following diagram summarizes the update stack workflow:
API Version 2010-05-15
5
AWS CloudFormation User Guide
Delete Stack Workflow
Important
Updates can cause interruptions. Depending on the resource and property that you are updating,
the update might interrupt or even replace an existing resource. For more information, see AWS
CloudFormation Stacks Updates (p. 85).
1. You modify an AWS CloudFormation stack template in a text editor. For example, suppose you want
to change the instance type for an Amazon EC2 instance. In the original stack template, change the
instance type property for that instance.
2. You save the AWS CloudFormation template locally or in an Amazon S3 bucket.
3. You select the AWS CloudFormation stack that you want to update and specify the location of the
modified template file. The location can be a file on your local computer or an Amazon S3 URL. You
can update stacks by using the AWS CloudFormation console (p. 85), API, or AWS CLI.
Note
If you specify a local template file, AWS CloudFormation automatically uploads your template
to an Amazon S3 bucket in your AWS account.
AWS CloudFormation compares the modified template with the original stack template and updates only
the resources that you modified.
After all the resources have been updated, AWS CloudFormation signals that your stack has been
successfully updated. If the stack updates fails, AWS CloudFormation rolls back any changes to the last
known working state.
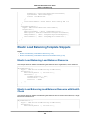
Delete Stack Workflow
When you delete a stack, you specify the stack to delete, and AWS CloudFormation deletes the stack
and all the resources in that stack. You can delete stacks by using the AWS CloudFormation
console (p. 75), API, or AWS CLI.
If you want to delete a stack but want to retain some resources in that stack, you can use a deletion
policy (p. 641) to retain those resources.
After all the resources have been deleted, AWS CloudFormation signals that your stack has been
successfully deleted. If AWS CloudFormation cannot delete a resource, the stack will not be deleted. Any
resources that haven't been deleted will remain until you can successfully delete the stack.
Additional Resources
• For more information about creating AWS CloudFormation templates, see Template Anatomy (p. 113).
• For more information about creating, updating, or deleting stacks, see Working with Stacks (p. 67).
API Version 2010-05-15
6
AWS CloudFormation User Guide
Signing Up for an AWS Account
Getting Started with AWS
CloudFormation
If you're new to AWS CloudFormation, the guides in this section will help get you started quickly, provide
you with fundamental information about using CloudFormation from the AWS Console, and guide you
through using the AWS command line interface (CLI) so that you can manage your CloudFormation
stacks from your system's command prompt.
Topics
• Signing Up for an AWS Account (p. 7)
• Get Started (p. 8)
• Learn Template Basics (p. 14)
• Walkthrough: Updating a Stack (p. 24)
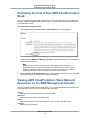
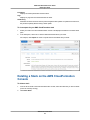
• Using CloudFormer to Create AWS CloudFormation Templates from Existing AWS Resources (p. 47)
• AWS CloudFormation Endpoints (p. 53)
• AWS CloudFormation and VPC Endpoints (p. 54)
Signing Up for an AWS Account
Before you can use AWS CloudFormation or any Amazon Web Services, you must first sign up for an
AWS account.
To sign up for an AWS account
1.
2.
Open http://www.amazonaws.cn/, and then click Sign Up.
Follow the on-screen instructions.
Part of the sign-up procedure involves receiving a phone call and entering a PIN using the phone
keypad.
API Version 2010-05-15
7
AWS CloudFormation User Guide
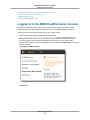
Get Started
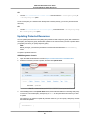
Get Started
With the right template, you can deploy at once all the AWS resources you need for an application. In
this section, you'll examine a template that declares the resources for a WordPress blog, creates a
WordPress blog as a stack, monitors the stack creation process, examines the resources on the stack,
and then deletes the stack. You use the AWS Management Console to complete these tasks.
Step 1: Sign up for the Service
Signing up for AWS CloudFormation also automatically signs you up for other AWS products you need,
such as Amazon Elastic Compute Cloud, Amazon Relational Database Service and Amazon Simple
Notification Service. You're not charged for any services unless you use them.
Note
AWS CloudFormation is a free service; however, you are charged for the AWS resources you
include in your stacks at the current rates for each. For more information about AWS pricing, go
to the detail page for each product on http://www.amazonaws.cn.
To sign up for AWS CloudFormation
1.
2.
Go to http://www.amazonaws.cn/cloudformation, and then click Sign Up for AWS CloudFormation.
Follow the on-screen instructions.
If you don't already have an AWS account, you'll be prompted to create one when you sign up for AWS
CloudFormation.
Part of the sign-up procedure involves receiving a phone call and entering a PIN using the phone keypad.
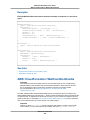
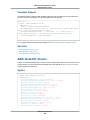
Step 2: Pick a template
Next, you'll need a template that specifies the resources that you want in your stack. For this step, you
use a sample template that is already prepared. The sample template creates a basic WordPress blog
that uses a single Amazon EC2 instance and an Amazon RDS DB Instance. The template also creates
an Amazon EC2 and Amazon RDS security group to control firewall settings for the Amazon EC2 instance
and the database instance.
Important
AWS CloudFormation is free, but the AWS resources that AWS CloudFormation creates are live
(and not running in a sandbox). You will incur the standard usage fees for these resources until
you terminate them in the last task in this tutorial.The total charges will be minimal. For information
about how you might minimize any charges, go to http://www.amazonaws.cn/free/.
To view the template
•
You can download or view the WordPress sample template from https://s3.amazonaws.com/
cloudformation-templates-us-east-1/WordPress_Single_Instance_With_RDS.template.
You don't need to download it unless you want to inspect it. You will use the template URL later in
this guide.
A template is a JavaScript Object Notation (JSON) text file that contains the configuration information
about the AWS resources you want to create in the stack. In this particular sample template, it includes
six top-level sections: AWSTemplateFormatVersion, Description, Parameters, Mappings,
Resources, and Outputs; however, only the Resources section is required.
API Version 2010-05-15
8
AWS CloudFormation User Guide
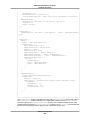
Step 2: Pick a template
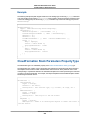
The Resources section contains the definitions of the AWS resources you want to create with the template.
Each resource is listed separately and specifies the properties that are necessary for creating that particular
resource. The following resource declaration is the configuration for the Amazon RDS database instance,
which in this example has the logical name DBInstance:
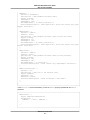
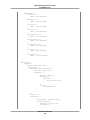
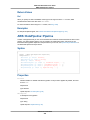
"Resources" : {
...
"DBInstance" : {
"Type": "AWS::RDS::DBInstance",
"Properties": {
"DBName"
: { "Ref" : "DBName" },
"Engine"
: "MySQL",
"MasterUsername"
: { "Ref" : "DBUsername" },
"DBInstanceClass"
: { "Ref" : "DBClass" },
"DBSecurityGroups" : [{ "Ref" : "DBSecurityGroup" }],
"AllocatedStorage" : { "Ref" : "DBAllocatedStorage" },
"MasterUserPassword": { "Ref" : "DBPassword" }
}
},
"DBSecurityGroup": {
"Type": "AWS::RDS::DBSecurityGroup",
"Properties": {
"DBSecurityGroupIngress": { "EC2SecurityGroupName": { "Ref": "WebServer
SecurityGroup"} },
"GroupDescription"
: "Frontend Access"
}
},
...
},
If you have created database instances before, you can recognize properties, such as Engine,
DBInstanceClass, and AllocatedStorage, that determine the configuration of the database instance.
Resource declarations are an efficient way to specify all these configuration settings at once. When you
put resource declarations in a template, you can create and configure all the declared resources easily
by using the template to create a stack. To launch the same configuration of resources, all you have to
do is create a new stack that uses the same template.
The resource declaration begins with a string that specifies the logical name for the resource. As you'll
see, the logical name can be used to refer to resources within the template.
You use the Parameters section to declare values that can be passed to the template when you create
the stack. A parameter is an effective way to specify sensitive information, such as user names and
passwords, that you don't want to store in the template itself. It is also a way to specify information that
might be unique to the specific application or configuration you are deploying, for example, a domain
name or instance type. When you create the WordPress stack later in this section, you'll see the set of
parameters declared in the template appear on the Specify Parameters page of the Create Stack wizard,
where you can specify the parameters before you create the stack.
The following parameters are used in the template to specify values that are used in properties of the
Amazon RDS database instance resource:
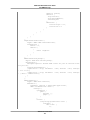
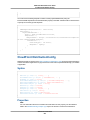
"Parameters" : {
...
API Version 2010-05-15
9
AWS CloudFormation User Guide
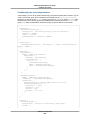
Step 2: Pick a template
"DBName" : {
"Default": "wordpress",
"Description" : "The WordPress database name",
"Type": "String",
"MinLength": "1",
"MaxLength": "64",
"AllowedPattern" : "[a-zA-Z][a-zA-Z0-9]*",
"ConstraintDescription" : "must begin with a letter and contain only alpha
numeric characters."
},
"DBUsername" : {
"Default": "admin",
"NoEcho": "true",
"Description" : "The WordPress database admin account user name",
"Type": "String",
"MinLength": "1",
"MaxLength": "16",
"AllowedPattern" : "[a-zA-Z][a-zA-Z0-9]*",
"ConstraintDescription" : "must begin with a letter and contain only alpha
numeric characters."
},
"DBPassword" : {
"Default": "admin",
"NoEcho": "true",
"Description" : "The WordPress database admin account password",
"Type": "String",
"MinLength": "8",
"MaxLength": "41",
"AllowedPattern" : "[a-zA-Z0-9]*",
"ConstraintDescription" : "must contain only alphanumeric characters."
},
"DBAllocatedStorage" : {
"Default": "5",
"Description" : "The size of the database (Gb)",
"Type": "Number",
"MinValue": "5",
"MaxValue": "1024",
"ConstraintDescription" : "must be between 5 and 1024Gb."
},
...
},
In the DBInstance resource declaration, you see the DBName property specified with the DBName
parameter:
"DBInstance" : {
"Type": "AWS::RDS::DBInstance",
"Properties": {
"DBName" : { "Ref" : "DBName" },
...
}
},
API Version 2010-05-15
10
AWS CloudFormation User Guide
Step 3: Make sure you have prepared any required items
for the stack
The braces contain a call to the Ref (p. 669) function with DBName as its input. The Ref function returns
the value of the object it refers to. In this case, the Ref function sets the DBName property to the value
that was specified for DBName when the stack was created.
The Ref function can also set a resource's property to the value of another resource. For example, the
resource declaration DBInstance contains the following property declaration:
"DBInstance" : {
"Type": "AWS::RDS::DBInstance",
"Properties": {
...
"DBSecurityGroups" : [{ "Ref" : "DBSecurityGroup" }],
...
}
},
The DBSecurityGroups property takes a list of Amazon RDS database security groups.The Ref function
has an input of DBSecurityGroup, which is the logical name of a database security group in the template,
and adds the name of DBSecurityGroup to the DBSecurityGroups property.
In the template, you'll also find a Mappings section. You use mappings to declare conditional values that
are evaluated in a similar manner as a lookup table statement. The template uses mappings to select
the correct Amazon machine image (AMI) for the region and the architecture type for the instance type.
Outputs define custom values that are returned by the aws cloudformation describe-stacks
command and in the AWS CloudFormation console Outputs tab after the stack is created. You can use
output values to return information from the resources in the stack, such as the URL for a website that
was created in the template. We cover mappings, outputs, and other things about templates in more
detail in Learn Template Basics (p. 14).
That's enough about templates for now. Let's start creating a stack.
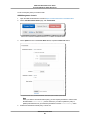
Step 3: Make sure you have prepared any required
items for the stack
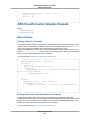
Before you create a stack from a template, you must ensure that all dependent resources that the template
requires are available. A template can use or refer to both existing AWS resources and resources declared
in the template itself. AWS CloudFormation takes care of checking references to resources in the template
and also checks references to existing resources to ensure that they exist in the region where you are
creating the stack. If your template refers to a dependent resource that does not exist, stack creation
fails.
The example WordPress template contains an input parameter, KeyName, that specifies the key pair
used for the Amazon EC2 instance that is declared in the template. The template depends on the user
who creates a stack from the template to supply a valid Amazon EC2 key pair for the KeyName parameter.
If you supply a valid key pair name, the stack creates successfully. If you don't supply a valid key pair
name, the stack is rolled back.
Make sure you have a valid Amazon EC2 key pair and record the key pair name before you create the
stack.
To see your key pairs, open the Amazon EC2 console, then click Key Pairs in the navigation pane.
Note
If you don't have an Amazon EC2 key pair, you must create the key pair in the same region
where you are creating the stack. For information about creating a key pair, see Getting an SSH
Key Pair in the Amazon EC2 User Guide for Linux Instances.
API Version 2010-05-15
11
AWS CloudFormation User Guide
Step 4: Create the stack
Now that you have a valid key pair, let's use the WordPress template to create a stack.
Step 4: Create the stack
You will create your stack based on the WordPress-1.0.0 file discussed earlier. The template contains
several AWS resources including an Amazon RDS database instance and an Amazon EC2 instance.
To create the WordPress stack
1.
2.
Sign in to the AWS Management Console and open the AWS CloudFormation console at https://
console.amazonaws.cn/cloudformation/.
If this is a new AWS CloudFormation account, click Create New Stack. Otherwise, click Create
Stack.
3.
In the Stack section, enter a stack name in the Name field. For this example, use MyWPTestStack.
The stack name cannot contain spaces.
4.
In the Template section, select Specify an Amazon S3 Template URL to type or paste the URL
for the sample WordPress template, and then click Next:
https://s3.amazonaws.com/cloudformation-templates-us-east-1/WordPress_Single_Instance_With_RDS.template
Note
AWS CloudFormation templates that are stored in an Amazon S3 bucket must be accessible
to the user who is creating the stack, and must exist in the same region as the stack being
created. Therefore, if the Amazon S3 bucket exists in the us-east-1 region, the stack must
also be created in us-east-1.
5.
In the KeyName field, enter the name of a valid Amazon EC2 key pair in the same region you are
creating the stack.
Note
On the Specify Parameters page, you'll recognize the parameters from the Parameters
section of the template.
6.
7.
8.
Click Next.
In this scenario, we won't add any tags. Click Next. Tags, which are key-value pairs, can help you
identify your stacks. For more information, see Adding Tags to Your AWS CloudFormation Stack.
Review the information for the stack. When you're satisfied with the settings, click Create.
Your stack might take several minutes to create—but you probably don't want to just sit around waiting.
If you're like us, you'll want to know how the stack creation is going.
Step 5: Monitor the progress of stack creation
After you complete the Create Stack wizard, AWS CloudFormation begins creating the resources that
are specified in the template. Your new stack, MyWPTestStack, appears in the list at the top portion of
the CloudFormation console. Its status should be CREATE_IN_PROGRESS. You can see detailed
status for a stack by viewing its events.
To view the events for the stack
1.
On the AWS CloudFormation console, select the stack MyWPTestStack in the list.
2.
In the stack details pane, click the Events tab.
The console automatically refreshes the event list with the most recent events every 60 seconds.
API Version 2010-05-15
12
AWS CloudFormation User Guide
Step 6: Use your stack resources
The Events tab displays each major step in the creation of the stack sorted by the time of each event,
with latest events on top.
The first event (at the bottom of the event list) is the start of the stack creation process:
2013-04-24 18:54 UTC-7 CREATE_IN_PROGRESS AWS::CloudFormation::Stack
MyWPTestStack User initiated
Next are events that mark the beginning and completion of the creation of each resource. For example,
creation of the DBSecurityGroup security group results in the following entries:
2013-04-24 18:59 UTC-7 CREATE_COMPLETE AWS::RDS::DBSecurityGroup...
2013-04-24 18:54 UTC-7 CREATE_IN_PROGRESS AWS::RDS::DBSecurityGroup...
The CREATE_IN_PROGRESS event is logged when AWS CloudFormation reports that it has begun to
create the resource. The CREATE_COMPLETE event is logged when the resource is successfully created.
When AWS CloudFormation has successfully created the stack, you will see the following event at the
top of the Events tab:
2013-04-24 19:17 UTC-7 CREATE_COMPLETE AWS::CloudFormation::Stack MyWPTestStack
If AWS CloudFormation cannot create a resource, it reports a CREATE_FAILED event and, by default,
rolls back the stack and deletes any resources that have been created. The Status Reason column
displays the issue that caused the failure. For example, if you specified an invalid database password,
you might see something like the following event for the AWS::RDS::DBInstance resource:
2013-04-24 19:21 UTC-7 CREATE_FAILED AWS::RDS::DBInstance DBInstance The
parameter MasterUserPassword is not a valid password because it is shorter than
8 characters.
Step 6: Use your stack resources
When the stack MyWPTestStack has a status of CREATE_COMPLETE, AWS CloudFormation has finished
creating the stack, and you can start using its resources.
The sample WordPress stack creates a WordPress website. You can continue with the WordPress setup
by running the WordPress installation script.
To complete the WordPress installation
1.
On the Outputs tab, in the WebsiteURL row, click the link in the Value column.
2.
The WebsiteURL output value is the URL of the installation script for the WordPress website that
you created with the stack.
On the web page for the WordPress installation, follow the on-screen instructions to complete the
WordPress installation. For more information about installing WordPress, see http://
codex.wordpress.org/Installing_WordPress.
After you complete the installation and log in, you are directed to the dashboard where you can set
additional options for your WordPress blog. Then, you can start writing posts for your blog that you
successfully created by using a AWS CloudFormation template.
API Version 2010-05-15
13
AWS CloudFormation User Guide
Step 7: Clean Up
Step 7: Clean Up
You have completed the AWS CloudFormation getting started tasks. To make sure you are not charged
for any unwanted services, you can clean up by deleting the stack and its resources.
To delete the stack and its resources
1.
From the AWS CloudFormation console, select the MyWPTestStack stack.
2.
3.
Click Delete Stack.
In the confirmation message that appears, click Yes, Delete.
The status for MyWPTestStack changes to DELETE_IN_PROGRESS. In the same way you monitored the
creation of the stack, you can monitor its deletion by using the Event tab. When AWS CloudFormation
completes the deletion of the stack, it removes the stack from the list.
Congratulations! You successfully picked a template, created a stack, viewed and used its resources,
and deleted the stack and its resources. Not only that, you were able to set up a WordPress blog using
a AWS CloudFormation template. You can find other templates in the AWS CloudFormation Sample
Template Library.
Now it's time to learn more about templates so that you can easily modify existing templates or create
your own: Learn Template Basics (p. 14).
Learn Template Basics
Topics
• What is an AWS CloudFormation Template? (p. 14)
• Resources: Hello Bucket! (p. 15)
• Resource Properties and Using Resources Together (p. 15)
• Receiving User Input Using Input Parameters (p. 19)
• Specifying Conditional Values Using Mappings (p. 20)
• Constructed Values and Output Values (p. 22)
• Next Steps (p. 24)
In Get Started (p. 8), you learned how to use a template to create a stack. You saw resources declared
in a template and how they map to resources in the stack. We also touched on input parameters and how
they enable you to pass in specific values when you create a stack from a template. In this section, we'll
go deeper into resources and parameters. We'll also cover the other components of templates so that
you'll know how to use these components together to create templates that produce the AWS resources
you want.
What is an AWS CloudFormation Template?
Before we go any further, we should cover the basics of what a template is. A template is a declaration
of the AWS resources that make up a stack. The template is stored as a text file whose format complies
with the JavaScript Object Notation (JSON) standard. Because they are just text files, you can create
and edit them in any text editor and manage them in your source control system with the rest of your
source code. For more information about the JSON format, see http://www.json.org.
In the template, you use a JSON structure AWS CloudFormation can interpret to declare the AWS
resources you want to create and configure. In the JSON format, an object is declared as a name-value
API Version 2010-05-15
14
AWS CloudFormation User Guide
Resources: Hello Bucket!
pair or a pairing of a name with a set of child objects enclosed within braces. Multiple sibling objects are
separated by commas. An AWS CloudFormation template begins with an open brace and ends with a
close brace. Within those braces, you can declare top-level JSON objects, as described in the Template
Anatomy (p. 113). The only required top-level object is the Resources object, which must declare at least
one resource. Let's start with the most basic template containing only a Resources object, which contains
a single resource declaration.
Resources: Hello Bucket!
The Resources object contains a list of resource objects contained within braces. A resource declaration
contains the resource's attributes, which are themselves declared as child objects. A resource must have
a Type attribute, which defines the kind of AWS resource you want to create. The Type attribute has a
special format:
AWS::ProductIdentifier::ResourceType
For example, the resource type for an Amazon S3 bucket is AWS::S3::Bucket (p. 526). For a full list of
resource types, see Template Reference (p. 286).
Let's take a look at a very basic template. The following template declares a single resource of type
AWS::S3::Bucket: with the name HelloBucket.
{
"Resources" : {
"HelloBucket" : {
"Type" : "AWS::S3::Bucket"
}
}
}
The syntactic elements are quoted strings. If you use this template to create a stack, AWS CloudFormation
will create an Amazon S3 bucket. Creating a bucket is simple, because AWS CloudFormation can create
a bucket with default settings. For other resources, such as an Auto Scaling group or EC2 instance, AWS
CloudFormation requires more information. Resource declarations use a Properties attribute to specify
the information used to create a resource.
Depending on the resource type, some properties are required, such as the ImageId property for an
AWS::EC2::Instance (p. 354) resource, and others are optional. Some properties have default values,
such as the AccessControl property of the AWS::S3::Bucket resource, so specifying a value for those
properties is optional. Other properties are not required but may add functionality that you want, such as
the WebsiteConfiguration property of the AWS::S3::Bucket resource. Specifying a value for such properties
is entirely optional and based on your needs. In the example above, because the AWS::S3::Bucket
resource has only optional properties and we didn't need any of the optional features, we could accept
the defaults and omit the Properties attribute.
To view the properties for each resource type, see the topics in Resource Property Types Reference (p. 543).
Resource Properties and Using Resources
Together
Usually, a property for a resource is simply a string value. For example, the following template specifies
a canned ACL (PublicRead) for the AccessControl property of the bucket.
API Version 2010-05-15
15
AWS CloudFormation User Guide
Resource Properties and Using Resources Together
{
"Resources" : {
"HelloBucket" : {
"Type" : "AWS::S3::Bucket",
"Properties" : {
"AccessControl" : "PublicRead"
}
}
}
}
Some resources can have multiple properties, and some properties can have one or more subproperties.
For example, the AWS::S3::Bucket (p. 526) resource has two properties, AccessControl and
WebsiteConfiguration. The WebsiteConfiguration property has two subproperties, IndexDocument and
ErrorDocument. The following template shows our original bucket resource with the additional properties.
{
"Resources" : {
"HelloBucket" : {
"Type" : "AWS::S3::Bucket",
"Properties" : {
"AccessControl" : "PublicRead",
"WebsiteConfiguration" : {
"IndexDocument" : "index.html",
"ErrorDocument" : "error.html"
}
}
}
}
}
Note how the sibling properties—AccessControl and WebsiteConfiguration, and IndexDocument and
ErrorDocument—are separated with commas. One of the most common syntax errors in a template is a
missing comma between sibling property declarations and between resources.
One of the greatest benefits of templates and AWS CloudFormation is the ability to create a set of
resources that work together to create an application or solution. The name used for a resource within
the template is a logical name. When AWS CloudFormation creates the resource, it generates a physical
name that is based on the combination of the logical name, the stack name, and a unique ID.
You're probably wondering how you set properties on one resource based on the name or property of
another resource. For example, you can create a CloudFront distribution backed by an S3 bucket or an
EC2 instance that uses EC2 security groups, and all of these resources can be created in the same
template. AWS CloudFormation has a number of intrinsic functions that you can use to refer to other
resources and their properties. You can use the Ref function (p. 669) to refer to an identifying property of
a resource. Frequently, this is the physical name of the resource; however, sometimes it can be an
identifier, such as the IP address for an AWS::EC2::EIP (p. 351) resource or an Amazon Resource Name
(ARN) for an Amazon SNS topic. For a list of values returned by the Ref function, see Ref function (p. 669).
The following template contains an AWS::EC2::Instance (p. 354) resource. The resource's SecurityGroups
property calls the Ref function to refer to the AWS::EC2::SecurityGroup resource InstanceSecurityGroup.
{
"Resources" : {
"Ec2Instance" : {
"Type" : "AWS::EC2::Instance",
"Properties" : {
API Version 2010-05-15
16
AWS CloudFormation User Guide
Resource Properties and Using Resources Together
"SecurityGroups" : [ { "Ref" : "InstanceSecurityGroup" } ],
"KeyName" : "mykey",
"ImageId" : ""
}
},
"InstanceSecurityGroup" : {
"Type" : "AWS::EC2::SecurityGroup",
"Properties" : {
"GroupDescription" : "Enable SSH access via port 22",
"SecurityGroupIngress" : [ {
"IpProtocol" : "tcp",
"FromPort" : "22",
"ToPort" : "22",
"CidrIp" : "0.0.0.0/0"
} ]
}
}
}
}
You probably noticed that the Ref function call is expressed like other JSON objects, as a name-value
pair separated by a colon and surrounded by braces. The function name is the name, and the input
parameter for the function is the value. You'll also notice that the function call is also surrounded by
brackets. In JSON, lists are surrounded by brackets. The SecurityGroups property is a list of security
groups, and in this example we have only one item in the list. The following template has an additional
item in the property list of the SecurityGroup.
{
"Resources" : {
"Ec2Instance" : {
"Type" : "AWS::EC2::Instance",
"Properties" : {
"SecurityGroups" : [ { "Ref" : "InstanceSecurityGroup" }, "MyExisting
SecurityGroup" ],
"KeyName" : "mykey",
"ImageId" : "ami-7a11e213"
}
},
"InstanceSecurityGroup" : {
"Type" : "AWS::EC2::SecurityGroup",
"Properties" : {
"GroupDescription" : "Enable SSH access via port 22",
"SecurityGroupIngress" : [ {
"IpProtocol" : "tcp",
"FromPort" : "22",
"ToPort" : "22",
"CidrIp" : "0.0.0.0/0"
} ]
}
}
}
}
MyExistingSecurityGroup is a string that refers to an existing EC2 security group instead of a security
group declared in a template. You use literal strings to refer to existing AWS resources.
API Version 2010-05-15
17
AWS CloudFormation User Guide
Resource Properties and Using Resources Together
In the example above, the KeyName property of the AWS::EC2::Instance (p. 354) is the literal string mykey.
This means that a key pair with the name mykey must exist in the region where the stack is being created;
otherwise, stack creation will fail because the key pair does not exist. The key pair you use can vary with
the region where you are creating the stack, or you may want to share the template with someone else
so that they can use it with their AWS account. If so, you can use an input parameter so that the key pair
name can be specified when the stack is created. The Ref function can refer to input parameters that are
specified at stack creation time. The following template adds a Parameters object containing the KeyName
parameter, which is used to specify the KeyName property for the AWS::EC2::Instance resource. The
parameter type is AWS::EC2::KeyPair::KeyName, which ensures a user specifies a valid key pair
name in her account and in the region where the stack is being created.
{
"Parameters" : {
"KeyName" : {
"Description" : "The EC2 Key Pair to allow SSH access to the instance",
"Type" : "AWS::EC2::KeyPair::KeyName"
}
},
"Resources" : {
"Ec2Instance" : {
"Type" : "AWS::EC2::Instance",
"Properties" : {
"SecurityGroups" : [ { "Ref" : "InstanceSecurityGroup" }, "MyExisting
SecurityGroup" ],
"KeyName" : { "Ref" : "KeyName"},
"ImageId" : "ami-7a11e213"
}
},
"InstanceSecurityGroup" : {
"Type" : "AWS::EC2::SecurityGroup",
"Properties" : {
"GroupDescription" : "Enable SSH access via port 22",
"SecurityGroupIngress" : [ {
"IpProtocol" : "tcp",
"FromPort" : "22",
"ToPort" : "22",
"CidrIp" : "0.0.0.0/0"
} ]
}
}
}
}
The Ref function is handy if the parameter or the value returned for a resource is exactly what you want;
however, you may need other attributes of a resource. For example, if you want to create a CloudFront
distribution with an S3 origin, you need to specify the bucket location by using a DNS-style address. A
number of resources have additional attributes whose values you can use in your template. To get these
attributes, you use the Fn::GetAtt (p. 661) function. The following template creates a CloudFront distribution
resource that specifies the DNS name of an S3 bucket resource using Fn::GetAtt function to get the
bucket's DomainName attribute.
"Resources" : {
"myBucket" : {
"Type" : "AWS::S3::Bucket"
},
"myDistribution" : {
API Version 2010-05-15
18
AWS CloudFormation User Guide
Receiving User Input Using Input Parameters
"Type" : "AWS::CloudFront::Distribution",
"Properties" : {
"DistributionConfig" : {
"Origins" : [ {
"DomainName": {"Fn::GetAtt" : ["myBucket", "DomainName"]},
"Id" : "myS3Origin",
"S3OriginConfig" : { }
} ],
"Enabled" : "true",
"DefaultCacheBehavior" : {
"TargetOriginId" : "myS3Origin",
"ForwardedValues" : {
"QueryString" : "false"
},
"ViewerProtocolPolicy" : "allow-all"
}
}
}
}
}
The Fn::GetAtt function takes two parameters, the logical name of the resource and the name of the
attribute to be retrieved. For a full list of available attributes for resources, see Fn::GetAtt (p. 661). You'll
notice that the Fn::Getatt function lists its two parameters in an array. For functions that take multiple
parameters, you use an array to specify their parameters.
Receiving User Input Using Input Parameters
So far, you've learned about resources and a little bit about how to use them together within a template.
You've learned how to refer to input parameters, but we haven't gone deeply into how to define the input
parameters themselves. Let's take a look at parameter declarations and how you can restrict and validate
user input.
You declare parameters in a template's Parameters object. A parameter contains a list of attributes that
define its value and constraints against its value. The only required attribute is Type, which can be String,
Number, or an AWS-specific type. You can also add a Description attribute that tells a user more about
what kind of value they should specify. The parameter's name and description appear in the Specify
Parameters page when a user uses the template in the Create Stack wizard.
The following template fragment is a Parameters object that declares the parameters used in the Specify
Parameters page above.
"Parameters": {
"KeyName": {
"Description" : "Name of an existing EC2 KeyPair to enable SSH access
into the WordPress web server",
"Type": "AWS::EC2::KeyPair::KeyName"
},
"WordPressUser": {
"Default": "admin",
"NoEcho": "true",
"Description" : "The WordPress database admin account user name",
"Type": "String",
"MinLength": "1",
"MaxLength": "16",
API Version 2010-05-15
19
AWS CloudFormation User Guide
Specifying Conditional Values Using Mappings
"AllowedPattern" : "[a-zA-Z][a-zA-Z0-9]*"
},
"WebServerPort": {
"Default": "8888",
"Description" : "TCP/IP port for the WordPress web server",
"Type": "Number",
"MinValue": "1",
"MaxValue": "65535"
}
},
The KeyName parameter is of type AWS::EC2::KeyPair::KeyName (an AWS-specific parameter type)
and has a description. You'll notice that KeyName has no Default attribute and the other parameters do.
Because KeyName has no default value, it must be specified at stack creation time: AWS CloudFormation
will not create the stack without a value for KeyName. When a user uses the template in the Create Stack
wizard, the console will show a drop-down list of valid values for AWS-specific parameter types.
For parameters with default values, AWS CloudFormation will use the default values unless users specify
another value. If you omit the default attribute, users will be required to specify a value for that parameter;
however, requiring the user to input a value does not ensure that the value is valid. To validate the value
of a parameter, you can declare constraints.
For AWS-specific parameter types, AWS CloudFormation validates input values against existing values
in a user's AWS account and in the region where he is creating the stack. For example, another
AWS-specific type is AWS::EC2::VPC::Id, which requires users to specify VPC IDs that are already
created in their accounts and in the region that they are creating their stacks.
For the String type, you can use the following attributes to declare constraints: MinLength, MaxLength,
Default, AllowedValues, and AllowedPattern. In the example above, the WordPressUser parameter has
three constraints: the parameter value must be 1 to 16 character long (MinLength, MaxLength) and must
begin with a letter followed by any combination of letters and numbers (AllowedPattern).
For the Number type, you can declare the following constraints: MinValue, MaxValue, Default, and
AllowedValues. A number can be an integer or a float value. In the example above, the WebServerPort
parameter must be a number between 1 and 65535 inclusive (MinValue, MaxValue).
Earlier in this section, we mentioned that parameters are a good way to specify sensitive or
implementation-specific data, such as passwords or user names, that you need to use but do not want
to embed in the template itself. For sensitive information, you can use the NoEcho attribute to prevent a
parameter value from being displayed in the console, command line tools, or API. If you set the NoEcho
attribute to true, the parameter value is returned as asterisks (*****). In the example above, the
WordPressUser parameter value is not visible to anyone viewing the stack's settings, and its value is
returned as asterisks.
Specifying Conditional Values Using Mappings
Parameters are a great way to enable users to specify unique or sensitive values for use in the properties
of stack resources; however, there may be settings that are region dependent or are somewhat complex
for users to figure out because of other conditions or dependencies. In these cases, you would want to
put some logic in the template itself so that users can specify simpler values (or none at all) to get the
results that they want. In an earlier example, we hardcoded the AMI ID for the ImageId property of our
EC2 instance. This works fine in the US-East region, where it represents the AMI that we want. However,
if the user tries to build the stack in a different region he or she will get the wrong AMI or no AMI at all.
(AMI IDs are unique to a region, so the same AMI ID in a different region may not represent any AMI or
a completely different one.)
API Version 2010-05-15
20
AWS CloudFormation User Guide
Specifying Conditional Values Using Mappings
To avoid this problem, you need a way to specify the right AMI ID based on a conditional input (in this
example, the region where the stack is created). There are two template features that can help, the
Mappings object and the AWS::Region pseudo parameter.
The AWS::Region pseudo parameter is a value that AWS CloudFormation resolves as the region where
the stack is created. Pseudo parameters are resolved by AWS CloudFormation when you create the
stack. Mappings enable you to use an input value as a condition that determines another value. Similar
to a switch statement, a mapping associates one set of values with another. Using the AWS::Region
parameter together with a mapping, you can ensure that an AMI ID appropriate to the region is specified.
The following template contains a Mappings object with a mapping named RegionMap that is used to
map an AMI ID to the appropriate region.
{
"Parameters" : {
"KeyName" : {
"Description" : "Name of an existing EC2 KeyPair to enable SSH access to
the instance",
"Type" : "String"
}
},
"Mappings" : {
"RegionMap" : {
"us-east-1" : {
"AMI" : "ami-76f0061f"
},
"us-west-1" : {
"AMI" : "ami-655a0a20"
},
"eu-west-1" : {
"AMI" : "ami-7fd4e10b"
},
"ap-southeast-1" : {
"AMI" : "ami-72621c20"
},
"ap-northeast-1" : {
"AMI" : "ami-8e08a38f"
}
}
},
"Resources" : {
"Ec2Instance" : {
"Type" : "AWS::EC2::Instance",
"Properties" : {
"KeyName" : { "Ref" : "KeyName" },
"ImageId" : { "Fn::FindInMap" : [ "RegionMap", { "Ref" : "AWS::Region"
}, "AMI" ]},
"UserData" : { "Fn::Base64" : "80" }
}
}
}
}
In the RegionMap, each region is mapped to a name-value pair. The name-value pair is a label, and the
value to map. In the RegionMap, AMI is the label and the AMI ID is the value. To use a map to return a
value, you use the Fn::FindInMap (p. 660) function, passing the name of the map, the value used to find
API Version 2010-05-15
21
AWS CloudFormation User Guide
Constructed Values and Output Values
the mapped value, and the label of the mapped value you want to return. In the example above, the
ImageId property of the resource Ec2Instance uses the Fn::FindInMap function to determine its value by
specifying RegionMap as the map to use, AWS::Region as the input value to map from, and AMI as the
label to identify the value to map to. For example, if this template were used to create a stack in the
us-west-1 region, ImageId would be set to ami-655a0a20.
Tip
The AWS::Region pseudo parameter enables you to get the region where the stack is created.
Some resources, such as AWS::EC2::Instance (p. 354),
AWS::AutoScaling::AutoScalingGroup (p. 288), and
AWS::ElasticLoadBalancing::LoadBalancer (p. 441), have a property that specifies availability
zones. You can use the Fn::GetAZs function (p. 666) to get the list of all availability zones in a
region.
Constructed Values and Output Values
Parameters and mappings are an excellent way to pass or determine specific values at stack creation
time, but there can be situations where a value from a parameter or other resource attribute is only part
of the value you need. For example, in the following fragment from the WordPress template, the Fn::Join
function constructs the Target subproperty of the HealthCheck property for the ElasticLoadBalancer
resource by concatenating the WebServerPort parameter with other literal strings to form the value
needed.
"Resources" : {
"ElasticLoadBalancer" : {
"Type" : "AWS::ElasticLoadBalancing::LoadBalancer",
"Properties" : {
"AvailabilityZones" : { "Fn::GetAZs" : "" },
"Instances" : [ { "Ref" : "Ec2Instance1" },{ "Ref" : "Ec2Instance2" }
],
"Listeners" : [ {
"LoadBalancerPort" : "80",
"InstancePort" : { "Ref" : "WebServerPort" },
"Protocol" : "HTTP"
} ],
"HealthCheck" : {
"Target" : { "Fn::Join" : [ "", ["HTTP:", { "Ref" : "WebServerPort"
}, "/"]]},
"HealthyThreshold" : "3",
"UnhealthyThreshold" : "5",
"Interval" : "30",
"Timeout" : "5"
}
}
},
The Fn::Join function takes two parameters, a delimiter that separates the values you want to concatenate
and an array of values in the order that you want them to appear. In the example above, the Fn::Join
function specifies an empty string as the delimiter and HTTP:, the value of the WebServerPort parameter,
and a / character as the values to concatenate. If WebServerPort had a value of 8888, the Target property
would be set to the following value:
HTTP:8888/
API Version 2010-05-15
22
AWS CloudFormation User Guide
Constructed Values and Output Values
The Fn::Join function is also useful for declaring output values for the stack. The Outputs object in the
template contains declarations for the values that you want to have available after the stack is created.
An output is a convenient way to capture important information about your resources or input parameters.
For example, in the WordPress template, we declare the following Outputs object.
"Outputs": {
"InstallURL": {
"Value": {
"Fn::Join": [
"",
[
"http://",
{
"Fn::GetAtt": [
"ElasticLoadBalancer",
"DNSName"
]
},
"/wp-admin/install.php"
]
]
},
"Description" : "Installation URL of the WordPress website"
},
"WebsiteURL": {
"Value": {
"Fn::Join": [
"",
[
"http://",
{
"Fn::GetAtt": [
"ElasticLoadBalancer",
"DNSName" ]
}
]
]
}
}
}
Each output value has a name, a Value attribute that contains declaration of the value returned as the
output value, and optionally a description of the value. In the previous example, InstallURL is the string
returned by a Fn::Join function call that concatenates http://, the DNS name of the resource
ElasticLoadBalancer, and /wp-admin/install.php. The output value would be similar to the following:
http://mywptests-elasticl-1gb51l6sl8y5v-206169572.us-east-1.elb.amazonaws.com/wpadmin/install.php
In the Get Started tutorial, we used this link to conveniently go to the installation page for the WordPress
blog that we created. AWS CloudFormation generates the output values after it finishes creating the
stack. You can view output values in the Outputs tab of the AWS CloudFormation console or by using
the aws cloudformation describe-stacks command.
API Version 2010-05-15
23
AWS CloudFormation User Guide
Next Steps
Next Steps
We just walked through the basic parts of a template and how to use them.You learned about the following
about templates:
• Declaring resources and their properties
• Referencing other resources with the Ref function and resource attributes using the Fn::GetAtt function
• Using parameters to enable users to specify values at stack creation time and using constraints to
validate parameter input
• Using mappings to determine conditional values
• Using the Fn::Join function to construct values based on parameters, resource attributes, and other
strings
• Using output values based to capture information about the stack's resources.
We didn't cover two top level objects in a template: AWSTemplateFormatVersion and Description.
AWSTemplateFormatVersion is simply the version of the template format—if you don't specify it, AWS
CloudFormation will use the latest version. The Description is any valid JSON string and this description
appears in the Specify Parameters page of the Create Stack wizard. For more information, see Format
Version (p. 114) and Description (p. 114).
Of course, there are more advanced template and stack features. Here is a list of a few important ones
that you'll want to learn more about:
Optional attributes that can be used with any resource:
• DependsOn attribute (p. 642) enables you to specify that one resource must be created after another.
• DeletionPolicy attribute (p. 641) enables you to specify how AWS CloudFormation should handle the
deletion of a resource.
• Metadata (p. 645) attribute enables you to specify structured data with a resource.
AWS::CloudFormation::Stack (p. 324) enables you to nest another stack as a resource within your template.
Walkthrough: Updating a Stack
With AWS CloudFormation, you can update the properties for resources in your existing stacks. These
changes can range from simple configuration changes, such as updating the alarm threshold on a
CloudWatch alarm, to more complex changes, such as updating the Amazon Machine Image (AMI)
running on an Amazon EC2 instance. Many of the AWS resources in a template can be updated, and we
continue to add support for more.
This section walks through a simple progression of updates of a running stack. It shows how the use of
templates makes it possible to use a version control system for the configuration of your AWS infrastructure,
just as you use version control for the software you are running. We will walk through the following steps:
1. Create the Initial Stack (p. 31)—create a stack using a base Amazon Linux AMI, installing the Apache
Web Server and a simple PHP application using the AWS CloudFormation helper scripts.
2. Update the Application (p. 32)—update one of the files in the application and deploy the software using
AWS CloudFormation.
3. Update the Instance Type (p. 34)—change the instance type of the underlying Amazon EC2 instance.
4. Update the AMI on an Amazon EC2 instance (p. 36)—change the Amazon Machine Image (AMI) for
the Amazon EC2 instance in your stack.
API Version 2010-05-15
24
AWS CloudFormation User Guide
A Simple Application
5. Add a Key Pair to an Instance (p. 37)—add an Amazon EC2 key pair to the instance, and then update
the security group to allow SSH access to the instance.
6. Change the Stack's Resources (p. 38)—add and remove resources from the stack, converting it to an
auto-scaled, load-balanced application by updating the template.
A Simple Application
We'll begin by creating a stack that we can use throughout the rest of this section. We have provided a
simple template that launches a single instance PHP web application hosted on the Apache Web Server
and running on an Amazon Linux AMI.
The Apache Web Server, PHP, and the simple PHP application are all installed by the AWS CloudFormation
helper scripts that are installed by default on the Amazon Linux AMI. The following template snippet
shows the metadata that describes the packages and files to install, in this case the Apache Web Server
and the PHP infrastructure from the Yum repository for the Amazon Linux AMI. The snippet also shows
the Services section, which ensures that the Apache Web Server is running. In the Properties section of
the Amazon EC2 instance definition, the UserData property contains the CloudInit script that calls cfn-init
to install the packages and files.
"WebServerInstance": {
"Type" : "AWS::EC2::Instance",
"Metadata" : {
"AWS::CloudFormation::Init" : {
"config" : {
"packages" : {
"yum" : {
"httpd"
: [],
"php"
: []
}
},
"files" : {
"/var/www/html/index.php" : {
"content" : { "Fn::Join" : ["", [
"<?php\n",
"echo '<h1>AWS CloudFormation sample PHP application</h1>';\n",
"echo '<p>", { "Ref" : "WelcomeMessage" }, "</p>';\n",
"?>\n"
]]},
"mode"
: "000644",
"owner"
: "apache",
"group"
: "apache"
},
},
:
"services" : {
"sysvinit" : {
"httpd"
: { "enabled" : "true", "ensureRunning" : "true" }
}
}
}
API Version 2010-05-15
25
AWS CloudFormation User Guide
A Simple Application
}
},
"Properties": {
:
"UserData"
: { "Fn::Base64" : { "Fn::Join" : ["", [
"#!/bin/bash\n",
"yum update -y aws-cfn-bootstrap\n",
:
"# Install the files and packages from the metadata\n",
"/opt/aws/bin/cfn-init -v ",
"
--stack ", { "Ref" : "AWS::StackName" },
"
--resource WebServerInstance ",
"
--region ", { "Ref" : "AWS::Region" }, "\n",
:
]]}}
}
},
The application itself is a very simple two-line "Hello, World" example that is entirely defined within the
template. For a real-world application, the files may be stored on Amazon S3, GitHub, or another repository
and referenced from the template. AWS CloudFormation can download packages (such as RPMs or
RubyGems), as well as reference individual files and expand .zip and .tar files to create the application
artifacts on the Amazon EC2 instance.
The template enables and configures the cfn-hup daemon to listen for changes to the configuration defined
in the metadata for the Amazon EC2 instance. By using the cfn-hup daemon, you can update application
software, such as the version of Apache or PHP, or you can update the PHP application file itself from
AWS CloudFormation. The following snippet from the same Amazon EC2 resource in the template shows
the pieces necessary to configure cfn-hup to call cfn-init to update the software if any changes to the
metadata are detected:
"WebServerInstance": {
"Type" : "AWS::EC2::Instance",
"Metadata" : {
"AWS::CloudFormation::Init" : {
"config" : {
:
"files" : {
:
"/etc/cfn/cfn-hup.conf" : {
"content" : { "Fn::Join" : ["", [
"[main]\n",
"stack=", { "Ref" : "AWS::StackName" }, "\n",
"region=", { "Ref" : "AWS::Region" }, "\n"
]]},
"mode"
: "000400",
"owner"
: "root",
"group"
: "root"
},
API Version 2010-05-15
26
AWS CloudFormation User Guide
A Simple Application
"/etc/cfn/hooks.d/cfn-auto-reloader.conf" : {
"content": { "Fn::Join" : ["", [
"[cfn-auto-reloader-hook]\n",
"triggers=post.update\n",
"path=Resources.WebServerInstance.Metadata.AWS::CloudForma
tion::Init\n",
"action=/opt/aws/bin/cfn-init -s ", { "Ref" : "AWS::StackId"
}, " -r WebServerInstance ",
" --region
", { "Ref" : "AWS::Region" }, "\n",
"runas=root\n"
]]}
}
},
:
},
"Properties": {
:
"UserData"
: { "Fn::Base64" : { "Fn::Join" : ["", [
:
"# Start up the cfn-hup daemon to listen for changes to the Web Server
metadata\n",
"/opt/aws/bin/cfn-hup || error_exit 'Failed to start cfn-hup'\n",
:
]]}}
}
},
To complete the stack, the template creates an Amazon EC2 security group.
{
"AWSTemplateFormatVersion" : "2010-09-09",
"Description" : "AWS CloudFormation Sample Template: Sample template that can
be used to test EC2 updates. **WARNING** This template creates an Amazon Ec2
Instance. You will be billed for the AWS resources used if you create a stack
from this template.",
"Parameters" : {
"InstanceType" : {
"Description" : "WebServer EC2 instance type",
"Type" : "String",
"Default" : "m1.small",
"AllowedValues" : [ "t1.micro", "t2.micro", "t2.small", "t2.medium",
"m1.small", "m1.medium", "m1.large", "m1.xlarge", "m2.xlarge",
"m2.2xlarge", "m2.4xlarge", "m3.medium", "m3.large", "m3.xlarge", "m3.2xlarge",
"c1.medium", "c1.xlarge", "c3.large", "c3.xlarge", "c3.2xlarge",
"c3.4xlarge", "c3.8xlarge", "g2.2xlarge", "r3.large", "r3.xlarge", "r3.2xlarge",
"r3.4xlarge", "r3.8xlarge", "i2.xlarge", "i2.2xlarge", "i2.4xlarge",
"i2.8xlarge", "hi1.4xlarge", "hs1.8xlarge", "cr1.8xlarge", "cc2.8xlarge",
API Version 2010-05-15
27
AWS CloudFormation User Guide
A Simple Application
"cg1.4xlarge"],
"ConstraintDescription" : "must be a valid EC2 instance type."
}
},
"Mappings" : {
"AWSInstanceType2Arch" : {
"t1.micro"
: { "Arch"
"t2.micro"
: { "Arch"
"t2.small"
: { "Arch"
"t2.medium"
: { "Arch"
"m1.small"
: { "Arch"
"m1.medium"
: { "Arch"
"m1.large"
: { "Arch"
"m1.xlarge"
: { "Arch"
"m2.xlarge"
: { "Arch"
"m2.2xlarge" : { "Arch"
"m2.4xlarge" : { "Arch"
"m3.medium"
: { "Arch"
"m3.large"
: { "Arch"
"m3.xlarge"
: { "Arch"
"m3.2xlarge" : { "Arch"
"c1.medium"
: { "Arch"
"c1.xlarge"
: { "Arch"
"c3.large"
: { "Arch"
"c3.xlarge"
: { "Arch"
"c3.2xlarge" : { "Arch"
"c3.4xlarge" : { "Arch"
"c3.8xlarge" : { "Arch"
"g2.2xlarge" : { "Arch"
"r3.large"
: { "Arch"
"r3.xlarge"
: { "Arch"
"r3.2xlarge" : { "Arch"
"r3.4xlarge" : { "Arch"
"r3.8xlarge" : { "Arch"
"i2.xlarge"
: { "Arch"
"i2.2xlarge" : { "Arch"
"i2.4xlarge" : { "Arch"
"i2.8xlarge" : { "Arch"
"hi1.4xlarge" : { "Arch"
"hs1.8xlarge" : { "Arch"
"cr1.8xlarge" : { "Arch"
"cc2.8xlarge" : { "Arch"
},
:
:
:
:
:
:
:
:
:
:
:
:
:
:
:
:
:
:
:
:
:
:
:
:
:
:
:
:
:
:
:
:
:
:
:
:
"AWSRegionArch2AMI" : {
"us-east-1"
: { "PV64"
"HVMG2" : "ami-3a329952" },
"us-west-2"
: { "PV64"
"HVMG2" : "ami-47296a77" },
"us-west-1"
: { "PV64"
"HVMG2" : "ami-331b1376" },
"eu-west-1"
: { "PV64"
"HVMG2" : "ami-00913777" },
"ap-southeast-1" : { "PV64"
"HVMG2" : "ami-fabe9aa8" },
"ap-northeast-1" : { "PV64"
"HVMG2" : "ami-5dd1ff5c" },
"PV64"
"HVM64"
"HVM64"
"HVM64"
"PV64"
"PV64"
"PV64"
"PV64"
"PV64"
"PV64"
"PV64"
"HVM64"
"HVM64"
"HVM64"
"HVM64"
"PV64"
"PV64"
"HVM64"
"HVM64"
"HVM64"
"HVM64"
"HVM64"
"HVMG2"
"HVM64"
"HVM64"
"HVM64"
"HVM64"
"HVM64"
"HVM64"
"HVM64"
"HVM64"
"HVM64"
"HVM64"
"HVM64"
"HVM64"
"HVM64"
},
},
},
},
},
},
},
},
},
},
},
},
},
},
},
},
},
},
},
},
},
},
},
},
},
},
},
},
},
},
},
},
},
},
},
}
: "ami-50842d38", "HVM64" : "ami-08842d60",
: "ami-af86c69f", "HVM64" : "ami-8786c6b7",
: "ami-c7a8a182", "HVM64" : "ami-cfa8a18a",
: "ami-aa8f28dd", "HVM64" : "ami-748e2903",
: "ami-20e1c572", "HVM64" : "ami-d6e1c584",
: "ami-21072820", "HVM64" : "ami-35072834",
API Version 2010-05-15
28
AWS CloudFormation User Guide
A Simple Application
"ap-southeast-2" : { "PV64"
"HVMG2" : "ami-e98ae9d3" },
"sa-east-1"
: { "PV64"
"HVMG2" : "NOT_SUPPORTED" },
"cn-north-1"
: { "PV64"
"HVMG2" : "NOT_SUPPORTED" },
"eu-central-1"
: { "PV64"
"HVMG2" : "ami-b03503ad" }
}
},
: "ami-8b4724b1", "HVM64" : "ami-fd4724c7",
: "ami-9d6cc680", "HVM64" : "ami-956cc688",
: "ami-a857c591", "HVM64" : "ami-ac57c595",
: "ami-a03503bd", "HVM64" : "ami-b43503a9",
"Resources" : {
"WebServerInstance": {
"Type" : "AWS::EC2::Instance",
"Metadata" : {
"Comment" : "Install a simple
"AWS::CloudFormation::Init" :
"config" : {
"packages" : {
"yum" : {
"httpd"
:
"php"
:
}
},
PHP application",
{
[],
[]
"files" : {
"/var/www/html/index.php" : {
"content" : { "Fn::Join" : ["", [
"<?php\n",
"echo '<h1>AWS CloudFormation sample PHP application</h1>';\n",
"?>\n"
]]},
"mode"
"owner"
"group"
: "000644",
: "apache",
: "apache"
},
"/etc/cfn/cfn-hup.conf" : {
"content" : { "Fn::Join" : ["", [
"[main]\n",
"stack=", { "Ref" : "AWS::StackId" }, "\n",
"region=", { "Ref" : "AWS::Region" }, "\n"
]]},
"mode"
: "000400",
"owner"
: "root",
"group"
: "root"
},
"/etc/cfn/hooks.d/cfn-auto-reloader.conf" : {
"content": { "Fn::Join" : ["", [
"[cfn-auto-reloader-hook]\n",
"triggers=post.update\n",
"path=Resources.WebServerInstance.Metadata.AWS::CloudForma
tion::Init\n",
API Version 2010-05-15
29
AWS CloudFormation User Guide
A Simple Application
"action=/opt/aws/bin/cfn-init -s ", { "Ref" : "AWS::StackId"
}, " -r WebServerInstance ",
" --region
", { "Ref" :
"AWS::Region" }, "\n",
"runas=root\n"
]]}
}
},
"services" : {
"sysvinit" : {
"httpd"
: { "enabled" : "true", "ensureRunning" : "true" },
"cfn-hup" : { "enabled" : "true", "ensureRunning" : "true",
"files" : ["/etc/cfn/cfn-hup.conf", "/etc/cfn/hooks.d/cfnauto-reloader.conf"]}
}
}
}
}
},
"Properties": {
"ImageId" : { "Fn::FindInMap" : [ "AWSRegionArch2AMI", { "Ref" :
"AWS::Region" },
{ "Fn::FindInMap" : [ "AWSInstanceType2Arch", { "Ref"
: "InstanceType" }, "Arch" ] } ] },
"InstanceType"
: { "Ref" : "InstanceType" },
"SecurityGroups" : [ {"Ref" : "WebServerSecurityGroup"} ],
"UserData"
: { "Fn::Base64" : { "Fn::Join" : ["", [
"#!/bin/bash -xe\n",
"yum update -y aws-cfn-bootstrap\n",
"# Install the files and packages from the metadata\n",
"/opt/aws/bin/cfn-init -v ",
"
--stack ", { "Ref" : "AWS::StackName" },
"
--resource WebServerInstance ",
"
--region ", { "Ref" : "AWS::Region" }, "\n",
"# Start up the cfn-hup daemon to listen for changes to the Web
Server metadata\n",
"/opt/aws/bin/cfn-hup || error_exit 'Failed to start cfn-hup'\n",
"# Signal the status from cfn-init\n",
"/opt/aws/bin/cfn-signal -e $? ",
"
--stack ", { "Ref" : "AWS::StackName" },
"
--resource WebServerInstance ",
"
--region ", { "Ref" : "AWS::Region" }, "\n"
]]}}
},
"CreationPolicy" : {
"ResourceSignal" : {
"Timeout" : "PT5M"
}
}
},
API Version 2010-05-15
30
AWS CloudFormation User Guide
Create the Initial Stack
"WebServerSecurityGroup" : {
"Type" : "AWS::EC2::SecurityGroup",
"Properties" : {
"GroupDescription" : "Enable HTTP access via port 80",
"SecurityGroupIngress" : [
{"IpProtocol" : "tcp", "FromPort" : "80", "ToPort" : "80", "CidrIp"
: "0.0.0.0/0"}
]
}
}
},
"Outputs" : {
"WebsiteURL" : {
"Description" : "Application URL",
"Value" : { "Fn::Join" : ["", ["http://", { "Fn::GetAtt" : [ "WebServer
Instance", "PublicDnsName" ]}]] }
}
}
}
This example uses a single Amazon EC2 instance, but you can use the same mechanisms on more
complex solutions that make use of Elastic Load Balancers and Auto Scaling groups to manage a collection
of application servers. There are, however, some special considerations for Auto Scaling groups. For
more information, see Updating Auto Scaling Groups (p. 34).
Create the Initial Stack
For the purposes of this example, we’ll use the AWS Management Console to create an initial stack from
the sample template.
Caution
Completing this procedure will deploy live AWS services.You will be charged the standard usage
rates as long as these services are running.
To create the stack from the AWS Management Console
1.
2.
3.
4.
Copy the previous template and save it locally on your system as a text file. Note the location because
you'll need to use the file in a subsequent step.
Log in to the AWS CloudFormation console at https://console.amazonaws.cn/cloudformation .
Click Create New Stack.
5.
In the Create New Stack wizard, on the Select Template screen, type UpdateTutorial in the
Name field. On the same page, select Upload a template to Amazon S3 and browse to the file that
you downloaded in the first step, and then click Next.
On the Specify Parameters screen, in the Instance Type box, type t1.micro. Then click Next.
6.
7.
On the Options screen, click Next.
On the Review screen, verify that all the settings are as you want them, and then click Create.
After the status of your stack is CREATE_COMPLETE, the output tab will display the URL of your website.
If you click the value of the WebsiteURL output, you will see your new PHP application working.
API Version 2010-05-15
31
AWS CloudFormation User Guide
Update the Application
Update the Application
Now that we have deployed the stack, let's update the application. We'll make a simple change to the
text that is printed out by the application. To do so, we’ll add an echo command to the index.php file as
shown in this template snippet:
"WebServerInstance": {
"Type" : "AWS::EC2::Instance",
"Metadata" : {
"AWS::CloudFormation::Init" : {
"config" : {
:
"files" : {
"/var/www/html/index.php" : {
"content" : { "Fn::Join" : ["", [
"<?php\n",
"echo '<h1>AWS CloudFormation sample PHP application</h1>';\n",
"echo 'Updated version via UpdateStack';\n ",
"?>\n"
]]},
"mode"
: "000644",
"owner"
: "apache",
"group"
: "apache"
},
:
}
},
Use a text editor to manually edit the template file that you saved locally.
Now, we'll update the stack.
To update the stack from the AWS Management Console
1.
2.
3.
4.
5.
6.
Log in to the AWS CloudFormation console, at: https://console.amazonaws.cn/cloudformation.
On the AWS CloudFormation dashboard, click the stack you created previously, and then click
Update Stack.
In the Update Stack wizard, on the Select Template screen, select Upload a template to Amazon
S3, select the modified template, and then click Next.
On the Options screen, click Next.
Click Next because the stack doesn't have a stack policy. All resources can be updated without an
overriding policy.
On the Review screen, verify that all the settings are as you want them, and then click Update.
If you update the stack from the AWS Management Console, you will notice that the parameters that
were used to create the initial stack are prepopulated on the Parameters page of the Update Stack
wizard. If you use the aws cloudformation update-stack command, be sure to type in the same
values for the parameters that you used originally to create the stack.
API Version 2010-05-15
32
AWS CloudFormation User Guide
Update the Application
When your stack is in the UPDATE_COMPLETE state, you can click the WebsiteURL output value again
to verify that the changes to your application have taken effect. By default, the cfn-hup daemon runs every
15 minutes, so it may take up to 15 minutes for the application to change once the stack has been updated.
To see the set of resources that were updated, go to the AWS CloudFormation console. On the Events
tab, look at the stack events. In this particular case, the metadata for the Amazon EC2 instance
WebServerInstance was updated, which caused AWS CloudFormation to also reevaluate the Elastic IP
address and the WaitCondition resource to ensure that there were no changes that affected the update.
None of the other stack resources were modified. AWS CloudFormation will update only those resources
in the stack that are affected by any changes to the stack. Such changes can be direct, such as property
or metadata changes, or they can be due to dependencies or data flows through Ref, GetAtt, or other
intrinsic template functions.
This simple update illustrates the process; however, you can make much more complex changes to the
files and packages that are deployed to your Amazon EC2 instances. For example, you might decide that
you need to add MySQL to the instance, along with PHP support for MySQL. To do so, simply add the
additional packages and files along with any additional services to the configuration and then update the
stack to deploy the changes. In the following template snippet, the changes are highlighted in red:
"WebServerInstance": {
"Type" : "AWS::EC2::Instance",
"Metadata" : {
"Comment" : "Install a simple
"AWS::CloudFormation::Init" :
"config" : {
"packages" : {
"yum" : {
"httpd"
:
"php"
:
"php-mysql"
:
"mysql-server"
:
"mysql-libs"
:
"mysql"
:
}
},
PHP application",
{
[],
[],
[],
[],
[],
[]
:
"services" : {
"sysvinit" : {
"httpd"
: { "enabled" : "true", "ensureRunning" : "true" },
"cfn-hup" : { "enabled" : "true", "ensureRunning" : "true",
"files" : ["/etc/cfn/cfn-hup.conf", "/etc/cfn/hooks.d/cfnauto-reloader.conf"]},
"mysqld"
: { "enabled" : "true", "ensureRunning" : "true" }
}
}
}
}
},
"Properties": {
:
}
}
API Version 2010-05-15
33
AWS CloudFormation User Guide
Changing Resource Properties
You can also use UpdateStack, along with the CloudFormation metadata, to update to new versions of
the packages used by the application. In the previous examples, the version property for each package
is empty, indicating that cfn-init should install the latest version of the package.
"packages" : {
"yum" : {
"httpd"
"php"
}
: [],
: []
You can optionally specify a version string for a package. If you change the version string in subsequent
update stack calls, the new version of the package will be deployed. Here's an example of using version
numbers for RubyGems packages. Any package that supports versioning can have specific versions.
"packages" : {
"rubygems" : {
"mysql"
"rubygems-update"
"rake"
"rails"
}
}
:
:
:
:
[],
["1.6.2"],
["0.8.7"],
["2.3.11"]
Updating Auto Scaling Groups
If you are using Auto Scaling groups in your template, as opposed to Amazon EC2 instance resources,
updating the application will work in exactly the same way; however, AWS CloudFormation does not
provide any synchronization or serialization across the Amazon EC2 instances in an Auto Scaling group.
The cfn-hup daemon on each host will run independently and update the application on its own schedule.
When you use cfn-hup to update the on-instance configuration, each instance will run the cfn-hup hooks
on its own schedule; there is no coordination between the instances in the stack. You should consider
the following:
• If the cfn-hup changes run on all Amazon EC2 instances in the Auto Scaling group at the same time,
your service might be unavailable during the update.
• If the cfn-hup changes run at different times, old and new versions of the software may be running at
the same.
To avoid these issues, consider using the update attribute on the Auto Scaling group. For more information,
see UpdatePolicy (p. 645).
Changing Resource Properties
With AWS CloudFormation, you can change the properties of an existing resource in the stack. The
following sections describe various updates that solve specific problems; however, any property of any
resource that supports updating in the stack can be modified as necessary.
Update the Instance Type
The stack we have built so far uses a t1.micro Amazon EC2 instance. Let's suppose that your newly
created website is getting more traffic than a t1.micro instance can handle, and now you want to move
to an m1.small Amazon EC2 instance type. If the architecture of the instance type changes, the instance
will be created with a different AMI. If you check out the mappings in the template, you will see that both
the t1.micro and m1.small are the same architectures and use the same Amazon Linux AMIs.
API Version 2010-05-15
34
AWS CloudFormation User Guide
Changing Resource Properties
"Mappings" : {
"AWSInstanceType2Arch" : {
"t1.micro"
: { "Arch"
"t2.micro"
: { "Arch"
"t2.small"
: { "Arch"
"t2.medium"
: { "Arch"
"m1.small"
: { "Arch"
"m1.medium"
: { "Arch"
"m1.large"
: { "Arch"
"m1.xlarge"
: { "Arch"
"m2.xlarge"
: { "Arch"
"m2.2xlarge" : { "Arch"
"m2.4xlarge" : { "Arch"
"m3.medium"
: { "Arch"
"m3.large"
: { "Arch"
"m3.xlarge"
: { "Arch"
"m3.2xlarge" : { "Arch"
"c1.medium"
: { "Arch"
"c1.xlarge"
: { "Arch"
"c3.large"
: { "Arch"
"c3.xlarge"
: { "Arch"
"c3.2xlarge" : { "Arch"
"c3.4xlarge" : { "Arch"
"c3.8xlarge" : { "Arch"
"g2.2xlarge" : { "Arch"
"r3.large"
: { "Arch"
"r3.xlarge"
: { "Arch"
"r3.2xlarge" : { "Arch"
"r3.4xlarge" : { "Arch"
"r3.8xlarge" : { "Arch"
"i2.xlarge"
: { "Arch"
"i2.2xlarge" : { "Arch"
"i2.4xlarge" : { "Arch"
"i2.8xlarge" : { "Arch"
"hi1.4xlarge" : { "Arch"
"hs1.8xlarge" : { "Arch"
"cr1.8xlarge" : { "Arch"
"cc2.8xlarge" : { "Arch"
},
:
:
:
:
:
:
:
:
:
:
:
:
:
:
:
:
:
:
:
:
:
:
:
:
:
:
:
:
:
:
:
:
:
:
:
:
"AWSRegionArch2AMI" : {
"us-east-1"
: { "PV64"
"HVMG2" : "ami-3a329952" },
"us-west-2"
: { "PV64"
"HVMG2" : "ami-47296a77" },
"us-west-1"
: { "PV64"
"HVMG2" : "ami-331b1376" },
"eu-west-1"
: { "PV64"
"HVMG2" : "ami-00913777" },
"ap-southeast-1" : { "PV64"
"HVMG2" : "ami-fabe9aa8" },
"ap-northeast-1" : { "PV64"
"HVMG2" : "ami-5dd1ff5c" },
"ap-southeast-2" : { "PV64"
"HVMG2" : "ami-e98ae9d3" },
"sa-east-1"
: { "PV64"
"HVMG2" : "NOT_SUPPORTED" },
"cn-north-1"
: { "PV64"
"PV64"
"HVM64"
"HVM64"
"HVM64"
"PV64"
"PV64"
"PV64"
"PV64"
"PV64"
"PV64"
"PV64"
"HVM64"
"HVM64"
"HVM64"
"HVM64"
"PV64"
"PV64"
"HVM64"
"HVM64"
"HVM64"
"HVM64"
"HVM64"
"HVMG2"
"HVM64"
"HVM64"
"HVM64"
"HVM64"
"HVM64"
"HVM64"
"HVM64"
"HVM64"
"HVM64"
"HVM64"
"HVM64"
"HVM64"
"HVM64"
},
},
},
},
},
},
},
},
},
},
},
},
},
},
},
},
},
},
},
},
},
},
},
},
},
},
},
},
},
},
},
},
},
},
},
}
: "ami-50842d38", "HVM64" : "ami-08842d60",
: "ami-af86c69f", "HVM64" : "ami-8786c6b7",
: "ami-c7a8a182", "HVM64" : "ami-cfa8a18a",
: "ami-aa8f28dd", "HVM64" : "ami-748e2903",
: "ami-20e1c572", "HVM64" : "ami-d6e1c584",
: "ami-21072820", "HVM64" : "ami-35072834",
: "ami-8b4724b1", "HVM64" : "ami-fd4724c7",
: "ami-9d6cc680", "HVM64" : "ami-956cc688",
: "ami-a857c591", "HVM64" : "ami-ac57c595",
API Version 2010-05-15
35
AWS CloudFormation User Guide
Changing Resource Properties
"HVMG2" : "NOT_SUPPORTED" },
"eu-central-1"
: { "PV64" : "ami-a03503bd", "HVM64" : "ami-b43503a9",
"HVMG2" : "ami-b03503ad" }
}
}
Let's use the template that we modified in the previous section to change the instance type. Because
InstanceType was an input parameter to the template, we don't need to modify the template; we can
simply change the value of the parameter in the Stack Update wizard, on the Specify Parameters page.
To update the stack from the AWS Management Console
1.
2.
3.
4.
5.
6.
7.
Log in to the AWS CloudFormation console at https://console.amazonaws.cn/cloudformation.
On the AWS CloudFormation dashboard, click the stack you created previously, and then click
Update Stack.
In the Update Stack wizard, on the Select Template screen, select Use existing template, and
then click Next.
The Specify Parameters page appears with the parameters that were used to create the initial stack
are pre-populated in the Specify Parameters section.
Change the value of the InstanceType text box from t1.micro to t2.small. Then, click Next.
On the Options screen, click Next.
Click Next because the stack doesn't have a stack policy. All resources can be updated without an
overriding policy.
On the Review screen, verify that all the settings are as you want them, and then click Update.
You can dynamically change the instance type of an EBS-backed Amazon EC2 instance by starting and
stopping the instance. AWS CloudFormation tries to optimize the change by updating the instance type
and restarting the instance, so the instance ID does not change. When the instance is restarted, however,
the public IP address of the instance does change.To ensure that the Elastic IP address is bound correctly
after the change, AWS CloudFormation will also update the Elastic IP address. You can see the changes
in the AWS CloudFormation console on the Events tab.
To check the instance type from the AWS Management Console, open the Amazon EC2 console, and
locate your instance there.
Update the AMI on an Amazon EC2 instance
Now let's look at how we might change the Amazon Machine Image (AMI) running on the instance. We
will trigger the AMI change by updating the stack to use a new Amazon EC2 instance type, such as
t2.medium, which is an HVM64 instance type.
As in the previous section, we’ll use our existing template to change the instance type used by our example
stack. In the Stack Update wizard, on the Specify Parameters page, change the value of the Instance
Type.
In this case, we cannot simply start and stop the instance to modify the AMI; AWS CloudFormation
considers this a change to an immutable property of the resource. In order to make a change to an
immutable property, AWS CloudFormation must launch a replacement resource, in this case a new
Amazon EC2 instance running the new AMI.
After the new instance is running, AWS CloudFormation updates the other resources in the stack to point
to the new resource. When all new resources are created, the old resource is deleted, a process known
as UPDATE_CLEANUP. This time, you will notice that the instance ID and application URL of the instance
in the stack has changed as a result of the update. The events in the Event table contain a description
API Version 2010-05-15
36
AWS CloudFormation User Guide
Adding Resource Properties
"Requested update has a change to an immutable property and hence creating a new physical resource"
to indicate that a resource was replaced.
If you have application code written into the AMI that you want to update, you can use the same stack
update mechanism to update the AMI to load your new application.
To update the AMI for an instance on your stack
1.
2.
3.
Create your new AMIs containing your application or operating system changes. For more information,
go to Creating Your Own AMIs in the Amazon EC2 User Guide for Linux Instances.
Update your template to incorporate the new AMI IDs.
Update the stack, either from the AWS Management Console as explained in Update the
Application (p. 32) or by using the AWS command aws cloudformation update-stack.
When you update the stack, AWS CloudFormation detects that the AMI ID has changed, and then it
triggers a stack update in the same way as we triggered the one above.
Update the Amazon EC2 Launch Configuration for an Auto
Scaling Group
If you are using Auto Scaling groups rather than Amazon EC2 instances, the process of updating the
running instances is a little different. With Auto Scaling resources, the configuration of the Amazon EC2
instances, such as the instance type or the AMI ID is encapsulated in the Auto Scaling launch configuration.
You can make changes to the launch configuration in the same way as we made changes to the Amazon
EC2 instance resources in the previous sections. However, changing the launch configuration does not
impact any of the running Amazon EC2 instances in the Auto Scaling group. An updated launch
configuration applies only to new instances that are created after the update.
If you want to propagate the change to your launch configuration across all the instances in your Auto
Scaling group, you can use an update attribute. For more information, see UpdatePolicy (p. 645).
Adding Resource Properties
So far, we've looked at changing existing properties of a resource in a template. You can also add
properties that were not originally specified in the template. To illustrate that, we’ll add an Amazon EC2
key pair to an existing EC2 instance and then open up port 22 in the Amazon EC2 Security Group so that
you can use Secure Shell (SSH) to access the instance.
Add a Key Pair to an Instance
To add SSH access to an existing Amazon EC2 instance
1.
Add two additional parameters to the template to pass in the name of an existing Amazon EC2 key
pair and SSH location.
"Parameters" : {
"KeyName" : {
"Description" : "Name of an existing Amazon EC2 key pair for SSH ac
cess",
"Type": "AWS::EC2::KeyPair::KeyName",
},
"SSHLocation" : {
"Description" : " The IP address range that can be used to SSH to the
API Version 2010-05-15
37
AWS CloudFormation User Guide
Change the Stack's Resources
EC2 instances",
"Type": "String",
"MinLength": "9",
"MaxLength": "18",
"Default": "0.0.0.0/0",
"AllowedPattern":
"(\\d{1,3})\\.(\\d{1,3})\\.(\\d{1,3})\\.(\\d{1,3})/(\\d{1,2})",
"ConstraintDescription": "must be a valid IP CIDR range of the form
x.x.x.x/x."
}
:
},
2.
Add the KeyName property to the Amazon EC2 instance.
"WebServerInstance": {
"Type" : "AWS::EC2::Instance",
:
"Properties": {
:
"KeyName" : { "Ref" : "KeyName" },
:
}
},
3.
Add port 22 and the SSH location to the ingress rules for the Amazon EC2 security group.
"WebServerSecurityGroup" : {
"Type" : "AWS::EC2::SecurityGroup",
"Properties" : {
"GroupDescription" : "Enable HTTP and SSH",
"SecurityGroupIngress" : [
{"IpProtocol" : "tcp", "FromPort" : "22", "ToPort" : "22", "CidrIp"
: { "Ref" : "SSHLocation"}},
{"IpProtocol" : "tcp", "FromPort" : "80", "ToPort" : "80", "CidrIp"
: …
]
}
},
4.
Update the stack, either from the AWS Management Console as explained in Update the
Application (p. 32) or by using the AWS command aws cloudformation update-stack.
Change the Stack's Resources
Since application needs can change over time, AWS CloudFormation allows you to change the set of
resources that make up the stack. To demonstrate, we’ll take the single instance application from Adding
Resource Properties (p. 37) and convert it to an auto-scaled, load-balanced application by updating the
stack.
This will create a simple, single instance PHP application using an Elastic IP address. We'll now turn the
application into a highly available, auto-scaled, load balanced application by changing its resources during
an update.
API Version 2010-05-15
38
AWS CloudFormation User Guide
Change the Stack's Resources
1.
Add an Elastic Load Balancer resource.
"ElasticLoadBalancer" : {
"Type" : "AWS::ElasticLoadBalancing::LoadBalancer",
"Properties" : {
"CrossZone" : "true",
"AvailabilityZones" : { "Fn::GetAZs" : "" },
"LBCookieStickinessPolicy" : [ {
"PolicyName" : "CookieBasedPolicy",
"CookieExpirationPeriod" : "30"
} ],
"Listeners" : [ {
"LoadBalancerPort" : "80",
"InstancePort" : "80",
"Protocol" : "HTTP",
"PolicyNames" : [ "CookieBasedPolicy" ]
} ],
"HealthCheck" : {
"Target" : "HTTP:80/",
"HealthyThreshold" : "2",
"UnhealthyThreshold" : "5",
"Interval" : "10",
"Timeout" : "5"
}
}
}
2.
Convert the EC2 instance in the template into an Auto Scaling Launch Configuration. The properties
are identical, so we only need to change the type name from:
"WebServerInstance": {
"Type" : "AWS::EC2::Instance",
to:
"LaunchConfig": {
"Type" : "AWS::AutoScaling::LaunchConfiguration",
For clarity in the template, we changed the name of the resource from WebServerInstance to
LaunchConfig, so you’ll need to update the resource name referenced by cfn-init and cfn-hup (just
search for WebServerInstance and replace it with LaunchConfig, except for cfn-signal). For cfn-signal,
you'll need to signal the Auto Scaling group (WebServerGroup) not the instance, as shown in the
following snippet:
"# Signal the status from cfn-init\n",
"/opt/aws/bin/cfn-signal -e $? ",
"
--stack ", { "Ref" : "AWS::StackName" },
"
--resource WebServerGroup ",
"
--region ", { "Ref" : "AWS::Region" }, "\n"
3.
Add an Auto Scaling Group resource.
API Version 2010-05-15
39
AWS CloudFormation User Guide
Change the Stack's Resources
"WebServerGroup" : {
"Type" : "AWS::AutoScaling::AutoScalingGroup",
"Properties" : {
"AvailabilityZones" : { "Fn::GetAZs" : "" },
"LaunchConfigurationName" : { "Ref" : "LaunchConfig" },
"MinSize" : "1",
"DesiredCapacity" : "1",
"MaxSize" : "5",
"LoadBalancerNames" : [ { "Ref" : "ElasticLoadBalancer" } ]
},
"CreationPolicy" : {
"ResourceSignal" : {
"Timeout" : "PT15M"
}
},
"UpdatePolicy": {
"AutoScalingRollingUpdate": {
"MinInstancesInService": "1",
"MaxBatchSize": "1",
"PauseTime" : "PT15M",
"WaitOnResourceSignals": "true"
}
}
}
4.
Update the Security Group definition to lock down the traffic to the instances from the load balancer.
"WebServerSecurityGroup" : {
"Type" : "AWS::EC2::SecurityGroup",
"Properties" : {
"GroupDescription" : "Enable HTTP access via port 80 locked down to
the ELB and SSH access",
"SecurityGroupIngress" : [
{"IpProtocol" : "tcp", "FromPort" : "80", "ToPort" : "80",
"SourceSecurityGroupOwnerId" : {"Fn::GetAtt" : ["ElasticLoadBalancer",
"SourceSecurityGroup.OwnerAlias"]},
"SourceSecurityGroupName" : {"Fn::GetAtt" : ["ElasticLoadBalancer",
"SourceSecurityGroup.GroupName"]}},
{"IpProtocol" : "tcp", "FromPort" : "22", "ToPort" : "22", "CidrIp"
: { "Ref" : "SSHLocation"}}
]
}
}
5.
Update the Outputs to return the DNS Name of the Elastic Load Balancer as the location of the
application from:
"WebsiteURL" : {
"Value" : { "Fn::Join" : ["", ["http://",
{ "Fn::GetAtt" : [ "WebServerInstance", "PublicDnsName" ]}]]},
"Description" : "Application URL"
}
to:
API Version 2010-05-15
40
AWS CloudFormation User Guide
Change the Stack's Resources
"WebsiteURL" : {
"Value" : { "Fn::Join" : ["", ["http://",
{ "Fn::GetAtt" : [ "ElasticLoadBalancer", "DNSName" ]}]]},
"Description" : "Application URL"
}
For reference, the follow sample shows the complete template. If you use this template to update the
stack, you will convert your simple, single instance application into a highly available, multi-AZ, auto-scaled
and load balanced application. Only the resources that need to be updated will be altered, so had there
been any data stores for this application, the data would have remained intact. Now, you can use AWS
CloudFormation to grow or enhance your stacks as your requirements change.
{
"AWSTemplateFormatVersion" : "2010-09-09",
"Description" : "AWS CloudFormation Sample Template: Sample template that can
be used to test EC2 updates. **WARNING** This template creates an Amazon Ec2
Instance. You will be billed for the AWS resources used if you create a stack
from this template.",
"Parameters" : {
"KeyName": {
"Description" : "Name of an existing EC2 KeyPair to enable SSH access to
the instance",
"Type": "AWS::EC2::KeyPair::KeyName",
"ConstraintDescription" : "must be the name of an existing EC2 KeyPair."
},
"SSHLocation" : {
"Description" : " The IP address range that can be used to SSH to the EC2
instances",
"Type": "String",
"MinLength": "9",
"MaxLength": "18",
"Default": "0.0.0.0/0",
"AllowedPattern":
"(\\d{1,3})\\.(\\d{1,3})\\.(\\d{1,3})\\.(\\d{1,3})/(\\d{1,2})",
"ConstraintDescription": "must be a valid IP CIDR range of the form
x.x.x.x/x."
},
"InstanceType" : {
"Description" : "WebServer EC2 instance type",
"Type" : "String",
"Default" : "m1.small",
"AllowedValues" : [ "t1.micro", "t2.micro", "t2.small", "t2.medium",
"m1.small", "m1.medium", "m1.large", "m1.xlarge", "m2.xlarge",
"m2.2xlarge", "m2.4xlarge", "m3.medium", "m3.large", "m3.xlarge", "m3.2xlarge",
"c1.medium", "c1.xlarge", "c3.large", "c3.xlarge", "c3.2xlarge",
"c3.4xlarge", "c3.8xlarge", "g2.2xlarge", "r3.large", "r3.xlarge", "r3.2xlarge",
"r3.4xlarge", "r3.8xlarge", "i2.xlarge", "i2.2xlarge", "i2.4xlarge",
"i2.8xlarge", "hi1.4xlarge", "hs1.8xlarge", "cr1.8xlarge", "cc2.8xlarge",
API Version 2010-05-15
41
AWS CloudFormation User Guide
Change the Stack's Resources
"cg1.4xlarge"],
"ConstraintDescription" : "must be a valid EC2 instance type."
}
},
"Mappings" : {
"AWSInstanceType2Arch" : {
"t1.micro"
: { "Arch"
"t2.micro"
: { "Arch"
"t2.small"
: { "Arch"
"t2.medium"
: { "Arch"
"m1.small"
: { "Arch"
"m1.medium"
: { "Arch"
"m1.large"
: { "Arch"
"m1.xlarge"
: { "Arch"
"m2.xlarge"
: { "Arch"
"m2.2xlarge" : { "Arch"
"m2.4xlarge" : { "Arch"
"m3.medium"
: { "Arch"
"m3.large"
: { "Arch"
"m3.xlarge"
: { "Arch"
"m3.2xlarge" : { "Arch"
"c1.medium"
: { "Arch"
"c1.xlarge"
: { "Arch"
"c3.large"
: { "Arch"
"c3.xlarge"
: { "Arch"
"c3.2xlarge" : { "Arch"
"c3.4xlarge" : { "Arch"
"c3.8xlarge" : { "Arch"
"g2.2xlarge" : { "Arch"
"r3.large"
: { "Arch"
"r3.xlarge"
: { "Arch"
"r3.2xlarge" : { "Arch"
"r3.4xlarge" : { "Arch"
"r3.8xlarge" : { "Arch"
"i2.xlarge"
: { "Arch"
"i2.2xlarge" : { "Arch"
"i2.4xlarge" : { "Arch"
"i2.8xlarge" : { "Arch"
"hi1.4xlarge" : { "Arch"
"hs1.8xlarge" : { "Arch"
"cr1.8xlarge" : { "Arch"
"cc2.8xlarge" : { "Arch"
},
:
:
:
:
:
:
:
:
:
:
:
:
:
:
:
:
:
:
:
:
:
:
:
:
:
:
:
:
:
:
:
:
:
:
:
:
"AWSRegionArch2AMI" : {
"us-east-1"
: { "PV64"
"HVMG2" : "ami-3a329952" },
"us-west-2"
: { "PV64"
"HVMG2" : "ami-47296a77" },
"us-west-1"
: { "PV64"
"HVMG2" : "ami-331b1376" },
"eu-west-1"
: { "PV64"
"HVMG2" : "ami-00913777" },
"ap-southeast-1" : { "PV64"
"HVMG2" : "ami-fabe9aa8" },
"ap-northeast-1" : { "PV64"
"HVMG2" : "ami-5dd1ff5c" },
"PV64"
"HVM64"
"HVM64"
"HVM64"
"PV64"
"PV64"
"PV64"
"PV64"
"PV64"
"PV64"
"PV64"
"HVM64"
"HVM64"
"HVM64"
"HVM64"
"PV64"
"PV64"
"HVM64"
"HVM64"
"HVM64"
"HVM64"
"HVM64"
"HVMG2"
"HVM64"
"HVM64"
"HVM64"
"HVM64"
"HVM64"
"HVM64"
"HVM64"
"HVM64"
"HVM64"
"HVM64"
"HVM64"
"HVM64"
"HVM64"
},
},
},
},
},
},
},
},
},
},
},
},
},
},
},
},
},
},
},
},
},
},
},
},
},
},
},
},
},
},
},
},
},
},
},
}
: "ami-50842d38", "HVM64" : "ami-08842d60",
: "ami-af86c69f", "HVM64" : "ami-8786c6b7",
: "ami-c7a8a182", "HVM64" : "ami-cfa8a18a",
: "ami-aa8f28dd", "HVM64" : "ami-748e2903",
: "ami-20e1c572", "HVM64" : "ami-d6e1c584",
: "ami-21072820", "HVM64" : "ami-35072834",
API Version 2010-05-15
42
AWS CloudFormation User Guide
Change the Stack's Resources
"ap-southeast-2" : { "PV64"
"HVMG2" : "ami-e98ae9d3" },
"sa-east-1"
: { "PV64"
"HVMG2" : "NOT_SUPPORTED" },
"cn-north-1"
: { "PV64"
"HVMG2" : "NOT_SUPPORTED" },
"eu-central-1"
: { "PV64"
"HVMG2" : "ami-b03503ad" }
}
},
: "ami-8b4724b1", "HVM64" : "ami-fd4724c7",
: "ami-9d6cc680", "HVM64" : "ami-956cc688",
: "ami-a857c591", "HVM64" : "ami-ac57c595",
: "ami-a03503bd", "HVM64" : "ami-b43503a9",
"Resources" : {
"ElasticLoadBalancer" : {
"Type" : "AWS::ElasticLoadBalancing::LoadBalancer",
"Properties" : {
"CrossZone" : "true",
"AvailabilityZones" : { "Fn::GetAZs" : "" },
"LBCookieStickinessPolicy" : [ {
"PolicyName" : "CookieBasedPolicy",
"CookieExpirationPeriod" : "30"
} ],
"Listeners" : [ {
"LoadBalancerPort" : "80",
"InstancePort" : "80",
"Protocol" : "HTTP",
"PolicyNames" : [ "CookieBasedPolicy" ]
} ],
"HealthCheck" : {
"Target" : "HTTP:80/",
"HealthyThreshold" : "2",
"UnhealthyThreshold" : "5",
"Interval" : "10",
"Timeout" : "5"
}
}
},
"WebServerGroup" : {
"Type" : "AWS::AutoScaling::AutoScalingGroup",
"Properties" : {
"AvailabilityZones" : { "Fn::GetAZs" : "" },
"LaunchConfigurationName" : { "Ref" : "LaunchConfig" },
"MinSize" : "1",
"DesiredCapacity" : "1",
"MaxSize" : "5",
"LoadBalancerNames" : [ { "Ref" : "ElasticLoadBalancer" } ]
},
"CreationPolicy" : {
"ResourceSignal" : {
"Timeout" : "PT15M"
}
},
"UpdatePolicy": {
"AutoScalingRollingUpdate": {
"MinInstancesInService": "1",
"MaxBatchSize": "1",
"PauseTime" : "PT15M",
API Version 2010-05-15
43
AWS CloudFormation User Guide
Change the Stack's Resources
"WaitOnResourceSignals": "true"
}
}
},
"LaunchConfig": {
"Type" : "AWS::AutoScaling::LaunchConfiguration",
"Metadata" : {
"Comment" : "Install a simple PHP application",
"AWS::CloudFormation::Init" : {
"config" : {
"packages" : {
"yum" : {
"httpd"
: [],
"php"
: []
}
},
"files" : {
"/var/www/html/index.php" : {
"content" : { "Fn::Join" : ["", [
"<?php\n",
"echo '<h1>AWS CloudFormation sample PHP application</h1>';\n",
"echo 'Updated version via UpdateStack';\n ",
"?>\n"
]]},
"mode"
: "000644",
"owner"
: "apache",
"group"
: "apache"
},
"/etc/cfn/cfn-hup.conf" : {
"content" : { "Fn::Join" : ["", [
"[main]\n",
"stack=", { "Ref" : "AWS::StackId" }, "\n",
"region=", { "Ref" : "AWS::Region" }, "\n"
]]},
"mode"
: "000400",
"owner"
: "root",
"group"
: "root"
},
"/etc/cfn/hooks.d/cfn-auto-reloader.conf" : {
"content": { "Fn::Join" : ["", [
"[cfn-auto-reloader-hook]\n",
"triggers=post.update\n",
"path=Resources.LaunchConfig.Metadata.AWS::CloudForma
tion::Init\n",
"action=/opt/aws/bin/cfn-init -s ", { "Ref" : "AWS::StackId"
}, " -r LaunchConfig ",
" --region
", { "Ref" :
"AWS::Region" }, "\n",
"runas=root\n"
]]}
}
API Version 2010-05-15
44
AWS CloudFormation User Guide
Change the Stack's Resources
},
"services" : {
"sysvinit" : {
"httpd"
: { "enabled" : "true", "ensureRunning" : "true" },
"cfn-hup" : { "enabled" : "true", "ensureRunning" : "true",
"files" : ["/etc/cfn/cfn-hup.conf", "/etc/cfn/hooks.d/cfnauto-reloader.conf"]}
}
}
}
}
},
"Properties": {
"ImageId" : { "Fn::FindInMap" : [ "AWSRegionArch2AMI", { "Ref" :
"AWS::Region" },
{ "Fn::FindInMap" : [ "AWSInstanceType2Arch", { "Ref"
: "InstanceType" }, "Arch" ] } ] },
"InstanceType"
: { "Ref" : "InstanceType" },
"KeyName"
: { "Ref" : "KeyName" },
"SecurityGroups" : [ {"Ref" : "WebServerSecurityGroup"} ],
"UserData"
: { "Fn::Base64" : { "Fn::Join" : ["", [
"#!/bin/bash -xe\n",
"yum update -y aws-cfn-bootstrap\n",
"# Install the files and packages from the metadata\n",
"/opt/aws/bin/cfn-init -v ",
"
--stack ", { "Ref" : "AWS::StackName" },
"
--resource LaunchConfig ",
"
--region ", { "Ref" : "AWS::Region" }, "\n",
"# Start up the cfn-hup daemon to listen for changes to the Web
Server metadata\n",
"/opt/aws/bin/cfn-hup || error_exit 'Failed to start cfn-hup'\n",
"# Signal the status from cfn-init\n",
"/opt/aws/bin/cfn-signal -e $? ",
"
--stack ", { "Ref" : "AWS::StackName" },
"
--resource WebServerGroup ",
"
--region ", { "Ref" : "AWS::Region" }, "\n"
]]}}
}
},
"WebServerSecurityGroup" : {
"Type" : "AWS::EC2::SecurityGroup",
"Properties" : {
"GroupDescription" : "Enable HTTP access via port 80 locked down to the
ELB and SSH access",
"SecurityGroupIngress" : [
{"IpProtocol" : "tcp", "FromPort" : "80", "ToPort" : "80",
"SourceSecurityGroupOwnerId" : {"Fn::GetAtt" : ["ElasticLoadBalancer",
"SourceSecurityGroup.OwnerAlias"]},"SourceSecurityGroupName" : {"Fn::GetAtt" :
["ElasticLoadBalancer", "SourceSecurityGroup.GroupName"]}},
{"IpProtocol" : "tcp", "FromPort" : "22", "ToPort" : "22", "CidrIp"
API Version 2010-05-15
45
AWS CloudFormation User Guide
Availability and Impact Considerations
: { "Ref" : "SSHLocation"}}
]
}
}
},
"Outputs" : {
"WebsiteURL" : {
"Description" : "Application URL",
"Value" : { "Fn::Join" : ["", ["http://", { "Fn::GetAtt" : [ "ElasticLoad
Balancer", "DNSName" ]}]] }
}
}
}
Availability and Impact Considerations
Different properties have different impacts on the resources in the stack.You can use AWS CloudFormation
to update any property; however, before you make any changes, you should consider these questions:
1. How does the update affect the resource itself? For example, updating an alarm threshold will render
the alarm inactive during the update. As we have seen, changing the instance type requires that the
instance be stopped and restarted. AWS CloudFormation uses the Update or Modify actions for the
underlying resources to make changes to resources. To understand the impact of updates, you should
check the documentation for the specific resources.
2. Is the change mutable or immutable? Some changes to resource properties, such as changing the
AMI on an Amazon EC2 instance, are not supported by the underlying services. In the case of mutable
changes, AWS CloudFormation will use the Update or Modify type APIs for the underlying resources.
For immutable property changes, AWS CloudFormation will create new resources with the updated
properties and then link them to the stack before deleting the old resources. Although AWS
CloudFormation tries to reduce the down time of the stack resources, replacing a resource is a multistep
process, and it will take time. During stack reconfiguration, your application will not be fully operational.
For example, it may not be able to serve requests or access a database.
Related Resources
For more information about using AWS CloudFormation to start applications and on integrating with other
configuration and deployment services such as Puppet and Opscode Chef, see the following whitepapers:
• Bootstrapping Applications via AWS CloudFormation
• Integrating AWS CloudFormation with Opscode Chef
• Integrating AWS CloudFormation with Puppet
The template used throughout this section is a "Hello, World" PHP application. The template library also
has an Amazon ElastiCache sample template that shows how to integrate a PHP application with
ElasticCache using cfn-hup and cfn-init to respond to changes in the Amazon ElastiCache Cache Cluster
configuration, all of which can be performed by Update Stack.
API Version 2010-05-15
46
AWS CloudFormation User Guide
Using CloudFormer to Create Templates
Using CloudFormer to Create AWS
CloudFormation Templates from Existing AWS
Resources
CloudFormer is a template creation tool that creates an AWS CloudFormation template from existing
AWS resources in your account. You select any supported AWS resources that are running in your
account, and CloudFormer creates a template in an Amazon S3 bucket.
Important
CloudFormer is a beta tool that produces templates that you can use as a starting point. For
more information about CloudFormer and the resources it supports, see the CloudFormer page.
The following list outlines the basic procedure for using CloudFormer:
1. Provision and configure the required resources using your existing processes and tools.
2. Create and launch a CloudFormer stack.
CloudFormer is itself an AWS CloudFormation stack. You run CloudFormer by launching the stack
from your AWS environment. It runs on a t1.micro Amazon EC2 instance and requires no other
resources.
3. Use CloudFormer to create a template using any of your existing AWS resources and save it to an
Amazon S3 bucket.
4. Shut down the CloudFormer stack.
You usually don't need CloudFormer beyond this point, so you can avoid additional charges by shutting
it down, which terminates the associated Amazon EC2 instance.
5. Use the template to launch the stack, as needed.
The following topics describes how to use CloudFormer by walking you through a basic scenario (a simple
website on an Amazon EC2 instance) that creates a template with multiple resources. However, this
example is just one of many possible scenarios; CloudFormer can create a template from any collection
of AWS resources.
Topics
• Step 1: Create a CloudFormer Stack (p. 47)
• Step 2: Launch the CloudFormer Stack (p. 48)
• Step 3: Use CloudFormer to Create a Template (p. 49)
Step 1: Create a CloudFormer Stack
CloudFormer is itself an AWS CloudFormation stack, so the first step is to create and launch the stack.
There are several ways to perform this task.
• The AWS CloudFormation console.
• The URLs on the CloudFormer tool page.
Because the AWS CloudFormation console is a good way to learn how to work with AWS resources, this
walkthrough launches a CloudFormer stack by using the console.
API Version 2010-05-15
47
AWS CloudFormation User Guide
Step 2: Launch the CloudFormer Stack
To create a CloudFormer stack using the AWS CloudFormation Console
1.
Log in to the AWS CloudFormation console and click Create New Stack to launch the stack creation
wizard. For instructions on how to log in, see Logging in to the AWS CloudFormation Console.
2.
3.
Specify a name for the CloudFormer stack in the Name field.
In the Template section, select Select a sample template and then select CloudFormer from the
drop-down list.
Click Next to specify input parameters.
4.
5.
6.
7.
8.
In the Parameters section, type a password and user name that you'll use to log in to CloudFormer,
and then click Next.
Click Next.
For CloudFormer, you don't need to specify any additional options.
Review the information about the stack and select I acknowledge that this template may create
IAM resources.
After you finish reviewing the stack information, click Create to start creating the CloudFormer stack.
CloudFormer is an AWS CloudFormation stack, so it must go through the normal stack creation
process, which can take a few minutes.
Step 2: Launch the CloudFormer Stack
After the CloudFormer stack's status is CREATE_COMPLETE, you can launch the stack.
To launch the CloudFormer stack
1.
2.
3.
Click the CloudFormer stack's entry in the AWS CloudFormation Console, and select the Outputs
tab in the stack information pane.
In the Value column, click the URL to launch the CloudFormer tool.
Type the user name and password that you specified when you created the CloudFormer stack.
When log in to CloudFormer, it displays the first page of the tool in your browser, where you can start to
create your template, as described in the next section.
API Version 2010-05-15
48
AWS CloudFormation User Guide
Step 3: Use CloudFormer to Create a Template
Note
The CloudFormer stack launches a t1.micro Amazon EC2 instance, which must be manually
terminated after you are finished.
After you create a CloudFormer stack, it becomes one of your account's collection of stacks. To create
another template, just launch the CloudFormer stack again.
Step 3: Use CloudFormer to Create a Template
Before you start using CloudFormer to create a template, first ensure that your account has all the AWS
resources that you want to include in your template. This walkthrough assumes that your account has:
• An Amazon EC2 instance (AWS::EC2::Instance).
• An Amazon EC2 security group (AWS::EC2::SecurityGroup). You should associate the security
group with the instance.
• An Elastic IP Address(AWS::EC2::EIP). You should associate the address with the instance.
To use CloudFormer to create a template from your AWS resources
1.
2.
Under Select the AWS Region, select the template's region from the list, and click Create Template.
The tool must first analyze your account, so it might take a few minutes before the Intro page is
displayed.
On the Intro page, enter a description for your template.You can also use this page to select resources
with a filter or select all resources in your account. This walkthrough specifies resources manually,
so leave Resource Name Filter and Select all resources in your account blank and cleared,
respectively and click Continue.
API Version 2010-05-15
49
AWS CloudFormation User Guide
Step 3: Use CloudFormer to Create a Template
3.
The following pages are for resources that are not used by this walkthrough, so just examine the
page for future reference and click Continue. In order:
1. DNS Names allows you to include Route 53 records.
2. The Virtual Private Clouds allows you to include Amazon VPCs.
3. Virtual Private Cloud Network Topologies allows you to include Amazon VPC subnets, gateways,
DHCP configurations, and VPN connections.
4. Virtual Private Cloud Security Configuration allows you to include network ACLS and route
tables.
4.
Network Resources allows you to include Elastic Load Balancing load balancers, Elastic IP
Addresses, CloudFront distributions, and Amazon EC2 network interfaces. Select the Elastic IP
address you want to include in the template.
5.
The Compute Resources page allows you to include Auto Scaling groups and Amazon EC2
instances. Before you started creating the template, you associated an Elastic IP Address with your
Amazon EC2 instance, creating a dependent resource. When you reach Compute Resources,
CloudFormer automatically selects dependent instances, so just ensure that your instance is selected
and click Continue.
API Version 2010-05-15
50
AWS CloudFormation User Guide
Step 3: Use CloudFormer to Create a Template
Note
You can manually include additional instances, as needed. If you don't want to include an
automatically selected instance, just clear the check box.
6.
The following pages are for resources that are not used by this walkthrough, so just examine the
page for future reference and click Continue. In order:
1. Storage allows you to include Amazon EBS volumes, Amazon RDS instances, DynamoDB tables,
and Amazon S3 buckets.
2. Application Services allows you to include ElastiCache clusters, Amazon SQS queues, Amazon
SimpleDB domains, and Amazon SNS topics.
System Configuration allows you to include Auto Scaling launch configurations, Amazon RDS
subnet groups, ElastiCache parameter groups, and Amazon RDS parameter groups.
7.
The Security Groups page allows you include security groups. Before you started creating the
template, you associated an Amazon EC2 security group with your Amazon EC2 instance, creating
a dependent resource. When you reach Security Groups, CloudFormer automatically selects
dependent security groups, so just ensure that your group is selected and click Continue.
Note
You can manually include additional security groups—including Amazon EC2 security
groups, Amazon RDS security groups, and so on—as appropriate. If you don't want to
include an automatically selected security group, just clear the check box.
8.
9.
The Operational Resources page allows you to include Auto Scaling policies and CloudWatch
alarms. This walkthrough uses neither, so just click Continue.
The Summary page serves several purposes:
• It allows you to review the resources you've added to your template.
To modify your resources, click Back to return to the appropriate pages and modify your selections
as needed.
• It allows you to change your the auto-generated logical names that were assigned to your resources.
To modify a logical name, click Modify and enter the name in the Logical Name field.
• It allows you to specify outputs that provide necessary information, such as your site's IP address
or URL.
API Version 2010-05-15
51
AWS CloudFormation User Guide
Step 3: Use CloudFormer to Create a Template
To modify an output, click Modify and select the appropriate output from the list.
Examine the resources you've selected and make any necessary changes. You should have one
Elastic IP Address, one Amazon EC2 instance, and one Amazon EC2 security group. When you are
satisfied, click Continue to generate the template.
10. The AWS CloudFormation Template page displays the generated template. You can use the
template to deploy your resources as a combined set with AWS CloudFormation, or as a base
template for further modification.
Note
In addition to the resources that you explicitly specified, the template includes values that
are associated with those resources such as Amazon EC2 instances' Availability Zones.
Select an Amazon S3 bucket from the S3 Bucket list and click Save Template to save the template
to the bucket and add it to your accounts collection of stacks.
API Version 2010-05-15
52
AWS CloudFormation User Guide
AWS CloudFormation Endpoints
Save Template gives you two options:
• Launch Stack saves the template to the specified Amazon S3 bucket and also launches the stack
immediately.
• Create Template simply saves the template to the specified Amazon S3 bucket.
You can launch the stack later just like you would with any other template, for example, by using
the AWS CloudFormation console.
11. Now that you have the template, you don't need the CloudFormer stack any more. To avoid
unnecessary charges to your account, go to the Amazon EC2 console and delete the CloudFormer
Amazon EC2 instance.
AWS CloudFormation Endpoints
To reduce data latency in your applications, most Amazon Web Services products allow you to select a
regional endpoint to make your requests. An endpoint is a URL that is the entry point for a web service.
The following table lists the standard AWS CloudFormation endpoints:
Region Name
Endpoint
Asia Pacific (Singapore) Region
cloudformation.ap-southeast-1.amazonaws.com
Asia Pacific (Sydney) Region
cloudformation.ap-southeast-2.amazonaws.com
Asia Pacific (Tokyo) Region
cloudformation.ap-northeast-1.amazonaws.com
China (Beijing) Region
cloudformation.cn-north-1.amazonaws.com.cn
EU (Frankfurt) Region
cloudformation.eu-central-1.amazonaws.com
EU (Ireland) Region
cloudformation.eu-west-1.amazonaws.com
South America (Sao Paulo) Region
cloudformation.sa-east-1.amazonaws.com
API Version 2010-05-15
53
AWS CloudFormation User Guide
AWS CloudFormation and VPC Endpoints
Region Name
Endpoint
US East (N. Virginia) Region
cloudformation.us-east-1.amazonaws.com
US West (N. California) Region
cloudformation.us-west-1.amazonaws.com
US West (Oregon) Region
cloudformation.us-west-2.amazonaws.com
Note
All AWS CloudFormation endpoints use the HTTPS protocol for access.
For more information about regions and endpoints for AWS CloudFormation and other services, go to
Regions and Endpoints in the Amazon Web Services General Reference.
AWS CloudFormation and VPC Endpoints
When you work with a stack with custom resources (p. 252) or wait conditions (p. 230), resources in that
stack must send responses to a pre-signed Amazon Simple Storage Service (Amazon S3) URL before
AWS CloudFormation proceeds with the stack operation. If you use the VPC endpoint feature, those
resources in the VPC must have access to certain S3 buckets. If they can't send responses to Amazon
S3, AWS CloudFormation won't receive any response and the stack operation fails.
AWS CloudFormation has a bucket for custom resources and wait conditions in each region, so you can
grant access only to buckets that correspond to the region and feature that are relevant to your
configuration. For example, if you have custom resources that use VPC endpoints in us-west-2, you
need to grant access only to the cloudformation-custom-resource-response-us-west-2 bucket.
Resources in a VPC that must respond to a custom resource request require access to the following S3
buckets:
cloudformation-custom-resource-response-ap-northeast-1
cloudformation-custom-resource-response-ap-southeast-1
cloudformation-custom-resource-response-ap-southeast-2
cloudformation-custom-resource-response-cn-north-1
cloudformation-custom-resource-response-eu-central-1
cloudformation-custom-resource-response-eu-west-1
cloudformation-custom-resource-response-sa-east-1
cloudformation-custom-resource-response-us-east-1
cloudformation-custom-resource-response-us-gov-west-1
cloudformation-custom-resource-response-us-west-1
cloudformation-custom-resource-response-us-west-2
Resources in a VPC that must respond to a wait condition require access to the following S3 buckets:
cloudformation-waitcondition-ap-northeast-1
cloudformation-waitcondition-ap-southeast-1
cloudformation-waitcondition-ap-southeast-2
cloudformation-waitcondition-cn-north-1
cloudformation-waitcondition-eu-central-1
cloudformation-waitcondition-eu-west-1
cloudformation-waitcondition-sa-east-1
cloudformation-waitcondition-us-east-1
cloudformation-waitcondition-us-gov-west-1
API Version 2010-05-15
54
AWS CloudFormation User Guide
AWS CloudFormation and VPC Endpoints
cloudformation-waitcondition-us-west-1
cloudformation-waitcondition-us-west-2
API Version 2010-05-15
55
AWS CloudFormation User Guide
Organize Your Stacks By Lifecycle and Ownership
AWS CloudFormation Best
Practices
Best practices are recommendations that can help you use AWS CloudFormation more effectively and
securely throughout its entire workflow. Learn how to plan and organize your stacks, create templates
that describe your resources and the software applications that run on them, and manage your stacks
and their resources. The following best practices are based on real-world experience from current AWS
CloudFormation customers.
Planning and organizing
• Organize Your Stacks By Lifecycle and Ownership (p. 56)
• Reuse Templates to Replicate Stacks in Multiple Environments (p. 57)
• Verify Quotas for All Resource Types (p. 57)
• Use Nested Stacks to Reuse Common Template Patterns (p. 58)
Creating templates
• Do Not Embed Credentials in Your Templates (p. 58)
• Use AWS-Specific Parameter Types (p. 58)
• Use Parameter Constraints (p. 58)
• Use AWS::CloudFormation::Init to Deploy Software Applications on Amazon EC2 Instances (p. 59)
• Validate Templates Before Using Them (p. 59)
Managing stacks
• Manage All Stack Resources Through AWS CloudFormation (p. 59)
• Use Stack Policies (p. 59)
• Use AWS CloudTrail to Log AWS CloudFormation Calls (p. 60)
• Use Code Reviews and Revision Controls to Manage Your Templates (p. 60)
Organize Your Stacks By Lifecycle and
Ownership
Use the lifecycle and ownership of your AWS resources to help you decide what resources should go in
each stack. Normally, you might put all your resources in one stack, but as your stack grows in scale and
broadens in scope, managing a single stack can be cumbersome and time consuming. By grouping
API Version 2010-05-15
56
AWS CloudFormation User Guide
Use IAM to Control Access
resources with common lifecycles and ownership, owners can make changes to their set of resources
by using their own process and schedule without affecting other resources.
For example, imagine a team of developers and engineers who own a website that is hosted on autoscaling
instances behind a load balancer. Because the website has its own lifecycle and is maintained by the
website team, you can create a stack for the website and its resources. Now imagine that the website
also uses back-end databases, where the databases are in a separate stack that are owned and maintained
by database administrators. Whenever the website team or database team needs to update their resources,
they can do so without affecting each other's stack. If all resources were in a single stack, coordinating
and communicating updates can be difficult.
For additional guidance about organizing your stacks, you can use two common frameworks: a multi-layered
architecture and service-oriented architecture (SOA).
A layered architecture organizes stacks into multiple horizontal layers that build on top of one another,
where each layer has a dependency on the layer directly below it. You can have one or more stacks in
each layer, but within each layer, your stacks should have AWS resources with similar lifecycles and
ownership.
With a service-oriented architecture, you can organize big business problems into manageable parts.
Each of these parts is a service that has a clearly defined purpose and represents a self-contained unit
of functionality.You can map these services to a stack, where each stack has its own lifecycle and owners.
All of these services (stacks) can be wired together so that they can interact with one another.
Use IAM to Control Access
IAM is an AWS service that you can use to manage users and their permissions in AWS. You can use
IAM with AWS CloudFormation to specify what AWS CloudFormation actions users can perform, such
as viewing stack templates, creating stacks, or deleting stacks. Furthermore, anyone managing AWS
CloudFormation stacks will require permissions to resources within those stacks. For example, if users
want to use AWS CloudFormation to launch, update, or terminate Amazon EC2 instances, they must
have permission to call the relevant Amazon EC2 actions.
Verify Quotas for All Resource Types
Before launching a stack, ensure that you can create all the resources that you want without hitting your
AWS account limits. If you hit a limit, AWS CloudFormation won't create your stack successfully until you
increase your quota or delete extra resources. Each service can have various limits that you should be
aware of before launching a stack. For example, by default, you can only launch 20 AWS CloudFormation
stacks per region in your AWS account. For more information about limits and how to increase the default
limits, see AWS Service Limits in the AWS General Reference.
Reuse Templates to Replicate Stacks in Multiple
Environments
After you have your stacks and resources set up, you can reuse your templates to replicate your
infrastructure in multiple environments. For example, you can create environments for development,
testing, and production so that you can test changes before implementing them into production. To make
templates reusable, use the parameters, mappings, and conditions sections so that you can customize
your stacks when you create them. For example, for your development environments, you can specify a
lower-cost instance type compared to your production environment, but all other configurations and
API Version 2010-05-15
57
AWS CloudFormation User Guide
Use Nested Stacks to Reuse Common Template Patterns
settings remain the same. For more information about parameters, mappings, and conditions, see Template
Anatomy (p. 113).
Use Nested Stacks to Reuse Common Template
Patterns
As your infrastructure grows, common patterns can emerge in which you declare the same components
in each of your templates. You can separate out these common components and create dedicated
templates for them. That way, you can mix and match different templates but use nested stacks to create
a single, unified stack. Nested stacks are stacks that create other stacks. To create nested stacks, use
the AWS::CloudFormation::Stack (p. 324) resource in your template to reference other templates.
For example, assume that you have a load balancer configuration that you use for most of your stacks.
Instead of copying and pasting the same configurations into your templates, you can create a dedicated
template for the load balancer. Then, you just use the AWS::CloudFormation::Stack (p. 324) resource to
reference that template from within other templates. If the load balancer template is updated, any stack
that is referencing it will use the updated the load balancer when you update the stack. In addition to
simplifying updates, this approach lets you use experts to create and maintain components that you might
not be necessarily familiar with. All you need to do is reference their templates.
Do Not Embed Credentials in Your Templates
Rather than embedding sensitive information in your AWS CloudFormation templates, use input parameters
to pass in information whenever you create or update a stack. If you do, make sure to use the NoEcho
property to obfuscate the parameter value.
For example, suppose your stack creates a new database instance. When the database is created, AWS
CloudFormation needs to pass a database administrator password.You can pass in a password by using
an input parameter instead of embedding it in your template. For more information, see Parameters (p. 115).
Use AWS-Specific Parameter Types
If your template requires inputs for existing AWS-specific values, such as existing Amazon Virtual Private
Cloud IDs or an Amazon EC2 key pair name, use AWS-specific parameter types. For example, you can
specify a parameter as type AWS::EC2::KeyPair::KeyName, which takes an existing key pair name
that is in the your AWS account and in the region where the you are creating the stack. AWS
CloudFormation can quickly validate values for AWS-specific parameter types before creating your stack.
Also, if you use the AWS CloudFormation console, AWS CloudFormation shows a drop-down list of valid
values, so you don't have to look up or memorize the correct VPC IDs or key pair names. For more
information, see Parameters (p. 115).
Use Parameter Constraints
With constraints, you can describe allowed input values so that AWS CloudFormation catches any invalid
values before creating a stack. You can set constraints such as a minimum length, maximum length, and
allowed patterns. For example, you can set constraints on a database user name value so that it must
be a minimum length of eight character and contain only alpha-numeric characters. For more information,
see Parameters (p. 115).
API Version 2010-05-15
58
AWS CloudFormation User Guide
Use AWS::CloudFormation::Init to Deploy Software
Applications on Amazon EC2 Instances
Use AWS::CloudFormation::Init to Deploy
Software Applications on Amazon EC2 Instances
When you launch stacks, you can install and configure software applications on Amazon EC2 instances
by using the cfn-init helper script and the AWS::CloudFormation::Init resource. By using
AWS::CloudFormation::Init, you can describe the configurations that you want rather than scripting
procedural steps. You can also update configurations without recreating instances. And if anything goes
wrong with your configuration, AWS CloudFormation generates logs that you can use to investigate
issues.
In your template, specify installation and configuration states in the AWS::CloudFormation::Init (p. 314)
resource. For a walkthrough that shows how to use cfn-init and AWS::CloudFormation::Init, see
Deploying Applications on Amazon EC2 with AWS CloudFormation (p. 234).
Validate Templates Before Using Them
Before you use a template to create or update a stack, you can use AWS CloudFormation to validate it.
Validating a template can help you catch syntax and some semantic errors, such as circular dependencies,
before AWS CloudFormation creates any resources. If you use the AWS CloudFormation console, the
console automatically validates the template after you specify input parameters. For the AWS CLI or AWS
CloudFormation API, use the aws cloudformation validate-template command or ValidateTemplate action.
Manage All Stack Resources Through AWS
CloudFormation
After you launch a stack, use the AWS CloudFormation console, API, or AWS CLI to update resources
in your stack. Do not make changes to stack resources outside of AWS CloudFormation. Doing so can
create a mismatch between your stack's template and the current state of your stack resources, which
can cause errors if you update or delete the stack. For more information, see Walkthrough: Updating a
Stack (p. 24).
Use Stack Policies
Stack policies help protect critical stack resources from unintentional updates that could cause resources
to be interrupted or even replaced. A stack policy is a JSON document that describes what update actions
can be performed on designated resources. Specify a stack policy whenever you create a stack that has
critical resources.
During a stack update, you must explicitly specify the protected resources that you want to update;
otherwise, no changes are made to protected resources. For more information, see Prevent Updates to
Stack Resources (p. 94).
API Version 2010-05-15
59
AWS CloudFormation User Guide
Use AWS CloudTrail to Log AWS CloudFormation Calls
Use AWS CloudTrail to Log AWS
CloudFormation Calls
AWS CloudTrail tracks anyone making AWS CloudFormation API calls in your AWS account. API calls
are logged whenever anyone uses the AWS CloudFormation API, the AWS CloudFormation console, a
back-end console, or AWS CloudFormation AWS CLI commands. Enable logging and specify an Amazon
S3 bucket to store the logs. That way, if you ever need to, you can audit who made what AWS
CloudFormation call in your account. For more information, see Logging AWS CloudFormation API Calls
in AWS CloudTrail (p. 692).
Use Code Reviews and Revision Controls to
Manage Your Templates
Your stack templates describe the configuration of your AWS resources, such as their property values.
To review changes and to keep an accurate history of your resources, use code reviews and revision
controls. These methods can help you track changes between different versions of your templates, which
can help you track changes to your stack resources. Also, by maintaining a history, you can always revert
your stack to a certain version of your template.
API Version 2010-05-15
60
AWS CloudFormation User Guide
AWS CloudFormation Actions and Resources
Controlling Access with AWS
Identity and Access Management
With AWS Identity and Access Management (IAM), you can create IAM users to control who has access
to which resources in your AWS account. You can use IAM with AWS CloudFormation to control what
users can do with AWS CloudFormation, such as whether they can view stack templates, create stacks,
or delete stacks.
In addition to AWS CloudFormation actions, you can manage what AWS services and resources are
available to each user. That way, you can control which resources users can access when they use AWS
CloudFormation. For example, you can specify which users can create Amazon EC2 instances, terminate
database instances, or update VPCs. Those same permissions are applied anytime they use AWS
CloudFormation to do those actions.
For more information about all the services that you can control access to, see AWS Services that Support
IAM in IAM User Guide.
Topics
• AWS CloudFormation Actions and Resources (p. 61)
• AWS CloudFormation Conditions (p. 64)
• Acknowledging IAM Resources in AWS CloudFormation Templates (p. 64)
• Manage Credentials for Applications Running on Amazon EC2 Instances (p. 64)
• Grant Temporary Access (Federated Access) (p. 65)
AWS CloudFormation Actions and Resources
When you create a group or an IAM user in your AWS account, you can associate an IAM policy with
that group or user, which specifies the permissions that you want to grant. For example, imagine you
have a group of entry-level developers. You can create a Junior application developers group
that includes all entry-level developers. Then, you associate a policy with that group that allows users to
only view AWS CloudFormation stacks. In this scenario, you might have a policy such as the following
sample:
API Version 2010-05-15
61
AWS CloudFormation User Guide
AWS CloudFormation Actions and Resources
A sample policy that grants view stack permissions
{
"Version":"2012-10-17",
"Statement":[{
"Effect":"Allow",
"Action":[
"cloudformation:DescribeStacks",
"cloudformation:DescribeStackEvents",
"cloudformation:DescribeStackResource",
"cloudformation:DescribeStackResources"
],
"Resource":"*"
}]
}
The policy grants permissions to all the describe stack calls, which are listed in the Action element. In
the Resource element, the policy specifies an asterisk (*), a wild card that allows the actions to be done
on all AWS CloudFormation stacks.
In addition to AWS CloudFormation actions, IAM users who create or delete stacks require additional
permissions that depends on the stack templates. For example, if you have a template that describes an
Amazon SQS Queue, the user must have the corresponding permissions for Amazon SQS actions to
successfully create the stack, as shown in the following sample policy:
A sample policy that grants create and view stack actions and all Amazon SQS actions
{
"Version":"2012-10-17",
"Statement":[{
"Effect":"Allow",
"Action":[
"sqs:*",
"cloudformation:CreateStack",
"cloudformation:DescribeStacks",
"cloudformation:DescribeStackEvents",
"cloudformation:DescribeStackResources",
"cloudformation:GetTemplate",
"cloudformation:ValidateTemplate"
],
"Resource":"*"
}]
}
AWS CloudFormation also supports resource-level permissions, so you can specify actions for a specific
stack, as shown in the following policy:
API Version 2010-05-15
62
AWS CloudFormation User Guide
AWS CloudFormation Console-Specific Permissions
A sample policy that denies the delete and update stack actions for the MyProductionStack
{
"Version":"2012-10-17",
"Statement":[{
"Effect":"Deny",
"Action":[
"cloudformation:DeleteStack",
"cloudformation:UpdateStack"
],
"Resource":"arn:aws:cloudformation:us-east-1:123456789012:stack/MyPro
ductionStack/*"
}]
}
The sample policy uses a wild card at the end of the stack name so that delete stack and update stack
are denied on the full stack ID (such as
arn:aws:cloudformation:us-east-1:123456789012:stack/MyProductionStack/abc9dbf0-43c2-11e3-a6e8-50fa526be49c)
and on the stack name (such as MyProductionStack).
For a list of all AWS CloudFormation actions that you can allow or deny, see the AWS CloudFormation
API Reference.
AWS CloudFormation Console-Specific
Permissions
IAM users who use the AWS CloudFormation console require additional permissions that are not required
for using the AWS Command Line Interface or AWS CloudFormation APIs. Compared to the CLI and
API, the console provides additional features that require additional permissions, such as template uploads
to Amazon S3 buckets and drop-down lists for AWS-specific parameter types.
For all the following actions, grant permissions to all resources; don't limit actions to specific stacks or
buckets.
The following required action is used only by the AWS CloudFormation console and is not documented
in the API reference. The action allows users to upload templates to Amazon S3 buckets.
cloudformation:CreateUploadBucket
When users upload templates,they require the following Amazon S3 permissions:
s3:PutObject
s3:ListBucket
s3:GetObject
s3:CreateBucket
For templates with AWS-specific parameter types, users require permissions to make the corresponding
describe API calls. For example, if a template includes the AWS::EC2::KeyPair::KeyName parameter
type, users require permission to call the EC2 DescribeKeyPairs action, which is how the console gets
values for the parameter drop-down list. The following examples are actions that are required for other
parameter types:
API Version 2010-05-15
63
AWS CloudFormation User Guide
AWS CloudFormation Conditions
ec2:DescribeSecurityGroups (for the AWS::EC2::SecurityGroup::Id parameter type)
ec2:DescribeSubnets (for the Subnet::Id parameter type)
ec2:DescribeVpcs (for the AWS::EC2::VPC::Id parameter type)
AWS CloudFormation Conditions
In an IAM policy, you can optionally specify conditions that control when a policy is in effect. AWS
CloudFormation does not have service-specific conditions. However, you can use the AWS-wide conditions,
such as DateLessThan, which specifies when a policy stops taking effect. For more information about
AWS-wide conditions, see Condition in IAM Policy Elements Reference in IAM User Guide.
Note
Do not use the aws:SourceIp condition. AWS CloudFormation provisions resources by using
its own IP address, not the IP address of the originating request. For example, when you create
a stack, AWS CloudFormation makes requests from its IP address to launch an Amazon EC2
instance or to create an Amazon S3 bucket, not the IP address from the CreateStack call or
the aws cloudformation create-stack command.
Acknowledging IAM Resources in AWS
CloudFormation Templates
Before you can create a stack, AWS CloudFormation validates your template. During the validation, AWS
CloudFormation also checks your template for AWS resources that you should be aware of. Currently,
AWS CloudFormation checks only for IAM resources in your templates. We recommend that you review
the permissions associated with each IAM resource. IAM resources, such as an IAM user with full access,
can access and modify any resource in your AWS account. To ensure that you've reviewed all IAM
resources, you must acknowledge that the template is creating those resources before AWS
CloudFormation creates the stack.
You can acknowledge the capabilities of AWS CloudFormation templates by using the AWS AWS
CloudFormation console, command line, or API:
• In the AWS CloudFormation console, select I acknowledge that this template may create IAM
resources on the Specify Parameters page of the Create Stack or Update Stack wizards.
• For the AWS Command Line Interface, specify the CAPABILITY_IAM value for the --capabilities
parameter when you use the aws cloudformation create-stack and aws cloudformation
update-stack commands.
• For the API, specify Capabilities.member.1=CAPABILITY_IAM when you use the CreateStack
and UpdateStack actions.
Manage Credentials for Applications Running
on Amazon EC2 Instances
If you have an application that runs on an Amazon EC2 instance and needs to make requests to AWS
resources such as Amazon S3 buckets or an DynamoDB table, the application requires AWS security
credentials. However, distributing and embedding long-term security credentials in every instance that
you launch is a challenge and a potential security risk. Instead of using long-term credentials, like IAM
user credentials, we recommend that you create an IAM role that is associated with an Amazon EC2
API Version 2010-05-15
64
AWS CloudFormation User Guide
Grant Temporary Access (Federated Access)
instance when the instance is launched. An application can then get temporary security credentials from
the Amazon EC2 instance. You don't have to embed long-term credentials on the instance. Also, to make
managing credentials easier, you can specify just a single role for multiple Amazon EC2 instances; you
don't have to create unique credentials for each instance.
For a template snippet that shows how to launch an instance with a role, see IAM Role Template
Examples (p. 201).
Note
Applications on instances that use temporary security credentials can call any AWS
CloudFormation actions. However, because AWS CloudFormation interacts with many other
AWS services, you must verify that all the services that you want to use support temporary
security credentials. For more information, see AWS Services that Support AWS STS.
Grant Temporary Access (Federated Access)
In some cases, you might want to grant users with no AWS credentials temporary access to your AWS
account. Instead of creating and deleting long-term credentials whenever you want to grant temporary
access, use AWS Security Token Service (AWS STS). For example, you can use IAM roles. From one
IAM role, you can programmatically create and then distribute many temporary security credentials (which
include an access key, secret access key, and security token). These credentials have a limited life, so
they cannot be used to access your AWS account after they expire. You can also create multiple IAM
roles in order to grant individual users different levels of permissions. IAM roles are useful for scenarios
like federated identities and single sign-on.
A federated identity is a distinct identity that you can use across multiple systems. For enterprise users
with an established on-premises identity system (such as LDAP or Active Directory), you can handle all
authentication with your on-premises identity system. After a user has been authenticated, you provide
temporary security credentials from the appropriate IAM user or role. For example, you can create an
administrators role and a developers role, where administrators have full access to the AWS account
and developers have permissions to work only with AWS CloudFormation stacks. After an administrator
is authenticated, the administrator is authorized to obtain temporary security credentials from the
administrators role. However, for developers, they can obtain temporary security credentials from
only the developers role.
You can also grant federated users access to the AWS Management Console. After users authenticate
with your on-premises identity system, you can programmatically construct a temporary URL that gives
direct access to the AWS Management Console. When users use the temporary URL, they won't need
to sign in to AWS because they have already been authenticated (single sign-on). Also, because the URL
is constructed from the users' temporary security credentials, the permissions that are available with
those credentials determine what permissions users have in the AWS Management Console.
You can use several different AWS STS APIs to generate temporary security credentials. For more
information about which API to use, see Ways to Get Temporary Security Credentials in Using Temporary
Security Credentials.
Important
You cannot work with IAM when you use temporary security credentials that were generated
from the GetFederationToken API. Instead, if you need to work with IAM, use temporary
security credentials from a role.
AWS CloudFormation interacts with many other AWS services. When you use temporary security
credentials with AWS CloudFormation, verify that all the services that you want to use support temporary
security credentials. For more information, see AWS Services that Support AWS STS.
For more information, see the following related resources in Using Temporary Security Credentials:
• Scenarios for Granting Temporary Access
API Version 2010-05-15
65
AWS CloudFormation User Guide
Grant Temporary Access (Federated Access)
• Giving Federated Users Direct Access to the AWS Management Console
API Version 2010-05-15
66
AWS CloudFormation User Guide
Using the Console
Working with Stacks
A stack is a collection of AWS resources that you can manage as a single unit. In other words, you can
create, update, or delete a collection of resources by creating, updating, or deleting stacks. All the resources
in a stack are defined by the stack's AWS CloudFormation template. A stack, for instance, can include
all the resources required to run a web application, such as a web server, a database, and networking
rules. If you no longer require that web application, you can simply delete the stack, and all of its related
resources are deleted.
AWS CloudFormation ensures all stack resources are created or deleted as appropriate. Because AWS
CloudFormation treats the stack resources as a single unit, they must all be created or deleted successfully
for the stack to be created or deleted. If a resource cannot be created, AWS CloudFormation rolls the
stack back and automatically deletes any resources that were created. If a resource cannot be deleted,
any remaining resources are retained until the stack can be successfully deleted.
You can work with stacks by using the AWS CloudFormation console, API, or AWS CLI.
Note
You are charged for the stack resources for the time they were operating (even if you deleted
the stack right away).
Topics
• Using the AWS CloudFormation Console (p. 67)
• Using the AWS Command Line Interface (p. 77)
• AWS CloudFormation Stacks Updates (p. 85)
• Working with Microsoft Windows Stacks on AWS CloudFormation (p. 104)
Using the AWS CloudFormation Console
The AWS CloudFormation console allows you to create, monitor, update and delete stacks directly from
your web browser. This section contains guidance on using the AWS CloudFormation console to perform
common actions.
In This Section
• Logging In to the Console (p. 68)
• Creating a Stack (p. 69)
• Creating an EC2 Key Pair (p. 73)
API Version 2010-05-15
67
AWS CloudFormation User Guide
Logging In to the Console
• Estimating the Cost of Your AWS CloudFormation Stack (p. 74)
• Viewing Stack Data and Resources (p. 74)
• Deleting a Stack (p. 75)
• Viewing Deleted Stacks (p. 76)
Logging In to the AWS CloudFormation Console
The AWS CloudFormation console allows you to create, monitor, update, and delete your AWS
CloudFormation stacks with a web-based interface. It is part of the AWS Management Console.
You can access the AWS CloudFormation console in a number of ways:
• Open the AWS CloudFormation console directly with the URL
https://console.amazonaws.cn/cloudformation/ . If you are not logged in to the AWS
Management Console yet, you need to log in before using the AWS CloudFormation console.
• If you are logged into and using the AWS Management Console, you can access the AWS
CloudFormation console by opening the Services menu and selecting CloudFormation in one of the
following sub-menus:
• Deployment and Management
• All Services
API Version 2010-05-15
68
AWS CloudFormation User Guide
Creating a Stack
If you don't have any AWS CloudFormation stacks running, you are presented with the option to Create
a stack. Otherwise, you see a list of your currently-running stacks.
See Also
• Creating a Stack (p. 69)
Creating a Stack on the AWS CloudFormation
Console
Creating a stack on the AWS CloudFormation console is an easy, wizard-driven process that consists of
the following steps:
1. Starting the Create Stack wizard (p. 69)
2. Selecting a stack template (p. 70)
3. Specifying stack parameters (p. 71)
4. Setting Stack Options (p. 72)
5. Reviewing your stack (p. 73)
After creating a stack, you can monitor the stack's progress, view the stack's resources and outputs,
update the stack, and delete it. Information about these actions are provided in their associated topics.
Starting the Create Stack Wizard
To create a stack on the AWS CloudFormation console
1.
Log in to the AWS Management Console and select CloudFormation in the Services menu.
2.
Create a new stack by using one of the following options:
• Click Create Stack. This is the only option if you have a currently running stack.
API Version 2010-05-15
69
AWS CloudFormation User Guide
Creating a Stack
• Click Create New Stack in the CloudFormation Stacks main window. This option is visible only
if you have no running stacks.
• Click Launch CloudFormer in the CloudFormation Stacks main window to create a stack from
currently running resources. This option is visible only if you have no running stacks.
For more information about using CloudFormer to create AWS CloudFormation stacks, see Using
CloudFormer to Create Templates (p. 47).
Next, you choose a stack template (p. 70).
Selecting a Stack Template on the AWS CloudFormation
Console
After starting the Create Stack wizard (p. 69), you specify a stack name and select the template AWS
CloudFormation uses to create your stack.
AWS CloudFormation templates are JSON files that specify the AWS resources that make up your stack.
For more information about AWS CloudFormation templates, see Template Anatomy (p. 113).
To choose a stack name and select a stack template:
1.
On the Create A New Stack page of the Create Stack wizard, type a stack name in the Name box.
A stack name can contain only alphanumeric characters (case sensitive) and hyphens. It must start
with an alphabetic character and cannot be longer than 255 characters.
2.
Choose a stack using one of the following options:
API Version 2010-05-15
70
AWS CloudFormation User Guide
Creating a Stack
Use a sample template
Select an AWS CloudFormation template from among those available on the menu. The list of
available templates in the menu is generally the same as the list of templates on the AWS
CloudFormation Sample Templates web page.
You can select CloudFormer from the list to create a stack from existing AWS resources, using
the CloudFormer tool. For more information, see Using CloudFormer to Create Templates (p. 47).
Upload a template file
Select an AWS CloudFormation template on your local system. Specify the full path or click
Browse to select the file that you want to upload.
An uploaded template can be, at most, 51200 bytes.
Note
If you upload a local template file, AWS CloudFormation uploads it to an Amazon S3
bucket in your AWS account. AWS CloudFormation creates a unique bucket for each
region in which you upload a template file. The buckets are accessible to anyone with
Amazon S3 permissions in your AWS account. If an AWS CloudFormation-created
bucket already exists, the template is added to that bucket.
You can use your own bucket and manage its permissions by manually uploading
templates to Amazon S3. Then whenever you create or update a stack, specify the
Amazon S3 URL of a template file.
Provide a template URL
Specify a URL to a template in an Amazon S3 bucket.
The URL must point to a template (max size: 460,800 bytes) in an Amazon S3 bucket that you
have read permissions to, located in the same region as the stack. The URL itself can be, at
most, 1024 characters long.
3.
Click Next Step to accept your settings and proceed with specifying stack parameters (p. 71).
Specifying Stack Parameters on the AWS CloudFormation
Console
After selecting a stack template, specify values for all the parameters that were defined in the template.
With parameters, you can customize your stack at creation time. Your parameter values can be used in
the stack template to modify how resources are configured. That way you don't have to hard code values
in multiple templates to specify different settings. For more information about parameters in an AWS
CloudFormation template, see Parameters (p. 115).
AWS-specific Parameter Types
When you create stacks that contain AWS-specific parameter types, the AWS CloudFormation console
provides drop-down lists of valid values for those parameters. Depending on the parameter type, you can
search for values by ID, name, or the value of the Name tag. For example, with the AWS::EC2::VPC::Id
parameter type, you can search for a specific VPC ID, such as vpc-b47658d1. If the VPC was tagged
with a name, such as Name:TestVPC, you can also search for TestVPC. Currently, you can search only
for tag values with the Name key.
API Version 2010-05-15
71
AWS CloudFormation User Guide
Creating a Stack
Note
The console doesn't provide a drop-down list or enable you to search for values with the
AWS::EC2::Image::Id parameter type; AWS CloudFormation only verifies if the input values
are valid Amazon Elastic Compute Cloud image IDs.
To enter parameter values for your stack
1.
On the Specify Parameters page of the Create Stack wizard, specify parameters defined in the
stack template.
You can change any parameters with default values.
2.
When you are satisfied with the parameter values, click Next to proceed with setting options for your
stack (p. 72).
Setting AWS CloudFormation Stack Options
After specifying parameters (p. 115) that are defined in the template, you can set additional options for
your stack.
You can set the following stack options:
Tags
Tags are arbitrary key-value pairs that can be used to identify your stack for purposes such as cost
allocation. For more information about what tags are and how they can be used, see Tagging Your
Resources in the Amazon EC2 User Guide.
A Key consists of any alphanumeric characters but must not contain any spaces. Tag keys up to
127 characters long. A Value consists of any alphanumeric characters or spaces. Tag values can
be up to 255 characters long.
Notification Options
A new or existing Amazon Simple Notification Service topic where notifications about stack events
are sent.
If you create an Amazon SNS topic, you must specify a name and an email address, where stack
event notifications are sent.
Timeout
The number of minutes before stack creation times out. If the stack could not be created before the
time expires, creation fails due to timeout and the stack is rolled back. By default, the stack creation
never times out.
Rollback on failure
Specifies whether the stack should be rolled back if stack creation fails. Typically, you want to accept
the default value of Yes. Select No if you want the stack's state retained even if creation fails, such
as when you are debugging a stack template.
Stack policy
Defines the resources that you want to protect from unintentional updates during a stack update. By
default, all resources can be updated during a stack update. For more information, see Prevent
Updates to Stack Resources (p. 94).
To set stack options
1.
2.
On the Options screen of the Create Stack wizard, you can specify tags or set additional options
by expanding the Advanced section.
When you have entered all of your stack options, click Next Step to proceed with reviewing your
stack (p. 73).
API Version 2010-05-15
72
AWS CloudFormation User Guide
Creating an EC2 Key Pair
Reviewing Your Stack and Estimating Stack Cost on the
AWS CloudFormation Console
The final step before your stack is launched is to review the values entered while creating the stack. You
can also estimate the cost of your stack.
1.
On the Review page, review the details of your stack.
If you need to change any of the values prior to launching the stack, click Back to go back to the
page that has the setting that you want to change.
2.
3.
(Optional) You can click the Cost link to estimate the cost of your stack. The AWS Simple Monthly
Calculator displays values from your stack template and launch settings.
After you review the stack launch settings and the estimated cost of your stack, click Create to launch
your stack.
Your stack appears in the list of AWS CloudFormation stacks, with a status of
CREATE_IN_PROGRESS.
While your stack is being created (or afterward), you can use the stack detail pane to view your
stack's events, data, or resources (p. 74). AWS CloudFormation automatically refreshes stack events
every minute. By viewing stack creation events, you can understand the sequence of events that
lead to your stack's creation (or failure, if your are debugging your stack).
After your stack has been successfully created, its status changes to CREATE_COMPLETE. You
can then select it (if necessary) and click the Outputs tab to view your stack's outputs if you have
defined any in the template.
Creating an EC2 Key Pair
The use of some AWS CloudFormation resources and templates will require you to specify an Amazon
EC2 key pair for authentication, such as when you are configuring SSH access to your instances.
Amazon EC2 key pairs can be created with the AWS Management Console by using the following
procedure.
To create an EC2 key pair
1.
In the AWS Management Console, switch from the AWS CloudFormation console to the Amazon
EC2 console by clicking the Services button in the top-left corner of the screen, and select EC2.
2.
The console display now shows the Amazon EC2 console dashboard.
In the Amazon EC2 console, in the Navigation pane, click Key Pairs.
3.
You see the Key Pairs page, displaying your Amazon EC2 key pairs. If you haven't created any yet,
the list is empty, and instead shows the Create Key Pair button.
Click the Create Key Pair button.
4.
Type a key pair name, and click Create. It doesn't matter what you name it, but make it something
you can easily remember.
The key pair is created, and the download of your private key begins. It will be called name.pem,
where name represents the name you gave to your key pair.
5.
Download the key pair, and set the permissions to 400 (on a Linux or Mac OS system).
API Version 2010-05-15
73
AWS CloudFormation User Guide
Estimating the Cost of Your Stack
Estimating the Cost of Your AWS CloudFormation
Stack
There is no additional charge for AWS CloudFormation. You pay for AWS resources (e.g. Amazon EC2
instances, Elastic Load Balancing load balancers and so on) created using AWS CloudFormation as if
you created them by hand.
To estimate the cost of your stack
1.
On the Review page of the Create Stack or Update Stack dialog, click the Cost link.
This link opens the AWS Simple Monthly Calculator in a new browser page (or tab, depending on
how your browser is set up).
Note
Because you launched the calculator from the AWS CloudFormation console, it is
pre-populated with your template configuration and parameter values. There are many
additional configurable values that can provide you with a better estimate if you have an
idea of how much data transfer you expect to your Amazon EC2 instance.
2.
Click the Estimate of your Monthly Bill tab for a monthly estimate of running your stack, along with
a categorized display of what factors contributed to the estimate.
Viewing AWS CloudFormation Stack Data and
Resources on the AWS Management Console
After you've created an AWS CloudFormation stack, you can use the AWS Management Console to view
its data and resources. You can view the following stack information:
Outputs
Displays outputs that were declared in the stack's template.
Resources
Displays the resources that are part of the stack.
Events
Displays the operations that are tracked when you create, update, or delete the stack.
Template
Displays the stack's template.
API Version 2010-05-15
74
AWS CloudFormation User Guide
Deleting a Stack
Parameters
Displays the stack's parameters and their values.
Tags
Displays any tags that were associated with the stack.
Stack Policy
Describes the stack resources that are protected against stack updates. To update these resources,
they must be explicitly allowed during a stack update.
To view outputs for your AWS CloudFormation stack
1.
2.
Select your stack in the AWS CloudFormation console. This displays information in the stack detail
pane.
In the detail pane, click a tab to view the related information about your stack.
For example, click Outputs to view the outputs that are associated with your stack.
Deleting a Stack on the AWS CloudFormation
Console
To delete a stack
1.
2.
From the list of stacks in the AWS CloudFormation console, select the stack that you want to delete
(it must be currently running).
Click Delete Stack.
API Version 2010-05-15
75
AWS CloudFormation User Guide
Viewing Deleted Stacks
3.
Click Yes, Delete when prompted.
Note
After stack deletion has begun, you cannot abort it. The stack proceeds to the
DELETE_IN_PROGRESS state.
After the stack deletion is complete, the stack will be in the DELETE_COMPLETE state. Stacks
in the DELETE_COMPLETE state are not displayed in the AWS CloudFormation console by
default. To display deleted stacks, you must change the stack view setting as described in
Viewing Deleted Stacks (p. 76).
Viewing Deleted Stacks on the AWS
CloudFormation Console
By default, the AWS CloudFormation console does not display stacks in the DELETE_COMPLETE state.
To display information about deleted stacks, you must change the stack view.
To view deleted stacks
•
In the AWS CloudFormation console, select Deleted from the Filter list.
AWS CloudFormation lists all of your deleted stacks (stacks with DELETE_COMPLETE status).
See Also
• Deleting a Stack (p. 75)
• Viewing Stack Data and Resources (p. 74)
API Version 2010-05-15
76
AWS CloudFormation User Guide
Related Topics
Related Topics
• Using the AWS CLI (p. 77)
Using the AWS Command Line Interface
With the AWS Command Line Interface (CLI), you can create, monitor, update and delete stacks from
your system's terminal. You can also use the AWS CLI to automate actions through scripts. For more
information about the AWS CLI, see the AWS Command Line Interface User Guide.
If you use Windows PowerShell, AWS also offers the AWS Tools for Windows PowerShell.
Note
The prior AWS CloudFormation CLI tools are still available, but not recommended. If you need
information about the prior AWS CloudFormation CLI tools, see the AWS CloudFormation CLI
Reference in the documentation archive.
Topics
• Creating a Stack (p. 77)
• Describing and Listing Your Stacks (p. 78)
• Viewing Stack Event History (p. 80)
• Listing Resources (p. 83)
• Retrieving a Template (p. 83)
• Validating a Template (p. 84)
• Deleting a Stack (p. 85)
Creating a Stack
To create a stack you run the aws cloudformation create-stack command. You must provide the
stack name, the location of a valid template, and any input parameters.
Note
If you specify a local template file, AWS CloudFormation uploads it to an Amazon S3 bucket in
your AWS account. AWS CloudFormation creates a unique bucket for each region in which you
upload a template file. The buckets are accessible to anyone with Amazon S3 permissions in
your AWS account. If an AWS CloudFormation-created bucket already exists, the template is
added to that bucket.
You can use your own bucket and manage its permissions by manually uploading templates to
Amazon S3. Then whenever you create or update a stack, specify the Amazon S3 URL of a
template file.
By default, aws cloudformation describe-stacks returns parameter values. To prevent sensitive
parameter values such as passwords from being returned, include a NoEcho property set to TRUE in your
AWS CloudFormation template.
The following example creates the myteststack stack:
PROMPT> aws cloudformation create-stack --stack-name myteststack --templatebody file:///home/testuser/mytemplate.json --parameters ParameterKey=Parm1,Para
meterValue=test1 ParameterKey=Parm2,ParameterValue=test2
{
"StackId" : "arn:aws:cloudformation:us-west-2:123456789012:stack/mytest
API Version 2010-05-15
77
AWS CloudFormation User Guide
Describing and Listing Your Stacks
stack/330b0120-1771-11e4-af37-50ba1b98bea6"
}
Describing and Listing Your Stacks
You can use two AWS CLI commands to get information about your AWS CloudFormation stacks: aws
cloudformation list-stacks and aws cloudformation describe-stacks.
aws cloudformation list-stacks
The aws cloudformation list-stacks command enables you to get a list of any of the stacks you
have created (even those which have been deleted up to 90 days). You can use an option to filter results
by stack status, such as CREATE_COMPLETE and DELETE_COMPLETE. The aws cloudformation
list-stacks command returns summary information about any of your running or deleted stacks,
including the name, stack identifier, template, and status.
Note
The aws cloudformation list-stacks command returns information on deleted stacks for 90 days
after they have been deleted.
The following example shows a summary of all stacks that have a status of CREATE_COMPLETE:
PROMPT> aws cloudformation list-stacks --stack-status-filter CREATE_COMPLETE
[
{
"StackId": "arn:aws:cloudformation:us-east1:123456789012:stack/myteststack/
644df8e0-0dff-11e3-8e2f-5088487c4896",
"TemplateDescription": "AWS CloudFormation Sample Template S3_Bucket:
Sample template showing how to create a publicly accessible S3 bucket. **WARN
ING** This template creates an
S3 bucket. You will be billed for the AWS resources used if you create a stack
from this template.",
"StackStatusReason": null,
"CreationTime": "2013-08-26T03:27:10.190Z",
"StackName": "myteststack",
"StackStatus": "CREATE_COMPLETE"
}
]
aws cloudformation describe-stacks
The aws cloudformation describe-stacks command provides information on your running stacks.
You can use an option to filter results on a stack name. This command returns information about the
stack, including the name, stack identifier, and status.
The following example shows summary information for the myteststack stack:
PROMPT> aws cloudformation describe-stacks --stack-name myteststack
{
"Stacks": [
{
"StackId": "arn:aws:cloudformation:us-east1:123456789012:stack/myteststack/a69442d0-0b8f-11e3-8b8a-500150b352e0",
API Version 2010-05-15
78
AWS CloudFormation User Guide
Describing and Listing Your Stacks
"Description": "AWS CloudFormation Sample Template S3_Bucket: Sample
template showing how to create a publicly accessible S3 bucket. **WARNING**
This template creates an S3 bucket.
You will be billed for the AWS resources used if you create a stack from this
template.",
"Tags": [],
"Outputs": [
{
"Description": "Name of S3 bucket to hold website content",
"OutputKey": "BucketName",
"OutputValue": "myteststack-s3bucket-jssofi1zie2w"
}
],
"StackStatusReason": null,
"CreationTime": "2013-08-23T01:02:15.422Z",
"Capabilities": [],
"StackName": "myteststack",
"StackStatus": "CREATE_COMPLETE",
"DisableRollback": false
}
]
}
If you don't use the --stack-name option to limit the output to one stack, information on all your running
stacks is returned.
Stack Status Codes
You can specify one or more stack status codes to list only stacks with the specified status codes. The
following table describes each stack status code:
Stack Status
Description
CREATE_COMPLETE
Successful creation of one or more stacks.
CREATE_IN_PROGRESS
Ongoing creation of one or more stacks.
CREATE_FAILED
Unsuccessful creation of one or more stacks. View the stack events
to see any associated error messages. Possible reasons for a
failed creation include insufficient permissions to work with all resources in the stack, parameter values rejected by an AWS service,
or a timeout during resource creation.
DELETE_COMPLETE
Successful deletion of one or more stacks. Deleted stacks are retained and viewable for 90 days.
DELETE_FAILED
Unsuccessful deletion of one or more stacks. Because the delete
failed, you might have some resources that are still running; however, you cannot work with or update the stack. Delete the stack
again or view the stack events to see any associated error messages.
DELETE_IN_PROGRESS
Ongoing removal of one or more stacks.
ROLLBACK_COMPLETE
Successful removal of one or more stacks after a failed stack creation or after an explicitly canceled stack creation. Any resources
that were created during the create stack action are deleted.
API Version 2010-05-15
79
AWS CloudFormation User Guide
Viewing Stack Event History
Stack Status
Description
ROLLBACK_FAILED
Unsuccessful removal of one or more stacks after a failed stack
creation or after an explicitly canceled stack creation. Delete the
stack or view the stack events to see any associated error messages.
ROLLBACK_IN_PROGRESS
Ongoing removal of one or more stacks after a failed stack creation
or after an explicitly cancelled stack creation.
UPDATE_COMPLETE
Successful update of one or more stacks.
UPDATE_COMPLETE_CLEANUP_IN_PROGRESS
Ongoing removal of old resources for one or more stacks after a
successful stack update. For stack updates that require resources
to be replaced, AWS CloudFormation creates the new resources
first and then deletes the old resources to help reduce any interruptions with your stack. In this state, the stack has been updated and
is usable, but AWS CloudFormation is still deleting the old resources.
UPDATE_IN_PROGRESS
Ongoing update of one or more stacks.
UPDATE_ROLLBACK_COMPLETE
Successful return of one or more stacks to a previous working state
after a failed stack update.
UPDATE_ROLLBACK_COMPLETE_CLEANUP_IN_PROGRESS
Ongoing removal of new resources for one or more stacks after a
failed stack update. In this state, the stack has been rolled back to
its previous working state and is usable, but AWS CloudFormation
is still deleting any new resources it created during the stack update.
UPDATE_ROLLBACK_FAILED
Unsuccessful return of one or more stacks to a previous working
state after a failed stack update.You can delete the stack or contact
customer support to restore the stack to a usable state.
UPDATE_ROLLBACK_IN_PROGRESS
Ongoing return of one or more stacks to the previous working state
after failed stack update.
Viewing Stack Event History
You can track the status of the resources AWS CloudFormation is creating and deleting with the aws
cloudformation describe-stack-events command.The amount of time to create or delete a stack
depends on the complexity of your stack.
In the following example, a sample stack is created from a template file by using the aws cloudformation
create-stack command. After the stack is created, the events that were reported during stack creation
are shown by using the aws cloudformation describe-stack-events command.
The following example creates a stack with the name myteststack using the sampletemplate.json
template file:
PROMPT> aws cloudformation create-stack --stack-name myteststack --templatebody file:///home/local/test/sampletemplate.json
[
{
"StackId": "arn:aws:cloudformation:us-east1:123456789012:stack/myteststack/466df9e0-0dff-08e3-8e2f-5088487c4896",
"Description": "AWS CloudFormation Sample Template S3_Bucket: Sample
API Version 2010-05-15
80
AWS CloudFormation User Guide
Viewing Stack Event History
template showing how to create a publicly accessible S3 bucket. **WARNING**
This template creates an S3 bucket.
You will be billed for the AWS resources used if you create a stack from this
template.",
"Tags": [],
"Outputs": [
{
"Description": "Name of S3 bucket to hold website content",
"OutputKey": "BucketName",
"OutputValue": "myteststack-s3bucket-jssofi1zie2w"
}
],
"StackStatusReason": null,
"CreationTime": "2013-08-23T01:02:15.422Z",
"Capabilities": [],
"StackName": "myteststack",
"StackStatus": "CREATE_COMPLETE",
"DisableRollback": false
}
]
The following example describes the myteststack stack:
PROMPT> aws cloudformation describe-stack-events --stack-name myteststack
{
"StackEvents": [
{
"StackId": "arn:aws:cloudformation:us-east1:123456789012:stack/myteststack/466df9e0-0dff-08e3-8e2f-5088487c4896",
"EventId": "af67ef60-0b8f-11e3-8b8a-500150b352e0",
"ResourceStatus": "CREATE_COMPLETE",
"ResourceType": "AWS::CloudFormation::Stack",
"Timestamp": "2013-08-23T01:02:30.070Z",
"StackName": "myteststack",
"PhysicalResourceId": "arn:aws:cloudformation:us-east1:123456789012:stack/myteststack/a69442d0-0b8f-11e3-8b8a-500150b352e0",
"LogicalResourceId": "myteststack"
},
{
"StackId": "arn:aws:cloudformation:us-east1:123456789012:stack/myteststack/466df9e0-0dff-08e3-8e2f-5088487c4896",
"EventId": "S3Bucket-CREATE_COMPLETE-1377219748025",
"ResourceStatus": "CREATE_COMPLETE",
"ResourceType": "AWS::S3::Bucket",
"Timestamp": "2013-08-23T01:02:28.025Z",
"StackName": "myteststack",
"ResourceProperties": "{\"AccessControl\":\"PublicRead\"}",
"PhysicalResourceId": "myteststack-s3bucket-jssofi1zie2w",
"LogicalResourceId": "S3Bucket"
},
{
"StackId": "arn:aws:cloudformation:us-east1:123456789012:stack/myteststack/466df9e0-0dff-08e3-8e2f-5088487c4896",
"EventId": "S3Bucket-CREATE_IN_PROGRESS-1377219746688",
"ResourceStatus": "CREATE_IN_PROGRESS",
"ResourceType": "AWS::S3::Bucket",
"Timestamp": "2013-08-23T01:02:26.688Z",
API Version 2010-05-15
81
AWS CloudFormation User Guide
Viewing Stack Event History
"ResourceStatusReason": "Resource creation Initiated",
"StackName": "myteststack",
"ResourceProperties": "{\"AccessControl\":\"PublicRead\"}",
"PhysicalResourceId": "myteststack-s3bucket-jssofi1zie2w",
"LogicalResourceId": "S3Bucket"
},
{
"StackId": "arn:aws:cloudformation:us-east1:123456789012:stack/myteststack/466df9e0-0dff-08e3-8e2f-5088487c4896",
"EventId": "S3Bucket-CREATE_IN_PROGRESS-1377219743862",
"ResourceStatus": "CREATE_IN_PROGRESS",
"ResourceType": "AWS::S3::Bucket",
"Timestamp": "2013-08-23T01:02:23.862Z",
"StackName": "myteststack",
"ResourceProperties": "{\"AccessControl\":\"PublicRead\"}",
"PhysicalResourceId": null,
"LogicalResourceId": "S3Bucket"
},
{
"StackId": "arn:aws:cloudformation:us-east1:123456789012:stack/myteststack/466df9e0-0dff-08e3-8e2f-5088487c4896",
"EventId": "a69469e0-0b8f-11e3-8b8a-500150b352e0",
"ResourceStatus": "CREATE_IN_PROGRESS",
"ResourceType": "AWS::CloudFormation::Stack",
"Timestamp": "2013-08-23T01:02:15.422Z",
"ResourceStatusReason": "User Initiated",
"StackName": "myteststack",
"PhysicalResourceId": "arn:aws:cloudformation:us-east1:123456789012:stack/myteststack/a69442d0-0b8f-11e3-8b8a-500150b352e0",
"LogicalResourceId": "myteststack"
}
]
}
Note
You can run the aws cloudformation describe-stack-events command while the stack is being
created to view events as they are reported.
The most recent events are reported first. The following table describe the fields returned by the aws
cloudformation describe-stack-events command:
Field
Description
EventId
Event identifier
StackName
Name of the stack that the event corresponds to
StackId
Identifier of the stack that the event corresponds to
LogicalResourceId
Logical identifier of the resource
PhysicalResourceId
Physical identifier of the resource
ResourceProperties
Properties of the resource
ResourceType
Type of the resource
Timestamp
Time when the event occurred
API Version 2010-05-15
82
AWS CloudFormation User Guide
Listing Resources
Field
Description
ResourceStatus
The status of the resource, which can be one of the following status
codes: CREATE_COMPLETE | CREATE_FAILED | CREATE_IN_PROGRESS | DELETE_COMPLETE | DELETE_FAILED | DELETE_IN_PROGRESS | DELETE_SKIPPED | UPDATE_COMPLETE | UPDATE_FAILED
| UPDATE_IN_PROGRESS.
The DELETE_SKIPPED status applies to resources with a deletion
policy attribute of retain.
ResourceStatusReason
More information on the status
Listing Resources
Immediately after you run the aws cloudformation create-stack command, you can list its resources
using the aws cloudformation list-stack-resources command. This command lists a summary
of each resource in the stack that you specify with the --stack-name parameter. The report includes a
summary of the stack, including the creation or deletion status.
The following example shows the resources for the myteststack stack:
PROMPT> aws cloudformation list-stack-resources --stack-name myteststack
{
"StackResourceSummaries": [
{
"ResourceStatus": "CREATE_COMPLETE",
"ResourceType": "AWS::S3::Bucket",
"ResourceStatusReason": null,
"LastUpdatedTimestamp": "2013-08-23T01:02:28.025Z",
"PhysicalResourceId": "myteststack-s3bucket-sample",
"LogicalResourceId": "S3Bucket"
}
]
}
AWS CloudFormation reports resource details on any running or deleted stack. If you specify the name
of a stack whose status is CREATE_IN_PROCESS, AWS CloudFormation reports only those resources
whose status is CREATE_COMPLETE.
Note
The aws cloudformation describe-stack-resources command returns information on deleted
stacks for 90 days after they have been deleted.
Retrieving a Template
AWS CloudFormation stores the template you use to create your stack as part of the stack. You can
retrieve the template from AWS CloudFormation using the aws cloudformation get-template
command.
Note
The aws cloudformation get-template command returns the deleted stacks templates
for up to 90 days after the stack has been deleted.
The following example shows the template for the myteststack stack:
API Version 2010-05-15
83
AWS CloudFormation User Guide
Validating a Template
PROMPT> aws cloudformation get-template --stack-name myteststack
{
"TemplateBody": {
"AWSTemplateFormatVersion": "2010-09-09",
"Outputs": {
"BucketName": {
"Description": "Name of S3 bucket to hold website content",
"Value": {
"Ref": "S3Bucket"
}
}
},
"Description": "AWS CloudFormation Sample Template S3_Bucket: Sample
template showing how to create a publicly accessible S3 bucket. **WARNING**
This template creates an S3 bucket.
You will be billed for the AWS resources used if you create a stack from this
template.",
"Resources": {
"S3Bucket": {
"Type": "AWS::S3::Bucket",
"Properties": {
"AccessControl": "PublicRead"
}
}
}
}
}
The output contains the entire template body, enclosed in quotation marks.
Validating a Template
To check your template file for syntax errors, you can use the aws cloudformation
validate-template command.
Note
The aws cloudformation validate-template command is designed to check only the
syntax of your template. It does not ensure that the property values you have specified for a
resource are valid for that resource. Nor does it determine the number of resources that will exist
when the stack is created.
To check the operational validity, you need to attempt to create the stack. There is no sandbox or test
area for AWS CloudFormation stacks, so you are charged for the resources you create during testing.
You can validate templates locally by using the --template-body parameter, or remotely with the
--template-url parameter. The following example validates a template in a remote location:
PROMPT> aws cloudformation validate-template --template-url https://s3.amazon
aws.com/cloudformation-templates-us-east-1/S3_Bucket.template
{
"Description": "AWS CloudFormation Sample Template S3_Bucket: Sample template
showing how to create a publicly accessible S3 bucket. **WARNING** This template
creates an S3 bucket.
You will be billed for the AWS resources used if you create a stack from this
template.",
"Parameters": [],
API Version 2010-05-15
84
AWS CloudFormation User Guide
Deleting a Stack
"Capabilities": []
}
The expected result is no error message, with information about all parameters listed.
The following example shows an error with a local template file:
PROMPT> aws cloudformation validate-template --template-body file:///home/loc
al/test/sampletemplate.json
{
"ResponseMetadata": {
"RequestId": "4ae33ec0-1988-11e3-818b-e15a6df955cd"
},
"Errors": [
{
"Message": "Template format error: JSON not well-formed. (line 11,
column 8)",
"Code": "ValidationError",
"Type": "Sender"
}
],
"Capabilities": [],
"Parameters": []
}
A client error (ValidationError) occurred: Template format error: JSON not wellformed. (line 11, column 8)
Deleting a Stack
To delete a stack, you run the aws cloudformation delete-stack command. You must specify the
name of the stack that you want to delete. When you delete a stack, you delete the stack and all of its
resources.
The following example deletes the myteststack stack:
PROMPT> aws cloudformation delete-stack --stack-name myteststack
AWS CloudFormation Stacks Updates
You can update a stack that has been successfully created to update resources in the stack, such as an
Amazon EC2 instance, or to update the stack's settings, such as the stack's Amazon SNS notification
topic. For example, if your stack included an Amazon EC2 instance, you can update that instance by
updating the stack. You don't need to create a new stack. You can use the AWS CloudFormation console,
the aws cloudformation update-stack CLI command, or the UpdateStack API to update a stack.
Updates to stack resources
You modify stack resources by submitting an updated template or by submitting updated input parameters.
When you submit an update, AWS CloudFormation updates resources based on differences between
what you submit and the stack's current template. Resources that have not changed run without disruption
during the update process. Resources that are updated could be interrupted or replaced, depending on
the resources and properties that are being updated. AWS CloudFormation uses one of the following
techniques to update resources:
API Version 2010-05-15
85
AWS CloudFormation User Guide
Stack Updates
Update with No Interruption
AWS CloudFormation updates the resource without disrupting operation of that resource and without
changing the resource's physical name. For example, if you update any properties on an
AWS::CloudWatch::Alarm (p. 334) resource, AWS CloudFormation updates the alarm's configuration
and, during the update, the alarm's operation continues without disruption.
Updates with Some Interruption
AWS CloudFormation updates the resource with some interruption but the physical name is retained.
For example, if you update certain properties on an AWS::EC2::Instance (p. 354) resource, the instance
might have some interruption while AWS CloudFormation and Amazon EC2 reconfigure the instance.
Replacement
AWS CloudFormation recreates the resource during an update, which also generates a new physical
ID. AWS CloudFormation creates the replacement resource first, changes references from other
dependent resources to point to the replacement resource, and then deletes the old resource. For
example, if you update the Engine property of an AWS::RDS::DBInstance (p. 496) resource, AWS
CloudFormation creates a new resource and replaces the current DBInstance resource with the new
one.
To learn more about updating a particular resource, see the documentation that is associated with that
resource. For example, the Amazon EC2 documentation provides details about what changes interrupt
an instance. See also the AWS Resource Types Reference (p. 286), where the effects of updating a
resource are listed for each property.
Depending on the technique AWS CloudFormation uses to modify each updated resource in your stack,
you can make decisions about when it's best to modify resources to reduce the impact of these changes
on your application. In particular, you can plan when resources must be replaced during an update. For
example, if you update the Port property of an AWS::RDS::DBInstance resource, AWS CloudFormation
creates a new DB instance with the updated port setting and a new physical name. To plan for this, you
should do the following:
1. Take a snapshot of the current databases.
2. Prepare a strategy for how applications that use that DB instance will handle an interruption while the
DB instance is being replaced.
3. Ensure that the applications that use that DB instance take into account the updated port setting and
any other updates you have made.
4. Use the DB snapshot to restore the databases on the new DB instance.
This example is not exhaustive; it's meant to give you an idea of the things to plan for when a resource
is replaced during an update.
Note
If the template includes one or more nested stacks (p. 324), AWS CloudFormation also initiates
an update for every nested stack. This is necessary to determine whether the nested stacks
have been modified. AWS CloudFormation updates only those resources in the nested stacks
that have changes specified in corresponding templates.
Topics
• Modifying a Stack Template (p. 87)
• Updating a Stack (p. 90)
• Monitoring the Progress of a Stack Update (p. 92)
• Canceling a Stack Update (p. 93)
• Prevent Updates to Stack Resources (p. 94)
API Version 2010-05-15
86
AWS CloudFormation User Guide
Modifying a Stack Template
Modifying a Stack Template
If you want to modify resources and properties that are declared in a stack template, you must modify
the stack's template. To ensure that you update only the resources that you intend to update, use the
template for the existing stack as a starting point and then make your updates to that template. If you are
managing your template in a source control system, use a copy of that template as a starting point.
Otherwise, you can get a copy of a stack template from AWS CloudFormation.
If you want to modify just the parameters or settings of a stack (like a stack's Amazon SNS topic), you
can reuse the existing stack template. You don't need to get a copy of the stack template or make any
modification to the stack template.
Note
If your template includes an unsupported change, AWS CloudFormation returns a message
saying that the change is not permitted. This message might occur asynchronously, however,
because resources are created and updated by AWS CloudFormation in a non-deterministic
order by default.
Topics
• To get and modify a template for a stack from AWS CloudFormation by using the console (p. 87)
• To get and modify a template for a stack from AWS CloudFormation by using the command line (p. 89)
To get and modify a template for a stack from AWS
CloudFormation by using the console
1.
In the AWS CloudFormation console, select the stack that you want to update and then click the
Template tab to view the stack template.
API Version 2010-05-15
87
AWS CloudFormation User Guide
Modifying a Stack Template
2.
3.
From the Template tab, copy the template into a text file.
Modify the template file and then save it. Modify only the resources that you want to update. Use the
same values as the current stack configuration for resources and properties that you aren't updating.
You can modify the template by completing any of the following actions:
• Add new resources, or remove existing resources.
For most resources, changing the logical name of a resource is equivalent to deleting that resource
and replacing it with a new one. Any other resources that depend on the renamed resource also
need to be updated and might cause them to be replaced. Other resources require you to update
a property (not just the logical name) in order to trigger an update.
• Add, modify, or delete properties of existing resources.
Consult the AWS Resource Types Reference (p. 286) for information about the effects of updating
particular resource properties. For each property, the effects of an update will be one of the following:
• Update requires: No interruption (p. 86)
• Update requires: Some interruptions (p. 86)
• Update requires: Replacement (p. 86)
• Add, modify, or delete attributes for resources (Metadata, DependsOn, CreationPolicy, UpdatePolicy,
and DeletionPolicy).
API Version 2010-05-15
88
AWS CloudFormation User Guide
Modifying a Stack Template
Important
You cannot update the CreationPolicy, DeletionPolicy. or UpdatePolicy attribute by itself.
You can update them only when you include changes that add, modify, or delete resources.
For example, you can add or modify a metadata attribute of a resource.
• Add, modify, or delete parameter declarations. However, you cannot add, modify, or delete a
parameter that is used by a resource that does not support updates.
• Add, modify, or delete mapping declarations.
Important
You cannot update a mapping by itself if the values in the mapping are not being used
by your stack. You need to include changes that add, modify, or delete resources. For
example, you can add or modify a metadata attribute of a resource. If you update a
mapping value that your stack is using, you don't need to make any other changes to
trigger an update.
• Add, modify, or delete condition declarations.
Important
You cannot update conditions by themselves. You can update conditions only when you
include changes that add, modify, or delete resources. For example, you can add or
modify a metadata attribute of a resource.
• Add, modify, or delete output value declarations.
Important
You cannot update outputs by themselves.You can update outputs only when you include
changes that add, modify, or delete resources. For example, you can add or modify a
metadata attribute of a resource.
Some resources or properties may have constraints on property values or changes to those values.
For example, changes to the AllocatedStorage property of an AWS::RDS::DBInstance (p. 496)
resource must be greater than the current setting, If the value specified for the update does not meet
those constraints, the update for that resource will fail. For the specific constraints on AllocatedStorage
changes, see ModifyDBInstance.
4.
Updates to a resource can affect the properties of other resources. If you used the Ref function
(p. 669) or the Fn::GetAtt function (p. 661) to specify an attribute from an updated resource as part of
a property value in another resource in the template, AWS CloudFormation will also update the
resource that contains the reference to the property that has changed. For example, if you updated
the MasterUsername property of an AWS::RDS::DBInstance resource and you had an
AWS::AutoScaling::LaunchConfiguration resource that had a UserData property that contained a
reference to the DB instance name using the Ref function, AWS CloudFormation would recreate the
DB instance with a new name and also update the LaunchConfiguration resource.
If you want to specify the template as a URL when you update the stack, upload the update template
to an Amazon S3 bucket. The bucket must be in the same region as the stack that you are updating.
To get and modify a template for a stack from AWS
CloudFormation by using the command line
1.
2.
Use the command aws cloudformation get-template to get the template for the stack you
want to update.
Copy the template, paste it into a text file, modify it, and save it. Make sure that you copy only the
template. The command encloses the template in quotation marks, but do not copy the quotation
marks surrounding the template. The template itself starts with an open brace and ends with the final
close brace. Specify changes to the stack's resources in this file.
API Version 2010-05-15
89
AWS CloudFormation User Guide
Updating a Stack
Updating a Stack
When you update a stack, you can modify resources in your stack, update stack settings, or both. For
example, you can increase the capacity of an Amazon EC2 instance by changing the instance type, or
you can update a stack's Amazon SNS notification topic.
When you update the stack, you can change the parameter values that are used for resources that support
updates; however, you must keep the existing values in the current stack for parameters that affect
resources that do not support updates.
Topics
• To update an existing AWS CloudFormation stack by using the console (p. 90)
• To update an existing AWS CloudFormation stack by using the command line (p. 91)
To update an existing AWS CloudFormation stack by using
the console
1.
2.
3.
In the AWS CloudFormation console, from the list of stacks, select the running stack that you want
to update.
Click Update Stack.
Depending on whether you modified the stack template, you can reuse the existing template or
specify another one.
• If you did not modify the stack template, select Use existing template.
• If you modified the stack template, specify the location of the updated template:
• For a template stored locally on your computer, select Upload a template to Amazon S3. Enter
the location for the template file, or click Browse to navigate to the file and select it, and then
click Next.
• For a template stored in an Amazon S3 bucket, select Specify an Amazon S3 URL. Enter or
paste the URL for the template, and then click Next.
4.
On the Specify Parameters page, enter or modify the parameter values, and then click Next.
AWS CloudFormation populates each parameter with the value that is currently set in the stack with
the exception of parameters declared with the NoEcho attribute; however, you can still use existing
values by selecting Use existing value.
API Version 2010-05-15
90
AWS CloudFormation User Guide
Updating a Stack
5.
On the Options page, you can enter an overriding stack policy or update the Amazon SNS notification
topic. The overriding stack policy enables you to update protected resources. For more information,
see Prevent Updates to Stack Resources (p. 94).
After you have completed modifying any options, click Next.
6.
Review the information for the stack. If you have IAM resources in the template, select I acknowledge
that this template may create IAM resources to specify that you want to use IAM resources in the
template. For more information about using IAM resources in templates, see Controlling Access with
AWS Identity and Access Management (p. 61).
7.
Click Update.
Your stack enters the UPDATE_IN_PROGRESS state. After it has finished updating, the stack state
is set to UPDATE_COMPLETE.
If the stack update fails, AWS CloudFormation automatically roll back any changes, and the stack
is set to UPDATE_ROLLBACK_COMPLETE.
Note
After your stack has begun updating, you can cancel the update while it's still in the
UPDATE_IN_PROGRESS state. For more information, see Canceling a Stack Update (p. 93).
To update an existing AWS CloudFormation stack by using
the command line
•
Use the command aws cloudformation update-stack to update a stack by specifying the
stack to update, updated template, parameter values, and capabilities.
The following sample update stack command updates the template and input parameters for the
mystack stack:
PROMPT> aws cloudformation update-stack --stack-name mystack --template-url
https://s3.amazonaws.com/sample/updated.template
--parameters ParameterKey=VPCID,ParameterValue=SampleVPCID ParameterKey=Sub
netIDs,ParameterValue=SampleSubnetID1\\,SampleSubnetID2
The following sample update stack command updates just the SubnetIDs parameter values for the
mystack stack:
PROMPT> aws cloudformation update-stack --stack-name mystack --use-previoustemplate
--parameters ParameterKey=VPCID,UsePreviousValue=true ParameterKey=Subnet
IDs,ParameterValue=SampleSubnetID1\\,UpdatedSampleSubnetID2
The following sample update stack command adds two stack notification topics to the mystack stack:
PROMPT> aws cloudformation update-stack --stack-name mystack --use-previoustemplate
--notification-arns "arn:aws:sns:us-east-1:12345678912:mytopic"
"arn:aws:sns:us-east-1:12345678912:mytopic2"
The following sample update stack command removes all stack notification topics from the mystack
stack:
API Version 2010-05-15
91
AWS CloudFormation User Guide
Monitoring Progress
PROMPT> aws cloudformation update-stack --stack-name mystack --use-previoustemplate
--notification-arns []
Monitoring the Progress of a Stack Update
You can monitor the progress of a stack update by viewing the stack's events. The console's Events tab
displays each major step in the creation and update of the stack sorted by the time of each event with
latest events on top. The start of the stack update process is marked with an UPDATE_IN_PROGRESS
event for the stack:
2011-09-30 09:35 PDT AWS::CloudFormation::Stack MyStack UPDATE_IN_PROGRESS
Next are events that mark the beginning and completion of the update of each resource that was changed
in the update template. For example, updating an AWS::RDS::DBInstance (p. 496) resource named MyDB
would result in the following entries:
2011-09-30 09:35 PDT AWS::RDS::DBInstance MyDB UPDATE_COMPLETE
2011-09-30 09:35 PDT AWS::RDS::DBInstance MyDB UPDATE_IN_PROGRESS
The UPDATE_IN_PROGRESS event is logged when AWS CloudFormation reports that it has begun to
update the resource. The UPDATE_COMPLETE event is logged when the resource is successfully
created.
When AWS CloudFormation has successfully updated the stack, you will see the following event:
2011-09-30 09:35 PDT AWS::CloudFormation::Stack MyStack UPDATE_COMPLETE
If an update of a resource fails, AWS CloudFormation reports an UPDATE_FAILED event that includes
a reason for the failure. For example, if your update template specified a property change that is not
supported by the resource such as reducing the size of AllocatedStorage for an
AWS::RDS::DBInstance (p. 496) resource, you would see events like these:
2011-09-30 09:36 PDT AWS::RDS::DBInstance MyDB UPDATE_FAILED Size cannot be
less than current size; requested: 5; current: 10
2011-09-30 09:35 PDT AWS::RDS::DBInstance MyDB UPDATE_IN_PROGRESS
If a resource update fails, AWS CloudFormation rolls back any resources that it has updated during the
upgrade to their configurations before the update. Here is an example of the events you would see during
an update rollback:
2011-09-30 09:38 PDT AWS::CloudFormation::Stack MyStack UPDATE_ROLLBACK_COMPLETE
2011-09-30 09:38 PDT AWS::RDS::DBInstance MyDB UPDATE_COMPLETE
2011-09-30 09:37 PDT AWS::RDS::DBInstance MyDB UPDATE_IN_PROGRESS
API Version 2010-05-15
92
AWS CloudFormation User Guide
Canceling a Stack Update
2011-09-30 09:37 PDT AWS::CloudFormation::Stack MyStack UPDATE_ROLLBACK_IN_PRO
GRESS The following resource(s) failed to update: [MyDB]
Topics
• To view stack events by using the console (p. 93)
• To view stack events by using the command line (p. 93)
To view stack events by using the console
1.
2.
In the AWS CloudFormation console, select the stack that you updated and then click the Events
tab to view the stacks events.
To update the event list with the most recent events, click the refresh button in the AWS
CloudFormation console.
To view stack events by using the command line
•
Use the command aws cloudformation describe-stack-events to view the events for a
stack.
Canceling a Stack Update
After a stack update has begun, you can cancel the stack update if the stack is still in the
UPDATE_IN_PROGRESS state. After an update has finished, you cannot cancel it. You can, however,
update a stack again with any previous settings.
If you cancel a stack update, the stack is rolled back to the stack configuration that existed prior to initiating
the stack update.
Topics
• To cancel a stack update by using the console (p. 93)
• To cancel a stack update by using the command line (p. 94)
To cancel a stack update by using the console
1.
From the list of stacks in the AWS CloudFormation console, select the stack that is currently being
updated (its state must be UPDATE_IN_PROGRESS) .
2.
Click Cancel Update.
API Version 2010-05-15
93
AWS CloudFormation User Guide
Prevent Updates to Stack Resources
3.
To continue canceling the update, click Yes, Cancel Update when prompted. Otherwise, click Cancel
to resume the update.
The stack proceeds to the UPDATE_ROLLBACK_IN_PROGRESS state. After the update cancellation
is complete, the stack is set to UPDATE_ROLLBACK_COMPLETE.
To cancel a stack update by using the command line
•
Use the command aws cloudformation cancel-update-stack to cancel an update.
Prevent Updates to Stack Resources
You can prevent stack resources (p. 286) from being unintentionally updated or deleted during a stack
update by using stack policies. Stack policies apply only during stack updates and should be used only
as a fail-safe mechanism to prevent accidental updates to certain stack resources. Do not use stack
policies to control access to AWS resources or actions; instead, use AWS Identity and Access Management
(IAM).
By default, all resources in a stack can be updated by anyone with update permissions. However, during
an update, some resources might require an interruption or might be completely replaced, which could
result in new physical IDs or completely new storage. To ensure that no one inadvertently updates these
resources, you can set a stack policy. The stack policy prevents anyone from accidentally updating
resources that are protected. If you want to update protected resources, you must explicitly specify those
resources during a stack update.
Important
After you set a stack policy, all resources in the stack are protected by default, even if you didn't
explicitly set a policy on those resources. For any resources that you still want to allow updates
on, you must specify an explicit Allow statement for those resources.
Stack policy overview
Stack policies are JSON documents that define which update actions can be performed on designated
resources. You can define only one stack policy per stack; however, you can protect multiple resources
within a single policy. Here's a sample stack policy that prevents updates to the ProductionDatabase
resource:
API Version 2010-05-15
94
AWS CloudFormation User Guide
Prevent Updates to Stack Resources
{
"Statement" : [
{
"Effect" : "Deny",
"Action" : "Update:*",
"Principal": "*",
"Resource" : "LogicalResourceId/ProductionDatabase"
},
{
"Effect" : "Allow",
"Action" : "Update:*",
"Principal": "*",
"Resource" : "*"
}
]
}
In the Effect element, we specify Deny and use a wild card (an asterisk) in the Action element to
prevent all update actions, such as replacement or deletion. In the Resource element, we specify the
resource with the ProductionDatabase logical ID. The Principal element is required but supports
only the wild card (*).
Note that when you set a stack policy, all resources are protected by default. Therefore, to allow updates
on all other resources, we added an Allow statement that allows all actions on all resources. Even though
the Allow specifies all resources, the explicit Deny overrides any allows.
How to apply a stack policy
You can use the console or AWS CLI to apply a stack policy at the time you create a stack. You can also
use the AWS CLI to apply a stack policy to a stack that you've already created. After you apply a stack
policy, you cannot remove it from the stack; however, you can use the AWS CLI to modify the policy.
Stack policies apply to all users who want to update the stack. In other words, you cannot associate
different stack policies with different users.
If you want to allows users to update protected resources, those users must have permission to the
SetStackPolicy action. During an update, users can set a stack policy that temporarily overrides the
stack policy. For more information, see Updating Protected Resources (p. 97).
Topics
• Setting a Stack Policy (p. 95)
• Updating Protected Resources (p. 97)
• Modifying a Stack Policy (p. 98)
• Stack Policy Reference (p. 99)
• Sample Stack Policies (p. 101)
Setting a Stack Policy
When you want to protect stack resources from unintentional updates, you define a stack policy in JSON
format and then associate it with a stack when you create or update the stack. For more information about
writing stack policies, see Stack Policy Reference (p. 99). Note that after you apply a stack policy, you
cannot remove it from the stack; however, you can always update the policy by using the AWS CLI.
By default, when you create a stack, no stack policy is set on the stack, so you can update any resources.
However, after you set a stack policy, all stack resources are protected by default unless you specify an
explicit Allow statement for those resources.
API Version 2010-05-15
95
AWS CloudFormation User Guide
Prevent Updates to Stack Resources
To set a stack policy when you create a stack:
AWS Management Console
1.
Open the AWS CloudFormation console at https://console.amazonaws.cn/cloudformation/.
2.
On the CloudFormation Stacks page, click Create Stack.
3.
On the Options screen of the Create Stack wizard, expand the Advanced section.
Note
When you create a stack and include a policy, you don't require permission to use the AWS
CloudFormation SetStackPolicy action. However, if you want to update the policy or
update protected resources, you must have permission to use the SetStackPolicy action.
4.
Select a file that defines a stack policy or enter one.
API Version 2010-05-15
96
AWS CloudFormation User Guide
Prevent Updates to Stack Resources
CLI
•
Use the aws cloudformation create-stack command with the --stack-policy-body or
--stack-policy-url option.
To set a stack policy on a stack that has already been created (currently, you can only do this with the
AWS CLI):
CLI
•
Use the aws cloudformation set-stack-policy command with the --stack-policy-body
or --stack-policy-url option.
Updating Protected Resources
You can update protected resources by lifting their protections with a temporary policy that overrides the
stack policy. The temporary policy should allow updates on the resources that you want to update. When
you update your stack, you specify temporary policy.
Note
Before you begin, you must have permission to use the AWS CloudFormation SetStackPolicy
action.
To update a protected resource:
AWS Management Console
1.
2.
Open the AWS CloudFormation console at https://console.amazonaws.cn/cloudformation/.
Select the stack that you want to update, and then click Update Stack.
3.
On the Policy screen of the Update Stack wizard, select a file that defines an overriding stack policy
or enter one. The override policy must specify an Allow for the protected resources that you want
to update.
For example, if you wanted to update all protected resources, you can specify a temporary override
that allows all updates:
{
"Statement" : [
API Version 2010-05-15
97
AWS CloudFormation User Guide
Prevent Updates to Stack Resources
{
"Effect" : "Allow",
"Action" : "Update:*",
"Principal": "*",
"Resource" : "*"
}
]
}
Note
The override policy is a temporary policy that is applied only during this update and won't
permanently change the stack policy. To modify a stack policy, see Modifying a Stack
Policy (p. 98).
AWS CLI
•
Use the aws cloudformation update-stack command with the
--stack-policy-during-update-body or --stack-policy-during-update-url option.
Note
The override policy is a temporary policy that is applied only during this update and won't
permanently change the stack policy. To modify a stack policy, see Modifying a Stack
Policy (p. 98).
Modifying a Stack Policy
In situations where you might want to protect additional resources or where you might not need to protect
resources anymore, you can modify a stack policy to add or remove resources. For example, imagine
that you added another database to your stack that you want to protect. You can use the AWS CLI to
add a deny statement for that resource.
To modify a stack policy (currently, you can only do this with the AWS CLI):
CLI
•
Use the aws cloudformation set-stack-policy command with the --stack-policy-body
or --stack-policy-url option.
Remove All Protections
After you set a stack policy, you cannot remove or delete the policy. If you want to remove all protections,
you must modify the policy to explicitly allow all actions on all resources. By default a stack policy denies
all updates. The following sample policy allows all updates on all resources:
{
"Statement" : [
{
"Effect" : "Allow",
"Action" : "Update:*",
"Principal": "*",
"Resource" : "*"
}
]
}
API Version 2010-05-15
98
AWS CloudFormation User Guide
Prevent Updates to Stack Resources
Stack Policy Reference
Stack policies are JSON documents that define which update actions users can do and which resources
they can take action on. These permissions are defined in the following elements: Effect, Action,
Resource, and Condition. When you create a stack, no stack policy is set by default. In other words,
all update actions on all resources are allowed. If you want to protect stack resources, you must set a
stack policy. The following pseudo code shows the syntax for a stack policy:
{
"Statement" : [
{
"Effect" : "Deny_or_Allow",
"Action" : "update_actions",
"Principal" : "*",
"Resource" : "LogicalResourceId/resource_logical_ID",
"Condition" : {
"StringEquals_or_StringLike" : {
"ResourceType" : [resource_type, ...]
}
}
}
]
}
Effect
Determines whether the actions that you specify are denied or allowed on the resource that you
specify. You can specify only Deny or Allow for this element, as shown in the following snippet:
"Effect" : "Deny"
Important
If a stack policy includes any overlapping statements, a Deny always overrides an Allow.
If you want ensure that a resource is protected, use a Deny statement for that resource.
Action
Specifies the update actions that are denied or allowed. You can specify the following actions:
Update:Modify
Specifies update actions where resources might experience no interruptions or some interruptions
while changes are being applied. All resources maintain their physical IDs.
Update:Replace
Specifies update actions where resources are recreated. AWS CloudFormation creates a new
resource with the specified updates and then deletes the old resource. Because the resource is
recreated, the physical ID of the resource might be different.
Update:Delete
Specifies update actions where resources are removed. Any updates that completely remove
resources from a stack template require this action.
Update:*
Specifies all update actions. The asterisk is a wild card that represents all update actions.
The following snippet shows how you can specify just the replace and delete actions:
"Action" : ["Update:Replace", "Update:Delete"]
You can also use a Not with actions. For example, if you wanted to allow all update actions, except
for Update:Delete, you can use NotAction, as shown in the following sample:
API Version 2010-05-15
99
AWS CloudFormation User Guide
Prevent Updates to Stack Resources
{
"Statement" : [
{
"Effect" : "Allow",
"NotAction" : "Update:Delete",
"Principal": "*",
"Resource" : "*"
}
]
}
For more information about stack updates, see AWS CloudFormation Stacks Updates (p. 85).
Principal
The Principal element is required but supports only the wild card (*).
Resource
Specifies the logical IDs of the resources that the policy applies to. If you want to specify types of
resources (p. 286), use the Condition element.
You can specify a single resource by using its logical ID, as shown in the following snippet:
"Resource" : ["LogicalResourceId/myEC2instance"]
You can also use a wild card with logical IDs. For example, if you prefix the logical IDs of all related
resources, you can specify them all with a wild card, as shown in the following snippet:
"Resource" : ["LogicalResourceId/MyPrefix*"]
You can also use a Not with resources. For example, if you wanted to allow updates to all resources,
except for one, you can use a NotResource, as shown in the following sample:
{
"Statement" : [
{
"Effect" : "Allow",
"Action" : "Update:*",
"Principal": "*",
"NotResource" : "LogicalResourceId/ProductionDatabase"
}
]
}
When you set a stack policy, any update not explicitly allowed is denied by default. By allowing
updates to all resources except for the ProductionDatabase resource, updates to the
ProductionDatabase resource are denied.
Conditions
Specifies the resource type (p. 286) that the policy applies to. If you want to specify the logical IDs of
specific resources, use the Resource element.
You can specify a resource type such as all Amazon EC2 instances and Amazon RDS DB instances,
as shown in the following sample:
{
"Statement" : [
API Version 2010-05-15
100
AWS CloudFormation User Guide
Prevent Updates to Stack Resources
{
"Effect" : "Deny",
"Principal" : "*",
"Action" : "Update:*",
"Resource" : "*",
"Condition" : {
"StringEquals" : {
"ResourceType" : ["AWS::EC2::Instance", "AWS::RDS::DBInstance"]
}
}
},
{
"Effect" : "Allow",
"Principal" : "*",
"Action" : "Update:*",
"Resource" : "*"
}
]
}
When you set a stack policy, any update not explicitly allowed is denied by default. The Allow
statement grants update permissions to all resources except for Amazon EC2 instances and Amazon
RDS DB instances. The Deny statement always overrides any allows.
You can also use a wild card with resource types. For example, you can deny update permissions
to all Amazon EC2 resources, such as instances, security groups, and subnets by using a wild card,
as shown in the following snippet:
"Condition" : {
"StringLike" : {
"ResourceType" : ["AWS::EC2::*"]
}
}
You must use the StringLike condition when you use wild cards.
Sample Stack Policies
Prevent any updates to all stack resources
In order to prevent updates to all stack resources, the following policy specifies a Deny for all update
actions on all resources:
{
"Statement" : [
{
"Effect" : "Deny",
"Action" : "Update:*",
"Principal": "*",
"Resource" : "*"
}
]
}
API Version 2010-05-15
101
AWS CloudFormation User Guide
Prevent Updates to Stack Resources
Prevent updates to a database only
The following policy denies all update actions for the database with the MyDatabase logical ID. To allow
updates for all other stack resources, the policy also allows all update actions on all resources. The Allow
statement doesn't affect the MyDatabase resource because the Deny statement always overrides any
allows.
{
"Statement" : [
{
"Effect" : "Deny",
"Action" : "Update:*",
"Principal": "*",
"Resource" : "LogicalResourceId/MyDatabase"
},
{
"Effect" : "Allow",
"Action" : "Update:*",
"Principal": "*",
"Resource" : "*"
}
]
}
Another way to achieve the same result is to use the default deny. When you set a stack policy, any
update not explicitly allowed is denied by default. The following sample uses a NotResource to allow
updates to all resources, except for the ProductionDatabase resource.
{
"Statement" : [
{
"Effect" : "Allow",
"Action" : "Update:*",
"Principal": "*",
"NotResource" : "LogicalResourceId/ProductionDatabase"
}
]
}
By allowing updates to all resources except for the ProductionDatabase resource, updates to the
ProductionDatabase resource are denied by default. However, because an explicit deny overrides
any allows, you can ensure that a resource is protected by using a Deny statement.
Prevent any updates to all Amazon RDS DB instances
The following policy denies all update actions for the Amazon RDS DB instance resource type. To allow
updates for all other stack resources, the policy specifies an allow for all update actions on all resources.
The Allow statement does not affect the Amazon RDS DB instance resources because the Deny statement
always overrides any allows.
{
"Statement" : [
{
"Effect" : "Deny",
"Action" : "Update:*",
API Version 2010-05-15
102
AWS CloudFormation User Guide
Prevent Updates to Stack Resources
"Principal": "*",
"Resource" : "*",
"Condition" : {
"StringEquals" : {
"ResourceType" : ["AWS::RDS::DBInstance"]
}
}
},
{
"Effect" : "Allow",
"Action" : "Update:*",
"Principal": "*",
"Resource" : "*"
}
]
}
Prevent replacement updates for an instance
The following policy denies updates that would cause a replacement for the instance with the MyInstance
logical ID. To allow updates for all other stack resources, the policy also allows all update actions on all
resources. As always, however, the Allow statement doesn't affect the MyInstance resource because
the Deny statement always overrides any allows.
{
"Statement" : [
{
"Effect" : "Deny",
"Action" : "Update:Replace",
"Principal": "*",
"Resource" : "LogicalResourceId/MyInstance"
},
{
"Effect" : "Allow",
"Action" : "Update:*",
"Principal": "*",
"Resource" : "*"
}
]
}
Prevent updates to any nested stacks
The following policy denies all update actions for the AWS CloudFormation stack resource type (nested
stacks). To updates for all other stack resources, the policy also allows all update actions on all resources.
As always, however, the Allow statement does not affect the AWS CloudFormation stack resources
because the Deny statement always overrides any allows.
{
"Statement" : [
{
"Effect" : "Deny",
"Action" : "Update:*",
"Principal": "*",
"Resource" : "*",
API Version 2010-05-15
103
AWS CloudFormation User Guide
Working with Windows Stacks
"Condition" : {
"StringEquals" : {
"ResourceType" : ["AWS::CloudFormation::Stack"]
}
}
},
{
"Effect" : "Allow",
"Action" : "Update:*",
"Principal": "*",
"Resource" : "*"
}
]
}
Working with Microsoft Windows Stacks on AWS
CloudFormation
AWS CloudFormation allows you to create Microsoft Windows stacks based on Amazon EC2 Windows
Amazon Machine Images (AMIs) and provides you with the ability to install software, to use remote
desktop to access your stack, and to update and configure your stack.
The topics in this section are designed to demonstrate how common tasks related to creation and
management of Windows instances are accomplished with AWS CloudFormation.
In This Section
• Microsoft Windows Amazon Machine Images (AMIs) and AWS CloudFormation Templates (p. 104)
• Bootstrapping AWS CloudFormation Windows Stacks (p. 105)
• Accessing AWS CloudFormation Windows Instances (p. 109)
Microsoft Windows Amazon Machine Images
(AMIs) and AWS CloudFormation Templates
With AWS CloudFormation, you can create Microsoft Windows stacks for running Windows server
instances. A number of pre-configured templates are available to launch directly from the AWS
CloudFormation Sample Templates page, such as the following templates:
• Windows_Single_Server_SharePoint_Foundation.template - SharePoint® Foundation 2010 running
on Microsoft Windows Server® 2008 R2
• Windows_Single_Server_Active_Directory.template - Create a single server installation of Active
Directory running on Microsoft Windows Server® 2008 R2.
• Windows_Roles_And_Features.template - Create a single server specifying server roles running on
Microsoft Windows Server® 2008 R2.
• ElasticBeanstalk_Windows_Sample.template - Launch an AWS Elastic Beanstalk sample application
on Windows Server 2008 R2 running IIS 7.5.
Note
Microsoft, Windows Server, and SharePoint are trademarks of the Microsoft group of companies.
API Version 2010-05-15
104
AWS CloudFormation User Guide
Bootstrapping Windows Stacks
Although these stacks are already configured, you can use any EC2 Windows AMI as the basis of an
AWS CloudFormation Windows stack.
Bootstrapping AWS CloudFormation Windows
Stacks
This topic describes how to bootstrap a Windows stack and troubleshoot stack creation issues. If you will
be creating your own Windows image for use with CloudFormation, see the information at Configuring a
Windows Instance Using EC2ConfigService in the Amazon EC2 Microsoft Windows Guide for instructions.
You must set up a Windows instance with EC2ConfigService for it to work with the AWS CloudFormation
bootstrapping tools.
Topics
• Example of Bootstrapping a Windows Stack (p. 105)
• How to Manage Windows Services (p. 108)
• How to Troubleshoot Stack Creation Issues (p. 108)
Example of Bootstrapping a Windows Stack
For the purposes of illustration, we'll examine the AWS CloudFormation single-instance Sharepoint server
template, which can be viewed, in its entirety, at the following URL:
• https://s3.amazonaws.com/cloudformation-templates-us-east-1/Windows_Single_Server_SharePoint_Foundation.template
This example demonstrates how to:
• Create an IAM User and Security Group for access to the instance
• Configure initialization files: cfn-credentials, cfn-hup.conf, and cfn-auto-reloader.conf
• Download and install a package such as Sharepoint Foundation 2010 on the server instance.
• Use a WaitCondition to ensure resources are ready
• Retrieve an IP for the instance with Amazon Elastic IP (EIP).
The AWS CloudFormation helper script cfn-init is used to perform each of these actions, based on
information in the AWS::CloudFormation::Init (p. 314) resource in the Windows Single Server Sharepoint
Foundation template.
The AWS::CloudFormation::Init section is named "SharePointFoundation", and begins with a standard
declaration:
"SharePointFoundation": {
"Type" : "AWS::EC2::Instance",
"Metadata" : {
"AWS::CloudFormation::Init" : {
"config" : {
After this, the files section of AWS::CloudFormation::Init is declared:
"files" : {
"c:\\cfn\\cfn-hup.conf" : {
API Version 2010-05-15
105
AWS CloudFormation User Guide
Bootstrapping Windows Stacks
"content" : { "Fn::Join" : ["", [
"[main]\n",
"stack=", { "Ref" : "AWS::StackName" }, "\n",
"region=", { "Ref" : "AWS::Region" }, "\n"
]]}
},
"c:\\cfn\\hooks.d\\cfn-auto-reloader.conf" : {
"content": { "Fn::Join" : ["", [
"[cfn-auto-reloader-hook]\n",
"triggers=post.update\n",
"path=Resources.SharePointFoundation.Metadata.AWS::CloudFormation::Init\n",
"action=cfn-init.exe -v -s ", { "Ref" : "AWS::StackName" },
" -r SharePointFoundation",
" --region ", { "Ref" : "AWS::Region" },
"\n"
]]}
},
"C:\\SharePoint\\SharePointFoundation2010.exe" : {
"source" : "http://d3adzpja92utk0.cloudfront.net/SharePointFoundation.exe"
}
},
Three files are created here and placed in the C:\cfn directory on the server instance. They are:
• cfn-hup.conf, the configuration file for cfn-hup.
• cfn-auto-reloader.conf, the configuration file for the hook used by cfn-hup to initiate an update
(calling cfn-init) when the metadata in AWS::CloudFormation::Init changes.
There is also a file that is downloaded to the server: SharePointFoundation.exe. This file is used to
install SharePoint on the server instance.
Important
Since paths on Windows use a backslash ('\') character, you must always remember to properly
escape all backslashes by prepending another backslash whenever you refer to a Windows path
in the AWS CloudFormation template.
Next is the commands section, which are cmd.exe commands.
"commands" : {
"1-extract" : {
"command" : "C:\\SharePoint\\SharePointFoundation2010.exe /extract:C:\\Share
Point\\SPF2010 /quiet /log:C:\\SharePoint\\SharePointFoundation2010-extract.log"
},
"2-prereq" : {
"command" : "C:\\SharePoint\\SPF2010\\PrerequisiteInstaller.exe /unattended"
},
"3-install" : {
"command" : "C:\\SharePoint\\SPF2010\\setup.exe /config C:\\Share
Point\\SPF2010\\Files\\SetupSilent\\config.xml"
}
API Version 2010-05-15
106
AWS CloudFormation User Guide
Bootstrapping Windows Stacks
Because commands in the instance are processed in alphabetical order by name, each command has
been prepended with a number indicating its desired execution order. Thus, we can make sure that the
installation package is first extracted, all prerequisites are then installed, and finally, installation of
SharePoint is started.
Next is the Properties section:
"Properties": {
"InstanceType" : { "Ref" : "InstanceType" },
"ImageId" : { "Fn::FindInMap" : [ "AWSRegionArch2AMI", { "Ref" : "AWS::Region"
},
{ "Fn::FindInMap" : [ "AWSInstanceType2Arch", { "Ref" : "Instan
ceType" }, "Arch" ] } ] },
"SecurityGroups" : [ {"Ref" : "SharePointFoundationSecurityGroup"} ],
"KeyName" : { "Ref" : "KeyPairName" },
"UserData" : { "Fn::Base64" : { "Fn::Join" : ["", [
"<script>\n",
"cfn-init.exe -v -s ", { "Ref" : "AWS::StackName" },
" -r SharePointFoundation",
" --region ", { "Ref" : "AWS::Region" }, "\n",
"cfn-signal.exe -e %ERRORLEVEL% ", { "Fn::Base64" : { "Ref" : "SharePoint
FoundationWaitHandle" }}, "\n",
"</script>"
]]}}
}
In this section, the UserData property contains a cmd.exe script that will be executed by cfn-init,
surrounded by <script> tags. You can use a Windows Powershell script here instead by surrounding your
script with <powershell> tags. For Windows stacks, you must base64 encode the wait condition handle
URL again.
SharePointFoundationWaitHandle is referenced here and run with cfn-signal. The
WaitConditionHandle and associated WaitCondition are declared next in the template:
"SharePointFoundationWaitHandle" : {
"Type" : "AWS::CloudFormation::WaitConditionHandle"
},
"SharePointFoundationWaitCondition" : {
"Type" : "AWS::CloudFormation::WaitCondition",
"DependsOn" : "SharePointFoundation",
"Properties" : {
"Handle" : {"Ref" : "SharePointFoundationWaitHandle"},
"Timeout" : "3600"
}
}
Since executing all of the steps and installing SharePoint might take a while, but not an entire hour, the
WaitCondition waits an hour (3600 seconds) before timing out.
If all goes well, an Elastic IP is used to provide access to the SharePoint instance:
API Version 2010-05-15
107
AWS CloudFormation User Guide
Bootstrapping Windows Stacks
"Outputs" : {
"SharePointFoundationURL" : {
"Value" : { "Fn::Join" : ["", ["http://", { "Ref" : "SharePointFoundationEIP"
} ]] },
"Description" : "SharePoint Team Site URL. Please retrieve Administrator
password of the instance and use it to access the URL"
}
Once stack creation is complete, the IP address supplied by EIP will be displayed in the Outputs tab of
the AWS CloudFormation console. However, before you can access the instance you will need to retreive
the auto-generated temporary Administrator password for the instance. Instructions about how to do this
are provided in the Accessing AWS CloudFormation Windows Instances (p. 109) topic.
How to Manage Windows Services
You manage Windows services in the same way as Linux services, except that you use a windows key
instead of sysvinit.The following example starts the cfn-hup service, sets it to Automatic, and restarts
the service if cfn-init modifies the c:\cfn\cfn-hup.conf or
c:\cfn\hooks.d\cfn-auto-reloader.conf configuration files.
"services" : {
"windows" : {
"cfn-hup" : {
"enabled" : "true",
"ensureRunning" : "true",
"files" : ["c:\\cfn\\cfn-hup.conf", "c:\\cfn\\hooks.d\\cfn-auto-reload
er.conf"]
}
}
}
You can manage other Windows services in the same way by using the name—not the display name—to
reference the service.
How to Troubleshoot Stack Creation Issues
If your stack fails during creation, the default behavior is to Rollback on failure. While this is normally a
good default because it avoids unnecessary charges, it makes it difficult to debug why your stack creation
is failing.
To turn this behavior off, click Show Advanced Options when creating your stack with the AWS
CloudFormation console, and click the No selector next to Rollback on failure. This will allow you to log
into your instance and view the logfiles to pinpoint issues encountered when running your startup scripts.
Important logs to look at are:
• The EC2 configuration log at C:\Program
Files\Amazon\Ec2ConfigService\Logs\Ec2ConfigLog.txt
• The cfn-init log at C:\cfn\log\cfn-init.log
API Version 2010-05-15
108
AWS CloudFormation User Guide
Accessing Windows Instances
Accessing AWS CloudFormation Windows
Instances
Once you've successfully created a Microsoft Windows stack on AWS CloudFormation, you can log in
to your instance with Remote Desktop to configure it manually. There are a number of steps involved:
1. Find the physical id of your Windows instance.
2. Use the physical id to retrieve the login credentials from Amazon EC2.
3. Use the login credentials to access your instance with Remote Desktop.
Note
Before starting, you'll need to have an AWS CloudFormation Windows stack running, and you'll
also need the private key of the key pair you used when creating the instance. For information
about generating Amazon EC2 key pairs, see Creating an EC2 Key Pair (p. 73).
To retrieve the physical ID of your AWS CloudFormation Windows instance:
1.
2.
From the AWS CloudFormation console, click on your Windows-based stack. You will see your stack
information appear in the lower pane of the window.
Click the Resources tab, and find the Physical ID of the AWS::EC2::Instance (p. 354). It will look
something like this: i-51366b2a.
If you have many instances running, you will probably want to remember the physical ID of your
instance, or write it down. You'll need it to recover the Administrator password to log in to your
instance.
Once you have the physical ID of your instance, you can use this to retrieve the Administrator password.
To retrieve the Administrator password for your Windows instance:
1.
2.
3.
At the top left corner of the AWS CloudFormation console, click Services and then EC2. This will
bring you to the Amazon EC2 Console Dashboard.
On the Navigation Bar, click Instances. This will bring up a list titled My Instances.
In the list, find your instance by its physical ID. Once you find it, right-click its entry on the list. This
will display the Instance Management context menu.
API Version 2010-05-15
109
AWS CloudFormation User Guide
Accessing Windows Instances
4.
On the context menu, click Get Windows Password. A dialog will appear, called Retrieve Default
Windows Administrator Password. On this dialog, an encrypted password will be shown, as well
as the Amazon EC2 key pair that you used when creating the AWS CloudFormation Windows stack.
5.
Do one of the following (they are equivalent):
• Locate the private key file you downloaded that corresponds to the key pair shown, copy its contents
to the clipboard, and then paste it into the Private Key box on the dialog.
• Click the Browse button to browse for the private key file on your system. When you select it, the
contents of the file will appear in the Private Key box.
6.
Click Decrypt Password. The connection information for your instance will be shown, consisting of:
• the IP address of your remote instance.
• The user name to use when logging in.
• The decrypted password.
API Version 2010-05-15
110
AWS CloudFormation User Guide
Accessing Windows Instances
Note
This password is meant to be temporary. Once you log in to your instance, you should change
it to one of your own choice.
These user credentials can be used to log in to your Windows instance with Remote Desktop.
To log in to your AWS CloudFormation Windows stack:
1.
2.
Start your Remote Desktop client.
When prompted for the Server, enter the server name that you retrieved for your instance from EC2.
3.
4.
5.
Enter the User name ("Administrator") and the Password that you retrieved from EC2.
If you are prompted for a Domain, leave the field blank.
Click OK to finish connecting.
Once you're logged in to your server, you can configure it how you like. You can also use this credential
information to log in to any secure outputs that your stack created, such as a Sharepoint site. It's your
Windows instance, do what you want with it!
API Version 2010-05-15
111
AWS CloudFormation User Guide
Working with AWS CloudFormation
Templates
Topics
• Template Anatomy (p. 113)
• Example Templates (p. 130)
• Template Snippets (p. 152)
• Creating Templates (p. 224)
• Custom Resources (p. 252)
• Using Regular Expressions in AWS CloudFormation Templates (p. 285)
The key to getting the most out of AWS CloudFormation is a thorough understanding of templates. A
template is a text file whose format complies with the JSON standard.
To get you started quickly on modifying and authoring templates, this section provides template anatomy
details, example templates and template snippets. This section also discusses how to modify and validate
templates.
• In Template Anatomy (p. 113), we provide the technical details for coding each of the template objects.
• In Template Snippets (p. 152), we provide a number of template sections that demonstrate how to write
the JSON code for a particular section of a template. In this section you'll find starter snippets for
Amazon EC2 instances, Amazon S3 domains, AWS CloudFormation mappings, and more.The snippets
are selected to cover a range of resources and properties you are likely to include often in your templates.
They are grouped by the resources they would be used to declare, with general-purpose AWS
CloudFormation snippets in General Template Snippets (p. 152)).
• The section Example Templates (p. 130) contains a number of sample templates that will create stacks
with little or no modification. The samples range in complexity, and highlight the use of AWS
CloudFormation template features in the context of a complete application. Some of the templates
require you to specify values in the command's --parameters option.
For details about the supported resources, type names, intrinsic functions, and pseudo parameters you
can use in your templates, see the Template Reference (p. 286) section.
API Version 2010-05-15
112
AWS CloudFormation User Guide
Template Anatomy
Template Anatomy
A template is a JSON-formatted text file that describes your AWS infrastructure. Templates include several
major sections. The Resources section is the only section that is required. The first character in the
template must be an open brace ({), and the last character must be a closed brace (}). The following
template fragment shows the template structure and sections.
{
"AWSTemplateFormatVersion" : "version date",
"Description" : "JSON string",
"Metadata" : {
template metadata
},
"Parameters" : {
set of parameters
},
"Mappings" : {
set of mappings
},
"Conditions" : {
set of conditions
},
"Resources" : {
set of resources
},
"Outputs" : {
set of outputs
}
}
Some sections in a template can be in any order. However, as you build your template, it might be helpful
to use the logical ordering of the previous example, as values in one section might refer to values from
a previous section. The following list gives a brief overview of each section.
Format Version (optional) (p. 114)
Specifies the AWS CloudFormation template version that the template conforms to. The template
format version is not the same as the API or WSDL version. The template format version can change
independently of the API and WSDL versions.
Description (optional) (p. 114)
A text string that describes the template. This section must always follow the template format version
section.
Metadata (optional) (p. 115)
JSON objects that provide additional information about the template.
Parameters (optional) (p. 115)
Specifies values that you can pass in to your template at runtime (when you create or update a stack).
You can refer to parameters in the Resources and Outputs sections of the template.
API Version 2010-05-15
113
AWS CloudFormation User Guide
See Also
Mappings (optional) (p. 122)
A mapping of keys and associated values that you can use to specify conditional parameter values,
similar to a lookup table. You can match a key to a corresponding value by using the
Fn::FindInMap (p. 660) intrinsic function in the Resources and Outputs section.
Conditions (optional) (p. 125)
Defines conditions that control whether certain resources are created or whether certain resource
properties are assigned a value during stack creation or update. For example, you could conditionally
create a resource that depends on whether the stack is for a production or test environment.
Resources (required) (p. 127)
Specifies the stack resources and their properties, such as an Amazon Elastic Compute Cloud
instance or an Amazon Simple Storage Service bucket.You can refer to resources in the Resources
and Outputs sections of the template.
Outputs (optional) (p. 129)
Describes the values that are returned whenever you view your stack's properties. For example, you
can declare an output for an Amazon S3 bucket name and then call the aws cloudformation
describe-stacks AWS CLI command to view the name.
See Also
For more information about JSON, see http://www.json.org.
Format Version
The AWSTemplateFormatVersion section (optional) identifies the capabilities of the template. The
latest template format version is 2010-09-09 and is currently the only valid value.
Note
The template format version is not the same as the API or WSDL version. The template format
version can change independently of the API and WSDL versions.
The value for the template format version declaration must be a literal string.You cannot use a parameter
or function to specify the template format version. If you don't specify a value, AWS CloudFormation
assumes the latest template format version. The following snippet is an example of a valid template format
version declaration:
"AWSTemplateFormatVersion" : "2010-09-09"
Description
The Description section (optional) enables you to include arbitrary comments about your template.
The Description must follow the AWSTemplateFormatVersion section.
The value for the description declaration must be a literal string that is between 0 and 1024 bytes in length.
You cannot use a parameter or function to specify the description. The following snippet is an example
of a description declaration:
"Description" : "Here are some details about the template."
API Version 2010-05-15
114
AWS CloudFormation User Guide
Metadata
Metadata
You can use the optional Metadata section to include arbitrary JSON objects that provide details about
the template. For example, you can include template implementation details about specific resources, as
shown in the following snippet:
"Metadata" : {
"Instances" : {"Description" : "Information about the instances"},
"Databases" : {"Description" : "Information about the databases"}
}
Parameters
You can use the optional Parameters section to pass values into your template when you create a stack.
With parameters, you can create templates that are customized each time you create a stack. For example,
you can create a parameter for Amazon EC2 instance types, as shown in the following snippet:
"Parameters" : {
"InstanceTypeParameter" : {
"Type" : "String",
"Default" : "t1.micro",
"AllowedValues" : ["t1.micro", "m1.small", "m1.large"],
"Description" : "Enter t1.micro, m1.small, or m1.large. Default is t1.micro."
}
}
When you create a stack, you can specify the value for the InstanceTypeParameter. That way, you
can choose what instance type you want when you create a stack. By default, the template uses t1.micro.
Within the same template, you can use the Ref intrinsic function to specify the parameter value in other
parts of the template, as shown in the following snippet:
"Ec2Instance" : {
"Type" : "AWS::EC2::Instance",
"Properties" : {
"InstanceType" : { "Ref" : "InstanceTypeParameter" },
"ImageId" : "ami-2f726546"
}
}
Syntax and Properties
The Parameters section consists of the key name Parameters, followed by a single colon. Braces
enclose all parameter declarations. If you declare multiple parameters, they are delimited by commas.
You have a maximum of 60 parameters in an AWS CloudFormation template.
For each parameter, you must declare a logical name in quotation marks followed by a colon. The logical
name must be alphanumeric and unique among all logical names within the template. After you declare
the parameter's logical name, you can specify the parameter's properties. You must declare parameters
as one of following types: String, Number, CommaDelimitedList, or an AWS-specific type. For
String, Number, and AWS-specific parameter types, you can define constraints that AWS CloudFormation
uses to validate the value of the parameter.
API Version 2010-05-15
115
AWS CloudFormation User Guide
Parameters
Important
For sensitive parameter values (such as passwords), set the NoEcho property to true. That
way, whenever anyone describes your stack, the parameter value is shown as asterisks (*****).
The following table describes all the properties for a parameter and whether a property is required:
API Version 2010-05-15
116
AWS CloudFormation User Guide
Parameters
Property
ReDescription
quired
Type
Yes
API Version 2010-05-15
117
AWS CloudFormation User Guide
Parameters
Property
ReDescription
quired
The data type for the parameter.
String
A literal string.
For example, users could specify "MyUserName".
Number
An integer or float. AWS CloudFormation validates the parameter
value as a number; however, when you use the parameter elsewhere in your template (for example, by using the Ref intrinsic
function), the parameter value becomes a string.
For example, users could specify "8888".
List<Number>
An array of integers or floats that are separated by commas. AWS
CloudFormation validates the parameter value as numbers;
however, when you use the parameter elsewhere in your template
(for example, by using the Ref intrinsic function), the parameter
value becomes a list of strings.
For example, users could specify "80,20", and a Ref will result
in ["80","20"].
CommaDelimitedList
An array of literal strings that are separated by commas. The total
number of strings should be one more than the total number of
commas. Also, each member string is space trimmed.
For example, users could specify "test,dev,prod", and a Ref
will result in ["test","dev","prod"].
AWS-specific parameter types
Existing AWS values that are in the template user's account. You
can specify the following AWS-specific types:
AWS::EC2::AvailabilityZone::Name
An Availability Zone, such as us-west-2a.
AWS::EC2::Image::Id
An Amazon EC2 image ID, such as ami-ff527ecf. Note
that the AWS CloudFormation console won't show a dropdown list of values for this parameter type.
AWS::EC2::Instance::Id
An Amazon EC2 instance ID, such as i-1e731a32.
AWS::EC2::KeyPair::KeyName
An Amazon EC2 key pair name.
AWS::EC2::SecurityGroup::GroupName
An EC2-Classic or default VPC security group name, such
as my-sg-abc.
AWS::EC2::SecurityGroup::Id
A security group ID, such as sg-a123fd85.
AWS::EC2::Subnet::Id
A subnet ID, such as subnet-123a351e.
AWS::EC2::Volume::Id
An Amazon EBS volume ID, such as vol-3cdd3f56.
API Version 2010-05-15
118
AWS CloudFormation User Guide
Parameters
Property
ReDescription
quired
AWS::EC2::VPC::Id
A VPC ID, such as vpc-a123baa3.
AWS::Route53::HostedZone::Id
An Amazon Route 53 hosted zone ID, such as
Z23YXV4OVPL04A.
List<AWS::EC2::AvailabilityZone::Name>
An array of Availability Zones for a region, such as us-west2a, us-west-2b.
List<AWS::EC2::Image::Id>
An array of Amazon EC2 image IDs, such as amiff527ecf, ami-e7527ed7. Note that the AWS CloudFormation console won't show a drop-down list of values for this
parameter type.
List<AWS::EC2::Instance::Id>
An array of Amazon EC2 instance IDs, such as i1e731a32, i-1e731a34.
List<AWS::EC2::SecurityGroup::GroupName>
An array of EC2-Classic or default VPC security group names,
such as my-sg-abc, my-sg-def.
List<AWS::EC2::SecurityGroup::Id>
An array of security group IDs, such as sg-a123fd85, sgb456fd85.
List<AWS::EC2::Subnet::Id>
An array of subnet IDs, such as subnet-123a351e, subnet-456b351e.
List<AWS::EC2::Volume::Id>
An array of Amazon EBS volume IDs, such as vol3cdd3f56, vol-4cdd3f56.
List<AWS::EC2::VPC::Id>
An array of VPC IDs, such as vpc-a123baa3, vpcb456baa3.
List<AWS::Route53::HostedZone::Id>
An array of Amazon Route 53 hosted zone IDs, such as
Z23YXV4OVPL04A, Z23YXV4OVPL04B.
AWS CloudFormation validates input values for these types
against existing values in a user's account. For example, with the
AWS::EC2::KeyPair::KeyName type, a user must enter an
existing Amazon EC2 key pair name that is in her account and
in the region in which she is creating the stack.
Default
No
A value of the appropriate type for the template to use if no value is
specified when a stack is created. If you define constraints for the
parameter, you must specify a value that adheres to those constraints.
NoEcho
No
Whether to mask the parameter value whenever anyone makes a call
that describes the stack. If you set the value to true, the parameter
value is masked with asterisks (*****).
AllowedValues
No
An array containing the list of values allowed for the parameter.
API Version 2010-05-15
119
AWS CloudFormation User Guide
Parameters
Property
ReDescription
quired
AllowedPattern
No
A regular expression that represents the patterns you want to allow
for String types.
MaxLength
No
An integer value that determines the largest number of characters you
want to allow for String types.
MinLength
No
An integer value that determines the smallest number of characters
you want to allow for String types.
MaxValue
No
A numeric value that determines the largest numeric value you want
to allow for Number types.
MinValue
No
A numeric value that determines the smallest numeric value you want
to allow for Number types.
Description
No
A string of up to 4000 characters that describes the parameter.
ConstraintDescription
No
A string that explains the constraint when the constraint is violated.
For example, without a constraint description, a parameter that has
an allowed pattern of [A-Za-z0-9]+ displays the following error
message when the user specifies an invalid value:
Malformed input-Parameter MyParameter must match
pattern [A-Za-z0-9]+
By adding a constraint description, such as must only contain
upper- and lowercase letters, and numbers, you can display
a customized error message:
Malformed input-Parameter MyParameter must only con
tain upper and lower case letters and numbers
Examples
Basic Input Parameters
The following example Parameters section declares two parameters. The DBPort parameter is of type
Number with a default of 3306. The minimum value that can be specified is 1150, and the maximum
value that can be specified is 65535. The DBPwd parameter is of type String with no default value. The
NoEcho property is set to true to prevent describe stack calls, such as the aws cloudformation
describe-stacks AWS CLI command, from returning the parameter value. The minimum length that
can be specified is 1, and the maximum length that can be specified is 41. The pattern allows lowercase
and uppercase alphabetic characters and numerals.
"Parameters" : {
"DBPort" : {
"Default" : "3306",
"Description" : "TCP/IP port for the database",
"Type" : "Number",
"MinValue" : "1150",
"MaxValue" : "65535"
API Version 2010-05-15
120
AWS CloudFormation User Guide
Parameters
},
"DBPwd" : {
"NoEcho" : "true",
"Description" : "The database admin account password",
"Type" : "String",
"MinLength" : "1",
"MaxLength" : "41",
"AllowedPattern" : "[a-zA-Z0-9]*"
}
}
AWS-Specific Parameter Types
When you use AWS-specific parameter types, anyone who uses your template to create or update a
stack must specify existing AWS values that are in his account and in the region for the current stack.
AWS-specific parameter types help ensure that input values for these types exist and are correct before
AWS CloudFormation creates or updates any resources. For example, if you use the
AWS::EC2::KeyPair::KeyName parameter type, AWS CloudFormation validates the input value against
users' existing key pair names before it creates any resources, such as Amazon EC2 instances.
If a user uses the AWS Management Console, AWS CloudFormation prepopulates AWS-specific parameter
types with valid values. That way the user doesn't have to remember and correctly enter a specific name
or ID. She just selects one or more values from a drop-down list. Also, depending on the parameter type,
users can search for values by ID, name, or Name tag value. For more information, see Specifying Stack
Parameters (p. 71).
The following example declares two parameters with the types AWS::EC2::KeyPair::KeyName and
AWS::EC2::Subnet::Id. These types limit valid values to existing key pair names and subnet IDs.
Because the mySubnetIDs parameter is specified as a list, a user can specify one or more subnet IDs.
"Parameters" : {
"myKeyPair" : {
"Description" : "Amazon EC2 Key Pair",
"Type" : "AWS::EC2::KeyPair::KeyName"
},
"mySubnetIDs" : {
"Description" : "Subnet IDs",
"Type" : "List<AWS::EC2::Subnet::Id>"
}
}
Currently, a user can't use the AWS CLI or AWS CloudFormation API to view a list of valid values for
AWS-specific parameters. However, he can view information about each parameter, such as the parameter
type, by using the aws cloudformation get-template-summary command or GetTemplateSummary API.
Comma-delimited List Parameter Type
You can use the CommaDelimitedList parameter type to specify multiple string values in a single
parameter. That way, you can use a single parameter instead of many different parameters to specify
multiple values. For example, if you create three different subnets with their own CIDR blocks, you could
use three different parameters to specify three different CIDR blocks. But it's simpler just to use a single
parameter that takes a list of three CIDR blocks, as shown in the following snippet:
"Parameters" : {
"DbSubnetIpBlocks": {
API Version 2010-05-15
121
AWS CloudFormation User Guide
Mappings
"Description": "Comma-delimited list of three CIDR blocks",
"Type": "CommaDelimitedList",
"Default": "10.0.48.0/24, 10.0.112.0/24, 10.0.176.0/24"
}
}
To refer to a specific value in a list, use the Fn::Select intrinsic function in the Resources section of
your template. You pass the index value of the object that you want and a list of objects, as shown in the
following snippet:
"DbSubnet1" : {
"Type" : "AWS::EC2::Subnet",
"Properties" : {
"AvailabilityZone" : {"Fn::Join" : ["",[ { "Ref" : "AWS::Region" }, {
"Fn::Select" : [ "0", {"Ref" : "VpcAzs"} ] } ] ]} ,
"VpcId" : { "Ref" : "VPC" },
"CidrBlock" : { "Fn::Select" : [ "0", {"Ref" : "DbSubnetIpBlocks"} ] }
}
},
"DbSubnet2" : {
"Type" : "AWS::EC2::Subnet",
"Properties" : {
"AvailabilityZone" : {"Fn::Join" : ["",[ { "Ref" : "AWS::Region" }, {
"Fn::Select" : [ "1", {"Ref" : "VpcAzs"} ] } ] ]} ,
"VpcId" : { "Ref" : "VPC" },
"CidrBlock" : { "Fn::Select" : [ "1", {"Ref" : "DbSubnetIpBlocks"} ] }
}
},
"DbSubnet3" : {
"Type" : "AWS::EC2::Subnet",
"Properties" : {
"AvailabilityZone" : {"Fn::Join" : ["",[ { "Ref" : "AWS::Region" }, {
"Fn::Select" : [ "2", {"Ref" : "VpcAzs"} ] } ] ]} ,
"VpcId" : { "Ref" : "VPC" },
"CidrBlock" : { "Fn::Select" : [ "2", {"Ref" : "DbSubnetIpBlocks"} ] }
}
}
Mappings
The optional Mappings section matches a key to a corresponding set of named values. For example, if
you want to set values based on a region, you can create a mapping that uses the region name as a key
and contains the values you want to specify for each specific region.You use the Fn::FindInMap intrinsic
function to retrieve values in a map.
You cannot base a mapping on a parameter, pseudo parameter, or intrinsic function.
Syntax
The Mappings section consists of the key name Mappings, followed by a single colon. Braces enclose
all mapping declarations. If you declare multiple mappings, they are delimited by commas. The keys and
values in mappings must be literal strings. For each mapping, you must declare a logical name in quotation
marks followed by a colon and braces that enclose the sets of values to map. The following example
shows a Mappings section containing a single mapping named Mapping01.
API Version 2010-05-15
122
AWS CloudFormation User Guide
Mappings
"Mappings" : {
"Mapping01" :
"Key01" : {
"Value" :
},
"Key02" : {
"Value" :
},
"Key03" : {
"Value" :
}
}
}
{
"Value01"
"Value02"
"Value03"
Within a mapping, each map is a key followed by a colon and a set of name-value pairs that are enclosed
by braces. The key identifies each map, and it must be unique within the mapping. Within the braces,
you can declare multiple name-value pairs.
Examples
The following example shows a Mappings section with a map RegionMap, which contains five keys that
map to name-value pairs containing single string values. The keys are region names. Each name-value
pair is the AMI ID for the 32-bit AMI in the region represented by the key.
"Mappings" : {
"RegionMap" : {
"us-east-1"
"us-west-1"
"eu-west-1"
"ap-southeast-1"
"ap-northeast-1"
}
}
:
:
:
:
:
{
{
{
{
{
"32"
"32"
"32"
"32"
"32"
:
:
:
:
:
"ami-6411e20d"},
"ami-c9c7978c"},
"ami-37c2f643"},
"ami-66f28c34"},
"ami-9c03a89d"}
The name-value pairs have a name (32 in the example) and a value. By naming the values, you can map
more than one set of values to a key. The following example has region keys that are mapped to two sets
of values: one named 32 and the other 64.
"RegionMap" : {
"us-east-1"
"us-west-1"
"eu-west-1"
"ap-southeast-1"
"ap-northeast-1"
}
:
:
:
:
:
{
{
{
{
{
"32"
"32"
"32"
"32"
"32"
:
:
:
:
:
"ami-6411e20d",
"ami-c9c7978c",
"ami-37c2f643",
"ami-66f28c34",
"ami-9c03a89d",
"64"
"64"
"64"
"64"
"64"
:
:
:
:
:
"ami-7a11e213"
"ami-cfc7978a"
"ami-31c2f645"
"ami-60f28c32"
"ami-a003a8a1"
},
},
},
},
}
You can use the Fn::FindInMap (p. 660) function to return a named value based on a specified key.
The following example template contains an Amazon EC2 resource whose ImageId property is assigned
by the FindInMap function. The FindInMap function specifies key as the region where the stack is
created (using the AWS::Region pseudo parameter (p. 674)) and 32 as the name of the value to map to.
{
"AWSTemplateFormatVersion" : "2010-09-09",
API Version 2010-05-15
123
AWS CloudFormation User Guide
Mappings
"Mappings" : {
"RegionMap" : {
"us-east-1" : { "32"
"us-west-1" : { "32"
"eu-west-1" : { "32"
"ap-southeast-1" : {
"ap-northeast-1" : {
}
},
: "ami-6411e20d", "64"
: "ami-c9c7978c", "64"
: "ami-37c2f643", "64"
"32" : "ami-66f28c34",
"32" : "ami-9c03a89d",
: "ami-7a11e213" },
: "ami-cfc7978a" },
: "ami-31c2f645" },
"64" : "ami-60f28c32" },
"64" : "ami-a003a8a1" }
"Resources" : {
"myEC2Instance" : {
"Type" : "AWS::EC2::Instance",
"Properties" : {
"ImageId" : { "Fn::FindInMap" : [ "RegionMap", { "Ref" : "AWS::Region"
}, "32"]},
"InstanceType" : "m1.small"
}
}
}
}
The following example shows a Mappings section with a mapping that contains three keys that map to
arrays that contain multiple string values. The keys represent three regions, and the mapped values are
the list of Availability Zones used in each region. The AWS::ElasticLoadBalancing::LoadBalancer (p. 441)
resource uses the FindInMap function and the Region2AZ map to specify the AvailabilityZones
property.
{
"AWSTemplateFormatVersion" : "2010-09-09",
"Mappings" : {
"Region2AZ" :
"us-west-1"
"us-east-1"
"eu-west-1"
}
},
{
: { "AZ" : ["us-west-1a", "us-west-1b"] },
: { "AZ" : ["us-east-1a", "us-east-1b", "us-east-1c"] },
: { "AZ" : ["eu-west-1a", "eu-west-1b"] }
"Resources" : {
"MyELB" : {
"Type" : "AWS::ElasticLoadBalancing::LoadBalancer",
"Properties" : {
"AvailabilityZones" : { "Fn::FindInMap" : [ "Region2AZ", { "Ref" :
"AWS::Region" }, "AZ" ] },
"Listeners" : [ {
"LoadBalancerPort" : "8888" ,
"InstancePort" : "8888" ,
"Protocol" : "HTTP"
} ],
"HealthCheck" : {
"Target" : { "Fn::Join" : [ "", ["HTTP:", "8888", "/"]]},
"HealthyThreshold" : "5",
"UnhealthyThreshold" : "2",
"Interval" : "10",
"Timeout" : "8"
}
API Version 2010-05-15
124
AWS CloudFormation User Guide
Conditions
}
}
}
}
Conditions
The optional Conditions section includes statements that define when a resource is created or when
a property is defined. For example, you can compare whether a value is equal to another value. Based
on the result of that condition, you can conditionally create resources. If you have multiple conditions,
separate them with commas.
You might use conditions when you want to reuse a template that can create resources in different
contexts, such as a test environment versus a production environment. In your template, you can add an
EnvironmentType input parameter, which accepts either prod or test as inputs. For the production
environment, you might include Amazon EC2 instances with certain capabilities; however, for the test
environment, you want to use reduced capabilities to save money. With conditions, you can define which
resources are created and how they're configured for each environment type.
Conditions are evaluated based on input parameters that you declare when you create or update a stack.
Within each condition, you can reference another condition, a parameter value, or a mapping. After you
define all your conditions, you can associate them with resources and resource properties in the Resources
and Outputs sections of a template.
At stack creation or stack update, AWS CloudFormation evaluates all the conditions in your template
before creating any resources. Any resources that are associated with a true condition are created. Any
resources that are associated with a false condition are ignored.
Important
During a stack update, you cannot update conditions by themselves. You can update conditions
only when you include changes that add, modify, or delete resources.
Syntax
The Conditions section consists of the key name Conditions, followed by a single colon. Braces
enclose all condition declarations. If you declare multiple conditions, they are delimited by commas.
Each condition declaration includes a logical ID and intrinsic functions that are evaluated when you create
or update a stack. The following pseudo template outlines the Conditions section:
"Conditions" : {
"Logical ID" : {Intrinsic function}
}
You can use the following intrinsic functions to define conditions:
• Fn::And
• Fn::Equals
• Fn::If
• Fn::Not
• Fn::Or
For more information about the syntax of each intrinsic function, see Condition Functions (p. 649).
API Version 2010-05-15
125
AWS CloudFormation User Guide
Conditions
Examples
The following sample template includes an EnvType input parameter, where you can specify prod to
create a stack for production or test to create a stack for testing. For a production environment, AWS
CloudFormation creates an Amazon EC2 instance and attaches a volume to the instance. For a test
environment, AWS CloudFormation creates only the Amazon EC2 instance.
{
"AWSTemplateFormatVersion" : "2010-09-09",
"Mappings" : {
"RegionMap" : {
"us-east-1"
"us-west-1"
"us-west-2"
"eu-west-1"
"sa-east-1"
"ap-southeast-1"
},
"ap-southeast-2"
},
"ap-northeast-1"
}
}
},
: { "AMI" : "ami-7f418316", "TestAz" : "us-east-1a" },
: { "AMI" : "ami-951945d0", "TestAz" : "us-west-1a" },
: { "AMI" : "ami-16fd7026", "TestAz" : "us-west-2a" },
: { "AMI" : "ami-24506250", "TestAz" : "eu-west-1a" },
: { "AMI" : "ami-3e3be423", "TestAz" : "sa-east-1a" },
: { "AMI" : "ami-74dda626", "TestAz" : "ap-southeast-1a"
: { "AMI" : "ami-b3990e89", "TestAz" : "ap-southeast-2a"
: { "AMI" : "ami-dcfa4edd", "TestAz" : "ap-northeast-1a"
"Parameters" : {
"EnvType" : {
"Description" : "Environment type.",
"Default" : "test",
"Type" : "String",
"AllowedValues" : ["prod", "test"],
"ConstraintDescription" : "must specify prod or test."
}
},
"Conditions" : {
"CreateProdResources" : {"Fn::Equals" : [{"Ref" : "EnvType"}, "prod"]}
},
"Resources" : {
"EC2Instance" : {
"Type" : "AWS::EC2::Instance",
"Properties" : {
"ImageId" : { "Fn::FindInMap" : [ "RegionMap", { "Ref" : "AWS::Region"
}, "AMI" ]}
}
},
"MountPoint" : {
"Type" : "AWS::EC2::VolumeAttachment",
"Condition" : "CreateProdResources",
"Properties" : {
"InstanceId" : { "Ref" : "EC2Instance" },
"VolumeId" : { "Ref" : "NewVolume" },
"Device" : "/dev/sdh"
}
API Version 2010-05-15
126
AWS CloudFormation User Guide
Resources
},
"NewVolume" : {
"Type" : "AWS::EC2::Volume",
"Condition" : "CreateProdResources",
"Properties" : {
"Size" : "100",
"AvailabilityZone" : { "Fn::GetAtt" : [ "EC2Instance", "AvailabilityZone"
]}
}
}
},
"Outputs" : {
"VolumeId" : {
"Value" : { "Ref" : "NewVolume" },
"Condition" : "CreateProdResources"
}
}
}
The CreateProdResources condition evaluates to true if the EnvType parameter is equal to prod.
In the sample template, the NewVolume and MountPoint resources are associated with the
CreateProdResources condition. Therefore, the resources are created only if the EnvType parameter
is equal to prod.
Resources
The required Resources section declare the AWS resources that you want as part of your stack, such
as an Amazon EC2 instance or an Amazon S3 bucket. You must declare each resource separately;
however, you can specify multiple resources of the same type. If you declare multiple resources, separate
them with commas.
Syntax
The Resources section consists of the key name Resources, followed by a single colon. Braces enclose
all resource declarations. If you declare multiple resources, they are delimited by commas. The following
pseudo template outlines the Resources section:
"Resources" : {
"Logical ID" : {
"Type" : "Resource type",
"Properties" : {
Set of properties
}
}
}
Logical ID
The logical ID must be alphanumeric (A-Za-z0-9) and unique within the template.You use the logical
name to reference the resource in other parts of the template. For example, if you want to map an
Amazon Elastic Block Store to an Amazon EC2 instance, you reference the logical IDs to associate
the block stores with the instance.
API Version 2010-05-15
127
AWS CloudFormation User Guide
Resources
In addition to the logical ID, certain resources also have a physical ID, which is the actual assigned
name for that resource, such as an Amazon EC2 instance ID or an Amazon S3 bucket name. You
use the physical IDs to identify resources outside of AWS CloudFormation templates, but only after
the resources have been created. For example, you might give an Amazon EC2 instance resource
a logical ID of MyEC2Instance; but when AWS CloudFormation creates the instance, AWS
CloudFormation automatically generates and assigns a physical ID (such as i-28f9ba55) to the
instance. You can use this physical ID to identify the instance and view its properties (such as the
DNS name) by using the Amazon EC2 console. For resources that support custom names, you can
assign your own names (physical IDs) to help you quickly identify resources. For example, you can
name an Amazon S3 bucket that stores logs as MyPerformanceLogs. For more information, see
Name Type (p. 608).
Resource type
The resource type identifies the type of resource that you are declaring. For example, the
AWS::EC2::Instance declares an Amazon EC2 instance. For a list of all the resource types, see
AWS Resource Types Reference (p. 286).
Resource properties
Resource properties are additional options that you can specify for a resource. For example, for each
Amazon EC2 instance, you must specify an AMI ID for that instance. You declare the AMI ID as a
property of the instance, as shown in the following snippet:
"Resources" : {
"MyEC2Instance" : {
"Type" : "AWS::EC2::Instance",
"Properties" : {
"ImageId" : "ami-2f726546"
}
}
}
If a resource does not require any properties to be declared, omit the properties section of that
resource.
Property values can be literal strings, lists of strings, Booleans, parameter references, pseudo
references, or the value returned by a function. When a property value is a literal string, the value is
enclosed in double quotes. If a value is the result of a list of any kind, it is enclosed in brackets ([
]). If a value is the result of an intrinsic function or reference, it is enclosed in braces ({ }). These
rules apply when you combine literals, lists, references, and functions to obtain a value. The following
sample shows you how to declare different property value types:
"Properties" : {
"String" : "one-string-value",
"LiteralList" : [ "first-value", "second-value" ],
"Boolean" : "true"
"ReferenceForOneValue" : { "Ref" : "MyLogicalResourceName" } ,
"FunctionResultWithFunctionParams" : {
"Fn::Join" : [ "%", [ "Key=", { "Ref" : "MyParameter" } ] ] }
}
Examples
The following example shows a typical Resource declaration. It defines two resources. The MyInstance
resource includes the MyQueue resource as part of its UserData property:
API Version 2010-05-15
128
AWS CloudFormation User Guide
Outputs
"Resources" : {
"MyInstance" : {
"Type" : "AWS::EC2::Instance",
"Properties" : {
"UserData" : {
"Fn::Base64" : {
"Fn::Join" : [ "", [ "Queue=", { "Ref" : "MyQueue" } ] ]
} },
"AvailabilityZone" : "us-east-1a",
"ImageId" : "ami-20b65349"
}
},
"MyQueue" : {
"Type" : "AWS::SQS::Queue",
"Properties" : {
}
}
}
Outputs
The optional Outputs section declares the values that you want to return in response to describe stack
calls. For example, you can output the Amazon S3 bucket name for your stack so that you can easily find
it.
Important
During a stack update, you cannot update outputs by themselves. You can update outputs only
when you include changes that add, modify, or delete resources.
Syntax
The Outputs section consists of the key name Outputs, followed by a single colon. Braces enclose all
output declarations. If you declare multiple outputs, they are delimited by commas. You can declare a
maximum of 60 outputs in an AWS CloudFormation template. The following pseudo template outlines
the Outputs section:
"Outputs" : {
"Logical ID" : {
"Description" : "Information about the value",
"Value" : "Value to return"
}
}
Logical ID
An identifier for this output. The logical ID must be alphanumeric (A-Za-z0-9) and unique within the
template.
Description (optional)
A String type up to 4K in length describing the output value.
Value (required)
The value of the property that is returned by the aws cloudformation describe-stacks command.
API Version 2010-05-15
129
AWS CloudFormation User Guide
Example Templates
Note
You can conditionally create outputs by adding a Condition property and then refer to a
condition that is defined in the Conditions section of a template.
Examples
Output properties are declared like any other property. In the following example, the output named
BackupLoadBalancerDNSName returns the DNS name for the resource with the logical name
BackupLoadBalancer if the CreateProdResources condition is true. The second output shows how
you can specify multiple outputs.
"Outputs" : {
"BackupLoadBalancerDNSName" : {
"Description": "The DNSName of the backup load balancer",
"Value" : { "Fn::GetAtt" : [ "BackupLoadBalancer", "DNSName" ]},
"Condition" : "CreateProdResources"
},
"InstanceID" : {
"Description": "The Instance ID",
"Value" : { "Ref" : "EC2Instance" }
}
}
Example Templates
The example AWS CloudFormation templates are written to show the features of AWS CloudFormation,
and to serve as a starting point for you to create custom stacks. We provide the two stack applications
below. In the following sections we describe the template, its parts, and detail any special features it may
have. A link to the latest source code for the template is also included.
Topics
• Auto Scaling Group with LoadBalancer, Auto Scaling Policies, and CloudWatch Alarms (p. 130)
• Amazon EC2 Running an Amazon Linux AMI (p. 139)
• Create a Load-Balanced Apache Website (p. 142)
• Auto-Scaled Worker that uses Spot Instances to Monitor Work in an SQS Queue (p. 145)
More sample templates are available at http://www.amazonaws.cn/cloudformation/
aws-cloudformation-templates/. In addition, we add new sample templates regularly to provide examples
for newly supported features. Please check the AWS CloudFormation Discussion Forum for
announcements. Also, other AWS CloudFormation users may have developed templates to provide
custom solutions, and may post their AWS CloudFormation solutions to the forum as well.
Auto Scaling Group with LoadBalancer, Auto
Scaling Policies, and CloudWatch Alarms
Topics
• Auto Scaling Multi-AZ Template (p. 131)
• Template Walkthrough (p. 137)
API Version 2010-05-15
130
AWS CloudFormation User Guide
Auto Scaling Group with LoadBalancer, Auto Scaling
Policies, and CloudWatch Alarms
This template creates a sample web site that uses Auto Scaling and Elastic Load Balancing and is
configured to use multiple availability zones. The template also contains CloudWatch alarms that execute
Auto Scaling policies to add or remove instances from the Auto Scaling group when the defined thresholds
are exceeded.
Important
This template creates one or more Amazon EC2 instances. You will be billed for the AWS
resources used if you create a stack from this template.
You can get the latest version of this sample template at https://s3.amazonaws.com/
cloudformation-templates-us-east-1/AutoScalingMultiAZWithNotifications.template.
Auto Scaling Multi-AZ Template
{
"AWSTemplateFormatVersion" : "2010-09-09",
"Description" : "AWS CloudFormation Sample Template AutoScalingMultiAZWithNo
tifications: Create a multi-az, load balanced and Auto Scaled sample web site
running on an Apache Web Serever. The application is configured to span all
Availability Zones in the region and is Auto-Scaled based on the CPU utilization
of the web servers. Notifications will be sent to the operator email address
on scaling events. The instances are load balanced with a simple health check
against the default web page. **WARNING** This template creates one or more
Amazon EC2 instances and an Elastic Load Balancer. You will be billed for the
AWS resources used if you create a stack from this template.",
"Parameters" : {
"InstanceType" : {
"Description" : "WebServer EC2 instance type",
"Type" : "String",
"Default" : "m1.small",
"AllowedValues" : [ "t1.micro", "t2.micro", "t2.small", "t2.medium",
"m1.small", "m1.medium", "m1.large",
"m1.xlarge", "m2.xlarge", "m2.2xlarge", "m2.4xlarge", "m3.medium",
"m3.large", "m3.xlarge", "m3.2xlarge", "c1.medium", "c1.xlarge", "c3.large",
"c3.xlarge", "c3.2xlarge",
"c3.4xlarge", "c3.8xlarge", "g2.2xlarge", "r3.large", "r3.xlarge",
"r3.2xlarge", "r3.4xlarge", "r3.8xlarge", "i2.xlarge", "i2.2xlarge",
"i2.4xlarge", "i2.8xlarge",
"hi1.4xlarge", "hs1.8xlarge", "cr1.8xlarge", "cc2.8xlarge", "cg1.4xlarge"],
"ConstraintDescription" : "must be a valid EC2 instance type."
},
"OperatorEMail": {
"Description": "EMail address to notify if there are any scaling opera
tions",
"Type": "String",
"AllowedPattern": "([a-zA-Z0-9_\\-\\.]+)@((\\[[0-9]{1,3}\\.[0-9]{1,3}\\.[09]{1,3}\\.)|(([a-zA-Z0-9\\-]+\\.)+))([a-zA-Z]{2,4}|[0-9]{1,3})(\\]?)",
"ConstraintDescription": "must be a valid email address."
},
"KeyName" : {
"Description" : "The EC2 Key Pair to allow SSH access to the instances",
"Type" : "AWS::EC2::KeyPair::KeyName",
API Version 2010-05-15
131
AWS CloudFormation User Guide
Auto Scaling Group with LoadBalancer, Auto Scaling
Policies, and CloudWatch Alarms
"ConstraintDescription" : "must be the name of an existing EC2 KeyPair."
},
"SSHLocation" : {
"Description" : "The IP address range that can be used to SSH to the EC2
instances",
"Type": "String",
"MinLength": "9",
"MaxLength": "18",
"Default": "0.0.0.0/0",
"AllowedPattern":
"(\\d{1,3})\\.(\\d{1,3})\\.(\\d{1,3})\\.(\\d{1,3})/(\\d{1,2})",
"ConstraintDescription": "must be a valid IP CIDR range of the form
x.x.x.x/x."
}
},
"Mappings" : {
"AWSInstanceType2Arch" : {
"t1.micro"
: { "Arch"
"t2.micro"
: { "Arch"
"t2.small"
: { "Arch"
"t2.medium"
: { "Arch"
"m1.small"
: { "Arch"
"m1.medium"
: { "Arch"
"m1.large"
: { "Arch"
"m1.xlarge"
: { "Arch"
"m2.xlarge"
: { "Arch"
"m2.2xlarge" : { "Arch"
"m2.4xlarge" : { "Arch"
"m3.medium"
: { "Arch"
"m3.large"
: { "Arch"
"m3.xlarge"
: { "Arch"
"m3.2xlarge" : { "Arch"
"c1.medium"
: { "Arch"
"c1.xlarge"
: { "Arch"
"c3.large"
: { "Arch"
"c3.xlarge"
: { "Arch"
"c3.2xlarge" : { "Arch"
"c3.4xlarge" : { "Arch"
"c3.8xlarge" : { "Arch"
"g2.2xlarge" : { "Arch"
"r3.large"
: { "Arch"
"r3.xlarge"
: { "Arch"
"r3.2xlarge" : { "Arch"
"r3.4xlarge" : { "Arch"
"r3.8xlarge" : { "Arch"
"i2.xlarge"
: { "Arch"
"i2.2xlarge" : { "Arch"
"i2.4xlarge" : { "Arch"
"i2.8xlarge" : { "Arch"
"hi1.4xlarge" : { "Arch"
"hs1.8xlarge" : { "Arch"
"cr1.8xlarge" : { "Arch"
"cc2.8xlarge" : { "Arch"
},
:
:
:
:
:
:
:
:
:
:
:
:
:
:
:
:
:
:
:
:
:
:
:
:
:
:
:
:
:
:
:
:
:
:
:
:
"PV64"
"HVM64"
"HVM64"
"HVM64"
"PV64"
"PV64"
"PV64"
"PV64"
"PV64"
"PV64"
"PV64"
"HVM64"
"HVM64"
"HVM64"
"HVM64"
"PV64"
"PV64"
"HVM64"
"HVM64"
"HVM64"
"HVM64"
"HVM64"
"HVMG2"
"HVM64"
"HVM64"
"HVM64"
"HVM64"
"HVM64"
"HVM64"
"HVM64"
"HVM64"
"HVM64"
"HVM64"
"HVM64"
"HVM64"
"HVM64"
},
},
},
},
},
},
},
},
},
},
},
},
},
},
},
},
},
},
},
},
},
},
},
},
},
},
},
},
},
},
},
},
},
},
},
}
API Version 2010-05-15
132
AWS CloudFormation User Guide
Auto Scaling Group with LoadBalancer, Auto Scaling
Policies, and CloudWatch Alarms
"AWSRegionArch2AMI" : {
"us-east-1"
: { "PV64"
"HVMG2" : "ami-3a329952" },
"us-west-2"
: { "PV64"
"HVMG2" : "ami-47296a77" },
"us-west-1"
: { "PV64"
"HVMG2" : "ami-331b1376" },
"eu-west-1"
: { "PV64"
"HVMG2" : "ami-00913777" },
"ap-southeast-1" : { "PV64"
"HVMG2" : "ami-fabe9aa8" },
"ap-northeast-1" : { "PV64"
"HVMG2" : "ami-5dd1ff5c" },
"ap-southeast-2" : { "PV64"
"HVMG2" : "ami-e98ae9d3" },
"sa-east-1"
: { "PV64"
"HVMG2" : "NOT_SUPPORTED" },
"cn-north-1"
: { "PV64"
"HVMG2" : "NOT_SUPPORTED" },
"eu-central-1"
: { "PV64"
"HVMG2" : "ami-b03503ad" }
}
: "ami-50842d38", "HVM64" : "ami-08842d60",
: "ami-af86c69f", "HVM64" : "ami-8786c6b7",
: "ami-c7a8a182", "HVM64" : "ami-cfa8a18a",
: "ami-aa8f28dd", "HVM64" : "ami-748e2903",
: "ami-20e1c572", "HVM64" : "ami-d6e1c584",
: "ami-21072820", "HVM64" : "ami-35072834",
: "ami-8b4724b1", "HVM64" : "ami-fd4724c7",
: "ami-9d6cc680", "HVM64" : "ami-956cc688",
: "ami-a857c591", "HVM64" : "ami-ac57c595",
: "ami-a03503bd", "HVM64" : "ami-b43503a9",
},
"Resources" : {
"NotificationTopic": {
"Type": "AWS::SNS::Topic",
"Properties": {
"Subscription": [ { "Endpoint": { "Ref": "OperatorEMail" }, "Protocol":
"email" } ]
}
},
"WebServerGroup" : {
"Type" : "AWS::AutoScaling::AutoScalingGroup",
"Properties" : {
"AvailabilityZones" : { "Fn::GetAZs" : ""},
"LaunchConfigurationName" : { "Ref" : "LaunchConfig" },
"MinSize" : "1",
"MaxSize" : "3",
"LoadBalancerNames" : [ { "Ref" : "ElasticLoadBalancer" } ],
"NotificationConfigurations" : [{
"TopicARN" : { "Ref" : "NotificationTopic" },
"NotificationTypes" : [ "autoscaling:EC2_INSTANCE_LAUNCH",
"autoscaling:EC2_INSTANCE_LAUNCH_ERROR",
"autoscaling:EC2_INSTANCE_TERMINATE",
"autoscaling:EC2_INSTANCE_TERMINATE_ERROR"]
}]
},
"CreationPolicy" : {
"ResourceSignal" : {
"Timeout" : "PT15M",
"Count"
: "1"
}
},
"UpdatePolicy": {
"AutoScalingRollingUpdate": {
API Version 2010-05-15
133
AWS CloudFormation User Guide
Auto Scaling Group with LoadBalancer, Auto Scaling
Policies, and CloudWatch Alarms
"MinInstancesInService": "1",
"MaxBatchSize": "1",
"PauseTime" : "PT15M",
"WaitOnResourceSignals": "true"
}
}
},
"LaunchConfig" : {
"Type" : "AWS::AutoScaling::LaunchConfiguration",
"Metadata" : {
"Comment" : "Install a simple application",
"AWS::CloudFormation::Init" : {
"config" : {
"packages" : {
"yum" : {
"httpd" : []
}
},
"files" : {
"/var/www/html/index.html" : {
"content" : { "Fn::Join" : ["\n", [
"<img src=\"https://s3.amazonaws.com/cloudformation-ex
amples/cloudformation_graphic.png\" alt=\"AWS CloudFormation Logo\"/>",
"<h1>Congratulations, you have successfully launched the AWS
CloudFormation sample.</h1>"
]]},
"mode"
: "000644",
"owner"
: "root",
"group"
: "root"
},
"/etc/cfn/cfn-hup.conf" : {
"content" : { "Fn::Join" : ["", [
"[main]\n",
"stack=", { "Ref" : "AWS::StackId" }, "\n",
"region=", { "Ref" : "AWS::Region" }, "\n"
]]},
"mode"
: "000400",
"owner"
: "root",
"group"
: "root"
},
"/etc/cfn/hooks.d/cfn-auto-reloader.conf" : {
"content": { "Fn::Join" : ["", [
"[cfn-auto-reloader-hook]\n",
"triggers=post.update\n",
"path=Resources.LaunchConfig.Metadata.AWS::CloudForma
tion::Init\n",
"action=/opt/aws/bin/cfn-init -v ",
"
--stack ", { "Ref" : "AWS::StackName" },
"
--resource LaunchConfig ",
"
--region ", { "Ref" : "AWS::Region" }, "\n",
"runas=root\n"
]]}
}
},
API Version 2010-05-15
134
AWS CloudFormation User Guide
Auto Scaling Group with LoadBalancer, Auto Scaling
Policies, and CloudWatch Alarms
"services" : {
"sysvinit" : {
"httpd"
: { "enabled" : "true", "ensureRunning" : "true" },
"cfn-hup" : { "enabled" : "true", "ensureRunning" : "true",
"files" : ["/etc/cfn/cfn-hup.conf",
"/etc/cfn/hooks.d/cfn-auto-reloader.conf"]}
}
}
}
}
},
"Properties" : {
"KeyName" : { "Ref" : "KeyName" },
"ImageId" : { "Fn::FindInMap" : [ "AWSRegionArch2AMI", { "Ref" :
"AWS::Region" },
{ "Fn::FindInMap" : [ "AWSInstance
Type2Arch", { "Ref" : "InstanceType" }, "Arch" ] } ] },
"SecurityGroups" : [ { "Ref" : "InstanceSecurityGroup" } ],
"InstanceType" : { "Ref" : "InstanceType" },
"UserData"
: { "Fn::Base64" : { "Fn::Join" : ["", [
"#!/bin/bash -xe\n",
"yum update -y aws-cfn-bootstrap\n",
"/opt/aws/bin/cfn-init -v ",
"
--stack ", { "Ref" : "AWS::StackName" },
"
--resource LaunchConfig ",
"
--region ", { "Ref" : "AWS::Region" }, "\n",
"/opt/aws/bin/cfn-signal -e $? ",
"
--stack ", { "Ref" : "AWS::StackName" },
"
--resource WebServerGroup ",
"
--region ", { "Ref" : "AWS::Region" }, "\n"
]]}}
}
},
"WebServerScaleUpPolicy" : {
"Type" : "AWS::AutoScaling::ScalingPolicy",
"Properties" : {
"AdjustmentType" : "ChangeInCapacity",
"AutoScalingGroupName" : { "Ref" : "WebServerGroup" },
"Cooldown" : "60",
"ScalingAdjustment" : "1"
}
},
"WebServerScaleDownPolicy" : {
"Type" : "AWS::AutoScaling::ScalingPolicy",
"Properties" : {
"AdjustmentType" : "ChangeInCapacity",
"AutoScalingGroupName" : { "Ref" : "WebServerGroup" },
"Cooldown" : "60",
"ScalingAdjustment" : "-1"
}
},
"CPUAlarmHigh": {
API Version 2010-05-15
135
AWS CloudFormation User Guide
Auto Scaling Group with LoadBalancer, Auto Scaling
Policies, and CloudWatch Alarms
"Type": "AWS::CloudWatch::Alarm",
"Properties": {
"AlarmDescription": "Scale-up if CPU > 90% for 10 minutes",
"MetricName": "CPUUtilization",
"Namespace": "AWS/EC2",
"Statistic": "Average",
"Period": "300",
"EvaluationPeriods": "2",
"Threshold": "90",
"AlarmActions": [ { "Ref": "WebServerScaleUpPolicy" } ],
"Dimensions": [
{
"Name": "AutoScalingGroupName",
"Value": { "Ref": "WebServerGroup" }
}
],
"ComparisonOperator": "GreaterThanThreshold"
}
},
"CPUAlarmLow": {
"Type": "AWS::CloudWatch::Alarm",
"Properties": {
"AlarmDescription": "Scale-down if CPU < 70% for 10 minutes",
"MetricName": "CPUUtilization",
"Namespace": "AWS/EC2",
"Statistic": "Average",
"Period": "300",
"EvaluationPeriods": "2",
"Threshold": "70",
"AlarmActions": [ { "Ref": "WebServerScaleDownPolicy" } ],
"Dimensions": [
{
"Name": "AutoScalingGroupName",
"Value": { "Ref": "WebServerGroup" }
}
],
"ComparisonOperator": "LessThanThreshold"
}
},
"ElasticLoadBalancer" : {
"Type" : "AWS::ElasticLoadBalancing::LoadBalancer",
"Properties" : {
"AvailabilityZones" : { "Fn::GetAZs" : "" },
"CrossZone" : "true",
"Listeners" : [ {
"LoadBalancerPort" : "80",
"InstancePort" : "80",
"Protocol" : "HTTP"
} ],
"HealthCheck" : {
"Target" : "HTTP:80/",
"HealthyThreshold" : "3",
"UnhealthyThreshold" : "5",
"Interval" : "30",
"Timeout" : "5"
}
}
API Version 2010-05-15
136
AWS CloudFormation User Guide
Auto Scaling Group with LoadBalancer, Auto Scaling
Policies, and CloudWatch Alarms
},
"InstanceSecurityGroup" : {
"Type" : "AWS::EC2::SecurityGroup",
"Properties" : {
"GroupDescription" : "Enable SSH access and HTTP from the load balancer
only",
"SecurityGroupIngress" : [ {
"IpProtocol" : "tcp",
"FromPort" : "22",
"ToPort" : "22",
"CidrIp" : { "Ref" : "SSHLocation"}
},
{
"IpProtocol" : "tcp",
"FromPort" : "80",
"ToPort" : "80",
"SourceSecurityGroupOwnerId" : {"Fn::GetAtt" : ["ElasticLoadBalancer",
"SourceSecurityGroup.OwnerAlias"]},
"SourceSecurityGroupName" : {"Fn::GetAtt" : ["ElasticLoadBalancer",
"SourceSecurityGroup.GroupName"]}
} ]
}
}
},
"Outputs" : {
"URL" : {
"Description" : "The URL of the website",
"Value" : { "Fn::Join" : [ "", [ "http://", { "Fn::GetAtt" : [ "Elastic
LoadBalancer", "DNSName" ]}]]}
}
}
}
Template Walkthrough
The example template contains an Auto Scaling group with a LoadBalancer, a security group that defines
ingress rules, CloudWatch alarms, and Auto Scaling policies.
The template has three input parameters: InstanceType is the type of EC2 instance to use for the Auto
Scaling group and has a default of m1.small; WebServerPort is the TCP port for the web server and has
a default of 8888; KeyName is the name of an EC2 key pair to be used for the Auto Scaling group.
KeyName must be specified at stack creation (parameters with no default value must be specified at
stack creation).
The AWS::AutoScaling::AutoScalingGroup (p. 288) resource WebServerGroup declares the following Auto
Scaling group configuration:
• AvailabilityZones specifies the availability zones where the auto scaling group's EC2 instances will be
created. The Fn::GetAZs (p. 666) function call { "Fn::GetAZs" : "" } specifies all availability zones
for the region in which the stack is created.
• MinSize and MaxSize set the minimum and maximum number of EC2 instances in the Auto Scaling
group.
• LoadBalancerNames lists the LoadBalancers used to route traffic to the Auto Scaling group. The
LoadBalancer for this group is the ElasticLoadBalancer resource.
API Version 2010-05-15
137
AWS CloudFormation User Guide
Auto Scaling Group with LoadBalancer, Auto Scaling
Policies, and CloudWatch Alarms
The AWS::AutoScaling::LaunchConfiguration (p. 294) resource LaunchConfig declares the following
configurations to use for the EC2 instances in the WebServerGroup Auto Scaling group:
• KeyName takes the value of the KeyName input parameter as the EC2 key pair to use.
• UserData is the Base64 encoded value of the WebServerPort parameter, which is passed to an
application .
• SecurityGroups is a list of EC2 security groups that contain the firewall ingress rules for EC2 instances
in the Auto Scaling group. In this example, there is only one security group and it is declared as a
AWS::EC2::SecurityGroup (p. 375) resource: InstanceSecurityGroup. This security group contains two
ingress rules: 1) a TCP ingress rule that allows access from all IP addresses ("CidrIp" : "0.0.0.0/0") for
port 22 (for SSH access) and 2) a TCP ingress rule that allows access from the ElasticLoadBalancer
resource for the WebServerPort port by specifying the LoadBalancer's source security group. The
GetAtt (p. 661) function is used to get the SourceSecurityGroup.OwnerAlias and
SourceSecurityGroup.GroupName properties from the ElasticLoadBalancer resource. For more
information about the Elastic Load Balancing security groups, see Manage Security Groups in Amazon
EC2-Classic or Manage Security Groups in Amazon VPC.
• ImageId is the evaluated value of a set of nested maps. We added the maps so that the template
contained the logic for choosing the right image ID. That logic is based on the instance type that was
specified with the InstanceType parameter (AWSInstanceType2Arch maps the instance type to an
architecture 32 or 64) and the region where the stack is created (AWSRegionArch2AMI maps the region
and architecture to a image ID):
{ "Fn::FindInMap" : [ "AWSRegionArch2AMI",
{ "Ref" : "AWS::Region" },
{ "Fn::FindInMap" : [ "AWSInstanceType2Arch",
{ "Ref" : "InstanceType" },
"Arch" ]
}
]}
For example, if you use this template to create a stack in the us-east-1 region and specify m1.small as
InstanceType, AWS CloudFormation would evaluate the inner map for AWSInstanceType2Arch as the
following:
{ "Fn::FindInMap" : [ "AWSInstanceType2Arch", "m1.small", "Arch" ] }
In the AWSInstanceType2Arch mapping, the Arch value for the m1.small key maps to 32, which is
used as the value for the outer map. The key is the evaluated result of the AWS::Region pseudo
parameter which is the region where the stack is being created. For this example, AWS::Region is
us-east-1; therefore, the outer map is evaluated as follows:
Fn::FindInMap" : [ "AWSRegionArch2AMI", "us-east-1", "32"]
In the AWSRegionArch2AMI mapping, the value 32 for the key us-east-1 maps to ami-6411e20d. This
means that ImageId would be ami-6411e20d.
The AWS::ElasticLoadBalancing::LoadBalancer (p. 441) resource ElasticLoadBalancer declares the
following LoadBalancer configuration:
• AvailabilityZones is a list of availability zones where the LoadBalancer will distribute traffic. In this
example, the Fn::GetAZs function call { "Fn::GetAZs" : "" } specifies all availability zones for
the region in which the stack is created.
API Version 2010-05-15
138
AWS CloudFormation User Guide
Amazon EC2 Running an Amazon Linux AMI
• Listeners is a list of load balancing routing configurations that specify the port that the LoadBalancer
accepts requests, the port on the registered EC2 instances where the LoadBalancer forwards requests,
and the protocol used to route requests.
• HealthCheck is the configuration that Elastic Load Balancing uses to check the health of the EC2
instances that the LoadBalancer routes traffic to. In this example, the HealthCheck targets the root
address of the EC2 instances using the port specified by WebServerPort over the HTTP protocol. If
the WebServerPort is 8888, the { "Fn::Join" : [ "", ["HTTP:", { "Ref" :
"WebServerPort" }, "/"]]} function call is evaluated as the string HTTP:8888/. It also specifies
that the EC2 instances have an interval of 30 seconds between health checks (Interval). The Timeout
is defined as the length of time Elastic Load Balancing waits for a response from the health check target
(5 seconds in this example). After the Timeout period lapses, Elastic Load Balancing marks that EC2
instance's health check as unhealthy. When an EC2 instance fails 5 consecutive health checks
(UnhealthyThreshold), Elastic Load Balancing stops routing traffic to that EC2 instance until that instance
has 3 consecutive healthy health checks at which point Elastic Load Balancing considers the EC2
instance healthy and begins routing traffic to that instance again.
The AWS::AutoScaling::ScalingPolicy (p. 304) resource WebServerScaleUpPolicy is an Auto Scaling
policy that scales up the Auto Scaling group WebServerGroup. The AdjustmentType property is set to
ChangeInCapacity. This means that the ScalingAdjustment represents the number of instances to
add (if ScalingAdjustment is positive, instances are added; if negative, instances are deleted). In this
example, ScalingAdjustment is 1; therefore, the policy increments the number of EC2 instances in
the group by 1 when the policy is executed. The Cooldown property specifies that Auto Scaling waits 60
seconds before starting any other policy or trigger related actions.
The AWS::CloudWatch::Alarm (p. 334) resource CPUAlarmHigh specifies the scaling policy
WebServerScaleUpPolicy as the action to execute when the alarm is in an ALARM state (AlarmActions).
The alarm monitors the EC2 instances in the WebServerGroup Auto Scaling group (Dimensions). The
alarm measures the average (Statistic) EC2 instance CPU utilization (Namespace and MetricName) of
the instances in the WebServerGroup (Dimensions) over a 300 second interval (Period). When this value
(average CPU utilization over 300 seconds) remains greater than 90 percent (ComparisonOperator and
Threshold) for 2 consecutive periods (EvaluationPeriod), the alarm will go into an ALARM state and
CloudWatch will execute the WebServerScaleUpPolicy policy (AlarmActions) described above scale up
the WebServerGroup.
The CPUAlarmLow alarm measures the same metrics but has an alarm that triggers when CPU utilization
is less than 75 percent (ComparisonOperator and Threshold) and executes the WebServerScaleDownPolicy
policy to remove 1 EC2 instance from the Auto Scaling group WebServerGroup.
Amazon EC2 Running an Amazon Linux AMI
This template declares one parameter and four mappings. Resources include an Amazon EC2 instance
and a security group. The mapping uses the AWS::Region pseudo parameter to select the appropriate
AMI. The Outputs section prints the instance ID of the instance, the Availability Zone in which it is created,
and its public IP address.
You can get the latest version of this sample template at https://s3.amazonaws.com/
cloudformation-templates-us-east-1/EC2InstanceWithSecurityGroupSample.template.
Amazon Linux AMI Sample Template
{
"AWSTemplateFormatVersion" : "2010-09-09",
"Description" : "AWS CloudFormation Sample Template EC2InstanceWithSecurity
GroupSample: Create an Amazon EC2 instance running the Amazon Linux AMI. The
API Version 2010-05-15
139
AWS CloudFormation User Guide
Amazon EC2 Running an Amazon Linux AMI
AMI is chosen based on the region in which the stack is run. This example creates
an EC2 security group for the instance to give you SSH access. **WARNING**
This template creates an Amazon EC2 instance. You will be billed for the AWS
resources used if you create a stack from this template.",
"Parameters" : {
"KeyName": {
"Description" : "Name of an existing EC2 KeyPair to enable SSH access to
the instance",
"Type": "AWS::EC2::KeyPair::KeyName",
"ConstraintDescription" : "must be the name of an existing EC2 KeyPair."
},
"InstanceType" : {
"Description" : "WebServer EC2 instance type",
"Type" : "String",
"Default" : "m1.small",
"AllowedValues" : [ "t1.micro", "t2.micro", "t2.small", "t2.medium",
"m1.small", "m1.medium", "m1.large", "m1.xlarge", "m2.xlarge", "m2.2xlarge",
"m2.4xlarge", "m3.medium", "m3.large", "m3.xlarge", "m3.2xlarge", "c1.medium",
"c1.xlarge", "c3.large", "c3.xlarge", "c3.2xlarge", "c3.4xlarge", "c3.8xlarge",
"g2.2xlarge", "r3.large", "r3.xlarge", "r3.2xlarge", "r3.4xlarge", "r3.8xlarge",
"i2.xlarge", "i2.2xlarge", "i2.4xlarge", "i2.8xlarge", "hi1.4xlarge",
"hs1.8xlarge", "cr1.8xlarge", "cc2.8xlarge", "cg1.4xlarge"],
"ConstraintDescription" : "must be a valid EC2 instance type."
},
"SSHLocation" : {
"Description" : "The IP address range that can be used to SSH to the EC2
instances",
"Type": "String",
"MinLength": "9",
"MaxLength": "18",
"Default": "0.0.0.0/0",
"AllowedPattern":
"(\\d{1,3})\\.(\\d{1,3})\\.(\\d{1,3})\\.(\\d{1,3})/(\\d{1,2})",
"ConstraintDescription": "must be a valid IP CIDR range of the form
x.x.x.x/x."
}
},
"Mappings" : {
"AWSInstanceType2Arch" : {
"t1.micro"
: { "Arch"
"t2.micro"
: { "Arch"
"t2.small"
: { "Arch"
"t2.medium"
: { "Arch"
"m1.small"
: { "Arch"
"m1.medium"
: { "Arch"
"m1.large"
: { "Arch"
"m1.xlarge"
: { "Arch"
"m2.xlarge"
: { "Arch"
"m2.2xlarge" : { "Arch"
"m2.4xlarge" : { "Arch"
"m3.medium"
: { "Arch"
"m3.large"
: { "Arch"
"m3.xlarge"
: { "Arch"
:
:
:
:
:
:
:
:
:
:
:
:
:
:
"PV64"
"HVM64"
"HVM64"
"HVM64"
"PV64"
"PV64"
"PV64"
"PV64"
"PV64"
"PV64"
"PV64"
"HVM64"
"HVM64"
"HVM64"
},
},
},
},
},
},
},
},
},
},
},
},
},
},
API Version 2010-05-15
140
AWS CloudFormation User Guide
Amazon EC2 Running an Amazon Linux AMI
"m3.2xlarge"
"c1.medium"
"c1.xlarge"
"c3.large"
"c3.xlarge"
"c3.2xlarge"
"c3.4xlarge"
"c3.8xlarge"
"g2.2xlarge"
"r3.large"
"r3.xlarge"
"r3.2xlarge"
"r3.4xlarge"
"r3.8xlarge"
"i2.xlarge"
"i2.2xlarge"
"i2.4xlarge"
"i2.8xlarge"
"hi1.4xlarge"
"hs1.8xlarge"
"cr1.8xlarge"
"cc2.8xlarge"
:
:
:
:
:
:
:
:
:
:
:
:
:
:
:
:
:
:
:
:
:
:
{
{
{
{
{
{
{
{
{
{
{
{
{
{
{
{
{
{
{
{
{
{
"Arch"
"Arch"
"Arch"
"Arch"
"Arch"
"Arch"
"Arch"
"Arch"
"Arch"
"Arch"
"Arch"
"Arch"
"Arch"
"Arch"
"Arch"
"Arch"
"Arch"
"Arch"
"Arch"
"Arch"
"Arch"
"Arch"
:
:
:
:
:
:
:
:
:
:
:
:
:
:
:
:
:
:
:
:
:
:
"HVM64"
"PV64"
"PV64"
"HVM64"
"HVM64"
"HVM64"
"HVM64"
"HVM64"
"HVMG2"
"HVM64"
"HVM64"
"HVM64"
"HVM64"
"HVM64"
"HVM64"
"HVM64"
"HVM64"
"HVM64"
"HVM64"
"HVM64"
"HVM64"
"HVM64"
},
},
},
},
},
},
},
},
},
},
},
},
},
},
},
},
},
},
},
},
},
}
},
"AWSRegionArch2AMI" : {
"us-east-1"
: { "PV64"
"HVMG2" : "ami-3a329952" },
"us-west-2"
: { "PV64"
"HVMG2" : "ami-47296a77" },
"us-west-1"
: { "PV64"
"HVMG2" : "ami-331b1376" },
"eu-west-1"
: { "PV64"
"HVMG2" : "ami-00913777" },
"ap-southeast-1" : { "PV64"
"HVMG2" : "ami-fabe9aa8" },
"ap-northeast-1" : { "PV64"
"HVMG2" : "ami-5dd1ff5c" },
"ap-southeast-2" : { "PV64"
"HVMG2" : "ami-e98ae9d3" },
"sa-east-1"
: { "PV64"
"HVMG2" : "NOT_SUPPORTED" },
"cn-north-1"
: { "PV64"
"HVMG2" : "NOT_SUPPORTED" },
"eu-central-1"
: { "PV64"
"HVMG2" : "ami-b03503ad" }
}
: "ami-50842d38", "HVM64" : "ami-08842d60",
: "ami-af86c69f", "HVM64" : "ami-8786c6b7",
: "ami-c7a8a182", "HVM64" : "ami-cfa8a18a",
: "ami-aa8f28dd", "HVM64" : "ami-748e2903",
: "ami-20e1c572", "HVM64" : "ami-d6e1c584",
: "ami-21072820", "HVM64" : "ami-35072834",
: "ami-8b4724b1", "HVM64" : "ami-fd4724c7",
: "ami-9d6cc680", "HVM64" : "ami-956cc688",
: "ami-a857c591", "HVM64" : "ami-ac57c595",
: "ami-a03503bd", "HVM64" : "ami-b43503a9",
},
"Resources" : {
"EC2Instance" : {
"Type" : "AWS::EC2::Instance",
"Properties" : {
"SecurityGroups" : [ { "Ref" : "InstanceSecurityGroup" } ],
"KeyName" : { "Ref" : "KeyName" },
"ImageId" : { "Fn::FindInMap" : [ "AWSRegionArch2AMI", { "Ref" :
"AWS::Region" },
{ "Fn::FindInMap" : [ "AWSInstanceType2Arch", { "Ref"
API Version 2010-05-15
141
AWS CloudFormation User Guide
Create a Load-Balanced Apache Website
: "InstanceType" }, "Arch" ] } ] }
}
},
"InstanceSecurityGroup" : {
"Type" : "AWS::EC2::SecurityGroup",
"Properties" : {
"GroupDescription" : "Enable SSH access via port 22",
"SecurityGroupIngress" : [ {
"IpProtocol" : "tcp",
"FromPort" : "22",
"ToPort" : "22",
"CidrIp" : { "Ref" : "SSHLocation"}
} ]
}
}
},
"Outputs" : {
"InstanceId" : {
"Description" : "InstanceId of the newly created EC2 instance",
"Value" : { "Ref" : "EC2Instance" }
},
"AZ" : {
"Description" : "Availability Zone of the newly created EC2 instance",
"Value" : { "Fn::GetAtt" : [ "EC2Instance", "AvailabilityZone" ] }
},
"PublicDNS" : {
"Description" : "Public DNSName of the newly created EC2 instance",
"Value" : { "Fn::GetAtt" : [ "EC2Instance", "PublicDnsName" ] }
},
"PublicIP" : {
"Description" : "Public IP address of the newly created EC2 instance",
"Value" : { "Fn::GetAtt" : [ "EC2Instance", "PublicIp" ] }
}
}
}
Create a Load-Balanced Apache Website
This template declares two parameters and four mappings. Resources include an Elastic Load Balancing
load balancer with listeners and health check, two Amazon EC2 instances, and a security group. The
Outputs section prints the URL of the load balancer.
Load-Balanced Apache Website Sample Template
{
"AWSTemplateFormatVersion" : "2010-09-09",
"Description" : "Create a load balanced sample web site. The AMI is chosen
based on the region in which the stack is run. This example creates 2 EC2 in
stances behind a load balancer with a simple health check. The instances may
be created in one or more AZs. The web site is available on port 80, however,
the instances can be configured to listen on any port (8888 by default).
**WARNING** This template creates one or more Amazon EC2 instances. You will
API Version 2010-05-15
142
AWS CloudFormation User Guide
Create a Load-Balanced Apache Website
be billed for the AWS resources used if you create a stack from this template.",
"Parameters" : {
"InstanceType" : {
"Description" : "Type of EC2 instance to launch",
"Type" : "String",
"Default" : "m1.small"
},
"WebServerPort" : {
"Description" : "TCP/IP port of the web server",
"Type" : "String",
"Default" : "8888"
},
"KeyName" : {
"Description" : "Name of an existing EC2 KeyPair to enable SSH access to
the instances",
"Type" : "AWS::EC2::KeyPair::KeyName",
"ConstraintDescription" : "must be the name of an existing EC2 KeyPair."
}
},
"Mappings" : {
"AWSInstanceType2Arch" : {
"t1.micro"
: { "Arch" : "64" },
"m1.small"
: { "Arch" : "32" },
"m1.large"
: { "Arch" : "64" },
"m1.xlarge"
: { "Arch" : "64" },
"m2.xlarge"
: { "Arch" : "64" },
"m2.2xlarge" : { "Arch" : "64" },
"m2.4xlarge" : { "Arch" : "64" },
"c1.medium"
: { "Arch" : "32" },
"c1.xlarge"
: { "Arch" : "64" },
"cc1.4xlarge" : { "Arch" : "64" }
},
"AWSRegionArch2AMI" : {
"us-east-1" : { "32" : "ami-6411e20d", "64"
"us-west-1" : { "32" : "ami-c9c7978c", "64"
"eu-west-1" : { "32" : "ami-37c2f643", "64"
"ap-southeast-1" : { "32" : "ami-66f28c34",
"ap-northeast-1" : { "32" : "ami-9c03a89d",
}
},
: "ami-7a11e213" },
: "ami-cfc7978a" },
: "ami-31c2f645" },
"64" : "ami-60f28c32" },
"64" : "ami-a003a8a1" }
"Resources" : {
"ElasticLoadBalancer" : {
"Type" : "AWS::ElasticLoadBalancing::LoadBalancer",
"Properties" : {
"AvailabilityZones" : { "Fn::GetAZs" : "" },
"Instances" : [ { "Ref" : "Ec2Instance1" },{ "Ref" : "Ec2Instance2" }
],
"Listeners" : [ {
"LoadBalancerPort" : "80",
"InstancePort" : { "Ref" : "WebServerPort" },
"Protocol" : "HTTP"
} ],
"HealthCheck" : {
API Version 2010-05-15
143
AWS CloudFormation User Guide
Create a Load-Balanced Apache Website
"Target" : { "Fn::Join" : [ "", ["HTTP:", { "Ref" : "WebServerPort"
}, "/"]]},
"HealthyThreshold" : "3",
"UnhealthyThreshold" : "5",
"Interval" : "30",
"Timeout" : "5"
}
}
},
"Ec2Instance1" : {
"Type" : "AWS::EC2::Instance",
"Properties" : {
"SecurityGroups" : [ { "Ref" : "InstanceSecurityGroup" } ],
"KeyName" : { "Ref" : "KeyName" },
"ImageId" : { "Fn::FindInMap" : [ "AWSRegionArch2AMI", { "Ref" :
"AWS::Region" },
{ "Fn::FindInMap" : [ "AWSInstance
Type2Arch", { "Ref" : "InstanceType" },
"Arch" ] } ] },
"UserData" : { "Fn::Base64" : { "Ref" : "WebServerPort" }}
}
},
"Ec2Instance2" : {
"Type" : "AWS::EC2::Instance",
"Properties" : {
"SecurityGroups" : [ { "Ref" : "InstanceSecurityGroup" } ],
"KeyName" : { "Ref" : "KeyName" },
"ImageId" : { "Fn::FindInMap" : [ "AWSRegionArch2AMI", { "Ref" :
"AWS::Region" },
{ "Fn::FindInMap" : [ "AWSInstance
Type2Arch", { "Ref" : "InstanceType" },
"Arch" ] } ] },
"UserData" : { "Fn::Base64" : { "Ref" : "WebServerPort" }}
}
},
"InstanceSecurityGroup" : {
"Type" : "AWS::EC2::SecurityGroup",
"Properties" : {
"GroupDescription" : "Enable SSH access and HTTP access on the inbound
port",
"SecurityGroupIngress" : [ {
"IpProtocol" : "tcp",
"FromPort" : "22",
"ToPort" : "22",
"CidrIp" : "0.0.0.0/0"
},
{
"IpProtocol" : "tcp",
"FromPort" : { "Ref" : "WebServerPort" },
"ToPort" : { "Ref" : "WebServerPort" },
"CidrIp" : "0.0.0.0/0"
} ]
}
}
},
API Version 2010-05-15
144
AWS CloudFormation User Guide
Auto-Scaled Worker that uses Spot Instances to Monitor
Work in an SQS Queue
"Outputs" : {
"URL" : {
"Description" : "URL of the sample website",
"Value" : { "Fn::Join" : [ "", [ "http://", { "Fn::GetAtt" : [ "Elastic
LoadBalancer", "DNSName" ]}]]}
}
}
}
Auto-Scaled Worker that uses Spot Instances to
Monitor Work in an SQS Queue
This template uses spot instances to create an auto-scaled worker that monitors work (messages) in an
SQS queue. The application is auto-scaled based on the amount of work in the queue. When there is
work, Auto Scaling scales up; when there is no work, Auto Scaling scales down. Each message contains
a command or script to run, an input file location, and an output location for the results.
WorkerRole Template
{
"AWSTemplateFormatVersion" : "2010-09-09",
"Description" : "AWS CloudFormation Sample Template WorkerRole: Create a multiaz, Auto Scaled worker that pulls command messages from a queue and execs the
command. Each message contains a command/script to run, an input file location and
an output location for the results. The application is Auto-Scaled based on the
amount of work in the queue. **WARNING** This template creates one or more Amazon
EC2 instances and an Amazon SQS queue. You will be billed for the AWS resources
used if you create a stack from this template.",
"Parameters" : {
"InstanceType" : {
"Description" : "Worker EC2 instance type",
"Type" : "String",
"Default" : "m1.small",
"AllowedValues" : [ "t1.micro","m1.small","m1.medi
um","m1.large","m1.xlarge","m2.xlarge","m2.2xlarge","m2.4xlarge","c1.medi
um","c1.xlarge","cc1.4xlarge","cc2.8xlarge","cg1.4xlarge"],
"ConstraintDescription" : "must be a valid EC2 instance type."
},
"KeyName" : {
"Description" : "The EC2 Key Pair to allow SSH access to the instances",
"Type": "AWS::EC2::KeyPair::KeyName",
"ConstraintDescription" : "must be the name of an existing EC2 KeyPair."
},
"MinInstances" : {
"Description" : "The minimum number of Workers",
"Type" : "Number",
"MinValue" : "0",
"Default" : "0",
"ConstraintDescription" : "Enter a number >=0"
API Version 2010-05-15
145
AWS CloudFormation User Guide
Auto-Scaled Worker that uses Spot Instances to Monitor
Work in an SQS Queue
},
"MaxInstances" : {
"Description" : "The maximum number of Workers",
"Type" : "Number",
"MinValue" : "1",
"Default" : "1",
"ConstraintDescription" : "Enter a number >1"
}
},
"Mappings" : {
"AWSInstanceType2Arch" : {
"t1.micro"
: { "Arch"
"m1.small"
: { "Arch"
"m1.medium"
: { "Arch"
"m1.large"
: { "Arch"
"m1.xlarge"
: { "Arch"
"m2.xlarge"
: { "Arch"
"m2.2xlarge" : { "Arch"
"m2.4xlarge" : { "Arch"
"c1.medium"
: { "Arch"
"c1.xlarge"
: { "Arch"
"cc1.4xlarge" : { "Arch"
"cc2.8xlarge" : { "Arch"
"cg1.4xlarge" : { "Arch"
},
:
:
:
:
:
:
:
"AWSRegionArch2AMI" : {
"us-east-1"
: { "32"
"ami-0da96764" },
"us-west-2"
: { "32"
"NOT_YET_SUPPORTED" },
"us-west-1"
: { "32"
"NOT_YET_SUPPORTED" },
"eu-west-1"
: { "32"
"NOT_YET_SUPPORTED" },
"ap-southeast-1" : { "32"
"NOT_YET_SUPPORTED" },
"ap-northeast-1" : { "32"
"NOT_YET_SUPPORTED" },
"sa-east-1"
: { "32"
"NOT_YET_SUPPORTED" }
}
},
:
:
:
:
:
:
:
:
:
:
:
:
:
"64" },
"64" },
"64" },
"64" },
"64" },
"64" },
"64" },
"64" },
"64" },
"64" },
"64HVM" },
"64HVM" },
"64HVM" }
: "ami-31814f58", "64" : "ami-1b814f72", "64HVM"
: "ami-38fe7308", "64" : "ami-30fe7300", "64HVM"
: "ami-11d68a54", "64" : "ami-1bd68a5e", "64HVM"
: "ami-973b06e3", "64" : "ami-953b06e1", "64HVM"
: "ami-b4b0cae6", "64" : "ami-beb0caec", "64HVM"
: "ami-0644f007", "64" : "ami-0a44f00b", "64HVM"
: "ami-3e3be423", "64" : "ami-3c3be421", "64HVM"
"Resources" : {
"WorkerUser" : {
"Type" : "AWS::IAM::User",
"Properties" : {
"Path": "/",
"Policies": [{
"PolicyName": "root",
"PolicyDocument": {
"Version": "2012-10-17",
"Statement":[{
"Effect": "Allow",
API Version 2010-05-15
146
AWS CloudFormation User Guide
Auto-Scaled Worker that uses Spot Instances to Monitor
Work in an SQS Queue
"Action": [
"cloudformation:DescribeStackResource",
"sqs:ReceiveMessage",
"sqs:DeleteMessage",
"sns:Publish"
],
"Resource": "*"
}]
}
}]
}
},
"WorkerKeys" : {
"Type" : "AWS::IAM::AccessKey",
"Properties" : {
"UserName" : {"Ref": "WorkerUser"}
}
},
"InputQueue" : {
"Type" : "AWS::SQS::Queue"
},
"InputQueuePolicy" : {
"Type" : "AWS::SQS::QueuePolicy",
"DependsOn" : "LaunchConfig",
"Properties" : {
"Queues" : [ { "Ref" : "InputQueue" } ],
"PolicyDocument": {
"Version": "2012-10-17",
"Id": "ReadFromQueuePolicy",
"Statement" : [ {
"Sid": "ConsumeMessages",
"Effect": "Allow",
"Principal" : { "AWS": {"Fn::GetAtt" : ["WorkerUser", "Arn"]} },
"Action": ["sqs:ReceiveMessage", "sqs:DeleteMessage"],
"Resource": { "Fn::GetAtt" : [ "InputQueue", "Arn" ] }
} ]
}
}
},
"InstanceSecurityGroup" : {
"Type" : "AWS::EC2::SecurityGroup",
"Properties" : {
"GroupDescription" : "Enable SSH access",
"SecurityGroupIngress" : [ { "IpProtocol" : "tcp", "FromPort" : "22",
"ToPort" : "22", "CidrIp" : "0.0.0.0/0" } ]
}
},
"LaunchConfig" : {
"Type" : "AWS::AutoScaling::LaunchConfiguration",
"Metadata" : {
"Comment" : "Install a simple PHP application",
"AWS::CloudFormation::Init" : {
"configSets" : {
API Version 2010-05-15
147
AWS CloudFormation User Guide
Auto-Scaled Worker that uses Spot Instances to Monitor
Work in an SQS Queue
"ALL" : ["XML", "Time", "LWP", "AmazonLibraries", "WorkerRole"]
},
"XML" : {
"packages" : {
"yum" : {
"perl-XML-Simple"
: []
}
}
},
"Time" : {
"packages" : {
"yum" : {
"perl-LWP-Protocol-https" : []
}
}
},
"LWP" : {
"packages" : {
"yum" : {
"perl-Time-HiRes"
: []
}
}
},
"AmazonLibraries" : {
"sources" : {
"/home/ec2-user/sqs" : "http://s3.amazonaws.com/awscode/amazonqueue/2009-02-01/perl/library/amazon-queue-2009-02-01-perl-library.zip"
}
},
"WorkerRole" : {
"files" : {
"/etc/cron.d/worker.cron" : {
"content" : "*/1 * * * * ec2-user /home/ec2-user/worker.pl &>
/home/ec2-user/worker.log\n",
"mode"
: "000644",
"owner"
: "root",
"group"
: "root"
},
"/home/ec2-user/worker.pl" : {
"content" : { "Fn::Join" : ["", [
"#!/usr/bin/perl -w\n",
"#\n",
"use strict;\n",
"use Carp qw( croak );\n",
"use lib qw(/home/ec2-user/sqs/amazon-queue-2009-02-01-perllibrary/src); \n",
"use LWP::Simple qw( getstore );\n",
"\n",
"my $AWS_ACCESS_KEY_ID
= \"", { "Ref" : "WorkerKeys" },
"\";\n",
"my $AWS_SECRET_ACCESS_KEY = \"", { "Fn::GetAtt": ["WorkerKeys",
"SecretAccessKey"]}, "\";\n",
"my $QUEUE_NAME
= \"", { "Ref" : "InputQueue" },
"\";\n",
"my $COMMAND_FILE
= \"/home/ec2-user/command\";\n",
"\n",
"eval {\n",
API Version 2010-05-15
148
AWS CloudFormation User Guide
Auto-Scaled Worker that uses Spot Instances to Monitor
Work in an SQS Queue
"\n",
" use Amazon::SQS::Client; \n",
" my $service = Amazon::SQS::Client->new($AWS_ACCESS_KEY_ID,
$AWS_SECRET_ACCESS_KEY);\n",
" \n",
" my $response = $service->receiveMessage({QueueUrl=>$QUEUE_NAME,
MaxNumberOfMessages=>1});\n",
" if ($response->isSetReceiveMessageResult) {\n",
"
my $result = $response->getReceiveMessageResult();\n",
"
if ($result->isSetMessage) {\n",
"
my $messageList = $response->getReceiveMessageResult()>getMessage();\n",
"
foreach(@$messageList) {\n",
"
my $message = $_;\n",
"
my $messageHandle = 0;\n",
"
if ($message->isSetReceiptHandle()) {\n",
"
$messageHandle = $message->getReceiptHandle();\n",
"
} else {\n",
"
croak \"Couldn't get message Id from message\";\n",
"
}\n",
"
if ($message->isSetBody()) {\n",
"
my %parameters = split(/[=;]/, $message->get
Body());\n",
"
if (defined($parameters{\"Input\"}) &&
defined($parameters{\"Output\"}) && defined($parameters{\"Command\"})) {\n",
"
getstore($parameters{\"Command\"}, $COM
MAND_FILE);\n",
"
chmod(0755, $COMMAND_FILE);\n",
"
my $command = $COMMAND_FILE . \" \" . $paramet
ers{\"Input\"} . \" \" . $parameters{\"Output\"};\n",
"
my $result = `$command`;\n",
"
print \"Result = \" . $result . \"\\n\";\n",
"
} else {\n",
"
croak \"Invalid message\";\n",
"
}\n",
"
} else {\n",
"
croak \"Couldn't get message body from message\";\n",
"
}\n",
"
my $response = $service->deleteMes
sage({QueueUrl=>$QUEUE_NAME, ReceiptHandle=>$messageHandle});\n",
"
}\n",
"
} else {\n",
"
printf \"Empty Poll\\n\";\n",
"
}\n",
" } else {\n",
"
croak \"Call failed\";\n",
" }\n",
"}; \n",
"\n",
"my $ex = $@;\n",
"if ($ex) {\n",
" require Amazon::SQS::Exception;\n",
" if (ref $ex eq \"Amazon::SQS::Exception\") {\n",
"
print(\"Caught Exception: \" . $ex->getMessage() .
\"\\n\");\n",
" } else {\n",
"
croak $@;\n",
API Version 2010-05-15
149
AWS CloudFormation User Guide
Auto-Scaled Worker that uses Spot Instances to Monitor
Work in an SQS Queue
" }\n",
"}\n"
]]},
"mode"
: "000755",
"owner"
: "ec2-user",
"group"
: "ec2-user"
}
}
}
}
},
"Properties" : {
"KeyName" : { "Ref" : "KeyName" },
"SpotPrice" : "0.05",
"ImageId" : { "Fn::FindInMap" : [ "AWSRegionArch2AMI", { "Ref" :
"AWS::Region" },
{ "Fn::FindInMap" : [ "AWSInstance
Type2Arch", { "Ref" : "InstanceType" },
"Arch" ] } ] },
"SecurityGroups" : [ { "Ref" : "InstanceSecurityGroup" } ],
"InstanceType" : { "Ref" : "InstanceType" },
"UserData"
: { "Fn::Base64" : { "Fn::Join" : ["", [
"#!/bin/bash\n",
"yum update -y aws-cfn-bootstrap\n",
"# Install the Worker application\n",
"/opt/aws/bin/cfn-init ",
"
--stack ", { "Ref" : "AWS::StackName" },
"
--resource LaunchConfig ",
"
--configset ALL",
"
--access-key ", { "Ref" : "WorkerKeys" },
"
--secret-key ", {"Fn::GetAtt": ["WorkerKeys", "SecretAccess
Key"]},
"
--region ", { "Ref" : "AWS::Region" }, "\n"
]]}}
}
},
"WorkerGroup" : {
"Type" : "AWS::AutoScaling::AutoScalingGroup",
"Properties" : {
"AvailabilityZones" : { "Fn::GetAZs" : ""},
"LaunchConfigurationName" : { "Ref" : "LaunchConfig" },
"MinSize" : { "Ref" : "MinInstances" },
"MaxSize" : { "Ref" : "MaxInstances" }
}
},
"WorkerScaleUpPolicy" : {
"Type" : "AWS::AutoScaling::ScalingPolicy",
"Properties" : {
"AdjustmentType" : "ChangeInCapacity",
"AutoScalingGroupName" : { "Ref" : "WorkerGroup" },
"Cooldown" : "60",
"ScalingAdjustment" : "1"
}
},
"WorkerScaleDownPolicy" : {
API Version 2010-05-15
150
AWS CloudFormation User Guide
Auto-Scaled Worker that uses Spot Instances to Monitor
Work in an SQS Queue
"Type" : "AWS::AutoScaling::ScalingPolicy",
"Properties" : {
"AdjustmentType" : "ChangeInCapacity",
"AutoScalingGroupName" : { "Ref" : "WorkerGroup" },
"Cooldown" : "60",
"ScalingAdjustment" : "-1"
}
},
"TooManyMessagesAlarm": {
"Type": "AWS::CloudWatch::Alarm",
"Properties": {
"AlarmDescription": "Scale-Up if queue depth grows beyond 10 messages",
"Namespace": "AWS/SQS",
"MetricName": "ApproximateNumberOfMessagesVisible",
"Dimensions": [{ "Name": "QueueName", "Value" : { "Fn::GetAtt" : ["In
putQueue", "QueueName"] } }],
"Statistic": "Sum",
"Period": "60",
"EvaluationPeriods": "3",
"Threshold": "1",
"ComparisonOperator": "GreaterThanThreshold",
"AlarmActions": [ { "Ref": "WorkerScaleUpPolicy" } ]
}
},
"NotEnoughMessagesAlarm": {
"Type": "AWS::CloudWatch::Alarm",
"Properties": {
"AlarmDescription": "Scale-down if there are too many empty polls, indic
ating there is not enough work",
"Namespace": "AWS/SQS",
"MetricName": "NumberOfEmptyReceives",
"Dimensions": [{ "Name": "QueueName", "Value" : { "Fn::GetAtt" : ["In
putQueue", "QueueName"] } }],
"Statistic": "Sum",
"Period": "60",
"EvaluationPeriods": "10",
"Threshold": "3",
"ComparisonOperator": "GreaterThanThreshold",
"AlarmActions": [ { "Ref": "WorkerScaleDownPolicy" } ]
}
}
},
"Outputs" : {
"QueueURL" : {
"Description" : "URL of input queue",
"Value" : { "Ref" : "InputQueue" }
}
}
}
API Version 2010-05-15
151
AWS CloudFormation User Guide
Template Snippets
Template Snippets
This section provides a number of example scenarios that you can use to understand how to declare
various AWS CloudFormation template parts.You can also use the snippets as a starting point for sections
of your custom templates.
Note
Because AWS CloudFormation templates must be JSON compliant, there is no provision for a
line continuation character. The wrapping of the snippets in this document may be random if the
line is longer that 80 characters.
Topics
• General Template Snippets (p. 152)
• Auto Scaling Template Snippets (p. 157)
• AWS CloudFormation Template Snippets (p. 160)
• Amazon CloudFront Template Snippets (p. 163)
•
•
•
•
•
•
•
•
•
•
•
•
•
•
Amazon CloudWatch Template Snippets (p. 167)
Amazon CloudWatch Logs Template Snippets (p. 169)
Amazon EC2 Template Snippets (p. 177)
Amazon EC2 Container Service Template Snippets (p. 186)
Elastic Beanstalk Template Snippets (p. 193)
Elastic Load Balancing Template Snippets (p. 194)
AWS Identity and Access Management Template Snippets (p. 195)
AWS OpsWorks Template Snippets (p. 207)
Amazon Redshift Template Snippets (p. 210)
Amazon RDS Template Snippets (p. 214)
Amazon Route 53 Template Snippets (p. 218)
Amazon S3 Template Snippets (p. 221)
Amazon SNS Template Snippets (p. 224)
Amazon SQS Template Snippets (p. 224)
General Template Snippets
The following examples show different AWS CloudFormation template features that aren't specific to an
AWS service.
Topics
• Base64 Encoded UserData Property (p. 153)
• Base64 Encoded UserData Property with AccessKey and SecretKey (p. 153)
• Parameters Section with One Literal String Parameter (p. 153)
• Parameters Section with String Parameter with Regular Expression Constraint (p. 154)
• Parameters Section with Number Parameter with MinValue and MaxValue Constraints (p. 154)
• Parameters Section with Number Parameter with AllowedValues Constraint (p. 154)
• Parameters Section with One Literal CommaDelimitedList Parameter (p. 155)
• Parameters Section with Parameter Value Based on Pseudo Parameter (p. 155)
• Mapping Section with Three Mappings (p. 155)
• Description Based on Literal String (p. 156)
• Outputs Section with One Literal String Output (p. 156)
API Version 2010-05-15
152
AWS CloudFormation User Guide
General
• Outputs Section with One Resource Reference and One Pseudo Reference Output (p. 156)
• Outputs Section with an Output Based on a Function, a Literal String, a Reference, and a Pseudo
Parameter (p. 156)
• Template Format Version (p. 156)
• AWS Tag Property (p. 157)
Base64 Encoded UserData Property
This example shows the assembly of a UserData property using the Fn::Base64 and Fn::Join functions.
The references MyValue and MyName are parameters that must be defined in the Parameters section of
the template. The literal string Hello World is just another value this example passes in as part of the
UserData.
"UserData" : {
"Fn::Base64" : {
"Fn::Join" : [ ",", [
{ "Ref" : "MyValue" },
{ "Ref" : "MyName" },
"Hello World" ] ]
}
}
Base64 Encoded UserData Property with AccessKey and
SecretKey
This example shows the assembly of a UserData property using the Fn::Base64 and Fn::Join functions.
It includes the AccessKey and SecretKey information. The references AccessKey and SecretKey
are parameters that must be defined in the Parameters section of the template.
"UserData" : {
"Fn::Base64" : {
"Fn::Join" : [ "", [
"ACCESS_KEY=", { "Ref" : "AccessKey" },
"SECRET_KEY=", { "Ref" : "SecretKey" } ]
]
}
}
Parameters Section with One Literal String Parameter
The following example depicts a valid Parameters section declaration in which a single String type
parameter is declared.
"Parameters" : {
"UserName" : {
"Type" : "String",
"Default" : "nonadmin",
"Description" : "Assume a vanilla user if no command-line spec provided"
}
}
API Version 2010-05-15
153
AWS CloudFormation User Guide
General
Parameters Section with String Parameter with Regular
Expression Constraint
The following example depicts a valid Parameters section declaration in which a single String type
parameter is declared. The AdminUserAccount parameter has a default of admin. The parameter value
must have a minimum length of 1, a maximum length of 16, and contains alphabetic characters and
numbers but must begin with an alphabetic character.
"Parameters" : {
"AdminUserAccount": {
"Default": "admin",
"NoEcho": "true",
"Description" : "The admin account user name",
"Type": "String",
"MinLength": "1",
"MaxLength": "16",
"AllowedPattern" : "[a-zA-Z][a-zA-Z0-9]*"
}
}
Parameters Section with Number Parameter with MinValue
and MaxValue Constraints
The following example depicts a valid Parameters section declaration in which a single Number type
parameter is declared. The WebServerPort parameter has a default of 80 and a minimum value 1 and
maximum value 65535.
"Parameters" : {
"WebServerPort": {
"Default": "80",
"Description" : "TCP/IP port for the web server",
"Type": "Number",
"MinValue": "1",
"MaxValue": "65535"
}
}
Parameters Section with Number Parameter with
AllowedValues Constraint
The following example depicts a valid Parameters section declaration in which a single Number type
parameter is declared. The WebServerPort parameter has a default of 80 and allows only values of 80
and 8888.
"Parameters" : {
"WebServerPortLimited": {
"Default": "80",
"Description" : "TCP/IP port for the web server",
"Type": "Number",
"AllowedValues" : ["80", "8888"]
}
}
API Version 2010-05-15
154
AWS CloudFormation User Guide
General
Parameters Section with One Literal CommaDelimitedList
Parameter
The following example depicts a valid Parameters section declaration in which a single
CommaDelimitedList type parameter is declared. The NoEcho property is set to TRUE, which will mask
its value with asterisks (*****) in the aws cloudformation describe-stacks output.
"Parameters" : {
"UserRoles" : {
"Type" : "CommaDelimitedList",
"Default" : "guest,newhire",
"NoEcho" : "TRUE"
}
}
Parameters Section with Parameter Value Based on Pseudo
Parameter
This example shows a parameter assignment based on the value returned from the pseudo parameter,
"AWS::StackName".
"Parameters" : {
"StackName" : {
"Type" : "String",
"Default" : { "Ref" : "AWS::StackName"}
}
},
Mapping Section with Three Mappings
The following example depicts a valid Mapping section declaration that contains three mappings. The
map, when matched with a mapping key of Stop, SlowDown, or Go, provides the RGB values assigned
to the corresponding RGBColor attribute.
"Mappings" : {
"LightColor" : {
"Stop" : {
"Description" : "red",
"RGBColor" : "RED 255 GREEN 0 BLUE 0"
},
"SlowDown" : {
"Description" : "yellow",
"RGBColor" : "RED 255 GREEN 255 BLUE 0"
},
"Go" : {
"Description" : "green",
"RGBColor" : "RED 0 GREEN 128 BLUE 0"
}
}
},
API Version 2010-05-15
155
AWS CloudFormation User Guide
General
Description Based on Literal String
The following example depicts a valid Description section declaration where the value is based on a literal
string. This snippet can be for templates, parameters, resources, properties, or outputs.
"Description" : "Replace this value"
Outputs Section with One Literal String Output
This example shows a output assignment based on a literal string.
"Outputs" : {
"MyPhone" : {
"Value" : "Please call 555-5555",
"Description" : "A random message for aws cloudformation describe-stacks"
}
}
Outputs Section with One Resource Reference and One
Pseudo Reference Output
This example shows an Outputs section with two output assignments. One is based on a resource, and
the other is based on a pseudo reference.
"Outputs" : {
"SNSTopic" : { "Value" : { "Ref" : "MyNotificationTopic" } },
"StackName" : { "Value" : { "Ref" : "AWS::StackName" } }
}
Outputs Section with an Output Based on a Function, a
Literal String, a Reference, and a Pseudo Parameter
This example shows an Outputs section with one output assignment. The Join function is used to
concatenate the value, using a percent sign as the delimiter.
"Outputs" : {
"MyOutput" : {
"Value" : { "Fn::Join" :
[ "%", [ "A-string", {"Ref" : "AWS::StackName" } ] ]
}
}
}
Template Format Version
The following snippet depicts a valid Template Format Version section declaration.
"AWSTemplateFormatVersion" : "2010-09-09"
API Version 2010-05-15
156
AWS CloudFormation User Guide
Auto Scaling
AWS Tag Property
This example shows an AWS Tag property. You would specify this property within the Properties section
of a resource. When the resource is created, it will be tagged with the tags you declare.
"Tags" : [
{
"Key" :
"Value"
},
{
"Key" :
"Value"
}
]
},
"keyname1",
: "value1"
"keyname2",
: "value2"
Auto Scaling Template Snippets
Topics
• Auto Scaling Launch Configuration Resource (p. 157)
• Auto Scaling Group Resource (p. 158)
• Auto Scaling Policy Triggered by CloudWatch Alarm (p. 158)
• Auto Scaling Group with Notifications (p. 159)
• Auto Scaling with an UpdatePolicy (p. 159)
Auto Scaling Launch Configuration Resource
This example shows an Auto Scaling AWS::AutoScaling::LaunchConfiguration resource. The
SecurityGroups property specifies both an AWS::EC2::SecurityGroup resource named
myEC2SecurityGroup and an existing EC2 security group named myExistingEC2SecurityGroup. The
BlockDeviceMappings property lists two devices: a 50 gigabyte EBS volume mapped to /dev/sdk and a
virtual device ephemeral0 mapped to /dev/sdc.
"SimpleConfig" : {
"Type" : "AWS::AutoScaling::LaunchConfiguration",
"Properties" : {
"ImageId" : "ami-6411e20d",
"SecurityGroups" : [ { "Ref" : "myEC2SecurityGroup" }, "myExistingEC2Se
curityGroup" ],
"InstanceType" : "m1.small",
"BlockDeviceMappings" : [ {
"DeviceName" : "/dev/sdk",
"Ebs" : {"VolumeSize" : "50"}
}, {
"DeviceName" : "/dev/sdc",
"VirtualName" : "ephemeral0"
} ]
}
},
API Version 2010-05-15
157
AWS CloudFormation User Guide
Auto Scaling
Auto Scaling Group Resource
This example shows an Auto Scaling AWS::AutoScaling::AutoScalingGroup (p. 288) resource. The
AvailabilityZones property specifies the availability zones where the auto-scaling group's EC2 instances
will be created. In this example, the Fn::GetAZs (p. 666) function call { "Fn::GetAZs" : "" } specifies
all availability zones for the region in which the stack is created. The LoadBalancerNames property lists
the LoadBalancers used to route traffic to the Auto Scaling group. In this example, one LoadBalancer is
specified, the AWS::ElasticLoadBalancing::LoadBalancer (p. 441) resource LB.
"MyServerGroup" : {
"Type" : "AWS::AutoScaling::AutoScalingGroup",
"Properties" : {
"AvailabilityZones" : { "Fn::GetAZs" : ""},
"LaunchConfigurationName" : { "Ref" : "SimpleConfig" },
"MinSize" : "1",
"MaxSize" : "3",
"LoadBalancerNames" : [ { "Ref" : "LB" } ]
}
},
Auto Scaling Policy Triggered by CloudWatch Alarm
This example shows an AWS::AutoScaling::ScalingPolicy (p. 304) resource that scales up the Auto Scaling
group asGroup. The AdjustmentType property specifies ChangeInCapacity, which means that the
ScalingAdjustment represents the number of instances to add (if ScalingAdjustment is positive)
or delete (if it is negative). In this example, ScalingAdjustment is 1; therefore, the policy increments
the number of EC2 instances in the group by 1 when the policy is executed.
The AWS::CloudWatch::Alarm (p. 334) resource CPUAlarmHigh specifies the scaling policy ScaleUpPolicy
as the action to execute when the alarm is in an ALARM state (AlarmActions).
"ScaleUpPolicy" : {
"Type" : "AWS::AutoScaling::ScalingPolicy",
"Properties" : {
"AdjustmentType" : "ChangeInCapacity",
"AutoScalingGroupName" : { "Ref" : "asGroup" },
"Cooldown" : "1",
"ScalingAdjustment" : "1"
}
},
"CPUAlarmHigh": {
"Type": "AWS::CloudWatch::Alarm",
"Properties": {
"EvaluationPeriods": "1",
"Statistic": "Average",
"Threshold": "10",
"AlarmDescription": "Alarm if CPU too high or metric disappears indicating
instance is down",
"Period": "60",
"AlarmActions": [ { "Ref": "ScaleUpPolicy" } ],
"Namespace": "AWS/EC2",
"Dimensions": [ {
"Name": "AutoScalingGroupName",
"Value": { "Ref": "asGroup" }
API Version 2010-05-15
158
AWS CloudFormation User Guide
Auto Scaling
} ],
"ComparisonOperator": "GreaterThanThreshold",
"MetricName": "CPUUtilization"
}
},
Auto Scaling Group with Notifications
This example shows an AWS::AutoScaling::AutoScalingGroup (p. 288) resource that sends Amazon SNS
notifications when the specified events take place. The NotificationConfigurations property
specifies the SNS topic where AWS CloudFormation sends a notification and the events that will cause
AWS CloudFormation to send notifications. When the events specified by NotificationTypes occur,
AWS CloudFormation will send a notification to the SNS topic specified by TopicARN. In this example,
AWS CloudFormation sends a notification to the SNS topic topic1 when the
autoscaling:EC2_INSTANCE_LAUNCH and autoscaling:EC2_INSTANCE_LAUNCH_ERROR events
occur.
"MyAsGroupWithNotification" : {
"Type" : "AWS::AutoScaling::AutoScalingGroup",
"Properties" : {
"AvailabilityZones" : { "Ref" : "azList" },
"LaunchConfigurationName" : { "Ref" : "myLCOne" },
"MinSize" : "0",
"MaxSize" : "2",
"DesiredCapacity" : "1",
"NotificationConfigurations" : [
{
"TopicARN" : { "Ref" : "topic1" },
"NotificationTypes" : [
"autoscaling:EC2_INSTANCE_LAUNCH",
"autoscaling:EC2_INSTANCE_LAUNCH_ERROR",
"autoscaling:EC2_INSTANCE_TERMINATE",
"autoscaling:EC2_INSTANCE_TERMINATE_ERROR"
]
}
]
}
}
Auto Scaling with an UpdatePolicy
This example shows how to use an UpdatePolicy (p. 645) with an auto-scaling group.
"ASG1" : {
"UpdatePolicy" : {
"AutoScalingRollingUpdate" : {
"MinInstancesInService" : "1",
"MaxBatchSize" : "1",
"PauseTime" : "PT12M5S"
}
},
"Type" : "AWS::AutoScaling::AutoScalingGroup",
"Properties" : {
"AvailabilityZones" : { "Fn::GetAZs" : { "Ref" : "AWS::Region" } },
API Version 2010-05-15
159
AWS CloudFormation User Guide
AWS CloudFormation
"LaunchConfigurationName" : { "Ref" : "ASLC" },
"MaxSize" : "3",
"MinSize" : "1"
}
}
AWS CloudFormation Template Snippets
Topics
• Nested Stacks (p. 160)
• Wait Condition (p. 161)
Nested Stacks
Nesting a Stack in a Template
This example template contains an nested stack resource called myStack. When AWS CloudFormation
creates a stack from the template, it creates the myStack, whose template is specified in the TemplateURL
property. The output value StackRef returns the stack ID for myStack and the value
OutputFromNestedStack returns the output value BucketName from within the myStack resource. The
Outputs.nestedstackoutputname format is reserved for specifying output values from nested stacks
and can be used anywhere within the containing template.
For more information, see AWS::CloudFormation::Stack (p. 324).
{
"AWSTemplateFormatVersion" : "2010-09-09",
"Resources" : {
"myStack" : {
"Type" : "AWS::CloudFormation::Stack",
"Properties" : {
"TemplateURL" : "https://s3.amazonaws.com/cloudformation-templatesus-east-1/S3_Bucket.template",
"TimeoutInMinutes" : "60"
}
}
},
"Outputs": {
"StackRef": {"Value": { "Ref" : "myStack"}},
"OutputFromNestedStack" : {
"Value" : { "Fn::GetAtt" : [ "myStack", "Outputs.BucketName" ] }
}
}
}
Nesting a Stack with Input Parameters in a Template
This example template contains a stack resource that specifies input parameters. When AWS
CloudFormation creates a stack from this template, it uses the value pairs declared within the Parameters
property as the input parameters for the template used to create the myStackWithParams stack. In this
example, the InstanceType and KeyName parameters are specified.
For more information, see AWS::CloudFormation::Stack (p. 324).
API Version 2010-05-15
160
AWS CloudFormation User Guide
AWS CloudFormation
{
"AWSTemplateFormatVersion" : "2010-09-09",
"Resources" : {
"myStackWithParams" : {
"Type" : "AWS::CloudFormation::Stack",
"Properties" : {
"TemplateURL" : "https://s3.amazonaws.com/cloudformation-templatesus-east-1/EC2ChooseAMI.template",
"Parameters" : {
"InstanceType" : "t1.micro",
"KeyName" : "mykey"
}
}
}
}
}
Wait Condition
Using a Wait Condition with an Amazon EC2 Instance
Important
For Amazon EC2 and Auto Scaling resources, we recommend that you use a CreationPolicy
attribute instead of wait conditions. Add a CreationPolicy attribute to those resources and use
the cfn-signal helper script to signal when an instance has been successfully created.
If you can't use a creation policy, you view the following example template, which declares an Amazon
EC2 instance with a wait condition. The wait condition myWaitCondition uses myWaitConditionHandle
for signaling, uses the DependsOn attribute (p. 642) to specify that the wait condition will trigger after the
Amazon EC2 instance resource has been created, and uses the Timeout property to specify a duration
of 4500 seconds for the wait condition. In addition, the presigned URL that signals the wait condition is
passed to the Amazon EC2 instance with the UserData property of the Ec2Instance resource, thus
enabling an application or script running on that Amazon EC2 instance to retrieve the pre-signed URL
and employ it to signal a success or failure to the wait condition. Note that you need to create the application
or script that signals the wait condition. The output value ApplicationData contains the data passed back
from the wait condition signal.
For more information, see Creating Wait Conditions in a Template (p. 230),
AWS::CloudFormation::WaitCondition (p. 326), and AWS::CloudFormation::WaitConditionHandle (p. 329).
{
"AWSTemplateFormatVersion" : "2010-09-09",
"Mappings" : {
"RegionMap" : {
"us-east-1" : {
"AMI" : "ami-76f0061f"
},
"us-west-1" : {
"AMI" : "ami-655a0a20"
},
"eu-west-1" : {
"AMI" : "ami-7fd4e10b"
},
"ap-northeast-1" : {
"AMI" : "ami-8e08a38f"
},
API Version 2010-05-15
161
AWS CloudFormation User Guide
AWS CloudFormation
"ap-southeast-1" : {
"AMI" : "ami-72621c20"
}
}
},
"Resources" : {
"Ec2Instance" : {
"Type" : "AWS::EC2::Instance",
"Properties" : {
"UserData" : { "Fn::Base64" : {"Ref" : "myWaitHandle"}},
"ImageId" : { "Fn::FindInMap" : [ "RegionMap", { "Ref" :
"AWS::Region" }, "AMI" ]}
}
},
"myWaitHandle" : {
"Type" : "AWS::CloudFormation::WaitConditionHandle",
"Properties" : {
}
},
"myWaitCondition" : {
"Type" : "AWS::CloudFormation::WaitCondition",
"DependsOn" : "Ec2Instance",
"Properties" : {
"Handle" : { "Ref" : "myWaitHandle" },
"Timeout" : "4500"
}
}
},
"Outputs" : {
"ApplicationData" : {
"Value" : { "Fn::GetAtt" : [ "myWaitCondition", "Data" ]},
"Description" : "The data passed back as part of signalling the
WaitCondition."
}
}
}
Using Curl to signal a Wait Condition
This example shows a Curl command line that signals success to a wait condition.
curl -T /tmp/a "https://cloudformation-waitcondition-test.s3.amazon
aws.com/arn%3Aaws%3Acloudformation%3Aus-east-1%3A034017226601%3Astack%2Fstackgosar-20110427004224-test-stack-with-WaitCondition--VEYW%2Fe498ce60-70a1-11e081a7-5081d0136786%2FmyWaitConditionHandle?Expires=1303976584&AWSAccessKeyId=AKI
AIOSFODNN7EXAMPLE&Signature=ik1twT6hpS4cgNAw7wyOoRejVoo%3D"
where the file /tmp/a contains the following JSON structure:
{
"Status" : "SUCCESS",
"Reason" : "Configuration Complete",
"UniqueId" : "ID1234",
"Data" : "Application has completed configuration."
}
API Version 2010-05-15
162
AWS CloudFormation User Guide
CloudFront
This example shows a Curl command line that sends the same success signal except it sends the JSON
as a parameter on the command line.
curl -X PUT -H 'Content-Type:' --data-binary '{"Status" : "SUCCESS","Reason" :
"Configuration Complete","UniqueId" : "ID1234","Data" : "Application has com
pleted configuration."}' "https://cloudformation-waitcondition-test.s3.amazon
aws.com/arn%3Aaws%3Acloudformation%3Aus-east-1%3A034017226601%3Astack%2Fstackgosar-20110427004224-test-stack-with-WaitCondition--VEYW%2Fe498ce60-70a1-11e081a7-5081d0136786%2FmyWaitConditionHandle?Expires=1303976584&AWSAccessKeyId=AKI
AIOSFODNN7EXAMPLE&Signature=ik1twT6hpS4cgNAw7wyOoRejVoo%3D"
Amazon CloudFront Template Snippets
Topics
• Amazon CloudFront Distribution Resource with an Amazon S3 Origin (p. 163)
• Amazon CloudFront Distribution Resource with Custom Origin (p. 164)
• Amazon CloudFront Distribution with Multi-origin Support. (p. 165)
Amazon CloudFront Distribution Resource with an Amazon
S3 Origin
This example shows an Amazon CloudFront Distribution (p. 330) using an S3Origin (p. 560).
"myDistribution" : {
"Type" : "AWS::CloudFront::Distribution",
"Properties" : {
"DistributionConfig" : {
"Origins" : [ {
"DomainName": "mybucket.s3.amazonaws.com",
"Id" : "myS3Origin",
"S3OriginConfig" : {
"OriginAccessIdentity" : "origin-access-identity/cloud
front/E127EXAMPLE51Z"
}
}],
"Enabled" : "true",
"Comment" : "Some comment",
"DefaultRootObject" : "index.html",
"Logging" : {
"IncludeCookies" : "false",
"Bucket" : "mylogs.s3.amazonaws.com",
"Prefix" : "myprefix"
},
"Aliases" : [ "mysite.example.com", "yoursite.example.com" ],
"DefaultCacheBehavior" : {
"AllowedMethods" : [ "DELETE", "GET", "HEAD", "OPTIONS", "PATCH",
"POST", "PUT" ],
"TargetOriginId" : "myS3Origin",
"ForwardedValues" : {
"QueryString" : "false",
"Cookies" : { "Forward" : "none" }
},
"TrustedSigners" : [ "1234567890EX", "1234567891EX" ],
API Version 2010-05-15
163
AWS CloudFormation User Guide
CloudFront
"ViewerProtocolPolicy" : "allow-all"
},
"PriceClass" : "PriceClass_200",
"Restrictions" : {
"GeoRestriction" : {
"RestrictionType" : "whitelist",
"Locations" : [ "AQ", "CV" ]
}
},
"ViewerCertificate" : { "CloudFrontDefaultCertificate" : "true" }
}
}
}
Amazon CloudFront Distribution Resource with Custom
Origin
This example shows an Amazon CloudFront Distribution (p. 330) using a CustomOrigin (p. 559).
"myDistribution": {
"Type": "AWS: : CloudFront: : Distribution",
"Properties": {
"DistributionConfig": {
"Origins": [
{
"DomainName": "www.example.com",
"Id": "myCustomOrigin",
"CustomOriginConfig": {
"HTTPPort": "80",
"HTTPSPort": "443",
"OriginProtocolPolicy": "http-only"
}
}
],
"Enabled": "true",
"Comment": "Somecomment",
"DefaultRootObject": "index.html",
"Logging": {
"IncludeCookies" : "true",
"Bucket": "mylogs.s3.amazonaws.com",
"Prefix": "myprefix"
},
"Aliases": [
"mysite.example.com",
"*.yoursite.example.com"
],
"DefaultCacheBehavior": {
"TargetOriginId": "myCustomOrigin",
"SmoothStreaming" : "false",
"ForwardedValues": {
"QueryString": "false",
"Cookies" : { "Forward" : "all" }
},
"TrustedSigners": [
"1234567890EX",
API Version 2010-05-15
164
AWS CloudFormation User Guide
CloudFront
"1234567891EX"
],
"ViewerProtocolPolicy": "allow-all"
},
"CustomErrorResponses" : [ {
"ErrorCode" : "404",
"ResponsePagePath" : "/error-pages/404.html",
"ResponseCode" : "200",
"ErrorCachingMinTTL" : "30"
} ],
"PriceClass" : "PriceClass_200",
"Restrictions" : {
"GeoRestriction" : {
"RestrictionType" : "whitelist",
"Locations" : [ "AQ", "CV" ]
}
},
"ViewerCertificate" : { "CloudFrontDefaultCertificate" : "true" }
}
}
}
Amazon CloudFront Distribution with Multi-origin Support.
This template snippet shows how to declare a CloudFront Distribution (p. 330) with multi-origin support.
In the DistributionConfig (p. 551), a list of origins is provided and a DefaultCacheBehavior (p. 556) is set.
{
"AWSTemplateFormatVersion" : "2010-09-09",
"Resources" : {
"myDistribution" : {
"Type" : "AWS::CloudFront::Distribution",
"Properties" : {
"DistributionConfig" : {
"Origins" : [ {
"Id" : "myS3Origin",
"DomainName" : "mybucket.s3.amazonaws.com",
"S3OriginConfig" : {
"OriginAccessIdentity" : "origin-access-iden
tity/cloudfront/E127EXAMPLE51Z"
}
},
{
"Id" : "myCustomOrigin",
"DomainName" : "www.example.com",
"CustomOriginConfig" : {
"HTTPPort" : "80",
"HTTPSPort" : "443",
"OriginProtocolPolicy" : "http-only"
}
}
],
"Enabled" : "true",
"Comment" : "Some comment",
"DefaultRootObject" : "index.html",
"Logging" : {
API Version 2010-05-15
165
AWS CloudFormation User Guide
CloudFront
"IncludeCookies" : "true",
"Bucket" : "mylogs.s3.amazonaws.com",
"Prefix" : "myprefix"
},
"Aliases" : [ "mysite.example.com", "yoursite.example.com"
],
"DefaultCacheBehavior" : {
"TargetOriginId" : "myS3Origin",
"ForwardedValues" : {
"QueryString" : "false",
"Cookies" : { "Forward" : "all" }
},
"TrustedSigners" : [ "1234567890EX", "1234567891EX"
],
"ViewerProtocolPolicy" : "allow-all",
"MinTTL" : "100",
"SmoothStreaming" : "true"
},
"CacheBehaviors" : [ {
"AllowedMethods" : [ "DELETE", "GET", "HEAD", "OP
TIONS", "PATCH", "POST", "PUT" ],
"TargetOriginId" : "myS3Origin",
"ForwardedValues" : {
"QueryString" : "true",
"Cookies" : { "Forward" : "none" }
},
"TrustedSigners" : [ "1234567890EX", "1234567891EX"
],
"ViewerProtocolPolicy" : "allow-all",
"MinTTL" : "50",
"PathPattern" : "images1/*.jpg"
},
{
"AllowedMethods" : [ "DELETE", "GET", "HEAD", "OP
TIONS", "PATCH", "POST", "PUT" ],
"TargetOriginId" : "myCustomOrigin",
"ForwardedValues" : {
"QueryString" : "true",
"Cookies" : { "Forward" : "none" }
},
"TrustedSigners" : [ "1234567890EX", "1234567891EX"
],
"ViewerProtocolPolicy" : "allow-all",
"MinTTL" : "50",
"PathPattern" : "images2/*.jpg"
}
],
"CustomErrorResponses" : [ {
"ErrorCode" : "404",
"ResponsePagePath" : "/error-pages/404.html",
"ResponseCode" : "200",
"ErrorCachingMinTTL" : "30"
} ],
"PriceClass" : "PriceClass_All",
"ViewerCertificate" : { "CloudFrontDefaultCertificate" :
"true" }
}
}
API Version 2010-05-15
166
AWS CloudFormation User Guide
CloudWatch
}
}
}
Amazon CloudWatch Template Snippets
Topics
• Billing Alarm (p. 167)
• CPU Utilization Alarm (p. 167)
• Recover an Amazon Elastic Compute Cloud instance (p. 168)
Billing Alarm
In the following sample, CloudWatch sends an email notification when charges to your AWS account
exceed the alarm threshold. Note that you'll need to enable billing alerts to receive notifications about
your usage.
"SpendingAlarm": {
"Type": "AWS::CloudWatch::Alarm",
"Properties": {
"AlarmDescription": { "Fn::Join": ["", [
"Alarm if AWS spending is over $",
{ "Ref": "AlarmThreshold" }
]]},
"Namespace": "AWS/Billing",
"MetricName": "EstimatedCharges",
"Dimensions": [{
"Name": "Currency",
"Value" : "USD"
}],
"Statistic": "Maximum",
"Period": "21600",
"EvaluationPeriods": "1",
"Threshold": { "Ref": "AlarmThreshold" },
"ComparisonOperator": "GreaterThanThreshold",
"AlarmActions": [{
"Ref": "BillingAlarmNotification"
}],
"InsufficientDataActions": [{
"Ref": "BillingAlarmNotification"
}]
}
}
CPU Utilization Alarm
The following sample snippet creates an alarm that sends a notification when the average CPU utilization
of an Amazon EC2 instance exceeds 90 percent for more than 60 seconds over three evaluation periods.
"CPUAlarm" : {
"Type" : "AWS::CloudWatch::Alarm",
"Properties" : {
API Version 2010-05-15
167
AWS CloudFormation User Guide
CloudWatch
"AlarmDescription" : "CPU alarm for my instance",
"AlarmActions" : [ { "Ref" : "logical name of an AWS::SNS::Topic resource"
} ],
"MetricName" : "CPUUtilization",
"Namespace" : "AWS/EC2",
"Statistic" : "Average",
"Period" : "60",
"EvaluationPeriods" : "3",
"Threshold" : "90",
"ComparisonOperator" : "GreaterThanThreshold",
"Dimensions" : [ {
"Name" : "InstanceId",
"Value" : { "Ref" : "logical name of an AWS::EC2::Instance resource" }
} ]
}
}
Recover an Amazon Elastic Compute Cloud instance
The following CloudWatch alarm recovers an EC2 instance when it has any status check failures for 15
consecutive minutes. For more information about alarm actions, see Create Alarms That Stop, Terminate,
or Recover an Instance in the Amazon CloudWatch Developer Guide.
{
"AWSTemplateFormatVersion": "2010-09-09",
"Parameters" : {
"RecoveryInstance" : {
"Description" : "The EC2 instance ID to associate this alarm with.",
"Type" : "AWS::EC2::Instance::Id"
}
},
"Resources": {
"RecoveryTestAlarm": {
"Type": "AWS::CloudWatch::Alarm",
"Properties": {
"AlarmDescription": "Trigger a recovery when instance status check fails
for 15 consecutive minutes.",
"Namespace": "AWS/EC2" ,
"MetricName": "StatusCheckFailed_System",
"Statistic": "Minimum",
"Period": "60",
"EvaluationPeriods": "15",
"ComparisonOperator": "GreaterThanThreshold",
"Threshold": "0",
"AlarmActions": [ {"Fn::Join" : ["", ["arn:aws:automate:", { "Ref" :
"AWS::Region" }, ":ec2:recover" ]]} ],
"Dimensions": [{"Name": "InstanceId","Value": {"Ref": "RecoveryIn
stance"}}]
}
}
}
}
API Version 2010-05-15
168
AWS CloudFormation User Guide
CloudWatch Logs
Amazon CloudWatch Logs Template Snippets
Topics
• Send Logs to CloudWatch Logs from an Instance (p. 169)
• See Also (p. 176)
Send Logs to CloudWatch Logs from an Instance
Amazon CloudWatch Logs can monitor your system, application, and custom log files from Amazon EC2
instances or other sources. You can use AWS CloudFormation to provision and manage log groups and
metric filters. For more information about getting started with Amazon CloudWatch Logs, see Monitoring
System, Application, and Custom Log Files in the Amazon CloudWatch Developer Guide.
The following template describes a web server and its custom metrics. Log events from the web server's
log provides the data for the custom metrics. To send log events to a custom metric, the UserData field
installs a CloudWatch Logs agent on the Amazon EC2 instance. The configuration information for the
agent, such as the location of the server log file, the log group name, and the log stream name, are defined
in the /tmp/cwlogs/apacheaccess.conf file. The log stream is created after the web server starts
sending log events to the /var/log/httpd/access_log file.
The two metric filters describe how the log information is transformed into CloudWatch metrics. The 404
metric counts the number of 404 occurrences. The size metric tracks the size of a request. The two
CloudWatch alarms will send notifications if there are more than two 404s within two minutes or if the
average request size is over 3500 KB over 10 minutes.
{
"AWSTemplateFormatVersion": "2010-09-09",
"Description": "AWS CloudFormation Sample Template for CloudWatch Logs.",
"Parameters": {
"KeyName": {
"Description": "Name of an existing EC2 KeyPair to enable SSH access
to the instances",
"Type": "AWS::EC2::KeyPair::KeyName",
"ConstraintDescription" : "must be the name of an existing EC2
KeyPair."
},
"SSHLocation" : {
"Description" : "The IP address range that can be used to SSH to the
EC2 instances",
"Type": "String",
"MinLength": "9",
"MaxLength": "18",
"Default": "0.0.0.0/0",
"AllowedPattern":
"(\\d{1,3})\\.(\\d{1,3})\\.(\\d{1,3})\\.(\\d{1,3})/(\\d{1,2})",
"ConstraintDescription": "must be a valid IP CIDR range of the form
x.x.x.x/x."
},
"OperatorEmail": {
"Description": "Email address to notify if there are any scaling op
erations",
"Type": "String"
}
},
"Mappings": {
API Version 2010-05-15
169
AWS CloudFormation User Guide
CloudWatch Logs
"RegionMap": {
"us-east-1": {
"AMI": "ami-fb8e9292"
},
"us-west-1": {
"AMI": "ami-7aba833f"
},
"us-west-2": {
"AMI": "ami-043a5034"
},
"eu-west-1": {
"AMI": "ami-2918e35e"
},
"ap-southeast-1": {
"AMI": "ami-b40d5ee6"
},
"ap-southeast-2": {
"AMI": "ami-3b4bd301"
},
"ap-northeast-1": {
"AMI": "ami-c9562fc8"
},
"sa-east-1": {
"AMI": "ami-215dff3c"
},
"eu-central-1": {
"AMI" : "ami-a03503bd"
}
}
},
"Resources": {
"LogRole": {
"Type": "AWS::IAM::Role",
"Properties": {
"AssumeRolePolicyDocument": {
"Version": "2012-10-17",
"Statement": [
{
"Effect": "Allow",
"Principal": {
"Service": [
"ec2.amazonaws.com"
]
},
"Action": [
"sts:AssumeRole"
]
}
]
},
"Path": "/",
"Policies": [
{
"PolicyName": "LogRolePolicy",
"PolicyDocument": {
"Version": "2012-10-17",
"Statement": [
{
API Version 2010-05-15
170
AWS CloudFormation User Guide
CloudWatch Logs
"Effect": "Allow",
"Action": [
"logs:Create*",
"logs:PutLogEvents",
"s3:GetObject"
],
"Resource": [
"arn:aws:logs:*:*:*",
"arn:aws:s3:::*"
]
}
]
}
}
]
}
},
"LogRoleInstanceProfile": {
"Type": "AWS::IAM::InstanceProfile",
"Properties": {
"Path": "/",
"Roles": [
{
"Ref": "LogRole"
}
]
}
},
"WebServerSecurityGroup": {
"Type": "AWS::EC2::SecurityGroup",
"Properties": {
"GroupDescription": "Enable HTTP access via port 80 and SSH access
via port 22",
"SecurityGroupIngress" : [
{"IpProtocol" : "tcp", "FromPort" : "80", "ToPort" : "80", "CidrIp"
: "0.0.0.0/0"},
{"IpProtocol" : "tcp", "FromPort" : "22", "ToPort" : "22", "CidrIp"
: { "Ref" : "SSHLocation"}}
]
}
},
"WebServerHost": {
"Type": "AWS::EC2::Instance",
"Metadata": {
"Comment": "Install a simple PHP application",
"AWS::CloudFormation::Init": {
"config": {
"packages": {
"yum": {
"httpd": [],
"php": []
}
},
"files": {
"/tmp/cwlogs/apacheaccess.conf": {
"content": {
"Fn::Join": [
"",
API Version 2010-05-15
171
AWS CloudFormation User Guide
CloudWatch Logs
[
"[general]\n",
"state_file= /var/awslogs/agentstate\n",
"[/var/log/httpd/access_log]\n",
"file = /var/log/httpd/access_log\n",
"log_group_name = ", {"Ref": "Web
ServerLogGroup"}, "\n",
"log_stream_name = {in
stance_id}/apache.log\n",
"datetime_format = %d/%b/%Y:%H:%M:%S"
]
]
},
"mode": "000400",
"owner": "apache",
"group": "apache"
},
"/var/www/html/index.php": {
"content": {
"Fn::Join": [
"",
[
"<?php\n",
"echo '<h1>AWS CloudFormation sample
PHP application</h1>';\n",
"?>\n"
]
]
},
"mode": "000644",
"owner": "apache",
"group": "apache"
},
"/etc/cfn/cfn-hup.conf": {
"content": {
"Fn::Join": [
"",
[
"[main]\n",
"stack=",
{
"Ref": "AWS::StackId"
},
"\n",
"region=",
{
"Ref": "AWS::Region"
},
"\n"
]
]
},
"mode": "000400",
"owner": "root",
"group": "root"
API Version 2010-05-15
172
AWS CloudFormation User Guide
CloudWatch Logs
},
"/etc/cfn/hooks.d/cfn-auto-reloader.conf": {
"content": {
"Fn::Join": [
"",
[
"[cfn-auto-reloader-hook]\n",
"triggers=post.update\n",
"path=Resources.WebServer
Host.Metadata.AWS::CloudFormation::Init\n",
"action=/opt/aws/bin/cfn-init -s
",
{
"Ref": "AWS::StackId"
},
" -r WebServerHost ",
" --region
",
{
"Ref": "AWS::Region"
},
"\n",
"runas=root\n"
]
]
}
}
},
"services": {
"sysvinit": {
"httpd": {
"enabled": "true",
"ensureRunning": "true"
},
"sendmail": {
"enabled": "false",
"ensureRunning": "false"
}
}
}
}
}
},
"CreationPolicy" : {
"ResourceSignal" : { "Timeout" : "PT5M" }
},
"Properties": {
"ImageId": {
"Fn::FindInMap": [
"RegionMap",
{
"Ref": "AWS::Region"
},
"AMI"
]
},
"KeyName": {
"Ref": "KeyName"
},
API Version 2010-05-15
173
AWS CloudFormation User Guide
CloudWatch Logs
"InstanceType": "t1.micro",
"SecurityGroups": [ { "Ref": "WebServerSecurityGroup" } ],
"IamInstanceProfile": { "Ref": "LogRoleInstanceProfile" },
"UserData": {
"Fn::Base64": {
"Fn::Join": [
"",
[
"#!/bin/bash -xe\n",
"# Get the latest CloudFormation package\n",
"yum update -y aws-cfn-bootstrap\n",
"# Start cfn-init\n",
"/opt/aws/bin/cfn-init -s ", { "Ref":
"AWS::StackId" }, " -r WebServerHost ", " --region ", { "Ref": "AWS::Region"
},
" || error_exit 'Failed to run cfn-init'\n",
"# Start up the cfn-hup daemon to listen for
changes to the EC2 instance metadata\n",
"/opt/aws/bin/cfn-hup || error_exit 'Failed to
start cfn-hup'\n",
"# Get the CloudWatch Logs agent\n",
"wget https://s3.amazonaws.com/aws-cloud
watch/downloads/latest/awslogs-agent-setup.py\n",
"# Install the CloudWatch Logs agent\n",
"python awslogs-agent-setup.py -n -r ", { "Ref"
: "AWS::Region" }, " -c /tmp/cwlogs/apacheaccess.conf || error_exit 'Failed
to run CloudWatch Logs agent setup'\n",
"# All done so signal success\n",
"/opt/aws/bin/cfn-signal -e $? ",
"
--stack ", { "Ref" : "AWS::StackName"
},
"
"
--resource WebServerHost ",
--region ", { "Ref" : "AWS::Region"
}, "\n"
]
]
}
}
}
},
"WebServerLogGroup": {
"Type": "AWS::Logs::LogGroup",
"Properties": {
"RetentionInDays": 7
}
},
"404MetricFilter": {
"Type": "AWS::Logs::MetricFilter",
"Properties": {
"LogGroupName": {
"Ref": "WebServerLogGroup"
},
API Version 2010-05-15
174
AWS CloudFormation User Guide
CloudWatch Logs
"FilterPattern": "[ip, identity, user_id, timestamp, request,
status_code = 404, size, ...]",
"MetricTransformations": [
{
"MetricValue": "1",
"MetricNamespace": "test/404s",
"MetricName": "test404Count"
}
]
}
},
"BytesTransferredMetricFilter": {
"Type": "AWS::Logs::MetricFilter",
"Properties": {
"LogGroupName": {
"Ref": "WebServerLogGroup"
},
"FilterPattern": "[ip, identity, user_id, timestamp, request,
status_code, size, ...]",
"MetricTransformations": [
{
"MetricValue": "$size",
"MetricNamespace": "test/BytesTransferred",
"MetricName": "testBytesTransferred"
}
]
}
},
"404Alarm": {
"Type": "AWS::CloudWatch::Alarm",
"Properties": {
"AlarmDescription": "The number of 404s is greater than 2 over
2 minutes",
"MetricName": "test404Count",
"Namespace": "test/404s",
"Statistic": "Sum",
"Period": "60",
"EvaluationPeriods": "2",
"Threshold": "2",
"AlarmActions": [
{
"Ref": "AlarmNotificationTopic"
}
],
"Unit": "Count",
"ComparisonOperator": "GreaterThanThreshold"
}
},
"BandwidthAlarm": {
"Type": "AWS::CloudWatch::Alarm",
"Properties": {
"AlarmDescription": "The average volume of traffic is greater
3500 KB over 10 minutes",
"MetricName": "testBytesTransferred",
"Namespace": "test/BytesTransferred",
"Statistic": "Average",
"Period": "300",
"EvaluationPeriods": "2",
API Version 2010-05-15
175
AWS CloudFormation User Guide
CloudWatch Logs
"Threshold": "3500",
"AlarmActions": [
{
"Ref": "AlarmNotificationTopic"
}
],
"Unit": "Kilobytes",
"ComparisonOperator": "GreaterThanThreshold"
}
},
"AlarmNotificationTopic": {
"Type": "AWS::SNS::Topic",
"Properties": {
"Subscription": [
{
"Endpoint": { "Ref": "OperatorEmail" },
"Protocol": "email"
}
]
}
}
},
"Outputs": {
"InstanceId": {
"Description": "The instance ID of the web server",
"Value": {
"Ref": "WebServerHost"
}
},
"WebsiteURL" : {
"Value" : { "Fn::Join" : ["", ["http://", { "Fn::GetAtt" : [ "Web
ServerHost", "PublicDnsName" ]}]] },
"Description" : "URL for newly created LAMP stack"
},
"PublicIP": {
"Description": "Public IP address of the web server",
"Value": {
"Fn::GetAtt": [
"WebServerHost",
"PublicIp"
]
}
},
"CloudWatchLogGroupName": {
"Description": "The name of the CloudWatch log group",
"Value": {
"Ref": "WebServerLogGroup"
}
}
}
}
See Also
For more information about CloudWatch Logs resources, see AWS::Logs::LogGroup (p. 468) or
AWS::Logs::MetricFilter (p. 469).
API Version 2010-05-15
176
AWS CloudFormation User Guide
Amazon EC2
Amazon EC2 Template Snippets
Topics
• EC2 Block Device Mapping Examples (p. 177)
• Assigning an Amazon EC2 Elastic IP Using AWS::EC2::EIP Snippet (p. 178)
• Assigning an Existing Elastic IP to an Amazon EC2 instance using AWS::EC2::EIPAssociation
Snippet (p. 178)
• Assigning an Existing VPC Elastic IP to an Amazon EC2 instance using AWS::EC2::EIPAssociation
Snippet (p. 179)
• Elastic Network Interface (ENI) Template Snippets (p. 179)
• Amazon EC2 Instance Resource (p. 181)
• Amazon EC2 Instance with Volume, Tag, and UserData Properties (p. 181)
• Amazon EC2 Instance Resource with an Amazon SimpleDB Domain (p. 182)
•
•
•
•
Amazon EC2 Security Group Resource with Two CIDR Range Ingress Rules (p. 182)
Amazon EC2 Security Group Resource with Two Security Group Ingress Rules (p. 183)
Amazon EC2 Security Group Resource with LoadBalancer Ingress Rule (p. 183)
Using AWS::EC2::SecurityGroupIngress to Create Mutually Referencing Amazon EC2 Security Group
Resources (p. 184)
• Amazon EC2 Volume Resource (p. 185)
• Amazon EC2 VolumeAttachment Resource (p. 185)
• Amazon EC2 Instance in a Default VPC Security Group (p. 186)
EC2 Block Device Mapping Examples
EC2 Instance with Block Device Mapping
"Ec2Instance" : {
"Type" : "AWS::EC2::Instance",
"Properties" : {
"ImageId" : { "Fn::FindInMap" : [ "AWSRegionArch2AMI", { "Ref" :
"AWS::Region" },
{ "Fn::FindInMap" : [ "AWSInstance
Type2Arch", { "Ref" : "InstanceType" }, "Arch" ] } ] },
"KeyName" : { "Ref" : "KeyName" },
"InstanceType" : { "Ref" : "InstanceType" },
"SecurityGroups" : [{ "Ref" : "Ec2SecurityGroup" }],
"BlockDeviceMappings" : [
{
"DeviceName" : "/dev/sda1",
"Ebs" : { "VolumeSize" : "50" }
},{
"DeviceName" : "/dev/sdm",
"Ebs" : { "VolumeSize" : "100" }
}
]
}
}
API Version 2010-05-15
177
AWS CloudFormation User Guide
Amazon EC2
EC2 Instance with Ephemeral Drives
"Ec2Instance" : {
"Type" : "AWS::EC2::Instance",
"Properties" : {
"ImageId" : { "Fn::FindInMap" : [ "AWSRegionArch2AMI", { "Ref" :
"AWS::Region" }, "PV64" ]},
"KeyName" : { "Ref" : "KeyName" },
"InstanceType" : "m1.small",
"SecurityGroups" : [{ "Ref" : "Ec2SecurityGroup" }],
"BlockDeviceMappings" : [
{
"DeviceName" : "/dev/sdc",
"VirtualName" : "ephemeral0"
}
]
}
}
Assigning an Amazon EC2 Elastic IP Using AWS::EC2::EIP
Snippet
This example shows how to allocate an Amazon EC2 Elastic IP address and assign it to an Amazon EC2
instance using a AWS::EC2::EIP resource (p. 351).
"MyEIP" : {
"Type" : "AWS::EC2::EIP",
"Properties" : {
"InstanceId" : { "Ref" : "logical name of an AWS::EC2::Instance resource"
}
}
}
Assigning an Existing Elastic IP to an Amazon EC2 instance
using AWS::EC2::EIPAssociation Snippet
This example shows how to assign an existing Amazon EC2 Elastic IP address to an Amazon EC2
instance using an AWS::EC2::EIPAssociation resource (p. 353).
"IPAssoc" : {
"Type" : "AWS::EC2::EIPAssociation",
"Properties" : {
"InstanceId" : { "Ref" : "logical name of an AWS::EC2::Instance
resource" },
"EIP" : "existing Elastic IP address"
}
}
API Version 2010-05-15
178
AWS CloudFormation User Guide
Amazon EC2
Assigning an Existing VPC Elastic IP to an Amazon EC2
instance using AWS::EC2::EIPAssociation Snippet
This example shows how to assign an existing VPC Elastic IP address to an Amazon EC2 instance using
an AWS::EC2::EIPAssociation resource (p. 353).
"VpcIPAssoc" : {
"Type" : "AWS::EC2::EIPAssociation",
"Properties" : {
"InstanceId" : { "Ref" : "logical name of an AWS::EC2::Instance
resource" },
"AllocationId" : "existing VPC Elastic IP allocation ID"
}
}
Elastic Network Interface (ENI) Template Snippets
VPC_EC2_Instance_With_ENI
Sample template showing how to create an instance with two elastic network interface (ENI). The sample
assumes you have already created a VPC.
"Resources" : {
"ControlPortAddress" : {
"Type" : "AWS::EC2::EIP",
"Properties" : {
"Domain" : "vpc"
}
},
"AssociateControlPort" : {
"Type" : "AWS::EC2::EIPAssociation",
"Properties" : {
"AllocationId" : { "Fn::GetAtt" : [ "ControlPortAddress", "AllocationId"
]},
"NetworkInterfaceId" : { "Ref" : "controlXface" }
}
},
"WebPortAddress" : {
"Type" : "AWS::EC2::EIP",
"Properties" : {
"Domain" : "vpc"
}
},
"AssociateWebPort" : {
"Type" : "AWS::EC2::EIPAssociation",
"Properties" : {
"AllocationId" : { "Fn::GetAtt" : [ "WebPortAddress", "AllocationId"
]},
"NetworkInterfaceId" : { "Ref" : "webXface" }
}
},
"SSHSecurityGroup" : {
"Type" : "AWS::EC2::SecurityGroup",
"Properties" : {
API Version 2010-05-15
179
AWS CloudFormation User Guide
Amazon EC2
"VpcId" : { "Ref" : "VpcId" },
"GroupDescription" : "Enable SSH access via port 22",
"SecurityGroupIngress" : [ { "IpProtocol" : "tcp", "FromPort" : "22",
"ToPort" : "22", "CidrIp" : "0.0.0.0/0" } ]
}
},
"WebSecurityGroup" : {
"Type" : "AWS::EC2::SecurityGroup",
"Properties" : {
"VpcId" : { "Ref" : "VpcId" },
"GroupDescription" : "Enable HTTP access via user defined port",
"SecurityGroupIngress" : [ { "IpProtocol" : "tcp", "FromPort" : 80,
"ToPort" : 80, "CidrIp" : "0.0.0.0/0" } ]
}
},
"controlXface" : {
"Type" : "AWS::EC2::NetworkInterface",
"Properties" : {
"SubnetId" : { "Ref" : "SubnetId" },
"Description" :"Interface for control traffic such as SSH",
"GroupSet" : [ {"Ref" : "SSHSecurityGroup"} ],
"SourceDestCheck" : "true",
"Tags" : [ {"Key" : "Network", "Value" : "Control"}]
}
},
"webXface" : {
"Type" : "AWS::EC2::NetworkInterface",
"Properties" : {
"SubnetId" : { "Ref" : "SubnetId" },
"Description" :"Interface for web traffic",
"GroupSet" : [ {"Ref" : "WebSecurityGroup"} ],
"SourceDestCheck" : "true",
"Tags" : [ {"Key" : "Network", "Value" : "Web"}]
}
},
"Ec2Instance" : {
"Type" : "AWS::EC2::Instance",
"Properties" : {
"ImageId" : { "Fn::FindInMap" : [ "RegionMap", { "Ref" : "AWS::Region"
}, "AMI" ]},
"KeyName" : { "Ref" : "KeyName" },
"NetworkInterfaces" : [ { "NetworkInterfaceId" : {"Ref" : "con
trolXface"}, "DeviceIndex" : "0" },
{ "NetworkInterfaceId" : {"Ref" : "webXface"}, "DeviceIndex" : "1" }],
"Tags" : [ {"Key" : "Role", "Value" : "Test Instance"}],
"UserData" : {"Fn::Base64" : { "Fn::Join" : ["",[
"#!/bin/bash -ex","\n",
"\n","yum install ec2-net-utils -y","\n",
"ec2ifup eth1","\n",
"service httpd start"]]}
}
}
}
}
API Version 2010-05-15
180
AWS CloudFormation User Guide
Amazon EC2
Amazon EC2 Instance Resource
This snippet shows a simple AWS::EC2::Instance resource.
"MyInstance" : {
"Type" : "AWS::EC2::Instance",
"Properties" : {
"AvailabilityZone" : "us-east-1a",
"ImageId" : "ami-20b65349"
}
}
Amazon EC2 Instance with Volume, Tag, and UserData
Properties
This snippet shows an AWS::EC2::Instance resource with one Amazon EC2 volume, one tag, and a user
data property. An AWS::EC2::SecurityGroup resource, an AWS::SNS::Topic resource, and an
AWS::ETC::Volume resource all must be defined in the same template. Also, the reference to KeyName
is a parameters that must be defined in the Parameters section of the template.
"MyInstance" : {
"Type" : "AWS::EC2::Instance",
"Properties" : {
"KeyName" : { "Ref" : "KeyName" },
"SecurityGroups" : [ {
"Ref" : "logical name of AWS::EC2::SecurityGroup resource"
} ],
"UserData" : {
"Fn::Base64" : {
"Fn::Join" : [ ":", [
"PORT=80",
"TOPIC=", {
"Ref" : "logical name of an AWS::SNS::Topic resource"
} ]
]
}
},
"InstanceType" : "m1.small",
"AvailabilityZone" : "us-east-1a",
"ImageId" : "ami-1e817677",
"Volumes" : [
{ "VolumeId" : {
"Ref" : "logical name of AWS::EC2::Volume resource"
},
"Device" : "/dev/sdk" }
],
"Tags" : [ {
"Key" : "Name",
"Value" : "MyTag"
} ]
}
}
API Version 2010-05-15
181
AWS CloudFormation User Guide
Amazon EC2
Amazon EC2 Instance Resource with an Amazon SimpleDB
Domain
This snippet shows an AWS::EC2::Instance resource with an Amazon SimpleDB domain specified in the
UserData.
"MyInstance" : {
"Type" : "AWS::EC2::Instance",
"Properties" : {
"UserData" : {
"Fn::Base64" : {
"Fn::Join" : [ "",
[ "Domain=", {
"Ref" : "logical name of an AWS::SDB::Domain resource"
} ]
]
}
},
"AvailabilityZone" : "us-east-1a",
"ImageId" : "ami-20b65349"
}
}
Amazon EC2 Security Group Resource with Two CIDR Range
Ingress Rules
This snippet shows an AWS::EC2::SecurityGroup resource that describes two ingress rules giving access
to a specified CIDR range for the TCP protocol on the specified ports.
"ServerSecurityGroup" : {
"Type" : "AWS::EC2::SecurityGroup",
"Properties" : {
"GroupDescription" : "allow connections from specified CIDR ranges",
"SecurityGroupIngress" : [
{
"IpProtocol" : "tcp",
"FromPort" : "80",
"ToPort" : "80",
"CidrIp" : "0.0.0.0/0"
},{
"IpProtocol" : "tcp",
"FromPort" : "22",
"ToPort" : "22",
"CidrIp" : "192.168.1.1/32"
}
]
}
}
API Version 2010-05-15
182
AWS CloudFormation User Guide
Amazon EC2
Amazon EC2 Security Group Resource with Two Security
Group Ingress Rules
This snippet shows an AWS::EC2::SecurityGroup resource that describes two security group ingress
rules. The first ingress rule grants access to the existing security group myadminsecuritygroup, which is
owned by the 1234-5678-9012 AWS account, for the TCP protocol on port 22. The second ingress rule
grants access to the security group mysecuritygroupcreatedincfn for TCP on port 80. This ingress rule
uses the Ref intrinsic function to refer to a security group (whose logical name is
mysecuritygroupcreatedincfn) created in the same template. You must declare a value for both the
SourceSecurityGroupName and SourceSecurityGroupOwnerId properties.
"ServerSecurityGroupBySG" : {
"Type" : "AWS::EC2::SecurityGroup",
"Properties" : {
"GroupDescription" : "allow connections from specified source security
group",
"SecurityGroupIngress" : [
{
"IpProtocol" : "tcp",
"FromPort" : "22",
"ToPort" : "22",
"SourceSecurityGroupName" : "myadminsecuritygroup",
"SourceSecurityGroupOwnerId" : "123456789012"
},
{
"IpProtocol" : "tcp",
"FromPort" : "80",
"ToPort" : "80",
"SourceSecurityGroupName" : {"Ref" : "mysecuritygroupcreatedincfn"}
}
]
}
}
Amazon EC2 Security Group Resource with LoadBalancer
Ingress Rule
This snippet shows an AWS::EC2::SecurityGroup resource that contains a security group ingress rule
that grants access to the LoadBalancer myELB for TCP on port 80. Note that the rule uses the
SourceSecurityGroup.OwnerAlias and SourceSecurityGroup.GroupName properties of the
myELB resource to specify the source security group of the LoadBalancer.
"myELB" : {
"Type" : "AWS::ElasticLoadBalancing::LoadBalancer",
"Properties" : {
"AvailabilityZones" : [ "us-east-1a" ],
"Listeners" : [ {
"LoadBalancerPort" : "80",
"InstancePort" : "80",
"Protocol" : "HTTP"
} ]
}
},
API Version 2010-05-15
183
AWS CloudFormation User Guide
Amazon EC2
"ELBIngressGroup" : {
"Type" : "AWS::EC2::SecurityGroup",
"Properties" : {
"GroupDescription" : "ELB ingress group",
"SecurityGroupIngress" : [
{
"IpProtocol" : "tcp",
"FromPort" : "80",
"ToPort" : "80",
"SourceSecurityGroupOwnerId" : {"Fn::GetAtt" : ["myELB",
"SourceSecurityGroup.OwnerAlias"]},
"SourceSecurityGroupName" : {"Fn::GetAtt" : ["myELB",
"SourceSecurityGroup.GroupName"]}
}
]
}
Using AWS::EC2::SecurityGroupIngress to Create Mutually
Referencing Amazon EC2 Security Group Resources
This snippet shows two AWS::EC2::SecurityGroupIngress resources that add mutual ingress rules to the
EC2 security groups SGroup1 and SGroup2.The SGroup1Ingress resource enables ingress from SGroup2
through TCP/IP port 80 to SGroup1.The SGroup2Ingress resource enables ingress from SGroup1 through
TCP/IP port 80 to SGroup2.
Note
If you are using an Amazon VPC, the SecurityGroupIngress properties must include VpcId
and you must use GroupId and SourceSecurityGroupId instead of GroupName and
SourceSecurityGroupName
"SGroup1" : {
"Type" : "AWS::EC2::SecurityGroup",
"Properties" : {
"GroupDescription" : "EC2 Instance access"
}
},
"SGroup2" : {
"Type" : "AWS::EC2::SecurityGroup",
"Properties" : {
"GroupDescription" : "EC2 Instance access"
}
},
"SGroup1Ingress" : {
"Type" : "AWS::EC2::SecurityGroupIngress",
"Properties" : {
"GroupName" : { "Ref" : "SGroup1" },
"IpProtocol" : "tcp",
"ToPort" : "80",
"FromPort" : "80",
"SourceSecurityGroupName" : { "Ref" : "SGroup2" }
}
},
"SGroup2Ingress" : {
"Type" : "AWS::EC2::SecurityGroupIngress",
"Properties" : {
"GroupName" : { "Ref" : "SGroup2" },
API Version 2010-05-15
184
AWS CloudFormation User Guide
Amazon EC2
"IpProtocol" : "tcp",
"ToPort" : "80",
"FromPort" : "80",
"SourceSecurityGroupName" : { "Ref" : "SGroup1" }
}
}
Amazon EC2 Volume Resource
This snippet shows a simple Amazon EC2 volume resource with a DeletionPolicy attribute set to Snapshot.
With the Snapshot DeletionPolicy set, AWS CloudFormation will take a snapshot of this volume before
deleting it during stack deletion. Make sure you specify a value for SnapShotId, or a value for Size, but
not both. Remove the one you don't need.
"MyEBSVolume" : {
"Type" : "AWS::EC2::Volume",
"Properties" : {
"Size" : "specify a size if no SnapShotId",
"SnapshotId" : "specify a SnapShotId if no Size",
"AvailabilityZone" : { "Ref" : "AvailabilityZone" }
},
"DeletionPolicy" : "Snapshot"
}
Amazon EC2 VolumeAttachment Resource
This snippet shows the following resources: an Amazon EC2 instance using an Amazon Linux AMI from
the US-East (Northern Virginia) Region, an EC2 security group that allows SSH access to IP addresses,
a new Amazon EBS volume sized at 100 GB and in the same Availability Zone as the EC2 instance, and
a volume attachment that attaches the new volume to the EC2 instance.
"Resources" : {
"Ec2Instance" : {
"Type" : "AWS::EC2::Instance",
"Properties" : {
"SecurityGroups" : [ { "Ref" : "InstanceSecurityGroup" } ],
"ImageId" : "ami-76f0061f"
}
},
"InstanceSecurityGroup" : {
"Type" : "AWS::EC2::SecurityGroup",
"Properties" : {
"GroupDescription" : "Enable SSH access via port 22",
"SecurityGroupIngress" : [ {
"IpProtocol" : "tcp",
"FromPort" : "22",
"ToPort" : "22",
"CidrIp" : "0.0.0.0/0"
} ]
}
},
"NewVolume" : {
"Type" : "AWS::EC2::Volume",
API Version 2010-05-15
185
AWS CloudFormation User Guide
Amazon ECS
"Properties" : {
"Size" : "100",
"AvailabilityZone" : { "Fn::GetAtt" : [ "Ec2Instance", "AvailabilityZone"
]},
}
},
"MountPoint" : {
"Type" : "AWS::EC2::VolumeAttachment",
"Properties" : {
"InstanceId" : { "Ref" : "Ec2Instance" },
"VolumeId" : { "Ref" : "NewVolume" },
"Device" : "/dev/sdh"
}
}
}
Amazon EC2 Instance in a Default VPC Security Group
Whenever you create a VPC, AWS automatically creates default resources for that VPC, such as a
security group. However, when you define a VPC in AWS CloudFormation templates, you don't yet have
the physical IDs of those default resources. To obtain the IDs, use the Fn::GetAtt (p. 661) intrinsic function.
That way, you can use the default resources instead of creating new ones in your template. For example,
the following template snippet associates the default security group of the myVPC VPC with the myInstance
Amazon EC2 instance.
"myVPC": {
"Type": "AWS::EC2::VPC",
"Properties": {
"CidrBlock": {"Ref": "myVPCCIDRRange"},
"EnableDnsSupport": false,
"EnableDnsHostnames": false,
"InstanceTenancy": "default"
}
},
"myInstance" : {
"Type" : "AWS::EC2::Instance",
"Properties" : {
"ImageId": {
"Fn::FindInMap": ["AWSRegionToAMI",{"Ref": "AWS::Region"},"64"]
},
"SecurityGroupIds" : [{"Fn::GetAtt": ["myVPC", "DefaultSecurityGroup"]}],
"SubnetId" : {"Ref" : "mySubnet"}
}
}
Amazon EC2 Container Service Template Snippets
Amazon EC2 Container Service (Amazon ECS) is a container management service that makes it easy
to run, stop, and manage Docker containers on a cluster of Amazon Elastic Compute Cloud (Amazon
EC2) instances.
The following sample template deploys a web application that mimics the sample application from Getting
Started with Amazon ECS in the Amazon EC2 Container Service Developer Guide. Use the sample
template to help you describe Amazon ECS resource in your AWS CloudFormation templates.
API Version 2010-05-15
186
AWS CloudFormation User Guide
Amazon ECS
{
"AWSTemplateFormatVersion" : "2010-09-09",
"Parameters" : {
"KeyName": {
"Type": "AWS::EC2::KeyPair::KeyName",
"Description": "Name of an existing EC2 KeyPair to enable SSH access to
the ECS instances"
},
"SubnetID": {
"Type": "List<AWS::EC2::Subnet::Id>",
"Description": "List of an existing subnet IDs to use for the load balancer
and auto scaling group"
},
"DesiredCapacity": {
"Type": "Number",
"Default" : "1",
"Description": "Number of instances to launch in your ECS cluster"
},
"MaxSize": {
"Type": "Number",
"Default" : "1",
"Description": "Maximum number of instances that can be launched in your
ECS cluster"
},
"InstanceType" : {
"Description" : "The EC2 instance type",
"Type" : "String",
"Default" : "t2.micro",
"AllowedValues" : [ "t2.micro", "t2.small", "t2.medium", "m3.medium",
"m3.large", "m3.xlarge",
"m3.2xlarge", "c3.large", "c3.xlarge", "c3.2xlarge", "c3.4xlarge", "c3.8xlarge",
"c4.large", "c4.xlarge",
"c4.2xlarge", "c4.4xlarge", "c4.8xlarge", "r3.large", "r3.xlarge", "r3.2xlarge",
"r3.4xlarge", "r3.8xlarge",
"i2.xlarge", "i2.2xlarge", "i2.4xlarge", "i2.8xlarge", "d2.xlarge", "d2.2xlarge",
"d2.4xlarge", "d2.8xlarge",
"hi1.4xlarge", "hs1.8xlarge", "cr1.8xlarge", "cc2.8xlarge"],
"ConstraintDescription" : "must be a valid EC2 instance type."
},
"SSHLocation" : {
"Description" : " The IP address range that can be used to SSH to the EC2
instances",
"Type": "String",
"MinLength": "9",
"MaxLength": "18",
"Default": "0.0.0.0/0",
"AllowedPattern":
"(\\d{1,3})\\.(\\d{1,3})\\.(\\d{1,3})\\.(\\d{1,3})/(\\d{1,2})",
"ConstraintDescription": "must be a valid IP CIDR range of the form
x.x.x.x/x."
}
},
"Mappings" : {
"AWSRegionToAMI" : {
"us-east-1"
: { "AMIID" : "ami-5f59ac34" },
"us-west-2"
: { "AMIID" : "ami-c188b0f1" },
"eu-west-1"
: { "AMIID" : "ami-3db4ca4a" },
API Version 2010-05-15
187
AWS CloudFormation User Guide
Amazon ECS
"ap-northeast-1" : { "AMIID" : "ami-ca01d8ca" },
"ap-southeast-2" : { "AMIID" : "ami-5b5d2661" }
}
},
"Resources" : {
"ECSCluster": {
"Type": "AWS::ECS::Cluster"
},
"taskdefinition": {
"Type": "AWS::ECS::TaskDefinition",
"Properties" : {
"ContainerDefinitions" : [
{
"Name": "simple-app",
"Cpu": "10",
"Essential": "true",
"Image":"httpd:2.4",
"Memory":"300",
"MountPoints": [{
"ContainerPath": "/usr/local/apache2/htdocs",
"SourceVolume": "my-vol"
}],
"PortMappings": [
{ "HostPort": 80, "ContainerPort": 80 }
]
},
{
"Name": "busybox",
"Cpu": 10,
"Command": [
"/bin/sh -c \"while true; do echo '<html> <head> <title>Amazon
ECS Sample App</title> <style>body {margin-top: 40px; background-color: #333;}
</style> </head><body> <div style=color:white;text-align:center> <h1>Amazon
ECS Sample App</h1> <h2>Congratulations!</h2> <p>Your application is now running
on a container in Amazon ECS.</p>' > top; /bin/date > date ; echo
'</div></body></html>' > bottom; cat top date bottom > /usr/local/apache2/ht
docs/index.html ; sleep 1; done\""
],
"EntryPoint": [ "sh", "-c"],
"Essential": false,
"Image": "busybox",
"Memory": 200,
"VolumesFrom": [
{
"SourceContainer": "simple-app"
}
]
}
],
"Volumes": [
{ "Name": "my-vol" }
]
}
},
"EcsElasticLoadBalancer" : {
"Type" : "AWS::ElasticLoadBalancing::LoadBalancer",
"Properties" : {
API Version 2010-05-15
188
AWS CloudFormation User Guide
Amazon ECS
"Subnets" : { "Ref" : "SubnetID" },
"Listeners" : [ {
"LoadBalancerPort" : "80",
"InstancePort" : "80",
"Protocol" : "HTTP"
} ],
"HealthCheck" : {
"Target" : "HTTP:80/",
"HealthyThreshold" : "2",
"UnhealthyThreshold" : "10",
"Interval" : "30",
"Timeout" : "5"
}
}
},
"ECSAutoScalingGroup" : {
"Type" : "AWS::AutoScaling::AutoScalingGroup",
"Properties" : {
"VPCZoneIdentifier" : { "Ref" : "SubnetID" },
"LaunchConfigurationName" : { "Ref" : "ContainerInstances" },
"MinSize" : "1",
"MaxSize" : { "Ref" : "MaxSize" },
"DesiredCapacity" : { "Ref" : "DesiredCapacity" }
},
"CreationPolicy" : {
"ResourceSignal" : {
"Timeout" : "PT15M"
}
},
"UpdatePolicy": {
"AutoScalingRollingUpdate": {
"MinInstancesInService": "1",
"MaxBatchSize": "1",
"PauseTime" : "PT15M",
"WaitOnResourceSignals": "true"
}
}
},
"ContainerInstances": {
"Type": "AWS::AutoScaling::LaunchConfiguration",
"Metadata" : {
"AWS::CloudFormation::Init" : {
"config" : {
"commands" : {
"01_add_instance_to_cluster" : {
"command" : { "Fn::Join": [ "", [ "#!/bin/bash\n", "echo
ECS_CLUSTER=", { "Ref": "ECSCluster" }, " >> /etc/ecs/ecs.config" ] ] }
}
},
"files" : {
"/etc/cfn/cfn-hup.conf" : {
"content" : { "Fn::Join" : ["", [
"[main]\n",
"stack=", { "Ref" : "AWS::StackId" }, "\n",
"region=", { "Ref" : "AWS::Region" }, "\n"
]]},
API Version 2010-05-15
189
AWS CloudFormation User Guide
Amazon ECS
"mode"
"owner"
"group"
: "000400",
: "root",
: "root"
},
"/etc/cfn/hooks.d/cfn-auto-reloader.conf" : {
"content": { "Fn::Join" : ["", [
"[cfn-auto-reloader-hook]\n",
"triggers=post.update\n",
"path=Resources.ContainerInstances.Metadata.AWS::CloudForma
tion::Init\n",
"action=/opt/aws/bin/cfn-init -v ",
"
--stack ", { "Ref" : "AWS::StackName" },
"
--resource ContainerInstances ",
"
--region ", { "Ref" : "AWS::Region" }, "\n",
"runas=root\n"
]]}
}
},
"services" : {
"sysvinit" : {
"cfn-hup" : { "enabled" : "true", "ensureRunning" : "true",
"files" : ["/etc/cfn/cfn-hup.conf", "/etc/cfn/hooks.d/cfn-auto-reloader.conf"]
}
}
}
}
}
},
"Properties": {
"ImageId" : { "Fn::FindInMap" : [ "AWSRegionToAMI", { "Ref" :
"AWS::Region" }, "AMIID" ] },
"InstanceType"
: { "Ref" : "InstanceType" },
"IamInstanceProfile": { "Ref": "EC2InstanceProfile" },
"KeyName"
: { "Ref" : "KeyName" },
"UserData"
: { "Fn::Base64" : { "Fn::Join" : ["", [
"#!/bin/bash -xe\n",
"yum install -y aws-cfn-bootstrap\n",
"/opt/aws/bin/cfn-init -v ",
"
--stack ", { "Ref" : "AWS::StackName" },
"
--resource ContainerInstances ",
"
--region ", { "Ref" : "AWS::Region" }, "\n",
"/opt/aws/bin/cfn-signal -e $? ",
"
--stack ", { "Ref" : "AWS::StackName" },
"
--resource ECSAutoScalingGroup ",
"
--region ", { "Ref" : "AWS::Region" }, "\n"
]]}}
}
},
"service": {
"Type": "AWS::ECS::Service",
"DependsOn": ["ECSAutoScalingGroup"],
"Properties" : {
"Cluster": {"Ref": "ECSCluster"},
"DesiredCount": "1",
"LoadBalancers": [
API Version 2010-05-15
190
AWS CloudFormation User Guide
Amazon ECS
{
"ContainerName": "simple-app",
"ContainerPort": "80",
"LoadBalancerName" : { "Ref" : "EcsElasticLoadBalancer" }
}
],
"Role" : {"Ref":"ECSServiceRole"},
"TaskDefinition" : {"Ref":"taskdefinition"}
}
},
"ECSServiceRole": {
"Type": "AWS::IAM::Role",
"Properties": {
"AssumeRolePolicyDocument": {
"Statement": [
{
"Effect": "Allow",
"Principal": {
"Service": [
"ecs.amazonaws.com"
]
},
"Action": [
"sts:AssumeRole"
]
}
]
},
"Path": "/",
"Policies": [
{
"PolicyName": "ecs-service",
"PolicyDocument": {
"Statement": [
{
"Effect": "Allow",
"Action": [
"elasticloadbalancing:Describe*",
"elasticloadbalancing:DeregisterInstancesFromLoadBalancer",
"elasticloadbalancing:RegisterInstancesWithLoadBalancer",
"ec2:Describe*",
"ec2:AuthorizeSecurityGroupIngress"
],
"Resource": "*"
}
]
}
}
]
}
},
"EC2Role": {
"Type": "AWS::IAM::Role",
"Properties": {
"AssumeRolePolicyDocument": {
"Statement": [
{
API Version 2010-05-15
191
AWS CloudFormation User Guide
Amazon ECS
"Effect": "Allow",
"Principal": {
"Service": [
"ec2.amazonaws.com"
]
},
"Action": [
"sts:AssumeRole"
]
}
]
},
"Path": "/",
"Policies": [
{
"PolicyName": "ecs-service",
"PolicyDocument": {
"Statement": [
{
"Effect": "Allow",
"Action": [
"ecs:CreateCluster",
"ecs:RegisterContainerInstance",
"ecs:DeregisterContainerInstance",
"ecs:DiscoverPollEndpoint",
"ecs:Submit*",
"ecs:Poll"
],
"Resource": "*"
}
]
}
}
]
}
},
"EC2InstanceProfile": {
"Type": "AWS::IAM::InstanceProfile",
"Properties": {
"Path": "/",
"Roles": [
{
"Ref": "EC2Role"
}
]
}
}
},
"Outputs" : {
"ecsservice" : {
"Value" : { "Ref" : "service" }
},
"ecscluster" : {
"Value" : { "Ref" : "ECSCluster" }
},
"taskdef" : {
"Value" : { "Ref" : "taskdefinition" }
API Version 2010-05-15
192
AWS CloudFormation User Guide
Elastic Beanstalk
}
}
}
Elastic Beanstalk Template Snippets
With Elastic Beanstalk, you can quickly deploy and manage applications in AWS without worrying about
the infrastructure that runs those applications. The following sample template can help you describe
Elastic Beanstalk resources in your AWS CloudFormation template.
Elastic Beanstalk Sample PHP
The following sample template deploys a sample PHP web application that is stored in an Amazon S3
bucket. The Elastic Beanstalk environment is 64-bit Amazon Linux running PHP 5.3. The environment is
also an autoscaling, load-balancing environment, with a minimum of two Amazon EC2 instances and a
maximum of six.
{
"AWSTemplateFormatVersion": "2010-09-09",
"Resources": {
"sampleApplication": {
"Type": "AWS::ElasticBeanstalk::Application",
"Properties": {
"Description": "AWS Elastic Beanstalk Sample Application"
}
},
"sampleApplicationVersion": {
"Type": "AWS::ElasticBeanstalk::ApplicationVersion",
"Properties": {
"ApplicationName": { "Ref": "sampleApplication" },
"Description": "AWS ElasticBeanstalk Sample Application Version",
"SourceBundle": {
"S3Bucket": { "Fn::Join": [ "-", [ "elasticbeanstalk-samples", {
"Ref": "AWS::Region" } ] ] },
"S3Key": "php-sample.zip"
}
}
},
"sampleConfigurationTemplate": {
"Type": "AWS::ElasticBeanstalk::ConfigurationTemplate",
"Properties": {
"ApplicationName": { "Ref": "sampleApplication" },
"Description": "AWS ElasticBeanstalk Sample Configuration Template",
"OptionSettings": [
{
"Namespace": "aws:autoscaling:asg",
"OptionName": "MinSize",
"Value": "2"
},
{
"Namespace": "aws:autoscaling:asg",
"OptionName": "MaxSize",
"Value": "6"
},
{
API Version 2010-05-15
193
AWS CloudFormation User Guide
Elastic Load Balancing
"Namespace": "aws:elasticbeanstalk:environment",
"OptionName": "EnvironmentType",
"Value": "LoadBalanced"
}
],
"SolutionStackName": "64bit Amazon Linux running PHP 5.3"
}
},
"sampleEnvironment": {
"Type": "AWS::ElasticBeanstalk::Environment",
"Properties": {
"ApplicationName": { "Ref": "sampleApplication" },
"Description": "AWS ElasticBeanstalk Sample Environment",
"TemplateName": { "Ref": "sampleConfigurationTemplate" },
"VersionLabel": { "Ref": "sampleApplicationVersion" }
}
}
}
}
Elastic Load Balancing Template Snippets
Topics
• Elastic Load Balancing Load Balancer Resource (p. 194)
• Elastic Load Balancing Load Balancer Resource with Health Check (p. 194)
Elastic Load Balancing Load Balancer Resource
This example shows an Elastic Load Balancing load balancer with a single listener, and no instances.
"MyLoadBalancer" : {
"Type" : "AWS::ElasticLoadBalancing::LoadBalancer",
"Properties" : {
"AvailabilityZones" : [ "us-east-1a" ],
"Listeners" : [ {
"LoadBalancerPort" : "80",
"InstancePort" : "80",
"Protocol" : "HTTP"
} ]
}
}
Elastic Load Balancing Load Balancer Resource with Health
Check
This example shows an Elastic Load Balancing load balancer with two Amazon EC2 instances, a single
listener and a health check.
"MyLoadBalancer" : {
"Type" : "AWS::ElasticLoadBalancing::LoadBalancer",
"Properties" : {
"AvailabilityZones" : [ "us-east-1a" ],
API Version 2010-05-15
194
AWS CloudFormation User Guide
IAM
"Instances" : [
{ "Ref" : "logical name of AWS::EC2::Instance resource 1" },
{ "Ref" : "logical name of AWS::EC2::Instance resource 2" }
],
"Listeners" : [ {
"LoadBalancerPort" : "80",
"InstancePort" : "80",
"Protocol" : "HTTP"
} ],
"HealthCheck" : {
"Target" : "HTTP:80/",
"HealthyThreshold" : "3",
"UnhealthyThreshold" : "5",
"Interval" : "30",
"Timeout" : "5"
}
}
}
AWS Identity and Access Management Template
Snippets
This section contains AWS Identity and Access Management template snippets.
Topics
• Declaring an IAM User Resource (p. 195)
• Declaring an IAM Access Key Resource (p. 196)
• Declaring an IAM Group Resource (p. 198)
• Adding Users to a Group (p. 198)
• Declaring an IAM Policy (p. 199)
• Declaring an Amazon S3 Bucket Policy (p. 199)
• Declaring an Amazon SNS Topic Policy (p. 200)
• Declaring an Amazon SQS Policy (p. 200)
• IAM Role Template Examples (p. 201)
Important
When creating or updating a stack using a template containing IAM resources, you must
acknowledge the use of IAM capabilities. For more information about using IAM resources in
templates, see Controlling Access with AWS Identity and Access Management (p. 61).
Declaring an IAM User Resource
This snippet shows how to declare an AWS::IAM::User (p. 463) resource to create an IAM user. The user
is declared with the path "/" and a login profile with the password myP@ssW0rd.
The policy document named giveaccesstoqueueonly gives the user permission to perform all SQS
actions on the SQS queue resource myqueue, and denies access to all other SQS queue resources. The
Fn::GetAtt (p. 661) function gets the Arn attribute of the AWS::SQS::Queue (p. 538) resource myqueue.
API Version 2010-05-15
195
AWS CloudFormation User Guide
IAM
The policy document named giveaccesstotopiconly is added to the user to give the user permission
to perform all SNS actions on the SNS topic resource mytopic and to deny access to all other SNS
resources. The Ref function (p. 669) gets the ARN of the AWS::SNS::Topic (p. 535) resource mytopic.
"myuser" : {
"Type" : "AWS::IAM::User",
"Properties" : {
"Path" : "/",
"LoginProfile" : {
"Password" : "myP@ssW0rd"
},
"Policies" : [ {
"PolicyName" : "giveaccesstoqueueonly",
"PolicyDocument" : {
"Version": "2012-10-17",
"Statement" : [ {
"Effect" : "Allow",
"Action" : [ "sqs:*" ],
"Resource" : [ {
"Fn::GetAtt" : [ "myqueue", "Arn" ]
} ]
}, {
"Effect" : "Deny",
"Action" : [ "sqs:*" ],
"NotResource" : [ {
"Fn::GetAtt" : [ "myqueue", "Arn" ]
} ]
}
] }
}, {
"PolicyName" : "giveaccesstotopiconly",
"PolicyDocument" : {
"Version": "2012-10-17",
"Statement" : [ {
"Effect" : "Allow",
"Action" : [ "sns:*" ],
"Resource" : [ { "Ref" : "mytopic" } ]
}, {
"Effect" : "Deny",
"Action" : [ "sns:*" ],
"NotResource" : [ { "Ref" : "mytopic" } ]
} ]
}
} ]
}
}
Declaring an IAM Access Key Resource
This snippet shows an AWS::IAM::AccessKey (p. 448) resource. The myaccesskey resource creates an
access key and assigns it to an IAM user that is declared as an AWS::IAM::User (p. 463) resource in the
template.
"myaccesskey" : {
API Version 2010-05-15
196
AWS CloudFormation User Guide
IAM
"Type" : "AWS::IAM::AccessKey",
"Properties" : {
"UserName" : { "Ref" : "myuser" }
}
}
You can get the secret key for an AWS::IAM::AccessKey resource using the Fn::GetAtt (p. 661) function.
The only time that you can get the secret key for an AWS access key is when it is created. One way to
retrieve the secret key is by putting it into an output value. You can get the access key using the Ref
function. The following output value declarations get the access key and secret key for myaccesskey.
"AccessKeyformyaccesskey" : {
"Value" : { "Ref" : "myaccesskey" }
},
"SecretKeyformyaccesskey" : {
"Value" : {
"Fn::GetAtt" : [ "myaccesskey", "SecretAccessKey" ]
}
}
You can also pass the AWS access key and secret key to an EC2 instance or Auto Scaling group defined
in the template. The following AWS::EC2::Instance (p. 354) declaration uses the UserData property to
pass the access key and secret key for the myaccesskey resource.
"myinstance" : {
"Type" : "AWS::EC2::Instance",
"Properties" : {
"AvailabilityZone" : "us-east-1a",
"ImageId" : "ami-20b65349",
"UserData" : {
"Fn::Base64" : {
"Fn::Join" : [
"", [
"ACCESS_KEY=", {
"Ref" : "myaccesskey"
},
"&",
"SECRET_KEY=",
{
"Fn::GetAtt" : [
"myaccesskey",
"SecretAccessKey"
]
}
]
]
}
}
}
}
API Version 2010-05-15
197
AWS CloudFormation User Guide
IAM
Declaring an IAM Group Resource
This snippet shows an AWS::IAM::Group (p. 450) resource. The group has a path ("/myapplication/"). The
policy document named myapppolicy is added to the group to allow the group's users to perform all SQS
actions on the SQS queue resource myqueue and deny access to all other SQS resources except
myqueue.
To assign a policy to a resource, IAM requires the Amazon Resource Name (ARN) for the resource. In
the snippet, the Fn::GetAtt (p. 661) function gets the ARN of the AWS::SQS::Queue (p. 538) resource
queue.
"mygroup" : {
"Type" : "AWS::IAM::Group",
"Properties" : {
"Path" : "/myapplication/",
"Policies" : [ {
"PolicyName" : "myapppolicy",
"PolicyDocument" : {
"Version": "2012-10-17",
"Statement" : [ {
"Effect" : "Allow",
"Action" : [ "sqs:*" ],
"Resource" : [ {
"Fn::GetAtt" : [ "myqueue", "Arn" ]
} ]
},
{
"Effect" : "Deny",
"Action" : [ "sqs:*" ],
"NotResource" : [ { "Fn::GetAtt" : [ "myqueue", "Arn" ] } ]
}
] }
} ]
}
}
Adding Users to a Group
The AWS::IAM::UserToGroupAddition (p. 464) resource adds users to a group. In the following snippet,
the addUserToGroup resource adds the following users to an existing group named myexistinggroup2:
an existing user existinguser1 and a user myuser that is declared as an AWS::IAM::User (p. 463) resource
in the template.
"addUserToGroup" : {
"Type" : "AWS::IAM::UserToGroupAddition",
"Properties" : {
"GroupName" : "myexistinggroup2",
"Users" : [ "existinguser1", { "Ref" : "myuser" } ]
}
}
API Version 2010-05-15
198
AWS CloudFormation User Guide
IAM
Declaring an IAM Policy
This snippet shows how to create a policy and apply it to multiple groups using an AWS::IAM::Policy (p. 456)
resource named mypolicy. The mypolicy resource contains a PolicyDocument property that allows
GetObject, PutObject, and PutObjectAcl actions on the objects in the S3 bucket represented by the ARN
arn:aws:s3:::myAWSBucket. The mypolicy resource applies the policy to an existing group named
myexistinggroup1 and a group mygroup that is declared in the template as an AWS::IAM::Group (p. 450)
resource. This example shows how apply a policy to a group using the Groups property; however, you
can alternatively use the Users property to add a policy document to a list of users.
"mypolicy" : {
"Type" : "AWS::IAM::Policy",
"Properties" : {
"PolicyName" : "mygrouppolicy",
"PolicyDocument" : {
"Version": "2012-10-17",
"Statement" : [ {
"Effect" : "Allow",
"Action" : [
"s3:GetObject" , "s3:PutObject" , "s3:PutObjectAcl" ],
"Resource" : "arn:aws:s3:::myAWSBucket/*"
} ]
},
"Groups" : [ "myexistinggroup1", { "Ref" : "mygroup" } ]
}
}
Declaring an Amazon S3 Bucket Policy
This snippet shows how to create a policy and apply it to an Amazon S3 bucket using the
AWS::S3::BucketPolicy (p. 533) resource. The mybucketpolicy resource declares a policy document that
allows the user1 IAM user to perform the GetObject action on all objects in the S3 bucket to which this
policy is applied. In the snippet, the Fn::GetAtt (p. 661) function gets the ARN of the user1 resource. The
mybucketpolicy resource applies the policy to the AWS::S3::Bucket (p. 526) resource mybucket. The Ref
function (p. 669) gets the bucket name of the mybucket resource.
"mybucketpolicy" : {
"Type" : "AWS::S3::BucketPolicy",
"Properties" : {
"PolicyDocument" : {
"Id" : "MyPolicy",
"Version": "2012-10-17",
"Statement" : [ {
"Sid" : "ReadAccess",
"Action" : [ "s3:GetObject" ],
"Effect" : "Allow",
"Resource" : { "Fn::Join" : [
"", [ "arn:aws:s3:::", { "Ref" : "mybucket" } , "/*" ]
] },
"Principal" : {
"AWS" : { "Fn::GetAtt" : [ "user1", "Arn" ] }
}
} ]
},
API Version 2010-05-15
199
AWS CloudFormation User Guide
IAM
"Bucket" : { "Ref" : "mybucket" }
}
}
}
Declaring an Amazon SNS Topic Policy
This snippet shows how to create a policy and apply it to an Amazon SNS topic using the
AWS::SNS::TopicPolicy (p. 537) resource. The mysnspolicy resource contains a PolicyDocument property
that allows an AWS::IAM::User (p. 463) resource myuser to perform the publish action on an
AWS::SNS::Topic (p. 535) resource mytopic. In the snippet, the Fn::GetAtt (p. 661) function gets the ARN
for the myuser resource and the Ref (p. 669) function gets the ARN for the mytopic resource.
"mysnspolicy" : {
"Type" : "AWS::SNS::TopicPolicy",
"Properties" : {
"PolicyDocument" : {
"Id" : "MyTopicPolicy",
"Version" : "2012-10-17",
"Statement" : [ {
"Sid" : "My-statement-id",
"Effect" : "Allow",
"Principal" : {
"AWS" : { "Fn::GetAtt" : [ "myuser", "Arn" ] }
},
"Action" : "sns:Publish",
"Resource" : "*"
} ]
},
"Topics" : [ { "Ref" : "mytopic" } ]
}
}
Declaring an Amazon SQS Policy
This snippet shows how to create a policy and apply it to an Amazon SQS queue using the
AWS::SQS::QueuePolicy (p. 542) resource. The PolicyDocument property allows an existing user myapp
(specified by its ARN) to perform the send message action on an existing queue, which is specified by
its URL, and an AWS::SQS::Queue (p. 538) resource myqueue. The Ref (p. 669) function gets the URL for
the myqueue resource.
"mysqspolicy" : {
"Type" : "AWS::SQS::QueuePolicy",
"Properties" : {
"PolicyDocument" : {
"Id" : "MyQueuePolicy",
"Version" : "2012-10-17",
"Statement" : [ {
"Sid" : "Allow-User-SendMessage",
"Effect" : "Allow",
"Principal" : {
"AWS" : "arn:aws:iam::123456789012:user/myapp"
},
API Version 2010-05-15
200
AWS CloudFormation User Guide
IAM
"Action" : [ "sqs:SendMessage" ],
"Resource" : "*"
} ]
},
"Queues" : [
"https://sqs.us-east-1.amazonaws.com/123456789012/myexistingqueue",
{ "Ref" : "myqueue" }
]
}
}
IAM Role Template Examples
This section provides CloudFormation template examples for IAM Roles for EC2 Instances.
For more information about IAM roles, see Working with Roles in the AWS Identity and Access Management
User Guide.
API Version 2010-05-15
201
AWS CloudFormation User Guide
IAM
IAM Role with EC2
API Version 2010-05-15
202
AWS CloudFormation User Guide
IAM
Example IAM Role with External Policy and Instance Profiles wired to an EC2 Instance
In this example, the Instance Profile is referenced by the IamInstanceProfile property of the EC2 Instance.
Both the Instance Policy and Role Policy reference the AWS::IAM::Role (p. 458).
{
"AWSTemplateFormatVersion": "2010-09-09",
"Resources": {
"myEC2Instance": {
"Type": "AWS::EC2::Instance",
"Version": "2009-05-15",
"Properties": {
"ImageId": "ami-205fba49",
"InstanceType": "m1.small",
"Monitoring": "true",
"DisableApiTermination": "false",
"IamInstanceProfile": {
"Ref": "RootInstanceProfile"
}
}
},
"RootRole": {
"Type": "AWS::IAM::Role",
"Properties": {
"AssumeRolePolicyDocument": {
"Version" : "2012-10-17",
"Statement": [ {
"Effect": "Allow",
"Principal": {
"Service": [ "ec2.amazonaws.com" ]
},
"Action": [ "sts:AssumeRole" ]
} ]
},
"Path": "/"
}
},
"RolePolicies": {
"Type": "AWS::IAM::Policy",
"Properties": {
"PolicyName": "root",
"PolicyDocument": {
"Version" : "2012-10-17",
"Statement": [ {
"Effect": "Allow",
"Action": "*",
"Resource": "*"
} ]
},
"Roles": [ { "Ref": "RootRole" } ]
}
},
"RootInstanceProfile": {
"Type": "AWS::IAM::InstanceProfile",
"Properties": {
"Path": "/",
"Roles": [ { "Ref": "RootRole" } ]
API Version 2010-05-15
203
AWS CloudFormation User Guide
IAM
}
}
}
}
API Version 2010-05-15
204
AWS CloudFormation User Guide
IAM
IAM Role with AutoScaling Group
API Version 2010-05-15
205
AWS CloudFormation User Guide
IAM
Example IAM Roles With External Policy And Instance Profiles Wired to an AutoScaling
Group
In this example, the Instance Profile is referenced by the IamInstanceProfile property of an AutoScaling
Group Launch Configuration.
{
"AWSTemplateFormatVersion": "2010-09-09",
"Resources": {
"myLCOne": {
"Type": "AWS::AutoScaling::LaunchConfiguration",
"Version": "2009-05-15",
"Properties": {
"ImageId": "ami-205fba49",
"InstanceType": "m1.small",
"InstanceMonitoring": "true",
"IamInstanceProfile": { "Ref": "RootInstanceProfile" }
}
},
"myASGrpOne": {
"Type": "AWS::AutoScaling::AutoScalingGroup",
"Version": "2009-05-15",
"Properties": {
"AvailabilityZones": [ "us-east-1a" ],
"LaunchConfigurationName": { "Ref": "myLCOne" },
"MinSize": "0",
"MaxSize": "0",
"HealthCheckType": "EC2",
"HealthCheckGracePeriod": "120"
}
},
"RootRole": {
"Type": "AWS::IAM::Role",
"Properties": {
"AssumeRolePolicyDocument": {
"Version" : "2012-10-17",
"Statement": [ {
"Effect": "Allow",
"Principal": {
"Service": [ "ec2.amazonaws.com" ]
},
"Action": [ "sts:AssumeRole" ]
} ]
},
"Path": "/"
}
},
"RolePolicies": {
"Type": "AWS::IAM::Policy",
"Properties": {
"PolicyName": "root",
"PolicyDocument": {
"Version" : "2012-10-17",
"Statement": [ {
"Effect": "Allow",
"Action": "*",
"Resource": "*"
API Version 2010-05-15
206
AWS CloudFormation User Guide
AWS OpsWorks
} ]
},
"Roles": [ { "Ref": "RootRole" } ]
}
},
"RootInstanceProfile": {
"Type": "AWS::IAM::InstanceProfile",
"Properties": {
"Path": "/",
"Roles": [ { "Ref": "RootRole" } ]
}
}
}
}
AWS OpsWorks Template Snippets
AWS OpsWorks is an application management service that simplifies a wide range of tasks such as
software configuration, application deployment, scaling, and monitoring. AWS CloudFormation is a
resource management service that you can use to manage AWS OpsWorks resources, such as AWS
OpsWorks stacks, layers, apps, and instances.
AWS OpsWorks Sample PHP App
The following sample template deploys a sample AWS OpsWorks PHP web application that is stored in
public Git repository. The AWS OpsWorks stack includes two application servers with a load balancer
that distributes incoming traffic evenly across the servers. The AWS OpsWorks stack also includes a
back-end MySQL database server to store data. For more information about the sample AWS OpsWorks
application, see Walkthrough: Learn AWS AWS OpsWorks Basics by Creating an Application Server
Stack in the AWS OpsWorks User Guide.
Note
The ServiceRoleArn and DefaultInstanceProfileArn properties reference IAM roles
that are created after you use AWS OpsWorks for the first time.
{
"AWSTemplateFormatVersion": "2010-09-09",
"Parameters": {
"ServiceRole": {
"Default": "aws-opsworks-service-role",
"Description": "The OpsWorks service role",
"Type": "String",
"MinLength": "1",
"MaxLength": "64",
"AllowedPattern": "[a-zA-Z][a-zA-Z0-9-]*",
"ConstraintDescription": "must begin with a letter and contain only alpha
numeric characters."
},
"InstanceRole": {
"Default": "aws-opsworks-ec2-role",
"Description": "The OpsWorks instance role",
"Type": "String",
"MinLength": "1",
"MaxLength": "64",
"AllowedPattern": "[a-zA-Z][a-zA-Z0-9-]*",
"ConstraintDescription": "must begin with a letter and contain only alpha
API Version 2010-05-15
207
AWS CloudFormation User Guide
AWS OpsWorks
numeric characters."
},
"AppName": {
"Default": "myapp",
"Description": "The app name",
"Type": "String",
"MinLength": "1",
"MaxLength": "64",
"AllowedPattern": "[a-zA-Z][a-zA-Z0-9]*",
"ConstraintDescription": "must begin with a letter and contain only alpha
numeric characters."
},
"MysqlRootPassword" : {
"Description" : "MysqlRootPassword",
"NoEcho" : "true",
"Type" : "String"
}
},
"Resources": {
"myStack": {
"Type": "AWS::OpsWorks::Stack",
"Properties": {
"Name": {
"Ref": "AWS::StackName"
},
"ServiceRoleArn": {
"Fn::Join": [
"", ["arn:aws:iam::", {"Ref": "AWS::AccountId"},
":role/", {"Ref": "ServiceRole"}]
]
},
"DefaultInstanceProfileArn": {
"Fn::Join": [
"", ["arn:aws:iam::", {"Ref": "AWS::AccountId"},
":instance-profile/", {"Ref": "InstanceRole"}]
]
},
"UseCustomCookbooks": "true",
"CustomCookbooksSource": {
"Type": "git",
"Url": "git://github.com/amazonwebservices/opsworks-example-cook
books.git"
}
}
},
"myLayer": {
"Type": "AWS::OpsWorks::Layer",
"DependsOn": "myApp",
"Properties": {
"StackId": {"Ref": "myStack"},
"Type": "php-app",
"Shortname" : "php-app",
"EnableAutoHealing" : "true",
"AutoAssignElasticIps" : "false",
"AutoAssignPublicIps" : "true",
"Name": "MyPHPApp",
"CustomRecipes" : {
"Configure" : ["phpapp::appsetup"]
API Version 2010-05-15
208
AWS CloudFormation User Guide
AWS OpsWorks
}
}
},
"DBLayer" : {
"Type" : "AWS::OpsWorks::Layer",
"DependsOn": "myApp",
"Properties" : {
"StackId" : {"Ref":"myStack"},
"Type" : "db-master",
"Shortname" : "db-layer",
"EnableAutoHealing" : "true",
"AutoAssignElasticIps" : "false",
"AutoAssignPublicIps" : "true",
"Name" : "MyMySQL",
"CustomRecipes" : {
"Setup" : ["phpapp::dbsetup"]
},
"Attributes" : {
"MysqlRootPassword" : {"Ref":"MysqlRootPassword"},
"MysqlRootPasswordUbiquitous": "true"
},
"VolumeConfigurations":[{"MountPoint":"/vol/mysql","NumberOf
Disks":1,"Size":10}]
}
},
"ELBAttachment" : {
"Type" : "AWS::OpsWorks::ElasticLoadBalancerAttachment",
"Properties" : {
"ElasticLoadBalancerName" : { "Ref" : "ELB" },
"LayerId" : { "Ref" : "myLayer" }
}
},
"ELB" : {
"Type": "AWS::ElasticLoadBalancing::LoadBalancer",
"Properties": {
"AvailabilityZones": { "Fn::GetAZs" : "" } ,
"Listeners": [{
"LoadBalancerPort": "80",
"InstancePort": "80",
"Protocol": "HTTP",
"InstanceProtocol": "HTTP"
}],
"HealthCheck": {
"Target": "HTTP:80/",
"HealthyThreshold": "2",
"UnhealthyThreshold": "10",
"Interval": "30",
"Timeout": "5"
}
}
},
"myAppInstance1": {
"Type": "AWS::OpsWorks::Instance",
"Properties": {
"StackId": {"Ref": "myStack"},
"LayerIds": [{"Ref": "myLayer"}],
"InstanceType": "m1.small"
}
API Version 2010-05-15
209
AWS CloudFormation User Guide
Amazon Redshift
},
"myAppInstance2": {
"Type": "AWS::OpsWorks::Instance",
"Properties": {
"StackId": {"Ref": "myStack"},
"LayerIds": [{"Ref": "myLayer"}],
"InstanceType": "m1.small"
}
},
"myDBInstance": {
"Type": "AWS::OpsWorks::Instance",
"Properties": {
"StackId": {"Ref": "myStack"},
"LayerIds": [{"Ref": "DBLayer"}],
"InstanceType": "m1.small"
}
},
"myApp" : {
"Type" : "AWS::OpsWorks::App",
"Properties" : {
"StackId" : {"Ref":"myStack"},
"Type" : "php",
"Name" : {"Ref": "AppName"},
"AppSource" : {
"Type" : "git",
"Url" : "git://github.com/amazonwebservices/opsworks-demo-php-simpleapp.git",
"Revision" : "version2"
},
"Attributes" : {
"DocumentRoot" : "web"
}
}
}
}
}
Amazon Redshift Template Snippets
Amazon Redshift is a fully managed, petabyte-scale data warehouse service in the cloud. You can use
AWS CloudFormation to provision and manage Amazon Redshift clusters.
Amazon Redshift Cluster
The following sample template creates an Amazon Redshift cluster according to the parameter values
that are specified when the stack is created. The cluster parameter group that is associated with the
Amazon Redshift cluster enables user activity logging. The template also launches the Amazon Redshift
clusters in an Amazon VPC that is defined in the template. The VPC includes an internet gateway so that
you can access the Amazon Redshift clusters from the Internet. However, the communication between
the cluster and the Internet gateway must also be enabled, which is done by the route table entry.
Note
The template includes the IsMultiNodeCluster condition so that the NumberOfNodes
parameter is declared only when the ClusterType parameter value is set to multi-node.
API Version 2010-05-15
210
AWS CloudFormation User Guide
Amazon Redshift
{
"AWSTemplateFormatVersion": "2010-09-09",
"Parameters" : {
"DatabaseName" : {
"Description" : "The name of the first database to be created when the
cluster is created",
"Type" : "String",
"Default" : "dev",
"AllowedPattern" : "([a-z]|[0-9])+"
},
"ClusterType" : {
"Description" : "The type of cluster",
"Type" : "String",
"Default" : "single-node",
"AllowedValues" : [ "single-node", "multi-node" ]
},
"NumberOfNodes" : {
"Description" : "The number of compute nodes in the cluster. For multinode clusters, the NumberOfNodes parameter must be greater than 1",
"Type" : "Number",
"Default" : "1"
},
"NodeType" : {
"Description" : "The type of node to be provisioned",
"Type" : "String",
"Default" : "dw1.xlarge",
"AllowedValues" : [ "dw1.xlarge", "dw1.8xlarge", "dw2.large", "dw2.8xlarge"
]
},
"MasterUsername" : {
"Description" : "The user name that is associated with the master user
account for the cluster that is being created",
"Type" : "String",
"Default" : "defaultuser",
"AllowedPattern" : "([a-z])([a-z]|[0-9])*"
},
"MasterUserPassword" : {
"Description" : "The password that is associated with the master user
account for the cluster that is being created.",
"Type" : "String",
"NoEcho" : "true"
},
"InboundTraffic" : {
"Description" : "Allow inbound traffic to the cluster from this CIDR
range.",
"Type" : "String",
"MinLength": "9",
"MaxLength": "18",
"Default" : "0.0.0.0/0",
"AllowedPattern" :
"(\\d{1,3})\\.(\\d{1,3})\\.(\\d{1,3})\\.(\\d{1,3})/(\\d{1,2})",
"ConstraintDescription" : "must be a valid CIDR range of the form
x.x.x.x/x."
},
"PortNumber" : {
"Description" : "The port number on which the cluster accepts incoming
connections.",
"Type" : "Number",
API Version 2010-05-15
211
AWS CloudFormation User Guide
Amazon Redshift
"Default" : "5439"
}
},
"Conditions" : {
"IsMultiNodeCluster" : {
"Fn::Equals" : [{ "Ref" : "ClusterType" }, "multi-node" ]
}
},
"Resources" : {
"RedshiftCluster" : {
"Type" : "AWS::Redshift::Cluster",
"DependsOn" : "AttachGateway",
"Properties" : {
"ClusterType" : { "Ref" : "ClusterType" },
"NumberOfNodes" : { "Fn::If" : [ "IsMultiNodeCluster", { "Ref" :
"NumberOfNodes" }, { "Ref" : "AWS::NoValue" }]},
"NodeType" : { "Ref" : "NodeType" },
"DBName" : { "Ref" : "DatabaseName" },
"MasterUsername" : { "Ref" : "MasterUsername" },
"MasterUserPassword" : { "Ref" : "MasterUserPassword" },
"ClusterParameterGroupName" : { "Ref" : "RedshiftClusterParameterGroup"
},
"VpcSecurityGroupIds" : [ { "Ref" : "SecurityGroup" } ],
"ClusterSubnetGroupName" : { "Ref" : "RedshiftClusterSubnetGroup" },
"PubliclyAccessible" : "true",
"Port" : { "Ref" : "PortNumber" }
}
},
"RedshiftClusterParameterGroup" : {
"Type" : "AWS::Redshift::ClusterParameterGroup",
"Properties" : {
"Description" : "Cluster parameter group",
"ParameterGroupFamily" : "redshift-1.0",
"Parameters" : [{
"ParameterName" : "enable_user_activity_logging",
"ParameterValue" : "true"
}]
}
},
"RedshiftClusterSubnetGroup" : {
"Type" : "AWS::Redshift::ClusterSubnetGroup",
"Properties" : {
"Description" : "Cluster subnet group",
"SubnetIds" : [ { "Ref" : "PublicSubnet" } ]
}
},
"VPC" : {
"Type" : "AWS::EC2::VPC",
"Properties" : {
"CidrBlock" : "10.0.0.0/16"
}
},
"PublicSubnet" : {
"Type" : "AWS::EC2::Subnet",
"Properties" : {
"CidrBlock" : "10.0.0.0/24",
"VpcId" : { "Ref" : "VPC" }
API Version 2010-05-15
212
AWS CloudFormation User Guide
Amazon Redshift
}
},
"SecurityGroup" : {
"Type" : "AWS::EC2::SecurityGroup",
"Properties" : {
"GroupDescription" : "Security group",
"SecurityGroupIngress" : [ {
"CidrIp" : { "Ref": "InboundTraffic" },
"FromPort" : { "Ref" : "PortNumber" },
"ToPort" : { "Ref" : "PortNumber" },
"IpProtocol" : "tcp"
} ],
"VpcId" : { "Ref" : "VPC" }
}
},
"myInternetGateway" : {
"Type" : "AWS::EC2::InternetGateway"
},
"AttachGateway" : {
"Type" : "AWS::EC2::VPCGatewayAttachment",
"Properties" : {
"VpcId" : { "Ref" : "VPC" },
"InternetGatewayId" : { "Ref" : "myInternetGateway" }
}
},
"PublicRouteTable" : {
"Type" : "AWS::EC2::RouteTable",
"Properties" : {
"VpcId" : {
"Ref" : "VPC"
}
}
},
"PublicRoute" : {
"Type" : "AWS::EC2::Route",
"DependsOn" : "AttachGateway",
"Properties" : {
"RouteTableId" : {
"Ref" : "PublicRouteTable"
},
"DestinationCidrBlock" : "0.0.0.0/0",
"GatewayId" : {
"Ref" : "myInternetGateway"
}
}
},
"PublicSubnetRouteTableAssociation" : {
"Type" : "AWS::EC2::SubnetRouteTableAssociation",
"Properties" : {
"SubnetId" : {
"Ref" : "PublicSubnet"
},
"RouteTableId" : {
"Ref" : "PublicRouteTable"
}
}
}
},
API Version 2010-05-15
213
AWS CloudFormation User Guide
Amazon RDS
"Outputs" : {
"ClusterEndpoint" : {
"Description" : "Cluster endpoint",
"Value" : { "Fn::Join" : [ ":", [ { "Fn::GetAtt" : [ "RedshiftCluster",
"Endpoint.Address" ] }, { "Fn::GetAtt" : [ "RedshiftCluster", "Endpoint.Port"
] } ] ] }
},
"ClusterName" : {
"Description" : "Name of cluster",
"Value" : { "Ref" : "RedshiftCluster" }
},
"ParameterGroupName" : {
"Description" : "Name of parameter group",
"Value" : { "Ref" : "RedshiftClusterParameterGroup" }
},
"RedshiftClusterSubnetGroupName" : {
"Description" : "Name of cluster subnet group",
"Value" : { "Ref" : "RedshiftClusterSubnetGroup" }
},
"RedshiftClusterSecurityGroupName" : {
"Description" : "Name of cluster security group",
"Value" : { "Ref" : "SecurityGroup" }
}
}
}
See Also
AWS::Redshift::Cluster (p. 486)
Amazon RDS Template Snippets
Topics
• Amazon RDS DB Instance Resource (p. 214)
• Amazon RDS Oracle Database DB Instance Resource (p. 215)
• Amazon RDS DBSecurityGroup Resource for CIDR Range (p. 215)
• Amazon RDS DBSecurityGroup with an Amazon EC2 security group (p. 216)
• Multiple VPC security groups (p. 216)
• Amazon RDS Database Instance in a VPC Security Group (p. 217)
Amazon RDS DB Instance Resource
This example shows an Amazon RDS DB Instance resource. Because the optional EngineVersion property
is not specified, the default engine version is used for this DB Instance. For details about the default
engine version and other default settings, see CreateDBInstance. The DBSecurityGroups property
authorizes network ingress to the AWS::RDS::DBSecurityGroup resources named
MyDbSecurityByEC2SecurityGroup and MyDbSecurityByCIDRIPGroup. For details, see
AWS::RDS::DBInstance (p. 496). The DB Instance resource also has a DeletionPolicy attribute set to
Snapshot. With the Snapshot DeletionPolicy set, AWS CloudFormation will take a snapshot of this DB
Instance before deleting it during stack deletion.
API Version 2010-05-15
214
AWS CloudFormation User Guide
Amazon RDS
"MyDB" : {
"Type" : "AWS::RDS::DBInstance",
"Properties" : {
"DBSecurityGroups" : [
{"Ref" : "MyDbSecurityByEC2SecurityGroup"}, {"Ref" : "MyDbSecurityByCID
RIPGroup"} ],
"AllocatedStorage" : "5",
"DBInstanceClass" : "db.m1.small",
"Engine" : "MySQL",
"MasterUsername" : "MyName",
"MasterUserPassword" : "MyPassword"
},
"DeletionPolicy" : "Snapshot"
}
Amazon RDS Oracle Database DB Instance Resource
This example creates an Oracle Database DB Instance resource by specifying the Engine as oracle-ee
with a license model of bring-your-own-license. For details about the settings for Oracle Database DB
instances, see CreateDBInstance. The DBSecurityGroups property authorizes network ingress to the
AWS::RDS::DBSecurityGroup resources named MyDbSecurityByEC2SecurityGroup and
MyDbSecurityByCIDRIPGroup. For details, see AWS::RDS::DBInstance (p. 496).The DB Instance resource
also has a DeletionPolicy attribute set to Snapshot. With the Snapshot DeletionPolicy set, AWS
CloudFormation will take a snapshot of this DB Instance before deleting it during stack deletion.
"MyDB" : {
"Type" : "AWS::RDS::DBInstance",
"Properties" : {
"DBSecurityGroups" : [
{"Ref" : "MyDbSecurityByEC2SecurityGroup"}, {"Ref" : "MyDbSecurityByCID
RIPGroup"} ],
"AllocatedStorage" : "5",
"DBInstanceClass" : "db.m1.small",
"Engine" : "oracle-ee",
"LicenseModel" : "bring-your-own-license",
"MasterUsername" : "master",
"MasterUserPassword" : "SecretPassword01"
},
"DeletionPolicy" : "Snapshot"
}
Amazon RDS DBSecurityGroup Resource for CIDR Range
This example shows an Amazon RDS DBSecurityGroup resource with ingress authorization for the
specified CIDR range in the format ddd.ddd.ddd.ddd/dd. For details, see
AWS::RDS::DBSecurityGroup (p. 509) and Amazon RDS Security Group Rule (p. 620).
"MyDbSecurityByCIDRIPGroup" : {
"Type" : "AWS::RDS::DBSecurityGroup",
"Properties" : {
"GroupDescription" : "Ingress for CIDRIP",
"DBSecurityGroupIngress" : {
"CIDRIP" : "192.168.0.0/32"
}
API Version 2010-05-15
215
AWS CloudFormation User Guide
Amazon RDS
}
}
Amazon RDS DBSecurityGroup with an Amazon EC2 security
group
This example shows an AWS::RDS::DBSecurityGroup (p. 509) resource with ingress authorization from
an Amazon EC2 security group referenced by MyEc2SecurityGroup.
To do this, you define an EC2 security group and then use the intrinsic Ref function to refer to the EC2
security group within your DBSecurityGroup.
"DBInstance" : {
"Type": "AWS::RDS::DBInstance",
"Properties": {
"DBName"
: { "Ref" :
"Engine"
: "MySQL",
"MasterUsername"
: { "Ref" :
"DBInstanceClass"
: { "Ref" :
"DBSecurityGroups" : [ { "Ref"
"AllocatedStorage" : { "Ref" :
"MasterUserPassword": { "Ref" :
}
},
"DBName" },
"DBUsername" },
"DBClass" },
: "DBSecurityGroup" } ],
"DBAllocatedStorage" },
"DBPassword" }
"DBSecurityGroup": {
"Type": "AWS::RDS::DBSecurityGroup",
"Properties": {
"DBSecurityGroupIngress": { "EC2SecurityGroupName": { "Ref": "WebServer
SecurityGroup" } },
"GroupDescription"
: "Frontend Access"
}
},
"WebServerSecurityGroup" : {
"Type" : "AWS::EC2::SecurityGroup",
"Properties" : {
"GroupDescription" : "Enable HTTP access via port 80 and SSH access",
"SecurityGroupIngress" : [
{"IpProtocol" : "tcp", "FromPort" : "80", "ToPort" : "80", "CidrIp" :
"0.0.0.0/0"},
{"IpProtocol" : "tcp", "FromPort" : "22", "ToPort" : "22", "CidrIp" :
"0.0.0.0/0"}
]
}
}
The full template from which this example is extracted can be seen at
Drupal_Single_Instance_With_RDS.template
Multiple VPC security groups
This example shows an AWS::RDS::DBSecurityGroup (p. 509) resource with ingress authorization for
multiple Amazon EC2 VPC security groups in AWS::RDS::DBSecurityGroupIngress (p. 511).
API Version 2010-05-15
216
AWS CloudFormation User Guide
Amazon RDS
{
"Resources" : {
"DBinstance" : {
"Type" : "AWS::RDS::DBInstance",
"Properties" : {
"AllocatedStorage" : "5",
"DBInstanceClass" : "db.m1.small",
"DBName" : { "MyDBName" },
"DBSecurityGroups" : [ { "Ref" : "DbSecurityByEC2SecurityGroup" }
],
"DBSubnetGroupName" : { "Ref" : "MyDBSubnetGroup" },
"Engine" : "MySQL",
"MasterUserPassword": { "MyDBPassword" }
"MasterUsername"
: { "MyDBUsername" },
},
"DeletionPolicy" : "Snapshot"
},
"DbSecurityByEC2SecurityGroup" : {
"Type" : "AWS::RDS::DBSecurityGroup",
"Properties" : {
"GroupDescription" : "Ingress for Amazon EC2 security group",
"EC2VpcId" : { "MyVPC" },
"DBSecurityGroupIngress" : [ {
"EC2SecurityGroupId" : "sg-b0ff1111",
"EC2SecurityGroupOwnerId" : "111122223333"
}, {
"EC2SecurityGroupId" : "sg-ffd722222",
"EC2SecurityGroupOwnerId" : "111122223333"
} ]
}
}
}
}
Amazon RDS Database Instance in a VPC Security Group
This example shows an Amazon RDS database instance associated with an Amazon EC2 VPC security
group.
{
"DBEC2SecurityGroup": {
"Type": "AWS::EC2::SecurityGroup",
"Properties" : {
"GroupDescription": "Open database for access",
"SecurityGroupIngress" : [{
"IpProtocol" : "tcp",
"FromPort" : "3306",
"ToPort" : "3306",
"SourceSecurityGroupName" : { "Ref" : "WebServerSecurityGroup" }
}]
}
},
"DBInstance" : {
"Type": "AWS::RDS::DBInstance",
API Version 2010-05-15
217
AWS CloudFormation User Guide
Amazon Route 53
"Properties": {
"DBName"
: { "Ref" : "DBName" },
"Engine"
: "MySQL",
"MultiAZ"
: { "Ref": "MultiAZDatabase" },
"MasterUsername"
: { "Ref" : "DBUser" },
"DBInstanceClass"
: { "Ref" : "DBClass" },
"AllocatedStorage" : { "Ref" : "DBAllocatedStorage" },
"MasterUserPassword": { "Ref" : "DBPassword" },
"VPCSecurityGroups" : [ { "Fn::GetAtt": [ "DBEC2SecurityGroup", "GroupId"
] } ]
}
}
}
Amazon Route 53 Template Snippets
Topics
• Amazon Route 53 Resource Record Set Using Hosted Zone Name or ID (p. 218)
• Using RecordSetGroup to Set Up Weighted Resource Record Sets (p. 219)
• Using RecordSetGroup to Set Up an Alias Resource Record Set (p. 220)
• An Alias Resource Record Set for a CloudFront Distribution (p. 220)
Amazon Route 53 Resource Record Set Using Hosted Zone
Name or ID
When you create an Amazon Route 53 resource record set, you must specify the hosted zone where you
want to add it. AWS CloudFormation provides two ways to do this. You can explicitly specify the hosted
zone using the HostedZoneId property or have AWS CloudFormation find the hosted zone using the
HostedZoneName property. If you use the HostedZoneName property and there are multiple hosted
zones with the same domain name, AWS CloudFormation doesn't create the stack.
Adding RecordSet using HostedZoneId
This example adds an Amazon Route 53 resource record set containing an SPF record for the domain
name mysite.example.com that uses the HostedZoneId property to specify the hosted zone.
"myDNSRecord" : {
"Type" : "AWS::Route53::RecordSet",
"Properties" :
{
"HostedZoneId" : "/hostedzone/Z3DG6IL3SJCGPX",
"Name" : "mysite.example.com.",
"Type" : "SPF",
"TTL" : "900",
"ResourceRecords" : [ "\"v=spf1 ip4:192.168.0.1/16 -all\"" ]
}
}
Adding RecordSet using HostedZoneName
This example adds an Amazon Route 53 resource record set containing A records for the domain name
"mysite.example.com" using the HostedZoneName property to specify the hosted zone.
API Version 2010-05-15
218
AWS CloudFormation User Guide
Amazon Route 53
"myDNSRecord2" : {
"Type" : "AWS::Route53::RecordSet",
"Properties" : {
"HostedZoneName" : "example.com.",
"Comment" : "A records for my frontends.",
"Name" : "mysite.example.com.",
"Type" : "A",
"TTL" : "900",
"ResourceRecords" : [
"192.168.0.1",
"192.168.0.2"
]
}
}
Using RecordSetGroup to Set Up Weighted Resource Record
Sets
This example uses an AWS::Route53::RecordSetGroup (p. 524) to set up two CNAME records for the
"example.com." hosted zone. The RecordSets property contains the CNAME record sets for the
"mysite.example.com" DNS name. Each record set contains an identifier (SetIdentifier) and weight
(Weight). The weighting for Frontend One is 40% (4 of 10) and Frontend Two is 60% (6 of 10). For more
information about weighted resource record sets, see Setting Up Weighted Resource Record Sets in
Amazon Route 53 Developer Guide.
"myDNSOne" : {
"Type" : "AWS::Route53::RecordSetGroup",
"Properties" : {
"HostedZoneName" : "example.com.",
"Comment" : "Weighted RR for my frontends.",
"RecordSets" : [
{
"Name" : "mysite.example.com.",
"Type" : "CNAME",
"TTL" : "900",
"SetIdentifier" : "Frontend One",
"Weight" : "4",
"ResourceRecords" : ["example-ec2.amazonaws.com"]
},
{
"Name" : "mysite.example.com.",
"Type" : "CNAME",
"TTL" : "900",
"SetIdentifier" : "Frontend Two",
"Weight" : "6",
"ResourceRecords" : ["example-ec2-larger.amazonaws.com"]
}
]
}
}
API Version 2010-05-15
219
AWS CloudFormation User Guide
Amazon Route 53
Using RecordSetGroup to Set Up an Alias Resource Record
Set
This example uses an AWS::Route53::RecordSetGroup (p. 524) to set up an alias resource record set for
the "example.com." hosted zone. The RecordSets property contains the A record for the zone apex
"example.com." The AliasTarget (p. 621) property specifies the hosted zone ID and DNS name for the
myELB LoadBalancer by using the GetAtt (p. 661) intrinsic function to retrieve the
CanonicalHostedZoneNameID and CanonicalHostedZoneName properties of myELB resource. For more
information about alias resource record sets, see Creating Alias Resource Record Sets in the Amazon
Route 53 Developer Guide.
"myELB" : {
"Type" : "AWS::ElasticLoadBalancing::LoadBalancer",
"Properties" : {
"AvailabilityZones" : [ "us-east-1a" ],
"Listeners" : [ {
"LoadBalancerPort" : "80",
"InstancePort" : "80",
"Protocol" : "HTTP"
} ]
}
},
"myDNS" : {
"Type" : "AWS::Route53::RecordSetGroup",
"Properties" : {
"HostedZoneName" : "example.com.",
"Comment" : "Zone apex alias targeted to myELB LoadBalancer.",
"RecordSets" : [
{
"Name" : "example.com.",
"Type" : "A",
"AliasTarget" : {
"HostedZoneId" : { "Fn::GetAtt" : ["myELB", "CanonicalHosted
ZoneNameID"] },
"DNSName" : { "Fn::GetAtt" : ["myELB","CanonicalHostedZone
Name"] }
}
}
]
}
}
An Alias Resource Record Set for a CloudFront Distribution
The following example creates an alias record set that routes queries to the specified CloudFront distribution
domain name.
"myDNS" : {
"Type" : "AWS::Route53::RecordSetGroup",
"Properties" : {
"HostedZoneId" : { "Ref" : "myHostedZoneID" },
"RecordSets" : [{
"Name" : { "Ref" : "myRecordSetDomainName" },
"Type" : "A",
"AliasTarget" : {
API Version 2010-05-15
220
AWS CloudFormation User Guide
Amazon S3
"HostedZoneId" : "Z2FDTNDATAQYW2",
"DNSName" : { "Ref" : "myCloudFrontDistributionDomainName" }
}
}]
}
}
Amazon S3 Template Snippets
Topics
• Creating an Amazon S3 Bucket with Defaults (p. 221)
• Creating an Amazon S3 Bucket for Website Hosting and with a DeletionPolicy (p. 221)
• Creating a Static Website Using a Custom Domain (p. 222)
Creating an Amazon S3 Bucket with Defaults
This example uses a AWS::S3::Bucket (p. 526) to create a bucket with default settings.
"myS3Bucket" : {
"Type" : "AWS::S3::Bucket"
}
Creating an Amazon S3 Bucket for Website Hosting and with
a DeletionPolicy
This example creates a bucket as a website. The AccessControl property is set to the canned ACL
PublicRead (public read permissions are required for buckets set up for website hosting). Because this
bucket resource has a DeletionPolicy attribute (p. 641) set to Retain, AWS CloudFormation will not delete
this bucket when it deletes the stack. The Output section uses Fn::GetAtt to retrieve the WebsiteURL
attribute and DomainName attribute of the S3Bucket resource.
{
"AWSTemplateFormatVersion" : "2010-09-09",
"Resources" : {
"S3Bucket" : {
"Type" : "AWS::S3::Bucket",
"Properties" : {
"AccessControl" : "PublicRead",
"WebsiteConfiguration" : {
"IndexDocument" : "index.html",
"ErrorDocument" : "error.html"
}
},
"DeletionPolicy" : "Retain"
}
},
"Outputs" : {
"WebsiteURL" : {
"Value" : { "Fn::GetAtt" : [ "S3Bucket", "WebsiteURL" ] },
"Description" : "URL for website hosted on S3"
},
"S3BucketSecureURL" : {
API Version 2010-05-15
221
AWS CloudFormation User Guide
Amazon S3
"Value" : { "Fn::Join" : [ "", [ "https://", { "Fn::GetAtt" :
[ "S3Bucket", "DomainName" ] } ] ] },
"Description" : "Name of S3 bucket to hold website content"
}
}
}
Creating a Static Website Using a Custom Domain
You can use Amazon Route 53 with a registered domain. The following sample assumes that you have
already created a hosted zone in Amazon Route 53 for your domain. The example creates two buckets
for website hosting. The root bucket hosts the content, and the other bucket redirects
www.domainname.com requests to the root bucket. The record sets map your domain name to Amazon
S3 endpoints.
For more information about using a custom domain, see Setting Up a Static Website Using a Custom
Domain in the Amazon Simple Storage Service Developer Guide.
{
"AWSTemplateFormatVersion": "2010-09-09",
"Mappings" : {
"RegionMap" : {
"us-east-1" : { "S3hostedzoneID" : "Z3AQBSTGFYJSTF", "websiteend
point" : "s3-website-us-east-1.amazonaws.com" },
"us-west-1" : { "S3hostedzoneID" : "Z2F56UZL2M1ACD", "websiteend
point" : "s3-website-us-west-1.amazonaws.com" },
"us-west-2" : { "S3hostedzoneID" : "Z3BJ6K6RIION7M", "websiteend
point" : "s3-website-us-west-2.amazonaws.com" },
"eu-west-1" : { "S3hostedzoneID" : "Z1BKCTXD74EZPE", "websiteend
point" : "s3-website-eu-west-1.amazonaws.com" },
"ap-southeast-1" : { "S3hostedzoneID" : "Z3O0J2DXBE1FTB", "websit
eendpoint" : "s3-website-ap-southeast-1.amazonaws.com" },
"ap-southeast-2" : { "S3hostedzoneID" : "Z1WCIGYICN2BYD", "websit
eendpoint" : "s3-website-ap-southeast-2.amazonaws.com" },
"ap-northeast-1" : { "S3hostedzoneID" : "Z2M4EHUR26P7ZW", "websit
eendpoint" : "s3-website-ap-northeast-1.amazonaws.com" },
"sa-east-1" : { "S3hostedzoneID" : "Z31GFT0UA1I2HV", "websiteend
point" : "s3-website-sa-east-1.amazonaws.com" }
}
},
"Parameters": {
"RootDomainName": {
"Description": "Domain name for your website (example.com)",
"Type": "String"
}
},
"Resources": {
"RootBucket": {
"Type": "AWS::S3::Bucket",
"Properties": {
"BucketName" : {"Ref":"RootDomainName"},
"AccessControl": "PublicRead",
"WebsiteConfiguration": {
"IndexDocument":"index.html",
"ErrorDocument":"404.html"
}
API Version 2010-05-15
222
AWS CloudFormation User Guide
Amazon S3
}
},
"WWWBucket": {
"Type": "AWS::S3::Bucket",
"Properties": {
"BucketName": {
"Fn::Join": ["", ["www.", {"Ref":"RootDomainName"}]]
},
"AccessControl": "BucketOwnerFullControl",
"WebsiteConfiguration": {
"RedirectAllRequestsTo": {
"HostName": {"Ref": "RootBucket"}
}
}
}
},
"myDNS": {
"Type": "AWS::Route53::RecordSetGroup",
"Properties": {
"HostedZoneName": {
"Fn::Join": ["", [{"Ref": "RootDomainName"}, "."]]
},
"Comment": "Zone apex alias.",
"RecordSets": [
{
"Name": {"Ref": "RootDomainName"},
"Type": "A",
"AliasTarget": {
"HostedZoneId": {"Fn::FindInMap" : [ "RegionMap",
{ "Ref" : "AWS::Region" }, "S3hostedzoneID"]},
"DNSName": {"Fn::FindInMap" : [ "RegionMap", { "Ref"
: "AWS::Region" }, "websiteendpoint"]}
}
},
{
"Name": {
"Fn::Join": ["", ["www.", {"Ref":"RootDomainName"}]]
},
"Type": "CNAME",
"TTL" : "900",
"ResourceRecords" : [
{"Fn::GetAtt":["WWWBucket", "DomainName"]}
]
}
]
}
}
},
"Outputs": {
"WebsiteURL": {
"Value": {"Fn::GetAtt": ["RootBucket", "WebsiteURL"]},
"Description": "URL for website hosted on S3"
}
}
}
API Version 2010-05-15
223
AWS CloudFormation User Guide
Amazon SNS
Amazon SNS Template Snippets
This example shows an Amazon SNS topic resource. It requires a valid email address.
"MySNSTopic" : {
"Type" : "AWS::SNS::Topic",
"Properties" : {
"Subscription" : [ {
"Endpoint" : "add valid email address",
"Protocol" : "email"
} ]
}
}
Amazon SQS Template Snippets
This example shows an Amazon SQS queue.
"MyQueue" : {
"Type" : "AWS::SQS::Queue",
"Properties" : {
"VisibilityTimeout" : "value"
}
}
Creating Templates
Topics
• Specifying Intrinsic Functions (p. 224)
• Adding Input Parameters to Your Template (p. 225)
• Use Parameters and Mappings to Specify Values in Your Template (p. 226)
• Conditionally Creating Resources (p. 228)
• Tagging Your Member Resources (p. 229)
• Specifying Output Values (p. 229)
• Creating Wait Conditions in a Template (p. 230)
• Deploying Applications on Amazon EC2 with AWS CloudFormation (p. 234)
Specifying Intrinsic Functions
AWS CloudFormation intrinsic functions are special actions you use in your template to assign values to
properties not available until runtime. Each function is declared with a double-quoted name, a single
colon, and its parameters. When an argument is a literal string, it is enclosed in double quotes (""). When
arguments are in a list of any kind, they are enclosed in brackets ([ ]). If an argument is a value that is
returned from an intrinsic function, it is enclosed in braces ({ }).
The following example shows the function "Fn::GetAtt" being used to assign a value to the MyLBDNSName,
which it does by retrieving the value of the attribute DNSName from the Elastic Load Balancing load balancer
named MyLoadBalancer.
API Version 2010-05-15
224
AWS CloudFormation User Guide
Adding Input Parameters
"Properties" : {
"MyMyLBDNSName" : {
"Fn::GetAtt" : [ "MyLoadBalancer", "DNSName" ]
}
}
For more information about intrinsic functions, see Intrinsic Function Reference (p. 648).
Adding Input Parameters to Your Template
You can configure your templates to require input parameters by adding them to the Parameters section.
Each parameter you add must contain a value at runtime. You can specify a default value for each
parameter to make the parameter optional. If you do not specify a default value, you must provide a value
for that parameter when you create the stack.
A parameter can be declared as a String, Number, CommaDelimitedList, or AWS-specific type. The
String, Number, and AWS-specific types can have constraints that AWS CloudFormation uses to validate
the value of the parameter. For more information about parameter constraints, see Parameters (p. 115).
The following sample configures a single parameter, Email:
"Parameters" : {
"Email" : {
"Type" : "String"
}
}
The parameter has no default, so you must provide a value to create the stack. After you create the
CloudWatch Alarms stack with a value for Email, the aws cloudformation describe-stacks
command returns the following:
STACK myAlarms
arn:aws:aws cloudformation:us-east-1:165024647323:stack/f5b4cbb0-24d7-11e0-93a508be05d086/myAlarms
[email protected] 2011-01-20T20:57:57Z CREATE_COMPLETE
User Initiated false Instance=i-0723826b
You can configure the parameter to not display with the NoEcho parameter:
"Parameters" : {
"Email" : {
"Type" : "String",
"NoEcho" : "TRUE"
}
}
Here's the output from a stack created with the same template, but with the NoEcho set to TRUE:
STACK myAlarms2
arn:aws:aws cloudformation:us-east-1:165024647323:stack/ff6ff540-24db-11e0-94f85081b017c4b/myAlarms2
API Version 2010-05-15
225
AWS CloudFormation User Guide
Use Parameters and Mappings to Specify Values in Your
Template
Email=****** 2011-01-20T21:26:52Z
false Instance=i-f734959b
CREATE_COMPLETE
User Initiated
The value for Email is masked with asterisks.
To supply the values for parameters, you include the --parameters option to the aws cloudformation
create-stack command.
For example, the following command adds a value for the UserName and Password parameters:
PROMPT> aws cloudformation create-stack --stack-name MyStack --template-body
file:///home/local/test/sampletemplate.json
--parameters ParameterKey=UserName,ParameterValue=Joe ParameterKey=Password,Para
meterValue=JoesPw
Parameters are separated with a space. Note that parameter names are case sensitive. If you mistype
the parameter name when you run aws cloudformation create-stack, AWS CloudFormation will
not create the stack, and will report that the template doesn't contain the parameter.
Validate AWS-Specific Values
For some AWS values, such as Amazon EC2 key pair names and VPC IDs, you can use AWS-specific
parameter types to validate input parameter values against existing values in users' AWS accounts. For
example, you can use the AWS::EC2::KeyPair::KeyName parameter type to ensure that users specify
a valid key pair name before AWS CloudFormation creates or updates any resources. AWS-specific
parameter types are helpful in catching invalid values early. For more information, see Parameters (p. 115).
Use Parameters and Mappings to Specify Values
in Your Template
You can use an input parameter to refer to a specific value in a map by using the Fn::FindInMap
function. For example, suppose you have a list of regions that map to a specific AMI. You can select the
AMI that your stack uses by specifying a region parameter when you create the stack.
1. Add one parameter to your Parameters section for every mapping you want to include. The parameter
is how you pass in the desired mapping key.
2. Create the mappings that contain the key options and key values.
3. Use the Fn::FindInMap function as the value for the resource property or output you want to assign
conditionally.
Note
When you use input parameters for keys and values in the Fn::FindInMap function, set
default values for those parameters. Otherwise, if the parameters in the Fn::FindInMap
function are not defined, stack creation fails.
Consider this example. Suppose you want the aws cloudformation describe-stacks command
to print the AMI name of the AMI you want to run based on a particular region. You could do this with the
following:
{
"AWSTemplateFormatVersion" : "2010-09-09",
"Description" : "TemplateName - ShortMapExample.template",
API Version 2010-05-15
226
AWS CloudFormation User Guide
Use Parameters and Mappings to Specify Values in Your
Template
"Parameters" : {
"Region" : {
"Default" : "us-east-1",
"Description" : " 'us-east-1' | 'us-west-1' | 'eu-west-1' | 'ap-southeast1' "
}
},
"Mappings" : {
"RegionMap" : {
"us-east-1" : {
"AMI" : "ami-76f0061f"
},
"us-west-1" : {
"AMI" : "ami-655a0a20"
},
"eu-west-1" : {
"AMI" : "ami-7fd4e10b"
},
"ap-southeast-1" : {
"AMI" : "ami-72621c20"
}
}
},
"Resources" : {
...other resources...
},
"Outputs" : {
"OutVal" : {
"Description" : "Return the name of the AMI matching the RegionMap key",
"Value" : { "Fn::FindInMap" : [ "RegionMap", { "Ref" : "Region" }, "AMI"
]}
}
}
}
The parameter Region accepts a string value, ideally one of the region identifiers in the template. The
Mappings section declares the RegionMap mapping. Each mapping key assigns a value to the AMI
attribute. The Outputs section declares the OutVal output, which gets its value based on the value
returned from Fn:FindInMap.
The following shows the value assigned to OutVal based on the listed command:
API Version 2010-05-15
227
AWS CloudFormation User Guide
Conditionally Creating Resources
Command Lines
Value Assigned to OutVal
aws cloudformation create-stack --stack-name MyTestStack
--template-body file:///home/local/test/ShortRe
gionExample.json
--parameters ParameterKey=Region,ParameterValue=us-west1
...
aws cloudformation describe-stacks --stack-name MyTest
Stack
aws cloudformation create-stack --stack-name MyTestStack
--template-body file:///home/local/test/ShortRe
gionExample.json
--parameters ParameterKey=Region,ParameterValue=eu-west1
...
aws cloudformation describe-stacks --stack-name MyTest
Stack
aws cloudformation create-stack --stack-name MyTestStack
--template-body file:///home/local/test/ShortRe
gionExample.json
...
aws cloudformation describe-stacks MyTestStack
ami-655a0a20
ami-7fd4e10b
ami-76f0061f
In the first two cases, the value specified as part of the --parameters option determines the value of
OutVal. In the third example, a mapping key is not specified, so the default region, us-east-1, will be
used.
Conditionally Creating Resources
When you create or update a stack, you can create resources conditioned on input parameters and
mappings. You can set up multiple conditions with different outcomes for each. For example, you can
specify an Amazon EC2 security group as an input parameter and use that security group in your stack.
However, if a security group isn't provided, a security group that you specified in the template is created.
You can conditionally create resources by completing the following steps:
1. In the Parameters section of the template, define input parameters that you can use in your conditions.
For more information, see Adding Input Parameters to Your Template (p. 225).
2. In the Conditions section of the template, define the conditions that you want to use by using the intrinsic
functions for conditions. For more information, see Conditions (p. 125).
3. In the Resources and Outputs sections of the template, associate conditions with related resources
or properties. For more information, see Conditions (p. 125).
For additional sample templates and information about the syntax of conditions, see Condition
Functions (p. 649).
API Version 2010-05-15
228
AWS CloudFormation User Guide
Tagging Your Resources
Tagging Your Member Resources
AWS CloudFormation automatically tags your resources with the stack name that you can filter on when
viewing those resources in the AWS Management Console.
In addition to the stack name tags that AWS CloudFormation adds for you, you can add custom tags to
the resources that support tagging.
Note
Tags you add to a member resource do not appear in the output from aws cloudformation
describe-stack-resources. However, they do appear in the AWS Management Console
on the tab for the tagged resource.
Suppose you wanted to customize a template to include the tag Stage for deployment stage, and QA for
its value. You could write the definition for the MyInstance resource as follows:
"MyInstance" : {
"Type" : "AWS::EC2::Instance",
"Properties" : {
"SecurityGroups" : [ { "Ref" : "MySecurityGroup" } ],
"AvailabilityZone" : "us-east-1a",
"ImageId" : "ami-20b65349",
"Volumes" : [
{ "VolumeId" : { "Ref" : "MyEBS" },
"Device" : "/dev/sdk" }
],
"Tags" : [
{
"Key" : "Stage",
"Value" : "QA"
}
]
}
}
After you created the stack, you could then filter on the Stage tag in the AWS Management Console.
Specifying Output Values
You can use the template Outputs section to specify custom values that are included in the values returned
by aws cloudformation describe-stacks command. You specify each custom value according to
template property rules (Resources (p. 127)), so you can base their value on literals, parameter references,
pseudo parameters, mapping value, and intrinsic functions.
For a simple example, a sample template declares two outputs, IPAddress and InstanceId:
"Outputs" : {
"IPAddress" : {
"Value" : { "Ref" : "MyIp" }
},
"InstanceId" : {
"Value" : { "Ref" : "MyInstance" }
}
}
API Version 2010-05-15
229
AWS CloudFormation User Guide
Creating Wait Conditions
Both values are based on logical names declared within the template. IPAddress refers to the
AWS::EC2::EIP type with the logical name MyIp, and InstanceId refers to the AWS::EC2::Instance
type with the logical name MyInstance.
After the stack is created, and aws cloudformation describe-stacks reports its status as being
CREATE_COMPLETE, it also reports the following:
PROMPT> aws cloudformation describe-stacks --stack-name StackName
...
"Outputs": [
{
"OutputKey": "IPAddress",
"OutputValue": "184.72.229.56"
},
{
"OutputKey": "InstanceId",
"OutputValue": "i-47ab0a2b"
}
],
...
The custom output values IPAddress and InstanceId are present at the end of the report.
Creating Wait Conditions in a Template
Important
For Amazon EC2 and Auto Scaling resources, we recommend that you use a CreationPolicy
attribute instead of wait conditions. Add a CreationPolicy attribute to those resources and use
the cfn-signal helper script to signal when an instance has been successfully created.
For more information, see CreationPolicy (p. 639) or Deploying Applications on Amazon EC2 with
AWS CloudFormation (p. 234).
Using the AWS::CloudFormation::WaitCondition (p. 326) resource and CreationPolicy (p. 639) attribute,
you can do the following:
• Coordinate stack resource creation with other configuration actions that are external to the stack creation
• Track the status of a configuration process
For example, you can start the creation of another resource after an application configuration is partially
complete, or you can send signals during an installation and configuration process to track its progress.
Using a Wait Condition Handle
Note
If you use the VPC endpoint feature, resources in the VPC that respond to wait conditions must
have access to AWS CloudFormation-specific Amazon Simple Storage Service (Amazon S3)
buckets. Resources must send wait condition responses to a pre-signed Amazon S3 URL. If
they can't send responses to Amazon S3, AWS CloudFormation won't receive a response and
the stack operation fails. For more information, see AWS CloudFormation and VPC
Endpoints (p. 54).
You can use the wait condition and wait condition handle to make AWS CloudFormation pause the creation
of a stack and wait for a signal before it continues to create the stack. For example, you might want to
download and configure applications on an Amazon EC2 instance before considering the creation of that
Amazon EC2 instance complete.
The following list provides a summary of how a wait condition with a wait condition handle works:
API Version 2010-05-15
230
AWS CloudFormation User Guide
Creating Wait Conditions
• AWS CloudFormation creates a wait condition just like any other resource. When AWS CloudFormation
creates a wait condition, it reports the wait condition’s status as CREATE_IN_PROGRESS and waits
until it receives the requisite number of success signals or the wait condition’s timeout period has
expired. If AWS CloudFormation receives the requisite number of success signals before the time out
period expires, it continues creating the stack; otherwise, it sets the wait condition’s status to
CREATE_FAILED and rolls the stack back.
• The Timeout property determines how long AWS CloudFormation waits for the requisite number of
success signals. Timeout is a minimum-bound property, meaning the timeout occurs no sooner than
the time you specify, but can occur shortly thereafter. The maximum time that you can specify is 43200
seconds (12 hours ).
• Typically, you want a wait condition to begin immediately after the creation of a specific resource, such
as an Amazon EC2 instance, RDS DB instance, or Auto Scaling group. You do this by adding the
DependsOn attribute (p. 642) to a wait condition.When you add a DependsOn attribute to a wait condition,
you specify that the wait condition is created only after the creation of a particular resource has
completed. When the wait condition is created, AWS CloudFormation begins the timeout period and
waits for success signals.
• You can also use the DependsOn attribute on other resources. For example, you may want an RDS
DB instance to be created and a database configured on that DB instance first before creating the EC2
instances that use that database. In this case, you create a wait condition that has a DependsOn
attribute that specifies the DB instance, and you create EC2 instance resources that have DependsOn
attributes that specify the wait condition. This would ensure that the EC2 instances would only be
created directly after the DB instance and the wait condition were completed.
• AWS CloudFormation must receive a specified number of success signals for a wait condition before
setting that wait condition’s status to CREATE_COMPLETE continuing the creation of the stack. The
wait condition’s Count property specifies the number of success signals. If none is set, the default is
1.
• A wait condition requires a wait condition handle to set up a presigned URL that is used as the signaling
mechanism. The presigned URL enables you to send a signal without having to supply your AWS
credentials. You use that presigned URL to signal success or failure, which is encapsulated in a JSON
statement. For the format of that JSON statement, see the Wait Condition Signal JSON Format (p. 233).
• If a wait condition receives the requisite number of success signals (as defined in the Count property)
before the timeout period expires, AWS CloudFormation marks the wait condition as
CREATE_COMPLETE and continues creating the stack. Otherwise, AWS CloudFormation fails the
wait condition and rolls the stack back (for example, if the timeout period expires without requisite
success signals or if a failure signal is received).
To use a wait condition in a stack:
1.
Declare an AWS::CloudFormation::WaitConditionHandle resource in the stack's template. A wait
condition handle has no properties; however, a reference to a WaitConditionHandle resource resolves
to a pre-signed URL that you can use to signal success or failure to the WaitCondition. For example:
"myWaitHandle" : {
"Type" : "AWS::CloudFormation::WaitConditionHandle",
"Properties" : {
}
}
2.
Declare an AWS::CloudFormation::WaitCondition resource in the stack's template. A WaitCondition
resource has two required properties: Handle is a reference to a WaitConditionHandle declared in
the template and Timeout is the number seconds for AWS CloudFormation to wait.You can optionally
set the Count property, which determines the number of success signals that the wait condition must
receive before AWS CloudFormation can resume creating the stack.
API Version 2010-05-15
231
AWS CloudFormation User Guide
Creating Wait Conditions
To control when the wait condition is triggered, you set a DependsOn attribute on the wait condition.
A DependsOn clause associates a resource with the wait condition. After AWS CloudFormation
creates the DependsOn resource, it blocks further stack resource creation until one of the following
events occur: a) the timeout period expires b) The requisite number of success signals are received
c) A failure signal is received.
Here is an example of a wait condition that begins after the successful creation of the Ec2Instance
resource, uses the myWaitHandle resource as the WaitConditionHandle, has a timeout of 4500
seconds, and has the default Count of 1 (since no Count property is specified):
"myWaitCondition" : {
"Type" : "AWS::CloudFormation::WaitCondition",
"DependsOn" : "Ec2Instance",
"Properties" : {
"Handle" : { "Ref" : "myWaitHandle" },
"Timeout" : "4500"
}
}
3.
Get the presigned URL to use for signaling.
In the template, the presigned URL can be retrieved by passing the logical name of the
AWS::CloudFormation::WaitConditionHandle resource to the Ref intrinsic function. For example, you
can use the UserData property on AWS::EC2::Instance resources to pass the presigned URL to the
Amazon EC2 instances so that scripts or applications running on those instances can signal success
or failure to AWS CloudFormation:
"UserData" : {
"Fn::Base64" : {
"Fn::Join" : [ "", ["SignalURL=", { "Ref" : "myWaitHandle" } ] ]
}
}
Note: In the AWS Management Console or the AWS CloudFormation command line tools, the
presigned URL is displayed as the physical ID of the wait condition handle resource.
4.
Select a method for detecting when the stack enters the wait condition.
If you create the stack with notifications enabled, AWS CloudFormation publishes a notification for
every stack event to the specified topic. If you or your application subscribe to that topic, you can
monitor the notifications for the wait condition handle creation event and retrieve the presigned URL
from the notification message.
You can also monitor the stack's events using the AWS Management Console, the AWS
CloudFormation command line tools, or the AWS CloudFormation API.
5.
Use the presigned URL to signal success or failure.
To send a signal, you send an HTTP request message using the presigned URL. The request method
must be PUT and the Content-Type header must be an empty string or omitted.The request message
must be a JSON structure of the form specified in Wait Condition Signal JSON Format (p. 233).
You need to send the number of success signals specified by the Count property in order for AWS
CloudFormation to continue stack creation. If you have a Count that is greater than 1, the UniqueId
value for each signal must be unique across all signals sent to a particular wait condition.
A Curl command is one way to send a signal. The following example shows a Curl command line
that signals success to a wait condition.
curl -T /tmp/a "https://cloudformation-waitcondition-test.s3.amazon
aws.com/arn%3Aaws%3Acloudformation%3Aus-east-1%3A034017226601%3Astack%2Fstack-
API Version 2010-05-15
232
AWS CloudFormation User Guide
Creating Wait Conditions
gosar-20110427004224-test-stack-with-WaitCondition--VEYW%2Fe498ce60-70a111e0-81a7-5081d0136786%2FmyWaitConditionHandle?Expires=1303976584&AWSAccess
KeyId=AKIAIOSFODNN7EXAMPLE&Signature=ik1twT6hpS4cgNAw7wyOoRejVoo%3D"
where the file /tmp/a contains the following JSON structure:
{
"Status" : "SUCCESS",
"Reason" : "Configuration Complete",
"UniqueId" : "ID1234",
"Data" : "Application has completed configuration."
}
This example shows a Curl command line that sends the same success signal except it sends the
JSON structure as a parameter on the command line.
curl -X PUT -H 'Content-Type:' --data-binary '{"Status" : "SUCCESS","Reason"
: "Configuration Complete","UniqueId" : "ID1234","Data" : "Application has
completed configuration."}' "https://cloudformation-waitconditiontest.s3.amazonaws.com/arn%3Aaws%3Acloudformation%3Aus-east1%3A034017226601%3Astack%2Fstack-gosar-20110427004224-test-stack-with-Wait
Condition--VEYW%2Fe498ce60-70a1-11e0-81a7-5081d0136786%2FmyWaitCondition
Handle?Expires=1303976584&AWSAccessKeyId=AKIAIOSFODNN7EXAMPLE&Signa
ture=ik1twT6hpS4cgNAw7wyOoRejVoo%3D"
Wait Condition Signal JSON Format
When you signal a wait condition, you must use the following JSON format:
{
"Status" : "StatusValue",
"UniqueId" : "Some UniqueId",
"Data" : "Some Data",
"Reason" : "Some Reason"
}
Where:
StatusValue must be one of the following values:
• SUCCESS indicates a success signal.
• FAILURE indicates a failure signal and triggers a failed wait condition and a stack rollback.
UniqueId identifies the signal to AWS CloudFormation. If the Count property of the wait condition is greater
than 1, the UniqueId value must be unique across all signals sent for a particular wait condition; otherwise,
AWS CloudFormation will consider the signal a retransmission of the previously sent signal with the same
UniqueId, and it will ignore the signal.
API Version 2010-05-15
233
AWS CloudFormation User Guide
Deploying Applications
Data is any information that you want to send back with the signal. The Data value can be accessed by
calling the Fn::GetAtt function (p. 661) within the template. For example, if you create the following output
value for the wait condition mywaitcondition, you can use the aws cloudformation describe-stacks
command, DescribeStacks action, or Outputs tab of the CloudFormation console to view the Data sent
by valid signals sent to AWS CloudFormation:
"WaitConditionData" : {
"Value" : { "Fn::GetAtt" : [ "mywaitcondition", "Data" ]},
"Description" : "The data passed back as part of signalling the
WaitCondition"
},
The Fn::GetAtt function returns the UniqueId and Data as a name/value pair within a JSON structure.
The following is an example of the Data attribute returned by the WaitConditionData output value defined
above:
{"Signal1":"Application has completed configuration."}
Reason is a string with no other restrictions on its content besides JSON compliance.
Deploying Applications on Amazon EC2 with AWS
CloudFormation
You can use AWS CloudFormation to automatically install, configure, and start applications on Amazon
EC2 instances. Doing so enables you to easily duplicate deployments and update existing installations
without connecting directly to the instance, which can save you a lot of time and effort.
AWS CloudFormation includes a set of helper scripts (cfn-init, cfn-signal, cfn-get-metadata, and cfn-hup)
that are based on cloud-init. You call these helper scripts from your AWS CloudFormation templates to
install, configure, and update applications on Amazon EC2 instances that are in the same template.
The following walkthrough describes how to create a template that launches a LAMP stack by using cfn
helper scripts to install, configure and start Apache, MySQL, and PHP. You'll start with a simple template
that sets up a basic Amazon EC2 instance running Amazon Linux, and then continue adding to the
template until it describes a full LAMP stack.
For additional strategies and examples about deploying applications with AWS CloudFormation, see the
Bootstrapping Applications via AWS CloudFormation article.
Topics
• Basic Amazon EC2 Instance (p. 234)
• LAMP Installation (p. 237)
• LAMP Configuration (p. 240)
• CreationPolicy Attribute (p. 244)
Basic Amazon EC2 Instance
You start with a basic template that defines a single Amazon EC2 instance with a security group that
allows SSH traffic on port 22 and HTTP traffic on port 80, as shown in the following example:
API Version 2010-05-15
234
AWS CloudFormation User Guide
Deploying Applications
{
"AWSTemplateFormatVersion" : "2010-09-09",
"Description" : "AWS CloudFormation sample template LAMP_Single_Instance:
Create a LAMP stack using a single EC2
instance and a local MySQL database for storage. This template demonstrates
using the AWS CloudFormation bootstrap
scripts to install the packages and files necessary to deploy the Apache web
server, PHP, and MySQL at instance launch time.
**WARNING** This template creates an Amazon EC2 instance. You will be billed
for the AWS resources used if you create a stack from this template.",
"Parameters" : {
"KeyName": {
"Description" : "Name of an existing EC2 KeyPair to enable SSH access to
the instance",
"Type": "AWS::EC2::KeyPair::KeyName",
"ConstraintDescription" : "Can contain only ASCII characters."
},
"InstanceType" : {
"Description" : "WebServer EC2 instance type",
"Type" : "String",
"Default" : "m1.small",
"AllowedValues" : [ "t1.micro", "t2.micro", "t2.small", "t2.medium",
"m1.small", "m1.medium", "m1.large", "m1.xlarge", "m2.xlarge", "m2.2xlarge",
"m2.4xlarge", "m3.medium", "m3.large", "m3.xlarge", "m3.2xlarge", "c1.medium",
"c1.xlarge", "c3.large", "c3.xlarge", "c3.2xlarge", "c3.4xlarge", "c3.8xlarge",
"g2.2xlarge", "r3.large", "r3.xlarge", "r3.2xlarge", "r3.4xlarge", "r3.8xlarge",
"i2.xlarge", "i2.2xlarge", "i2.4xlarge", "i2.8xlarge", "hi1.4xlarge",
"hs1.8xlarge", "cr1.8xlarge", "cc2.8xlarge", "cg1.4xlarge"],
"ConstraintDescription" : "Must be a valid EC2 instance type"
},
"SSHLocation" : {
"Description" : "The IP address range that can be used to SSH to the EC2
instances",
"Type": "String",
"MinLength": "9",
"MaxLength": "18",
"Default": "0.0.0.0/0",
"AllowedPattern":
"(\\d{1,3})\\.(\\d{1,3})\\.(\\d{1,3})\\.(\\d{1,3})/(\\d{1,2})",
"ConstraintDescription": "Must be a valid IP CIDR range of the form
x.x.x.x/x"
}
},
"Mappings" : {
"AWSInstanceType2Arch" : {
"t1.micro"
: { "Arch"
"t2.micro"
: { "Arch"
"t2.small"
: { "Arch"
"t2.medium"
: { "Arch"
"m1.small"
: { "Arch"
"m1.medium"
: { "Arch"
"m1.large"
: { "Arch"
"m1.xlarge"
: { "Arch"
"m2.xlarge"
: { "Arch"
"m2.2xlarge" : { "Arch"
:
:
:
:
:
:
:
:
:
:
"PV64"
"HVM64"
"HVM64"
"HVM64"
"PV64"
"PV64"
"PV64"
"PV64"
"PV64"
"PV64"
},
},
},
},
},
},
},
},
},
},
API Version 2010-05-15
235
AWS CloudFormation User Guide
Deploying Applications
"m2.4xlarge"
"m3.medium"
"m3.large"
"m3.xlarge"
"m3.2xlarge"
"c1.medium"
"c1.xlarge"
"c3.large"
"c3.xlarge"
"c3.2xlarge"
"c3.4xlarge"
"c3.8xlarge"
"g2.2xlarge"
"r3.large"
"r3.xlarge"
"r3.2xlarge"
"r3.4xlarge"
"r3.8xlarge"
"i2.xlarge"
"i2.2xlarge"
"i2.4xlarge"
"i2.8xlarge"
"hi1.4xlarge"
"hs1.8xlarge"
"cr1.8xlarge"
"cc2.8xlarge"
:
:
:
:
:
:
:
:
:
:
:
:
:
:
:
:
:
:
:
:
:
:
:
:
:
:
{
{
{
{
{
{
{
{
{
{
{
{
{
{
{
{
{
{
{
{
{
{
{
{
{
{
"Arch"
"Arch"
"Arch"
"Arch"
"Arch"
"Arch"
"Arch"
"Arch"
"Arch"
"Arch"
"Arch"
"Arch"
"Arch"
"Arch"
"Arch"
"Arch"
"Arch"
"Arch"
"Arch"
"Arch"
"Arch"
"Arch"
"Arch"
"Arch"
"Arch"
"Arch"
:
:
:
:
:
:
:
:
:
:
:
:
:
:
:
:
:
:
:
:
:
:
:
:
:
:
"PV64"
"HVM64"
"HVM64"
"HVM64"
"HVM64"
"PV64"
"PV64"
"HVM64"
"HVM64"
"HVM64"
"HVM64"
"HVM64"
"HVMG2"
"HVM64"
"HVM64"
"HVM64"
"HVM64"
"HVM64"
"HVM64"
"HVM64"
"HVM64"
"HVM64"
"HVM64"
"HVM64"
"HVM64"
"HVM64"
},
},
},
},
},
},
},
},
},
},
},
},
},
},
},
},
},
},
},
},
},
},
},
},
},
}
},
"AWSRegionArch2AMI" : {
"us-east-1"
: { "PV64"
"HVMG2" : "ami-3a329952" },
"us-west-2"
: { "PV64"
"HVMG2" : "ami-47296a77" },
"us-west-1"
: { "PV64"
"HVMG2" : "ami-331b1376" },
"eu-west-1"
: { "PV64"
"HVMG2" : "ami-00913777" },
"ap-southeast-1" : { "PV64"
"HVMG2" : "ami-fabe9aa8" },
"ap-northeast-1" : { "PV64"
"HVMG2" : "ami-5dd1ff5c" },
"ap-southeast-2" : { "PV64"
"HVMG2" : "ami-e98ae9d3" },
"sa-east-1"
: { "PV64"
"HVMG2" : "NOT_SUPPORTED" },
"cn-north-1"
: { "PV64"
"HVMG2" : "NOT_SUPPORTED" },
"eu-central-1"
: { "PV64"
"HVMG2" : "ami-b03503ad" }
}
},
: "ami-50842d38", "HVM64" : "ami-08842d60",
: "ami-af86c69f", "HVM64" : "ami-8786c6b7",
: "ami-c7a8a182", "HVM64" : "ami-cfa8a18a",
: "ami-aa8f28dd", "HVM64" : "ami-748e2903",
: "ami-20e1c572", "HVM64" : "ami-d6e1c584",
: "ami-21072820", "HVM64" : "ami-35072834",
: "ami-8b4724b1", "HVM64" : "ami-fd4724c7",
: "ami-9d6cc680", "HVM64" : "ami-956cc688",
: "ami-a857c591", "HVM64" : "ami-ac57c595",
: "ami-a03503bd", "HVM64" : "ami-b43503a9",
"Resources" : {
"WebServerInstance": {
"Type": "AWS::EC2::Instance",
"Properties": {
"ImageId" : { "Fn::FindInMap" : [ "AWSRegionArch2AMI", { "Ref" :
API Version 2010-05-15
236
AWS CloudFormation User Guide
Deploying Applications
"AWS::Region" },
{ "Fn::FindInMap" : [ "AWSInstanceType2Arch", { "Ref"
: "InstanceType" }, "Arch" ] } ] },
"InstanceType"
: { "Ref" : "InstanceType" },
"SecurityGroups" : [ {"Ref" : "WebServerSecurityGroup"} ],
"KeyName"
: { "Ref" : "KeyName" }
}
},
"WebServerSecurityGroup" : {
"Type" : "AWS::EC2::SecurityGroup",
"Properties" : {
"GroupDescription" : "Enable HTTP access via port 80",
"SecurityGroupIngress" : [
{"IpProtocol" : "tcp", "FromPort" : "80", "ToPort" : "80", "CidrIp"
: "0.0.0.0/0"},
{"IpProtocol" : "tcp", "FromPort" : "22", "ToPort" : "22", "CidrIp"
: { "Ref" : "SSHLocation"}}
]
}
}
},
"Outputs" : {
"WebsiteURL" : {
"Description" : "URL for newly created LAMP stack",
"Value" : { "Fn::Join" : ["", ["http://", { "Fn::GetAtt" : [ "WebServer
Instance", "PublicDnsName" ]}]] }
}
}
}
In addition to the Amazon EC2 instance and security group, we create three input parameters that specify
the instance type, an Amazon EC2 key pair to use for SSH access, and an IP address range that can be
used to SSH to the instance. The mapping section ensures that AWS CloudFormation uses the correct
AMI ID for the stack's region and the Amazon EC2 instance type. Finally, the output section outputs the
public URL of the web server.
LAMP Installation
You'll build on the previous basic Amazon EC2 template to automatically install Apache, MySQL, and
PHP. To install the applications, you'll add a UserData property and Metadata property. However, the
template won't configure and start the applications until the next section.
In the following example, sections marked with an ellipsis (...) are omitted for brevity. Additions to the
template are shown in red italic text.
{
"AWSTemplateFormatVersion" : "2010-09-09",
"Description" : "AWS CloudFormation Sample Template LAMP_Install_Only: ...",
"Parameters" : {
"KeyName" : { ... },
API Version 2010-05-15
237
AWS CloudFormation User Guide
Deploying Applications
"InstanceType" : { ...
},
"Mappings" : { ... },
"Resources" : {
"WebServerInstance": {
"Type": "AWS::EC2::Instance",
"Metadata" : {
"Comment1" : "Configure the bootstrap helpers to install the Apache Web
Server and PHP",
"Comment2" : "Save website content to /var/www/html/index.php",
"AWS::CloudFormation::Init" : {
"configSets" : {
"Install" : [ "Install" ]
},
"Install" : {
"packages" : {
"yum" : {
"mysql"
"mysql-server"
"mysql-libs"
"httpd"
"php"
"php-mysql"
}
},
:
:
:
:
:
:
[],
[],
[],
[],
[],
[]
"files" : {
"/var/www/html/index.php" : {
"content" : { "Fn::Join" : [ "", [
"<html>\n",
" <head>\n",
"
<title>AWS CloudFormation PHP Sample</title>\n",
"
<meta http-equiv=\"Content-Type\" content=\"text/html;
charset=ISO-8859-1\">\n",
" </head>\n",
" <body>\n",
"
<h1>Welcome to the AWS CloudFormation PHP Sample</h1>\n",
"
"
"
"
"
"
"
"
"
"
"
<p/>\n",
<?php\n",
// Print out the current data and time\n",
print \"The Current Date and Time is: <br/>\";\n",
print date(\"g:i A l, F j Y.\");\n",
?>\n",
<p/>\n",
<?php\n",
// Setup a handle for CURL\n",
$curl_handle=curl_init();\n",
curl_setopt($curl_handle,CURLOPT_CONNECTTIMEOUT,2);\n",
"
curl_setopt($curl_handle,CURLOPT_RETURNTRANSFER,1);\n",
"
// Get the hostname of the intance from the instance
"
curl_setopt($curl_handle,CURLOPT_URL,'ht
metadata\n",
API Version 2010-05-15
238
AWS CloudFormation User Guide
Deploying Applications
tp://169.254.169.254/latest/meta-data/public-hostname');\n",
"
$hostname = curl_exec($curl_handle);\n",
"
if (empty($hostname))\n",
"
{\n",
"
print \"Sorry, for some reason, we got no hostname
back <br />\";\n",
"
}\n",
"
else\n",
"
{\n",
"
print \"Server = \" . $hostname . \"<br />\";\n",
"
}\n",
"
// Get the instance-id of the intance from the instance
metadata\n",
"
curl_setopt($curl_handle,CURLOPT_URL,'ht
tp://169.254.169.254/latest/meta-data/instance-id');\n",
"
$instanceid = curl_exec($curl_handle);\n",
"
if (empty($instanceid))\n",
"
{\n",
"
print \"Sorry, for some reason, we got no instance
id back <br />\";\n",
"
}\n",
"
else\n",
"
{\n",
"
print \"EC2 instance-id = \" . $instanceid . \"<br
/>\";\n",
"
}\n",
"
$Database
= \"", {"Ref" : "DBName"}, "\";\n",
"
$DBUser
= \"", {"Ref" : "DBUsername"}, "\";\n",
"
$DBPassword = \"", {"Ref" : "DBPassword"}, "\";\n",
"
print \"Database = \" . $Database . \"<br />\";\n",
"
$dbconnection = mysql_connect($Database, $DBUser,
$DBPassword)\n",
"
or die(\"Could not connect: \" .
ysql_error());\n",
"
print (\"Connected to $Database successfully\");\n",
"
mysql_close($dbconnection);\n",
"
?>\n",
"
<h2>PHP Information</h2>\n",
"
<p/>\n",
"
<?php\n",
"
phpinfo();\n",
"
?>\n",
" </body>\n",
"</html>\n"
]]},
"mode" : "000600",
"owner" : "apache",
"group" : "apache"
},
"services" : {
"sysvinit" : {
"httpd"
: { "enabled" : "true", "ensureRunning" : "true" }
}
}
}
},
"Properties": {
"ImageId" : { "Fn::FindInMap" : [ "AWSRegionArch2AMI", { "Ref" :
API Version 2010-05-15
239
AWS CloudFormation User Guide
Deploying Applications
"AWS::Region" },
{ "Fn::FindInMap" : [ "AWSInstanceType2Arch", { "Ref"
: "InstanceType" }, "Arch" ] } ] },
"InstanceType"
: { "Ref" : "InstanceType" },
"SecurityGroups" : [ {"Ref" : "WebServerSecurityGroup"} ],
"KeyName"
: { "Ref" : "KeyName" },
"UserData"
: { "Fn::Base64" : { "Fn::Join" : ["", [
"yum update -y aws-cfn-bootstrap\n",
"# Install the files and packages from the metadata\n",
"/opt/aws/bin/cfn-init -v ",
"
--stack ", { "Ref" : "AWS::StackName" },
"
--resource WebServerInstance ",
"
--configsets Install ",
"
--region ", { "Ref" : "AWS::Region" }, "\n"
]]}}
}
},
"WebServerSecurityGroup" : { ...
}
},
"Outputs" : { ... }
}
The UserData property runs two shell commands: install the AWS CloudFormation helper scripts and
then run the cfn-init (p. 677) helper script. When you run cfn-init, it reads metadata from the
AWS::CloudFormation::Init (p. 314) resource, which describes the actions to be carried out by cfn-init. For
example, you can use cfn-init and AWS::CloudFormation::Init to install packages, write files to disk, or
start a service. In our case, cfn-init installs the listed packages (httpd, mysql, and php) and creates the
/var/www/html/index.php file (a sample PHP application).
LAMP Configuration
Now that we have a template that installs Linux, Apache, MySQL, and PHP, we'll need to expand the
template so that it automatically configures and runs Apache, MySQL, and PHP. In the following example,
we expand on the Parameters section, AWS::CloudFormation::Init resource, and UserData
property to complete the configuration. As with the previous template, sections marked with an ellipsis
(...) are omitted for brevity. Additions to the template are shown in red italic text.
{
"AWSTemplateFormatVersion" : "2010-09-09",
"Description" : "AWS CloudFormation Sample Template LAMP_Single_Instance:
Create a LAMP stack using a single EC2 instance and a local MySQL database for
storage. This template demonstrates using the AWS CloudFormation bootstrap
scripts to install the packages and files necessary to deploy the Apache web
server, PHP and MySQL at instance launch time. **WARNING** This template creates
an Amazon EC2 instance. You will be billed for the AWS resources used if you
create a stack from this template.",
"Parameters" : {
"KeyName" : { ...
},
API Version 2010-05-15
240
AWS CloudFormation User Guide
Deploying Applications
"DBName": {
"Default": "MyDatabase",
"Description" : "MySQL database name",
"Type": "String",
"MinLength": "1",
"MaxLength": "64",
"AllowedPattern" : "[a-zA-Z][a-zA-Z0-9]*",
"ConstraintDescription" : "Must begin with a letter and contain only al
phanumeric characters"
},
"DBUsername": {
"NoEcho": "true",
"Description" : "Username for MySQL database access",
"Type": "String",
"MinLength": "1",
"MaxLength": "16",
"AllowedPattern" : "[a-zA-Z][a-zA-Z0-9]*",
"ConstraintDescription" : "Must begin with a letter and contain only al
phanumeric characters"
},
"DBPassword": {
"NoEcho": "true",
"Description" : "Password for MySQL database access",
"Type": "String",
"MinLength": "1",
"MaxLength": "41",
"AllowedPattern" : "[a-zA-Z0-9]*",
"ConstraintDescription" : "Must contain only alphanumeric characters"
},
"DBRootPassword": {
"NoEcho": "true",
"Description" : "Root password for MySQL",
"Type": "String",
"MinLength": "1",
"MaxLength": "41",
"AllowedPattern" : "[a-zA-Z0-9]*",
"ConstraintDescription" : "Must contain only alphanumeric characters"
},
"InstanceType" : { ...
}
},
"Mappings" : {
...
},
"Resources" : {
"WebServer": {
"Type": "AWS::EC2::Instance",
"Metadata" : {
"Comment1" : "Configure the bootstrap helpers to install the Apache Web
Server and PHP",
"Comment2" : "Save website content to /var/www/html/index.php",
API Version 2010-05-15
241
AWS CloudFormation User Guide
Deploying Applications
"AWS::CloudFormation::Init" : {
"configSets" : {
"InstallAndRun" : [ "Install", "Configure" ]
},
"Install" : {
"packages" : {
"yum" : {
"mysql"
"mysql-server"
"mysql-libs"
"httpd"
"php"
"php-mysql"
}
},
:
:
:
:
:
:
[],
[],
[],
[],
[],
[]
"files" : {
"/var/www/html/index.php" : {
"content" : { ... },
"mode" : "000600",
"owner" : "apache",
"group" : "apache"
},
"/tmp/setup.mysql" : {
"content" : { "Fn::Join" : ["", [
"CREATE DATABASE ", { "Ref" : "DBName" }, ";\n",
"GRANT ALL ON ", { "Ref" : "DBName" }, ".* TO '", { "Ref" :
"DBUsername" }, "'@localhost IDENTIFIED BY '", { "Ref" : "DBPassword" }, "';\n"
]]},
"mode" : "000400",
"owner" : "root",
"group" : "root"
},
"/etc/cfn/cfn-hup.conf" : {
"content" : { "Fn::Join" : ["", [
"[main]\n",
"stack=", { "Ref" : "AWS::StackId" }, "\n",
"region=", { "Ref" : "AWS::Region" }, "\n"
]]},
"mode"
: "000400",
"owner"
: "root",
"group"
: "root"
},
"/etc/cfn/hooks.d/cfn-auto-reloader.conf" : {
"content": { "Fn::Join" : ["", [
"[cfn-auto-reloader-hook]\n",
"triggers=post.update\n",
"path=Resources.WebServerInstance.Metadata.AWS::CloudForma
tion::Init\n",
"action=/opt/aws/bin/cfn-init -v ",
"
--stack ", { "Ref" : "AWS::StackName" },
"
--resource WebServerInstance ",
"
--configsets InstallAndRun ",
"
--region ", { "Ref" : "AWS::Region" }, "\n",
"runas=root\n"
API Version 2010-05-15
242
AWS CloudFormation User Guide
Deploying Applications
]]}
}
},
},
"services" : {
"sysvinit" : {
"mysqld" : { "enabled" : "true", "ensureRunning" : "true" },
"httpd"
: { "enabled" : "true", "ensureRunning" : "true" },
"cfn-hup" : { "enabled" : "true", "ensureRunning" : "true",
"files" : ["/etc/cfn/cfn-hup.conf",
"/etc/cfn/hooks.d/cfn-auto-reloader.conf"]}
}
}
},
"Configure" : {
"commands" : {
"01_set_mysql_root_password" : {
"command" : { "Fn::Join" : ["", ["mysqladmin -u root password
'", { "Ref" : "DBRootPassword" }, "'"]]},
"test" : { "Fn::Join" : ["", ["$(mysql ", { "Ref" : "DBUsername"
}, " -u root --password='", { "Ref" : "DBRootPassword" }, "' >/dev/null 2>&1
</dev/null); (( $? != 0 ))"]]}
},
"02_create_database" : {
"command" : { "Fn::Join" : ["", ["mysql -u root --password='",
{ "Ref" : "DBRootPassword" }, "' < /tmp/setup.mysql"]]},
"test" : { "Fn::Join" : ["", ["$(mysql ", { "Ref" : "DBUsername"
}, " -u root --password='", { "Ref" : "DBRootPassword" }, "' >/dev/null 2>&1
</dev/null); (( $? != 0 ))"]]}
}
}
}
}
},
"Properties": {
"ImageId" : { "Fn::FindInMap" : [ "AWSRegionArch2AMI", { "Ref" :
"AWS::Region" },
{ "Fn::FindInMap" : [ "AWSInstanceType2Arch", { "Ref"
: "InstanceType" }, "Arch" ] } ] },
"InstanceType"
: { "Ref" : "InstanceType" },
"SecurityGroups" : [ {"Ref" : "WebServerSecurityGroup"} ],
"KeyName"
: { "Ref" : "KeyName" },
"UserData"
: { "Fn::Base64" : { "Fn::Join" : ["", [
"#!/bin/bash -xe\n",
"yum update -y aws-cfn-bootstrap\n",
"# Install the files and packages from the metadata\n",
"/opt/aws/bin/cfn-init ",
"
--stack ", { "Ref" : "AWS::StackName" },
"
--resource WebServerInstance ",^M
"
--configsets InstallAndRun ",
"
--region ", { "Ref" : "AWS::Region" }, "\n"
]]}}
}
},
"WebServerSecurityGroup" : { ... }
API Version 2010-05-15
243
AWS CloudFormation User Guide
Deploying Applications
},
"Outputs" : { ... }
}
The example adds more parameters to obtain information for configuring the MySQL database, such as
the database name, user name, password, and root password. The parameters also contain constraints
that catch incorrectly formatted values before AWS CloudFormation creates the stack.
In the AWS::CloudFormation::Init resource, we added a MySQL setup file, containing the database
name, user name, and password. The example also adds a services property to ensure that the httpd
and mysqld services are running (ensureRunning set to true) and to ensure that the services are
restarted if the instance is rebooted (enabled set to true). A good practice is to also include the
cfn-hup (p. 684) helper script, with which you can make configuration updates to running instances by
updating the stack template. For example, you could change the sample PHP application and then run
a stack update to deploy the change.
In order to run the MySQL commands after the is installation complete, the example adds another
configuration set to run the commands. Configuration sets are useful when you have a series of tasks
that must be completed in a specific order. The example first runs the Installation configuration set
and then the Configure configuration set. The Configure configuration set specifies the database root
password and then creates a database. In the commands section, the commands are processed in
alphabetical order by name, so the example adds a number before each command name to indicate its
desired run order.
CreationPolicy Attribute
Finally, you need a way to instruct AWS CloudFormation to complete stack creation only after all the
services (such as Apache and MySQL) are running and not after all the stack resources are created. In
other words, if you use the template from the previous section to launch a stack, AWS CloudFormation
sets the status of the stack as CREATE_COMPLETE after it successfully creates all the resources. However,
if one or more services failed to start, AWS CloudFormation still sets the stack status as
CREATE_COMPLETE. To prevent the status from changing to CREATE_COMPLETE until all the services
have successfully started, you can add a CreationPolicy (p. 639) attribute to the instance. This attribute
puts the instance's status in CREATE_IN_PROGRESS until AWS CloudFormation receives the required
number of success signals or the timeout period is exceeded, so you can control when the instance has
been successfully created.
The following example adds a creation policy to the Amazon EC2 instance to ensure that cfn-init completes
the LAMP installation and configuration before the stack creation is completed. In conjunction with the
creation policy, the example needs to run the cfn-signal (p. 679) helper script to signal AWS CloudFormation
when all the applications are installed and configured.
{
"AWSTemplateFormatVersion" : "2010-09-09",
"Description" : "AWS CloudFormation Sample Template LAMP_Single_Instance:
...",
"Parameters" : { ... },
"Mappings" : { ... },
"Resources" : {
"WebServerInstance": {
"Type": "AWS::EC2::Instance",
API Version 2010-05-15
244
AWS CloudFormation User Guide
Deploying Applications
"Metadata" : { ... },
"Properties": {
"ImageId" : { "Fn::FindInMap" : [ "AWSRegionArch2AMI", { "Ref" :
"AWS::Region" },
{ "Fn::FindInMap" : [ "AWSInstanceType2Arch", { "Ref"
: "InstanceType" }, "Arch" ] } ] },
"InstanceType"
: { "Ref" : "InstanceType" },
"SecurityGroups" : [ {"Ref" : "WebServerSecurityGroup"} ],
"KeyName"
: { "Ref" : "KeyName" },
"UserData"
: { "Fn::Base64" : { "Fn::Join" : ["", [
"#!/bin/bash -xe\n",
"yum update aws-cfn-bootstrap\n",
"# Install the files and packages from the metadata\n",
"/opt/aws/bin/cfn-init ",
"
--stack ", { "Ref" : "AWS::StackName" },
"
--resource WebServerInstance ",^M
"
--configsets InstallAndRun ",
"
--region ", { "Ref" : "AWS::Region" }, "\n",
"# Signal the status from cfn-init\n",
"/opt/aws/bin/cfn-signal -e $? ",
"
--stack ", { "Ref" : "AWS::StackName" },
"
--resource WebServerInstance ",
"
--region ", { "Ref" : "AWS::Region" }, "\n"
]]}}
},
"CreationPolicy" : {
"ResourceSignal" : {
"Timeout" : "PT5M"
}
}
},
"WebServerSecurityGroup" : { ...
}
},
"Outputs" : {
"WebsiteURL" : { ...
}
}
}
The creation policy attribute uses the ISO 8601 format to define a timeout period of 5 minutes. And
because you're waiting for just 1 instance to be configured, you only need to wait for one success signal,
which is the default count.
In the UserData property, the template runs the cfn-signal script to send a success signal with an exit
code if all the services are configured and started successfully. When you use the cfn-signal script, you
must include the stack ID or name and the logical ID of the resource that you want to signal. If the
configuration fails or if the timeout period is exceeded, cfn-signal sends a failure signal that causes the
resource creation to fail.
The following example shows final complete template. You can also view the template at the following
location:
API Version 2010-05-15
245
AWS CloudFormation User Guide
Deploying Applications
https://s3.amazonaws.com/cloudformation-templates-us-east-1/LAMP_Single_Instance.template
{
"AWSTemplateFormatVersion" : "2010-09-09",
"Description" : "AWS CloudFormation Sample Template LAMP_Single_Instance:
Create a LAMP stack using a single EC2 instance and a local MySQL database for
storage. This template demonstrates using the AWS CloudFormation bootstrap
scripts to install the packages and files necessary to deploy the Apache web
server, PHP and MySQL at instance launch time. **WARNING** This template creates
an Amazon EC2 instance. You will be billed for the AWS resources used if you
create a stack from this template.",
"Parameters" : {
"KeyName": {
"Description" : "Name of an existing EC2 KeyPair to enable SSH access to
the instance",
"Type": "AWS::EC2::KeyPair::KeyName",
"ConstraintDescription" : "Can contain only ASCII characters."
},
"DBName": {
"Default": "MyDatabase",
"Description" : "MySQL database name",
"Type": "String",
"MinLength": "1",
"MaxLength": "64",
"AllowedPattern" : "[a-zA-Z][a-zA-Z0-9]*",
"ConstraintDescription" : "Must begin with a letter and contain only al
phanumeric characters"
},
"DBUsername": {
"NoEcho": "true",
"Description" : "User name for MySQL database access",
"Type": "String",
"MinLength": "1",
"MaxLength": "16",
"AllowedPattern" : "[a-zA-Z][a-zA-Z0-9]*",
"ConstraintDescription" : "Must begin with a letter and contain only al
phanumeric characters"
},
"DBPassword": {
"NoEcho": "true",
"Description" : "Password for MySQL database access",
"Type": "String",
"MinLength": "1",
"MaxLength": "41",
"AllowedPattern" : "[a-zA-Z0-9]*",
"ConstraintDescription" : "Must contain only alphanumeric characters"
},
"DBRootPassword": {
"NoEcho": "true",
"Description" : "Root password for MySQL",
"Type": "String",
API Version 2010-05-15
246
AWS CloudFormation User Guide
Deploying Applications
"MinLength": "1",
"MaxLength": "41",
"AllowedPattern" : "[a-zA-Z0-9]*",
"ConstraintDescription" : "Must contain only alphanumeric characters"
},
"InstanceType" : {
"Description" : "WebServer EC2 instance type",
"Type" : "String",
"Default" : "m1.small",
"AllowedValues" : [ "t1.micro", "t2.micro", "t2.small", "t2.medium",
"m1.small", "m1.medium", "m1.large", "m1.xlarge", "m2.xlarge", "m2.2xlarge",
"m2.4xlarge", "m3.medium", "m3.large", "m3.xlarge", "m3.2xlarge", "c1.medium",
"c1.xlarge", "c3.large", "c3.xlarge", "c3.2xlarge", "c3.4xlarge", "c3.8xlarge",
"g2.2xlarge", "r3.large", "r3.xlarge", "r3.2xlarge", "r3.4xlarge", "r3.8xlarge",
"i2.xlarge", "i2.2xlarge", "i2.4xlarge", "i2.8xlarge", "hi1.4xlarge",
"hs1.8xlarge", "cr1.8xlarge", "cc2.8xlarge", "cg1.4xlarge"],
"ConstraintDescription" : "Must be a valid EC2 instance type"
},
"SSHLocation" : {
"Description" : "The IP address range that can be used to SSH to the EC2
instances",
"Type": "String",
"MinLength": "9",
"MaxLength": "18",
"Default": "0.0.0.0/0",
"AllowedPattern":
"(\\d{1,3})\\.(\\d{1,3})\\.(\\d{1,3})\\.(\\d{1,3})/(\\d{1,2})",
"ConstraintDescription": "Must be a valid IP CIDR range of the form
x.x.x.x/x"
}
},
"Mappings" : {
"AWSInstanceType2Arch" : {
"t1.micro"
: { "Arch"
"t2.micro"
: { "Arch"
"t2.small"
: { "Arch"
"t2.medium"
: { "Arch"
"m1.small"
: { "Arch"
"m1.medium"
: { "Arch"
"m1.large"
: { "Arch"
"m1.xlarge"
: { "Arch"
"m2.xlarge"
: { "Arch"
"m2.2xlarge" : { "Arch"
"m2.4xlarge" : { "Arch"
"m3.medium"
: { "Arch"
"m3.large"
: { "Arch"
"m3.xlarge"
: { "Arch"
"m3.2xlarge" : { "Arch"
"c1.medium"
: { "Arch"
"c1.xlarge"
: { "Arch"
"c3.large"
: { "Arch"
"c3.xlarge"
: { "Arch"
"c3.2xlarge" : { "Arch"
"c3.4xlarge" : { "Arch"
"c3.8xlarge" : { "Arch"
"g2.2xlarge" : { "Arch"
:
:
:
:
:
:
:
:
:
:
:
:
:
:
:
:
:
:
:
:
:
:
:
"PV64"
"HVM64"
"HVM64"
"HVM64"
"PV64"
"PV64"
"PV64"
"PV64"
"PV64"
"PV64"
"PV64"
"HVM64"
"HVM64"
"HVM64"
"HVM64"
"PV64"
"PV64"
"HVM64"
"HVM64"
"HVM64"
"HVM64"
"HVM64"
"HVMG2"
},
},
},
},
},
},
},
},
},
},
},
},
},
},
},
},
},
},
},
},
},
},
},
API Version 2010-05-15
247
AWS CloudFormation User Guide
Deploying Applications
"r3.large"
"r3.xlarge"
"r3.2xlarge"
"r3.4xlarge"
"r3.8xlarge"
"i2.xlarge"
"i2.2xlarge"
"i2.4xlarge"
"i2.8xlarge"
"hi1.4xlarge"
"hs1.8xlarge"
"cr1.8xlarge"
"cc2.8xlarge"
:
:
:
:
:
:
:
:
:
:
:
:
:
{
{
{
{
{
{
{
{
{
{
{
{
{
"Arch"
"Arch"
"Arch"
"Arch"
"Arch"
"Arch"
"Arch"
"Arch"
"Arch"
"Arch"
"Arch"
"Arch"
"Arch"
:
:
:
:
:
:
:
:
:
:
:
:
:
"HVM64"
"HVM64"
"HVM64"
"HVM64"
"HVM64"
"HVM64"
"HVM64"
"HVM64"
"HVM64"
"HVM64"
"HVM64"
"HVM64"
"HVM64"
},
},
},
},
},
},
},
},
},
},
},
},
}
},
"AWSRegionArch2AMI" : {
"us-east-1"
: { "PV64"
"HVMG2" : "ami-3a329952" },
"us-west-2"
: { "PV64"
"HVMG2" : "ami-47296a77" },
"us-west-1"
: { "PV64"
"HVMG2" : "ami-331b1376" },
"eu-west-1"
: { "PV64"
"HVMG2" : "ami-00913777" },
"ap-southeast-1" : { "PV64"
"HVMG2" : "ami-fabe9aa8" },
"ap-northeast-1" : { "PV64"
"HVMG2" : "ami-5dd1ff5c" },
"ap-southeast-2" : { "PV64"
"HVMG2" : "ami-e98ae9d3" },
"sa-east-1"
: { "PV64"
"HVMG2" : "NOT_SUPPORTED" },
"cn-north-1"
: { "PV64"
"HVMG2" : "NOT_SUPPORTED" },
"eu-central-1"
: { "PV64"
"HVMG2" : "ami-b03503ad" }
}
: "ami-50842d38", "HVM64" : "ami-08842d60",
: "ami-af86c69f", "HVM64" : "ami-8786c6b7",
: "ami-c7a8a182", "HVM64" : "ami-cfa8a18a",
: "ami-aa8f28dd", "HVM64" : "ami-748e2903",
: "ami-20e1c572", "HVM64" : "ami-d6e1c584",
: "ami-21072820", "HVM64" : "ami-35072834",
: "ami-8b4724b1", "HVM64" : "ami-fd4724c7",
: "ami-9d6cc680", "HVM64" : "ami-956cc688",
: "ami-a857c591", "HVM64" : "ami-ac57c595",
: "ami-a03503bd", "HVM64" : "ami-b43503a9",
},
"Resources" : {
"WebServerInstance": {
"Type": "AWS::EC2::Instance",
"Metadata" : {
"AWS::CloudFormation::Init" : {
"configSets" : {
"InstallAndRun" : [ "Install", "Configure" ]
},
"Install" : {
"packages" : {
"yum" : {
"mysql"
"mysql-server"
"mysql-libs"
"httpd"
"php"
:
:
:
:
:
[],
[],
[],
[],
[],
API Version 2010-05-15
248
AWS CloudFormation User Guide
Deploying Applications
"php-mysql"
: []
}
},
"files" : {
"/var/www/html/index.php" : {
"content" : { "Fn::Join" : [ "", [
"<html>\n",
" <head>\n",
"
<title>AWS CloudFormation PHP Sample</title>\n",
"
<meta http-equiv=\"Content-Type\" content=\"text/html;
charset=ISO-8859-1\">\n",
" </head>\n",
" <body>\n",
"
<h1>Welcome to the AWS CloudFormation PHP Sample</h1>\n",
"
"
"
"
"
"
"
"
"
"
"
<p/>\n",
<?php\n",
// Print out the current data and time\n",
print \"The Current Date and Time is: <br/>\";\n",
print date(\"g:i A l, F j Y.\");\n",
?>\n",
<p/>\n",
<?php\n",
// Setup a handle for CURL\n",
$curl_handle=curl_init();\n",
curl_setopt($curl_handle,CURLOPT_CONNECTTIMEOUT,2);\n",
"
curl_setopt($curl_handle,CURLOPT_RETURNTRANSFER,1);\n",
"
// Get the hostname of the intance from the instance
metadata\n",
"
curl_setopt($curl_handle,CURLOPT_URL,'ht
tp://169.254.169.254/latest/meta-data/public-hostname');\n",
"
$hostname = curl_exec($curl_handle);\n",
"
if (empty($hostname))\n",
"
{\n",
"
print \"Sorry, for some reason, we got no hostname
back <br />\";\n",
"
}\n",
"
else\n",
"
{\n",
"
print \"Server = \" . $hostname . \"<br />\";\n",
"
}\n",
"
// Get the instance-id of the intance from the instance
metadata\n",
"
curl_setopt($curl_handle,CURLOPT_URL,'ht
tp://169.254.169.254/latest/meta-data/instance-id');\n",
"
$instanceid = curl_exec($curl_handle);\n",
"
if (empty($instanceid))\n",
"
{\n",
"
print \"Sorry, for some reason, we got no instance
id back <br />\";\n",
"
}\n",
"
else\n",
"
{\n",
"
print \"EC2 instance-id = \" . $instanceid . \"<br
/>\";\n",
API Version 2010-05-15
249
AWS CloudFormation User Guide
Deploying Applications
"
"
"
"
"
"
}\n",
$Database
= \"", {"Ref" : "DBName"}, "\";\n",
$DBUser
= \"", {"Ref" : "DBUsername"}, "\";\n",
$DBPassword = \"", {"Ref" : "DBPassword"}, "\";\n",
print \"Database = \" . $Database . \"<br />\";\n",
$dbconnection = mysql_connect($Database, $DBUser,
$DBPassword)\n",
"
or die(\"Could not connect: \" .
ysql_error());\n",
"
print (\"Connected to $Database successfully\");\n",
"
mysql_close($dbconnection);\n",
"
?>\n",
"
<h2>PHP Information</h2>\n",
"
<p/>\n",
"
<?php\n",
"
phpinfo();\n",
"
?>\n",
" </body>\n",
"</html>\n"
]]},
"mode" : "000600",
"owner" : "apache",
"group" : "apache"
},
"/tmp/setup.mysql" : {
"content" : { "Fn::Join" : ["", [
"CREATE DATABASE ", { "Ref" : "DBName" }, ";\n",
"GRANT ALL ON ", { "Ref" : "DBName" }, ".* TO '", { "Ref" :
"DBUsername" }, "'@localhost IDENTIFIED BY '", { "Ref" : "DBPassword" }, "';\n"
]]},
"mode" : "000400",
"owner" : "root",
"group" : "root"
},
"/etc/cfn/cfn-hup.conf" : {
"content" : { "Fn::Join" : ["", [
"[main]\n",
"stack=", { "Ref" : "AWS::StackId" }, "\n",
"region=", { "Ref" : "AWS::Region" }, "\n"
]]},
"mode"
: "000400",
"owner"
: "root",
"group"
: "root"
},
"/etc/cfn/hooks.d/cfn-auto-reloader.conf" : {
"content": { "Fn::Join" : ["", [
"[cfn-auto-reloader-hook]\n",
"triggers=post.update\n",
"path=Resources.WebServerInstance.Metadata.AWS::CloudForma
tion::Init\n",
"action=/opt/aws/bin/cfn-init -v ",
"
--stack ", { "Ref" : "AWS::StackName" },
"
--resource WebServerInstance ",
"
--configsets InstallAndRun ",
"
--region ", { "Ref" : "AWS::Region" }, "\n",
API Version 2010-05-15
250
AWS CloudFormation User Guide
Deploying Applications
"runas=root\n"
]]}
}
},
"services" : {
"sysvinit" : {
"mysqld" : { "enabled" : "true", "ensureRunning" : "true" },
"httpd"
: { "enabled" : "true", "ensureRunning" : "true" },
"cfn-hup" : { "enabled" : "true", "ensureRunning" : "true",
"files" : ["/etc/cfn/cfn-hup.conf",
"/etc/cfn/hooks.d/cfn-auto-reloader.conf"]}
}
}
},
"Configure" : {
"commands" : {
"01_set_mysql_root_password" : {
"command" : { "Fn::Join" : ["", ["mysqladmin -u root password
'", { "Ref" : "DBRootPassword" }, "'"]]},
"test" : { "Fn::Join" : ["", ["$(mysql ", { "Ref" : "DBUsername"
}, " -u root --password='", { "Ref" : "DBRootPassword" }, "' >/dev/null 2>&1
</dev/null); (( $? != 0 ))"]]}
},
"02_create_database" : {
"command" : { "Fn::Join" : ["", ["mysql -u root --password='",
{ "Ref" : "DBRootPassword" }, "' < /tmp/setup.mysql"]]},
"test" : { "Fn::Join" : ["", ["$(mysql ", { "Ref" : "DBUsername"
}, " -u root --password='", { "Ref" : "DBRootPassword" }, "' >/dev/null 2>&1
</dev/null); (( $? != 0 ))"]]}
}
}
}
}
},
"Properties": {
"ImageId" : { "Fn::FindInMap" : [ "AWSRegionArch2AMI", { "Ref" :
"AWS::Region" },
{ "Fn::FindInMap" : [ "AWSInstanceType2Arch", { "Ref"
: "InstanceType" }, "Arch" ] } ] },
"InstanceType"
: { "Ref" : "InstanceType" },
"SecurityGroups" : [ {"Ref" : "WebServerSecurityGroup"} ],
"KeyName"
: { "Ref" : "KeyName" },
"UserData"
: { "Fn::Base64" : { "Fn::Join" : ["", [
"#!/bin/bash -xe\n",
"yum update -y aws-cfn-bootstrap\n",
"# Install the files and packages from the metadata\n",
"/opt/aws/bin/cfn-init -v ",
"
--stack ", { "Ref" : "AWS::StackName" },
"
--resource WebServerInstance ",
"
--configsets InstallAndRun ",
"
--region ", { "Ref" : "AWS::Region" }, "\n",
"# Signal the status from cfn-init\n",
"/opt/aws/bin/cfn-signal -e $? ",
"
--stack ", { "Ref" : "AWS::StackName" },
API Version 2010-05-15
251
AWS CloudFormation User Guide
Custom Resources
"
"
--resource WebServerInstance ",
--region ", { "Ref" : "AWS::Region" }, "\n"
]]}}
},
"CreationPolicy" : {
"ResourceSignal" : {
"Timeout" : "PT5M"
}
}
},
"WebServerSecurityGroup" : {
"Type" : "AWS::EC2::SecurityGroup",
"Properties" : {
"GroupDescription" : "Enable HTTP access via port 80",
"SecurityGroupIngress" : [
{"IpProtocol" : "tcp", "FromPort" : "80", "ToPort" : "80", "CidrIp"
: "0.0.0.0/0"},
{"IpProtocol" : "tcp", "FromPort" : "22", "ToPort" : "22", "CidrIp"
: { "Ref" : "SSHLocation"}}
]
}
}
},
"Outputs" : {
"WebsiteURL" : {
"Description" : "URL for newly created LAMP stack",
"Value" : { "Fn::Join" : ["", ["http://", { "Fn::GetAtt" : [ "WebServer
Instance", "PublicDnsName" ]}]] }
}
}
}
Custom Resources
Custom resources enable you to write custom provisioning logic in templates that AWS CloudFormation
runs anytime you create, update, or delete stacks. For example, you might want to include resources that
aren't available as AWS CloudFormation resource types (p. 286). You can include those resources by
using custom resources. That way you can still manage all your related resources in a single stack.
Use the AWS::CloudFormation::CustomResource (p. 311) or Custom::String (p. 312) resource
type to define custom resources in your templates. Custom resources require one property: the service
token, which specifies where AWS CloudFormation sends requests to, such as an Amazon SNS topic.
Note
If you use the VPC endpoint feature, custom resources in the VPC must have access to AWS
CloudFormation-specific Amazon Simple Storage Service (Amazon S3) buckets. Custom
resources must send responses to a pre-signed Amazon S3 URL. If they can't send responses
to Amazon S3, AWS CloudFormation won't receive a response and the stack operation fails.
For more information, see AWS CloudFormation and VPC Endpoints (p. 54).
How Custom Resources Work
Any action taken for a custom resource involves three parties.
API Version 2010-05-15
252
AWS CloudFormation User Guide
How Custom Resources Work
template developer
Creates a template that includes a custom resource type. The template developer specifies the
service token and any input data in the template.
custom resource provider
Owns the custom resource and determines how the it handles and responds to requests from AWS
CloudFormation. The custom resource provider must provide a service token that the template
developer uses.
AWS CloudFormation
During a stack operation, sends a request to a service token that is specified in the template, and
then waits for a response before proceeding with the stack operation.
The template developer and custom resource provider can be the same person or entity, but the process
is the same. The following steps describe the general process:
1. The template developer defines a custom resource in his or her template, which includes a service
token and any input data parameters. Depending on the custom resource, the input data might be
required; however, the service token is always required.
The service token specifies where AWS CloudFormation sends requests to, such as to an Amazon
SNS topic ARN or to an AWS Lambda function ARN. For more information, see
AWS::CloudFormation::CustomResource (p. 311). The service token and the structure of the input data
is defined by the custom resource provider.
2. Whenever anyone uses the template to create, update, or delete a stack that contains a custom
resource, AWS CloudFormation sends a request to the specified service token. The service token
must be in the same region in which you are creating the stack.
In the request, AWS CloudFormation includes information such as the request type and a pre-signed
Amazon Simple Storage Service URL, where the custom resource sends responses to. For more
information about what's included in the request, see Custom Resource Request Objects (p. 275).
The following sample data shows what AWS CloudFormation includes in a request:
{
"RequestType" : "Create",
"ResponseURL" : "http://pre-signed-S3-url-for-response",
"StackId" : "arn:aws:cloudformation:us-west-2:EXAMPLE/stack-name/guid",
"RequestId" : "unique id for this create request",
"ResourceType" : "Custom::TestResource",
"LogicalResourceId" : "MyTestResource",
"ResourceProperties" : {
"Name" : "Value",
"List" : [ "1", "2", "3" ]
}
}
3. The custom resource provider processes the AWS CloudFormation request and returns a response
of SUCCESS or FAILED to the pre-signed URL.
In the response, the custom resource provider can also include name-value pairs that the template
developer can access. For example, the response can include output data if the request succeeded
or an error message if the request failed. For more information about responses, see Custom Resource
Response Objects (p. 276).
The custom resource provider is responsible for listening and responding to the request. For example,
for Amazon SNS notifications, the custom resource provider must listen and respond to notifications
API Version 2010-05-15
253
AWS CloudFormation User Guide
Amazon Simple Notification Service-backed Custom
Resources
that are sent to a specific topic ARN. AWS CloudFormation waits and listens for a response in the
pre-signed URL location.
The following sample data shows what a custom resource might include in a response:
{
"Status" : "SUCCESS",
"PhysicalResourceId" : "TestResource1",
"StackId" : "arn:aws:cloudformation:us-west-2:EXAMPLE:stack/stackname/guid",
"RequestId" : "unique id for this create request",
"LogicalResourceId" : "MyTestResource",
"Data" : {
"OutputName1" : "Value1",
"OutputName2" : "Value2",
}
}
4. After getting a response, AWS CloudFormation proceeds with the stack operation according to the
response. Any output data from the custom resource is stored in the pre-signed URL location. The
template developer can retrieve that data by using the Fn::GetAtt (p. 661) function.
Topics
• Amazon Simple Notification Service-backed Custom Resources (p. 254)
• AWS Lambda-backed Custom Resources (p. 260)
• Custom Resource Reference (p. 274)
Amazon Simple Notification Service-backed
Custom Resources
When you associate an Amazon SNS topic with a custom resource, you use Amazon SNS notifications
to trigger custom provisioning logic. With custom resources and Amazon SNS, you can enable scenarios
such as adding new resources to a stack and injecting dynamic data into a stack. For example, when
you create a stack, AWS CloudFormation can send a create request to a topic that's monitored by an
application that's running on an Amazon Elastic Compute Cloud instance. The Amazon SNS notification
triggers the application to carry out additional provisioning tasks, such as retrieve a pool of white-listed
Elatic IPs. After it's done, the application sends a response (and any output data) that notifies AWS
CloudFormation to proceed with the stack operation.
Walkthrough: Using Amazon Simple Notification Service to
Create Custom Resources
This walkthrough will step through the custom resource process, explaining the sequence of events and
messages sent and received as a result of custom resource stack creation, updates, and deletion.
Step 1: Stack Creation
1. The template developer creates an AWS CloudFormation stack that contains a custom resource; in
the template example below, we use the custom resource type name Custom::SeleniumTester
for the custom resource MySeleniumTest.
API Version 2010-05-15
254
AWS CloudFormation User Guide
Amazon Simple Notification Service-backed Custom
Resources
The custom resource type is declared with a service token, optional provider-specific properties, and
optional Fn::GetAtt (p. 661) attributes that are defined by the custom resource provider. These
properties and attributes can be used to pass information from the template developer to the custom
resource provider and vice-versa. Custom resource type names must be alphanumeric and can have
a maximum length of 60 characters.
The following example shows a template that has both custom properties and return attributes:
{
"AWSTemplateFormatVersion" : "2010-09-09",
"Resources" : {
"MySeleniumTest" : {
"Type": "Custom::SeleniumTester",
"Version" : "1.0",
"Properties" : {
"ServiceToken": "arn:aws:sns:us-west-2:123456789012:CRTest",
"seleniumTester" : "SeleniumTest()",
"endpoints" : [ "http://mysite.com", "http://myecommercesite.com/",
"http://search.mysite.com" ],
"frequencyOfTestsPerHour" : [ "3", "2", "4" ]
}
}
},
"Outputs" : {
"topItem" : {
"Value" : { "Fn::GetAtt" : ["MySeleniumTest", "resultsPage"] }
},
"numRespondents" : {
"Value" : { "Fn::GetAtt" : ["MySeleniumTest", "lastUpdate"] }
}
}
}
Note
The names and values of the data accessed with Fn::GetAtt are returned by the custom
resource provider during the provider's response to AWS CloudFormation. If the custom
resource provider is a third-party, then the template developer must obtain the names of these
return values from the custom resource provider.
2. AWS CloudFormation sends an Amazon SNS notification to the resource provider with a
"RequestType" : "Create" that contains information about the stack, the custom resource properties
from the stack template, and an S3 URL for the response.
The SNS topic that is used to send the notification is embedded in the template in the ServiceToken
property. To avoid using a hard-coded value, a template developer can use a template parameter so
that the value is entered at the time the stack is launched.
The following example shows a custom resource Create request which includes a custom resource
type name, Custom::SeleniumTester, created with a LogicalResourceId of MySeleniumTester:
{
"RequestType" : "Create",
"ResponseURL" : "http://pre-signed-S3-url-for-response",
"StackId" : "arn:aws:cloudformation:us-west-2:123456789012:stack/stackname/guid",
"RequestId" : "unique id for this create request",
"ResourceType" : "Custom::SeleniumTester",
API Version 2010-05-15
255
AWS CloudFormation User Guide
Amazon Simple Notification Service-backed Custom
Resources
"LogicalResourceId" : "MySeleniumTester",
"ResourceProperties" : {
"seleniumTester" : "SeleniumTest()",
"endpoints" : [ "http://mysite.com", "http://myecommercesite.com/",
"http://search.mysite.com" ],
"frequencyOfTestsPerHour" : [ "3", "2", "4" ]
}
}
3. The custom resource provider processes the data sent by the template developer and determines
whether the Create request was successful. The resource provider then uses the S3 URL sent by
AWS CloudFormation to send a response of either SUCCESS or FAILED.
Depending on the response type, different response fields will be expected by AWS CloudFormation.
Refer to the Responses section in the reference topic for the RequestType that is being processed.
In response to a create or update request, the custom resource provider can return data elements in
the Data (p. 277) field of the response. These are name/value pairs, and the names correspond to the
Fn::GetAtt attributes used with the custom resource in the stack template. The values are the data
that is returned when the template developer calls Fn::GetAtt on the resource with the attribute
name.
The following is an example of a custom resource response:
{
"Status" : "SUCCESS",
"PhysicalResourceId" : "Tester1",
"StackId" : "arn:aws:cloudformation:us-west-2:123456789012:stack/stackname/guid",
"RequestId" : "unique id for this create request",
"LogicalResourceId" : "MySeleniumTester",
"Data" : {
"resultsPage" : "http://www.myexampledomain/test-results/guid",
"lastUpdate" : "2012-11-14T03:30Z",
}
}
The StackId, RequestId, and LogicalResourceId fields must be copied verbatim from the request.
4. AWS CloudFormation declares the stack status as CREATE_COMPLETE or CREATE_FAILED. If the
stack was successfully created, the template developer can use the output values of the created custom
resource by accessing them with Fn::GetAtt (p. 661).
For example, the custom resource template used for illustration used Fn::GetAtt to copy resource
outputs into the stack outputs:
"Outputs" : {
"topItem" : {
"Value" : { "Fn::GetAtt" : ["MySeleniumTest", "resultsPage"] }
},
"numRespondents" : {
"Value" : { "Fn::GetAtt" : ["MySeleniumTest", "lastUpdate"] }
}
}
API Version 2010-05-15
256
AWS CloudFormation User Guide
Amazon Simple Notification Service-backed Custom
Resources
For detailed information about the request and response objects involved in Create requests, see
Create (p. 278) in the Custom Resource Reference (p. 274).
Step 2: Stack Updates
To update an existing stack, you must submit a template that specifies updates for the properties of
resources in the stack, as shown in the example below. AWS CloudFormation updates only the resources
that have changes specified in the template. For more information about updating stacks, see AWS
CloudFormation Stacks Updates (p. 85).
You can update custom resources that require a replacement of the underlying physical resource. When
you update a custom resource in an AWS CloudFormation template, AWS CloudFormation sends an
update request to that custom resource. If a custom resource requires a replacement, the new custom
resource must send a response with the new physical ID. When AWS CloudFormation receives the
response, it compares the PhysicalResourceId between the old and new custom resources. If they
are different, AWS CloudFormation recognizes the update as a replacement and sends a delete request
to the old resource, as shown in Step 3: Stack Deletion (p. 258).
1. The template developer initiates an update to the stack that contains a custom resource. During an
update, the template developer can specify new Properties in the stack template.
The following is an example of an Update to the stack template using a custom resource type:
{
"AWSTemplateFormatVersion" : "2010-09-09",
"Resources" : {
"MySeleniumTest" : {
"Type": "Custom::SeleniumTester",
"Version" : "1.0",
"Properties" : {
"ServiceToken": "arn:aws:sns:us-west-2:123456789012:CRTest",
"seleniumTester" : "SeleniumTest()",
"endpoints" : [ "http://mysite.com", "http://myecommercesite.com/",
"http://search.mysite.com",
"http://mynewsite.com" ],
"frequencyOfTestsPerHour" : [ "3", "2", "4", "3" ]
}
}
},
"Outputs" : {
"topItem" : {
"Value" : { "Fn::GetAtt" : ["MySeleniumTest", "resultsPage"] }
},
"numRespondents" : {
"Value" : { "Fn::GetAtt" : ["MySeleniumTest", "lastUpdate"] }
}
}
}
2. AWS CloudFormation sends an Amazon SNS notification to the resource provider with a
"RequestType" : "Update" that contains similar information to the Create call, except that the
OldResourceProperties field contains the old resource properties, and ResourceProperties contains
the updated (if any) resource properties.
The following is an example of an Update request:
API Version 2010-05-15
257
AWS CloudFormation User Guide
Amazon Simple Notification Service-backed Custom
Resources
{
"RequestType" : "Update",
"ResponseURL" : "http://pre-signed-S3-url-for-response",
"StackId" : "arn:aws:cloudformation:us-west-2:123456789012:stack/stackname/guid",
"RequestId" : "uniqueid for this update request",
"LogicalResourceId" : "MySeleniumTester",
"ResourceType" : "Custom::SeleniumTester"
"PhysicalResourceId" : "Tester1",
"ResourceProperties" : {
"seleniumTester" : "SeleniumTest()",
"endpoints" : [ "http://mysite.com", "http://myecommercesite.com/",
"http://search.mysite.com",
"http://mynewsite.com" ],
"frequencyOfTestsPerHour" : [ "3", "2", "4", "3" ]
}
"OldResourceProperties" : {
"seleniumTester" : "SeleniumTest()",
"endpoints" : [ "http://mysite.com", "http://myecommercesite.com/",
"http://search.mysite.com" ],
"frequencyOfTestsPerHour" : [ "3", "2", "4" ]
}
}
3. The custom resource provider processes the data sent by AWS CloudFormation. The custom resource
performs the update and sends a response of either SUCCESS or FAILED to the S3 URL. AWS
CloudFormation then compares the PhysicalResourceIDs of old and new custom resources. If they
are different, AWS CloudFormation recognizes that the update requires a replacement and sends a
delete request to the old resource. The following example demonstrates the custom resource provider
response to an Update request.
{
"Status" : "SUCCESS",
"StackId" : "arn:aws:cloudformation:us-west-2:123456789012:stack/stackname/guid",
"RequestId" : "uniqueid for this update request",
"LogicalResourceId" : "MySeleniumTester",
"PhysicalResourceId" : "Tester2"
}
The StackId, RequestId, and LogicalResourceId fields must be copied verbatim from the request.
4. AWS CloudFormation declares the stack status as UPDATE_COMPLETE or UPDATE_FAILED. If the
update fails, the stack rolls back. If the stack was successfully updated, the template developer can
access any new output values of the created custom resource with Fn::GetAtt.
For detailed information about the request and response objects involved in Update requests, see
Update (p. 282) in the Custom Resource Reference (p. 274).
Step 3: Stack Deletion
1. The template developer deletes a stack that contains a custom resource. AWS CloudFormation gets
the current properties specified in the stack template along with the SNS topic, and prepares to make
a request to the custom resource provider.
API Version 2010-05-15
258
AWS CloudFormation User Guide
Amazon Simple Notification Service-backed Custom
Resources
2. AWS CloudFormation sends an Amazon SNS notification to the resource provider with a
"RequestType" : "Delete" that contains current information about the stack, the custom resource
properties from the stack template, and an S3 URL for the response.
Whenever you delete a stack or make an update that removes or replaces the custom resource, AWS
CloudFormation compares the PhysicalResourceId between the old and new custom resources.
If they are different, AWS CloudFormation recognizes the update as a replacement and sends a delete
request for the old resource (OldPhysicalResource), as shown in the following example of a Delete
request.
{
"RequestType" : "Delete",
"ResponseURL" : "http://pre-signed-S3-url-for-response",
"StackId" : "arn:aws:cloudformation:us-west-2:123456789012:stack/stackname/guid",
"RequestId" : "unique id for this delete request",
"ResourceType" : "Custom::SeleniumTester",
"LogicalResourceId" : "MySeleniumTester",
"PhysicalResourceId" : "Tester1",
"ResourceProperties" : {
"seleniumTester" : "SeleniumTest()",
"endpoints" : [ "http://mysite.com", "http://myecommercesite.com/",
"http://search.mysite.com",
"http://mynewsite.com" ],
"frequencyOfTestsPerHour" : [ "3", "2", "4", "3" ]
}
}
DescribeStackResource, DescribeStackResources, and ListStackResources display the
user-defined name if it has been specified.
3. The custom resource provider processes the data sent by AWS CloudFormation and determines
whether the Delete request was successful. The resource provider then uses the S3 URL sent by
AWS CloudFormation to send a response of either SUCCESS or FAILED.
The following is an example of a custom resource provider response to a Delete request:
{
"Status" : "SUCCESS",
"StackId" : "arn:aws:cloudformation:us-west-2:123456789012:stack/stackname/guid",
"RequestId" : "unique id for this delete request",
"LogicalResourceId" : "MySeleniumTester",
"PhysicalResourceId" : "Tester1"
}
The StackId, RequestId, and LogicalResourceId fields must be copied verbatim from the request.
4. AWS CloudFormation declares the stack status as DELETE_COMPLETE or DELETE_FAILED.
For detailed information about the request and response objects involved in Delete requests, see
Delete (p. 280) in the Custom Resource Reference (p. 274).
API Version 2010-05-15
259
AWS CloudFormation User Guide
AWS Lambda-backed Custom Resources
See Also
• AWS CloudFormation Custom Resource Reference (p. 274)
• AWS::CloudFormation::CustomResource (p. 311)
• Fn::GetAtt (p. 661)
AWS Lambda-backed Custom Resources
When you associate a Lambda function with a custom resource, you invoke the function whenever you
create, update, or delete AWS CloudFormation stacks. AWS CloudFormation calls a Lambda API to
invoke the function and passes all the request data to the function, such as the request type and resource
properties. The power and customizability of Lambda functions in combination with AWS CloudFormation
enable a wide range of scenarios, such as creating cross-stack references, dynamically looking up AMI
IDs during stack creation, and implementing and using utility functions, such as a string reversal function.
Topics
• Walkthrough: Refer to Resources in Another Stack (p. 260)
• Walkthrough: Looking Up Amazon Machine Image IDs (p. 267)
Walkthrough: Refer to Resources in Another Stack
When you want to create a stack that refers to existing resources in another stack, use cross-stack
references. Cross-stack references enable you to use a layered or service-oriented architecture to organize
your AWS resources into multiple stacks while still being able to use resources from one stack in another
stack. You don't need to include all the resources you need into a single stack.
For example, imagine that you have a network layer that maintains all of your networking rules and assets.
In this layer, you have a network stack that creates a VPC, its security group, and its subnet, which are
specifically for public web applications. In a separate web application layer, you might have multiple web
applications, where each application is its own stack. Any stack with a public web application must use
the security group and subnet from the network stack. To do so, the web application stack must reference
resources in the network stack. To enable this, you must create a cross-stack reference. Using cross-stack
references is helpful because owners of the web application stacks don't need to worry about creating
or maintaining any networking rules or assets. They just pull in the resources they need from the network
stack.
Typically, to create a cross-stack reference, you might manually look up the resources that you want and
then use input parameters to include them in the template that you're creating. However, with AWS
Lambda, you can create a function that retrieves the outputs from a stack. All you need to do is declare
a custom resource to invoke the function, and then use the Fn::GetAtt intrinsic function to get a specific
output value.
The following walkthrough shows you how to associate a Lambda function with a custom resource and
how to use the function to create a cross-stack reference. Note that the walkthrough assumes that you
have an understanding of custom resources and Lambda. For more information, see Custom
Resources (p. 252) or AWS Lambda Developer Guide.
Walkthrough overview
For this walkthrough, you'll create two separate stacks and a Lambda function. You'll create a network
stack that includes a VPC, security group, and subnet. You'll also create a web application stack that
launches an Amazon Elastic Compute Cloud instance, which uses the security group and subnet from
the network stack. To refer to resources in the network stack, you'll use a custom resource in the web
application stack. The custom resource will be associated with a Lambda function that takes in a stack
API Version 2010-05-15
260
AWS CloudFormation User Guide
AWS Lambda-backed Custom Resources
name and then returns the output values from that stack. For this walkthrough, the function retrieves the
network stack's output values (the security group and subnet IDs).
Whenever you create, update, or delete a stack with that custom resource, AWS CloudFormation invokes
the associated Lambda function and waits for the function to send a response to a pre-signed Amazon
Simple Storage Service URL. The function responds with either a success or failure message.
For successful requests, the function responds with data that is structured as key-value pairs, which are
the network stack's output names and values. In the web application stack template, you use a Fn::GetAtt
intrinsic function on the custom resource to refer to that data. If the request fails (for example, if the
specified stack name doesn't exist), the function sends an error message and AWS CloudFormation fails
the stack creation or update.
You must create the stacks and Lambda function in the same region, and you must have AWS Identity
and Access Management permissions to use all the corresponding services, such as Lambda, Amazon
EC2, and AWS CloudFormation.
The following steps describe the overall process:
Note
AWS CloudFormation is a free service; however, you are charged for the AWS resources you
include in your stacks at the current rate for each. For more information about AWS pricing, go
to the detail page for each product on http://www.amazonaws.cn.
1. Create a network stack by using a sample template. (p. 261)
The web application stack will refer to the security group and subnet in this stack. The walkthough
provides a sample network stack template that works in conjunction with the sample Lambda function
and web application stack.
2. Create a Lambda function. (p. 262)
The function retrieves the output values from a specified stack. The walkthrough provides sample
JavaScript code that you can use to create the function. You'll also need to create an IAM role, which
Lambda uses to make calls to AWS CloudFormation (execution role).
3. Create an web application stack that uses the Lambda function. (p. 265)
The web application stack demonstrates how you associate the Lambda function with a custom resource
and use the results from the function to refer to resources in the network stack.
4. Clean up your resources by deleting your stacks and the Lambda function. (p. 266)
Step 1: Creating the Network Stack
The network stack contains the VPC, security group, and subnet that you will use in the web application
stack. In addition to those resources, the network stack creates an Internet gateway and routing tables
to enable public access. You must create this stack before you create the web application stack. If you
don't, the web application stack won't be able to reference the security group or subnet.
To create your network stack
1.
Sign in to the AWS Management Console and open the AWS CloudFormation console at https://
console.amazonaws.cn/cloudformation/.
2.
3.
Choose Create Stack.
In the Stack section, type SampleNetworkConfiguration in the Name field.
Record the name of this stack. You'll need the stack name when you launch the web application
stack.
API Version 2010-05-15
261
AWS CloudFormation User Guide
AWS Lambda-backed Custom Resources
4.
In the Template section, select Specify an Amazon S3 template URL, and then copy and paste
the following URL in the text box: https://s3.amazonaws.com/cloudformation-examples/
lambda/Network.template
5.
6.
The link is the location of the network stack template. View the template by going to the link to see
what resources the stack will create.
After you have reviewed the template, choose Next.
For this walkthrough, you don't need to add any tags or specify any advanced settings. Choose Next.
7.
Ensure the stack name and template URL are correct, and then choose Create.
Your stack might take several minutes to create. During this time, you can create the Lambda function.
Step 2: Creating the Lambda function
A Lambda function is custom code that you can run in the cloud. This walkthrough provides a sample
function that takes a stack name and returns the outputs from that stack. When you create the function,
you also create an execution role for Lambda so that it has permission to call the AWS CloudFormation
DescribeStacks API. For more information about Lambda and how it works, see the AWS Lambda
Developer Guide.
To create a Lambda function
1.
2.
3.
Go to the Lambda console at https://console.amazonaws.cn/lambda/.
Choose Create a Lambda function.
In the Name field, type LookupStackOutputs.
4.
5.
6.
Record the name of this function.You'll need the function name when you launch the web application
stack.
For the Code entry type, choose Edit code inline.
For the Code Template, choose None.
In the editor, copy and paste the following sample JavaScript code.
This sample uses only the aws-sdk library, so you don't need to upload any code or custom libraries
that are saved as .ZIP files. If you want to download a copy of the sample, go to https://
s3.amazonaws.com/cloudformation-examples/lambda/LookupStackOutputs.js.
/**
* A sample Lambda function that takes an AWS CloudFormation stack name
* and returns the outputs from that stack.
**/
exports.handler = function(event, context) {
console.log("REQUEST RECEIVED:\n", JSON.stringify(event));
if (event.RequestType == "Delete") {
sendResponse(event, context, "SUCCESS");
return;
}
var stackName = event.ResourceProperties.StackName;
var responseStatus = "FAILED";
var responseData = {};
// Verifies that a stack name was passed
API Version 2010-05-15
262
AWS CloudFormation User Guide
AWS Lambda-backed Custom Resources
if (stackName) {
var aws = require("aws-sdk");
var cfn = new aws.CloudFormation();
// Calls CloudFormation DescribeStacks
cfn.describeStacks({StackName: stackName}, function(err, data) {
if (err) {
responseData = {Error: "DescribeStacks call failed"};
console.log(responseData.Error + ":\n", err);
}
// Populates the return data with the outputs from the specified
stack
else {
responseStatus = "SUCCESS";
data.Stacks[0].Outputs.forEach(function(output) {
responseData[output.OutputKey] = output.OutputValue;
});
}
sendResponse(event, context, responseStatus, responseData);
});
} else {
responseData = {Error: "Stack name not specified"};
console.log(responseData.Error);
sendResponse(event, context, responseStatus, responseData);
}
};
//Sends response to the pre-signed S3 URL
function sendResponse(event, context, responseStatus, responseData) {
var responseBody = JSON.stringify({
Status: responseStatus,
Reason: "See the details in CloudWatch Log Stream: " + context.log
StreamName,
PhysicalResourceId: context.logStreamName,
StackId: event.StackId,
RequestId: event.RequestId,
LogicalResourceId: event.LogicalResourceId,
Data: responseData
});
console.log("RESPONSE BODY:\n", responseBody);
var https = require("https");
var url = require("url");
var parsedUrl = url.parse(event.ResponseURL);
var options = {
hostname: parsedUrl.hostname,
port: 443,
path: parsedUrl.path,
method: "PUT",
headers: {
"content-type": "",
"content-length": responseBody.length
}
};
var request = https.request(options, function(response) {
API Version 2010-05-15
263
AWS CloudFormation User Guide
AWS Lambda-backed Custom Resources
console.log("STATUS: " + response.statusCode);
console.log("HEADERS: " + JSON.stringify(response.headers));
// Tell AWS Lambda that the function execution is done
context.done();
});
request.on("error", function(error) {
console.log("sendResponse Error:\n", error);
// Tell AWS Lambda that the function execution is done
context.done();
});
// write data to request body
request.write(responseBody);
request.end();
}
7.
For the Handler name, keep the default name.
The handler name is the name of your JavaScript function that Lambda calls to start running your
code. The sample code uses the default value handler.
8.
For Role, choose Basic execution role in the Create new role section.
The console opens a browser tab where you modify the properties of the role.
9. For IAM Role, choose Create a new IAM Role.
10. For Role Name, type SampleLambdaRole.
11. Choose View Policy Document, and then choose Edit to modify the IAM role policy.
The console reminds you to read about the execution role.
12. Choose Ok to edit the policy.
13. In the editor, copy and paste the following sample policy over any exiting policy, and then choose
Allow.
The sample policy grants Lambda permissions to describe AWS CloudFormation stacks and to send
logs to Amazon CloudWatch.
{
"Version": "2012-10-17",
"Statement": [
{
"Effect": "Allow",
"Action": [
"logs:*"
],
"Resource": "arn:aws:logs:*:*:*"
},
{
"Effect": "Allow",
"Action": [
"cloudformation:DescribeStacks"
],
"Resource": "*"
}
]
}
API Version 2010-05-15
264
AWS CloudFormation User Guide
AWS Lambda-backed Custom Resources
After you choose Allow, the SampleLambdaRole role is chosen as the execution role.
14. In the Advanced settings section, choose a timeout of 10 seconds.
If you don't specify a sufficiently long timeout, Lambda might cause a timeout before the function can
complete.
15. Choose Create Lambda function to create your Lambda function.
Now your network stack is complete. You can now invoke your Lambda function to refer to resources in
your network stack, as demonstrated in the next step, Step 3: Creating the Web Application Stack (p. 265).
Step 3: Creating the Web Application Stack
The web application stack creates a basic EC2 instance that uses the security group and subnet from
the network stack. In the web application stack, you use a custom resource and associate it with the
Lambda function that you created. When you create the web application stack, AWS CloudFormation
invokes the Lambda function and waits until the function sends a response to the pre-signed Amazon S3
URL. In the response, the function returns the output names and values from the network stack.
Web application stack template snippets
To associate a function with a custom resource, you specify the Amazon Resource Name (ARN) of the
function as the service token. In our case, the Lambda function also requires a stack name so that it
knows which stack outputs to get. To pass the stack name, the function requires that you declare the
custom resource as shown in the following snippet:
"NetworkInfo": {
"Type": "Custom::NetworkInfo",
"Properties": {
"ServiceToken": { "Fn::Join": [ "", [ "arn:aws:lambda:", { "Ref":
"AWS::Region" }, ":", { "Ref": "AWS::AccountId" }, ":function:", {"Ref" :
"LambdaFunctionName"} ] ] },
"StackName": {
"Ref": "NetworkStackName"
}
}
}
To refer to data that's returned from a custom resource, you use the Fn::GetAtt intrinsic function. The
Fn::GetAtt function takes the name of the custom resource and an attribute name. In the sample
template, the custom resource name is NetworkInfo. The attribute names are the same name values
that are in the Outputs section of the network stack template (VPCId, WebServerSecurityGroup, and
PublicSubnet). For example, the following snippet shows you how to refer to the security group and
subnet IDs:
"GroupSet" : [{ "Fn::GetAtt": [ "NetworkInfo", "WebServerSecurityGroup" ] }],
"SubnetId" : { "Fn::GetAtt": [ "NetworkInfo", "PublicSubnet" ] }
When AWS CloudFormation resolves the Fn::GetAtt function, it examines the Data property from the
Lambda function's response. The Data property is constructed by the Lambda function and is similar to
the following example:
API Version 2010-05-15
265
AWS CloudFormation User Guide
AWS Lambda-backed Custom Resources
Example Data property from a Lambda function response
"Data": {
"WebServerSecurityGroup": "sg-ab12c3de",
"PublicSubnet": "subnet-ab123cd4"
}
To create the web application stack
1.
2.
Go to the AWS CloudFormation console at https://console.amazonaws.cn/cloudformation/.
Choose Create Stack.
3.
In the Stack section, type SampleApplication in the Name field.
4.
In the Template section, select Specify an Amazon S3 template URL, and then copy and paste
the following URL in the text box: https://s3.amazonaws.com/cloudformation-examples/
lambda/Application.template
5.
6.
7.
8.
The link provides the location of the application stack template. View the template by going to the
link to see what resources the stack will create.
After you have reviewed the template, choose Next.
In the Parameters section, specify the name of the Lambda function and the name of the network
stack for the LambdaFunctionName and NetworkStackName parameters, and then choose Next.
The default values are the same names that were specified in this walkthrough.
For this walkthrough, you don't need to add any tags or specify any advanced settings. Choose Next.
Ensure the stack name and template URL are correct, and then choose Create.
It might take several minutes for your stack to be created. After the stack has been created, view its
resources and note the instance ID. For more information, see Viewing Stack Data and Resources (p. 74).
You can verify the instance's security group and subnet by viewing its properties in the Amazon EC2
console at https://console.amazonaws.cn/ec2/. You'll see that the instance is using the security group
and subnet from the SampleNetworkConfiguration stack. You created a cross-stack reference by
using a Lambda-backed custom resource.
If you run into an error with the Lambda function, you can go to the Amazon CloudWatch Logs console
to view the function's logs and debug the error. The name of the log stream is the same as the physical
ID of the custom resource, which you can find by viewing the stack's resources.
Note
If the SampleNetworkConfiguration stack is updated and either the security group or the
subnet ID changes, you must update the SampleApplication stack to use the new IDs. To
trigger an update for the SampleApplication stack, you must make a change to the stack's
template, such as adding an arbitrary property and value to the custom resource. For example,
you can add "version" : "1" as a custom resource property. The Lambda function ignores
the property and continues to work normally.
Clean Up Resources
To make sure you are not charged for any unwanted services, delete your stacks and your Lambda
function.
Note
If you want to reuse the Lambda function, do not delete it. You can reuse the function with any
number of stacks; you don't have to create a new function for each stack. You must also keep
the execution role.
API Version 2010-05-15
266
AWS CloudFormation User Guide
AWS Lambda-backed Custom Resources
To delete the stacks
1.
From the AWS CloudFormation console, choose the SampleApplication stack.
2.
3.
Choose Delete Stack.
In the confirmation message, choose Yes, Delete.
4.
After the stack has been deleted, repeat the same steps for the MyTestNetworkStack.
Wait until AWS CloudFormation completely deletes the MyTestWebApp stack. If the Amazon EC2
instance is still running in the VPC, the VPC in the MyTestNetworkStack stack might fail to delete.
Also, note that the Lambda function isn't deleted when you delete the MyTestWebApp stack. You
must delete the function manually.
To delete the Lambda function
Note
Delete any stacks that use the Lambda function before deleting the function. If you delete the
function first, stacks that use the function won't be able to delete successfully.
1.
2.
3.
From the Lambda console, choose the LookupStackOutputs function.
Choose Delete.
In the confirmation message, choose Delete.
To delete the Lambda execution role
1.
2.
3.
4.
5.
Go to the AWS Identity and Access Management console at https://console.amazonaws.cn/iam/.
From the navigation pane, choose Roles.
In the list of roles, choose SampleLambdaRole.
Choose Role Actions, and then Delete Role.
In the confirmation message, choose Yes, Delete.
All the resources that you created have been deleted.
Now that you understand how to create and use Lambda functions with AWS CloudFormation, you can
use the sample templates from this walkthrough or create your own to easily cross-reference resources
in other stacks or to build other custom functions.
See Also
• AWS CloudFormation Custom Resource Reference (p. 274)
• AWS::CloudFormation::CustomResource (p. 311)
• AWS Lambda Developer Guide
Walkthrough: Looking Up Amazon Machine Image IDs
When you launch an Amazon Elastic Compute Cloud (Amazon EC2) instance, you must also specify an
Amazon Machine Image (AMI) that includes information required to launch the instance, such as the
operating system. Any AWS CloudFormation templates that declare Amazon EC2 instances, must also
specify their AMI IDs. However, the correct AMI ID can depend on the instance type and region in which
you're launching your stack. Not only that, but the IDs can change regularly, such as when an AMI is
updated to include software updates.
API Version 2010-05-15
267
AWS CloudFormation User Guide
AWS Lambda-backed Custom Resources
Normally, you might map AMI IDs to specific instance types and regions. If you wanted to update the IDs,
you would manually update them in each of your templates. With custom resources and AWS Lambda
(Lambda), you can create a function that gets the latest AMI IDs for the region and instance type that
you're using so that you don't have to maintain mappings.
The following walkthrough shows you how to associate a Lambda function with a custom resource to
look up AMI IDs. Note that the walkthrough assumes that you have an understanding of custom resources
and Lambda. For more information, see Custom Resources (p. 252) or AWS Lambda Developer Guide.
Walkthrough Overview
For this walkthrough, you'll create a Lambda function and an AWS CloudFormation stack that has a single
EC2 instance. The walkthough provides sample code and a sample template that you'll use to create the
function and stack, which must be in the same region.
The sample template uses the AWS::CloudFormation::CustomResource resource type to invoke
and send input values to the Lambda function. Anytime you use the template, AWS CloudFormation
invokes and sends request information, such as the request type, input data, and a pre-signed Amazon
Simple Storage Service (Amazon S3) URL, to the function. The function uses that information to look up
the correct AMI ID and then sends a response to the pre-signed URL.
After AWS CloudFormation gets a response in the pre-signed URL location, AWS CloudFormation
proceeds with the stack operation. AWS CloudFormation uses the Lambda function's response to specify
an instance's AMI ID.
The following list describes the overall process. Note that you'll require AWS Identity and Access
Management (IAM) permissions to use all the corresponding services, such as Lambda, Amazon EC2,
and AWS CloudFormation.
Note
AWS CloudFormation is a free service; however, you are charged for the AWS resources that
you include in your stacks at the current rate for each. For more information about AWS pricing,
go to the detail page for each product on http://www.amazonaws.cn.
1. Create a Lambda function. (p. 268)
The function demonstrates how you can create code to handle requests from AWS CloudFormation.
When you create the function, you'll also need to create an IAM role (execution role), which Lambda
uses to make calls to Amazon EC2.
2. Create a stack that uses the Lambda function. (p. 272)
The EC2 instance stack demonstrates how you associate the Lambda function with a custom resource
and use the results from the function to specify an AMI ID.
3. Delete your stack and the Lambda function. (p. 273)
In the final step, you clean up your resources so that you aren't charged for any resources that might
keep running. If you want to reuse the Lambda function, you can keep it and reuse it with any number
of stacks; you don't have to create a new function for each stack.
Step 1: Creating the Lambda Function
Use the Lambda console to create your Lambda function, which takes an instance's architecture and
region and then returns an AMI ID. The walkthrough provides sample JavaScript code to create the
function.
When you create the function, you also must create an execution role for Lambda so that it has permission
to call the EC2 DescribeImages API.
API Version 2010-05-15
268
AWS CloudFormation User Guide
AWS Lambda-backed Custom Resources
To create a Lambda function
1.
Go to the Lambda console at https://console.amazonaws.cn/lambda/.
2.
3.
Choose Create a Lambda function.
In the Name field, type LookUpAMIID.
Record the name of this function. You'll need the function name when you launch the EC2 instance
stack.
4.
5.
For the Code entry type, choose Edit code inline.
For the Code Template, choose None.
6.
In the editor, copy and paste the following sample JavaScript code.
This sample uses only the aws-sdk library, so you don't need to upload code or custom libraries
that are saved as .ZIP files. If you want to download a copy of the sample, go to https://
s3.amazonaws.com/cloudformation-examples/lambda/LookupAMIId.js.
/**
* A sample Lambda function that looks up the latest AMI ID for a given region
and architecture.
**/
// Map instance architectures to an AMI name pattern
var archToAMINamePattern = {
"PV64": "amzn-ami-pv*.x86_64-ebs",
"HVM64": "amzn-ami-hvm*.x86_64-gp2",
"HVMG2": "amzn-ami-graphics-hvm-*x86_64-ebs*"
};
var aws = require("aws-sdk");
exports.handler = function(event, context) {
console.log("REQUEST RECEIVED:\n" + JSON.stringify(event));
// For Delete requests, immediately send a SUCCESS response.
if (event.RequestType == "Delete") {
sendResponse(event, context, "SUCCESS");
return;
}
var responseStatus = "FAILED";
var responseData = {};
var ec2 = new aws.EC2({region: event.ResourceProperties.Region});
var describeImagesParams = {
Filters: [{ Name: "name", Values: [archToAMINamePattern[event.Re
sourceProperties.Architecture]]}],
Owners: [event.ResourceProperties.Architecture == "HVMG2" ?
"679593333241" : "amazon"]
};
// Get AMI IDs with the specified name pattern and owner
ec2.describeImages(describeImagesParams, function(err, describeImages
Result) {
if (err) {
responseData = {Error: "DescribeImages call failed"};
console.log(responseData.Error + ":\n", err);
}
API Version 2010-05-15
269
AWS CloudFormation User Guide
AWS Lambda-backed Custom Resources
else {
var images = describeImagesResult.Images;
// Sort images by name in decscending order. The names contain
the AMI version, formatted as YYYY.MM.Ver.
images.sort(function(x, y) { return y.Name.localeCompare(x.Name);
});
for (var j = 0; j < images.length; j++) {
if (isBeta(images[j].Name)) continue;
responseStatus = "SUCCESS";
responseData["Id"] = images[j].ImageId;
break;
}
}
sendResponse(event, context, responseStatus, responseData);
});
};
// Check if the image is a beta or rc image. The Lambda function won't return
any of those images.
function isBeta(imageName) {
return imageName.toLowerCase().indexOf("beta") > -1 || imageName.toLower
Case().indexOf(".rc") > -1;
}
// Send response to the pre-signed S3 URL
function sendResponse(event, context, responseStatus, responseData) {
var responseBody = JSON.stringify({
Status: responseStatus,
Reason: "See the details in CloudWatch Log Stream: " + context.log
StreamName,
PhysicalResourceId: context.logStreamName,
StackId: event.StackId,
RequestId: event.RequestId,
LogicalResourceId: event.LogicalResourceId,
Data: responseData
});
console.log("RESPONSE BODY:\n", responseBody);
var https = require("https");
var url = require("url");
var parsedUrl = url.parse(event.ResponseURL);
var options = {
hostname: parsedUrl.hostname,
port: 443,
path: parsedUrl.path,
method: "PUT",
headers: {
"content-type": "",
"content-length": responseBody.length
}
};
console.log("SENDING RESPONSE...\n");
API Version 2010-05-15
270
AWS CloudFormation User Guide
AWS Lambda-backed Custom Resources
var request = https.request(options, function(response) {
console.log("STATUS: " + response.statusCode);
console.log("HEADERS: " + JSON.stringify(response.headers));
// Tell AWS Lambda that the function execution is done
context.done();
});
request.on("error", function(error) {
console.log("sendResponse Error:" + error);
// Tell AWS Lambda that the function execution is done
context.done();
});
// write data to request body
request.write(responseBody);
request.end();
}
7.
For the Handler name, keep the default name.
The handler name is the name of the JavaScript function that Lambda calls to start running your
code. The sample code uses the default value handler.
8.
For Role, choose Basic execution role in the Create new role section.
The console opens a browser tab where you modify the properties of the role.
9. For IAM Role, choose Create a new IAM Role.
10. For Role Name, type SampleLambdaRole.
11. Choose View Policy Document, and then choose Edit to modify the IAM role policy.
The console reminds you to read about the execution role.
12. Choose Ok to edit the policy.
13. In the editor, copy and paste the following sample policy over any exiting policy, and then choose
Allow.
The sample policy grants Lambda permission to describe EC2 images.
{
"Version": "2012-10-17",
"Statement": [
{
"Effect": "Allow",
"Action": [
"logs:*"
],
"Resource": "arn:aws:logs:*:*:*"
},
{
"Effect": "Allow",
"Action": [
"ec2:DescribeImages"
],
"Resource": "*"
}
]
}
API Version 2010-05-15
271
AWS CloudFormation User Guide
AWS Lambda-backed Custom Resources
14. In the Advanced settings section, choose a timeout of 30 seconds.
If you don't specify a sufficiently long timeout, Lambda might cause a timeout before the function can
complete.
15. Choose Create Lambda function to create your Lambda function.
You can now use your Lambda function to get the correct AMI ID when you create a stack with an EC2
instance, as demonstrated in the next step Step 2: Creating the EC2 Instance Stack (p. 272).
Step 2: Creating the EC2 Instance Stack
Use the sample template and AWS CloudFormation console to create the EC2 instance stack. When you
create the stack, AWS CloudFormation invokes the Lambda function that you created and waits until the
function sends a response to the pre-signed Amazon S3 URL. In the response, the function returns the
latest AMI ID that corresponds to the instance type and region in which you are creating the instance.
The function's response is used to specify the AMI ID of an EC2 instance.
EC2 Instance Stack Template Snippets
The following snippets explain relevant parts of the sample template that can help you understand how
to associate a Lambda function with a custom resource and how to use the function's response.
To associate a function with a custom resource, you specify the Amazon Resource Name (ARN) of the
function as the service token. The following snippet uses the Fn::Join intrinsic function to construct the
function's ARN, where the function's name is specified by an input parameter. To find the correct AMI ID,
the Lambda function requires the stack's region and the instance's architecture, which are specified by
the Region and Architecture properties.Valid values for the properties are determined by the Lambda
function because it uses them as inputs.
"AMIInfo": {
"Type": "Custom::AMIInfo",
"Properties": {
"ServiceToken": { "Fn::Join": [ "", [ "arn:aws:lambda:", { "Ref":
"AWS::Region" }, ":", { "Ref": "AWS::AccountId" }, ":function:", { "Ref":
"LookUpAMIID" } ] ] },
"Region": { "Ref": "AWS::Region" },
"Architecture": { "Fn::FindInMap" : [ "AWSInstanceType2Arch", { "Ref" :
"InstanceType" }, "Arch" ] }
}
}
When the Lambda function calls the EC2 DescribeImages API, it uses the region and instance
architecture to filter the list of images. The function sorts the list of images by date and returns the latest
image.
When the Lambda function sends a response to the pre-signed URL, the function returns the AMI ID in
the Data property. The data is structured as a name-value pair, as shown in the following example:
Example Data property from a Lambda function response
"Data": {
"Id": "ami-43795473"
}
To use the data from your Lambda function, use the Fn::GetAtt intrinsic function and provide the custom
resource name that's associated with your function and an attribute name that maps to the value you
API Version 2010-05-15
272
AWS CloudFormation User Guide
AWS Lambda-backed Custom Resources
want. In this walkthrough, specify the custom resource name as AMIInfo and the attribute name as Id,
as shown in the following snippet:
"SampleInstance": {
"Type": "AWS::EC2::Instance",
"Properties": {
"InstanceType"
: { "Ref" : "InstanceType" },
"ImageId": { "Fn::GetAtt": [ "AMIInfo", "Id" ] }
}
}
To create the EC2 instance stack
1.
2.
Go to the AWS CloudFormation console at https://console.amazonaws.cn/cloudformation/.
Choose Create Stack.
3.
In the Stack section, type SampleEC2Instance in the Name field.
4.
In the Template section, select Specify an Amazon S3 template URL, and then copy and paste
the following URL in the text box: https://s3.amazonaws.com/cloudformation-examples/
lambda/AMILookupSample.template
5.
6.
The link provides the location of the application stack template. View the template by going to the
link to see the resources the stack will create.
After you have reviewed the template, choose Next.
In the Parameters section, specify the name of the Lambda function, and then choose Next.
7.
8.
The default value is the same name that was specified in this walkthrough when you created the
function.
For this walkthrough, you don't need to add tags or specify advanced settings. Choose Next.
Ensure the stack name and template URL are correct, and then choose Create.
It might take several minutes for your stack to be created. You can view the stack events to monitor
progress. For more information, see Viewing Stack Data and Resources (p. 74).
If stack creation successfully completes, all resources in the stack, such as the custom resource and EC2
instance, were also successfully created. In other words, you successfully used a Lambda function to
specify the AMI ID of an EC2 instance.You don't have to maintain a mapping of AMI IDs in your templates.
You can also view the stack outputs to see which AMI ID AWS CloudFormation used to create the EC2
instance.
If you run into an error with the Lambda function, you can go to the Amazon CloudWatch Logs console
to view the function's logs and debug the error. The name of the log stream is the same as the physical
ID of the custom resource, which you can find by viewing the stack's resources.
Step 3: Clean Up Resources
To make sure that you are not charged for unwanted services, delete your stacks and your Lambda
function.
Note
If you want to reuse the Lambda function, do not delete it. You can reuse the function with any
number of stacks; you don't have to create a new function for each stack. You must also keep
the execution role.
To delete the stacks
1.
From the AWS CloudFormation console, choose the SampleEC2Instance stack.
API Version 2010-05-15
273
AWS CloudFormation User Guide
Custom Resource Reference
2.
3.
Choose Delete Stack.
In the confirmation message, choose Yes, Delete.
Note that the Lambda function isn't deleted when you delete the SampleEC2Instance stack, even
though the function automatically responds with a success message when it receives a Delete
request. You must delete the function manually.
To delete the Lambda function
Note
Delete any stacks that use the Lambda function before deleting the function. If you delete the
function first, stacks that use the function won't be able to delete successfully.
1.
2.
3.
From the Lambda console, choose the LookUpAMIID function.
Choose Delete.
In the confirmation message, choose Delete.
To delete the Lambda execution role
1.
2.
3.
4.
5.
Go to the AWS Identity and Access Management console at https://console.amazonaws.cn/iam/.
From the navigation pane, choose Roles.
In the list of roles, choose SampleLambdaRole.
Choose Role Actions, and then Delete Role.
In the confirmation message, choose Yes, Delete.
All the resources that you created have been deleted.
Now that you understand how to create and use Lambda functions with AWS CloudFormation, you can
use the samples from this walkthrough to build other custom functions.
See Also
• AWS CloudFormation Custom Resource Reference (p. 274)
• AWS::CloudFormation::CustomResource (p. 311)
Custom Resource Reference
This section provides detail about:
• The JSON request and response fields that are used in messages sent to and from AWS CloudFormation
when providing a custom resource.
• Expected fields for requests to, and responses to, the custom resource provider in response to stack
creation, stack updates, and stack deletion.
In This Section
• Custom Resource Request Objects (p. 275)
• Custom Resource Response Objects (p. 276)
• Custom Resource Request Types (p. 277)
API Version 2010-05-15
274
AWS CloudFormation User Guide
Custom Resource Reference
Custom Resource Request Objects
Template Developer Request Properties
The template developer uses the AWS CloudFormation resource,
AWS::CloudFormation::CustomResource (p. 311), to specify a custom resource in a template.
In AWS::CloudFormation::CustomResource, all properties are defined by the custom resource provider.
There is only one required property: ServiceToken.
ServiceToken
The service token (an Amazon SNS topic or AWS Lambda function Amazon Resource Name) that
is obtained from the custom resource provider to access the service. The service token must be in
the same region in which you are creating the stack.
Required: Yes
Type: String
All other fields in the resource properties are optional and are sent, verbatim, to the custom resource
provider in the request's ResourceProperties field. The provider defines both the names and the valid
contents of these fields.
Custom Resource Provider Request Fields
These fields are sent in JSON requests from AWS CloudFormation to the custom resource provider in
the SNS topic that the provider has configured for this purpose.
RequestType
The request type is set by the AWS CloudFormation stack operation (create-stack, update-stack, or
delete-stack) that was initiated by the template developer for the stack that contains the custom
resource.
Must be one of: Create, Update, or Delete. For more information, see Custom Resource Request
Types (p. 277).
Required: Yes
Type: String
ResponseURL
The response URL identifies a pre-signed Amazon S3 bucket that receives responses from the
custom resource provider to AWS CloudFormation.
Required: Yes
Type: String
StackId
The Amazon Resource Name (ARN) that identifies the stack containing the custom resource.
Combining the StackId with the RequestId forms a value that can be used to uniquely identify a
request on a particular custom resource.
Required: Yes
Type: String
RequestId
A unique ID for the request.
API Version 2010-05-15
275
AWS CloudFormation User Guide
Custom Resource Reference
Combining the StackId with the RequestId forms a value that can be used to uniquely identify a
request on a particular custom resource.
Required: Yes
Type: String
ResourceType
The template developer-chosen resource type of the custom resource in the AWS CloudFormation
template. Custom resource type names can be up to 60 characters long and can include alphanumeric
and the following characters: _@-.
Required: Yes
Type: String
LogicalResourceId
The template developer-chosen name (logical ID) of the custom resource in the AWS CloudFormation
template. This is provided to facilitate communication between the custom resource provider and the
template developer.
Required: Yes
Type: String
PhysicalResourceId
A required custom resource provider-defined physical ID that is unique for that provider.
Required: Always sent with Update and Delete requests; never sent with Create.
Type: String
ResourceProperties
This field contains the contents of the Properties object sent by the template developer. Its contents
are defined by the custom resource provider.
Required: No
Type: JSON object
OldResourceProperties
Used only for Update requests. Contains the resource properties that were declared previous to the
update request.
Required: Yes
Type: JSON object
Custom Resource Response Objects
Custom Resource Provider Response Fields
Status
The status value sent by the custom resource provider in response to an AWS
CloudFormation-generated request.
Must be either SUCCESS or FAILED.
Required: Yes
Type: String
API Version 2010-05-15
276
AWS CloudFormation User Guide
Custom Resource Reference
Reason
Describes the reason for a failure response.
Required: Required if Status is FAILED; optional otherwise.
Type: String
PhysicalResourceId
This value should be an identifier unique to the custom resource vendor, and can be up to 1Kb in
size. The value must be a non-empty string.
Required: Yes
Type: String
StackId
The Amazon Resource Name (ARN) that identifies the stack containing the custom resource. This
response value should be copied verbatim from the request.
Required: Yes
Type: String
RequestId
A unique ID for the request. This response value should be copied verbatim from the request.
Required: Yes
Type: String
LogicalResourceId
The template developer-chosen name (logical ID) of the custom resource in the AWS CloudFormation
template. This response value should be copied verbatim from the request.
Required: Yes
Type: String
Data
Optional, custom resource provider-defined name-value pairs to send with the response. The values
provided here can be accessed by name in the template with Fn::GetAtt.
Required: No
Type: JSON object
Custom Resource Request Types
The request type is sent in the RequestType field in the vendor request object (p. 275) sent by AWS
CloudFormation when the template developer creates, updates, or deletes a stack that contains a custom
resource.
Each request type has a particular set of fields that are sent with the request, including an S3 URL for
the response by the custom resource provider. The provider responds to the S3 bucket with either a
SUCCESS or FAILED result. Each result also has a particular set of fields expected by AWS CloudFormation.
This section provides information about the request and response fields, with examples, for each request
type.
In This Section
• Create (p. 278)
API Version 2010-05-15
277
AWS CloudFormation User Guide
Custom Resource Reference
• Delete (p. 280)
• Update (p. 282)
Create
Custom resource provider requests with RequestType set to "Create" are sent when the template
developer creates a stack that contains a custom resource.
Request
Create requests contain the following fields:
RequestType
Will be "Create".
RequestId
A unique ID for the request.
ResponseURL
The response URL identifies a pre-signed Amazon S3 bucket that receives responses from the
custom resource provider to AWS CloudFormation.
ResourceType
The template developer-chosen resource type of the custom resource in the AWS CloudFormation
template. Custom resource type names can be up to 60 characters long and can include alphanumeric
and the following characters: _@-.
LogicalResourceId
The template developer-chosen name (logical ID) of the custom resource in the AWS CloudFormation
template.
StackId
The Amazon Resource Name (ARN) that identifies the stack containing the custom resource.
ResourceProperties
This field contains the contents of the Properties object sent by the template developer. Its contents
are defined by the custom resource provider.
Example
{
"RequestType" : "Create",
"RequestId" : "unique id for this create request",
"ResponseURL" : "pre-signed-url-for-create-response",
"ResourceType" : "Custom::MyCustomResourceType",
"LogicalResourceId" : "name of resource in template",
"StackId" : "arn:aws:cloudformation:us-east-1:namespace:stack/stackname/guid",
"ResourceProperties" : {
"key1" : "string",
"key2" : [ "list" ],
"key3" : { "key4" : "map" }
}
}
API Version 2010-05-15
278
AWS CloudFormation User Guide
Custom Resource Reference
Responses
Success
When the create request is successful, a response must be sent to the S3 bucket with the following fields:
Status
Must be "SUCCESS".
LogicalResourceId
The template developer-chosen name (logical ID) of the custom resource in the AWS CloudFormation
template. This response value should be copied verbatim from the request.
RequestId
A unique ID for the request. This response value should be copied verbatim from the request.
StackId
The Amazon Resource Name (ARN) that identifies the stack containing the custom resource. This
response value should be copied verbatim from the request.
PhysicalResourceId
This value should be an identifier unique to the custom resource vendor, and can be up to 1Kb in
size. The value must be a non-empty string.
Data
Optional, custom resource provider-defined name-value pairs to send with the response. The values
provided here can be accessed by name in the template with Fn::GetAtt.
Example
{
"Status" : "SUCCESS",
"LogicalResourceId" : "name of resource in template (copied from request)",
"RequestId" : "unique id for this create request (copied from request)",
"StackId" : "arn:aws:cloudformation:us-east-1:namespace:stack/stack-name/guid
(copied from request)",
"PhysicalResourceId" : "required vendor-defined physical id that is unique
for that vendor",
"Data" : {
"keyThatCanBeUsedInGetAtt1" : "data for key 1",
"keyThatCanBeUsedInGetAtt2" : "data for key 2"
}
}
Failed
When the create request fails, a response must be sent to the S3 bucket with the following fields:
Status
Must be "FAILED".
Reason
Describes the reason for a failure response.
LogicalResourceId
The template developer-chosen name (logical ID) of the custom resource in the AWS CloudFormation
template. This response value should be copied verbatim from the request.
RequestId
A unique ID for the request. This response value should be copied verbatim from the request.
API Version 2010-05-15
279
AWS CloudFormation User Guide
Custom Resource Reference
StackId
The Amazon Resource Name (ARN) that identifies the stack containing the custom resource. This
response value should be copied verbatim from the request.
Example
{
"Status" : "FAILED",
"Reason" : "Required failure reason string",
"LogicalResourceId" : "name of resource in template (copied from request)",
"RequestId" : "unique id for this create request (copied from request)",
"StackId" : "arn:aws:cloudformation:us-east-1:namespace:stack/stack-name/guid
(copied from request)"
}
Delete
Custom resource provider requests with RequestType set to "Delete" are sent when the template
developer deletes a stack that contains a custom resource.
Request
Delete requests contain the following fields:
RequestType
Will be "Delete".
RequestId
A unique ID for the request.
ResourceType
The template developer-chosen resource type of the custom resource in the AWS CloudFormation
template. Custom resource type names can be up to 60 characters long and can include alphanumeric
and the following characters: _@-.
ResponseURL
The response URL identifies a pre-signed Amazon S3 bucket that receives responses from the
custom resource provider to AWS CloudFormation.
LogicalResourceId
The template developer-chosen name (logical ID) of the custom resource in the AWS CloudFormation
template.
StackId
The Amazon Resource Name (ARN) that identifies the stack containing the custom resource.
PhysicalResourceId
A required custom resource provider-defined physical ID that is unique for that provider.
ResourceProperties
This field contains the contents of the Properties object sent by the template developer. Its contents
are defined by the custom resource provider.
Example
{
"RequestType" : "Delete",
API Version 2010-05-15
280
AWS CloudFormation User Guide
Custom Resource Reference
"RequestId" : "unique id for this delete request",
"ResponseURL" : "pre-signed-url-for-delete-response",
"StackId" : "arn:aws:cloudformation:us-east-1:namespace:stack/stackname/guid",
"ResourceType" : "Custom::MyCustomResourceType",
"LogicalResourceId" : "name of resource in template",
"PhysicalResourceId" : "custom resource provider-defined physical id",
"ResourceProperties" : {
"key1" : "string",
"key2" : [ "list" ],
"key3" : { "key4" : "map" }
}
}
Responses
Success
When the delete request is successful, a response must be sent to the S3 bucket with the following fields:
Status
Must be "SUCCESS".
LogicalResourceId
The template developer-chosen name (logical ID) of the custom resource in the AWS CloudFormation
template. This response value should be copied verbatim from the request.
RequestId
A unique ID for the request. This response value should be copied verbatim from the request.
StackId
The Amazon Resource Name (ARN) that identifies the stack containing the custom resource. This
response value should be copied verbatim from the request.
PhysicalResourceId
This value should be an identifier unique to the custom resource vendor, and can be up to 1Kb in
size. The value must be a non-empty string.
Example
{
"Status" : "SUCCESS",
"LogicalResourceId" : "name of resource in template (copied from request)",
"RequestId" : "unique id for this delete request (copied from request)",
"StackId" : "arn:aws:cloudformation:us-east-1:namespace:stack/stack-name/guid
(copied from request)",
"PhysicalResourceId" : "custom resource provider-defined physical id"
}
Failed
When the delete request fails, a response must be sent to the S3 bucket with the following fields:
Status
Must be "FAILED".
Reason
The reason for the failure.
API Version 2010-05-15
281
AWS CloudFormation User Guide
Custom Resource Reference
LogicalResourceId
The LogicalResourceId value copied from the delete request (p. 280).
RequestId
The RequestId value copied from the delete request (p. 280).
StackId
The StackId value copied from the delete request (p. 280).
PhysicalResourceId
A required custom resource provider-defined physical ID that is unique for that provider.
Example
{
"Status" : "FAILED",
"Reason" : "Required failure reason string",
"LogicalResourceId" : "name of resource in template (copied from request)",
"RequestId" : "unique id for this delete request (copied from request)",
"StackId" : "arn:aws:cloudformation:us-east-1:namespace:stack/stack-name/guid
(copied from request)",
"PhysicalResourceId" : "custom resource provider-defined physical id"
}
Update
Custom resource provider requests with RequestType set to "Update" are sent when the template
developer updates a stack that contains a custom resource.
Request
Update requests contain the following fields:
RequestType
Will be "Update".
RequestId
A unique ID for the request.
ResponseURL
The response URL identifies a pre-signed Amazon S3 bucket that receives responses from the
custom resource provider to AWS CloudFormation.
StackId
The Amazon Resource Name (ARN) that identifies the stack containing the custom resource.
ResourceType
The template developer-chosen resource type of the custom resource in the AWS CloudFormation
template. Custom resource type names can be up to 60 characters long and can include alphanumeric
and the following characters: _@-. You cannot change the type during an update.
LogicalResourceId
The template developer-chosen name (logical ID) of the custom resource in the AWS CloudFormation
template.
PhysicalResourceId
A required custom resource provider-defined physical ID that is unique for that provider.
ResourceProperties
The new resource property values declared by the template developer in the updated AWS
CloudFormation template.
API Version 2010-05-15
282
AWS CloudFormation User Guide
Custom Resource Reference
OldResourceProperties
The resource property values that were previously declared by the template developer in the AWS
CloudFormation template.
Example
{
"RequestType" : "Update",
"RequestId" : "unique id for this update request",
"ResponseURL" : "pre-signed-url-for-update-response",
"StackId" : "arn:aws:cloudformation:us-east-1:namespace:stack/stackname/guid",
"ResourceType" : "Custom::MyCustomResourceType",
"LogicalResourceId" : "name of resource in template",
"PhysicalResourceId" : "custom resource provider-defined physical id",
"ResourceProperties" : {
"key1" : "new-string",
"key2" : [ "new-list" ],
"key3" : { "key4" : "new-map" }
}
"OldResourceProperties" : {
"key1" : "string",
"key2" : [ "list" ],
"key3" : { "key4" : "map" }
}
}
Responses
Success
If the custom resource provider is able to successfully update the resource, AWS CloudFormation expects
status to be set to "SUCCESS" in the response.
Status
Must be "SUCCESS".
StackId
The Amazon Resource Name (ARN) that identifies the stack containing the custom resource. This
response value should be copied verbatim from the request.
RequestId
A unique ID for the request. This response value should be copied verbatim from the request.
LogicalResourceId
The template developer-chosen name (logical ID) of the custom resource in the AWS CloudFormation
template. This response value should be copied verbatim from the request.
PhysicalResourceId
This value should be an identifier unique to the custom resource vendor, and can be up to 1Kb in
size. The value must be a non-empty string.
Data
Optional, custom resource provider-defined name-value pairs to send with the response. The values
provided here can be accessed by name in the template with Fn::GetAtt.
API Version 2010-05-15
283
AWS CloudFormation User Guide
Custom Resource Reference
Example
{
"Status" : "SUCCESS",
"StackId" : "arn:aws:cloudformation:us-east-1:namespace:stack/stack-name/guid
(copied from request)",
"RequestId" : "unique id for this update request (copied from request)",
"LogicalResourceId" : "name of resource in template (copied from request)",
"PhysicalResourceId" : "custom resource provider-defined physical id",
"Data" : {
"keyThatCanBeUsedInGetAtt1" : "data for key 1",
"keyThatCanBeUsedInGetAtt2" : "data for key 2"
}
}
Failed
If the resource cannot be updated with new set of properties, AWS CloudFormation expects the status
to be set to "FAILED", along with a failure reason in the response.
Status
Must be "FAILED".
Reason
Describes the reason for a failure response.
LogicalResourceId
The template developer-chosen name (logical ID) of the custom resource in the AWS CloudFormation
template. This response value should be copied verbatim from the request.
RequestId
A unique ID for the request. This response value should be copied verbatim from the request.
StackId
The Amazon Resource Name (ARN) that identifies the stack containing the custom resource. This
response value should be copied verbatim from the request.
PhysicalResourceId
This value should be an identifier unique to the custom resource vendor, and can be up to 1Kb in
size. The value must be a non-empty string.
Example
{
"Status" : "FAILED",
"Reason" : "Required failure reason string",
"LogicalResourceId" : "name of resource in template (copied from request)",
"RequestId" : "unique id for this update request (copied from request)",
"StackId" : "arn:aws:cloudformation:us-east-1:namespace:stack/stack-name/guid
(copied from request)",
"PhysicalResourceId" : "custom resource provider-defined physical id"
}
API Version 2010-05-15
284
AWS CloudFormation User Guide
Using Regular Expressions
Using Regular Expressions in AWS
CloudFormation Templates
Regular expressions (commonly known as regexes) can be specified in a number of places within an
AWS CloudFormation template, such as for the AllowedPattern property when creating a template
parameter (p. 115).
Regular expressions in AWS CloudFormation conform to the Java regular expression syntax. A full
description of this syntax and its constructs can be viewed in the Java documentation, here:
java.util.regex.Pattern.
Important
Since AWS CloudFormation templates use the JSON syntax for specifying objects and data,
you will need to add an additional backslash to any backslash characters in your regular
expression, or JSON will interpret these as escape characters.
For example, if you include a \d in your regular expression to match a digit character, you will
need to write it as \\d in your template.
API Version 2010-05-15
285
AWS CloudFormation User Guide
AWS Resource Types
Template Reference
This section details the supported resources, type names, intrinsic functions and pseudo parameters
used in AWS CloudFormation templates.
Topics
• AWS Resource Types Reference (p. 286)
• Resource Property Types Reference (p. 543)
• Resource Attribute Reference (p. 639)
• Intrinsic Function Reference (p. 648)
• Pseudo Parameters Reference (p. 674)
• CloudFormation Helper Scripts Reference (p. 676)
AWS Resource Types Reference
This section contains reference information for all AWS resources that are supported by AWS
CloudFormation
Resource type identifiers always take the following form:
AWS::aws-product-name::data-type-name
Topics
• AWS::AutoScaling::AutoScalingGroup (p. 288)
• AWS::AutoScaling::LaunchConfiguration (p. 294)
• AWS::AutoScaling::LifecycleHook (p. 301)
• AWS::AutoScaling::ScalingPolicy (p. 304)
• AWS::AutoScaling::ScheduledAction (p. 305)
• AWS::CloudFormation::Authentication (p. 308)
• AWS::CloudFormation::CustomResource (p. 311)
• AWS::CloudFormation::Init (p. 314)
• AWS::CloudFormation::Stack (p. 324)
• AWS::CloudFormation::WaitCondition (p. 326)
API Version 2010-05-15
286
AWS CloudFormation User Guide
AWS Resource Types
• AWS::CloudFormation::WaitConditionHandle (p. 329)
• AWS::CloudFront::Distribution (p. 330)
• AWS::CloudTrail::Trail (p. 331)
• AWS::CloudWatch::Alarm (p. 334)
• AWS::DataPipeline::Pipeline (p. 338)
• AWS::DynamoDB::Table (p. 343)
• AWS::EC2::CustomerGateway (p. 347)
• AWS::EC2::DHCPOptions (p. 349)
• AWS::EC2::EIP (p. 351)
• AWS::EC2::EIPAssociation (p. 353)
• AWS::EC2::Instance (p. 354)
• AWS::EC2::InternetGateway (p. 361)
•
•
•
•
•
•
•
•
•
•
•
•
•
•
•
•
•
•
•
•
AWS::EC2::NetworkAcl (p. 363)
AWS::EC2::NetworkAclEntry (p. 364)
AWS::EC2::NetworkInterface (p. 366)
AWS::EC2::NetworkInterfaceAttachment (p. 370)
AWS::EC2::Route (p. 371)
AWS::EC2::RouteTable (p. 374)
AWS::EC2::SecurityGroup (p. 375)
AWS::EC2::SecurityGroupEgress (p. 378)
AWS::EC2::SecurityGroupIngress (p. 381)
AWS::EC2::Subnet (p. 385)
AWS::EC2::SubnetNetworkAclAssociation (p. 387)
AWS::EC2::SubnetRouteTableAssociation (p. 389)
AWS::EC2::Volume (p. 390)
AWS::EC2::VolumeAttachment (p. 393)
AWS::EC2::VPC (p. 395)
AWS::EC2::VPCDHCPOptionsAssociation (p. 397)
AWS::EC2::VPCGatewayAttachment (p. 398)
AWS::EC2::VPCPeeringConnection (p. 400)
AWS::EC2::VPNConnection (p. 408)
AWS::EC2::VPNConnectionRoute (p. 410)
• AWS::EC2::VPNGateway (p. 411)
• AWS::EC2::VPNGatewayRoutePropagation (p. 412)
• AWS::ECS::Cluster (p. 414)
• AWS::ECS::Service (p. 414)
• AWS::ECS::TaskDefinition (p. 416)
• AWS::ElastiCache::CacheCluster (p. 418)
• AWS::ElastiCache::ParameterGroup (p. 424)
• AWS::ElastiCache::ReplicationGroup (p. 426)
• AWS::ElastiCache::SecurityGroup (p. 431)
• AWS::ElastiCache::SecurityGroupIngress (p. 431)
• AWS::ElastiCache::SubnetGroup (p. 432)
• AWS::ElasticBeanstalk::Application (p. 433)
• AWS::ElasticBeanstalk::ApplicationVersion (p. 434)
• AWS::ElasticBeanstalk::ConfigurationTemplate (p. 436)
API Version 2010-05-15
287
AWS CloudFormation User Guide
AWS::AutoScaling::AutoScalingGroup
• AWS::ElasticBeanstalk::Environment (p. 438)
• AWS::ElasticLoadBalancing::LoadBalancer (p. 441)
• AWS::IAM::AccessKey (p. 448)
• AWS::IAM::Group (p. 450)
• AWS::IAM::InstanceProfile (p. 451)
• AWS::IAM::ManagedPolicy (p. 453)
• AWS::IAM::Policy (p. 456)
• AWS::IAM::Role (p. 458)
• AWS::IAM::User (p. 463)
• AWS::IAM::UserToGroupAddition (p. 464)
• AWS::Kinesis::Stream (p. 465)
• AWS::Lambda::Function (p. 466)
•
•
•
•
•
•
•
•
•
•
•
•
•
•
•
•
•
•
•
•
AWS::Logs::LogGroup (p. 468)
AWS::Logs::MetricFilter (p. 469)
AWS::OpsWorks::App (p. 470)
AWS::OpsWorks::ElasticLoadBalancerAttachment (p. 473)
AWS::OpsWorks::Instance (p. 474)
AWS::OpsWorks::Layer (p. 478)
AWS::OpsWorks::Stack (p. 482)
AWS::Redshift::Cluster (p. 486)
AWS::Redshift::ClusterParameterGroup (p. 491)
AWS::Redshift::ClusterSecurityGroup (p. 493)
AWS::Redshift::ClusterSecurityGroupIngress (p. 494)
AWS::Redshift::ClusterSubnetGroup (p. 495)
AWS::RDS::DBInstance (p. 496)
AWS::RDS::DBParameterGroup (p. 506)
AWS::RDS::DBSubnetGroup (p. 508)
AWS::RDS::DBSecurityGroup (p. 509)
AWS::RDS::DBSecurityGroupIngress (p. 511)
AWS::RDS::EventSubscription (p. 513)
AWS::RDS::OptionGroup (p. 515)
AWS::Route53::HealthCheck (p. 517)
• AWS::Route53::HostedZone (p. 518)
• AWS::Route53::RecordSet (p. 520)
• AWS::Route53::RecordSetGroup (p. 524)
• AWS::S3::Bucket (p. 526)
• AWS::S3::BucketPolicy (p. 533)
• AWS::SDB::Domain (p. 535)
• AWS::SNS::Topic (p. 535)
• AWS::SNS::TopicPolicy (p. 537)
• AWS::SQS::Queue (p. 538)
• AWS::SQS::QueuePolicy (p. 542)
AWS::AutoScaling::AutoScalingGroup
The AWS::AutoScaling::AutoScalingGroup type creates an Auto Scaling group.
API Version 2010-05-15
288
AWS CloudFormation User Guide
AWS::AutoScaling::AutoScalingGroup
You can add an UpdatePolicy (p. 645) attribute to your Auto Scaling group to control how rolling updates
are performed when a change has been made to the Auto Scaling group's launch configuration (p. 294)
or subnet group membership (p. 292).
Syntax
{
"Type" : "AWS::AutoScaling::AutoScalingGroup",
"Properties" : {
"AvailabilityZones (p. 289)" : [ String, ... ],
"Cooldown (p. 289)" : String,
"DesiredCapacity (p. 289)" : String,
"HealthCheckGracePeriod (p. 290)" : Integer,
"HealthCheckType (p. 290)" : String,
"InstanceId (p. 290)" : String,
"LaunchConfigurationName (p. 290)" : String,
"LoadBalancerNames (p. 291)" : [ String, ... ],
"MaxSize (p. 291)" : String,
"MetricsCollection (p. 291)" : [ MetricsCollection, ... ]
"MinSize (p. 291)" : String,
"NotificationConfigurations (p. 291)" : [ NotificationConfigurations, ...
],
"PlacementGroup (p. 291)" : String,
"Tags (p. 291)" : [ Auto Scaling Tag, ..., ],
"TerminationPolicies (p. 292)" : [ String, ..., ],
"VPCZoneIdentifier (p. 292)" : [ String, ... ]
}
}
Properties
AvailabilityZones
Contains a list of availability zones for the group.
Required: Conditional. If you don't specify the VPCZoneIdentifier property, you must specify this
property.
Type: List of strings
Update requires: No interruption (p. 86)
Cooldown
The number of seconds after a scaling activity is completed before any further scaling activities can
start.
Required: No
Type: String
Update requires: No interruption (p. 86)
DesiredCapacity
Specifies the desired capacity for the Auto Scaling group.
If SpotPrice is not set in the AWS::AutoScaling::LaunchConfiguration (p. 294) for this Auto Scaling
group, then Auto Scaling will begin to bring instances online based on DesiredCapacity.
CloudFormation will not mark the Auto Scaling group as successful (by setting its status to
CREATE_COMPLETE) until the desired capacity is reached.
API Version 2010-05-15
289
AWS CloudFormation User Guide
AWS::AutoScaling::AutoScalingGroup
If SpotPrice is set, then DesiredCapacity will not be used as a criteria for success, since instances
will only be started when the spot price has been matched. After the spot price has been matched,
however, Auto Scaling uses DesiredCapacity as the target capacity for the group.
Required: No
Type: String
Update requires: No interruption (p. 86)
HealthCheckGracePeriod
The length of time in seconds after a new EC2 instance comes into service that Auto Scaling starts
checking its health.
Required: No
Type: Integer
Update requires: No interruption (p. 86)
HealthCheckType
The service you want the health status from, Amazon EC2 or Elastic Load Balancer. Valid values
are EC2 or ELB.
Required: No
Type: String
Update requires: No interruption (p. 86)
InstanceId
The ID of the Amazon EC2 instance you want to use to create the Auto Scaling group. Use this
property if you want to create an Auto Scaling group that uses an existing Amazon EC2 instance
instead of a launch configuration.
When you use an Amazon EC2 instance to create an Auto Scaling group, a new launch configuration
is first created and then associated with the Auto Scaling group. The new launch configuration derives
all its properties from the instance, with the exception of BlockDeviceMapping and
AssociatePublicIpAddress.
Required: Conditional. You must specify this property if you don't specify the
LaunchConfigurationName property.
Type: String
Update requires: Replacement (p. 86)
LaunchConfigurationName
Specifies the name of the associated AWS::AutoScaling::LaunchConfiguration (p. 294).
Note
If this resource has a public IP address and is also in a VPC that is defined in the same
template, you must use the DependsOn attribute to declare a dependency on the
VPC-gateway attachment. For more information, see DependsOn Attribute (p. 642).
Required: Conditional; you must specify this property if you don't specify the InstanceId property.
Type: String
Update requires: No interruption (p. 86)
Important
When you update the LaunchConfigurationName, existing Amazon EC2 instances
continue to run with the configuration that they were originally launched with. To update
API Version 2010-05-15
290
AWS CloudFormation User Guide
AWS::AutoScaling::AutoScalingGroup
existing instances, specify an update policy attribute for this Auto Scaling group. For more
information, see UpdatePolicy (p. 645).
LoadBalancerNames
A list of load balancers associated with this Auto Scaling group.
Required: No
Type: List of strings
Update requires: Replacement (p. 86)
Important
When you update LoadBalancerNames, the entire Auto Scaling group is replaced.
MaxSize
The maximum size of the Auto Scaling group.
Required: Yes
Type: String
Update requires: No interruption (p. 86)
MetricsCollection
Enables the monitoring of group metrics of an Auto Scaling group.
Required: No
Type: A list of Auto Scaling MetricsCollection (p. 548)
Update requires: No interruption (p. 86)
MinSize
The minimum size of the Auto Scaling group.
Required: Yes
Type: String
Update requires: No interruption (p. 86)
NotificationConfigurations
An embedded property that configures an Auto Scaling group to send notifications when specified
events take place.
Required: No
Type: List of Auto Scaling NotificationConfigurations (p. 548)
Update requires: No interruption (p. 86)
PlacementGroup
The name of an existing cluster placement group into which you want to launch your instances. A
placement group is a logical grouping of instances within a single Availability Zone. You cannot
specify multiple Availability Zones and a placement group.
Required: No
Type: String
Update requires: No interruption (p. 86)
Tags
The tags you want to attach to this resource.
API Version 2010-05-15
291
AWS CloudFormation User Guide
AWS::AutoScaling::AutoScalingGroup
For more information about tags, go to Tagging Auto Scaling Groups and Amazon EC2 Instances
in the Auto Scaling Developer Guide.
Required: No
Type: List of Auto Scaling Tags (p. 549)
Update requires: No interruption (p. 86)
TerminationPolicies
A policy or a list of policies that are used to select the instances to terminate. The policies are executed
in the order that you list them.
For more information on configuring a termination policy for your Auto Scaling group, see Instance
Termination Policy for Your Auto Scaling Group in the Auto Scaling Developer Guide.
Required: No
Type: List of strings
Update requires: No interruption (p. 86)
VPCZoneIdentifier
A list of subnet identifiers of Amazon Virtual Private Cloud (Amazon VPCs).
If you specify the AvailabilityZones property, the subnets that you specify for this property must
reside in those Availability Zones.
For more information, go to Using EC2 Dedicated Instances Within Your VPC in the Auto Scaling
Developer Guide.
Required: Conditional. If you don't specify the AvailabilityZones property, you must specify this
property.
Type: List of strings
Update requires: Some interruptions (p. 86)
Note
When you update VPCZoneIdentifier, the instances are replaced, but not the Auto Scaling
group.
Return Value
When the logical ID of this resource is provided to the Ref intrinsic function, Ref returns the resource
name.
In the following sample, the Ref function returns the name of the MyASGroup Auto Scaling group, such
as mystack-myasgroup-NT5EUXTNTXXD.
{ "Ref": "MyASGroup" }
For more information about using the Ref function, see Ref (p. 669).
Examples
To view more Auto Scaling examples, see Auto Scaling Template Snippets (p. 157).
API Version 2010-05-15
292
AWS CloudFormation User Guide
AWS::AutoScaling::AutoScalingGroup
Auto Scaling Group with an Elastic Load Balancing Load Balancer, Launch
Configuration, and Metric Collection
"WebServerGroup" : {
"Type" : "AWS::AutoScaling::AutoScalingGroup",
"Properties" : {
"AvailabilityZones" : { "Fn::GetAZs" : "" },
"LaunchConfigurationName" : { "Ref" : "LaunchConfig" },
"MinSize" : "2",
"MaxSize" : "2",
"LoadBalancerNames" : [ { "Ref" : "ElasticLoadBalancer" } ],
"MetricsCollection": [
{
"Granularity": "1Minute",
"Metrics": [
"GroupMinSize",
"GroupMaxSize"
]
}
]
}
}
Batch Update Instances in an Auto Scaling Group
The following example shows how to configure updates by including an UpdatePolicy (p. 645) attribute.
The attribute contains an AutoScalingRollingUpdate embedded object with three attributes that specify
the update policy settings.
"ASG1" : {
"UpdatePolicy" : {
"AutoScalingRollingUpdate" : {
"MinInstancesInService" : "1",
"MaxBatchSize" : "1",
"PauseTime" : "PT12M5S"
}
},
"Type" : "AWS::AutoScaling::AutoScalingGroup",
"Properties" : {
"AvailabilityZones" : { "Fn::GetAZs" : { "Ref" : "AWS::Region" } },
"LaunchConfigurationName" : { "Ref" : "ASLC" },
"MaxSize" : "3",
"MinSize" : "1"
}
}
Auto Scaling Group Wait on Signals From New Instances
In the following example, the Auto Scaling group waits for new Amazon EC2 instances to signal the group
before Auto Scaling proceeds to update the next batch of instances. In the UpdatePolicy (p. 645) attribute,
the WaitOnResourceSignals flag is set to true. You can use the cfn-signal (p. 679) helper script on
each instance to signal the Auto Scaling group.
API Version 2010-05-15
293
AWS CloudFormation User Guide
AWS::AutoScaling::LaunchConfiguration
"ASG1" : {
"UpdatePolicy" : {
"AutoScalingRollingUpdate" : {
"MinInstancesInService" : "1",
"MaxBatchSize" : "1",
"PauseTime" : "PT12M5S",
"WaitOnResourceSignals" : "true"
}
},
"Type" : "AWS::AutoScaling::AutoScalingGroup",
"Properties" : {
"AvailabilityZones" : { "Fn::GetAZs" : { "Ref" : "AWS::Region" } },
"LaunchConfigurationName" : { "Ref" : "ASLC" },
"MaxSize" : "3",
"MinSize" : "1"
}
}
See Also
• UpdatePolicy (p. 645)
• UpdateAutoScalingGroup in the Auto Scaling API Reference
• AWS CloudFormation Stacks Updates (p. 85)
AWS::AutoScaling::LaunchConfiguration
The AWS::AutoScaling::LaunchConfiguration type creates an Auto Scaling launch configuration that can
be used by an Auto Scaling group to configure Amazon EC2 instances in the Auto Scaling group.
Important
When you update a property of the LaunchConfiguration resource, AWS CloudFormation deletes
that resource and creates a new launch configuration with the updated properties and a new
name.This update action does not deploy any change across the running Amazon EC2 instances
in the auto scaling group. In other words, an update simply replaces the LaunchConfiguration
so that when the auto scaling group launches new instances, they will get the updated
configuration, but existing instances continue to run with the configuration that they were originally
launched with. This works the same way as if you made similar changes manually to an auto
scaling group.
If you want to update existing instances when you update the LaunchConfiguration resource,
you must specify an update policy attribute for the AWS::AutoScaling::AutoScalingGroup
resource. For more information, see UpdatePolicy (p. 645).
Syntax
{
"Type" : "AWS::AutoScaling::LaunchConfiguration",
"Properties" : {
"AssociatePublicIpAddress (p. 295)" : Boolean,
"BlockDeviceMappings (p. 295)" : [ BlockDeviceMapping, ... ],
"ClassicLinkVPCId (p. 295)" : String,
"ClassicLinkVPCSecurityGroups (p. 295)" : [ String, ... ],
"EbsOptimized (p. 296)" : Boolean,
"IamInstanceProfile (p. 296)" : String,
API Version 2010-05-15
294
AWS CloudFormation User Guide
AWS::AutoScaling::LaunchConfiguration
"ImageId (p. 296)" : String,
"InstanceId (p. 296)" : String,
"InstanceMonitoring (p. 296)" : Boolean,
"InstanceType (p. 297)" : String,
"KernelId (p. 297)" : String,
"KeyName (p. 297)" : String,
"PlacementTenancy (p. 297)" : String,
"RamDiskId (p. 297)" : String,
"SecurityGroups (p. 297)" : [ SecurityGroup, ... ],
"SpotPrice (p. 298)" : String,
"UserData (p. 298)" : String
}
}
Properties
AssociatePublicIpAddress
For Amazon EC2 instances in a VPC, indicates whether instances in the Auto Scaling group receive
public IP addresses. If you specify true, each instance in the Auto Scaling receives a unique public
IP address.
Note
If this resource has a public IP address and is also in a VPC that is defined in the same
template, you must use the DependsOn attribute to declare a dependency on the
VPC-gateway attachment. For more information, see DependsOn Attribute (p. 642).
Required: No
Type: Boolean
Update requires: Replacement (p. 86)
BlockDeviceMappings
Specifies how block devices are exposed to the instance. You can specify virtual devices and EBS
volumes.
Required: No
Type: A list of BlockDeviceMappings (p. 545).
Update requires: Replacement (p. 86)
ClassicLinkVPCId
The ID of a ClassicLink-enabled VPC to link your EC2-Classic instances to. You can specify this
property only for EC2-Classic instances. For more information, see ClassicLink in the Amazon Elastic
Compute Cloud User Guide.
Required: No
Type: String
Update requires: Replacement (p. 86)
ClassicLinkVPCSecurityGroups
The IDs of one or more security groups for the VPC that you specified in the ClassicLinkVPCId
property.
Required: Conditional. If you specified the ClassicLinkVPCId property, you must specify this
property.
Type: List of strings
API Version 2010-05-15
295
AWS CloudFormation User Guide
AWS::AutoScaling::LaunchConfiguration
Update requires: Replacement (p. 86)
EbsOptimized
Specifies whether the launch configuration is optimized for EBS I/O. This optimization provides
dedicated throughput to Amazon EBS and an optimized configuration stack to provide optimal EBS
I/O performance.
Additional fees are incurred when using EBS-optimized instances. For more information about fees
and supported instance types, see EBS-Optimized Instances in the Amazon Elastic Compute Cloud
User Guide.
Required: No If this property is not specified, "false" is used.
Type: Boolean
Update requires: Replacement (p. 86)
IamInstanceProfile
Provides the name or the Amazon Resource Name (ARN) of the instance profile associated with the
IAM role for the instance. The instance profile contains the IAM role.
Required: No
Type: String (1–1600 chars)
Update requires: Replacement (p. 86)
ImageId
Provides the unique ID of the Amazon Machine Image (AMI) that was assigned during registration.
Required: Yes
Type: String
Update requires: Replacement (p. 86)
InstanceId
The ID of the Amazon EC2 instance you want to use to create the launch configuration. Use this
property if you want the launch configuration to use settings from an existing Amazon EC2 instance.
When you use an instance to create a launch configuration, all properties are derived from the instance
with the exception of BlockDeviceMapping and AssociatePublicIpAddress.You can override
any properties from the instance by specifying them in the launch configuration.
Required: No
Type: String
Update requires: Replacement (p. 86)
InstanceMonitoring
Indicates whether detailed instance monitoring is enabled for the Auto Scaling group. By default, this
property is set to true (enabled).
When detailed monitoring is enabled, Amazon CloudWatch (CloudWatch) generates metrics every
minute and your account is charged a fee. When you disable detailed monitoring, CloudWatch
generates metrics every 5 minutes. For more information, see Monitor Your Auto Scaling Instances
in the Auto Scaling Developer Guide.
Required: No
Type: Boolean
Update requires: Replacement (p. 86)
API Version 2010-05-15
296
AWS CloudFormation User Guide
AWS::AutoScaling::LaunchConfiguration
InstanceType
Specifies the instance type of the EC2 instance.
Required: Yes
Type: String
Update requires: Replacement (p. 86)
KernelId
Provides the ID of the kernel associated with the EC2 AMI.
Required: No
Type: String
Update requires: Replacement (p. 86)
KeyName
Provides the name of the EC2 key pair.
Required: No
Type: String
Update requires: Replacement (p. 86)
PlacementTenancy
The tenancy of the instance. An instance with a tenancy of dedicated runs on single-tenant hardware
and can only be launched in a VPC. You must set the value of this parameter to dedicated if want
to launch dedicated instances in a shared tenancy VPC (a VPC with the instance placement tenancy
attribute set to default). For more information, see CreateLaunchConfiguration in the Auto Scaling
API Reference.
If you specify this property, you must specify at least one subnet in the VPCZoneIdentifier property
of the AWS::AutoScaling::AutoScalingGroup (p. 288) resource.
Required: No
Type: String
Update requires: Replacement (p. 86)
RamDiskId
The ID of the RAM disk to select. Some kernels require additional drivers at launch. Check the kernel
requirements for information about whether you need to specify a RAM disk. To find kernel
requirements, refer to the AWS Resource Center and search for the kernel ID.
Required: No
Type: String
Update requires: Replacement (p. 86)
SecurityGroups
A list that contains the EC2 security groups to assign to the Amazon EC2 instances in the Auto
Scaling group. The list can contain the name of existing EC2 security groups or references to
AWS::EC2::SecurityGroup resources created in the template. If your instances are launched within
VPC, specify Amazon VPC security group IDs.
Required: No
Type: A list of EC2 security groups.
API Version 2010-05-15
297
AWS CloudFormation User Guide
AWS::AutoScaling::LaunchConfiguration
Update requires: Replacement (p. 86)
SpotPrice
The spot price for this autoscaling group. If a spot price is set, then the autoscaling group will launch
when the current spot price is less than the amount specified in the template.
When you have specified a spot price for an auto scaling group, the group will only launch when the
spot price has been met, regardless of the setting in the autoscaling group's DesiredCapacity.
For more information about configuring a spot price for an autoscaling group, see Using Auto Scaling
to Launch Spot Instances in the AutoScaling Developer Guide.
Required: No
Type: String
Update requires: Replacement (p. 86)
Note
When you change your bid price by creating a new launch configuration, running instances
will continue to run as long as the bid price for those running instances is higher than the
current Spot price.
UserData
The user data available to the launched EC2 instances.
Required: No
Type: String
Update requires: Replacement (p. 86)
Return Value
When the logical ID of this resource is provided to the Ref intrinsic function, Ref returns the resource
name. For example:
{ "Ref": "LaunchConfig" }
For the resource with the logical ID LaunchConfig, Ref will return the Auto Scaling launch configuration
name, such as mystack-mylaunchconfig-1DDYF1E3B3I.
For more information about using the Ref function, see Ref (p. 669).
API Version 2010-05-15
298
AWS CloudFormation User Guide
AWS::AutoScaling::LaunchConfiguration
Template Examples
Example LaunchConfig with block device
This example shows a launch configuration that describes two Amazon Elastic Block Store mappings.
"LaunchConfig" : {
"Type" : "AWS::AutoScaling::LaunchConfiguration",
"Properties" : {
"KeyName" : { "Ref" : "KeyName" },
"ImageId" : {
"Fn::FindInMap" : [
"AWSRegionArch2AMI",
{ "Ref" : "AWS::Region" },
{
"Fn::FindInMap" : [
"AWSInstanceType2Arch", { "Ref" : "InstanceType" }, "Arch"
]
}
]
},
"UserData" : { "Fn::Base64" : { "Ref" : "WebServerPort" }},
"SecurityGroups" : [ { "Ref" : "InstanceSecurityGroup" } ],
"InstanceType" : { "Ref" : "InstanceType" },
"BlockDeviceMappings" : [
{
"DeviceName" : "/dev/sda1",
"Ebs" : { "VolumeSize" : "50", "VolumeType" : "io1", "Iops" : 200 }
},
{
"DeviceName" : "/dev/sdm",
"Ebs" : { "VolumeSize" : "100", "DeleteOnTermination" : "true"}
}
]
}
}
API Version 2010-05-15
299
AWS CloudFormation User Guide
AWS::AutoScaling::LaunchConfiguration
Example LaunchConfig with Spot Price in Autoscaling Group
This example shows a launch configuration that features a spot price in the AutoScaling group. This
launch configuration will only be active if the current spot price is less than the amount in the template
specification (0.05).
"LaunchConfig" : {
"Type" : "AWS::AutoScaling::LaunchConfiguration",
"Properties" : {
"KeyName" : { "Ref" : "KeyName" },
"ImageId" : {
"Fn::FindInMap" : [
"AWSRegionArch2AMI",
{ "Ref" : "AWS::Region" },
{
"Fn::FindInMap" : [
"AWSInstanceType2Arch", { "Ref" : "InstanceType" }, "Arch"
]
}
]
},
"SecurityGroups" : [ { "Ref" : "InstanceSecurityGroup" } ],
"SpotPrice" : "0.05",
"InstanceType" : { "Ref" : "InstanceType" }
}
}
Example LaunchConfig with IAM Instance Profile
Here's a launch configuration using the IamInstanceProfile (p. 296) property.
Only the AWS::AutoScaling::LaunchConfiguration specification is shown. For the full template, including
the definition of, and further references from the AWS::IAM::InstanceProfile (p. 451) object referenced
here as "RootInstanceProfile", see: auto_scaling_with_instance_profile.template.
"myLCOne": {
"Type": "AWS::AutoScaling::LaunchConfiguration",
"Properties": {
"ImageId": {
"Fn::FindInMap": [
"AWSRegionArch2AMI",
{ "Ref": "AWS::Region" },
{
"Fn::FindInMap": [
"AWSInstanceType2Arch", { "Ref": "InstanceType" }, "Arch"
]
}
]
},
"InstanceType": { "Ref": "InstanceType" },
"IamInstanceProfile": { "Ref": "RootInstanceProfile" }
}
}
API Version 2010-05-15
300
AWS CloudFormation User Guide
AWS::AutoScaling::LifecycleHook
Example EBS-optimized volume with specified PIOPS
You can create an AWS CloudFormation stack with auto scaled instances that contain EBS-optimized
volumes with a specified PIOPS. This can increase the performance of your EBS-backed instances as
explained in Increasing EBS Performance in the Amazon Elastic Compute Cloud User Guide.
Caution
Additional fees are incurred when using EBS-optimized instances. For more information, see
EBS-Optimized Instances in the Amazon Elastic Compute Cloud User Guide.
Because you cannot override PIOPS settings in an auto scaling launch configuration, the AMI in your
launch configuration must have been configured with a block device mapping that specifies the desired
PIOPS. You can do this by creating your own EC2 AMI with the following characteristics:
• An instance type of m1.large or greater. This is required for EBS optimization.
• An EBS-backed AMI with a volume type of "io1" and the number of IOPS you want for the Auto
Scaling-launched instances.
• The size of the EBS volume must accommodate the IOPS you need. There is a 10 : 1 ratio between
IOPS and Gibibytes (GiB) of storage, so for 100 PIOPS, you need at least 10 GiB storage on the root
volume.
Use this AMI in your Auto Scaling launch configuration. For example, an EBS-optimized AMI with PIOPS
that has the AMI ID ami-7430ba44 would be used in your launch configuration like this:
"LaunchConfig" : {
"Type" : "AWS::AutoScaling::LaunchConfiguration",
"Properties" : {
"KeyName" : { "Ref" : "KeyName" },
"ImageId" : { "ami-7430ba44" },
"UserData" : { "Fn::Base64" : { "Ref" : "WebServerPort" } },
"SecurityGroups" : [ { "Ref" : "InstanceSecurityGroup" } ],
"InstanceType" : { "m1.large" },
"EbsOptimized" : "true"
}
},
Be sure to set the InstanceType to at least m1.large and set EbsOptimized to true.
When you create a launch configuration such as this one, your launched instances will contain optimized
EBS root volumes with the PIOPS that you selected when creating the AMI.
To view more LaunchConfiguration snippets, see Auto Scaling Launch Configuration Resource (p. 157).
See Also
• Creating Your Own AMIs in the Amazon Elastic Compute Cloud User Guide.
• Block Device Mapping in the Amazon Elastic Compute Cloud User Guide.
AWS::AutoScaling::LifecycleHook
Use AWS::AutoScaling::LifecycleHook to control the state of an instance in an Auto Scaling group
after it is launched or terminated. When you use a lifecycle hook, the Auto Scaling group either pauses
the instance after it is launched (before it is put into service) or pauses the instance as it is terminated
API Version 2010-05-15
301
AWS CloudFormation User Guide
AWS::AutoScaling::LifecycleHook
(before it is fully terminated). For more information, see Examples of How to Use Lifecycle Hooks in the
Auto Scaling Developer Guide.
Syntax
{
"Type" : "AWS::AutoScaling::LifecycleHook",
"Properties" : {
"AutoScalingGroupName (p. 302)" : String,
"DefaultResult (p. 302)" : String,
"HeartbeatTimeout (p. 302)" : Integer,
"LifecycleTransition (p. 302)" : String,
"NotificationMetadata (p. 303)" : String,
"NotificationTargetARN (p. 303)" : String,
"RoleARN (p. 303)" : String
}
}
Properties
For information about valid and default values, see LifecycleHook in the Auto Scaling API Reference.
AutoScalingGroupName
The name of the Auto Scaling group for the lifecycle hook.
Required: Yes
Type: String
Update requires: Replacement (p. 86)
DefaultResult
The action the Auto Scaling group takes when the lifecycle hook timeout elapses or if an unexpected
failure occurs.
Required: No
Type: String
Update requires: No interruption (p. 86)
HeartbeatTimeout
The amount of time that can elapse before the lifecycle hook times out. When the lifecycle hook times
out, Auto Scaling performs the action that you specified in the DefaultResult property.
Required: No
Type: Integer
Update requires: No interruption (p. 86)
LifecycleTransition
The state of the Amazon EC2 instance to which you want to attach the lifecycle hook.
Required: Yes
Type: String
Update requires: No interruption (p. 86)
API Version 2010-05-15
302
AWS CloudFormation User Guide
AWS::AutoScaling::LifecycleHook
NotificationMetadata
Additional information that you want to include when Auto Scaling sends a message to the notification
target.
Required: No
Type: String
Update requires: No interruption (p. 86)
NotificationTargetARN
The Amazon resource name (ARN) of the notification target that Auto Scaling uses to notify you
when an instance is in the transition state for the lifecycle hook. You can specify an Amazon SQS
queue or an Amazon SNS topic. The notification message includes the following information: lifecycle
action token, user account ID, Auto Scaling group name, lifecycle hook name, instance ID, lifecycle
transition, and notification metadata.
Required: Yes
Type: String
Update requires: No interruption (p. 86)
RoleARN
The ARN of the IAM role that allows the Auto Scaling group to publish to the specified notification
target. The role requires permissions to Amazon SNS and Amazon SQS.
Required: Yes
Type: String
Update requires: No interruption (p. 86)
Return Value
When the logical ID of this resource is provided to the Ref intrinsic function, Ref returns the resource
name. For example:
{ "Ref": "MyLifeCycleHook" }
Ref returns the lifecycle hook name, such as mylifecyclehookname.
For more information about using the Ref function, see Ref (p. 669).
Example
In the following template snippet, the Auto Scaling pauses instances before completely terminating them.
While in the pending state, you can, for example, connect to the instance and download logs or any other
data before the instance is terminated.
"myLifecycleHook": {
"Type": "AWS::AutoScaling::LifecycleHook",
"Properties": {
"AutoScalingGroupName": { "Ref": "myAutoScalingGroup" },
"LifecycleTransition": "autoscaling:EC2_INSTANCE_TERMINATING",
"NotificationTargetARN": { "Ref": "lifecycleHookTopic" },
"RoleARN": { "Fn::GetAtt": [ "lifecycleHookRole", "Arn" ] }
API Version 2010-05-15
303
AWS CloudFormation User Guide
AWS::AutoScaling::ScalingPolicy
}
}
AWS::AutoScaling::ScalingPolicy
The AWS::AutoScaling::ScalingPolicy resource adds a scaling policy to an auto scaling group. A scaling
policy specifies whether to scale the auto scaling group up or down, and by how much. For more information
on scaling policies, see Scaling by Policy in the Auto Scaling Developer Guide.
You can use a scaling policy together with an CloudWatch alarm. An CloudWatch alarm can automatically
initiate actions on your behalf, based on parameters you specify. A scaling policy is one type of action
that an alarm can initiate. For a snippet showing how to create an Auto Scaling policy that is triggered by
an CloudWatch alarm, see Auto Scaling Policy Triggered by CloudWatch Alarm (p. 158).
This type supports updates. For more information about updating this resource, see PutScalingPolicy.
Syntax
{
"Type" : "AWS::AutoScaling::ScalingPolicy",
"Properties" : {
"AdjustmentType (p. 304)" : String,
"AutoScalingGroupName (p. 304)" : String,
"Cooldown (p. 304)" : String,
"MinAdjustmentStep (p. 305)" : Integer,
"ScalingAdjustment (p. 305)" : String
}
}
Properties
AdjustmentType
Specifies whether the ScalingAdjustment is an absolute number or a percentage of the current
capacity.Valid values are ChangeInCapacity, ExactCapacity, and PercentChangeInCapacity.
Required: Yes
Type: String
Update requires: No interruption (p. 86)
AutoScalingGroupName
The name or Amazon Resource Name (ARN) of the Auto Scaling Group that you want to attach the
policy to.
Required: Yes
Type: String
Update requires: No interruption (p. 86)
Cooldown
The amount of time, in seconds, after a scaling activity completes before any further trigger-related
scaling activities can start.
Required: No
API Version 2010-05-15
304
AWS CloudFormation User Guide
AWS::AutoScaling::ScheduledAction
Type: String
Update requires: No interruption (p. 86)
MinAdjustmentStep
The minmum number of instances that are added or removed when the Auto Scaling group scales
up or down. You can use this property only when you specify PercentChangeInCapacity for the
AdjustmentType property.
Required: No
Type: Integer
Update requires: No interruption (p. 86)
ScalingAdjustment
The number of instances by which to scale. AdjustmentType determines the interpretation of this
number, such as an absolute number or as a percentage of the existing Auto Scaling group size. A
positive increment adds to the current capacity and a negative value removes from the current
capacity.
Required: Yes
Type: String
Update requires: No interruption (p. 86)
Return Value
When you specify an AWS::AutoScaling::ScalingPolicy type as an argument to the Ref function, AWS
CloudFormation returns the policy name.
For more information about using the Ref function, see Ref (p. 669).
AWS::AutoScaling::ScheduledAction
Creates a scheduled scaling action for an Auto Scaling group, changing the number of servers available
for your application in response to predictable load changes.
Important
Note the following:
• If you have rolling updates enabled, you must suspend scheduled actions before you can
update the Auto Scaling group. You can suspend processes by using the AWS CLI or Auto
Scaling API. For more information, see Suspend and Resume Auto Scaling Process in the
Auto Scaling Developer Guide.
• When you update a stack with an Auto Scaling group and scheduled action, AWS
CloudFormation always sets the min size, max size, and desired capacity properties of your
Auto Scaling group to the values that are defined in the
AWS::AutoScaling::AutoScalingGroup resource of your template, even if a scheduled
action is in effect. However, you might not want AWS CloudFormation to change any of the
group size property values, such as when you have a scheduled action in effect. You can use
an UpdatePolicy attribute (p. 645) to prevent AWS CloudFormation from changing the min size,
max size, or desired capacity property values during a stack update unless you modified the
individual values in your template.
API Version 2010-05-15
305
AWS CloudFormation User Guide
AWS::AutoScaling::ScheduledAction
Syntax
{
"Type" : "AWS::AutoScaling::ScheduledAction",
"Properties" : {
"AutoScalingGroupName (p. 306)" : String,
"DesiredCapacity (p. 306)" : Integer,
"EndTime (p. 306)" : Time stamp,
"MaxSize (p. 306)" : Integer,
"MinSize (p. 306)" : Integer,
"Recurrence (p. 307)" : String,
"StartTime (p. 307)" : Time stamp
}
}
Properties
AutoScalingGroupName
The name or ARN of the Auto Scaling group.
Required: Yes
Type: String
Update requires: Replacement (p. 86)
DesiredCapacity
The number of Amazon EC2 instances that should be running in the Auto Scaling group.
Required: No
Type: Integer
Update requires: No interruption (p. 86)
EndTime
The time in UTC for this schedule to end. For example, 2010-06-01T00:00:00Z.
Required: No
Type: Time stamp
Update requires: No interruption (p. 86)
MaxSize
The maximum number of Amazon EC2 instances in the Auto Scaling group.
Required: No
Type: Integer
Update requires: No interruption (p. 86)
MinSize
The minimum number of Amazon EC2 instances in the Auto Scaling group.
Required: No
Type: Integer
Update requires: No interruption (p. 86)
API Version 2010-05-15
306
AWS CloudFormation User Guide
AWS::AutoScaling::ScheduledAction
Recurrence
The time in UTC when recurring future actions will start. You specify the start time by following the
Unix cron syntax format. For more information about cron syntax, go to http://en.wikipedia.org/wiki/
Cron.
Specifying the StartTime and EndTime properties with Recurrence property forms the start and
stop boundaries of the recurring action.
Required: No
Type: String
Update requires: No interruption (p. 86)
StartTime
The time in UTC for this schedule to start. For example, 2010-06-01T00:00:00Z.
Required: No
Type: Time stamp
Update requires: No interruption (p. 86)
Return Value
When the logical ID of this resource is provided to the Ref intrinsic function, Ref returns the resource
name. For example:
{ "Ref": "MyScheduledAction" }
For a scheduled Auto Scaling action with the logical ID MyScheduledAction, Ref returns the scheduled
action name. For example:
mystack-myscheduledaction-NT5EUXTNTXXD
For more information about using the Ref function, see Ref (p. 669).
Auto Scaling Scheduled Action Snippet
The following template snippet includes two scheduled actions that scale the number of instances in an
Auto Scaling group. The ScheduledActionUp action starts at 7 AM every day and sets the Auto Scaling
group to a minimum of five Amazon EC2 instances with a maximum of 10. The ScheduledActionDown
action starts at 7 PM every day and sets the Auto Scaling group to a minimum and maximum of one
Amazon EC2 instance.
"ScheduledActionUp": {
"Type": "AWS::AutoScaling::ScheduledAction",
"Properties": {
"AutoScalingGroupName": {
"Ref": "WebServerGroup"
},
"MaxSize": "10",
"MinSize": "5",
"Recurrence": "0 7 * * *"
}
},
"ScheduledActionDown": {
API Version 2010-05-15
307
AWS CloudFormation User Guide
AWS::CloudFormation::Authentication
"Type": "AWS::AutoScaling::ScheduledAction",
"Properties": {
"AutoScalingGroupName": {
"Ref": "WebServerGroup"
},
"MaxSize": "1",
"MinSize": "1",
"Recurrence": "0 19 * * *"
}
}
AWS::CloudFormation::Authentication
Use the AWS::CloudFormation::Authentication resource to specify authentication credentials for files or
sources that you specify with the AWS::CloudFormation::Init (p. 314) resource.
To include authentication information for a file or source that you specify with AWS::CloudFormation::Init,
use the uris property if the source is a URI or the buckets property if the source is an Amazon S3 bucket.
For more information about files, see Files (p. 318). For more information about sources, see
Sources (p. 323).
You can also specify authentication information for files directly in the AWS::CloudFormation::Init resource.
The files key of the resource contains a property named authentication. You can use the
authentication property to associate authentication information defined in an
AWS::CloudFormation::Authentication resource directly with a file.
For files, AWS CloudFormation looks for authentication information in the following order:
1. The authentication property of the AWS::CloudFormation::Init files key.
2. The uris or buckets property of the AWS::CloudFormation::Authentication resource.
For sources, AWS CloudFormation looks for authentication information in the uris or buckets property
of the AWS::CloudFormation::Authentication resource.
Syntax
Unlike most AWS CloudFormation resources, the AWS::CloudFormation::Authentication type does not
contain a block called "Properties", but instead contains a list of user-named blocks, each containing its
own authentication properties.
Not all properties pertain to each authentication type; see the type (p. 309) property for more details.
{
"Type" : "AWS::CloudFormation::Authentication" {
"String" : {
"accessKeyId (p. 309)" : String,
"buckets (p. 309)" : [ String, ... ],
"password (p. 309)" : String,
"secretKey (p. 309)" : String,
"type (p. 309)" : String,
"uris (p. 309)" : [ String, ... ],
"username (p. 309)" : String,
"roleName (p. 309)" : String
},
API Version 2010-05-15
308
AWS CloudFormation User Guide
AWS::CloudFormation::Authentication
...
}
}
Properties
accessKeyId
Specifies the access key ID for S3 authentication.
Required: Conditional Can be specified only if the type property is set to "S3".
Type: String
buckets
A comma-delimited list of Amazon S3 buckets to be associated with the S3 authentication credentials.
Required: Conditional Can be specified only if the type property is set to "S3".
Type: List of strings
password
Specifies the password for basic authentication.
Required: Conditional Can be specified only if the type property is set to "basic".
Type: String
secretKey
Specifies the secret key for S3 authentication.
Required: Conditional Can be specified only if the type property is set to "S3".
Type: String
type
Specifies whether the authentication scheme uses a user name and password ("basic") or an access
key ID and secret key ("S3").
If you specify "basic", you must also specify the username, password, and uris properties.
If you specify "S3", you must also specify the accessKeyId, secretKey, and buckets properties.
Required: Yes
Type: String Valid values are "basic" or "S3"
uris
A comma-delimited list of URIs to be associated with the basic authentication credentials. The
authorization applies to the specified URIs and any more specific URI. For example, if you specify
http://www.example.com, the authorization will also apply to http://www.example.com/test.
Required: Conditional Can be specified only if the type property is set to "basic".
Type: List of strings
username
Specifies the user name for basic authentication.
Required: Conditional Can be specified only if the type property is set to "basic".
Type: String
roleName
Describes the role for role-based authentication.
API Version 2010-05-15
309
AWS CloudFormation User Guide
AWS::CloudFormation::Authentication
Required: Conditional Can be specified only if the type property is set to "S3".
Type: String.
Examples
Example EC2 Web Server Authentication
This template snippet shows how to get a file from a private S3 bucket within an EC2 instance. The
credentials used for authentication are defined in the AWS::CloudFormation::Authentication resource,
and referenced by the AWS::CloudFormation::Init resource in the files section.
"WebServer": {
"Type": "AWS::EC2::Instance",
"DependsOn" : "BucketPolicy",
"Metadata" : {
"AWS::CloudFormation::Init" : {
"config" : {
"packages" : { "yum" : { "httpd" : [] } },
"files" : {
"/var/www/html/index.html" : {
"source" : {
"Fn::Join" : [
"", [ "http://s3.amazonaws.com/", { "Ref" : "BucketName"
}, "/index.html" ]
]
},
"mode"
: "000400",
"owner" : "apache",
"group" : "apache",
"authentication" : "S3AccessCreds"
}
},
"services" : {
"sysvinit" : {
"httpd" : { "enabled" : "true", "ensureRunning" : "true" }
}
}
}
},
"AWS::CloudFormation::Authentication" : {
"S3AccessCreds" : {
"type" : "S3",
"accessKeyId" : { "Ref" : "CfnKeys" },
"secretKey" : { "Fn::GetAtt": [ "CfnKeys", "SecretAccessKey" ] }
}
}
},
"Properties": {
... EC2 Resource Properties ...
}
}
API Version 2010-05-15
310
AWS CloudFormation User Guide
AWS::CloudFormation::CustomResource
Example Specifying Both Basic and S3 Authentication
The following example template snippet includes both basic and S3 authentication types.
"AWS::CloudFormation::Authentication" : {
"testBasic" : {
"type" : "basic",
"username" : { "Ref" : "UserName" },
"password" : { "Ref" : "Password" },
"uris" : [ "http://www.example.com/test" ]
},
"testS3" : {
"type" : "S3",
"accessKeyId" : { "Ref" : "AccessKeyID" },
"secretKey" : { "Ref" : "SecretAccessKeyID" },
"buckets" : [ "myawsbucket" ]
}
}
Example IAM Roles
The following example shows how to use IAM roles.
"AWS::CloudFormation::Authentication": {
"rolebased" : {
"type": "s3",
"buckets": [ "myBucket" ],
"roleName": { "Ref": "myRole" }
}
}
The example assumes the following:
• myRole is an AWS::IAM::Role (p. 458) resource.
• The Amazon EC2 instance that is running cfn-init is associated with myRole through an instance profile.
• The example specifies the authentication by using the buckets property, like normal Amazon S3
authentication. You can also specify the authentication by name.
AWS::CloudFormation::CustomResource
In an AWS CloudFormation template, you use the AWS::CloudFormation::CustomResource (p. 311)
or Custom::String (p. 312) resource type to specify custom resources.
Custom resources provide a way for you to write custom provisioning logic in AWS CloudFormation
template and have AWS CloudFormation run it during a stack operation, such as when you create, update
or delete a stack. For more information, see Custom Resources (p. 252).
Note
If you use the VPC endpoint feature, custom resources in the VPC must have access to AWS
CloudFormation-specific Amazon Simple Storage Service (Amazon S3) buckets. Custom
resources must send responses to a pre-signed Amazon S3 URL. If they can't send responses
to Amazon S3, AWS CloudFormation won't receive a response and the stack operation fails.
For more information, see AWS CloudFormation and VPC Endpoints (p. 54).
API Version 2010-05-15
311
AWS CloudFormation User Guide
AWS::CloudFormation::CustomResource
Syntax
{
"Type" : "AWS::CloudFormation::CustomResource",
"Version" : "1.0",
"Properties" : {
"ServiceToken (p. 312)" : String,
... provider-defined properties ...
}
}
or
{
"Type" : "Custom::String",
"Version" : "1.0",
"Properties" : {
"ServiceToken (p. 312)" : String,
... provider-defined properties ...
}
}
Note
Only one property is defined by AWS for a custom resource: ServiceToken. All other properties
are defined by the service provider.
Custom::String
For custom resources, you can specify AWS::CloudFormation::CustomResource as the resource
type, or you can specify your own resource type name. For example, instead of using
AWS::CloudFormation::CustomResource, you can use Custom::MyCustomResourceTypeName.
Custom resource type names can include alphanumeric characters and the following characters: _@-.
You can specify a custom resource type name up to a maximum length of 60 characters. You cannot
change the type during an update.
Using your own resource type names helps you quickly differentiate the types of custom resources in
your stack. For example, if you had two custom resources that conduct two different ping tests, you could
name their type as Custom::PingTester to make them easily identifiable as ping testers (instead of
using AWS::CloudFormation::CustomResource).
Properties
ServiceToken
The service token that was given to the template developer by the service provider to access the
service, such as an Amazon SNS topic ARN or Lambda function ARN. The service token must be
from the same region in which you are creating the stack.
Required: Yes
Type: String
API Version 2010-05-15
312
AWS CloudFormation User Guide
AWS::CloudFormation::CustomResource
Return Values
For a custom resource, return values are defined by the custom resource provider, and are retrieved by
calling Fn::GetAtt (p. 661) on the provider-defined attributes.
Examples
Creating a custom resource definition in a template
The following example demonstrates how to create a custom resource definition in a template.
{
"AWSTemplateFormatVersion" : "2010-09-09",
"Resources" : {
"MyFrontEndTest" : {
"Type": "AWS::CloudFormation::CustomResource",
"Version" : "1.0",
"Properties" : {
"ServiceToken": "arn:aws:sns:us-east-1:84969EXAMPLE:CRTest",
"key1" : "string",
"key2" : [ "list" ],
"key3" : { "key4" : "map" }
}
}
},
"Outputs" : {
"CustomResourceAttribute1" : {
"Value" : { "Fn::GetAtt" : ["MyFrontEndTest", "responseKey1"] }
},
"CustomResourceAttribute2" : {
"Value" : { "Fn::GetAtt" : ["MyFrontEndTest", "responseKey2"] }
}
}
}
All properties other than ServiceToken, and all Fn::GetAtt resource attributes, are defined by the
custom resource provider.
Creating a user-defined resource type for a custom resource
The following example demonstrates how to create a type name for a custom resource.
{
"AWSTemplateFormatVersion" : "2010-09-09",
"Resources" : {
"MyFrontEndTest" : {
"Type": "Custom::PingTester",
"Version" : "1.0",
"Properties" : {
"ServiceToken": "arn:aws:sns:us-east-1:84969EXAMPLE:CRTest",
"key1" : "string",
"key2" : [ "list" ],
"key3" : { "key4" : "map" }
}
}
},
API Version 2010-05-15
313
AWS CloudFormation User Guide
AWS::CloudFormation::Init
"Outputs" : {
"CustomResourceAttribute1" : {
"Value" : { "Fn::GetAtt" : ["MyFrontEndTest", "responseKey1"] }
},
"CustomResourceAttribute2" : {
"Value" : { "Fn::GetAtt" : ["MyFrontEndTest", "responseKey2"] }
}
}
}
Using an AWS Lambda function in a custom resource
With Lambda functions and custom resources, you can run custom code in response to stack events
(create, update, and delete). The following custom resource invokes a Lambda function and sends it the
StackName property as input. The function returns an the outputs from the specified stack name. For
more information, see Walkthrough: Refer to Resources in Another Stack (p. ?).
"MyCustomResource" : {
"Type" : "Custom::TestLambdaCrossStackRef",
"Properties" : {
"ServiceToken": { "Fn::Join": [ "", [ "arn:aws:lambda:", { "Ref":
"AWS::Region" }, ":", { "Ref": "AWS::AccountId" }, ":function:", {"Ref" :
"LambdaFunctionName"} ] ] },
"StackName": {
"Ref": "NetworkStackName"
}
}
}
Replacing a Custom Resource During an Update
You can update custom resources that require a replacement of the underlying physical resource. When
you update a custom resource in an AWS CloudFormation template, AWS CloudFormation sends an
update request to that custom resource. If the custom resource requires a replacement, the new custom
resource must send a response with the new physical ID. When AWS CloudFormation receives the
response, it compares the PhysicalResourceId between the old and new custom resources. If they
are different, AWS CloudFormation recognizes the update as a replacement and sends a delete request
to the old resource. For a step-by-step walkthrough of this process, see Stack Updates (p. 257).
Note the following:
• You can monitor the progress of the update in the Events tab. For more information, see Viewing Stack
Data and Resources (p. 74).
• For more information about resource behavior during updates, see AWS CloudFormation Stacks
Updates (p. 85).
AWS::CloudFormation::Init
Topics
• Configsets (p. 316)
• Commands (p. 318)
• Files (p. 318)
• Groups (p. 320)
API Version 2010-05-15
314
AWS CloudFormation User Guide
AWS::CloudFormation::Init
• Packages (p. 321)
• Services (p. 322)
• Sources (p. 323)
• Users (p. 324)
Use the AWS::CloudFormation::Init type to include metadata on an Amazon EC2 instance for the cfn-init
helper script. If your template calls the cfn-init script, the script looks for resource metadata rooted in the
AWS::CloudFormation::Init metadata key. For more information about cfn-init, see cfn-init (p. 677).
The metadata is organized into config keys, which you can group into configsets. You can specify a
configset when you call cfn-init in your template. If you don't specify a configset, cfn-init looks for a single
config key named config.
The configuration is separated into sections. The following template snippet shows how you can attach
metadata for cfn-init to an Amazon EC2 instance resource within the template.
"Resources": {
"MyInstance": {
"Type": "AWS::EC2::Instance",
"Metadata" : {
"AWS::CloudFormation::Init" : {
"config" : {
"packages" : {
:
},
"groups" : {
:
},
"users" : {
:
},
"sources" : {
:
},
"files" : {
:
},
"commands" : {
:
},
"services" : {
:
}
}
}
},
"Properties": {
:
}
}
}
Note
The cfn-init helper script processes these configuration sections in the following order: packages,
groups, users, sources, files, commands, and then services. If you require a different order,
API Version 2010-05-15
315
AWS CloudFormation User Guide
AWS::CloudFormation::Init
separate your sections into different config keys, and then use a configset that specifies the
order in which the config keys should be processed.
cfn-init supports all metadata types for Linux systems. It supports metadata types for Windows with
conditions that are described in the sections that follow.
For an example of using AWS::CloudFormation::Init and the cfn-init helper script, see Deploying
Applications on Amazon EC2 with AWS CloudFormation (p. 234).
For an example that shows how to use cfn-init to create a Windows stack, see Bootstrapping AWS
CloudFormation Windows Stacks (p. 105).
Configsets
If you want to create more than one config key and to have cfn-init process them in a specific order, create
a configset that contains the config keys in the desired order. For example, the following template snippet
creates configsets named ascending and descending that each contain two config keys.
"AWS::CloudFormation::Init" : {
"configSets" : {
"ascending" : [ "config1" , "config2" ],
"descending" : [ "config2" , "config1" ]
},
"config1" : {
"commands" : {
"test" : {
"command" : "echo \"$CFNTEST\" > test.txt",
"env" : { "CFNTEST" : "I come from config1." },
"cwd" : "~"
}
}
},
"config2" : {
"commands" : {
"test" : {
"command" : "echo \"$CFNTEST\" > test.txt",
"env" : { "CFNTEST" : "I come from config2" },
"cwd" : "~"
}
}
}
}
The following example calls to cfn-init refer to the preceding example configsets. The example calls are
abbreviated for clarity, see cfn-init (p. 677) for the complete syntax.
• If a call to cfn-init specifies the ascending configset:
cfn-init -c ascending
the script processes config1 and then processes config2 and the test.txt file would contain the text
I come from config2.
• If a call to cfn-init specifies the descending configset:
cfn-init -c descending
API Version 2010-05-15
316
AWS CloudFormation User Guide
AWS::CloudFormation::Init
the script processes config2 and then processes config1 and the test.txt file would contain the text
I come from config1.
You can create multiple configsets, and call a series of them using your cfn-init script. Each configset can
contain a list of config keys or references to other configsets. For example, the following template snippet
creates three configsets. The first configset, test1, contains one config key named 1. The second
configset, test2, contains a reference to the test1 configset and one config key named 2. The third
configset, default, contains a reference to the configset test2.
"AWS::CloudFormation::Init" : {
"configSets" : {
"test1" : [ "1" ],
"test2" : [ { "ConfigSet" : "test1" }, "2" ],
"default" : [ { "ConfigSet" : "test2" } ]
},
"1" : {
"commands" : {
"test" : {
"command" : "echo \"$MAGIC\" > test.txt",
"env" : { "MAGIC" : "I come from the environment!" },
"cwd" : "~"
}
}
},
"2" : {
"commands" : {
"test" : {
"command" : "echo \"$MAGIC\" >> test.txt",
"env" : { "MAGIC" : "I am test 2!" },
"cwd" : "~"
}
}
}
}
The following calls to cfn-init refer to the configSets declared in the preceding template snippet. The
example calls are abbreviated for clarity, see cfn-init (p. 677) for the complete syntax.
• If you specify test1 only:
cfn-init -c test1
cfn-init processes config key 1 only.
• If you specify test2 only:
cfn-init -c test2
cfn-init processes config key 1 and then processes config key 2.
• If you specify the default configset (or no configsets at all):
cfn-init -c default
you get the same behavior that you would if you specify configset test2.
API Version 2010-05-15
317
AWS CloudFormation User Guide
AWS::CloudFormation::Init
Commands
You can use the commands key to execute commands on the EC2 instance.The commands are processed
in alphabetical order by name.
Key
Description
command
Required. Either an array or a string specifying the command to run. If you
use an array, you do not need to escape space characters or enclose command parameters in quotes.
env
Optional. Sets environment variables for the command. This property overwrites, rather than appends, the existing environment.
cwd
Optional. The working directory
test
Optional. A test command that determines whether cfn-init runs commands
that are specified in the command key. The cfn-init script runs the test in a
command interpreter, such as Bash or cmd.exe. Whether a test passes depends on the exit code that the interpreter returns.
For Linux, the test command must return an exit code of 0. For Windows, the
test command must return an %ERRORLEVEL% of 0.
ignoreErrors
Optional. A Boolean value that determines whether cfn-init continues to run
if the command in contained in the command key fails (returns a non-zero
value). Set to true if you want cfn-init to continue running even if the command fails. Set to false if you want cfn-init to stop running if the command
fails. The default value is false.
waitAfterCompletion
Optional. For Windows systems only. Specifies how long to wait (in seconds)
after a command has finished in case the command causes a reboot. The
default value is 60 seconds and a value of "forever" directs cfn-init to exit and
resume only after the reboot is complete.
The following example snippet calls the echo command.
"commands" : {
"test" : {
"command" : "echo \"$MAGIC\" > test.txt",
"env" : { "MAGIC" : "I come from the environment!" },
"cwd" : "~",
"test" : "test ! -e ~/test.txt",
"ignoreErrors" : "false"
}
}
Files
You can use the files key to create files on the EC2 instance. The content can be either inline in the
template or the content can be pulled from a URL. The files are written to disk in lexicographic order. The
following table lists the supported keys.
API Version 2010-05-15
318
AWS CloudFormation User Guide
AWS::CloudFormation::Init
Key
Description
content
Either a string or a properly formatted JSON object. If you use a JSON object
as your content, the JSON will be written to a file on disk. Any intrinsic functions such as Fn::GetAtt or Ref are evaluated before the JSON object is
written to disk. When you create a symlink, specify the symlink target as the
content.
source
A URL to load the file from. This option cannot be specified with the content
key.
encoding
The encoding format. Only used if the content is a string. Encoding is not
applied if you are using a source.
Valid values: plain | base64
group
The name of the owning group for this file. Not supported for Windows systems.
owner
The name of the owning user for this file. Not supported for Windows systems.
mode
A six-digit octal value representing the mode for this file. Not supported for
Windows systems. Use the first three digits for symlinks and the last three
digits for setting permissions. To create a symlink, specify 120000. To specify
permissions for a file, use the last three digits, such as 000644.
authentication
The name of an authentication method to use. This overrides any default
authentication. You can use this property to select an authentication method
you define with the AWS::CloudFormation::Authentication (p. 308) resource.
context
Specifies a context for files that are to be processed as Mustache templates.
To use this key, you must have installed aws-cfn-bootstrap 1.3-11 or later as
well as pystache.
The following example snippet creates a file named setup.mysql as part of a larger installation.
"files" : {
"/tmp/setup.mysql" : {
"content" : { "Fn::Join" : ["", [
"CREATE DATABASE ", { "Ref" : "DBName" }, ";\n",
"CREATE USER '", { "Ref" : "DBUsername" }, "'@'localhost' IDENTIFIED BY
'",
{ "Ref" : "DBPassword" }, "';\n",
"GRANT ALL ON ", { "Ref" : "DBName" }, ".* TO '", { "Ref" : "DBUsername"
},
"'@'localhost';\n",
"FLUSH PRIVILEGES;\n"
]]},
"mode" : "000644",
"owner" : "root",
"group" : "root"
}
},
The full template is available at: https://s3.amazonaws.com/cloudformation-templates-us-east-1/
Drupal_Single_Instance.template
API Version 2010-05-15
319
AWS CloudFormation User Guide
AWS::CloudFormation::Init
The following example snippet creates a symlink /tmp/myfile2.txt that points at an existing file
/tmp/myfile1.txt.
"files" : {
"/tmp/myfile2.txt" : {
"content" : "/tmp/myfile1.txt",
"mode" : "120000"
}
}
Mustache templates are used primarily to create configuration files. For example, you can store a
configuration file in an S3 bucket and interpolate Refs and GetAtts from the template, instead of using
Fn::Join (p. 667). The following example snippet outputs "Content for test9" to /tmp/test9.txt.
"files" : {
"/tmp/test9.txt" : {
"content" : "Content for {{name}}",
"context" : { "name" : "test9" }
}
}
When working with Mustache templates, note the following:
• The context key must be present for the files to be processed.
• The context key must be a key-value map, but it can be nested.
• You can process files with inline content by using the content key and remote files by using the source
key.
• Mustache support depends on the pystache version. Version 0.5.2 supports the Mustache 1.1.2
specification.
Groups
You can use the groups key to create Linux/UNIX groups and to assign group IDs. The groups key is not
supported for Windows systems.
To create a group, add a new key-value pair that maps a new group name to an optional group ID. The
groups key can contain one or more group names. The following table lists the available keys.
Key
Description
gid
A group ID number.
If a group ID is specified, and the group already exists by name, the group
creation will fail. If another group has the specified group ID, the OS may reject
the group creation.
Example: { "gid" : "23" }
Example snippet
The following snippet specifies a group named groupOne without assigning a group ID and a group
named groupTwo that specified a group ID value of 45.
API Version 2010-05-15
320
AWS CloudFormation User Guide
AWS::CloudFormation::Init
"groups" : {
"groupOne" : {},
"groupTwo" : { "gid" : "45" }
}
Packages
You can use the packages key to download and install pre-packaged applications and components. On
Windows systems, the packages key supports only the MSI installer.
Supported package formats
The cfn-init script currently supports the following package formats: apt, msi, python, rpm, rubygems, and
yum. Packages are processed in the following order: rpm, yum/apt, and then rubygems and python. There
is no ordering between rubygems and python, and packages within each package manager are not
guaranteed to be installed in any order.
Specifying versions
Within each package manager, each package is specified as a package name and a list of versions. The
version can be a string, a list of versions, or an empty string or list. An empty string or list indicates that
you want the latest version. For rpm manager, the version is specified as a path to a file on disk or a URL.
If you specify a version of a package, cfn-init will attempt to install that version even if a newer version of
the package is already installed on the instance. Some package managers support multiple versions, but
others may not. Please check the documentation for your package manager for more information. If you
do not specify a version and a version of the package is already installed, the cfn-init script will not install
a new version—it will assume that you want to keep and use the existing version.
Example snippets
The following snippet specifies a version URL for rpm, requests the latest versions from yum, and version
0.10.2 of chef from rubygems:
"rpm" : {
"epel" : "http://download.fedoraproject.org/pub/epel/5/i386/epel-release-54.noarch.rpm"
},
"yum" : {
"httpd" : [],
"php" : [],
"wordpress" : []
},
"rubygems" : {
"chef" : [ "0.10.2" ]
}
The following snippet specifies a URL for an MSI package:
"msi" : {
"awscli" : "https://s3.amazonaws.com/aws-cli/AWSCLI64.msi"
}
API Version 2010-05-15
321
AWS CloudFormation User Guide
AWS::CloudFormation::Init
Services
You can use the services key to define which services should be enabled or disabled when the instance
is launched. On Linux systems, this key is supported by using sysvinit. On Windows systems, it is supported
by using the Windows service manager.
The services key also allows you to specify dependencies on sources, packages and files so that if a
restart is needed due to files being installed, cfn-init will take care of the service restart. For example, if
you download the Apache HTTP Server package, the package installation will automatically start the
Apache HTTP Server during the stack creation process. However, if the Apache HTTP Server configuration
is updated later in the stack creation process, the update won't take effect unless the Apache server is
restarted. You can use the services key to ensure that the Apache HTTP service is restarted.
The following table lists the supported keys.
Key
Description
ensureRunning
Set to true to ensure that the service is running after cfn-init finishes.
Set to false to ensure that the service is not running after cfn-init finishes.
Omit this key to make no changes to the service state.
enabled
Set to true to ensure that the service will be started automatically upon boot.
Set to false to ensure that the service will not be started automatically upon
boot.
Omit this key to make no changes to this property.
files
A list of files. If cfn-init changes one directly via the files block, this service
will be restarted
sources
A list of directories. If cfn-init expands an archive into one of these directories,
this service will be restarted.
packages
A map of package manager to list of package names. If cfn-init installs or
updates one of these packages, this service will be restarted.
commands
A list of command names. If cfn-init runs the specified command, this service
will be restarted.
The following Linux snippet configures the services as follows:
• The nginx service will be restarted if either /etc/nginx/nginx.conf or /var/www/html are modified by
cfn-init.
• The php-fastcgi service will be restarted if cfn-init installs or updates php or spawn-fcgi using yum.
• The sendmail service will be stopped and disabled.
"services" : {
"sysvinit" : {
"nginx" : {
"enabled" : "true",
"ensureRunning" : "true",
"files" : ["/etc/nginx/nginx.conf"],
"sources" : ["/var/www/html"]
API Version 2010-05-15
322
AWS CloudFormation User Guide
AWS::CloudFormation::Init
},
"php-fastcgi" : {
"enabled" : "true",
"ensureRunning" : "true",
"packages" : { "yum" : ["php", "spawn-fcgi"] }
},
"sendmail" : {
"enabled" : "false",
"ensureRunning" : "false"
}
}
}
The following Windows snippet starts the cfn-hup service, sets it to automatic, and restarts the service
if cfn-init modifies the specified configuration files:
"services" : {
"windows" : {
"cfn-hup" : {
"enabled" : "true",
"ensureRunning" : "true",
"files" : ["c:\\cfn\\cfn-hup.conf", "c:\\cfn\\hooks.d\\cfn-auto-reload
er.conf"]
}
}
}
Sources
You can use the sources key to download an archive file and unpack it in a target directory on the EC2
instance. This key is fully supported for both Linux and Windows systems.
Supported formats
Supported formats are tar, tar+gzip, tar+bz2 and zip.
GitHub
If you use GitHub as a source control system, you can use cfn-init and the sources package mechanism
to pull a specific version of your application. GitHub allows you to create a zip or a tar from a specific
version via a URL as follows:
https://github.com/<your directory>/(zipball|tarball)/<version>
For example, the following snippet pulls down version master as a .tar file.
"sources" : {
"/etc/puppet" : https://github.com/user1/cfn-demo/tarball/master
}
Example
The following example downloads a zip file from an Amazon S3 bucket and unpacks it into /etc/myapp:
API Version 2010-05-15
323
AWS CloudFormation User Guide
AWS::CloudFormation::Stack
"sources" : {
"/etc/myapp" : "https://s3.amazonaws.com/mybucket/myapp.tar.gz"
}
You can use authentication credentials for a source. However, you cannot put an authentication key in
the sources block. Instead, include a buckets key in your S3AccessCreds block. For an example, see
the example template. For more information on Amazon S3 authentication credentials, see
AWS::CloudFormation::Authentication (p. 308).
Users
You can use the users key to create Linux/UNIX users on the EC2 instance. The users key is not supported
for Windows systems.
The following table lists the supported keys.
Key
Description
uid
A user ID. The creation process fails if the user name exists with a different
user ID. If the user ID is already assigned to an existing user the operating
system may reject the creation request.
groups
A list of group names. The user will be added to each group in the list.
homeDir
The user's home directory.
Users are created as non-interactive system users with a shell of /sbin/nologin. This is by design and
cannot be modified.
"users" : {
"myUser" : {
"groups" : ["groupOne", "groupTwo"],
"uid" : "50",
"homeDir" : "/tmp"
}
}
AWS::CloudFormation::Stack
The AWS::CloudFormation::Stack type nests a stack as a resource in a top-level template.
You can add output values from a nested stack within the containing template.You use the GetAtt (p. 661)
function with the nested stack's logical name and the name of the output value in the nested stack in the
format Outputs.NestedStackOutputName.
When you apply template changes to update a top-level stack, AWS CloudFormation updates the top-level
stack and initiates an update to its nested stacks. AWS CloudFormation updates the resources of modified
nested stacks, but does not update the resources of unmodified nested stacks. For more information,
see AWS CloudFormation Stacks Updates (p. 85).
Note
You must acknowledge IAM capabilities for nested stacks that contain IAM resources. Also,
verify that you have cancel update stack permissions, which is required if an update rolls back.
API Version 2010-05-15
324
AWS CloudFormation User Guide
AWS::CloudFormation::Stack
For more information about IAM and AWS CloudFormation, see Controlling Access with AWS
Identity and Access Management (p. 61).
Syntax
{
"Type" : "AWS::CloudFormation::Stack",
"Properties" : {
"NotificationARNs (p. 325)" : [ String, ... ],
"Parameters (p. 325)" : { CloudFormation Stack Parameters Property
Type (p. 550) },
"TemplateURL (p. 325)" : String,
"TimeoutInMinutes (p. 325)" : String
}
}
Properties
NotificationARNs
A list of existing Amazon SNS topics where notifications about stack events are sent.
Required: No
Type: List of strings
Update requires: No interruption (p. 86)
Parameters
The set of parameters passed to AWS CloudFormation when this nested stack is created.
Note
If you use the ref function to pass a parameter value to a nested stack, comma-delimited
list parameters must be of type String. In other words, you cannot pass values that are of
type CommaDelimitedList to nested stacks.
Required: Conditional (required if the nested stack requires input parameters).
Type: CloudFormation Stack Parameters Property Type (p. 550)
Update requires: Whether an update causes interruptions depends on the resources that are being
update. An update never causes a nested stack to be replaced.
TemplateURL
The URL of a template that specifies the stack that you want to create as a resource. The template
must be stored on an Amazon S3 bucket, so the URL must have the form:
https://s3.amazonaws.com/.../TemplateName.template
Required: Yes
Type: String
Update requires: Whether an update causes interruptions depends on the resources that are being
update. An update never causes a nested stack to be replaced.
TimeoutInMinutes
The length of time, in minutes, that AWS CloudFormation waits for the nested stack to reach the
CREATE_COMPLETE state. The default is no timeout. When AWS CloudFormation detects that the
nested stack has reached the CREATE_COMPLETE state, it marks the nested stack resource as
API Version 2010-05-15
325
AWS CloudFormation User Guide
AWS::CloudFormation::WaitCondition
CREATE_COMPLETE in the parent stack and resumes creating the parent stack. If the timeout
period expires before the nested stack reaches CREATE_COMPLETE, AWS CloudFormation marks
the nested stack as failed and rolls back both the nested stack and parent stack.
Required: No
Type: String
Update requires: Updates are not supported.
Return Values
Ref
For AWS::CloudFormation::Stack, Ref returns the Stack ID. For example:
arn:aws:cloudformation:us-east-1:123456789012:stack/mystack-mynestedstack-sgg
frhxhum7w/f449b250-b969-11e0-a185-5081d0136786
For more information about using the Ref function, see Ref (p. 669).
Fn::GetAtt
Outputs.NestedStackOutputName
Returns: The output value from the specified nested stack where NestedStackOutputName is the
name of the output value.
For more information about using Fn:GetAtt, see Fn::GetAtt (p. 661).
Related Information
• For sample template snippets, see Nested Stacks in AWS CloudFormation Template Snippets (p. 160).
• If you have nested stacks that are stuck in an in-progress operation, see Troubleshooting Errors in
Troubleshooting AWS CloudFormation (p. 697).
AWS::CloudFormation::WaitCondition
Important
For Amazon EC2 and Auto Scaling resources, we recommend that you use a CreationPolicy
attribute instead of wait conditions. Add a CreationPolicy attribute to those resources and use
the cfn-signal helper script to signal when an instance has been successfully created.
You can use a wait condition for situations like the following:
• To coordinate stack resource creation with configuration actions that are external to the stack creation
• To track the status of a configuration process
For these situations, we recommend that you associate a CreationPolicy (p. 639) attribute with the wait
condition so that you don't have to use a wait condition handle. For more information and an example,
see Creating Wait Conditions in a Template (p. 230). If you use a CreationPolicy with a wait condition, do
not specify any of the wait condition's properties.
API Version 2010-05-15
326
AWS CloudFormation User Guide
AWS::CloudFormation::WaitCondition
Note
If you use the VPC endpoint feature, resources in the VPC that respond to wait conditions must
have access to AWS CloudFormation-specific Amazon Simple Storage Service (Amazon S3)
buckets. Resources must send wait condition responses to a pre-signed Amazon S3 URL. If
they can't send responses to Amazon S3, AWS CloudFormation won't receive a response and
the stack operation fails. For more information, see AWS CloudFormation and VPC
Endpoints (p. 54).
Syntax
{
"Type" : "AWS::CloudFormation::WaitCondition",
"Properties" : {
"Count (p. 327)" : String,
"Handle (p. 327)" : String,
"Timeout (p. 327)" : String
}
}
Properties
Count
The number of success signals that AWS CloudFormation must receive before it continues the stack
creation process. When the wait condition receives the requisite number of success signals, AWS
CloudFormation resumes the creation of the stack. If the wait condition does not receive the specified
number of success signals before the Timeout period expires, AWS CloudFormation assumes that
the wait condition has failed and rolls the stack back.
Required: No
Type: String
Update requires: Updates are not supported.
Handle
A reference to the wait condition handle used to signal this wait condition. Use the Ref intrinsic
function to specify an AWS::CloudFormation::WaitConditionHandle (p. 329) resource.
Anytime you add a WaitCondition resource during a stack update, you must associate the wait
condition with a new WaitConditionHandle resource. Do not reuse an old wait condition handle that
has already been defined in the template. If you reuse a wait condition handle, the wait condition
might evaluate old signals from a previous create or update stack command.
Required: Yes
Type: String
Update requires: Updates are not supported.
Timeout
The length of time (in seconds) to wait for the number of signals that the Count property specifies.
Timeout is a minimum-bound property, meaning the timeout occurs no sooner than the time you
specify, but can occur shortly thereafter. The maximum time that can be specified for this property
is 12 hours (43200 seconds).
Required: Yes
Type: String
API Version 2010-05-15
327
AWS CloudFormation User Guide
AWS::CloudFormation::WaitCondition
Update requires: Updates are not supported.
Return Values
Ref
When the logical ID of this resource is provided to the Ref intrinsic function, Ref returns the resource
name.
For more information about using the Ref function, see Ref (p. 669).
Fn::GetAtt
Fn::GetAtt returns a value for a specified attribute of this type. This section lists the available attributes
and corresponding return values.
Data
Returns: A JSON object that contains the UniqueId and Data values from the wait condition signal(s)
for the specified wait condition. For more information about wait condition signals, see Wait Condition
Signal JSON Format (p. 233).
Example return value for a wait condition with 2 signals:
{ "Signal1" : "Step 1 complete." , "Signal2" : "Step 2 complete." }
For more information about using Fn:GetAtt, see Fn::GetAtt (p. 661).
API Version 2010-05-15
328
AWS CloudFormation User Guide
AWS::CloudFormation::WaitConditionHandle
Examples
Example WaitCondition that waits for the desired number of instances in a web server
group
"WebServerGroup" : {
"Type" : "AWS::AutoScaling::AutoScalingGroup",
"Properties" : {
"AvailabilityZones" : { "Fn::GetAZs" : "" },
"LaunchConfigurationName" : { "Ref" : "LaunchConfig" },
"MinSize" : "1",
"MaxSize" : "5",
"DesiredCapacity" : { "Ref" : "WebServerCapacity" },
"LoadBalancerNames" : [ { "Ref" : "ElasticLoadBalancer" } ]
}
},
"WaitHandle" : {
"Type" : "AWS::CloudFormation::WaitConditionHandle"
},
"WaitCondition" : {
"Type" : "AWS::CloudFormation::WaitCondition",
"DependsOn" : "WebServerGroup",
"Properties" : {
"Handle" : { "Ref" : "WaitHandle" },
"Timeout" : "300",
"Count"
: { "Ref" : "WebServerCapacity" }
}
}
See Also
• Creating Wait Conditions in a Template (p. 230)
• DependsOn Attribute (p. 642)
AWS::CloudFormation::WaitConditionHandle
Important
For Amazon EC2 and Auto Scaling resources, we recommend that you use a CreationPolicy
attribute instead of wait conditions. Add a CreationPolicy attribute to those resources and use
the cfn-signal helper script to signal when an instance has been successfully created.
For more information, see Deploying Applications on Amazon EC2 with AWS
CloudFormation (p. 234).
The AWS::CloudFormation::WaitConditionHandle type has no properties. When you reference the
WaitConditionHandle resource by using the Ref function, AWS CloudFormation returns a presigned URL.
You pass this URL to applications or scripts that are running on your Amazon EC2 instances to send
signals to that URL. An associated AWS::CloudFormation::WaitCondition (p. 326) resource checks the
URL for the required number of success signals or for a failure signal.
Important
Anytime you add a WaitCondition resource during a stack update or update a resource with
a wait condition, you must associate the wait condition with a new WaitConditionHandle
API Version 2010-05-15
329
AWS CloudFormation User Guide
AWS::CloudFront::Distribution
resource. Do not reuse an old wait condition handle that has already been defined in the template.
If you reuse a wait condition handle, the wait condition might evaluate old signals from a previous
create or update stack command.
Syntax
{
"Type" : "AWS::CloudFormation::WaitConditionHandle",
"Properties" : {
}
}
Note
Updates are not supported for this resource.
Related Resources
For information about how to use wait conditions, see Creating Wait Conditions in a Template (p. 230).
AWS::CloudFront::Distribution
Creates an Amazon CloudFront web distribution. For general information about CloudFront distributions,
see the Introduction to Amazon CloudFront in the Amazon CloudFront Developer Guide. For specific
information about creating CloudFront web distributions, see POST Distribution in the Amazon CloudFront
API Reference.
Syntax
{
"Type" : "AWS::CloudFront::Distribution",
"Properties" : {
"DistributionConfig (p. 330)" : DistributionConfig
}
}
Properties
DistributionConfig
The distribution's configuration information.
Required: Yes
Type: DistributionConfig (p. 551) type
Update requires: No interruption (p. 86)
Return Values
Ref
Returns: The CloudFront distribution ID. For example: E27LVI50CSW06W.
API Version 2010-05-15
330
AWS CloudFormation User Guide
AWS::CloudTrail::Trail
For more information about using the Ref function, see Ref (p. 669).
Fn::GetAtt
Fn::GetAtt returns a value for a specified attribute of this type. This section lists the available attributes
and corresponding return values.
DomainName
Returns: The domain name of the resource. For example: d2fadu0nynjpfn.cloudfront.net.
For more information about using Fn:GetAtt, see Fn::GetAtt (p. 661).
Template Examples
To view AWS::CloudFront::Distribution snippets, see Amazon CloudFront Template Snippets (p. 163).
AWS::CloudTrail::Trail
The AWS::CloudTrail::Trail resource creates a trail and specifies where logs are published. A
CloudTrail trail can capture AWS API calls made by your AWS account and publishes the logs to an
Amazon S3 bucket.
Syntax
{
"Type" : "AWS::CloudTrail::Trail",
"Properties" : {
"IncludeGlobalServiceEvents (p. 331)" : Boolean,
"IsLogging (p. 331)" : Boolean,
"S3BucketName (p. 331)" : String,
"S3KeyPrefix (p. 332)" : String,
"SnsTopicName (p. 332)" : String
}
}
Properties
IncludeGlobalServiceEvents
Indicates whether the trail is publishing events from global services, such as IAM, to the log files.
Required: No
Type: Boolean
Update requires: No interruption (p. 86)
IsLogging
Indicates whether the CloudTrail trail is currently logging AWS API calls.
Required: Yes
Type: Boolean
Update requires: No interruption (p. 86)
S3BucketName
The name of the Amazon S3 bucket where CloudTrail publishes log files.
API Version 2010-05-15
331
AWS CloudFormation User Guide
AWS::CloudTrail::Trail
Required: Yes
Type: String
Update requires: No interruption (p. 86)
S3KeyPrefix
An Amazon S3 object key prefix that precedes the name of all log files.
Required: No
Type: String
Update requires: No interruption (p. 86)
SnsTopicName
The name of an Amazon SNS topic that is notified when new log files are published.
Required: No
Type: String
Update requires: No interruption (p. 86)
Return Values
Ref
When the logical ID of this resource is provided to the Ref intrinsic function, Ref returns the resource
name.
For more information about using the Ref function, see Ref (p. 669).
Example
The following example creates a CloudTrail trail, an Amazon S3 bucket where logs are published, and
an Amazon SNS topic where notifications are sent. The bucket and topic policies allow CloudTrail (from
the specified regions) to publish logs to the Amazon S3 bucket and to send notifications to an email that
you specify. Because CloudTrail automatically writes to the bucket_name/AWSLogs/account_ID/
folder, the bucket policy grants write privileges for that prefix. For information about CloudTrail bucket
policies, see Amazon S3 Bucket Policy in the AWS CloudTrail User Guide.
For more information about the regions that CloudTrail supports, see Supported Regions in the AWS
CloudTrail User Guide.
{
"AWSTemplateFormatVersion" : "2010-09-09",
"Parameters" : {
"OperatorEmail": {
"Description": "Email address to notify when new logs are published.",
"Type": "String"
}
},
"Resources" : {
"S3Bucket": {
"DeletionPolicy" : "Retain",
"Type": "AWS::S3::Bucket",
"Properties": {
API Version 2010-05-15
332
AWS CloudFormation User Guide
AWS::CloudTrail::Trail
}
},
"BucketPolicy" : {
"Type" : "AWS::S3::BucketPolicy",
"Properties" : {
"Bucket" : {"Ref" : "S3Bucket"},
"PolicyDocument" : {
"Version": "2012-10-17",
"Statement": [
{
"Sid": "AWSCloudTrailAclCheck",
"Effect": "Allow",
"Principal": {
"AWS": [
"arn:aws:iam::903692715234:root",
"arn:aws:iam::859597730677:root",
"arn:aws:iam::814480443879:root",
"arn:aws:iam::216624486486:root",
"arn:aws:iam::086441151436:root",
"arn:aws:iam::388731089494:root",
"arn:aws:iam::284668455005:root",
"arn:aws:iam::113285607260:root"
]
},
"Action": "s3:GetBucketAcl",
"Resource": { "Fn::Join" : ["", ["arn:aws:s3:::",
{"Ref":"S3Bucket"}]]}
},
{
"Sid": "AWSCloudTrailWrite",
"Effect": "Allow",
"Principal": {
"AWS": [
"arn:aws:iam::903692715234:root",
"arn:aws:iam::859597730677:root",
"arn:aws:iam::814480443879:root",
"arn:aws:iam::216624486486:root",
"arn:aws:iam::086441151436:root",
"arn:aws:iam::388731089494:root",
"arn:aws:iam::284668455005:root",
"arn:aws:iam::113285607260:root"
]
},
"Action": "s3:PutObject",
"Resource": { "Fn::Join" : ["", ["arn:aws:s3:::",
{"Ref":"S3Bucket"}, "/AWSLogs/", {"Ref":"AWS::AccountId"}, "/*"]]},
"Condition": {
"StringEquals": {
"s3:x-amz-acl": "bucket-owner-full-control"
}
}
}
]
}
}
},
"Topic": {
"Type": "AWS::SNS::Topic",
API Version 2010-05-15
333
AWS CloudFormation User Guide
AWS::CloudWatch::Alarm
"Properties": {
"Subscription": [ {
"Endpoint": { "Ref": "OperatorEmail" },
"Protocol": "email" } ]
}
},
"TopicPolicy" : {
"Type" : "AWS::SNS::TopicPolicy",
"Properties" : {
"Topics" : [{"Ref":"Topic"}],
"PolicyDocument" : {
"Version": "2008-10-17",
"Statement": [
{
"Sid": "AWSCloudTrailSNSPolicy",
"Effect": "Allow",
"Principal": {
"AWS": [
"arn:aws:iam::903692715234:root",
"arn:aws:iam::859597730677:root",
"arn:aws:iam::814480443879:root",
"arn:aws:iam::216624486486:root",
"arn:aws:iam::086441151436:root",
"arn:aws:iam::388731089494:root",
"arn:aws:iam::284668455005:root",
"arn:aws:iam::113285607260:root"
]
},
"Resource": "*",
"Action": "SNS:Publish"
}
]
}
}
},
"myTrail" : {
"DependsOn" : ["BucketPolicy", "TopicPolicy"],
"Type" : "AWS::CloudTrail::Trail",
"Properties" : {
"S3BucketName" : {"Ref":"S3Bucket"},
"SnsTopicName" : {"Fn::GetAtt":["Topic","TopicName"]},
"IsLogging" : true
}
}
}
}
AWS::CloudWatch::Alarm
The AWS::CloudWatch::Alarm type creates an CloudWatch alarm.
This type supports updates. For more information about updating this resource, see PutMetricAlarm. For
more information about updating stacks, see AWS CloudFormation Stacks Updates (p. 85).
API Version 2010-05-15
334
AWS CloudFormation User Guide
AWS::CloudWatch::Alarm
Syntax
{
"Type" : "AWS::CloudWatch::Alarm",
"Properties" : {
"ActionsEnabled (p. 335)" : Boolean,
"AlarmActions (p. 335)" : [ String, ... ],
"AlarmDescription (p. 335)" : String,
"AlarmName (p. 335)" : String,
"ComparisonOperator (p. 336)" : String,
"Dimensions (p. 336)" : [ Metric dimension, ... ],
"EvaluationPeriods (p. 336)" : String,
"InsufficientDataActions (p. 336)" : [ String, ... ],
"MetricName (p. 336)" : String,
"Namespace (p. 337)" : String,
"OKActions (p. 337)" : [ String, ... ],
"Period (p. 337)" : String,
"Statistic (p. 337)" : String,
"Threshold (p. 337)" : String,
"Unit (p. 337)" : String
}
}
Properties
ActionsEnabled
Indicates whether or not actions should be executed during any changes to the alarm's state.
Required: No
Type: Boolean
Update requires: No interruption (p. 86)
AlarmActions
The list of actions to execute when this alarm transitions into an ALARM state from any other state.
Each action is specified as an Amazon Resource Number (ARN). For more information about creating
alarms and the actions you can specify, see Creating Amazon CloudWatch Alarms in the Amazon
CloudWatch Developer Guide.
Required: No
Type: List of strings
Update requires: No interruption (p. 86)
AlarmDescription
The description for the alarm.
Required: No
Type: String
Update requires: No interruption (p. 86)
AlarmName
A name for the alarm. If you don't specify a name, AWS CloudFormation generates a unique physical
ID and uses that ID for the alarm name. For more information, see Name Type (p. 608).
API Version 2010-05-15
335
AWS CloudFormation User Guide
AWS::CloudWatch::Alarm
Important
If you specify a name, you cannot do updates that require this resource to be replaced. You
can still do updates that require no or some interruption. If you must replace the resource,
specify a new name.
Required: No
Type: String
Update requires: Replacement (p. 86)
ComparisonOperator
The arithmetic operation to use when comparing the specified Statistic and Threshold. The specified
Statistic value is used as the first operand.
You can specify the following values: GreaterThanOrEqualToThreshold |
GreaterThanThreshold | LessThanThreshold | LessThanOrEqualToThreshold
Required: Yes
Type: String
Update requires: No interruption (p. 86)
Dimensions
The dimensions for the alarm's associated metric.
Required: No
Type: List of Metric Dimension (p. 564)
Update requires: No interruption (p. 86)
EvaluationPeriods
The number of periods over which data is compared to the specified threshold.
Required: Yes
Type: String
Update requires: No interruption (p. 86)
InsufficientDataActions
The list of actions to execute when this alarm transitions into an INSUFFICIENT_DATA state from
any other state. Each action is specified as an Amazon Resource Number (ARN). Currently the only
action supported is publishing to an Amazon SNS topic or an Amazon Auto Scaling policy.
Required: No
Type: List of strings
Update requires: No interruption (p. 86)
MetricName
The name for the alarm's associated metric. For more information about the metrics that you can
specify, see Amazon CloudWatch Namespaces, Dimensions, and Metrics Reference in the Amazon
CloudWatch Developer Guide.
Required: Yes
Type: String
Update requires: No interruption (p. 86)
API Version 2010-05-15
336
AWS CloudFormation User Guide
AWS::CloudWatch::Alarm
Namespace
The namespace for the alarm's associated metric.
Required: Yes
Type: String
Update requires: No interruption (p. 86)
OKActions
The list of actions to execute when this alarm transitions into an OK state from any other state. Each
action is specified as an Amazon Resource Number (ARN). Currently the only action supported is
publishing to an Amazon SNS topic or an Amazon Auto Scaling policy.
Required: No
Type: List of strings
Update requires: No interruption (p. 86)
Period
The time over which the specified statistic is applied. You must specify a time in seconds that is also
a multiple of 60.
Required: Yes
Type: String
Update requires: No interruption (p. 86)
Statistic
The statistic to apply to the alarm's associated metric.
You can specify the following values: SampleCount | Average | Sum | Minimum | Maximum
Required: Yes
Type: String
Update requires: No interruption (p. 86)
Threshold
The value against which the specified statistic is compared.
Required: Yes
Type: String
Update requires: No interruption (p. 86)
Unit
The unit for the alarm's associated metric.
You can specify the following values: Seconds | Microseconds | Milliseconds | Bytes | Kilobytes |
Megabytes | Gigabytes | Terabytes | Bits | Kilobits | Megabits | Gigabits | Terabits | Percent | Count
| Bytes/Second | Kilobytes/Second | Megabytes/Second | Gigabytes/Second | Terabytes/Second |
Bits/Second | Kilobits/Second | Megabits/Second | Gigabits/Second | Terabits/Second | Count/Second
| None
Required: No
Type: String
Update requires: No interruption (p. 86)
API Version 2010-05-15
337
AWS CloudFormation User Guide
AWS::DataPipeline::Pipeline
Return Values
Ref
When you specify an AWS::CloudWatch::Alarm type as an argument to the Ref function, AWS
CloudFormation returns the value of the AlarmName.
For more information about using the Ref function, see Ref (p. 669).
Examples
For sample template snippets, see Amazon CloudWatch Template Snippets (p. 167).
AWS::DataPipeline::Pipeline
Creates a data pipeline that you can use to automate the movement and transformation of data. In each
pipeline, you define pipeline objects, such as activities, schedules, data nodes, and resources. For
information about pipeline objects and components that you can use, see Pipeline Object Reference in
the AWS Data Pipeline Developer Guide.
Syntax
{
"Type" : "AWS::DataPipeline::Pipeline",
"Properties" : {
"Activate (p. 338)" : Boolean,
"Description (p. 338)" : String,
"Name (p. 339)" : String,
"ParameterObjects (p. 339)" : [ Parameter object, ... ],
"ParameterValues (p. 339)" : [ Parameter value, ... ],
"PipelineObjects (p. 339)" : [ Pipeline object, ... ],
"PipelineTags (p. 339)" : [ Pipeline tag, ... ]
}
}
Properties
Activate
Indicates whether to validate and start the pipeline or stop an active pipeline. By default, the value
is set to true.
Required: No
Type: Boolean
Update requires: No interruption (p. 86)
Description
A description for the pipeline.
Required: No
Type: String
Update requires: Replacement (p. 86).
API Version 2010-05-15
338
AWS CloudFormation User Guide
AWS::DataPipeline::Pipeline
Name
A name for the pipeline. Because AWS CloudFormation assigns each new pipeline a unique identifier,
you can use the same name for multiple pipelines that are associated with your AWS account.
Required: Yes
Type: String
Update requires: Replacement (p. 86)
ParameterObjects
Defines the variables that are in the pipeline definition. For more information, see Creating a Pipeline
Using Parameterized Templates in the AWS Data Pipeline Developer Guide.
Required: No
Type: AWS Data Pipeline Pipeline ParameterObjects (p. 566)
Update requires: No interruption (p. 86)
ParameterValues
Defines the values for the parameters that are defined in the ParameterObjects property. For
more information, see Creating a Pipeline Using Parameterized Templates in the AWS Data Pipeline
Developer Guide.
Required: No
Type: AWS Data Pipeline Pipeline ParameterValues (p. 568)
Update requires: No interruption (p. 86)
PipelineObjects
A list of pipeline objects that make up the pipeline. For more information about pipeline objects and
a description of each object, see Pipeline Object Reference in the AWS Data Pipeline Developer
Guide.
Required: Yes
Type: A list of AWS Data Pipeline PipelineObjects (p. 568)
Update requires: Some interruptions (p. 86). Not all objects, fields, and values can be updated.
Restrictions on what can be updated are documented in Editing Your Pipelines in the AWS Data
Pipeline Developer Guide.
PipelineTags
A list of arbitrary tags (key-value pairs) to associate with the pipeline, which you can use to control
permissions. For more information, see Controlling Access to Pipelines and Resources in the AWS
Data Pipeline Developer Guide.
Required: No
Type: AWS Data Pipeline Pipeline PipelineTags (p. 570)
Update requires: No interruption (p. 86)
Return Values
Ref
When the logical ID of this resource is provided to the Ref intrinsic function, Ref returns the resource
name. For example:
API Version 2010-05-15
339
AWS CloudFormation User Guide
AWS::DataPipeline::Pipeline
When you specify an AWS::DataPipeline::Pipeline resource as an argument to the Ref function,
AWS CloudFormation returns the pipeline ID.
For more information about using the Ref function, see Ref (p. 669).
Example
The following data pipeline copies a CSV file from one Amazon Simple Storage Service (Amazon S3)
bucket to another. The pipeline uses a copy activity and an Amazon Elastic Compute Cloud (Amazon
EC2) instance to copy the data. The copy activity runs once a day for two occurrences. The roles for the
pipeline and the pipeline resource are declared elsewhere in the same template.
For more information about copying CSV data, see Copy CSV Data Between Amazon S3 Buckets Using
AWS Data Pipeline in the AWS Data Pipeline Developer Guide.
"CSVCopy": {
"Type": "AWS::DataPipeline::Pipeline",
"Properties": {
"Name": "CopyCSVData",
"Description": "A test pipeline that copies a CSV file from one S3
bucket to another.",
"Activate": "true",
"PipelineTags": [
{
"Key": "type",
"Value": "TEST"
},
{
"Key": "StackID",
"Value": { "Ref" : "AWS::StackId" }
}
],
"ParameterObjects": [
{
"Id": "myS3InputLoc",
"Attributes": [
{
"Key": "description",
"StringValue": "S3 input location"
},
{
"Key": "type",
"StringValue": "AWS::S3::ObjectKey"
},
{
"Key": "default",
"StringValue": "s3://mycsvfiles/csvfile.csv"
}
]
},
{
"Id": "myS3OutputLoc",
"Attributes": [
{
"Key": "description",
"StringValue": "S3 output location"
},
{
API Version 2010-05-15
340
AWS CloudFormation User Guide
AWS::DataPipeline::Pipeline
"Key": "type",
"StringValue": "AWS::S3::ObjectKey"
}
]
}
],
"ParameterValues": [
{
"Id": "myS3OutputLoc",
"StringValue": "s3://outputbucket"
}
],
"PipelineObjects": [
{
"Id": "DefaultScheduleID",
"Name": "DefaultSchedule",
"Fields": [
{
"Key": "type",
"StringValue": "Schedule"
},
{
"Key": "occurrences",
"StringValue": "2"
},
{
"Key": "startAt",
"StringValue": "FIRST_ACTIVATION_DATE_TIME"
},
{
"Key": "period",
"StringValue": "1 day"
}
]
},
{
"Id": "S3InputLocationID",
"Name": "S3InputLocation",
"Fields": [
{
"Key": "filePath",
"StringValue": "#{myS3InputLoc}"
},
{
"Key": "type",
"StringValue": "S3DataNode"
},
{
"Key": "schedule",
"RefValue": "DefaultScheduleID"
}
]
},
{
"Id": "S3OutputLocationID",
"Name": "S3OutputLocation",
"Fields": [
{
API Version 2010-05-15
341
AWS CloudFormation User Guide
AWS::DataPipeline::Pipeline
"Key": "filePath",
"StringValue": "#{myS3OutputLoc}/#{format(@scheduled
StartTime, 'YYYY-MM-dd-HH-mm-ss')}/output.csv"
},
{
"Key": "type",
"StringValue": "S3DataNode"
},
{
"Key": "schedule",
"RefValue": "DefaultScheduleID"
}
]
},
{
"Id": "EC2ResourceObjID",
"Name": "EC2ResourceObj",
"Fields": [
{
"Key": "type",
"StringValue": "Ec2Resource"
},
{
"Key": "schedule",
"RefValue": "DefaultScheduleID"
},
{
"Key": "instanceType",
"StringValue": { "Ref" : "EDPInstanceType" }
},
{
"Key": "role",
"StringValue": { "Ref": "DataPipelineRole" }
},
{
"Key": "resourceRole",
"StringValue": { "Ref": "EC2InstanceProfile" }
}
]
},
{
"Id": "MyCopyActivityID",
"Name": "MyCopyActivity",
"Fields": [
{
"Key": "type",
"StringValue": "CopyActivity"
},
{
"Key": "runsOn",
"RefValue": "EC2ResourceObjID"
},
{
"Key": "input",
"RefValue": "S3InputLocationID"
},
{
"Key": "output",
API Version 2010-05-15
342
AWS CloudFormation User Guide
AWS::DynamoDB::Table
"RefValue": "S3OutputLocationID"
},
{
"Key": "schedule",
"RefValue": "DefaultScheduleID"
}
]
}
]
}
}
AWS::DynamoDB::Table
Creates a DynamoDB table.
Note
AWS CloudFormation typically creates DynamoDB tables in parallel. However, if your template
includes DynamoDB tables with indexes, you must declare dependencies so that the tables are
created sequentially. For a sample snippet, see DynamoDB Table with a DependsOn
Attribute (p. 346).
Syntax
{
"Type" : "AWS::DynamoDB::Table",
"Properties" : {
"AttributeDefinitions (p. 343)" : [ AttributeDefinitions, ... ],
"GlobalSecondaryIndexes (p. 343)" : [ GlobalSecondaryIndexes, ... ],
"KeySchema (p. 344)" : [ KeySchema, ... ],
"LocalSecondaryIndexes (p. 344)" : [ LocalSecondaryIndexes, ... ],
"ProvisionedThroughput (p. 344)" : { ProvisionedThroughput },
"TableName (p. 344)" : String
}
}
Properties
AttributeDefinitions
A list of AttributeName and AttributeType objects that describe the key schema for the table
and indexes.
Required: Yes
Type: DynamoDB Attribute Definitions (p. 570)
Update requires: Replacement (p. 86)
GlobalSecondaryIndexes
Global secondary indexes to be created on the table. You can create up to 5 global secondary
indexes.
Required: No
Type: DynamoDB Global Secondary Indexes (p. 571)
Update requires: Replacement (p. 86)
API Version 2010-05-15
343
AWS CloudFormation User Guide
AWS::DynamoDB::Table
KeySchema
Specifies the attributes that make up the primary key for the table. The attributes in the KeySchema
property must also be defined in the AttributeDefinitions property.
Required: Yes
Type: DynamoDB Key Schema (p. 572)
Update requires: Replacement (p. 86)
LocalSecondaryIndexes
Local secondary indexes to be created on the table. You can create up to 5 local secondary indexes.
Each index is scoped to a given hash key value. The size of each hash key can be up to 10 gigabytes.
Required: No
Type: DynamoDB Local Secondary Indexes (p. 572)
Update requires: Replacement (p. 86)
ProvisionedThroughput
Throughput for the specified table, consisting of values for ReadCapacityUnits and WriteCapacityUnits.
For more information about the contents of a Provisioned Throughput structure, see DynamoDB
Provisioned Throughput (p. 574).
Required: Yes
Type: DynamoDB Provisioned Throughput (p. 574)
Update requires: No interruption (p. 86)
TableName
A name for the table. If you don't specify a name, AWS CloudFormation generates a unique physical
ID and uses that ID for the table name. For more information, see Name Type (p. 608).
Important
If you specify a name, you cannot do updates that require this resource to be replaced. You
can still do updates that require no or some interruption. If you must replace the resource,
specify a new name.
Required: No
Type: String
Update requires: Replacement (p. 86)
Note
For detailed information about the limits in DynamoDB, see Limits in Amazon DynamoDB in the
Amazon DynamoDB Developer Guide.
Return Value
When the logical ID of this resource is provided to the Ref intrinsic function, Ref returns the resource
name. For example:
{ "Ref": "MyResource" }
For the resource with the logical ID myDynamoDBTable, Ref will return the DynamoDB table name.
For more information about using the Ref function, see Ref (p. 669).
API Version 2010-05-15
344
AWS CloudFormation User Guide
AWS::DynamoDB::Table
DynamoDB Table with Local and Secondary Indexes
The following sample creates an DynamoDB table with Album, Artist, and Sales as attributes. The
primary key includes the Album attribute as the hash key and Artist attribute as the range key. The
table also includes a global and a secondary index. For querying the number of sales for a given artist,
the global secondary index uses the Sales attribute as the hash key and the Artist attribute as the
range key. For querying the sales of an album, the local secondary index uses the same hash key as the
table but uses the Sales attribute as the range key.
{
"AWSTemplateFormatVersion" : "2010-09-09",
"Resources" : {
"myDynamoDBTable" : {
"Type" : "AWS::DynamoDB::Table",
"Properties" : {
"AttributeDefinitions" : [
{
"AttributeName" : "Album",
"AttributeType" : "S"
},
{
"AttributeName" : "Artist",
"AttributeType" : "S"
},
{
"AttributeName" : "Sales",
"AttributeType" : "N"
}
],
"KeySchema" : [
{
"AttributeName" : "Album",
"KeyType" : "HASH"
},
{
"AttributeName" : "Artist",
"KeyType" : "RANGE"
}
],
"ProvisionedThroughput" : {
"ReadCapacityUnits" : "5",
"WriteCapacityUnits" : "5"
},
"TableName" : "myTableName",
"GlobalSecondaryIndexes" : [{
"IndexName" : "myGSI",
"KeySchema" : [
{
"AttributeName" : "Sales",
"KeyType" : "HASH"
},
{
"AttributeName" : "Artist",
"KeyType" : "RANGE"
}
],
"Projection" : {
API Version 2010-05-15
345
AWS CloudFormation User Guide
AWS::DynamoDB::Table
"NonKeyAttributes" : ["Album"],
"ProjectionType" : "INCLUDE"
},
"ProvisionedThroughput" : {
"ReadCapacityUnits" : "5",
"WriteCapacityUnits" : "5"
}
}],
"LocalSecondaryIndexes" :[{
"IndexName" : "myLSI",
"KeySchema" : [
{
"AttributeName" : "Album",
"KeyType" : "HASH"
},
{
"AttributeName" : "Sales",
"KeyType" : "RANGE"
}
],
"Projection" : {
"NonKeyAttributes" : ["Artist"],
"ProjectionType" : "INCLUDE"
}
}]
}
}
}
}
DynamoDB Table with a DependsOn Attribute
If you include multiple DynamoDB tables with indexes in a single template, you must include dependencies
so that the tables are created sequentially. The following sample assumes that the myFirstDDBTable
table is declared in the same template as the mySecondDDBTable table, and both tables include a
secondary index. The mySecondDDBTable table includes a dependency on the myFirstDDBTable
table so that AWS CloudFormation creates the tables one at a time.
"mySecondDDBTable" : {
"Type" : "AWS::DynamoDB::Table",
"DependsOn" : "myFirstDDBTable" ,
"Properties" : {
"AttributeDefinitions" : [
{
"AttributeName" : "ArtistId",
"AttributeType" : "S"
},
{
"AttributeName" : "Concert",
"AttributeType" : "S"
},
{
"AttributeName" : "TicketSales",
"AttributeType" : "S"
}
],
API Version 2010-05-15
346
AWS CloudFormation User Guide
AWS::EC2::CustomerGateway
"KeySchema" : [
{
"AttributeName" : "ArtistId",
"KeyType" : "HASH"
},
{
"AttributeName" : "Concert",
"KeyType" : "RANGE"
}
],
"ProvisionedThroughput" : {
"ReadCapacityUnits" : {"Ref" : "ReadCapacityUnits"},
"WriteCapacityUnits" : {"Ref" : "WriteCapacityUnits"}
},
"GlobalSecondaryIndexes" : [{
"IndexName" : "myGSI",
"KeySchema" : [
{
"AttributeName" : "TicketSales",
"KeyType" : "HASH"
}
],
"Projection" : {
"ProjectionType" : "KEYS_ONLY"
},
"ProvisionedThroughput" : {
"ReadCapacityUnits" : {"Ref" : "ReadCapacityUnits"},
"WriteCapacityUnits" : {"Ref" : "WriteCapacityUnits"}
}
}]
}
}
AWS::EC2::CustomerGateway
Provides information to AWS about your VPN customer gateway device.
Syntax
{
"Type" : "AWS::EC2::CustomerGateway",
"Properties" : {
"BgpAsn (p. 347)" : Number,
"IpAddress (p. 348)" : String,
"Tags (p. 348)" : [ Resource Tag, ... ],
"Type (p. 348)" : String
}
}
Properties
BgpAsn
The customer gateway's Border Gateway Protocol (BGP) Autonomous System Number (ASN).
API Version 2010-05-15
347
AWS CloudFormation User Guide
AWS::EC2::CustomerGateway
Required: Yes
Type: Number BgpAsn is always an integer value.
Update requires: Replacement (p. 86)
IpAddress
The internet-routable IP address for the customer gateway's outside interface. The address must be
static.
Required: Yes
Type: String
Update requires: Replacement (p. 86)
Tags
The tags that you want to attach to the resource.
Required: No
Type: AWS CloudFormation Resource Tags (p. 618).
Update requires: No interruption (p. 86).
Type
The type of VPN connection that this customer gateway supports.
Required: Yes
Type: String
Update requires: Replacement (p. 86)
Example: ipsec.1
Return Value
When the logical ID of this resource is provided to the Ref intrinsic function, Ref returns the resource
name. For example:
{ "Ref": "MyResource" }
For the resource with the logical ID "MyResource", Ref will return the AWS resource name.
For more information about using the Ref function, see Ref (p. 669).
Example
{
"AWSTemplateFormatVersion" : "2010-09-09",
"Resources" : {
"myCustomerGateway" : {
"Type" : "AWS::EC2::CustomerGateway",
"Properties" : {
"Type" : "ipsec.1",
"BgpAsn" : "64000",
"IpAddress" : "1.1.1.1"
API Version 2010-05-15
348
AWS CloudFormation User Guide
AWS::EC2::DHCPOptions
}
}
}
}
See Also
• CreateCustomerGateway in the Amazon EC2 API Reference.
AWS::EC2::DHCPOptions
Creates a set of DHCP options for your VPC.
For more information, see CreateDhcpOptions in the Amazon EC2 API Reference.
Syntax
{
"Type" : "AWS::EC2::DHCPOptions",
"Properties" : {
"DomainName (p. 349)" : String,
"DomainNameServers (p. 349)" : [ String, ... ],
"NetbiosNameServers (p. 350)" : [ String, ... ],
"NetbiosNodeType (p. 350)" : Number,
"NtpServers (p. 350)" : [ String, ... ],
"Tags (p. 350)" : [ Resource Tag, ... ]
}
}
Properties
DomainName
A domain name of your choice.
Required: Conditional; see note (p. 350).
Type: String
Update requires: Replacement (p. 86)
Example: "example.com"
DomainNameServers
The IP (IPv4) address of a domain name server. You can specify up to four addresses.
Required: Conditional; see note (p. 350).
Type: List of strings
Update requires: Replacement (p. 86)
Example: "DomainNameServers" : [ "10.0.0.1", "10.0.0.2" ]
Example: To preserve the order of IP addresses, specify a comma delimited list as a single string:
"DomainNameServers" : [ "10.0.0.1, 10.0.0.2" ]
API Version 2010-05-15
349
AWS CloudFormation User Guide
AWS::EC2::DHCPOptions
NetbiosNameServers
The IP address (IPv4) of a NetBIOS name server. You can specify up to four addresses.
Required: Conditional; see note (p. 350).
Type: List of strings
Update requires: Replacement (p. 86)
Example: "NetbiosNameServers" : [ "10.0.0.1", "10.0.0.2" ]
Example: To preserve the order of IP addresses, specify a comma delimited list as a single string:
"NetbiosNameServers" : [ "10.0.0.1, 10.0.0.2" ]
NetbiosNodeType
An integer value indicating the NetBIOS node type:
• 1: Broadcast ("B")
• 2: Point-to-point ("P")
• 4: Mixed mode ("M")
• 8: Hybrid ("H")
For more information about these values and about NetBIOS node types, see RFC 2132, RFC 1001,
and RFC 1002. We recommend that you use only the value 2 at this time (broadcast and multicast
are not currently supported).
Required: Required if NetBiosNameServers is specified; optional otherwise.
Type: List of numbers
Update requires: Replacement (p. 86)
Example: "NetbiosNodeType" : 2
NtpServers
The IP address (IPv4) of a Network Time Protocol (NTP) server.You can specify up to four addresses.
Required: Conditional; see note (p. 350).
Type: List of strings
Update requires: Replacement (p. 86)
Example: "NtpServers" : [ "10.0.0.1" ]
Example: To preserve the order of IP addresses, specify a comma delimited list as a single string:
"NtpServers" : [ "10.0.0.1, 10.0.0.2" ]
Tags
An arbitrary set of tags (key–value pairs) for this resource.
Required: No
Type: AWS CloudFormation Resource Tags (p. 618)
Update requires: No interruption (p. 86).
Conditional Properties
At least one of the following properties must be specified:
• DomainNameServers (p. 349)
API Version 2010-05-15
350
AWS CloudFormation User Guide
AWS::EC2::EIP
• NetbiosNameServers (p. 350)
• NtpServers (p. 350)
After this condition has been fulfilled, the rest of these properties are optional.
If you specify NetbiosNameServers, then NetbiosNodeType is required.
Return Values
Ref
When the logical ID of this resource is provided to the Ref intrinsic function, Ref returns the resource
name.
For more information about using the Ref function, see Ref (p. 669).
Example
{
"AWSTemplateFormatVersion" : "2010-09-09",
"Resources" : {
"myDhcpOptions" : {
"Type" : "AWS::EC2::DHCPOptions",
"Properties" : {
"DomainName" : "example.com",
"DomainNameServers" : [ "AmazonProvidedDNS" ],
"NtpServers" : [ "10.2.5.1" ],
"NetbiosNameServers" : [ "10.2.5.1" ],
"NetbiosNodeType" : 2,
"Tags" : [ { "Key" : "foo", "Value" : "bar" } ]
}
}
}
}
See Also
• CreateDhcpOptions in the Amazon EC2 API Reference
• Using Tags in the Amazon Elastic Compute Cloud User Guide.
• RFC 2132 - DHCP Options and BOOTP Vendor Extensions, Network Working Group, 1997
• RFC 1001 - Protocol Standard for a NetBIOS Service on a TCP/UDP Transport: Concepts and Methods,
Network Working Group, 1987
• RFC 1002 - Protocol Standard for a NetBIOS Service on a TCP/UDP Transport: Detailed Specifications,
Network Working Group, 1987
AWS::EC2::EIP
The AWS::EC2::EIP resource allocates an Elastic IP (EIP) address and can, optionally, associate it with
an Amazon EC2 instance.
API Version 2010-05-15
351
AWS CloudFormation User Guide
AWS::EC2::EIP
Syntax
{
"Type" : "AWS::EC2::EIP",
"Properties" : {
"InstanceId (p. 352)" : String,
"Domain (p. 352)" : String
}
}
Properties
InstanceId
The Instance ID of the Amazon EC2 instance that you want to associate with this Elastic IP address.
Required: No
Type: String
Update requires: No interruption (p. 86)
Domain
Set to vpc to allocate the address to your Virtual Private Cloud (VPC). No other values are supported.
Note
If you define an Elastic IP address and associate it with a VPC that is defined in the same
template, you must declare a dependency on the VPC-gateway attachment by using the
DependsOn attribute on this resource. For more information, see DependsOn Attribute (p. 642).
For more information, see AllocateAddress in the Amazon EC2 API Reference. For more information
about Elastic IP Addresses in VPC, go to IP Addressing in Your VPC in the Amazon VPC User Guide.
Required: Conditional. Required when allocating an address to a VPC
Type: String
Update requires: Replacement (p. 86)
Return Values
Ref
When you specify the logical ID of an AWS::EC2::EIP object as an argument to the Ref function, AWS
CloudFormation returns the value of the instance's PublicIp.
For more information about using the Ref function, see Ref (p. 669).
Fn::GetAtt
Fn::GetAtt returns a value for a specified attribute of this type. This section lists the available attributes
and corresponding return values.
AllocationId
The ID that AWS assigns to represent the allocation of the address for use with Amazon VPC. This
is returned only for VPC elastic IP addresses. Example return value: eipalloc-5723d13e
API Version 2010-05-15
352
AWS CloudFormation User Guide
AWS::EC2::EIPAssociation
For more information about using Fn:GetAtt, see Fn::GetAtt (p. 661).
Examples
To view AWS::EC2::EIP snippets, see Assigning an Amazon EC2 Elastic IP Using AWS::EC2::EIP
Snippet (p. 178).
AWS::EC2::EIPAssociation
The AWS::EC2::EIPAssociation resource type associates an Elastic IP address with an Amazon EC2
instance. The Elastic IP address can be an existing Elastic IP address or an Elastic IP address allocated
through an AWS::EC2::EIP resource (p. 351).
This type supports updates. For more information about updating stacks, see AWS CloudFormation
Stacks Updates (p. 85).
Syntax
{
"Type": "AWS::EC2::EIPAssociation",
"Properties": {
"AllocationId (p. 353)": String,
"EIP (p. 353)": String,
"InstanceId (p. 353)": String,
"NetworkInterfaceId (p. 354)": String,
"PrivateIpAddress (p. 354)": String
}
}
Properties
AllocationId
Allocation ID for the VPC Elastic IP address you want to associate with an Amazon EC2 instance in
your VPC.
Required: Conditional. Required for a VPC.
Type: String
Update requires: Replacement (p. 86) if you also change the InstanceId or NetworkInterfaceId
property. If not, update requires No interruption (p. 86).
EIP
Elastic IP address that you want to associate with the Amazon EC2 instance specified by the
InstanceId property. You can specify an existing Elastic IP address or a reference to an Elastic
IP address allocated with a AWS::EC2::EIP resource (p. 351).
Required: Conditional. Required for Elastic IP addresses for use in EC2-Classic.
Type: String
Update requires: Replacement (p. 86) if you also change the InstanceId or NetworkInterfaceId
property. If not, update requires No interruption (p. 86).
InstanceId
Instance ID of the Amazon EC2 instance that you want to associate with the Elastic IP address
specified by the EIP property.
API Version 2010-05-15
353
AWS CloudFormation User Guide
AWS::EC2::Instance
Required: No
Type: String
Update requires: Replacement (p. 86) if you also change the AllocationId or EIP property. If not,
update requires No interruption (p. 86).
NetworkInterfaceId
The ID of the network interface to associate with the Elastic IP address (VPC only).
Required: No
Type: String
Update requires: Replacement (p. 86) if you also change the AllocationId or EIP property. If not,
update requires No interruption (p. 86).
PrivateIpAddress
The private IP address that you want to associate with the Elastic IP address. The private IP address
is restricted to the primary and secondary private IP addresses that are associated with the network
interface. By default, the private IP address that is associated with the EIP is the primary private IP
address of the network interface.
Required: No
Type: String
Update requires: No interruption (p. 86)
Return Values
Ref
When the logical ID of this resource is provided to the Ref intrinsic function, Ref returns the resource
name.
For more information about using the Ref function, see Ref (p. 669).
Examples
For AWS::EC2::EIPAssociation snippets, see Assigning an Amazon EC2 Elastic IP Using AWS::EC2::EIP
Snippet (p. 178).
AWS::EC2::Instance
The AWS::EC2::Instance type creates an Amazon EC2 instance.
If an Elastic IP address is attached to your instance, AWS CloudFormation reattaches the Elastic IP
address after it updates the instance. For more information about updating stacks, see AWS
CloudFormation Stacks Updates (p. 85).
Syntax
{
"Type" : "AWS::EC2::Instance",
"Properties" : {
API Version 2010-05-15
354
AWS CloudFormation User Guide
AWS::EC2::Instance
"AvailabilityZone (p. 355)" : String,
"BlockDeviceMappings (p. 355)" : [ EC2 Block Device Mapping, ... ],
"DisableApiTermination (p. 355)" : Boolean,
"EbsOptimized (p. 356)" : Boolean,
"IamInstanceProfile (p. 356)" : String,
"ImageId (p. 356)" : String,
"InstanceInitiatedShutdownBehavior (p. 356)" : String,
"InstanceType (p. 356)" : String,
"KernelId (p. 357)" : String,
"KeyName (p. 357)" : String,
"Monitoring (p. 357)" : Boolean,
"NetworkInterfaces (p. 357)" : [ EC2 Network Interface, ... ],
"PlacementGroupName (p. 357)" : String,
"PrivateIpAddress (p. 357)" : String,
"RamdiskId (p. 358)" : String,
"SecurityGroupIds (p. 358)" : [ String, ... ],
"SecurityGroups (p. 358)" : [ String, ... ],
"SourceDestCheck (p. 358)" : Boolean,
"SubnetId (p. 358)" : String,
"Tags (p. 359)" : [ Resource Tag, ... ],
"Tenancy (p. 359)" : String,
"UserData (p. 359)" : String,
"Volumes (p. 359)" : [ EC2 MountPoint (p. 578), ... ]
}
}
Properties
AvailabilityZone
Specifies the name of the Availability Zone in which the instance is located.
For more information about AWS regions and Availability Zones, see Regions and Availability Zones
in the Amazon EC2 User Guide.
Required: No. If not specified, an Availability Zone will be automatically chosen for you based on the
load balancing criteria for the region.
Type: String
Update requires: Replacement (p. 86)
BlockDeviceMappings
Defines a set of Amazon Elastic Block Store block device mappings, ephemeral instance store block
device mappings, or both. For more information, see Amazon Elastic Block Store or Amazon EC2
Instance Store in the Amazon EC2 User Guide for Linux Instances.
Required: No
Type: A list of Amazon EC2 Block Device Mapping Property (p. 575).
Update requires: Replacement (p. 86). If you change only the DeleteOnTermination property for
one or more block devices, update requires No interruption (p. 86).
DisableApiTermination
Specifies whether the instance can be terminated through the API.
Required: No
Type: Boolean
API Version 2010-05-15
355
AWS CloudFormation User Guide
AWS::EC2::Instance
Update requires: No interruption (p. 86)
EbsOptimized
Specifies whether the instance is optimized for Amazon Elastic Block Store I/O. This optimization
provides dedicated throughput to Amazon EBS and an optimized configuration stack to provide
optimal EBS I/O performance.
For more information about the instance types that can be launched as Amazon EBS optimized
instances, see Amazon EBS-Optimized Instances in the Amazon Elastic Compute Cloud User Guide.
Additional fees are incurred when using Amazon EBS-optimized instances.
Required: No. By default, AWS CloudFormation specifies false.
Type: Boolean
Update requires:
• Update requires: Some interruptions (p. 86) for Amazon EBS-backed instances
• Update requires: Replacement (p. 86) for instance store-backed instances
IamInstanceProfile
The physical ID of an instance profile or a reference to an AWS::IAM::InstanceProfile (p. 451) resource.
For more information about IAM roles, see Working with Roles in the AWS Identity and Access
Management User Guide.
Required: No
Type: String
Update requires: Replacement (p. 86)
ImageId
Provides the unique ID of the Amazon Machine Image (AMI) that was assigned during registration.
Required: Yes
Type: String
Update requires: Replacement (p. 86)
InstanceInitiatedShutdownBehavior
Indicates whether an instance stops or terminates when you shut down the instance from the instance's
operating system shutdown command. You can specify stop or terminate. For more information,
see the RunInstances command in the Amazon EC2 API Reference.
Required: No
Type: String
Update requires: No interruption (p. 86)
InstanceType
The instance type, such as t2.micro. The default type is "m1.small". For a list of instance types,
see Instance Families and Types.
Required: No
Type: String
Update requires:
• Update requires: Some interruptions (p. 86) for Amazon EBS-backed instances
• Update requires: Replacement (p. 86) for instance store-backed instances
API Version 2010-05-15
356
AWS CloudFormation User Guide
AWS::EC2::Instance
KernelId
The kernel ID.
Required: No
Type: String
Update requires:
• Update requires: Some interruptions (p. 86) for Amazon EBS-backed instances
• Update requires: Replacement (p. 86) for instance store-backed instances
KeyName
Provides the name of the Amazon EC2 key pair.
Required: No
Type: String
Update requires: Replacement (p. 86)
Monitoring
Specifies whether monitoring is enabled for the instance.
Required: No
Type: Boolean
Update requires: No interruption (p. 86)
NetworkInterfaces
A list of embedded objects that describe the network interfaces to associate with this instance.
Note
If this resource has a public IP address and is also in a VPC that is defined in the same
template, you must use the DependsOn attribute to declare a dependency on the
VPC-gateway attachment. For more information, see DependsOn Attribute (p. 642).
Required: No
Type: A list of EC2 NetworkInterface Embedded Property Type (p. 580)
Update requires: Replacement (p. 86)
PlacementGroupName
The name of an existing placement group that you want to launch the instance into (for cluster
instances).
Required: No
Type: String
Update requires: Replacement (p. 86)
PrivateIpAddress
The private IP address for this instance.
Important
If you make an update to an instance that requires replacement, you must assign a new
private IP address. During a replacement, AWS CloudFormation creates a new instance
but doesn't delete the old instance until the stack has successfully updated. If the stack
update fails, AWS CloudFormation uses the old instance in order to roll back the stack to
the previous working state. The old and new instances cannot have the same private IP
address.
API Version 2010-05-15
357
AWS CloudFormation User Guide
AWS::EC2::Instance
(Optional) If you're using Amazon VPC, you can use this parameter to assign the instance a specific
available IP address from the subnet (for example, 10.0.0.25). By default, Amazon VPC selects an
IP address from the subnet for the instance.
Required: No
Type: String
Update requires: Replacement (p. 86)
RamdiskId
The ID of the RAM disk to select. Some kernels require additional drivers at launch. Check the kernel
requirements for information about whether you need to specify a RAM disk. To find kernel
requirements, go to the AWS Resource Center and search for the kernel ID.
Required: No
Type: String
Update requires:
• Update requires: Some interruptions (p. 86) for Amazon EBS-backed instances
• Update requires: Replacement (p. 86) for instance store-backed instances
SecurityGroupIds
A list that contains the security group IDs for VPC security groups to assign to the Amazon EC2
instance. If you specified the NetworkInterfaces property, do not specify this property.
Required: Conditional. Required for VPC security groups.
Type: List of strings
Update requires:
• Update requires: No interruption (p. 86) for instances that are in a VPC.
• Update requires: Replacement (p. 86) for instances that are not in a VPC.
SecurityGroups
Valid only for Amazon EC2 security groups. A list that contains the Amazon EC2 security groups to
assign to the Amazon EC2 instance. The list can contain both the name of existing Amazon EC2
security groups or references to AWS::EC2::SecurityGroup resources created in the template.
Required: No
Type: List of strings
Update requires: Replacement (p. 86).
SourceDestCheck
Controls whether source/destination checking is enabled on the instance. Also determines if an
instance in a VPC will perform network address translation (NAT).
A value of "true" means that source/destination checking is enabled, and a value of "false"
means that checking is disabled. For the instance to perform NAT, the value must be "false". For
more information, see NAT Instances in the Amazon Virtual Private Cloud User Guide.
Required: No
Type: Boolean
Update requires: No interruption (p. 86)
SubnetId
If you're using Amazon VPC, this property specifies the ID of the subnet that you want to launch the
instance into. If you specified the NetworkInterfaces property, do not specify this property.
API Version 2010-05-15
358
AWS CloudFormation User Guide
AWS::EC2::Instance
Required: No
Type: String
Update requires: Replacement (p. 86)
Tags
An arbitrary set of tags (key–value pairs) for this instance.
Required: No
Type: AWS CloudFormation Resource Tags (p. 618)
Update requires: No interruption (p. 86).
Tenancy
The tenancy of the instance that you want to launch. This value can be either "default" or
"dedicated". An instance that has a tenancy value of "dedicated" runs on single-tenant
hardware and can be launched only into a VPC. For more information, see Using EC2 Dedicated
Instances Within Your VPC in the Amazon VPC User Guide.
Required: No
Type: String
Update requires: Replacement (p. 86)
UserData
Base64-encoded MIME user data that is made available to the instances.
Required: No
Type: String
Update requires:
• Update requires: Some interruptions (p. 86) for Amazon EBS-backed instances.
Note
For EBS-backed instances, changing the UserData stops and then starts the instance;
however, Amazon EC2 doesn't automatically run the updated UserData. To update
configurations on your instance, use the cfn-hup (p. 684) helper script.
• Update requires: Replacement (p. 86) for instance store-backed instances.
Volumes
The Amazon EBS volumes to attach to the instance.
Note
Before detaching a volume, unmount any file systems on the device within your operating
system. If you don't unmount the file system, a volume might get stuck in a busy state while
detaching.
Required: No
Type: A list of EC2 MountPoints (p. 578).
Update requires: No interruption (p. 86)
API Version 2010-05-15
359
AWS CloudFormation User Guide
AWS::EC2::Instance
Return Values
Ref
When you pass the logical ID of an AWS::EC2::Instance object to the intrinsic Ref function, the object's
InstanceId is returned. For example: i-636be302.
For more information about using the Ref function, see Ref (p. 669).
Fn::GetAtt
Fn::GetAtt returns a value for a specified attribute of this type. This section lists the available attributes
and corresponding return values.
AvailabilityZone
The Availability Zone where the specified instance is launched. For example: us-east-1b.
You can retrieve a list of all Availability Zones for a region by using the Fn::GetAZs (p. 666) intrinsic
function.
PrivateDnsName
The private DNS name of the specified instance. For example: ip-10-24-34-0.ec2.internal.
PublicDnsName
The public DNS name of the specified instance. For example:
ec2-107-20-50-45.compute-1.amazonaws.com.
PrivateIp
The private IP address of the specified instance. For example: 10.24.34.0.
PublicIp
The public IP address of the specified instance. For example: 192.0.2.0.
For more information about using Fn:GetAtt, see Fn::GetAtt (p. 661).
Examples
EC2 Instance with an EBS Block Device Mapping
{
"AWSTemplateFormatVersion" : "2010-09-09",
"Description" : "Ec2 block device mapping",
"Resources" : {
"MyEC2Instance" : {
"Type" : "AWS::EC2::Instance",
"Properties" : {
"ImageId" : "ami-79fd7eee",
"KeyName" : "testkey",
"BlockDeviceMappings" : [
{
"DeviceName" : "/dev/sdm",
"Ebs" : {
"VolumeType" : "io1",
"Iops" : "200",
"DeleteOnTermination" : "false",
"VolumeSize" : "20"
}
},
API Version 2010-05-15
360
AWS CloudFormation User Guide
AWS::EC2::InternetGateway
{
"DeviceName" : "/dev/sdk",
"NoDevice" : {}
}
]
}
}
}
}
Automatically Assign a Public IP Address
You can associate a public IP address with a network interface only if it has a device index of 0 and if it
is a new network interface (not an existing one).
"Ec2Instance" : {
"Type" : "AWS::EC2::Instance",
"Properties" : {
"ImageId" : { "Fn::FindInMap" : [ "RegionMap", { "Ref" : "AWS::Region" },
"AMI" ]},
"KeyName" : { "Ref" : "KeyName" },
"NetworkInterfaces": [ {
"AssociatePublicIpAddress": "true",
"DeviceIndex": "0",
"GroupSet": [{ "Ref" : "myVPCEC2SecurityGroup" }],
"SubnetId": { "Ref" : "PublicSubnet" }
} ]
}
}
Other Examples
You can download templates that show how to use AWS::EC2::Instance to create a virtual private cloud
(VPC):
• Single instance in a single subnet
• Multiple subnets with ELB and Auto Scaling group
For more information about an AWS::EC2::Instance that has an IAM instance profile, see: Create an EC2
instance with an associated instance profile.
For more information about Amazon EC2 template examples, see: Amazon EC2 Template Snippets (p. 177).
See Also
• RunInstances in the Amazon Elastic Compute Cloud API Reference
• EBS-Optimized Instances in the Amazon Elastic Compute Cloud User Guide
AWS::EC2::InternetGateway
Creates a new Internet gateway in your AWS account. After creating the Internet gateway, you then attach
it to a VPC.
API Version 2010-05-15
361
AWS CloudFormation User Guide
AWS::EC2::InternetGateway
Syntax
{
"Type" : "AWS::EC2::InternetGateway",
"Properties" : {
"Tags (p. 362)" : [ Resource Tag, ... ]
}
}
Properties
Tags
An arbitrary set of tags (key–value pairs) for this resource.
Required: No
Type: AWS CloudFormation Resource Tags (p. 618)
Update requires: No interruption (p. 86).
Return Values
Ref
When the logical ID of this resource is provided to the Ref intrinsic function, Ref returns the resource
name.
For more information about using the Ref function, see Ref (p. 669).
Example
{
"AWSTemplateFormatVersion" : "2010-09-09",
"Resources" : {
"myInternetGateway" : {
"Type" : "AWS::EC2::InternetGateway",
"Properties" : {
"Tags" : [ {"Key" : "foo", "Value" : "bar"}]
}
}
}
}
See Also
• CreateInternetGateway in the Amazon EC2 API Reference.
• Using Tags in the Amazon Elastic Compute Cloud User Guide.
API Version 2010-05-15
362
AWS CloudFormation User Guide
AWS::EC2::NetworkAcl
AWS::EC2::NetworkAcl
Creates a new network ACL in a VPC.
Syntax
{
"Type" : "AWS::EC2::NetworkAcl",
"Properties" : {
"Tags (p. 363)" : [ Resource Tag, ... ],
"VpcId (p. 363)" : String
}
}
Properties
Tags
An arbitrary set of tags (key–value pairs) for this ACL.
Required: No
Type: AWS CloudFormation Resource Tags (p. 618)
Update requires: No interruption (p. 86).
VpcId
The ID of the VPC where the network ACL will be created.
Required: Yes
Type: String
Update requires: Replacement (p. 86)
Return Values
Ref
When the logical ID of this resource is provided to the Ref intrinsic function, Ref returns the resource
name.
For more information about using the Ref function, see Ref (p. 669).
Example
{
"AWSTemplateFormatVersion" : "2010-09-09",
"Resources" : {
"myNetworkAcl" : {
"Type" : "AWS::EC2::NetworkAcl",
"Properties" : {
"VpcId" : { "Ref" : "myVPC" },
"Tags" : [ { "Key" : "foo", "Value" : "bar" } ]
API Version 2010-05-15
363
AWS CloudFormation User Guide
AWS::EC2::NetworkAclEntry
}
}
}
}
See Also
• CreateNetworkAcl in the Amazon EC2 API Reference
• Network ACLs in the Amazon Virtual Private Cloud User Guide.
AWS::EC2::NetworkAclEntry
Creates an entry (i.e., rule) in a network ACL with a rule number you specify. Each network ACL has a
set of numbered ingress rules and a separate set of numbered egress rules.
Syntax
{
"Type" : "AWS::EC2::NetworkAclEntry",
"Properties" : {
"CidrBlock (p. 364)" : String,
"Egress (p. 364)" : Boolean,
"Icmp (p. 364)" : EC2 ICMP,
"NetworkAclId (p. 365)" : String,
"PortRange (p. 365)" : EC2 PortRange,
"Protocol (p. 365)" : Integer,
"RuleAction (p. 365)" : String,
"RuleNumber (p. 365)" : Integer
}
}
Properties
CidrBlock
The CIDR range to allow or deny, in CIDR notation (e.g., 172.16.0.0/24).
Required: Yes
Type: String
Update requires: No interruption (p. 86)
Egress
Whether this rule applies to egress traffic from the subnet ("true") or ingress traffic to the subnet
("false").
Required: Yes
Type: Boolean
Update requires: Replacement (p. 86).
Icmp
The Internet Control Message Protocol (ICMP) code and type.
API Version 2010-05-15
364
AWS CloudFormation User Guide
AWS::EC2::NetworkAclEntry
Required: Conditional required if specifying 1 (ICMP) for the protocol parameter.
Type: EC2 ICMP Property Type (p. 578)
Update requires: No interruption (p. 86)
NetworkAclId
ID of the ACL where the entry will be created.
Required: Yes
Type: String
Update requires: Replacement (p. 86).
PortRange
The range of port numbers for the UDP/TCP protocol.
Required: Conditional Required if specifying 6 (TCP) or 17 (UDP) for the protocol parameter.
Type: EC2 PortRange Property Type (p. 584)
Update requires: No interruption (p. 86)
Protocol
The IP protocol that the rule applies to. You must specify -1 or a protocol number (go to Protocol
Numbers at iana.org). You can specify -1 for all protocols.
Note
If you specify -1, all ports are opened and the PortRange property is ignored.
Required: Yes
Type: Number
Update requires: No interruption (p. 86)
RuleAction
Whether to allow or deny traffic that matches the rule; valid values are "allow" or "deny".
Required: Yes
Type: String
Update requires: No interruption (p. 86)
RuleNumber
Rule number to assign to the entry (e.g., 100). This must be a positive integer from 1 to 32766.
Required: Yes
Type: Number
Update requires: Replacement (p. 86).
Return Values
Ref
When the logical ID of this resource is provided to the Ref intrinsic function, Ref returns the resource
name.
For more information about using the Ref function, see Ref (p. 669).
API Version 2010-05-15
365
AWS CloudFormation User Guide
AWS::EC2::NetworkInterface
Example
{
"AWSTemplateFormatVersion" : "2010-09-09",
"Resources" : {
"myNetworkAclEntry" : {
"Type" : "AWS::EC2::NetworkAclEntry",
"Properties" : {
"NetworkAclId" : { "Ref" : "myNetworkAcl" },
"RuleNumber" : "100",
"Protocol" : "-1",
"RuleAction" : "allow",
"Egress" : "true",
"CidrBlock" : "172.16.0.0/24",
"Icmp" : { "Code" : "-1", "Type" : "-1" },
"PortRange" : { "From" : "53", "To" : "53" }
}
}
}
}
See Also
• NetworkAclEntry in the Amazon EC2 API Reference
• Network ACLs in the Amazon Virtual Private Cloud User Guide.
AWS::EC2::NetworkInterface
Describes a network interface in an Elastic Compute Cloud (EC2) instance for AWS CloudFormation.
This is provided in a list in the NetworkInterfaces property of AWS::EC2::Instance (p. 354).
Syntax
{
"Type" : "AWS::EC2::NetworkInterface",
"Properties" : {
"Description (p. 367)" : String,
"GroupSet (p. 367)" : [ String, ... ],
"PrivateIpAddress (p. 367)" : String,
"PrivateIpAddresses (p. 367)" : [ PrivateIpAddressSpecification, ... ],
"SecondaryPrivateIpAddressCount (p. 367)" : Integer,
"SourceDestCheck (p. 368)" : Boolean,
"SubnetId (p. 368)" : String,
"Tags (p. 368)" : [ Resource Tag, ... ],
}
}
API Version 2010-05-15
366
AWS CloudFormation User Guide
AWS::EC2::NetworkInterface
Properties
Description
The description of this network interface.
Required: No
Type: String
Update requires: No interruption (p. 86).
GroupSet
A list of security group IDs associated with this network interface.
Required: No
Type: List of strings.
Update requires: No interruption (p. 86)
PrivateIpAddress
Assigns a single private IP address to the network interface, which is used as the primary private IP
address. If you want to specify multiple private IP address, use the PrivateIpAddresses property.
Required: No
Type: String
Update requires: Replacement (p. 86).
PrivateIpAddresses
Assigns a list of private IP addresses to the network interface. You can specify a primary private IP
address by setting the value of the Primary property to true in the
PrivateIpAddressSpecification property. If you want Amazon EC2 to automatically assign
private IP addresses, use the SecondaryPrivateIpAddressCount property and do not specify
this property.
For information about the maximum number of private IP addresses, see Private IP Addresses Per
ENI Per Instance Type in the Amazon EC2 User Guide for Linux Instances.
Required: No
Type: list of PrivateIpAddressSpecification (p. 583).
Update requires: Replacement (p. 86) if you change the primary private IP address. If not, update
requires No interruption (p. 86).
SecondaryPrivateIpAddressCount
The number of secondary private IP addresses that Amazon EC2 automatically assigns to the network
interface. Amazon EC2 uses the value of the PrivateIpAddress property as the primary private
IP address. If you don't specify that property, Amazon EC2 automatically assigns both the primary
and secondary private IP addresses.
If you want to specify your own list of private IP addresses, use the PrivateIpAddresses property
and do not specify this property.
For information about the maximum number of private IP addresses, see Private IP Addresses Per
ENI Per Instance Type in the Amazon EC2 User Guide for Linux Instances.
Required: No
Type: Integer.
API Version 2010-05-15
367
AWS CloudFormation User Guide
AWS::EC2::NetworkInterface
Update requires: No interruption (p. 86).
SourceDestCheck
Flag indicating whether traffic to or from the instance is validated.
Required: No
Type: Boolean
Update requires: No interruption (p. 86).
SubnetId
The ID of the subnet to associate with the network interface.
Required: Yes
Type: String
Update requires: Replacement (p. 86).
Tags
An arbitrary set of tags (key–value pairs) for this network interface.
Required: No
Type: AWS CloudFormation Resource Tags (p. 618)
Update requires: No interruption (p. 86).
Return Values
Ref
When the logical ID of this resource is provided to the Ref intrinsic function, Ref returns the resource
name.
For more information about using the Ref function, see Ref (p. 669).
Fn::GetAtt
Fn::GetAtt returns a value for a specified attribute of this type. This section lists the available attributes
and corresponding return values.
PrimaryPrivateIpAddress
Returns the primary private IP address of the network interface. For example, 10.0.0.192.
SecondaryPrivateIpAddresses
Returns the secondary private IP addresses of the network interface. For example, ["10.0.0.161",
"10.0.0.162", "10.0.0.163"].
For more information about using Fn:GetAtt, see Fn::GetAtt (p. 661).
Template Examples
Tip
For more NetworkInterface template examples, see Elastic Network Interface (ENI) Template
Snippets (p. 179).
API Version 2010-05-15
368
AWS CloudFormation User Guide
AWS::EC2::NetworkInterface
Simple Standalone ENI
This is a simple standalone Elastic Network Interface (ENI), using all of the available properties.
{
"AWSTemplateFormatVersion" : "2010-09-09",
"Description" : "Simple Standalone ENI",
"Resources" : {
"myENI" : {
"Type" : "AWS::EC2::NetworkInterface",
"Properties" : {
"Tags": [{"Key":"foo","Value":"bar"}],
"Description": "A nice description.",
"SourceDestCheck": "false",
"GroupSet": ["sg-75zzz219"],
"SubnetId": "subnet-3z648z53",
"PrivateIpAddress": "10.0.0.16"
}
}
}
}
ENI on an EC2 instance
This is an example of an ENI on an EC2 instance. In this example, one ENI is added to the instance. If
you want to add more than one ENI, you can specify a list for the NetworkInterface property. However,
you can specify multiple ENIs only if all the ENIs have just private IP addresses (no associated public IP
address). If you have an ENI with a public IP address, specify it and then use the
AWS::EC2::NetworkInterfaceAttachment resource to add additional ENIs.
"Ec2Instance" : {
"Type" : "AWS::EC2::Instance",
"Properties" : {
"ImageId" : { "Fn::FindInMap" : [ "RegionMap", { "Ref" : "AWS::Region"
}, "AMI" ]},
"KeyName" : { "Ref" : "KeyName" },
"SecurityGroupIds" : [{ "Ref" : "WebSecurityGroup" }],
"SubnetId" : { "Ref" : "SubnetId" },
"NetworkInterfaces" : [ {
"NetworkInterfaceId" : {"Ref" : "controlXface"}, "DeviceIndex" : "1"
} ],
"Tags" : [ {"Key" : "Role", "Value" : "Test Instance"}],
"UserData" : { "Fn::Base64" : { "Ref" : "WebServerPort" }}
}
}
See Also
• NetworkInterfaceType in the Amazon Elastic Compute Cloud API Reference
API Version 2010-05-15
369
AWS CloudFormation User Guide
AWS::EC2::NetworkInterfaceAttachment
AWS::EC2::NetworkInterfaceAttachment
Attaches an elastic network interface (ENI) to an Amazon EC2 instance. You can use this resource type
to attach additional network interfaces to an instances without interruption.
Syntax
{
"Type" : "AWS::EC2::NetworkInterfaceAttachment",
"Properties" : {
"DeleteOnTermination (p. 370)": Boolean,
"DeviceIndex (p. 370)": String,
"InstanceId (p. 370)": String,
"NetworkInterfaceId (p. 370)": String,
}
}
Properties
DeleteOnTermination
Whether to delete the network interface when the instance terminates. By default, this value is set
to True.
Required: No
Type: Boolean.
Update requires: No interruption (p. 86)
DeviceIndex
The network interface's position in the attachment order. For example, the first attached network
interface has a DeviceIndex of 0.
Required: Yes.
Type: String.
Update requires: No interruption (p. 86)
InstanceId
The ID of the instance to which you will attach the ENI.
Required: Yes.
Type: String.
Update requires: No interruption (p. 86)
NetworkInterfaceId
The ID of the ENI that you want to attach.
Required: Yes.
Type: String.
Update requires: No interruption (p. 86)
API Version 2010-05-15
370
AWS CloudFormation User Guide
AWS::EC2::Route
Return Values
Ref
When the logical ID of this resource is provided to the Ref intrinsic function, Ref returns the resource
name.
For more information about using the Ref function, see Ref (p. 669).
Example
Example Attaching MyNetworkInterface to MyInstance
"NetworkInterfaceAttachment" : {
"Type" : "AWS::EC2::NetworkInterfaceAttachment",
"Properties" : {
"InstanceId" : {"Ref" : "MyInstance"},
"NetworkInterfaceId" : {"Ref" : "MyNetworkInterface"},
"DeviceIndex" : "1"
}
}
AWS::EC2::Route
Creates a new route in a route table within a VPC. The route's target can be either a gateway attached
to the VPC or a NAT instance in the VPC.
Syntax
{
"Type" : "AWS::EC2::Route",
"Properties" : {
"DestinationCidrBlock (p. 371)" : String,
"GatewayId (p. 372)" : String,
"InstanceId (p. 372)" : String,
"NetworkInterfaceId (p. 372)" : String,
"RouteTableId (p. 372)" : String,
"VpcPeeringConnectionId (p. 372)" : String
}
}
Properties
DestinationCidrBlock
The CIDR address block used for the destination match. For example, "0.0.0.0/0". Routing
decisions are based on the most specific match.
Required: Yes
Type: String
Update requires: Replacement (p. 86)
API Version 2010-05-15
371
AWS CloudFormation User Guide
AWS::EC2::Route
GatewayId
The ID of an Internet gateway or virtual private gateway that is attached to your VPC. For example:
"igw-eaad4883".
For route entries that specify a gateway, you must specify a dependency on the gateway attachment
resource. For more information, see DependsOn Attribute (p. 642).
Required: Conditional. You must specify only one of the following properties: GatewayId,
InstanceId, NetworkInterfaceId, or VpcPeeringConnectionId.
Type: String
Update requires: No interruption (p. 86)
InstanceId
The ID of a NAT instance in your VPC. For example, "i-1a2b3c4d".
Required: Conditional. You must specify only one of the following properties: GatewayId,
InstanceId, NetworkInterfaceId, or VpcPeeringConnectionId.
Type: String
Update requires: No interruption (p. 86)
NetworkInterfaceId
Allows the routing of network interface IDs.
Required: Conditional. You must specify only one of the following properties: GatewayId,
InstanceId, NetworkInterfaceId, or VpcPeeringConnectionId.
Type: String
Update requires: No interruption (p. 86)
RouteTableId
The ID of the route table (p. 374) where the route will be added.
Required: Yes
Type: String
Update requires: Replacement (p. 86)
VpcPeeringConnectionId
The ID of a VPC peering connection.
Required: Conditional. You must specify only one of the following properties: GatewayId,
InstanceId, NetworkInterfaceId, or VpcPeeringConnectionId.
Type: String
Update requires: No interruption (p. 86)
Return Values
Ref
When the logical ID of this resource is provided to the Ref intrinsic function, Ref returns the resource
name.
For more information about using the Ref function, see Ref (p. 669).
API Version 2010-05-15
372
AWS CloudFormation User Guide
AWS::EC2::Route
Examples
Example Route with Gateway ID
{
"AWSTemplateFormatVersion" : "2010-09-09",
"Resources" : {
"myRoute" : {
"Type" : "AWS::EC2::Route",
"DependsOn" : "GatewayToInternet",
"Properties" : {
"RouteTableId" : { "Ref" : "myRouteTable" },
"DestinationCidrBlock" : "0.0.0.0/0",
"GatewayId" : { "Ref" : "myInternetGateway" }
}
}
}
}
Example Route with Instance ID
{
"AWSTemplateFormatVersion" : "2010-09-09",
"Resources" : {
"myRoute" : {
"Type" : "AWS::EC2::Route",
"Properties" : {
"RouteTableId" : { "Ref" : "myRouteTable" },
"DestinationCidrBlock" : "0.0.0.0/0",
"InstanceId" : { "Ref" : "myInstance" }
}
}
}
}
Example Route with Network Interface ID.
{
"AWSTemplateFormatVersion" : "2010-09-09",
"Resources" : {
"myRoute" : {
"Type" : "AWS::EC2::Route",
"Properties" : {
"RouteTableId" : { "Ref" : "myRouteTable" },
"DestinationCidrBlock" : "0.0.0.0/0",
"NetworkInterfaceId" : { "Ref" : "eni-1a2b3c4d" }
}
}
}
}
API Version 2010-05-15
373
AWS CloudFormation User Guide
AWS::EC2::RouteTable
Example Route with VPC peering connection ID.
{
"AWSTemplateFormatVersion" : "2010-09-09",
"Resources" : {
"myRoute" : {
"Type" : "AWS::EC2::Route",
"Properties" : {
"RouteTableId" : { "Ref" : "myRouteTable" },
"DestinationCidrBlock" : "0.0.0.0/0",
"VpcPeeringConnectionId" : { "Ref" : "myVPCPeeringConnectionID" }
}
}
}
}
See Also
• AWS::EC2::RouteTable (p. 374)
• CreateRoute in the Amazon EC2 API Reference
• Route Tables in the Amazon VPC User Guide.
AWS::EC2::RouteTable
Creates a new route table within a VPC. After you create a new route table, you can add routes and
associate the table with a subnet.
Syntax
{
"Type" : "AWS::EC2::RouteTable",
"Properties" : {
"VpcId (p. 374)" : String,
"Tags (p. 374)" : [ Resource Tag, ... ]
}
}
Properties
VpcId
The ID of the VPC where the route table will be created.
Example: vpc-11ad4878
Required: Yes
Type: String
Update requires: Replacement (p. 86)
Tags
An arbitrary set of tags (key–value pairs) for this route table.
API Version 2010-05-15
374
AWS CloudFormation User Guide
AWS::EC2::SecurityGroup
Required: No
Type: AWS CloudFormation Resource Tags (p. 618)
Update requires: No interruption (p. 86).
Return Values
Ref
When the logical ID of this resource is provided to the Ref intrinsic function, Ref returns the resource
name.
For more information about using the Ref function, see Ref (p. 669).
Examples
Example
The following example snippet uses the VPC ID from a VPC named myVPC that was declared elsewhere
in the same template.
{
"AWSTemplateFormatVersion" : "2010-09-09",
"Resources" : {
"myRouteTable" : {
"Type" : "AWS::EC2::RouteTable",
"Properties" : {
"VpcId" : { "Ref" : "myVPC" },
"Tags" : [ { "Key" : "foo", "Value" : "bar" } ]
}
}
}
}
See Also
•
•
•
•
AWS::EC2::Route (p. 371)
CreateRouteTable in the Amazon EC2 API Reference
Route Tables in the Amazon VPC User Guide
Using Tags in the Amazon Elastic Compute Cloud User Guide
AWS::EC2::SecurityGroup
Creates an Amazon EC2 security group. To create a VPC security group, use the VpcId (p. 376) property.
This type supports updates. For more information about updating stacks, see AWS CloudFormation
Stacks Updates (p. 85).
Important
If you want to cross-reference two security groups in the ingress and egress rules of those
security groups, use the AWS::EC2::SecurityGroupEgress (p. 378) and
AWS::EC2::SecurityGroupIngress (p. 381) resources to define your rules. Do not use the embedded
API Version 2010-05-15
375
AWS CloudFormation User Guide
AWS::EC2::SecurityGroup
ingress and egress rules in the AWS::EC2::SecurityGroup. If you do, it causes a circular
dependency, which AWS CloudFormation doesn't allow.
Syntax
{
"Type" : "AWS::EC2::SecurityGroup",
"Properties" : {
"GroupDescription (p. 376)" : String,
"SecurityGroupEgress (p. 376)" : [ Security Group Rule, ... ],
"SecurityGroupIngress (p. 376)" : [ Security Group Rule, ... ],
"Tags (p. 376)" : [ Resource Tag, ... ],
"VpcId (p. 376)" : String
}
}
Properties
GroupDescription
Description of the security group.
Required: Yes
Type: String
Update requires: Replacement (p. 86)
SecurityGroupEgress
A list of Amazon EC2 security group egress rules.
Required: No
Type: EC2 Security Group Rule (p. 584)
Update requires: No interruption (p. 86)
SecurityGroupIngress
A list of Amazon EC2 security group ingress rules.
Required: No
Type: EC2 Security Group Rule (p. 584)
Update requires: No interruption (p. 86)
Tags
The tags that you want to attach to the resource.
Required: No
Type: AWS CloudFormation Resource Tags (p. 618).
Update requires: No interruption (p. 86).
VpcId
The physical ID of the VPC. Can be obtained by using a reference to an AWS::EC2::VPC (p. 395),
such as: { "Ref" : "myVPC" }.
For more information about using the Ref function, see Ref (p. 669).
Required: Yes, for VPC security groups
API Version 2010-05-15
376
AWS CloudFormation User Guide
AWS::EC2::SecurityGroup
Type: String
Update requires: Replacement (p. 86)
Note
For more information about VPC security groups, go to Security Groups in the Amazon VPC
User Guide.
Return Values
Ref
When you specify an AWS::EC2::SecurityGroup type as an argument to the Ref function, AWS
CloudFormation returns the security group name (for EC2-classic) or the security group ID (for EC2-VPC).
For more information about using the Ref function, see Ref (p. 669).
Fn::GetAtt
Fn::GetAtt returns a value for a specified attribute of this type. This section lists the available attributes
and corresponding return values.
GroupId
The group ID of the specified security group, such as sg-94b3a1f6.
For more information about using Fn:GetAtt, see Fn::GetAtt (p. 661).
Examples
The following sample defines a security group with an ingress and egress rule:
"InstanceSecurityGroup" : {
"Type" : "AWS::EC2::SecurityGroup",
"Properties" : {
"GroupDescription" : "Allow http to client host",
"VpcId" : {"Ref" : "myVPC"},
"SecurityGroupIngress" : [{
"IpProtocol" : "tcp",
"FromPort" : "80",
"ToPort" : "80",
"CidrIp" : "0.0.0.0/0"
}],
"SecurityGroupEgress" : [{
"IpProtocol" : "tcp",
"FromPort" : "80",
"ToPort" : "80",
"CidrIp" : "0.0.0.0/0"
}]
}
}
When you create a VPC security group, Amazon EC2 creates a default egress rule that allows egress
traffic on all ports and IP protocols to any location. The default rule is removed only when you specify
one or more egress rules. If you want to remove the default rule and limit egress traffic to just the localhost
(127.0.0.1/32), you can use the following sample:
API Version 2010-05-15
377
AWS CloudFormation User Guide
AWS::EC2::SecurityGroupEgress
"sgwithoutegress": {
"Type": "AWS::EC2::SecurityGroup",
"Properties": {
"GroupDescription": "Limits security group egress traffic",
"SecurityGroupEgress": [
{
"CidrIp": "127.0.0.1/32",
"IpProtocol": "-1"
}
],
"VpcId": { "Ref": "myVPC"}
}
}
See Also
• Using Security Groups in the Amazon EC2 User Guide for Linux Instances.
• Security Groups in the Amazon VPC User Guide.
AWS::EC2::SecurityGroupEgress
The AWS::EC2::SecurityGroupEgress resource adds an egress rule to an Amazon VPC security
group.
Important
Use AWS::EC2::SecurityGroupIngress and AWS::EC2::SecurityGroupEgress only
when necessary, typically to allow security groups to reference each other in ingress and egress
rules. Otherwise, use the embedded ingress and egress rules of
AWS::EC2::SecurityGroup (p. 375). For more information, see Amazon EC2 Security Groups.
Syntax
{
"CidrIp (p. 378)" : String,
"DestinationSecurityGroupId (p. 379)" : String,
"FromPort (p. 379)" : Integer,
"GroupId (p. 379)" : String,
"IpProtocol (p. 379)" : String,
"ToPort (p. 379)" : Integer
}
Properties
For more information about adding egress rules to VPC security groups, go to
AuthorizeSecurityGroupEgress in the Amazon EC2 API Reference.
Note
If you change this resource's logical ID, you must also update a property value in order to trigger
an update for this resource.
CidrIp
CIDR range.
Type: String
API Version 2010-05-15
378
AWS CloudFormation User Guide
AWS::EC2::SecurityGroupEgress
Required: Conditional. Cannot be used when specifying a destination security group.
Update requires: Replacement (p. 86)
DestinationSecurityGroupId
Specifies the group ID of the destination Amazon VPC security group.
Type: String
Required: Conditional. Cannot be used when specifying a CIDR IP address.
Update requires: Replacement (p. 86)
FromPort
Start of port range for the TCP and UDP protocols, or an ICMP type number. If you specify icmp for
the IpProtocol property, you can specify -1 as a wildcard (i.e., any ICMP type number).
Type: Integer
Required: Yes
Update requires: Replacement (p. 86)
GroupId
ID of the Amazon VPC security group to modify. This value can be a reference to an
AWS::EC2::SecurityGroup (p. 375) resource that has a valid VpcId property or the ID of an existing
Amazon VPC security group.
Type: String
Required: Yes
Update requires: Replacement (p. 86)
IpProtocol
IP protocol name or number. For valid values, see the IpProtocol parameter in
AuthorizeSecurityGroupIngress
Type: String
Required: Yes
Update requires: Replacement (p. 86)
ToPort
End of port range for the TCP and UDP protocols, or an ICMP code. If you specify icmp for the
IpProtocol property, you can specify -1 as a wildcard (i.e., any ICMP code).
Type: Integer
Required: Yes
Update requires: Replacement (p. 86)
Return Values
Ref
When the logical ID of this resource is provided to the Ref intrinsic function, Ref returns the resource
name.
For more information about using the Ref function, see Ref (p. 669).
API Version 2010-05-15
379
AWS CloudFormation User Guide
AWS::EC2::SecurityGroupEgress
VPC Security Groups Example
In some cases, you might have an originating (source) security group to which you want to add an outbound
rule that allows traffic to a destination (target) security group. The target security group also needs an
inbound rule that allows traffic from the source security group. Note that you cannot use the Ref function
to specify the outbound and inbound rules for each security group. Doing so creates a circular dependency;
you cannot have two resources that depend on each other. Instead, use the egress and ingress resources
to declare these outbound and inbound rules, as shown in the following template snippet.
{
"AWSTemplateFormatVersion": "2010-09-09",
"Resources": {
"SourceSG": {
"Type": "AWS::EC2::SecurityGroup",
"Properties": {
"VpcId" : "vpc-e063f789",
"GroupDescription": "Sample source security group"
}
},
"TargetSG": {
"Type": "AWS::EC2::SecurityGroup",
"Properties": {
"VpcId" : "vpc-e063f789",
"GroupDescription": "Sample target security group"
}
},
"OutboundRule": {
"Type": "AWS::EC2::SecurityGroupEgress",
"Properties":{
"IpProtocol": "tcp",
"FromPort": "0",
"ToPort": "65535",
"DestinationSecurityGroupId": {
"Fn::GetAtt": [
"TargetSG",
"GroupId"
]
},
"GroupId": {
"Fn::GetAtt": [
"SourceSG",
"GroupId"
]
}
}
},
"InboundRule": {
"Type": "AWS::EC2::SecurityGroupIngress",
"Properties":{
"IpProtocol": "tcp",
"FromPort": "0",
"ToPort": "65535",
"SourceSecurityGroupId": {
"Fn::GetAtt": [
"SourceSG",
"GroupId"
]
API Version 2010-05-15
380
AWS CloudFormation User Guide
AWS::EC2::SecurityGroupIngress
},
"GroupId": {
"Fn::GetAtt": [
"TargetSG",
"GroupId"
]
}
}
}
}
}
AWS::EC2::SecurityGroupIngress
The AWS::EC2::SecurityGroupIngress resource adds an ingress rule to an Amazon EC2 or Amazon
VPC security group.
Important
Use AWS::EC2::SecurityGroupIngress and AWS::EC2::SecurityGroupEgress only
when necessary, typically to allow security groups to reference each other in ingress and egress
rules. Otherwise, use the embedded ingress and egress rules of
AWS::EC2::SecurityGroup (p. 375). For more information, see Amazon EC2 Security Groups.
Syntax
{
"CidrIp (p. 381)" : String,
"FromPort (p. 382)" : Integer,
"GroupId (p. 382)" : String,
"GroupName (p. 382)" : String,
"IpProtocol (p. 382)" : String,
"SourceSecurityGroupName (p. 382)" : String,
"SourceSecurityGroupId (p. 382)" : String,
"SourceSecurityGroupOwnerId (p. 383)" : String,
"ToPort (p. 383)" : Integer
}
Properties
For more information about adding ingress rules to Amazon EC2 or VPC security groups, see
AuthorizeSecurityGroupIngress in the Amazon EC2 API Reference.
Note
If you change this resource's logical ID, you must also update a property value in order to trigger
an update for this resource.
CidrIp
Specifies a CIDR range.
For an overview of CIDR ranges, go to the Wikipedia Tutorial.
Type: String
Required: Conditional. If you specify SourceSecurityGroupName, do not specify CidrIp.
Update requires: Replacement (p. 86)
API Version 2010-05-15
381
AWS CloudFormation User Guide
AWS::EC2::SecurityGroupIngress
FromPort
Start of port range for the TCP and UDP protocols, or an ICMP type number. If you specify icmp for
the IpProtocol property, you can specify -1 as a wildcard (i.e., any ICMP type number).
Type: Integer
Required: Yes, for ICMP and any protocol that uses ports.
Update requires: Replacement (p. 86)
GroupId
ID of the Amazon EC2 or VPC security group to modify. The group must belong to your account.
Type: String
Required: Conditional. You must specify the GroupName property or the GroupId property. For
security groups that are in a VPC, you must use the GroupId property. For example, EC2-VPC
accounts must use the GroupId property.
Update requires: Replacement (p. 86)
GroupName
Name of the Amazon EC2 security group (non-VPC security group) to modify. This value can be a
reference to an AWS::EC2::SecurityGroup (p. 375) resource or the name of an existing Amazon EC2
security group.
Type: String
Required: Conditional. You must specify the GroupName property or the GroupId property. For
security groups that are in a VPC, you must use the GroupId property. For example, EC2-VPC
accounts must use the GroupId property.
Update requires: Replacement (p. 86)
IpProtocol
IP protocol name or number. For valid values, see the IpProtocol parameter in
AuthorizeSecurityGroupIngress
Type: String
Required: Yes
Update requires: Replacement (p. 86)
SourceSecurityGroupId
Specifies the ID of the source security group or uses the Ref intrinsic function to refer to the logical
ID of a security group defined in the same template.
Type: String
Required: Conditional. If you specify CidrIp, do not specify SourceSecurityGroupId.
Update requires: Replacement (p. 86)
SourceSecurityGroupName
Specifies the name of the Amazon EC2 security group (non-VPC security group) to allow access or
uses the Ref intrinsic function to refer to the logical name of a security group defined in the same
template. For instances in a VPC, specify the SourceSecurityGroupId property.
Type: String
Required: Conditional. If you specify CidrIp, do not specify SourceSecurityGroupName.
Update requires: Replacement (p. 86)
API Version 2010-05-15
382
AWS CloudFormation User Guide
AWS::EC2::SecurityGroupIngress
SourceSecurityGroupOwnerId
Specifies the AWS Account ID of the owner of the Amazon EC2 security group specified in the
SourceSecurityGroupName property.
Type: String
Required: Conditional. If you specify SourceSecurityGroupName and that security group is owned
by a different account than the account creating the stack, you must specify the
SourceSecurityGroupOwnerId; otherwise, this property is optional.
Update requires: Replacement (p. 86)
ToPort
End of port range for the TCP and UDP protocols, or an ICMP code. If you specify icmp for the
IpProtocol property, you can specify -1 as a wildcard (i.e., any ICMP code).
Type: Integer
Required: Yes, for ICMP and any protocol that uses ports.
Update requires: Replacement (p. 86)
Examples
EC2 Security Group and Ingress Rule
To create an Amazon EC2 (non-VPC) security group and an ingress rule, use the
SourceSecurityGroupName property in the ingress rule.
The following template snippet creates an EC2 security group with an ingress rule that allows incoming
traffic on port 80 from any other host in the security group.The snippet uses the intrinsic function Ref (p. 669)
to specify the value for SourceSecurityGroupName.
{
"AWSTemplateFormatVersion": "2010-09-09",
"Resources": {
"SGBase": {
"Type": "AWS::EC2::SecurityGroup",
"Properties": {
"GroupDescription": "Base Security Group",
"SecurityGroupIngress": [
{
"IpProtocol": "tcp",
"CidrIp": "0.0.0.0/0",
"FromPort": "22",
"ToPort": "22"
}
]
}
},
"SGBaseIngress": {
"Type": "AWS::EC2::SecurityGroupIngress",
"Properties": {
"GroupName": { "Ref": "SGBase" },
"IpProtocol": "tcp",
"FromPort": "80",
"ToPort": "80",
"SourceSecurityGroupName": { "Ref": "SGBase" }
API Version 2010-05-15
383
AWS CloudFormation User Guide
AWS::EC2::SecurityGroupIngress
}
}
}
}
VPC Security Groups with Egress and Ingress Rules
In some cases, you might have an originating (source) security group to which you want to add an outbound
rule that allows traffic to a destination (target) security group. The target security group also needs an
inbound rule that allows traffic from the source security group. Note that you cannot use the Ref function
to specify the outbound and inbound rules for each security group. Doing so creates a circular dependency;
you cannot have two resources that depend on each other. Instead, use the egress and ingress resources
to declare these outbound and inbound rules, as shown in the following template snippet.
{
"AWSTemplateFormatVersion": "2010-09-09",
"Resources": {
"SourceSG": {
"Type": "AWS::EC2::SecurityGroup",
"Properties": {
"VpcId" : "vpc-e063f789",
"GroupDescription": "Sample source security group"
}
},
"TargetSG": {
"Type": "AWS::EC2::SecurityGroup",
"Properties": {
"VpcId" : "vpc-e063f789",
"GroupDescription": "Sample target security group"
}
},
"OutboundRule": {
"Type": "AWS::EC2::SecurityGroupEgress",
"Properties":{
"IpProtocol": "tcp",
"FromPort": "0",
"ToPort": "65535",
"DestinationSecurityGroupId": {
"Fn::GetAtt": [
"TargetSG",
"GroupId"
]
},
"GroupId": {
"Fn::GetAtt": [
"SourceSG",
"GroupId"
]
}
}
},
"InboundRule": {
"Type": "AWS::EC2::SecurityGroupIngress",
"Properties":{
"IpProtocol": "tcp",
"FromPort": "0",
"ToPort": "65535",
API Version 2010-05-15
384
AWS CloudFormation User Guide
AWS::EC2::Subnet
"SourceSecurityGroupId": {
"Fn::GetAtt": [
"SourceSG",
"GroupId"
]
},
"GroupId": {
"Fn::GetAtt": [
"TargetSG",
"GroupId"
]
}
}
}
}
}
Allow Ping Requests
To allow ping requests, add the ICMP protocol type and specify 8 (echo request) for the ICMP type and
either 0 or -1 (all) for the ICMP code.
"SGPing" : {
"Type" : "AWS::EC2::SecurityGroup",
"DependsOn": "VPC",
"Properties" : {
"GroupDescription" : "SG to test ping",
"VpcId" : {"Ref" : "VPC"},
"SecurityGroupIngress" : [
{ "IpProtocol" : "tcp", "FromPort" : "22", "ToPort" : "22", "CidrIp" :
"10.0.0.0/24" },
{ "IpProtocol" : "icmp", "FromPort" : "8", "ToPort" : "-1", "CidrIp" :
"10.0.0.0/24" }
]
}
}
AWS::EC2::Subnet
Creates a subnet in an existing VPC.
Syntax
{
"Type" : "AWS::EC2::Subnet",
"Properties" : {
"AvailabilityZone (p. 386)" : String,
"CidrBlock (p. 386)" : String,
"MapPublicIpOnLaunch (p. 386)" : Boolean,
"Tags (p. 386)" : [ Resource Tag, ... ],
"VpcId (p. 386)" : { "Ref" : String }
}
}
API Version 2010-05-15
385
AWS CloudFormation User Guide
AWS::EC2::Subnet
Properties
AvailabilityZone
The availability zone in which you want the subnet. Default: AWS selects a zone for you
(recommended).
Required: No
Type: String
Update requires: Replacement (p. 86)
Note
If you update this property, you must also update the CidrBlock property.
CidrBlock
The CIDR block that you want the subnet to cover (for example, "10.0.0.0/24").
Required: Yes
Type: String
Update requires: Replacement (p. 86)
Note
If you update this property, you must also update the AvailabilityZone property.
MapPublicIpOnLaunch
Indicates whether instances that are launched in this subnet receive a public IP address. By default,
the value is false.
Required: No
Type: Boolean
Update requires: No interruption (p. 86).
Tags
An arbitrary set of tags (key–value pairs) for this subnet.
Required: No
Type: AWS CloudFormation Resource Tags (p. 618)
Update requires: No interruption (p. 86).
VpcId
A Ref structure that contains the ID of the VPC on which you want to create the subnet. The VPC ID
is provided as the value of the "Ref" property, as: { "Ref": "VPCID" }.
Required: Yes
Type: Ref ID
Update requires: Replacement (p. 86)
Note
If you update this property, you must also update the CidrBlock property.
Return Values
You can pass the logical ID of the resource to an intrinsic function to get a value back from the resource.
The value that is returned depends on the function used.
API Version 2010-05-15
386
AWS CloudFormation User Guide
AWS::EC2::SubnetNetworkAclAssociation
Ref
When the logical ID of this resource is provided to the Ref intrinsic function, Ref returns the resource
name.
For more information about using the Ref function, see Ref (p. 669).
Fn::GetAtt
Fn::GetAtt returns a value for a specified attribute of this type. This section lists the available attributes
and corresponding return values.
AvailabilityZone
Returns the availability zone (for example, "us-east-1a") of this subnet.
Example:
{ "Fn::GetAtt" : [ "mySubnet", "AvailabilityZone" ] }
For more information about using Fn:GetAtt, see Fn::GetAtt (p. 661).
Example
The following example snippet uses the VPC ID from a VPC named myVPC that was declared elsewhere
in the same template.
{
"AWSTemplateFormatVersion" : "2010-09-09",
"Resources" : {
"mySubnet" : {
"Type" : "AWS::EC2::Subnet",
"Properties" : {
"VpcId" : { "Ref" : "myVPC" },
"CidrBlock" : "10.0.0.0/24",
"AvailabilityZone" : "us-east-1a",
"Tags" : [ { "Key" : "foo", "Value" : "bar" } ]
}
}
}
}
See Also
• CreateSubnet in the Amazon EC2 API Reference
• Using Tags in the Amazon Elastic Compute Cloud User Guide
AWS::EC2::SubnetNetworkAclAssociation
Associates a subnet with a network ACL.
For more information, go to ReplaceNetworkAclAssociation in the Amazon EC2 API Reference.
API Version 2010-05-15
387
AWS CloudFormation User Guide
AWS::EC2::SubnetNetworkAclAssociation
Note
The EC2 API Reference refers to the SubnetId parameter as the AssociationId.
Syntax
"Type" : "AWS::EC2::SubnetNetworkAclAssociation",
"Properties" : {
"SubnetId (p. 388)" : { String }
"NetworkAclId (p. 388)" : { String }
}
Properties
SubnetId
The ID representing the current association between the original network ACL and the subnet.
Required: Yes
Type: String
Update requires: Replacement (p. 86)
NetworkAclId
The ID of the new ACL to associate with the subnet.
Required: Yes
Type: String
Update requires: Replacement (p. 86)
Return Values
Ref
When the logical ID of this resource is provided to the Ref intrinsic function, Ref returns the resource
name.
For more information about using the Ref function, see Ref (p. 669).
Fn::GetAtt
Fn::GetAtt returns a value for a specified attribute of this type. This section lists the available attributes
and corresponding return values.
AssociationId
Returns the value of this object's SubnetId (p. 388) property.
For more information about using Fn:GetAtt, see Fn::GetAtt (p. 661).
API Version 2010-05-15
388
AWS CloudFormation User Guide
AWS::EC2::SubnetRouteTableAssociation
Template Examples
Example
{
"AWSTemplateFormatVersion" : "2010-09-09",
"Resources" : {
"mySubnetNetworkAclAssociation" : {
"Type" : "AWS::EC2::SubnetNetworkAclAssociation",
"Properties" : {
"SubnetId" : { "Ref" : "mySubnet" },
"NetworkAclId" : { "Ref" : "myNetworkAcl" },
}
}
}
}
AWS::EC2::SubnetRouteTableAssociation
Associates a subnet with a route table.
Syntax
{
"Type" : "AWS::EC2::SubnetRouteTableAssociation",
"Properties" : {
"RouteTableId (p. 389)" : String,
"SubnetId (p. 389)" : String,
}
}
Properties
RouteTableId
The ID of the route table. This is commonly written as a reference to a route table declared elsewhere
in the template. For example:
"RouteTableId" : { "Ref" : "myRouteTable" }
Required: Yes
Type: String
Update requires: No interruption (p. 86). However, the physical ID changes when the route table ID
is changed.
SubnetId
The ID of the subnet. This is commonly written as a reference to a subnet declared elsewhere in the
template. For example:
"SubnetId" : { "Ref" : "mySubnet" }
API Version 2010-05-15
389
AWS CloudFormation User Guide
AWS::EC2::Volume
Required: Yes
Type: String
Update requires: Replacement (p. 86)
Return Value
When the logical ID of this resource is provided to the Ref intrinsic function, Ref returns the resource
name. For example:
{ "Ref": "MyRTA" }
For the subnet route table association with the logical ID "MyRTA", Ref will return the AWS resource
name.
For more information about using the Ref function, see Ref (p. 669).
Example
{
"AWSTemplateFormatVersion" : "2010-09-09",
"Resources" : {
"mySubnetRouteTableAssociation" : {
"Type" : "AWS::EC2::SubnetRouteTableAssociation",
"Properties" : {
"SubnetId" : { "Ref" : "mySubnet" },
"RouteTableId" : { "Ref" : "myRouteTable" }
}
}
}
}
See Also
• AssociateRouteTable in the Amazon EC2 API Reference
AWS::EC2::Volume
The AWS::EC2::Volume type creates a new Amazon Elastic Block Store volume.
You can set a deletion policy for your volume to control how AWS CloudFormation handles the volume
when the stack is deleted. For Amazon Elastic Block Store volumes, you can choose to retain the volume,
to delete the volume, or to create a snapshot of the volume. For more information, see DeletionPolicy
Attribute (p. 641).
Note
If you set a deletion policy that creates a snapshot, all tags on the volume are included in the
snapshot.
API Version 2010-05-15
390
AWS CloudFormation User Guide
AWS::EC2::Volume
Syntax
{
"Type":"AWS::EC2::Volume",
"Properties" : {
"AvailabilityZone (p. 391)" : String,
"Encrypted (p. 391)" : Boolean,
"Iops (p. 391)" : Number,
"KmsKeyId (p. 391)" : String,
"Size (p. 392)" : String,
"SnapshotId (p. 392)" : String,
"Tags (p. 392)" : [ Resource Tag, ... ],
"VolumeType (p. 392) : String
}
}
Properties
AvailabilityZone
The Availability Zone in which to create the new volume.
Required: Yes
Type: String
Update requires: Updates are not supported.
Encrypted
Indicates whether the volume is encrypted. Encrypted Amazon EBS volumes can only be attached
to instance types that support Amazon EBS encryption. Volumes that are created from encrypted
snapshots are automatically encrypted.You cannot create an encrypted volume from an unencrypted
snapshot or vice versa. If your AMI uses encrypted volumes, you can only launch the AMI on supported
instance types. For more information, see Amazon EBS encryption in the Amazon EC2 User Guide
for Linux Instances.
Required: Conditional. If you specify the KmsKeyId property, you must enable encryption.
Type: Boolean
Update requires: Updates are not supported.
Iops
The number of I/O operations per second (IOPS) that the volume supports. This can be any integer
value from 1–4000.
Required: Conditional. Required when the volume type is io1; not used with other volume types.
Type: Number
Update requires: Updates are not supported.
KmsKeyId
The Amazon Resource Name (ARN) of the AWS Key Management Service master key that is used
to create the encrypted volume, such as
arn:aws:kms:us-east-1:012345678910:key/abcd1234-a123-456a-a12b-a123b4cd56ef.
If you create an encrypted volume and don't specify this property, the default master key is used.
Required: No
API Version 2010-05-15
391
AWS CloudFormation User Guide
AWS::EC2::Volume
Type: String
Update requires: Updates are not supported.
Size
The size of the volume, in gibibytes (GiBs). For more information about the valid sizes for each volume
type, see the CreateVolume Size parameter in the Amazon EC2 API Reference.
If you specify the SnapshotId property, the size must be equal to or greater than the snapshot size
(by default, the size will be the same size of the snapshot).
Note
The size of the EBS volume must accommodate the IOPS you need. There is a 10 : 1 ratio
between IOPS and Gibibytes (GiB) of storage, so for 100 PIOPS, you need at least 10 GiB
storage on the root volume.
Required: Conditional. Required if you are not creating a volume from a snapshot.
Type: String
Update requires: Updates are not supported.
SnapshotId
The snapshot from which to create the new volume.
Required: Conditional Required if you are creating a volume from a snapshot. If you do not specify
a value for the SnapshotId property, you must specify a value for the Size property.
Type: String
Update requires: Updates are not supported.
Tags
An arbitrary set of tags (key–value pairs) for this volume.
Required: No
Type: AWS CloudFormation Resource Tags (p. 618)
Update requires: Updates are not supported.
VolumeType
The volume type. You can specify standard, io1, or gp2. If you set the type to io1, you must also
set the Iops property. For more information about these values and the default value, see
CreateVolume in the Amazon EC2 API Reference.
Required: No
Type: String
Update requires: Updates are not supported.
Return Values
Ref
When you specify an AWS::EC2::Volume type as an argument to the Ref function, AWS CloudFormation
returns the volume's physical ID. For example: vol-5cb85026.
For more information about using the Ref function, see Ref (p. 669).
API Version 2010-05-15
392
AWS CloudFormation User Guide
AWS::EC2::VolumeAttachment
Examples
Example Encrypted Amazon EBS volume with DeletionPolicy to make a snapshot on delete
"NewVolume" : {
"Type" : "AWS::EC2::Volume",
"Properties" : {
"Size" : "100",
"Encrypted" : "true",
"AvailabilityZone" : { "Fn::GetAtt" : [ "Ec2Instance", "AvailabilityZone"
] },
"Tags" : [ {
"Key" : "MyTag",
"Value" : "TagValue"
} ]
},
"DeletionPolicy" : "Snapshot"
}
Example Amazon EBS volume with 100 provisioned IOPS
"NewVolume" : {
"Type" : "AWS::EC2::Volume",
"Properties" : {
"Size" : "100",
"VolumeType" : "io1",
"Iops" : "100",
"AvailabilityZone" : { "Fn::GetAtt" : [ "EC2Instance", "AvailabilityZone"
] }
}
}
See Also
• CreateVolume in the Amazon Elastic Compute Cloud API Reference
• DeletionPolicy Attribute (p. 641)
AWS::EC2::VolumeAttachment
Attaches an Amazon EBS volume to a running instance and exposes it to the instance with the specified
device name.
Important
Before this resource can be deleted (and therefore the volume detached), you must first unmount
the volume in the instance. Failure to do so results in the volume being stuck in the busy state
while it is trying to detach, which could possibly damage the file system or the data it contains.
If an Amazon EBS volume is the root device of an instance, it cannot be detached while the
instance is in the "running" state. To detach the root volume, stop the instance first.
If the root volume is detached from an instance with an AWS Marketplace product code, then
the AWS Marketplace product codes from that volume are no longer associated with the instance.
API Version 2010-05-15
393
AWS CloudFormation User Guide
AWS::EC2::VolumeAttachment
Syntax
{
"Type":"AWS::EC2::VolumeAttachment",
"Properties" : {
"Device (p. 394)" : String,
"InstanceId (p. 394)" : String,
"VolumeId (p. 394)" : String
}
}
Properties
Device
How the device is exposed to the instance (e.g., /dev/sdh, or xvdh).
Required: Yes
Type: String
Update requires: Updates are not supported.
InstanceId
The ID of the instance to which the volume attaches. This value can be a reference to an
AWS::EC2::Instance (p. 354) resource, or it can be the physical ID of an existing EC2 instance.
Required: Yes
Type: String
Update requires: Updates are not supported.
VolumeId
The ID of the Amazon EBS volume. The volume and instance must be within the same Availability
Zone. This value can be a reference to an AWS::EC2::Volume (p. 390) resource, or it can be the
volume ID of an existing Amazon EBS volume.
Required: Yes
Type: String
Update requires: Updates are not supported.
Example
This example attaches an EC2 EBS volume to the EC2 instance with the logical name "Ec2Instance".
"NewVolume" : {
"Type" : "AWS::EC2::Volume",
"Properties" : {
"Size" : "100",
"AvailabilityZone" : { "Fn::GetAtt" : [ "Ec2Instance", "AvailabilityZone"
] },
"Tags" : [ {
"Key" : "MyTag",
API Version 2010-05-15
394
AWS CloudFormation User Guide
AWS::EC2::VPC
"Value" : "TagValue"
} ]
}
},
"MountPoint" : {
"Type" : "AWS::EC2::VolumeAttachment",
"Properties" : {
"InstanceId" : { "Ref" : "Ec2Instance" },
"VolumeId" : { "Ref" : "NewVolume" },
"Device" : "/dev/sdh"
}
}
See Also
•
•
•
•
•
Amazon Elastic Block Store (Amazon EBS) in the Amazon Elastic Compute Cloud User Guide.
Attaching a Volume to an Instance in the Amazon Elastic Compute Cloud User Guide
Detaching an Amazon EBS Volume from an Instance in the Amazon Elastic Compute Cloud User Guide
AttachVolume in the Amazon Elastic Compute Cloud API Reference
DetachVolume in the Amazon Elastic Compute Cloud API Reference
AWS::EC2::VPC
Creates a Virtual Private Cloud (VPC) with the CIDR block that you specify.
Syntax
{
"Type" : "AWS::EC2::VPC",
"Properties" : {
"CidrBlock (p. 395)" : String,
"EnableDnsSupport (p. 395)" : Boolean,
"EnableDnsHostnames (p. 396)" : Boolean,
"InstanceTenancy (p. 396)" : String,
"Tags (p. 396)" : [ Resource Tag, ... ]
}
}
Properties
CidrBlock
The CIDR block you want the VPC to cover. For example: "10.0.0.0/16".
Required: Yes
Type: String
Update requires: Replacement (p. 86)
EnableDnsSupport
Specifies whether DNS resolution is supported for the VPC. If this attribute is true, the Amazon
DNS server resolves DNS hostnames for your instances to their corresponding IP addresses;
otherwise, it does not. By default the value is set to true.
API Version 2010-05-15
395
AWS CloudFormation User Guide
AWS::EC2::VPC
Required: No
Type: Boolean
Update requires: No interruption (p. 86)
EnableDnsHostnames
Specifies whether the instances launched in the VPC get DNS hostnames. If this attribute is true,
instances in the VPC get DNS hostnames; otherwise, they do not. You can only set
EnableDnsHostnames to true if you also set the EnableDnsSupport attribute to true. By default,
the value is set to false.
Required: No
Type: Boolean
Update requires: No interruption (p. 86)
InstanceTenancy
The allowed tenancy of instances launched into the VPC.
• "default": Instances can be launched with any tenancy.
• "dedicated": Any instance launched into the VPC will automatically be dedicated, regardless of
the tenancy option you specify when you launch the instance.
Required: No
Type: String
Valid values: "default" or "dedicated"
Update requires: Replacement (p. 86)
Tags
An arbitrary set of tags (key–value pairs) for this VPC.
Required: No
Type: AWS CloudFormation Resource Tags (p. 618)
Update requires: No interruption (p. 86).
Return Values
Ref
When the logical ID of this resource is provided to the Ref intrinsic function, Ref returns the resource
name.
For more information about using the Ref function, see Ref (p. 669).
Fn::GetAtt
Fn::GetAtt returns a value for a specified attribute of this type. This section lists the available attributes
and corresponding return values.
You can obtain the following default resource IDs, which AWS creates whenever you create a VPC.
DefaultNetworkAcl
The default network ACL ID that is associated with the VPC. For example, acl-814dafe3.
DefaultSecurityGroup
The default security group ID that is associated with the VPC. For example, sg-b178e0d3.
API Version 2010-05-15
396
AWS CloudFormation User Guide
AWS::EC2::VPCDHCPOptionsAssociation
For more information about using Fn:GetAtt, see Fn::GetAtt (p. 661).
Example
{
"AWSTemplateFormatVersion" : "2010-09-09",
"Resources" : {
"myVPC" : {
"Type" : "AWS::EC2::VPC",
"Properties" : {
"CidrBlock" : "10.0.0.0/16",
"EnableDnsSupport" : "false",
"EnableDnsHostnames" : "false",
"InstanceTenancy" : "dedicated",
"Tags" : [ {"Key" : "foo", "Value" : "bar"} ]
}
}
}
}
See Also
• CreateVpc in the Amazon EC2 API Reference.
AWS::EC2::VPCDHCPOptionsAssociation
Associates a set of DHCP options (that you've previously created) with the specified VPC.
Syntax
{
"Type" : "AWS::EC2::VPCDHCPOptionsAssociation",
"Properties" : {
"DhcpOptionsId (p. 397)" : String,
"VpcId (p. 397)" : String
}
}
Properties
DhcpOptionsId
The ID of the DHCP options you want to associate with the VPC. Specify default if you want the
VPC to use no DHCP options.
Required: Yes
Type: String
Update requires: No interruption (p. 86)
VpcId
The ID of the VPC to associate with this DHCP options set.
API Version 2010-05-15
397
AWS CloudFormation User Guide
AWS::EC2::VPCGatewayAttachment
Required: Yes
Type: String
Update requires: Replacement (p. 86)
Return Values
Ref
When the logical ID of this resource is provided to the Ref intrinsic function, Ref returns the resource
name.
For more information about using the Ref function, see Ref (p. 669).
Example
The following snippet uses the Ref intrinsic function to associate the myDHCPOptions DHCP options
with the myVPC VPC. The VPC and DHCP options can be declared in the same template or added as
input parameters. For more information about the VPC or the DHCP options resources, see
AWS::EC2::VPC (p. 395) or AWS::EC2::DHCPOptions (p. 349).
"myVPCDHCPOptionsAssociation" : {
"Type" : "AWS::EC2::VPCDHCPOptionsAssociation",
"Properties" : {
"VpcId" : {"Ref" : "myVPC"},
"DhcpOptionsId" : {"Ref" : "myDHCPOptions"}
}
}
See Also
• AssociateDhcpOptions in the Amazon EC2 API Reference.
AWS::EC2::VPCGatewayAttachment
Attaches a gateway to a VPC.
Syntax
{
"Type" : "AWS::EC2::VPCGatewayAttachment",
"Properties" : {
"InternetGatewayId (p. 399)" : String,
"VpcId (p. 399)" : String,
"VpnGatewayId (p. 399)" : String
}
}
API Version 2010-05-15
398
AWS CloudFormation User Guide
AWS::EC2::VPCGatewayAttachment
Properties
InternetGatewayId
The ID of the Internet gateway.
Required: Conditional You must specify either InternetGatewayId or VpnGatewayId, but not both.
Type: String
Update requires: No interruption (p. 86)
VpcId
The ID of the VPC to associate with this gateway.
Required: Yes
Type: String
Update requires: No interruption (p. 86)
VpnGatewayId
The ID of the virtual private network (VPN) gateway to attach to the VPC.
Required: Conditional You must specify either InternetGatewayId or VpnGatewayId, but not both.
Type: String
Update requires: No interruption (p. 86)
Return Values
Ref
When the logical ID of this resource is provided to the Ref intrinsic function, Ref returns the resource
name.
For more information about using the Ref function, see Ref (p. 669).
API Version 2010-05-15
399
AWS CloudFormation User Guide
AWS::EC2::VPCPeeringConnection
Examples
Example Attaching both an Internet gateway and a VPN gateway to a VPC
To attach both an Internet gateway and a VPN gateway to a VPC, you must specify two separate
AWS::EC2::VPCGatewayAttachment resources:
"AttachGateway" : {
"Type" : "AWS::EC2::VPCGatewayAttachment",
"Properties" : {
"VpcId" : { "Ref" : "VPC" },
"InternetGatewayId" : { "Ref" : "myInternetGateway" }
}
},
"AttachVpnGateway" : {
"Type" : "AWS::EC2::VPCGatewayAttachment",
"Properties" : {
"VpcId" : { "Ref" : "VPC" },
"VpnGatewayId" : { "Ref" : "myVPNGateway" }
}
},
See Also
• AttachVpnGateway in the Amazon EC2 API Reference.
AWS::EC2::VPCPeeringConnection
A VPC peering connection enables a network connection between two virtual private clouds (VPCs) so
that you can route traffic between them by means of a private IP addresses. For more information about
VPC peering and its limitation, see VPC Peering Overview in the Amazon VPC Peering Guide.
Note
With AWS CloudFormation, you can create a peering connection only between VPCs in the
same AWS account. You cannot create a peering connection with another AWS account.
Syntax
{
"Type" : "AWS::EC2::VPCPeeringConnection",
"Properties" : {
"PeerVpcId (p. 400)" : String,
"Tags (p. 401)" : [ Resource Tag, ... ],
"VpcId (p. 401)" : String
}
}
Properties
PeerVpcId
The ID of the VPC with which you are creating the peering connection.
API Version 2010-05-15
400
AWS CloudFormation User Guide
AWS::EC2::VPCPeeringConnection
Required: Yes
Type: String
Update requires: Replacement (p. 86)
Tags
An arbitrary set of tags (key–value pairs) for this resource.
Required: No
Type: AWS CloudFormation Resource Tags (p. 618)
Update requires: No interruption (p. 86).
VpcId
The ID of the VPC that is requesting a peering connection.
Required: Yes
Type: String
Update requires: Replacement (p. 86)
Return Values
Ref
When the logical ID of this resource is provided to the Ref intrinsic function, Ref returns the resource
name.
For more information about using the Ref function, see Ref (p. 669).
API Version 2010-05-15
401
AWS CloudFormation User Guide
AWS::EC2::VPCPeeringConnection
Examples
API Version 2010-05-15
402
AWS CloudFormation User Guide
AWS::EC2::VPCPeeringConnection
Example A sample VPC peering connection
The following sample template creates two VPCs to demonstrate how to configure a peering connection.
For a VPC peering connection, you must create a VPC peering route for each VPC route table, as shown
in the sample by PeeringRoute1 and PeeringRoute2. If you launch the template, you can SSH into
the myInstance instance and then ping the myPrivateInstance instance even though both instances
are in separate VPCs.
{
"AWSTemplateFormatVersion": "2010-09-09",
"Description": "Creates a VPC that and then creates a peering connection
with an existing VPC that you specify.",
"Parameters": {
"EC2KeyPairName": {
"Description": "Name of an existing EC2 KeyPair to enable SSH access
to the instances",
"Type": "AWS::EC2::KeyPair::KeyName",
"ConstraintDescription" : "must be the name of an existing EC2
KeyPair."
},
"InstanceType": {
"Description": "EC2 instance type",
"Type": "String",
"Default": "t1.micro",
"AllowedValues": [
"t1.micro",
"m1.small",
"m3.medium",
"m3.large",
"m3.xlarge",
"m3.2xlarge",
"c3.large",
"c3.xlarge",
"c3.2xlarge",
"c3.4xlarge",
"c3.8xlarge"
],
"ConstraintDescription": "must be a valid EC2 instance type."
},
"myVPCIDCIDRRange": {
"Description": "The IP address range for your new VPC.",
"Type": "String",
"MinLength": "9",
"MaxLength": "18",
"Default": "10.1.0.0/16",
"AllowedPattern":
"(\\d{1,3})\\.(\\d{1,3})\\.(\\d{1,3})\\.(\\d{1,3})/(\\d{1,2})",
"ConstraintDescription": "must be a valid IP CIDR range of the form
x.x.x.x/x."
},
"myPrivateVPCIDCIDRRange": {
"Description": "The IP address range for your new Private VPC.",
"Type": "String",
"MinLength": "9",
"MaxLength": "18",
"Default": "10.0.0.0/16",
"AllowedPattern":
"(\\d{1,3})\\.(\\d{1,3})\\.(\\d{1,3})\\.(\\d{1,3})/(\\d{1,2})",
API Version 2010-05-15
403
AWS CloudFormation User Guide
AWS::EC2::VPCPeeringConnection
"ConstraintDescription": "must be a valid IP CIDR range of the form
x.x.x.x/x."
},
"EC2SubnetCIDRRange": {
"Description": "The IP address range for a subnet in myPrivateVPC.",
"Type": "String",
"MinLength": "9",
"MaxLength": "18",
"Default": "10.0.0.0/24",
"AllowedPattern":
"(\\d{1,3})\\.(\\d{1,3})\\.(\\d{1,3})\\.(\\d{1,3})/(\\d{1,2})",
"ConstraintDescription": "must be a valid IP CIDR range of the form
x.x.x.x/x."
},
"EC2PublicSubnetCIDRRange": {
"Description": "The IP address range for a subnet in myVPC.",
"Type": "String",
"MinLength": "9",
"MaxLength": "18",
"Default": "10.1.0.0/24",
"AllowedPattern":
"(\\d{1,3})\\.(\\d{1,3})\\.(\\d{1,3})\\.(\\d{1,3})/(\\d{1,2})",
"ConstraintDescription": "must be a valid IP CIDR range of the form
x.x.x.x/x."
}
},
"Mappings": {
"AWSRegionToAMI": {
"us-east-1": {
"64": "ami-fb8e9292"
},
"us-west-2": {
"64": "ami-043a5034"
},
"us-west-1": {
"64": "ami-7aba833f"
},
"eu-west-1": {
"64": "ami-2918e35e"
},
"ap-southeast-1": {
"64": "ami-b40d5ee6"
},
"ap-southeast-2": {
"64": "ami-3b4bd301"
},
"ap-northeast-1": {
"64": "ami-c9562fc8"
},
"sa-east-1": {
"64": "ami-215dff3c"
}
}
},
"Resources": {
"myPrivateVPC": {
"Type": "AWS::EC2::VPC",
API Version 2010-05-15
404
AWS CloudFormation User Guide
AWS::EC2::VPCPeeringConnection
"Properties": {
"CidrBlock": {"Ref": "myPrivateVPCIDCIDRRange"},
"EnableDnsSupport": false,
"EnableDnsHostnames": false,
"InstanceTenancy": "default"
}
},
"myPrivateEC2Subnet" : {
"Type" : "AWS::EC2::Subnet",
"Properties" : {
"VpcId" : { "Ref" : "myPrivateVPC" },
"CidrBlock" : {"Ref": "EC2SubnetCIDRRange"}
}
},
"RouteTable" : {
"Type" : "AWS::EC2::RouteTable",
"Properties" : {
"VpcId" : {"Ref" : "myPrivateVPC"}
}
},
"PeeringRoute1" : {
"Type" : "AWS::EC2::Route",
"Properties" : {
"DestinationCidrBlock": "0.0.0.0/0",
"RouteTableId" : { "Ref" : "RouteTable" },
"VpcPeeringConnectionId" : { "Ref" : "myVPCPeeringConnection"
}
}
},
"SubnetRouteTableAssociation" : {
"Type" : "AWS::EC2::SubnetRouteTableAssociation",
"Properties" : {
"SubnetId" : { "Ref" : "myPrivateEC2Subnet" },
"RouteTableId" : { "Ref" : "RouteTable" }
}
},
"myVPC": {
"Type": "AWS::EC2::VPC",
"Properties": {
"CidrBlock": {"Ref": "myVPCIDCIDRRange"},
"EnableDnsSupport": true,
"EnableDnsHostnames": true,
"InstanceTenancy": "default"
}
},
"PublicSubnet": {
"Type": "AWS::EC2::Subnet",
"Properties": {
"CidrBlock": {"Ref": "EC2PublicSubnetCIDRRange"},
"VpcId": {
"Ref": "myVPC"
}
}
},
"myInternetGateway": {
"Type": "AWS::EC2::InternetGateway"
},
"AttachGateway": {
API Version 2010-05-15
405
AWS CloudFormation User Guide
AWS::EC2::VPCPeeringConnection
"Type": "AWS::EC2::VPCGatewayAttachment",
"Properties": {
"VpcId": {
"Ref": "myVPC"
},
"InternetGatewayId": {
"Ref": "myInternetGateway"
}
}
},
"PublicRouteTable": {
"Type": "AWS::EC2::RouteTable",
"Properties": {
"VpcId": {
"Ref": "myVPC"
}
}
},
"PeeringRoute2" : {
"Type" : "AWS::EC2::Route",
"Properties" : {
"DestinationCidrBlock": { "Ref" : "myPrivateVPCIDCIDRRange" },
"RouteTableId" : { "Ref" : "PublicRouteTable" },
"VpcPeeringConnectionId" : { "Ref" : "myVPCPeeringConnection"
}
}
},
"PublicRoute": {
"Type": "AWS::EC2::Route",
"DependsOn": "AttachGateway",
"Properties": {
"RouteTableId": {
"Ref": "PublicRouteTable"
},
"DestinationCidrBlock": "0.0.0.0/0",
"GatewayId": {
"Ref": "myInternetGateway"
}
}
},
"PublicSubnetRouteTableAssociation": {
"Type": "AWS::EC2::SubnetRouteTableAssociation",
"Properties": {
"SubnetId": {
"Ref": "PublicSubnet"
},
"RouteTableId": {
"Ref": "PublicRouteTable"
}
}
},
"myPrivateVPCEC2SecurityGroup" : {
"Type" : "AWS::EC2::SecurityGroup",
"Properties" : {
"GroupDescription": "Private instance security group",
"VpcId" : { "Ref" : "myPrivateVPC" },
"SecurityGroupIngress" : [
API Version 2010-05-15
406
AWS CloudFormation User Guide
AWS::EC2::VPCPeeringConnection
{"IpProtocol" : "-1", "FromPort" : "0", "ToPort" : "65535",
"CidrIp" : "0.0.0.0/0"}
]
}
},
"myVPCEC2SecurityGroup" : {
"Type" : "AWS::EC2::SecurityGroup",
"Properties" : {
"GroupDescription": "Public instance security group",
"VpcId" : { "Ref" : "myVPC" },
"SecurityGroupIngress" : [
{"IpProtocol" : "tcp", "FromPort" : "80", "ToPort" : "80",
"CidrIp" : "0.0.0.0/0"},
{"IpProtocol" : "tcp", "FromPort" : "22", "ToPort" : "22",
"CidrIp" : "0.0.0.0/0"}
]
}
},
"myPrivateInstance" : {
"Type" : "AWS::EC2::Instance",
"Properties" : {
"SecurityGroupIds" : [{ "Ref" : "myPrivateVPCEC2SecurityGroup"
}],
"SubnetId" : { "Ref" : "myPrivateEC2Subnet" },
"KeyName": {
"Ref": "EC2KeyPairName"
},
"ImageId": {
"Fn::FindInMap": [
"AWSRegionToAMI",
{"Ref": "AWS::Region"},
"64"
]
}
}
},
"myInstance" : {
"Type" : "AWS::EC2::Instance",
"Properties" : {
"NetworkInterfaces": [ {
"AssociatePublicIpAddress": "true",
"DeviceIndex": "0",
"GroupSet": [{ "Ref" : "myVPCEC2SecurityGroup" }],
"SubnetId": { "Ref" : "PublicSubnet" }
} ],
"KeyName": {
"Ref": "EC2KeyPairName"
},
"ImageId": {
"Fn::FindInMap": [
"AWSRegionToAMI",
{"Ref": "AWS::Region"},
"64"
]
}
}
},
"myVPCPeeringConnection": {
API Version 2010-05-15
407
AWS CloudFormation User Guide
AWS::EC2::VPNConnection
"Type": "AWS::EC2::VPCPeeringConnection",
"Properties": {
"VpcId": {"Ref": "myVPC"},
"PeerVpcId": {"Ref": "myPrivateVPC"}
}
}
}
}
AWS::EC2::VPNConnection
Creates a new VPN connection between an existing virtual private gateway and a VPN customer gateway.
For more information, go to CreateVpnConnection in the Amazon EC2 API Reference.
Syntax
{
"Type" : "AWS::EC2::VPNConnection",
"Properties" : {
"Type (p. 408)" : String,
"CustomerGatewayId (p. 408)" : GatewayID,
"StaticRoutesOnly (p. 408)" : Boolean,
"Tags (p. 409)" : [ Resource Tag, ... ],
"VpnGatewayId (p. 409)" : GatewayID
}
}
Properties
Type
The type of VPN connection this virtual private gateway supports.
Example: "ipsec.1"
Required: Yes
Type: String
Update requires: Replacement (p. 86)
CustomerGatewayId
The ID of the customer gateway. This can either be an embedded JSON object or a reference to a
Gateway ID.
Required: Yes
Type: String
Update requires: Replacement (p. 86)
StaticRoutesOnly
Indicates whether the VPN connection requires static routes.
Required: Conditional: If you are creating a VPN connection for a device that does not support Border
Gateway Protocol (BGP), you must specify true.
API Version 2010-05-15
408
AWS CloudFormation User Guide
AWS::EC2::VPNConnection
Type: Boolean
Update requires: Replacement (p. 86)
Tags
The tags that you want to attach to the resource.
Required: No
Type: AWS CloudFormation Resource Tags (p. 618).
Update requires: No interruption (p. 86).
VpnGatewayId
The ID of the virtual private gateway. This can either be an embedded JSON object or a reference
to a Gateway ID.
Required: Yes
Type: String
Update requires: Replacement (p. 86)
Return Value
When the logical ID of this resource is provided to the Ref intrinsic function, Ref returns the resource
name. For example:
{ "Ref": "MyVPNConnection" }
For the VPNConnection with the logical ID "MyVPNConnection", Ref will return the VPN connection's
resource name.
For more information about using the Ref function, see Ref (p. 669).
Template Examples
Example VPNConnection
{
"AWSTemplateFormatVersion" : "2010-09-09",
"Resources" : {
"myVPNConnection" : {
"Type" : "AWS::EC2::VPNConnection",
"Properties" : {
"Type" : "ipsec.1",
"StaticRoutesOnly" : "true",
"CustomerGatewayId" : {"Ref" : "myCustomerGateway"},
"VpnGatewayId" : {"Ref" : "myVPNGateway"}
}
}
}
}
API Version 2010-05-15
409
AWS CloudFormation User Guide
AWS::EC2::VPNConnectionRoute
AWS::EC2::VPNConnectionRoute
A static route that is associated with a VPN connection between an existing virtual private gateway and
a VPN customer gateway. The static route allows traffic to be routed from the virtual private gateway to
the VPN customer gateway.
Syntax
{
"Type" : "AWS::EC2::VPNConnectionRoute",
"Properties" : {
"DestinationCidrBlock (p. 410)" : String
"VpnConnectionId (p. 410)" : String,
}
}
Properties
DestinationCidrBlock
The CIDR block that is associated with the local subnet of the customer network.
Required: Yes.
Type: String
Update requires: Replacement (p. 86)
VpnConnectionId
The ID of the VPN connection.
Required: Yes.
Type: String
Update requires: Replacement (p. 86)
Return Values
Ref
When the logical ID of this resource is provided to the Ref intrinsic function, Ref returns the resource
name.
For more information about using the Ref function, see Ref (p. 669).
API Version 2010-05-15
410
AWS CloudFormation User Guide
AWS::EC2::VPNGateway
Example
Example Specifying a static route
"MyConnectionRoute0" : {
"Type" : "AWS::EC2::VPNConnectionRoute",
"Properties" : {
"DestinationCidrBlock" : "10.0.0.0/16",
"VpnConnectionId" : {"Ref" : "Connection0"}
}
}
See Also
• CreateVpnConnectionRoute in the Amazon EC2 API Reference.
AWS::EC2::VPNGateway
Creates a virtual private gateway. A virtual private gateway is the VPC-side endpoint for your VPN
connection.
Syntax
{
"Type" : "AWS::EC2::VPNGateway",
"Properties" : {
"Type (p. 411)" : String,
"Tags (p. 411)" : [ Resource Tag, ... ]
}
}
Properties
Type
The type of VPN connection this virtual private gateway supports. The only valid value is "ipsec.1".
Required: Yes
Type: String
Update requires: Replacement (p. 86)
Tags
An arbitrary set of tags (key–value pairs) for this resource.
Required: No
Type: AWS CloudFormation Resource Tags (p. 618)
Update requires: No interruption (p. 86).
API Version 2010-05-15
411
AWS CloudFormation User Guide
AWS::EC2::VPNGatewayRoutePropagation
Return Value
When the logical ID of this resource is provided to the Ref intrinsic function, Ref returns the resource
name. For example:
{ "Ref": "MyVPNGateway" }
For the VPN gateway with the logical ID "MyVPNGateway", Ref will return the gateway's resource name.
For more information about using the Ref function, see Ref (p. 669).
Example
{
"AWSTemplateFormatVersion" : "2010-09-09",
"Resources" : {
"myVPNGateway" : {
"Type" : "AWS::EC2::VPNGateway",
"Properties" : {
"Type" : "ipsec.1",
"Tags" : [ { "Key" : "Use", "Value" : "Test" } ]
}
}
}
}
See Also
• CreateVpnGateway in the Amazon EC2 API Reference.
AWS::EC2::VPNGatewayRoutePropagation
Enables a virtual private gateway (VGW) to propagate routes to the routing tables of a VPC.
Note
If you reference a VPN gateway that is in the same template as your VPN gateway route
propagation, you must explicitly declare a dependency on the VPN gateway attachment. The
AWS::EC2::VPNGatewayRoutePropagation resource cannot use the VPN gateway until it
has successfully attached to the VPC. Add a DependsOn (p. 642) attribute in the
AWS::EC2::VPNGatewayRoutePropagation resource to explicitly declare a dependency on
the VPN gateway attachment.
Syntax
{
"Type" : "AWS::EC2::VPNGatewayRoutePropagation",
"Properties" : {
"RouteTableIds (p. 413)" : [ String, ... ],
"VpnGatewayId (p. 413)" : String
}
API Version 2010-05-15
412
AWS CloudFormation User Guide
AWS::EC2::VPNGatewayRoutePropagation
}
Properties
RouteTableIds
A list of routing table IDs that are associated with a VPC. The routing tables must be associated with
the same VPC that the virtual private gateway is attached to.
Required: Yes
Type: List of route table IDs
Update requires: No interruption (p. 86)
VpnGatewayId
The ID of the virtual private gateway that is attached to a VPC. The virtual private gateway must be
attached to the same VPC that the routing tables are associated with.
Required: Yes
Type: String
Update requires: No interruption (p. 86)
Return Value
When the logical ID of this resource is provided to the Ref intrinsic function, Ref returns the resource
name. For example:
{ "Ref": "myVPNGatewayRouteProp" }
For the VPN gateway with the logical ID myVPNGatewayRouteProp, Ref will return the gateway's
resource name.
For more information about using the Ref function, see Ref (p. 669).
Example
"myVPNGatewayRouteProp" : {
"Type" : "AWS::EC2::VPNGatewayRoutePropagation",
"Properties" : {
"RouteTableIds" : [{"Ref" : "PrivateRouteTable"}],
"VpnGatewayId" : {"Ref" : "VPNGateway"}
}
}
See Also
• EnableVgwRoutePropagation in the Amazon EC2 API Reference.
API Version 2010-05-15
413
AWS CloudFormation User Guide
AWS::ECS::Cluster
AWS::ECS::Cluster
The AWS::ECS::Cluster resource creates an Amazon EC2 Container Service (Amazon ECS) cluster.
This resource has no properties; use the Amazon ECS container agent to connect to the cluster. For
more information, see Amazon ECS Container Agent in the Amazon EC2 Container Service Developer
Guide.
Syntax
{
"Type" : "AWS::ECS::Cluster"
}
Return Values
Ref
When the logical ID of this resource is provided to the Ref intrinsic function, Ref returns the resource
name.
In the following sample, the Ref function returns the name of the MyECSCluster cluster, such as
MyStack-MyECSCluster-NT5EUXTNTXXD.
{ "Ref": "MyECSCluster" }
For more information about using the Ref function, see Ref (p. 669).
Example
The following sample declares an Amazon ECS cluster:
"MyCluster": {
"Type": "AWS::ECS::Cluster"
}
AWS::ECS::Service
The AWS::ECS::Service resource creates an Amazon EC2 Container Service (Amazon ECS) service
that runs and maintains the desired number of tasks and associated load balancers.
Syntax
{
"Type" : "AWS::ECS::Service",
"Properties" : {
"Cluster (p. 415)" : String,
"DesiredCount (p. 415)" : Integer,
"LoadBalancers (p. 415)" : [ Load Balancer Objects, ... ],
"Role (p. 415)" : String,
"TaskDefinition (p. 415)" : String
API Version 2010-05-15
414
AWS CloudFormation User Guide
AWS::ECS::Service
}
}
Properties
Note
When you use Auto Scaling or Amazon Elastic Compute Cloud (Amazon EC2) to create container
instances for an Amazon ECS cluster, the Amazon ECS service resource must have a
dependency on the Auto Scaling group or Amazon EC2 instances. That way the container
instances are available and associated with the Amazon ECS cluster before AWS CloudFormation
creates the Amazon ECS service.
Cluster
The name or Amazon Resource Name (ARN) of the cluster that you want to run your service on. If
you do not specify a cluster, Amazon ECS uses the default cluster.
Required: No
Type: String
Update requires: Replacement (p. 86)
DesiredCount
The number of simultaneous tasks, which you specify by using the TaskDefinition property, that
you want to run on the cluster.
Required: Yes
Type: String
Update requires: No interruption (p. 86)
LoadBalancers
A list of load balancer objects to associate with the cluster.
Required: No
Type: List of Amazon EC2 Container Service Service LoadBalancers (p. 587)
Update requires: Replacement (p. 86)
Role
The name or ARN of an AWS Identity and Access Management (IAM) role that allows your Amazon
ECS container agent to make calls to your load balancer.
Required: Conditional. This parameter is required only if you specify the LoadBalancers property.
Type: String
Update requires: Replacement (p. 86)
TaskDefinition
The family, family and revision (family:revision), or ARN of the task definition that you want to
run on the cluster.
Required: Yes
Type: String
Update requires: Some interruptions (p. 86)
API Version 2010-05-15
415
AWS CloudFormation User Guide
AWS::ECS::TaskDefinition
Return Values
Ref
When the logical ID of this resource is provided to the Ref intrinsic function, Ref returns the ARN.
In the following sample, the Ref function returns the ARN of the MyECSService service, such as
arn:aws:ecs:us-west-2:123456789012:service/sample-webapp.
{ "Ref": "MyECSService" }
For more information about using the Ref function, see Ref (p. 669).
Example
The following sample defines an Amazon ECS service that uses a cluster and task definition that are
declared elsewhere in the same template:
"WebApp": {
"Type": "AWS::ECS::Service",
"Properties" : {
"Cluster": { "Ref": "cluster" },
"DesiredCount": { "Ref": "desiredcount" },
"TaskDefinition" : { "Ref":"taskdefinition" }
}
}
Related Resources
For a complete sample template that shows how you can create an Amazon ECS cluster and service,
see Amazon EC2 Container Service Template Snippets (p. 186).
AWS::ECS::TaskDefinition
The AWS::ECS::TaskDefinition resource describes the container and volume definitions of an
Amazon EC2 Container Service (Amazon ECS) task. You can specify which Docker images to use, the
required resources, and other configurations related to launching the task definition through an Amazon
ECS service or task.
Syntax
{
"Type" : "AWS::ECS::TaskDefinition",
"Properties" : {
"ContainerDefinitions (p. 416)" : [ Container Definition, ... ],
"Volumes (p. 417)" : [ Volume Definition, ... ]
}
}
Properties
ContainerDefinitions
A list of container definitions in JSON format that describe the containers that make up your task.
API Version 2010-05-15
416
AWS CloudFormation User Guide
AWS::ECS::TaskDefinition
Required: Yes
Type: List of Amazon EC2 Container Service TaskDefinition ContainerDefinitions (p. 588)
Update requires: Replacement (p. 86)
Volumes
A list of volume definitions in JSON format for volumes that you can use in your container definitions.
Required: Yes
Type: List of Amazon EC2 Container Service TaskDefinition Volumes (p. 593)
Update requires: Replacement (p. 86)
Return Values
Ref
When the logical ID of this resource is provided to the Ref intrinsic function, Ref returns the Amazon
Resource Name (ARN).
In the following sample, the Ref function returns the ARN of the MyTaskDefinition task, such as
arn:aws:ecs:us-west-2:123456789012:task/1abf0f6d-a411-4033-b8eb-a4eed3ad252a.
{ "Ref": "MyTaskDefinition" }
For more information about using the Ref function, see Ref (p. 669).
Example
The following example defines an Amazon ECS task definition, which includes two container definitions
and one volume definition:
"taskdefinition": {
"Type": "AWS::ECS::TaskDefinition",
"Properties" : {
"ContainerDefinitions" : [
{
"Name": {"Ref": "AppName"},
"MountPoints": [
{
"SourceVolume": "my-vol",
"ContainerPath": "/var/www/my-vol"
}
],
"Image":"amazon/amazon-ecs-sample",
"Cpu": "10",
"PortMappings":[
{
"ContainerPort": {"Ref":"AppContainerPort"},
"HostPort": {"Ref":"AppHostPort"}
}
],
"EntryPoint": [
"/usr/sbin/apache2",
API Version 2010-05-15
417
AWS CloudFormation User Guide
AWS::ElastiCache::CacheCluster
"-D",
"FOREGROUND"
],
"Memory":"500",
"Essential": "true"
},
{
"Name": "busybox",
"Image": "busybox",
"Cpu": "10",
"EntryPoint": [
"sh",
"-c"
],
"Memory": "500",
"Command": [
"/bin/sh -c \"while true; do /bin/date > /var/www/my-vol/date; sleep
1; done\""
],
"Essential" : "false",
"VolumesFrom": [
{
"SourceContainer": {"Ref":"AppName"}
}
]
}],
"Volumes": [
{
"Host": {
"SourcePath": "/var/lib/docker/vfs/dir/"
},
"Name": "my-vol"
}]
}
}
Related Resources
For a complete sample template that shows how you can create an Amazon ECS cluster and service,
see Amazon EC2 Container Service Template Snippets (p. 186).
AWS::ElastiCache::CacheCluster
The AWS::ElastiCache::CacheCluster type creates an Amazon ElastiCache cache cluster.
Syntax
{
"Type" : "AWS::ElastiCache::CacheCluster",
"Properties" :
{
"AutoMinorVersionUpgrade (p. 419)" : Boolean,
"AZMode (p. 419)" : String,
"CacheNodeType (p. 419)" : String,
API Version 2010-05-15
418
AWS CloudFormation User Guide
AWS::ElastiCache::CacheCluster
"CacheParameterGroupName (p. 419)" : String,
"CacheSecurityGroupNames (p. 420)" : [ String, ... ],
"CacheSubnetGroupName (p. 420)" : String,
"ClusterName (p. 420)" : String,
"Engine (p. 420)" : String,
"EngineVersion (p. 420)" : String,
"NotificationTopicArn (p. 420)" : String,
"NumCacheNodes (p. 421)" : String,
"Port (p. 421)" : Integer,
"PreferredAvailabilityZone (p. 421)" : String,
"PreferredAvailabilityZones (p. 421)" : [String, ... ],
"PreferredMaintenanceWindow (p. 421)" : String,
"SnapshotArns (p. 422)" : [String, ... ],
"SnapshotName (p. 422)" : String,
"SnapshotRetentionLimit (p. 422)" : Integer,
"SnapshotWindow (p. 422)" : String,
"VpcSecurityGroupIds (p. 422)" : [String, ...]
}
}
Properties
For valid values, see CreateCacheCluster in the Amazon ElastiCache API Reference.
AutoMinorVersionUpgrade
Indicates that minor engine upgrades will be applied automatically to the cache cluster during the
maintenance window.
Required: No
Type: Boolean
Default: true
Update requires: No interruption (p. 86)
AZMode
For Memcached cache clusters, indicates whether the nodes are created in a single Availability Zone
or across multiple Availability Zones in the cluster's region.
Required: Conditional. If you specify multiple Availability Zones in the
PreferredAvailabilityZones property, you must specify cross Availability Zones for this property.
Type: String
Update requires: No interruption (p. 86)
CacheNodeType
The compute and memory capacity of nodes in a cache cluster.
Required: Yes
Type: String
Update requires: Replacement (p. 86)
CacheParameterGroupName
The name of the cache parameter group that is associated with this cache cluster.
Required: No
API Version 2010-05-15
419
AWS CloudFormation User Guide
AWS::ElastiCache::CacheCluster
Type: String
Update requires: Some interruptions (p. 86)
CacheSecurityGroupNames
A list of cache security group names that are associated with this cache cluster. If your cache cluster
is in a VPC, specify the VpcSecurityGroupIds property instead.
Required: Conditional: If your cache cluster isn't in a VPC, you must specify this property.
Type: List of strings
Update requires: No interruption (p. 86)
CacheSubnetGroupName
The cache subnet group that you associate with a cache cluster.
Required: No
Type: String
Update requires: Replacement (p. 86)
ClusterName
A name for the cache cluster. If you don't specify a name, AWS CloudFormation generates a unique
physical ID and uses that ID for the cache cluster. For more information, see Name Type (p. 608).
Important
If you specify a name, you cannot do updates that require this resource to be replaced. You
can still do updates that require no or some interruption. If you must replace the resource,
specify a new name.
The name must contain 1 to 20 alphanumeric characters or hyphens. The name must start with a
letter and cannot end with a hyphen or contain two consecutive hyphens.
Required: No
Type: String
Update requires: Replacement (p. 86)
Engine
The name of the cache engine to be used for this cache cluster, such as memcached or redis.
Required: Yes
Type: String
Update requires: Replacement (p. 86)
EngineVersion
The version of the cache engine to be used for this cluster.
Required: No
Type: String
Update requires: Some interruptions (p. 86)
NotificationTopicArn
The Amazon Resource Name (ARN) of the Amazon Simple Notification Service (SNS) topic to which
notifications will be sent.
Required: No
Type: String
API Version 2010-05-15
420
AWS CloudFormation User Guide
AWS::ElastiCache::CacheCluster
Update requires: No interruption (p. 86)
NumCacheNodes
The number of cache nodes that the cache cluster should have.
Required: Yes
Type: String
Update requires: No interruption (p. 86). However, if the PreferredAvailabilityZone and
PreferredAvailabilityZones properties were not previously specified and you don't specify
any new values, an update requires replacement (p. 86).
Port
The port number on which each of the cache nodes will accept connections.
Required: No
Type: Integer
Update requires: Replacement (p. 86)
PreferredAvailabilityZone
The Amazon EC2 Availability Zone in which the cache cluster is created.
Required: No
Type: String
Update requires: Replacement (p. 86)
PreferredAvailabilityZones
For Memcached cache clusters, the list of Availability Zones in which cache nodes are created. The
number of Availability Zones listed must equal the number of cache nodes. For example, if you want
to create three nodes in two different Availability Zones, you can specify ["us-east-1a",
"us-east-1a", "us-east-1b"], which would create two nodes in us-east-1a and one node in
us-east-1b.
If you specify a subnet group and you're creating your cache cluster in a VPC, you must specify
Availability Zones that are associated with the subnets in the subnet group that you've chosen.
If you want all the nodes in the same Availability Zone, use the PreferredAvailabilityZone
property or repeat the Availability Zone multiple times in the list.
Required: No
Type: List of strings
If you specify an Availability Zone that was previously specified in the template, such as in the
PreferredAvailabilityZone property, the update requires some interruptions (p. 86). Also, if
the PreferredAvailabilityZones property was already specified and you're updating its values
(regardless of whether you specify the same Availability Zones), the update requires some
interruptions (p. 86).
All other updates require replacement (p. 86).
PreferredMaintenanceWindow
The weekly time range (in UTC) during which system maintenance can occur.
Required: No
Type: String
Update requires: No interruption (p. 86)
API Version 2010-05-15
421
AWS CloudFormation User Guide
AWS::ElastiCache::CacheCluster
SnapshotArns
The ARN of the snapshot file that you want to use to seed a new Redis cache cluster. If you manage
a Redis instance outside of Amazon ElastiCache, you can create a new cache cluster in ElastiCache
by using a snapshot file that is stored in an Amazon S3 bucket.
Required: No
Type: List of strings
Update requires: Replacement (p. 86)
SnapshotName
The name of a snapshot from which to restore data into a new Redis cache cluster.
Required: No
Type: String
Update requires: Replacement (p. 86)
SnapshotRetentionLimit
For Redis cache clusters, the number of days for which ElastiCache retains automatic snapshots
before deleting them. For example, if you set the value to 5, a snapshot that was taken today will be
retained for 5 days before being deleted.
Required: No
Type: Integer
Update requires: No interruption (p. 86)
SnapshotWindow
For Redis cache clusters, the daily time range (in UTC) during which ElastiCache will begin taking
a daily snapshot of your node group. For example, you can specify 05:00-09:00.
Required: No
Type: String
Update requires: No interruption (p. 86)
VpcSecurityGroupIds
A list of VPC security group IDs. If your cache cluster isn't in a VPC, specify the
CacheSecurityGroupNames property instead.
Note
You must use the AWS::EC2::SecurityGroup resource instead of the
AWS::ElastiCache::SecurityGroup resource in order to specify an ElastiCache security
group that is in a VPC. In addition, if you use the default VPC for your AWS account, you
must use the Fn::GetAtt function and the GroupId attribute to retrieve security group
IDs (instead of the Ref function). To see a sample template, see the Template Snippet
section.
Required: Conditional: If your cache cluster is in a VPC, you must specify this property.
Type: List of strings
Update requires: No interruption (p. 86)
API Version 2010-05-15
422
AWS CloudFormation User Guide
AWS::ElastiCache::CacheCluster
Notes
Obtaining the Cache Cluster Node Addresses
The ElastiCache cache cluster does not have a single endpoint, but you can obtain the endpoints for
individual cache nodes by defining a get-cache-nodes script and installing it in the
AWS::CloudFormation::Init (p. 314) section of the template.
You can view a full sample templates for implementation details:
• For Memcached, see https://s3.amazonaws.com/cloudformation-templates-us-east-1/
ElastiCache.template
• For Redis, see https://s3.amazonaws.com/cloudformation-templates-us-east-1/
ElastiCache_Redis.template
The Amazon ElastiCache template uses the AWS CloudFormation bootstrap script cfn-hup (p. 684) to
detect changes to the Amazon ElastiCache cache cluster configuration, such as the number of instances
in the cache cluster. It then runs a script to update the on-host configuration for the application.
Return Values
Ref
When the logical ID of this resource is provided to the Ref intrinsic function, Ref returns the resource
name.
For more information about using the Ref function, see Ref (p. 669).
Fn::GetAtt
Fn::GetAtt returns a value for a specified attribute of this type. This section lists the available attributes
and corresponding return values.
Note
Currently, you can use Fn::GetAtt only with Memcached cache clusters.
ConfigurationEndpoint.Address
The DNS address of the configuration endpoint for the Memcached cache cluster.
ConfigurationEndpoint.Port
The port number of the configuration endpoint for the Memcached cache cluster.
For more information about using Fn:GetAtt, see Fn::GetAtt (p. 661).
Template Snippets
Cluster in a Default VPC
The following snippet describes an ElastiCache cluster in a security group that is in a default VPC. Usually,
a security group in a VPC requires the VPC ID to be specified. In this case, no VPC ID is needed because
the security group uses the default VPC.
For the cache cluster, the VpcSecurityGroupIds property is used to associate the cluster with the
security group. Because the VpcSecurityGroupIds property requires security group IDs (not security
group names), the template snippet uses the Fn::GetAtt function instead of a Ref function on the
API Version 2010-05-15
423
AWS CloudFormation User Guide
AWS::ElastiCache::ParameterGroup
ElasticacheSecurityGroup resource. Because the security group doesn't specify a VPC ID, the Ref
function will return the security group name.
"ElasticacheSecurityGroup": {
"Type": "AWS::EC2::SecurityGroup",
"Properties": {
"GroupDescription": "Elasticache Security Group",
"SecurityGroupIngress": [ {
"IpProtocol": "tcp",
"FromPort": "11211",
"ToPort": "11211",
"SourceSecurityGroupName": {"Ref": "InstanceSecurityGroup"}
} ]
}
},
"ElasticacheCluster": {
"Type": "AWS::ElastiCache::CacheCluster",
"Properties": {
"AutoMinorVersionUpgrade": "true",
"Engine": "memcached",
"CacheNodeType": "cache.t1.micro",
"NumCacheNodes": "1",
"VpcSecurityGroupIds": [{"Fn::GetAtt": [ "ElasticacheSecurityGroup",
"GroupId"]}]
}
}
Memcached Nodes in Multiple Availability Zones
The following example launches a cache cluster with three nodes, where two nodes are created in
us-west-2a and one is created in us-west-2b.
"myCacheCluster" : {
"Type": "AWS::ElastiCache::CacheCluster",
"Properties" : {
"AZMode" : "cross-az",
"CacheNodeType" : "cache.m3.medium",
"Engine" : "memcached",
"NumCacheNodes" : "3",
"PreferredAvailabilityZones" : [ "us-west-2a", "us-west-2a", "us-west-2b"
]
}
}
See Also
• CreateCacheCluster in the Amazon ElastiCache API Reference Guide
• ModifyCacheCluster in the Amazon ElastiCache API Reference Guide
AWS::ElastiCache::ParameterGroup
The AWS::ElastiCache::ParameterGroup type creates a new cache parameter group. Cache parameter
groups control the parameters for a cache cluster.
API Version 2010-05-15
424
AWS CloudFormation User Guide
AWS::ElastiCache::ParameterGroup
Syntax
{
"Type": "AWS::ElastiCache::ParameterGroup",
"Properties": {
"CacheParameterGroupFamily" : String,
"Description" : String,
"Properties" : { "prop1" : "value1", ... }
}
}
Properties
CacheParameterGroupFamily
The name of the cache parameter group family that the cache parameter group can be used with.
Required: Yes
Type: String
Update requires: Updates are not supported.
Description
The description for the Cache Parameter Group.
Required: Yes
Type: String
Update requires: Updates are not supported.
Properties
A comma-delimited list of parameter name/value pairs. For more information, go to
ModifyCacheParameterGroup in the Amazon ElastiCache API Reference Guide.
Example:
"Properties" : {
"cas_disabled" : "1",
"chunk_size_growth_factor" : "1.02"
}
Required: Yes
Type: JSON object
Update requires: Updates are not supported.
Return Values
Ref
When the logical ID of this resource is provided to the Ref intrinsic function, Ref returns the resource
name.
API Version 2010-05-15
425
AWS CloudFormation User Guide
AWS::ElastiCache::ReplicationGroup
For more information about using the Ref function, see Ref (p. 669).
Example
"MyParameterGroup": {
"Type": "AWS::ElastiCache::ParameterGroup",
"Properties": {
"Description": "MyNewParameterGroup",
"CacheParameterGroupFamily": "memcached1.4",
"Properties" : {
"cas_disabled" : "1",
"chunk_size_growth_factor" : "1.02"
}
}
}
See Also
• CreateCacheParameterGroup in the Amazon ElastiCache API Reference Guide
• ModifyCacheParameterGroup in the Amazon ElastiCache API Reference Guide
• AWS CloudFormation Stacks Updates (p. 85)
AWS::ElastiCache::ReplicationGroup
The AWS::ElastiCache::ReplicationGroup resource creates an Amazon ElastiCache replication
group. A replication group is a collection of cache clusters, where one of the clusters is a primary read-write
cluster and the others are read-only replicas.
Note
Currently, replication groups are supported only for Redis clusters.
Syntax
{
"Type" : "AWS::ElastiCache::ReplicationGroup",
"Properties" : {
"AutomaticFailoverEnabled (p. 427)" : Boolean,
"AutoMinorVersionUpgrade (p. 427)" : Boolean,
"CacheNodeType (p. 427)" : String,
"CacheParameterGroupName (p. 427)" : String,
"CacheSecurityGroupNames (p. 427)" : [ String, ... ],
"CacheSubnetGroupName (p. 428)" : String,
"Engine (p. 428)" : String,
"EngineVersion (p. 428)" : String,
"NotificationTopicArn (p. 428)" : String,
"NumCacheClusters (p. 428)" : Integer,
"Port (p. 428)" : Integer,
"PreferredCacheClusterAZs (p. 428)" : [ String, ... ],
"PreferredMaintenanceWindow (p. 429)" : String,
"ReplicationGroupDescription (p. 429)" : String,
"SecurityGroupIds (p. 429)" : [ String, ... ],
"SnapshotArns (p. 429)" : [ String, ... ],
"SnapshotRetentionLimit (p. 429)" : Integer,
"SnapshotWindow (p. 429)" : String
API Version 2010-05-15
426
AWS CloudFormation User Guide
AWS::ElastiCache::ReplicationGroup
}
}
Properties
For more information about each property and valid values, see CreateReplicationGroup in the Amazon
ElastiCache API Reference Guide.
AutomaticFailoverEnabled
Indicates whether Multi-AZ is enabled. When Multi-AZ is enabled, a read-only replica is automatically
promoted to a read-write primary cluster if the existing primary cluster fails. If you specify true, you
must specify a value greater than 1 for the NumCacheNodes property. By default, AWS CloudFormation
sets the value to true.
For more information about Multi-AZ, see Multi-AZ with Redis Replication Groups in the Amazon
ElastiCache User Guide.
Note
You cannot enable automatic failover for Redis versions earlier than 2.8.6 or for T1 and T2
cache node types.
Required: No
Type: Boolean
Update requires: No interruption (p. 86)
AutoMinorVersionUpgrade
Currently, this property isn't used by ElastiCache.
Required: No
Type: Boolean
Update requires: No interruption (p. 86)
CacheNodeType
The compute and memory capacity of nodes in the node group. To see valid values, see
CreateReplicationGroup in the Amazon ElastiCache API Reference Guide.
Required: Yes
Type: String
Update requires: Replacement (p. 86)
CacheParameterGroupName
The name of the parameter group to associate with this replication group.
Required: No
Type: String
Update requires: No interruption (p. 86)
CacheSecurityGroupNames
A list of cache security group names to associate with this replication group. If you specify the
SecurityGroupIds property, do not specify this property; you can specify only one.
Required: No
Type: List of strings
API Version 2010-05-15
427
AWS CloudFormation User Guide
AWS::ElastiCache::ReplicationGroup
Update requires: No interruption (p. 86)
CacheSubnetGroupName
The name of a cache subnet group to use for this replication group.
Required: No
Type: String
Update requires: Replacement (p. 86)
Engine
The name of the cache engine to use for the cache clusters in this replication group. Currently, you
can specify only redis.
Required: Yes
Type: String
Update requires: Replacement (p. 86)
EngineVersion
The version number of the cache engine to use for the cache clusters in this replication group.
Required: No
Type: String
Update requires: No interruption (p. 86)
NotificationTopicArn
The Amazon Resource Name (ARN) of the Amazon Simple Notification Service topic to which
notifications are sent.
Required: No
Type: String
Update requires: No interruption (p. 86)
NumCacheClusters
The number of cache clusters for this replication group. If automatic failover is enabled, you must
specify a value greater than 1.
Required: Yes
Type: Integer
Update requires: Replacement (p. 86)
Port
The port number on which each member of the replication group accepts connections.
Required: No
Type: Integer
Update requires: Replacement (p. 86)
PreferredCacheClusterAZs
A list of Availability Zones (AZs) in which the cache clusters in this replication group are created.
Required: No
Type: List of strings
API Version 2010-05-15
428
AWS CloudFormation User Guide
AWS::ElastiCache::ReplicationGroup
Update requires: Replacement (p. 86)
PreferredMaintenanceWindow
The weekly time range during which system maintenance can occur. Use the following format to
specify a time range: ddd:hh24:mi-ddd:hh24:mi (24H Clock UTC). For example, you can specify
sun:22:00-sun:23:30 for Sunday from 10 PM to 11:30 PM.
Required: No
Type: String
Update requires: No interruption (p. 86)
ReplicationGroupDescription
The description of the replication group.
Required: Yes
Type: String
Update requires: No interruption (p. 86)
SecurityGroupIds
A list of Amazon Virtual Private Cloud (Amazon VPC) security groups to associate with this replication
group. Use this property only when you are creating a replication group in a VPC. If you specify the
CacheSecurityGroupNames property, do not specify this property; you can specify only one.
Required: No
Type: List of strings
Update requires: No interruption (p. 86)
SnapshotArns
A single-element string list that specifies an ARN of a Redis .rdb snapshot file that is stored in
Amazon Simple Storage Service (Amazon S3). The snapshot file populates the node group. The
Amazon S3 object name in the ARN cannot contain commas. For example, you can specify
arn:aws:s3:::my_bucket/snapshot1.rdb.
Required: No
Type: List of strings
Update requires: Replacement (p. 86)
SnapshotRetentionLimit
The number of days that ElastiCache retains automatic snapshots before deleting them.
Required: No
Type: Integer
Update requires: No interruption (p. 86)
SnapshotWindow
The time range (in UTC) when ElastiCache takes a daily snapshot of your node group. For example,
you can specify 05:00-09:00.
Required: No
Type: String
Update requires: No interruption (p. 86)
API Version 2010-05-15
429
AWS CloudFormation User Guide
AWS::ElastiCache::ReplicationGroup
Return Values
Ref
When the logical ID of this resource is provided to the Ref intrinsic function, Ref returns the resource
name.
In the following sample, the Ref function returns the name of the myReplicationGroup replication
group, such as abc12xmy3d1w3hv6.
{ "Ref": "myReplicationGroup" }
For more information about using the Ref function, see Ref (p. 669).
Fn::GetAtt
Fn::GetAtt returns a value for a specified attribute of this type. This section lists the available attributes
and corresponding return values.
PrimaryEndPoint.Address
The DNS address of the primary read-write cache node.
PrimaryEndPoint.Port
The number of the port that the primary read-write cache engine is listening on.
ReadEndPoint.Addresses
A string with a list of endpoints for the read-only replicas. The order of the addresses map to the
order of the ports from the ReadEndPoint.Ports attribute.
ReadEndPoint.Ports
A string with a list of ports for the read-only replicas. The order of the ports map to the order of the
addresses from the ReadEndPoint.Addresses attribute.
For more information about using Fn:GetAtt, see Fn::GetAtt (p. 661).
Example
The following sample declares a replication group with two nodes and automatic failover enabled.
"myReplicationGroup" : {
"Type": "AWS::ElastiCache::ReplicationGroup",
"Properties": {
"ReplicationGroupDescription" : "my description",
"NumCacheClusters" : "2",
"Engine" : "redis",
"CacheNodeType" : "cache.m3.medium"
"AutoMinorVersionUpgrade" : "true",
"AutomaticFailoverEnabled" : "true",
"CacheSubnetGroupName" : "subnetgroup",
"EngineVersion" : "2.8.6",
"PreferredMaintenanceWindow" : "wed:09:25-wed:22:30",
"SnapshotRetentionLimit" : "4",
"SnapshotWindow" : "03:30-05:30"
}
}
API Version 2010-05-15
430
AWS CloudFormation User Guide
AWS::ElastiCache::SecurityGroup
AWS::ElastiCache::SecurityGroup
The AWS::ElastiCache::SecurityGroup resource creates a cache security group. For more
information about cache security groups, go to Cache Security Groups in the Amazon ElastiCache User
Guide or go to CreateCacheSecurityGroup in the Amazon ElastiCache API Reference Guide.
To create an ElastiCache cluster in a VPC, use the AWS::EC2::SecurityGroup (p. 375) resource. For more
information, see the VpcSecurityGroupIds property in the AWS::ElastiCache::CacheCluster (p. 418)
resource.
Syntax
{
"Type" : "AWS::ElastiCache::SecurityGroup",
"Properties" :
{
"Description (p. 431)" : String
}
}
Properties
Description
A description for the cache security group.
Type: String
Required: No
Update requires: Updates are not supported.
Return Values
Ref
When you specify the AWS::ElastiCache::SecurityGroup resource as an argument to the Ref
function, AWS CloudFormation returns the CacheSecurityGroupName property of the cache security
group.
For more information about using the Ref function, see Ref (p. 669).
AWS::ElastiCache::SecurityGroupIngress
The AWS::ElastiCache::SecurityGroupIngress type authorizes ingress to a cache security group from
hosts in specified Amazon EC2 security groups. For more information about ElastiCache security group
ingress, go to AuthorizeCacheSecurityGroupIngress in the Amazon ElastiCache API Reference Guide.
Syntax
{
"Type" : "AWS::ElastiCache::SecurityGroupIngress",
"Properties" :
{
API Version 2010-05-15
431
AWS CloudFormation User Guide
AWS::ElastiCache::SubnetGroup
"CacheSecurityGroupName (p. 432)" : String,
"EC2SecurityGroupName (p. 432)" : String,
"EC2SecurityGroupOwnerId (p. 432)" : String
}
}
Properties
CacheSecurityGroupName
The name of the Cache Security Group to authorize.
Type: String
Required: Yes
Update requires: Updates are not supported.
EC2SecurityGroupName
Name of the EC2 Security Group to include in the authorization.
Type: String
Required: Yes
Update requires: Updates are not supported.
EC2SecurityGroupOwnerId
Specifies the AWS Account ID of the owner of the EC2 security group specified in the
EC2SecurityGroupName property. The AWS access key ID is not an acceptable value.
Type: String
Required: No
Update requires: Updates are not supported.
AWS::ElastiCache::SubnetGroup
Creates a cache subnet group. For more information about cache subnet groups, go to Cache Subnet
Groups in the Amazon ElastiCache User Guide or go to CreateCacheSubnetGroup in the Amazon
ElastiCache API Reference Guide.
When you specify an AWS::ElastiCache::SubnetGroup type as an argument to the Ref function, AWS
CloudFormation returns the name of the cache subnet group.
Syntax
"SubnetGroup" : {
"Type" : "AWS::ElastiCache::SubnetGroup",
"Properties" : {
"Description (p. 433)" : String,
"SubnetIds (p. 433)" : [ String, ... ]
}
}
API Version 2010-05-15
432
AWS CloudFormation User Guide
AWS::ElasticBeanstalk::Application
Properties
Description
The description for the cache subnet group.
Type: String
Required: Yes
Update requires: No interruption (p. 86)
SubnetIds
The Amazon EC2 subnet IDs for the cache subnet group.
Type: String list
Required: Yes
Update requires: No interruption (p. 86)
Example
"SubnetGroup" : {
"Type" : "AWS::ElastiCache::SubnetGroup",
"Properties" : {
"Description" : "Cache Subnet Group",
"SubnetIds" : [ { "Ref" : "Subnet1" }, { "Ref" : "Subnet2" } ]
}
}
AWS::ElasticBeanstalk::Application
Creates an Elastic Beanstalk application.
Syntax
{
"Type" : "AWS::ElasticBeanstalk::Application",
"Properties" : {
"ApplicationName (p. 433)" : String,
"Description (p. 434)" : String
}
}
Properties
ApplicationName
A name for the Elastic Beanstalk application. If you don't specify a name, AWS CloudFormation
generates a unique physical ID and uses that ID for the application name. For more information, see
Name Type (p. 608).
API Version 2010-05-15
433
AWS CloudFormation User Guide
AWS::ElasticBeanstalk::ApplicationVersion
Important
If you specify a name, you cannot do updates that require this resource to be replaced. You
can still do updates that require no or some interruption. If you must replace the resource,
specify a new name.
Required: No
Type: String
Update requires: Replacement (p. 86)
Description
An optional description of this application.
Required: No
Type: String
Update requires: No interruption (p. 86)
Return Values
Ref
When the logical ID of this resource is provided to the Ref intrinsic function, Ref returns the resource
name.
For more information about using the Ref function, see Ref (p. 669).
Example
{
"Type" : "AWS::ElasticBeanstalk::Application",
"Properties" : {
"ApplicationName" : "SampleAWSElasticBeanstalkApplication",
"Description" : "AWS Elastic Beanstalk PHP Sample Application"
}
}
See Also
• For a complete Elastic Beanstalk sample template, see Elastic Beanstalk Template Snippets (p. 193).
AWS::ElasticBeanstalk::ApplicationVersion
Creates an application version, an iteration of deployable code, for an Elastic Beanstalk application.
Syntax
{
"Type" : "AWS::ElasticBeanstalk::ApplicationVersion",
"Properties" : {
"ApplicationName (p. 435)" : String,
"Description (p. 435)" : String,
API Version 2010-05-15
434
AWS CloudFormation User Guide
AWS::ElasticBeanstalk::ApplicationVersion
"SourceBundle (p. 435)" : { SourceBundle }
}
}
Members
ApplicationName
Name of the Elastic Beanstalk application that is associated with this application version.
Required: Yes
Type: String
Update requires: Replacement (p. 86)
Description
A description of this application version.
Required: No
Type: String
Update requires: Some interruptions (p. 86)
SourceBundle
The location of the source bundle for this version.
Required: Yes
Type: Source Bundle (p. 596)
Update requires: Replacement (p. 86)
Return Values
Ref
When the logical ID of this resource is provided to the Ref intrinsic function, Ref returns the resource
name.
For more information about using the Ref function, see Ref (p. 669).
Example
"myAppVersion" :{
"Type" : "AWS::ElasticBeanstalk::ApplicationVersion",
"Properties" : {
"ApplicationName" : {"Ref" : "myApp"},
"Description" : "my sample version",
"SourceBundle" : {
"S3Bucket" : { "Fn::Join" :
["-", [ "elasticbeanstalk-samples", { "Ref" : "AWS::Region" } ] ] },
"S3Key" : "php-sample.zip"
}
}
}
API Version 2010-05-15
435
AWS CloudFormation User Guide
AWS::ElasticBeanstalk::ConfigurationTemplate
See Also
• For a complete Elastic Beanstalk sample template, see Elastic Beanstalk Template Snippets (p. 193).
AWS::ElasticBeanstalk::ConfigurationTemplate
Creates a configuration template for an Elastic Beanstalk application.You can use configuration templates
to deploy different versions of an application by using the configuration settings that you define in the
configuration template.
Syntax
{
"Type" : "AWS::ElasticBeanstalk::ConfigurationTemplate",
"Properties" : {
"ApplicationName (p. 436)" : String,
"Description (p. 436)" : String,
"EnvironmentId (p. 436)" : String,
"OptionSettings (p. 436)" : [ OptionSetting, ... ],
"SolutionStackName (p. 437)" : String,
"SourceConfiguration (p. 437)" : Source configuration
}
}
Members
ApplicationName
Name of the Elastic Beanstalk application that is associated with this configuration template.
Required: Yes
Type: String
Update requires: Replacement (p. 86)
Description
An optional description for this configuration.
Type: String
Required: No
Update requires: Some interruptions (p. 86)
EnvironmentId
An environment whose settings you want to use to create the configuration template. You must
specify this property if you don't specify the SolutionStackName or SourceConfiguration
properties.
Type: String
Required: Conditional
Update requires: Replacement (p. 86)
OptionSettings
A list of OptionSettings (p. 595) for this Elastic Beanstalk configuration. For a complete list of Elastic
Beanstalk configuration options, see Option Values, in the AWS Elastic Beanstalk Developer Guide.
API Version 2010-05-15
436
AWS CloudFormation User Guide
AWS::ElasticBeanstalk::ConfigurationTemplate
Type: A list of OptionSettings (p. 595).
Required: No
Update requires: Some interruptions (p. 86)
SolutionStackName
The name of an Elastic Beanstalk solution stack that this configuration will use. A solution stack
specifies the operating system, architecture, and application server for a configuration template, such
as 64bit Amazon Linux 2013.09 running Tomcat 7 Java 7. For more information, see
Supported Platforms in the AWS Elastic Beanstalk Developer Guide.
You must specify this property if you don't specify the EnvironmentId or SourceConfiguration
properties.
Type: String
Required: Conditional
Update requires: Replacement (p. 86)
SourceConfiguration
A configuration template that is associated with another Elastic Beanstalk application. If you specify
the SolutionStackName property and the SourceConfiguration property, the solution stack in
the source configuration template must match the value that you specified for the
SolutionStackName property.
You must specify this property if you don't specify the EnvironmentId or SolutionStackName
properties.
Type: Elastic Beanstalk SourceConfiguration Property Type (p. 597)
Required: Conditional
Update requires: Replacement (p. 86)
Return Values
Ref
When the logical ID of this resource is provided to the Ref intrinsic function, Ref returns the resource
name.
For more information about using the Ref function, see Ref (p. 669).
Example
This example of an ElasticBeanstalk ConfigurationTemplate is found in the AWS CloudFormation sample
template ElasticBeanstalkSample.template, which also provides an example of its use within an
AWS::ElasticBeanstalk::Application.
"myConfigTemplate" : {
"Type" : "AWS::ElasticBeanstalk::ConfigurationTemplate",
"Properties" : {
"ApplicationName" :{"Ref" : "myApp"},
"Description" : "my sample configuration template",
"EnvironmentId" : "",
"SourceConfiguration" : {
API Version 2010-05-15
437
AWS CloudFormation User Guide
AWS::ElasticBeanstalk::Environment
"ApplicationName" : {"Ref" : "mySecondApp"},
"TemplateName" : {"Ref" : "mySourceTemplate"}
},
"SolutionStackName" : "64bit Amazon Linux running PHP 5.3",
"OptionSettings" : [ {
"Namespace" : "aws:autoscaling:launchconfiguration",
"OptionName" : "EC2KeyName",
"Value" : { "Ref" : "KeyName" }
} ]
}
}
See Also
• AWS::ElasticBeanstalk::Application (p. 433)
• Option Values in the AWS Elastic Beanstalk Developer Guide
• For a complete Elastic Beanstalk sample template, see Elastic Beanstalk Template Snippets (p. 193).
AWS::ElasticBeanstalk::Environment
Creates or updates an Elastic Beanstalk environment.
Syntax
{
"Type" : "AWS::ElasticBeanstalk::Environment",
"Properties" : {
"ApplicationName (p. 438)" : String,
"CNAMEPrefix (p. 438)" : String,
"Description (p. 439)" : String,
"EnvironmentName (p. 439)" : String,
"OptionSettings (p. 439)" : [ OptionSettings, ... ],
"SolutionStackName (p. 439)" : String,
"TemplateName (p. 439)" : String,
"Tier (p. 440)" : Environment Tier,
"VersionLabel (p. 440)" : String
}
}
Properties
ApplicationName
The name of the application that is associated with this environment.
Required: Yes
Type: String
Update requires: Replacement (p. 86)
CNAMEPrefix
A prefix for your Elastic Beanstalk environment URL.
API Version 2010-05-15
438
AWS CloudFormation User Guide
AWS::ElasticBeanstalk::Environment
Required: No
Type: String
Update requires: Replacement (p. 86)
Description
A description that helps you identify this environment.
Required: No
Type: String
Update requires: No interruption (p. 86)
EnvironmentName
A name for the Elastic Beanstalk environment. If you don't specify a name, AWS CloudFormation
generates a unique physical ID and uses that ID for the environment name. For more information,
see Name Type (p. 608).
Important
If you specify a name, you cannot do updates that require this resource to be replaced. You
can still do updates that require no or some interruption. If you must replace the resource,
specify a new name.
Required: No
Type: String
Update requires: Replacement (p. 86)
OptionSettings
Key-value pairs defining configuration options for this environment. These options override the values
that are defined in the solution stack or the configuration template. If you remove any options during
a stack update, the removed options revert to default values.
Required: No
Type: A list of OptionSettings (p. 595).
Update requires: Some interruptions (p. 86)
SolutionStackName
The name of an Elastic Beanstalk solution stack that this configuration will use. For more information,
see Supported Platforms in the AWS Elastic Beanstalk Developer Guide. You must specify either
this parameter or an Elastic Beanstalk configuration template name.
Required: No
Type: String
Update requires: Replacement (p. 86)
TemplateName
The name of the Elastic Beanstalk configuration template to use with the environment. You must
specify either this parameter or a solution stack name.
Required: No
Type: String
Update requires: Some interruptions (p. 86)
API Version 2010-05-15
439
AWS CloudFormation User Guide
AWS::ElasticBeanstalk::Environment
Tier
Specifies the tier to use in creating this environment. The environment tier that you choose determines
whether Elastic Beanstalk provisions resources to support a web application that handles HTTP(S)
requests or a web application that handles background-processing tasks.
Required: No
Type: Elastic Beanstalk Environment Tier Property Type (p. 594)
Update requires: See Elastic Beanstalk Environment Tier Property Type (p. 594)
VersionLabel
The version to associate with the environment.
Required: No
Type: String
Update requires: Some interruptions (p. 86)
Return Values
Ref
When the logical ID of this resource is provided to the Ref intrinsic function, Ref returns the resource
name.
For more information about using the Ref function, see Ref (p. 669).
Fn::GetAtt
Fn::GetAtt returns a value for a specified attribute of this type. This section lists the available attributes
and corresponding return values.
EndpointURL
The URL to the load balancer for this environment.
Example:
awseb-myst-myen-132MQC4KRLAMD-1371280482.us-east-1.elb.amazonaws.com
For more information about using Fn:GetAtt, see Fn::GetAtt (p. 661).
Examples
Simple Environment
{
"Type" : "AWS::ElasticBeanstalk::Environment",
"Properties" : {
"ApplicationName" : { "Ref" : "sampleApplication" },
"Description" : "AWS Elastic Beanstalk Environment running PHP Sample
Application",
"EnvironmentName" : "SamplePHPEnvironment",
"TemplateName" : "DefaultConfiguration",
"VersionLabel" : "Initial Version"
API Version 2010-05-15
440
AWS CloudFormation User Guide
AWS::ElasticLoadBalancing::LoadBalancer
}
}
Environment with Embedded Option Settings
{
"Type" : "AWS::ElasticBeanstalk::Environment",
"Properties" : {
"ApplicationName" : { "Ref" : "sampleApplication" },
"Description" : "AWS Elastic Beanstalk Environment running Python Sample
Application",
"EnvironmentName" : "SamplePythonEnvironment",
"SolutionStackName" : "64bit Amazon Linux running Python",
"OptionSettings" : [ {
"Namespace" : "aws:autoscaling:launchconfiguration",
"OptionName" : "EC2KeyName",
"Value" : { "Ref" : "KeyName" }
} ],
"VersionLabel" : "Initial Version"
}
}
See Also
• Launching New Environments in the AWS Elastic Beanstalk Developer Guide
• Managing Environments in the AWS Elastic Beanstalk Developer Guide
• For a complete Elastic Beanstalk sample template, see Elastic Beanstalk Template Snippets (p. 193).
AWS::ElasticLoadBalancing::LoadBalancer
The AWS::ElasticLoadBalancing::LoadBalancer type creates a LoadBalancer.
Note
If this resource has a public IP address and is also in a VPC that is defined in the same template,
you must use the DependsOn attribute to declare a dependency on the VPC-gateway attachment.
For more information, see DependsOn Attribute (p. 642).
Syntax
{
"Type": "AWS::ElasticLoadBalancing::LoadBalancer",
"Properties": {
"AccessLoggingPolicy (p. 442)" : AccessLoggingPolicy,
"AppCookieStickinessPolicy (p. 442)" : [ AppCookieStickinessPolicy, ...
],
"AvailabilityZones (p. 442)" : [ String, ... ],
"ConnectionDrainingPolicy (p. 442)" : ConnectionDrainingPolicy,
"ConnectionSettings (p. 442)" : ConnectionSettings,
"CrossZone (p. 443)" : Boolean,
"HealthCheck (p. 443)" : HealthCheck,
"Instances (p. 443)" : [ String, ... ],
API Version 2010-05-15
441
AWS CloudFormation User Guide
AWS::ElasticLoadBalancing::LoadBalancer
"LBCookieStickinessPolicy (p. 443)" : [ LBCookieStickinessPolicy, ... ],
"LoadBalancerName (p. 443)" : String,
"Listeners (p. 443)" : [ Listener, ... ],
"Policies (p. 444)" : [ ElasticLoadBalancing Policy, ... ],
"Scheme (p. 444)" : String,
"SecurityGroups (p. 444)" : [ Security Group, ... ],
"Subnets (p. 444)" : [ String, ... ],
"Tags (p. 444)" : [ Resource Tag, ... ]
}
}
Properties
AccessLoggingPolicy
Captures detailed information for all requests made to your load balancer, such as the time a request
was received, client’s IP address, latencies, request path, and server responses.
Required: No
Type: Elastic Load Balancing AccessLoggingPolicy (p. 597)
Update requires: No interruption (p. 86)
AppCookieStickinessPolicy
Generates one or more stickiness policies with sticky session lifetimes that follow that of an
application-generated cookie. These policies can be associated only with HTTP/HTTPS listeners.
Required: No
Type: A list of AppCookieStickinessPolicy (p. 598) objects.
Update requires: No interruption (p. 86)
AvailabilityZones
The Availability Zones in which to create the load balancer.You can specify the AvailabilityZones
or Subnets property, but not both.
Note
For load balancers that are in a VPC, specify the Subnets property.
Required: No
Type: List of strings
Update requires: Replacement (p. 86) if you did not have an Availability Zone specified and you are
adding one or if you are removing all Availability Zones. Otherwise, update requires no
interruption (p. 86).
ConnectionDrainingPolicy
Whether deregistered or unhealthy instances can complete all in-flight requests.
Required: No
Type: Elastic Load Balancing ConnectionDrainingPolicy (p. 599)
Update requires: No interruption (p. 86)
ConnectionSettings
Specifies how long front-end and back-end connections of your load balancer can remain idle.
Required: No
API Version 2010-05-15
442
AWS CloudFormation User Guide
AWS::ElasticLoadBalancing::LoadBalancer
Type: Elastic Load Balancing ConnectionSettings (p. 600)
Update requires: No interruption (p. 86)
CrossZone
Whether cross-zone load balancing is enabled for the load balancer. With cross-zone load balancing,
your load balancer nodes route traffic to the back-end instances across all Availability Zones. By
default the CrossZone property is false.
Required: No
Type: Boolean
Update requires: No interruption (p. 86)
HealthCheck
Application health check for the instances.
Required: No
Type: ElasticLoadBalancing HealthCheck Type (p. 600).
Update requires: Replacement (p. 86) if you did not have a health check specified and you are adding
one or if you are removing a health check. Otherwise, update requires no interruption (p. 86).
Instances
A list of EC2 instance IDs for the load balancer.
Required: No
Type: List of strings
Update requires: No interruption (p. 86)
LBCookieStickinessPolicy
Generates a stickiness policy with sticky session lifetimes controlled by the lifetime of the browser
(user-agent), or by a specified expiration period. This policy can be associated only with HTTP/HTTPS
listeners.
Required: No
Type: A list of LBCookieStickinessPolicy (p. 601) objects.
Update requires: No interruption (p. 86)
LoadBalancerName
A name for the load balancer. If you don't specify a name, AWS CloudFormation generates a unique
physical ID and uses that ID for the load balancer. The name must be unique within your set of load
balancers. For more information, see Name Type (p. 608).
Important
If you specify a name, you cannot do updates that require this resource to be replaced. You
can still do updates that require no or some interruption. If you must replace the resource,
specify a new name.
Required: No
Type: String
Update requires: Replacement (p. 86)
Listeners
One or more listeners for this load balancer. Each listener must be registered for a specific port, and
you cannot have more than one listener for a given port.
API Version 2010-05-15
443
AWS CloudFormation User Guide
AWS::ElasticLoadBalancing::LoadBalancer
Important
If you update the property values for a listener specified by the Listeners property, AWS
CloudFormation will delete the existing listener and create a new one with the updated
properties. During the time that AWS CloudFormation is performing this action, clients will
not be able to connect to the load balancer.
Required: Yes
Type: A list of ElasticLoadBalancing Listener Property Type (p. 602) objects.
Update requires: No interruption (p. 86)
Policies
A list of elastic load balancing policies to apply to this elastic load balancer.
Required: No
Type: A list of ElasticLoadBalancing policy (p. 603) objects.
Update requires: No interruption (p. 86)
Scheme
For load balancers attached to an Amazon VPC, this parameter can be used to specify the type of
load balancer to use. Specify internal to create an internal load balancer with a DNS name that
resolves to private IP addresses or internet-facing to create a load balancer with a publicly
resolvable DNS name, which resolves to public IP addresses.
Note
If you specify internal, you must specify subnets to associate with the load balancer, not
Availability Zones.
Required: No
Type: String
Update requires: Replacement (p. 86)
SecurityGroups
Required: No
Type: A list of security groups assigned to your load balancer within your virtual private cloud (VPC).
Update requires: No interruption (p. 86)
Subnets
A list of subnet IDs in your virtual private cloud (VPC) to attach to your load balancer.You can specify
the AvailabilityZones or Subnets property, but not both.
For more information about using Elastic Load Balancing in a VPC, see How Do I Use Elastic Load
Balancing in Amazon VPC in the Elastic Load Balancing Developer Guide.
Required: No
Type: List of strings
Update requires: Replacement (p. 86) if you did not have an subnet specified and you are adding
one or if you are removing all subnets. Otherwise, update requires no interruption (p. 86).
Tags
An arbitrary set of tags (key-value pairs) for this load balancer.
Required: No
Type: AWS CloudFormation Resource Tags (p. 618)
API Version 2010-05-15
444
AWS CloudFormation User Guide
AWS::ElasticLoadBalancing::LoadBalancer
Update requires: No interruption (p. 86)
Return Values
Ref
When the logical ID of this resource is provided to the Ref intrinsic function, Ref returns the resource
name. For example, mystack-myelb-1WQN7BJGDB5YQ.
For more information about using the Ref function, see Ref (p. 669).
Fn::GetAtt
Fn::GetAtt returns a value for a specified attribute of this type. This section lists the available attributes
and corresponding return values.
CanonicalHostedZoneName
The name of the Amazon Route 53 hosted zone that is associated with the load balancer.
Important
If you specify internal for the Elastic Load Balancing scheme, use DNSName instead. For
an internal scheme, the load balancer doesn't have a CanonicalHostedZoneName
value.
Example: mystack-myelb-15HMABG9ZCN57-1013119603.us-east-1.elb.amazonaws.com
CanonicalHostedZoneNameID
The ID of the Amazon Route 53 hosted zone name that is associated with the load balancer.
Example: Z3DZXE0Q79N41H
DNSName
The DNS name for the load balancer.
Example: mystack-myelb-15HMABG9ZCN57-1013119603.us-east-1.elb.amazonaws.com
SourceSecurityGroup.GroupName
The security group that you can use as part of your inbound rules for your load balancer's back-end
Amazon EC2 application instances.
Example: amazon-elb
SourceSecurityGroup.OwnerAlias
The owner of the source security group.
Example: amazon-elb-sg
For more information about using Fn:GetAtt, see Fn::GetAtt (p. 661).
Examples
A load balancer with a health check and access logs
"ElasticLoadBalancer" : {
"Type" : "AWS::ElasticLoadBalancing::LoadBalancer",
"Properties" : {
"AvailabilityZones" : { "Fn::GetAZs" : "" },
"Instances" : [ { "Ref" : "Ec2Instance1" },{ "Ref" : "Ec2Instance2" } ],
"Listeners" : [ {
API Version 2010-05-15
445
AWS CloudFormation User Guide
AWS::ElasticLoadBalancing::LoadBalancer
"LoadBalancerPort" : "80",
"InstancePort" : { "Ref" : "WebServerPort" },
"Protocol" : "HTTP"
} ],
"HealthCheck" : {
"Target" : {
"Fn::Join" : [ "", [ "HTTP:", { "Ref" : "WebServerPort" }, "/" ] ]
},
"HealthyThreshold" : "3",
"UnhealthyThreshold" : "5",
"Interval" : "30",
"Timeout" : "5"
},
"AccessLoggingPolicy": {
"S3BucketName": {
"Ref": "S3LoggingBucket"
},
"S3BucketPrefix": "MyELBLogs",
"Enabled": "true",
"EmitInterval" : "60"
},
"DependsOn": "S3LoggingBucketPolicy"
}
}
A load balancer with access logging enabled
The following sample snippet creates an Amazon S3 bucket with a bucket policy that allows the load
balancer to store information in the Logs/AWSLogs/AWS account number/ folder. The load balancer
also includes an explicit dependency on the bucket policy, which is required before the load balancer can
write to the bucket.
"S3LoggingBucket": {
"Type": "AWS::S3::Bucket"
},
"S3LoggingBucketPolicy": {
"Type": "AWS::S3::BucketPolicy",
"Properties": {
"Bucket": {
"Ref": "S3LoggingBucket"
},
"PolicyDocument": {
"Version": "2008-10-17",
"Statement": [ {
"Sid": "ELBAccessLogs20130930",
"Effect": "Allow",
"Resource": {
"Fn::Join": [
"",
[
"arn:aws:s3:::",
{ "Ref": "S3LoggingBucket" },
"/",
"Logs",
"/AWSLogs/",
{ "Ref": "AWS::AccountId" },
API Version 2010-05-15
446
AWS CloudFormation User Guide
AWS::ElasticLoadBalancing::LoadBalancer
"/*"
]
]
},
"Principal": "*",
"Action": [
"s3:PutObject"
]
} ]
}
}
},
"ElasticLoadBalancer": {
"Type": "AWS::ElasticLoadBalancing::LoadBalancer",
"Properties": {
"AvailabilityZones": { "Fn::GetAZs": "" },
"Listeners": [{
"LoadBalancerPort": "80",
"InstancePort": "80",
"Protocol": "HTTP"
}],
"HealthCheck": {
"Target": "HTTP:80/",
"HealthyThreshold": "3",
"UnhealthyThreshold": "5",
"Interval": "30",
"Timeout": "5"
},
"AccessLoggingPolicy": {
"S3BucketName": {
"Ref": "S3LoggingBucket"
},
"S3BucketPrefix": "Logs",
"Enabled": "true",
"EmitInterval" : "60"
}
},
"DependsOn": "S3LoggingBucketPolicy"
}
A load balancer with a connection draining policy
The following snippet enables a connection draining policy that ends connections to a deregistered or
unhealthy instance after 60 seconds.
"ElasticLoadBalancer" : {
"Type" : "AWS::ElasticLoadBalancing::LoadBalancer",
"Properties" : {
"AvailabilityZones" : { "Fn::GetAZs" : "" },
"Instances" : [ { "Ref" : "Ec2Instance1" },{ "Ref" : "Ec2Instance2" } ],
"Listeners": [{
"LoadBalancerPort": "80",
"InstancePort": "80",
"Protocol": "HTTP"
}],
"HealthCheck": {
"Target": "HTTP:80/",
API Version 2010-05-15
447
AWS CloudFormation User Guide
AWS::IAM::AccessKey
"HealthyThreshold": "3",
"UnhealthyThreshold": "5",
"Interval": "30",
"Timeout": "5"
},
"ConnectionDrainingPolicy": {
"Enabled" : "true",
"Timeout" : "60"
}
}
}
More examples
Examples of AWS CloudFormation templates can be viewed and downloaded from the AWS
CloudFormation Sample Templates. These include:
• ELBSample.template: A load balancer with a health check.
• ELBStickinessSample.template: A load balancer example configured with cookie-based stickiness.
• ELBWithLockedDownEC2Instances.template: A load balancer with instances that receive traffic only
from the load balancer.
• ELBWithLockedDownAutoScaledInstances.template: A load balancer with an auto scaling group that
receives traffic only from the load balancer.
• ELBZoneApex.template: Maps a load balancer to a DNS zone apex.
See Also
• CreateLoadBalancer in the Elastic Load Balancing API Reference
AWS::IAM::AccessKey
The AWS::IAM::AccessKey resource type generates a secret access key and assigns it to an IAM user
or AWS account.
This type supports updates. For more information about updating stacks, see AWS CloudFormation
Stacks Updates (p. 85).
Syntax
{
"Type": "AWS::IAM::AccessKey",
"Properties": {
"Serial (p. 449)": Integer,
"Status (p. 449)": String,
"UserName (p. 449)": String
}
}
API Version 2010-05-15
448
AWS CloudFormation User Guide
AWS::IAM::AccessKey
Properties
Serial
This value is specific to AWS CloudFormation and can only be incremented. Incrementing this value
notifies AWS CloudFormation that you want to rotate your access key. When you update your stack,
AWS CloudFormation will replace the existing access key with a new key.
Required: No
Type: Integer
Update requires: Replacement (p. 86)
Status
The status of the access key.
Required: Yes
Type: String
Valid values: "Active" or "Inactive"
Update requires: No interruption (p. 86)
UserName
The name of the user that the new key will belong to.
Required: Yes
Type: String
Update requires: Replacement (p. 86)
Return Values
Ref
Specifying this resource ID to the intrinsic Ref function will return the AccessKeyId. For example:
AKIAIOSFODNN7EXAMPLE.
For more information about using the Ref function, see Ref (p. 669).
Fn::GetAtt
Fn::GetAtt returns a value for a specified attribute of this type. This section lists the available attributes
and corresponding return values.
SecretAccessKey
Returns the secret access key for the specified AWS::IAM::AccessKey resource. For example:
wJalrXUtnFEMI/K7MDENG/bPxRfiCYzEXAMPLEKEY.
For more information about using Fn:GetAtt, see Fn::GetAtt (p. 661).
Template Examples
To view AWS::IAM::AccessKey snippets, see Declaring an IAM Access Key Resource (p. 196).
API Version 2010-05-15
449
AWS CloudFormation User Guide
AWS::IAM::Group
AWS::IAM::Group
The AWS::IAM::Group type creates an Identity and Access Management (IAM) group.
This type supports updates. For more information about updating stacks, see AWS CloudFormation
Stacks Updates (p. 85).
Syntax
{
"Type": "AWS::IAM::Group",
"Properties": {
"ManagedPolicyArns (p. 450)": [ String, ... ],
"Path (p. 450)": String,
"Policies (p. 450)": [ Policies, ... ]
}
}
Properties
ManagedPolicyArns
One or more managed policy ARNs to attach to this group.
Required: No
Type: List of strings
Update requires: No interruption (p. 86)
Path
The path to the group. For more information about paths, see Identifiers for IAM Entities in Using
IAM.
Required: No
Type: String
Update requires: No interruption (p. 86)
Policies
The policies to associate with this group. For information about policies, see Overview of Policies in
Using IAM.
Required: No
Type: List of IAM Policies (p. 606)
Update requires: No interruption (p. 86)
Return Values
Ref
Specifying this resource ID to the intrinsic Ref function will return the GroupName. For example:
mystack-mygroup-1DZETITOWEKVO.
For more information about using the Ref function, see Ref (p. 669).
API Version 2010-05-15
450
AWS CloudFormation User Guide
AWS::IAM::InstanceProfile
Fn::GetAtt
Fn::GetAtt returns a value for a specified attribute of this type. This section lists the available attributes
and corresponding return values.
Arn
Returns the Amazon Resource Name (ARN) for the AWS::IAM::Group resource. For example:
arn:aws:iam::123456789012:group/mystack-mygroup-1DZETITOWEKVO.
For more information about using Fn:GetAtt, see Fn::GetAtt (p. 661).
Template Examples
To view AWS::IAM::Group snippets, see Declaring an IAM Group Resource (p. 198)
AWS::IAM::InstanceProfile
Creates an AWS Identity and Access Management (IAM) Instance Profile that can be used with IAM
Roles for EC2 Instances.
For more information about IAM roles, see Working with Roles in the AWS Identity and Access Management
User Guide.
Syntax
{
"Type": "AWS::IAM::InstanceProfile",
"Properties": {
"Path (p. 451)": String,
"Roles (p. 451)": [ IAM Roles ]
}
}
Properties
Path
The path associated with this IAM instance profile. For information about IAM paths, see Friendly
Names and Paths in the AWS Identity and Access Management User Guide.
Required: Yes
Type: String
Update requires: Replacement (p. 86)
Roles
The roles associated with this IAM instance profile.
Required: Yes
Type: List of references to AWS::IAM::Roles. Currently, a maximum of one role can be assigned to
an instance profile.
Update requires: No interruption (p. 86)
API Version 2010-05-15
451
AWS CloudFormation User Guide
AWS::IAM::InstanceProfile
Return Values
Ref
When the logical ID of this resource is provided to the Ref intrinsic function, Ref returns the resource
name. For example:
{ "Ref": "MyProfile" }
For the IAM::InstanceProfile with the logical ID "MyProfile", Ref will return the resource name.
For more information about using the Ref function, see Ref (p. 669).
Fn::GetAtt
Fn::GetAtt returns a value for a specified attribute of this type. This section lists the available attributes
and corresponding return values.
Arn
Returns the Amazon Resource Name (ARN) for the instance profile. For example:
{"Fn::GetAtt" : ["MyProfile", "Arn"] }
This will return a value such as
“arn:aws:iam::1234567890:instance-profile/MyProfile-ASDNSDLKJ”.
For more information about using Fn:GetAtt, see Fn::GetAtt (p. 661).
API Version 2010-05-15
452
AWS CloudFormation User Guide
AWS::IAM::ManagedPolicy
Template Examples
Example IAM Role with Embedded Policy and Instance Profiles
This example shows an embedded Policy in the IAM::Role. The policy is specified inline in the IAM::Role
Policies property.
{
"AWSTemplateFormatVersion": "2010-09-09",
"Resources": {
"RootRole": {
"Type": "AWS::IAM::Role",
"Properties": {
"AssumeRolePolicyDocument": {
"Version" : "2012-10-17",
"Statement": [ {
"Effect": "Allow",
"Principal": {
"Service": [ "ec2.amazonaws.com" ]
},
"Action": [ "sts:AssumeRole" ]
} ]
},
"Path": "/",
"Policies": [ {
"PolicyName": "root",
"PolicyDocument": {
"Version" : "2012-10-17",
"Statement": [ {
"Effect": "Allow",
"Action": "*",
"Resource": "*"
} ]
}
} ]
}
},
"RootInstanceProfile": {
"Type": "AWS::IAM::InstanceProfile",
"Properties": {
"Path": "/",
"Roles": [ {
"Ref": "RootRole"
} ]
}
}
}
}
AWS::IAM::ManagedPolicy
AWS::IAM::ManagedPolicy creates an AWS Identity and Access Management (IAM) managed policy
for your AWS account that you can use to apply permissions to IAM users, groups, and roles. For more
information about managed policies, see Managed Policies and Inline Policies in the IAM User Guide
guide.
API Version 2010-05-15
453
AWS CloudFormation User Guide
AWS::IAM::ManagedPolicy
Syntax
{
"Type": "AWS::IAM::ManagedPolicy",
"Properties": {
"Description (p. 454)" : String,
"Groups (p. 454)" : [ String, ... ],
"Path (p. 454)" : String,
"PolicyDocument (p. 454)" : JSON object,
"Roles (p. 454)" : [ String, ... ],
"Users (p. 455)" : [ String, ... ]
}
}
Properties
Description
A description of the policy. For example, you can describe the permissions that are defined in the
policy.
Required: No
Type: String
Update requires: Replacement (p. 86)
Groups
The names of groups to attach to this policy.
Required: No
Type: List of strings
Update requires: No interruption (p. 86)
Path
The path for the policy. By default, the path is /. For more information, see IAM Identifiers in the IAM
User Guide guide.
Required: No
Type: String
Update requires: Replacement (p. 86)
PolicyDocument
Policies that define the permissions for this managed policy.
Required: Yes
Type: JSON object
Update requires: No interruption (p. 86)
Roles
The names of roles to attach to this policy.
Note
If a policy has a Ref to a role and if a resource (such as AWS::ECS::Service) also has
a Ref to the same role, add a DependsOn attribute to the resource so that the resource
depends on the policy. This dependency ensures that the role's policy is available throughout
API Version 2010-05-15
454
AWS CloudFormation User Guide
AWS::IAM::ManagedPolicy
the resource's lifecycle. For example, when you delete a stack with an AWS::ECS::Service
resource, the DependsOn attribute ensures that the AWS::ECS::Service resource can
complete its deletion before its role's policy is deleted.
Required: No
Type: List of strings
Update requires: No interruption (p. 86)
Users
The names of users to attach to this policy.
Required: No
Type: List of strings
Update requires: No interruption (p. 86)
Return Values
Ref
When the logical ID of this resource is provided to the Ref intrinsic function, Ref returns the ARN.
In the following sample, the Ref function returns the ARN of the CreateTestDBPolicy managed policy,
such as
arn:aws:iam::123456789012:policy/teststack-CreateTestDBPolicy-16M23YE3CS700.
{ "Ref": "CreateTestDBPolicy" }
For more information about using the Ref function, see Ref (p. 669).
Example
The following snippet creates a managed policy and associates it with the TestDBGroup group. The
managed policy grants users permission to create t2.micro database instances. The database must use
the MySQL database engine and the instance name must include the prefix test.
"CreateTestDBPolicy" : {
"Type" : "AWS::IAM::ManagedPolicy",
"Properties" : {
"Description" : "Policy for creating a test database",
"Path" : "/",
"PolicyDocument" :
{
"Version":"2012-10-17",
"Statement" : [{
"Effect" : "Allow",
"Action" : "rds:CreateDBInstance",
"Resource" : {"Fn::Join" : [ "", [ "arn:aws:rds:", { "Ref" : "AWS::Re
gion" }, ":", { "Ref" : "AWS::AccountId" }, ":db:test*" ] ]},
"Condition" : {
"StringEquals" : { "rds:DatabaseEngine" : "mysql" }
}
},
{
API Version 2010-05-15
455
AWS CloudFormation User Guide
AWS::IAM::Policy
"Effect" : "Allow",
"Action" : "rds:CreateDBInstance",
"Resource" : {"Fn::Join" : [ "", [ "arn:aws:rds:", { "Ref" : "AWS::Re
gion" }, ":", { "Ref" : "AWS::Region" }, ":db:test*" ] ]},
"Condition" : {
"StringEquals" : { "rds:DatabaseClass" : "db.t2.micro" }
}
}]
},
"Groups" : ["TestDBGroup"]
}
}
AWS::IAM::Policy
The AWS::IAM::Policy resource associates an IAM policy with IAM users, roles, or groups. For more
information about IAM policies, see Overview of IAM Policies in the IAM User Guide guide.
Syntax
{
"Type": "AWS::IAM::Policy",
"Properties": {
"Groups (p. 456)" : [ String, ... ],
"PolicyDocument (p. 456)" : JSON object,
"PolicyName (p. 456)" : String,
"Roles (p. 457)" : [ String, ... ],
"Users (p. 457)" : [ String, ... ]
}
}
Properties
Groups
The names of groups to which you want to add the policy.
Required: Conditional. You must specify at least one of the following properties: Groups, Roles, or
Users.
Type: List of strings
Update requires: No interruption (p. 86)
PolicyDocument
A policy document that contains permissions to add to the specified users or groups.
Required: Yes
Type: JSON object
Update requires: No interruption (p. 86)
PolicyName
The name of the policy.
Required: Yes
API Version 2010-05-15
456
AWS CloudFormation User Guide
AWS::IAM::Policy
Type: String
Update requires: No interruption (p. 86)
Roles
The names of AWS::IAM::Role (p. 458)s to attach to this policy.
Note
If a policy has a Ref to a role and if a resource (such as AWS::ECS::Service) also has
a Ref to the same role, add a DependsOn attribute to the resource so that the resource
depends on the policy. This dependency ensures that the role's policy is available throughout
the resource's lifecycle. For example, when you delete a stack with an AWS::ECS::Service
resource, the DependsOn attribute ensures that the AWS::ECS::Service resource can
complete its deletion before its role's policy is deleted.
Required: Conditional. You must specify at least one of the following properties: Groups, Roles, or
Users.
Type: List of strings
Update requires: No interruption (p. 86)
Users
The names of users for whom you want to add the policy.
Required: Conditional. You must specify at least one of the following properties: Groups, Roles, or
Users.
Type: List of strings
Update requires: No interruption (p. 86)
Return Values
Ref
When the logical ID of this resource is provided to the Ref intrinsic function, Ref returns the resource
name.
For more information about using the Ref function, see Ref (p. 669).
Examples
IAM Policy with policy group
{
"Type" : "AWS::IAM::Policy",
"Properties" : {
"PolicyName" : "CFNUsers",
"PolicyDocument" : {
"Version" : "2012-10-17",
"Statement": [ {
"Effect"
: "Allow",
"Action"
: [
"cloudformation:Describe*",
"cloudformation:List*",
"cloudformation:Get*"
API Version 2010-05-15
457
AWS CloudFormation User Guide
AWS::IAM::Role
],
"Resource" : "*"
} ]
},
"Groups" : [ { "Ref" : "CFNUserGroup" } ]
}
}
This snippet is from IAM_Users_Groups_and_Policies.template
IAM Policy with specified role
{
"Type": "AWS::IAM::Policy",
"Properties": {
"PolicyName": "root",
"PolicyDocument": {
"Version" : "2012-10-17",
"Statement": [
{ "Effect": "Allow", "Action": "*", "Resource": "*" }
]
},
"Roles": [ { "Ref": "RootRole" } ]
}
}
This snippet is from auto_scaling_with_instance_profile.template.
To view more AWS::IAM::Policy snippets, see Declaring an IAM Policy (p. 199).
AWS::IAM::Role
Creates an AWS Identity and Access Management (IAM) role. An IAM role can be used to enable
applications running on an Amazon EC2 instance to securely access your AWS resources.
For more information about IAM roles, see Working with Roles in the AWS Identity and Access Management
User Guide.
Syntax
{
"Type": "AWS::IAM::Role",
"Properties": {
"AssumeRolePolicyDocument (p. 459)": { JSON },
"ManagedPolicyArns (p. 459)": [ String, ... ],
"Path (p. 459)": String,
"Policies (p. 459)": [ Policies, ... ]
}
}
API Version 2010-05-15
458
AWS CloudFormation User Guide
AWS::IAM::Role
Properties
AssumeRolePolicyDocument
The IAM assume role policy that is associated with this role.
Required: Yes
Type: A JSON policy document.
Update requires: No interruption (p. 86)
Note
You can associate only one assume role policy with a role. For an example of an assume
role policy, see Template Examples (p. 461).
ManagedPolicyArns
One or more managed policy ARNs to attach to this role.
Required: No
Type: List of strings
Update requires: No interruption (p. 86)
Path
The path associated with this role. For information about IAM paths, see Friendly Names and Paths
in IAM User Guide.
Required: No
Type: String
Update requires: Replacement (p. 86)
Policies
The policies to associate with this role. Policies can also be specified externally. For sample templates
that demonstrates both embedded and external policies, see Template Examples (p. 461).
Note
If an external policy (such as AWS::IAM::Policy or AWS::IAM::ManagedPolicy) has
a Ref to a role and if a resource (such as AWS::ECS::Service) also has a Ref to the
same role, add a DependsOn attribute to the resource so that the resource depends on the
external policy. This dependency ensures that the role's policy is available throughout the
resource's lifecycle. For example, when you delete a stack with an AWS::ECS::Service
resource, the DependsOn attribute ensures that the AWS::ECS::Service resource can
complete its deletion before its role's policy is deleted.
Required: No
Type: List of IAM Policies (p. 606)
Update requires: No interruption (p. 86)
Notes on policies for IAM roles
For general information about IAM policies and policy documents, see How to Write a Policy in IAM User
Guide.
API Version 2010-05-15
459
AWS CloudFormation User Guide
AWS::IAM::Role
Return Values
Ref
When the logical ID of this resource is provided to the Ref intrinsic function, Ref returns the resource
name. For example:
{ "Ref": "RootRole" }
For the IAM::Role with the logical ID "RootRole", Ref will return the resource name.
For more information about using the Ref function, see Ref (p. 669).
Fn::GetAtt
Fn::GetAtt returns a value for a specified attribute of this type. This section lists the available attributes
and corresponding return values.
Arn
Returns the Amazon Resource Name (ARN) for the instance profile. For example:
{"Fn::GetAtt" : ["MyRole", "Arn"] }
This will return a value such as “arn:aws:iam::1234567890:role/MyRole-AJJHDSKSDF”.
For more information about using Fn:GetAtt, see Fn::GetAtt (p. 661).
API Version 2010-05-15
460
AWS CloudFormation User Guide
AWS::IAM::Role
Template Examples
Example IAM Role with Embedded Policy and Instance Profiles
This example shows an embedded Policy in the IAM::Role. The policy is specified inline in the IAM::Role
Policies property.
{
"AWSTemplateFormatVersion": "2010-09-09",
"Resources": {
"RootRole": {
"Type": "AWS::IAM::Role",
"Properties": {
"AssumeRolePolicyDocument": {
"Version" : "2012-10-17",
"Statement": [ {
"Effect": "Allow",
"Principal": {
"Service": [ "ec2.amazonaws.com" ]
},
"Action": [ "sts:AssumeRole" ]
} ]
},
"Path": "/",
"Policies": [ {
"PolicyName": "root",
"PolicyDocument": {
"Version" : "2012-10-17",
"Statement": [ {
"Effect": "Allow",
"Action": "*",
"Resource": "*"
} ]
}
} ]
}
},
"RootInstanceProfile": {
"Type": "AWS::IAM::InstanceProfile",
"Properties": {
"Path": "/",
"Roles": [ {
"Ref": "RootRole"
} ]
}
}
}
}
API Version 2010-05-15
461
AWS CloudFormation User Guide
AWS::IAM::Role
Example IAM Role with External Policy and Instance Profiles
In this example, the Policy and InstanceProfile resources are specified externally to the IAM Role. They
refer to the role by specifying its name, "RootRole", in their respective Roles properties.
{
"AWSTemplateFormatVersion": "2010-09-09",
"Resources": {
"RootRole": {
"Type": "AWS::IAM::Role",
"Properties": {
"AssumeRolePolicyDocument": {
"Version" : "2012-10-17",
"Statement": [ {
"Effect": "Allow",
"Principal": {
"Service": [ "ec2.amazonaws.com" ]
},
"Action": [ "sts:AssumeRole" ]
} ]
},
"Path": "/"
}
},
"RolePolicies": {
"Type": "AWS::IAM::Policy",
"Properties": {
"PolicyName": "root",
"PolicyDocument": {
"Version" : "2012-10-17",
"Statement": [ {
"Effect": "Allow",
"Action": "*",
"Resource": "*"
} ]
},
"Roles": [ {
"Ref": "RootRole"
} ]
}
},
"RootInstanceProfile": {
"Type": "AWS::IAM::InstanceProfile",
"Properties": {
"Path": "/",
"Roles": [ {
"Ref": "RootRole"
} ]
}
}
}
}
See Also
• AWS Identity and Access Management Template Snippets (p. 195)
API Version 2010-05-15
462
AWS CloudFormation User Guide
AWS::IAM::User
• AWS::IAM::InstanceProfile (p. 451)
AWS::IAM::User
The AWS::IAM::User type creates a user.
Syntax
{
"Type": "AWS::IAM::User",
"Properties": {
"Groups (p. 463)": [ String, ... ],
"LoginProfile (p. 463)": LoginProfile Type,
"ManagedPolicyArns (p. 463)": [ String, ... ],
"Path (p. 463)": String,
"Policies (p. 464)": [ Policies, ... ]
}
}
Properties
Groups
A name of a group to which you want to add the user.
Required: No
Type: List of strings
Update requires: No interruption (p. 86)
LoginProfile
Creates a login profile so that the user can access the AWS Management Console.
Required: No
Type: IAM User LoginProfile (p. 606)
Update requires: No interruption (p. 86)
ManagedPolicyArns
One or more managed policy ARNs to attach to this user.
Required: No
Type: List of strings
Update requires: No interruption (p. 86)
Path
The path for the user name. For more information about paths, see Identifiers for IAM Entities in
Using AWS Identity and Access Management.
Required: No
Type: String
Update requires: No interruption (p. 86)
API Version 2010-05-15
463
AWS CloudFormation User Guide
AWS::IAM::UserToGroupAddition
Policies
The policies to associate with this user. For information about policies, see Overview of Policies in
[Using IAM].
Required: No
Type: List of IAM Policies (p. 606)
Update requires: No interruption (p. 86)
Return Values
Ref
Specifying this resource ID to the intrinsic Ref function will return the UserName. For example:
mystack-myuser-1CCXAFG2H2U4D.
For more information about using the Ref function, see Ref (p. 669).
Fn::GetAtt
Fn::GetAtt returns a value for a specified attribute of this type. This section lists the available attributes
and corresponding return values.
Arn
Returns the Amazon Resource Name (ARN) for the specified AWS::IAM::User resource. For example:
arn:aws:iam::123456789012:user/mystack-myuser-1CCXAFG2H2U4D.
For more information about using Fn:GetAtt, see Fn::GetAtt (p. 661).
Template Examples
To view AWS::IAM::User snippets, see: Declaring an IAM User Resource (p. 195)
AWS::IAM::UserToGroupAddition
The AWS::IAM::UserToGroupAddition type adds AWS Identity and Access Management (IAM) users to
a group.
This type supports updates. For more information about updating stacks, see AWS CloudFormation
Stacks Updates (p. 85).
Syntax
{
"Type": "AWS::IAM::UserToGroupAddition",
"Properties": {
"GroupName (p. 465)": String,
"Users (p. 465)": [ User1, ... ]
}
}
API Version 2010-05-15
464
AWS CloudFormation User Guide
AWS::Kinesis::Stream
Properties
GroupName
The name of group to add users to.
Required: Yes
Type: String
Update requires: No interruption (p. 86)
Users
Required: Yes
Type: List of users
Update requires: No interruption (p. 86)
Return Value
When the logical ID of this resource is provided to the Ref intrinsic function, Ref returns the resource
name. For example:
{ "Ref": "MyUserToGroupAddition" }
For the AWS::IAM::UserToGroupAddition with the logical ID "MyUserToGroupAddition", Ref will return
the AWS resource name.
For more information about using the Ref function, see Ref (p. 669).
Template Examples
To view AWS::IAM::UserToGroupAddition snippets, see Adding Users to a Group (p. 198).
AWS::Kinesis::Stream
Creates an Amazon Kinesis stream that captures and transports data records that are emitted from data
sources. For specific information about creating streams, see CreateStream in the Amazon Kinesis API
Reference.
Syntax
{
"Type" : "AWS::Kinesis::Stream",
"Properties" : {
"ShardCount (p. 465)" : Integer
}
}
Properties
ShardCount
The number of shards that the stream uses. For greater provisioned throughput, increase the number
of shards.
Required: Yes
Type: Integer
API Version 2010-05-15
465
AWS CloudFormation User Guide
AWS::Lambda::Function
Update requires: Replacement (p. 86)
Return Values
Ref
When you specify an AWS::Kinesis::Stream resource as an argument to the Ref function, AWS
CloudFormation returns the stream name (physical ID).
For more information about using the Ref function, see Ref (p. 669).
AWS::Lambda::Function
The AWS::Lambda::Function resource creates an AWS Lambda (Lambda) function that can run code
in response to events. For more information, see CreateFunction in the AWS Lambda Developer Guide.
Syntax
{
"Type" : "AWS::Lambda::Function",
"Properties" : {
"Code (p. 466)" : Code,
"Description (p. 466)" : String,
"Handler (p. 466)" : String,
"MemorySize (p. 467)" : Integer,
"Role (p. 467)" : String,
"Runtime (p. 467)" : String,
"Timeout (p. 467)" : Integer
}
}
Properties
Code
The source code of your Lambda function.
Required: Yes
Type: AWS Lambda Function Code (p. 607)
Update requires: No interruption (p. 86)
Description
A description of the function.
Required: No
Type: String
Update requires: No interruption (p. 86)
Handler
The name of the function within your code that Lambda calls to start running the code.
Required: Yes
Type: String
API Version 2010-05-15
466
AWS CloudFormation User Guide
AWS::Lambda::Function
Update requires: No interruption (p. 86)
MemorySize
The amount of memory, in MB, that is allocated to your Lambda function. Lambda uses this value
to infer the amount of CPU and memory that is allocated to your function. Your function use case
determines your CPU and memory requirements. For example, a database operation might need
less memory than an image processing function. The default value is 128 MB, and you must specify
a value that is greater than or equal to 128.
Required: No
Type: Integer
Update requires: No interruption (p. 86)
Role
The Amazon Resource Name (ARN) of the AWS Identity and Access Management (IAM) role that
Lambda assumes when it runs your code to access AWS.
Required: Yes
Type: String
Update requires: No interruption (p. 86)
Runtime
The runtime environment for the Lambda function that you are uploading. Currently, Lambda supports
only nodejs.
Required: Yes
Type: String
Update requires: Replacement (p. 86)
Timeout
The function execution time (in seconds) after which Lambda terminates the function. Because the
execution time affects cost, set this value based on the function's expected execution time. By default,
Timeout is set to 3 seconds.
Required: No
Type: Integer
Update requires: No interruption (p. 86)
Return Values
Ref
When the logical ID of this resource is provided to the Ref intrinsic function, Ref returns the resource
name.
In the following sample, the Ref function returns the name of the AMILookUp function, such as
MyStack-AMILookUp-NT5EUXTNTXXD.
{ "Ref": "AMILookUp" }
For more information about using the Ref function, see Ref (p. 669).
API Version 2010-05-15
467
AWS CloudFormation User Guide
AWS::Logs::LogGroup
Fn::GetAtt
Fn::GetAtt returns a value for a specified attribute of this type. This section lists the available attributes
and corresponding return values.
Arn
The ARN of the Lambda function, such as
arn:aws:lambda:us-west-2:123456789012:MyStack-AMILookUp-NT5EUXTNTXXD.
For more information about using Fn:GetAtt, see Fn::GetAtt (p. 661).
Example
The following example uses a packaged file in an Amazon S3 bucket to create a Lambda function.
"AMIIDLookup": {
"Type": "AWS::Lambda::Function",
"Properties": {
"Handler": "index.handler",
"Role": { "Fn::GetAtt" : ["LambdaExecutionRole", "Arn"] },
"Code": {
"S3Bucket": "lambda-functions",
"S3Key": "amilookup.zip"
},
"Runtime": "nodejs",
"Timeout": "25"
}
}
AWS::Logs::LogGroup
The AWS::Logs::LogGroup resource creates an Amazon CloudWatch Logs log group that defines
common properties for log streams, such as their retention and access control rules. Each log stream
must belong to one log group.
Syntax
{
"Type" : "AWS::Logs::LogGroup",
"Properties" : {
"RetentionInDays (p. 468)" : Integer
}
}
Properties
RetentionInDays
The number of days log events are kept in CloudWatch Logs. When a log event expires, CloudWatch
Logs automatically deletes it. For valid values, see PutRetentionPolicy in the Amazon CloudWatch
Logs API Reference.
Required: No
Type: Integer
API Version 2010-05-15
468
AWS CloudFormation User Guide
AWS::Logs::MetricFilter
Update requires: No interruption (p. 86)
Return Values
Ref
When the logical ID of this resource is provided to the Ref intrinsic function, Ref returns the resource
name.
For more information about using the Ref function, see Ref (p. 669).
Examples
The following example creates a CloudWatch Logs log group that retains events for 7 days.
"myLogGroup": {
"Type": "AWS::Logs::LogGroup",
"Properties": {
"RetentionInDays": 7
}
}
For an additional sample template, see Amazon CloudWatch Logs Template Snippets (p. 169).
AWS::Logs::MetricFilter
The AWS::Logs::MetricFilter resource creates a metric filter that describes how Amazon CloudWatch
Logs extracts information from logs that you specify and transforms it into Amazon CloudWatch metrics.
If you have multiple metric filters that are associated with a log group, all the filters are applied to the log
streams in that group.
Syntax
{
"Type": "AWS::Logs::MetricFilter",
"Properties": {
"FilterPattern (p. 469)": [String, ...],
"LogGroupName (p. 470)": String,
"MetricTransformations (p. 470)": [ MetricTransformations, ... ]
}
}
Properties
Note
For more information about constraints and values for each property, see PutMetricFilter in the
Amazon CloudWatch Logs API Reference.
FilterPattern
Describes the pattern that CloudWatch Logs follows to interpret each entry in a log. For example, a
log entry might contain fields such as timestamps, IP addresses, error codes, bytes transferred, and
so on. You use the pattern to specify those fields and to specify what to look for in the log file. For
example, if you're interested in error codes that begin with 1234, your filter pattern might be
[timestamps, ip_addresses, error_codes = 1234*, size, ...].
API Version 2010-05-15
469
AWS CloudFormation User Guide
AWS::OpsWorks::App
Required: Yes
Type: List of strings
Update requires: No interruption (p. 86)
LogGroupName
The name of an existing log group that you want to associate with this metric filter.
Required: Yes
Type: String
Update requires: Replacement (p. 86)
MetricTransformations
Describes how to transform data from a log into a CloudWatch metric.
Required: Yes
Type: A list of CloudWatch Logs MetricFilter MetricTransformation Property (p. 566)
Important
Currently, you can specify only one metric transformation for each metric filter. If you want
to specify multiple metric transformations, you must specify multiple metric filters.
Update requires: No interruption (p. 86)
Examples
The following example sends a value of 1 to the 404Count metric whenever the status code field includes
a 404 value.
"404MetricFilter": {
"Type": "AWS::Logs::MetricFilter",
"Properties": {
"LogGroupName": { "Ref": "myLogGroup" },
"FilterPattern": "[ip, identity, user_id, timestamp, request, status_code
= 404, size]",
"MetricTransformations": [
{
"MetricValue": "1",
"MetricNamespace": "WebServer/404s",
"MetricName": "404Count"
}
]
}
}
For an additional sample template, see Amazon CloudWatch Logs Template Snippets (p. 169).
AWS::OpsWorks::App
Defines an AWS OpsWorks app for an AWS OpsWorks stack. The app represents code that you want
to run on an application server.
API Version 2010-05-15
470
AWS CloudFormation User Guide
AWS::OpsWorks::App
Syntax
{
"Type": "AWS::OpsWorks::App",
"Properties": {
"AppSource (p. 471)" : Source,
"Attributes (p. 471)" : { String:String, ... },
"Description (p. 471)" : String,
"Domains (p. 471)" : [ String, ... ],
"EnableSsl (p. 471)" : Boolean,
"Name (p. 472)" : String,
"Shortname (p. 472)" : String,
"SslConfiguration (p. 472)" : { SslConfiguration },
"StackId (p. 472)" : String,
"Type (p. 472)" : String
}
}
Properties
AppSource
Contains the information required to retrieve an app from a repository.
Required: No
Type: AWS OpsWorks Source Type (p. 613)
Update requires: No interruption (p. 86)
Attributes
One or more user-defined key-value pairs to be added to the stack attributes bag.
Required: No
Type: A list of key-value pairs
Update requires: No interruption (p. 86)
Description
A description of the app.
Required: No
Type: String
Update requires: No interruption (p. 86)
Domains
The app virtual host settings, with multiple domains separated by commas. For example,
'www.example.com, example.com'.
Required: No
Type: List of strings
Update requires: No interruption (p. 86)
EnableSsl
Whether to enable SSL for this app.
Required: No
API Version 2010-05-15
471
AWS CloudFormation User Guide
AWS::OpsWorks::App
Type: Boolean
Update requires: No interruption (p. 86)
Name
The AWS OpsWorks app name.
Required: Yes
Type: String
Update requires: No interruption (p. 86)
Shortname
The app short name, which is used internally by AWS OpsWorks and by Chef recipes.
Required: No
Type: String
Update requires: Replacement (p. 86)
SslConfiguration
The SSL configuration
Required: No
Type: AWS OpsWorks SslConfiguration Type (p. 614)
Update requires: No interruption (p. 86)
StackId
The AWS OpsWorks stack ID that this app will be associated with.
Required: Yes
Type: String
Update requires: Replacement (p. 86)
Type
The app type. Each supported type is associated with a particular layer. For more information, see
CreateApp in the AWS OpsWorks API Reference.
Required: Yes
Type: String
Update requires: No interruption (p. 86)
Return Values
Ref
When the logical ID of this resource is provided to the Ref intrinsic function, Ref returns the resource
name. For example:
{ "Ref": "myApp" }
For the AWS OpsWorks stack myApp, Ref returns the AWS OpsWorks app ID.
For more information about using the Ref function, see Ref (p. 669).
API Version 2010-05-15
472
AWS CloudFormation User Guide
AWS::OpsWorks::ElasticLoadBalancerAttachment
Template Snippet
The following snippet creates an AWS OpsWorks app that uses a PHP application in a Git repository:
"myApp" : {
"Type" : "AWS::OpsWorks::App",
"Properties" : {
"StackId" : {"Ref":"myStack"},
"Type" : "php",
"Name" : {"myPHPapp"},
"AppSource" : {
"Type" : "git",
"Url" : "git://github.com/amazonwebservices/opsworks-demo-php-simpleapp.git",
"Revision" : "version1"
}
}
}
See Also
• AWS::OpsWorks::Stack (p. 482)
• AWS::OpsWorks::Layer (p. 478)
• AWS::OpsWorks::Instance (p. 474)
AWS::OpsWorks::ElasticLoadBalancerAttachment
Attaches an Elastic Load Balancing load balancer to an AWS OpsWorks layer that you specify.
Syntax
{
"Type": "AWS::OpsWorks::ElasticLoadBalancerAttachment",
"Properties": {
"ElasticLoadBalancerName (p. 473)" : String,
"LayerId (p. 473)" : String
}
}
Properties
ElasticLoadBalancerName
Elastic Load Balancing load balancer name.
Required: Yes
Type: String
Update requires: No interruption (p. 86)
LayerId
The AWS OpsWorks layer ID that the Elastic Load Balancing load balancer will be attached to.
Required: Yes
API Version 2010-05-15
473
AWS CloudFormation User Guide
AWS::OpsWorks::Instance
Type: String
Update requires: No interruption (p. 86)
Template Snippet
The following snippet specifies a load balancer attachment to an AWS OpsWorks layer, both of which
would be described elsewhere in the same template:
"ELBAttachment" : {
"Type" : "AWS::OpsWorks::ElasticLoadBalancerAttachment",
"Properties" : {
"ElasticLoadBalancerName" : { "Ref" : "ELB" },
"LayerId" : { "Ref" : "Layer" }
}
}
See Also
• AWS::OpsWorks::Layer (p. 478)
AWS::OpsWorks::Instance
Creates an instance for an AWS OpsWorks stack. These instances represent the Amazon EC2 instances
that, for example, handle the work of serving applications and balancing traffic.
Syntax
{
"Type": "AWS::OpsWorks::Instance",
"Properties": {
"AmiId (p. 474)" : String,
"Architecture (p. 475)" : String,
"AutoScalingType (p. 475)" : String,
"AvailabilityZone (p. 475)" : String,
"InstallUpdatesOnBoot (p. 475)" : Boolean,
"InstanceType (p. 475)" : String,
"LayerIds (p. 475)" : [ String, ... ],
"Os (p. 475)" : String,
"RootDeviceType (p. 476)" : String,
"SshKeyName (p. 476)" : String,
"StackId (p. 476)" : String,
"SubnetId (p. 476)" : String,
"TimeBasedAutoScaling (p. 476)" : { TimeBasedAutoScaling }
}
}
Properties
AmiId
The ID of the custom AMI to be used to create the instance. The AMI should be based on one of the
standard AWS OpsWorks APIs.
API Version 2010-05-15
474
AWS CloudFormation User Guide
AWS::OpsWorks::Instance
Required: No
Type: String
Update requires: Updates are not supported.
Architecture
The instance architecture.
Required: No
Type: String
Update requires: Some interruptions (p. 86)
AutoScalingType
For scaling instances, the type of scaling. If you specify load-based scaling, do not specify a time-based
scaling configuration. For valid values, see CreateInstance in the AWS OpsWorks API Reference.
Required: No
Type: String
Update requires: Replacement (p. 86)
AvailabilityZone
The instance Availability Zone.
Required: No
Type: String
Update requires: Replacement (p. 86)
InstallUpdatesOnBoot
Whether to install operating system and package updates when the instance boots.
Required: No
Type: Boolean
Update requires: Some interruptions (p. 86)
InstanceType
The instance type, which must be supported by AWS OpsWorks. For more information, see
CreateInstance in the AWS OpsWorks API Reference.
Required: Yes
Type: String
Update requires: Some interruptions (p. 86)
LayerIds
The IDs of the AWS OpsWorks layers that will be associated with this instance.
Required: Yes
Type: List of strings
Update requires: Some interruptions (p. 86)
Os
The instance operating system. For more information, see CreateInstance in the AWS OpsWorks
API Reference.
API Version 2010-05-15
475
AWS CloudFormation User Guide
AWS::OpsWorks::Instance
Required: No
Type: String
Update requires: Some interruptions (p. 86)
RootDeviceType
The instance root device type.
Required: No
Type: String
Update requires: Replacement (p. 86)
SshKeyName
The instance SSH key name.
Required: No
Type: String
Update requires: Some interruptions (p. 86)
StackId
The ID of the AWS OpsWorks stack that this instance will be associated with.
Required: Yes
Type: String
Update requires: Replacement (p. 86)
SubnetId
The ID of the instance's subnet. If the stack is running in a VPC, you can use this parameter to
override the stack's default subnet ID value and direct AWS OpsWorks to launch the instance in a
different subnet.
Required: No
Type: String
Update requires: Replacement (p. 86)
TimeBasedAutoScaling
The time-based scaling configuration for the instance.
Required: No
Type: AWS OpsWorks TimeBasedAutoScaling Type (p. 615)
Update requires: Replacement (p. 86)
Return Values
Ref
When the logical ID of this resource is provided to the Ref intrinsic function, Ref returns the resource
name. For example:
{ "Ref": "myInstance1" }
API Version 2010-05-15
476
AWS CloudFormation User Guide
AWS::OpsWorks::Instance
For the AWS OpsWorks instance myInstance1, Ref returns the AWS OpsWorks instance ID.
For more information about using the Ref function, see Ref (p. 669).
Template Snippets
Basic AWS OpsWorks Instances
The following snippet creates two AWS OpsWorks instances that are associated with the myStack AWS
OpsWorks stack and the myLayer AWS OpsWorks layer:
"myInstance1" : {
"Type" : "AWS::OpsWorks::Instance",
"Properties" : {
"StackId" : {"Ref":"myStack"},
"LayerIds" : [{"Ref":"myLayer"}],
"InstanceType" : "m1.small"
}
},
"myInstance2" : {
"Type" : "AWS::OpsWorks::Instance",
"Properties" : {
"StackId" : {"Ref":"myStack"},
"LayerIds" : [{"Ref":"myLayer"}],
"InstanceType" : "m1.small"
}
}
Time-based Auto Scaling Instance
In the following example, the DBInstance instance is online for four hours from UTC 1200 - 1600 on
Friday, Saturday, and Sunday. The instance is offline for all other times and days.
"DBInstance" : {
"Type" : "AWS::OpsWorks::Instance",
"Properties" : {
"AutoScalingType" : "timer",
"StackId" : {"Ref":"Stack"},
"LayerIds" : [{"Ref":"DBLayer"}],
"InstanceType" : "m1.small",
"TimeBasedAutoScaling" : {
"Friday" : { "12" : "on", "13" : "on", "14" : "on", "15" : "on" },
"Saturday" : { "12" : "on", "13" : "on", "14" : "on", "15" : "on" },
"Sunday" : { "12" : "on", "13" : "on", "14" : "on", "15" : "on" }
}
}
}
See Also
• AWS::OpsWorks::Stack (p. 482)
• AWS::OpsWorks::Layer (p. 478)
• AWS::OpsWorks::App (p. 470)
API Version 2010-05-15
477
AWS CloudFormation User Guide
AWS::OpsWorks::Layer
AWS::OpsWorks::Layer
Creates an AWS OpsWorks layer. A layer defines, for example, which packages and applications are
installed and how they are configured.
Syntax
{
"Type": "AWS::OpsWorks::Layer",
"Properties": {
"Attributes (p. 478)" : { String:String },
"AutoAssignElasticIps (p. 478)" : Boolean,
"AutoAssignPublicIps (p. 478)" : Boolean,
"CustomInstanceProfileArn (p. 479)" : String,
"CustomRecipes (p. 479)" : Recipes,
"CustomSecurityGroupIds (p. 479)" : [ String, ... ],
"EnableAutoHealing (p. 479)" : Boolean,
"InstallUpdatesOnBoot (p. 479)" : Boolean,
"LifecycleEventConfiguration (p. 479)" : LifeCycleEventConfiguration,
"LoadBasedAutoScaling (p. 479)" : LoadBasedAutoScaling,
"Name (p. 479)" : String,
"Packages (p. 480)" : [ String, ... ],
"Shortname (p. 480)" : String,
"StackId (p. 480)" : String,
"Type (p. 480)" : String,
"VolumeConfigurations (p. 480)" : [ VolumeConfiguration, ... ]
}
}
Properties
Attributes
One or more user-defined key-value pairs to be added to the stack attributes bag.
Required: No
Type: A list of key-value pairs
Update requires: No interruption (p. 86)
AutoAssignElasticIps
Whether to automatically assign an Elastic IP address to Amazon EC2 instances in this layer.
Required: Yes
Type: Boolean
Update requires: No interruption (p. 86)
AutoAssignPublicIps
For AWS OpsWorks stacks that are running in a VPC, whether to automatically assign a public IP
address to Amazon EC2 instances in this layer.
Required: Yes
Type: Boolean
Update requires: No interruption (p. 86)
API Version 2010-05-15
478
AWS CloudFormation User Guide
AWS::OpsWorks::Layer
CustomInstanceProfileArn
The Amazon Resource Name (ARN) of an IAM instance profile that is to be used for the Amazon
EC2 instances in this layer.
Required: No
Type: String
Update requires: No interruption (p. 86)
CustomRecipes
Custom event recipes for this layer.
Required: No
Type: AWS OpsWorks Recipes Type (p. 612)
Update requires: No interruption (p. 86)
CustomSecurityGroupIds
Custom security group IDs for this layer.
Required: No
Type: List of strings
Update requires: No interruption (p. 86)
EnableAutoHealing
Whether to automatically heal Amazon EC2 instances that have become disconnected or timed out.
Required: Yes
Type: Boolean
Update requires: No interruption (p. 86)
InstallUpdatesOnBoot
Whether to install operating system and package updates when the instance boots.
Required: No
Type: Boolean
Update requires: No interruption (p. 86)
LifecycleEventConfiguration
The lifecycle events for the AWS OpsWorks layer.
Required: No
Type: AWS OpsWorks Layer LifeCycleConfiguration (p. 610)
Update requires: No interruption (p. 86)
LoadBasedAutoScaling
The load-based scaling configuration for the AWS OpsWorks layer.
Required: No
Type: AWS OpsWorks LoadBasedAutoScaling Type (p. 611)
Update requires: No interruption (p. 86)
Name
The AWS OpsWorks layer name.
API Version 2010-05-15
479
AWS CloudFormation User Guide
AWS::OpsWorks::Layer
Required: Yes
Type: String
Update requires: No interruption (p. 86)
Packages
The packages for this layer.
Required: No
Type: List of strings
Update requires: No interruption (p. 86)
Shortname
The layer short name, which is used internally by AWS OpsWorks and by Chef recipes. The short
name is also used as the name for the directory where your app files are installed.
The name can have a maximum of 200 characters, which are limited to the alphanumeric characters,
'-', '_', and '.'.
Required: Yes
Type: String
Update requires: No interruption (p. 86)
StackId
The ID of the AWS OpsWorks stack that this layer will be associated with.
Required: Yes
Type: String
Update requires: Replacement (p. 86)
Type
The layer type. A stack cannot have more than one layer of the same type. For more information,
see CreateLayer in the AWS OpsWorks API Reference.
Required: Yes
Type: String
Update requires: Replacement (p. 86)
VolumeConfigurations
Describes the Amazon EBS volumes for this layer.
Required: No
Type: A list of AWS OpsWorks VolumeConfiguration Type (p. 616)
Update requires: Replacement (p. 86)
Return Values
Ref
When the logical ID of this resource is provided to the Ref intrinsic function, Ref returns the resource
name. For example:
API Version 2010-05-15
480
AWS CloudFormation User Guide
AWS::OpsWorks::Layer
{ "Ref": "myLayer" }
For the AWS OpsWorks layer myLayer, Ref returns the AWS OpsWorks layer ID.
For more information about using the Ref function, see Ref (p. 669).
Template Snippet
AWS OpsWorks PHP Layer
The following snippet creates an AWS OpsWorks PHP layer that is associated with the myStack AWS
OpsWorks stack. The layer is dependent on the myApp AWS OpsWorks application.
"myLayer": {
"Type": "AWS::OpsWorks::Layer",
"DependsOn": "myApp",
"Properties": {
"StackId": {"Ref": "myStack"},
"Name": "PHP App Server",
"Type": "php-app",
"Shortname" : "php-app",
"EnableAutoHealing" : "true",
"AutoAssignElasticIps" : "false",
"AutoAssignPublicIps" : "true",
"Name": "MyPHPApp"
}
}
Load-based Auto Scaling Layer
The following snippet creates a load-based automatic scaling AWS OpsWorks PHP layer that is associated
with the myStack AWS OpsWorks stack.
"myLayer": {
"Type": "AWS::OpsWorks::Layer",
"DependsOn": "myApp",
"Properties": {
"StackId": {"Ref": "myStack"},
"Name": "PHP App Server",
"Type": "php-app",
"Shortname" : "php-app",
"EnableAutoHealing" : "true",
"AutoAssignElasticIps" : "false",
"AutoAssignPublicIps" : "true",
"Name": "MyPHPApp",
"LoadBasedAutoScaling" : {
"Enable" : "true",
"UpScaling" : {
"InstanceCount" : 1,
"ThresholdsWaitTime" : 1,
"IgnoreMetricsTime" : 1,
"CpuThreshold" : 70.0,
"MemoryThreshold" : 30.0,
"LoadThreshold" : 0.7
},
API Version 2010-05-15
481
AWS CloudFormation User Guide
AWS::OpsWorks::Stack
"DownScaling" : {
"InstanceCount" : 1,
"ThresholdsWaitTime" : 1,
"IgnoreMetricsTime" : 1,
"CpuThreshold" : 30.0,
"MemoryThreshold" : 70.0,
"LoadThreshold" : 0.3
}
}
}
}
See Also
• AWS::OpsWorks::Stack (p. 482)
• AWS::OpsWorks::App (p. 470)
• AWS::OpsWorks::Instance (p. 474)
AWS::OpsWorks::Stack
Creates an AWS OpsWorks stack. An AWS OpsWorks stack represents a set of instances that you want
to manage collectively, typically because they have a common purpose such as serving PHP applications.
Syntax
{
"Type" : "AWS::OpsWorks::Stack",
"Properties" : {
"Attributes (p. 482)" : { String:String, ... },
"ChefConfiguration (p. 483)" : { ChefConfiguration },
"ConfigurationManager (p. 483)" : { StackConfigurationManager },
"CustomCookbooksSource (p. 483)" : { Source },
"CustomJson (p. 483)" : JSON,
"DefaultAvailabilityZone (p. 483)" : String,
"DefaultInstanceProfileArn (p. 484)" : String,
"DefaultOs (p. 484)" : String,
"DefaultRootDeviceType (p. 484)" : String,
"DefaultSshKeyName (p. 484)" : String,
"DefaultSubnetId (p. 484)" : String,
"HostnameTheme (p. 484)" : String,
"Name (p. 484)" : String,
"ServiceRoleArn (p. 485)" : String,
"UseCustomCookbooks (p. 485)" : Boolean,
"UseOpsworksSecurityGroups (p. 485)" : Boolean,
"VpcId (p. 485)" : String
}
}
Properties
Attributes
One or more user-defined key-value pairs to be added to the stack attributes bag.
API Version 2010-05-15
482
AWS CloudFormation User Guide
AWS::OpsWorks::Stack
Required: No
Type: A list of key-value pairs
Update requires: No interruption (p. 86)
ChefConfiguration
Describes the Chef configuration. For more information, see the CreateStack ChefConfiguration
parameter in the AWS OpsWorks API Reference.
Note
To enable Berkshelf, you must select a Chef version in the ConfigurationManager
property that supports Berkshelf.
Required: No
Type: AWS OpsWorks ChefConfiguration Type (p. 610)
Update requires: No interruption (p. 86)
ConfigurationManager
Describes the configuration manager. When you create a stack, you use the configuration manager
to specify the Chef version. For supported Chef versions, see the CreateStack ConfigurationManager
parameter in the AWS OpsWorks API Reference.
Required: No
Type: AWS OpsWorks StackConfigurationManager Type (p. 615)
Update requires: No interruption (p. 86)
CustomCookbooksSource
Contains the information required to retrieve a cookbook from a repository.
Required: No
Type: AWS OpsWorks Source Type (p. 613)
Update requires: No interruption (p. 86)
CustomJson
A user-defined custom JSON object. The custom JSON is used to override the corresponding default
stack configuration JSON values. For more information, see CreateStack in the AWS OpsWorks API
Reference.
Important
AWS CloudFormation submits all JSON attributes as strings, including any Boolean or
number attributes. If you have recipes that expect booleans or numbers, you must modify
the recipes to accept strings and to interpret those strings as booleans or numbers.
Required: No
Type: JSON object
Update requires: No interruption (p. 86)
DefaultAvailabilityZone
The stack's default Availability Zone, which must be in the specified region.
Required: No
Type: String
Update requires: No interruption (p. 86)
API Version 2010-05-15
483
AWS CloudFormation User Guide
AWS::OpsWorks::Stack
DefaultInstanceProfileArn
The Amazon Resource Name (ARN) of an IAM instance profile that is the default profile for all of the
stack's Amazon EC2 instances.
Required: Yes
Type: String
Update requires: No interruption (p. 86)
DefaultOs
The stack's default operating system. For more information, see CreateStack in the AWS OpsWorks
API Reference.
Required: No
Type: String
Update requires: No interruption (p. 86)
DefaultRootDeviceType
The default root device type. This value is used by default for all instances in the stack, but you can
override it when you create an instance. For more information, see CreateStack in the AWS OpsWorks
API Reference.
Required: No
Type: String
Update requires: No interruption (p. 86)
DefaultSshKeyName
A default SSH key for the stack instances. You can override this value when you create or update
an instance.
Required: No
Type: String
Update requires: No interruption (p. 86)
DefaultSubnetId
The stack's default subnet ID. All instances are launched into this subnet unless you specify another
subnet ID when you create the instance.
Required: Conditional. If you specify the VpcId property, you must specify this property.
Type: String
Update requires: No interruption (p. 86)
HostnameTheme
The stack's host name theme, with spaces replaced by underscores. The theme is used to generate
host names for the stack's instances. For more information, see CreateStack in the AWS OpsWorks
API Reference.
Required: No
Type: String
Update requires: No interruption (p. 86)
Name
The name of the AWS OpsWorks stack.
API Version 2010-05-15
484
AWS CloudFormation User Guide
AWS::OpsWorks::Stack
Required: Yes
Type: String
Update requires: No interruption (p. 86)
ServiceRoleArn
The AWS Identity and Access Management (IAM) role that AWS OpsWorks uses to work with AWS
resources on your behalf. You must specify an Amazon Resource Name (ARN) for an existing IAM
role.
Required: Yes
Type: String
Update requires: No interruption (p. 86)
UseCustomCookbooks
Whether the stack uses custom cookbooks.
Required: No
Type: Boolean
Update requires: No interruption (p. 86)
UseOpsworksSecurityGroups
Whether to associate the AWS OpsWorks built-in security groups with the stack's layers.
Required: No
Type: Boolean
Update requires: No interruption (p. 86)
VpcId
The ID of the VPC that the stack is to be launched into, which must be in the specified region. All
instances are launched into this VPC. If you specify this property, you must specify the
DefaultSubnetId property.
Required: No
Type: String
Update requires: Replacement (p. 86)
Return Values
Ref
When the logical ID of this resource is provided to the Ref intrinsic function, Ref returns the resource
name. For example:
{ "Ref": "myStack" }
For the AWS OpsWorks stack myStack, Ref returns the AWS OpsWorks stack ID.
For more information about using the Ref function, see Ref (p. 669).
API Version 2010-05-15
485
AWS CloudFormation User Guide
AWS::Redshift::Cluster
Template Snippet
The following snippet creates an AWS OpsWorks stack that uses the default service role and Amazon
EC2 role, which are created after you use AWS OpsWorks for the first time:
"myStack" : {
"Type" : "AWS::OpsWorks::Stack",
"Properties" : {
"Name" : {"Ref":"OpsWorksStackName"},
"ServiceRoleArn" : { "Fn::Join": ["", ["arn:aws:iam::", {"Ref":"AWS::Accoun
tId"}, ":role/aws-opsworks-service-role"]] },
"DefaultInstanceProfileArn" : { "Fn::Join": ["", ["arn:aws:iam::",
{"Ref":"AWS::AccountId"}, ":instance-profile/aws-opsworks-ec2-role"]] },
"DefaultSshKeyName" : {"Ref":"KeyName"}
}
}
For a complete sample AWS OpsWorks template, see AWS OpsWorks Template Snippets (p. 207).
See Also
• AWS::OpsWorks::Layer (p. 478)
• AWS::OpsWorks::App (p. 470)
• AWS::OpsWorks::Instance (p. 474)
AWS::Redshift::Cluster
Creates an Amazon Redshift cluster. A cluster is a fully managed data warehouse that consists of set of
compute nodes. For more information about default values and valid values, see CreateCluster in the
Amazon Redshift API Reference.
Syntax
{
"Type": "AWS::Redshift::Cluster",
"Properties": {
"AllowVersionUpgrade (p. 487)" : Boolean,
"AutomatedSnapshotRetentionPeriod (p. 487)" : Integer,
"AvailabilityZone (p. 487)" : String,
"ClusterParameterGroupName (p. 487)" : String,
"ClusterSecurityGroups (p. 487)" : [ String, ... ],
"ClusterSubnetGroupName (p. 488)" : String,
"ClusterType (p. 488)" : String,
"ClusterVersion (p. 488)" : String,
"DBName (p. 488)" : String,
"ElasticIp (p. 488)" : String,
"Encrypted (p. 488)" : Boolean,
"HsmClientCertificateIdentifier (p. 488)" : String,
"HsmConfigurationIdentifier (p. 489)" : String,
"MasterUsername (p. 489)" : String,
"MasterUserPassword (p. 489)" : String,
"NodeType (p. 489)" : String,
"NumberOfNodes (p. 489)" : Integer,
API Version 2010-05-15
486
AWS CloudFormation User Guide
AWS::Redshift::Cluster
"OwnerAccount (p. 489)" : String,
"Port (p. 489)" : Integer,
"PreferredMaintenanceWindow (p. 490)" : String,
"PubliclyAccessible (p. 490)" : Boolean,
"SnapshotClusterIdentifier (p. 490)" : String,
"SnapshotIdentifier (p. 490)" : String,
"VpcSecurityGroupIds (p. 490)" : [ String, ... ]
}
}
Properties
AllowVersionUpgrade
When a new version of the Amazon Redshift is released, indicates whether upgrades can be applied
to the engine that is running on the cluster. The upgrades are applied during the maintenance window.
Required: No
Type: Boolean
Update requires: No interruption (p. 86)
AutomatedSnapshotRetentionPeriod
The number of days that automated snapshots are retained. If you set the value to 0, automated
snapshots are disabled.
Required: No
Type: Integer
Update requires: No interruption (p. 86)
AvailabilityZone
The Amazon EC2 Availability Zone in which you want to provision your Amazon Redshift cluster. For
example, if you have several Amazon EC2 instances running in a specific Availability Zone, you might
want the cluster to be provisioned in the same zone in order to decrease network latency.
Required: No
Type: String
Update requires: Replacement (p. 86)
ClusterParameterGroupName
The name of the parameter group that you want to associate with this cluster.
Required: No
Type: String
Update requires: Some interruptions (p. 86)
ClusterSecurityGroups
A list of security groups that you want to associate with this cluster.
Required: No
Type: List of strings
Update requires: No interruption (p. 86)
API Version 2010-05-15
487
AWS CloudFormation User Guide
AWS::Redshift::Cluster
ClusterSubnetGroupName
The name of a cluster subnet group that you want to associate with this cluster.
Required: No
Type: String
Update requires: Replacement (p. 86)
ClusterType
The type of cluster. You can specify single-node or multi-node.
Required: Yes
Type: String
Update requires: No interruption (p. 86)
ClusterVersion
The Amazon Redshift engine version that you want to deploy on the cluster.
Required: No
Type: String
Update requires: No interruption (p. 86)
DBName
The name of the first database that is created when the cluster is created.
Required: Yes
Type: String
Update requires: Replacement (p. 86)
ElasticIp
The Elastic IP (EIP) address for the cluster.
Required: No
Type: String
Update requires: Replacement (p. 86)
Encrypted
Indicates whether the data in the cluster is encrypted at rest.
Required: No
Type: Boolean
Update requires: Replacement (p. 86)
HsmClientCertificateIdentifier
Specifies the name of the HSM client certificate that the Amazon Redshift cluster uses to retrieve
the data encryption keys stored in an HSM.
Required: No
Type: String
Update requires: No interruption (p. 86)
API Version 2010-05-15
488
AWS CloudFormation User Guide
AWS::Redshift::Cluster
HsmConfigurationIdentifier
Specifies the name of the HSM configuration that contains the information that the Amazon Redshift
cluster can use to retrieve and store keys in an HSM.
Required: No
Type: String
Update requires: No interruption (p. 86)
MasterUsername
The user name that is associated with the master user account for this cluster.
Required: Yes
Type: String
Update requires: Replacement (p. 86)
MasterUserPassword
The password associated with the master user account for this cluster.
Required: Yes
Type: String
Update requires: No interruption (p. 86)
NodeType
The node type that is provisioned for this cluster.
Required: Yes
Type: String
Update requires: No interruption (p. 86)
NumberOfNodes
The number of compute nodes in the cluster. If you specify multi-node for the ClusterType
parameter, you must specify a number greater than 1.
Required: Conditional
Type: Integer
Update requires: No interruption (p. 86)
OwnerAccount
When you restore from a snapshot from another AWS account, the 12-digit AWS account ID that
contains that snapshot.
Required: No
Type: String
Update requires: Replacement (p. 86)
Port
The port number on which the cluster accepts incoming connections.
Required: No
Type: Integer
Update requires: Replacement (p. 86)
API Version 2010-05-15
489
AWS CloudFormation User Guide
AWS::Redshift::Cluster
PreferredMaintenanceWindow
The weekly time range (in UTC) during which automated cluster maintenance can occur. The format
of the time range is ddd:hh24:mi-ddd:hh24:mi.
Required: No
Type: String
Update requires: No interruption (p. 86)
PubliclyAccessible
Indicates whether the cluster can be accessed from a public network.
Required: No
Type: Boolean
Update requires: Replacement (p. 86)
SnapshotClusterIdentifier
The name of the cluster the source snapshot was created from.
Required: No
Required: Conditional. This property is required if your IAM policy includes a restriction on the cluster
name, where the resource element specifies anything other than the wildcard character (*) for the
cluster name.
Update requires: Replacement (p. 86)
SnapshotIdentifier
The name of the snapshot from which to create a new cluster.
Required: Conditional. If you specified the SnapshotClusterIdentifier property, you must
specify this property.
Type: String
Update requires: Replacement (p. 86)
VpcSecurityGroupIds
A list of VPC security groups that are associated with this cluster.
Required: No
Type: List of strings
Update requires: No interruption (p. 86)
Return Values
Ref
When the logical ID of this resource is provided to the Ref intrinsic function, Ref returns the resource
name. For example:
{ "Ref": "myCluster" }
For the Amazon Redshift cluster myCluster, Ref returns the name of the cluster.
For more information about using the Ref function, see Ref (p. 669).
API Version 2010-05-15
490
AWS CloudFormation User Guide
AWS::Redshift::ClusterParameterGroup
Fn::GetAtt
Fn::GetAtt returns a value for a specified attribute of this type. This section lists the available attributes
and corresponding return values.
Endpoint.Address
The connection endpoint for the Amazon Redshift cluster. For example:
examplecluster.cg034hpkmmjt.us-east-1.redshift.amazonaws.com .
Endpoint.Port
The port number on which the Amazon Redshift cluster accepts connections. For example: 5439.
Template Snippet
The following snippet describes a single-node Amazon Redshift cluster. The master user password is
referenced from an input parameter that is in the same template.
"myCluster" : {
"Type": "AWS::Redshift::Cluster",
"Properties": {
"MasterUsername" : "master",
"MasterUserPassword" : { "Ref" : "MasterUserPassword" },
"NodeType" : "dw.hs1.xlarge",
"ClusterType" : "single-node"
}
}
For a complete sample template, see Amazon Redshift Template Snippets (p. 210).
AWS::Redshift::ClusterParameterGroup
Creates an Amazon Redshift parameter group that you can associate with an Amazon Redshift cluster.
The parameters in the group apply to all the databases that you create in the cluster.
Syntax
{
"Type": "AWS::Redshift::ClusterParameterGroup",
"Properties": {
"Description (p. 491)" : String,
"ParameterGroupFamily (p. 492)" : String,
"Parameters (p. 492)" : [ Parameter, ... ]
}
}
Properties
Description
A description of the parameter group.
Required: Yes
Type: String
API Version 2010-05-15
491
AWS CloudFormation User Guide
AWS::Redshift::ClusterParameterGroup
Update requires: Replacement (p. 86)
ParameterGroupFamily
The Amazon Redshift engine version that applies to this cluster parameter group. The cluster engine
version determines the set of parameters that you can specify in the Parameters property.
Required: Yes
Type: String
Update requires: Replacement (p. 86)
Parameters
A list of parameter names and values that are allowed by the Amazon Redshift engine version that
you specified in the ParameterGroupFamily property. For more information, see Amazon Redshift
Parameter Groups in the Amazon Redshift Cluster Management Guide.
Required: No
Type: Amazon Redshift Parameter Type (p. 617)
Update requires: No interruption (p. 86)
Return Values
Ref
When the logical ID of this resource is provided to the Ref intrinsic function, Ref returns the resource
name. For example:
{ "Ref": "myClusterParameterGroup" }
For the Amazon Redshift cluster parameter group myClusterParameterGroup, Ref returns the name
of the cluster parameter group.
For more information about using the Ref function, see Ref (p. 669).
Template Snippets
The following snippet describes a parameter group with one parameter that is specified:
"myClusterParameterGroup" : {
"Type" : "AWS::Redshift::ClusterParameterGroup",
"Properties" : {
"Description" : "My parameter group",
"ParameterGroupFamily" : "redshift-1.0",
"Parameters" : [ {
"ParameterName" : "enable_user_activity_logging",
"ParameterValue" : "true"
}]
}
}
The following snippet modifies the workload management configuration using the
wlm_json_configuration parameter. The parameter value is a JSON object that must be passed as
a string enclosed in quotation marks ("). Use only single quotation marks (') in the JSON object.
API Version 2010-05-15
492
AWS CloudFormation User Guide
AWS::Redshift::ClusterSecurityGroup
"RedshiftClusterParameterGroup" : {
"Type" : "AWS::Redshift::ClusterParameterGroup",
"Properties" : {
"Description" : "Cluster parameter group",
"ParameterGroupFamily" : "redshift-1.0",
"Parameters" : [{
"ParameterName" : "wlm_json_configuration",
"ParameterValue" : "[{'user_group':['ex
ample_user_group1'],'query_group':['example_query_group1'],'query_concur
rency':7},{'query_concurrency':5}]"
}]
}
}
AWS::Redshift::ClusterSecurityGroup
Creates an Amazon Redshift security group.You use security groups to control access to Amazon Redshift
clusters that are not in a VPC.
Syntax
{
"Type": "AWS::Redshift::ClusterSecurityGroup",
"Properties": {
"Description (p. 493)" : String
}
}
Properties
Description
A description of the security group.
Required: Yes
Type: String
Update requires: Replacement (p. 86)
Return Values
Ref
When the logical ID of this resource is provided to the Ref intrinsic function, Ref returns the resource
name. For example:
{ "Ref": "myClusterSecurityGroup" }
For the Amazon Redshift cluster security group myClusterSecurityGroup, Ref returns the name of
the cluster security group.
For more information about using the Ref function, see Ref (p. 669).
API Version 2010-05-15
493
AWS CloudFormation User Guide
AWS::Redshift::ClusterSecurityGroupIngress
Template Snippet
The following snippet creates an Amazon Redshift cluster security group that you can associate cluster
security group ingress rules with:
"myClusterSecurityGroup" : {
"Type": "AWS::Redshift::ClusterSecurityGroup",
"Properties": {
"Description" : "Security group to determine where connections to the Amazon
Redshift cluster can come from"
}
}
See Also
• AWS::Redshift::ClusterSecurityGroupIngress (p. 494)
AWS::Redshift::ClusterSecurityGroupIngress
Specifies inbound (ingress) rules for an Amazon Redshift security group.
Syntax
{
"Type": "AWS::Redshift::ClusterSecurityGroupIngress",
"Properties": {
"ClusterSecurityGroupName (p. 494)" : String,
"CIDRIP (p. 494)" : String,
"EC2SecurityGroupName (p. 494)" : String,
"EC2SecurityGroupOwnerId (p. 495)" : String
}
}
Properties
ClusterSecurityGroupName
The name of the Amazon Redshift security group that will be associated with the ingress rule.
Required: Yes
Type: String
Update requires: Replacement (p. 86)
CIDRIP
The IP address range that has inbound access to the Amazon Redshift security group.
Required: No
Type: String
Update requires: Replacement (p. 86)
EC2SecurityGroupName
The Amazon EC2 security group that will be added the Amazon Redshift security group.
API Version 2010-05-15
494
AWS CloudFormation User Guide
AWS::Redshift::ClusterSubnetGroup
Required: No
Type: String
Update requires: Replacement (p. 86)
EC2SecurityGroupOwnerId
The 12-digit AWS account number of the owner of the Amazon EC2 security group that is specified
by the EC2SecurityGroupName parameter.
Required: Conditional. If you specify the EC2SecurityGroupName property, you must specify this
property.
Type: String
Update requires: Replacement (p. 86)
Template Snippet
The following snippet describes a ingress rules for an Amazon Redshift cluster security group:
"myClusterSecurityGroupIngressIP" : {
"Type": "AWS::Redshift::ClusterSecurityGroupIngress",
"Properties": {
"ClusterSecurityGroupName" : {"Ref":"myClusterSecurityGroup"},
"CIDRIP" : "10.0.0.0/16"
}
}
See Also
• AWS::Redshift::ClusterSecurityGroup (p. 493)
AWS::Redshift::ClusterSubnetGroup
Creates an Amazon Redshift subnet group.You must provide a list of one or more subnets in your existing
Amazon VPC when creating an Amazon Redshift subnet group.
Syntax
{
"Type": "AWS::Redshift::ClusterSubnetGroup",
"Properties": {
"Description (p. 495)" : String,
"SubnetIds (p. 496)" : [ String, ... ]
}
}
Properties
Description
A description of the subnet group.
Required: Yes
API Version 2010-05-15
495
AWS CloudFormation User Guide
AWS::RDS::DBInstance
Type: String
Update requires: No interruption (p. 86)
SubnetIds
A list of VPC subnet IDs. You can modify a maximum of 20 subnets.
Required: Yes
Type: List of strings
Update requires: No interruption (p. 86)
Return Values
Ref
When the logical ID of this resource is provided to the Ref intrinsic function, Ref returns the resource
name. For example:
{ "Ref": "myClusterSubnetGroup" }
For the Amazon Redshift cluster subnet group myClusterSubnetGroup, Ref returns the name of the
cluster subnet group.
For more information about using the Ref function, see Ref (p. 669).
Template Snippet
The following snippet specifies one subnet for an Amazon Redshift cluster subnet group.
"myClusterSubnetGroup" : {
"Type": "AWS::Redshift::ClusterSubnetGroup",
"Properties": {
"Description" : "My ClusterSubnetGroup",
"SubnetIds" : ["subnet-7fbc2813"]
}
}
AWS::RDS::DBInstance
The AWS::RDS::DBInstance type creates an Amazon RDS database instance. For detailed information
about configuring RDS DB instances, see CreateDBInstance.
Important
If a DB instance is deleted or replaced during an update, all automated snapshots are deleted.
However, manual DB snapshot are retained. During an update that requires replacement, you
can apply a stack policy to prevent DB instances from being replaced. For more information,
see Prevent Updates to Stack Resources (p. 94).
Syntax
{
"Type" : "AWS::RDS::DBInstance",
API Version 2010-05-15
496
AWS CloudFormation User Guide
AWS::RDS::DBInstance
"Properties" :
{
"AllocatedStorage (p. 497)" : String,
"AllowMajorVersionUpgrade (p. 497)" : Boolean,
"AutoMinorVersionUpgrade (p. 498)" : Boolean,
"AvailabilityZone (p. 498)" : String,
"BackupRetentionPeriod (p. 498)" : String,
"CharacterSetName (p. 498)" : String,
"DBInstanceClass (p. 498)" : String,
"DBInstanceIdentifier (p. 498)" : String,
"DBName (p. 499)" : String,
"DBParameterGroupName (p. 499)" : String,
"DBSecurityGroups (p. 499)" : [ String, ... ],
"DBSnapshotIdentifier (p. 499)" : String,
"DBSubnetGroupName (p. 500)" : String,
"Engine (p. 500)" : String,
"EngineVersion (p. 500)" : String,
"Iops (p. 500)" : Number,
"KmsKeyId (p. 500)" : String,
"LicenseModel (p. 501)" : String,
"MasterUsername (p. 501)" : String,
"MasterUserPassword (p. 501)" : String,
"MultiAZ (p. 501)" : Boolean,
"OptionGroupName (p. 502)" : String,
"Port (p. 502)" : String,
"PreferredBackupWindow (p. 502)" : String,
"PreferredMaintenanceWindow (p. 502)" : String,
"PubliclyAccessible (p. 502)" : Boolean,
"SourceDBInstanceIdentifier (p. 502)" : String,
"StorageEncrypted (p. 503)" : Boolean,
"StorageType (p. 503)" : String,
"Tags (p. 504)" : [ Resource Tag, ..., ],
"VPCSecurityGroups (p. 504)" : [ String, ... ]
}
}
Properties
AllocatedStorage
The allocated storage size specified in gigabytes (GB).
If any value is used in the Iops parameter, AllocatedStorage must be at least 100 GB, which
corresponds to the minimum Iops value of 1000. If Iops is increased (in 1000 IOPS increments),
then AllocatedStorage must also be increased (in 100 GB increments) correspondingly.
Required: Yes
Type: String
Update requires: No interruption (p. 86)
AllowMajorVersionUpgrade
Indicates whether major version upgrades are allowed. Changing this parameter does not result in
an outage, and the change is applied asynchronously as soon as possible.
Constraints: This parameter must be set to true when you specify an EngineVersion that differs
from the DB instance's current major version.
Required: No
API Version 2010-05-15
497
AWS CloudFormation User Guide
AWS::RDS::DBInstance
Type: Boolean
Update requires: No interruption (p. 86)
AutoMinorVersionUpgrade
Indicates that minor engine upgrades will be applied automatically to the DB instance during the
maintenance window. The default value is true.
Required: No
Type: Boolean
Update requires: No interruption (p. 86) or some interruptions (p. 86). For more information, see
ModifyDBInstance in the Amazon Relational Database Service API Reference.
AvailabilityZone
The name of the Availability Zone where the DB instance is located. You cannot set the
AvailabilityZone parameter if the MultiAZ parameter is set to true.
Required: No
Type: String
Update requires: Replacement (p. 86)
BackupRetentionPeriod
The number of days for which automatic DB snapshots are retained.
Important
If this DB instance is deleted or replaced during an update, all automated snapshots are
deleted. However, manual DB snapshot are retained.
Required: No
Type: String
Update requires: No interruption (p. 86) or some interruptions (p. 86). For more information, see
ModifyDBInstance in the Amazon Relational Database Service API Reference.
CharacterSetName
For supported engines, specifies the character set to associate with the database instance. For more
information, see Appendix: Oracle Character Sets Supported in Amazon RDS in the Amazon Relational
Database Service User Guide.
If you specify the DBSnapshotIdentifier or or SourceDBInstanceIdentifier property, do
not specify this property. The value is inherited from the snapshot or source database instance.
Required: No
Type: String
Update requires: Replacement (p. 86)
DBInstanceClass
The name of the compute and memory capacity class of the DB instance.
Required: Yes
Type: String
Update requires: Some interruptions (p. 86)
DBInstanceIdentifier
A name for the DB instance. If you don't specify a name, AWS CloudFormation generates a unique
physical ID and uses that ID for the DB instance. For more information, see Name Type (p. 608).
API Version 2010-05-15
498
AWS CloudFormation User Guide
AWS::RDS::DBInstance
Important
If you specify a name, you cannot do updates that require this resource to be replaced. You
can still do updates that require no or some interruption. If you must replace the resource,
specify a new name.
Required: No
Type: String
Update requires: Replacement (p. 86)
DBName
The name of the initial database of this instance that was provided at create time, if one was specified.
This same name is returned for the life of the DB instance.
Required: No
Type: String
Update requires: Replacement (p. 86)
DBParameterGroupName
The name of an existing DB parameter group or a reference to an
AWS::RDS::DBParameterGroup (p. 506) resource created in the template.
Required: No
Type: String
Update requires: No interruption (p. 86) or some interruptions (p. 86). For more information, see
ModifyDBInstance in the Amazon Relational Database Service API Reference. Also, if any of the
data members of the referenced parameter group are changed during an update, the database
instance may need to be restarted, causing some interruption.
DBSecurityGroups
A list of the DB security groups to assign to the Amazon RDS instance. The list can include both the
name of existing DB security groups or references to AWS::RDS::DBSecurityGroup (p. 509) resources
created in the template.
If you set DBSecurityGroups, you must not set VPCSecurityGroups (p. 504), and vice-versa.
Required: No
Type: List of strings
Update requires: No interruption (p. 86)
DBSnapshotIdentifier
The identifier for the DB snapshot to restore from.
By specifying this property, you can create a DB instance from the specified DB snapshot. If the
DBSnapshotIdentifier property is an empty string or the AWS::RDS::DBInstance declaration has no
DBSnapshotIdentifier property, the database is created as a new database. If the property contains
a value (other than empty string), AWS CloudFormation creates a database from the specified
snapshot. If a snapshot with the specified name does not exist, the database creation fails and the
stack rolls back.
Required: No
Type: String
Update requires: Replacement (p. 86)
API Version 2010-05-15
499
AWS CloudFormation User Guide
AWS::RDS::DBInstance
DBSubnetGroupName
A DB subnet group to associate with the DB instance.
If there is no DB subnet group, then it is a non-VPC DB instance.
For more information about using Amazon RDS in a VPC, go to Using Amazon RDS with Amazon
Virtual Private Cloud (VPC) in the Amazon Relational Database Service Developer Guide.
Required: No
Type: String
Update requires: Replacement (p. 86)
Engine
The name of the database engine that the DB instance uses. This property is optional when you
specify the DBSnapshotIdentifier property to create DB instances.
For valid values, see the Engine parameter of the CreateDBInstance action in the Amazon Relational
Database Service API Reference.
Required: Conditional
Type: String
Update requires: Replacement (p. 86)
EngineVersion
The version number of the database engine to use.
Required: No
Type: String
Update requires: Some interruptions (p. 86)
Iops
The number of I/O operations per second (IOPS) that the database should provision. This can be
any integer value from 1000 to 10,000, in 1000 IOPS increments.
If any value is used in the Iops parameter, AllocatedStorage must be at least 100 GB, which
corresponds to the minimum Iops value of 1000. If Iops is increased (in 1000 IOPS increments),
then AllocatedStorage must also be increased (in 100 GB increments) correspondingly.
For more information about this parameter, see Provisioned IOPS Storage in the Amazon Relational
Database Service User Guide.
Required: Conditional. If you specify io1 for the StorageType property, you must specify this
property.
Type: Number
Update requires: No interruption (p. 86)
KmsKeyId
The Amazon Resource Name (ARN) of the AWS Key Management Service master key that is used
to encrypt the database instance, such as
arn:aws:kms:us-east-1:012345678910:key/abcd1234-a123-456a-a12b-a123b4cd56ef.
If you enable the StorageEncrypted property but don't specify this property, the default master
key is used.
If you specify the DBSnapshotIdentifier or SourceDBInstanceIdentifier property, do not
specify this property. The value is inherited from the snapshot or source database instance.
API Version 2010-05-15
500
AWS CloudFormation User Guide
AWS::RDS::DBInstance
Note
Currently, if you specify DBSecurityGroups, this property is ignored. If you want to specify
a security group and this property, you must use a VPC security group. For more information
about Amazon RDS and VPC, see Using Amazon RDS with Amazon VPC in the Amazon
Relational Database Service User Guide.
Required: No
Type: String
Update requires: Replacement (p. 86).
LicenseModel
The license model information for the DB instance.
Required: No
Type: String
Update requires: Replacement (p. 86).
MasterUsername
The master user name for the database instance. This property is optional when you specify the
DBSnapshotIdentifier property to create DB instances.
Note
If you specify the SourceDBInstanceIdentifier or DBSnapshotIdentifier property,
do not specify this property. The value is inherited from the source database instance or
snapshot.
Required: Conditional
Type: String
Update requires: Replacement (p. 86).
MasterUserPassword
The master password for the database instance. This property is optional when you specify the
DBSnapshotIdentifier property to create DB instances.
Note
If you specify the SourceDBInstanceIdentifier property, do not specify this property.
The value is inherited from the source database instance.
Required: Conditional
Type: String
Update requires: No interruption (p. 86).
MultiAZ
Specifies if the database instance is a multiple Availability Zone deployment. You cannot set the
AvailabilityZone parameter if the MultiAZ parameter is set to true.
Note
Do not specify this property if you want a Multi-AZ deployment for a SQL Server database
instance. Use the mirroring option in an option group to set Multi-AZ for a SQL Server
database instance.
Required: No
Type: Boolean
Update requires: No interruption (p. 86).
API Version 2010-05-15
501
AWS CloudFormation User Guide
AWS::RDS::DBInstance
OptionGroupName
An option group that this database instance is associated with.
Required: No
Type: String
Update requires: No interruption (p. 86).
Port
The port for the instance.
Required: No
Type: String
Update requires: Replacement (p. 86).
PreferredBackupWindow
The daily time range during which automated backups are created if automated backups are enabled,
as determined by the BackupRetentionPeriod.
Required: No
Type: String
Update requires: No interruption (p. 86).
PreferredMaintenanceWindow
The weekly time range (in UTC) during which system maintenance can occur.
Required: No
Type: String
Update requires: No interruption (p. 86) or some interruptions (p. 86). For more information, see
ModifyDBInstance in the Amazon Relational Database Service API Reference.
PubliclyAccessible
Indicates whether the database instance is an Internet-facing instance. If you specify true, an
instance is created with a publicly resolvable DNS name, which resolves to a public IP address. If
you specify false, an internal instance is created with a DNS name that resolves to a private IP
address.
The default behavior value depends on your VPC setup and the database subnet group. For more
information, see the PubliclyAccessible parameter in CreateDBInstance in the Amazon Relational
Database Service API Reference.
Note
If this resource has a public IP address and is also in a VPC that is defined in the same
template, you must use the DependsOn attribute to declare a dependency on the
VPC-gateway attachment. For more information, see DependsOn Attribute (p. 642).
Required: No
Type: Boolean
Update requires: Replacement (p. 86).
SourceDBInstanceIdentifier
If you want to create a read replica DB instance, specify the ID of the source database instance.
Each database instance can have a certain number of read replicas. For more information, see
Working with Read Replicas in the Amazon Relational Database Service Developer Guide.
API Version 2010-05-15
502
AWS CloudFormation User Guide
AWS::RDS::DBInstance
The SourceDBInstanceIdentifier property determines whether a database instance is a read
replica. If you remove the SourceDBInstanceIdentifier property from your current template
and then update your stack, the read replica is deleted and a new database instance (not a read
replica) is created.
Important
Note the following:
• Read replicas do not support deletion policies. Any deletion policy that's associated with
a read replica is ignored.
• You must create read replicas that are in the same region as the source database instance.
Currently, cross-region replicas are not supported.
• If you specify SourceDBInstanceIdentifier, do not set the MultiAZ property to
true and do not specify the DBSnapshotIdentifier property.You cannot deploy read
replicas in multiple Availability Zones, and you cannot create a read replica from a
snapshot.
• Do not set the BackupRetentionPeriod, DBName, MasterUsername,
MasterUserPassword, and PreferredBackupWindow properties. The database
attributes are inherited from the source database instance, and backups are disabled for
read replicas.
Required: No
Type: String
Update requires: Replacement (p. 86).
StorageEncrypted
Indicates whether the database instance is encrypted.
If you specify the DBSnapshotIdentifier or SourceDBInstanceIdentifier property, do not
specify this property. The value is inherited from the snapshot or source database instance.
Note
Currently, if you specify DBSecurityGroups, this property is ignored. If you want to specify
a security group and this property, you must use a VPC security group. For more information
about Amazon RDS and VPC, see Using Amazon RDS with Amazon VPC in the Amazon
Relational Database Service User Guide.
Required: Conditional. If you specify the KmsKeyId property, you must enable encryption.
Type: Boolean
Update requires: Replacement (p. 86).
StorageType
The storage type associated with this database instance.
For the default and valid values, see the StorageType parameter of the CreateDBInstance action
in the Amazon Relational Database Service API Reference.
Note
Currently, if you specify DBSecurityGroups, this property is ignored. If you want to specify
a security group and this property, you must use a VPC security group. For more information
about Amazon RDS and VPC, see Using Amazon RDS with Amazon VPC in the Amazon
Relational Database Service User Guide.
Required: No
Type: String
Update requires: Some interruptions (p. 86)
API Version 2010-05-15
503
AWS CloudFormation User Guide
AWS::RDS::DBInstance
Tags
An arbitrary set of tags (key–value pairs) for this database instance.
Required: No
Type: AWS CloudFormation Resource Tags (p. 618)
Update requires: No interruption (p. 86).
VPCSecurityGroups
A list of the VPC security groups to assign to the Amazon RDS instance. The list can include both
the physical IDs of existing VPC security groups or references to AWS::EC2::SecurityGroup (p. 375)
resources created in the template.
If you set VPCSecurityGroups, you must not set DBSecurityGroups (p. 499), and vice-versa.
Important
You can migrate a database instance in your stack from an RDS DB security group to a
VPC security group, but you should keep the following points in mind:
• You cannot revert to using an RDS security group once you have established a VPC
security group membership.
• When you migrate your DB instance to VPC security groups, if your stack update rolls
back because of another failure in the database instance update, or because of an update
failure in another AWS CloudFormation resource, the rollback will fail because it cannot
revert to an RDS security group.
To avoid this situation, only migrate your DB instance to using VPC security groups when
that is the only change in your stack template.
Required: No
Type: List of strings
Update requires: No interruption (p. 86).
Updating and Deleting AWS:RDS::DBInstances
When updates are made to properties labeled "Update requires: Replacement (p. 86)", AWS
CloudFormation first creates a replacement DB instance resource, then changes references from other
dependent resources to point to the replacement resource, and finally deletes the old resource.
Caution
If you do not take a snapshot of the database before updating the stack, you will lose the data
when your DB instance is replaced. To preserve your data, take the following precautions:
1. Deactivate any applications that are using the DB instance so that there is no activity against
the DB instance.
2. Create a snapshot of the DB instance. For more information about creating DB snapshots,
see Creating a DB snapshot.
3. If you want to restore your instance using a DB snapshot, modify the update template with
your DB instance changes and add the DBSnapshotIdentifier property with the ID of the DB
snapshot that you want to use.
4. Update the stack.
For more information about updating other properties on this resource, see ModifyDBInstance. For more
information about updating stacks, see AWS CloudFormation Stacks Updates (p. 85).
You can set a deletion policy for your DB instance to control how AWS CloudFormation handles the
instance when the stack is deleted. For Amazon RDS DB instances, you can choose to retain the instance,
API Version 2010-05-15
504
AWS CloudFormation User Guide
AWS::RDS::DBInstance
to delete the instance, or to create a snapshot of the instance. For more information, see DeletionPolicy
Attribute (p. 641).
Return Values
Ref
When you provide the RDS DB instance's logical name to the Ref intrinsic function, Ref will return the
DBInstanceIdentifier. For example: mystack-mydb-ea5ugmfvuaxg.
For more information about using the Ref function, see Ref (p. 669).
Fn::GetAtt
Fn::GetAtt returns a value for a specified attribute of this type. This section lists the available attributes
and corresponding return values.
• Endpoint.Address
The connection endpoint for the database. For example:
mystack-mydb-1apw1j4phylrk.cg034hpkmmjt.us-east-1.rds.amazonaws.com.
• Endpoint.Port
The port number on which the database accepts connections. For example: 3306.
For more information about using Fn:GetAtt, see Fn::GetAtt (p. 661).
Examples
Example DBInstance with a set MySQL version, Tags and DeletionPolicy
This example shows how to set the MySQL version that has a DeletionPolicy Attribute (p. 641)
set. With the DeletionPolicy set to Snapshot, AWS CloudFormation will take a snapshot of this DB
instance before deleting it during stack deletion. A tag that contains a friendly name for the database is
also set.
"MyDB" : {
"Type" : "AWS::RDS::DBInstance",
"Properties" : {
"DBName" : { "Ref" : "DBName" },
"AllocatedStorage" : { "Ref" : "DBAllocatedStorage" },
"DBInstanceClass" : { "Ref" : "DBInstanceClass" },
"Engine" : "MySQL",
"EngineVersion" : "5.5",
"MasterUsername" : { "Ref" : "DBUser" },
"MasterUserPassword" : { "Ref" : "DBPassword" },
"Tags" : [ { "Key" : "Name", "Value" : "My SQL Database" } ]
},
"DeletionPolicy" : "Snapshot"
}
API Version 2010-05-15
505
AWS CloudFormation User Guide
AWS::RDS::DBParameterGroup
Example DBInstance with provisioned IOPS
This example sets a provisioned IOPS value in the Iops (p. 500) property. Note that the
AllocatedStorage (p. 497) property is set according to the 10:1 ratio between IOPS and GiBs of storage.
"MyDB" : {
"Type" : "AWS::RDS::DBInstance",
"Properties" : {
"AllocatedStorage" : "100",
"DBInstanceClass" : "db.m1.small",
"Engine" : "MySQL",
"EngineVersion" : "5.5",
"Iops" : "1000",
"MasterUsername" : { "Ref" : "DBUser" },
"MasterUserPassword" : { "Ref" : "DBPassword" }
}
}
Example Read replica DBInstance
This example creates a read replica named MyDBreadreplica for the MyDB DB instance.
"MyDB" : {
"Type" : "AWS::RDS::DBInstance",
"Properties" : {
"DBName" : { "Ref" : "DBName" },
"AllocatedStorage" : { "Ref" : "DBAllocatedStorage" },
"DBInstanceClass" : { "Ref" : "DBClass" },
"Engine" : "MySQL",
"EngineVersion" : "5.6",
"MasterUsername" : { "Ref" : "DBUser" } ,
"MasterUserPassword" : { "Ref" : "DBPassword" },
"Port" : "5804",
"Tags" : [{"Key" : "Role", "Value" : "Primary"}]
}
},
"MyDBreadreplica" : {
"Type": "AWS::RDS::DBInstance",
"Properties": {
"SourceDBInstanceIdentifier": { "Ref" : "MyDB" },
"Port" : "5802",
"Tags" : [{"Key" : "Role", "Value" : "ReadRep"}]
}
}
}
To view more AWS::RDS::DBInstance template snippets, see Amazon RDS Template Snippets (p. 214).
AWS::RDS::DBParameterGroup
Creates a custom parameter group for an RDS database family. For more information about RDS parameter
groups, see Working with DB Parameter Groups in the Amazon Relational Database Service User Guide.
API Version 2010-05-15
506
AWS CloudFormation User Guide
AWS::RDS::DBParameterGroup
This type can be declared in a template and referenced in the DBParameterGroupName parameter of
AWS::RDS::DBInstance (p. 496).
Note
Applying a ParameterGroup to a DBInstance may require the instance to reboot, resulting in a
database outage for the duration of the reboot.
Syntax
{
"Type": "AWS::RDS::DBParameterGroup",
"Properties" : {
"Description (p. 507)" : String,
"Family (p. 507)" : String,
"Parameters (p. 507)" : DBParameters,
"Tags (p. 507)" : [ Resource Tag, ... ]
}
}
Properties
Description
A friendly description of the RDS parameter group. For example, "My Parameter Group".
Required: Yes
Type: String
Update requires: No interruption (p. 86)
Family
The database family of this RDS parameter group. For example, "MySQL5.1".
Required: Yes
Type: String
Update requires: No interruption (p. 86)
Parameters
The parameters to set for this RDS parameter group.
Required: No
Type: DBParameters, a JSON object consisting of key/value pairs of Strings. For example:
"Parameters" : {
"Key1" : "Value1",
"Key2" : "Value2",
"Key3" : "Value3"
}
Update requires: No interruption (p. 86)
Tags
The tags that you want to attach to the RDS parameter group.
API Version 2010-05-15
507
AWS CloudFormation User Guide
AWS::RDS::DBSubnetGroup
Required: No
Type: A list of resource tags (p. 618).
Update requires: No interruption (p. 86)
Return Values
Ref
When the logical ID of this resource is provided to the Ref intrinsic function, Ref returns the resource
name. For example:
{ "Ref": "MyDBParameterGroup" }
For the RDS::DBParameterGroup with the logical ID "MyDBParameterGroup", Ref will return the resource
name.
For more information about using the Ref function, see Ref (p. 669).
AWS::RDS::DBSubnetGroup
The AWS::RDS::DBSubnetGroup type creates an RDS database subnet group. Subnet groups must
contain at least one subnet in two availability zones in the region.
Syntax
{
"Type" : "AWS::RDS::DBSubnetGroup",
"Properties" : {
"DBSubnetGroupDescription (p. 508)" : String,
"SubnetIds (p. 508)" : [ String, ... ],
"Tags (p. 509)" : [ Resource Tag, ... ]
}
}
Properties
DBSubnetGroupDescription
The description for the DB Subnet Group.
Required: Yes
Type: String
Update requires: No interruption (p. 86)
SubnetIds
The EC2 Subnet IDs for the DB Subnet Group.
Required: Yes
Type: List of strings
API Version 2010-05-15
508
AWS CloudFormation User Guide
AWS::RDS::DBSecurityGroup
Update requires: No interruption (p. 86)
Tags
The tags that you want to attach to the RDS database subnet group.
Required: No
Type: A list of resource tags (p. 618).
Update requires: No interruption (p. 86)
Example
{
"AWSTemplateFormatVersion" : "2010-09-09",
"Resources" : {
"myDBSubnetGroup" : {
"Type" : "AWS::RDS::DBSubnetGroup",
"Properties" : {
"DBSubnetGroupDescription" : "description",
"SubnetIds" : [ "subnet-7b5b4112", "subnet-7b5b4115" ],
"Tags" : [ {"key" : "value", "key2" : "value2"} ]
}
}
}
}
See Also
• CreateDBSubnetGroup in the Amazon Relational Database Service API Reference
• ModifyDBSubnetGroup in the Amazon Relational Database Service API Reference
• AWS CloudFormation Stacks Updates (p. 85)
AWS::RDS::DBSecurityGroup
The AWS::RDS::DBSecurityGroup type is used to create or update an Amazon RDS DB Security Group.
For more information about DB Security Groups, see Working with DB Security Groups in the Amazon
Relational Database Service Developer Guide.
For details on the settings for DB security groups, see CreateDBSecurityGroup.
When you specify an AWS::RDS::DBSecurityGroup as an argument to the Ref function, AWS
CloudFormation returns the value of the DBSecurityGroupName.
Syntax
{
"Type" : "AWS::RDS::DBSecurityGroup",
"Properties" :
{
"EC2VpcId (p. 510)" : { "Ref" : "myVPC" },
"DBSecurityGroupIngress (p. 510)" : [ RDS Security Group Rule (p. 620) object
API Version 2010-05-15
509
AWS CloudFormation User Guide
AWS::RDS::DBSecurityGroup
1, ... ],
"GroupDescription (p. 510)" : String,
"Tags (p. 510)" : [ Resource Tag, ... ]
}
}
Properties
EC2VpcId
The Id of VPC. Indicates which VPC this DB Security Group should belong to.
Type: String
Required: Conditional. Must be specified to create a DB Security Group for a VPC; may not be
specified otherwise.
Update requires: Replacement (p. 86)
DBSecurityGroupIngress
Network ingress authorization for an Amazon EC2 security group or an IP address range.
Type: List of RDS Security Group Rules (p. 620).
Required: Yes
Update requires: No interruption (p. 86)
GroupDescription
Description of the security group.
Type: String
Required: Yes
Update requires: Replacement (p. 86)
Tags
The tags that you want to attach to the Amazon RDS DB security group.
Required: No
Type: A list of resource tags (p. 618).
Update requires: No interruption (p. 86)
Template Examples
Tip
For more RDS template examples, see Amazon RDS Template Snippets (p. 214).
Single VPC security group
This template snippet creates/updates a single VPC security group, referred to by EC2SecurityGroupName.
"DBSecurityGroup": {
"Type": "AWS::RDS::DBSecurityGroup",
"Properties": {
"EC2VpcId" : { "Ref" : "VpcId" },
"DBSecurityGroupIngress": [
{"EC2SecurityGroupName": { "Ref": "WebServerSecurityGroup"}}
],
"GroupDescription": "Frontend Access"
}
},
API Version 2010-05-15
510
AWS CloudFormation User Guide
AWS::RDS::DBSecurityGroupIngress
Multiple VPC security groups
This template snippet creates/updates multiple VPC security groups.
{
"Resources" : {
"DBinstance" : {
"Type" : "AWS::RDS::DBInstance",
"Properties" : {
"DBSecurityGroups" : [ {"Ref" : "DbSecurityByEC2SecurityGroup"} ],
"AllocatedStorage" : "5",
"DBInstanceClass" : "db.m1.small",
"Engine" : "MySQL",
"MasterUsername" : "YourName",
"MasterUserPassword" : "YourPassword"
},
"DeletionPolicy" : "Snapshot"
},
"DbSecurityByEC2SecurityGroup" : {
"Type" : "AWS::RDS::DBSecurityGroup",
"Properties" : {
"GroupDescription" : "Ingress for Amazon EC2 security group",
"DBSecurityGroupIngress" : [ {
"EC2SecurityGroupId" : "sg-b0ff1111",
"EC2SecurityGroupOwnerId" : "111122223333"
}, {
"EC2SecurityGroupId" : "sg-ffd722222",
"EC2SecurityGroupOwnerId" : "111122223333"
} ]
}
}
}
}
AWS::RDS::DBSecurityGroupIngress
The AWS::RDS::DBSecurityGroupIngress type enables ingress to a DBSecurityGroup using one of two
forms of authorization. First, EC2 or VPC security groups can be added to the DBSecurityGroup if the
application using the database is running on EC2 or VPC instances. Second, IP ranges are available if
the application accessing your database is running on the Internet. For more information about DB security
groups, see Working with DB security groups
This type supports updates. For more information about updating stacks, see AWS CloudFormation
Stacks Updates (p. 85).
For details about the settings for DB security group ingress, see AuthorizeDBSecurityGroupIngress.
Syntax
{
"CIDRIP (p. 512)": String,
"DBSecurityGroupName (p. 512)": String,
API Version 2010-05-15
511
AWS CloudFormation User Guide
AWS::RDS::DBSecurityGroupIngress
"EC2SecurityGroupId (p. 512)": String,
"EC2SecurityGroupName (p. 512)": String,
"EC2SecurityGroupOwnerId (p. 512)": String
}
Properties
CIDRIP
The IP range to authorize.
For an overview of CIDR ranges, go to the Wikipedia Tutorial.
Type: String
Update requires: No interruption (p. 86)
DBSecurityGroupName
The name (ARN) of the AWS::RDS::DBSecurityGroup (p. 509) to which this ingress will be added.
Type: String
Required: Yes
Update requires: No interruption (p. 86)
EC2SecurityGroupId
The ID of the VPC or EC2 security group to authorize.
For VPC DB security groups, use EC2SecurityGroupId. For EC2 security groups, use
EC2SecurityGroupOwnerId and either EC2SecurityGroupName or EC2SecurityGroupId.
Type: String
Required: No
Update requires: No interruption (p. 86)
EC2SecurityGroupName
The name of the EC2 security group to authorize.
For VPC DB security groups, use EC2SecurityGroupId. For EC2 security groups, use
EC2SecurityGroupOwnerId and either EC2SecurityGroupName or EC2SecurityGroupId.
Type: String
Required: No
Update requires: No interruption (p. 86)
EC2SecurityGroupOwnerId
The AWS Account Number of the owner of the EC2 security group specified in the
EC2SecurityGroupName parameter. The AWS Access Key ID is not an acceptable value.
For VPC DB security groups, use EC2SecurityGroupId. For EC2 security groups, use
EC2SecurityGroupOwnerId and either EC2SecurityGroupName or EC2SecurityGroupId.
Type: String
Required: No
Update requires: No interruption (p. 86)
API Version 2010-05-15
512
AWS CloudFormation User Guide
AWS::RDS::EventSubscription
Return Values
Ref
When the logical ID of this resource is provided to the Ref intrinsic function, Ref returns the resource
name.
For more information about using the Ref function, see Ref (p. 669).
See Also
• AuthorizeDBSecurityGroupIngress in the Amazon Relational Database Service API Reference
AWS::RDS::EventSubscription
Use the AWS::RDS::EventSubscription resource to get notifications for Amazon Relational Database
Service events through the Amazon Simple Notification Service. For more information, see Using Amazon
RDS Event Notification in the Amazon Relational Database Service User Guide.
Syntax
{
"Type" : "AWS::RDS::EventSubscription",
"Properties" : {
"Enabled (p. 513)" : Boolean,
"EventCategories (p. 513)" : [ String, ... ],
"SnsTopicArn (p. 514)" : String,
"SourceIds (p. 514)" : [ String, ... ],
"SourceType (p. 514)" : String
}
}
Properties
For information about valid and default values, see CreateEventSubscription in the Amazon Relational
Database Service API Reference.
Enabled
Indicates whether to activate the subscription. If you don't specify this property, AWS CloudFormation
activates the subscription.
Required: No
Type: Boolean
Update requires: No interruption (p. 86)
EventCategories
A list of event categories that you want to subscribe to for a given source type. If you don't specify
this property, you are notified about all event categories.
Required: No
Type: List of strings
Update requires: No interruption (p. 86)
API Version 2010-05-15
513
AWS CloudFormation User Guide
AWS::RDS::EventSubscription
SnsTopicArn
The Amazon Resource Name (ARN) of an Amazon SNS topic that you want to send event notifications
to.
Required: Yes
Type: String
Update requires: Replacement (p. 86)
SourceIds
A list of identifiers for which Amazon RDS provides notification events.
If you don't specify a value, notifications are provided for all sources. If you specify multiple values,
they must be of the same type. For example, if you specify a database instance ID, all other values
must be database instance IDs.
Required: No
Type: List of strings
Update requires: No interruption (p. 86)
SourceType
The type of source for which Amazon RDS provides notification events. For example, if you want to
be notified of events generated by a database instance, set this parameter to db-instance. If you
don't specify a value, notifications are provided for all source types.
Required: Conditional. If you specify the SourceIds or EventCategories property, you must
specify this property.
Type: String
Update requires: Replacement (p. 86) if you're removing this property after it was previously specified.
All other updates require no interruption (p. 86).
Return Value
When the logical ID of this resource is provided to the Ref intrinsic function, Ref returns the resource
name. For example:
{ "Ref": "myEventSubscription" }
For the resource with the logical ID myEventSubscription, Ref returns the Amazon RDS event
subscription name, such as: mystack-myEventSubscription-1DDYF1E3B3I.
For more information about using the Ref function, see Ref (p. 669).
Example
The following snippet creates an event subscription for an existing database instance db-instance-1
and a database with the logical ID myDBInstance, which is declared elsewhere in the same template.
"myEventSubscription": {
"Type": "AWS::RDS::EventSubscription",
"Properties": {
"EventCategories": ["configuration change", "failure", "deletion"],
"SnsTopicArn": "arn:aws:sns:us-west-2:123456789012:example-topic",
API Version 2010-05-15
514
AWS CloudFormation User Guide
AWS::RDS::OptionGroup
"SourceIds": ["db-instance-1", { "Ref" : "myDBInstance" }],
"SourceType":"db-instance",
"Enabled" : false
}
}
AWS::RDS::OptionGroup
Use the AWS::RDS::OptionGroup resource to create an option group that can make managing data
and databases easier. For more information about option groups, see Working with Option Groups in the
Amazon Relational Database Service User Guide.
Syntax
{
"Type": "AWS::RDS::OptionGroup",
"Properties" : {
"EngineName (p. 515)" : String,
"MajorEngineVersion (p. 515)" : String,
"OptionGroupDescription (p. 515)" : String,
"OptionConfigurations (p. 515)" : [ OptionConfigurations, ... ],
"Tags (p. 516)" : [ Resource Tag, ... ]
}
}
Properties
EngineName
The name of the database engine that this option group is associated with.
Required: Yes
Type: String
Update requires: Replacement (p. 86)
MajorEngineVersion
The major version number of the database engine that this option group is associated with.
Required: Yes
Type: String
Update requires: Replacement (p. 86)
OptionGroupDescription
A description of the option group.
Required: Yes
Type: String
Update requires: Replacement (p. 86)
OptionConfigurations
The configurations for this option group.
Required: Yes
API Version 2010-05-15
515
AWS CloudFormation User Guide
AWS::RDS::OptionGroup
Type: Amazon RDS OptionGroup OptionConfigurations (p. 619)
Update requires: Replacement (p. 86)
Tags
An arbitrary set of tags (key–value pairs) for this option group.
Required: No
Type: AWS CloudFormation Resource Tags (p. 618)
Update requires: No interruption (p. 86)
Return Values
Ref
When the logical ID of this resource is provided to the Ref intrinsic function, Ref returns the resource
name. For example:
{ "Ref": "myOptionGroup" }
For the myOptionGroup resource, Ref returns the name of the option group.
For more information about using the Ref function, see Ref (p. 669).
Example
The following snippet creates an option group with two option configurations (OEM and APEX):
"OracleOptionGroup": {
"Type": "AWS::RDS::OptionGroup",
"Properties": {
"EngineName": "oracle-ee",
"MajorEngineVersion": "12.1",
"OptionGroupDescription": "A test option group",
"OptionConfigurations":[
{
"OptionName": "OEM",
"DBSecurityGroupMemberships": ["default"],
"Port": "5500"
},
{
"OptionName": "APEX"
}
]
}
}
The following snippet creates an option group that specifies two option settings for the MEMCACHED option:
"SQLOptionGroup": {
"Type": "AWS::RDS::OptionGroup",
"Properties": {
"EngineName": "mysql",
API Version 2010-05-15
516
AWS CloudFormation User Guide
AWS::Route53::HealthCheck
"MajorEngineVersion": "5.6",
"OptionGroupDescription": "A test option group",
"OptionConfigurations":[
{
"OptionName": "MEMCACHED",
"VpcSecurityGroupMemberships": ["sg-a1238db7"],
"Port": "1234",
"OptionSettings": [
{"Name": "CHUNK_SIZE", "Value": "32"},
{"Name": "BINDING_PROTOCOL", "Value": "ascii"}
]
}
]
}
}
AWS::Route53::HealthCheck
You can use the AWS::Route53::HealthCheck resource to check the health of your resources before
Amazon Route 53 responds to a DNS query. For more information, see How Health Checks Work in
Simple Amazon Route 53 Configurations in the Amazon Route 53 Developer Guide.
Syntax
{
"Type" : "AWS::Route53::HealthCheck",
"Properties" : {
"HealthCheckConfig (p. 517)" : { HealthCheckConfig },
"HealthCheckTags (p. 517)" : [ HealthCheckTags, ... ]
}
}
Properties
HealthCheckConfig
An Amazon Route 53 health check.
Required: Yes
Type: Amazon Route 53 HealthCheckConfig (p. 623)
Update requires: No interruption (p. 86)
HealthCheckTags
An arbitrary set of tags (key–value pairs) for this health check.
Required: No
Type: List of Amazon Route 53 HealthCheckTags (p. 625)
Update requires: No interruption (p. 86)
API Version 2010-05-15
517
AWS CloudFormation User Guide
AWS::Route53::HostedZone
Example
The following template snippet creates an Amazon Route 53 health check that sends request to the
specified endpoint.
"myHealthCheck": {
"Type": "AWS::Route53::HealthCheck",
"Properties": {
"HealthCheckConfig": {
"IPAddress": "000.000.000.000",
"Port": "80",
"Type": "HTTP",
"ResourcePath": "/example/index.html",
"FullyQualifiedDomainName": "example.com",
"RequestInterval": "30",
"FailureThreshold": "3"
},
"HealthCheckTags" : [{
"Key": "SampleKey1",
"Value": "SampleValue1"
},
{
"Key": "SampleKey2",
"Value": "SampleValue2"
}]
}
}
AWS::Route53::HostedZone
The AWS::Route53::HostedZone resource creates a hosted zone, which can contain a collection of
record sets for a domain. You cannot create a hosted zone for a top-level domain (TLD). For more
information, see POST CreateHostedZone or POST CreateHostedZone (Private) in the Amazon Route 53
API Reference.
Syntax
{
"Type" : "AWS::Route53::HostedZone",
"Properties" : {
"HostedZoneConfig (p. 518)" : { HostedZoneConfig },
"HostedZoneTags (p. 519)" : [ HostedZoneTags, ... ],
"Name (p. 519)" : String,
"VPCs (p. 519)" : [ HostedZoneVPCs, ... ]
}
}
Properties
HostedZoneConfig
A complex type that contains an optional comment about your hosted zone.
Required: No
Type: Amazon Route 53 HostedZoneConfig Property (p. 625)
API Version 2010-05-15
518
AWS CloudFormation User Guide
AWS::Route53::HostedZone
Update requires: No interruption (p. 86)
HostedZoneTags
An arbitrary set of tags (key–value pairs) for this hosted zone.
Required: No
Type: List of Amazon Route 53 HostedZoneTags (p. 626)
Update requires: No interruption (p. 86)
Name
The name of the domain. For resource record types that include a domain name, specify a fully
qualified domain name.
Required: Yes
Type: String
Update requires: Replacement (p. 86)
VPCs
One or more VPCs that you want to associate with this hosted zone. When you specify this property,
AWS CloudFormation creates a private hosted zone.
Required: No
Type: List of Amazon Route 53 HostedZoneVPCs (p. 626)
If this property was specified previously and you're modifying values, updates require no
interruption (p. 86). If this property wasn't specified and you add values, updates require
replacement (p. 86). Also, if this property was specified and you remove all values, updates require
replacement (p. 86).
Return Value
When the logical ID of this resource is provided to the Ref intrinsic function, Ref returns the resource
name. For example:
{ "Ref": "myHostedZone" }
Ref returns the hosted zone ID, such as Z23ABC4XYZL05B.
For more information about using the Ref function, see Ref (p. 669).
Example
The following template snippet creates a private hosted zone for the example.com domain.
"DNS": {
"Type": "AWS::Route53::HostedZone",
"Properties": {
"HostedZoneConfig": {
"Comment": "My hosted zone for example.com"
},
"Name": "example.com",
"VPCs": [{
"VPCId": "vpc-abcd1234",
API Version 2010-05-15
519
AWS CloudFormation User Guide
AWS::Route53::RecordSet
"VPCRegion": "ap-northeast-1"
},
{
"VPCId": "vpc-efgh5678",
"VPCRegion": "us-west-2"
}],
"HostedZoneTags" : [{
"Key": "SampleKey1",
"Value": "SampleValue1"
},
{
"Key": "SampleKey2",
"Value": "SampleValue2"
}]
}
}
AWS::Route53::RecordSet
The AWS::Route53::RecordSet type can be used as a standalone resource or as an embedded property
in the AWS::Route53::RecordSetGroup (p. 524) type. Note that some AWS::Route53::RecordSet properties
are valid only when used within AWS::Route53::RecordSetGroup.
For more information about constraints and values for each property, see POST CreateHostedZone for
hosted zones and POST ChangeResourceRecordSet for resource record sets.
Syntax
{
"Type" : "AWS::Route53::RecordSet",
"Properties" : {
"AliasTarget (p. 520)" : AliasTarget (p. 621),
"Comment (p. 521)" : String,
"Failover (p. 521)" : String,
"GeoLocation (p. 521)" : { GeoLocation },
"HealthCheckId (p. 521)" : String,
"HostedZoneId (p. 521)" : String,
"HostedZoneName (p. 521)" : String,
"Name (p. 522)" : String,
"Region (p. 522)" : String,
"ResourceRecords (p. 522)" : [ String ],
"SetIdentifier (p. 523)" : String,
"TTL (p. 523)" : String,
"Type (p. 523)" : String,
"Weight (p. 523)" : Integer
}
}
Properties
AliasTarget
Alias resource record sets only: Information about the domain to which you are redirecting traffic.
If you specify this property, do not specify the TTL property. The alias uses a TTL value from the
alias target record.
API Version 2010-05-15
520
AWS CloudFormation User Guide
AWS::Route53::RecordSet
For more information about alias resource record sets, see Creating Alias Resource Record Sets in
the Amazon Route 53 Developer Guide and POST ChangeResourceRecordSets in the Amazon
Route 53 API reference.
Required: Conditional. Required if you are creating an alias resource record set.
Type: AliasTarget (p. 621)
Update requires: No interruption (p. 86)
Comment
Any comments you want to include about the hosted zone.
Required: No
Type: String
Update requires: No interruption (p. 86)
Failover
Designates the record set as a PRIMARY or SECONDARY failover record set. When you have more
than one resource performing the same function, you can configure Amazon Route 53 to check the
health of your resources and use only health resources to respond to DNS queries.You cannot create
nonfailover resource record sets that have the same Name and Type property values as failover
resource record sets. For more information, see the Failover element in the Amazon Route 53 API
Reference.
Required: No
Type: String
Update requires: No interruption (p. 86)
GeoLocation
Describes how Amazon Route 53 responds to DNS queries based on the geographic origin of the
query.
Required: No
Type: Amazon Route 53 Record Set GeoLocation Property (p. 622)
Update requires: No interruption (p. 86)
HealthCheckId
The health check ID that you want to apply to this record set. Amazon Route 53 returns this resource
record set in response to a DNS query only while record set is healthy.
Required: No
Type: String
Update requires: No interruption (p. 86)
HostedZoneId
The ID of the hosted zone.
Required: Conditional. You must specify either the HostedZoneName or HostedZoneId, but you
cannot specify both.
Type: String
Update requires: Replacement (p. 86)
HostedZoneName
The name of the domain for the hosted zone where you want to add the record set.
API Version 2010-05-15
521
AWS CloudFormation User Guide
AWS::Route53::RecordSet
When you create a stack using an AWS::Route53::RecordSet that specifies HostedZoneName, AWS
CloudFormation attempts to find a hosted zone whose name matches the HostedZoneName. If AWS
CloudFormation cannot find a hosted zone with a matching domain name, or if there is more than
one hosted zone with the specified domain name, AWS CloudFormation will not create the stack.
If you have multiple hosted zones with the same domain name, you must explicitly specify the hosted
zone using HostedZoneId.
Required: Conditional. You must specify either the HostedZoneName or HostedZoneId, but you
cannot specify both.
Type: String
Update requires: Replacement (p. 86)
Name
The name of the domain. This must be a fully specified domain, ending with a period as the last label
indication. If you omit the final period, Amazon Route 53 assumes the domain is relative to the root.
Required: Yes
Type: String
Update requires: No interruption (p. 86)
Region
Latency resource record sets only: The Amazon EC2 region where the resource that is specified in
this resource record set resides. The resource typically is an AWS resource, for example, Amazon
EC2 instance or an Elastic Load Balancing load balancer, and is referred to by an IP address or a
DNS domain name, depending on the record type.
When Amazon Route 53 receives a DNS query for a domain name and type for which you have
created latency resource record sets, Amazon Route 53 selects the latency resource record set that
has the lowest latency between the end user and the associated Amazon EC2 region. Amazon
Route 53 then returns the value that is associated with the selected resource record set.
The following restrictions must be followed:
• You can only specify one resource record per latency resource record set.
• You can only create one latency resource record set for each Amazon EC2 region.
• You are not required to create latency resource record sets for all Amazon EC2 regions. Amazon
Route 53 will choose the region with the best latency from among the regions for which you create
latency resource record sets.
• You cannot create both weighted and latency resource record sets that have the same values for
the Name and Type elements.
To see a list of regions by service, see Regions and Endpoints in the AWS General Reference.
ResourceRecords
List of resource records to add. Each record should be in the format appropriate for the record type
specified by the Type property. For information about different record types and their record formats,
see Appendix: Domain Name Format in the Amazon Route 53 Developer Guide.
Required: Conditional. Required if TTL or SetIdentifier is set. Also, if you set ResourceRecords,
you must set TTL or SetIdentifier.
Note
If you are creating an alias resource record set, you should omit ResourceRecords.
Type: List of strings
Update requires: No interruption (p. 86)
API Version 2010-05-15
522
AWS CloudFormation User Guide
AWS::Route53::RecordSet
SetIdentifier
A unique identifier that differentiates among multiple resource record sets that have the same
combination of DNS name and type.
Required: Conditional. Required if you are creating a weighted, latency, failover, or geolocation
resource record set. ResourceRecords must also be set.
For more information, see the SetIdentifier element in the Amazon Route 53 Developer Guide.
Type: String
Update requires: No interruption (p. 86)
TTL
The resource record cache time to live (TTL), in seconds. If you specify this property, do not specify
the AliasTarget property. For alias target records, the alias uses a TTL value from the target.
If TTL is specified, then ResourceRecords is also required.
Required: No
Type: String
Update requires: No interruption (p. 86)
Type
The type of records to add.
Required: Yes
Type: String
Valid Values: A | AAAA | CNAME | MX | NS | PTR | SOA | SPF | SRV | TXT
Update requires: No interruption (p. 86)
Weight
Weighted resource record sets only: Among resource record sets that have the same combination
of DNS name and type, a value that determines what portion of traffic for the current resource record
set is routed to the associated location.
For more information about weighted resource record sets, see Setting Up Weighted Resource
Record Sets in the Amazon Route 53 Developer Guide.
Required: Conditional. Required if you are creating a weighted resource record set.
Type: Number. Weight expects integer values.
Update requires: No interruption (p. 86)
Return Value
When you specify an AWS::Route53::RecordSet type as an argument to the Ref function, AWS
CloudFormation returns the value of the domain name of the record set.
For more information about using the Ref function, see Ref (p. 669).
API Version 2010-05-15
523
AWS CloudFormation User Guide
AWS::Route53::RecordSetGroup
Example
Example Mapping an Amazon Route 53 A record to the public IP of an Amazon EC2 instance
"Resources" : {
"Ec2Instance" : {
"Type" : "AWS::EC2::Instance",
"Properties" : {
"ImageId" : { "Fn::FindInMap" : [
"RegionMap", { "Ref" : "AWS::Region" }, "AMI"
] }
}
},
"myDNSRecord" : {
"Type" : "AWS::Route53::RecordSet",
"Properties" : {
"HostedZoneName" : {
"Fn::Join" : [ "", [
{ "Ref" : "HostedZone" }, "."
] ]
},
"Comment" : "DNS name for my instance.",
"Name" : {
"Fn::Join" : [ "", [
{"Ref" : "Ec2Instance"}, ".",
{"Ref" : "AWS::Region"}, ".",
{"Ref" : "HostedZone"} ,"."
] ]
},
"Type" : "A",
"TTL" : "900",
"ResourceRecords" : [
{ "Fn::GetAtt" : [ "Ec2Instance", "PublicIp" ] }
]
}
}
},
For additional AWS::Route53::RecordSet snippets, see Amazon Route 53 Template Snippets (p. 218) .
AWS::Route53::RecordSetGroup
The AWS::Route53::RecordSetGroup resource creates record sets for a hosted zone. For more information
about constraints and values for each property, see POST CreateHostedZone for hosted zones and
POST ChangeResourceRecordSet for resource record sets.
Syntax
{
"Type" : "AWS::Route53::RecordSetGroup",
"Properties" : {
"HostedZoneId (p. 525)" : String,
"HostedZoneName (p. 525)" : String,
API Version 2010-05-15
524
AWS CloudFormation User Guide
AWS::Route53::RecordSetGroup
"RecordSets (p. 525)" : [ RecordSet1, ... ],
"Comment (p. 525)" : String,
}
}
Properties
HostedZoneId
The ID of the hosted zone.
Required: Conditional: You must specify either the HostedZoneName or HostedZoneId, but you
cannot specify both.
Type: String
Update requires: Replacement (p. 86)
HostedZoneName
The name of the domain for the hosted zone where you want to add the record set.
When you create a stack using an AWS::Route53::RecordSet that specifies HostedZoneName, AWS
CloudFormation attempts to find a hosted zone whose name matches the HostedZoneName. If AWS
CloudFormation cannot find a hosted zone with a matching domain name, or if there is more than
one hosted zone with the specified domain name, AWS CloudFormation will not create the stack.
If you have multiple hosted zones with the same domain name, you must explicitly specify the hosted
zone using HostedZoneId.
Required: Conditional. You must specify either the HostedZoneName or HostedZoneId, but you
cannot specify both.
Type: String
Update requires: Replacement (p. 86)
RecordSets
List of resource record sets to add.
Required: Yes
Type: list of AWS::Route53::RecordSet (p. 520)
Update requires: No interruption (p. 86)
Comment
Any comments you want to include about the hosted zone.
Required: No
Type: String
Update requires: No interruption (p. 86)
Return Value
When the logical ID of this resource is provided to the Ref intrinsic function, Ref returns the resource
name. For example:
{ "Ref": "MyRecordSetGroup" }
For the resource with the logical ID "MyRecordSetGroup", Ref will return the AWS resource name.
For more information about using the Ref function, see Ref (p. 669).
Template Examples
For AWS::Route53::RecordSetGroup snippets, see Amazon Route 53 Template Snippets (p. 218).
API Version 2010-05-15
525
AWS CloudFormation User Guide
AWS::S3::Bucket
AWS::S3::Bucket
The AWS::S3::Bucket type creates an Amazon S3 bucket.
You can set a deletion policy for your bucket to control how AWS CloudFormation handles the bucket
when the stack is deleted. For Amazon S3 buckets, you can choose to retain the bucket or to delete the
bucket. For more information, see DeletionPolicy Attribute (p. 641).
Important
Only Amazon S3 buckets that are empty can be deleted. Deletion will fail for buckets that have
contents.
Syntax
{
"Type" : "AWS::S3::Bucket",
"Properties" : {
"AccessControl (p. 526)" : String,
"BucketName (p. 526)" : String,
"CorsConfiguration (p. 527)" : CORS Configuration,
"LifecycleConfiguration (p. 527)" : Lifecycle Configuration,
"LoggingConfiguration (p. 527)" : Logging Configuration,
"NotificationConfiguration (p. 527)" : Notification Configuration,
"Tags (p. 527)" : [ Resource Tag, ... ],
"VersioningConfiguration (p. 527)" : Versioning Configuration,
"WebsiteConfiguration (p. 527)" : Website Configuration Type
}
}
Properties
AccessControl
A canned access control list (ACL) that grants predefined permissions to the bucket. For more
information about canned ACLs, see Canned ACLs in the Amazon S3 documentation.
Required: No
Type: String
Valid values: Private | PublicRead | PublicReadWrite | AuthenticatedRead |
LogDeliveryWrite | BucketOwnerRead | BucketOwnerFullControl
Update requires: No interruption (p. 86)
BucketName
A name for the bucket. If you don't specify a name, AWS CloudFormation generates a unique physical
ID and uses that ID for the bucket name. For more information, see Name Type (p. 608). The bucket
name must contain only lowercase letters, numbers, periods (.), and dashes (-).
Important
If you specify a name, you cannot do updates that require this resource to be replaced. You
can still do updates that require no or some interruption. If you must replace the resource,
specify a new name.
Required: No
Type: String
API Version 2010-05-15
526
AWS CloudFormation User Guide
AWS::S3::Bucket
Update requires: Replacement (p. 86)
CorsConfiguration
Rules that define cross-origin resource sharing of objects in this bucket. For more information, see
Enabling Cross-Origin Resource Sharing in the Amazon Simple Storage Service Developer Guide.
Required: No
Type: Amazon S3 Cors Configuration (p. 627)
Update requires: No interruption (p. 86)
LifecycleConfiguration
Rules that define how Amazon S3 manages objects during their lifetime. For more information, see
Object Lifecycle Management in the Amazon Simple Storage Service Developer Guide.
Required: No
Type: Amazon S3 Lifecycle Configuration (p. 628)
Update requires: No interruption (p. 86)
LoggingConfiguration
Settings that defines where logs are stored.
Required: No
Type: Amazon S3 Logging Configuration (p. 631)
Update requires: No interruption (p. 86)
NotificationConfiguration
Configuration that defines which Amazon SNS topic to send messages to and what events to report.
Required: No
Type: Amazon S3 Notification Configuration (p. 632)
Update requires: No interruption (p. 86)
Tags
An arbitrary set of tags (key-value pairs) for this Amazon S3 bucket.
Required: No
Type: AWS CloudFormation Resource Tags (p. 618)
Update requires: No interruption (p. 86)
VersioningConfiguration
Enables multiple variants of all objects in this bucket. You might enable versioning to prevent objects
from being deleted or overwritten by mistake or to archive objects so that you can retrieve previous
versions of them.
Required: No
Type: Amazon S3 Versioning Configuration (p. 633)
Update requires: No interruption (p. 86)
WebsiteConfiguration
Information used to configure the bucket as a static website. For more information, see Hosting
Websites on Amazon S3.
Required: No
API Version 2010-05-15
527
AWS CloudFormation User Guide
AWS::S3::Bucket
Type: Website Configuration Type (p. 633)
Update requires: No interruption (p. 86)
Return Values
Ref
When the logical ID of this resource is provided to the Ref intrinsic function, Ref returns the resource
name.
Example: mystack-mybucket-kdwwxmddtr2g
For more information about using the Ref function, see Ref (p. 669).
Fn::GetAtt
Fn::GetAtt returns a value for a specified attribute of this type. This section lists the available attributes
and corresponding return values.
DomainName
Returns the DNS name of the specified bucket.
Example: mystack-mybucket-kdwwxmddtr2g.s3.amazonaws.com
WebsiteURL
Amazon S3 website endpoint for the specified bucket.
Example: http://mystack-mybucket-kdwwxmddtr2g.s3-website-us-east-1.amazonaws.com/
For more information about using Fn:GetAtt, see Fn::GetAtt (p. 661).
API Version 2010-05-15
528
AWS CloudFormation User Guide
AWS::S3::Bucket
Examples
Example Static website configuration with a routing rule
In this example, AWS::S3::Bucket's Fn::GetAtt values are used to provide outputs. The routing rule
redirects requests to an Amazon EC2 instance in the event of an HTTP 404 error and inserts a object
key prefix report-404/ in the redirect. For example, if you request a page ExamplePage.html and it
results in a HTTP 404 error, the request is routed to a page report-404/ExamplePage.html on the
specified instance. For all other HTTP error codes, error.html is returned.
"Resources" : {
"S3Bucket" : {
"Type" : "AWS::S3::Bucket",
"Properties" : {
"AccessControl" : "PublicRead",
"BucketName" : "PublicBucket",
"WebsiteConfiguration" : {
"IndexDocument" : "index.html",
"ErrorDocument" : "error.html",
"RoutingRules": [
{
"RoutingRuleCondition": {
"HttpErrorCodeReturnedEquals": "404",
"KeyPrefixEquals": "out1/"
},
"RedirectRule": {
"HostName": "ec2-11-22-333-44.compute-1.amazonaws.com",
"ReplaceKeyPrefixWith": "report-404/"
}
}
]
}
},
"DeletionPolicy" : "Retain"
}
},
"Outputs" : {
"WebsiteURL" : {
"Value" : { "Fn::GetAtt" : [ "S3Bucket", "WebsiteURL" ] },
"Description" : "URL for website hosted on S3"
},
"S3BucketSecureURL" : {
"Value" : { "Fn::Join" : [
"", [ "https://", { "Fn::GetAtt" : [ "S3Bucket", "DomainName" ] } ]
] },
"Description" : "Name of S3 bucket to hold website content"
}
}
API Version 2010-05-15
529
AWS CloudFormation User Guide
AWS::S3::Bucket
Example Enable cross-origin resource sharing
The following sample template shows an Amazon S3 bucket with two cross-origin resource sharing rules.
{
"AWSTemplateFormatVersion": "2010-09-09",
"Resources": {
"S3Bucket": {
"Type": "AWS::S3::Bucket",
"Properties": {
"AccessControl": "PublicReadWrite",
"CorsConfiguration": {
"CorsRules": [
{
"AllowedHeaders": [
"*"
],
"AllowedMethods": [
"GET"
],
"AllowedOrigins": [
"*"
],
"ExposedHeaders": [
"Date"
],
"Id": "myCORSRuleId1",
"MaxAge": "3600"
},
{
"AllowedHeaders": [
"x-amz-*"
],
"AllowedMethods": [
"DELETE"
],
"AllowedOrigins": [
"http://www.example1.com",
"http://www.example2.com"
],
"ExposedHeaders": [
"Connection",
"Server",
"Date"
],
"Id": "myCORSRuleId2",
"MaxAge": "1800"
}
]
}
}
}
},
"Outputs": {
"BucketName": {
"Value": {
"Ref": "S3Bucket"
},
API Version 2010-05-15
530
AWS CloudFormation User Guide
AWS::S3::Bucket
"Description": "Name of the sample Amazon S3 bucket with CORS en
abled."
}
}
}
Example Manage the lifecycle for Amazon S3 objects
The following sample template shows an Amazon S3 bucket with a lifecycle configuration rule. The rule
applies to all objects with the glacier key prefix. The objects are transitioned to Amazon Glacier after
one day and deleted after one year.
{
"AWSTemplateFormatVersion": "2010-09-09",
"Resources": {
"S3Bucket": {
"Type": "AWS::S3::Bucket",
"Properties": {
"AccessControl": "PublicReadWrite",
"LifecycleConfiguration": {
"Rules": [
{
"Id": "GlacierRule"
"Prefix": "glacier",
"Status": "Enabled",
"ExpirationInDays": "365",
"Transition": {
"TransitionInDays": "1",
"StorageClass": "Glacier"
}
}
]
}
}
}
},
"Outputs": {
"BucketName": {
"Value": {
"Ref": "S3Bucket"
},
"Description": "Name of the sample Amazon S3 bucket with a lifecycle
configuration."
}
}
}
API Version 2010-05-15
531
AWS CloudFormation User Guide
AWS::S3::Bucket
Example Log access requests for a specific bucket
The following sample template creates two Amazon S3 buckets. The LoggingBucket bucket store the
logs from the S3Bucket bucket. The logging bucket requires log delivery write permissions in order
receive logs from the S3Bucket bucket.
{
"AWSTemplateFormatVersion": "2010-09-09",
"Resources": {
"S3Bucket": {
"Type": "AWS::S3::Bucket",
"Properties": {
"AccessControl": "PublicRead",
"LoggingConfiguration": {
"DestinationBucketName": {"Ref" : "LoggingBucket"},
"LogFilePrefix": "testing-logs"
}
}
},
"LoggingBucket": {
"Type": "AWS::S3::Bucket",
"Properties": {
"AccessControl": "LogDeliveryWrite"
}
}
},
"Outputs": {
"BucketName": {
"Value": {
"Ref": "S3Bucket"
},
"Description": "Name of the sample Amazon S3 bucket with a logging
configuration."
}
}
}
API Version 2010-05-15
532
AWS CloudFormation User Guide
AWS::S3::BucketPolicy
Example Receive bucket notifications to an Amazon SNS topic
The following sample template shows an Amazon S3 bucket with a notification configuration that sends
an event to the specified topic when Amazon S3 has lost all replicas of an object.
{
"AWSTemplateFormatVersion": "2010-09-09",
"Resources": {
"S3Bucket": {
"Type": "AWS::S3::Bucket",
"Properties": {
"AccessControl": "PublicReadWrite",
"NotificationConfiguration": {
"TopicConfigurations": [
{
"Topic": "arn:aws:sns:us-east1:123456789012:TestTopic",
"Event": "s3:ReducedRedundancyLostObject"
}
]
}
}
}
},
"Outputs": {
"BucketName": {
"Value": {
"Ref": "S3Bucket"
},
"Description": "Name of the sample Amazon S3 bucket with a notific
ation configuration."
}
}
}
For more examples, see Amazon S3 Template Snippets (p. 221).
See Also
• DeletionPolicy Attribute (p. 641)
• Access Control List (ACL) Overview in the Amazon Simple Storage Service Developer Guide
• Hosting a Static Website on Amazon S3 in the Amazon Simple Storage Service Developer Guide
AWS::S3::BucketPolicy
The AWS::S3::BucketPolicy type applies an Amazon S3 bucket policy to an Amazon S3 bucket.
AWS::S3::BucketPolicy Snippet: Declaring an Amazon S3 Bucket Policy (p. 199)
Syntax
{
"Type" : "AWS::S3::BucketPolicy",
API Version 2010-05-15
533
AWS CloudFormation User Guide
AWS::S3::BucketPolicy
"Properties" : {
"Bucket (p. 534)" : String,
"PolicyDocument (p. 534)" : JSON
}
}
Properties
Bucket
The Amazon S3 bucket that the policy applies to.
Required: Yes
Type: String
You cannot update this property. If you want to add or remove a bucket from a bucket policy, you
must modify your AWS CloudFormation template by creating a new bucket policy resource and
removing the old one. Then use the modified template to update your AWS CloudFormation stack.
PolicyDocument
A policy document containing permissions to add to the specified bucket.
Required: Yes
Type: JSON object
Update requires: No interruption (p. 86)
API Version 2010-05-15
534
AWS CloudFormation User Guide
AWS::SDB::Domain
Examples
Example Bucket policy that allows GET requests from specific referers
The following sample is a bucket policy that is attached to the myExampleBucket bucket and allows
GET requests that originate from www.example.com and example.com:
"SampleBucketPolicy" : {
"Type" : "AWS::S3::BucketPolicy",
"Properties" : {
"Bucket" : {"Ref" : "myExampleBucket"},
"PolicyDocument": {
"Statement":[{
"Action":["s3:GetObject"],
"Effect":"Allow",
"Resource": { "Fn::Join" : ["", ["arn:aws:s3:::", { "Ref" : "myExampleBuck
et" } , "/*" ]]},
"Principal":"*",
"Condition":{
"StringLike":{
"aws:Referer":[
"http://www.example.com/*",
"http://example.com/*"
]
}
}
}]
}
}
}
AWS::SDB::Domain
The AWS::SDB::Domain type does not have any properties.
Updates are not supported for this resource.
When you specify an AWS::SDB::Domain type as an argument to the Ref function, AWS CloudFormation
returns the value of the DomainName.
The following example shows an Amazon SimpleDB domain resource:
"MySDBDomain" : {
"Type" : "AWS::SDB::Domain",
"Properties" : {
"Description" : "Other than this AWS CloudFormation Description property,
SDB Domains have no properties."
}
}
AWS::SNS::Topic
The AWS::SNS::Topic type creates an Amazon SNS topic.
API Version 2010-05-15
535
AWS CloudFormation User Guide
AWS::SNS::Topic
Syntax
{
"Type" : "AWS::SNS::Topic",
"Properties" : {
"DisplayName (p. 536)" : String,
"Subscription (p. 536)" : [ SNS Subscription, ... ],
"TopicName (p. 536)" : String
}
}
Properties
Important
After you create an Amazon SNS topic, you cannot update its properties by using AWS
CloudFormation.You can modify an Amazon SNS topic by using the AWS Management Console.
DisplayName
A developer-defined string that can be used to identify this SNS topic.
Required: No
Type: String
Update requires: Updates are not supported.
Subscription
The SNS subscriptions (endpoints) for this topic.
Required: No
Type: List of SNS Subscriptions (p. 638)
Update requires: Updates are not supported.
TopicName
A name for the topic. If you don't specify a name, AWS CloudFormation generates a unique physical
ID and uses that ID for the topic name. For more information, see Name Type (p. 608).
Required: No
Type: String
Update requires: Updates are not supported.
Return Values
Ref
For the AWS::SNS::Topic resource, the Ref intrinsic function returns the topic ARN, for example:
arn:aws:sns:us-east-1:123456789012:mystack-mytopic-NZJ5JSMVGFIE.
For more information about using the Ref function, see Ref (p. 669).
Fn::GetAtt
Fn::GetAtt returns a value for a specified attribute of this type. This section lists the available attributes
and corresponding return values.
API Version 2010-05-15
536
AWS CloudFormation User Guide
AWS::SNS::TopicPolicy
TopicName
Returns the name for an Amazon SNS topic.
For more information about using Fn:GetAtt, see Fn::GetAtt (p. 661).
Examples
An example of an SNS topic subscribed to by two SQS queues:
"MySNSTopic" : {
"Type" : "AWS::SNS::Topic",
"Properties" : {
"Subscription" : [
{ "Endpoint" : { "Fn::GetAtt" : [ "MyQueue1", "Arn" ] }, "Protocol" :
"sqs" },
{ "Endpoint" : { "Fn::GetAtt" : [ "MyQueue2", "Arn" ] }, "Protocol" :
"sqs" }
],
"TopicName" : "SampleTopic"
}
}
See Also
• Using an AWS CloudFormation Template to Create a Topic that Sends Messages to Amazon SQS
Queues in the Amazon Simple Notification Service Developer Guide
AWS::SNS::TopicPolicy
The AWS::SNS::TopicPolicy resource associates Amazon SNS topics with a policy.
Syntax
{
"Type" : "AWS::SNS::TopicPolicy",
"Properties" :
{
"PolicyDocument (p. 537)" : JSON,
"Topics (p. 538)" : [ List of SNS topic ARNs, ... ]
}
}
Properties
PolicyDocument
A policy document that contains permissions to add to the specified SNS topics.
Required: Yes
Type: JSON object
Update requires: No interruption (p. 86)
API Version 2010-05-15
537
AWS CloudFormation User Guide
AWS::SQS::Queue
Topics
The Amazon Resource Names (ARN) of the topics to which you want to add the policy. You can use
the Ref function (p. 669) to specify an AWS::SNS::Topic (p. 535) resource.
Required: Yes
Type: A list of Amazon SNS topics ARNs
Update requires: No interruption (p. 86)
For sample AWS::SNS::TopicPolicy snippts, see Declaring an Amazon SNS Topic Policy (p. 200).
AWS::SQS::Queue
The AWS::SQS::Queue type creates an Amazon SQS queue.
Syntax
{
"Type": "AWS::SQS::Queue",
"Properties": {
"DelaySeconds (p. 538)": Integer,
"MaximumMessageSize (p. 538)": Integer,
"MessageRetentionPeriod (p. 538)": Integer,
"QueueName (p. 539)": String,
"ReceiveMessageWaitTimeSeconds (p. 539)": Integer,
"RedrivePolicy (p. 539)": RedrivePolicy,
"VisibilityTimeout (p. 539)": Integer
}
}
Properties
DelaySeconds
The time in seconds that the delivery of all messages in the queue will be delayed. You can specify
an integer value of 0 to 900 (15 minutes). The default value is 0.
Required: No
Type: Integer
Update requires: No interruption (p. 86)
MaximumMessageSize
The limit of how many bytes a message can contain before Amazon SQS rejects it. You can specify
an integer value from 1024 bytes (1 KiB) to 262144 bytes (256 KiB). The default value is 262144
(256 KiB).
Required: No
Type: Integer
Update requires: No interruption (p. 86)
MessageRetentionPeriod
The number of seconds Amazon SQS retains a message. You can specify an integer value from 60
seconds (1 minute) to 1209600 seconds (14 days). The default value is 345600 seconds (4 days).
API Version 2010-05-15
538
AWS CloudFormation User Guide
AWS::SQS::Queue
Required: No
Type: Integer
Update requires: No interruption (p. 86)
QueueName
A name for the queue. If you don't specify a name, AWS CloudFormation generates a unique physical
ID and uses that ID for the queue name. For more information, see Name Type (p. 608).
Important
If you specify a name, you cannot do updates that require this resource to be replaced. You
can still do updates that require no or some interruption. If you must replace the resource,
specify a new name.
Required: No
Type: String
Update requires: Replacement (p. 86)
ReceiveMessageWaitTimeSeconds
Specifies the duration, in seconds, that the ReceiveMessage action call waits until a message is in
the queue in order to include it in the response, as opposed to returning an empty response if a
message is not yet available. You can specify an integer from 1 to 20. The short polling is used as
the default or when you specify 0 for this property. For more information, see Amazon SQS Long
Poll.
Required: No
Type: Integer
Update requires: No interruption (p. 86)
RedrivePolicy
Specifies an existing dead letter queue to receive messages after the source queue (this queue) fails
to process a message a specified number of times.
Required: No
Type: Amazon SQS RedrivePolicy (p. 638)
Update requires: No interruption (p. 86)
VisibilityTimeout
The length of time during which the queue will be unavailable once a message is delivered from the
queue. This blocks other components from receiving the same message and gives the initial
component time to process and delete the message from the queue.
Values must be from 0 to 43200 seconds (12 hours). If no value is specified, the default value of 30
seconds will be used.
For more information about SQS Queue visibility timeouts, see Visibility Timeout in the Amazon
Simple Queue Service Developer Guide.
Required: No
Type: Integer
Update requires: No interruption (p. 86)
API Version 2010-05-15
539
AWS CloudFormation User Guide
AWS::SQS::Queue
Return Values
Ref
The AWS::SQS::Queue type returns the queue URL, for example:
https://sqs.us-east-1.amazonaws.com/123456789012/aa4-MyQueue-Z5NOSZO2PZE9.
For more information about using the Ref function, see Ref (p. 669).
Fn::GetAtt
Fn::GetAtt returns a value for a specified attribute of this type. This section lists the available attributes
and corresponding return values.
Arn
Returns the Amazon Resource Name (ARN) of the queue. For example:
arn:aws:sqs:us-east-1:123456789012:mystack-myqueue-15PG5C2FC1CW8
QueueName
Returns the queue name. For example:
mystack-myqueue-1VF9BKQH5BJVI
Examples
SQS Queue with Cloudwatch Alarms
{
"AWSTemplateFormatVersion" : "2010-09-09",
"Description" : "AWS CloudFormation Sample Template SQS_With_CloudWatch_Alarms:
Sample template showing how to create an SQS queue with Amazon CloudWatch
alarms on queue depth. **WARNING** This template creates an Amazon SQS queue
and one or more Amazon CloudWatch alarms. You will be billed for the AWS re
sources used if you create a stack from this template.",
"Parameters" : {
"AlarmEmail": {
"Default": "[email protected]",
"Description": "Email address to notify if operational problems arise",
"Type": "String"
}
},
"Resources" : {
"MyQueue" : {
"Type" : "AWS::SQS::Queue",
"Properties" : {
"QueueName" : "SampleQueue"
}
},
"AlarmTopic": {
"Type": "AWS::SNS::Topic",
"Properties": {
"Subscription": [{
"Endpoint": { "Ref": "AlarmEmail" },
API Version 2010-05-15
540
AWS CloudFormation User Guide
AWS::SQS::Queue
"Protocol": "email"
}]
}
},
"QueueDepthAlarm": {
"Type": "AWS::CloudWatch::Alarm",
"Properties": {
"AlarmDescription": "Alarm if queue depth grows beyond 10 messages",
"Namespace": "AWS/SQS",
"MetricName": "ApproximateNumberOfMessagesVisible",
"Dimensions": [{
"Name": "QueueName",
"Value" : { "Fn::GetAtt" : ["MyQueue", "QueueName"] }
}],
"Statistic": "Sum",
"Period": "300",
"EvaluationPeriods": "1",
"Threshold": "10",
"ComparisonOperator": "GreaterThanThreshold",
"AlarmActions": [{
"Ref": "AlarmTopic"
}],
"InsufficientDataActions": [{
"Ref": "AlarmTopic"
}]
}
}
},
"Outputs" : {
"QueueURL" : {
"Description" : "URL of newly created SQS Queue",
"Value" : { "Ref" : "MyQueue" }
},
"QueueARN" : {
"Description" : "ARN of newly created SQS Queue",
"Value" : { "Fn::GetAtt" : ["MyQueue", "Arn"]}
},
"QueueName" : {
"Description" : "Name newly created SQS Queue",
"Value" : { "Fn::GetAtt" : ["MyQueue", "QueueName"]}
}
}
}
SQS Queue with a Dead Letter Queue
The following sample creates a source queue and a dead letter queue. Because the source queue specifies
the dead letter queue in its redrive policy, the source queue is dependent on the creation of the dead
letter queue.
{
"AWSTemplateFormatVersion" : "2010-09-09",
"Resources" : {
"MySourceQueue" : {
"Type" : "AWS::SQS::Queue",
API Version 2010-05-15
541
AWS CloudFormation User Guide
AWS::SQS::QueuePolicy
"Properties" : {
"RedrivePolicy": {
"deadLetterTargetArn" : {"Fn::GetAtt" : [ "MyDeadLetterQueue" , "Arn"
]},
"maxReceiveCount" : 5
}
}
},
"MyDeadLetterQueue" : {
"Type" : "AWS::SQS::Queue"
}
},
"Outputs" : {
"SourceQueueURL" : {
"Description" : "URL of the source queue",
"Value" : { "Ref" : "MySourceQueue" }
},
"SourceQueueARN" : {
"Description" : "ARN of the source queue",
"Value" : { "Fn::GetAtt" : ["MySourceQueue", "Arn"]}
},
"DeadLetterQueueURL" : {
"Description" : "URL of the dead letter queue",
"Value" : { "Ref" : "MyDeadLetterQueue" }
},
"DeadLetterQueueARN" : {
"Description" : "ARN of the dead letter queue",
"Value" : { "Fn::GetAtt" : ["MyDeadLetterQueue", "Arn"]}
}
}
}
See Also
• CreateQueue in the Amazon Simple Queue Service API Reference
• What is Amazon Simple Queue Service? in the Amazon Simple Queue Service Developer Guide
AWS::SQS::QueuePolicy
The AWS::SQS::QueuePolicy type applies a policy to SQS queues.
AWS::SQS::QueuePolicy Snippet: Declaring an Amazon SQS Policy (p. 200)
Syntax
{
"Type" : "AWS::SQS::QueuePolicy",
"Properties" : {
"PolicyDocument (p. 543)" : JSON,
"Queues (p. 543)" : [ String, ... ]
}
}
API Version 2010-05-15
542
AWS CloudFormation User Guide
Resource Property Types
Properties
PolicyDocument
A policy document containing permissions to add to the specified SQS queues.
Required: Yes
Type: JSON object
Update requires: No interruption (p. 86)
Queues
The URLs of the queues to which you want to add the policy. You can use the Ref function (p. 669)
to specify an AWS::SQS::Queue (p. 538) resource.
Required: Yes
Type: List of strings
Update requires: No interruption (p. 86)
Resource Property Types Reference
This section details the resource-specific properties for the resources supported by AWS CloudFormation.
Topics
• AWS CloudFormation AutoScaling Block Device Mapping Property Type (p. 545)
• AWS CloudFormation AutoScaling EBS Block Device Property Type (p. 546)
• Auto Scaling MetricsCollection (p. 548)
• Auto Scaling NotificationConfigurations (p. 548)
• Auto Scaling Tags Property Type (p. 549)
• CloudFormation Stack Parameters Property Type (p. 550)
• CloudFront DistributionConfig (p. 551)
• CloudFront DistributionConfig CacheBehavior (p. 553)
• CloudFront DistributionConfig CustomErrorResponse (p. 555)
• CloudFront DefaultCacheBehavior (p. 556)
• CloudFront Logging (p. 557)
• CloudFront DistributionConfig Origin (p. 558)
• CloudFront DistributionConfig Origin CustomOrigin (p. 559)
• CloudFront DistributionConfig Origin S3Origin (p. 560)
• CloudFront DistributionConfiguration Restrictions (p. 560)
• CloudFront DistributionConfig Restrictions GeoRestriction (p. 561)
• CloudFront DistributionConfiguration ViewerCertificate (p. 561)
• CloudFront ForwardedValues (p. 562)
• CloudFront ForwardedValues Cookies (p. 563)
• CloudWatch Metric Dimension Property Type (p. 564)
• CloudWatch Logs MetricFilter MetricTransformation Property (p. 566)
• AWS Data Pipeline Pipeline ParameterObjects (p. 566)
• AWS Data Pipeline Parameter Objects Attributes (p. 567)
• AWS Data Pipeline Pipeline ParameterValues (p. 568)
• AWS Data Pipeline PipelineObjects (p. 568)
API Version 2010-05-15
543
AWS CloudFormation User Guide
Resource Property Types
• AWS Data Pipeline Data Pipeline Object Fields (p. 569)
• AWS Data Pipeline Pipeline PipelineTags (p. 570)
• DynamoDB Attribute Definitions (p. 570)
• DynamoDB Global Secondary Indexes (p. 571)
• DynamoDB Key Schema (p. 572)
• DynamoDB Local Secondary Indexes (p. 572)
• DynamoDB Projection Object (p. 573)
• DynamoDB Provisioned Throughput (p. 574)
• Amazon EC2 Block Device Mapping Property (p. 575)
• Amazon Elastic Block Store Block Device Property (p. 576)
• EC2 ICMP Property Type (p. 578)
• EC2 MountPoint Property Type (p. 578)
•
•
•
•
•
•
•
•
•
•
•
•
•
•
•
•
•
•
•
•
EC2 NetworkInterface Embedded Property Type (p. 580)
EC2 Network Interface Association (p. 582)
EC2 Network Interface Attachment (p. 582)
EC2 Network Interface Group Item (p. 583)
EC2 Network Interface Private IP Specification (p. 583)
EC2 PortRange Property Type (p. 584)
EC2 Security Group Rule Property Type (p. 584)
Amazon EC2 Container Service Service LoadBalancers (p. 587)
Amazon EC2 Container Service TaskDefinition ContainerDefinitions (p. 588)
Amazon EC2 Container Service TaskDefinition ContainerDefinitions Environment (p. 590)
Amazon EC2 Container Service TaskDefinition ContainerDefinitions MountPoints (p. 591)
Amazon EC2 Container Service TaskDefinition ContainerDefinitions PortMappings (p. 592)
Amazon EC2 Container Service TaskDefinition ContainerDefinitions VolumesFrom (p. 592)
Amazon EC2 Container Service TaskDefinition Volumes (p. 593)
Amazon EC2 Container Service TaskDefinition Volumes Host (p. 594)
Elastic Beanstalk Environment Tier Property Type (p. 594)
Elastic Beanstalk OptionSettings Property Type (p. 595)
Elastic Beanstalk SourceBundle Property Type (p. 596)
Elastic Beanstalk SourceConfiguration Property Type (p. 597)
Elastic Load Balancing AccessLoggingPolicy (p. 597)
• ElasticLoadBalancing AppCookieStickinessPolicy Type (p. 598)
• Elastic Load Balancing ConnectionDrainingPolicy (p. 599)
• Elastic Load Balancing ConnectionSettings (p. 600)
• ElasticLoadBalancing HealthCheck Type (p. 600)
• ElasticLoadBalancing LBCookieStickinessPolicy Type (p. 601)
• ElasticLoadBalancing Listener Property Type (p. 602)
• ElasticLoadBalancing Policy Type (p. 603)
• IAM Policies (p. 606)
• IAM User LoginProfile (p. 606)
• AWS Lambda Function Code (p. 607)
• Name Type (p. 608)
• AWS OpsWorks AutoScalingThresholds Type (p. 609)
• AWS OpsWorks ChefConfiguration Type (p. 610)
• AWS OpsWorks Layer LifeCycleConfiguration (p. 610)
API Version 2010-05-15
544
AWS CloudFormation User Guide
AutoScaling Block Device Mapping
• AWS OpsWorks Layer LifeCycleConfiguration ShutdownEventConfiguration (p. 611)
• AWS OpsWorks LoadBasedAutoScaling Type (p. 611)
• AWS OpsWorks Recipes Type (p. 612)
• AWS OpsWorks Source Type (p. 613)
• AWS OpsWorks SslConfiguration Type (p. 614)
• AWS OpsWorks StackConfigurationManager Type (p. 615)
• AWS OpsWorks TimeBasedAutoScaling Type (p. 615)
• AWS OpsWorks VolumeConfiguration Type (p. 616)
• Amazon Redshift Parameter Type (p. 617)
• AWS CloudFormation Resource Tags Type (p. 618)
• Amazon RDS OptionGroup OptionConfigurations (p. 619)
• Amazon RDS OptionGroup OptionConfigurations OptionSettings (p. 620)
•
•
•
•
•
•
•
•
•
•
•
•
•
•
•
•
•
•
•
•
Amazon RDS Security Group Rule (p. 620)
Route 53 AliasTarget Property (p. 621)
Amazon Route 53 Record Set GeoLocation Property (p. 622)
Amazon Route 53 HealthCheckConfig (p. 623)
Amazon Route 53 HealthCheckTags (p. 625)
Amazon Route 53 HostedZoneConfig Property (p. 625)
Amazon Route 53 HostedZoneTags (p. 626)
Amazon Route 53 HostedZoneVPCs (p. 626)
Amazon S3 Cors Configuration (p. 627)
Amazon S3 Cors Configuration Rule (p. 627)
Amazon S3 Lifecycle Configuration (p. 628)
Amazon S3 Lifecycle Rule (p. 628)
Amazon S3 Lifecycle Rule NoncurrentVersionTransition (p. 630)
Amazon S3 Lifecycle Rule Transition (p. 631)
Amazon S3 Logging Configuration (p. 631)
Amazon S3 Notification Configuration (p. 632)
Amazon S3 Notification Topic Configurations (p. 632)
Amazon S3 Versioning Configuration (p. 633)
Amazon S3 Website Configuration Property (p. 633)
Amazon S3 Website Configuration Redirect All Requests To Property (p. 635)
• Amazon S3 Website Configuration Routing Rules Property (p. 635)
• Amazon S3 Website Configuration Routing Rules Redirect Rule Property (p. 636)
• Amazon S3 Website Configuration Routing Rules Routing Rule Condition Property (p. 637)
• Amazon SNS Subscription Property Type (p. 638)
• Amazon SQS RedrivePolicy (p. 638)
AWS CloudFormation AutoScaling Block Device
Mapping Property Type
The AutoScaling Block Device Mapping type is an embedded property of the
AWS::AutoScaling::LaunchConfiguration (p. 294) type.
API Version 2010-05-15
545
AWS CloudFormation User Guide
AutoScaling EBS Block Device
Syntax
{
"DeviceName (p. 546)" : String,
"Ebs (p. 546)" : AutoScaling EBS Block Device,
"NoDevice (p. 546)" : Boolean,
"VirtualName (p. 546)" : String
}
Properties
Note
For more information about the constraints and valid values of each property, see Ebs in the
Auto Scaling API Reference.
DeviceName
The name of the device within Amazon EC2.
Required: Yes
Type: String
Ebs
The Amazon Elastic Block Store volume information.
Required: Conditional You can specify either VirtualName or Ebs, but not both.
Type: AutoScaling EBS Block Device (p. 546).
NoDevice
Suppresses the device mapping. If NoDevice is set to true for the root device, the instance might
fail the Amazon EC2 health check. Auto Scaling launches a replacement instance if the instance fails
the health check.
Required: No
Type: Boolean
VirtualName
The name of the virtual device. The name must be in the form ephemeralX where X is a number
starting from zero (0), for example, ephemeral0.
Required: Conditional You can specify either VirtualName or Ebs, but not both.
Type: String
AWS CloudFormation AutoScaling EBS Block
Device Property Type
The AutoScaling EBS Block Device type is an embedded property of the AutoScaling Block Device
Mapping (p. 545) type.
API Version 2010-05-15
546
AWS CloudFormation User Guide
AutoScaling EBS Block Device
Syntax
{
"DeleteOnTermination (p. 547)" : Boolean,
"Iops (p. 547)" : Integer,
"SnapshotId (p. 547)" : String,
"VolumeSize (p. 547)" : Integer,
"VolumeType (p. 547)" : String
}
Properties
DeleteOnTermination
Indicates whether to delete the volume when the instance is terminated. By default, Auto Scaling
uses true.
Required: No
Type: Boolean
Iops
The number of I/O operations per second (IOPS) that the volume supports. The maximum ratio of
IOPS to volume size is 30.
Required: No
Type: Integer.
SnapshotId
The snapshot ID of the volume to use.
Required: Conditional If you specify both SnapshotId and VolumeSize, VolumeSize must be
equal or greater than the size of the snapshot.
Type: String
VolumeSize
The volume size, in Gibibytes (GiB). This can be a number from 1 – 1024. If the volume type is EBS
optimized, the minimum value is 10. For more information about specifying the volume type, see
EbsOptimized in AWS::AutoScaling::LaunchConfiguration (p. 294).
Required: Conditional If you specify both SnapshotId and VolumeSize, VolumeSize must be
equal or greater than the size of the snapshot.
Type: Integer.
Update requires: Some interruptions (p. 86)
VolumeType
The volume type. By default, Auto Scaling uses the standard volume type. For more information,
see Ebs in the Auto Scaling API Reference.
Required: No
Type: String
Examples
For AutoScaling EBS Block Device snippets, see Auto Scaling Launch Configuration Resource (p. 157).
API Version 2010-05-15
547
AWS CloudFormation User Guide
Auto Scaling MetricsCollection
Auto Scaling MetricsCollection
The MetricsCollection is a property of the AWS::AutoScaling::AutoScalingGroup (p. 288) resource
that describes the group metrics that an Auto Scaling group sends to CloudWatch. These metrics describe
the group rather than any of its instances. For more information, see EnableMetricsCollection in the Auto
Scaling API Reference.
Syntax
{
"Granularity (p. 548)" : String,
"Metrics (p. 548)" : [ String, ... ]
}
Properties
Granularity
The frequency at which Auto Scaling sends aggregated data to CloudWatch. For example, you can
specify 1Minute to send aggregated data to CloudWatch every minute.
Required: Yes
Type: String
Metrics
The list of metrics to collect. If you don't specify any metrics, all metrics are enabled.
Required: No
Type: List of strings
Auto Scaling NotificationConfigurations
The NotificationConfigurations property is an embedded property of the
AWS::AutoScaling::AutoScalingGroup (p. 288) resource that specifies the events for which the
Auto Scaling group sends notifications.
Syntax
{
"NotificationTypes (p. 548)" : [ String, ... ],
"TopicARN (p. 549)" : String
}
Properties
NotificationTypes
A list of event types that trigger a notification. Event types can include any of the following types:
autoscaling:EC2_INSTANCE_LAUNCH, autoscaling:EC2_INSTANCE_LAUNCH_ERROR,
autoscaling:EC2_INSTANCE_TERMINATE, autoscaling:EC2_INSTANCE_TERMINATE_ERROR,
and autoscaling:TEST_NOTIFICATION. For more information about event types, see
DescribeAutoScalingNotificationTypes in the Auto Scaling API Reference.
API Version 2010-05-15
548
AWS CloudFormation User Guide
Auto Scaling Tags
Required: Yes
Type: List of strings
TopicARN
The Amazon Resource Name (ARN) of the Amazon Simple Notification Service (SNS) topic.
Required: Yes
Type: String
Examples
For NotificationConfigurations snippets, see Auto Scaling Group with Notifications (p. 159).
Auto Scaling Tags Property Type
The Auto Scaling Tags property is an embedded property of the
AWS::AutoScaling::AutoScalingGroup (p. 288) type. For more information about tags, go to Tagging Auto
Scaling Groups and Amazon EC2 Instances in the Auto Scaling Developer Guide.
AWS CloudFormation adds the following tags to all Auto Scaling groups and associated instances:
• aws:cloudformation:stack-name
• aws:cloudformation:stack-id
• aws:cloudformation:logical-id
Syntax
{
"Key (p. 549)" : String,
"Value (p. 549)" : String,
"PropagateAtLaunch (p. 549)" : Boolean
}
Properties
Key
The key name of the tag.
Required: Yes
Type: String
Value
The value for the tag.
Required: Yes
Type: String
PropagateAtLaunch
Set to true if you want AWS CloudFormation to copy the tag to EC2 instances that are launched
as part of the auto scaling group. Set to false if you want the tag attached only to the auto scaling
group and not copied to any instances launched as part of the auto scaling group.
Required: Yes
Type: Boolean
API Version 2010-05-15
549
AWS CloudFormation User Guide
CloudFormation Stack Parameters
Example
The following example template snippet creates two Auto Scaling tags. The first tag, MyTag1, is attached
to an Auto Scaling group named WebServerGroup and is copied to any EC2 instances launched as part
of the Auto Scaling group. The second tag, MyTag2, is attached only to the Auto Scaling group named
WebServerGroup.
"WebServerGroup" : {
"Type" : "AWS::AutoScaling::AutoScalingGroup",
"Properties" : {
"AvailabilityZones" : { "Fn::GetAZs" : "" },
"LaunchConfigurationName" : { "Ref" : "LaunchConfig" },
"MinSize" : "1",
"MaxSize" : "2",
"LoadBalancerNames" : [ { "Ref" : "ElasticLoadBalancer" } ],
"Tags" : [ {
"Key" : "MyTag1",
"Value" : "Hello World 1",
"PropagateAtLaunch" : "true"
}, {
"Key" : "MyTag2",
"Value" : "Hello World 2",
"PropagateAtLaunch" : "false"
} ]
}
}
CloudFormation Stack Parameters Property Type
The Parameters type is an embedded property of the AWS::CloudFormation::Stack (p. 324) type.
The Parameters type contains a set of value pairs that represent the parameters that will be passed to
the template used to create an AWS::CloudFormation::Stack resource. Each parameter has a name
corresponding to a parameter defined in the embedded template and a value representing the value that
you want to set for the parameter. For example, the sample template EC2ChooseAMI.template contains
the following Parameters section:
"Parameters" : {
"InstanceType" : {
"Type" : "String",
"Default" : "m1.small",
"Description" : "EC2 instance type, e.g. m1.small, m1.large, etc."
},
"WebServerPort" : {
"Type" : "String",
"Default" : "80",
"Description" : "TCP/IP port of the web server"
},
"KeyName" : {
"Type" : "String",
"Description" : "Name of an existing EC2 KeyPair to enable SSH access to
the web server"
API Version 2010-05-15
550
AWS CloudFormation User Guide
CloudFront DistributionConfig
}
}
You could use the following template to embed a stack (myStackWithParams) using the
EC2ChooseAMI.template and use the Parameters property in the AWS::CloudFormation::Stack resource
to specify an InstanceType and KeyName:
{
"AWSTemplateFormatVersion" : "2010-09-09",
"Resources" : {
"myStackWithParams" : {
"Type" : "AWS::CloudFormation::Stack",
"Properties" : {
"TemplateURL" : "https://s3.amazonaws.com/cloudformation-templatesus-east-1/EC2ChooseAMI.template",
"Parameters" : {
"InstanceType" : "t1.micro",
"KeyName" : "mykey"
}
}
}
}
}
CloudFront DistributionConfig
DistributionConfig is a property of the AWS::CloudFront::Distribution (p. 330) property that describes which
Amazon CloudFront origin servers to get your files from when users request the files through your website
or application.
Syntax
{
"Aliases (p. 552)" : [ String, ... ],
"CacheBehaviors (p. 552)" : [ CacheBehavior, ... ],
"Comment (p. 552)" : String,
"CustomErrorResponses (p. 552)" : [ CustomErrorResponse, ... ],
"DefaultCacheBehavior (p. 552)" : DefaultCacheBehavior,
"DefaultRootObject (p. 552)" : String,
"Enabled (p. 552)" : Boolean,
"Logging (p. 552)" : Logging,
"Origins (p. 552)" : [ Origin, ... ],
"PriceClass (p. 553)" : String,
"Restrictions (p. 553)" : Restriction,
"ViewerCertificate (p. 553)" : ViewerCertificate
}
Properties
Note
For more information about the constraints and valid values of each property, see the elements
table in the DistributionConfig Complex Type topic in the Amazon CloudFront API Reference.
API Version 2010-05-15
551
AWS CloudFormation User Guide
CloudFront DistributionConfig
Aliases
CNAMEs (alternate domain names), if any, for the distribution.
Required: No
Type: List of strings
CacheBehaviors
A list of CacheBehavior types for the distribution.
Required: No
Type: List of CacheBehavior (p. 553)
Comment
Any comments that you want to include about the distribution.
Required: No
Type: String
CustomErrorResponses
Whether CloudFront replaces HTTP status codes in the 4xx and 5xx range with custom error
messages before returning the response to the viewer.
Required: No
Type List of CloudFront DistributionConfig CustomErrorResponse (p. 555)
DefaultCacheBehavior
The default cache behavior that is triggered if you do not specify the CacheBehavior property or if
files don't match any of the values of PathPattern in the CacheBehavior property.
Required: Yes
Type: DefaultCacheBehavior type (p. 556)
DefaultRootObject
The object (such as index.html) that you want CloudFront to request from your origin when the
root URL for your distribution (such as http://example.com/) is requested.
Note
Specifying a default root object avoids exposing the contents of your distribution.
Required: No
Type: String
Enabled
Controls whether the distribution is enabled to accept end user requests for content.
Required: Yes
Type: Boolean
Logging
Controls whether access logs are written for the distribution. To turn on access logs, specify this
property.
Required: No
Type: Logging (p. 557) type
Origins
A list of origins for this CloudFront distribution. For each origin, you can specify whether it is an
Amazon S3 or custom origin.
API Version 2010-05-15
552
AWS CloudFormation User Guide
CloudFront DistributionConfig CacheBehavior
Required: Yes
Type: List of Origins (p. 558).
PriceClass
The price class that corresponds with the maximum price that you want to pay for the CloudFront
service. For more information, see Choosing the Price Class in the Amazon CloudFront Developer
Guide.
Required: No
Type: String
Restrictions
Specifies restrictions on who or how viewers can access your content.
Required: No
Type: CloudFront DistributionConfiguration Restrictions (p. 560)
ViewerCertificate
The certificate to use when viewers use HTTPS to request objects.
Required: No
Type: CloudFront DistributionConfiguration ViewerCertificate (p. 561)
See Also
• DistributionConfig Complex Type in the Amazon CloudFront API Reference
CloudFront DistributionConfig CacheBehavior
CacheBehavior is a property of the DistributionConfig (p. 551) property that describes the Amazon
CloudFront cache behavior when the requested URL matches a pattern.
Syntax
{
"AllowedMethods (p. 554)" : [ String ],
"CachedMethods (p. 554)" : [ String ],
"ForwardedValues (p. 554)" : ForwardedValues,
"MinTTL (p. 554)" : String,
"PathPattern (p. 554)" : String,
"SmoothStreaming (p. 554)" : Boolean,
"TargetOriginId (p. 554)" : String,
"TrustedSigners (p. 554)" : [ String, ... ],
"ViewerProtocolPolicy (p. 555)" : String
}
Properties
Note
For more information about the constraints and valid values of each property, see the elements
table in the DistributionConfig Complex Type topic in the Amazon CloudFront API Reference.
API Version 2010-05-15
553
AWS CloudFormation User Guide
CloudFront DistributionConfig CacheBehavior
AllowedMethods
HTTP methods that CloudFront processes and forwards to your Amazon S3 bucket or your custom
origin. You can specify ["HEAD", "GET"], ["GET", "HEAD", "OPTIONS"], or ["DELETE",
"GET", "HEAD", "OPTIONS", "PATCH", "POST", "PUT"]. If you don't specify a value, AWS
CloudFormation specifies ["HEAD", "GET"].
Required: No
Type: List of strings
CachedMethods
HTTP methods for which CloudFront caches responses. You can specify ["HEAD", "GET"] or
["GET", "HEAD", "OPTIONS"]. If you don't specify a value, AWS CloudFormation specifies
["HEAD", "GET"].
Required: No
Type: List of strings
ForwardedValues
Specifies how CloudFront handles query strings or cookies.
Required: Yes
Type: ForwardedValues (p. 562) type
MinTTL
The minimum amount of time that you want objects to stay in the cache before CloudFront queries
your origin to see whether the object has been updated.
Required: No
Type: String
PathPattern
The pattern to which this cache behavior applies. For example, you can specify images/*.jpg.
When CloudFront receives an end-user request, CloudFront compares the requested path with path
patterns in the order in which cache behaviors are listed in the template.
Required: Yes
Type: String
SmoothStreaming
Indicates whether to use the origin that is associated with this cache behavior to distribute media
files in the Microsoft Smooth Streaming format. If you specify true, you can still use this cache
behavior to distribute other content if the content matches the PathPattern value.
Required: No
Type: Boolean
TargetOriginId
The ID value of the origin to which you want CloudFront to route requests when a request matches
the value of the PathPattern property.
Required: Yes
Type: String
TrustedSigners
A list of AWS accounts that can create signed URLs in order to access private content.
Required: No
API Version 2010-05-15
554
AWS CloudFormation User Guide
CloudFront DistributionConfig CustomErrorResponse
Type: List of strings
ViewerProtocolPolicy
The protocol that users can use to access the files in the origin that you specified in the
TargetOriginId property when a request matches the value of the PathPattern property.
Required: Yes
Type: String
CloudFront DistributionConfig
CustomErrorResponse
CustomErrorResponse is a property of the CloudFront DistributionConfig (p. 551) resource that defines
custom error messages for certain HTTP status codes.
Syntax
{
"ErrorCachingMinTTL (p. 555)" : Integer,
"ErrorCode (p. 555)" : Integer,
"ResponseCode (p. 555)" : Integer,
"ResponsePagePath (p. 556)" : String
}
Properties
Note
For more information about the constraints and valid values of each property, see the elements
table in the DistributionConfig Complex Type topic in the Amazon CloudFront API Reference.
ErrorCachingMinTTL
The minimum amount of time, in seconds, that Amazon CloudFront caches the HTTP status code
that you specified in the ErrorCode property. The default value is 300.
Required: No
Type: Integer
ErrorCode
An HTTP status code for which you want to specify a custom error page. You can specify 400, 403,
404, 405, 414, 500, 501, 502, 503, or 504.
Required: Yes
Type: Integer
ResponseCode
The HTTP status code that CloudFront returns to viewer along with the custom error page. You can
specify 200, 400, 403, 404, 405, 414, 500, 501, 502, 503, or 504.
Required: Conditional. Required if you specified the ResponsePagePath property.
Type: Integer
API Version 2010-05-15
555
AWS CloudFormation User Guide
CloudFront DefaultCacheBehavior
ResponsePagePath
The path to the custom error page that CloudFront returns to a viewer when your origin returns the
HTTP status code that you specified in the ErrorCode property. For example, you can specify
/404-errors/403-forbidden.html.
Required: Conditional. Required if you specified the ResponseCode property.
Type: String
CloudFront DefaultCacheBehavior
DefaultCacheBehavior is a property of the DistributionConfig (p. 551) property that describes the default
cache behavior for an Amazon CloudFront distribution.
Syntax
{
"AllowedMethods (p. 556)" : [ String, ... ],
"CachedMethods (p. 556)" : [ String, ... ],
"ForwardedValues (p. 556)" : ForwardedValues,
"MinTTL (p. 557)" : String,
"SmoothStreaming (p. 557)" : Boolean,
"TargetOriginId (p. 557)" : String,
"TrustedSigners (p. 557)" : [ String, ... ],
"ViewerProtocolPolicy (p. 557)" : String
}
Properties
Note
For more information about the constraints and valid values of each property, see the elements
table in the DistributionConfig Complex Type topic in the Amazon CloudFront API Reference.
AllowedMethods
HTTP methods that CloudFront processes and forwards to your Amazon S3 bucket or your custom
origin. You can specify ["HEAD", "GET"], ["GET", "HEAD", "OPTIONS"], or ["DELETE",
"GET", "HEAD", "OPTIONS", "PATCH", "POST", "PUT"]. If you don't specify a value, AWS
CloudFormation specifies ["HEAD", "GET"].
Required: No
Type: List of strings
CachedMethods
HTTP methods for which CloudFront caches responses. You can specify ["HEAD", "GET"] or
["GET", "HEAD", "OPTIONS"]. If you don't specify a value, AWS CloudFormation specifies
["HEAD", "GET"].
Required: No
Type: List of strings
ForwardedValues
Specifies how CloudFront handles query strings or cookies.
Required: Yes
Type: ForwardedValues (p. 562) type
API Version 2010-05-15
556
AWS CloudFormation User Guide
CloudFront Logging
MinTTL
The minimum amount of time that you want objects to stay in the cache before CloudFront queries
your origin to see whether the object has been updated.
Required: No
Type: String
SmoothStreaming
Indicates whether to use the origin that is associated with this cache behavior to distribute media
files in the Microsoft Smooth Streaming format.
Required: No
Type: Boolean
TargetOriginId
The value of ID for the origin that CloudFront routes requests to when the default cache behavior is
applied to a request.
Required: Yes
Type: String
TrustedSigners
A list of AWS accounts that can create signed URLs in order to access private content.
Required: No
Type: List of strings
ViewerProtocolPolicy
The protocol that users can use to access the files in the origin that you specified in the
TargetOriginId property when the default cache behavior is applied to a request.
Required: Yes
Type: String
CloudFront Logging
Logging is a property of the DistributionConfig (p. 551) property that enables Amazon CloudFront to
deliver access logs for each distribution to an Amazon Simple Storage Service (S3) bucket.
Syntax
{
"Bucket (p. 558)" : String,
"IncludeCookies (p. 558)" : Boolean,
"Prefix (p. 558)" : String
}
Properties
Note
For more information about the constraints and valid values of each property, see the elements
table in the DistributionConfig Complex Type topic in the Amazon CloudFront API Reference.
API Version 2010-05-15
557
AWS CloudFormation User Guide
CloudFront DistributionConfig Origin
Bucket
The Amazon S3 bucket address where access logs are stored, for example,
mybucket.s3.amazonaws.com.
Required: Yes
Type: String
IncludeCookies
Indicates whether CloudFront includes cookies in access logs.
Required: No
Type: Boolean
Prefix
A prefix for the access log file names for this distribution.
Required: No
Type: String
CloudFront DistributionConfig Origin
Origin is a property of the DistributionConfig (p. 551) property that describes an Amazon CloudFront
distribution origin.
Syntax
{
"CustomOriginConfig (p. 558)" : Custom Origin,
"DomainName (p. 558)" : String,
"Id (p. 559)" : String,
"OriginPath (p. 559)" : String,
"S3OriginConfig (p. 559)" : S3 Origin
}
Properties
Note
For more information about the constraints and valid values of each property, see the elements
table in the DistributionConfig Complex Type topic in the Amazon CloudFront API Reference.
CustomOriginConfig
Origin information to specify a custom origin.
Required: Conditional. You cannot use CustomOriginConfig and S3OriginConfig in the same
distribution, but you must specify one or the other.
Type: CustomOrigin (p. 559) type
DomainName
The DNS name of the Amazon Simple Storage Service (S3) bucket or the HTTP server from which
you want CloudFront to get objects for this origin.
Required: Yes
Type: String
API Version 2010-05-15
558
AWS CloudFormation User Guide
CloudFront DistributionConfig Origin CustomOrigin
Id
An identifier for the origin. The value of Id must be unique within the distribution.
Required: Yes
Type: String
OriginPath
The path that CloudFront uses to request content from an S3 bucket or custom origin.The combination
of the DomainName and OriginPath properties must resolve to a valid path. The value must start
with a slash mark (/) and cannot end with a slash mark.
Required: No
Type: String
S3OriginConfig
Origin information to specify an S3 origin.
Required: Conditional. You cannot use S3OriginConfig and CustomOriginConfig in the same
distribution, but you must specify one or the other.
Type: S3Origin (p. 560) type
CloudFront DistributionConfig Origin
CustomOrigin
CustomOrigin is a property of the Amazon CloudFront Origin (p. 558) property that describes an HTTP
server.
Syntax
{
"HTTPPort (p. 559)" : String,
"HTTPSPort (p. 559)" : String,
"OriginProtocolPolicy (p. 560)" : String
}
Properties
Note
For more information about the constraints and valid values of each property, see the elements
table in the DistributionConfig Complex Type topic in the Amazon CloudFront API Reference.
HTTPPort
The HTTP port the custom origin listens on.
Required: No
Type: String
HTTPSPort
The HTTPS port the custom origin listens on.
Required: No
Type: String
API Version 2010-05-15
559
AWS CloudFormation User Guide
CloudFront DistributionConfig Origin S3Origin
OriginProtocolPolicy
The origin protocol policy to apply to your origin.
Required: Yes
Type: String
CloudFront DistributionConfig Origin S3Origin
S3Origin is a property of the Origin (p. 558) property that describes the Amazon Simple Storage Service
(S3) origin to associate with an Amazon CloudFront origin.
Syntax
{
"OriginAccessIdentity (p. 560)" : String
}
Properties
Note
For more information about the constraints and valid values of each property, see the elements
table in the DistributionConfig Complex Type topic in the Amazon CloudFront API Reference.
OriginAccessIdentity
The CloudFront origin access identity to associate with the origin. This is used to configure the origin
so that end users can access objects in an Amazon S3 bucket through CloudFront only.
Required: No
Type: String
CloudFront DistributionConfiguration Restrictions
Restrictions is a property of the CloudFront DistributionConfig (p. 551) property that lets you limit which
viewers can access your content.
Syntax
{
"GeoRestriction (p. 560)" : GeoRestriction
}
Properties
Note
For more information about the constraints and valid values of each property, see the elements
table in the DistributionConfig Complex Type topic in the Amazon CloudFront API Reference.
GeoRestriction
The countries in which viewers are able to access your content.
API Version 2010-05-15
560
AWS CloudFormation User Guide
CloudFront DistributionConfig Restrictions
GeoRestriction
Required: Yes
Type: CloudFront DistributionConfig Restrictions GeoRestriction (p. 561)
CloudFront DistributionConfig Restrictions
GeoRestriction
GeoRestriction is a property of the CloudFront DistributionConfiguration Restrictions (p. 560) property
that describes the countries in which Amazon CloudFront allows viewers to access your content.
Syntax
{
"Locations (p. 561)" : [ String, ... ],
"RestrictionType (p. 561)" : String
}
Properties
Note
For more information about the constraints and valid values of each property, see the elements
table in the DistributionConfig Complex Type topic in the Amazon CloudFront API Reference.
Locations
The two-letter, uppercase country code for a country that you want to include in your blacklist or
whitelist.
Required: Conditional. Required if you specified blacklist or whitelist for the RestrictionType
property.
Type: List of strings
RestrictionType
The method to restrict distribution of your content:
blacklist
Prevents viewers in the countries that you specified from accessing your content.
whitelist
Allows viewers in the countries that you specified to access your content.
none
No distribution restrictions by country.
Required: Yes
Type: String
CloudFront DistributionConfiguration
ViewerCertificate
ViewerCertificate is a property of the CloudFront DistributionConfig (p. 551) property that specifies which
certificate to use when viewers use HTTPS to request objects.
API Version 2010-05-15
561
AWS CloudFormation User Guide
CloudFront ForwardedValues
Syntax
{
"CloudFrontDefaultCertificate (p. 562)" : Boolean,
"IamCertificateId (p. 562)" : String,
"MinimumProtocolVersion (p. 562)" : String,
"SslSupportMethod (p. 562)" : String
}
Properties
Note
For more information about the constraints and valid values of each property, see the elements
table in the DistributionConfig Complex Type topic in the Amazon CloudFront API Reference.
CloudFrontDefaultCertificate
Indicates whether to use the default certificate for your CloudFront domain name when viewers use
HTTPS to request your content.
Required: Conditional. You must specify either this property or IamCertificateId.
Type: Boolean
IamCertificateId
The IAM certificate ID to use if you're using an alternate domain name.
Required: Conditional.You must specify either this property or CloudFrontDefaultCertificate.
Type: String
MinimumProtocolVersion
The minimum version of the SSL protocol that you want CloudFront to use for HTTPS connections.
CloudFront serves your objects only to browsers or devices that support at least the SSL version
that you specify.
If you specify the IamCertificateId property and specify SNI only for the SslSupportMethod
property, you must use TLSv1 for the minimum protocol version. If you don't specify a value, AWS
CloudFormation specifies SSLv3.
Required: No.
Type: String
SslSupportMethod
Specifies how CloudFront serves HTTPS requests.
Required: Conditional. Required if you specified the IamCertificateId property.
Type: String
CloudFront ForwardedValues
ForwardedValues is a property of the DefaultCacheBehavior (p. 556) and CacheBehavior (p. 553)
properties that indicates whether Amazon CloudFront forwards query strings or cookies.
API Version 2010-05-15
562
AWS CloudFormation User Guide
CloudFront ForwardedValues Cookies
Syntax
{
"Cookies (p. 563)" : Cookies,
"Headers (p. 563)" : [ String, ... ],
"QueryString (p. 563)" : Boolean
}
Properties
Note
For more information about the constraints and valid values of each property, see the elements
table in the DistributionConfig Complex Type topic in the Amazon CloudFront API Reference.
Cookies
Forwards specified cookies to the origin of the cache behavior.
Required: No
Type: CloudFront ForwardedValues Cookies (p. 563)
Headers
Specifies the headers that you want Amazon CloudFront to forward to the origin for this cache behavior
(whitelisted headers). For the headers that you specify, Amazon CloudFront also caches separate
versions of a specified object that is based on the header values in viewer requests.
If you specify a single asterisk (["*"]), all headers are forwarded. If you don't specify a value, only
the default headers are forwarded.
Required: No
Type: List of strings
QueryString
Indicates whether you want CloudFront to forward query strings to the origin that is associated with
this cache behavior. If so, specify true; if not, specify false.
Required: Yes
Type: Boolean
CloudFront ForwardedValues Cookies
Cookies is a property of the CloudFront ForwardedValues (p. 562) that describes which cookies are
forwarded to the Amazon CloudFront origin.
Syntax
{
"Forward (p. 564)" : String,
"WhitelistedNames (p. 564)" : [ String, ... ]
}
API Version 2010-05-15
563
AWS CloudFormation User Guide
CloudWatch Metric Dimension
Properties
Note
For more information about the constraints and valid values of each property, see the elements
table in the DistributionConfig Complex Type topic in the Amazon CloudFront API Reference.
Forward
The cookies to forward to the origin of the cache behavior.You can specify none, all, or whitelist.
Required: Yes
Type: String
WhitelistedNames
The names of cookies to forward to the origin for the cache behavior.
Required: Conditional. Required if you specified whitelist for the Forward property.
Type: List of strings
CloudWatch Metric Dimension Property Type
The Metric Dimension is an embedded property of the AWS::CloudWatch::Alarm (p. 334) type. Dimensions
are arbitrary name/value pairs that can be associated with a CloudWatch metric. You can specify a
maximum of 10 dimensions for a given metric.
Syntax
{
"Name" : String,
"Value" : String
}
Properties
Name
The name of the dimension, from 1–255 characters in length.
Required: Yes
Type: String
Value
The value representing the dimension measurement, from 1–255 characters in length.
Required: Yes
Type: String
Examples
Two CloudWatch alarms with dimension values supplied by the Ref function
The Ref (p. 669) and Fn::GetAtt (p. 661) intrinsic functions are often used to supply values for CloudWatch
metric dimensions. Here is an example using the Ref function.
API Version 2010-05-15
564
AWS CloudFormation User Guide
CloudWatch Metric Dimension
"CPUAlarmHigh": {
"Type": "AWS::CloudWatch::Alarm",
"Properties": {
"AlarmDescription": "Scale-up if CPU is greater than 90% for 10 minutes",
"MetricName": "CPUUtilization",
"Namespace": "AWS/EC2",
"Statistic": "Average",
"Period": "300",
"EvaluationPeriods": "2",
"Threshold": "90",
"AlarmActions": [ { "Ref": "WebServerScaleUpPolicy" } ],
"Dimensions": [
{
"Name": "AutoScalingGroupName",
"Value": { "Ref": "WebServerGroup" }
}
],
"ComparisonOperator": "GreaterThanThreshold"
}
},
"CPUAlarmLow": {
"Type": "AWS::CloudWatch::Alarm",
"Properties": {
"AlarmDescription": "Scale-down if CPU is less than 70% for 10 minutes",
"MetricName": "CPUUtilization",
"Namespace": "AWS/EC2",
"Statistic": "Average",
"Period": "300",
"EvaluationPeriods": "2",
"Threshold": "70",
"AlarmActions": [ { "Ref": "WebServerScaleDownPolicy" } ],
"Dimensions": [
{
"Name": "AutoScalingGroupName",
"Value": { "Ref": "WebServerGroup" }
}
],
"ComparisonOperator": "LessThanThreshold"
}
}
See Also
• Dimension in the Amazon CloudWatch API Reference
• Amazon CloudWatch Metrics, Namespaces, and Dimensions Reference in the Amazon CloudWatch
Developer Guide
API Version 2010-05-15
565
AWS CloudFormation User Guide
CloudWatch Logs MetricFilter MetricTransformation
Property
CloudWatch Logs MetricFilter
MetricTransformation Property
MetricTransformation is a property of the AWS::Logs::MetricFilter (p. 469) resource that describes
how to transform log streams into a CloudWatch metric.
Syntax
{
"MetricName (p. 566)": String,
"MetricNamespace (p. 566)": String,
"MetricValue (p. 566)": String
}
Properties
Note
For more information about constraints and values for each property, see MetricTransformation
in the Amazon CloudWatch Logs API Reference.
MetricName
The name of the CloudWatch metric to which the log information will be published.
Required: Yes
Type: String
MetricNamespace
The destination namespace of the CloudWatch metric. Namespaces are containers for metrics. For
example, you can add related metrics in the same namespace.
Required: Yes
Type: String
MetricValue
The value that is published to the CloudWatch metric. For example, if you're counting the occurrences
of a particular term like Error, specify 1 for the metric value. If you're counting the number of bytes
transferred, reference the value that is in the log event by using $ followed by the name of the field
that you specified in the filter pattern, such as $size.
Required: Yes
Type: String
Examples
For samples of the MetricTransformation property, see AWS::Logs::MetricFilter (p. 469) or Amazon
CloudWatch Logs Template Snippets (p. 169).
AWS Data Pipeline Pipeline ParameterObjects
ParameterObjects is a property of the AWS::DataPipeline::Pipeline (p. 338) resource that describes
parameters that are used in a pipeline definition.
API Version 2010-05-15
566
AWS CloudFormation User Guide
AWS Data Pipeline Parameter Objects Attributes
Syntax
{
"Attributes (p. 567)" : [ Attribute, ... ],
"Id (p. 567)" : String
}
Properties
Attributes
Key-value pairs that define the attributes of the parameter object.
Required: Yes
Type: AWS Data Pipeline Parameter Objects Attributes (p. 567)
Id
The identifier of the parameter object.
Required: Yes
Type: String
AWS Data Pipeline Parameter Objects Attributes
Attribute is a property of the AWS Data Pipeline Pipeline ParameterObjects (p. 566) property that
defines the attributes of a parameter object as key-value pairs.
Syntax
{
"Key (p. 567)" : String,
"StringValue (p. 567)" : String
}
Properties
Key
Specifies the name of a parameter attribute. To view parameter attributes, see Creating a Pipeline
Using Parameterized Templates in the AWS Data Pipeline Developer Guide.
Required: Yes
Type: String
StringValue
A parameter attribute value.
Required: Conditional if the key that you are using requires it.
Type: String
API Version 2010-05-15
567
AWS CloudFormation User Guide
AWS Data Pipeline Pipeline ParameterValues
AWS Data Pipeline Pipeline ParameterValues
ParameterValues is a property of the AWS::DataPipeline::Pipeline (p. 338) resource that sets values
for parameters that are used in a pipeline definition.
Syntax
{
"Id (p. 568)" : String,
"StringValue (p. 568)" : String
}
Properties
Id
The ID of a parameter object.
Required: Yes
Type: String
StringValue
A value to associate with the parameter object.
Required: Yes
Type: String
AWS Data Pipeline PipelineObjects
PipelineObjects is a property of the AWS::DataPipeline::Pipeline (p. 338) resource that describes a
data pipeline object.
Syntax
{
"Fields (p. 568)" : [ Field type ],
"Id (p. 568)" : String,
"Name (p. 569)" : String
}
Properties
Fields
Key-value pairs that define the properties of the object.
Required: Yes
Type: AWS Data Pipeline Data Pipeline Object Fields (p. 569)
Id
Identifier of the object.
Required: Yes
API Version 2010-05-15
568
AWS CloudFormation User Guide
AWS Data Pipeline Data Pipeline Object Fields
Type: String
Name
Name of the object.
Required: Yes
Type: String
AWS Data Pipeline Data Pipeline Object Fields
Key-value pairs that describe the properties of a data pipeline object (p. 568).
Syntax
{
"Key (p. 569)" : String,
"RefValue (p. 569)" : String,
"StringValue (p. 569)" : String
}
Properties
Key
Specifies the name of a field for a particular object. To view fields for a data pipeline object, see
Pipeline Object Reference in the AWS Data Pipeline Developer Guide.
Required: Yes
Type: String
RefValue
A field value that you specify as an identifier of another object in the same pipeline definition.
Note
You can specify the field value as either a string value (StringValue) or a reference to
another object (RefValue), but not both.
Required: Conditional if the key that you are using requires it.
Type: String
StringValue
A field value that you specify as a string. To view valid values for a particular field, see Pipeline Object
Reference in the AWS Data Pipeline Developer Guide.
Note
You can specify the field value as either a string value (StringValue) or a reference to
another object (RefValue), but not both.
Required: Conditional if the key that you are using requires it.
Type: String
API Version 2010-05-15
569
AWS CloudFormation User Guide
AWS Data Pipeline Pipeline PipelineTags
AWS Data Pipeline Pipeline PipelineTags
PipelineTags is a property of the AWS::DataPipeline::Pipeline (p. 338) resource that defines arbitrary
key-value pairs for a pipeline.
Syntax
{
"Key (p. 570)" : String,
"Value (p. 570)" : String
}
Properties
Key
The key name of a tag.
Required: Yes
Type: String
Value
The value to associate with the key name.
Required: Yes
Type: String
DynamoDB Attribute Definitions
A list of attribute definitions for the AWS::DynamoDB::Table (p. 343) resource. Each element is composed
of an AttributeName and AttributeType.
Syntax
{
"AttributeName (p. 570)" : String,
"AttributeType (p. 570)" : String
}
Properties
AttributeName
The name of an attribute. Attribute names can be 1 – 255 characters long and have no character
restrictions.
Required: Yes
Type: String
AttributeType
The data type for the attribute. You can specify S for string data, N for numeric data, or B for binary
data.
Required: Yes
API Version 2010-05-15
570
AWS CloudFormation User Guide
DynamoDB Global Secondary Indexes
Type: String
Examples
For an example, see AWS::DynamoDB::Table (p. 343).
DynamoDB Global Secondary Indexes
Describes global secondary indexes for the AWS::DynamoDB::Table (p. 343) resource.
Syntax
{
"IndexName (p. 571)" : String,
"KeySchema (p. 571)" : [ KeySchema, ... ],
"Projection (p. 571)" : { Projection },
"ProvisionedThroughput (p. 571)" : { ProvisionedThroughput }
}
Properties
IndexName
The name of the global secondary index. The index name can be 3 – 255 characters long and have
no character restrictions.
Required: Yes
Type: String
KeySchema
The complete index key schema for the global secondary index, which consists of one or more pairs
of attribute names and key types.
Required: Yes
Type: DynamoDB Key Schema (p. 572)
Projection
Attributes that are copied (projected) from the source table into the index. These attributes are in
addition to the primary key attributes and index key attributes, which are automatically projected.
Required: Yes
Type: DynamoDB Projection Object (p. 573)
ProvisionedThroughput
The provisioned throughput settings for the index.
Required: Yes
Type: DynamoDB Provisioned Throughput (p. 574)
Examples
For an example of a declared global secondary index, see AWS::DynamoDB::Table (p. 343).
API Version 2010-05-15
571
AWS CloudFormation User Guide
DynamoDB Key Schema
DynamoDB Key Schema
Describes a primary key for the AWS::DynamoDB::Table (p. 343) resource or a key schema for an index.
Each element is composed of an AttributeName and KeyType.
For the primary key of an Amazon DynamoDB table that consists of only a hash attribute, specify one
element with a KeyType of HASH. For the primary key of an Amazon DynamoDB table that consists of a
hash and range attributes, specify two elements: one with a KeyType of HASH and one with a KeyType
of RANGE.
For a complete discussion of DynamoDB primary keys, see Primary Key in the Amazon DynamoDB
Developer Guide.
Syntax
{
"AttributeName (p. 572)" : String,
"KeyType (p. 572)" : "HASH or RANGE"
}
Properties
AttributeName
The attribute name that is used as the primary key for this table. Primary key element names can be
1 – 255 characters long and have no character restrictions.
Required: Yes
Type: String
KeyType
Represents the attribute data, consisting of the data type and the attribute value itself.You can specify
HASH or RANGE.
Required: Yes
Type: String
Examples
For an example of a declared key schema, see AWS::DynamoDB::Table (p. 343).
DynamoDB Local Secondary Indexes
Describes local secondary indexes for the AWS::DynamoDB::Table (p. 343) resource. Each index is scoped
to a given hash key value. Tables with one or more local secondary indexes are subject to an item
collection size limit, where the amount of data within a given item collection cannot exceed 10 GB.
Syntax
{
"IndexName (p. 573)" : String,
"KeySchema (p. 573)" : [ KeySchema, ...],
API Version 2010-05-15
572
AWS CloudFormation User Guide
DynamoDB Projection Object
"Projection (p. 573)" : { Projection }
}
Properties
IndexName
The name of the local secondary index. The index name can be 3 – 255 characters long and have
no character restrictions.
Required: Yes
Type: String
KeySchema
The complete index key schema for the local secondary index, which consists of one or more pairs
of attribute names and key types. For local secondary indexes, the hash key must be the same as
that of the source table.
Required: Yes
Type: DynamoDB Key Schema (p. 572)
Projection
Attributes that are copied (projected) from the source table into the index. These attributes are
additions to the primary key attributes and index key attributes, which are automatically projected.
Required: Yes
Type: DynamoDB Projection Object (p. 573)
Examples
For an example of a declared local secondary index, see AWS::DynamoDB::Table (p. 343).
DynamoDB Projection Object
Attributes that are copied (projected) from the source table into the index. These attributes are additions
to the primary key attributes and index key attributes, which are automatically projected.
Syntax
{
"NonKeyAttributes (p. 573)" : [ String, ... ],
"ProjectionType (p. 574)" : String
}
Properties
NonKeyAttributes
The non-key attribute names that are projected into the index.
For local secondary indexes, the total count of NonKeyAttributes summed across all of the local
secondary indexes must not exceed 20. If you project the same attribute into two different indexes,
this counts as two distinct attributes in determining the total.
API Version 2010-05-15
573
AWS CloudFormation User Guide
DynamoDB Provisioned Throughput
Required: No
Type: List of strings
ProjectionType
The set of attributes that are projected into the index:
KEYS_ONLY
Only the index and primary keys are projected into the index.
INCLUDE
Only the specified table attributes are projected into the index. The list of projected attributes
are in NonKeyAttributes.
ALL
All of the table attributes are projected into the index.
Required: No
Type: String
Examples
For an example, see AWS::DynamoDB::Table (p. 343).
DynamoDB Provisioned Throughput
Describes a set of provisioned throughput values for an AWS::DynamoDB::Table (p. 343) resource.
DynamoDB uses these capacity units to allocate sufficient resources to provide the requested throughput.
For a complete discussion of DynamoDB provisioned throughput values, see Specifying Read and Write
Requirements in the DynamoDB Developer Guide.
Syntax
{
"ReadCapacityUnits (p. 574)" : Number,
"WriteCapacityUnits (p. 574)" : Number
}
Parameters
ReadCapacityUnits
Sets the desired minimum number of consistent reads of items (up to 1KB in size) per second for
the specified table before Amazon DynamoDB balances the load.
Required: Yes
Type: Number
WriteCapacityUnits
Sets the desired minimum number of consistent writes of items (up to 1KB in size) per second for
the specified table before Amazon DynamoDB balances the load.
Required: Yes
Type: Number
API Version 2010-05-15
574
AWS CloudFormation User Guide
Amazon EC2 Block Device Mapping Property
Note
For detailed information about the limits of provisioned throughput values in DynamoDB, see
Limits in Amazon DynamoDB in the DynamoDB Developer Guide.
Examples
For an example of declared provisioned throughput values, see AWS::DynamoDB::Table (p. 343).
Amazon EC2 Block Device Mapping Property
The Amazon EC2 block device mapping property is an embedded property of the
AWS::EC2::Instance (p. 354) resource. For block device mappings for an Auto Scaling launch configuration,
see AutoScaling Block Device Mapping (p. 545).
Syntax
{
"DeviceName (p. 575)" : String,
"Ebs (p. 575)" : EC2 EBS Block Device,
"NoDevice (p. 575)" : {},
"VirtualName (p. 575)" : String
}
Properties
DeviceName
The name of the device within Amazon EC2.
Required: Yes
Type: String
Ebs
Required: Conditional You can specify either VirtualName or Ebs, but not both.
Type: Amazon Elastic Block Store Block Device Property (p. 576).
NoDevice
This property can be used to unmap a defined device.
Required: No
Type: an empty map: {}.
VirtualName
The name of the virtual device. The name must be in the form ephemeralX where X is a number
starting from zero (0); for example, ephemeral0.
Required: Conditional You can specify either VirtualName or Ebs, but not both.
Type: String
API Version 2010-05-15
575
AWS CloudFormation User Guide
Amazon Elastic Block Store Block Device Property
Examples
Block Device Mapping with two EBS Volumes
This example sets the EBS-backed root device (/dev/sda1) size to 50 GiB, and another EBS-backed
device mapped to /dev/sdm that is 100 GiB in size.
"BlockDeviceMappings" : [
{
"DeviceName" : "/dev/sda1",
"Ebs" : { "VolumeSize" : "50" }
},
{
"DeviceName" : "/dev/sdm",
"Ebs" : { "VolumeSize" : "100" }
}
]
Block Device Mapping with an Ephemeral Drive
This example maps an ephemeral drive to device /dev/sdc.
"BlockDeviceMappings" : [
{
"DeviceName" : "/dev/sdc",
"VirtualName" : "ephemeral0"
}
]
Unmapping an AMI-defined Device
To unmap a device defined in the AMI, set the NoDevice property to an empty map, as shown here:
{
"DeviceName":"/dev/sde",
"NoDevice": {}
}
See Also
• Amazon EC2 Instance Store in the Amazon Elastic Compute Cloud User Guide
Amazon Elastic Block Store Block Device Property
The Amazon Elastic Block Store block device type is an embedded property of the Amazon EC2 Block
Device Mapping Property (p. 575) property.
API Version 2010-05-15
576
AWS CloudFormation User Guide
Amazon Elastic Block Store Block Device Property
Syntax
{
"DeleteOnTermination (p. 577)" : Boolean,
"Encrypted (p. 577)" : Boolean,
"Iops (p. 577)" : Number,
"SnapshotId (p. 577)" : String,
"VolumeSize (p. 577)" : String,
"VolumeType (p. 578)" : String
}
Properties
DeleteOnTermination
Determines whether to delete the volume on instance termination. The default value is true.
Required: No
Type: Boolean
Encrypted
Indicates whether the volume is encrypted. Encrypted Amazon EBS volumes can only be attached
to instance types that support Amazon EBS encryption. Volumes that are created from encrypted
snapshots are automatically encrypted.You cannot create an encrypted volume from an unencrypted
snapshot or vice versa. If your AMI uses encrypted volumes, you can only launch the AMI on supported
instance types. For more information, see Amazon EBS encryption in the Amazon EC2 User Guide
for Linux Instances.
Required: No
Type: Boolean
Iops
The number of I/O operations per second (IOPS) that the volume supports. This can be an integer
from 100 – 2000.
Required: Conditional Required when the volume type (p. 578) is io1; not used with other volume
types.
Type: Number
SnapshotId
The snapshot ID of the volume to use to create a block device.
Required: Conditional If you specify both SnapshotId and VolumeSize, VolumeSize must be
equal or greater than the size of the snapshot.
Type: String
VolumeSize
The volume size, in gibibytes (GiB). This can be a number from 1 – 1024. If the volume type is io1,
the minimum value is 10.
Required: Conditional If you specify both SnapshotId and VolumeSize, VolumeSize must be
equal or greater than the size of the snapshot.
Type: String
Update requires: Some interruptions (p. 86)
API Version 2010-05-15
577
AWS CloudFormation User Guide
EC2 ICMP
VolumeType
The volume type. You can specify standard, io1, or gp2. If you set the type to io1, you must also
set the Iops property. For more information about these values and the default value, see
CreateVolume in the Amazon EC2 API Reference.
Required: No
Type: String
Example
{
"DeviceName":"/dev/sdc",
"Ebs":{
"SnapshotId":"snap-xxxxxx",
"VolumeSize":"50",
"VolumeType":"io1",
"Iops":"1000",
"DeleteOnTermination":"false"
}
}
See Also
• CreateVolume in the Amazon Elastic Compute Cloud API Reference
EC2 ICMP Property Type
The EC2 ICMP property is an embedded property of the AWS::EC2::NetworkAclEntry (p. 364) type.
The following properties are available with the EC2 ICMP type.
Property
Type
Required
Notes
Code
Integer
Condition- The Internet Control Message Protocol (ICMP) code.
al
You can use -1 to specify all ICMP codes for the given
ICMP type.
Condition: Required if specifying 1 (ICMP) for the CreateNetworkAclEntry protocol parameter.
Type
Integer
Condition- The Internet Control Message Protocol (ICMP) type.
al
You can use -1 to specify all ICMP types.
Condition: Required if specifying 1 (ICMP) for the CreateNetworkAclEntry protocol parameter.
EC2 MountPoint Property Type
The EC2 MountPoint property is an embedded property of the AWS::EC2::Instance (p. 354) type.
API Version 2010-05-15
578
AWS CloudFormation User Guide
EC2 MountPoint
Syntax
{
"Device (p. 579)" : String,
"VolumeId (p. 579)" : String
}
Properties
Device
How the device is exposed to the instance (such as /dev/sdh, or xvdh).
Required: Yes
Type: String
VolumeId
The ID of the Amazon EBS volume. The volume and instance must be within the same Availability
Zone and the instance must be running.
Required: Yes
Type: String
Example
This mount point (specified in the Volumes property in the EC2 instance) refers to a named EBS volume,
"NewVolume".
"Ec2Instance" : {
"Type" : "AWS::EC2::Instance",
"Properties" : {
"AvailabilityZone" : {
"Fn::FindInMap" : [ "RegionMap", { "Ref" : "AWS::Region" }, "TestAz"
]
},
"SecurityGroups" : [ { "Ref" : "InstanceSecurityGroup" } ],
"KeyName" : { "Ref" : "KeyName" },
"ImageId" : {
"Fn::FindInMap" : [ "RegionMap", { "Ref" : "AWS::Region" }, "AMI" ]
},
"Volumes" : [
{ "VolumeId" : { "Ref" : "NewVolume" }, "Device" : "/dev/sdk" }
]
}
},
"NewVolume" : {
"Type" : "AWS::EC2::Volume",
"Properties" : {
"Size" : "100",
"AvailabilityZone" : {
"Fn::FindInMap" : [ "RegionMap", { "Ref" : "AWS::Region" }, "TestAz"
]
}
API Version 2010-05-15
579
AWS CloudFormation User Guide
EC2 Network Interface
}
}
See Also
• AWS::EC2::Instance (p. 354)
• AWS::EC2::Volume (p. 390)
EC2 NetworkInterface Embedded Property Type
The EC2 Network Interface type is an embedded property of the AWS::EC2::Instance (p. 354) type. It
specifies a network interface that is to be attached.
Syntax
{
"AssociatePublicIpAddress (p. 580)" : Boolean,
"DeleteOnTermination (p. 580)" : Boolean,
"Description (p. 580)" : String,
"DeviceIndex (p. 581)" : String,
"GroupSet (p. 581)" : [ String, ... ],
"NetworkInterfaceId (p. 581)" : String,
"PrivateIpAddress (p. 581)" : String,
"PrivateIpAddresses (p. 581)" : [ Priv