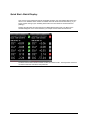
1
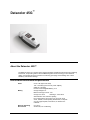
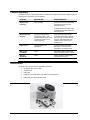
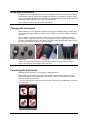
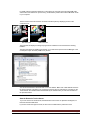
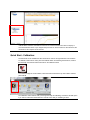
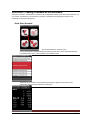
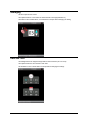
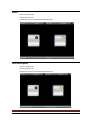
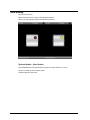
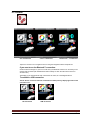
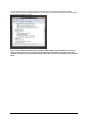
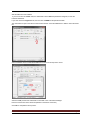
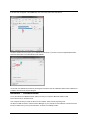
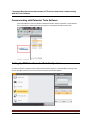
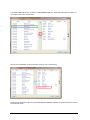
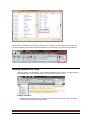
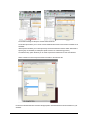
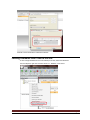
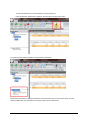
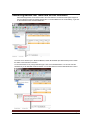
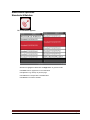
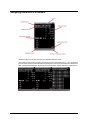
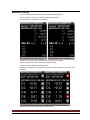
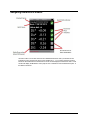
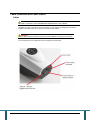
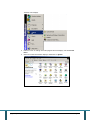
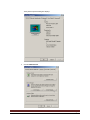
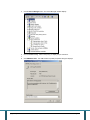
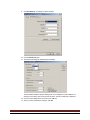
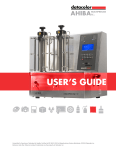
Datacolor 45G™ User’s Guide Datacolor 45G User’s Guide (December, 2011) All efforts have been made to ensure the accuracy of the information presented in this format. However, should any errors be detected, Datacolor appreciates your efforts to notify us of these oversights. Changes are periodically made to this information and are incorporated into forthcoming versions. Datacolor reserves the right to make improvements and/or changes in the product(s) and/or program(s) described in this material at any time. Copyright © 2011 Datacolor. ALL RIGHTS RESERVED. This material may not be reproduced or duplicated, in whole or in part, without the express written permission of Datacolor. Microsoft Windows® are registered trademarks of Microsoft Corporation. All other registered trademarks are the property of their respective owners. To obtain information on local agents, contact either of the offices listed below, or visit our website at www.datacolor.com. Americas (Lawrenceville, NJ) Telephone: Fax: 1 (609) 924 2189 / 1 (800) 982 6496 1 (609) 895 7472 Switzerland (Dietlikon) Telephone: Fax: +(41) 1 835 3711 +(41) 1 835 3820 Asia (Hong Kong) Telephone: Fax: +(852) 2420 8283 +(852) 2420 8320 Manufactured At: Datacolor Technology (Suzhou) Co. No. 288 Shengpu Road Suzhou Industrial Park Export Processing Zone B, Suzhou, Jiangsu, P.R. China 215021 This product has been tested to the requirements of CAN/CSA-C22.2 No. 61010-1, second edition, including Amendment 1, or a later version of the same standard incorporating the same level of testing requirements. Datacolor 45G User Guide Page 2 Contents Datacolor 45G™ ______________________________________________________________ 3 About the Datacolor 45G™ __________________________________________________________ 3 Electrical/Environmental Requirements _______________________________________________ 3 Safety Warnings __________________________________________________________________ 4 Feature Summary _________________________________________________________________ 5 Accessories ______________________________________________________________________ 5 Calibration Tiles __________________________________________________________________ 5 Calibration Tiles __________________________________________________________________ 6 Quick Start Instructions ____________________________________________________________ 7 Charging the Instrument: ___________________________________________________________ 7 Connecting the Instrument: _________________________________________________________ 7 Quick Start - Calibration: __________________________________________________________ 11 Quick Start - Creating a Standard on the Instrument:____________________________________ 12 Quick Start –Batch Display: ________________________________________________________ 13 Main Menu ________________________________________________________________ 14 Navigation: _____________________________________________________________________ 14 Calibration: _____________________________________________________________________ 14 Settings: _______________________________________________________________________ 16 Averaging ______________________________________________________________________ 17 Date and Time ___________________________________________________________________ 17 Gloss __________________________________________________________________________ 18 Text Description _________________________________________________________________ 18 Auto Naming ____________________________________________________________________ 19 PC Access: ______________________________________________________________________ 20 Bluetooth™ Communication: _______________________________________________________ 23 Communicating with Datacolor Tools Software:________________________________________ 24 Setting Up TOOLS software for Portable Operation: ____________________________________ 24 Creating Standards in Tools _______________________________________________________ 26 Loading Standards from Tools to the 45G ____________________________________________ 28 Transferring Batches into Tools from the 45G Instrument _______________________________ 30 Measuring Batches directly into the Tools Desktop ____________________________________ 31 Stand-Alone Operation ___________________________________________________________ 32 Standards & Batches: ____________________________________________________________ 32 Navigating tolerances in a standard _________________________________________________ 33 Standard Cloning ________________________________________________________________ 34 Navigating tolerances in a Batch ___________________________________________________ 35 Cable Installation and Power Switch ________________________________________________ 37 Maintenance ___________________________________________________________________ 45 Tile Handling and Cleaning ________________________________________________________ 45 Appendix _________________________________________________________________ 46 Instrument Specifications _________________________________________________________ 47 Index ____________________________________________________________________ 51 Datacolor 45G User Guide Page 2 Datacolor 45G™ About the Datacolor 45G™ The Datacolor 45G™ is a member of the newest generation of Datacolor hand-held color measuring instruments, incorporating state-of-the-art CMOS integrated circuit technology in the instrument design. It is intended for use as a device for measuring, specifying and evaluating color in both laboratory and industrial settings. Electrical/Environmental Requirements Power Battery Absolute Operating Environment 5Vdc, 3.2A (input to the 45G) 100 – 240 VAC( input to the AC power adapter) 50/60 Hz, 0.6A Input Lithium Ion Rechargeable Battery, 3.7V Charge Voltage 4.2V Maximum Charge Current: 1.5A Charge: 0<T<50°C Discharge : -20<T<60°C Store between 40% and 50% capacity; Do not store above 140°F (60°C). Do not crush, short circuit, mutilate, reverse polarity, disassemble, or dispose of in fire; might explode, cause burns, or release toxic materials. 5º to 40º C 20-85% RH, non-condensing Indoor Use Altitude up to 2,000 meters Safety Warnings If the equipment is used in a manner not specified by the manufacturer, the protection provided by the equipment may be impaired. Battery: Do not store above 60°C (140°F), crush, short circuit, mutilate, reverse polarity, disassemble, or dispose of in fire; might explode, cause burns, or release toxic materials. CAUTION There are no user-serviceable parts for this equipment. For battery replacement: Unit must be returned to factory or an authorized Datacolor Service Center. Light Source Do not stare directly into the open port located in the bottom of the instrument when the measurement is in progress. Staring directly into the light source can result in eye discomfort similar to that of staring at a camera flash. Power CAUTION Disconnect power before servicing. The power supply supplied with the unit must be used. Datacolor 45G User Guide Page 4 Feature Summary The Datacolor 45G™ employs state-of-the-art features including the spectrometer, light source, and optics. Below is a summary of those features: FEATURE DESCRIPTION PURPOSE/BENEFIT Measurement Geometry 45/0º geometry Provides accurate and repeatable measurement of smooth and textured surfaces Includes a built-in 60º gloss meter for simultaneous measurement of Gloss and Color SP2000 Spectral Analyzer Proprietary dual-channel holographic grating. 256photodiode linear arrays used for both the reference and sample channels. Dual channel design provides continuous monitoring of sample illumination and compensates for changes. 256-photodiode array enhances the precision of the measurement. Light source Total Bandwidth LED Illumination Provides consistent full width illumination for accurate and repeatable color measurement Wavelength Resolution 10 nm Reflectance data is measured at 2.5nm intervals from 400 – 700nm. Effective Bandwidth 10nm Greater precision enhances the measurement accuracy. Accessories All models come with the following standard accessories: AC Adaptor with power cable Targeting foot USB cable Calibration stand with Black Trap, White Tile and Gloss Tile USB Flash Drive with Calibration Data Calibration Tiles A black trap, white tile and Gloss tile are provided in the calibration tray of the Datacolor 45G. The black trap ,white tile and gloss tile are used each time the instrument is calibrated. Datacolor 45G User Guide Page 6 Quick Start Instructions The Datacolor 45G Portable Spectrophotometer is bundled with Datacolor Tools software. Datacolor Tools software is used to configure the Standards and Tolerances you will want to use with the 45G. So it is very important that Datacolor Tools software is installed and operating first. Please consult the Quick Start Guide for Datacolor Tools in the Tools software case. More complete instructions are included later in this Guide. Charging the Instrument: Please make sure that your Datacolor 45G instrument is fully charged before using. The instrument does not charge through the USB connection, so it is necessary to use the AC Adaptor to charge the instrument. Each AC Adaptor comes with a collection of plugs for connecting to power supplies in different regions. Select the appropriate plug for your region and place it into the charger head by sliding the lock open and snapping the plug in place. Make sure that the lock slides firmly back in place and that the plug is secure before plugging into your Power Outlet. Global Plugs Sliding Lock Lock in Place ! NOTE: The Power Switch at the back of the instrument must be in the ON position to accept a charge. The instrument will not charge when turned OFF. Connecting the Instrument: The Datacolor 45G connects to your computer via USB or Bluetooth. ! NOTE: Before you connect the instrument for the first time, please install the Datacolor Tools software provided with the instrument. When fully installed, close the Tools software for the initial Driver connection to the instrument. To connect the instrument, connect the instrument to the computer via the USB cable and press the PC Access button For USB, make sure that the instrument is connected to the computer via the provided USB cable and that the Tools software is up and running. For Bluetooth, please make sure that Bluetooth is ON in your computer. The PC Access screen will show the connection has taken place by displaying arrows on the connection icon. Not Connected USB Connected The Computer will display a message saying that new hardware is found and the driver is being installed. The 45G uses Serial over USB communication, so you will need to open the Device Manager in the Control panel. Open the Ports (COM & LPT) section: You will see the Datacolor 45G listed with a Com Port address. Make note of that address and close the device manager. This step is only necessary for the first time an instrument is connected To the Tools software. This address will be remembered by the software after you enter the information in the procedure below. Start the Datacolor Tools software. If you have chosen the Textile mode, the default User name is DCI. No password is assigned, so leave the Password field blank. If you have chosen the Pigment mode, the user name is USER and the password is CC3. Datacolor 45G User Guide Page 8 The next window to open is the Driver’s measurement window. Press the ADD button to add the 45G to the Driver list: Select CURRENT DATACOLOR INSTRUMENTS and 45G from the drop down menus: Select the COM port that was noted earlier in the PORT menu of the Device Manager. Enter the serial number of the instrument (labeled on the bottom of the 45G.) Click ADD to complete the driver process. If the 45G does not appear in the NAME field, click on the drop-down menu and select it: The Driver window will now prompt you to calibrate the instrument. If you wish to use the integrated Gloss Meter, Press the radio button next to GLOSS and click calibrate: You should now calibrate the instrument, following the instructions from the Calibration Wizard. When calibration is complete, the main Tools program will open. When connected, the device will appear as a remote drive in the explorer panel on the left-hand side of the Tools Screen. The standards will appear as folders in that drive. Batches will be in the folders. (see RED box in image below.) Datacolor 45G User Guide Page 10 ! NOTE: While connected, the Datacolor 45G acts as a dumb instrument and does not display or store measurement results. If you navigate away from the PC Access window on the instrument, the connection to the computer will be severed. Quick Start - Calibration: The instrument can be calibrated in either stand-alone mode or through Datacolor Tools software. To calibrate in stand-alone mode, press the Calibrate button and following the directions, measure the black trap, the white tile and the black tile on the calibration stand. To measure through the Tools software, select the Instrument tab in the top menu ribbon and then press CALIB: The calibration wizard will then walk you through the steps for calibrating. Choose the GLOSS option if you want to make Gloss measurements. This will ensure that you calibrate got Gloss. Quick Start - Creating a Standard on the Instrument: Although the Datacolor Tools Software is intended to be the Standards Creation center for the 45G instrument, you can create a new standard on the instrument by selecting a standard with the appropriate tolerances and measuring new standard data against it. Quick Start-Standard: First, Select Standard on the main screen Then scroll though the available standards by pressing the left arrow. (Three default standards are pre-loaded from the factory.) The Standard in the red field is active. Tolerances can be viewed on each standard by pressing the up/down arrows. Each screen represents a particular tolerance/illuminant combination. Datacolor 45G User Guide Page 12 Quick Start –Batch Display: Once you find a set of tolerances that are acceptable, measure your new standard with that screen active. A new Standard will be created. The default name will contain the time date stamp. ( If you require custom naming of your standard, please refer to the User Guide CD enclosed with this package.) Pressing the OK button will put the instrument in Batch Measurement mode. The Name of the standard will appear on the screen. Measure your sample and the results will look like this: The Green Check marks indicate a PASS. The Red X’s indicate a FAIL. The Gray Boxes mean that no tolerance has been selected for that parameter. Main Menu Navigation: Tap Desired Icon to access function or navigate using 5-way button (up, down, left, right and OK) OK selects highlighted function Left button backs out to previous window. Calibration: ! Important NOTE: The Calibration Tray provided with the Datacolor 45G can accommodate the instrument with the target foot attached or detached. However, to ensure repeatability in calibration, two anchoring plates is provided to hold the instrument firming in place when the targeting foot is not attached, one on the Black/White color calibration side and one on the Black Gloss tile side. If you need to measure with the Targeting Foot, be sure to remove the anchoring plates first. These can be stored inside the Calibration stand where they can be snapped into an internal holder. Datacolor 45G User Guide Page 14 Place the Instrument into the Calibration tray with the measuring aperture over the Black Trap hole Measure the Black Trap and wait for the Green Light before moving the instrument When the White Tile Light is Blue, measure and wait for the green light . Then read the Black Gloss Tile on the opposite side of the Calibration stand. The Black Tile will show in this screen only when GLOSS is active. (GLOSS can be turned ON or OFF in the Settings Menu.) After the Black Gloss Tile is measured, the screen will show GREEN lights on all calibration functions. Click OK to accept the calibration and return to the main Menu. Note: Hit the Left Button to escape without calibrating. Settings: The Settings menu shows Five options. Tap the desired option, or scroll up and down through the options using the up/down buttons, then hit OK. The Active Option is highlighted in Red. Datacolor 45G User Guide Page 16 Averaging Hit OK to Open function screen Use up/down buttons to set number of measurements to average (Default is 01) OK button to return to Main Menu, or hit left button to escape without changing the setting Date and Time Use left/right buttons to navigate through fields for Time and Date. (24 hour clock) Use up/down buttons to set numbers in each field Hit OK Button to save or hit left button to escape without changing the settings Gloss Hit OK to change status Red is Off. Green is On Hit left button to save and escape back to Settings menu Text Description Hit OK to change status Red is Off. Green is On. Hit left button to save and escape back to Settings menu. Datacolor 45G User Guide Page 18 Auto Naming Hit OK to change status Red is Off (allows custom naming of standards and batches) Green is On (automatically assigns time/date stamp as name) System Update – (New Feature) Insert USB Flash Drive with New Firmware upgrade and follow directions on screen Hit OK to complete Firmware System update Firmware application will restart. PC Access: No connection USB Connected Bluetooth™ Connected Tap the PC Access icon or navigate to the icon using the navigation buttons and press OK. If you want to use the Bluetooth™ connection: Check the device manager on your PC to make sure your Bluetooth receiver is on and that you can see the 45G connection (the 45G Bluetooth radio is always on when the instrument is in the PC Access mode.) The display on the 45G will show when connections are active, as in the diagrams above. To establish a USB connection: The PC Access screen will show the connection has taken place by displaying arrows on the connection icon. Not Connected Datacolor 45G User Guide USB Connected Page 20 The Computer will display a message saying that new hardware is found and the driver is being installed. The 45G uses Serial over USB communication, so you will need to open the Device Manager in the Control panel. Open the Ports (COM & LPT) section: You will see the Datacolor 45G listed with a Com Port address. Make note of that address and close the device manager. This step is only necessary for the first time an instrument is connected To the Tools software. This address will be remembered by the software after you enter the information in the procedure below. Start the Datacolor Tools software. If you have chosen the Textile mode, the default User name is DCI. No password is assigned, so leave the Password field blank. If you have chosen the Pigment mode, the user name is USER and the password is CC3. The next window to open is the Driver’s measurement window. Press the ADD button to add the 45G to the Driver list: Select CURRENT DATACOLOR INSTRUMENTS and 45G from the drop down menus: Select the COM port that was noted earlier in the PORT menu of the Device Manager. Enter the serial number of the instrument (labeled on the bottom of the 45G.) Click ADD to complete the driver process. Datacolor 45G User Guide Page 22 If the 45G does not appear in the NAME field, click on the drop-down menu and select it: The Driver window will now prompt you to calibrate the instrument. If you wish to use the integrated Gloss Meter, Press the radio button next to GLOSS and click calibrate: You should now calibrate the instrument, following the instructions from the Calibration Wizard. When calibration is complete, the main Tools program will open. Bluetooth™ Communication: To use the instrument in Bluetooth mode, make sure that your computer’s Bluetooth adaptor is ON. Put the device into PC ACCESS mode. Your computer will ask you to pair the device to the computer. Enter 1234 as the pairing code. As above for USB connection, check the Device Manager on your computer for the COM Port connection and use that port number when you set up the instrument, as above in the USB procedure. ! Important Note:Instrument must remain in PC Access mode when communicating with the Tools Software. Communicating with Datacolor Tools Software: Consult the Datacolor Tools User Guide for detailed information about the operation of Tools Software. Once connected, the 45G instrument shows up in the Tools explorer Window as a flash drive: Setting Up TOOLS software for Portable Operation: To make the transfer of standards easier, please add the following functions to the Home Bar by Clicking on the Circle in the Upper Left-hand corner of the screen and clicking on Home Bar Options: Datacolor 45G User Guide Page 24 In the EDIT HOME BAR screen, scroll down to INSTRUMENT SEND ALL STDS and hit the right arrow button to move this function over to the Active list: Click OK on the Add Button screen and function will move over to the Active list: Scroll down the left-hand list again and select INSTRUMENT REMOTE, repeating the process. Click OK to exit the Home Bar Edit screen: Those Functions now appear in the Home Bar, enabling you to send all of your standards to the instrument with one click and allowing you to use the measurement buttons on the instrument to enter data into Tools software: Creating Standards in Tools To activate the 45G in Tools Software , Go to the Remote Measure button in the Top Tool Bar and select “Measure Standard.” Hit the measure button on the 45G and then enter the name Creating Tolerances Highlight the new standard in the Tools Explorer window on the left-hand side of the screen. Rightclick and select the Standard Tolerance option. Datacolor 45G User Guide Page 26 The Tolerance Dialog box will open and offer three tolerances: The Global option allows you to choose a set of Global tolerances that can be used as a default for all standards. Shared options will allow you to select previously constructed tolerances that are either shared with a specific group of standards (for example a specific customer or manufacturing process.) The Standard Only option will allow you to create a special set of tolerances for this new standard. Select a tolerance from the Drop Down Menu and add it to the tolerance list: Uncheck the All Illuminants box and select the appropriate Illuminant/Observers and Parameters for your standard: Click OK to close the tolerance maintenance Window. Loading Standards from Tools to the 45G To send a single standard from the Tools desktop to the 45G, Select the standard in the Tools Explorer, right click and select Send Curr. Standard to the Device. Datacolor 45G User Guide Page 28 To send all standards from the Tools desktop to the 45G instrument, Press the Send ALL STDS button installed on the Home bar at the top of the screen: The Instrument Drive will then display the newly transferred standards: Disconnect the Instrument by hitting the left button on the instrument to get out of PC Access mode, and then detach the USB cable. The instrument is now ready for stand- alone measurement. Transferring Batches into Tools from the 45G Instrument After measuring batches, reconnect the 45G to the Tools software. The instrument will again reappear in the Tools Explorer window as a Mass Storage Drive. To send all Batches to the Tools Desktop , right-click on the Instrument name and select SEND ALL: The same menu will allow you to Delete All Batches, Delete All Standards (and their batches) and to refresh the status of the instrument connection. To send the batches of only a single standard, right –click on the Standard Name. You can then send the Standard only or the Standard and all its batches. You can also delete the Current Standard from this menu: Datacolor 45G User Guide Page 30 Measuring Batches directly into the Tools Desktop The 45G can measure batches directly into the Tools Desktop. You must first go to the Remote Measure button and select BATCH REMOTE: Then enable Remote measurement by pressing the REMOTE Button: In this mode, the 45G acts like a desktop instrument and does not store or display data. ! Important Note: Instrument must remain in PC Access mode when communicating with the Tools Software. Stand-Alone Operation Standards & Batches: List of standards appears: Selection is highlighted in Red Field. Use Right button to go down the list Use Down button to page down for more standards Use Up button to go back up to previous page Use Left button to escape back to the Main Menu Use OK Button to select a standard Datacolor 45G User Guide Page 32 Navigating tolerances in a standard Use down button to view other tolerances and Standard Reflectance data The bottom bar will indicate how many windows are active for the standard. E.G., “1 of 4” means that there are three tolerances associated with the standard and a fourth window displays the Reflectance data. Clicking the DOWN button will access the other tolerances and the Reflectance values Screen: Standard Cloning Create a new standard on the instrument by cloning an existing standard Choose a tolerance on the instrument with the desirable tolerances. (Tolerances are not editable on the instrument) Measure the new target while in standard mode to create a new standard. The new standard uses the tolerances of the original standard To Measure a batch against the Standard, hit OK Measure a new batch by pressing either of the black measurement buttons on the sides of the instrument. The Green Checks mean PASS. The Red Xs mean FAIL. Datacolor 45G User Guide Page 34 Navigating tolerances in a Batch Use down button to view other tolerances and Standard Reflectance data ( The bottom bar will indicate how many windows are active for the standard. E.G., “1 of 4” means that there are three tolerances associated with the standard and a fourth window displays the Reflectance data. A fifth window will display the Metameric Index (CIE) for each combination of Illuminant/observer pairs in the Batch’s tolerances. NOTES Datacolor 45G User Guide Page 36 Cable Installation and Power Switch Cables WARNING BE SURE TO TURN OFF THE POWER BEFORE WORKING WITH ANY CABLES. The Datacolor 45G™ requires the use of two cables, a power cable for recharging the instrument’s batteries, and a USB cable, to connect the instrument to the computer. WARNING Refer to "Electrical/Environmental Requirements section before connecting your instrument. The connections for these cables are found on the back of the instrument. [Type text] Page 37 Power Supply A power supply, with multiple region connectors is provided with the instrument. Power is supplied to the back of the unit via an ac adaptor jack. WARNING The power cord supplied with the unit must be used. No other cords are acceptable. Power Switch The power switch is located on the rear panel of the instrument. !Note: The power switch must be in the “ON” position to charge the battery, or to power the unit with the battery when the power supply is not connected to the instrument. The instrument does not charge on the USB cable. T he AC adaptor must be used to charge the instrument. Communications Cable The instrument is connected to a computer through either the USB port or via Bluetooth: 1. 2. 3. Plug the AC Adaptor jack of the power cord into the power receptacle on the rear panel of the instrument. Insert the Adaptor plug into a standard AC outlet. Connect the small USB connector on the instrument cable to the appropriate female connector on the rear panel of the instrument. Connect the large USB connector on the instrument cable to a USB female port on the computer. Viewing/Changing System Port Assignment As part of this installation process, a port number is assigned to the USB port or Bluetooth connection. The default selection is the next available com port. Depending on the application you are running, you may need to know this port assignment to configure the Datacolor applications program(s) to recognize the USB port. NOTES Some Datacolor programs automatically configure the Bluetooth or USB port assignment. Others require that you manually assign the port number. Refer to the program User’s Guide for information to assign/edit the instrument port number. If the computer has more than one USB port, the program will default to the first one available. If you want to connect the instrument to a different USB port, you must assign the port manually in the applications software. The com port assignment is accessed through the Windows Control Panel as follows: 1. Click the Start button at the bottom left of the screen. Datacolor 45G User Guide Page 38 The Start menu displays. 2. 3. [Type text] Place the cursor on Settings so that the program submenu displays, and click Control Panel. When the Control Panel window displays, double-click on System. Page 39 The Systems Properties dialog box displays: 4. Click the Hardware Tab. Datacolor 45G User Guide Page 40 [Type text] 5. Click the Device Manager button. The Device Manager window displays. 6. Go to the Ports heading. Click on the plus (+) to display the port selections. 7. 8. Click USB Serial Port. The USB Serial Port (COM3) Properties dialog box displays. Page 41 9. Click Port Settings. The dialog box below displays: 10. Click the Advanced button. 11. The Advanced Settings for COM3 dialog box displays. The field labeled COM Port Number displays the current assignment for the USB port. To change the port setting, click the drop-down list arrow. The list of COM ports is displayed. 12. Click on the port assignment to be used for the USB port. 13. When you have completed the changes, click OK. Datacolor 45G User Guide Page 42 Changing the COM Port Assignment in Datacolor Programs To enable the USB port or Bluetooth connection for color measurements, you may need to change the com port assignment in the applications program. Refer to the program documentation for the specific Datacolor applications program you are running for instructions to configure the instrument. Instrument Calibration Data Each Datacolor 45G instrument has a unique set of Calibration data resident in the firmware. A back-up copy of this unique Calibration Data is provided on a USB Flash Drive included in the Datacolor 45G package. Keep this Memory stick in a safe place in case the calibration data on the instrument is lost. [Type text] Page 43 NOTES Datacolor 45G User Guide Page 44 Maintenance About Instrument Maintenance The sections that follow provide detailed instructions for maintaining the instrument and calibration tiles. These instructions and tips will help to insure that the instrument continues to perform properly over its life. CAUTION There are no user-serviceable parts for this equipment. Instrument Cleaning The measurement port should be examined visually for the presence of dust, sample particles, fibers, and excessive yellowing due to environmental influences. This inspection should be performed frequently, especially if you measure loose materials. If you discover loose materials in the sphere, they should be removed. Tile Handling and Cleaning Handling Tiles Handle calibration tiles with extreme care. Do not drop them, or scratch the glazed surface. Always grasp the tile using its edges. Cleaning Tiles The calibration tiles should be cleaned before each use. Wipe each tile clean with a soft, lint-free cloth. A detergent, free of optical brighteners, fluorescent materials or photoactive dyes should be used as needed to clear any oils, fingerprints, or other deposits. Liquid dish detergent is a suitable detergent. The detergent/water solution should be prepared as follows: 1 part detergent: 250 parts water Use a few drops of the detergent solution to moisten a soft, lint-free cloth, and gently wipe the tile surface. Rinse the detergent from the tile by wiping it with a cloth, moistened with clean water. NEVER use abrasive cleansers, razor blades, or other metal objects to remove dirt or foreign substances from the calibration tiles. This will damage the tile surface. NEVER immerse the tiles in water. Tiles that have scratches, chips, abrasions or cracks must be replaced. Signs of wear on the tile surface will affect the accuracy of the calibration. Large temperature variations will affect the accuracy of your calibration, requiring more frequent calibration. The calibration tiles should be stored in an environment that simulates the temperature of the samples to be measured. Prolonged exposure to sunlight or other sources of ultra-violet radiation will cause the color of the tiles to change. The tiles should always be stored in a protective case or container away from direct sunlight and environmental contaminants. Storage Cleaning the Black Trap [Type text] The black trap should be kept dust-free. Dust accumulating in the black trap should be blown out with compressed air. Page 45 Appendix Datacolor 45G User Guide Page 46 Instrument Specifications Specifications are subject to change without notice. ITEM DESCRIPTION Instrument Type Dual beam 45/0 with pan-chromatic LED array. Measuring Geometry 45º/illumination, 0 º viewing Illumination Source Pan-Chromatic LED Array approximating D65 above 400nm Spectral Analyzer Proprietary SP 2000 analyzer with dual 256-diode array and high-resolution holographic grating. Wavelength Range 400 – 700nm Effective Bandwidth 10nm Wavelength Resolution 10nm Photometric Range 0 to 200% Photometric Resolution 0.003% Aperture Configuration Large Area View. 11 mm Power Battery: Lithium Ion Rechargable Battery, 3.7V Charge Voltage 4.2V Maximum Charge Current: 1.5A Charge: 0<T<50°C Discharge : -20<T<60°C Store between 40% and 50% capacity; Do not store above 140°F (60°C). Do not crush, short circuit, mutilate, reverse polarity, disassemble, or dispose of in fire; might explode, cause burns, or release toxic materials. AC Adaptor ; 5Vdc, 3.2A (input to the 45G) 100 – 240 VAC( input to the AC power adapter) 50/60 Hz, 0.6A Input Lithium Ion Rechargeable Battery, 3.7V Performance— Repeatability* <0.05 CIELAB Max on white ceramic Performance— Reproducibility* <0.13 CIELAB ΔE average of 12 BCRA tiles Absolute Operating Environment 5º to 40º C, 20-85% RH, non-condensing Interface Bluetooth ~or~ USB v1.1 or higher Warranty 1-year parts and labor. Extended warranty available. * Specification based on following environmental conditions: 20°C; 50% RH; 2 sigma [Type text] Page 47 [Type text] Page 49 NOTES Datacolor 45G User Guide Page 50 Index A Absolute Operating Environment, 2 Absolute Operating Environment, 45 Accessories, 3 Aperture Configuration, 45 Light Source, 2 M Maintenance, 43 Measurement Geometry, 3, 45 P B Black Trap, 3, 4 cleaning, 43 C Cables, 35 installation, 35 Calibration Tiles, 4 COM Port Assignment, 41 COM Port Number, 40 Communications Cable, 36 E Effective Bandwidth, 3, 45 Electrical Requirements, 1 Environmental Requirements, 1 F Feature Summary, 3 Performance Repeatability, 45 Reproducibility, 45 Photometric range, 45 resolution, 45 Power, 2, 45 Power Cable, 3, 35, 36 S Safety Warnings, 2 Seriel Cable, 36 SP2000 Spectrometer, 3 Spectral Analyzer, 45 Sphere Cleaning, 43 System Port Assignment, 36 T Tiles cleaning, 43 handling, 43 storage, 43 G U Green Tile, 3 I Illumination Source, 45 Instrument specifications, 45 InstrumentType, 45 Interface, 45 L USB cable, 3, 35 USB Cable, 36 W Warranty, 45 Wavelength Range, 45 Wavelength Resolution, 3, 45 White Tile, 3, 4 Light source, 3 [Type text] Page 51 52 Index Datacolor 110 User's Guide