1
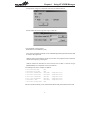
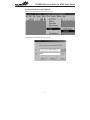
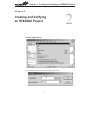
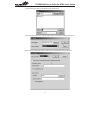
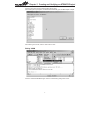
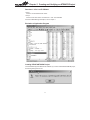
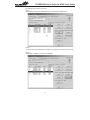
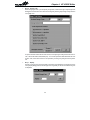
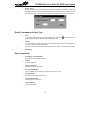
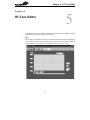
HT-IDE3000 User¢s Guide
for HT86 Voice Series
Copyright Ó 2005 by HOLTEK SEMICONDUCTOR INC. All rights reserved. Printed in Taiwan. No part of
this publication may be reproduced, stored in a retrieval system, or transmitted in any form by any means,
electronic, mechanical photocopying, recording, or otherwise without the prior written permission of
HOLTEK SEMICONDUCTOR INC.
NOTICE
The information appearing in this User¢s Guide is believed to be accurate at the time of publication. However, Holtek assumes no responsibility arising from the use of the specifications described. The applications mentioned herein are used solely for the purpose of illustration and Holtek makes no warranty or
representation that such applications will be suitable without further modification, nor recommends the
use of its products for application that may present a risk to human life due to malfunction or otherwise.
Holtek¢s products are not authorized for use as critical components in life support devices or systems.
Holtek reserves the right to alter its products without prior notification. For the most up-to-date information, please visit our web site at http://www.holtek.com.tw.
Contents
Contents
Chapter 1 Using HT-VROM Manager ................................................................1
Start HT-VROM Manager from HT-IDE3000.............................................................1
To Start DLVOC32 from HT-IDE3000........................................................................4
Chapter 2 Creating and Verify an HT86XXX Project ........................................5
Creating a New Project .............................................................................................5
Editing VROM ...........................................................................................................7
Editing Resource File (XX.asm) ................................................................................8
Building File.............................................................................................................10
Download ²*.VOC² to HT-IDE3000..........................................................................11
Emulation of Application Program ..........................................................................11
Creating HT86576/HT86768 Project .......................................................................11
Chapter 3 Playing Voice in the Program ........................................................15
Resource Consumption .................................................................................................20
Chapter 4 HT-VOICE Editor .............................................................................25
Record Command..........................................................................................................26
[Play] Command and Sample Rate ...............................................................................27
[Open] Command ..........................................................................................................28
[Save] Command and Voice Type .................................................................................30
Other Commands ..........................................................................................................30
File Menu .......................................................................................................................31
Project Menu..................................................................................................................31
Window Menu ................................................................................................................31
Chapter 5 HT-Tone Editor ................................................................................33
i
HT-IDE3000 User's Guide for HT86 Voice Series
Chapter 6 Using HT-Binary Editor ..................................................................37
Creating a New File .......................................................................................................37
Opening a File ...............................................................................................................38
Editing............................................................................................................................38
Save...............................................................................................................................39
Other Commands ..........................................................................................................40
ii
Preface
Preface
The HT86XXX is Holtek¢s voice synthesizer MCU series. Holtek provides software utility and function library to help the user accomplish his project easily. This Programmer¢s Guide is helpful for
the programmer who wants to learn how to use the voice resources in the HT-IDE3000 system.
iii
HT-IDE3000 User's Guide for HT86 Voice Series
iv
Chapter 1 Using HT-VROM Manager
Chapter 1
Using HT-VROM Manager
1
A voice ROM file (.VOC) should be prepared in advance in order to play voice files in HT86XXX
project. Holtek provides a software utility HT-VROM Manager for the user to build his .VOC file.
This chapter gives a brief description of the HT-VROM Manager.
Start HT-VROM Manager from HT-IDE3000
Click the <Tools\Voice\VROM Manager> button and execute it.
1
HT-IDE3000 User's Guide for HT86 Voice Series
Shown below is the main window of HT-VROM Manager.
®
Function descriptions for HT-VROM Manager
· Project file (.VMF) Functions
New: Create a new project, use the file browser to specify the project path name.
Open: Open an existing project
Save: Save the current project
Save As: Save the current project with another file name
· Source files (.WAV/.MID/.MLD/.BIN) Functions
Add: Add a source file at the end of the voice file list.
Insert: Insert a source file after the selected item in the file list.
Delete: Remove the selected item in the voice file list from the project.
2
Chapter 1 Using HT-VROM Manager
Change Mode: Change the compression method for the selected WAV file.
Silence: Define the silence length and range in a WAV file.
· Voice ROM file (.VOC) Functions
Build: Make the Voice ROM file (.VOC)
If the .VOC is generated successfully, the HT-VROM Manager will also generate two files (.HED
& .NUM) for the programmer.
.HED file contains some definitions for the voice functions. The programmer often include this
.Hed file at the beginning of his program.
.NUM file contains the information for each voice file such as offset in .VOC file, file type
(MIDI/WAV/BIN), and compression mode if it¢s a WAV file.
The following lines show an example of .NUM file:
0 00000020h BACH.MID
MID
1 00000820h 90071.MLD
MLD
2 00000CF0h SANTA6K.WAV
WAV/PCM8
3 00010800h CHIP04.WAV
WAV/UPCM
4 00012130h CLOW5K.WAV
WAV/AD4
5 00017710h FXSTAR.WAV
WAV/AD4
6 000185E0h C.WAV
WAV/UPCM
7 000197A0h SPCTD01.BIN
BIN
SampleRate:6000
SampleRate:8000
SampleRate:5000
SampleRate:8000
SampleRate:8000
After the .VOC file is built OK, you can use DLVOC32 software utility to download it to the HT-ICE.
3
HT-IDE3000 User's Guide for HT86 Voice Series
To Start DLVOC32 from HT-IDE3000
Click <Tools\Voice\Download> button and execute it.
The DLVOC32 main window is shown as follows
4
Chapter 2 Creating and Verifying an HT86XXX Project
Chapter 2
Creating and Verifying
an HT86XXX Project
Creating a New Project
Click <Project\New> button and the following dialog will be shown
5
2
HT-IDE3000 User's Guide for HT86 Voice Series
Click the <Browse> button and the following dialog will be shown
After creating the project name, click the <Open> button and the following dialog will be shown
Select a microcontroller, then click the <OK> button and the following dialog will be shown
6
Chapter 2 Creating and Verifying an HT86XXX Project
Click the <OK> button and the following dialog will be shown
After creating the Project Option, the HT-IDE will automatically open the Mask Option compiler.
After selecting from the list, click the <OK> button to save.
Editing VROM
Click the <Tool\Voice\VROM Manager> button and the following dialog will be shown
7
HT-IDE3000 User's Guide for HT86 Voice Series
After editing the VROM, click the <Build> button to produce .hed file, .num file and .voc file
For the HT-VROM Manager descriptions, refer to Chapter 1.
Editing Resource File (XX.asm)
Click the <Project\Edit> button and the following dialog will be shown
8
Chapter 2 Creating and Verifying an HT86XXX Project
After selecting the resource file (XX.asm), click the <OK> button
9
HT-IDE3000 User's Guide for HT86 Voice Series
Building File
Click <Build All> button and the following dialog will be shown
Generating ²*.cod² at output windows.
You can download *.cod into the Flash ROM by using a ROM writer.
Then emulate the code on HT86P00 EV board.
10
Chapter 2 Creating and Verifying an HT86XXX Project
Download ²*.VOC² to HT-IDE3000
· Step 1
Click the <Tool\Voice\Download> button
· Step 2
Click the <Download> button and download ²*.VOC² to HT-IDE3000
For the HT-VROM Manager description, refer to chapter 1.
Emulation of Application Program
Creating HT86576/HT86768 Project
The HT-IDE3000 supports VROM for the HT86384, if you want to edit HT86576/HT86768 project,
the following dialog will be shown
11
HT-IDE3000 User's Guide for HT86 Voice Series
The following steps should be carried out.
· Step 1
Edit VROM by using the HT-VROM Manager to ensure that the VROM size ok.
· Step 2
All source files (.wav/mid/mld/bin) are divided to be smaller than 1M, and save as new files.
· Step 3
Select MCU HT-86384 to emulate on HT-IDE3000.
12
Chapter 2 Creating and Verifying an HT86XXX Project
· Step 4
If your program code is ok after emulating on HT-IDE3000, you can create a new project and select MCU HT-86576/768, edit the same resource file to compile and build.
· Step 5
Download ²*.cod² into the Flash ROM by using a ROM writer, then emulate the code on
HT86P00 EV board.
13
HT-IDE3000 User's Guide for HT86 Voice Series
14
Chapter 3 Playing Voice in the Program
Chapter 3
Playing Voice in the Program
3
Holtek provides some voice playing functions so that the user can develop his project easily. To
use the voice functions defined in Holtek¢s HT86 Library, the following steps should be carried out:
Step1 - Add the following line at the beginning of the program.
#include xx.hed
; header file generated by HT-VROM Manager
Step 2 - Add #define RTC if real time clock is to be used.
· Syntax
#define RTC
; select Tools/Mask Option/32kHz RTC\Enable at the
; same time
Step 3 - Add #define HT82V733PXN if PXN is to be used as voice output.
· Syntax
#define HT82V733PXN
; X=A,B,C, N=0..7
· Example
#define HT82V733PC0
; select the PC0 to enable the HT82V733 OP IC
Steps 4 - Call the following macros and library functions in your program.
®
Speech macro
This is used to play a sound that has been previously composed through VREDIT utility.
· Syntax
speech [TrackNumber], [SamplingRate], [fVoiceDown], [fChannelNo],
[fVoiceUp], [Volume]
All parameters should be specified first before executing the ²speech....² command.
· Description
TrackNumber - TrackNumber, TrackNumber 2
The index number shown on the voice file list of the HT-VROM Manager is the playing sound¢s
TrackNumber. Refer to the .NUM file generated by the HT-VROM Manager for a listing of all the
composed sound sources. Note that TrackNumber is a number which ranges from 0...255.
If this argument is empty, then the previous track number is assumed.
15
HT-IDE3000 User's Guide for HT86 Voice Series
SamplingRate
Specify the sampling rate for the playing sound. The accepted range is from 2000 to 24000. The
maximum support sampling rate indicates the encoding algorithm and the selected system frequency. Refer to the SamplingRate macro for detailed listing table. Note that regardless of the
output channel selected, the assigned sampling rate is emulated through SR1 interrupt.
If this argument is empty, then the program is wrong.
fVoiceDown
Set this flag as 1 to clear the AUD output when the sound ends in order to save power consumption. If this argument is empty, then 0 is assumed.
fChannelNo
If this argument is empty, then timer 0 is assumed.
fChannelNo=0: TIMER0
fChannelNo=other: TIMER1
fVoiceUp
Set this flag as 1 to raise the voice up and to minimize noise while the sound starts. It will enable
the DAC circuit. If this argument is empty, then 0 is assumed.
However, while using the speech macro, the flag fVoiceUp is set to 1.
Volume
Set the volume value ranging from 1...7, if volume ¹ 1...7, then volume=7 is assumed.
· Example:
Speech 0, 6000, 1, 0, 1, 7
;
;
;
;
Speech 4, 6000, 1, 1, 1, 7
®
Play sound in track 0 under 6000Hz
sampling rate to channel 1
Play sound in track 4 under 6000Hz
sampling rate to channel 2
SamplingRate macro
Assign sampling rate (or occurrence rate) for SR1 interrupt.
· Syntax
SamplingRate channel, SamplingRate
· Description
Channel
1 to represent interrupt SR1, respectively
2 to represent interrupt SR2, respectively
SamplingRate
Specify the sampling rate (or occurrence rate) for the selected channel interrupt. The accepted
range is from 2000 to 24000.
Note that to take advantage of the SamplingRate macro for a fixed time to interrupt, user has to
enable the corresponding interrupt bit first (by setting the INTC register).
16
Chapter 3 Playing Voice in the Program
If speech macro is applied, maximum sampling rate is constrained by the encoding algorithm
and chosen system frequency, the table lists the experimental maximum sampling rate.
Encode\SysFreq
4MHz
6MHz
8MHz
8 bit PCM
12kHz
20kHz
24kHz
6 bit PCM
11kHz
16kHz
22kHz
4 bit ADPCM
11kHz
16kHz
22kHz
Maximum Support Sampling Rate
· Example:
SamplingRate 1, 8000
Set sampling rate of channel 1 to 8000Hz. That is, set channel 1 interrupt to occur for every
1/8000 second.
®
SetAddress & ReadByte macro
Used to access common data from Voice ROM. (Macro Version)
· Syntax
SetAddress
ReadByte
Address
· Description
The read data will be placed on the accumulator.
· Example
Read constant data from Voice ROM at 013F80H to variable ²DataStore².
SetAddress
013F80H
ReadByte
Mov
DataStore, A
®
FuncSetAddress & FuncReadByte procedure
· Syntax
call FuncSetAddress
call FuncReadByte
· Description
Used to access common data from Voice ROM. (Procedure Version) Public data RAM AddrL,
AddrM, and AddrH are used for the source address. Read data will be placed on the accumulator.
· Example
Read constant data from Voice ROM at 013F80H to variable ²DataStore².
mov
A,01H
mov
AddrH,A
mov
A,3FH
mov
AddrM,A
mov
A,80H
mov
AddrL,A
call FuncSetAddress
call FuncReadByte
mov
DataStore,A
17
HT-IDE3000 User's Guide for HT86 Voice Series
Note
®
Macro SetAddress, ReadByte and Procedure FuncSetAddress, FuncReadByte can only be used
when fStandBy flag is set or 08H/0CH/14H interrupts are disabled.
FuncCheckSum
· Syntax
call FunCheckSum
· Description
Check whether the voice ROM is ready.
This function must be called before playing sound. It will enable the VROM circuit.
®
InitTimeBase
· Syntax
call InitTimeBase
· Description
Setup 1ms time base for the melody sound source.
®
ClrRAM
· Syntax
call ClrRAM
· Description
Clear all RAM from 30h~FFh
®
Variable TrackNumber - TrackNumber, TrackNumber 2
TrackNumber records the track number being played or about to be played. Users may read
TrackNumber while some sound is playing (i.e. fStandBy is 0) or write it as the next track number of speech macro when fStandBy is set. The range of the TrackNumber is from 0 to 255.
®
Flag fStandBy - fStandBy, fStandBy 2
fStandBy is a bit flag denoting whether some sound is being played or not. If it is set then no
sound is being played.
Take note, the initial value of fStandBy is unknown after power supply is turned on. In other
words, the fStandBy must be equal to ²1² after the initial power on. So set this flag before the
first ²speech , , , , ,² command .
®
Flag fPause
fPause is a bit flag that can be read or written into. If it is set, sound playing is temporarily stopped
until it is cleared.
®
Flag fStop
fStop is a bit flag. If it is set, the currently playing sound is stopped and terminated. User has to invoke speech macro to play it again. Before you use flag fStop, you must call command ²call
InitTimeBase².
®
Variable VOL
The variable VOL are located at the special RAM 29H. Only the high nibble is valid and used to indicate the volume.
18
Chapter 3 Playing Voice in the Program
®
Variable
Since all the interrupts are occupied by the HT86 library, the library provides a software down counter,
variable TimeBaseCnt, for user application program to determine a fixed time period. TimeBaseCnt
decrements at fixed time slice if some sound is playing by speech macro (fStandBy flag is 0)
or the time base interrupt is enabled. User program has to poll TimeBaseCnt and manually reload
it when TimeBaseCnt decrements to 0. The fixed time slice is 1ms.
The following table lists the name and description of the macros and functions defined in HT86 library.
Name
Description
Speech
MACRO to play a voice file
SamplingRate
MACRO to specify the sampling rate for the voice file to be played
SetAddress
MACRO to setup address for download data
ReadByte
MACRO to read data from voice ROM to ACC
FuncSetAddress
Function to setup address for downloading data
FuncReadByte
Function to read data from voice ROM to ACC
FuncCheckSum
Function to check whether the voice ROM is ready
InitTimeBase
Function to setup 1ms time base for the melody file
ClrRAM
Function to clear the RAM from 30h~FFh
The following tables lists the public variable and flag name defined in HT86 library
Variable/Flag
Description
TrackNumber
TrackNumber 2
Track number (0~255)
VolTmp
Volume
AddrL/AddrM/AddrH Address for download
VdsStatusFlag
Status flag
TimeBaseCnt
Time base count
DataCode
Library subroutine return code
TimerL/TimerH
Timer low/high byte
ChannelNumber
SR number
fStandBy
fStandBy 2
Standby flag (0: busy; 1: end of segment)
fPause
Pause flag, set to pause the current playing
fStop
Stop flag, set to stop the current playing
fVoiceUp
Voice up flag, set to enable the DAC circuit before the sound starts
fVoiceDown
Voice down flag, set to clear the AUD when the sound ends
fChannelNo
Channel number (0: TIMER 0; Other: TIMER 1)
fRTC
RTC enable flag, set to enable the RTC
19
HT-IDE3000 User's Guide for HT86 Voice Series
Resource Consumption
Some C resources are occupied the VDS86 library. The kind of composed sound source and applied encoding algorithm determined its resource consumption is. Different resource consumption
are categorized into seven groups as shown in the following table.
C o m p r e s s in g
A lg o r ith m
R A M
A D P C M
M e lo d y
P C M 8
m 'P C M
3 0 H
A D
M e
P C
m 'P
3 0 H
3 0 H
D 2 H
C F H
F F H
F F H
U s e r 's a r e a
S y s te m
a re a
D 1 H
F F H
F F
F E
F D
F C
F B
H
H
H
H
H
V a r ia b le
&
fla g
F 6 H
F 5 H
F 2 H
T ra c k N
A d d rH
A d d rM
A d d rL
B it0 , fS
B it 1 , fP
B it 2 , fS
B it 3 , fN
B it 4 , fV
B it 7 , in
B it 6 , fV
B it 7 , in
V o ltm p
B it1 , fS
T ra c k N
0 0 0 H
R O M
u m b e r
ta n d B y
a u s s e
to p
o te C h a n g e d
o ic e D o w n
v a lid
o ic e U p
v a lid
ta n d B y 2
u m b e r 2
0 0 0 H
0 0 0 H
U s e r 's a r e a
1 7 A F H
S y s te m
a re a
1 C 2 C H
1 B 4 4 H
1 F F F H
20
1 F F F H
1 F F F H
P
lo
M
C
C M
d y
8
M
Chapter 3 Playing Voice in the Program
Example 1
TrackNumber and fStandBy
#DEFINE
RTC
#Include
Ex1.hed
;***********************************************
AVds86Code
.section at 0H
'code'
00H
ORG
NOP
NOP
NOP
JMP
T_START
ORG
04H
NOP
NOP
NOP
RETI
ORG
08H
JMP
Sr1Isr
ORG
0CH
JMP
Sr2Isr
ORG
10H
NOP
RETI
ORG
14H
JMP
TimeBaseIsr
T_START:
CALL
; Clear user RAM (30H~FFH)
CALL FuncCheckSum
NEXT:
Speech,8000,1,0,1,4
; play sound to channel 1
fStandBy
; fStandBy= 0
CLR
WDT
CLR
SNZ
fStandBy
; start play sound
JMP
$-2
INC
TrackNumber
MOV
A, 3
XOR
A, TrackNumber
ZERO
SNZ
JMP
NEXT
WDT
CLR
JMP
$-1
END
21
HT-IDE3000 User's Guide for HT86 Voice Series
Example 2
fStop
#DEFINE RTC
#include Ex1.hed
;***********************************************
AVds86Code
.section at 0H
'code'
ORG
00H
NOP
NOP
NOP
JMP
T_START
ORG
04H
NOP
NOP
NOP
RETI
ORG
08H
JMP
Sr1Isr
0CH
ORG
JMP
Sr2Isr
ORG
10H
NOP
RETI
ORG
14H
JMP
TimeBaseIsr
T_START:
CALL ClrRam
; Clear user RAM (30H~FFH)
CALL FuncCheckSum
CALL InitTimeBase
SET
PAC.0
NEXT:
Speech,8000,1,2,1,4
; play sound to channel 2
AAA:
CLR
WDT
CLR
fstandby2
; fstandby2= 0
SNZ
PA.0
JMP
BBB
SNZ
fstandby2
; start play sound
JMP
AAA
BBB:
SET
fstop
CLR
WDT
JMP
$-1
END
22
Chapter 3 Playing Voice in the Program
Example 3
#DEFINE RTC
#include Ex1.hed
;***********************************************
AVds86Code
.section at 0H
'code'
ORG
00H
NOP
NOP
NOP
JMP
T_START
04H
ORG
NOP
NOP
NOP
RETI
ORG
08H
JMP
Sr1Isr
ORG
0CH
JMP
Sr2Isr
ORG
10H
NOP
RETI
ORG
14H
JMP
TimeBaseIsr
T_START:
CALL ClrRam
; Clear user RAM (30H~FFH)
CALL FuncCheckSum
SET
PAC.0
NEXT:
Speech,8000,1,0,1,4
; play sound to channel 1
AAA:
WDT
CLR
fstandby
; fstandby= 0
SNZ
PA.0
JMP
BBB
SNZ
fstandby
; start play sound
JMP
AAA
CLR
WDT
JMP
$-1
BBB:
WDT
CLR
SET
fpause
SNZ
PA.0
JMP
BBB
CLR
fpause
JMP
AAA
END
23
HT-IDE3000 User's Guide for HT86 Voice Series
24
Chapter 4 HT-VOICE Editor
4
Chapter 4
HT-VOICE Editor
The main screen of the HT-Voice Editor is shown below. This chapter explains how to edit a wave
file, describe all the files and the menu commands.
The Main Screen of HT-Voice
25
HT-IDE3000 User's Guide for HT86 Voice Series
Record Command
®
Step 1
To create a new voice file, select the [New] command from the [File] menu.
®
Step 2
To record, select the [Record] command from the [Function] menu, or press the
button (if a
sound bluster card and microphone is available), a [Record Function Dialog] screen appears:
Record Function Dialog
Fill out the dialog box: File Name, Sampling Rate and other options. Press the [Begin] button to
start recording.
®
Step 3
The default longest time you can record is 25 sec (if option is 8 bits per sample and Mono). If you
need more time, select the [Memory..] command in the [Option] menu. The [Memory Setting Dialog] is shown as follows. Press the [End] button to stop recording.
Memory Setting Dialog
26
Chapter 4 HT-VOICE Editor
[Play] Command and Sample Rate
®
Step 1
Before playing, we must record or open a file. Select the [Play] command in the [Function] menu,
or press the
button to listen to the recorded sound. Press the
button to stop.
®
Step 2
To play a song repeatedly, select the number of times to play from the following combo box.
®
Step 3
You can also adjust the Sampling Rate, and then you can differentiate between the sounds produced. This command will not change the voice data, but the sampling rate when playing. Different sampling rate will come with different sounds, different frequency and speed.
27
HT-IDE3000 User's Guide for HT86 Voice Series
[Open] Command
®
Step 1
To open a voice file, select the [Open] command in the [File] menu.
®
Step 2 - cut/copy/paste
Select a range first, and then cut/copy the range by selecting the [cut]/[copy] command from the
[Edit] menu, or press the
[Edit] menu or the
/
button. After cutting or copying, click the [Paste] command in the
button to paste the range from the clipboard to the current position.
®
Step 3 - delete
Select a range first, and then click the [Delete] command in the [Edit] menu.
®
Step 4 - Re-sample
The Sample rate of the file can be changed by selecting the [ReSample] command in the [Edit]
menu. The [ReSample Dialog] box is shown below:
ReSample Dialog
The ReSample command will add/delete data points to suit the sampling rate you type in. If you
decrease the sampling rate, the timbre will not be as good as the original voice, but the file size will
be decreased.
®
Step 5 - Change Format
The voice file format can be changed by selecting the [ChangeFormat] command in the [Edit]
menu, or pressing the
button. You can change the Sampling rate, Channel, and Bits Per Sample of this file. If we open a PCM file, the system will open it with default setting, Sampling rate
8000Hz, 1 Channel, 8 Bits Per Sample. So we can set the correct setting by using the
[ChangeFormat] command.
28
Chapter 4 HT-VOICE Editor
®
Step 6 - Change Code
Before changing the code, you must specify a range first, or define the range in the [Change Code
Dialog] box as shown below. The code can be changed by selecting the [Change Code] command
in the [Edit] menu.
To replace the data marked with the code series, fill in the [Changed Code] edit box with code series, in the format of data1,data2,data3 (hex). You can also replace the data marked with the code
function. Also, select which channel to be replaced by checking the [Changed Channel] check
box.
®
Step 7 - Amplify
Specify a range first or choose the [Amplify] command from the [Edit] menu and define the range
in the [Amplify Dialog] window, and then type in the magnitude you want for the selected range to
be amplified.
29
HT-IDE3000 User's Guide for HT86 Voice Series
®
Step 8 - Offset
Specify a range first, or select the [Offset] command from the [Edit] menu and define a range in the
[Offset Dialog] window, and type in the desired offset value. If the offset value is negative, the voice
data will down offset, in other words, if the offset value is positive, the voice data will up offset.
[Save] Command and Voice Type
®
Save
To save a file, select the [Save] command in the [File] menu, or press the
is not specified, the system will show a [Save As] dialogue box.
button. If the file name
®
Save As
To save the current file under another name, select the [Save As] command from the [File] menu.
The system will show a [Save As] dialogue.
Type in the full path, file name and the file type (Wave Files (.WAV) or Holtek PCM File (.PCM)).
®
Save Range
Other Commands
®
Short Menus or Full Menus/File
Short menu/Full menu switch command.
®
Exit/File
Close the application.
®
About HT-Voice/File
Information about this application.
®
Tile or Arrange/Window
Tile (it is called Arrange in short menu) all opened files on the screen.
®
Cascade/Window
Cascade all opened files on the screen
®
Arrange Icons/Window
Arrange all icons on the screen
®
Close All/Window
Close all opened files
30
Chapter 4 HT-VOICE Editor
File Menu
The File pop-up menu consists of New, Open, Save, Save as and Print command.
®
New
Create a new project
®
Open
Open an existing project
VOC file must exist in the same directory with .VPJ file. If not, HT-VDS84 will create a new one for
you.
®
Save
Save the current edited project
®
Save As
Save the current edited project under a new file name
®
Print
Print the result including the file name, the starting address, and the compression methods used.
Project Menu
The File pop-up menu consists of System Clock, Silence Length, and Silence Tolerance command.
®
System Clock
Change the System Clock of the active project
®
Silence Tolerance
Change the Silence Tolerance of the active project
®
Silence Length
Change the Silence Length of the active project
Window Menu
The Window menu consists of Tile, Cascade, Arrange Icons, and Close All commands.
®
Tile
Tile all opened files on the screen
®
Cascade
Cascade all opened files on the screen
®
Close all
Close all opened project files
®
Arrange icons
Arrange all icons
31
HT-IDE3000 User's Guide for HT86 Voice Series
32
Chapter 5 HT-Tone Editor
5
Chapter 5
HT-Tone Editor
In this section, we will give an example to illustrate how to operate the HT-Tone Editor. This example is illustrated by a series of graphs for easy learning.
®
Step 1
Run HT-Tone.exe, then Select the ²New² command from the FILE menu to open a new TONE editor. The vertical coordinate represents the Frequency, and the horizontal coordinate represents
the Note number. As for the Frequency and the Note number, refer to steps 3 and 4.
33
HT-IDE3000 User's Guide for HT86 Voice Series
®
Step 2
Press the mouse left button and move the mouse, a curve will be produced in the window.
®
Step 3 - NOTE Number
Holtek has two types of Tone formats: 64 Note and 32 Note. A frequency can be assigned to each
note. It means that Tone file can play either 32 or 64 monotony. Change the note number by changing
the selection of the ²NOTE² combo box. The Fig below is an example of changing note 32 to note 64.
34
Chapter 5 HT-Tone Editor
®
Step 4 - BASE Frequency
Change the Base Frequency by selecting item from the ²BASE² combo box. For example: if the
Base Frequency is 64K, the max. frequency we can use is 32K.
®
Step 5 - Sound Type
The system supports three kinds of sound type: TONE, NOISE, TONE+NOISE. This function will
change the timbre. We can change the Sound Type, and press the [Play] button to audition the effect.
®
Step 6 - SPEED
We can scroll the speed bar to change the playing time of each note. For example, if the tone file
has 32 notes, and the speed of each note is 34ms, we will know that the playing time of this file is
32´34ms.
®
Step 7 - EDITING Mode
There are two editing modes for the user to ¢draw¢ the frequency of each note.
· DOT Mode
The drawing unit is ²NOTE² Press the mouse left button and drag it, we will get a curve in the editing window, as previously shown.
· LINE Mode
The drawing unit is ²LINE². Click the mouse left button, we will get the first point of the ²LINE².
Then click another note to get the second. A line will be drawn between these two points as
shown in the diagram on the next page.
35
HT-IDE3000 User's Guide for HT86 Voice Series
®
Step 8 - Frequency Label
As mentioned in step 4, if the Base Frequency is 64K, then the max. frequency of this tone file will
be 64/2=32K. For this reason the maximum value of Label 4 has been designed to be 32.
The frequency can be examined in more detail or finer adjustments can be made to its value using
the following method.
As an example, if the value of Label 4 is 32K and if we draw a line between Label 0 and Label 1, i.e.
between 0K and 8K, then this line will only be set to an approximate frequency. If Label 4 is set to
8K then this will allow us to reduce the frequency range displayed and subsequently allow the
notes to be set to a more precise frequency.
36
Chapter 6 Using HT-Binary Editor
Chapter 6
Using HT-Binary Editor
6
This chapter explains how to edit a binary file and describes the menu commands. The main
screen of the HT-Binary Editor is shown below. This is a simple binary editor used to communicate
with HT-VDS84.
Creating a New File
To create a new file, select the New command from the File menu, or press the
gin to input data (Hex) in the editing area.
37
button. Then be-
HT-IDE3000 User's Guide for HT86 Voice Series
Opening a File
To open a file, select the Open command from the File menu, or press the
ing Open File dialog box appears:
button. The follow-
Type in the full path, or press the Browse button to select a file, and input the starting address from
where the file is loaded in the Start Address edit box.
Editing
®
Go To
To go to a specific position, select the Go To command from the Edit menu, or press the
A Go To dialog box appears:
button.
Type in the position you want to go (in Hex), and press the Ok button.
®
Fill
To fill a range with a data (in Hex), select the Fill command in the Edit menu, or press the
ton. A Fill dialog box appears:
Type in the Start Address, End Address and data in Hex, and then press the Ok button.
38
but-
Chapter 6 Using HT-Binary Editor
®
Move
To copy data from a specified range to a target address, select the Move command in the Edit
menu, or press the
button. A Move dialog box appears:
Type in the Start Address, End Address and Target Address, and then press the Ok button.
Save
®
Save
To save a file, select the Save command from the File menu, or press the
button. A Save
File dialog box appears. If the file name is not specified, a Save As.. dialog box will appear.
Type in the Start Address and End Address you want to save, and then press the Ok button.
®
Save As ..
To save the current file under another name, select the Save As command in the File menu. A
Save As .. dialog box appears:
Type in the full path in the File Name edit box, or press the Browse button to select a file. Input the
Start Address and End Address you want to save, and then press the Ok button.
39
HT-IDE3000 User's Guide for HT86 Voice Series
Other Commands
®
Short Menu or Full Menu/File
Short menu/Full menu switch command.
®
Exit/File
Close the system.
®
About HT-Binary Editor*/File
Show information about the system.
®
Tile or Arrange/Window
Tile (it is called Arrange in short menu) all opened files on the screen.
®
Cascade/Window
Cascade all opened files on the screen.
®
Arrange Icons/Window
Arrange all icons on the screen.
®
Close All/Window
Close all opened files on the screen.
40