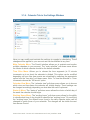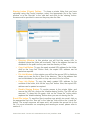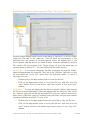
1
User Guide powered by www.communigate.com Table of Contents: 1. Pronto! Login Page.....................................................................................3 2. The “Main Window” ....................................................................................5 3. The Top Link Bar and Buttons...................................................................6 3.1. 4. 5. Settings Button................................................................................................. 6 3.1.1. General Settings Tab in the Settings Window ........................................... 7 3.1.2. Folders Tab in the Settings Window.......................................................... 8 3.1.3. Compose Tab in the Settings Window ...................................................... 9 3.1.4. Delete Tab in the Settings Window ......................................................... 10 3.1.5. IM Tab in the Settings Window................................................................ 11 3.1.6. Calendar Tab in the Settings Window ..................................................... 12 3.1.7. Contacts Tab in the Settings Window...................................................... 13 3.1.8. Mail Control Tab in the Settings Window................................................. 14 3.1.9. Call Control Tab in the Settings Window ................................................. 15 3.1.10. Dialer Tab in the Settings Window .......................................................... 17 3.1.11. Password Tab in the Settings Window .................................................... 18 3.2. IM Panel........................................................................................................... 19 3.3. Dialer ............................................................................................................... 21 3.4. Log Out Button ............................................................................................... 25 The “New” Button ..................................................................................... 26 4.1. E-mail Composition (New Æ E-mail)............................................................. 26 4.2. Creating an Event (New Æ Event)................................................................. 32 4.3. Adding a Contact (New Æ Contact) .............................................................. 36 4.4. Creating a New Folder (New Æ Folder) ........................................................ 39 Side Bar and Tabs..................................................................................... 41 5.1. E-Mail Tab ....................................................................................................... 42 5.1.1. Right Clicking a Folder under the “E-mail” Tab in the “Side Bar” ............ 47 Pronto! User Guide – Pronto! v2.7 CommuniGate Pro 5.2.10 | 22nd Dec. 2008 1 of 80 6. 5.1.2. Right Clicking an E-mail in the Message Grid in the “Main” Window ...... 49 5.1.3. Right Clicking the Sender of an E-mail in the Preview Pane................... 52 5.2. Calendaring Tab ............................................................................................. 53 5.3. Telephony Tab ................................................................................................ 57 5.4. Contacts Tab................................................................................................... 59 5.5. My Stuff Tab.................................................................................................... 61 5.5.1. My Photos................................................................................................ 62 5.5.2. My Music ................................................................................................. 65 5.5.3. My Videos................................................................................................ 68 5.6. News Tab......................................................................................................... 70 5.7. Files Tab.......................................................................................................... 72 Pronto! Keyboard Shortcuts .................................................................... 79 Pronto! User Guide – Pronto! v2.7 CommuniGate Pro 5.2.10 | 22nd Dec. 2008 2 of 80 1. Pronto! Login Page The logon page allows you to enter your account details such as username and password and optionally select your preferred language. To access your account enter the information into two fields: Username and Password. Once you have entered the username, password and optionally selected your language of choice, click the “Login” button and you will be re-directed to the e-mail inbox. Username Field: Make sure that the user name is the same as the one you initially registered (i.e.: TestAccount1). When entering the user name you are not required to enter the domain you registered with but only your user account name The username field is not case sensitive. Password Field: When the account was created a unique password was selected for identification purposes and to provide access to the account. Confirm that the password is the one that you registered and enter it here. The password field is case sensitive. Language Menu: The Pronto! interface is available in over 26 different languages. If you click on the language option, a pull-down menu will appear with a list of the available languages to choose from. If no language is chosen, Pronto! references your chosen language from the settings options. If you want to change the language of your interface at any time you may do so while you are Pronto! User Guide – Pronto! v2.7 CommuniGate Pro 5.2.10 | 22nd Dec. 2008 3 of 80 logged in via the general settings option in Pronto. Please note that changing the language preferences in Pronto! will result in the change being applied to the current session only. If you would like to change the language and keep this change current for all future sessions please refer to section 3.1.1. for more information. Use Proxy-Safe Mode: Using Proxy Safe Mode activates HTTP binding. With HTTP binding enabled the requests you make in Pronto! are encapsulated via HTTP requests so they can traverse HTTP proxies. Without this field checked, requests are processed using XIMSS. Unchecked, requests may confuse gateways and firewalls and force them to close the connection because XIMSS is a non-standard internet protocol. Disable Fixed Address Check: Your web-browser settings may enable some additional security measures such as the Fixed IP Address mechanism. When you connect using a network with multiple home proxies, the requests are processed by Pronto! from different network addresses even when you continue to use the same browser on the same network. If you login to Pronto! from this type of network disable the Fixed Address feature for this session, otherwise you may be disconnected from Pronto!. Disable Cookies Check: Some browsers do not support “cookies.” If you log into Pronto! from a browser that does not support cookies, disable cookies for this session. If you always connect from a browser that does not support cookies, disable the cookies option in your browser settings. Forgot your password?: When you signed up for your account, you were asked to enter an alternate e-mail address for use in case you forget your password. If you cannot remember the password, click on the “Forgot your Password” textlink. Enter your talktoip.com account name in the username field and click the “email me my Password” button. The server will process the request, and the password will automatically be sent in a new e-mail message to the alternate email address. If you have clicked on this button erroneously, cancel to return to the login screen. Pronto! User Guide – Pronto! v2.7 CommuniGate Pro 5.2.10 | 22nd Dec. 2008 4 of 80 2. The “Main Window” The “Main Window” is the large window that appears in the center of the Pronto! interface. Clicking on any of the tabs in the left most pane module will show the selected module in the “Main Window.” The header is located in the upper left hand side of the “Main Window” will change to correspond with the respective module that has been chosen and will reveal options relevant to the selection. This window will be referred to as the “Main Window” throughout the guide. Pronto! User Guide – Pronto! v2.7 CommuniGate Pro 5.2.10 | 22nd Dec. 2008 5 of 80 3. The Top Link Bar and Buttons 3.1. Settings Button The Pronto! interface allows you to configure options for your account and the Pronto! client. Changes can be made to the general or module-specific preferences by clicking on the Settings button, on the top right hand side of the screen. This will open the settings window. The various settings categories will appear on the left hand side of the window while the contents of the chosen settings category will appear on the right hand side of the window. Clicking on the update button at the bottom of the settings window after you have made the modifications will save the new preferences, otherwise, the default settings will be maintained. To close the settings window click on the upper right [X] button. To minimize the settings window click on the [_] button. The settings window will appear as a small minimized window at the bottom of the Pronto! interface. For any of the settings options, if the default option has been selected, Pronto! will access the default domain settings provided by your administrator. If the administrator changes these settings, the values will change for all options that use the default value. Within the settings window, you will find the following options: Pronto! User Guide – Pronto! v2.7 CommuniGate Pro 5.2.10 | 22nd Dec. 2008 6 of 80 3.1.1. General Settings Tab in the Settings Window Here you can modify and maintain general settings for the Pronto! interface. These settings will take place over the account and can be changed at any time. Language menu: The language preference can be chosen at any time by selecting any of the languages from this menu. Preferred Character Set menu: To change the character set and the way the characters appear in the Pronto! interface by choose any of the character sets found in this menu. Time Zone menu: The time zone settings can be changed to match the time of your locale by choosing any of the time-zones found in this menu. Layout menu: The layout and color settings of the Pronto! interface (sometimes referred to as “Skins”) can be changed by choosing any of the layouts found in this pull-down menu. Text Size: Click on the (+) button to increase the size of the currently selected text format. Click on the (-) button to decrease the size of the currently selected text format. Login Information: Check when you last successfully logged in to your account, when the last failed-login attempt was, and what product version is running. Pronto! User Guide – Pronto! v2.7 CommuniGate Pro 5.2.10 | 22nd Dec. 2008 7 of 80 3.1.2. Folders Tab in the Settings Window Here you can modify and maintain the inbox folder settings. These settings will apply to the Inbox folder and can be changed at any time. Display Field: The way the e-mail inbox is named and will appear in the Pronto! interface can be changed by modifying or entering new text into this field and updating. The way you have named the e-mail inbox will change accordingly and be reflected across the Pronto! interface and other client applications. Fields: The fields that will appear at the top of the e-mail Inbox window can be modified. This may better help to identify, sort through, and maintain your e-mail communications. Up to seven different fields may be shown. Send Read Receipts: You can choose to send read-receipt messages to contacts by selecting from this pull-down menu. Once the recipient has opened a message with a read-receipt attached a read-receipt message will be delivered to the sender alerting them that the e-mail has been opened. Pronto! User Guide – Pronto! v2.7 CommuniGate Pro 5.2.10 | 22nd Dec. 2008 8 of 80 3.1.3. Compose Tab in the Settings Window Here you can modify and maintain the e-mail composition settings. These settings will be apparent when you send and receive e-mail and can be changed at any time. Real Name Field: Allows you to add your first and/or last name to your e-mail messages. When you send a message the recipient will see the newly entered name appearing before the e-mail address allowing them to easily identify the sender. From Address Field: Your account allows you to change the way a recipient views what e-mail address an incoming message is from. To make your e-mail address appear differently than the initial signup address, enter the desired email address here. When a message is sent, it will appear that the message is originating from the input address, but the mail will still be processed to and from your address and account. Signature Field: To have a personalized signature appear at the bottom of every new composed message, enter your signature into this field. When you send a message, the signature will appear at the end of the message automatically. Reply Header Field: Pronto! allows you to customize the reply headers to outbound messages. In this field, you can modify the way the header at the start of your replies appears. Reply Quoting Field: Pronto! allows you to have a symbol or line of text that will indicate the body of the message you are replying. Modifying or entering text in this field will automatically place the text in front of each new line in the body of the message you are replying. Pronto! User Guide – Pronto! v2.7 CommuniGate Pro 5.2.10 | 22nd Dec. 2008 9 of 80 Store Drafts in Menu: This menu dictates in which folder your draft messages will be stored. The selected folder is where drafts will be stored. To access these drafts later, click on the respective folder. Save Sent Messages In Menu: This menu dictates which folder saved sent messages will be stored. The selected folder is where the saved sent messages will appear. To access these sent messages later, click on the respective folder. Auto-Save Menu: This menu allows you choose how often the account to automatically saves drafts of the current message. Drafted messages that are automatically saved will appear in the folder you have specified the saved drafts to be stored. Format Menu: You can choose to have e-mail messages composed in Plain Text format, or in HTML format. 3.1.4. Delete Tab in the Settings Window Here you can modify and maintain the e-mail deletion settings. These changes will be applied to your account and can be modified at any time. Message Delete Method Menu: To choose the way the messages are processed and deleted, select an option from this pull-down menu. You can choose to: Mark the messages for deletion at a later point and leave the marked messages in your inbox. Immediately delete the message as you flag it. Pronto! User Guide – Pronto! v2.7 CommuniGate Pro 5.2.10 | 22nd Dec. 2008 10 of 80 Mark the deleted messges to be moved to the trash folder. Trash Folder Menu: Choose which e-mail folder you would like to use as a trash can by selecting the respective folder from this pull-down menu. 3.1.5. IM Tab in the Settings Window Here you can modify and maintain the settings in regards to Instant Messaging. These changes will be applied to your account and can be modified at any time. IM Audio Alert Menu: By default an audio alert will be heard each time an instant message is received. To hear a sound alert when you receive an instant message, select “yes” from this menu. If you do not wish to receive an audio alert when receiving messages, select “no” from this menu. AutoSave IM Chats Menu: To enable automatic saving of instant messages by selecting “yes” from this menu. If you do not wish to store the instant messaging chats, select “no” from this menu and the log will be disabled. The option remains to save instant message chats by clicking on the “save” and “save as” buttons that appear in the instant messaging conversation window. History Folder Menu: To choose which of the e-mail folders you would like to have as the history folder, by selecting the respective folder from this pull-down menu. Pronto! User Guide – Pronto! v2.7 CommuniGate Pro 5.2.10 | 22nd Dec. 2008 11 of 80 3.1.6. Calendar Tab in the Settings Window Here you can modify and maintain the settings in regards to calendaring. These changes will be applied to your account and can be modified at any time. Main Calendar Menu: The Pronto! interface allows you to maintain and monitor multiple calendars in your account. The “main calendar” pull-down menu allows the choice of which calendar should be the default calendar. Time Slice Menu: Allows you to choose the time segments (in 15 minute increments up to an hour) the calendar is divided. This option can be modified depending on how often new events are scheduled by selecting the appropriate option from the “time slice” pull-down menu. Note: To view the calendar in 1 hour increments choose the “60 minute” option. Calendar View Menu: The “calendar view” pull-down menu allows you to choose which view and time-frame the calendar will initially display. These settings can be changed accordingly depending on what date the event is planned. Starts At Menu: The “starts at” pull-down menu allows the choice of which day of the week the calendar should begin. Working Hours Menu: The “working hours” pull-down menu allows for the ability to choose what time of day should be classified as “working hours.” By modifying the “working hours” the default hours found in the daily calendar views can be changed to match those of your schedule. The changes will be visible the next time access Pronto!. Pronto! User Guide – Pronto! v2.7 CommuniGate Pro 5.2.10 | 22nd Dec. 2008 12 of 80 Days to Publish Menu: This menu directly applies to free/busy information. The main calendar’s data is used to generate free/busy information. Using the “Days to Publish” pull-down menu allows you to specify the time period covered by free/busy information. 3.1.7. Contacts Tab in the Settings Window Here you can modify and maintain settings in regards to which folder contact information will be stored. When saving a contact, right click the message or import the contacts information from a vCard. This change will take place across your account and now the contact will be saved to the specified folder. Pronto! User Guide – Pronto! v2.7 CommuniGate Pro 5.2.10 | 22nd Dec. 2008 13 of 80 3.1.8. Mail Control Tab in the Settings Window Here you can set rules for and maintain control of incoming messages. These changes will take place across your account and any incoming messages will be subject to these modifications. Vacation Message: You can enable a pre-scripted auto-response to be distributed as an initial reply to any incoming messages. To create a “vacation message” enter the text into the vacation message field. There are many options found under this tab including: Saving the message for later use. To save the composed message for later use by clicking on the save button. Enabling or disabling vacation message by selecting the appropriate option. Clearing Replied addresses in case you need to update the vacation message or clear the list of addressees that have received the vacation message already. Redirect all Mail to: If you would like to have incoming messages routed to another e-mail address, enter the routing e-mail address into the “re-direct all mail to” field. There are many options available including: Saving the address for later use. To save the address for later use click on the save button after entering the redirect address. Enabling or disabling the re-directing of messages by selecting the appropriate option. Pronto! User Guide – Pronto! v2.7 CommuniGate Pro 5.2.10 | 22nd Dec. 2008 14 of 80 Keeping a copy of the re-directed messages in your account as well as forwarding to the requested e-mail address. Do not Redirect Automatic Messages: You can choose whether to have messages that are automatically generated re-directed to the requested email address or not. Preserving To/Cc fields so it looks like the incoming message was not routed through your account. If this option is not selected, you will be alerted that the message has been processed and forwarded through your account. Junk Mail Control: To modify the way the server filters incoming junk-mail you can do so by assigning the appropriate action to the appropriate risk-factor. Rules: For More information regarding rules please refer to the following site: http://www.communigate.com/CommuniGatePro/QueueRules.html. 3.1.9. Call Control Tab in the Settings Window Here you can set rules for incoming phone calls. Addresses must be specified so the automated rules will filter the calls. These addresses can take the form of a traditional phone number or can be the contacts’ e-mail address. These changes will take place across your account and any incoming phone-calls will be subject to these modifications. Voice Mail: To have incoming phone calls routed to voicemail you have to modify the settings. There are many options found under this tab including: Pronto! User Guide – Pronto! v2.7 CommuniGate Pro 5.2.10 | 22nd Dec. 2008 15 of 80 Automatically routing incoming calls to voicemail after a specified period of time by selecting the “After” option and choosing the desired time-frame. Automatically route incoming calls to voicemail if busy by selecting the “On Busy” option. Automatically route incoming calls to voicemail if the call fails for any reason other than "no answer”, "no response”, "busy”, "busy everywhere” or "declined". Simultaneous Ring: To route incoming phone calls routed to multiple numbers at once, you have to modify the settings for simultaneous ringing. There are a few options including: Enabling or disabling simultaneous ringing. When this option is enabled, the incoming call causes the registered devices to ring. If the device is not answered for the specified period of time, the call is "forked” to some other address (device, person or application) while the device continues to ring. The call is connected to any device that answers it and cancels calls to all other devices. Specifying how long the server should wait before ”forking” the call by selecting from the “after” pull-down menu. Specifying what numbers to route the call by entering the appropriate number into the “fork to” field. This feature routes calls to your mobile phone, your home phone, your assistant, etc. Divert Calls: To have incoming phone calls rejected or redirected to another phone number, modify the settings for call-diversion here. There are many options found including: Enabling or disabling call-diversion. Specifying what time frame to have calls diverted during under the “when” selection. To check if the current time is "afterhours” or during "work hours” Pronto! uses the main calendar settings. For more information on changing the “working hours” please refer to section 3.1.6. Specifying where calls should be diverted, by choosing from the “to” option. You can divert calls to: voicemail, a user specified address, or to present the caller with a busy signal when they try to reach you. Block Calls: To block incoming phone calls from ringing your devices modify the settings for blocking phone calls here. There are a few options found including: Enabling or disabling call-blocking. Specifying what addresses (who) to block phone calls from, in the “from” section. To blacklist users, include them into the “blocked address book.” Pronto! User Guide – Pronto! v2.7 CommuniGate Pro 5.2.10 | 22nd Dec. 2008 16 of 80 Specifying how you would like to block incoming calls in the “fork to” section. You can block calls by routing them directly to voicemail or send the caller a busy signal when they dial your devices. Custom Ring-back: If you would like to enable or disable the ring-back feature of Pronto! click on “Custom Ring-back.” 3.1.10. Dialer Tab in the Settings Window Here you can modify the general settings to be used with the Pronto! dialer. Once modified, these changes will take place across your account. Incoming Calls: You can specify availability for incoming calls by choosing any of the options via the “Incoming calls” pull-down menu. Touch-Tone (DTMF) Settings: If you would like to change the defined settings of the length of the DTMF signal, select the setting from the DTMF pull-down menu found under “Touch-Tone (DTMF) settings.” Pronto! User Guide – Pronto! v2.7 CommuniGate Pro 5.2.10 | 22nd Dec. 2008 17 of 80 3.1.11. Password Tab in the Settings Window You can modify the password settings to be used in Pronto!. These changes will take place across your account and you will have to log in with the password you have set. When changing the password, you will find the following options: Current Password Field: This is the field to enter the current password used to logon to your Pronto! account. New Password Field: This is the field to enter the new password you would like to use to logon to your Pronto! account. Re-Enter Password Field: To confirm you are changing your password, enter the new password again in this field. Enter the new password exactly as you have in the “new password” field; otherwise, the new password will be rejected. Forgotten Password Recovery Field: If you forget the password and would like to recover it, you can add a supplemental e-mail address for Pronto! to automatically mail the password to in this field. Please note the current password must be entered to have the changes apply to your account. Pronto! User Guide – Pronto! v2.7 CommuniGate Pro 5.2.10 | 22nd Dec. 2008 18 of 80 3.2. IM Panel One unique feature found in Pronto! is the ability to have an instant messaging conversation with your contacts. CommuniGate Pro supports SIP/SIMPLE and XMPP (also known as Jabber, e.g. Google Talk) – so you can IM with all contacts that either have a SIP/SIMPLE or a XMPP account. To briefly chat with a colleague or friend, or to have a conversation in real time, you can have an Instant Messaging session instead of sending e-mail back and forth. You can access or hide the instant messaging feature by clicking on the IM button on the top right hand side of your account. Once opened, the instant messaging window will appear along the right hand side of your account, and will thus resize the “main window.” Within the instant messaging window, you will find the following options: The [X] Button: To hide the instant messaging window, click on the “X button” on the top right hand side of the instant messaging window. Changing Status Menu: Pronto! allows you to change your presence to reflect what you are doing in the real world. To change the current status by select any option from the “change status” pull-down menu (found directly under The [X] Button). Contacts List: Spanning a majority of the vertical length of the instant messaging window is the contacts list. Once a contact has been added, he or she will show up in this list. You can then check the contacts list to see if your friend is online, and what status they are displaying. Double clicking on a contacts name will open the “send IM” window. Create Button: To add a new contact, click on the “create button” (the little green button with the white cross, located on the lower left hand side of the Instant Messaging window) A few fields need to be modified to add a new contact: The contact will be identified by their e-mail address, so the e-mail address must be entered precisely. Pronto! User Guide – Pronto! v2.7 CommuniGate Pro 5.2.10 | 22nd Dec. 2008 19 of 80 To specify in which group your new contact be categorized, manually type in the name of the group, or select the pre-existing group from the “group” pull-down menu. To specify what name the contact will appear as in the buddy list, enter the chosen username for the contact in the name field. Delete Button: Clicking on the “delete button” while highlighting at least one name from the contacts list will remove the respective contact from the contact list. Send IM Button: Clicking on the “send IM button” while highlighting a name from the contacts list will open the “send IM window” and allow you to chat with the specified contact. The “IM Conversation window”: This is the window used to send and receive instant messages. To minimize the current conversation window by clicking on the shrink button found in the upper right hand corner within the “IM conversation window.” Notice once the window has been minimized, the conversation will remain open, but will appear as a small minimized window containing the contacts name at the very bottom of the Pronto! interface. This minimized window will flash to alert you as incoming messages are received. To re-open the conversation click on this minimized window. To close the “IM conversation window” either click on the close button, or the [X] button. There are a couple of buttons and fields that appear within the “IM conversation window”: The input box is the smaller field that appears below the conversation box. This is where you will place the content to send to the contact. Once the content has been entered, either clicking the [Enter key] or clicking the send button will distribute the message to the contact. To start a new line without sending the message, hold the control button while pressing the enter button. The conversation box is the large field that appears within the “IM conversation window.” This is where the conversation unfolds. Inputted content will appear in the conversation box under your username name. The content your friend inputs will appear in the conversation box under their username. All messages are time-stamped to be easily searched through until you log out of Pronto!. To clean up the conversation area, select “clear” by right clicking on the conversation box. The Alert action appears between these two windows when the contact begins to respond to the message. Once the conversation has expanded past a couple of messages use the scrolling buttons that will appear on the right hand side of the “send IM window” to view past comments. To copy and paste parts of the conversation, highlight the desired text and copy it to the clipboard to paste at a later point. Pronto! User Guide – Pronto! v2.7 CommuniGate Pro 5.2.10 | 22nd Dec. 2008 20 of 80 To change the relative heights of the input and conversation boxes, drag the splitter between the two boxes to increase or decrease the box sizes. If auto-saving has been enabled, the history line will be present below the input box. If the auto-saving has been disabled, two buttons appear, “save” and “save as.” These buttons allow you to save and change the subject and content of the message being saved. Compose Button: Clicking on the “compose button” while highlighting a name from the contacts list will open a new e-mail message directed to the specified contact. Call Button: Clicking on the “call button” while highlighting a name from the contacts list opens the dialer, and initiates a phone call with the respective party. Right Clicking a contact in the contacts list: Right clicking a contact in the contacts list will open a menu and provide the option to: send an instant message, edit the contact and remove the contact. The edit button allows for the editing of the real named and group your contact is stored in. These functions work as outlined above. 3.3. Dialer Another unique feature found in Pronto! is the ability to make a phone call with a user specified contact. If you want to have a telephone conversation with a friend you can choose to contact them via telephony methods instead of sending instant messages or e-mail communications. Please note that the Pronto! Dialer is currently only available in the Web version of Pronto!. Also note that either the Pronto! User Guide – Pronto! v2.7 CommuniGate Pro 5.2.10 | 22nd Dec. 2008 21 of 80 contacts phone number or their e-mail address can be entered to dial the contact. To access the Dialer, click on the Dialer button on the top right hand side of your account. Once the dialer window is open, it will appear at the forefront of your account. To close the dialer, make sure there are no active calls, then click on the [X] button found in the upper right hand side of the dialer window. Within the dialer window, the following features and options can be found: Call Information Display Window: This is the large window that displays the statuses of your phone calls. Various pieces of information will be displayed here depending on which function of the dialer is being used or the task you are trying to complete. Input Window: This is the smaller of the two windows and where you can input the contact information of the person you want to connect with. Dial Button: After you have input the information, an invitation can be sent by using the “dial button” the button with the green arrow. Hold Button: If you have received a call in Pronto!, and are receiving another incoming call, or need to step away from the phone, click on the “hold button” (the button with the pause symbol) the button will become the “resume” button. Click on the “hold button” again to resume the call. Redial Button: After successfully calling and completing the conversation with the contact, the “redial” button will appear directly above the “dial” button. Clicking on the “redial” button will automatically dial the last contact called and initiate a phone call with them. Decline Button: This button will appear if an incoming phone call is received. If you do not wish to answer the call, click on the “decline button” the button with the red circle with a line through it. Accept Button: This button will appear if receiving an incoming phone call. To answer the call, click on the “accept button” the button with the flashing green arrow pointing downwards. Hang Up Button: This button will not appear until a phone call has been initiated. Once you have completed the call you can hang up by clicking on the “hang up button” the button with the red arrow pointing down. Transfer Button: This button will appear once a phone call has been initiated. To transfer the current call to a different number, enter the transfer number into the Pronto! dialer “input window” and click on the transfer button (the button with the two phones and arrows indicating a transfer of a call from one to the other) or select the recipient from the address book. To transfer a call to a function or speed-dial address, click on the corresponding function/speed dial button. If you have multiple lines, you can transfer from an active line to the one on hold. To do this, click and hold the transfer button - a drop down list of the lines on hold will be presented. The call can then be transferred to one of them by selecting it from the drop-down list. Pronto! User Guide – Pronto! v2.7 CommuniGate Pro 5.2.10 | 22nd Dec. 2008 22 of 80 Re-Direct a Call: Calls can be redirected without answering the incoming call. To do so, rules must be set to re-directing the call. For more information on redirecting a call, please refer to Divert Calls in section 3.1.9. Keypad: This is the common keypad found on standard phones: Clicking on any of the respective numbers on the keypad will place the clicked number into the input window. The phone number can be entered by typing it out while the cursor is in the Input Window. To delete a single digit in the phone number, place the cursor to the right of the number to delete in the Input Window. Clicking the [<] button, or clicking the backspace key on the keyboard will erase the digit before the cursor. To delete the entire phone number from the input window, click the [C] button or highlight the entire number in the Input Window and click the backspace key on the keyboard. Speed dial: With speed-dial there are 9 unassigned buttons. To save a contact to speed-dial, right click on one of the buttons found here and select “speed-dial setup.” You will then be able to call the contact by clicking on the button you have saved their information into. Speed dial Setup: The “speed-dial setup” window allows you to enter the contacts’ information into the input field within this window. After you have entered their number or address, click ok to save the number to the respective button, or click on the cancel or [X] button in the “speed dial setup” window to cancel input information. Functions: The function buttons are a way to access PBX services. Buttons can be configured by right clicking on each button and changing the context, or by setting up completely customized buttons. In the Pronto! dialer there are options to customize your calls that are normally found on a phone, and some additional options you may not. For more information on setting up your PBX services, please refer to the following webpage: http://mail.communigate.com/Guide//PBXServices.html Options available include: Voicemail Button: To change the voicemail greeting, click on the voicemail button and following the audio instructions given. Then proceed directly with the virtual keypad to make any changes to your voicemail. Park Button: To disconnect or (Park) a call, click on the “park” button and follow the audio instructions given. Pick Up Button: To pick up a call that is parked, click on the “pick-up” button and follow the audio instructions given. Missed Button: If you have just missed a call, and the call is being routed to your voicemail, you can pick up the call while the caller is leaving you a Pronto! User Guide – Pronto! v2.7 CommuniGate Pro 5.2.10 | 22nd Dec. 2008 23 of 80 message by clicking on the “missed” button and following the audio instructions given. Greeting Button: To create a custom greeting in your account to leave personal message, or leave announcements for certain callers, click on the “greeting” button and follow the audio instructions given. Each custom greeting is associated with a personal identification number (PIN) and the caller needs to know the greeting PIN to listen to the custom greeting. PBX Button: If you have a Private Branch Exchange (PBX) set up and would like to dial into it, click on the PBX button and follow the audio instructions given. Conference Button: The Pronto! interface can be used to host multi-party conferences by clicking on the “conference” button and following the audio instructions given. History: History compiles a running log of all calls created or participated in, through the account. The call history logs can be filtered: To filter the calls by type, select the call type from the “calls” pull-down menu. To filter the calls by month, select the month from the “month” pull-down menu. To filter through the calls by year, select the year from the “year” pulldown menu. To sort the calls by date, click on the “when” button. Double clicking the “when” button will sort the messages in ascending or descending order based upon date received. To filter the calls by recipient, click on the “Party” button. Double clicking the “party” button will sort the messages in ascending or descending order based upon the recipient’s username. To filter the calls by call-length (registered in seconds) click on the “time” button. Double clicking the “time” button will sort the messages in ascending or descending order based upon the length of the call. To filter the calls by termination reason, click on the “reason” button. Double click the “time” button to sort the messages in ascending or descending order based upon the reason the call was terminated. Double click on a call to initiate a phone call with the corresponding party. Voice Address book: Pronto! can automatically initiate a phone conversation with a previously saved contact by clicking on the button shaped like a book. This will open the “address book” and allow access to the contacts’ name and information. To close the “address book” click the [X] button found in the upper right hand side of the “address book” window. To add a new or edit an existing contact, look under “contacts” side-bar. There are various options found within the “address book”: Pronto! User Guide – Pronto! v2.7 CommuniGate Pro 5.2.10 | 22nd Dec. 2008 24 of 80 List of contacts window: This is the large sub-window that will appear within the “address book” window. The contact’s information will be displayed here. Contacts can be sorted in ascending and descending order by name or by e-mail address. Folder menu: If contacts are stored in multiple folders and sub-folders, you can choose which folder to search through from this pull-down menu. The contacts found within that folder will appear in the “list of contacts” found within the “address book” window. Search field: If you know the contacts name or a few letters of their name or e-mail, you can enter this information into the “search” field. Once the contacts information has been entered, click on the magnifying glass to the right of the “search” field to have Pronto! initiate a search for the contact in the specified folder. To clear the “search” field, click on the clear button. Once Pronto! returns with a positive search result, those contacts who meet the criteria will appear highlighted in the “list of contacts” window. Call button: After you have highlighted (selected) the appropriate contact to have a phone conversation with, click on the “call” button, or double click on the selected contact to initiate the call. 3.4. Log Out Button This button is located in the upper right hand side of your account in the main Pronto! interface. Once you are ready to log out of the Pronto! interface, click on the “Log Out” button to end the session. You will automatically be re-directed to the Pronto! login page. Pronto! User Guide – Pronto! v2.7 CommuniGate Pro 5.2.10 | 22nd Dec. 2008 25 of 80 4. The “New” Button To compose a new e-mail, create a new event, add a new contact, or create a new folder in the e-mail archive, click on the “new” button, found in the upper left hand side of the main Pronto! interface and select the appropriate option. A new window will open in front of the “main window” where you can manage the desired content. 4.1. E-mail Composition (New Æ E-mail) The core function of Pronto! is the ability to send and receive electronic communications. If you want to have a “paper record” or a running log of the conversations with contacts, choose to contact them via e-mail instead of instant messaging or the phone. E-mail can be checked at any time, at any place as long as the appropriate connection exists, along with the security measures found in Pronto! User Guide – Pronto! v2.7 CommuniGate Pro 5.2.10 | 22nd Dec. 2008 26 of 80 Pronto!, there is no need to carry around a large portfolio of documents; you can store and retrieve them electronically online. To open the e-mail composition window click on the “new” button once and select e-mail from the list of available options. To close the e-mail composition window, click on the [X] button, found in the upper right hand side of the composition window. When composing a new email you will find the following options: Content Field: This is the large window/field found in the e-mail composer where the e-mail content can be input. The e-mail message will be composed exactly as you type it and will be reflected in this window. Addressing your Mail: To successfully send an e-mail, the recipients e-mail address or applicable contact information needs to appear in the subject line so the recipient can easily identify your mail: TO field: This is where you input the main contact to send the e-mail message to. You can choose to send an e-mail message to multiple contacts in the TO: field by entering the addressees’ contact information and separating their addresses with a comma (,). If you were to click on the “TO” button the address book will open and you can then select the recipients to send the mail to directly from the address book. Auto-complete function: By default, when you start typing the contact’s e-mail address, Pronto! will automatically search and present all contacts whose names start with the letters you have entered into the “to field” and deliver them via a pull-down menu next to the “to field.” CC field: If you would like to copy someone on the outgoing e-mails, you can input the contact information for the person to be copied on in the CC: field. To copy multiple contacts on the outbound message in the CC: field by enter the addressees’ contact information and separating their addresses with a comma (,). If you were click on the “CC” button, the address book will open and you can then select the recipients to copy on the mail directly from the address book. BCC field: To copy someone on one of your outgoing e-mails but not let any of the other recipients know this person will also be receiving a copy of the mail as well, input the contact information for the person to be copied on the outgoing e-mails in the BCC: field. You can choose to copy multiple contacts in the outbound message in the BCC: field by entering the addressees’ contact information and separating their addresses with a comma (,). If you click on the “To” button, the address book will open and then you can select the recipients to blindly copy the on mail directly from the address book. Subject field: Each e-mail should be appropriately entitled as to give the recipient a good idea of what the body of the message will say. After choosing a subject line that gives a good overview of the content found within the body of the e-mail, enter the way you would like the subject of the message to appear in this field. The first impression the recipient will Pronto! User Guide – Pronto! v2.7 CommuniGate Pro 5.2.10 | 22nd Dec. 2008 27 of 80 get of the sent e-mail will be based on the subject line they see in their email inbox. Formatting Text Menu: To choose how you want the body of an e-mail message formatted, select the appropriate option from this pull-down menu. The format type will apply to the entire message created. By default or by selecting the “Plain text” format the body of the message will appear exactly as you see without any advanced formatting options. By selecting the “HTML” format, you will have access to a wide variety of html options such as: Font Type menu: choose the type of font to compose the body of the message from this pull down menu. Font Size menu: change the size of the font to compose the body of the message with in this menu. Click on the [I] to italicize, [u] to underline, or [b] to make the text bold. Click on the “left” “center” “right” or “spacing” alignment button to align the content of the e-mail accordingly. Click on the “bullet points” button to apply bullet points to the text. Send Button: When clicked on, this appropriately entitled button will send whatever content you have provided in the “content window” of the e-mail composer to the addresses provided in the TO: CC: and BCC: fields. Save Button: If you are in the middle of composing an e-mail and have to abruptly log off or if you want to save a draft of a composed e-mail, click on the “save” button to save a copy of the mail composed thus far into the “drafts” folder found under the e-mail Side-Bar. This mail can later be retrieved, edited and sent at your leisure. Print Button: Clicking on the button shaped like a printer will process the message composed thus far, open a new window in front of the e-mail composer displaying the way the message will be printed and then open your browsers standard printing options dialog window. You can then choose to print the message as you normally would print any web-based content. Attachments Button: Clicking on the button shaped like a paperclip will open your browsers attachment-searching dialog window. This will open the “attachments” window. To attach a file, you need to find the locally store the file then follow the file path. Once the file has been located, attach (open) the file as you normally would open any file in the browser. This file will appear as an attachment to your composed e-mail. Add Video Mail Button: To create a video message to send with your e-mail, click on the button shaped like a camera. To create a video mail, you are required to have a webcam and microphone connected properly to your computer. A warning will pop up requesting to access the webcam and Pronto! User Guide – Pronto! v2.7 CommuniGate Pro 5.2.10 | 22nd Dec. 2008 28 of 80 microphone. To create the video mail, you must allow Pronto! to access these devices. If the webcam and microphone have been configured correctly, the live streaming image the webcam is capturing will appear directly above the body of the e-mail you are composing. When adding a video mail to the message, the following options will be available: To begin recording, click on the “camera” button that appears in the “add video mail options window” to the right of the streaming image. Once this button has been clicked, the video will begin recording. To stop recording the video, click on the “camera” button a second time. To play back the captured video, click on the “play” button that appears directly below the “camera” button to the right of the streaming image in the “add video mail options window”. To delete the captured video, click on the [X] button that appears at the bottom the left hand side of the streaming image in the “add video mail options window”. To add the created video to a e-mail message, click on the check box that appears next to the [X] button at the bottom the left hand side of the streaming image in the “add video mail options window”. E-mail Address book (contact button): You can address a new e-mail message to a previously saved contact by clicking on the button shaped like a book. This will open the “address book” and allow access to the contacts’ name and information. To close the “address book” and continue to compose your email, click the [X] button found in the upper right hand side of the “address book” window. To add a new or edit an existing contact, you can do so under the “contacts” tab in the side-bar. There are various options found in the e-mail “address book” including: List of contacts window: This is the large window that will appear within the “address book.” The contact’s information will be displayed. You can choose to sort through your contacts in ascending and descending order by name or by e-mail address. Folder menu: If you have stored your contacts in multiple folders and subfolders, you can choose which folder to search through from this pull-down menu. The contacts found within that folder will appear in the “list of contacts” found within the “address book” window. Search field: If you know the contacts name, or first few letters of their name or e-mail, enter the information into the “search” field. Once the contacts information has been entered, click on the magnifying glass to the right of the “search” field to initiate a search for the contact in the specified folder. To clear the “search” field, click on the clear button. Once Pronto! returns with a positive search result, contacts who meet the criteria will appear highlighted in the “list of contacts” window. Pronto! User Guide – Pronto! v2.7 CommuniGate Pro 5.2.10 | 22nd Dec. 2008 29 of 80 TO: field: The field appearing next to the “TO:” button is where you can manually input the recipients’ e-mail addresses for the message to be distributed to. TO: button: Another way to add a contact to the “TO:” field in the current e-mail composition is by clicking on the “TO:” button. Once you have found the contact(s) in the “list of contacts” window, highlight the contact(s) and click on the “TO:” button. The contacts will appear in the “TO:” field of the current e-mail composition. You can also add a contact to this field by double clicking the specified contact from the “address book” while you are currently operating in the “TO:” field. The “address book” will close, and the contacts e-mail address will appear in the “TO:” field. CC: field: The field appearing next to the “CC:” button is where the recipients’ e-mail address can be manually input for your message to be copied. This field will appear only when searching through contacts to distribute e-mail messages. CC: button: To add a contact to the “CC:” field in the current e-mail composition, once you have found the contact(s) in the “list of contacts” window, highlight the contact(s) and click on the “CC:” button. Your contacts will appear in the “CC:” field of the current e-mail composition. This button will appear only when searching through contacts to distribute e-mail messages to. You can also add a contact to this field by double clicking the specified contact from the “address book” while you are currently operating in the “CC:” field. The “address book” will close, and the contacts e-mail will appear in the “CC:” field. BCC: field: The field appearing next to the “BCC:” button is where you can manually input the recipients’ e-mail addresses for the message to be blindly copied. This field will appear only when searching through contacts to distribute e-mail messages. BCC: button: To add a contact to the “BCC:” field in the current e-mail composition, once you have found the contact(s) in the “list of contacts” window, highlight the contact(s) and click on the “BCC:” button. The contacts will appear in the “BCC:” field of the current e-mail composition. This button will appear only when searching through contacts to distribute e-mail messages to. You can also add a contact to this field by double clicking the specified contact from the “address book” while you are currently operating in the “BCC:” field. The “address book” will close and the contact’s e-mail will appear in the “BCC:” field. Contacts with multiple addresses: If a contact has multiple addresses or phone numbers listed, the appropriate identification can be selected using the drop-down menu before adding the contact to your message. Close button: To close the “address book” click on the “close” button found at the bottom right hand side of the “address book.” Any modifications made to the TO: CC: and BCC: fields in the “address book” window will be applied to the current e-mail composition. Pronto! User Guide – Pronto! v2.7 CommuniGate Pro 5.2.10 | 22nd Dec. 2008 30 of 80 Cancel button: If you have opened the “address book” by mistake click on the “cancel” button found at the bottom right hand side of the “address book.” Priority Level Button: You can change the priority level of your outbound e-mail messages by clicking on the exclamation point shaped button. This will change the “priority level” of the message. When the recipient receives the message, they will notice that the priority level of the message has been set to high, indicating this message is of greater importance. To return the priority level of the message to normal, click on the “priority level” button again. Notifications Menu: You can request a notification message be sent to your email inbox that an outgoing e-mail has been either delivered to or opened by the recipient. You can utilize these messages for proof of e-mail delivery or to be alerted to the exact moment when the recipient first opens the mail. Spell Check Menu: Included in Pronto! is a spell-checker that can be used in correlation with the e-mail composer. Once the body of the message has been entered into the “content” window, the spelling of the content of the message can be checked in multiple languages by selecting the appropriate language from the “Spell Check” menu. Once you have selected the language, Pronto! will initiate the “spell check” function. If Pronto! finds a spelling error, the affected word will be highlighted red to alert you that this word might be misspelled. At this point, you can manually correct the misspelling, or you can find a list of the most relevant suggestions by right clicking the highlighted word, and choosing the correct spelling from your server’s spell checker. If you select a word from the Server database, the selected spelling will replace the misspelled word in the “content” window. Pronto! User Guide – Pronto! v2.7 CommuniGate Pro 5.2.10 | 22nd Dec. 2008 31 of 80 4.2. Creating an Event (New Æ Event) Another key aspect of Pronto! is the ability to create and maintain a running calendar of events, appointments or meetings. To quickly schedule an event, click on the “new” button once and select “event” from the list of available options. This will open the “events” window and the “events” window will appear at the forefront of your account. To close the “events” window click on the [X] button found in the upper right hand side of the “events” window. When creating a new event the event will automatically be created in the main calendar, unless you specify another calendar for the event to be created in. To select a calendar folder, go to the Calendar, and select a folder on from the menu. When creating a new event you will find the following options: Subject Field: You should appropriately entitle the event so that when the invitation is distributed to your guests, they will understand exactly what subject will be discussed during the event. Where Field: This is where you can enter the location of the event. Whether it takes place in person, over the phone, or online, you can pick an appropriate space to hold the event and this will be reflected in the invitation when it is distributed. Date Starts Field: You can choose the start date for the event by either clicking on the date or calendar button to the right of the “starts” field. This will bring up a menu allowing you to choose the month and day you would like the event to start. Pronto! User Guide – Pronto! v2.7 CommuniGate Pro 5.2.10 | 22nd Dec. 2008 32 of 80 In this menu, you can scroll through the months, and even years to plan a starting time for an event far off in the future. Time Starts Menu: You can choose the starting time of the event by clicking on the pull-down menu found to the right of the “Date starts field.” This will pull up available starting times for the event. You can then pick the starting time by clicking on the exact time the event will start. Date Ends Field: You can choose the ending date for the event by either clicking on the date or calendar button to the right of the “ends” field. This will bring up a menu allowing you to choose the month and day the event will end. In this menu, you can scroll through the months and years to select an ending time for an event far off in the future. Time Ends Menu: The ending time of the event can be chosen by clicking on the pull-down menu found to the right of the “Date Ends field.” This will pull up available finishing times for the event. You can then pick the ending time by clicking on the exact time the event should end. Content Window: In this window, you can enter the information that will be discussed at the event. All invited attendees will have access to this content. Attendees Button: Clicking on the “attendees” button will add two additional buttons and fields to the “event” window, the “TO:” button and field and the “Optional:” button and field. Clicking on the “attendees” button again will hide the two additional buttons and fields: TO: field: The field appearing next to the “TO:” button is where you can manually input the required attendees’ e-mail addresses for the event to be distributed. TO: button: Clicking on the “TO:” button will open the address book, allowing you to search for, add contacts and proceed as outlined in the section entitled “address book” under the topic of e-mail composition. After you have selected the appropriate contacts, they will appear in the “TO:” field. Optional: field: The field appearing next to the “Optional:” button is where you can manually input the optional attendees’ e-mail addresses for the event to be distributed. This field will appear only when searching through contacts to invite to the event. Optional: button: Clicking on the “Optional:” button will open the address book, allowing you to search for, add contacts and proceed as outlined in the section entitled “address book” under the topic of e-mail composition. After you have selected the appropriate contacts, they appear in the “Optional:” field. This button will appear only when searching through contacts to invite to the event. Show availability button: This button opens the free-busy display dialog which allows you to select an appropriate time-frame for your meeting based on availability information created by the attendees. Pronto! User Guide – Pronto! v2.7 CommuniGate Pro 5.2.10 | 22nd Dec. 2008 33 of 80 Save Button: After you have entered the subject of the event, select the location for the event, the appropriate start/end dates and times, which attendees to invite, and any other applicable option, clicking on the “save” button will save the event with the entered specifications. The newly created event will appear in the calendar. Print Button: Clicking on the button shaped like a printer will process the event you have created or opened and open the event in a new window and display the way the event will be printed. Your event can then be printed using open your browsers standard printing options dialog window. Then you can print the event as you would normally print any web-based content. Attachments Button: Clicking on the button shaped like a paperclip will open your browsers attachment-searching dialog window. To attach a file locate where you have locally stored your files are and then follow the path leading to that file. Attach the selected file as you would normally open any file in your browser. The file will appear as an attachment to the newly created event. Contacts Button: Clicking on the contacts button while creating an event will open the address book, allowing you to search for and add contacts to the event. Then proceed as outlined earlier under the section entitled “attendees” button by adding or removing contacts from the “TO:” and “Optional:” fields. Recurrence Button: You can change the frequency of which the event occurs by clicking on the “recurrence” button. Without clicking on this button the created event will be a one-time occurrence. When clicking on the “recurrence” button the “recurrence” window will appear at the forefront of your account. To close the “recurrence” window click on the [X] button found in the upper right hand side of the “recurrence” window. In the “recurrence” window, you will find the following options: Daily Selection Button: You can choose to have the event to re-occur daily by selecting this option. You can choose to have the event occur daily, every (x) number of days by entering the (x) number into the “days” field. The event will then occur every (x) number of days. Weekly Selection Button: If you want the event to re-occur weekly, select this option. You can choose to have the event occur weekly, every (x) number of weeks by entering the (x) number into the “weeks” field. Depending on which day the event is scheduled, you can ensure that it falls and will reoccur on a specific day by selecting the appropriate day. The event will occur every (x) number of days on a specific day. Monthly Selection Button: For the event to re-occur monthly, select this option. You can choose to have the event occur monthly every (x) number of months and on the (y) day of each month by entering the (x) number into the Monthly Selection field, and the (y) number into the “on days” field. The event will occur every (x) number of months, on every (y) day. Monthly by Weekday Selection: If you want the event to re-occur monthly on specific weekdays, select this option. You can choose to have the event occur monthly every (x) number of months by entering the (x) Pronto! User Guide – Pronto! v2.7 CommuniGate Pro 5.2.10 | 22nd Dec. 2008 34 of 80 number into the Monthly Selection field. From the “month(s) on:” pull-down menu, you can schedule the event to take place during a specific week within the month. To make sure the event will reoccur on a specific day, select the appropriate day. The event will occur every (x) number of months during the week you selected on the day you selected. Yearly Selection: For the event to re-occur yearly select this option. You can choose to have the event occur yearly, every (x) number of years and on the (y) day of each year by entering the (x) number into the “yearly” Selection field, the (y) number into the “on” field and choosing what month you would like the event to occur within. The event will occur every (x) number of years every (y) day during the month you selected. Yearly by Weekday Selection: For the event to re-occur yearly and on a specific date, select this option. To choose which month you would like to have the event take place, select the month from the “every month” menu. To choose the week you would like the event to take place in by selecting from the “on” date menu. Finally, select which weekday you would like the event to take place on by selecting the appropriate option. The event will occur yearly during the month you indicated in the week you indicated, on the day(s) you indicated. Ends by field: To specify which day the event terminates, select the appropriate day from the menu found by clicking on the calendar next to the “ends by” field. You can also manually input a termination date for the event by entering the two digit month, two digit date and four digit year into the field. Save button: Clicking on the “save” button after you have made the recurrence changes will automatically update your calendar as well as the invited colleagues calendar for the event you have modified. Cancel button: Clicking on the “cancel” button will close the recurrence window without saving your changes. Remove recurrence button: Clicking on the “remove recurrence” button will remove the recurrence from the event while keeping the remainder of the event information intact. Priority Level Button: To change the priority level of the event invitations, click on the exclamation point shaped button. When the recipient receives the invitation they will notice that the priority level of the invitation has been sent to high indicating this invitation should be responded to immediately or that this event is of high importance. If you want to return the priority level of the event to normal click on the “priority level” button again. Delete: To delete an event from your calendar, select the event and click on the “delete” button. The event and all recurrences have been removed from your calendar. Pronto! User Guide – Pronto! v2.7 CommuniGate Pro 5.2.10 | 22nd Dec. 2008 35 of 80 4.3. Adding a Contact (New Æ Contact) The core concept behind Pronto! is the ability of the end-user to easily communicate via instant messaging, e-mail, or voice by accessing their stored contacts list. The contacts list is the running database of information about friends, family or co-workers that has been entered into Pronto!, and your contacts are stored in the “address book.” To quickly add a contact to the “address book” click on the triangle icon next to the “new button” once and select “contact” from the list of available options. This will open the “contacts” window and the “contacts” window will appear at the forefront of your account. To close the “contacts” window, click on the [X] button found in the upper right hand side of the “contacts” window. When a new contact is created, it will be created in the selected contacts folder. To select a contact folder, go to the contacts tab and select a folder. If no folder is selected, the new contact will be created in the main contacts folder. When adding a new contact you will find the following options: Full Name Button: Clicking on either the “Full name” button or “Full name” field will open the “full name” window. To close the “full name” window, click on the [X] button found in the upper right hand side of the “full name” window. In this window you have the option to: Input the contacts’ professional title in the “title” field. Input the contacts’ first name in the “first name” field. Input the contacts’ middle name in the “middle name” field. Input the contacts’ last name in the “last name” field. Pronto! User Guide – Pronto! v2.7 CommuniGate Pro 5.2.10 | 22nd Dec. 2008 36 of 80 Enter the contacts’ suffix in the “suffix” field. Save the full-name of the contact by clicking the “OK” button after the contact information has been entered. Cancel out of the full-name editor by also clicking on the “cancel” button. Job Title field: Enter the work-appointed title for the contact in this field. Organization field: Enter the company/organization of the contact. Unit field: Enter the specific division of the company/organization that your contact works in, into this field. Profession field: Enter the profession of the contact into this field. Telephone field and display area: Clicking on the little green (+) button found under the Telephone field will create a new space to input the contacts’ telephone number. You can choose how you want to classify their number by selecting one of the options from the pull-down menu found next to the telephone number input space. You can delete a telephone number from the contact by clicking on the red (x) button found to the right of the telephone number classification pull-down menu. Multiple phone numbers can be entered for one contact. The radio button next to a phone number in the “telephone display area” indicates the default telephone number of the contact. E-mail field and display area: Clicking on the little green (+) button found under the e-mail field will create a new space to input the contacts e-mail information. You can choose how to classify their e-mail address by selecting one of the options from the pull-down menu found next to the e-mail address input space. An e-mail address can be deleted from the contact by clicking on the red (x) button to the right of the e-mail address classification pull-down menu. Multiple email addresses can be entered for one contact. The default address of the contact is indicated by the button next to it. Photo button and Photo display area: Clicking on the “photo” button will open the browsers’ search-dialog window. To save a photo image of the contact, locate where the photo has been stored, then follow the path leading to that file. Once you have found the photo, select the appropriate photo to represent the contact and open the photo as you normally would open any file or photo in your browser. Barring sizing restrictions, the selected photo will appear directly above the “photo” button in the “photo display area.” Note field: This field is found to the right of the photo button and display area. If there are additional notes to include with the previously stored information about the contact, add all supplemental information into this field. File As field: By default, Pronto! will store the contacts information by their last name followed by their first. To file the contact under a different name (create an alias), but still retain the first and last name fields, enter the alias of the contact into the “file as” field. When the contacts information has been saved, you will be able to search for them with this newly created alias. Pronto! User Guide – Pronto! v2.7 CommuniGate Pro 5.2.10 | 22nd Dec. 2008 37 of 80 Address button and field: Clicking on the “Address” button will open the “address information” window. Once you have opened the “address” window you have the option to: Input the contacts’ P.O. Box number in the “P.O. Box:” field. Input the contacts’ Street name in the “Street:” field. Input the contacts’ Suite Number in the “Suite:” field. Input the contacts’ City of residence in the “City:” field. Input the contacts’ State/Province of residence in the “State/Province:” field. Input the contacts’ Postal Code in the “Postal Code:” field. Input the contacts’ Country of residence in the “Country:” field. Save the input information into the address field. By clicking on the “ok” button, the newly input information will appear in the address field. Close the “address” window by clicking on the [X] button found in the upper right hand side of the “address” window. You can modify the classification of the contacts address by selecting the appropriate option from the pull-down menu found next to the “address” button and above the “address field.” Website field: Enter the URL for any website that your contact helped to build, maintain, frequents, works in correlation with or likes in this field. Save button: After the contacts’ information has been entered, click on the “save” button to save the contact to the address book exactly the way you configured it. If you search by the contacts last name or alias, you should be able to find the new contact within the “address book.” Save and Close button: After entering the contacts’ information you would like to have stored, click on the “save and close” button to save the contact to the address book exactly the way you configured it. Compose button: Clicking on the “compose” button found within specific users contact information will open the e-mail editor and automatically address the email to the selected user based upon the information previously provided. If you have provided multiple e-mail addresses for one contact, they will appear in menu form under the “compose” button. Call button: Clicking on the “call” button found within specific users contact information will open the “dialer” window and automatically initiate a phone call. If there are multiple telephone addresses’ for one contact, they will appear in menu form under the “call” button. Then select which number to dial. You must have entered the users’ information for the call button to work. Send IM button: Clicking on the “send IM” button found within specific users contact information will open the “instant messenger” window and automatically initiate an instant messaging session with the selected user based upon the Pronto! User Guide – Pronto! v2.7 CommuniGate Pro 5.2.10 | 22nd Dec. 2008 38 of 80 information previously provided. The users e-mail address is their IM identification and you must have entered it to chat with another user. Delete button: Clicking on the “delete” button found within specific users contact information will automatically delete the contact. There are no warnings or requests, therefore it is imperative that you want to delete the contacts information before clicking on this button. Un-decoded Message button: If you would like to see the message in its original coded form with no visual formatting applied, click on the “un-decoded message” button. Backwards button: This button can be used to cycle through the contacts in reverse-alphabetical order. When adding a contact, you can cycle through the address book to find pre-existing information or to edit an existing contact. Forwards button: This button can be used to cycle through the contacts in alphabetical order. When adding a contact, you can cycle through the address book to find pre-existing information or to edit an existing contact. 4.4. Creating a New Folder (New Æ Folder) With Pronto! you can create and specify the location of the new folder within your account. You can create new folders and directories for every aspect of Pronto!, from new e-mail folders to event folders to sub-folders within the “address book” all allowing for better organization of your electronic communications. To quickly Pronto! User Guide – Pronto! v2.7 CommuniGate Pro 5.2.10 | 22nd Dec. 2008 39 of 80 create a new folder click on the triangle icon next to the “new button” once and select “folder” from the list of available options. This will open the “New folder” window. To close the “New folder” window click on the [X] button, found in the upper right hand side of the “New folder” window. When creating a new folder, you will find the following options: Name field: Found at the top of the “New folder” window, input the name of the new folder to create. Folder type Menu: Found directly below the “name field” this pull-down menu allows you to specify what type of folder to create. Location Menu Window: Depending on what type of folder is created, you will see the list of available paths to choose from in this window. To choose the enddestination location for the folder, open the path leading to the desired location and click on the “save” button. To create a sub-folder within a pre-existing folder open the path leading to the pre-existing folder, make sure the folder is highlighted and then click on the “save” button. Save button: After the folder has been created, click on the “save” button to save the new folder at the file-path you have input. When you visit the parent directory, you will see the newly created folder. Pronto! User Guide – Pronto! v2.7 CommuniGate Pro 5.2.10 | 22nd Dec. 2008 40 of 80 5. Side Bar and Tabs Using the side bar and the tabs is the easiest way to access the various forms of communications available within Pronto!. When clicking on the any of the tabs found in the “sidebar” the respective tab will expand within the “side bar” to reveal all available tab-specific options Pronto! can deliver. Depending on the selection, options available to you that normally appear right above the “main window” will change accordingly. Pronto! User Guide – Pronto! v2.7 CommuniGate Pro 5.2.10 | 22nd Dec. 2008 41 of 80 5.1. E-Mail Tab Advanced e-mail options can be found by clicking on the “e-mail tab” on the sidebar. If you want to have a “paper record” or a running log of your conversations with contacts, you can contact them via e-mail instead of instant messaging or the phone. Clicking on the “e-mail tab” will access the list of available mailboxes and allow you to create, view, organize and maintain your messages. To manage e-mail, you will find the following options: E-mail Composition: For more information regarding composing a new e-mail please refer to section 4.1. Delete button: To delete an e-mail, select the appropriate message in the “main” window and click on the “delete” button. The selected messages will be deleted (moved to the trash folder if the preference for delete mode is set to “Move to trash”). Mark Unread Button: If you would like to classify an e-mail message as unread, you can do so by selecting the appropriate message in the “main” window and clicking on the “mark unread” button. The selected message will appear in your mailbox as an unread message. Mark Read Button: If you would like to classify an e-mail message as read you can do so by selecting the appropriate message in the “main” window and clicking on the “mark read” button. The selected message will appear in your mailbox as a read message. Set Flag Button: To specify a higher level of importance to an e-mail or to flag the e-mail to alert you at a later point, select the appropriate message in the Pronto! User Guide – Pronto! v2.7 CommuniGate Pro 5.2.10 | 22nd Dec. 2008 42 of 80 “main” window, and click on the “set flag” button. The selected message will appear flagged in your mailbox, the little red flag appearing next to the message in the “flag field” within the “main window.” Empty Trash Button: To delete the contents of the trash folder, click on the “empty trash” button. The folder will be empty. This button is only visible if you select the Trash folder in the folder tree and the preference for Delete mode is set to “Move to trash.” Purge Deleted Button: This button will appear if “delete mode” has been set to “mark” in the deletion options found in the “settings window” (refer to section 3.1.4 for more information). If the message to be marked for deletion is selected, clicking on the “purge deleted” button will automatically delete all marked messages. Reply Button: To reply to the sender of a message that you have read, select the appropriate message in the “main” window and click on the “reply” button. A window practically identical to the “e-mail composition” window will appear but with the contents of the message you have selected appearing indented in the “content field.” The “to:” field within the “e-mail composition” window will contain the address of the sender of the mail you are replying to. You can then respond to your mail as normal. Reply to All Button: To reply to the sender and anyone copied on a message that you have read, select the appropriate message and click on the “reply to all” button. A window practically identical to the “e-mail composition” window will appear, but with the contents of the message you have selected appearing indented in the “content field” found within the “e-mail composition” window. The “to:” and “cc:” fields within the “e-mail composition” window contain the addresses of the sender and anyone copied on the mail you are replying to. Then respond to the mail like you would normally compose an e-mail. Forward Button: To forward a message you have received to another e-mail address, select the appropriate message in the “main” window and click on the “Forward” button. A window practically identical to the “e-mail composition” window will appear with the contents of the message you have selected appearing as a forwarded-attached file, directly under the subject line of the newly forwarded message. While forwarding a message, you have the options to: Check the contents of the attached file you are forwarding by clicking name of the forwarded-attached file. Remove the attached file you are forwarding and continue to compose the e-mail by clicking on the checked box that appears to the left of the name of the forwarded-attached file. Forward the message with inline comments (direct replies to specific topics) by opening the message, and then clicking the forward button. Move Into Button: To categorize e-mail messages into specific folders select the appropriate message in the “main” window and click on the “move into” button. Pronto! User Guide – Pronto! v2.7 CommuniGate Pro 5.2.10 | 22nd Dec. 2008 43 of 80 This will open the “move into” window. To close the “move into” window, click on the [X] button, found in the upper right hand side of the “move into” window or the “cancel” button found in the lower right hand side of the “move into” window. Within the “move into” window, you should see all mailboxes that have been created as well as mailboxes you have access rights to. To move a message, you can: Double-click on the appropriate folder to move the message into. Click on the appropriate folder to move the message into and then click the “save” button found at the bottom right hand corner of the “move into” window. Copy Into Button: To copy and categorize e-mail messages into specific folders while leaving the message in its current destination, select the appropriate message in the “main” window and click on the “copy into” button. This will open the “copy into” window. To close the “copy into” window click on the [X] button found in the upper right hand side of the “copy into” window or the “cancel” button found in the lower right hand side of the “copy into” window. Within the “copy into” window, all mailboxes that you have created will be listed. To copy a message, you can: Double-click on the appropriate folder you would like to copy the message into- Click on the appropriate folder you would like to copy the message into and then click the “save” button found at the bottom right hand corner of the “copy into” window. Create a New Folder Button: An alternate way to create a new folder is by clicking on the button found at the bottom left hand corner of the “e-mail options” window found within the “e-mail” tab on the “side bar.” For more information on creating a new folder, please refer to section 4.4. Shared folders Button: To share specific folders in your Pronto! account with another user click on the “shared folders” button to open the “shared folders” window. To close the “shared folders” window, click on the [X] button found in the upper right hand side of the “shared folders” window or the “cancel” button found in the lower right hand side of the “shared folders” window. Within the “shared folders” window, you should find the following options: Username Button: Clicking on the “username” button will open the “email address book.” You can then search through the “e-mail address book” for the contact whose folders you wish to access. Once the appropriate contact information has been located, you can either double click on the appropriate contact, or highlight the appropriate contact and click on the close button found in the lower right hand side of the “e-mail address book.” Their e-mail information should automatically be placed within the “username” field. Username Field: Here, you can manually enter the e-mail address of the user whose folders to access. If you have previously selected the user Pronto! User Guide – Pronto! v2.7 CommuniGate Pro 5.2.10 | 22nd Dec. 2008 44 of 80 from the “e-mail address book” via the “username” button the respective information will be displayed in this field. Open Button: If you have access to other users folders, clicking on the “open” button will bring up the “shared folders” window, and change the “open” button to the “close” button. Shared Folders Window: If the user whose folder you would like to view has provided access, a list of the shared folders will appear in the “shared folders” window. Either check the folder for access to the folder, or uncheck the folder to no longer view the contents. Update Button: After you have selected or unselected the folders that you would like to view, clicking on the update button will give you access to the requested folders. The folders that are being shared with you appear under the “e-mail” tab on the “side bar” named respectively under the node with the name of the corresponding user. Close Button: To stop viewing the shared contents of the other user, click on the close button to remove the “shared folders” window. Once the “shared folders” window has been removed, the “close” button has will change back to the “open” button. Attachments Button: When receiving an e-mail with multiple attachments, the “attachments” button will appear in the e-mail you are viewing in the “main window” under the “sender” and “recipient” fields. To manage attachments from within a specific message open the “attachments” window. Pronto! User Guide – Pronto! v2.7 CommuniGate Pro 5.2.10 | 22nd Dec. 2008 45 of 80 Within the “attachments” window you will find the following options: Attachments List: All attached files in the e-mail appear in list form covering the body of the “attachments” window. Select or deselect each attachment you would like to manage by checking or un-checking the checkbox next to the attachment. Select All Button: To manage all attachments in a specific e-mail, click on the “select all” button. Deselect All Button: To unselect all of the attachments, click on the “deselect all” button. Save on Server As Button: To save the selected attachments, select the appropriate attachments and click on the “save on server” button. The “upload” file window will open and present the following options: Replace Existing Checkbox: To replace an existing file within a specific folder with the attachment, check the “replace existing” option. If there were identically name files the attachments function will have replaced the older copy. Upload File Button: To upload attachments to a specified file path click on the “upload file” button. Save Locally As Button: To save the selected attachments locally on your computer click on the “save locally as” button. Your web browserspecific file-saving menu will appear and save the files as you normal. E-mail File Button: To forward attachments to a contact via e-mail, select the appropriate attachments and then click on the “e-mail file” button. The e-mail composition window will open with the selected attachments included. Then compose an e-mail as normal in the Pronto! interface. For more information on composing a new e-mail, please refer to section 4.1. Remove Files Button: To remove attachments from an e-mail but still keep the e-mail in the folder, select which attachments to remove from the e-mail and click on the “remove files” button. The e-mail is still present but the selected attachments will no longer appear as an attachment in that email. Pronto! User Guide – Pronto! v2.7 CommuniGate Pro 5.2.10 | 22nd Dec. 2008 46 of 80 5.1.1. Right Clicking a Folder under the “E-mail” Tab in the “Side Bar” Another unique feature found in Pronto! is the ability to right click on a folder under the “e-mail” tab in the “side bar” to quickly organize and maintain e-mail folders. To make changes to a specific folder, right click on the folder. A browser specific menu will appear next to your mousepointer with the following options: Create Folder: For more information on creating a new folder please refer to section 4.4. Rename Folder: To rename a folder within your account make sure you have selected the appropriate folder and click on the “rename folder” button. The “rename folder” window will appear at the forefront of your account. To close the “rename folder” window click on the [X] button found in the upper right hand side of the “rename folder” window or the “cancel” button found in the lower right hand side of the “rename folder” window. Within the “rename folder” window, you should find the following options: “New folder name” field: Enter the name you would like to re-name the selected folder to in the “new folder name” field. Save button: Click on the save button will save the folder under the new name you have given it. Cancel button: Clicking on the cancel button will close the “rename folder” window. Remove Folder: To remove a folder from your account, select the appropriate folder(s) to delete and click on the “remove folder” button. The “delete folder” window will open. To close the “remove folder” window click on the [X] button found in the upper right hand side of the “remove folder” window or the “cancel” button found in the lower right hand side of the “remove folder” window. Within the “remove folder” window, you should find the following options: Delete button: Follow through with the deletion and remove the folder by clicking on the “delete” button. The folder and contents will then be permanently deleted from your account. Cancel button: Cancel the deletion and keep the selected folder(s) in your account by clicking on the “cancel” button. Pronto! User Guide – Pronto! v2.7 CommuniGate Pro 5.2.10 | 22nd Dec. 2008 47 of 80 Access Control List: To share a specific folder with a colleague or friend, select the appropriate folder(s) to share and click on the “access control list” button or right click on the appropriate folder and choose “access control list” from the pulldown menu. The “access control list” window will open at the forefront of your account. To close the “access control list” window click on the [X] button found in the upper right hand side of the “access control list” window or the “cancel” button found in the lower right hand side of the “access control list” window. Within the “access control list” window you should find the following options: New Button: Clicking on the “new” button within the “access control list” window” will allow you to enter the e-mail address of your friend or colleague to share the folder with. Edit Button: Clicking on the “edit” button within the “access control list” window” will allow you to edit the existing e-mail address of your friend or colleague to share the folder with. Delete Button: Clicking on the “delete” button within the “access control list” window will allow you to delete the existing e-mail address of your friend or colleague. Access Control List Rights: The Account owner can grant certain limited access rights to other users by specifying the options found under “Access Control Lists rights.” The following Mailbox access rights can be checked or unchecked: Lookup: By granting a user Lookup access rights, they will be able to view specified mailboxes in your account. Select: By granting a user read access rights, they will be able to open this Mailbox and see the messages in this Mailbox. Seen: By granting a user seen access rights, they will be able to mark messages as read. Usually a message is automatically marked as seen when a user reads it. If this access right is not granted to a user reading a message, the message "seen" status will not be changed. Flags: Granting a user with write access right allows them to be able to set message flags: i.e. to mark messages as answered or "flagged” and to reset the message flags. Insert: If you grant a user the Insert access right, that user will be able to append messages to this Mailbox and to copy messages from other Mailboxes into this one. Create: If you grant a user the Create access right, that user will be able to create new Mailboxes "inside" this Mailbox. Delete: If you grant a user the Delete access right, that user will be able to mark messages as deleted and to compress the Mailbox, removing all its messages marked as deleted. Pronto! User Guide – Pronto! v2.7 CommuniGate Pro 5.2.10 | 22nd Dec. 2008 48 of 80 Admin: If you grant a user the Administer access right, that user will be able to modify the mailbox, modify the mailbox meta-data, and see any hidden mailboxes and messages you might have. Save Button: Clicking on the “save” button within the “access control list” window” will save any changes you have made to the rights of that specific folder. Cancel Button: Clicking on the “cancel” button within the “access control list” window”, will disregard the changes and close the “access control list” window. 5.1.2. Right Clicking an E-mail in the Message Grid in the “Main” Window Another unique feature found in Pronto! is the ability to “right click” an e-mail in the preview pane under the “main” window to quickly access and control where the e-mail messages should go. To make changes to a specific e-mail right click on the e-mail message in question. The right clicking function can be used to “open”, “print”, “redirect” and “forward” multiple e-mails (maximum of ten) at once. A browser specific menu will appear next to the mouse-pointer with the following options: Open Message: Selecting “open message” will open a new window containing the message you have selected in front of the “main” window. Print Message: Selecting “print message” will open a new window containing the selected message in front of the “main” window. This window displays the way the message will be printed and then open your Pronto! User Guide – Pronto! v2.7 CommuniGate Pro 5.2.10 | 22nd Dec. 2008 49 of 80 browsers standard printing options dialog window. Then you can print the message as you normally would print any web-based content. Re-direct to…: To re-direct a received message to another e-mail address, select the appropriate message in the “main” window, right clicking on that message and select the “Re-direct to…” option from the pull-down menu. A new window containing the message you have selected in front of the “main” window containing the following options: The “To” Button: To select a pre-existing contact from the address book click on the “To” button and select the contact to re-direct the message to. The contact will appear in the “To” field within the “re-direct to…” window. The “To” field: Manually input a contacts e-mail address to re-direct the message in this field. The “Send” Button: If an address appears in the “to” field where you could re-direct the message by clicking on the “send” button within the “redirect to…” window will deliver the message to the address within the “to” field. The “cancel” button: To close this window, click on the cancel button. The message will not be re-directed. Forward Message: To forward a received message to another e-mail address, select the appropriate message in the “main” window, right click on that message then select the “Forward” option from the pull-down menu. A window practically identical to the “e-mail composition” window appears but with the contents of the selected message appearing as an forwarded-attached file directly under the subject line of the newly forwarded message. While forwarding a message, you have the options to: Check the contents of the attached forwarded file by clicking name of the forwarded-attached file. Remove the attached file, and continue to compose the e-mail by clicking on the checked box that appears to the left of the name of the forwarded-attached file. Delete Message: To delete an e-mail, select the appropriate message in the “main” window, right click on that message then select the “delete” option from the pull-down menu. The selected messages will be deleted (moved to the trash folder if available for restoration if need be). Move into…: To move and categorize your e-mail messages into specific folders, select the appropriate message in the “main” window, right click on that message and select the “move into” option from the pull-down menu. This will open the “move into” window, and the “move into” window will appear at the forefront of your account. To move a message, you can double-click on the appropriate folder to move the message into, or click on the appropriate folder to move the message into, and then click the Pronto! User Guide – Pronto! v2.7 CommuniGate Pro 5.2.10 | 22nd Dec. 2008 50 of 80 “save” button found at the bottom right hand corner of the “move into” window. Copy into…: To copy and categorize e-mail messages into specific folders, while leaving the message in its current destination, select the appropriate message in the “main” window, right click on that message, and select the “copy into” option from the pull-down menu. Within the “copy into” window all available mailboxes are listed. To copy a message: Double-click on the appropriate folder in which to copy the message or click on the appropriate folder to move the message into, and then click the “save” button found at the bottom right hand corner of the “copy into” window. Reply: To reply to the sender of a message, select the appropriate message in the “main” window, and right click on that message then select the “reply” option from the pull-down menu. A window practically identical to the “e-mail composition” window appears with the contents of the message you have selected visible in the “content field.” The “to:” field within the “e-mail composition” window will contain the address of the sender of the mail you are replying. You can then respond to the mail like you would normally compose an e-mail. Reply to all: To reply to the sender and anyone copied on a message that you have read, select the appropriate message, right click on that message and select the “reply to all” option from the pull-down menu. A window practically identical to the “e-mail composition” window appears with the contents of the message you have selected in the “content field” found within the “e-mail composition” window. The “to:” and “cc” fields within the “e-mail composition” window now contain the addresses of the sender and anyone copied on the mail you are replying. You can then respond to the mail like you would normally compose an e-mail. Call: To call the sender of the e-mail you have read, select the appropriate message right clicking on the message and select “call” from the pull-down menu. The Pronto! dialer will open and automatically try to initiate a voice call with the other party. You can then use the dialer like you would to handle any other call. Pronto! User Guide – Pronto! v2.7 CommuniGate Pro 5.2.10 | 22nd Dec. 2008 51 of 80 5.1.3. Right Clicking the Sender of an E-mail in the Preview Pane Another unique feature found in Pronto! is the ability to “right click” on the senders name in an e-mail under the “main window.” You will see a browser specific menu appear next to the mouse-pointer with the following options: Add Contact: To add the sender of the e-mail you are viewing to the address book, right click on the sender of the e-mail and select the “add contact” option. For more information on adding a contact, please refer to section 4.3. Compose e-mail: To compose an e-mail with the sender of the mail you are reading as the recipient, right click on the sender of the e-mail, and select the “compose e-mail” option. For more information on composing an e-mail, please refer to section 4.1. Send IM: To send an instant message to the sender of the mail you are reading, you can do so by right click on the sender’s e-mail, and select the “send IM” option. The instant messaging window will open and you can then chat back and forth with the contact, if he or she is online. You can then access all instant messaging options available in Pronto! as you normally would. For more information on instant messaging, please refer to section 3.2. Call: To call the sender of the mail you are reading, right click on the sender of the e-mail and selecting the “call” option. The Pronto! dialer will open and automatically initiate a call with the contact. You can then manage the calls as Pronto! User Guide – Pronto! v2.7 CommuniGate Pro 5.2.10 | 22nd Dec. 2008 52 of 80 you normally would through the Pronto! dialer. For more information on the Pronto! dialer, please refer to section 3.3. Schedule Meeting: To schedule a meeting with the sender of the mail you are viewing, right click on the sender of the e-mail and select the “schedule meeting” option. The new events window will open allowing to create a new event as you normally would within the Pronto! interface. For more information on creating an event, please refer to section 4.2. 5.2. Calendaring Tab Advanced calendaring options can be found by clicking on the “Calendars” tab on the side-bar. To plan an event, create a meeting, or set a reminder for yourself for a future engagement, schedule and monitor appointments using the calendaring features of Pronto!. Clicking on the “calendar” tab will bring up a small calendar view of the current month in the side-bar as well as access all of the calendars and display the primary calendar in the “main” window. Navigate through past, present and future events and change the starting dates for certain calendar-views using the “calendar tab.” In Pronto! several calendars can be created across your account, but only one is assigned the role of “main calendar.” When you accept an invitation or create a new appointment or meeting request the data will be stored in the “main calendar.” New Event: A event can be created by selecting the day and time in the daily and weekly view, right clicking on the day and selecting schedule meeting. For supplemental information on creating a new event, please refer to section 4.2. Pronto! User Guide – Pronto! v2.7 CommuniGate Pro 5.2.10 | 22nd Dec. 2008 53 of 80 Print button: To print the calendar view, make sure you have the appropriate “calendar view” selected and then click on the “print” button. A new window will pop up displaying how the calendar will appear when it prints. If satisfied with the view, you can then print the calendar as you would normally print any other document in your web browser. Daily Button: To view the calendar in daily format, click on the “daily” button. The calendar view will appear in “daily” format, spanning only a 24 hour segment. The date of the day you are viewing the calendar appears in the upper left-hand side of the “main” window. Navigate through future calendar views day by day by clicking on the right arrow button that appears at the top of your current calendar view in the “main window.” Navigate through past calendar views day by day by clicking on the left arrow button that appears at the top of the current calendar view in the “main window.” Work Week Button: To view the calendar in a work-week (5-day) format, click on the “work week” button. The calendar view will appear in “work week” format spanning from the date selected as the “starts at” date. The start and end dates of the work-week appear in the upper left-hand side of the “main” window: Navigate through future calendar views in 5-day format, by clicking on the right arrow button that appears at the top of the current calendar view in the “main window.” Navigate through past calendar views in 5-day format, by clicking on the left arrow button that appears at the top of the current calendar view in the “main window.” Weekly Button: To view the calendar in weekly format, click on the “weekly” button. The calendar view will appear in “weekly” format, spanning from the date selected as the “starts at” date. The start and end dates of the week you are viewing appear in the upper left-hand side of the “main” window: Navigate through future calendar views in weekly format, by clicking on the right arrow button that appears at the top of the current calendar view in the “main window.” Navigate through past calendar views in weekly format, by clicking on the left arrow button that appears at the top of the current calendar view in the “main window.” Monthly Button: To view your calendar in monthly format, click on the “monthly” button. The calendar view will appear in “monthly” format, spanning the next month. The month you are viewing appears in the upper left-hand side of the “main” window: Navigate through future calendar views in monthly format, by clicking on the right arrow button that appears at the top of the current calendar view in the “main window.” Pronto! User Guide – Pronto! v2.7 CommuniGate Pro 5.2.10 | 22nd Dec. 2008 54 of 80 Navigate through past calendar views in monthly format, by clicking on the left arrow button that appears at the top of the current calendar view in the “main window.” Merge Button: Pronto! uses tabbed browsing for viewing multiple calendars within the “main” window. If more than one calendar is accessible, you can view each calendar within the “main” window by clicking on the respective calendar tab in Pronto!. To view more than one of the available calendars, make sure each calendar you would like to view is checked under the “calendar” tab in the “side bar.” Select the “merge” option found in the upper right hand side of the “main” window while browsing through calendars, and all appointments from the calendars you have selected will appear in the “main” window. Create Folder Button: For more information on creating a new folder, please refer to section 4.4. Shared Folders Button: For more information on sharing a folder, please refer to the shared folders button explanation in section 5. Import Calendar Data Button: To import saved calendar data into the “main calendar” click on the “import calendar data” button. This will open the browserspecific folder management window, and you can import the calendar data that is saved in iCalendar format. If there is an error in text file format, the error message is displayed indicating the text line that caused the problem and no data is imported. Selecting a Calendar: If you have been given access rights to multiple calendars, you can select which you would like to view by clicking on the appropriate calendar from the menu. By checking a specific calendar, the calendar will appear in the “main” window. If multiple calendars are selected, they will appear as tabs at the top of the “main” window. All selected calendars are stored automatically in Pronto! so that the next time you log in, the selected calendars are still visible to you as tabs in the “main” window. Editing an Event: An event can be edited by dragging or resizing the time the event spans for in your daily and weekly views. This only works for events you have organized that are non-recurring. For a recurring event, open the event by double clicking on it. When the event is edited, optional updates are sent to the attendees. The event can then be accepted or rejected based on the updated invitation. Selecting a Color: To change the color scheme for the calendars, click on the color box that appears next to the specific calendar you would like to edit and then select a color from the grid. All selected color preferences are stored automatically for each individual calendar so that the next time you log in the changes will still be applied Replying to a Calendar Invite: If you have received a calendar invite in your email Inbox, you can manage how to reply to this invite. By clicking on the e-mail message containing the invite, the following options will appear at the top of the e-mail you are reading in the “main” window: Pronto! User Guide – Pronto! v2.7 CommuniGate Pro 5.2.10 | 22nd Dec. 2008 55 of 80 Accept Button: To accept the calendar invite, carefully review the details of the invite and click on the “accept” button. A window will open with the options to: notify the sender that you are attending the meeting via an automated e-mail response, notify the sender you are attending the meeting via a custom response, or to decline the invitation. After choosing one of these options, the invite will be made into an actual event, and the event will show up in the main calendar at the date and time you agreed to. Tentative Button: To tentatively accept the calendar invite, click on the “tentative” button. A window will open with the options to: notify the sender that you are tentatively attending the meeting via an automated e-mail response, notify the sender you are tentatively attending the meeting via a custom response, or notify the sender that you are declining the invite. After choosing one of these options, the invite will be turned into a tentative event, and the event will show up in the main calendar at the date and time requested. Decline Button: To decline the calendar invite, click on the “decline” button. A window will open with the options to: notify the sender that you are declining the meeting via an automated e-mail response, notify the sender you are declining the meeting via a custom response, or to notify the sender that you are declining the meeting. Calendar Button: To view your calendar before committing to attending or rejecting the proposed meeting, click on the “calendar” button. The calendar selected as the main calendar will appear, and you can browse through the calendar as you normally would. To switch back to the e-mail invite, click on the “e-mail tab” in the “side-bar.” Pronto! User Guide – Pronto! v2.7 CommuniGate Pro 5.2.10 | 22nd Dec. 2008 56 of 80 5.3. Telephony Tab General telephony and advanced calling and conferencing options can be found by clicking on the “telephony” tab on the side-bar. The Telephony feature found in Pronto! allows: the access and organization of voicemails, checking call logs and times and the ability to start and moderate audio conferences. Clicking on the “telephony” tab will bring up all folders within your e-mail inbox in alphabetical order under the “telephony” button on the side-bar. Two new options will appear in addition to the normal options; the “call logs” folder and the “conferencing” folder. Call Logs Folder: Found at the top of the list of the Pronto! folders under the “telephony” button in the side-bar. Pronto! stores a running log of every phone call made or received through the server. By clicking on the “call logs” folder a running list of all the calls made, received and participated in will be visible within the “main” window. There are several options you will find when accessing call logs: Call Type pull-down Menu: To have the call log display: all calls, incoming calls, outbound calls, or missed calls, select one of the four options to display the calls flagged with the respective option in the “main” window. Month pull-down Menu: To have the call log display only calls made within a certain month, choose the month from this pull-down menu. Year pull-down Menu: To have the call log display only calls made within a certain year, choose the month you would like to view the calls from this pull-down menu. Pronto! User Guide – Pronto! v2.7 CommuniGate Pro 5.2.10 | 22nd Dec. 2008 57 of 80 Sorting calls by field: You can navigate through the call logs in ascending or descending order, depending on which field you would like to organize by. Each field is signified by a blue-box directly above the first entry in each respective table header. Each field can be organized in ascending or descending order by clicking on the respective box above each field. Conference Module: You can create and maintain a voice-conference using the Pronto! interface. Clicking on the “conference” folder will bring up all conferencing options into the “main” window. As participants are added and removed from the conference, the specific contact information including call status and timers will appear and disappear from the “main” window. There are several options when creating a conference: Start Conference Button: To open up conferencing space, and moderate a conference, click on the “start conference” button. Add Button: Once you have opened a conference, to add a contact to the conference from the “e-mail address book” click on the “add” button. The address book will pop up and you can select the appropriate contact for the call. Add Field: Once you have opened a conference, to manually enter the contact information of the of the contact you would like to have join, enter that information into the “add” field. A participant may also be added by dragging that contact from the IM panel, or by dragging a contact from the open address book. A notification will be sent to the receiving party that you are in essence, trying to call them. Add Me Button: While you might have opened up conferencing space, you have not added yourself to the conference until you have clicked on the “add me” button. The Pronto dialer! will open and appear at the forefront of the Pronto! interface. Answering the call will automatically place you in the conference. Be sure not to close the Pronto! dialer, only minimize the window, otherwise you will be disconnected from the conference. Pronto! User Guide – Pronto! v2.7 CommuniGate Pro 5.2.10 | 22nd Dec. 2008 58 of 80 5.4. Contacts Tab To access the “e-mail address books” in the “main” window of the Pronto! interface click on the “contacts” tab on the side-bar. The contacts function found in Pronto! allows to: add, edit or remove contacts, organize contacts in alphabetical order, as well as initiate various forms of communications. Clicking on the “contacts” tab will bring up all folders within the address book in alphabetical order under the “contacts” tab on the side-bar, access the “e-mail address book” and display all entries in the “main” window. New Contact Button: For more information on adding a new contact, please refer to section 4.3. Delete button: Clicking on the “delete” button while highlighting specific users contact information within the “main” window, will automatically delete the contact. There is no warning, or request to make sure you want to delete the contact, so it is important to be absolutely sure you want to delete the contacts information before clicking on this button. Compose button: Clicking on the “compose” button while highlighting specific users contact information will open the e-mail editor and automatically compose an e-mail to the selected user based upon the information you have previously provided. If multiple e-mail addresses’ are provided for one contact, they will appear in menu form under the “compose” button. You can then pick and choose which address to compose to. Call button: Clicking on the “call” button while highlighting specific user contact information will open the “dialer” window and automatically initiate a phone call with the contact. If multiple telephone addresses’ have been provided for one Pronto! User Guide – Pronto! v2.7 CommuniGate Pro 5.2.10 | 22nd Dec. 2008 59 of 80 contact, they will appear in menu form under the “call” button. You can then pick and choose which number to dial. Send IM button: Clicking on the “send IM” button will open the “instant messenger” window and automatically create an instant messaging session with the selected user. If multiple e-mail addresses’ have been provided for one contact, they will appear in menu form under the “Send IM” button. You can then pick and choose which address to send the IM to. Move into… button: To move and categorize the contacts into specific folders, select the appropriate contact in the “main” window, and click the “move into” button. To move a contact, you can: Double-click on the appropriate folder to move the message into. Click on the appropriate folder to move the message into, and then click the “save” button found at the bottom right hand corner of the “move into” window. Copy into button: To copy and categorize your contacts into specific folders, while leaving the contact information in its current destination, select the appropriate contact in the “main” window, and clicking the “copy into” button. This will open the “copy into” window, and the “copy into” window will appear at the forefront of your account. To copy a contact: Double-click on the appropriate folder you would like to copy the message into. Click on the appropriate folder you would like to move the message into, and then click the “save” button found at the bottom right hand corner of the “copy into” window to copy contact information to this new location. Create Folder Button: For more information on creating a new folder, please refer to section 4.4. Share Folder Button: For more information on sharing a folder, please refer to the explanation of sharing a folder in section 5.1. Import vCard Data Button: To import saved electronic business card data (vCard) click on the “import vCard data” button. This will open the browserspecific folder management window, allowing you to import the vCard data. If there is an error in the file format, the error message is displayed indicating the incorrect file-format was used, and no vCard data will be imported. Pronto! User Guide – Pronto! v2.7 CommuniGate Pro 5.2.10 | 22nd Dec. 2008 60 of 80 5.5. My Stuff Tab The Pronto! interface contains a wide array of the rich-media applications. Clicking on the “My Stuff” tab in the “side-bar” will bring up a list of possible options that will appear under the “My Stuff” tab in the “side-bar.” From this list, you can access the various rich-media applications available in Pronto!. Pronto! User Guide – Pronto! v2.7 CommuniGate Pro 5.2.10 | 22nd Dec. 2008 61 of 80 5.5.1. My Photos One of the rich-media applications found within the Pronto! interface is the ability to upload and view image files. Click on the “My Photos” folder under the “My Stuff” tab in the “side-bar” to view the images you have previously uploaded to your Pronto! account, as well as upload new images and delete old images from the “My Photos” folder. Currently My Photos supports images with one of the following file extensions: *.Jpg, *.Jpeg, *.Gif, *.Png. Delete Button: Clicking on the “delete” button while highlighting specific files from the “thumbnail viewing window” in the “photo browser” will delete that file from the “My Photos” folder. Upload File Button: To upload an image file to your Pronto! account, click on the “upload file” button. Your browser-specific file locator window will open, and you can then browse through all of the files, and upload files to the “My Photos” folder like you normally would access them in your web-browser. Download Button: To download an image file stored in the “My Photos” folder highlight the appropriate image from the “photo browser” and clicking on the “download” button. Your browser-specific file-saving window will open, allowing to download the file like you would normally download any other file from the internet. My Photos Search Filter field: If you have uploaded a large quantity of image files, or want to search for the image by the its name, enter the name into this field and click on the magnifying glass icon that appears to the right of the “search-filter” field. Any appropriately named file that is saved into “My Photos” will appear as a thumbnail in the “photo browser window.” Pronto! User Guide – Pronto! v2.7 CommuniGate Pro 5.2.10 | 22nd Dec. 2008 62 of 80 Sort by Pull-down menu: Sort the images by the title of the image file, the date the image file was created, or the size of the image file. Selecting the appropriate option will sort the files in ascending order in the “photo browser window.” Photo browser window: This is where you will be able to preview all of the images that you have saved to the “My Photos” folder. You can either manually select the appropriate photo to bring up in the “photo viewing window” or use one of the two scrolling buttons found to the left and right of the “photo browser window” to scroll through the images: Scroll Left Button: To scroll through the images going from right to left, click on the scroll-left button. Scroll Right Button: To scroll through the images going from the left to the right, click on the scroll-right button. File Information Button: To see all relevant information about an image file selected from the “photo browser” window click on the “file information” button. The image in the “photo viewing” window will minimize allowing a new window to open above the “photo viewing” window and below the “photo browser” window. Clicking on the “file information” button a second time will minimize the new window: Name Field: The name of the active file should appear in this field already. To change the name of the file, enter the new name of the file into the “name” field. Description Field: To add comments or a description of the image to better identify the image at a later point, enter the description for the image in the “description” field. Folder: If the image is saved in a sub-folder, the location where the image is saved will appear here. You cannot manually change this location in this field; you will have to use the “file browser” to move the images into new folders and sub-folders. File information display field: To see the saved file information for the specific image, most of the such information will appear in the “file information” field including; the name of the image file, the dimensions of the image file, the size of the image file, and the date the image file was created. Save Button: If you have made any changes to a photo in the Pronto! interface, click on the save button to apply the changes to the file. Otherwise, the changes will not be applied. Photo Viewing Window: To see a larger view of the selected image, select the appropriate image from the “photo browser” window. The image will appear in larger format in the “photo viewing” window: Scroll Left Button: To scroll through the images going from right to left, click on the scroll-left button. Pronto! User Guide – Pronto! v2.7 CommuniGate Pro 5.2.10 | 22nd Dec. 2008 63 of 80 Scroll Right Button: To scroll through the images going from the left to the right, click on the scroll-right button. Remove Menu Button: To maximize the “photo viewing” window, click on the “remove menu” button. To minimize the “photo viewing” window, click on the “remove menu” button again. Original Size Button: To view the image at its original dimensions, click on the “original size” button. Fit to Window Button: To fit the image to the “photo viewing” window, click on the “fit to window” button. The image will appear keeping the appropriate aspect ratio of the original dimensions in the “photo viewing” window. Slideshow Button: To create a slideshow of the photos, click on the slideshow button and click on the play button that appears. interval of time delay between photos can be changed by either increasing the number of seconds with the “+” button or decreasing the number of seconds with the “-“ button. To stop viewing the photos in slideshow format, click on the “pause” button. Drag and Drop Photos (Pronto! on AIR only): A benefit of using Pronto! on AIR is the ability to drag and drop photos from the desktop to the “photo browser.” To do this, select the file on your desktop, and drag it to the “photo browser” found under “My Photos.” The images are now available to preview. To upload the file to your server, click on the “upload” button and follow the instructions outlined above in section 5.6.1 Pronto! User Guide – Pronto! v2.7 CommuniGate Pro 5.2.10 | 22nd Dec. 2008 64 of 80 5.5.2. My Music One of the rich-media applications found within the Pronto! interface is the ability to upload and listen to audio files. To upload, listen, delete, or create a playlist of audio files, click on the “My Music” folder under the “My Stuff” tab in the “sidebar.” Currently My Music supports *.mp3 audio files. Delete Button: Clicking on the “delete” button while highlighting specific files from the “track list window” will delete that specific file from the “My Music” folder. There is no warning, or request to make sure you want to delete the file so it is important to be sure you want to delete the file before clicking on this button. Upload File Button: To upload an image file to your Pronto! account, click on the “upload file” button. A browser-specific file locator window will open and allow you to browse through all of the files and upload files to the “My Music” folder. Download Button: To download an audio file stored in the “My Music” folder, highlight the appropriate audio file from the “track list” window and click on the “download” button. A browser-specific file-saving window will open allowing you to download the file. My Music Search/Filter field: If you have uploaded a large quantity of audio files, or want to search for the audio file by name, you can enter the name into this field and click on the magnifying glass icon. Any appropriately named file that is saved into “My Music” will appear as a thumbnail in the “track list” window. My Music Player: This application is used to listen to the audio files stored in your Pronto! account: Pronto! User Guide – Pronto! v2.7 CommuniGate Pro 5.2.10 | 22nd Dec. 2008 65 of 80 Track Information: If the audio file has any relevant track information such as the title, and copyright information, such information appears at the top of the “My Music” player. Rewind button: To listen to the current selected again from the beginning click on the “rewind” button and the track will start over. Play/Pause button: Once you have selected the appropriate audio file, click on the “play” button to automatically start playing the selected audio file in the “My Music” player. To pause the audio file, click on the play/pause button again. Stop button: To stop downloading and listening to the audio file, click on the “stop” button to stop the “My Music” player from downloading the audio file. Fast Forward button: To fast forward to the end of the current track click on the “fast forward” button and the track will progress to the end. Track progress information: This is the long narrow scrolling window that allows you to manually select a starting point for the audio file. Track length information: This window displays length of the audio file in standard-time format. The starting point will change depending on what point in the audio file you have decided you would like to play from and the ending point will be the total length of the track. Normal button: To have the “My Music” player access the audio files in the order which they appear in the “track list” window click on the “normal” button. Repeat button: To have the “My Music” player access the audio files and repeat specific songs from within the “track list” window click on the “repeat” button. Shuffle button: To have the “My Music” player access the audio files and randomly select songs from the “track list” window to play, click on the “shuffle” button. Volume Control: To change the volume of the audio files you are listening to click on the short-narrow scrolling window that appears to the right of the “shuffle” button. The volume range is from 0.00 (minimum) To 1.00 (maximum). Playlist Window: Pronto! allows you to create a running ordered list of audio files that you can easily access at a later time. Such lists can be used to sort audio files by: genre, length, or track information. When accessing said playlists in the “My Music” player only audio files from within that playlist will be accessed temporarily disregarding the remainder of the library. The option is available to sort the playlist by name or length in ascending and descending order by clicking on either the “name” or “length” field that appears at the top of this window: New Playlist Button: To create a new playlist, click on the “new playlist” button. To close the “add new playlist” window click on the [X] button found in the upper right hand side of the “add new playlist” window or the “close” button found in the lower right hand side of the “add new playlist” window. Within the “add new playlist” window you will find the following options: Pronto! User Guide – Pronto! v2.7 CommuniGate Pro 5.2.10 | 22nd Dec. 2008 66 of 80 List Name Field: To create a new playlist, a name must be provided for the playlist. Type the name to save the playlist as in the “list name” field. Playlist Menu: To edit various playlists, select the playlist to edit from under the “playlist” menu. To remove an audio file from a playlist in the “playlist” menu, drag the file from the playlist back into the “Track” menu. In the “playlist” menu you can sort the playlists in ascending and descending order by: Name, Time, Artist, Album and Genre. Track Grid: This menu shows all audio files you have saved in “My Music.” In the “track grid” you can sort the tracks in ascending and descending order by: Name, time, artist, album and genre. Save Button: To apply the changes to the playlists, click on the “save button” otherwise Pronto! will not apply the changes to the playlists. Close Button: To exit out of the “Add new playlist” window, click on the “close” button: Refresh Button: The “refresh” button refreshes the playlist and updates the playlist with your changes. Delete Button: Clicking on the “delete” button while highlighting specific playlists from within the “playlist” menu will delete that playlist from the “playlist” menu. There is no warning, or request to make sure you want to delete the playlist, so make sure you want to delete the playlist before clicking this button. Once deleted, the playlist is unrecoverable. Track List Window: The list of available audio files can be accessed in the “My Music” player will appear in the “track list” window. You can sort the tracks by name or length in ascending and descending order by clicking on either the “name” or “length” field that appears at the top of this window: Move to Button: To move a track from one playlist to another, select the appropriate track from the “track list” window and click on the “move to” button. A menu will appear displaying all possible playlists you can move that audio file into. Copy to Button: To copy a track from the “All Music” folder to one of the playlists while keeping the track in the “All Music” folder, select the appropriate track from the “track list” window and click on the “copy to” button. A menu will appear displaying all possible playlists you can copy that audio file into. To copy the audio file from the “All Music” folder, to a specific playlist, click in the appropriately named folder from the menu that appears under the “copy to” button. Drag and Drop Music (Pronto! on AIR only): A benefit of using Pronto! on AIR is the ability to drag and drop music from the desktop to the “music player.” To do this, select the audio file on the desktop, and drag it to the “music player” found under “My Music.” To upload the file to your server, click on the “upload” button and follow the instructions outlined above in section 5.6.2. Pronto! User Guide – Pronto! v2.7 CommuniGate Pro 5.2.10 | 22nd Dec. 2008 67 of 80 5.5.3. My Videos One of the rich-media applications found within the Pronto! interface is the ability to upload and view video files. By clicking on the “My Videos” folder under the “My Stuff” tab in the “side-bar”, you can view to all of the video files that have been uploaded as well as edit or delete video files. Currently “My Videos” supports flash video (.flv) files. Delete Button: on the “delete” button while highlighting specific files from the “Video List” window will delete that specific file from the “My Videos” folder. Upload File Button: To upload a video file to your Pronto! account, click on the “upload file” button. A browser-specific file locator window will open. Browse through all of the files and upload files to the “My Videos” folder. Download Button: To download a video file stored in the “My Videos” folder, highlight the appropriate video file from the “Video List” window and click on the “download” button. A browser-specific file-saving window will open, and you can then download the file. My Video Player: This is the application used to view the video files stored in your Pronto! account. You will find the following options available with the “My Video Player”: Play/Pause button: After selecting the appropriate video file, click on the “play” button to automatically start playing the selected video file in the “My Videos” player. To pause the video file, click on the play/pause button again. Pronto! User Guide – Pronto! v2.7 CommuniGate Pro 5.2.10 | 22nd Dec. 2008 68 of 80 Stop Button: To stop the video you are watching from playing, click on the “stop” button. Video progress information scrolling window: To the right of the “stop” button is a long narrow scrolling window that allows you to manually select a starting point for the video file. Video length information display: This window displays length of the video file in standard-time format. The starting point will change depending on what point in the video file you have decided you would like to play from. The ending point will be the total length of the track. Toggle repeat button: To have the “My Video” player repeat the current video file, click on the “toggle repeat” button. The video will then automatically start again when you have reached the end-point of the video. Full Screen button: To maximize the “My Videos” player click on the “full screen” button. The “My Videos” player will take up the entire screen. To minimize the “My Videos” player click the escape button on the keyboard. Volume Control: To change the volume of the video files you are viewing, click on volume button. The “volume control” popup window will open allowing the volume level to be modified. To minimize the “volume control” window click on the “volume control” button again: For maximum volume scroll to the top of the “volume control pop-up” window and make sure the icon reads 100%. For minimum volume scroll to the bottom of the “volume control pop-up window” and make sure the icon reads 0%. To mute the video click on the “Mute Off” button that appears at the bottom of the “volume control” popup window. Video Information Window: This window is “hidden” at the top of the “My Video Player.” To access this window click on the down arrow that appears across the top of the player. All relevant information about a video file will appear in the “video information” window. You can hide the “video information” window by hovering the mouse over the “My Video” player. In the video information window you will find the following options: Title Field: The name of the video file appears in this field already. To change the name of the video, enter the new name of the file into the “title” field. Folder Display Window: If the video is saved in a sub-folder, the location where the image is saved will appear here. To change the location of the video use the “file browser” to move the videos into new folders and subfolders. Description Field: To add comments or a description to the video, enter the description for the video in the “description” field. Pronto! User Guide – Pronto! v2.7 CommuniGate Pro 5.2.10 | 22nd Dec. 2008 69 of 80 File Information Display Window: To see the saved file information for the specific video, the information will appear in the “file information” field. Such information includes; the name of the video file, the length of the video file and the size of the video file. Save Button: If you have made any changes to a video you are viewing in via the Pronto! interface, click on the save button to apply the changes to the file. Otherwise, the changes will not be applied. Video Selection Window: This window is hidden at the side of the “My Video Player.” To access this window, click on the side arrow that appears across the left of the player. All of the uploaded videos will appear in the “video selection window.” To hide the “video selection” window, hover the mouse over the “My Video” player. 5.6. News Tab A neat feature found in the Pronto! interface is the ability to subscribe to RSS News feeds. To keep up to date on your favorite topics, or to stream news from a specific source, specify where to receive news articles of interest by clicking on the “news” tab. Clicking on the “news” tab will bring up all feed sources currently subscribed to in alphabetical order under the “news” button on the “side-bar” including a running counter before the name of the feed to alert you to any unread posts. Click on the individual source to display all current RSS feeds you have received from that source in the “main” window (organized by release date). Click on the headline of the article that interests you to directly access the feed via html. To open the feed, click on the “open” button in this small window. The Pronto! User Guide – Pronto! v2.7 CommuniGate Pro 5.2.10 | 22nd Dec. 2008 70 of 80 news feed will appear as a new page and allows you to browse through the article. Subscribe button: To receive headlines and news stories (subscribe) from a specific source, enter the address by clicking on the “subscribe” button. To close the “add news feed source” window click on the [X] button, found in the upper right hand side of the “add news feed source” window or the “cancel” button found in the lower right hand side of the “add news feed source” window. Within the “add news feed source” window, you will find the following options: Address (URL): field: To subscribe to a specific news source, type that address the way it appears in the “address (URL)” field. Save button: To update the log of the news-feeds you are subscribing to, click on the “save” button. The new source appears in the list of sources you are subscribing to under the “news” tab in the “side-bar.” Unsubscribe button: To unsubscribe to a RSS news feed, highlight the correct source from the list found under the “news” tab and then click on the “unsubscribe” button. The source has been removed from the RSS news feeds list, and that all stories from that source are no longer visible. Refresh button: Clicking on the Refresh button will command Pronto! to access and refresh the RSS news feed source for the most up to date information. If any posts have occurred since the last time you have checked the news feed, these posts will be visible in the “main window.” Mark all as Read button (posts from a specific RSS feed): To mark all of the posts from the RSS news feed source as read, click on the “mark all as read” button. All posts that are present in the “main window” will appear as read. Mark Read button: To mark a specific post from the RSS news feed source as read, click on the appropriate post, and click on the “mark read” button. The selected post will be marked as read in the “main window.” Mark Unread button: To mark a specific post from the RSS news feed source as unread, click on the appropriate post and click on the “mark unread” button. The selected post will be marked as unread in the “main window.” Refresh All button: Clicking on the “refresh all” button will command Pronto! to access and refresh all of the RSS news feed source for the most up to date information. If any new posts have occurred in any of the RSS news feeds, they will now be displayed. Mark all as Read button (all RSS feeds): To mark all of the posts from all of the RSS news feed sources as read, click on the “mark all as read” button. All of the RSS feeds will contain no unread postings. Right clicking in the “news” tab in the “side bar”: A unique feature found Pronto! is the ability to “right click” on an RSS news feed in the “news” tab in the “side bar” to better monitor the feeds. To make changes to a specific feed, right click on the feed. A browser specific menu will appear next to the mouse-pointer Pronto! User Guide – Pronto! v2.7 CommuniGate Pro 5.2.10 | 22nd Dec. 2008 71 of 80 with the option to either subscribe or un-subscribe to a specific RSS news feed. These two options work the same way as outlined above in section 5.6. 5.7. Files Tab A neat feature found in the Pronto! interface is the ability to browse through uploaded files. In essence, Pronto! can be used as a virtual hard-drive. You can upload files to Pronto! and as long as you can access your Pronto! account, you have the ability to download them wherever you would like to. Clicking on the “files” tab will bring up all files that have been uploaded under the “files” tab on the “side-bar.” Click on an individual file from this list to bring up and view relevant file information such as: date modified, file size, and extension type into the “main” window. To view the main directory of files you have uploaded, click on the “back” button and the main directory of files will appear in the “main window.” Delete button: Clicking on the “delete” button while highlighting a specific file or folder from the files list will bring up a deletion confirmation alert asking you if you are sure you would like to delete the file: To confirm deletion click on the “Yes” button found within the delete confirmation alert. To abort deletion, click on the “Cancel” button found within the delete confirmation alert. Renamed Marked button: To rename one of the files or folders, click on the “renamed marked” button. These changes will not be visible until the next time you log into Pronto!. To close the “renamed marked” window, click on the [X] button found in the upper right hand side of the “renamed marked” window or the “cancel” button found in the lower right hand side of the “renamed marked” window. Within the “renamed marked” window you will find the following options: Name Field: This field displays the currently saved name of the file and the extension type. New Folder Name field: Enter the name into the “new folder name” field. Pronto! User Guide – Pronto! v2.7 CommuniGate Pro 5.2.10 | 22nd Dec. 2008 72 of 80 Save Button: Click save to create the new folder. The file or folder name will appear in the “files” directory list under the “files” tab in the side-bar. Create Folder button: To create a new folder to better organize the uploaded files click on the “create folder” button. To close the “create folder” window click on the [X] button found in the upper right hand side of the “create folder” window, or the “cancel” button found in the lower right hand side of the “create folder window.” Within the “create folder” window you will find the following options: New Folder Name field: Enter the name into the “new folder name” field. Save Button: Click save to create the new folder. A new folder will appear in the “files” directory list under the “files” tab in the side-bar. Upload File button: To upload a file to your Pronto! account, click on the “upload file” button. When open you can then browse through the all of the files, and upload them. Download button: This button is hidden until you have uploaded a file. Once a file has been uploaded and selected, the download button should appear. To download a file from your Pronto! account, click on the “download” button. A browser-specific file-saving window will open, and you can then download the file. Drag and Drop Files (Pronto! on AIR only): A benefit of using Pronto! on AIR is the ability to drag and drop files from the desktop to your filespace. To do this, select the file on the desktop, and drag it to the appropriate folder found under “Files.” To upload the file to your server, click on the “upload” button and follow the instructions outlined above in section 5.6.2. Pronto! User Guide – Pronto! v2.7 CommuniGate Pro 5.2.10 | 22nd Dec. 2008 73 of 80 Sharing button (Public) Files: To share a public file, select the appropriate file in the “main window” or in the “files tab” in the “side bar” and click on the “sharing” button. A window will appear with an http:// address. This is the address that can be distributed to the public so they may view the files: Copy Link Button: To copy the newly created URL address for the files, click on the “copy link” button. Now, the copied URL address can be pasted as need be. Sharing button (Private) Files: To share a private file that has been uploaded using the Pronto! interface, select the appropriate file from the Private folder in the “files tab” in the “side bar” and click on the “sharing” button. A window will appear with a secure http: address that will lead to the file that is stored on the server. Pronto! User Guide – Pronto! v2.7 CommuniGate Pro 5.2.10 | 22nd Dec. 2008 74 of 80 This is the address that can be distributed to the public so they may view the files, however access must be provided to allow a user to view the files: Copy Link Button: To copy the newly created URL address for the files, click on the “copy link” button. Now, the copied URL address can be pasted as required. Disable Sharing Button: To revoke access to the private files, and remove the URL link, click on the “disable sharing” button. The URL that was created for the files has been removed. To share this file again, click on the “share file” button – which replaces the “disable sharing” button when not sharing the file. Pronto! User Guide – Pronto! v2.7 CommuniGate Pro 5.2.10 | 22nd Dec. 2008 75 of 80 Sharing button (Public) Folders: To share a public folder that you have uploaded using the Pronto! interface, select the appropriate file in the “main window” or in the “files tab” in the “side bar” and click on the “sharing” button: Directory Window: This is where the URL to distribute where the folder will be visible. This is the address that can be distributed to the public so they can view the directory of files. Copy Link Button: To easily copy the newly created URL address for the folder, click on the “copy link” button. Now, the copied URL address can be pasted as required. File List Window: In this window you will find the URL to distribute to provide access to the list of files in the directory. This is the address that can be distributed to the public so they can view of the list of files. Copy Link Button: To easily copy the newly created URL address for the contents of the folder, click on the “copy link” button. Now, the copied URL address can be pasted as required Pronto! User Guide – Pronto! v2.7 CommuniGate Pro 5.2.10 | 22nd Dec. 2008 76 of 80 Sharing button (Private) Folders: To share a private folder that you have uploaded using the Pronto! interface, select the appropriate file in the “main window” or in the “files tab” in the “side bar” and click on the “sharing” button. Access must be provided to users so they may view the files: Directory Window: In this window you will find the secure URL to distribute where the folder will be shared. This is the address that can be distributed to the public so they can view the directory of files. Copy Link Button: To copy the newly created URL address for the folder, click on the “copy link” button. Now, the copied URL address can be pasted as required. File List Window: In this window you will find the secure URL to distribute where you to see the list of files in the directory. This is the address that can be distributed to the public so they can view of the list of files. Copy Link Button: To copy the newly created URL address for the contents of the folder, click on the “copy link” button. Now, the copied URL address can be pasted as required. Disable Sharing Button: To revoke access to the private folder, and remove the URL link, click on the “disable sharing” button. The URL will be removed. To share this file again, click on the “share file” button which replaces the “disable sharing” button when you are not sharing the file. E-mail File button: To send the files to another user quickly via e-mail, click on the appropriate file in the “files tab” in the “side bar” then click on the “e-mail file” button. The e-mail composer will open and it will contain the secure link to the file. For more information on composing and sending an e-mail, please refer to section 4.1. Pronto! User Guide – Pronto! v2.7 CommuniGate Pro 5.2.10 | 22nd Dec. 2008 77 of 80 Right Clicking a File or Folder under the “Files” Tab in the “Side-Bar” Another unique feature found Pronto! is the ability to “right click” on a file or folder under the “files tab” in the “side bar.” This will allow for maintenance of the uploaded files and folders. A browser specific menu will appear next to the mouse-pointer with the options to: create a folder, rename a marked file, share a file, e-mail a file and remove a file. These options all work the same way as outlined above in section 5.7. Two new options will be visible as well: Move into…: To move and categorize the files messages into specific folders, select the appropriate file under the “files” tab in the “side bar” right click on that file and select the “move into” option from the pull-down menu. To move a message, you can: Double-click on the appropriate folder to move the file into. Click on the appropriate folder to move the file into, and then click the “save” button found at the bottom right hand corner of the “move into” window. Copy into…: To copy and categorize the files into specific folders, while leaving the file in its current destination, select the appropriate file under the “files” tab in the “side bar” right click on that file and select the “copy into” option from the pulldown menu. Within the “copy into” window, every file folder that you have created should be available and listed. To copy a file: Double-click on the appropriate folder you would like to copy the file into. Click on the appropriate folder to move the file into, and then click the “save” button found at the bottom right hand corner of the “copy into” window. Pronto! User Guide – Pronto! v2.7 CommuniGate Pro 5.2.10 | 22nd Dec. 2008 78 of 80 6. Pronto! Keyboard Shortcuts For more control and faster responses to messages, Pronto! makes use of keyboard shortcuts. Keyboard shortcuts enable the user to perform specific functions using their keyboard and mouse, instead of following route-paths, or clicking on buttons to reach your end-destination. The following keyboard shortcuts are available in Pronto!. Shift +R (reply) CTRL +A (select all) CTRL +C (copy) CTRL +V (paste) Pronto! User Guide – Pronto! v2.7 CommuniGate Pro 5.2.10 | 22nd Dec. 2008 79 of 80 *While every reasonable precaution has been taken in the preparation of this document, CommuniGate Systems assumes no responsibility for errors or omissions, or for damages resulting from the use of the information contained herein. The information contained in this document is believed to be accurate. However, no guarantee is provided. Use this information at your own risk. **All information is subject to change by CommuniGate Systems without notice due to product improvements or other reasons. No part of this document may be reproduced or transmitted in any form or by any means, electronic or mechanical, including photocopying, without the written permission of CommuniGate Systems. ***Copyright: 2008 All rights reserved. The CommuniGate Systems, CommuniGate Pro, CommuniGate Pronto! names and the CommuniGate Pro, CommuniGate Pronto!, CommuniGate Systems logos are trademarks or registered trademarks of Stalker Software, Inc. All other names are trademarks of their respective companies. Pronto! User Guide – Pronto! v2.7 CommuniGate Pro 5.2.10 | 22nd Dec. 2008 80 of 80