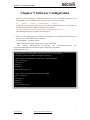
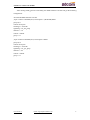
1
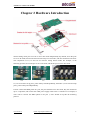
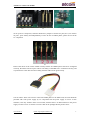
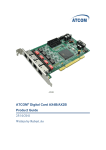
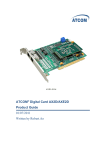
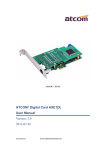
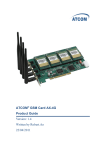
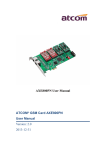
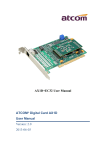
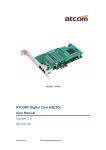
AXE2BL
ATCOM® Digital Card AXE2BL
Product Guide
Version: 2.0
2013-08-23
AXE2BL User Manual with DAHDI
Release note
Version
Changed note
1.0
First Release
2.0
Release the User manual
www.atcom.cn
Email: [email protected]
Editor
Date
Deniel
2013-08-23
AXE2BL User Manual with DAHDI
Content
CHAPTER 1 THE INTRODUCTION OF AXE2BL............................................................................................ 1
CHAPTER 2 HARDWARE INTRODUCTION.................................................................................................. 2
CHAPTER 3 TEST ENVIRONMENT...............................................................................................................4
CHAPTER 4 SOFTWARE INSTALLATION......................................................................................................5
CHAPTER 5 SOFTWARE CONFIGURATION................................................................................................. 7
CHAPTER 6 TEST....................................................................................................................................... 10
CHAPTER 7 REFERENCE............................................................................................................................ 11
www.atcom.cn
Email: [email protected]
AXE2BL User Manual with DAHDI
Contact ATCOM
The Introduction of ATCOM
ATCOM is the leading VoIP hardware manufacturer in global market. We have been keeping
innovating with customer’s needs oriented , working with partners to establish a total solution for
SMB VoIP with IP phone , IP PBX and Asterisk cards.
With over 10 years’ experience of R&D, manufacturing and service in network and VoIP filed;
mission of creating the biggest value for IP terminals, we commit ourselves in supplying the
competitive IP phone and other terminals for IP PBX, softswitch, IMS, NGN providers and
carriers; supplying the competitive total VoIP solution for SMB market. We keep improving the
customer’s experience and creating the bigger value with our reliable products. Until now , our
VoIP products has been sold to over 60 countries and used by millions of end users.
Contact sales:
Address
District C, east of 2nd floor, #3, Crown industry buildings, Chegongmiao
Industry area, Futian district, Shenzhen, China
Tel
+(86)755-23487618
Fax
+(86)755-23485319
E-mail
[email protected]
Contact Technical Support:
Tel
+(86)755-23481119
E-mail
[email protected]
Website address:
http://www.atcom.cn/
Download Center: http://www.atcom.cn/download.html
www.atcom.cn
Email: [email protected]
Chapter 1 the Introduction of AXE2BL
Overview of the AXE2BL
AXE2BL Asterisk card is the telephony PCI-E card which supports dual ISDN BRI ports. Using
AXE2BL digital BRI card, open source Asterisk PBX and stand alone PC, users can create their IP
PBX telephony solution included all the sophisticated features of traditional PBX, and extended
features such as voicemail in IP PBX. With low profile design, the AXE4BL is suitable for 2U
server.
Features
Dual ISDN BRI ports
Support Dahdi and mISDN
Support Asterisk, Freeswitch, Yate
Support Elastix, Trixbox, AsteriskNOW, PBX in a Flash
support ISDN phone
Supports NT and TE mode
100% compatible with all features of Asterisk PBX
With low profile design, the AXE4BL is suitable for 2U server.
Application
ISDN BRI IP PBX
ISDN least cost router
Voice over IP BRI termination gateways
IVR system
Traditional Calls/VoIP Calls Conference
Hardware Requirement
1.6-Ghz Pentium IV
512 MB RAM
PCI-E slot
PCI-E Card Dimension
120mm (Length)*64mm (height)
Operating System
Linux (all versions, releases and distributions from 1.0 up)
www.atcom.cn
Email: [email protected]
1
AXE2BL User Manual with DAHDI
Chapter 2 Hardware Introduction
TE/NT Setting: Each port can work in TE or NT mode independently. By default, all of the ports
are set to TE mode, because the telecom side always use NT mode, and users should use TE mode.
The components of C4, C5 and C2 are used for setting TE/NT mode. For example, in the
following pictures, the second port is set to TE mode, and the first port is set to NT mode.
C4
C5
C2
C4, C5 are used for set up port1, port2 orderly and independently; the button 1,2 are used for setup
port1, port2 orderly and independently.
If users connect the ISDN phone to a port, the port should be set to NT mode, they also should set
up C1 component, and connect the 4 PIN power supply cable to the C3 interface. For example, if
users want to connect the ISDN phone to the port 1, users should set up like the following
pictures:
www.atcom.cn
Email: [email protected]
2
AXE2BL User Manual with DAHDI
C2
C1
C4
To set up the C1 component, customer should use a jumper to connect two pins, the 1,2 are used to
set port1, port2 orderly and independently. If users do not use ISDN phone, please do not set the
C1 component.
C1
LED: If the driver of the card is loaded correctly and the /etc/dahdi/system.conf file is configured
correctly, the LED of the four ports will be red clearly; If the BRI line is connected correctly, and
it synchronizes to the other end successfully, then the LED will be green clearly.
Convert Cable: when users need to connect the ISDN phone to the ISDN card, the card should be
provided with extra power supply by C3 component and the power supply of server. At this
situation, users may need the extra convert cable, because there is no IDE interface in the power
supply of some servers. It contains a convert cable in the package like the picture above.
www.atcom.cn
Email: [email protected]
3
AXE2BL User Manual with DAHDI
Chapter 3 Test Environment
Test Environment:
Libpri-1.4.7
dahdi-linux-complete-2.6.2+2.6.2
asterisk-1.8.7.1
Centos6.0
AXE2BL
www.atcom.cn
(kernel version: 2.6.32-279.22.1.el6.i686)
Email: [email protected]
4
AXE2BL User Manual with DAHDI
Chapter 4 Software Installation
After inserting the card into the PCI-E slot and boot the server, please use the “lspci” command to
check the PCI-E bus compatibility. From the correct output, users can see the following line:
---------------------------------------------------------------------------------------------------------------------01:05.0 ISDN controller: Cologne Chip Designs GmbH ISDN network Controller [HFC-4S] (rev
01)
---------------------------------------------------------------------------------------------------------------------The Cologne Chip will be found, if users can not see one line like the line above, please poweroff
the server and try to use another PCI-E slot, if it still does not help, users have to check the
compatibility issue between the card and the PCI-E bus.
1.
To install asterisk and dahdi, we have to use “yum” command to install the following
prerequisite packages:
bison bison-devel zlib zlib-devel openssl openssl-devel gnutls-devel gcc gcc-c++ ncurses
ncurses-devel libxml2 libxml2-devel
2.
Download libpri, dahdi-linux-complete, and asterisk
[root@localhost src]#
wget http://downloads.asterisk.org/pub/telephony/libpri/releases/libpri-1.4.12.tar.gz
[root@localhost src]#
Wget
http://downloads.asterisk.org/pub/telephony/dahdi-linux-complete/dahdi-linux-complete-2.6.
2+2.6.2.tar.gz
[root@localhost src]#
wget http://downloads.asterisk.org/pub/telephony/asterisk/releases/asterisk-1.8.7.1.tar.gz
www.atcom.cn
Email: [email protected]
5
AXE2BL User Manual with DAHDI
3.
Install libpri
1) [root@localhost src]# tar -xvzf libpri-1.4.12.tar.gz
2) [root@localhost libpri-1.4.12]# make
3) [root@localhost libpri-1.4.12]# make install
4.
Install dahdi-linux-complete
1) [root@localhost src]# tar -xvzf dahdi-linux-complete-2.6.2+2.6.2.tar.gz
2) [root@localhost src]# cd dahdi-linux-complete-2.6.2+2.6.2
3) [root@localhost dahdi-linux-complete-2.6.2+2.6.2]# make
4) [root@localhost dahdi-linux-complete-2.6.2+2.6.2]# make install
5) [root@localhost dahdi-linux-complete-2.6.2+2.6.2]# make config
5.
Install asterisk
1) [root@localhost src]# tar -xvzf asterisk-1.8.7.1.tar.gz
2) [root@localhost asterisk-1.8.7.1]# ./configure
3) [root@localhost asterisk-1.8.7.1]# make
4) [root@localhost asterisk-1.8.7.1]# make install
5) [root@localhost asterisk-1.8.7.1]# make samples
www.atcom.cn
Email: [email protected]
6
AXE2BL User Manual with DAHDI
Chapter 5 Software Configuration
1. Please use cat /proc/interrupts command to check if the driver of AXE4BL is loaded or not, if
the AXE4BL driver is loaded correctly, users can get one line with wcb4xxp
20:
2310670
2218516 IO-APIC-fasteoi
wcb4xxp
If users can not get the line above, but users can get one line with hfc4s8s_l1, then please use
the following command to delete the hfc4s8s_l1.ko module.
rm –rf /lib/modules/2.6.18-238.el5/kernel/drivers/isdn/hisax/hfc4s8s_l1.ko
After deleting hfc4s8s_l1.ko, please reboot the server.
2. Please use the “dahdi_genconf” command to configure the /etc/dahdi/system.conf file and
generate /etc/asterisk/dahdi-channels.conf file.
[root@localhost ~]# dahdi_genconf
It does not show any output if dahdi_genconf run successfully.
After
running
dahdi_genconf
successfully,
the
/etc/dahdi/system.conf
and
/etc/asterisk/dahdi-channels.conf file will get the following configuration:
/etc/dahdi/system.conf:
# Autogenerated by /usr/sbin/dahdi_genconf on Tue Oct 18 11:20:32 2011
# This file is parsed by the Dahdi Configurator, dahdi_cfg
# Span 1: B4/0/1 "B4XXP (PCI) Card 0 Span 1" (MASTER) RED
span=1,1,0,ccs,ami
# termtype: te
bchan=1-2
hardhdlc=3
echocanceller=mg2,1-2
# Span 2: B4/0/2 "B4XXP (PCI) Card 0 Span 2" RED
span=2,2,0,ccs,ami
# termtype: te
bchan=4-5
hardhdlc=6
echocanceller=mg2,4-5
www.atcom.cn
Email: [email protected]
7
AXE2BL User Manual with DAHDI
After running dahdi_genconf successfully, the dahdi-channels.conf file will get the following
configuration:
/etc/asterisk/dahdi-channels.conf file:
; Span 1: B2/0/1 "B2XXP (PCI) Card 0 Span 1" (MASTER) RED
group=0,11
context=from-pstn
switchtype = euroisdn
signalling = bri_net_ptmp
channel => 1-2
context = default
group = 63
; Span 2: B2/0/2 "B2XXP (PCI) Card 0 Span 2" RED
group=0,12
context=from-pstn
switchtype = euroisdn
signalling = bri_cpe_ptmp
channel => 4-5
context = default
group = 63
www.atcom.cn
Email: [email protected]
8
AXE2BL User Manual with DAHDI
3. Please add the following line in the end of chan_dahdi.conf file
#include dahdi-channels.conf
4. Please run asterisk with the following command:
*CLI> asterisk
*CLI> asterisk -vvvgrc
*CLI> reload
5. Please run dahdi show channels command
users should get the following channels:
*CLI> dahdi show channels
users can get the following 8 channels: 1, 2, 4, 5
www.atcom.cn
Email: [email protected]
9
AXE2BL User Manual with DAHDI
Chapter 6 Test
1
LED: If the driver of the card is loaded correctly and the /etc/dahdi/system.conf file is
configured correctly, the LED of the four ports will be red clearly; If the BRI line is connected
correctly, and it synchronizes to the other end successfully, then the LED will be green clearly.
2
Check the ports status
1) Start asterisk
[root@localhost asterisk]# asterisk –vvgc
*CLI> reload
2) Run pri show spans command
users can get the following port information, if users have plugged the ISDN line for the
ports, the ports are in up status.
*CLI> pri show spans
PRI span 1/0: Up, Active
PRI span 2/0: Up, Active
3
Edit a dial-plan in “/etc/asterisk/extensions.conf” file
[from-internal]
exten=>_x.,1,Dial(dahdi/1/${EXTEN})
exten=>_x.,2,hangup()
This dial plan is used for outgoing calls, using this dial plan users can dial out directly without
prefix by channel 1.
[from-pstn]
exten=>s,1,Playback(demo-instruct)
exten=>s,2,Hangup()
This dial plan is used for incoming calls, any incoming calls dials in, then they can hear an
recorded voice(demo-instruct) about the introduction of Asterisk.
4
Test the port in NT mode
1) Set the jumper to NT mode
2) Change the dahdi-channels.conf file,
; Span 2: B2/0/1 "B2XXP (PCI) Card 0 Span 1" RED
group=0,11
context=from-pstn
switchtype = euroisdn
signalling = bri_cpe_ptmp
change the cpe to net: signalling = bri_net_ptmp
channel => 1-2
www.atcom.cn
Email: [email protected]
10
AXE2BL User Manual with DAHDI
Chapter 7 Reference
http://www.asteriskguru.com/
http://www.asterisk.org/downloads
http://www.atcom.cn/
www.atcom.cn
Email: [email protected]
11