1
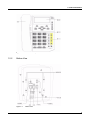
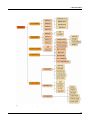
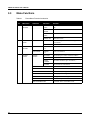
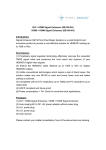
CN2x4
SIP Phone
User’s Manual
Manual Part Number 96-00213
Zed-3
501 Valley Way
Milpitas CA 95035
USA
+1-408-587-9333
http://www.zed-3.com
Notice
The information contained in this document is subject to change without notice.
Zed-3 makes no warranty of any kind with regard to this material, including, but not limited
to, the implied warranties of merchantability and fitness for a particular purpose. Zed-3 shall
not be liable for errors contained herein or for incidental or consequential damages in
connection with the furnishing, performance, or use of this material.
Zed-3 assumes no responsibility for the use or reliability of interconnected equipment that is
not furnished by Zed-3.
This document contains proprietary information which is protected by copyright. The
contents of this manual and the associated software are the property of Zed-3, and all rights
are reserved. No part of this document may be photocopied, reproduced, stored in any
computer format, translated to another language, or publicly displayed without the prior
written consent of Zed-3.
The information contained herein has been prepared by Zed-3 solely for use by Zed-3’ss
employees, agents, and customers. Dissemination or use of the information or concepts
contained herein to or by other parties is prohibited without prior written consent from Zed-3.
Zed-3, the Zed-3 logo, the Zed-3 mark,GS8, CN2x2, CN2x4, SE150, SE150P, SE150+, SE150,
SE500, and SEME are trademarks of Zed-3 and may be registered trademarks in certain
countries. All other names may be trademarks or registered trademarks of their respective
owners.
Revision History
Release
Release Date
0.1
13 June 2008
Contents
Product Introduction . . . . . . . . . . . . . . . . . . . . . . . . . . . . . . . . . . . . . . . . . . 1
1.1
Product Introduction . . . . . . . . . . . . . . . . . . . . . . . . . . . . . . . . . . . . . . . . . . . 1
1.2
Profile And Buttons . . . . . . . . . . . . . . . . . . . . . . . . . . . . . . . . . . . . . . . . . . . . 2
Installation . . . . . . . . . . . . . . . . . . . . . . . . . . . . . . . . . . . . . . . . . . . . . . . . . . 9
2.1
Checklist . . . . . . . . . . . . . . . . . . . . . . . . . . . . . . . . . . . . . . . . . . . . . . . . . . . . . . 9
2.2
Installation . . . . . . . . . . . . . . . . . . . . . . . . . . . . . . . . . . . . . . . . . . . . . . . . . . . 10
2.3
Acquire IP Address . . . . . . . . . . . . . . . . . . . . . . . . . . . . . . . . . . . . . . . . . . . . 11
2.4
Web Settings . . . . . . . . . . . . . . . . . . . . . . . . . . . . . . . . . . . . . . . . . . . . . . . . . 12
2.5
Change Language. . . . . . . . . . . . . . . . . . . . . . . . . . . . . . . . . . . . . . . . . . . . . 12
Phone Function . . . . . . . . . . . . . . . . . . . . . . . . . . . . . . . . . . . . . . . . . . . . .
3.1
LCD Display Descriptions. . . . . . . . . . . . . . . . . . . . . . . . . . . . . . . . . . . . . .
3.2
Menu Structure . . . . . . . . . . . . . . . . . . . . . . . . . . . . . . . . . . . . . . . . . . . . . . .
3.3
Menu Functions . . . . . . . . . . . . . . . . . . . . . . . . . . . . . . . . . . . . . . . . . . . . . .
3.4
Phone Settings. . . . . . . . . . . . . . . . . . . . . . . . . . . . . . . . . . . . . . . . . . . . . . . .
3.5
Keyboard Coding Rules. . . . . . . . . . . . . . . . . . . . . . . . . . . . . . . . . . . . . . . .
15
15
16
18
19
22
Phone Usage . . . . . . . . . . . . . . . . . . . . . . . . . . . . . . . . . . . . . . . . . . . . . . .
4.1
Making Calls . . . . . . . . . . . . . . . . . . . . . . . . . . . . . . . . . . . . . . . . . . . . . . . . .
4.2
Answer Calls . . . . . . . . . . . . . . . . . . . . . . . . . . . . . . . . . . . . . . . . . . . . . . . . .
4.3
In Calling . . . . . . . . . . . . . . . . . . . . . . . . . . . . . . . . . . . . . . . . . . . . . . . . . . . .
4.4
Do Not Disturb . . . . . . . . . . . . . . . . . . . . . . . . . . . . . . . . . . . . . . . . . . . . . . .
4.5
Call Forwarding . . . . . . . . . . . . . . . . . . . . . . . . . . . . . . . . . . . . . . . . . . . . . .
4.6
Check Call History . . . . . . . . . . . . . . . . . . . . . . . . . . . . . . . . . . . . . . . . . . . .
4.7
Phone Book . . . . . . . . . . . . . . . . . . . . . . . . . . . . . . . . . . . . . . . . . . . . . . . . . .
4.8
Call Volume Adjustment . . . . . . . . . . . . . . . . . . . . . . . . . . . . . . . . . . . . . . .
4.9
SMS . . . . . . . . . . . . . . . . . . . . . . . . . . . . . . . . . . . . . . . . . . . . . . . . . . . . . . . . .
4.10
Voice Mail Box. . . . . . . . . . . . . . . . . . . . . . . . . . . . . . . . . . . . . . . . . . . . . . . .
4.11
Restore Factory Configuration . . . . . . . . . . . . . . . . . . . . . . . . . . . . . . . . . .
23
23
28
30
33
34
35
36
37
37
38
38
Web Login. . . . . . . . . . . . . . . . . . . . . . . . . . . . . . . . . . . . . . . . . . . . . . . . . . 39
5.1
Login . . . . . . . . . . . . . . . . . . . . . . . . . . . . . . . . . . . . . . . . . . . . . . . . . . . . . . . . 39
5.2
Privilege Difference Between Administrator And Common User . . . . 40
5.3
Change Language. . . . . . . . . . . . . . . . . . . . . . . . . . . . . . . . . . . . . . . . . . . . . 40
Status . . . . . . . . . . . . . . . . . . . . . . . . . . . . . . . . . . . . . . . . . . . . . . . . . . . . . 43
Configurations . . . . . . . . . . . . . . . . . . . . . . . . . . . . . . . . . . . . . . . . . . . . . . 45
7.1
Preference . . . . . . . . . . . . . . . . . . . . . . . . . . . . . . . . . . . . . . . . . . . . . . . . . . . 46
CN2x4 SIP Phone User’s Manual 1
Contents
7.2
7.3
7.4
7.5
7.6
Network Configuration . . . . . . . . . . . . . . . . . . . . . . . . . . . . . . . . . . . . . . . .
Call Settings . . . . . . . . . . . . . . . . . . . . . . . . . . . . . . . . . . . . . . . . . . . . . . . . . .
Phone Settings. . . . . . . . . . . . . . . . . . . . . . . . . . . . . . . . . . . . . . . . . . . . . . . .
Save Modification . . . . . . . . . . . . . . . . . . . . . . . . . . . . . . . . . . . . . . . . . . . . .
Cancel Modification . . . . . . . . . . . . . . . . . . . . . . . . . . . . . . . . . . . . . . . . . . .
49
50
63
67
67
Phone Book . . . . . . . . . . . . . . . . . . . . . . . . . . . . . . . . . . . . . . . . . . . . . . . .
8.1
Check Phone Book . . . . . . . . . . . . . . . . . . . . . . . . . . . . . . . . . . . . . . . . . . . .
8.2
Add A New Record. . . . . . . . . . . . . . . . . . . . . . . . . . . . . . . . . . . . . . . . . . . .
8.3
Edit or Delete Records . . . . . . . . . . . . . . . . . . . . . . . . . . . . . . . . . . . . . . . . .
69
69
70
70
Tools . . . . . . . . . . . . . . . . . . . . . . . . . . . . . . . . . . . . . . . . . . . . . . . . . . . . . .
9.1
Upgrade Online . . . . . . . . . . . . . . . . . . . . . . . . . . . . . . . . . . . . . . . . . . . . . .
9.2
Change Password . . . . . . . . . . . . . . . . . . . . . . . . . . . . . . . . . . . . . . . . . . . . .
9.3
Backup/Recover Configurations . . . . . . . . . . . . . . . . . . . . . . . . . . . . . . . .
9.4
Recover Factory Configuration . . . . . . . . . . . . . . . . . . . . . . . . . . . . . . . . .
9.5
Reboot System . . . . . . . . . . . . . . . . . . . . . . . . . . . . . . . . . . . . . . . . . . . . . . . .
73
73
74
75
75
76
How to use headset . . . . . . . . . . . . . . . . . . . . . . . . . . . . . . . . . . . . . . . . . . 77
2 CN2x4 SIP Phone User’s Manual
1. Product Introduction
Chapter 1
Product Introduction
1.1
Product Introduction
Figure 1-1
•
•
SIP Phone Appearance
Standard SIP
Speech codec for VoIP
1
CN2x4 SIP Phone User’s Manual
•
•
•
•
•
•
•
Full-duplex speakerphone with echo cancellation
10/100Base-T Ethernet Port, use RJ-45 interface
Integrated Ethernet automatic toll switching repeater for PC connection
Downloadable firmware for further upgrade
IP address allocation - DHCP client or static settings
Full-duplex handfree speakerphone
26 buttons includes five standard function buttons, one menu button and one phone book
button.
•
•
•
•
•
•
•
•
•
•
•
•
•
•
•
•
3* 16 screen shows date, time and phone number etc
•
Supports VoIP under extreme network conditions. For example, packet loss rate is up to 40%
and network delay is up to 500ms.
•
•
•
ToS bit supported for improving QoS in manageable network.
Handfree function with frequency-domain echo cancellation
Network Bridge - Ethernet Hub with 2 ports
6-level handfree volume
6-level speech volume
6-level ring volume and silence.
4 ring types
4-level screen brightness
Coming call indication, received call list, outgoing call list and call history
Re-dialing, flashing, silence, transfer functions
Phone book
DDNS supported
NTP service and multi-DNS service supported
Manu- and auto- speech codec negotiation
G.711, G.723.1, G.723.1A, G.729A and G.729B speech coder
Advanced speech processing: self-adaptable jitter buffer processing in case of package delay
and package jittering
Friendly user management interface.
Implement managmet and configuration via keypad or Web Management System.
1.2
Profile And Buttons
1.2.1
Front View
2
1. Product Introduction
Figure 1-2
1.2.2
Front view of the panel
Bottom View
Figure 1-3
Bottom view
3
CN2x4 SIP Phone User’s Manual
1.2.3
Structure
Figure 1-4
1.2.4
Button Descriptions
Table 1-1
4
SIP Phone's structure
Button Descriptions
Button
Name
Decription
0 - 9, *, #
Digit number
Digits, * ,# for common use
< Menu >
Menu button
Enter menu mode when the phone is idle
< OK >
Confirmation button
Call out after dialing numbers.
< Esc >
Return button
Confirm operations in menu.
1. Product Introduction
Table 1-1
Button Descriptions
Button
Name
Decription
<▲>
Page up button
In menu:
<▼>
<W>
Page down button
Move left button
•
Move to previous item.
•
Move to previous one when viewing call records
•
Tune to upper-level volume
In menu:
•
Move to next item
•
Move to next one when viewing call records
•
Ttune to lower-level volume
In menu, move to the left item
In idle state, tune down the LCD gray scale
In handfree mode, headset mode or in conversation, tune down the
volume.
< X>
Move right button
In menu, move to the right item
In idle state, tune up the LCD gray scale
In handfree mode, headset mode, or in conversation, tune up the
volume.
< Msg >
Voice mailbox button
Listen to the voice mails.
< Hold >
Hold button
Hold the ongoing conversation temporarily
< Conf >
Conference button
Build up 3-parties conferrence
< Transfer >
Transfer button
Transfer a call to another number
< Mute >
Silence button
Close speaker temporarily
< Speaker >
Speakerphone button
In handfree mode, make a call via the speakerphone.
< Redial >
Redialing button
Redial the last numbe
<Phone
book>
Self-defined button
Execution of self-defined function buttons, the defaults are:
<Forword>
<Phone book>:search, add new number in phone book or use
speed dialing.
<DND>
<Forword>:forward always
<Park/Picku
p>
<DND>:do-not-disturb.
<Park/Pickup>:in conversation, check or pick up waiting call via
"pending call list" function.
<Call list>
<Call list>:record call history.
For more information, see 7.4 Phone Settings
<Call1> ~
< Call 4>
Line select button
Select different line to make a call via handfree speakerphone or
headset; in conversation, the button can be used to switch between
2 calls.
< Headset >
Headset button
In headset mode, you may make a call without the handle.
5
CN2x4 SIP Phone User’s Manual
1.2.5
Indicator Descriptions
The upper right indicator flashs in different mode based on different phone status.
As next table:
Table 1-2
Indicator Descriptions
LED
Color
Position
Status
Description
Phone status
indicator
red
On the upper
right corner
Flashing
quickly
Ringing when it has a coming call
Flashing
slowly
New missed call if you set "missed call
indication"
Have a new voice mail
1.2.6
Handfree
indicator
red
Headset
indicator
red
Line indicator
red
On
System is booting (before registry)
Off
No message (unread)
Above
<speaker>
button
On
Calling via the speakerphone
Off
Do not use handfree mode
Above
<headset>
button
On
Calling via the headset
Off
Do not use headset mode
Above <Call1>
~ <Call4>
buttons
Flashing
slowly
When a call is waiting
On
In conversation
Off
No use
LCD Screen Descriptions
Table 1-3
LCD screen descriptions
Name
Operation/status
Display
LCD screen
In idle state
Register successfully
"Year - month - day hour:minute:second
SIP PHONE
xxxx (extension number)"
off-hook
Line 1 to 4
calling
" calling
xxxx (extension number)"
callee is busy
"Line is busy"
in conversation
"xxxx (extension)
00:00:00 (duration)"
<Menu>
6
On-hook after
calling
"call end"
Press this button in
idle state
Menu item
1. Product Introduction
Table 1-3
LCD screen descriptions
Name
Operation/status
Display
<Msg>
Press this button in
idle state
Voice mail menu
< Hold >
Press this button in
calling
"call holding"
< Headset >
Press this button in
idle state
Display:
"connecting:
xxxx (extension)
00:00:00 (duration)
Headset"
< Mute >
Press this button in
conversation
"mute 00:00:00 (duration)"
< Redial >
Press this button in
idle state
Show the last dialed number, call it via speakerphone.
Press this button in
off-hook state
Redial the last dialed number or call the number showed in LCD
screen.
Press this button in
idle state
In handfree mode:
< Speaker >
Display:
"line 1 to 4"
< ▲ >/< ▼ >
buttons
Press this button in
idle state
Display outgoing numbers
Press this button in
conversation
Volume adjustment
Display:
"HANDSET?xxxx "
In menu or phone
book mode
Select menu item;
Display: ""menu" and "xxxx (extension)"
7
2. Installation
Chapter 2
Installation
The steps are:
•
•
•
•
•
•
•
•
2.1
Unpack the case.
Component assembly
Power on
Acquire an IP address for SIP phone
Input IP address in browser's address filed.
Login on SIP phone's Web Management System
Set phone parameters.
Save settings and reboot the system.
Checklist
Check the accessories in the box based on the checklist.
The checklist is:
9
CN2x4 SIP Phone User’s Manual
Figure 2-1
2.2
Installation
•
Choose a dry ventilated place to place the phone, right side is up.
Connect to 10Mpbs or 100Mpbs network via RJ45 terminal, like LAN, Ethernet broadbank
access, ADSL, or Cable Modem access.
Please confirm the connection before power-on. Wrong power adapter will damage the
phone set. Good connection with ground reduces voltage surge caused by lightning and
improves speech quality, so make it sure. (check the connection with ground when speech
quality is not good enough )
•
Installation steps:
As below:
1). Connect the handle and the base: plug one terminal of the
telephone cord into the handle port, another one into the port
of the base.
2). Connect the phone with network: plug one terminal of the
Ethernet cable into the Ethernet port on the bottom side of the
phone, plug aother terminal into the port of a switch, a hub, a
DSL router, a Cable modem or other equipment.
10
2. Installation
3). Power on: place the phone near power jack, connect the
phone with the power cable.
After installation, the screen shows this:
xxxx-xx-xx(年-月-日) xx:xx:xx(时:分:秒)
xxxx-xx-xx(year-month-day) xx:xx:xx(hour:minute:
second)
SIP PHONE
CONNECTING SERVER
2.3
Acquire IP Address
The sip phone will acquire IP address actively from DHCP server after connecting with network.
You can check the IP address like this:
Like below:
1.
press <Menu> to enter the menu;
2.
press <4>, or use <▲>/<▼> to choose [SYSTEM TOOLS], press <OK> to enter.
3.
press <1>, or use <▲>/<▼> to choose [PHONE STATUS], press <OK>
4.
press <1>, or use <▲>/<▼> to choose [LAN PORT] and press <OK>
5.
press <1>, or <OK> to display LAN PORT information ( like 192.168.200.204 )
LAN PORT
1.STATUS:WORKING
2.IP:192.168.200.204
Note: The IP address is any valid address (between 0 to 255).
11
CN2x4 SIP Phone User’s Manual
2.4
Web Settings
Via the build-in Web Management System to complement the initial configuration for CN2x4 SIP
Phone.
1.
Obtain IP address:
To login on Web Management System, you need to know the IP address of network and
PC. (set it as above )
2.
Login on Web Management System:
Input the IP address in the browser's field. The default username and password are
"admin" and "0000".
Figure 2-1 is the main page after login. The left part is menu navigator, and the right part is
the editing area for parameters.
3.
complete the basic configurations:
For the basic call functions, you need only three steps:
-
Allocate phone number and display name for the phone.
-
Set SIP Proxy and SIP Registrar.
-
Set Authentication ID and Password
These items are all filled in Configurations > Call Settings.
Note: save it after modification by clicking Configurations> Save .
More information in Part of Web Management System.
2.5
Change Language
The default language is English when start-up. CN2x4 SIP Phone supports multi-language. You
can use function button or Web Management System to change it.
By this way:
•
Via function button:
1). Press <Menu>, then the LCD screen shows the menu.
2). Press <5>, or use <▲>/<▼> to choose [DEVICE CONFIG] , press <OK> to enter it.
Input user name and password.
Note: Note: if the "menu configuration passworkd" is disabled, do not need to input user
name and password when setting via function button.
The default user name and password is "admin".
a. Press <Del> to delete user, press
"admin"
12
,
,
,
,
to re-input username
2. Installation
Figure 2-2
Web Management System
Showed in the screen:
USER NAME:
admin
b. Press <OK> to show:
13
CN2x4 SIP Phone User’s Manual
PASSWORD:
c.
Press digit buttons, reinput password "0000";
3). press <OK> to enter [DEVICE CONFIG] sub-menu:
a. Press <1>, or use <▲>/<▼> to choose?PREFERENCE] and press <OK> ;
b. Press <1>, or use <▲>/<▼> to choose?LANGUAGE] and press <OK>;
c.
Press <1>, or <OK> to show the LANGUAGE information.
d. Press <1>/<2> or use <▲>/<▼> to choose one language ( for example: "SIM.
CHINESE"means Simplified Chinese ).
LANGUAGE
1. [ ] ENGLISH
2. [+ ] SIM. CHINESE
4). press <Esc> to exit gradually after setting.
5). press <1> or use <▲>/<▼> to choose?SAVE] and press <OK> to save the settings.
Note: reboot the system to make the settings work. Turn off power to restart the equipment
after changing language mode.
•
Via Web Management System:
1). login on Web Management System;
2). Change the language: press Configurations > Preference to enter the page, change
Language to SIM Chinese for example.
3). Press Configurations > Save Changes to save it.
4). Press Tools > Reboot to reboot the equipment.
14
3. Phone Function
Chapter 3
Phone Function
3.1
LCD Display Descriptions
•
Date and time
On the upper left corner of the LCD screen is current date and time which are got from NTP
Server automatically based on your settings. About how to set NTP server, see Part III Web
Management System please.
•
Missed calls
The message is like this when there are missed calls:
X CALLS MISSED
Explaination: X is the nubmer of missed calls
Press <OK> to check the missed calls, the information includes coming time and caller
number. Use <▲>/<▼> to check next one.
•
Menu display
In menu mode, the screen shows all menu items, press <▲>/<▼> and <OK > to choose it.
•
Call display
1). Show these information when you have a coming call:
Caller name or number
00:00:00 (duration)
15
CN2x4 SIP Phone User’s Manual
2). The screen shows these information in conversation:
xxxx ( caller ID )
00:00:00 (duration)
3). The screen shows these information when you hang up the call.
Call End
Duration:
3.2
。
00:00:00
Menu Structure
Press <Menu> to enter the menu mode when the phone is in idle state. The phone quits the
menu when there is a coming call or picking up the handle. Or quit the menu automatically after
15 seconds since last operation.
The menu's structure is:
16
3. Phone Function
Figure 3-1
Web Management System main interface
17
CN2x4 SIP Phone User’s Manual
3.3
Menu Functions
Table 3-1
Menu
item
1
2
Phone Menu Function Introduction
Main menu
CALL
HISTORY
PHONE
1-level
sub-menu
2-level
sub-menu
Function
PROFILE 1~4
ANSWERED
CALLS
Record the number and the time of answered
calls
CALLS
MISSED
Record the number and the time of calls missed
DIALED
CALLS
Record the number and the time of dialed calls
DELETE ALL
Delete all records
VIEW
Check calls in phone book (includeing name
and number)
ADD NEW
Add new entry
SMS
PROFILE
1~4
Check or send SMS
VOICE MAIL
PROFILE
1~4
Enter voice mail box
PHONE
STATUS
LAN PORT
Check LAN port's status and the IP address
PC PORT
Check the connection between PC and outside
PHONE
NUMBER
Check line numbers( up to 4 numbers. )
HW INFO
Check hardware information
PROFILE 1~4
BOOK
3
4
18
MESSAGE
CENTER
SYSTEM
TOOLS
ONLINE UPGRADE
Update software online
SYSTEM VERSION
Check current version
RESET CONFIG
Restorer factory configuration
RING TYPE
Set ring type of coming calls
RING VOLUME
Set ring volume of coming calls
CALL FORWORD
Set forward object and conditions
DEF. HANDFREE DEV.
Set default device of handfree mode.
3. Phone Function
Table 3-1
Menu
item
5
Phone Menu Function Introduction
Main menu
DEVICE
CONFIG
1-level
sub-menu
2-level
sub-menu
Function
PREFERENCE
LANGUAGE
Set language( English or Chinese )
TIME ZONE
Set time zone
TITLE ON
LCD
Set display name in idle state ( may be
extension number )
DATETIME
SVR
Set time server's IP address
AUTO
CONFIG
Enable or disable auto-config, includeing
auto-config server and auto-update interval.
DNS
Set domain's IP adress
GATEWAY
Set gateway's IP address
PC PORT
Set PC's IP address
LAN PORT
Set LAN's IP address
DISABLE
Disable DNS service
GATEWAY
Set gateway's IP address
DNS ADDR
Set DNS Server's IP address
SUBNET
MASK
Set DNS Server's netmask for
STARTING
ADDR
Set the valid address extent for domain
NETWORK
CFG
DHCP
SERVICE
ENDING
ADDR
3.4
Phone Settings
3.4.1
Network Settings
Visit Menu > System Configurations > Network Configuration to set network parameters.
3.4.1.1
System Configuration Menu
Only administrator is permited to enter System Configuration menu, and you must provide
correct user name and password, like this:
1.
Press <Menu> to enter the menu in idle state.
2.
Press<5> ,or use <▲>/<▼> to choose [System Configurations] and press <OK> to enter.
Input user name and password as 2.5 Change Language 'Via Function button'.
Note: if 'menu configuration password' is disabled, do not need password when you set
'System Configuration' on the phone manually.
19
CN2x4 SIP Phone User’s Manual
3.4.1.2
Network Configurations
•
Set LAN port
The IP address of LAN Port can be obtained automatically or manually.
By manually:
1). Enter [System Configuration] sub-menu in idle state.
2). Press <2> or use <▲>/<▼> to choose?Network Configuration] and press <OK> to
enter it.
3). Press <4> or use <▲>/<▼> to choose [LAN Port] and press <OK> to enter it.
4). Press <3> , or use <▲>/<▼> to choose [Static IP] and press <OK> to enter the page of
address settings.
5). Press <1> or use <▲>/<▼> to choose [IP Address] and press <OK> to set parameters:
a. Use keypad to enter the IP address (use <*> instead of "." )
b. Press <OK> to return to superior menu.
6). Press <2> or use <▲>/<▼> to choose [Net Mask] and press <OK> to set it.
a. Use keypad to enter the IP address( use <*> instead of "." ).
b. Press <OK> to return to superior menu.
7). Save the configuration after setting.
•
Set PC Port
The IP address of PC Port can be obtained automatically or manually.
By manually:
1). Enter [System Configuration] sub-menu in idle state.
2). Press <2> or use <▲>/<▼> to choose?Network Configuration] and press <OK> to
enter it.
3). Press <3> or use <▲>/<▼> to choose [PC Port] and press <OK> to enter it.
4). Press <2> , or use <▲>/<▼> to choose [Static IP] and press <OK> to enter the page of
address settings.
5). Press <1> or use <▲>/<▼> to choose [IP Address] and press <OK> to set it:
a. Use keypad to enter the IP address (use <*> instead of "." )
b. Press <OK> to return to superior menu.
6). Press <2> or use <▲>/<▼> to choose [Net Mask] and press <OK> to set it.
a. a.Use keypad to enter the IP address ( use <*> instead of "." ).
b. b.Press <OK> to return to superior menu.
7). Save the configuration after setting.
•
20
Set Gateway's IP Address
3. Phone Function
1). Enter [System Configuration] sub-menu
2). Press <2> or use <▲>/<▼> to choose?Network Configuration] and press <OK> to
enter it.
3). Press <2> or use <▲>/<▼> to choose [Gateway] and press <OK> to set it.
a. Use keypad to enter the IP address ( use <*> instead of "." ).
b. Press <OK> to return to superior menu.
4). Save the configuration after setting.
•
Set DNS Server's IP Address
1). Enter [System Configuration] sub-menu
2). Press <2> or use <▲>/<▼> to choose [Network Configuration] and press <OK> to
enter it.
3). Press <1> or use <▲>/<▼> to choose [DNS] and press <OK> to set it.
4). Press <1>/<2> or <▲>/<▼> to choose which one to set -- [Primary DNS]
(recommended) / [Secondary DNS] (backup) -- and press <OK> to set it.
a. Use keypad to enter the IP address ( use <*> instead of "." ).
b. Press <OK> to return to superior menu.
5). Save the configuration after setting.
3.4.2
Set LCD Screen Gray Scale
Press <t>/<u> buttons to adjust LCD screen's gray scale in idle state (more stars means higher
gray scale ).
3.4.3
Set Ring Type
In idle state:
3.4.4
1.
Press <Menu> to enter menu item.
2.
Press <4>, or use <▲>/<▼> and <OK> to enter [System Tools]
3.
Press <5>, or use<▲>/<▼> and <OK> to enter [Ring Type]
4.
Press <1> ~ <4>, or use <▲>/<▼> and <OK> to select which line to set.
5.
Press <1> ~ <4>, or use <▲>/<▼> and <OK> to set ring type for this line.
6.
Press <▲>/<▼> to listen to the ring.
Set Ring Volume
In idle state:
1.
Press <Menu> to enter menu item.
2.
Press <4>, or use <▲>/<▼> to choose [System Tools] and press <OK> to enter it.
21
CN2x4 SIP Phone User’s Manual
3.5
3.
Press <6>, or use <▲>/<▼> to choose [Ring Volume] and press <OK> to enter it.
4.
Use <▲>/<▼> to set ring volume.( more stars means higher volume. No star means silence )
5.
Press <OK> to confirm and save it.
Keyboard Coding Rules
We provide keyboard coding system for your convenience of inputing letters or special characters
when you operate the phone book. Here are the rules:
Table 3-2
Phone Keyboard
Button
Description
<2>
2abcABC
<3>
3defDEF
<4>
4ghiGHI
<5>
5jklJKL
<6>
6mnoMNO
<7>
7pqrsPQRS
<8>
8tuvTUV
<9>
9wxyzWXYZ
<#>
#@%&
<*>
*.,<!?
If you need a letter or a special character, keep clicking the same button until you get the desired.
The system will confirm the current one if you leave the button alone for 1.5 seconds.
22
4. Phone Usage
Chapter 4
Phone Usage
CN2x4 SIP Phone has many call functions and dialing ways. We will introduce you the main call
functions of CN2x4 SIP Phone.
4.1
Making Calls
CN2x4 SIP Phone has 4 lines which all can make calls as your wish (the default line is the first
one); the caller ID showed to callee is the line's number if supported.
Choose a line:
4.1.1
4.1.2
1.
Press any one of Call1~Call4 buttons and the red LED light is on.
2.
Dial out a number and make a call.
Call Via Handle
1.
Pick up the handle and the red LED light is on.
2.
Dial out a number (before that, you should choose a line )
3.
Press <OK > to make the call.
Call Via Handfree Speaker
1.
Press <Speaker> and the red light nearby is on;
2.
Dial out a number ( before that, you should choose a line )
3.
Press <OK > to make the call.
Note: dial a number by pressing digit buttons and end it with <ok> (or wait for 1.5 seconds)
in idle state, the phone will make a call via handfree speaker by default, the
corresponding light of the line is red.
23
CN2x4 SIP Phone User’s Manual
4.1.3
4.1.4
Call Via Headset
1.
Press <Headset> and the above light is red.
2.
Dial out a number (before that, you should choose a line to make the call )
3.
Press <OK > to call.
Re-Dialing
In idle state:
1.
Press <Redial>;
The last number(s) dialed shows on the screen, use <▲>/<▼> to choose.
2.
4.1.5
4.1.6
Press <OK > to make the call.
Call Recorded Number
1.
Press <Menu> to enter the menu.
2.
Press <1> ,or <OK> to enter [Call Lists] .
3.
Press <1> to <4>, or use <▲>/<▼> to choose a line, press <OK> to enter it.
4.
Press <1> ~ <3>, or use <▲>/<▼> to choose the type of call lists( answered calls, missed
calls, dialed calls ) and press <OK> to confirm it.
5.
Use <▲>/<▼> to select a record and press <OK> to confirm it.
6.
Press <▲>/<▼> to choose [Call] .
7.
Press <OK> to make a call.
Call Answered Number
In idle state:
4.1.7
1.
Use <▲>/<▼> to browse numbers answered recently.
2.
Select a number and press <OK> to make the call via handfree speaker.
3.
Pick up the handle to switch to handle mode.
Call Phone Book
1.
Press <Menu> to enter the menu.
2.
Press <2> ,or <OK> to choose?Phone Book] and press <OK> to enter it.
3.
Press <1> ~ <4> ,or use <▲>/<▼> to choose a line and press <OK> to enter it.
4.
Press <1>, or use <▲>/<▼> to the phone book and press <OK> to enter it.
5.
Use <▲>/<▼> to view the records.
6.
Choose the number desired and press <OK> to confirm it.
1). Press <1>, or choose [Call] and press <OK> to confirm it.
24
4. Phone Usage
2). Press <OK> to make the call.
4.1.8
Call Speed Dial Number
Requirement: set self-defined speed dial button and object number beforehand (for example:
how to define <Park/Pickup> as speed dial button, see 7.4.1 Function Button Defination ; how to
define object number, see 4.9.3 Speed Dial ).
Operate like this:
4.1.9
1.
Press <Park/Pickup> to enter [Speed dial] menu.
2.
Use keypad or <▲>/<▼> to choose the number desired.
3.
Press <OK> to call out directly.
Call Another Number During Conversation
When you (user A) is in a conversation with user B (the number is 1002), CN2x4 SIP Phone
permits you call another number (user C, the number is 1003) without cuting off the conversation
with user B.
Note: CN2x4 SIP Phone has four lines to make calls, and it permits up to two calls per line
which may has a different number, So when you use them all, you may make 8 (2x4)
calls at the same time. In conversation, the line control button Call1?Call4 has the same
function as <Hold>.
4.1.9.1
Single Line Calling
Single line calling is calling two numbers on the same line at the same time.
1.
User A and user B are in conversation via Line 1;
Representation: Line1 indicator is on always, the screen displays:
Connecting:
User B 1002
00:05:12
2.
Keep the first conversation with user B:
Press <Call1> to hold it;
Representation: playing dialing tone, the screen displays:
Line 1
3.
Build up a conversation with the third party:
25
CN2x4 SIP Phone User’s Manual
1). Dial out the third party's number (user C, 1003), and pick up the handle or use handfree
speaker to make a call;
2). The conversation is built up after user C answered the phone.
Representation: Line1 indicator is on always, the screen displays:
Connecting:
1003
00:01:30
用户 B 的电话号码 pending
3.
switch the calls:
User A can recover the conversation with user B with or without hangup the conversation with
user C.
•
No hangup
1). Press <Call1> to recover the conversation with user B, and hold user C.
2). Press <Call1> again to switch between two calls.
•
Hangup
1). Flash the hook or hangup the phone to cut off the current conversation in off-hook state.
2). Press <Speaker> to cut off the current conversation in handfree state.
Palying "DUDU" alarm tone if there is reserved conversation, and the screen shows the
reserved number like this:
2007-11-30
14:50:05
CN2x4
1002 pending
3). Press <Call1> again to recover the conversation with user B.
4.1.9.2
Multiple Line Calling
Multiple line calling is making calls with more than two people on multi-lines (with different
numbers).
Prerequisite: set lines beforehand (the configuration, see 7.3 Call Settings)
1.
User A and user B are in conversation (the current line is Line1 in off-hook state);
Representation: Line1 indicator is on always (the handfree light is on always in handfree state), the
screen displays:
26
4. Phone Usage
Connecting:
User B 1002
00:05:12
2.
hold the first line (with user B):
User A press another idle line's control button (like <Call2>), and hold the conversation
with user B.
Representation: Line1 indicator is flashing quickly, Line2 indicator is on always (the handfree
indicator is on always in handfree state),when you her thes dialing tone, the screen shows:
Line 2:
3.
Build up the conversation with a third party:
1). Dial out a third party's number (user C, the number is 1003) and make the call (dial out
1003 and press <OK> in handfree state).
2). The conversation is built up after user C answered.
Representation: Line1 indicator is flashing quickly, Line2 indicator is on always (the handfree light
is on if in handfree state), without dialing tone, the screen displays:
Connecting:
1003
00:01:30
1002 pending
3.
Switching calls:
User A can recover the conversation with user B with or without hanging up the conversation
with user C.
•
No hangup:
1). Press <Call1> to recover the conversation with user B, as well as holding the
conversation with user C and the system plays holding music for user C.
2). Press <Call2> to recover the conversation with user C, as well as holding the
conversation with user B, and the system plays holding music for user B.
•
Hangup:
1). Flash the hook or hangup the phone to cut off the current conversation in handfree
state.
2). Press <Speaker> to cut off the current conversation in handfree mode.
27
CN2x4 SIP Phone User’s Manual
You will hear "DUDU" alarm tone if there is holding conversation; the held line's indicator is
flashing quickly at the same time. The screen shows:
2007-11-30
14:50:05
CN2x4
1002 pending
•
You may switch calls by "call waiting list" button (for more details, see 4.4.4 take back waiting
calls)
4.2
Answer Calls
4.2.1
Silence Ringing Tone
1.
Press <Menu> to enter the menu;
2.
Press <4> or use <▲>/<▼> to choose?System Tools] and press <OK> to enter it;
3.
Press <6> or use <▲>/<▼> to choose?Ring Volume] and press <OK> to enter it;
4.
Press<▼> to clear all stars to silence it:
Ring Volume:
The upper right indicator is flashing intead of ringing when you have a coming call, and the
screen shows:
Line 1 coming:
1002 Tom
Answer the call by picking up the handle or pressing handfree speaker button.
4.2.2
Answer Calls
There are two ways to answer a call:
•
•
The common way: pick up the handle
The handfree way: press <Speaker> or <Headset> (if you have a headset) to answer the
call.
Note: Zed-3 provides you handfree ways by speakerphone and headset. CN2x4 SIP Phone
use headset as the default. You can change it by System Tools of the phone or by Phone
Settings in Web Management System.
28
4. Phone Usage
•
4.2.3
Auto-answer way: if the auto-answer way (set in Call Settings in Web Management System)
is enabled, you can use the default auto-answer device when getting a coming call (set in
Call Settings in Web Management System).
Get Another Coming Call
If you (user A) get another coming call from user C (1003) during a conversation with user B,
CN2x4 SIP Phone lets you answer the third party's call without hanging up the conversation with
user A.
Note: CN2x4 SIP Phone provides up to four lines (with different numbers) and supports up
to two call per line. So when you use them all, you may get 8 (2x4) calls at the same time.
In conversation, line control buttons Call1?Call4 have the same function as <Hold>.
4.2.3.1
Single Line Calling
Single line calling is calling two numbers on the same line at the same time. For exmple, you are
in the conversation with user B (1002) on line 1 when user C (1003) is calling you.
Representation: Line1 indicator flashs twice and plays "DUDU" alarm tone, the screen shows:
Connecting:
User B 1002
00:00:16
1003 incom ing
You can answer user C with or without hanging up the conversation with user C:
•
•
4.2.3.2
Hangup: flash the hook to answer user C, but the conversation with user B is cut off.
No hangup:
-
Press <Hold> to hold the conversation with user B.
-
Flash the hook to answer user C without cutting off the conversation with user B.
-
During the conversation, press <Call1> to switch between two calls (viz. the
corresponding line control button has the same function as Flash button.)
Multiple Line Calling
Multiple line Calling is calling more than two numbers on different lines which have different
numbers at the same time.
Prerequisite: set multiple lines beforehand (see 7.3 Call Settings).
For example: you are talking with user B (1002) on line 1 when user C (1003) is calling you.
Representation: Line1 inicator is on always, Line2 indictor is flashing quickly, and has "DUDU" alarm
ring, the screen shows:
29
CN2x4 SIP Phone User’s Manual
Connecting:
User B 1002:
00:00:16
1003 incoming
Now you can answer user C with or without cutting off the conversation with user B.
•
Hangup: hook on and press <Call2> to answer user C, the conversation with user B is cut
off.
•
No hangup:
-
Press <Call2> to answer user C and hold user B.
During the conversation, you can use <Call1> to switch between two calls (viz. the
corresponding line button has the function as Flash button).
-
Or, you can use "Call Waiting Lists" button to switch between calls. (more details in 4.4.4
take back waiting calls)
4.3
In Calling
4.3.1
Mute
In ongoing conversations:
4.3.2
1.
Press <Mute> to close audio sending, the <Hold> light is flashing slowly, now you can
hear opposite voice, but he /she can not hear you.
2.
Press <Mute> again to recover to nomal mode.
Call Parking
Parking list allows you picking up calls in another location or with another phone without cutting
off calls. For example: if an operator needs to do something else when they are talking with
someone, the operator can park the call; after a while, he/she continues the call via another phone
or a PC which may be in another location.
4.3.2.1
Function Descriptions
You need to set the self-defined button with parking function before you use it. (For example:
define <Park/Pickup> as parking button, see "Key4" shortcut introduction in 7.4.1.1 default
function buttons )
30
4. Phone Usage
4.3.2.2
How to Park
Before parking, you should set parking function button first, the steps are in the part of "Key4"
shortcut introduction in 7.4.1.1 default function buttons. Here, we define <Park/Pickup> as
parking function button.
4.3.3
1.
In conversation, press <Park/Pickup> to get a parking number allocated by system
automatically, then hook off. The system put this call in the parking list.
2.
Later, dial out the parking number given by the system on another phone to continue the
parked call.
Call Holding
Use <Hold> to hold a ongoing call for a while. During this time, the other side are hearing the
background music instead of your voice.
Note: The difference bwteen <Hold> and <Mute> is: <Hold> plays music but <Mute>
makes a silence.
The steps are:
1.
Press <Hold> to hold a call, the current line's indicator is on always, the screen shows:
Call holding
2.
Press <Hold> again to recover the conversation with user Bl
The screen shows:
C onn ectin g:
U ser B 1 002
00:0 5:12
4.3.4
Take Back Waiting Calls
If you have more than two calls on several lines, you may use "Waiting list" to check and switch
bwteen waiting calls besides line control buttons. For example: Call Another Number During
Conversation and Get Another Coming Call.
For example: there are two calls on line 1 (you are talking with 6078, holding 6079 on line 1, and
2339 on line 2). Now you want to take back held calls as below:
Prerequisite: there is a preset function button showing waiting call list. (The default is <Call list
>, see 7.4.1.1 Default Function Buttons )
1.
In conversation, press <Call list > to show all waiting calls' information:
31
CN2x4 SIP Phone User’s Manual
PENDING LIST
Call1 6079 PENDING
Call2 2339 PENDING
2.
Use keypad or <▲>/<▼> to choose the desired, press <OK> to recover the conversation
with whom you chose.
4.3.5
Call Transfer
4.3.5.1
Blind Transfer
Blind transfer is transferring a call to a third party without noticing him/her. Operate as below:
Prerequisite: you are talking with user A on line 1 (Call1 indicator is on), and want to transfer the
call to user B (the number is 1003)
1.
Press <Transfer> to hold the conversation with user A.
You may hear the dialing tone, the screen shows:
Line 1:
4.3.5.2
2.
Dial out user B 's number (1003), and press <OK> to make the call.
3.
Hook on when you hear the ring tone, user A is transferred automatically to user B whose
phone is ringing now.
Supervised Transfer
Supervised transfer is transferring a call to a third party after noticing him/her and getting his/her
permission. Operate as below:
Prerequisite: you are talking with user A (the number is 1001) on line 1 (Call1 indicator is on), and
want to transfer the call to user B (the number is 1003)
1.
Press <Transfer> to hold the conversation with user A;
You may hear the dialing tone and the screen shows:
Line 1:
32
4. Phone Usage
2.
Dial out user B 's number (1003) and press <OK> to make a call.
3.
User B answered the call;
1). If user B agree to connect with user A:
You hang up the phone to transfer user A to user B directly.
2). If user B do not want to connect with user A:
a. After user B's hangup, you hear the hangup tone and the screen shows "Call End".
(Call1 indicator is on)
b. Your can choose:
•
Not hang up: press <Call1> to recover the conversation with user A.
•
Hang up: the status of the phone are: handfree incidator is flashing slowly,
<Call1> indicator is flashing quickly, the screen shows:
2007-11-30
17:50:02
CN2x4
1001 pending
Press <Call1> to recover the conversation with user A in handfree mode.
4.4
Do Not Disturb
If you do not want to be disturbed, you may use this function to avoid any coming calls.
Prerequisite: there is a preset DND function button. (the default is <DND>, see 7.4.1.1default
function buttons )
•
Enable DND function
Press < DND > to enable this function in idle state. The screen shows:
2007-11-30
14:50:05
CN2x4
用户名称
DND
enabled
1 2 DND
The line which enabled DND, here
we use 12 as an example.
-
Now, your phone does not ring when you get a coming call. The system plays voice
prompt for the caller, and your screen shows:
33
CN2x4 SIP Phone User’s Manual
2007-11-30
14:50:05
CN2x4
One Call Missed
1 2 DND
-
•
The number of
calls missed
The upper right red indicator is flashing if you enabled "missing call indication" (see 7.4
Phone Settings ).
Disable DND function
Press < DND > again to disable this function. The DND indication disappears on the screen.
4.5
Call Forwarding
Besides DND (see 4.3 Do Not Disturb ), you may use forward function to transfer a call to another
available phone under certain conditions.
4.5.1
Forward Settings
You need to set forward object in [Call Forward] menu before you use it.
CN2x4 SIP Phone provides two ways to enter [Call Forward] menu:
•
Menu way:
1). Press <Menu> to enter the menu;
2). Press <4>, or use <▲>/<▼> to choose [System Tools] and press <OK> to enter it.
3). Press <7>, or use <▲>/<▼> to choose [Call Forward] and press <OK> to set it.
•
Self-defined function button way:
CN2x4 SIP Phone provides <Forword> as the default function button to enter [Call
Forward] menu.
Press <Forword> to enter the menu directly.
4.5.1.1
Forward Object Setting
Choose a line before setting object number.
Here we set forward object for line 1.
1.
Press <1>, or use <▲>/<▼> to choose Line1 and press <OK> to enter it.
2.
Press <1>, or use <▲>/<▼> to choose [Call Forward] and press <OK> to set it.
1). Use keypad to input the object number.
2). Press <OK> to save it.
34
4. Phone Usage
3.
4.5.1.2
After setting the object number, you may set forward conditions next or later. (see 4.5.1.2
Enable Call Forwarding )
Enable Call Forward
The activation of forward function is set in [Call Forward] menu along with "Forward Condition".
Enable forward function for line 1 e.g.
1.
Press <1> or use <▲>/<▼> to choose "Line1" and press <OK> to enter it.
2.
Press <2> or use <▲>/<▼> to choose [Forward Condition] and press <OK> to enter it.
The default
Forward Condition
1.[+]Forbidden
2.[] Always
3.[] Busy
4.[] No answer
5.[] Busy/No answer
1). Use keypad or <▲>/<▼> to choose the condition desired, press <OK> to save it.
2). "[+]"means being chosen.
4.6
Check Call History
You can search, dial out, save or delete the numbers in call history lists. The lists are missed call
list, answered call list, and outgoing call list.
Note: check missed call list to remove the indication on the screen when you got a missed call.
How to check call lists:
1.
Press <Menu> to enter the menu.
2.
Press <1> or use <▲>/<▼> to choose [Call Lists] , press <OK> to enter it
3.
Press <1> ~ <4> or use <▲>/<▼> to choose a line, press <OK> to enter it
4.
Press <1> ~ <3> or use <▲>/<▼> to choose a list (answered calls, missed calls, outgoing
calls), press <OK> to enter it.
5.
Use <▲>/<▼> to move to other entries.
6.
Press <OK> to operate this entry.
35
CN2x4 SIP Phone User’s Manual
xxxx (the number desired)
1. Call
2. Save
3.Delete
4.Details
1). Press <1> or use <▲>/<▼> to choose [Call] and press <OK> to call this number.
2). Press <2> or use <▲>/<▼> to choose [Save] and press <OK> to save this number.
3). Press <3> or use <▲>/<▼> to choose [Delete] and press <OK> to delete this number.
4). Press <4> or use <▲>/<▼> to choose [Details] and press <OK> to check this number's
information: name, phone number, received date and time etc.
Note: You can check call lists even when you are in conversation.
4.7
Phone Book
Our phone book stores one hundred frequent numbers for speed dialing.
4.7.1
Add To Phone Book
In idle state:
1.
Press <Menu> to enter the menu.
2.
Press <2> or use <▲>/<▼> to choose [Phone Book] and press <OK> to enter it.
3.
Press<1> ~ <4> or use <▲>/<▼> to choose a line and press <OK> to enter it.
4.
Press<2> or use <▲>/<▼> to choose?Add New] and press <OK> to enter it.
5.
Use keypad to input the name, the number etc.
6.
4.7.2
-
Press <Del> to backward delete wrong characters.
-
Press digit buttons to re-input new name and password.
Press <OK> to save it.
Search, Call, Edit And Delete Numbers In Phone Book
In idle state:
36
1.
Press <Menu> to enter the menu.
2.
Press <2> or use <▲>/<▼> to choose [Phone Book] and press <OK> to enter it.
3.
Press<1> ~ <4> or use <▲>/<▼> to choose a line and press <OK> to enter it.
4. Phone Usage
4.
Press<1> or use <▲>/<▼> to choose?View] and press <OK> to enter it.
5.
Use <▲>/<▼> to browse records.
6.
When you find the one, press <OK> to operate on it:
1). Press<1> or use <▲>/<▼> to choose [Call] to call this number.
2). Press<2> or use <▲>/<▼> to choose [Edit] and press <OK> to modify the name and
the number.
a. Press <Del> to backward delete wrong characters.
b. Press digit buttons to re-input new name and password.
3). Press<3> or use <▲>/<▼> to choose[Delete] and press <OK> to delete this entry.
4.7.3
Speed Dialing
For the phone which opened phone book global mode, you can see [Speed Dial] in [Phone Book]
menu.
Press digit buttons or <▲>/<▼> in [Speed Dial] :
4.8
1.
choose [.empty] and press <OK> to put an existing number into speed dial list.
2.
choose an existing number and press <OK> to [Modify] or [Delete] this entry.
Call Volume Adjustment
In Call or off-hook state (pick up the handle or press down <Speaker>,<Headset> ), use
<t>/<u> to adjust call volumes (handle volume, handfree speaker volume, headset volume).
There are six levels. The system will reserve the level when hanging up.
4.9
SMS
CN2x4 SIP Phone provides receiving and sending SMS. This function's implementation also
needs IP-PBX's supports. Right now, CN2x4 SIP Phone can receive and send Chinese, English
SMS; but only edit and send English SMS.
4.9.1
View SMS
1.
Press <Menu> to enter the menu in idle state.
2.
Press <3> or use <▲>/<▼> to choose [Message Center] and press <OK> to enter it.
3.
Press <1> or use <▲>/<▼> to choose [SMS] and press <OK> to enter it.
4.
Press <1> ~ <4> or use <▲>/<▼> to choose a line and press <OK> to enter it.
5.
Press <1>or use <▲>/<▼> to choose?Message Box] and press <OK> to view all received
messages.
1). Use keypad or <▲>/<▼> and <OK> to view a messages.
2). Press <OK> again to operate on it.
•
Reply: reply the message (like writing a message)
37
CN2x4 SIP Phone User’s Manual
•
Call: call the sender.
•
Information: check the sender and received time.
•
Return : return to the text.
Note: The maximal storage is 30, new comer will replace the oldest one.
4.9.2
Write A New Message
1.
Press <Menu> to enter the menu in idle state.
2.
Press <3> or use <▲>/<▼> to choose [Message Center] and press <OK> to enter it.
3.
Press <1> or use <▲>/<▼> to choose [SMS] and press <OK> to enter it.
4.
Press <1> ~ <4> or use <▲>/<▼> to choose a line and press <OK> to enter it.
5.
Press <2>or use <▲>/<▼> to choose?New Message] and press <OK> to edit a new
message.
1). Use keypad to input text in [Content] field. (digits, characters, "*"and"#"are valid)
Note: Press <F1>( to be delete button by default) to backward delete characters.
2). Press <OK> when you finished.
3). Input object number in the [Receiver] field.
4). Press <OK> to send it out.
4.10
4.11
38
Voice Mail Box
1.
Press <Menu> to enter the menu in idle state.
2.
Press <3> or use <▲>/<▼> to choose [Message Center] and press <OK> to enter it.
3.
Press <2> or use <▲>/<▼> to choose [Voice Mail Box] and press <OK> to enter it.
4.
Press <1> ~ <4> or use <▲>/<▼> to choose a line and press <OK> to enter it.
5.
The system prompts you to input voice mail's password. (the default is 0000)
6.
Operate on it based on voice prompts.
Restore Factory Configuration
1.
Press <Menu> to enter the menu in idle state.
2.
Press <3> or use <▲>/<▼> to choose [System Tools] and press <OK> to enter it.
3.
Use <▲>/<▼> to choose [Clear Configuration]
4.
Press <OK> to restore the original factory configuration.
5. Web Login
Chapter 5
Web Login
5.1
Login
After power on, get the IP address of the phone by this way:
1.
Use keypad to query SIP Phone's IP address. (see 2.3 Acquire IP Address)
2.
Login to CN2x4 SIP Phone's Web config page:
1). Open a Web browser and input the IP address in the address filed.
2). Input the user name and password on the pop-up window.
Figure 5-1
Line Settings page
39
CN2x4 SIP Phone User’s Manual
There are two types of login users:
•
Administrator: the default user name password are "admin" and "0000".
Note: You need to input user name and password when setting "system configuration" on the
phone manully if you enable the "menu configuration password".
•
Common User: the username is "user" and the default password is "1234".
You are permitted to modify user password and adminsitrator password after login as an
administrator.
5.2
User
Privilege Difference Between Administrator And Common
Table 5-1
Privilege Difference Between Administrator And Common User
Function
Status
Configurations
All visible
visible
visible
Network Settings
visible
Call Settings
Un-visible
Phone Settings
visible
Save Modification
visible
Cancel Modification
visible
visible
Upgrade Online
visible
Change Password
visible
Backup/ Restore
Configuration
visible
Restore Factory
Configuration
Un-visible
Reboot system
visible
Logout
5.3
Common user
Preference
Phone Book
Tools
Administrator
visible
Change Language
The language can be switched real-time on the page of CN2x4 Web Management System.
After login, click "English", or "Chinese" on the upper right corner of the page to change current
language immediately.
40
5. Web Login
Note: changing the language here only makes sense for this login. It does not impact the
language of the phone menu. If you want to change the phone's menu language
permanently please set it as the "language" part in 7.1 Preference.
41
6. Status
Chapter 6
Status
Click Status on the left navigator, and the page shows you basic information and status about the
phone, like line number, line status, firmware version, hardware version, network information
etc.(like figure 6-1)
Figure 6-1
Web Interface
43
7. Configurations
Chapter 7
Configurations
Click Configurations to enter the page where you may set basic user preference, network
parameters, call settings and phone settings here. You may save or cancel any change at any time.
(see figure 7-1)
45
CN2x4 SIP Phone User’s Manual
Figure 7-1
7.1
Configurations Page
Preference
Here is the basic user information. (see figure 7-2)
46
7. Configurations
Figure 7-2
•
Configurations - Preference
Language: the language of CN2x4 Web Management System. You may choose Simplified
Chinese, English, and Korean.
Note: You should save it and reboot the device (Tools > Reboot ) to make the language work.
•
Time Zone: set it based on the time difference from GMT to get the correct local time.
Rules: GMT+N, N is the difference from GMT. For example: the Time Zone of China is
GMT+8. The standard time is GMT.
•
Display SIP Server Time: get time from SIP Server. Disable by default.
Note: You may use this option to synchronize system time with SIP Server if it supports
sending time in SIP message.
•
Time Server: input the IP address of Time Server for time synchronization.
Time Server is a kind of server providing network clock on the Internet. The devices used on
the Internet usually obtain local network time through Time Server.
•
•
Time Format: 24-hour or 12-hour.
Auto-provision: it is a function which downloads configurations to the phone from
configuration server automatically.
-
Provision Server: input the IP address or domain of auto-provision server if enabled.
Figure 7-3
Configurations - Preference - auto-provision
47
CN2x4 SIP Phone User’s Manual
-
•
•
Provision Interval: the refreshing interval of auto provision. Count in second, 30s e.g.
Key(#): set the function of "#" key.
-
As Dial Digits: take it as a common character like digit button.
-
As Delimiter: before any digits, it's a common character; after any digis, it's a delimiter.
The phone sends out all previous characters once it receives a "#".
Phone Book Mode: CN2x4 SIP Phone supports maximal four lines for calling. For your
convenience, here we use sharing mode which means multiple lines sharing the same
phone book. The default value is "By Line".
-
Global: multiple lines share one phone book.
-
By Line: individual phone book for each line.
Figure 7-4
Phone Book Mode
Note: in "sharing" phone book mode, you do not need to choose a line, but enter the "Phone
Book" directly and set "Speed Dial"; in "by line" phone book mode, the "Phone Book" in
Web Management System and phone menu are showed separately.
•
Network Tones: the phone provides 17 network tones for different users. For example:
Chinese, Korea etc., or you may define it by yourself. (see figure 7-5 )
-
Customized: set dial tone, ring tone, busy tone, prompt tone standard based on your
location.
Figure 7-5
Configurations - Preference - Network Tones
Note: Save it and reboot the device to make the network tones work.
•
48
Speaker Phone Mic Input Gain: the volume of speakerphone. Bigger value means higher
volume.
7. Configurations
Note: Save it and reboot the device to make the "speakerphone mic input gain" work.
7.2
Network Configuration
You need to set Ethernet port of the phone in Network Configuration menu. The phone has LAN
port and PC port. Among these, LAN port is for up connection with Ethernet, and PC port is for
down connection with PC or LAN.
Figure 7-6
•
Configurations - Network Configuration
LAN Port: DHCP, static IP or PPPoE
-
DHCP: obtain IP address from DHCP server on the network.
-
Static IP: if you do not have DHCP server or do not want to use the IP address allocated
by DHCP server, you may set fixed IP address for the phone. (see figure 7-7)
Figure 7-7
-
Configurations - Network Configuration - Static IP
PPPOE: choose it if you use PPPoE line.
Input user name and password then save them.
•
802.1q VLAN: you may set VLAN application if you use static IP or DHCP server, select
"Enable" to show this page:
If enabled, set these two parameters:
-
VLAN ID: set ID for VLAN, valid extent is from 2 to 4093;
49
CN2x4 SIP Phone User’s Manual
Figure 7-8
Configurations - Network Configuration -LAN Port -- PPPoE
Figure 7-9
Configurations - Network Configuration - VLAN
-
•
VLAN QoS: set valid value for QoS, from 0 to 7.
PC Port: PC port has two modes: bridge mode and static IP mode;
-
Bridge Mode: connect LAN port with outside in bridge mode.
-
Static IP: set IP address for PC port manually, as figure 7-10
Figure 7-10
•
Figure 7-11
50
Configurations - Network Configuration - PC Port - Static IP
DHCP Service: PC Port with static IP may enable DHCP server also, as figure 7-11.
Configurations - Network Configuration - PC Port - DHCP Sever
7. Configurations
7.3
Call Settings
Call settings are the primary configuration of the phone, has almost all configurations involved
SIP. You should make sure these settings are correct completely, or the phone can not be used
normally. Each CN2x4 SIP Phone has maximal 4 lines which can be assigned different numbers
supported by IP-PBX.
Note: If you are not sure, use the default settings to avoid mistakes.
•
Take line 1 as example:
Figure 7-12
7.3.1
Call Settings page
SIP Work Mode
CN2x4 SIP Phone supports two work modes: single server mode and multiple server mode.
51
CN2x4 SIP Phone User’s Manual
7.3.1.1
•
Single Server Mode: the phone supports four different numbers for four lines and supports
backup server.
•
Multiple Server Mode: the phone supports four groups configurations for four lines, these
configurations are separated and can work together.
Single Server Mode
In single server mode, the phone supports four different numbers from single server for four
lines, and supports a backup server to ensure reliable service.
Note: Only correct basic configurations are needed to meet primary communication
requirements.
Figure 7-13
•
52
Call Settings - Single Server Mode for SIP
Phone Number: the number of the line, four in total.
7. Configurations
Note: The unique number is assigned by administrator.
•
•
•
Authentication ID: authentication ID assigned by administrator. Four for four lines.
•
•
•
•
•
•
•
Ring Type: every line has its own ring type.
Password: the authentication password assigned by administrator. Four for four lines.
Display Name: it's for displaying caller number. The display name replaces the real caller
number on the callee's screen. Four for four lines.
SIP Proxy: the IP address or domain for Proxy Server.
SIP Registrar: the IP address or domain for Register Server.
Register Expiry(s): the expiry duration of register, count in second.
Outbound proxy: the IP address or domain for outbound proxy.
Home Domain: the home domain of the phone.
Call Wait While In Use: enable or disable call waiting function.
Note: Consistence recommended for "Call Wait While In Use" if you set multiple lines.
•
Call Forward Type: the conditions of call forwarding, including not forward, always
forward, forward when busy.
•
•
•
•
Call Forward Number: the object number of call forwarding.
Voice Mail Number: the connect number of voice mail system.
Hot Line Number: the object number of hot line.
Dial Plan: set the dial plan;
e.g.: [1-3]xx|34xx|3[1-3,5-9][4-9]xxx|0[0-9]xxxxxxxx|.T
Explaination:
•
-
"X" or "x": one digit from 0 to 9
-
"[1-3,5-9]": one digit:
•
"1-3",is the extent, means a digit between 1 to 3.
•
Multiple digit groups separated by comma " ," composes a union.
-
"|": separate two rules.
-
".": any digit of any length.
-
"T": dial out the number automatically after 4 seconds.
Backup Server: if enabled, backup server need to be set. The parameters includes the IP
address of backup proxy, the IP address of backup registrar, backup outbound proxy, backup
home domain, and retry interval.
53
CN2x4 SIP Phone User’s Manual
Figure 7-14
•
Call Settings - Single Server Word Mode - Backup Server Setting
Audio Codec Preference: the order of audio codec, or enable or disable certain codec.
Press "Audio Codec Preference >>" to check corresponding setting, see figure 7-15:
Figure 7-15
7.3.1.2
54
Call Settings - Single Server SIP Work Mode - Audio Codec Preference
-
Enable: check or not, enable or disable.
-
The Order: these codec is ordered by priority. Choose one codec and use [Move Up] or
[Move Down] to adjust the order.
Multiple Server Mode
7. Configurations
Figure 7-16
•
Call Settings - Multiple Server SIP Work Mode
Phone Number: the number of the phone.
Note: The unique number is assigned by administrator.
•
Display Name: it's for displaying caller number. The display name replaces the real caller
number on the callee's screen. Four for four lines.
•
•
•
•
•
SIP Proxy: the IP address or domain of Proxy Server.
SIP Registrar: the IP address or domain of Register Server.
Register Expiry(s): the expiry duration of register, count in second.
Outbound Proxy: the IP address or domain of outbound proxy.
Home Domain: the home domain of the phone.
55
CN2x4 SIP Phone User’s Manual
•
•
•
•
•
•
•
•
•
•
•
Authentication ID: authentication ID assigned by administrator. Four for four lines.
Password: the authentication password assigned by administrator. Four for four lines.
Call Wait While In Use: enable or disable call waiting function.
Call Forward Type: choosenot forword of one of five call forward types
Call Forward Number: the object number of call forwarding.
Voice Mail Number: the connect number of voice mail system.
Hot Line Number: the object number of hot line.
Dial Plan: set the dial plan; (more about it see 7.3.1.1Single Server Mode )
Ring Type: every line has its own ring type.
Auto Answer Mode: CN2x4 SIP Phone supports auto answer feature, there are two modes
if enabled.
-
All Coming Calls: auto-answer all coming calls.
-
Base On List: only auto-answer the numbers on the list (the maximum is 20 numbers).
Audio Codec Preference: the order of audio codec, or enable or disable certain codec.
Press "Audio Codec Preference >>" to check corresponding setting, see figure 7-17:
Figure 7-17
7.3.2
Call Settings - Multiple Server SIP Work Mode - Audio Codec Preference
-
Enable: check or not, enable or disable.
-
Ordering: these codec orderes by priority. Choose one codec and use [Move Up] or
[Move Down] to adjust the order.
Advanced Settings
Advanced settings involve some advanced features about call and speech. If you are not sure
about them, contact professionals or keep default settings.
On Call Settings page, click right "Advanced Settings>>" to check and set. (see figure 7-18)
56
7. Configurations
Figure 7-18
Call Settings- Advanced Settings
•
•
Signaling Port: the local communication port of the phone, the default value is 5060.
•
•
NAT Keep-alive: keep the NAT port alive always when enabled.
•
•
•
•
Message Waiting Indication: use SUBSCRIBE request message and MWI function when
enabled.
Virtual Ringback: play virtual ringback for users if do not receive 180 RING signal when
enabled.
SIP Rroute: the INVITE message with ROUTE field was sent by the phone when enabled.
Local Music on Hold: play local music on hold if enabled. The music file is local, but not
from PBX.
-
Enable: open by force.
-
Disable: close local music on hold by force.
Escape Key#: send out "#" as "%23";
-
Enable: send out character string “%23” while dial "#" key.
-
Disable: send out character “#” while dial "#" key.
Expiry Settings
Click "Advanced Timing>>" to check and set as below.
57
CN2x4 SIP Phone User’s Manual
Figure 7-19
-
Expiry Settings
No Answer Forward Expiry: the duration from forwarding to another number to time
out after the first callee's expiry. Count in second.
Note: This value should less than the value of "No Answer Expiry".
•
-
No Answer Expiry: the duration from when it's determined to be "no answer" to ending
of the call. Count in second.
-
NICT Expiry: the time value of NICT expiry. Count in second.
-
ICT Expiry: the time value of ICT expiry. Count in second.
-
Retransmit T1: the time value in millisecond of retransmit.
-
Retransmit T2: the time value of retransmit. Count in millisecond.
DTMF Signaling: two modes:
-
Inband: transmit secondary dialing number in RTP band by DTMF way.
-
Outband: set outband transmit protocol and RTP payload type also when using this
mode.
Figure 7-20
DTMF outband transmit mode
There are three kinds of outband transmit protocol provided:
58
•
RFC2833: define different payload value.
•
SIP INFO: transmit in SIP message in relay mode.
•
SIP INFO(EVENT): transmit in SIP messagen in event mode.
7. Configurations
-
•
RTP Payload Type: use payload value in RFC2833.
Signaling QoS: set the value of Signaling QoS, IP TOS and DiffServ are supported right
now:
-
IP TOS: set service type when using this option. (see figure 7-21 )
Figure 7-21
-
DiffServ: set DiiffServ type if use this option. (see figure 7-22)
Figure 7-22
•
Signaling QoS - IPTOS - Service Type
Signaling QoS - DiffServ - DiffServ Type
Signaling NAT Traversal: two work modes supported:
-
STUN(RFC 3489): namely, STUN server mode.Set the IP address and domain of STUN
server, and port if necessary if use this mode (see figure 7-23):
Figure 7-23
Signaling NAT Traversal - STUN server mode
59
CN2x4 SIP Phone User’s Manual
-
Relay Proxy Mode: set the IP address, port, user name, password also if use this mode.
(see figure 7-24)
Note: Relay Proxy mode supports transmission of encrypted or un-encrypted data. We
support multiple relay proxy backup mode in case of the breakup of communication
caused by certain unavailable relay proxy.
Figure 7-24
7.3.3
Signaling NAT Traversal - Relay Proxy Mode
Media
In Call Settings page, click right "Media Settings>>" to check and set. (see figure 7-25)
60
7. Configurations
Figure 7-25
•
•
•
Call Settings - Media Setting
RTP Port ( range): the range of local RTP port. The default value is 20008-20024.
RTP Package Length(ms): the time length of Packet Length, cound in millisecond.
Jitter Buffer: there are three processing modes: adaptive mode, sequential mode, fixed
mode.
Note: Mode recommended - adaptive mode usually gets the best result.
•
•
•
Minimal Delay: the minimal delay value of jitter processing.
Maximal Delay: the maximal delay value of jitter processing.
Media QoS: two modes supported for your choice based on your real network situation.
-
IP TOS: set service type if use this option. (see figure 7-26)
Figure 7-26
-
Media QoS - IPTOS - Service type
DiffServ: set DiiffServ type if use this option. (see figure 7-27)
61
CN2x4 SIP Phone User’s Manual
Figure 7-27
•
•
Meida QoS - DiffServ - DiffServ Type
Symmetrical RTP: transmit media in symmetrical RTP way if checked.
Media NAT Traversal: Media NAT Traversal supports three modes:
-
STUN(RFC 3489): namely, STUN server mode. Set the IP address or domain of STUN
server, an port if needed. (see figure 7-28)
Figure 7-28
-
Media NAT Traversal - STUN mode
Port Transparency / DMZ: set NAT address if use this mode:
•
NAT Address: Auto-detect and Manual modes provided.
Set address of DMZ manually if NAT address mode is "Manual". (see figure 7-29)
Figure 7-29
-
62
Media NAT Traversal - Port Transparency/ DMZ mode - set address manually
Relay Proxy Mode: set the address, port, user name, password of relay proxy if use this
mode. (see figure 7-31)
7. Configurations
P.S., relay proxy mode supports data encryption and un-encryption transmission.
Proxy mode supports three modes (1,2,3) when relay proxy handles media proxy.
Note: We supports relay proxy backup mode in case of communication breakup caused by
certain unavailable relay proxy.
Figure 7-30
•
7.4
Media NAT Traversal - Relay Proxy Mode
Side Tone Level: namely, side tone processing which make user listen to his/her own voice
in conversation. There are three fixed level (-8.5db, -12db, -18db) or no side tone for your
choice.
Phone Settings
63
CN2x4 SIP Phone User’s Manual
Figure 7-31
7.4.1
Configurations - Phone Settings
Basic Settings
•
•
•
•
•
Title:the title of the phone.
•
Missed Call LED Indication: whether use the LED indication of missed calls. (only shows
indication information when there is a missed coming call if disabled.)
•
Menu Configuration Password: whether need administrator password when change
configurations on the phone manually.
Display Title: the display title of the phone.
Auto Dial: enable or disable auto-dial function.
Auto-Dial Timeout: expiry time of auto-dialing.
Auto-Answer Default Device: the default device is headset or speaker (namely, handfree
device) when anto-answering a coming call when enabled the auto-answer option.
Note: Password suggested when you set phones for common users, for avoiding
misoperations.
•
•
7.4.2
Default Handfree Device: the assistant device of handfree mode: headset or speaker.
Auto Answer Default: set the default device to accept the incoming call of Auto answer,
Option is "Speaker" or "Headset".
Function Button Redefinations
Enable, disable, or redefine the function buttons in this part.
On the Phone Settings page, click "Function Key fine>>" to check and set. (see figure 7-32)
64
7. Configurations
Figure 7-32
7.4.2.1
Phone Settings - Function Button Redefination
Default Function Buttons
According to <Phone book> ~ <Call list>, there are Key 1 ~ key 5 buttons on the left side of
self-defined button area of the phone. Every function button has a default function in factory
configurations, as below:
•
•
•
•
Key 1 (<Phone book>): the default is "fixed "mode and default function is "Phone Book"
Key 2 (< Forword >): the default is "fixed "mode and default function is "Call Forward"
Key 3 (< DND>): the default is "fixed "mode and default function is "Do Not Disturb"
Key 4 (< Park/Pickup >): the default is "fixed" mode, it can be definded with different
functions separatedly for ringing (not answered) or calling (answered).
-
Speed Dial: the function button for not-answered ongoing call.
65
CN2x4 SIP Phone User’s Manual
The default function is "pick up" (web configuration displays "*98", need to cooperate
with Zed-3 IP-PBX ), namely, as the third party C, when user A is calling user B and
before user B answer the call, user C ( you ) can pick up the phone to talk with user A
instead of user B. For user A, the phone displays that user B is in conversation.
-
ShortCut Function: the function button for ongoing answered calls.
The default function is "park" (web configuration displays "*68", need to cooperate with
Zed-3 IP-PBX ), namely, pressing <Park/Pickup> to get the auto allocated park number
when the phone is in calling status, dial out the park number in another place to
continue the call.
•
7.4.2.2
Key 5 (< Call list >): the default is "fixed "mode and default function is "waiting list display",
namely, display all waiting numbers on the phone when the phone is in calling status.
Function Button Redefination
The administrator can modify the functions of key 1 to key 5 and save them to make them work.
Every button can be defined in fixed or manual mode.
•
Fixed Mode: select the function in the drop-down menu in this mode, including: phone
book, do-not-disturb, waiting list display, call forward, speed dialing list;
•
Manual Mode: set different function separately for ringing (un-answered) and calling
(answered) status.
-
Speed Dial: the function when the phone is in idle status.
-
ShortCut Function: the function when the phone is in conversation.
Speed dial and shortcut function can implement speed dialing and prefix auto-adding
function in manual mode. More information about it see 7.4.1.3 Configuration
Examples.
Note: the speed dial and shortcut function need to match the definition in dial plan.
7.4.2.3
Configuration Examples
•
Speed Dial Function:
1). Select a function button (like key 3);
2). Input the number in speed dial in manual mode (like "1234");
3). Operate the phone after modification: Press <DND> button to dial out the number
"1234" (ringing) in handfree mode after modification.
•
Prefix auto-adding function:
1). Select a function button (like key 4);
2). Input "prefix +" in speed dial in manual mode (like 6801).
3). Operate the phone after modification:
a. Hook off (or press handfree button ), and press < Park/Pickup > to show the prefix
"6801";
66
7. Configurations
b. Press digit buttons (like 1234) and press <OK> to call "68011234".
•
Prefix auto-adding with indication:
1). Select a function button (like key 5);
2). Input "prefix + (charactors)" in speed dial in manual mode , like "23(please input
number)";
3). Operate the phone after modification:
a. Hook off (or press handfree button), and press < Call list > to display "please input
number:";
b. Press digit buttons (like 39) and press <OK> to call "2339".
7.5
Save Modification
Save the change.
7.6
Cancel Modification
Cancel the change.
67
CN2x4 SIP Phone User’s Manual
68
8. Phone Book
Chapter 8
Phone Book
Using phone book to add a new number and dial it out. The new version supports different
phone book for different line.
Figure 8-1
Phone Book page
Here we use line 1 as an example to illustrate how to add and check the records in phone book.
8.1
Check Phone Book
Click Phone Book > Phone Book1 in left navigator, enter the phone book page to check the
records (see figure 8-2)
69
CN2x4 SIP Phone User’s Manual
Figure 8-2
8.2
the Phone Book of Line 1
Add A New Record
1.
Click Phone Book > Phone Book 1 > New Contact in left navigator, enter the Add New page
to add new name and number (see figure 8-3):
Figure 8-3
Add One New Record in Phone Book
2.
Input new Name and Number;
3.
Press [Add] to finish and return.
Click Phone Book > Phone Book 1 > View Contacts in left navigator, and return to previous
page.
8.3
Edit or Delete Records
Click [Edit] or [Delete] button to operate with chosen record.
70
8. Phone Book
Figure 8-4
Edit or Delete Records
71
9. Tools
Chapter 9
Tools
9.1
Upgrade Online
Here is current version and upgrade address, you may input the correct address to upgrade
online, pay attension to the address of HTTP server which provides upgrade service.
Figure 9-1
Upgrade Online
There are four steps:
1.
download the software:
2.
write in the file:
3.
verify the file:
73
CN2x4 SIP Phone User’s Manual
4.
reboot the system:
After upgrade, shows next figure:
Figure 9-2
5.
9.2
Upgrade successfully
press [OK] to return to Status page.
Change Password
Change the passwords of user and administrator here (see figure 9-3):
Figure 9-3
Change Password
Note: Only show user password here for common users. That is, only user's own login
password is permitted to change.
74
9. Tools
9.3
Backup/Recover Configurations
CN2x4 SIP Phone provides backup and recovery of configuration files. The backup configuration
file can be protected by password.
Figure 9-4
1.
Backup/ Recover Configuration page
Backup configuration file:
You may use password to protect the configuration file when backing up. Input password
and press [Save] to save the file with default name "config.dat". If without password, press
[Save] to save the file directly.
Note: If the backup configuration file is with password, you should input the password when
you recover the configuration.
2.
Recover the configuration:
Choose the file to recover the backup configuration. If the file is encrypted, you should input
the right password (which is set when backing up) to recover it.
9.4
Recover Factory Configuration
The option is to recover the factory configuration.
75
CN2x4 SIP Phone User’s Manual
Figure 9-5
9.5
Reboot System
Figure 9-6
76
Recover Factory Configuration
Reboot System Prompt
A. How to use headset
Appendix A
How to use headset1
1.
Insert the headset into the port of the phone, the screen shows a icon
connecting successfully.
2.
Press <Headset> to answer and call via the headset after connection.
which means
More information about it see Chapter 4 Phone Usage.
1. Headset: with microphone suggested.
77