1
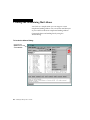
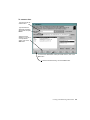
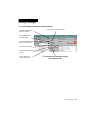
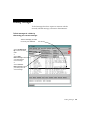
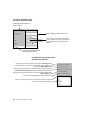
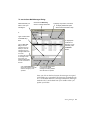
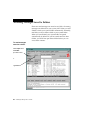
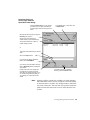
Z-Mail for Motif
User’s Guide
Version 3.2
NCD Software Corporation
101 Rowland Way, Suite 300
Novato, CA 94945
+1 415–898–8649
Important Notice
NCD Software Corporation (NCD Software) and its
licensors retain all ownership rights to the Z-Mail
computer program and other computer programs
(hereinafter called “Z-Mail”). NCD Software retains all
ownership rights to the Z-Mail documentation. Use of
Z-Mail is governed by the license agreement
accompanying your original media. The Z-Mail source
code is a confidential trade secret of NCD Software.
You may not attempt to decipher or decompile Z-Mail
or develop source code for Z-Mail, or knowingly allow
others to do so. You may not develop passwords or
codes or otherwise enable the program for equipment
that is not authorized for use with Z-Mail. Z-Mail and
its documentation may not be sublicensed and may
not be transferred without the prior written consent of
NCD Software.
Only you and your employees and consultants who
have agreed to the above restrictions may use Z-Mail
and only on authorized equipment.
Your right to copy Z-Mail and this manual is limited by
copyright law. Making copies, adaptations,
compilation works (except copies of Z-Mail for
archival purposes or as an essential step in the
utilization of the program in conjunction with the
equipment), without prior written authorization of NCD
Software, is prohibited by law and constitutes a
punishable violation of the law.
NCD SOFTWARE CORPORATIONPROVIDES THIS
PUBLICATION “AS IS” WITHOUT WARRANTY OF
ANY KIND, EXPRESS OR IMPLIED, INCLUDING
BUT NOT LIMITED TO THE IMPLIED WARRANTIES
OF MERCHANTABILITY OR FITNESS FOR A
PARTICULAR PURPOSE.
NCD Software Corporation may revise this
publication from time to time without notice. Some
states or jurisdictions do not allow disclaimer of
express or implied warranties in certain transactions;
therefore, this statement may not apply to you.
LIMITATION OF LIABILITY. IN NO EVENT WILL
NCD SOFTWARE OR ITS LICENSORS BE LIABLE
FOR ANY SPECIAL, INCIDENTAL, OR
CONSEQUENTIAL DAMAGES ARISING FROM THE
USE, PERFORMANCE OR NON-PERFORMANCE
OF Z-MAIL, AND ANY SOFTWARE SUPPORT,
INCLUDING ANY LOST PROFITS OR LOST DATA,
EVEN IF ADVISED OF THE POSSIBILITY OF SUCH
DAMAGES AND NOTWITHSTANDING ANY
FAILURE OF ESSENTIAL PURPOSE OF ANY
LIMITED REMEDY. SOME JURISDICTIONS DO
NOT ALLOW THE LIMITATION OR EXCLUSION OF
LIABILITY FOR INCIDENTAL OR CONSEQUENTIAL
DAMAGES SO THE ABOVE LIMITATION OR
EXCLUSION MAY NOT APPLY TO YOU.
In no event shall NCD Software and its licensors’
liability to you for all damages, losses and causes of
action, whether in contract, tort, negligence or
otherwise exceed the license fee paid for
Z-Mail.Copyright © 1990–1994 NCD Software
Corporation, Novato, California, U.S.A. All rights
reserved.
Z-Mail, and the ‘Z’ logo are registered trademarks and
Z-POP are trademark of NCD Software Corporation.
ZScript is a licensed trademark of Zenographics, Inc.
UNIX is a registered trademark of UNIX System
Laboratories.
Motif is a trademark of Open Software Foundation.
PostScript is a registered trademark of Adobe
Systems.
ADDITIONAL TERMS APPLICABLE TO U.S.
GOVERNMENT CONTRACTS AND END USERS.
Z-Mail: (a) was developed at private expense, and no
part of it was developed with government funds.; (b)
is a trade secret for all purposes of the Freedom of
Information Act; (c) is “commercial computer
software” and “commercial computer software
documentation”; and (d) in all respects is proprietary
data belonging solely to NCD Software and its
licensors.
Restricted Rights Legend for Units and Agencies of
the U.S. Department of Defense.
Z-Mail is furnished pursuant to this License, as set
forth in DFAR 252.211-7015(c)(2). Should any portion
of Z-Mail not be commercial computer software or
commercial computer software documentation, use,
duplication or disclosure of such portion is subject to
the restrictions set forth in DFAR
252.227-7103(c)(1)(II).
Restricted Rights Legend for Other Units and
Agencies of the U.S. Government.
Use, duplication or disclosure is subject to the
restrictions set forth in FAR 52.227-19. Unpublished all rights reserved under the copyright laws of the
United States.
Printed in the United States of America.
Starting Z-Mail
To start Z-Mail in Motif mode from the command line, enter:
zmail -gui
The -gui option tells Z-Mail to use its graphical user interface.
Z-Mail displays the Main Window, which contains summaries
of your incoming mail.
Starting Z-Mail
1
Reading a Message
Z-Mail displays a message summary for each message in your
mailbox. These summary lines are displayed in the message
summary list of the Main Window.
To read
a message:
Highlight the message
you want to read and
select Read from the
Message pull-down
menu.
or
Double click on the
message you want to
read.
or
Highlight the message
you want to read and
click on the Read button.
When you read a message, the Message Window comes up.
2
Z-Mail for Motif User’s Guide
To use the Message Window:
Pull down the menu associated with
the action you want to perform and
select from the action list.
If the message
contains an
attachment, click
on its icon to read
or process it.
(Some messages
may not contain
attachments.)
Click on the button
corresponding to
the action you
want to perform.
Reading a Message
3
Receiving attachments
Z-Mail enables you to send and receive mail attachments. An
attachment is a separate file associated with a message.
An attachment can be any type of file, such as text, graphics,
sound, video, spreadsheet, database, or even an entire
application. Any file can be attached to a message, provided
that the computer system can support it (sufficient disk space,
memory, etc.).
You can either process an attachment directly or save it to a
file by detaching it.
If Z-Mail does not know how to display an attachment, or if
the program required to process an attachment is not
available to you, Z-Mail pops up an error dialog. Contact your
system administrator for assistance or inform the person that
sent the attachment that you are having difficulty
processing it.
4
Z-Mail for Motif User’s Guide
Replying to a Message
Reply to messages either from the Message Window or from
the Main Window.
To reply to a message
from the Message Window:
Select an action
from the Reply
pull-down menu.
To reply to all
recipients who
received the original
message, select All.
To include the
original message as
part of your reply,
choose a selection
that contains
Include Msg.
or
Click on the Reply
button, which
automatically
addresses your
reply only to the
sender.
Replying to a Message
5
To reply to a message
from the Main Window:
Method 1
Click on the message you
want to reply to.
Pull down the
Compose menu.
Select the Reply
cascade menu.
Select the type of
reply you want to
send.
Method 2
Click on the
message you
want to reply to.
Press the Reply
button.
After specifying that you want to reply to a message, the
Compose Window comes up.
6
Z-Mail for Motif User’s Guide
When replying to a message, Z-Mail automatically addresses
the reply for you.
To compose
your reply:
Edit and add addresses by
using the address area.
Note the message number
of the message you are
replying to.
If you need to add
or edit the
addresses, refer
to the next page.
Change the
subject of your
reply by
highlighting and
typing over a
portion of it or all
of it.
To send your
reply,
click on the
Send button.
Enter the text of your message here.
Cancel the current compose session
by clicking on the Cancel button.
Z-Mail gives you the option of saving to a file
what you’ve written so far.
7
At the top of the Compose Window is a message address
area. The message address area lists the addresses that are
automatically completed and enables you to edit them. You
can also enter additional addresses.
To address
your reply:
Type in addresses
here.
The address you are
typing in is indicated
here.
To change an
address, click on it
once and click on a
button.
or
Double click on the message
you wish to edit.
To edit an address:
Highlight any part or all of the
message and type in the
changes.
When finished making
changes, press Return.
The edited address is
added to the list of
recipients.
8
Z-Mail for Motif User’s Guide
Sending a New Message
To send
a new message:
Select
Compose New from
the Compose
pull-down menu.
or
Press the Compose
button.
This brings up the Compose Window. Your first task to
perform from the Compose Window is to create the header
for your message, which includes addressing and providing
a subject.
Sending a New Message
9
To compose a new message:
Enter the addresses
of your recipients
here.
Press Return, and
the recipient’s
address is added to
the recipients list.
For more
information on
editing the
recipients list,
please refer to
page 8.
Enter the subject of
your message here.
If you want, include
an attachment by
clicking on the
Attachments
button.
For more
information about
inlcuding files and
attachments,
please refer to
page 15.
To send your reply,
click on the Send button.
Cancel the current compose session
by clicking on the Cancel button.
Z-Mail gives you the option of saving to a file what
you’ve written so far.
10 Z-Mail for Motif User’s Guide
Including Other Messages in Your Message
Z-Mail enables you to include plain text files and messages in
the body of a message. You can also send a wide variety
information in the form of an attachment.
From the Compose Window you can include other messages
in your message.
To include other messages:
Pull down the
Include menu.
Select from the
Messages or File
cascade menus.
Select from the
cascade menu.
(The current message
is included by default.)
or
Indented text
looks like this.
Click on the Include
button to include text
from the current
message (indented
by default).
Unindented text
looks like this.
Including Other Messages in Your Message 11
Including Files in Your Message
Z-Mail enables you to include plain text files in the body of a
message.
From the Compose Window you can either insert the file at
the current cursor position or replace the current contents of
your reply.
To a file in your message:
Pull down the
Include menu.
Select from the File
cascade menu.
Insert inserts the file
into your message.
Replace replaces the
current contents of
your message with a file
you specify.
After selecting from the
File cascade menu, the
File Finder Dialog
pops up.
12 Z-Mail for Motif User’s Guide
To select a file to include:
Move up directories by using
the Directory menu.
Move up to the parent directory
by double-clicking on [Parent
Directory].
To select a file, click on it.
When you click on a file name, it
automatically appears in the File
infput area. Alternatively, you can
type in a path name here.
To include the file, click on the OK
button.
To display the contents of a selected
directory, click on the Search
button.
Including Files in Your Message 13
Sending Attachments
Z-Mail enables you to attach a wide variety of files that are
delivered along with your message. These files are called
attachments.
Include attachments from the Compose Window.
To include an attachment:
Pull down the Include
menu to include
another message as
an attachment.
Select
As Attachment(s) from
the Messages menu.
(The current message is
included by default.)
or
Click on the
Attachments button,
which invokes the
Attachments Dialog.
14 Z-Mail for Motif User’s Guide
To specify a file to attach
(using the Attachments Dialog):
Change to the
directory in which the
file resides by using
the Directory
pull-down menu.
To select a file,
double-click on it.
The name of the file
appears on the File
input area.
If your Z-Mail system
is configured to
autotype, Autotype is
in dark type. Click this
button to autotype.
(Refer to the Z-Mail
Reference Manual
for more information
about autotyping.)
Attachments must be
correctly identified
and, if need be,
encoded.
If your attachment requires encoding, and you have not specified encoding,
Z-Mail warns you:
Click here to dismiss the Warning
window.
Please refer to page 17 for information
about file encoding.
Sending Attachments 15
To choose a file type:
Click on the File
Type button, which
brings up a menu
consisting of filetypes.
Choose a filetype from the
list that matches the type
of your file.
In many cases, file types are indicated by file name
extensions. For example, the file the-scream.jpg is a jpeg
encoded image file.
When you select a file type that is known to Z-Mail, Z-Mail
automatically encodes the file, if encoding is required.
If you aren’t sure what type of file you are sending and can’t
use Autotype, choose “application/octet-stream” to ensure
that Z-Mail encodes it for safe delivery.
16 Z-Mail for Motif User’s Guide
You may need to choose an encoding type if you are sending
a compiled program. Most of the time, you won’t need to
choose an encoding type.
To choose an encoding type:
Click on the
Encoding button,
which brings up the
Encoding Type
selection menu.
If the file is mostly or
entirely non-ASCII,
select base64
To complete the attachment:
After selecting a file,
file type, encoding (if
needed), click on the
Attach button.
The file name is then
listed in the Attached
Documents area.
After you’ve attached
all your documents,
press the Done
button.
Sending Attachments 17
Quitting Z-Mail
To quit Z-Mail:
Pull down the
Folder menu and
select Quit.
or
Type Ctrl+Q.
18 Z-Mail for UNIX User’s Guide, Version 3.2
Deleting and Undeleting Messages
When you delete messages, Z-Mail marks the messages with
asterisks (*) on the Message Summary line. Messages are
erased only when you update. Z-Mail prompts you to update
when you close a folder or quit Z-Mail.
To delete messages:
Select the messages
you want to delete.
Select Delete from
the pull-down menu.
or
Click on the Delete
button.
Before updating your current folder, closing
your current folder, or quitting Z-Mail, be
certain you’ve only marked messages you
want to permanently delete.
To irreversibly delete
messages marked for
deletion, click on the
Update button.
Deleting and Undeleting Messages 19
To undelete messages:
Select the messages
you’ve marked for
deletion, but have
decided to keep.
Select Undelete from
the pull-down menu.
or
Click on the Undelete
button.
20 Z-Mail for Motif User’s Guide
Printing Messages
You can print your messages by sending them to a local or
system printer. Before printing from Z-Mail, you or your
system administrator must configure your computing
environment with the appropriate printer destination
information.
To print messages
from the Main Window:
Select the messages
you want to print.
Select Print from the
Messages pull-down
menu.
or
Click on the Print
button.
Printing Messages 21
If you invoke printing from the Messages pull-down menu,
the Print Messages dialog comes up:
Specify the message
number or range of
message numbers of
the messages you
want to print.
Specify how much of
the message you
want to print. (You’ll
probably want to
choose Standard
Message Headers.)
Click on the printer you
want to use.
Edit the print
command you want
Z-Mail to use.
To print, click on the
Print button.
To cancel, click on the Done button.
If you invoke printing by clicking on the Print button, an
Input dialog comes up:
Select a printer.
or
Specify an
alternative printer.
Click on OK to send
the file to a printer, or
click on Cancel.
22 Z-Mail for Motif User’s Guide
To print a message
from the Message Window:
Select Print from the
Messages pull-down
menu. The Print
Message Dialog
comes up.
Refer to the previous
page for information
about the Print
Message Dialog.
Printing messages with attachments
Message attachments are not printed, unless the attachment
is plain text, less than 10000 characters, and not encoded.
Other attachments must be printed from the application
designed to handle that type of attachment. For more
information about receiving attachments, please refer to
page 4.
Printing Messages 23
Creating and Maintaining Mail Aliases
A mail alias is a simpler name you can assign to a more
complicated mailing address. You can use the mail alias just
as you would use the more complicated mailing address.
Create mail aliases and mailing lists by using the
Aliases Dialog.
To invoke the Aliases Dialog:
Pull down the
Options menu and
select Aliases.
24 Z-Mail for Motif User’s Guide
To create an alias:
Type the name for the
mail alias here.
Type the address or
addresses associated
with the alias and press
Return.
Add the new alias
definition to your list of
currently defined
aliases, click on the
Add button.
To save the alias definition for subsequent Z-Mail sessions, click on the
Save button.
To dismiss the Aliases Dialog, click on the Done button.
Creating and Maintaining Mail Aliases 25
To edit your aliases:
Click on the alias
you want to edit.
If you want to edit an address, click on the address you want to
edit. Changed addresses or the addresses you’ve added are
reflected here
Click on the button for
the action you want to
take on a selected
address.
Edit an old address or add a new
address here and press Return.
Press the Add button to add the new
or edited alias to your active alias list.
Press the Save button to
make the alias available for
future Z-Mail sessions.
26 Z-Mail for Motif User’s Guide
Sorting Messages
To sort messages according to standard sorting:
Pull down the Sort menu,
and select one item.
Sort by date from oldest to newest.
Sorts alphabetically by
message subject.
Sorts alphabetically by the
author’s e-mail address.
Sorts shortest to longest.
Sorts from highest to lowest
priority.
Sorts by status (new,
unread, deleted, etc.).
To customize your message sorting,
select Custom Sort.
Sorting Messages 27
To use the Custom Sort dialog:
Note the name of the folder
you are sorting.
To reverse any of the
sorting criteria, click on
the associated toggle
button.
Sort by date from oldest to
newest.
To make your sort case
insensitive, click here.
Sorts alphabetically by
message subject.
To keep your sort from
ignoring the “Re:” prefix,
which is added to the
subject of replies, click
here.
Sorts alphabetically by the
author’s e-mail address.
To use the date received
instead of the date sent (if
sorting by date), click here.
Sorts by message length,
shortest to longest.
A description of the
currently specified sort is
displayed here.
Sorts from highest to lowest
priority.
Sorts by status (new,
unread, deleted, etc.).
Dismiss the dialog.
Note:
Invoke the sort you’ve customized
by clicking on the Sort button.
The sort order you specify for the active folder is not
maintained automatically. When new mail arrives it is
always appended to the end of the folder. You must re-sort in
order to maintain the desired order of your folder. If you
update your folder, Z-Mail maintains the sort order, but if
you later save messages to the folder, the new messages are
added onto the end.
28 Z-Mail for Motif User’s Guide
Finding Messages
To find messages that have aspects in common with the
currently selected message, use items in the Find menu.
To find messages in a folder by
referencing your current message:
Select a message you want
to use as your reference.
Choose All References
By to search the whole
folder.
or
Choose Next
References By to search
your folder after the
current message.
or
Choose Previous
References By to search
your folder prior to the
current message.
Finding Messages 29
Selecting the following finds messages:
With the the current message’s subject.
Written by the the current message’s author.
That contain the current message’s ID.
That have the current message’s priority.
With the the current message’s mark.
To find messages according
to information you specify:
Search for a particular
pattern, which invokes the
Pattern Search dialog.
Search for messages
received on a particular
date or period, which
invokes the Date Search
Dialog.
30 Z-Mail for Motif User’s Guide
Finding messages by searching
for a pattern
To specify a text
pattern search:
Message numbers of the
messages that match the
search.
Specify the scope of the search. For more
information on these, see the next page.
Specify the search
string and the area in
which to search. Refer
to the next page for
more details.
Hide the summaries of
those messages that do
not match the pattern.
Select messages in the
Main Window that match
the search patterns.
The information area
reports the results of your
search.
Invoke the search by
pressing the Search button.
Done dismisses the window.
Clear clears the dialog for
another search.
Finding messages by searching for a pattern 31
To enter a text pattern and
the area in which to search:
Identify the area in which you
want to search.
Enter a string you want to search for.
In this example, all messages addressed to
“sickos,” authored by “ruthc,” and having the
string “meatchucks” in the subject line are
matched.
Type in an alternative header
field in which to search.
To adjust the scope of the search
(and process matches):
Search through only the messages you specify in the Messages field.
Match both upper- and lower-case occurrences of the text pattern you
specify in the Search Pattern field.
Treat search string in the form of a regular expression. See the online help
for Extended Pattern Matching for a list of allowed special characters.
Identify only those messages that do not match the pattern specified in the
Search Pattern field.
Search all open folders instead of just the active folder.
Perform an action automatically on all messages matching the search.
Choose one of the functions in this list.
32 Z-Mail for Motif User’s Guide
Finding messages by date
To find messages according to
a specified date or period:
Specify the message numbers or
range of message numbers for the
messages you want to search
through. The default is all messages.
Specify the scope and action you want the
search to take. See the next page for more
information.
Specify the date or period (beginning
and ending dates) you want to
search for by clicking and dragging
on the year, and clicking on a date
and month.
When searching for messages
between dates, the dates shown are
used as boundaries for the search.
Specify the range of the search
dates by clicking on the associated
radio button.
The information area reports the
results of your search.
Invoke the search by pressing the
Search button. Done dismisses the
window. Clear clears the dialog for
another search.
Finding messages by date 33
To adjust the scope of the search (and process matches):
Search through only the messages you specify in the Messages field.
Use the date the message was received, instead of the date the message
was sent, which is the default.
Identify only those messages that do not match the pattern specified in the
date specification field.
Search all open folders instead of just the active folder.
Perform an action automatically on all messages matching the search.
Choose one of the functions in this list.
34 Z-Mail for Motif User’s Guide
Saving Messages
You can save messages as individual files without headers or
as mail folders, which are collections of mail files that Z-Mail
can process.
To save messages
from the Main Window:
Select the messages
you want to save.
Select Save from the
Messages pull-down
menu.
or
Click on the Save button.
Saving Messages 35
To save a message
from the Message
Window:
Select Save from the
Messages pull-down
menu.
or
Click on the Save
button.
The Save Messages
Dialog comes up.
Refer to the next page
for information about
the Save Messages
Dialog.
36 Z-Mail for Motif User’s Guide
To use the Save Mail Messages Dialog:
Select the folder you
want to save your
message to.
Pull down the Directory
menu to change directories.
To display only folders, click here.
To display hidden files (files
whose names start with a dot).
or
Type a folder name
in the File entry
area.
To display the
contects of a
directory you’ve
selected, press
the Search
button.
Click on Save Text
Only to save the
message body only.
When you save the
message body only,
message headers are
not saved..
To access the contents
of messages saved
only as text, use
standard UNIX utilities
such as a text editor or
browser.
Click on Overwrite File to
replace the contents of the file
with the messages you’ve
specified.
Click on the As Copy button
to prevent the original
message from being deleted
when the folder is updated.
Once you click on the Save button, the messages are copied
to the folder you’ve specified. The messages are marked with
an "S" in the Main Window’s messages summaries. Messages
marked with S’s are deleted from your mailbox when you
update your folder.
Saving Messages 37
Accessing Messages Saved to Folders
Electronic mail messages are stored in mail folders. Incoming
messages are delivered to your system folder. When you start
Z-Mail, it loads your system folder automatically. Normally,
mail that you don’t delete is held in your system folder.
When you start Z-Mail, your system folder is opened
automatically by default. If you have mail stored in other
folders, you must first open those folders before you can
access their contents.
To read messages
saved to a folder:
Select Open from
the Folder
pull-down menu.
or
Type Ctrl+O.
38 Z-Mail for Motif User’s Guide
Select the folder you
want to open from the
Open Mail Folder Dialog:
Click on Folders Only if you only want to
list folders you can open. Plain text files
and messages saved as text only are not
listed.
To list hidden files, or “dot” files, click
on Hidden Files
Move up the directory tree by using the
Directory pull-up menu.
Access your home directory by
double-clicking on [Parent Directory].
Access other directories or files by
double-clicking on them.
or
Type in the path of the folder you want to
open.
Click on the Open button.
If you want to be able to update the
folder, click on Read/Write.
If you want to open the folder read-only,
click on Read Only before pushing the
Open button.
Folders load much more quickly and
consume far less system resources
when they are opened read-only. If you
do not intend to update the folder you
are opening, you should choose this
option.
Note:
To list the contents of a selected
directory, press the Search button.
Opening a folder as read-only prohibits you from updating
the actual folder itself. If you try to update a read-only folder,
an external index is created. Any changes made to the folder
are saved to the index. The next time you open the folder, the
folder resumes the same state it was in when the index was
created.
Accessing Messages Saved to Folders 39
Filtering Your Messages
Mail filters automatically process your mail according to
criteria you define using the Filters Dialog. This can aid you
in sorting and managing your mail.
To invoke the Filters Dialog:
Select Filters from the
Options pull-down
menu.
40 Z-Mail for Motif User’s Guide
To use the Filters dialog:
Select the type of filtering you
want to perform by clicking on
the associated radio button.
Enter pattern search information
in this area. For more
information, refer to the next
page.
This area changes to a date
information area if you click on
the Filter By Date radio button.
If you only want incoming
messages searched, click here.
Pull down this menu to indicate
what you want done with
matching (or non-matching)
messages.
Enter the name of the folder you
want matching messages filtered
to, if saving the messages.
For help finding the folder, click
on the File Finder button.
Enter a name for the filter. (The
name can be as long as you like,
but it shouldn’t contain blanks.)
Filtering Your Messages 41
To filter according to a pattern search:
Specify a search pattern.
If you do not want the search to
be case-specific, click here.
To match only messages that do
not contain the pattern, click
here.
Specify the areas you want to
search.
If you want to search a specific
header area, enter the name of
the header.
To filter according to date:
Press the button associated with
the date range you want to filter.
Type in a numerical value.
Specify the unit you want to use by
selecting one from the pulling down
the menu.
42 Z-Mail for Motif User’s Guide
To name and save
your filter:
If filtering mail to a folder, specify
a folder name.
Type a name for the filter.
Install the filter for your current session
by clicking on the Install button.
Save the filter so it runs after your
current session, click on the Save button.
Note:
To be able to filter mail already existing in your mailbox, you
must start up Z-Mail with the -filter option:
zmail -gui -filter &
Filtering Your Messages 43
To edit or delete a filter:
Click on the name of the filter you
want to edit or delete.
Edit any of the attributes you want to
change.
Click on the Install button. This
activates the filter for your current
session.
To save the filter changes for future
sessions, click the Save button. If you
do not click on the Save button, the
changes are only good for your
current session.
Click on the Delete button to remove the
current filter.
To make the deletion permanent, click on the
Save button.
44 Z-Mail for Motif User’s Guide
Using On-line Information
On-line help for Z-Mail is more complete than the
overview-style descriptions found in this User’s Guide. Be
certain to check the on-line help index if you cannot find the
information you need.
Accessing on-line help
You can access on-line help from all menu bars (the Help
menu) and by using the Help button in most dialogs.
To invoke on-line help
from the Main Menu:
Click on the Help pull-down menu from the menu bar.
Select the appropriate
Help topic.
Using On-line Information 45
To find the information
you need:
Click on a help topic.
Description of selected topic.
Double-click
on any
underlined
word to
display help
on that topic.
To search for a word, help topic,
or string, type it here.
46 Z-Mail for Motif User’s Guide
Then, press the Search button.
Using the Task Meter
When commands or other operations take a long time to
complete, Z-Mail displays a Task Meter that provides
feedback about how much of the job is done. As the
operation progresses, the indicator on the task meter slides
from 0% to 100%.
Note:
The current task is displayed.
In some cases, Z-Mail cannot determine what proportion of
the task has been completed. In these cases, the sliding
indicator does not appear on the Task Meter.
The slide displays the estimated percentage of the task
that’s completed. This slide rule will not appear if Z-Mail
cannot make an estimate.
Click the Stop button to interrupt the procedure.
Some tasks that are important to the correct functioning of Z-Mail
cannot be interrupted in this way. When a task cannot be
interrupted, the Stop button is grayed and clicking it has no effect.
To continue a task after stopping it,
click on the Continue button.
Using On-line Information 47
Using Z-Mail Shortcuts and Tools
Using key strokes to pull down menus
and select items
In addition to using your mouse to operate pull-down menus,
you can use your keyboard to operate them. The underlined
letter in each menu title and menu item is called a mnemonic.
To invoke a pull-down
menu item using mnemonics:
Pull down a menu by holding down the Meta key
and typing the underlined letter associated with
the menu you want to access.
For example, to pull down the Folder
menu, type:
Meta-f
Then, to invoke a menu item, type the
underlined letter associated with the item you
want.
For example, to quit, type:
q
(You do not need to hold down the Meta key.)
To dismiss a pull-down menu without selecting
an item, press Esc.
Note:
Note: The Meta key varies from workstation to workstation.
On some, it is the key with a diamond design, on others it is
the key labeled Alt. If you are unsure which key is the Metakey,
ask your system administrator or see your workstation’s user
guide.
48 Z-Mail for Motif User’s Guide
Invoking a menu item without pulling
down a menu
You can access menu items directly and avoid using
mnemonics or pull down menus by typing
command accelerators.
To use an accelerator
key sequence:
Type the character sequence displayed on the
right side of some items in pull-down menus.
For example, Ctrl+Q is the accelerator for the
Quit menu item in the File pulldown menu.
Pressing Ctrl+Q anywhere in the main window
will activate the Quit item, thus quitting Z-Mail.
Using Z-Mail Shortcuts and Tools 49
Finding files
The File Finder is included in several dialogs to let you search
for files (including mail folders) and directories. When a file
search is the only operation required, such as when
responding to a question whose answer is a file name, a File
Finder dialog appears.
When this toggle button is on, the File Finder
displays files whose names begin with a
dot (.) character. Dot files are not normally
shown when displaying the contents of a
To select a file or directory, double-click on a
file or directory name in the list
or
Type the path of the file or directory.
or
Click on the name in the list and press the OK
button.
If you selected a directory name, and you
want to see the contents of the directory, click
on the Search button.
Note:
These action buttons do not always appear when the File
Finder is part of another dialog. Instead, the action buttons of
that dialog act upon the text displayed in the File text field.
50 Z-Mail for Motif User’s Guide
Using the Z-Mail Toolbox
The easiest way to customize your Z-Mail sessions is through
the Z-Mail Toolbox.
To bring up the Z-Mail Toolbox:
Select Toolbox from the
Options menu
To use the Z-Mail Toolbox:
Click on the icon for the tool you want
to use.
To dismiss the Toolbox, click on the
Done button.
Using Z-Mail Shortcuts and Tools 51
Customizing Your Z-Mail Sessions
The easiest way to customize Z-Mail is by using the Variables
Dialog. The Variables Dialog enables you to change the
values of variables that govern how Z-Mail looks and
functions.
To invoke the Variables Dialog:
Pull down the Options
menu and select
Variables.
52 Z-Mail for Motif User’s Guide
To use the Variables Dialog:
Click on the variable you
want to change.
If you don’t know the variable you want to
change, type a key word to search for in the
variable descriptions. This can help you find a
variable that is associated with a customization
you may want to make.
Press the Search button to initiate the search.
Click on the
Save button to
save your
changes for use
in subsequent
Z-Mail sessions.
This area offers various buttons and text entry
areas that affect a given variable. This area
changes from variable to variable.
To apply to the variable the
settings you’ve made, click
on the Apply button, when
applicable.
Customizing Your Z-Mail Sessions 53
Index
A
addressing messages 8
aliases, creating and maintaining 24–25
attachments
printing 23
receiving 3–4
sending 14–17
folders
closing 18
opening 38-39
updating 19
G
gui option 1
C
H
closing your mailbox 18
Compose Window 7–10
addresses, editing 8
invoking 9
composing
replies to messages 7
new message 10
custom sorting 28
help, using online 45
D
date, searching for messages by 33
deleting messages 19
drafting a message 10
E
editing addresses 8
F
File Finder 13
finding messages 29–34
by customized searching 30
by date search 33
by pattern search 31
by pre-defined reference 29–30
I
including
attachments 14–17
files in a message 12
other messages in a message 11
L
lists, mailing
refer to aliases
M
mailbox
updating 19
closing 18
mailing lists
refer to aliases
Main Window
closing 18
invoking 1
printing messages from 21
marking messages for deletion 19
message summaries list 2
55
Z-Mail User’s Guide 55
messages
addressing 8
composing new 10
composing replies 7
finding 29
marking for deletion 19
message window 3
printing 35
printing from the Main Window
21–22
printing from the Message
Window 23
reading 2
replying to 5
searching by pattern 31
sending attachments 11, 12
sorting 27
summary list 2
P
pattern searching 31
printing 35
attachments 23
from the Message Window 23
problems with receiving attachments 4
Q
quitting Z-Mail 18
R
reading messages 2
receiving attachments 3–4
replying to messages from
Main Window 6
Messages Window 5
56
56
S
searching messages
by date 33
by pattern 30–32
sending
attachments 11-12
replies to messages 7
new messages 10
sorting messages 27–28
starting Z-Mail 1
System Folder 38
T
text pattern searching 31
U
undeleting a message marked for
deletion 20
updating your mailbox or folder 19