1
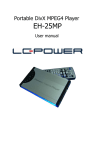
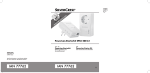
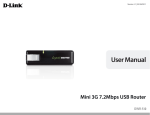
MIOPS USER MANUAL Firmware Version: 1.6 App Version: 1.0.0 Document Version: 1.0.6 Release Date: April 11th, 2015 Please check your firmware and app versions to verify the reference of this document. Please check your firmware and app versions to verify the reference of this document. Contents 1. Introduction ......................................................................................................................... 4 2. Specifications ...................................................................................................................... 6 3. Charging and Operation..................................................................................................... 6 4. Smartphone App ................................................................................................................. 7 4.1 Installing the Application ..................................................................................... 7 4.2 Starting the Application ....................................................................................... 7 4.3 Using the Application ........................................................................................... 9 4.3.2 Lightning Mode .......................................................................................... 10 4.3.3 Sound Mode ............................................................................................... 11 4.3.4 Laser Mode ................................................................................................. 13 4.3.5 Time Lapse Mode....................................................................................... 14 4.3.6 DIY (Do It Yourself) Mode .......................................................................... 14 4.3.7 HDR (High Dynamic Range) ...................................................................... 15 4.3.8 Press & Hold ............................................................................................... 15 4.3.8 Press & Lock ............................................................................................... 15 4.3.9 Timed Release ............................................................................................ 15 4.3.10 Mobile Dongle .......................................................................................... 15 5. Standalone Operation ......................................................................................................17 6. Firmware Upgrade ............................................................................................................18 7. Warranty ............................................................................................................................24 8. Disclaimer ..........................................................................................................................25 9. FCC Approval .....................................................................................................................26 Please check your firmware and app versions to verify the reference of this document. 1. Introduction Thank you for choosing MIOPS High-Speed Camera Trigger. MIOPS is revolutionary photography equipment, which combines power of electronics with the flexibility of smartphone platform. It will deliver high performance with reliable and easy operation. MIOPS is always open to new features with the upgradeable firmware. On top of that, the dedicated smartphone application is open to unlimited options. With every version of the app, you will get new features. In other words, MIOPS is a platform for high-speed photography rather than a gadget with firm capabilities. This document will be your reference for the overall operation of MIOPS including the app. Please note that the document can be out of date with the release of new app and firmware version. You can get the latest version of this manual from our website www.miops.com You can see the version of the firmware and app this document refers to, in the cover page of the document. This manual includes the information you need to use MIOPS with all features, so please read it carefully before using MIOPS. You can check the FAQ section to find answers of some common questions. If your question is not listed, please contact us. MIOPS combines different functions in a single unit. You can use it either as a standalone device or as a smartphone controllable device. If you use MIOPS as a standalone device, it will offer six different modes: Lightning, Sound, Laser, Time Lapse, HDR and DIY. You can fully configure these modes, using the buttons on the device. If you configure MIOPS using your smartphone, you can use advanced functions on top of basic modes as well. The advanced features are but not limited to: Scenario mode, Cable Release, Press and Hold, Press and Lock, Timed Release. With the new versions of the app, other functions may be available. Thank you very much again for choosing MIOPS. We hope that MIOPS will help you to bring your photography skills to the next level. Please check your firmware and app versions to verify the reference of this document. Figure 1 Buttons, Ports and LEDs Please check your firmware and app versions to verify the reference of this document. 2. Specifications In this section you can find the technical specifications of MIOPS. The specifications of your MIOPS may change depending on your model and some of the specifications may not be applicable for your device. LCD Screen: 128 x 128 pixels Battery: 3.7 Vdc, 1020 mAh, 3.8 Wh Bluetooth: Bluetooth 4.0 (Low Power) USB Interface: 5 Vdc 3. Charging and Operation MIOPS can only be used with the provided rechargeable battery and USB connection. The battery will be charged when you connect MIOPS to a USB power source. You can use your computer USB port for this purpose. You can power MIOPS directly from the USB port if the battery is not in the device. Using MIOPS with other type of battery and power source may harm your device. When you connect your MIOPS to a USB power source, it will start to charge the battery automatically. The power led will light up when the battery is charging. When the battery is full, the Power LED will dim. You can see the remaining battery percentage on the screen of MIOPS in any mode. Please check your firmware and app versions to verify the reference of this document. 4. Smartphone App The smartphone app is the dedicated interface to configure and control your MIOPS. It is available on iOS and Android platforms. You will receive software updates over AppStore and Android Market. The iOS version must be 7.0 or higher. The Android version must be 4.3 or higher. The communication between the smartphone and MIOPS is done over Bluetooth connection. Your smartphone has to be compatible with Bluetooth 4.0. The interface of the application is very similar for most of the functions. They have only a few minor differences in some of the modes. The difference will not change the user experience. 4.1 Installing the Application The app name is MIOPS Smart on AppStore and Android Market. You can download and install it from the repositories just like any free app. There is no registration needed to use the application. If your smartphone version is compatible, you can install it to your phone by following the regular app install procedure. 4.2 Starting the Application You will see the MIOPS logo on the screen of your phone. You can start the application by touching the MIOPS icon. Make sure that your phone is not in Airplane mode. Otherwise, MIOPS cannot communicate with your phone. Bluetooth must set to ON on your smartphone as well. Please check your firmware and app versions to verify the reference of this document. The initial screen of the app will show your smartphone and the nearby discovered MIOPS units. You can pair your MIOPS with the smartphone by touching the MIOPS icon. The logo will move onto the smartphone logo and the menu will show up on the left hand side of the screen. If you want pair the smartphone with another MIOPS, you can touch the refresh icon on left-top section of the screen. The app will discover all available MIOPS units in the Bluetooth cover range. You can choose which one to connect just by touching the MIOPS icon. Please check your firmware and app versions to verify the reference of this document. 4.3 Using the Application The app has a menu style interface to switch between different modes. The initial menu will appear on the left hand side of the screen. Different modes will be listed from top to button. You can select the mode you want to use by touching the icon. The menu will scroll down to show additional modes that do not fit into the screen. The menu will disappear once you select any mode and the app will enter in to the configuration page of that particular mode. You can switch between different modes anytime. In order to do that, you need to touch the menu icon on the top-right hand side of the screen. When you switch back and forth between different modes, the settings will not change. The first button on the menu is Search Devices button. This button is used if you haven't connected to your MIOPS as you have started the app. You can use the same button if your MIOPS has disconnected for some reason. The range, in which a MIOPS unit can be discovered, depends on different factors. If your device is not discovered by the app, get closer to the MIOPS. If there is too much interference in the environment, it may take longer to connect. If you have multiple MIOPS units in the area, you will see all of them on the screen. You can connect to a single MIOPS at a time. The Bluetooth connection is only needed until you have configured your MIOPS. Once you have successfully configured your MIOPS, you don't need keep the app running. If you want to switch to another mode or change settings, you will need Please check your firmware and app versions to verify the reference of this document. to start the application again. In that case, you can use the Search Devices button to discover and connect to your MIOPS again. A continuous connection is needed when you are going to use the four release modes: Cable Release, Press & Hold, Press & lock, Timed Release. These modes will only function properly if there is an active Bluetooth connection between MIOPS and your smart phone. In each mode you will have different parameters. You can set the parameters per your need. In order to send your configuration, to MIOPS, you need to touch the start button on the bottom of the screen. MIOPS will not start to function until you touch the “start” key. You can verify if the configuration has been successfully sent, by reading the notification “Data is sent successfully!” at the bottom of the screen. When the configuration is successfully sent, you will see that the screen of MIOPS changes to that mode if it is another mode. If MIOPS was in the same mode, the screen will refresh with the new adjusted parameters. 4.3.2 Lightning Mode The lightning mode is one of the six basic modes of MIOPS. In this mode, MIOPS will trigger your camera or flash unit, if it detects any sudden light event like lightning, fireworks, sparks, flash lights etc. Lightning mode has a single parameter to be adjusted and it is the sensitivity. You can set the sensitivity anywhere between 1 percent to 99 percent. If you want to capture light events which are not very powerful, you need to set the sensitivity to a high value. This will help you to capture more events. If you want to capture the most distinctive events only, you need to set the sensitivity to a lower value. In this case, MIOPS will not trigger your camera for a lightning which strikes very far away with little light emission. The optical sensor of MIOPS is also sensitive against IR (Infrared) light. As human eye cannot see IR, you may wonder why MIOPS is triggering your camera even if there is no lightning. The reason is most probably that there is an IR light event in the environment. The artificial light sources may cause false triggering. So, make sure that you are away from artificial light source. Light bulbs are the most common form of artificial light. When you are using MIOPS in lightning mode, make sure that you are away from light bulbs. Please check your firmware and app versions to verify the reference of this document. The sensitivity of the lightning mode can be adjusted, using the touch dial on the screen. Turning the dial clockwise will increase the sensitivity and vice versa. The faster you turn the dial, the faster will change the sensitivity. The current level can be read in the middle of the dial. If you want to fine tune the sensitivity level, you need to turn dial really slow. You can change the level by +/- 1 percent if you do so. You can change the sensitivity anytime, by using the buttons on MIOPS as well. But the settings on the smartphone app will override the settings on MIOPS, whenever data is sent from the app to MIOPS As it is the case in all modes, do not forget to touch the “start” button. Verify that data has been successfully sent to MIOPS to ensure a proper operation. 4.3.3 Sound Mode The sound mode is used for high-speed photography where your regular DSLR camera is too slow to take pictures of popping balloons, breaking glasses, exploding items etc. The idea behind using a sound trigger is very simple. Instead of triggering your camera, you are going to trigger the flash unit. Your camera will be in bulb mode in a completely dark room. Whenever the flash is triggered, you will capture a single frame. Instead of taking many pictures with a high-speed camera, you will capture a single frame with your regular DSLR camera. In this setup, the speed of the flash unit is also very important. The faster the flash unit, the sharper will be the image. Please check your firmware and app versions to verify the reference of this document. The sound mode has three different parameters. These are Sensitivity, Delay and Lock. The sensitivity can be set to a value between 1 and 99 using the dial. Setting the sensitivity to a high value will let you to capture more sound events. If you want to capture only high level sound events, you need to set the sensitivity to a lower value. You can try and see which sensitivity level fits your needs. The second parameter is delay. This parameter is very useful photography. for Let’s high speed assume you want to take the picture of a bullet flying through an apple. When the shotgun is fired, it will make a big noise. The sound event will be captured but it is too early to trigger the flash unit. The bullet has not reached the apple yet. So, you need to add some delay. The flash unit will be triggered after the delay you specified and this will allow you to capture the picture at the exact moment. You can set the delay anywhere between 0 ms and 999 ms. The third parameter is lock. This parameter is used if you want to trigger the flash unit for a single time only. In a dark room setup, there will be usually repeating sound events, which will cause the flash unit to be fired more than once. As your camera will be in bulb mode, this will cause blur in the image. In order to avoid this you can use the lock parameter. If you set the lock parameter to on, the device will be triggered once only. Please check your firmware and app versions to verify the reference of this document. 4.3.4 Laser Mode The laser mode is used is to capture picture of moving items. This can be a wild animal, a bird or a ball rolling down. In order to use this mode, you need a laser source. You will feed the laser beam to MIOPS and whenever the beam is broken MIOPS will trigger your camera or flash unit. The type of the laser source is not important. It can be a red or green laser source. The laser beam must be stabilized so it does not move away from the receiver of MIOPS. The receiver of MIOPS is on the front side of the device. Attention: Laser beam can be dangerous. Avoid eye contact. Use the laser source at your own risk. We strongly recommend that you use a protective goggle. The laser mode has three different parameters. These are Threshold, Delay and Frame. The threshold value is used to determine the minimum power of the laser source required to activate the mode. If you are using a low power laser source, you can set the threshold to a low value. The second parameter is the delay. It works the same way as in other modes. It adds the adjusted delay in milliseconds. The third parameter is the frame. This parameter determines how many pictures to be taken after the laser beam is broken. You can set the frame number anywhere between 1 up to 999. Please check your firmware and app versions to verify the reference of this document. 4.3.5 Time Lapse Mode Time Lapse videos are created by a series of pictures taken in a certain time frame with the same interval between each frame. This is exactly what MIOPS does in Time Lapse mode. It triggers your camera periodically per your settings. You can define how many pictures you want to take, so you don’t fill up your memory card. You can also define the exposure, so MIOPS will have the full control of your camera. Time Lapse mode has three different parameters. These are Interval, Exposure and Limit. You can set the interval anywhere between 1 sec and 59 min 59 sec. with 1 sec increments. You can set the exposure value up to 59 min 59 sec as well. The third parameter is limit. It defines the number of frames to be captured. You can set it up 9999. When this number is reached, MIOPS will no longer take pictures. 4.3.6 DIY (Do It Yourself) Mode DIY mode enables you to use external sensors for creative photography. You can hookup external sensor for pressure, temperature, humidity etc. The output voltage of the sensor must be between 0 and 3 Volts and the sensor must be connected to MIOPS using the DIY port. The DIY port is 3.5 mm jack. This mode has three different parameters. These are Threshold, Delay and Mode. You need to set a threshold value between 1 and 99 percent. The second parameter is delay. You can set a delay value Please check your firmware and app versions to verify the reference of this document. between 1 msec and 999 msec. Finally, you can also define the signal change mode. This determines what kind of signal change from the output of the sensor would be treated as a valid triggering event. There are three different options: Raise, Fall and Change. If you set it to Raise, MIOPS will detect only raising signals. If you set it to Fall, MIOPS will detect falling signals. If you want both types of signals to be detected, then you need to set the parameter to Change. 4.3.7 HDR (High Dynamic Range) The HDR mode is used to take pictures with different exposures. In the HDR mode, your camera must be in “Bulb Mode”, so MIOPS can control the exposure. You can use image processing software to combine these pictures and create an HDR image. This mode requires you to set three different parameters. These are Center, EV(+-), and Frame. The center value determines the initial value for the exposure. The second parameter is the EV (Exposure Value). This parameter determines how many exposure steps will be added up and down from the center value. The third parameter is Frame and this one determines how many pictures to be taken. 4.3.8 Press & Hold Using Press & hold mode you can keep the shutter open as long as you want. The shutter will open when you press the circle and it will close whenever you release it. 4.3.8 Press & Lock Press & Lock mode will open the shutter with a tap on the screen. The shutter will remain open until you tap the screen again. 4.3.9 Timed Release In this mode you can keep the shutter open for a certain period of time. You can specify the time period in seconds. You can go up to 1 hour. 4.3.10 Mobile Dongle The Mobile Dongle mode enables you to trigger your camera without being it connected to MIOPS. In this mode your camera has to be connected to the mobile dongle and the mobile dongle will be connected to the earpod output of your smart Please check your firmware and app versions to verify the reference of this document. phone. Set the volume of your smart phone to the highest level. You can put MIOPS far away from your camera. When MIOPS has to trigger your camera, it will send a signal to your smartphone and your smartphone will trigger your camera using the mobile dongle. In this mode, MIOPS must be able to send Bluetooth signal to your smartphone. Also make sure that your smart phone is not auto-locked. The phone will not be able to communicate with MIOPS if it is locked. For the reference cable connection for the Mobile Dongle Mode, please see the picture below. Figure 2 Mobile Dongle Cable Connection Please check your firmware and app versions to verify the reference of this document. 5. Standalone Operation You can use your MIOPS as a standalone device without the involvement of your smartphone. If you use MIOPS as a standalone device, you can set it to six basic modes: Lightning, Sound, Time Lapse, Laser, HDR and DIY modes. The advanced modes are available with the smart phone application only. The scenario mode will be enabled for the previously saved scenarios. If you have previously used MIOPS is scenario mode, the latest versions of them will be available in MIOPS as a standalone device. You can reuse them, but you cannot make any changes on them. The parameters of the basic modes are the same with the smartphone application. You can set the parameters with the buttons on the device. MIOPS features a device menu system which enables you to use the device very easily. The menu has two levels: Main Menu and Sub-menus. The Main Menu lets you to switch between different modes of operation. You can navigate on modes by using the right and left scroll buttons. To operate in a certain mode you need to enter the Sub-menu of that mode by pressing the Start button. Each mode of operation has its own Sub-Menu where you can adjust the settings of that mode as mentioned in the following sections. You can always switch back to the Main Menu from Sub-menus by pressing the Menu button. Please check your firmware and app versions to verify the reference of this document. 6. Firmware Upgrade When a new firmware is released, you can upgrade your MIOPS with the firmware upgrade software. In order to complete the upgrade you will need to download the following items: Firmware Upgrade Software, Device Drivers and Firmware File. Create a folder called MIOPS in your computer to store the required files. Note the folder location as you will save all of the required files to that folder. The Firmware Upgrade Software is the dedicated program that you will use to put the new firmware to your MIOPS. It transfers the firmware from your computer to MIOPS using the USB connection. You will also need to introduce MIOPS to your computer using the device drivers. You will need to do this once. Once this step is complete, your computer will recognize MIOPS automatically. For your convenience, we have bundled all of the required files into a single compressed file. You just need to download the file and extract it to the MIOPS folder that you have created for the upgrade. You can download the upgrade kit from the following link: http://www.miops.com/firmware/firmwareUpgrade.zip The content of the folder should be looking as shown in the picture below. Please check your firmware and app versions to verify the reference of this document. Figure 3 Firmware Upgrade Folder In order to start the firmware upgrade, you need to connect MIOPS to your computer with the provided USB connection cable. Connect MIOPS to your computer as it is still turned off. Start the MiopsUpgrade.exe software. This software will start automatically. In order to put MIOPS to firmware upgrade state, you need to turn it on while pressing the UP scroll button. This is important. If you cannot do this, MIOPS will not be in the firmware upgrade state and you will not be able to upgrade it. Press and hold the UP scroll button and turn MIOPS on. Then connect it to one of the USB ports of your computer. As this is the first time that MIOPS is connected to your computer, you will need to install the required drivers. After you have done this once, you don’t need to do it again. Next time your computer will recognize MIOPS which is put to “Firmware Upgrade” state. If you connect MIOPS to your computer without putting it to “Firmware Upgrade” state, it will not communicate with your computer so nothing will happen. Please check your firmware and app versions to verify the reference of this document. After you have connected MIOPS to your computer, open the “Control Panel” in Windows operating systems. Click “System” and choose “Device Manager”. You will see an unknown device under other devices section with exclamation point on it. Right click on this device and select Update Driver Software. Figure 4 Device Manager At this point you will be prompted if you want your computer search for the driver or you will be browsing for them. Choose “Browse my computer for driver software” and point the “driver” folder. Please check your firmware and app versions to verify the reference of this document. Figure 5 Locate Driver Folder The driver files will be copied and you should see the following screen. Figure 6 Driver Installed After that step you are ready to install the firmware. Switch off MIOPS again and switch it back on as you press and hold down the Up Scroll button. At this point, when you start MiopsUpgrade.exe, the program should recognize MIOPS and it will Please check your firmware and app versions to verify the reference of this document. show a green check sign on MIOPS. This means the software is ready to put the new firmware to MIOPS. The only thing you need to do is to locate the firmware file. Click the browse button (see highlighted with red below) and locate the firmware file you stored in the MIOPS folder. Figure 7 Browse for the Firmware File Please check your firmware and app versions to verify the reference of this document. This time it is the file MIOPS_v1_6.miops. The file name can change for the future versions to reflect the version changes. After this click the Upgrade MIOPS button. It should take about 15 seconds to upgrade the firmware. Then MIOPS will restart again and you will have your MIOPS with the new firmware updated. If anything goes during the firmware upgrade you can start over. Repeat the same of putting MIOPS to firmware upgrade mode locate the firmware file and then complete the upgrade. Figure 8 Firmware Upgrade Process When the firmware upgrade is completed, you should see the following confirmation message. Figure 9 Firmware Upgrade Complete Please check your firmware and app versions to verify the reference of this document. 7. Warranty MIOPS comes with a 2-Year warranty against manufacturing defects. If you think that your unit is not working as it should, please contact us at [email protected] with your purchase details. The device is not water proof, so water damages are not covered. If you are using MIOPS outside, make sure that you protect it from water. Do not drop MIOPS as this can damage the PCB and electronics components inside. There are no user serviceable parts inside, so please do not disassemble the device. Please check your firmware and app versions to verify the reference of this document. 8. Disclaimer Lightning Photography is a dangerous activity. We are not liable for any damage or personal injury associated with the use of MIOPS. MIOPS is intended for use as a camera shutter release device only and no other purpose. MIOPS is not waterproof. It should be treated and handled with the care of a camera and should not be dropped and/or exposed to extreme heat or moisture. Please check your firmware and app versions to verify the reference of this document. 9. FCC Approval Federal Communications Commission (FCC) Radio Frequency Interference Statement This equipment has been tested and found to comply with the limits for a Class B digital device, pursuant to Part 15 of the FCC Rules. These limits are designed to provide reasonable protection against harmful interference in a residential installation. This equipment generates, uses, and can radiate radio frequency energy and, if not installed and used in accordance with the instructions, may cause harmful interference to radio communications. However, there is no guarantee that interference will not occur in a particular installation. If this equipment does cause harmful interference to radio or television reception, which can be determined by turning the equipment off and on, the user is encouraged to try to correct the interference by one or more of the following measures: Reorient or relocate the receiving antenna. Increase the separation between the equipment and receiver. Connect the equipment to an outlet on a circuit different from that to which the receiver is connected. Consult the dealer or an experienced radio/TV technician for help. FCC Caution: To assure continued compliance, any changes or modifications not expressly approved by the party responsible for compliance could void the user’s authority to operate this equipment. (Example – use only shielded interface cables when connecting to computer or peripheral devices.) FCC Radiation Statement This equipment complies with FCC RF radiation exposure limits set forth for an uncontrolled environment. This transmitter must not be co-located or operating in conjunction with any other antenna or transmitter. This device complies with Part 15 of the FCC Rules. Operation is subject to the following two conditions: (1) This device may not cause harmful interference, and (2) This device must accept any interference received, including interference that may cause undesired operation. Please check your firmware and app versions to verify the reference of this document.