1
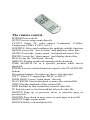
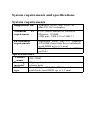
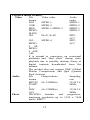
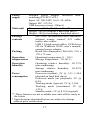
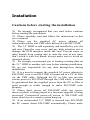
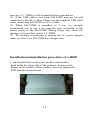
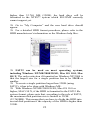
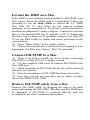
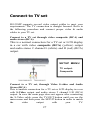
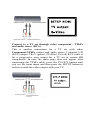
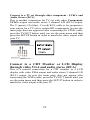
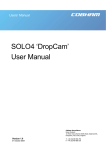
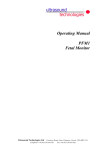
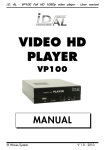
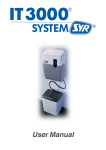
Portable DivX MPEG4 Player EH-25MP User manual Warnings and safety instructions This section describes precautions that should be observed in order to prevent injury to the user and damage to property, and to ensure the safe use of the product. Be sure to observe the following points when using the product to avoid any kind of malfunction. Warning The product may generate heat when used for a long period of time. Please do not attempt to disassemble this product. Do not use this product if it is wet or exposed to chemicals, oil or any liquid matter. Caution Do not handle, shake or try to remove this product while hard drive is writing and reading data. Do not bend, apply excessive pressure to or place heavy objects on this product. Do not expose this product to the following conditions: Heavy vibration or shock Direct sunshine Dusty, hot and/or humid conditions Extreme temperature fluctuations Near magnetic fields If this product is disconnected suddenly during file transfer, it may cause data loss and an error. If this happens, attach the product to your PC and run the Windows Scan Disk utilities. 1If bad sectors are generated in the hard drive due to physical impact or other causes, the product may not function properly. Please use the Scan Disk program of the Windows operation system to fix the error. 2 Operation Reminder Regular backup is recommended to preserve and store your data. We are not responsible for data deletion, damage or any consequences caused by improper handling or data storage. Limited liability The manufacturer, importer, wholesaler and reseller cannot be held responsible for accidental damage, including personal injury or any other damage due to inappropriate usage of the product. Information in the user manual is written for the current specification of the product. The manufacturer continues to provide additional functions and apply new technology to it. All specifications may be changed without prior notice to the individual user. Furthermore, warranty does not apply to: Damages or problems resulting from misuse, abuse, accident, alteration or incorrect electrical current or voltage. Any product tampered, with damaged warranty seal or serial number barcode or serial number label. Any product without a warranty or serial number barcode or serial number label EH-25MP is not designed or intended to, and may not be used to violate any copyrights or other IP (intellectual property) rights. Each user of EH-25MP may only use it in connection with materials legally owned by or licensed to the user and only extend such ownership or license rights that will permit such use. 3 Introduction A portable multimedia center anywhere, anytime Thank you for choosing this product. EH-25MP is a portable MPEG4 & DivX media player and storage device that you can connect to any PC or Mac via USB port (plug’n’play) in order to copy your favorite contents (movies, music, photos, data files) to it. Once you have transferred your data to EH-25MP, you can take it wherever you go. This user’s manual will explain the functions of EH-25MP. The better you know how to use it, the more enjoyment you will get from it. EH-25MP can not only be used to save data, but also to playback video files (DVD, MPEG1/2/4, DivX) and MP3 music files directly on your TV set. This is very appealing, because once you have films, music files or photo files on the hard disk of your PC, you don't always want to burn them to a blank disc to be able to play them, the EH-25MP is able to playback the files directly on your TV set. It saves many blank discs and unnecessary time waiting for a medium to be burnt. It's no longer necessary to buy a fast DVD burner. The EH25MP makes it a thing of the past. Now you can enjoy films, music and photo playback instantly! Multiple subtitle languages*** Support of multiple subtitle languages for movie playback. EH-25MP has been designed for the entire globe. With sophisticated Unicode character handling, it supports most of the major languages used in the menu selection and subtitle feature. Multiple OSD languages*** Support of multiple OSD (On Screen Display) languages for media playback or system operation. 4 Home theater / Car theater Store your video files and data on EH-25MP and enjoy your personal movies, music or photos wherever you go. It can handle 2,5" hard disk space up to 128GB (not included) which means storage space for up to 32 DVDs. But it can also playback DivX films which means there's an almost endless playback time for about 200 DivX films. Support of all standard video formats, including MPEG-4 (AVI, DivX, XviD), MPEG-2 (AVI, VOB), MPEG-1 (AVI, MPG, DAT). MP3 music player and music jukebox Save your music files on EH-25MP and enjoy music or a music slideshow through your TV speaker or existing audio device. It can store and playback MP3, WAV and AC3 music files; a maximum of about 4000 songs with a 128GB HDD installed. Digital photo album Use EH-25MP to share thousands of your digital photos with high resolution with your family or friends. You can also enjoy a photo slideshow in a big TV screen. Supports photo files with JPG, JPEG, motion JPG (15fps/30fps) or BMP** format. Data storage box Backup all files on EH-25MP and use it as a portable external disk drive and storage device. This could be done through the USB 2.0 interface at high speed up to 480MBit/s and transfer all data from your PC or Mac. Supports all standard 2,5” parallel ATA hard drives with a size up to 9,5mm. The maximum hard drive capacity is 128GB (with up to 4 partitions). 5 Firmware update You can download the latest updated features via firmwareupgrade. Please check back at www.lc-power.com regularlyfor the latest firmware. Powerful media processor The heart of the EH-25MP device is a powerful media processor supporting the demanding MPEG-4, MPEG-2, MPEG-1, DivX and XviD decoding. Comprehensive graphic user interface (GUI) menu EH-25MP is designed with a comprehensive graphic user interface menu to make the operation more user-friendly while playback of media files. Remote Control There are many hot keys on the remote control to make media playback easier. For example, you can always play the movie, music or photo files you want by pressing the hot key buttons MOVIE, MUSIC and PHOTO. USB 2.0 high speed data transfer Supports USB 2.0 with a maximum data transfer rate of 480MBit/s. DivX Compatibility DivX® is a new format for digital video. The DivX® codec is based on the MPEG-4 compression standard, it can reduce an MPEG-2 video (the same format used for DVD) to approx. ten percent of its original size. EH-25MP is compatible with DivX® format and can play any movie encoded with this compression format: 4.x, 5.x. 6 XviD Compatibility XviD is an ISO MPEG-4 compliant video codec. It is not a commercial product; it is an open source project which is developed and maintained by groups of people all over the world. EH-25MP is fully compatible with the XviD format and can play any movie encoded with this compression format. Enjoy now EH-25MP is a powerful, portable, digital multimedia player and data storage device that can be addressed to a huge variety of users, like: Home users who want to have a home theater and enjoy movies, music and photo slideshow on TV at home or in their car Computer users who download lots of favorite legal movies, music and pictures from the internet and want to enjoy them on TV anytime Travelers who want to share movies, music and photos at a hotel or a friend’s home Business people on the road who want some entertainment or who want to have business presentations through a projector at a meeting room or at a customer’s office Stores, shops, exhibitors, agencies and companies that want visual/audio promotion/advertising for their products Parents who want to back-up and replay their family movies or safe their own DVDs/CDs DivX enthusiasts who want to enjoy their DivX/MPEG-4 films Movie and music lovers who want to enjoy their favorites at all time 7 Checking the items in the Package Select the check boxes to confirm that all items are included in the package. In case any items are missing, please contact your reseller. Package Contents EH-25MP (no hard disk drive included) Infrared remote control (3 Volt CR2025 Lithium battery included) A/V Cable (Composite and Audio RCA) Multi video cables (S-Video, Component-YPbPr, VGA) USB 2.0 high speed cable (A to mini B) USB driver CD for Windows 98/SE Screw bag for the hard disk drive (screws, 4 pcs.) User’s manual External power adapter Keep the box and packing materials/cables in a safe place and use them when transporting the product for the purpose of repair or other service. Compact design The weight of EH-25MP is only approx. 300g (including a 2,5” HDD). Its dimension is as compact as depicted in the adjacent figure. This guarantees that the EH-25MP offers easy mobility. Names and functions of components You will find the following LEDs and interfaces on the front and on the rear panel of EH-25MP. Power LED IR LED Front panel view: (1) PWR LED -- Power LED; Power LED is green ON when power-on and red ON at standby mode. In standby mode, press the POWER button on the remote control to power-on EH25MP again. (2) HDD LED -- Hard drive LED; HDD LED is blue blinking when data is being read and the hard disk works (3) IR LED –-- Infrared remote control LED; IR LED is red blinking whenever the remote control signal is received (4) IR receiver --- Infrared remote control sensor 9 DC Input USB Input Audio/ v ideo connector Multi - video connector Rear panel view: (5) DC 5V -- DC input; connect to provide 5V power adapter for TV mode or PC mode. (6) USB -- USB port; connect to PC or Mac, the USB 2.0/USB 1.1 port provides power (max. 500mA) and transfers data (7) A/V -- Audio/Video connector; connect to composite (RCA) jack and audio jack (RCA) of the TV set (8) Multi-Video -- Multiple video connector; except the standard composite jack, the multi video connector provides more choices for the TV set connection, including S-Video, Component-YPbPr and VGA output. Top and side view: 142. 0 mm 88. 0 mm Brushed high-quality aluminum top cover Enclosure dimension: 86 x 145 x 24,5 mm (W x L x H) 11 The remote control POWER Power on/off SETUP Access setup menu directly TV-OUT Select TV video output (Composite, S-Video, Component-YPbPr, YCbCr, VGA) SUBTITLE Select and configure the multiple subtitle function MOVIE Access the “movie menu” and playback video files MUSIC Access the “music menu” and playback music files PHOTO Access the “photo menu” and display photo files FILE Access the “file menu” directly DISPLAY Display media information while playback TIME SEARCH Go to a specific position while movie playback ENTER Execute selected function (equal to the PLAY/PAUSE button) Navigation buttons: Navigate up, down, left and right N/P ** Select TV output type (NTSC or PAL)** MAIN PAGE Access “main menu” directly PLAY/PAUSE Start to playback or pause the selected file STOP Stop the playback of the selected file REW Rewind, to fast rewind the selected video file FF Fast forward, to fast forward the selected video file PAGEUP Page up or previous, move to previous page or previous file PAGEDN Page down or next, move to next page or next file REPEAT Toggle repeat mode ROTATE Rotate selected photo file ZOOM Zoom in selected photo file SLIDESHOW Execute music slideshow** directly S-TIME Toggle slideshow interval time S-Mode Toggle slideshow transition mode VOLUME +/- Adjust volume Number Keys 0~9 Number keys MUTE Volume mute on/off CANCEL Reset key for number key input Do not drop the remote control and do not put it in a wet place Do not expose the front panel of the infrared receiver directly to sunshine and strong light When the remote control becomes insensitive, please replace the battery with a new one N/P ** function will be supported in the future 13 System requirements and specifications System requirements Supported OS Windows 98/SE, ME, 2000, XP Mac OS 10.2 or higher Minimum PC requirement CPU: Intel Pentium III 500MHz Memory: 128MB USB port: USB 2.0 or USB 1.1 Environment requirements Supported HDD: Any 2,5” parallel ATA (IDE) hard disk drive (notebook sized HDD up to 9,5 mm) TV System: Multi-standard (NTSC or PAL) Specifications Product name Housing material HDD type EH-25MP High quality brushed aluminium cover with plastic body Any 2,5” parallel ATA (IDE) hard disk drive (notebook sized HDD up to 9,5 mm) Playback media formats: File Video codec Video format DAT MPEG-1 VOB MPEG-2 MPG, MPEG-1 MPEG-2 MPEG, M-JPG AVI DivX, XviD Audio Photo Audio codec MPEG-1 MPEG-2 MPEG-1 MPEG-2 MP3, AC3 MP3, AC3 AVI, MPEG-4 MPEG4 SP, MPEG4 ASP, ASF It is normal to experience an occasional pixilation and “skip effect” during video playback due to possibly missing clarity of digital contents downloaded from the internet. The product does not support GMC (Global Motion Compression) and Qpel (Quarter Pixel) features. File Output bitrate Sampling format rate MP3/M 64~192KBit/s 32/44.1/4 P2/MP 8KHz 1 WAV, 64~192KBit/s 32/44.1/4 AC3 8KHz JPG/JPEG baseline and progressive, maximum resolution up to 5120 x 3840 pixels, BMP** 15 Slideshow Multiple subtitle languages Multiple subtitle file formats HDD File system JPG, JPEG Embedded multiple subtitle (based on viewed material) languages SUB (MicroDVD format), SRT (SubRIP format), SMI (SAMI fomat), embedded multiple subtitle support FAT32 and NTFS ** (single partition or up to max. 4 multiple partitions) FAT32: Maximum size up to 128GB HDD NTFS**: no size restriction Capacity ESS Technology Kernel OS USB 2.0 high speed data transfer (USB 1.1 PC downwards compatible) output interface TV Output Interface: A/V connector: NTSC/PAL Composite Video (RCA) Multi video connector: S-Video, Component-YPbPr/YCbCr, VGA Analog stereo 2 channels (RCA) Audio PWR Power on/off: green color on/off LED LED System standby: red color on display HDD HDD data access: blue color LED blinking IR Remote control signal on/off: LED red color on/off External power adapter universal autoswitching (CE/FCC/cUL) Input: AC 100-240V, 0.6A, 50~60Hz Output: DC +5V/2A USB bus power (max. 500mA) Main unit Dimension (WxLxH): 88 x 142 x 20 mm Weight: 200 gr (without a hard disk drive) Weight: 300 gr (including a hard disk drive) EH-25MP (no hard disk drive included) Package Infrared remote control, A/V cable, contents multi video cables USB 2.0 high speed cables, USB driver CD for Windows 98/SE, user’s manual, external power adapter Retail box dimension (WxLxH): 210 x Packing 170 x 75 mm Operating temperature: 0 ~ 50 C; Operation Storage temperature: -10~60 C; temperatures Power supply Operating relative humidity: 10~75% non-condensing Storage relative humidity: 10~85% non-condensing Power-on (instant): 5V @ 1,11~1,38A Power (depend on hard disk drive) consumption Power-on mode (no playback): 5V @ 0,9A Working mode (typical): 5V @ 1,10A Working mode (maximum): 5V @ 1,25A Standby mode: 5V @ 0,32A (typical) ** These features are not available now and will be ready in the future * Specifications described herein are subject to change without prior notification. Operation humidity 17 Installation Cautions before starting the installation We strongly recommend that you read below cautions before starting the installation Please carefully read and follow the instructions in this user’s manual Please use the supplied AC power adapter, all video/audio cables and USB cable delivered with EH-25MP The 2,5” HDD is sold separately and installed by you, the end user. Open the case cover and pay high attention not to damage the PCB interface inside the case. Prevent water or other liquids from getting into or onto the case at any time, don’t touch it with wet hands, always make sure to avoid an electrical shock. We strongly recommend you to backup existing data on the 2,5” HDD to another safe area before starting installation. We are not responsible for any data damage/loss during installation. It is a must to connect the supplied AC power adapter to EH-25MP, even even EH-25MP is connected to a PC or Mac via the USB cable. Although the PC or Mac can provide certain power to EH-25MP through the USB cable, it cannot be guaranteed that the supplied power from the PC or Mac is good enough or stable enough to make EH-25MP work properly. Please don’t power off EH-25MP while any movie, music or photo is being played or a firmware upgrade is being processed. Unexpected power-off action to EH-25MP will cause data loss or a serious system hang-up. If an unformatted 2,5” HDD is inserted into EH-25MP, the PC cannot detect EH-25MP automatically. Please make sure any 2,5” HDD is well formatted before installation. If the USB cable is too long, EH-25MP may not be well connected to the PC or Mac. Please use the supplied USB cable when connecting EH-25MP to a PC or Mac. When EH-25MP is installed to a car, we strongly recommend you to use a car cigarette jack according to the power needs of the EH-25MP. Wrong usage may cause the damage or loss of data inside 2,5” HDD. We strongly recommend to unplug the AC power adapter when you don’t use EH-25MP for a longer time. Installation/uninstallation procedure of a HDD 1. One hand holds a side of the product and another hand holds the other side of the product, then press the button on the surface of the product, this way unplug the PCB interface board board. 19 2. Take out the PCB board, one hand presses the PCB board, anther hand holds the HDD. Then connect the IDE pin of the HDD towards the female IDE pin of the PCB board. 3. Push the HDD to the female connector until it fastens. 4. Take out a screw and fasten the HDD to the case. 5. Push the assembled HDD/PCB interface to the enclosure while pushing the button, then release the button. Make sure the HDD/PCB interface is locked to the enclosure. You should not be able to pull it out anymore without pressing the button on the enclosure. Installation of a HDD: Power off first before HDD installation to prevent risks of electric shock and damage of the HDD The HDD must be set to “master” mode when inserted to EH-25MP. If the HDD is set to “slave” mode, the HDD will not work with EH-25MP properly. Normally the HDDs factory default setting is “master”. Please make sure before you install the HDD to EH-25MP. 21 Connect EH-25MP to a PC Formatting the HDD with a PC If the HDD is not formatted and installed to EH-25MP, a PC cannot detect the HDD until it is formatted. It is suggested to format the HDD first. Follow the procedure to use the Disk Management Utility to format your 2,5” HDD first. Right click on “My Computer” and choose “Manage” Select “Disk Management” Select the hard disk drive you want to format. If the hard drive is formatted for the first time, click on the grey field on the left side to initialize the hard disk drive. Click on the empty field on the right side to create a partition and choose “New partition” During “New partition wizard” procedure, you must select “primary partition”. On selection of “Disk partition size” (MB), enter the disk partition size you prefer. It is necessary to format the HDD with the FAT32 file system, EH-25MP currently only supports FAT32 and can not support any HDD with the NTFS** file system. You must select a partition size less than 32GB (32.768 MB) for the FAT32 system. If you select a disk partition size higher than 32.768 MB (32GB), the hard drive will be formatted to the NTFS** system which EH-25MP currently cannot support yet. Go to “My Computer” and the new hard drive should appear. For a detailed HDD format procedure, please refer to the HDD manufacturer’s information or the Windows help files. FAT32 can be used on most operating systems, including Windows XP/ME/2000/98/SE, Mac OS 10.0, Mac OS X. The only restriction if formatted on Windows XP/2000 is that the largest size for a single partition has to be 32GB or smaller. To create a single partition larger then 32GB (using FAT32), it has to be done with Windows ME. With Windows XP/ME/2000/98/SE, Mac OS 10.0 or higher, MAC OS X, if the HDD is formatted to the FAT32 file system format, please note that, according to the rule of FAT32, the maximum disk partition size is limited to 32GB (32,768MB). This means that you have to divide the HDD into several disk partitions if the capacity of the HDD is higher than 32GB. 23 EH-25MP supports a maximum partition amount of four (4) per HDD. EH-25MP supports a maximum disk capacity of 128GB (32GB per partition x 4 partitions). Connect EH-25MP to a PC (Windows XP/ME/2000) There is no need to install any driver before connecting EH-25MP to a PC. Use the supplied USB cable to connect EH-25MP to the USB port of the PC. Although PCs can provide a certain amount of power to EH-25MP through the USB cable, it cannot be guaranteed that the supplied power from the PC is good enough or stable enough to make EH-25MP work properly. Normally the USB port provides enough power to power on EH-25MP. However, it depends on the USB port of your PC. If your PC cannot power on EH-25MP, it is recommended to connect the supplied AC power adapter to EH-25MP. When EH-25MP is connected to PC, a new HDD volume will be detected and shown on “My computer”. Now the installation of EH-25MP has been successful. In the next step, you can save any data, movie, music or photo files to the HDD. Connect to a PC (Windows 98/SE) If the operating system of your PC is Windows 98/SE, please don’t connect EH-25MP to a PC before the USB driver is installed. Insert the supplied “USB driver CD for Windows 98/SE” to an optical drive and install the USB driver to Windows 98SE. After the installation of the USB driver, use the supplied USB cable to connect EH-25MP to the PC using the USB port. When EH-25MP connects to the PC, a new HDD volume will be detected and shown on “My computer”. Now the installation of EH-25MP has been successful. Next step, you can save any data, movie, music or photo files to the HDD of EH-25MP. Remove safely from a PC (all Windows versions) In order to safely remove EH-25MP from a PC, double click the remove icon on right bottom corner of Windows taskbar. Follow the instruction to remove EH-25MP from a PC connection. The data and EH-25MP may be damaged if EH-25MP is removed directly and not according to the above mentioned procedure. Connect EH-25MP to a Mac 25 Format the HDD on a Mac If the HDD is not formatted and installed to EH-25MP, your Mac cannot detect the HDD until it is formatted. Follow the procedure to use the Disk Utility to format the 2,5” HDD first. Mac OS 9.2 and earlier do not support creating partitions in an external drive. To do that, you would need to purchase an additional 3rd party software. Connect the external drive to the internal IDE bus or upgrade to OS X. Initializing the drive can be done on all operation systems. For Mac OS X, use the Disk Utility to format and create partitions on the external drive. Select “Disk Utility” in the utilities folder Choose the external drive and format it according to your equipment. For Mac only, choose “Mac OS extended”. Connect EH-25MP to a Mac There is no need to install any driver before connecting EH-25MP to a Mac OS 10.0 or higher version. Use the supplied USB cable to connect EH-25MP to the Mac USB port. When powering on EH-25MP, the device will be detected and an icon is shown. Now the installation of EH-25MP has been successful. Next step, you can save any data, movie, music or photo files to the HDD of EH-25MP. Remove EH-25MP safely from a Mac Remove EH-25MP safely by dragging the icon to the trash sector and unplug the EH-25MP. The data and EH-25MP may be damaged if EH-25MP is removed directly and not according to the above mentioned procedure. Connect to TV set EH-25MP supports several video output cables to meet your requirements. The TV connection is straight forward. Refer to the following procedure and connect proper video & audio cables to your TV set. Connect to a TV set through video composite (RCA) and audio stereo (RCA). This is a normal connection for a TV set or LCD display in a car with video composite (RCA) (yellow) output and audio stereo 2 channel L (white) and R (red) (RCA) output. SETUP MENU TV output : Composite Connect to a TV set, through Video S-video and Audio Stereo (RCA) This is another connection for a TV set or LCD display in a car with S-Video output and audio stereo 2 channel L/R (RCA) output. In case the main page does not appear after connecting the S-Video cable, press the TV-OUT button until you see the main menu and then press the SETUP button in order to match the video output with your TV. 27 Connect to a TV set through video component - YPbPr and audio stereo (RCA) This is another connection for a TV set with video Component-YPbPr output and audio stereo 2 channel L/R (RCA) output. The Y (green), Pb (blue), Pr (red) RCA cable is for a progressive scan output for a TV set or certain HD components. In case the main page does not appear after connecting the YPbPr cable, press the TV-OUT button until you see the main menu and then press the SETUP button in order to match the video output with your TV. VPb Pr Connect to a TV set through video component - YCbCr and Audio Stereo (RCA) This is another connection for TV set with video ComponentYCbCr output and audio stereo 2 channel L/R (RCA) output. The Y (green), Cb (blue), Cr (red) RCA cable is for progressive scan output for a TV set or certain HD components. In case the main page does not appeared after connecting the YPbPr cable, press the TV-OUT button until you see the main menu and then press the SETUP button in order to match the video output with your TV. YCbCr Connect to a CRT Monitor or LCD Display through video VGA and audio stereo (RCA) This is a normal connection for a CRT monitor or a LCD display with video VGA output and audio stereo 2 channel L/R (RCA) output. In case the main page does not appear after connecting the YPbPr cable, press the TV-OUT button until you see the main menu and then press the SETUP button in order to match the video output with your TV. 29 Composi te TV output : VGA Getting started After connecting the video & audio cables properly to your TV set and EH-25MP, you can start to operate EH-25MP step by step. Quick installation guide Power on your TV set (no matter if the TV set is NTSC or PAL or multi-system auto-switch) Using the A/V cable or multi video cables supplied, connect EH-25MP to the TV set. Power on EH-25MP by plugging the AC power adapter (DC input) into the EH-25MP, and then plug the AC power cord to the electrical outlet. Press the TV-OUT button on the top side of the remote control to toggle proper video output to current TV set connection. Repeat pressing the TV-OUT button until the main menu appears on your TV screen. When pressing the TV-OUT button, it toggles the video output in the following sequence: Composite/YCbCrYpbPr VGA S-Video The first time you power on EH-25MP, the proper main menu screen may not appear on the TV set. This may be caused by the default setting of video output (composite) may not match to your current TV setting. 31 Before going to the setup menu of EH-25MP to adjust the video output properly, pressing the TV-OUT button is the best way to search for available video outputs. Once the main menu screen is properly shown on the TV set, press the SETUP button to adjust the right TV type (NTSC or PAL) and video output (S-Video, Composite/YCbCr, YPbPr, VGA) If the TV still shows a blank screen after finishing the above installation, be sure to set the TV to the correct video input type (AV mode) and channel. Refer to the TV manual for details. If the TV is black and white, press TV-OUT button to adjust the proper video output mode. If the TV screen is distorted or flicking, press the SETUP button and select the TV type to match your TV system, NTSC or PAL. Setup menu – EH-25MP Before enjoying media playback on EH-25MP, it is recommended to enter the setup menu to select proper parameter settings for movie, music and photo playback environment. To enter the setup menu, you can either select SETUP from the main menu or press the SETUP hotkey on the remote control, to exit the setup menu, press the SETUP button again anytime. TV Type NTSC Video Output PAL S-Video Composite/YCBCR YPBPR VGA Video Setup Subtitle setup Subtitle ON/OFF ON OFF Subtitle size Small Standard Subtitle color Orange Blue Grey White Subtitle background (color) Semi-transparent White Black Blue 33 OSD language setup OSD language English Francais Deutsch Italiano Swedish Danish Portuguese Spanish Factory default setup Firmware version Default Firmware upgrade setup Firmware upgrade D5.09.NP.EC.C1 MAIN MENU This is the menu that appears when you turn on EH25MP. There are five main selections: MOVIE, MUSIC, PHOTO, FILE and SETUP You can access the main menu by pressing the navigation buttons, PLAY or ENTER buttons to enter each submenu Or you can access the main menu directly by pressing the hotkeys MOVIE, MUSIC, PHOTO, FILE, SETUP on the remote control MOVIE MENU The movie menu displays all available video files (movies) in file directory style A preview window on the left top corner will help you to search the right video file you want to playback You can access the movie menu by pressing the navigation buttons, PLAY or ENTER buttons and start the movie playback On the left hand side is a menu for switching to another partition of the hard drive (up to 4 partitions) or return back to the main menu On the left hand side, pressing the PLAY ALL button will execute all movies in auto-play mode Pressing the REPEAT button, you may have all the files playing repeatedly. 35 MUSIC MENU The music menu displays all available music files (MP3 or WAV) in file directory style You can access the music menu by pressing the navigation buttons to playback music directly without pressing PLAY or ENTER buttons On the left hand side is a menu for switching to another partition of the hard drive (up to 4 partitions) or return back to the main menu On the left hand side, pressing the PLAY ALL button will execute all music files in auto-play mode PHOTO MENU The photo menu displays all available photo files (JPG/JPEG or BMP**) in file directory style A preview window on the left top corner will help you to search the right photo file you want to display You can access the photo menu by pressing the navigation buttons, PLAY or ENTER buttons On the left hand side is a menu for switching to another partition of the hard drive or return back to the main menu On the left hand side, pressing the PLAY ALL button will execute a photo slideshow directly FILE MENU The file menu displays all available files (videos, music, photos) in file directory style A preview window on the left top corner will help you to search for the right video or photo file you want to display On the left hand side is a menu for switching to another partition of the hard drive or return back to the main menu The PLAY ALL button is disabled in the file menu It is not recommended to playback any files from the file menu. The main function of the file menu is to verify all available files in file directly style. SETUP MENU 37 The setup menu is to properly configure EH-25MP for media playback and system operation On the video setup page of the setup menu, you can adjust the right TV type (NTSC or PAL) or video output (composite/YCBCR S-Video, YPBPR, VGA) to the TV set On the subtitle page, you can setup the subtitle displaying (on/off) or adjust DivX subtitle formats, including subtitle font size, subtitle color and subtitle background color On the OSD language page, you can select the preferred OSD language On the factory default page, you can store back all factory default setting values to EH-25MP On the firmware upgrade page, you can check or upgrade to the latest firmware which has previously been downloaded from the internet. Specifications described herein are subject to change without prior notification. * Product pictures are for reference only ** These features are not available yet and will be ready in the future *** Some features depend on the model version Please make sure to visit www.lc-power.com regularly to check for available firmware updates. LC-Power, 41352 Korschenbroich, Germany