1
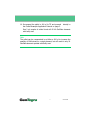
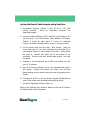
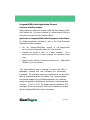
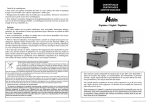
GenPlate User Guide Application of Crude Biosamples to GenPlates Version A April 2014 [email protected] WWW.GENTEGRA.COM Application of Crude Biosamples to GenPlates for Whole Blood and Clones Blood Products Overnight Bacterial Cultures DMSO or Glycerol Bacterial Stocks Buccal Swabs Mouthwash Oragene®DNA/saliva 2 GT20140402A Crude Biosample Application Protocol For preparation and application of the following types of crude biosamples to GenPlates for Whole Blood and Clones: Blood products (such as whole blood and buffy coat) Overnight Bacterial Cultures DMSO Bacterial Stocks Glycerol Bacterial Stocks Buccal Swabs Mouthwash Oragene®DNA/saliva Before applying buffy coat, please refer to Recommended Buffy coat Preparation ......................... 5 For optimal recovery of DNA from whole blood, please refer to the Blood Sample Handling Guidelines .............. 7 Refer to the following supplemental protocols for preparation and application of the following types of crude biosamples: Whole Blood .............................................................. 4 DMSO or Glycerol Bacterial Stocks .............................. 8 Buccal Swab Samples ................................................ 9 Buccal Mouthwash Samples ...................................... 10 Oragene® DNA/saliva .............................................. 15 Other Crude Biosamples ........................................... 16 3 GT20140402A Crude Biosample Application Protocol Refer to this protocol for application of whole blood. For preparation of other crude biosamples, refer to the protocols on pages 4-16 prior to beginning this protocol. 1. Remove the GenPlate from the foil pouch only when you are ready to use it. The foil pouch is reusable for storing or shipping the plate. 2. Remove and discard the silver adhesive seal on the top of the GenPlate before applying the sample to the storage element. The GenPlate should be used within 60 minutes of removal from foil pouch or stored at ambient temperature and <40% relative humidity. 3. Bring your sample to room temperature and rock for 10-15 minutes (this applies to blood products only). Spot 10 µl of the sample in the center of each well. It is not necessary for the pipette tip to contact the storage matrix, but the sample must be entirely dispensed onto the matrix to engage bactericidal and virucidal agents. 4. After applying the sample (or samples to a multi-sample plate), place the unsealed plate in a biosafety hood or an GenTegra Fast Dryer overnight (12-16 hours). 5. After samples are dry, apply the clear Adhesive Storage Plate Seal. Ensure that the seal is firmly attached to the top of the plate; avoid creating bubbles on the surface of the plate. 6. Plate is now ready for storage. To achieve maximum DNA yield, allow the plate to cure for an additional 2 weeks before recovering DNA. 4 GT20140402A Recommended Buffy Coat Preparation Before proceeding please read Crude Biosample Application Protocol (page 4). Additional Materials Required Anticoagulant-treated blood 1 - 15 ml conical tube per sample Ficoll-Paque™ Plus GE Healthcare - Product codes 17-1440-02 & 17-1440-03 Salt Solution See Ficoll-Paque Plus protocol for preparation instructions 1. 1. Mix together 2 ml of anticoagulant-treated whole blood and 2 ml of salt solution. 2. Mix the Ficoll-Paque Plus well and add 3 ml of it to a 15 ml conical tube. 3. Carefully add the 4 ml of whole blood plus salt solution on top of Ficoll-Paque Plus layer in the 15 ml tube. Do not mix the two layers. 4. Centrifuge sample at 400 x g for 30-40 minutes at 18-20°C. Upon completion, 4 layers should be visible (From top to bottom: plasma, buffy coat, Ficoll-Paque Plus, and granulocytes & erythrocytes). 5. Draw off the plasma layer using a clean Pasteur pipette and discard. Be careful not to disturb the buffy coat layer. 6. Using a clean pipette, transfer the buffy coat layer into a clean 15 ml conical tube. Be sure not to remove any Ficoll. 7. Add 6 ml of salt solution to the conical tube containing the buffy coat, and mix it up and down. 8. Centrifuge the conical tube for 3 minutes at 2000xg. should form. A pellet 9. Aspirate the salt solution and discard. 5 GT20140402A 10. Re-suspend the pellet in 400 µl 1x TE and proceed the Crude Biosample Application Protocol on page 3. directly to One 2 ml sample of whole blood will fill 40 GenPlate elements with buffy coat. Note The pellet can be resuspended in as little as 200 µl to increase the quantity of DNA stored on a single element, but will result in only 20 GenPlate elements spotted with buffy coat. 6 GT20140402A Blood Sample Handling Guidelines Before proceeding please read Crude Biosample Application Protocol (page 4). Room Temperature Blood Storage Prior to Spotting 0-24 hours - No change in DNA yield observed. 24-72 hours - Acceptable for use with GenPlate system, but a slight decrease in yield may be observed. 72 hours-8 days - A steady decline in DNA yield is observed. 5 days—20% drop in yield 8 days—33% drop in yield 2-8 weeks - Not recommended for use with GenPlate system. A considerable decline in the amount of recoverable DNA observed. 4°C Blood Storage Prior to Spotting 0-24 hours - No change in DNA yield observed. 24 hours-8 days - Acceptable for use with GenPlate system, but a slight decrease in yield may be observed. 2-8 weeks - Not recommended for use with GenPlate system. A considerable decline in the amount of recoverable DNA observed. Frozen Blood Storage Prior to Spotting Low Temperature (- - Results in an immediate drop in steadily to a 30-40% drop in DNA recoverability after 1 year. Ultra Low Temperature (- There is no influence on DNA yield or quality with long term storage (years). However, short term storage (24 hours) will alter DNA size. 7 GT20140402A DMSO or Glycerol Bacterial Stocks Application Protocol For detailed application instructions, refer to the Crude Biosample Application Protocol on page 4. Typical Glycerol/DMSO Stock Concentrations DMSO Stocks are 10% DMSO. Glycerol stocks may range from 8-50% glycerol. Preparation of the Glycerol/DMSO Stock or bacterial culture 1. Depending on the downstream application for the DNA recovered from the glycerol stocks, one ml of stock may be spun down to a cell pellet and resuspended in 250µl of LB, TB, SOC, TE, or TBS for a 4-fold concentration prior to application. 2. Apply the entire volume of DMSO/Glycerol Stock or bacterial culture to elements on a Whole Blood GenPlate (10 µL per element). 8 GT20140402A Buccal Swab Samples Application Protocol Additional Materials Required Incubator/Shaker or comparable thermo-mixer GVSPIN-250, Spin Basket/Tube Assembly Micro-centrifuge GVR-100, GenSolve for DNA recovery from whole blood spotted paper, 100 recoveries 2.0 ml micro-centrifuge tubes Collection of Buccal Swab Samples This collection protocol is shown as an example; your collection protocol may vary slightly. 1. Place a cotton swab against either the right or left cheek and brush up and down from the rear of the cheek to the front. 2. Place swab in a sealed collection tube. For best results, process swabs and apply to GenPlates on the day of collection. If swabs are not processed immediately, storage at 4°C or drying overnight in a biosafety hood prior to room temperature storage may help to preserve DNA quality. 3. Proceed to lysis protocol (page 10). 9 GT20140402A Lysing the Buccal Swab sample using GenSolve 1. Reconstitute Recovery Solution A with 16 ml of 1.0% LiDS solution provided. Vortex to completely re-suspend the lyophilized reagent. 2. Pre-heat incubator/Shaker to 65°C. Add 535 µl of Protease in the vial from step 1 and vortex briefly. (After addition of Protease, Solution A should be used within 2-3 hours for maximum recovery. Protease is typically yellow, brown, or orange in color.) 3. Cut the cotton swab from the stick. With forceps, place the buccal swab into a 2.0 ml micro-centrifuge tube and add 300 µl reconstituted Solution A with Protease to the tube. Make certain the swab is covered with liquid and at the bottom of the microtube. Continue until each buccal swab sample has been processed. 4. Incubate in the thermomixer set at 65°C and shaking at 1,400 rpm for 15 minutes. 5. Add 10 µl Recovery Solution B to a new microtube and insert a spin basket. Transfer the solution from Step 5 into the Spin Basket making sure to transfer along the swab by grasping with a forceps. 6. Centrifuge at 16,300 x g for five minutes, discard Spin Basket and swab. Pulse vortex each microtube and centrifuge briefly. 7. Proceed to Application Protocol (Page 11). Refer to the GenSolve User Guide for details on the use of GenSolve for DNA extraction form biosamples. 10 GT20140402A Application of Lysed Samples to GenPlates For detailed application instructions, refer to the Crude Biosample Application Protocol on page 4. 1. Apply the entire volume of lysed buccal swab sample to elements on a Whole Blood GenPlate (10 µl per element). The last element may have less than 10 µl. A 6-region GenPlate may be practical for this sample type. There is a maximum of 300µl of lysed sample which, after digestion and centrifuging, usually leaves ~240 µl for spotting onto GenPlates. A 6-region plate has 40 elements designated for each unique sample. The usual number of elements spotted per swab is 24 - 27. DNA Recovery 1. Follow the protocol in the GenSolve User Manual: Whole Blood DNA Recovery from FTA paper, Guthrie cards, and GenPlate elements. 2. Recover 6 elements in one tube at a time. Six elements represent approximately ¼ of the total buccal swab sample. Typical DNA yields from human buccal swabs for ¼ of the sample range from 0.1– 1.5µg. 11 GT20140402A Buccal Mouthwash Samples Application Protocol Additional Materials Required Scope Mouthwash 50 ml conical tubes TE Buffer Centrifuge Vortexer Collection of Mouthwash Samples This collection protocol is shown as an example; your collection protocol may vary slightly. 1. Place 15ml of Scope mouthwash into your mouth. 2. Swish mouthwash around your mouth for exactly 45 seconds. During the swishing, rub your cheeks gently against your teeth with your hands. This will help increase the number of cells collected during the process. 3. After 45 seconds of swishing and rubbing, spit the content of your mouth into a 50ml conical tube. 4. Proceed to Preparation of Cell Suspension from Mouthwash Samples Protocol (page 13). Ensure that the mouthwash samples are processed and applied to GenPlates on the day of collection. 12 GT20140402A Preparation of Cell Suspension from Mouthwash Samples For best results, process mouthwash samples and apply to GenPlates on the day of collection. 1. Centrifuge the 50 ml conical vial containing the mouthwash sample for 5 minutes at 2000xg. 2. Aspirate the supernatant off the cell pellet. 3. Optional: After removing most of the supernatant, you may transfer the remaining liquid and pellet to a 1.7ml microcentrifuge tube, centrifuge for an additional 5 minutes at 2000xg, and remove the remaining supernatant using a pipette tip. This helps to prevent dilution of the pellet in excess supernatant. 4. Resuspend the cell pellet in 160 µl of 1X TE Buffer by vortexing at high speed and pipetting up and down. It may be difficult to completely resuspend the cell pellet. Pipetting up and down will help to break up viscous material. If viscous material persists even after thorough vortexing and pipetting, it may be discarded in a biohazard container prior to applying the remaining cell suspension to GenPlates. Do not attempt to apply viscous filaments to GenPlates. 5. Proceed to Application protocol (page 14). 13 GT20140402A Application of Mouthwash Cell Suspension to GenPlates For detailed application instructions, refer to the Crude Biosample Application Protocol on page 4. 1. Apply the entire volume of cell suspension to elements of a Whole Blood GenPlate (10 µl per element). The last element may have less than 10 µl. A 12-region GenPlate may be practical for this sample type. There is a maximum of 160µl of lysed sample for spotting onto GenPlates. A 12- region plate has 16 elements designated for each unique sample. The usual number of elements spotted per swab is 14-18. DNA Recovery 1. Follow the protocol in the GenSolve User Manual: Whole Blood DNA Recovery from FTA paper, Guthrie cards, and GenPlate elements. 2. Recover 1-6 elements in one tube at a time. One element represents approximately 1/16 of the total mouthwash sample. Typical DNA yields from human mouthwash for 1/16 of the sample range from 0.2-1.7 µg. 14 GT20140402A Oragene®DNA/saliva Application Protocol Collection of Saliva Samples Saliva collection is performed using the DNA Genotek Oragene® DNA Self-Collection Kit. For proper collection of a saliva sample, follow the instructions provided with the Oragene-DNA kit. Application of Oragene®DNA/saliva Suspension to GenPlates For detailed application instructions, refer to the Crude Biosample Application Protocol on page 4. 1. Mix the Oragene-DNA/saliva sample in the Oragene-DNA vial by inversion and gentle shaking for a few seconds. 2. Incubate the sample at 50°C* in a water incubator for a minimum of one hour or in an air incubator for a minimum of two hours. 3. Apply the entire volume of sample to elements of a Whole Blood GenPlate (10 µl per element). *The heat-treatment step is essential to ensure that DNA is adequately released and that nucleases are permanently inactivated. The incubation step may be performed at any time after saliva is collected and before it is purified. Any volume of sample may be heat-treated prior to GenPlate application. Any remaining sample not applied to GenPlates can be stored at room temperature or frozen (-15°C to -20°C). The sample may be incubated at 50°C overnight if it is more convenient. Refer to the instructions provided with the Oragene-DNA kit for further information. 15 GT20140402A Application of other crude biosamples For additional questions or information about applying biosamples to GenPlates which please contact GenTegra Technical Support at 1-925-461-3010, or [email protected] References -Visvikis S, et al. DNA extraction and stability for epidemiological studies. Clin Chem Lab Med. 1998. 36(8):551-5. -Madisen L, et al. ME. DNA banking: the effects of storage of blood and isolated DNA on the integrity of DNA. Am J Med Genet. 1987. 27(2):379-90. -Schunemann HJ, et al. Short-term storage of blood samples and DNA isolation in serum separator tubes for application in epidemiological studies and clinical research. Ann Epidemiol. 10:538 -544. -Ross KS, et al. Repeated freezing and thawing of peripheral blood and DNA in suspension: effects on DNA yield and integrity. J Med Genet. 1990. 27(9):569-70. -Farkas DH, et al. Specimen stability for DNA-based diagnostic testing. Diagn Mol Pathol. 1996. 5(4):2. -Adams M, et al. Rapid freezing of whole blood or buffy coat samples for polymerase chain reaction and cell culture analysis: application to detection of human immunodeficiency virus in blood donor and recipient repositories. The Transfusion Safety Study Group. Transfusion. 1993. 33(6):504-8. 16 GT20140402A GenPlate GVN24P(4) shown Available GenPlate formats GVNP-20 Single region, 384 element GenPlate; maximum number of samples or maximum amount of sample GVN3P-20 3 region, 96 element GenPlate GVN6P-20 6 region, 40 element GenPlate; well suited to DNA samples extracted from Buccal swabs GVN12P-20 12 region, 16 element GenPlate; well suited to DNA samples extracted from mouthwash collection GVN24P-20 24 region, 4 element GenPlate; most popular and commonly used format for human blood samples 17 GT20140402A Notes Page 18 GT20140402A Notes Page 19 GT20140402A