1
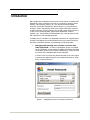
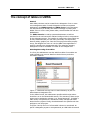
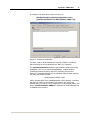
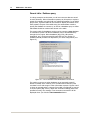
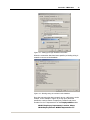
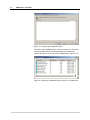
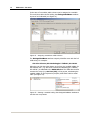
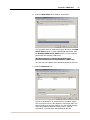
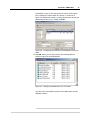
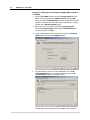
User Management Resource Administrator
UMRA tables
User Guide
ii
Contents
Copyright © 2005, Tools4Ever B.V. All rights reserved. No part of the contents of this user guide may
be reproduced or transmitted in any form or by any means without the written permission of
Tools4Ever.
DISCLAIMER - Tools4ever will not be held responsible for the outcome or consequences resulting
from your actions or usage of the informational material contained in this user guide. Responsibility
for the use of any and all information contained in this user guide is strictly and solely the
responsibility of that of the user.
All trademarks used are properties of their respective owners.
Table of Contents
Table of Contents
i
Introduction ...................................................................................................................... 3
The concept of tables in UMRA............................................................................................ 5
Special table type – Generic table Variable ......................................................................... 19
Processing user input ....................................................................................................... 23
Formatting tables............................................................................................................. 25
Using tables in UMRA – Forms & Delegation – Hands-on ..................................................... 26
Contacts.......................................................................................................................... 39
UMRA tables – User Guide
Introduction
Many employees nowadays have access to a wide variety of systems and
applications. Some examples are access to a company’s intranet, phone
systems, HR systemss, printers, etc. User accounts and associated
resources are usually maintained in Active Directory (or other directory
services). Larger organizations often have multiple information systems,
in which case user resource data are also stored outside Active Directory
(a SQL server holding HR data, phone book applications, location
systems, etc.). Using UMRA, an administrator can create projects to deal
with virtually any user management task.
In UMRA, the use of tables is an important instrument for supporting this
concept of managing users and associated resources in Active Directory
and other information systems, by facilitating the following tasks :
1. Managing and selecting user accounts, resources and
other input fields - In case of a delegation project, a list table
can be included in a form window to display and select fixed data
(a list table), Active Directory data (LDAP query), results of an NT
4 network call or database data. Some examples:
-
to select a user for whom the password needs to be reset. Figure
1 shows a form table listing the users obtained through an LDAP
query on Active Directory.
Figure 1 – Delegated project for resetting a password
4
UMRA tables – User Guide
-
to show a list of services or printers you wish to manage. A script
action can then be executed for the selected table entry (see
Figure 2) ;
Figure 2 – List of services as part of a delegation project to
manage services (e.g. stop, start, pause, resume services)
-
to select data from a database (e.g. a list of departments or a
table containing corporate telephone numbers)
Figure 3 – List of departments as a result of a database query
2. Manage the processing of tabular data (row by row) – this
method is used to run actions against each row of a table. It can
be used for instance, to query Active Directory for all the groups
of which a user is a member and to perform an action for each
group in the resulting table (e.g. setting a new group
membership and removing the existing one(s)).
3. Bulk data processing - Tables are also used to facilitate the
mass update of user data (e.g. mass creating Exchange
mailboxes or bulk create and edit users as part of a migration
project). In such mass projects, where a table is based on an
imported CSV file, script actions can be executed for each row in
a table (containing user resource objects, for instance). This
specific use of a table will not be discussed in this document.
The last chapter of this user guide contains several hands-on examples to
get familiar with the various table types. Each hands-on (marked with a
) will take approximately 30 minutes to
pointing finger symbol (
complete.
User Guide – UMRA tables
5
The concept of tables in UMRA
General
With UMRA, solutions can be created for the delegation of one or more
user management tasks. Forms & Delegation includes two separate
applications, the UMRA Console and UMRA Forms. In this document,
it is assumed that you already have basic knowledge of working with
UMRA. If this is not the case, please make yourself familiar first with the
UMRA basics.
The UMRA Console is used by systems administrator to build an
interface for the end user and to add and configure built-in script actions
for the delegation project. The interface is created using forms which can
be fully customized with your own titles, text fields, user input fields,
buttons, tables, graphics, etc. Once the form project has been properly
set up, the delegate user can run it in the UMRA Forms application to
perform a specific user management task. The underlying scripting
intelligence is neither accessible nor visible for the delegate user.
Selecting data using form tables
In a form, the administrator can also add form tables. Form tables are
used to display user resource data from Active Direcory and other
information systems.
Figure 4 – LDAP table showing users in Active Directory as part of a
Reset Password delegation form
In the UMRA Console, the administrator specifies which script actions
should be run on the selected table entries. The execution of these script
actions can be assigned to a button (e.g. “Reset Password”). In UMRA, a
wide variety of script actions is included to create, manage and delete
Active Directory objects. Finally, the administrator also specifies who has
priviliges to run the project.
In figures 5 and 6, the use of a form table is shown in more detail. As
part of a delegation project to reset passwords, an LDAP table is inserted
6
UMRA tables – User Guide
in the form window to retrieve all users in a specific organizational unit in
Active Directory using the query
(&(objectClass=user)(!(objectClass=computer)))
with a binding to LDAP://OU=<NameOU>, DC=MyDomain, DC=local.
Figure 5 – Defining an LDAP query for an LDAP table
This query retrieves all objects of the “user” object class in the OU
“<NameOU>”. Computer accounts are exempted from the results. In the
resulting form table (Figure 6), a user can be selected for whom the
password needs to be reset.
Figure 6 – Reset password delegation project. The result of the LDAP
query is displayed in the LDAP table (shown here with a red marquee)
User Guide – UMRA tables
In a project form, several table types are available which are shown in
the table below:
Table type
Subtyp
e
Description
Network table
Used to obtain the user accounts of an
OU, global group, domain or single
computer using an NT network call.
Fixed table
Used to display a list of fixed content in a
table (e.g. a list of department names).
Generic table
LDAP
Used to show the results of an LDAP
query in a table.
Generic table
Databas
e
Used to show the results of a database
query in a table.
Generic table
Variable
See section Special table type – Generic
table Variable for more information.
Network table
A network table is used for Windows NT 4 environments and can be of
one of the following network data types:
•
User accounts of an OU,
•
User accounts of a global group,
•
User accounts of a domain
•
User accounts of a single computer.
Specifying the network data type only determines the scope of the
network calls to be executed by UMRA and the columns that can be
shown for the corresponding network data table. To determine the data
that must be collected, you must specify the actual parameters or
arguments that are used to collect the network data. These are different
for each network data type (see the table below).
Network
table
type
Scope
Arguments
Columns
OU
User
accounts of
one or more
OUs
(including
child OUs)
<Domain>/<OU>/
<OU> or LDAP
name of the object.
Common name
Description
Username
Display name
Domain
OrganizationalUnit
Object
distinguished name
7
8
UMRA tables – User Guide
Network
table
type
Scope
Arguments
Columns
Global
group
User
accounts
that are a
member of
one or more
groups
<Domain>\<Global
Group> or
<DomainController
\<GlobalGroup>
Full name
User
accounts in
a domain
Domain name
(NETBIOS or DNS
format)
Domain
Description
Username
Global group
Domain
Full name
Description
Username
Domain
Single
computer
User
accounts
that are
maintained
on a
computer
(not
necessarily
a domain
controller).
Computer name
(NETBIOS or DNS
format)
Full name
Description
Username
Computer
Domain
Type
The columns can be assigned to a variable. When a delegate user selects
an entry in the resulting network table, the name of the variable and the
corresponding value will be passed to the UMRA service. See the section
Processing user input for more information.
Fixed table
The content of this table is either entered directly in UMRA or taken from
a flat text file. It is used to to present the end user with specific fixed
content in a form, such as a division, department, OU, domain etc. The
characteristics of a fixed table are that the information is not derived
from Active Directory, that it only contains 1 column and that it always
has the same contents.
Figure 7 – Simple fixed table (list of entries)
User Guide – UMRA tables
9
Generic table – LDAP query
This powerful generic table type allows you to query Active Directory and
show the results in a form table. To run a (complex) LDAP search, the
following information should be specified:
1. LDAP binding - the scope of the LDAP search;
2. LDAP filter - the objects you wish to filter on;
3. Attributes – the attributes you wish to retrieve for these
objects. These components will be individually discussed.
LDAP binding
Starting with Windows 2000, the LDAP provider is used to access Active
Directory. This binding method requires a binding string, which can be
defined in three different ways in UMRA:
Binding method
Description
Global Catalog
The global catalog is a searchable master index
containing directory data of all domains in a
forest. It contains an entry for every object in the
forest, but it does not include all properties of
each object. The Global Catalog is used to
improve the response time of LDAP searches. The
properties included in the Global Catalog are
generally useful for searches and are considered
static.
Active Directory
root
This option will bind to the Active Directory root
of a domain controller. The Active Directory
contains all the network information for the
forest. This binding method is suitable for
retrieving dynamic properties.
Manual
You can also enter a binding string yourself. This
binding string is the AdsPath of an object in
Active Directory, consisting of the LDAP provider
moniker (LDAP://) appended to the Distinguished
Name of the object. The Distinguished Name
specifies both the name and the location of an
object in the Active Directory hierarchy.
10
UMRA tables – User Guide
Figure 8 – LDAP binding options to bind to Active Directory
LDAP filter
An LDAP search filter can be defined as a clause specifying the conditions
that must be met by Active Directory objects. Only those objects
meeting the requirements are returned.
A condition takes the form of of a conditional statement, such as
"(cn=TestUser)". Each condition must be enclosed in parenthesis. In
general, a condition includes an attribute and a value, separated by an
operator.
Conditions can be combined using the following operators (note that the
operators "<" and ">" are not supported).
Operator
Description
=
Equal to
~=
Approximately equal to
<=
Less than or equal to
>=
Greater than or equal to
&
AND
|
OR
!
NOT
Conditions can also be nested using parenthesis. Furthermore, you can
use the "*" wildcard character in the search filter.
User Guide – UMRA tables
11
An example of an LDAP filter is shown in Figure 9:
(&(objectCategory=person)(objectClass=user)
(userAccountControl:1.2.840.113556.1.4.803:=2))
Figure 9 – Defining an LDAP filter
This filter, used to obtain disabled user objects, includes 3 conditions,
which should all be met (indicated by the AND (“&”) operator).
The userAccountControl attribute in this example needs some further
explanation. This is a so called bitmask attribute, a single attribute
containing numerous property values for controlling user account
behaviour. A bitmask attribute can be evaluated using an LDAP matching
rule using the following syntax:
attributename:ruleOID:=value
where attributename is the LDAPDisplayName of the attribute, ruleOID is
the object ID (OID) for the matching rule control, and value is the
decimal value you want to use for comparison. In the example above, the
string “1.2.840.113556.1.4.803=2” represents an LDAP matching rule
for disabled user accounts.
12
UMRA tables – User Guide
Attributes
Each object in Active Directory has a set of attributes, defined by and
depending on its type and class. Using the LDAP filter you have filtered
on some objects representing single entities (users, computers, printers,
applications, etc.) and their attributes. In the Attributes tab you can
define the LDAP display name for the attributes you wish to return for
the filtered objects. In the example shown in Figure 10, the attributes
Name, Description and sAMAccountName are specified as the
attributes to be returned.
Figure 10 – Specifying attributes to be returned for filtered objects
Attributes can either be selected from an extensive list of built-in
attributes, or entered by the user. For a full list of attributes, see
http://msdn.microsoft.com/library/default.asp?url=/library/enus/adschema/adschema/attributes_all.asp or check the MSDN library.
The final result of an LDAP search is displayed in a generic table (see
Figure 11). In the same way, you can retrieve user accounts in a specific
OU, show a list of groups, etc.
To process selected table entries, the column holding the attribute values
can be assigned to a variable and used as input for a script action. For
more information, see section Processing user input.
User Guide – UMRA tables
Figure 11 – Table as a result of an LDAP search on all disabled user
accounts in a domain
13
14
UMRA tables – User Guide
Generic table – Database query
In a large enterprise environment, not all user resource data are stored
in Active Directory. Other information systems, an HR system or a phone
system for example, may also hold user related information. In an UMRA
project form, a generic table can be inserted to display information from
these systems. As part of the table setup, the administrator needs to
specify the database to connect to, as well as a database query to define
which data should be retrieved and shown in the table.
The generic table for databases can be used to connect to any database
or information system. MS Access databases can be accessed directly
through the Jet engine. Other databases (SQL, ERP, HR systems,
PeopleSoft, etc.) can be accessed through OLE DB. The number of
available OLE DB providers will depend on your local configuration (see
Figure 12).
Figure 12 – List of available OLE DB database connections
The option to connect to other databases is an extremely powerful
feature in UMRA, since it allows you to combine Active Directory with
user data from a wide range of other information systems. Figures 9 and
10 show an example where a generic form table is configured to connect
to an HR system (SQL server). When the connection settings have been
specified correctly, the message “Test connection succeeded” will be
displayed when you click the Test Connection button.
User Guide – UMRA tables
15
Figure 13 - Setting up a SQL database connection
When the connection data have been specified, a binding string is
created to connect to the database.
Figure 14 – Binding string to connect to the database
Once the connection has been properly set up, a SQL query can be
created. In the example in Figure 15, a SQL query has been
specified to retrieve names of employees, locations and phone
numbers for the IT department from the EmployeePhone table:
SELECT Employee, Department, Location, Phone
FROM EmployeePhone WHERE Department=’IT’.
16
UMRA tables – User Guide
Figure 15 – Specifying the database query
The result of this database query is shown in Figure 16. The query
has returned the data in the columns Employee, Department,
Location and Phone for all rows where Department is equal to “IT”.
Figure 16 – Result of a database query is shown in an UMRA form
User Guide – UMRA tables
17
Formatting tables
In UMRA, the display of tables can be fully customized. The table lay-out
can be fully configured in the Configure form field window for tables
(Display tab).
-
Table alignment
-
Margins
-
Vertical offset
-
Fonts
-
Background colour
-
Etc.
18
UMRA tables – User Guide
Specifying columns
For each of the before mentioned generic tables you need to specify
which columns of the table you would like to display. This can be
configured in the Column tab of the Configure table window (see
figure below). In the same window, you can specify the sort order for the
selected column and assign a variable to the selected column..
For the generic table Variable you first need to specify the column
headers, which is discussed in Special table type – Generic table Variable.
User Guide – UMRA tables
19
Special table type – Generic table
Variable
Not all user relevant data can be captured using an LDAP or database
query. Table data are also generated by some specific script actions, in
which case the collected data are stored in a variable, instead of being
generated as part of a form table object. UMRA comes with several
built-in script actions producing table output, stored in a variable:
List services status – script action to manage services;
List printer documents – script action to manage printers and
printer queues;
Generate generic table – script action to generate a generic table
(LDAP query, database query or variable) and store the result in a
variable for further processing;
LDAP script actions to access other (non-Active Directory)
directory service like Novell eDirectory and Linux OpenLDAP;
Manage table data script action – script action for creating,
editing, and merging tables. See section Programmatically
creating and evaluating tables and the Help for more
information.
Projects making use of these script actions, usually consist of two parts.
The first project, or “auxiliary” project can be defined as the project in
which the project data are collected using one of the above mentioned
script actions. The result is stored in a variable. In the second project, or
“main” project, a table of the variable type can be inserted to show the
contents of this variable. Script actions can then be executed for selected
rows in the table (see the figure below).
Figure 17 – Concept of the generic table Variable
The practical use of this powerful concept is illustrated in Figure 18 and
16. Project A contains the script action “List services status”. The result
of this script action is
20
UMRA tables – User Guide
stored in table format in a variable called %ServicesTable%.
Figure 18 – Project A – Running a script action collecting data in table
format. The results are stored in a variable.
By defining project A as an initial project in project B, the script in project
A will be executed before the form of project B is displayed. The
variables in project A will be passed to project B. In project B (see Figure
15), a generic table of the variable type can now be inserted in the form
window to display content of the variable %ServicesTable%.
Figure 19 – Project B - The content of the variable is now displayed using
the generic table Variable
User Guide – UMRA tables
21
Specifying columns for table type Variable
The special table type Variable takes its input from a variable contaning
table data. This variable (which is the the result of script actions such as
Generate Generic table, List services status, Get User Table) does not
contain any header info. This means that you need to specify the correct
column names. For variables which are the result of one of the before
mentioned script actions, this is simply a matter of selecting the right
column template.
Script action
Variable
Use column template
Get user table
%UsersTable%
User info
List services status
%ServicesTable%
Services status (without
config info)
Services status (with
config info). If you
choose this template, 3
column names will be
added.
List printer
documents
%DocumentsTable%
Printer documents
List files and/or
directories
User defined
Files and or directories list
Once you have defined the column names as indicated above, you can
select the columns to be displayed and assign variables to columns using
the Columns tab. This is done in the same way as for the other generic
tables.
22
UMRA tables – User Guide
Generate Generic table –
Script
It is also possible to perform LDAP queries and database queries as part
of a script action and have the result stored as a variable. This is done
using the script action Generate generic table. The principle of
operation is identical to the one described above.
Programmatically creating and evaluating tables
Using the tables described in this document, you should be able to
manage table data for most user management tasks. There are situations
however, where these standard tables may not be sufficient:
•
You wish to evaluate an existing table programmatically and / or
create a new table from scratch ;
•
You need to combine data from the tables described earlier, with
data which are not contained in a table.
In such cases, you can use the For-Each and Manage table data script
actions to create your own tables.
User Guide – UMRA tables
23
Processing user input
When your form project includes a table from which the (Helpdesk) user
can make a selection, the selected data will have to be processed. To
understand how this works, we need to have a closer look at UMRA.
In the UMRA architecture, the form project as presented to the delegate
user in UMRA Form (client) has been separated from the actual script.
In other words, the UMRA project as shown on the client side does not
contain any scripting. The project script, developed by the administrator
in the UMRA Console, is part of the project maintained by the UMRA
Service. The script actions in this project script make use of variables.
As soon as a delegate user hits an action button in the project form on
the client side, the following data are submitted to the UMRA service:
•
the project form ID
•
the name of the variables and their corresponding values
•
the ID of the button which has been clicked
The UMRA Service then retrieves the project with the corresponding
project ID from the forms database and executes the script of the
project, substituting the variables in the script actions with the actual
values. This principle is shown in Figure 20.
UMRA Service
UMRA Forms (client)
ProjectID
Select User Account
%DN%
Retrieve project with ProjectID #
Check Button_Clicked
`
Specify domain
%Domain%
Execute script action (Get User %DN%)
EXECUTE
BUTTON
ButtonClicked
%Domain% = t4edoc
%DN% = CN=John Johnson, OU=Marketing, DC=t4edoc, DC=local
ProjectID
ButtonClicked
Figure 20 – Submitting variable values to the UMRA Service
24
UMRA tables – User Guide
In the case of form tables, table columns can be assigned to a variable.
This could be a table column holding the distinguishedName attribute
as part of an LDAP table (see Figure 21).
Figure 21 – Assigning variables to table columns
The distinguishedName attribute uniquely identifies users with the full
LDAP string. For example:
CN=John Johnson,OU=Marketing,DC=T4EDOC, DC=LOCAL
When the user hits the action button in the form, the variable %DN% for
the selected user ( e.g “CN=John Johnson,OU=Marketing,DC=T4EDOC,
DC=LOCAL”) is submitted to the UMRA Service. The UMRA Service then
executes the script (e.g. Get User (AD)) of the project, substituting the
variable %DN% in the script action property LDAP name with its actual
value (see Figure 22).
Figure 22 – Passing a variable holding the distinguishedName attribute to
the Get user script action
User Guide – UMRA tables
25
Formatting tables
In UMRA, the display of tables can be fully customized. The table lay-out
can be fully configured in the Configure form field window for tables
(Display tab).
-
Table alignment
-
Margins
-
Vertical offset
-
Fonts
-
Background colour
-
Etc.
26
UMRA tables – User Guide
Using tables in UMRA – Forms &
Delegation – Hands-on
Example 1 – Creating an LDAP table showing all disabled
users in a domain
The project created in this example can also be found in the directory
\Tools4ever\User Management Resource
Administrator\Example Projects\Forms\DisabledUsers.ufp.
LDAP table – Creating a table listing all disabled users in a
domain
1. Start the UMRA Console application and connect to the UMRA
Service: Select UMRA Service, Connect… and connect to the
computer on which the UMRA Service is installed.
2. Start the UMRA Console and create a new Forms project.
3. Right-click in the Forms window and choose the Add form field
command.
4. Select the Table option.
5. Select the Generic table option and click the Configure button.
6. Click the Configure button once more.
7. Select the option LDAP query under Table type. A dialog box
appears to configure your LDAP table.
8. Click the LDAP binding tab. In this window, the binding method
for the LDAP query is specified. You can either choose a default
binding to the Global Catalog or Active Directory root, or define
your own binding string. For this example, we want to perform
an LDAP search on all user objects in a domain, so we can select
the option Global Catalog. This is is a searchable master index
with data about all objects in the domain.
User Guide – UMRA tables
27
9. Click the LDAP Filter tab to define a search filter.
You can either enter an LDAP search query directly in the LDAP
search filter window or select a predefined search filter from
the Example LDAP search filters list box. For this example,
please enter the following LDAP query:
(&(objectCategory=person)(objectClass=user)
(userAccountControl:1.2.840.113556.1.4.803:=2)).
The next step is to specify which attributes should be returned.
10. Click the Attributes tab.
The list of attributes for an Active Directory is endless. Which
one you need to choose, also depends on the script action you
wish to perform on the user selection. For this simple example,
select the predefined attribute setting “Users – general
information”. This will return the cn attribute and the
28
UMRA tables – User Guide
description attribute. Click the Set button when you are done.
The LDAP query is now ready to be tested.
11. Click the Run test tab.
Click the Test button. The result of your LDAP query will appear
in the Table data section. Click OK three times to return to the
Forms window.
12. Right-click in the form window and choose the Toggle auto
preview command to preview your table. The result should be
similar to the figure shown below (the user names in your
network will of course be different).
You have now created an LDAP table which returns all the disabled users
in a domain. Script actions can now be added to your project specifying
what action needs to be performed on the selected data.
User Guide – UMRA tables
29
Example 2 – Creating a form table to connect to a database
As part of a delegation project, you want to show a delegate user a table
containing the phone numbers of employees in the IT department. These
data are available in the database EmployeePhoneNrs.mdb. In the
example below we will show you how a table can be created in UMRA to
display these data.
The project created in this section can also be found in the directory
\Tools4ever\User Management Resource
Administrator\Example Projects\Forms\GetPhoneNumbers.ufp.
LDAP table – Linking UMRA to an MS-Access database
containing phone numbers for all employees, listed by
department
The MS Access database we need to link to, contains one table which is
called EmployeePhone. This table holds the columns ID, PersNr,
Employee, Department, Manager, Location, FirstName and
Phone:
The link to the MS Access database is established through the Jet Engine,
so there is no need to have MSAccess installed. In case you wish to
explore the database yourself, you will find it in \Tools4ever\User
Management Resource Administrator\Example
Projects\Forms\EmployeePhoneNrs.mdb.
1. Start the UMRA Console application and connect to the UMRA
Service: Select UMRA Service, Connect… and connect to the
computer on which the UMRA Service is installed.
2. Create a new Forms project.
3. Right-click in the Forms window and choose the Add form field
command.
4. Select the Table option.
5. Select the Generic table option and click the Configure button.
6. Click the Configure button once more.
30
UMRA tables – User Guide
7. Select the option Database query under Table type. A dialog
box appears in which you can configure your database table. The
following step is to define the database type and name.
8. Click the Database tab. The following dialog box will appear:
9. Click the Configure button to specify the database you wish to
use. Select the option MS Access (Jet) database from the
Database type list.
User Guide – UMRA tables
31
Note - linking to a database is not limited to an MS Access
database. You can connect to any database for which a OLE DB
provider is available. If your database is not included in the
standard OLE DB list of OLE DB providers, please check with
your database provider.
10. Click the MS-Access (Jet) tab and browse to the file
EmployeePhoneNrs.mdb. Click the Open button.
11. Click OK to return to the database setup window. We have now
specified which database needs to be used. In order to specify
which data we want to retrieve from the database, a database
query must be specified. Click the Query tab. The following
dialog box will appear:
32
UMRA tables – User Guide
12. Enter the following query:
SELECT Employee, Location, Phone FROM
EmployeePhone WHERE Departments=”IT”
13. This query will return all records in the columns Employee,
Location and Phone of the EmployeePhone table (the table
name you obtained in step 2) where the column Department is
“IT”.
14. Click the Run test tab and click the Test button. The following
data should appear:
In the Columns tab, the displayed columns can be changed.
16. Click the Columns tab.
This window is used to configure which columns must be shown
in the form. Here you also specify the variables that are passed
to the UMRA Service when the end-user selects a table entry and
presses a submit button. On the left side, the Available
columns are shown. When the Run test was performed
User Guide – UMRA tables
33
successfully in step 13, the actual column names will be shown
here. Change the column width for column 1-3 as shown in
Figure 23. Exclude the columns 4-10 by selecting the column and
clicking the left arrow (Å). Finally, click OK.
Figure 23 – Configuring the columns to be displayed in the form
table
17. Click OK. When you run the preview, the resulting table as
shown in Figure 24 will be displayed.
Figure 24 – Displaying database data in a form table
You have now succcessfully created a form table object to hold
database content.
34
UMRA tables – User Guide
Excercise 3 – Creating a variable with table data and
showing the content in a form table
In this excercise, the project Collect Services is created which collects
the services information of a specific computer. These data can
subsequently be shown in another project defining how to manage these
services. Assigning script actions to the table data in the second project
falls outside the scope of this exercise, but is described in detail in the
document “UMRA Example projects: Service Management”.
The project created in this example can also be found in the directory
\Tools4ever\User Management Resource
Administrator\Example Projects\Forms\CollectServices.ufp and
ShowServices.ufp.
Creating project A – Collecting services
1. Start the UMRA Console application and connect to the UMRA
Service: Select UMRA Service, Connect… and connect to the
computer on which the UMRA Service is installed.
2. Choose FileÆNew. Select the option Form project and click
OK. Enter the name of the project, Collect Services, and click
OK.
First we will set up the action that creates and initializes the
variable holding the name of the computer of which we want to
manage the services.
3. Drag the Set variable script action into the script action window
and configure this script action as shown in Figure 25. In this
example, the name of the computer is “SERVER_A”.
Figure 25 – Defining the variable for the computer name
Next, we need to collect the service status information for the
User Guide – UMRA tables
35
computer “SERVER_A”.
4. In the Actions bar, drag the script action List services status
from the Services folder to the script section window. Specify
the properties for this script action as shown in Figure 26.
Figure 26 – Configuring the properties for the List services status
script action
The UMRA software will connect to the computer specified by
%ComputerName% and collect the status of all services. The
status information includes the name of the service, the
operational state of each service (running, stopped), type of
service (automatic, manual, disabled) and so on. This
information is stored as a table in the variable
%ServicesTable%. In other words, this single variable will
hold a table with multiple rows and columns. The content of this
variable can be displayed as a form table in another project for
managing the collected services.
Finally, the security settings for the project Collect Services
must be specified.
5. Choose the Form properties command from the Actions menu
and click the Security tab. For this exercise, you can set the
group to “Everyone”.
6. Save the project and close the project window
In the second project, a form table will be set up to display the
content of the variable %ServicesTable%.
36
UMRA tables – User Guide
Project B – Inserting a form table to display table content in
a variable
1. Choose FileÆNew. Select the option Form project and click
OK. Enter the project name, Show Services, and click OK.
Next, the project CollectServices must be specified as an initial
project to ensure that the variable %ServicesTable% is properly
passed to the Show Services project.
2. Right-click the Form window and select Form properties….
Select the Initial project tab and select CollectServices as
the initial project. Click OK.
3. Insert a table object in the Forms window. Select the Generic
table option and click the Configure button.
4.
The table data we wish to use are contained in the variable
%ServicesTable%, so we need to select the generic table
type Variable as shown in the figure below.
For this table type, the name of the variable and the columns
User Guide – UMRA tables
37
contained in this variable need to be specified in the Variable
generic table tab.
5.
Enter %ServicesTable% in the Variable name list.
Specifying the column names is necessary because a table
variable only holds the data of the table, not the column names.
Built-in column templates are available for this purpose.
6.
Select the column template Services status (with config info)
in the Columns section and click the Set columns button. This
will include the column names “Computer”, “Internal name”,
“Name”, “Service”, “Status (text)”, “Status (code)”, “Process ID”,
“Svc type (text)”, “Svc type (code)”, “Interactive”, “Startup-type
(text)”, “Startup-type (code)”, “Binary file” and “Logon as”|. See
the Help for more detailed information regarding these status
fields. Finally, click OK.
If you wish to make changes to the displayed columns, you can
do so in the Columns tab.
7.
Click the Columns tab.
38
UMRA tables – User Guide
This window is used to configure which columns must be shown
in the form. Here you also specify the variables that are passed
to the UMRA Service when the end-user selects a service and
presses a submit button. On the left hand side, the available
columns are shown. These columns correspond with the columns
configured in the previous step.
By using the add (->) and remove (<-) buttons you can set up
and modify a column configuration. In the example shown, the
form will have a table with 3 columns. The third column
(Internal name) will not be visible since it has a width of 0%.
This column is included since it uniquely specifies the name of
the service, but there is no need to display it for the end user.
When the user selects a service and presses a button, the value
of this column is stored in variable %ServiceName%. This
variable is passed to the UMRA Service and used for further
processing.
18. Click OK. When you run the preview, the resulting table as
shown in the figure below.
User Guide – UMRA tables
39
Contacts
If you have any comments regarding the content of this tables guide,
please contact [email protected].
You can also visit our Tools4Ever website for more information about our
products:
http://www.tools4ever.com/ (http://www.tools4ever.com/)
http://forum.tools4ever.com/ (http://forum.tools4ever.com/)
40
UMRA tables – User Guide
Filename:
Tables UG_v5.doc
Directory:
V:\Documentation\UMRA\Manuals\UMRA - Tables
Introduction\Doc
Template:
C:\Program Files\AuthorIT
V4\Data\Templates\Word Templates\AuthorIT.dot
Title:
resetpasswordV7draft18May2005
Subject:
User's Guide
Author:
E. van Wezel
Keywords:
Comments:
Copyright © 1996-2002 AuthorIT Software
Corporation Ltd., all rights reserved.
Creation Date: 11/28/2005 10:47:00 AM
Change Number: 221
Last Saved On: 1/12/2006 1:29:00 PM
Last Saved By: E. van Wezel
Total Editing Time:
3,392 Minutes
Last Printed On: 1/12/2006 1:30:00 PM
As of Last Complete Printing
Number of Pages:
42
Number of Words:
6,229 (approx.)
Number of Characters:
31,519 (approx.)