1
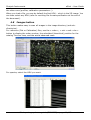
echelle spectrograph
User Guide
August 2009
F. Cochard / O. Thizy
Shelyak Instruments
Les Roussets
38420 Revel / France
Tél.: (33)4.76.41.36.81
http://www.shelyak.com
Email: [email protected]
Shelyak Instruments
eShel – User Guide
Versions history
Version
Date
1.0
March 11, 2008
2.0
August 9, 2009
Author
Comment
F. Cochard First version
O. Thizy
O. Thizy
Second version, english screen shots
eShel spectrograph user guide (DC0009B) – page 2 / 15
Shelyak Instruments
eShel – User Guide
Table des matières
1
2
3
4
5
6
7
8
Introduction.............................................................................................. 4
Description of eShel solution........................................................................4
Observation session....................................................................................7
Software presentation.................................................................................7
4.1 First contact........................................................................................ 8
4.2 Software organisation........................................................................... 8
4.3 Session button.....................................................................................9
4.4 Acquisition parameters..........................................................................9
4.5 Spectra processing button................................................................... 10
4.6 Instrument parameters button............................................................. 10
4.7 Spectra profiles button........................................................................10
4.8 Images button................................................................................... 11
Before starting observations...................................................................... 12
Observations........................................................................................... 13
At the end of the night.............................................................................. 13
Annexes: some useful Tcl/Tk scripts........................................................... 13
8.1 Apply a mirror in all FITS file in directory............................................... 13
8.2 Extract spectral domain.......................................................................14
eShel spectrograph user guide (DC0009B) – page 3 / 15
Shelyak Instruments
1
eShel – User Guide
Introduction
Eshel spectrograph is a complete solution for astronomy spectrography. Beside the
echelle spectrograph itself, it includes the Fiber Injection and Guider Unit, a remote
controled calibration unit, optical fibres, and a dedicated software.
The intend of this document is to help observers to prepare their observations. We
assume the instrument is tuned and ready for observations. If this is not the case,
refer to the « Installation and Maintenance Manual ». We also consider that you
have some basics in spectrography...
Proper usage of the instrument requires a good understanding of its principle, and
its image processing method. It is designed to automatically process the images :
when you launch an acquisition, you get a fully calibrated spectrum – not only
images (even if, of course, all raw images are carefully archived).
We present the instrument in a first step, and then the software.
2
Description of eShel solution
A spectrograph is an instrument which spreads out the light to analize its source.
The key component is a diffraction grating – a block of glass on which a high
number of lines per mm are engraved. Some optics components are used to
focused the resulting image on the sensor – in our case a CCD camera.
An Echelle spectrograph is a little bit more complex, but the basics is the same. The
grating is used at high orders (typically 32 to 52). The result is a high dispersion
spectrum, in which a lot of orders are mixed. We use a second disperser (so called
cross disperer) to separate the orders. Of course the instrument is designed in
order to have a little overlap between orders, then we can rebuid the complete
spectrum. The advantage is obvious : we get high resolution in the same time as
high bandwidth.
The result in the image is that you can see dozens of horizontal (and curved) lines
in your image :
eShel spectrograph user guide (DC0009B) – page 4 / 15
Shelyak Instruments
eShel – User Guide
You can read the spectrum like a book – but starting by the bottom line : low
wavelengths (blue part of the spectrum) is the bottom line. You should start to read
from bottom line (from left to right), and then the above, and so on. The extraction
of the spectrum – which consist to transform the 2D image in a line profile
calibrated in wavelength – requires to detect where are exactly each order, and
each wavelength in each order. In order to have accurate measures, we'll use white
light (which makes a continuous spectrum) and then calibration lamp (ie Thorium)
to find these informations.
These lights are send to the spectrograph through the fibre injection and guiding
unit and brought there from the calibration unit by a calibration optical fibre. A
cable brings power to a small activator which will insert a miror in front of the
object fibre to insert the calibration light in.
The specificity of astronomy spectrograhy is that we have a very low level of light.
This means that we constantly need to take care of the light collection and
transportation – to get the best S/N ratio possible.
Eshel spectrograph is fiber optics feeded. This means that the star light collected by
the telescope is transported towards the spectrograph through a fiber optics. This
have several advantages :
–
The spectrograph is in a quiet place, with no movement : The spectrum image is
always at the same position in the image (this is why automated image
processing is possible).
–
The light collection and the light analysis are totally split : it's easier to manage.
The light collection is made through the Fiber Injection and Guiding unit. This
device have a guiding camera, which look at fiber entrance : you can control
permanently (even automatically) that star light enter in the fiber. Never forget :
the better the light collection is made with Fiber Injection and Guiding unit, the
better the SNR will be !
Eshel solution is able to work automatically : White and calibration lamps can be
activated remotely. When they are switched on, a small mirror is moved in the FIG
to send reference light towards the spectrgraph (it's key that this light goes exactly
the same way as the star light).
eShel spectrograph user guide (DC0009B) – page 5 / 15
Shelyak Instruments
eShel – User Guide
All the elements described above are linked together like this :
1. Telescope mounting (T-mount, 45mm backfocus), here a Schmidt-Cassegrain
f/6.3 focal reducer and a Variable T-adapter to mount the Fiber Injection &
Guiding unit
2. Object optical fibre, 50µm diameter
3. Guiding video camera, connected to the telescope control PC (can be the
same as the acquisition). Autoguiding software control the telescope to
ensure the star light goes into the optical fibre
4. Calibration optical fibre, 200µm diameter
5. Cable to activate the mirror inside the Fibre Injection & Guiding unit
6. Cable to control telescope (not included in eShel solution)
7. USB Interface for the CCD camera controled by the eShel software
8. Serial connection to the Calibration unit
eShel spectrograph user guide (DC0009B) – page 6 / 15
Shelyak Instruments
3
eShel – User Guide
Observation session
When you start an observation session, you have to do following tasks :
–
Switch on all the elements (telescope, spectrograph, calibration module),
–
Run the eShel software and connect camera & calibration module,
–
Define your session parameters (ie: set up new directory),
–
Check focus of the spectrograph (see below),
–
Start a reference sequence acquisition (Bias + Dark, Flat + ThAr),
–
Point the telescope to your first target,
–
Start star spectrum acquisition,
–
Do the same for all your targets,
–
At the end of the night, launch a new reference sequence – to prevent any
change in the spectrum position.
The image processing can be made automatically, but it can also be done manually.
When you choose automatic processing, it is highly recommended to respect the
above order of acquisition : this way, images will be processed in real time.
For high accuracy radial velocity, you may prefere to take a Thorium-Argon
calibration frame before and after each target acquisition. Processing will then be
less automatised but it has been a proven solution.
4
Software presentation
Eshel software is a key element of eShel solution. Of course, you can use
alternative software for acquisition and/or processing. But we've put all our
experience in this software : our goal is that you focus on your observations, when
the software takes care of all technical staff. Of course, we don't want image
processing to be a black box, and we let you the full control of your observations.
Eshel software should be considered as a module of Audela – a general purpose
software for Astronomy. Audela and eShel softwares are Open Source, written in
TCL/TK language. In this document, we clearly focus on eShel software. But if you
need to get general information about Audela, please refer to its documentation :
http://www.audela.org
Of course, you can duplicate eShel software as much as you want.
Audela is based on many tools, like acquisition, image processing, focusing,
guiding, specific application (King method, supernovae detection...) and so on.
Eshel is one of these tool. You can setup the software to make it start by default
with eShel tool (click on Tools menu, select « tools selection », and select F2 in
front of « eShel »).
You can also select your language: french or english are currently supported for
eShel spectrograph user guide (DC0009B) – page 7 / 15
Shelyak Instruments
eShel – User Guide
eShel module.
eShel software works with FITS files. Specific keywords are setup in the files
headers, that are used for the processing. Resulting files are multi-HDU FITS files :
they contain 2D images, each order profiles, merged profile, order geometry and
calibration coefficients, and so on. The files structure is detailed at the end of this
document. If you want to process images that have not been taken through eShel
software, you may fill the specific keywords manually (there are some helpful tools
to do it).
4.1
First contact
When running eShel software, you are in front of this window :
The blue window is the main one, where images are visualized. On top, you have
general Audela functions. On bottom part, you have dynamic informations about
the image (linked to the cursor movement).
On the left, you have the eShel tool – the one that we describe now.
4.2
Software organisation
Eshel software is mainly made of two parts : Acquisition, and Processing. It uses
several sub-directories, that are automatically created when you select your images
directory (in session menu).
All newly acquired images are stored in the « Raw » sub-directory.
The processing (automatic or manual) identifies series of images, and detect the
type of image (offset, dark, flat, thar, object – defined in « IMAGETYP » keyword).
Based on the available files, it decides which processes are required, and launch
them. Depending on the images, the result will be put in specfic sub-directory :
–
« reference » for processed dark, flat, offset, thar.
eShel spectrograph user guide (DC0009B) – page 8 / 15
Shelyak Instruments
–
eShel – User Guide
« processed » for resulting spectra.
After image processing, the raw images are transferred to the « archive » subdirectory. A key point in eShel software : we never modify a raw image ! This is
very important to keep raw data intact, to allow later processing, with new tools
and/or new parameters.
Even if you have processed the images automatically, you always can re-run the
processing, simply by copying the archived images to « raw » directory.
Now, let's look at each button of the eShel tool.
4.3
Session button
This button should be used once per observation session. When you click it, the
session window appears. You can select observers names, observation site, and
image directory.
If needed, you can create a new site form.
Observers and site data will be copied in the files headers – then, it's important that
they are updated every day.
You may want to recover Bias and Dark master frame from previous session if you
run the camera at the same temperature; this will save some obsering time. Simply
copy the two files from previous reference sub-directory to the new one and the
program will take this into account assuming you do not change anything in the
equipment configuration.
4.4
Acquisition parameters
You can select the type of image to acquire. If you choose « One image », only one
image will be taken – and not recorded (if you want to record it, go to file/save
menu). This option is commonly used to chek that image is what you expect –
before launching a long serie. We also use it to determine the optimal exposure
time. For other options (object, dark, flat...), you can can define a number of
exposures.
The only difference between these options are :
–
The proper keyword (object, dark, flat, calib...) is setup in the image header,
–
If required, the lamp (flat or calibration) is switched on and the calibration
mirror is moved in the Fiber Injection & Guiding unit,
–
For the darks, the shutter is kept closed,
–
For the objects, the object name is required.
Of course, the acquisition is launched by clicking « Go Acq » button. You can see
the reminding duration during the exposure.
When a serie is launched (= if exposure number is greater than 1), all files of the
serie will be tagged in the header.
eShel spectrograph user guide (DC0009B) – page 9 / 15
Shelyak Instruments
4.5
eShel – User Guide
Spectra processing button
At this location, you can choose to make the processing automatically or manually.
It will be strictly equivalent at the end of the day. When « auto » option is selected,
a processing step is launched after each serie acquisition. When clicking on
« spectra processing » button, the following window will appear :
They are two buttons :
–
First generates the list of processing tasks, based on available files in the
« raw » sub-directory. Concretely, the software scans the sub-directory,
identifes consistent series of images, and if required reference data are
available, define the task to do (see below).
–
Second executes the processing defined in previous step, and moves the images
to proper sub-directories.
The software will optimize the processing and look for the Dark/Bias master frame
which have been taken the closest to the target to process for exemple (in terms of
exposure time and/or date/time).
4.6
Instrument parameters button
This button allows to change some parameters of the spectrograph. This must be
done by a qualified person. If you need to change (or at least check) one of this
parameter, please refer to « Installation and Maintenance Manual ».
4.7
Spectra profiles button
This button is used each time you want to read the resulting files. This is an
advanced tool, which can read all the HDU included of the resulting FITS files. If
you read the resulting file with the « file/open » menu in the main window (or with
any basic FITS viewer), you'll see the 2D image (which is the first HDU), but not
eShel spectrograph user guide (DC0009B) – page 10 / 15
Shelyak Instruments
eShel – User Guide
the other ones (profiles, calibration parameters...).
When you load a file, you see by default the first HDU – which is the 2D image. You
can then select any HDU (refer to resulting file format specification at the end of
the document).
4.8
Images button
This button makes easy to scan all images in the image directory (and subdirectories).
For reference (Flat or Calibration) files, use the « order », « calc » and « obs »
button to display the order number, the calculated (theoritical) position for the
catalog Thorium lines, and the actual observed ones:
For spectra, select the HDU you want:
eShel spectrograph user guide (DC0009B) – page 11 / 15
Shelyak Instruments
eShel – User Guide
We have used the following convention for the intermediate steps:
P_1A: extracted profile without wavelength calibration
P_1B: extracted and wavelength calibrated profile
P_1C: extracted, wavelength calibrated and instrumental response corrected profile
_32, _33... _50, _51...: order number
_FULL: merged spectrum
Depending on your application, you may want to use one or the other HDU.
« P_1C_FULL » will work for overall spectrum work but you may notice some
difficulties due to the echelle technology to properly merge all orders and some
specific line profile work would be better using the individual « P_1C_ » orders.
Tip: in the Visu window, double click at the right of the horizontal bar above the
filenames for automatic column width.
Tip: on spectral profile, zoom by using the right click; left click to unzoom.
5
Before starting observations
Here is a quick checklist of things to do before starting an observation:
●
switch on CCD camera, setup the camera in the software to connect it and
start cooling it;
●
switch on calibration unit and take a Thorium preview to make sure the
connection works. Advanced users can also go into the « instrument setup »
menu. Select the proper COM port (check on your windows device manager
to find which one is allocated) and click on ON buttons to test it;
●
check CCD camera focus by taking a Thorium preview. Installer may want to
provide a typical FWHM for a specific line as a check for end-user to perform
before the night. Or define a typical power of resolution which are displayed
after taking and processing a Thorium calibration serie;
●
once camera is cooled, you can start taking reference files, typically a series
of Flat and Calibration files.
Note: reference batch are created in the « instrument setup » panel. This is
normally done by the installer but user may have a need to modify/add them.
They will then appear on the drop list in the acquisition section. Typical users
create a serie for Thorium, one for Flat, one for Bias & Dark together. This
gives flexibility to end users.
●
switch on the flat lamp and the calibration mirror and reduce the guiding
camera exposure so you can see the optical fibre hole. Check it's in proper
focus and save its position. This can be done during the night if the user
« loose » the optical fibre position (note: if the fiber tip moves around in the
eShel spectrograph user guide (DC0009B) – page 12 / 15
Shelyak Instruments
eShel – User Guide
guiding image, this is an indication the guiding camera is not firmly mounted
on the Fibre Injection & Guiding unit);
●
6
Select processing in « auto » mode or not depending on your choice
Observations
Here is a quick checklist of things to do during an observation:
7
●
point a star with telescope and focus the telescope using the guiding camera
image;
●
if available, start the autoguiding (note: a autoguiding module is available in
latest eShel version);
●
type in the name of the object
●
do an « object preview » of typically 10sec to check your star and determine
the maximal exposure. Try to stay below 40000 counts on your spectra but
this depends on your camera (AntiBlooming or not for exemple). Check the
level by drawing a square on the spectrum and right-click to select the
« statistics » function – you can keep the window the same during all night;
●
Select the individual exposure time and the number of exposure; eventually
select to repaat the acquisition multiple time;
●
At the end of each serie acquired, your spectra will be processed if you are in
« auto » mode and you can see the result in the console as well as the
« processed » subdirectory (use the Visu « Images » module to visualize the
processed spectra). You can lunch the processing window if you are not in
« auto » mode and manually request a processing when you want;
At the end of the night
Remember to switch off CCD camera, guiding camera, and the calibration module.
It is recommanded to backup your data but leave in the « references » master files
as they can be of use for the next user.
8
Annexes: some useful Tcl/Tk scripts
Here are some example of Tcl/Tk scripts we find useful. Look at Tcl/Tk general
litterature and AudeLA documentation for general knowledge on this language.
8.1
Apply a mirror in all FITS file in directory
Imaging you have acquire spectra but they are not well oriented. You may want to
do a mirror on all those file. Here is a Tcl/Tk script file you can use to perform this
in the current directory (be careful, this current directory may different from your
session directory; set it up in the « setup » general menu).
Be careful as the script doesn't rename the output files!
eShel spectrograph user guide (DC0009B) – page 13 / 15
Shelyak Instruments
eShel – User Guide
global audace
::console::affiche_resultat "Traitement du répertoire: "
::console::affiche_resultat $audace(rep_images)
::console::affiche_resultat "\n"
### select all FITS file in current AudeLA directory :
set liste_fichier [glob -dir $audace(rep_images) -tails *.fit]
set nbre_fichier [llength $liste_fichier]
if {$nbre_fichier > 0} {
for {set i 0} {$i<$nbre_fichier} {incr i} {
set nom_fichier [string tolower [lindex $liste_fichier $i]]
loadima $nom_fichier
### mirror both ways, you can change the way you need it to be :
mirrorx
mirrory
saveima $nom_fichier
::console::affiche_resultat $nom_fichier
::console::affiche_resultat "\n"
}
} else
{ ::console::affiche_resultat "pas de fichier / no file to process.\n"}
8.2
Extract spectral domain
This script has been used to process a serie of spectra of a pulsating star. Each
spectra have been processed and merged profiles have been exported in our eShel
software into a single FITS profiles. Outcome is a serie of text files with continuum
rescaled to 1.0.
global audace
::console::affiche_resultat "Processing directory : "
::console::affiche_resultat $audace(rep_images)
::console::affiche_resultat "\n"
### select all FITS file in current AudeLA directory :
set liste_fichier [glob -dir $audace(rep_images) -tails *.fit]
set prefix_fichier "x"
set nbre_fichier [llength $liste_fichier]
eShel spectrograph user guide (DC0009B) – page 14 / 15
Shelyak Instruments
eShel – User Guide
if {$nbre_fichier > 0} {
for {set i 0} {$i<$nbre_fichier} {incr i} {
set nom_fichier [file rootname [string tolower [lindex $liste_fichier $i]]]
### define continuum value to set all spectra to continuum=1 around H-beta area :
set continuum_value [spc_icontinuum $nom_fichier 4970 4990]
### Crop spectrum :
spc_select $nom_fichier 4775 5090
### rescale spectrum so continuum is equal to 1.0 :
loadima "${nom_fichier}_sel"
mult [expr 1/$continuum_value]
saveima "${nom_fichier}_sel"
### Convert FITS file into a text file (DAT format) :
spc_fits2dat "${nom_fichier}_sel"
}
} else
{ ::console::affiche_resultat "pas de fichier / no file to process.\n"}
*** End Of document ***
eShel spectrograph user guide (DC0009B) – page 15 / 15