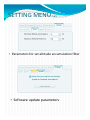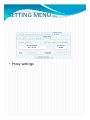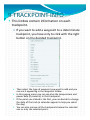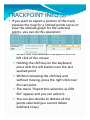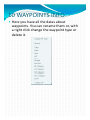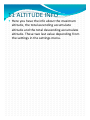
1
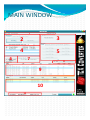
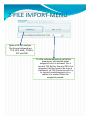
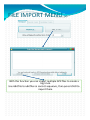
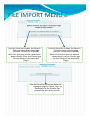
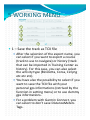
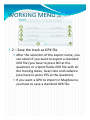
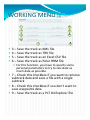
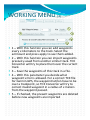
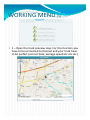
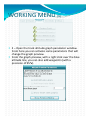
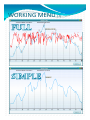
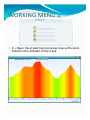
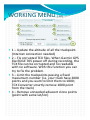
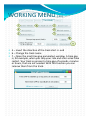
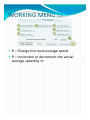
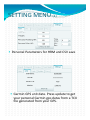
QUICK USER MANUAL MAIN WINDOW 1 2 3 4 5 6 7 8 9 10 11 1 TOP MENUBAR File Exit Button Help What’s New All the features the features added and bugs and bugs corrected About Information about the software Revision data and info data and info 2 FILE IMPORT MENU Open a file for Open a file for analyze. analyze The format allowed are TCX, GPX, KML, FITLOG, PLT and TRK If a file include waypoints, with a file include waypoints with this parameter you decide what waypoint error is allowed. For a correct TCX file for Garmin GPS, the waypoint lat/lon have to be over a trackpoint, so TCX Converter will try to correct invalid waypoint yp in a radius of x meters from the waypoint passed. FILE IMPORT MENU (2) With this function you can import multiple GPX files to create a big track. Use Add file to file to add files in correct in correct sequence, than sequence, than press LOAD to press LOAD to import them. FILE IMPORT MENU (3) Use this function to open the Garmin Communicator download page (internet connection required). Whit this function you can download datas directly from you Garmin gps via the Garmin Communicator Pl i Plugin. Use this function to open the Garmin Communicator upload page (internet connection required). Whit this function you can upload datas directly to you Garmin gps via the Garmin Communicator Pl i Plugin. Use this function to import datas via GpsBabel engine. Please, refer engine. Please, refer to GpsBabel site for Garmin Gps compatible with this function. 3 FILE DATA This window contain information about the name of the file. 4 COURSES LIST In this list‐box you can see the list of courses contained into the file loaded. If you load a file with only one track (GPX, TCX, TRK, KML, FITLOG) this list is only for information, with the total distance and time of the ride. For TCX files, once you have loaded the file you have h t select to l t from f thi list this li t what h t track t k you whant to load. This is because in TCX file can be stored more than one track. 5 WORKING MENU 1 4 2 5 3 6 9 7 8 1 – Save the track as TCX file After the selection of the export name, you can select if you want to export a course (track to use to navigate) or history (track that can be imported in Training Center as history). For this case, you can also select yp ((Bicicletta, Corsa, Ciclyng , , y g the activityy type etc etc etc). You have also the possibility to select if you want to save the TCX file with your personal gps informations (retrived by the personal gps the function in setting menu) or to use dummy gps informations. For a problem p with Garmin Connect, you ,y can select to don’t save DistanceMeters Tags. WORKING MENU (2) 1 4 2 5 3 6 9 7 8 2 – Save the track as GPX file After the selection of the export name, you can select if you want to export a standard can select export a standard GPX file (you have to press NO at the question) or a SportTracks GPX file with all the training datas, heart rate and cadence (you have to press YES at the question). If you want a GPX to import in MapSource, you have to save a standard GPX file. WORKING MENU (3) 1 4 2 5 3 6 9 7 8 3 – Save the track as KML file 4 – Save the track as TRK file 5 – Save the track as an Excel CSV file 6 – Save the track as Polar HRM file For this function, you have to specify some personal parameters to try to calculate as much data as possible. 7 – Check this checkbox if you want to remove subtrack data and save a file with a single subtrack 8 – Check this checkbox if you don’t want to save waypoints data 9 – Save the track as a PLT OziExplorer file WORKING MENU (4) 1 2 3 4 5 1 – With this function you can add waypoints every x kilometers to the track. Select the ammount and press apply to see them added. 2 – With this function yyou can import waypoints p yp previusly saved from another similar track. TCX Converter will try to place them over the current track. 3 – Save the waypoints of this track in a file. 4 – With this parameter you decide what waypoint error is allowed. For a correct TCX file for Garmin GPS, the waypoint lat/lon have to be over a trackpoint, so TCX Converter will try to correct invalid waypoint in a radius of x meters correct invalid waypoint in a radius of x meters from the waypoint passed. 5 – If checked, the present waypoints are deleted before new waypoints are imported WORKING MENU (5) 1 2 3 4 1 – Open the track preview map. For this function you have to be connected to internet and your track have to be perfect (correct date, average speed etc etc etc) WORKING MENU (6) 1 2 3 4 2 – Open the track altitude graph parameter window. From here you can activate some parameters that will change the graph preview. From the graph preview, with a right click over the blue altitude ltit d line, you li can also l add dd waypoints i t (with ( ith a precision of 95%). WORKING MENU (7) WORKING MENU (8) 1 2 3 4 3 – Open the styled track preview map with colors linked to the altitude of the track. WORKING MENU (9) 1 2 3 4 4 – Open the pendence histogram of the track. Here you can see if the track is hard or not WORKING MENU (10) 1 4 5 2 6 3 7 8 9 1 – Update the altitude of all the trackpoint. (Internet connection needed) 2 – Fix corrupted TCX files. When Garmin GPS like EDGE 705 power off during recording, the TCX file can be corrupted and no readable with no software. With this function you can try to fix the problem. 3 – Limit the trackpoints passing a fixed maxiumum number (i.e. your track have 2000 points and you want to limit them to 1000; TCX Converter smartly remove 1000 point f from th t k) the track) 4 – Remove unneeded adiacent clone points (point with same lat/lon) WORKING MENU (11) 1 4 5 2 6 3 7 8 9 5 – Invert the direction of the track start <> end 6 – Change the track name 7 – Open the mod time gap parameters window. A time gap is, for , example, when p , yyou stop your py ride and after some time restart. Your track so present a time gap of seconds, minutes or hours, that are not needed. With this function you can remove them from the track. WORKING MENU (12) 1 4 5 2 6 3 7 8 9 8 – Change the track average speed 9 – Increment or decrement the actual average speed by % SETTING MENU (1) Personal Parameters for HRM and CSV save Garmin GPS unit data. Press update to get your personal Garmin gps datas from a TCX file generated from your GPS. file generated GPS SETTING MENU (2) Parameters for set altitude accumulation filter Software update parameters So t a e update pa a ete s SETTING MENU (3) Proxy settings 6 DONATION BUTTON This is the more important function button of the software If you want to help my work to go on and you are satisfied about my software, you can place an ammount‐free donation with PayPal, using this button or using the links inside http://www.teambikeolympo.it/TCXConverter 7 AVERAGE SPEED INFO This box contain informations about the average speed of the current track. 8 SUBTRACKS INFO This popup listbox contain informations about the subtracks present in the current track. You k Y can move the cursor h di directly l to the start of the subtrack selected. 9 TRACKPOINT INFO This listbox contain information on each trackpoint. If you want to add a waypoint to a determinate trackpoint, you have only to click with the right button on the decided trackpoint. Then select the type of waypoint you want to add and you can see it appearing in the waypoint listbox. In this popup menu you can see also the temperature and power data (if presents) in that trackpoint. If the point you clicked is the first, you can decide to change the date of h d f the track h k (a calendar ( l d appear to help you h l select l the day) You can also remove all the trackpoints below the selected one or only the selected point. TRACKPOINT INFO (2) If you want to export a portion of the track, preview the map for a limited points series or view the altitude graph for the selected points you can do this points, you can do this operation: Select the first wanted trackpoint with a left click of the mouse Holding the shift key on the keyboard, press with the left button over the last wanted point Without releasing the shift key and without moving, press the right click over this last point. The menu “Export this selection as GPX file” appear and you can select it. You can also decide to deltete all the points selected (you cannot delete SubTrack rows) 10 WAYPOINTS INFO Here you have all the datas about waypoints. You can rename them or, with a right click change g g the waypoint yp type yp or delete it. 11 ALTITUDE INFO Here you have the info about the maximum altitude, the total ascending accumulate altitude and the total descending accumulate altitude. These two last value depending from the settings in the settings menu. GREETINGS I want to say thank you to all the people who helped me via PayPal donation or via software feedbacks that helped p me to correct a lot of bugs in the past. II want want also to say thank you to Garmin Slipstream Pro Cycling Team who decided to use my software for their tracks creation work. work